Post Syndicated from Rajesh Kantamani original https://aws.amazon.com/blogs/big-data/enable-advanced-search-capabilities-for-amazon-keyspaces-data-by-integrating-with-amazon-opensearch-service/
Amazon Keyspaces (for Apache Cassandra) is a fully managed, serverless, and Apache Cassandra-compatible database service offered by AWS. It caters to developers in need of a highly available, durable, and fast NoSQL database backend. When you start the process of designing your data model for Amazon Keyspaces, it’s essential to possess a comprehensive understanding of your access patterns, similar to the approach used in other NoSQL databases. This allows for the uniform distribution of data across all partitions within your table, thereby enabling your applications to achieve optimal read and write throughput. In cases where your application demands supplementary query features, such as conducting full-text searches on the data stored in a table, you may explore the utilization of alternative services like Amazon OpenSearch Service to meet these particular needs.
Amazon OpenSearch Service is a powerful and fully managed search and analytics service. It empowers businesses to explore and gain insights from large volumes of data quickly. OpenSearch Service is versatile, allowing you to perform text and geospatial searches. Amazon OpenSearch Ingestion is a fully managed, serverless data collection solution that efficiently routes data to your OpenSearch Service domains and Amazon OpenSearch Serverless collections. It eliminates the need for third-party tools to ingest data into your OpenSearch service setup. You simply configure your data sources to send information to OpenSearch Ingestion, which then automatically delivers the data to your specified destination. Additionally, you can configure OpenSearch Ingestion to apply data transformations before delivery.
In this post, we explore the process of integrating Amazon Keyspaces and Amazon OpenSearch Service using AWS Lambda and Amazon OpenSearch Ingestion to enable advanced search capabilities. The content includes a reference architecture, a step-by-step guide on infrastructure setup, sample code for implementing the solution within a use case, and an AWS Cloud Development Kit (AWS CDK) application for deployment.
Solution overview
AnyCompany, a rapidly growing eCommerce platform, faces a critical challenge in efficiently managing its extensive product and item catalog while enhancing the shopping experience for its customers. Currently, customers struggle to find specific products quickly due to limited search capabilities. AnyCompany aims to address this issue by implementing advanced search functionality that enables customers to easily search for the products. This enhancement is expected to significantly improve customer satisfaction and streamline the shopping process, ultimately boosting sales and retention rates.
The following diagram illustrates the solution architecture.

The workflow includes the following steps:
- Amazon API Gateway is set up to issue a POST request to the Amazon Lambda function when there is a need to insert, update, or delete data in Amazon Keyspaces.
- The Lambda function passes this modification to Amazon Keyspaces and holds the change, waiting for a success return code from Amazon Keyspaces that confirms the data persistence.
- After it receives the 200 return code, the Lambda function initiates an HTTP request to the OpenSearch Ingestion data pipeline asynchronously.
- The OpenSearch Ingestion process moves the transaction data to the OpenSearch Serverless collection.
- We then utilize the dev tools in OpenSearch Dashboards to execute various search patterns.
Prerequisites
Complete the following prerequisite steps:
- Ensure the AWS Command Line Interface (AWS CLI) is installed and the user profile is set up.
- Install Node.js, npm and the AWS CDK Toolkit.
- Install Python and jq.
- Use an integrated developer environment (IDE), such as Visual Studio Code.
Deploy the solution
The solution is detailed in an AWS CDK project. You don’t need any prior knowledge of AWS CDK. Complete the following steps to deploy the solution:
- Clone the GitHub repository to your IDE and navigate to the cloned repository’s directory:This project is structured like a standard Python project.
- On MacOS and Linux, complete the following steps to set up your virtual environment:
- Create a virtual environment
- After the virtual environment is created, activate it:
- For Windows users, activate the virtual environment as follows.
- After you activate the virtual environment, install the required dependencies:
- Bootstrap AWS CDK in your account:
(.venv) $ cdk bootstrap aws://<aws_account_id>/<aws_region>
After the bootstrap process completes, you’ll see a CDKToolkit AWS CloudFormation stack on the AWS CloudFormation console. AWS CDK is now ready for use.
- You can synthesize the CloudFormation template for this code:
- Use the
cdk deploycommand to create the stack:When the deployment process is complete, you’ll see the following CloudFormation stacks on the AWS CloudFormation console:
OpsApigwLambdaStackOpsServerlessIngestionStackOpsServerlessStackOpsKeyspacesStackOpsCollectionPipelineRoleStack
CloudFormation stack details
The CloudFormation template deploys the following components:
- An API named
keyspaces-OpenSearch-Endpointin API Gateway, which handles mutations (inserts, updates, and deletes) via the POST method to Lambda, compatible with OpenSearch Ingestion. - A keyspace named
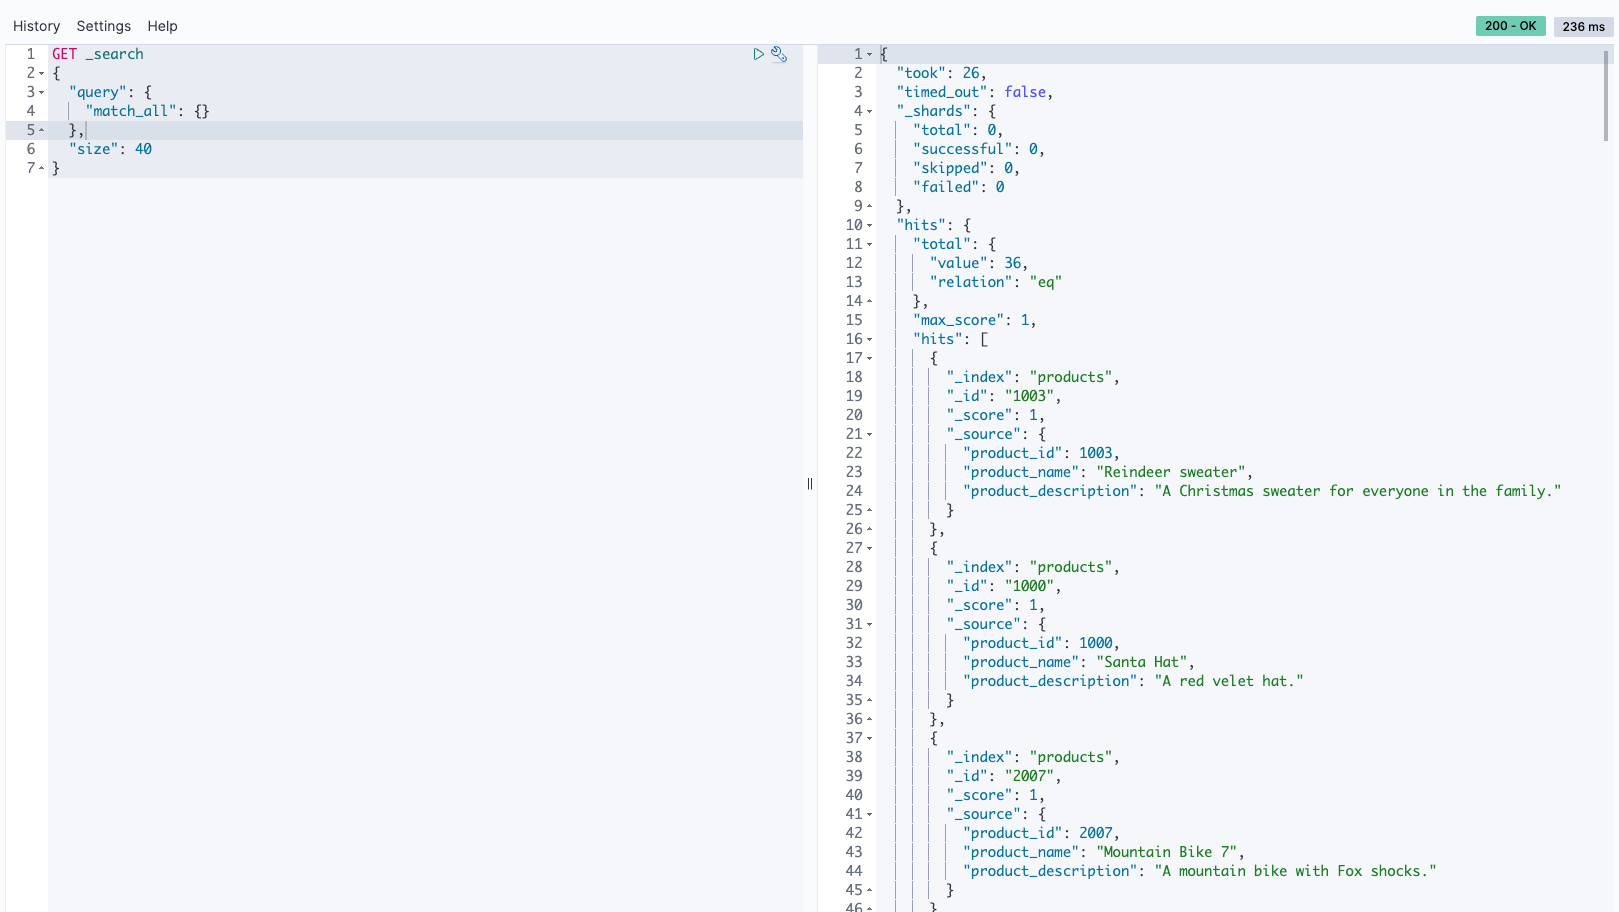
productsearch, along with a table calledproduct_by_item. The chosen partition key for this table isproduct_id. The following screenshot shows an example of the table’s attributes and data provided for reference using the CQL editor.

- A Lambda function called
OpsApigwLambdaStack-ApiHandler*that will forward the transaction to Amazon Keyspaces. After the transaction is committed in keyspaces, we send a response code of 200 to the client as well as asynchronously send the transaction to the OpenSearch Ingestion pipeline. - The OpenSearch ingestion pipeline, named
serverless-ingestion. This pipeline publishes records to an OpenSearch Serverless collection under an index namedproducts. The key for this collection isproduct_id. Additionally, the pipeline specifies the actions it can handle. Thedeleteaction supports delete operations; theindexaction is the default action, which supports insert and update operations.

We have chosen an OpenSearch Serverless collection as our target, so we included serverless: true in our configuration file. To keep things simple, we haven’t altered the network_policy_name settings, but you have the option to specify a different network policy name if needed. For additional details on how to set up network access for OpenSearch Serverless collections, refer to Creating network policies (console).
You can incorporate a dead-letter queue (DLQ) into your pipeline to handle and store events that fail to process. This allows for easy access and analysis of these events. If your sinks refuse data due to mapping errors or other problems, redirecting this data to the DLQ will facilitate troubleshooting and resolving the issue. For detailed instructions on configuring DLQs, refer to Dead-letter queues. To reduce complexity, we don’t configure the DLQs in this post.
Now that all components have been deployed, we can test the solution and conduct various searches on the OpenSearch Service index.
Test the solution
Complete the following steps to test the solution:
- On the API Gateway console, navigate to your API and choose the ANY method.
- Choose the Test tab.

- For Method type¸ choose POST.

This is the only supported method by OpenSearch Ingestion for any inserts, deletes, or updates.
- For Request body, enter the input.

The following are some of the sample requests:
If the test is successful, you should see a return code of 200 in API Gateway. The following is a sample response:
{"message": "Ingestion completed successfully for {'operation': 'insert', 'item': {'product_id': 100, 'product_name': 'Reindeer sweater', 'product_description': 'A Christmas sweater for everyone in the family.'}}."}
If the test is successful, you should see the updated records in the Amazon Keyspaces table.

- Now that you have loaded some sample data, run a sample query to confirm the data that you loaded using API Gateway is actually being persisted to OpenSearch Service. The following is a query against the OpenSearch Service index for
product_name = sweater:

- To update a record, enter the following in the API’s request body. If the record doesn’t already exist, this operation will insert the record.

- To delete a record, enter the following in the API’s request body.


Monitoring
You can use Amazon CloudWatch to monitor the pipeline metrics. The following graph shows the number of documents successfully sent to OpenSearch Service.

Run queries on Amazon Keyspaces data in OpenSearch Service
There are several methods to run search queries against an OpenSearch Service collection, with the most popular being through awscurl or the dev tools in the OpenSearch Dashboards. For this post, we will be utilizing the dev tools in the OpenSearch Dashboards.
To access the dev tools, Navigate to the OpenSearch collection dashboards and select the dashboard radio button, which is highlighted in the screenshot adjacent to the ingestion-collection.
Once on the OpenSearch Dashboards page, click on the Dev Tools radio button as highlighted

This action brings up the Dev Tools console, enabling you to run various search queries, either to validate the data or simply to query it.
Type in your query and use the size parameter to determine how many records you want to be displayed. Click the play icon to execute the query. Results will appear in the right pane.
The following are some of the different search queries that you can run against the ingestion-collection for different search needs. For more search methods and examples, refer to Searching data in Amazon OpenSearch Service.
Full text search
In a search for Bluetooth headphones, we adopted an exacting full-text search approach. Our strategy involved formulating a query to align precisely with the term “Bluetooth Headphones,” searching through an extensive product database. This method allowed us to thoroughly examine and evaluate a broad range of Bluetooth headphones, concentrating on those that best met our search parameters. See the following code:

Fuzzy search
We used a fuzzy search query to navigate through product descriptions, even when they contain variations or misspellings of our search term. For instance, by setting the value to “chrismas” and the fuzziness to AUTO, our search could accommodate common misspellings or close approximations in the product descriptions. This approach is particularly useful in making sure that we capture a wider range of relevant results, especially when dealing with terms that are often misspelled or have multiple variations. See the following code:

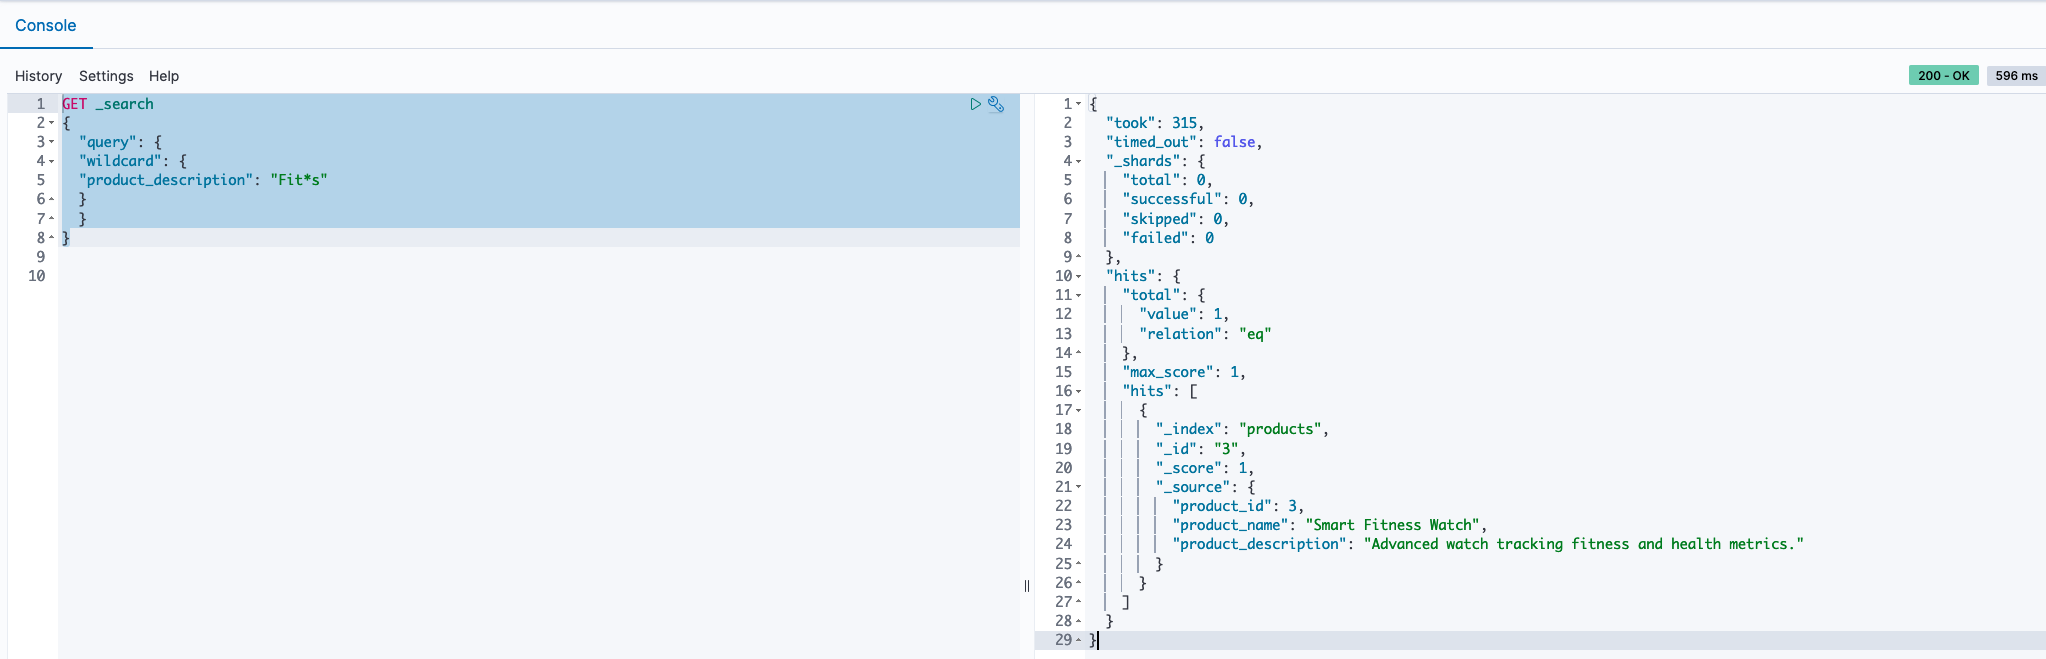
Wildcard search
In our approach to discovering a variety of products, we employed a wildcard search technique within the product descriptions. By using the query Fit*s, we signaled our search tool to look for any product descriptions that begin with “Fit” and end with “s,” allowing for any characters to appear in between. This method is effective for capturing a range of products that have similar naming patterns or attributes, making sure that we don’t miss out on relevant items that fit within a certain category but may have slightly different names or features. See the following code:
Troubleshooting
A status code other than 200 indicates a problem either in the Amazon Keyspaces operation or the OpenSearch Ingestion operation. View the CloudWatch logs of the Lambda function OpsApigwLambdaStack-ApiHandler* and the OpenSearch Ingestion pipeline logs to troubleshoot the failure.
You will see the following errors in the ingestion pipeline logs. This is because the pipeline endpoint is publicly accessible, and not accessible via VPC. They are harmless. As a best practice you can enable VPC access for the serverless collection, which provides an inherent layer of security.
2024-01-23T13:47:42.326 [armeria-common-worker-epoll-3-1] ERROR com.amazon.osis.HttpAuthorization - Unauthenticated request: Missing Authentication Token2024-01-23T13:47:42.327 [armeria-common-worker-epoll-3-1] ERROR com.amazon.osis.HttpAuthorization - Authentication status: 401
Clean up
To prevent additional charges and to effectively remove resources, delete the CloudFormation stacks by running the following command:
Verify the following CloudFormation stacks are deleted from the CloudFormation console:
- OpsApigwLambdaStack
- OpsServerlessIngestionStack
- OpsServerlessStack
- OpsKeyspacesStack
- OpsCollectionPipelineRoleStack
Finally, delete the CDKToolkit CloudFormation stack to remove the AWS CDK resources.
Conclusion
In this post, we delved into enabling diverse search scenarios on data stored in Amazon Keyspaces by using the capabilities of OpenSearch Service. Through the use of Lambda and OpenSearch Ingestion, we managed the data movement seamlessly. Furthermore, we provided insights into testing the deployed solution using a CloudFormation template, ensuring a thorough grasp of its practical application and effectiveness.
Test the procedure that is outlined in this post by deploying the sample code provided and share your feedback in the comments section.
About the authors
 Rajesh, a Senior Database Solution Architect. He specializes in assisting customers with designing, migrating, and optimizing database solutions on Amazon Web Services, ensuring scalability, security, and performance. In his spare time, he loves spending time outdoors with family and friends.
 Sylvia, a Senior DevOps Architect, specializes in designing and automating DevOps processes to guide clients through their DevOps transformation journey. During her leisure time, she finds joy in activities such as biking, swimming, practicing yoga, and photography.