Tag Archives: Amazon Keyspaces (for Apache Cassandra)

Enable advanced search capabilities for Amazon Keyspaces data by integrating with Amazon OpenSearch Service

Post Syndicated from Rajesh Kantamani original https://aws.amazon.com/blogs/big-data/enable-advanced-search-capabilities-for-amazon-keyspaces-data-by-integrating-with-amazon-opensearch-service/

Amazon Keyspaces (for Apache Cassandra) is a fully managed, serverless, and Apache Cassandra-compatible database service offered by AWS. It caters to developers in need of a highly available, durable, and fast NoSQL database backend. When you start the process of designing your data model for Amazon Keyspaces, it’s essential to possess a comprehensive understanding of your access patterns, similar to the approach used in other NoSQL databases. This allows for the uniform distribution of data across all partitions within your table, thereby enabling your applications to achieve optimal read and write throughput. In cases where your application demands supplementary query features, such as conducting full-text searches on the data stored in a table, you may explore the utilization of alternative services like Amazon OpenSearch Service to meet these particular needs.

Amazon OpenSearch Service is a powerful and fully managed search and analytics service. It empowers businesses to explore and gain insights from large volumes of data quickly. OpenSearch Service is versatile, allowing you to perform text and geospatial searches. Amazon OpenSearch Ingestion is a fully managed, serverless data collection solution that efficiently routes data to your OpenSearch Service domains and Amazon OpenSearch Serverless collections. It eliminates the need for third-party tools to ingest data into your OpenSearch service setup. You simply configure your data sources to send information to OpenSearch Ingestion, which then automatically delivers the data to your specified destination. Additionally, you can configure OpenSearch Ingestion to apply data transformations before delivery.

In this post, we explore the process of integrating  Amazon Keyspaces and Amazon OpenSearch Service using AWS Lambda and Amazon OpenSearch Ingestion to enable advanced search capabilities. The content includes a reference architecture, a step-by-step guide on infrastructure setup, sample code for implementing the solution within a use case, and an AWS Cloud Development Kit (AWS CDK) application for deployment.

Solution overview

AnyCompany, a rapidly growing eCommerce platform, faces a critical challenge in efficiently managing its extensive product and item catalog while enhancing the shopping experience for its customers. Currently, customers struggle to find specific products quickly due to limited search capabilities. AnyCompany aims to address this issue by implementing advanced search functionality that enables customers to easily search for the products. This enhancement is expected to significantly improve customer satisfaction and streamline the shopping process, ultimately boosting sales and retention rates.

The following diagram illustrates the solution architecture.

The workflow includes the following steps:

  1. Amazon API Gateway is set up to issue a POST request to the Amazon Lambda function when there is a need to insert, update, or delete data in Amazon Keyspaces.
  2. The Lambda function passes this modification to Amazon Keyspaces and holds the change, waiting for a success return code from Amazon Keyspaces that confirms the data persistence.
  3. After it receives the 200 return code, the Lambda function initiates an HTTP request to the OpenSearch Ingestion data pipeline asynchronously.
  4. The OpenSearch Ingestion process moves the transaction data to the OpenSearch Serverless collection.
  5. We then utilize the dev tools in OpenSearch Dashboards to execute various search patterns.

Prerequisites

Complete the following prerequisite steps:

  1. Ensure the AWS Command Line Interface (AWS CLI) is installed and the user profile is set up.
  2. Install Node.js, npm and the AWS CDK Toolkit.
  3. Install Python and jq.
  4. Use an integrated developer environment (IDE), such as Visual Studio Code.

Deploy the solution

The solution is detailed in an AWS CDK project. You don’t need any prior knowledge of AWS CDK. Complete the following steps to deploy the solution:

  1. Clone the GitHub repository to your IDE and navigate to the cloned repository’s directory:This project is structured like a standard Python project.
    git clone <repo-link>
    cd <repo-dir>

  2. On MacOS and Linux, complete the following steps to set up your virtual environment:
    • Create a virtual environment
      $ python3 -m venv .venv

    • After the virtual environment is created, activate it:
      $ source .venv/bin/activate

  3. For Windows users, activate the virtual environment as follows.
    % .venv\\\\Scripts\\\\activate.bat

  4. After you activate the virtual environment, install the required dependencies:
    (.venv) $ pip install -r requirements.txt

  5. Bootstrap AWS CDK in your account:(.venv) $ cdk bootstrap aws://<aws_account_id>/<aws_region>

After the bootstrap process completes, you’ll see a CDKToolkit AWS CloudFormation stack on the AWS CloudFormation console. AWS CDK is now ready for use.

  1. You can synthesize the CloudFormation template for this code:
    (.venv) $ export CDK_DEFAULT_ACCOUNT=$(aws sts get-caller-identity --query Account --output text)
    (.venv) $ export CDK_DEFAULT_REGION=<aws_region>
    (.venv) $ cdk synth -c iam_user_name=<your-iam-user-name> --all
    

  2. Use the cdk deploy command to create the stack:
    (.venv) $ cdk deploy -c iam_user_name=<your-iam-user-name> --all
    

    When the deployment process is complete, you’ll see the following CloudFormation stacks on the AWS CloudFormation console:

  • OpsApigwLambdaStack
  • OpsServerlessIngestionStack
  • OpsServerlessStack
  • OpsKeyspacesStack
  • OpsCollectionPipelineRoleStack

CloudFormation stack details

The CloudFormation template deploys the following components:

  1. An API named keyspaces-OpenSearch-Endpoint in API Gateway, which handles mutations (inserts, updates, and deletes) via the POST method to Lambda, compatible with OpenSearch Ingestion.
  2. A keyspace named productsearch, along with a table called product_by_item. The chosen partition key for this table is product_id. The following screenshot shows an example of the table’s attributes and data provided for reference using the CQL editor.
  3. A Lambda function called OpsApigwLambdaStack-ApiHandler* that will forward the transaction to Amazon Keyspaces. After the transaction is committed in keyspaces, we send a response code of 200 to the client as well as asynchronously send the transaction to the OpenSearch Ingestion pipeline.
  4. The OpenSearch ingestion pipeline, named serverless-ingestion. This pipeline publishes records to an OpenSearch Serverless collection under an index named products. The key for this collection is product_id. Additionally, the pipeline specifies the actions it can handle. The delete action supports delete operations; the index action is the default action, which supports insert and update operations.

We have chosen an OpenSearch Serverless collection as our target, so we included serverless: true in our configuration file. To keep things simple, we haven’t altered the network_policy_name settings, but you have the option to specify a different network policy name if needed. For additional details on how to set up network access for OpenSearch Serverless collections, refer to Creating network policies (console).

version: "2"
product-pipeline:
  source:
    http:
      path: "/${pipelineName}/test_ingestion_path"
  processor:
    - date:
        from_time_received: true
        destination: "@timestamp"
  sink:
    - opensearch:
        hosts: [ "<OpenSearch_Endpoint>" ]
        document_root_key: "item"
        index_type: custom
        index: "products"
        document_id_field: "item/product_id"
        flush_timeout: -1
        actions:
          - type: "delete"
            when: '/operation == "delete"'
          - type: "index"                      
        aws:
          sts_role_arn: "arn:aws:iam::<account_id>:role/OpenSearchCollectionPipelineRole"
          region: "us-east-1"
          serverless: true
        # serverless_options:
            # Specify a name here to create or update network policy for the serverless collection
            # network_policy_name: "network-policy-name"

You can incorporate a dead-letter queue (DLQ) into your pipeline to handle and store events that fail to process. This allows for easy access and analysis of these events. If your sinks refuse data due to mapping errors or other problems, redirecting this data to the DLQ will facilitate troubleshooting and resolving the issue. For detailed instructions on configuring DLQs, refer to Dead-letter queues. To reduce complexity, we don’t configure the DLQs in this post.

Now that all components have been deployed, we can test the solution and conduct various searches on the OpenSearch Service index.

Test the solution

Complete the following steps to test the solution:

  1. On the API Gateway console, navigate to your API and choose the ANY method.
  2. Choose the Test tab.
  3. For Method type¸ choose POST.

This is the only supported method by OpenSearch Ingestion for any inserts, deletes, or updates.

  1. For Request body, enter the input.

The following are some of the sample requests:

{"operation": "insert", "item": {"product_id": 1, "product_name": "Reindeer sweater", "product_description": "A Christmas sweater for everyone in the family." } }
{"operation": "insert", "item": {"product_id": 2, "product_name": "Bluetooth Headphones", "product_description": "High-quality wireless headphones with long battery life."}}
{"operation": "insert", "item": {"product_id": 3, "product_name": "Smart Fitness Watch", "product_description": "Advanced watch tracking fitness and health metrics."}}
{"operation": "insert", "item": {"product_id": 4, "product_name": "Eco-Friendly Water Bottle", "product_description": "Durable and eco-friendly bottle for hydration on-the-go."}}
{"operation": "insert", "item": {"product_id": 5, "product_name": "Wireless Charging Pad", "product_description": "Convenient pad for fast wireless charging of devices."}}

If the test is successful, you should see a return code of 200 in API Gateway. The following is a sample response:

{"message": "Ingestion completed successfully for {'operation': 'insert', 'item': {'product_id': 100, 'product_name': 'Reindeer sweater', 'product_description': 'A Christmas sweater for everyone in the family.'}}."}

If the test is successful, you should see the updated records in the Amazon Keyspaces table.

  1. Now that you have loaded some sample data, run a sample query to confirm the data that you loaded using API Gateway is actually being persisted to OpenSearch Service. The following is a query against the OpenSearch Service index for product_name = sweater:
awscurl --service aoss --region us-east-1 -X POST "<OpenSearch_Endpoint>/products/_search" -H "Content-Type: application/json" -d '
{
"query": {
"term": {
"product_name": "sweater"
     }
   } 
}'  | jq '.'

  1. To update a record, enter the following in the API’s request body. If the record doesn’t already exist, this operation will insert the record.
  2. To delete a record, enter the following in the API’s request body.

Monitoring

You can use Amazon CloudWatch to monitor the pipeline metrics. The following graph shows the number of documents successfully sent to OpenSearch Service.

Run queries on Amazon Keyspaces data in OpenSearch Service

There are several methods to run search queries against an OpenSearch Service collection, with the most popular being through awscurl or the dev tools in the OpenSearch Dashboards. For this post, we will be utilizing the dev tools in the OpenSearch Dashboards.

To access the dev tools, Navigate to the OpenSearch collection dashboards  and select the dashboard radio button, which is highlighted in the screenshot adjacent to the ingestion-collection.

Once on the OpenSearch Dashboards page, click on the Dev Tools radio button as highlighted

This action brings up the Dev Tools console, enabling you to run various search queries, either to validate the data or simply to query it.

Type in your query and use the size parameter to determine how many records you want to be displayed. Click the play icon to execute the query. Results will appear in the right pane.

The following are some of the different search queries that you can run against the ingestion-collection for different search needs. For more search methods and examples, refer to Searching data in Amazon OpenSearch Service.

Full text search

In a search for Bluetooth headphones, we adopted an exacting full-text search approach. Our strategy involved formulating a query to align precisely with the term “Bluetooth Headphones,” searching through an extensive product database. This method allowed us to thoroughly examine and evaluate a broad range of Bluetooth headphones, concentrating on those that best met our search parameters. See the following code:

Fuzzy search

We used a fuzzy search query to navigate through product descriptions, even when they contain variations or misspellings of our search term. For instance, by setting the value to “chrismas” and the fuzziness to AUTO, our search could accommodate common misspellings or close approximations in the product descriptions. This approach is particularly useful in making sure that we capture a wider range of relevant results, especially when dealing with terms that are often misspelled or have multiple variations. See the following code:

Wildcard search

In our approach to discovering a variety of products, we employed a wildcard search technique within the product descriptions. By using the query Fit*s, we signaled our search tool to look for any product descriptions that begin with “Fit” and end with “s,” allowing for any characters to appear in between. This method is effective for capturing a range of products that have similar naming patterns or attributes, making sure that we don’t miss out on relevant items that fit within a certain category but may have slightly different names or features. See the following code:

It is essential to comprehend that queries incorporating wildcard characters often exhibit reduced performance, as they require iterating through an extensive array of terms. Consequently, it is advisable to refrain from positioning wildcard characters at the beginning of a query, given that this approach can lead to operations that significantly strain both computational resources and time.

Troubleshooting

A status code other than 200 indicates a problem either in the Amazon Keyspaces operation or the OpenSearch Ingestion operation. View the CloudWatch logs of the Lambda function OpsApigwLambdaStack-ApiHandler* and the OpenSearch Ingestion pipeline logs to troubleshoot the failure.

You will see the following errors in the ingestion pipeline logs. This is because the pipeline endpoint is publicly accessible, and not accessible via VPC. They are harmless. As a best practice you can enable VPC access for the serverless collection, which provides an inherent layer of security.

  • 2024-01-23T13:47:42.326 [armeria-common-worker-epoll-3-1] ERROR com.amazon.osis.HttpAuthorization - Unauthenticated request: Missing Authentication Token
  • 2024-01-23T13:47:42.327 [armeria-common-worker-epoll-3-1] ERROR com.amazon.osis.HttpAuthorization - Authentication status: 401

Clean up

To prevent additional charges and to effectively remove resources, delete the CloudFormation stacks by running the following command:

(.venv) $ cdk destroy -c iam_user_name=<your-iam-user-name> --force --all

Verify the following CloudFormation stacks are deleted from the CloudFormation console:

Finally, delete the CDKToolkit CloudFormation stack to remove the AWS CDK resources.

Conclusion

In this post, we delved into enabling diverse search scenarios on data stored in Amazon Keyspaces by using the capabilities of OpenSearch Service. Through the use of Lambda and OpenSearch Ingestion, we managed the data movement seamlessly. Furthermore, we provided insights into testing the deployed solution using a CloudFormation template, ensuring a thorough grasp of its practical application and effectiveness.

Test the procedure that is outlined in this post by deploying the sample code provided and share your feedback in the comments section.


About the authors

Rajesh, a Senior Database Solution Architect. He specializes in assisting customers with designing, migrating, and optimizing database solutions on Amazon Web Services, ensuring scalability, security, and performance. In his spare time, he loves spending time outdoors with family and friends.

Sylvia, a Senior DevOps Architect, specializes in designing and automating DevOps processes to guide clients through their DevOps transformation journey. During her leisure time, she finds joy in activities such as biking, swimming, practicing yoga, and photography.

How SumUp built a low-latency feature store using Amazon EMR and Amazon Keyspaces

Post Syndicated from Shaheer Masoor original https://aws.amazon.com/blogs/big-data/how-sumup-built-a-low-latency-feature-store-using-amazon-emr-and-amazon-keyspaces/

This post was co-authored by Vadym Dolin, Data Architect at SumUp. In their own words, SumUp is a leading financial technology company, operating across 35 markets on three continents. SumUp helps small businesses be successful by enabling them to accept card payments in-store, in-app, and online, in a simple, secure, and cost-effective way. Today, SumUp card readers and other financial products are used by more than 4 million merchants around the world.

The SumUp Engineering team is committed to developing convenient, impactful, and secure financial products for merchants. To fulfill this vision, SumUp is increasingly investing in artificial intelligence and machine learning (ML). The internal ML platform in SumUp enables teams to seamlessly build, deploy, and operate ML solutions at scale.

One of the central elements of SumUp’s ML platform is the online feature store. It allows multiple ML models to retrieve feature vectors with single-digit millisecond latency, and enables application of AI for latency-critical use cases. The platform processes hundreds of transactions every second, with volume spikes during peak hours, and has steady growth that doubles the number of transactions every year. Because of this, the ML platform requires its low-latency feature store to be also highly reliable and scalable.

In this post, we show how SumUp built a millisecond-latency feature store. We also discuss the architectural considerations when setting up this solution so it can scale to serve multiple use cases, and present results showcasing the setups performance.

Overview of solution

To train ML models, we need historical data. During this phase, data scientists experiment with different features to test which ones produce the best model. From a platform perspective, we need to support bulk read and write operations. Read latency isn’t critical at this stage because the data is read into training jobs. After the models are trained and moved to production for real-time inference, we have the following requirements for the platform change: we need to support low-latency reads and use only the latest features data.

To fulfill these needs, SumUp built a feature store consisting of offline and online data stores. These were optimized for the requirements as described in the following table.

Data Store History Requirements ML Workflow Requirements Latency Requirements Storage Requirements Throughput Requirements Storage Medium
Offline Entire History Training Not important Cost-effective for large volumes Bulk read and writes Amazon S3
Online Only the latest Features Inference Single-digit millisecond Not important Read optimized Amazon Keyspaces

Amazon Keyspaces (for Apache Cassandra) is a serverless, scalable, and managed Apache Cassandra–compatible database service. It is built for consistent, single-digit-millisecond response times at scale. SumUp uses Amazon Keyspaces as a key-value pair store, and these features make it suitable for their online feature store. Delta Lake is an open-source storage layer that supports ACID transactions and is fully compatible with Apache Spark, making it highly performant at bulk read and write operations. You can store Delta Lake tables on Amazon Simple Storage Service (Amazon S3), which makes it a good fit for the offline feature store. Data scientists can use this stack to train models against the offline feature store (Delta Lake). When the trained models are moved to production, we switch to using the online feature store (Amazon Keyspaces), which offers the latest features set, scalable reads, and much lower latency.

Another important consideration is that we write a single feature job to populate both feature stores. Otherwise, SumUp would have to maintain two sets of code or pipelines for each feature creation job. We use Amazon EMR and create the features using PySpark DataFrames. The same DataFrame is written to both Delta Lake and Amazon Keyspaces, which eliminates the hurdle of having separate pipelines.

Finally, SumUp wanted to utilize managed services. It was important to SumUp that data scientists and data engineers focus their efforts on building and deploying ML models. SumUp had experimented with managing their own Cassandra cluster, and found it difficult to scale because it required specialized expertise. Amazon Keyspaces offered scalability without management and maintenance overhead. For running Spark workloads, we decided to use Amazon EMR. Amazon EMR makes it easy to provision new clusters and automatically or manually add and remove capacity as needed. You can also define a custom policy for auto scaling the cluster to suit your needs. Amazon EMR version 6.0.0 and above supports Spark version 3.0.0, which is compatible with Delta Lake.

It took SumUp 3 months from testing out AWS services to building a production-grade feature store capable of serving ML models. In this post we share a simplified version of the stack, consisting of the following components:

  • S3 bucket A – Stores the raw data
  • EMR cluster – For running PySpark jobs for populating the feature store
  • Amazon Keyspaces feature_store – Stores the online features table
  • S3 Bucket B – Stores the Delta Lake table for offline features
  • IAM role feature_creator – For running the feature job with the appropriate permissions
  • Notebook instance – For running the feature engineering code

We use a simplified version of the setup to make it easy to follow the code examples. SumUp data scientists use Jupyter notebooks for exploratory analysis of the data. Feature engineering jobs are deployed using an AWS Step Functions state machine, which consists of an AWS Lambda function that submits a PySpark job to the EMR cluster.

The following diagram illustrates our simplified architecture.

Prerequisites

To follow the solution, you need certain access rights and AWS Identity and Access Management (IAM) privileges:

  • An IAM user with AWS Command Line Interface (AWS CLI) access to an AWS account
  • IAM privileges to do the following:
    • Generate Amazon Keyspaces credentials
    • Create a keyspace and table
    • Create an S3 bucket
    • Create an EMR cluster
    • IAM Get Role

Set up the dataset

We start by cloning the project git repository, which contains the dataset we need to place in bucket A. We use a synthetic dataset, under Data/daily_dataset.csv. This dataset consists of energy meter readings for households. The file contains information like the number of measures, minimum, maximum, mean, median, sum, and std for each household on a daily basis. To create an S3 bucket (if you don’t already have one) and upload the data file, follow these steps:

  1. Clone the project repository locally by running the shell command:
    git clone https://github.com/aws-samples/amazon-keyspaces-emr-featurestore-kit.git

  2. On the Amazon S3 console, choose Create bucket.
  3. Give the bucket a name. For this post, we use featurestore-blogpost-bucket-xxxxxxxxxx (it’s helpful to append the account number to the bucket name to ensure the name is unique for common prefixes).
  4. Choose the Region you’re working in.
    It’s important that you create all resources in the same Region for this post.
  5. Public access is blocked by default, and we recommend that you keep it that way.
  6. Disable bucket versioning and encryption (we don’t need it for this post).
  7. Choose Create bucket.
  8. After the bucket is created, choose the bucket name and drag the folders Dataset and EMR into the bucket.

Set up Amazon Keyspaces

We need to generate credentials for Amazon Keyspaces, which we use to connect with the service. The steps for generating the credentials are as follows:

  1. On the IAM console, choose Users in the navigation pane.
  2. Choose an IAM user you want to generate credentials for.
  3. On the Security credentials tab, under Credentials for Amazon Keyspaces (for Apache Cassandra), choose Generate Credentials.
    A pop-up appears with the credentials, and an option to download the credentials. We recommend downloading a copy because you won’t be able to view the credentials again.We also need to create a table in Amazon Keyspaces to store our feature data. We have shared the schema for the keyspace and table in the GitHub project files Keyspaces/keyspace.cql and Keyspaces/Table_Schema.cql.
  4. On the Amazon Keyspaces console, choose CQL editor in the navigation pane.
  5. Enter the contents of the file Keyspaces/Keyspace.cql in the editor and choose Run command.
  6. Clear the contents of the editor, enter the contents of Keyspaces/Table_Schema.cql, and choose Run command.

Table creation is an asynchronous process, and you’re notified if the table is successfully created. You can also view it by choosing Tables in the navigation pane.

Set up an EMR cluster

Next, we set up an EMR cluster so we can run PySpark code to generate features. First, we need to set up a trust store password. A truststore file contains the Application Server’s trusted certificates, including public keys for other entities, this file is generated by the provided script and we need to provide a password for protecting this file. Amazon Keyspaces provides encryption in transit and at rest to protect and secure data transmission and storage, and uses Transport Layer Security (TLS) to help secure connections with clients. To connect to Amazon Keyspaces using TLS, we need to download an Amazon digital certificate and configure the Python driver to use TLS. This certificate is stored in a trust store; when we retrieve it, we need to provide the correct password.

  1. In the file EMR/emr_bootstrap_script.sh, update the following line to a password you want to use:
    # Create a JKS keystore from the certificate
    PASS={your_truststore_password_here}

  2. To point the bootstrap script to the one we uploaded to Amazon S3, update the following line to reflect the S3 bucket we created earlier:
    # Copy the Cassandra Connector config
    aws s3 cp s3://{your-s3-bucket}/EMR/app.config /home/hadoop/app.config

  3. To update the app.config file to reflect the correct trust store password, in the file EMR/app.config, update the value for truststore-password to the value you set earlier:
    {
        ssl-engine-factory {
          class = DefaultSslEngineFactory
          truststore-path = "/home/hadoop/.certs/cassandra_keystore.jks"
          truststore-password = "{your_password_here}"
        }
    }

  4. In the file EMR/app.config, update the following lines to reflect the Region and the user name and password generated earlier:
    contact-points = ["cassandra.<your-region>.amazonaws.com:9142"]
    load-balancing-policy.local-datacenter = <your-region>
    ..
    auth-provider {
        class = PlainTextAuthProvider
        username = "{your-keyspace-username}"
        password = "{your-keyspace-password}"
    }

    We need to create default instance roles, which are needed to run the EMR cluster.

  5. Update the contents S3 bucket created in the pre-requisite section by dragging the EMR folder into the bucket again.
  6. To create the default roles, run the create-default-roles command:
    aws emr create-default-roles

    Next, we create an EMR cluster. The following code snippet is an AWS CLI command that has Hadoop, Spark 3.0, Livy and JupyterHub installed. This also runs the bootstrapping script on the cluster to set up the connection to Amazon Keyspaces.

  7. Create the cluster with the following code. Provide the subnet ID to start a Jupyter notebook instance associated with this cluster, the S3 bucket you created earlier, and the Region you’re working in. You can provide the default Subnet, and to find this navigate to VPC>Subnets and copy the default subnet id.
    aws emr create-cluster --termination-protected --applications Name=Hadoop Name=Spark Name=Livy Name=Hive Name=JupyterHub --tags 'creator=feature-store-blogpost' --ec2-attributes '{"InstanceProfile":"EMR_EC2_DefaultRole","SubnetId":"your-subnet-id"}' --service-role EMR_DefaultRole --release-label emr-6.1.0 --log-uri 's3n://{your-s3-bucket}/elasticmapreduce/' --name 'emr_feature_store' --instance-groups '[{"InstanceCount":1,"EbsConfiguration":{"EbsBlockDeviceConfigs":[{"VolumeSpecification":{"SizeInGB":32,"VolumeType":"gp2"},"VolumesPerInstance":2}]},"InstanceGroupType":"CORE","InstanceType":"m5.xlarge","Name":"Core - 2"},{"InstanceCount":1,"EbsConfiguration":{"EbsBlockDeviceConfigs":[{"VolumeSpecification":{"SizeInGB":32,"VolumeType":"gp2"},"VolumesPerInstance":2}]},"InstanceGroupType":"MASTER","InstanceType":"m5.xlarge","Name":"Master - 1"}]' --bootstrap-actions '[{"Path":"s3://{your-s3-bucket HERE}/EMR/emr_bootstrap_script.sh","Name":"Execute_bootstarp_script"}]' --scale-down-behavior TERMINATE_AT_TASK_COMPLETION --region your-region

    Lastly, we create an EMR notebook instance to run the PySpark notebook Feature Creation and loading-notebook.ipynb (included in the repo).

  8. On the Amazon EMR console, choose Notebooks in the navigation pane.
  9. Choose Create notebook.
  10. Give the notebook a name and choose the cluster emr_feature_store.
  11. Optionally, configure the additional settings.
  12. Choose Create notebook.It can take a few minutes before the notebook instance is up and running.
  13. When the notebook is ready, select the notebook and choose either Open JupyterLab or Open Jupyter.
  14. In the notebook instance import, open the notebook Feature Creation and loading-notebook.ipynb (included in the repo) and change the kernel to PySpark.
  15. Follow the instructions in the notebook and run the cells one by one to read the data from Amazon S3, create features, and write these to Delta Lake and Amazon Keyspaces.

Performance testing

To test throughput for our online feature store, we run a simulation on the features we created. We simulate approximately 40,000 requests per second. Each request queries data for a specific key (an ID in our feature table). The process tasks do the following:

  • Initialize a connection to Amazon Keyspaces
  • Generate a random ID to query the data
  • Generate a CQL statement:
    SELECT * FROM feature_store.energy_data_features WHERE id=[list_of_ids[random_index between 0-5559]];

  • Start a timer
  • Send the request to Amazon Keyspaces
  • Stop the timer when the response from Amazon Keyspaces is received

To run the simulation, we start 245 parallel AWS Fargate tasks running on Amazon Elastic Container Service (Amazon ECS). Each task runs a Python script that makes 1 million requests to Amazon Keyspaces. Because our dataset only contains 5,560 unique IDs, we generate 1 million random numbers between 0–5560 at the start of the simulation and query the ID for each request. To run the simulation, we included the code in the folder Simulation. You can run the simulation in a SageMaker notebook instance by completing the following steps:

  1. On the Amazon SageMaker console, create a SageMaker notebook instance (or use an existing one).You can choose an ml.t3.large instance.
  2. Let SageMaker create an execution role for you if you don’t have one.
  3. Open the SageMaker notebook and choose Upload.
  4. Upload the Simulation folder from the repository. Alternatively, open a terminal window on the notebook instance and clone the repository https://github.com/aws-samples/amazon-keyspaces-emr-featurestore-kit.git.
  5. Follow the instructions and run the steps and cells in the Simulation/ECS_Simulation.ipynb notebook.
  6. On the Amazon ECS console, choose the cluster you provisioned with the notebook and choose the Tasks tab to monitor the tasks.

Each task writes the latency figures to a file and moves this to an S3 location. When the simulation ends, we collect all the data to get aggregated stats and plot charts.

In our setup, we set the capacity mode for Amazon Keyspaces to Provisioned RCU (read capacity units) at 40000 (fixed). After we start the simulation, the RCU rise close to 40000. After we start the simulation, the RCU (read capacity units) rise close to 40000, and the simulation takes around an hour to finish, as illustrated in the following visualization.

The first analysis we present is the latency distribution for the 245 million requests made during the simulation. Here the 99% percentile falls inside single-digit millisecond latency, as we would expect.

Quantile Latency (ms)
50% 3.11
90% 3.61
99% 5.56
99.90% 25.63

For the second analysis, we present the following time series charts for latency. The chart at the bottom shows the raw latency figures from all the 245 workers. The chart above that plots the average and minimum latency across all workers grouped over 1-second intervals. Here we can see both the minimum and the average latency throughout the simulation stays below 10 milliseconds. The third chart from the bottom plots maximum latency across all workers grouped over 1-second intervals. This chart shows occasional spikes in latency but nothing consistent we need to worry about. The top two charts are latency distributions; the one on the left plots all the data, and the one on the right plots the 99.9% percentile. Due to the presence of some outliers, the chart on the left shows a peak close to zero and a very tailed distribution. After we remove these outliers, we can see in the chart on the right that 99.9% of requests are completed in less than 5.5 milliseconds. This is a great result, considering we sent 245 million requests.

Cleanup

Some of the resources we created in this blogpost would incur costs if left running. Remember to terminate the EMR cluster, empty the S3 bucket and delete it, delete the Amazon KeySpaces table. Also delete the SageMaker and Amazon EMR notebooks. The Amazon ECS cluster is billed on tasks and would not incur any additional costs.

Conclusion

Amazon EMR, Amazon S3, and Amazon Keyspaces provide a flexible and scalable development experience for feature engineering. EMR clusters are easy to manage, and teams can share environments without compromising compute and storage capabilities. EMR bootstrapping makes it easy to install and test out new tools and quickly spin up environments to test out new ideas. Having the feature store split into offline and online store simplifies model training and deployment, and provides performance benefits.

In our testing, Amazon Keyspaces was able to handle peak throughput read requests within our desired requirement of single digit latency. It’s also worth mentioning that we found the on-demand mode to adapt to the usage pattern and an improvement in read/write latency a couple of days from when it was switched on.

Another important consideration to make for latency-sensitive queries is row length. In our testing, tables with lower row length had lower read latency. Therefore, it’s more efficient to split the data into multiple tables and make asynchronous calls to retrieve it from multiple tables.

We encourage you to explore adding security features and adopting security best practices according to your needs and potential company standards.

If you found this post useful, check out Loading data into Amazon Keyspaces with cqlsh for tips on how to tune Amazon Keyspaces, and Orchestrate Apache Spark applications using AWS Step Functions and Apache Livy on how to build and deploy PySpark jobs.


About the authors

Shaheer Mansoor is a Data Scientist at AWS. His focus is on building machine learning platforms that can host AI solutions at scale. His interest areas are ML Ops, Feature Stores, Model Hosting and Model Monitoring.

Vadym Dolinin is a Machine Learning Architect in SumUp. He works with several teams on crafting the ML platform, which enables data scientists to build, deploy, and operate machine learning solutions in SumUp. Vadym has 13 years of experience in the domains of data engineering, analytics, BI, and ML.

Oliver Zollikofer is a Data Scientist at AWS. He enables global enterprise customers to build and deploy machine learning models, as well as architect related cloud solutions.

How William Hill migrated NoSQL workloads at scale to Amazon Keyspaces

Post Syndicated from Kunal Gautam original https://aws.amazon.com/blogs/big-data/how-william-hill-migrated-nosql-workloads-at-scale-to-amazon-keyspaces/

Social gaming and online sports betting are competitive environments. The game must be able to handle large volumes of unpredictable traffic while simultaneously promising zero downtime. In this domain, user retention is no longer just desirable, it’s critical. William Hill is a global online gambling company based in London, England, and it is the founding member of the UK Betting and Gaming Council. They share the mission to champion the betting and gaming industry and set world-class standards to make sure of an enjoyable, fair, and safe betting and gambling experience for all of their customers. In sports betting, William Hill is an industry-leading brand, awarded with prestigious industry titles like the IGA Awards Sports Betting Operator of the year in 2019, 2020, and 2022, and the SBC Awards Racing Sportsbook of the Year in 2019. William Hill has been acquired by Caesars Entertainment, Inc (NASDAQ: CZR) in April 2021, and it’s the largest casino-entertainment company in the US and one of the world’s most diversified casino-entertainment providers. At the heart of William Hill gaming platform is a NoSQL database that maintains 100% uptime, scales in real-time to handle millions of users or more, and provides users with a responsive and personalized experience across all of their devices.

In this post, we’ll discuss how William Hill moved their workload from Apache Cassandra to Amazon Keyspaces (for Apache Cassandra) with zero downtime using AWS Glue ETL.

William Hill was facing challenges regarding scalability, cluster instability, high operational costs, and manual patching and server maintenance. They were looking for a NoSQL solution which was scalable, highly-available, and completely managed. This let them focus on providing better user experience rather than maintaining infrastructure. William Hill Limited decided to move forward with Amazon Keyspaces, since it can run Apache Cassandra workloads on AWS using the same Cassandra application code and developer tools used today, without the need to provision, patch, manage servers, install, maintain, or operate software.

Solution overview

William Hill Limited wanted to migrate their existing Apache Cassandra workloads to Amazon Keyspaces with a replication lag of minutes, with minimum migration costs and development efforts. Therefore, AWS Glue ETL was leveraged to deliver the desired outcome.

AWS Glue is a serverless data integration service that provides multiple benefits for migration:

  • No infrastructure to maintain; allocates the necessary computing power and runs multiple migration jobs simultaneously.
  • All-in-one pricing model that includes infrastructure and is 55% cheaper than other cloud data integration options.
  • No lock in with the service; possible to develop data migration pipelines in open-source Apache Spark (Spark SQL, PySpark, and Scala).
  • Migration pipeline can be scaled fearlessly with Amazon Keyspaces and AWS Glue.
  • Built-in pipeline monitoring to make sure of in-migration continuity.
  • AWS Glue ETL jobs make it possible to perform bulk data extraction from Apache Cassandra and ingest to Amazon Keyspaces.

In this post, we’ll take you through William Hill’s journey of building the migration pipeline from scratch to migrate the Apache Cassandra workload to Amazon Keyspaces by leveraging AWS Glue ETL with DataStax Spark Cassandra connector.

For the purpose of this post, let’s look at a typical Cassandra Network setup on AWS and the mechanism used to establish the connection with AWS Glue ETL. The migration solution described also works for Apache Cassandra hosted on on-premises clusters.

Architecture overview

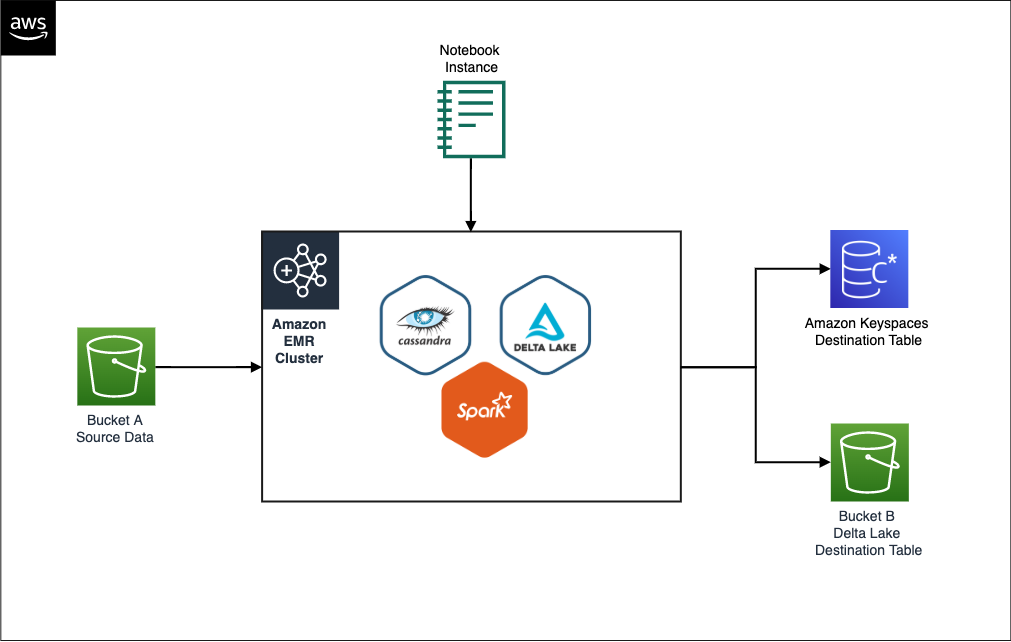
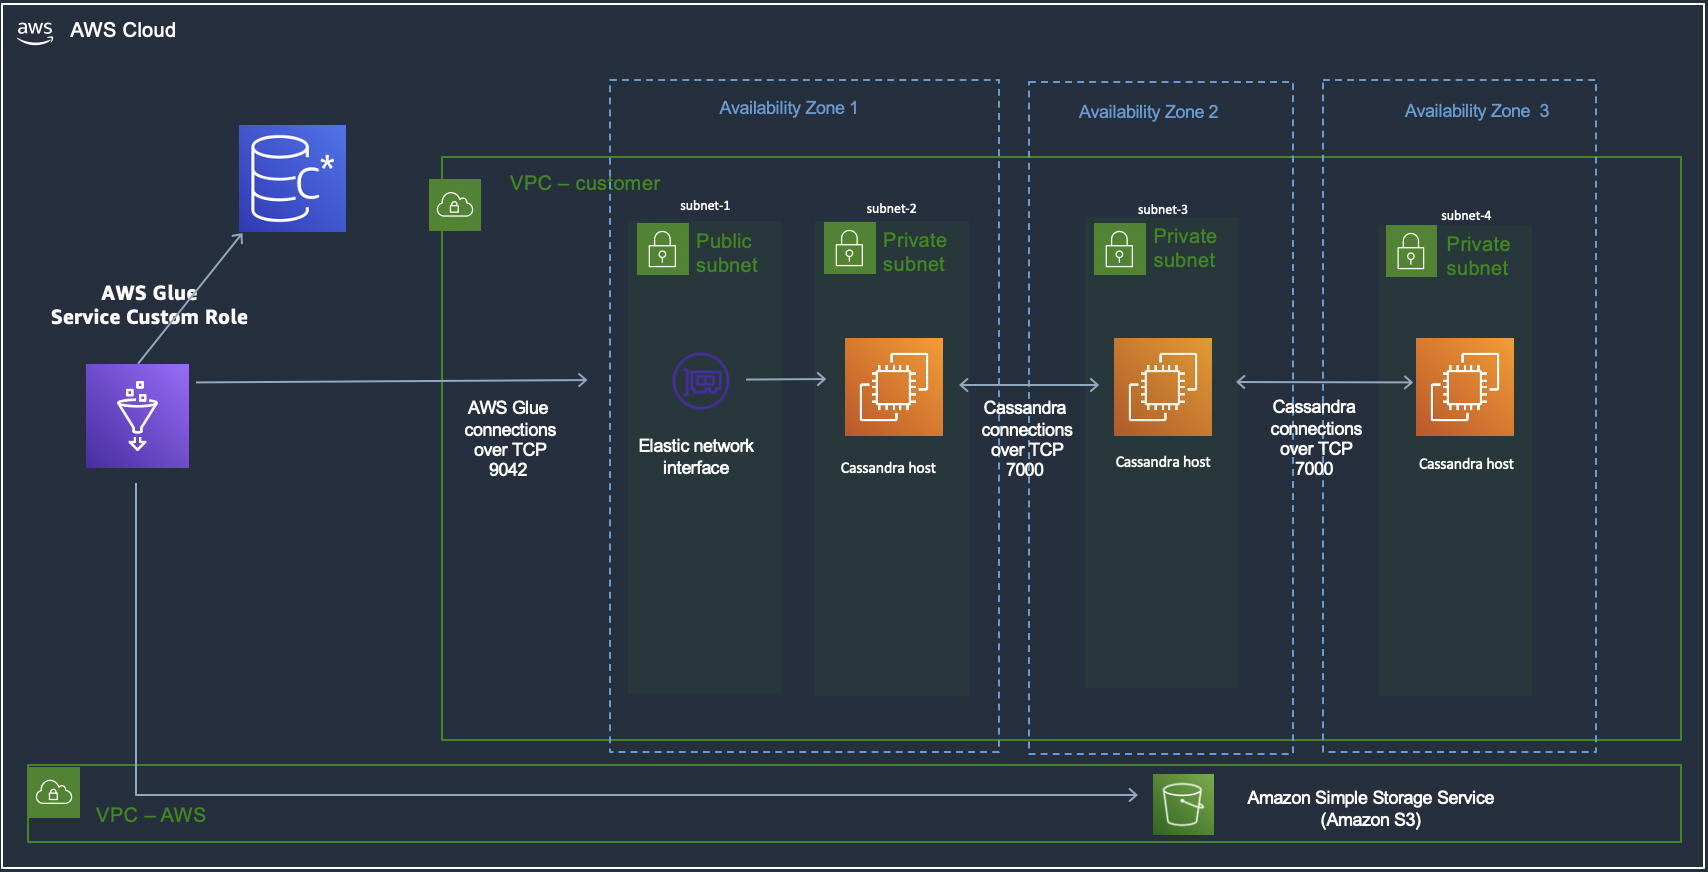
The architecture demonstrates the migration environment that requires Amazon Keyspaces, AWS Glue, Amazon Simple Storage Service (Amazon S3), and the Apache Cassandra cluster. To avoid a high CPU utilization/saturation on the Apache Cassandra cluster during the migration process, you might want to deploy another Cassandra datacenter to isolate your production from the migration workload to make the migration process seamless for your customers.

Amazon S3 has been used for staging while migrating data from Apache Cassandra to Amazon Keyspaces to make sure that the IO load on Cassandra serving live traffic on production is minimized, in case the data upload to Amazon Keyspaces fails and a retry must be done.

Prerequisites

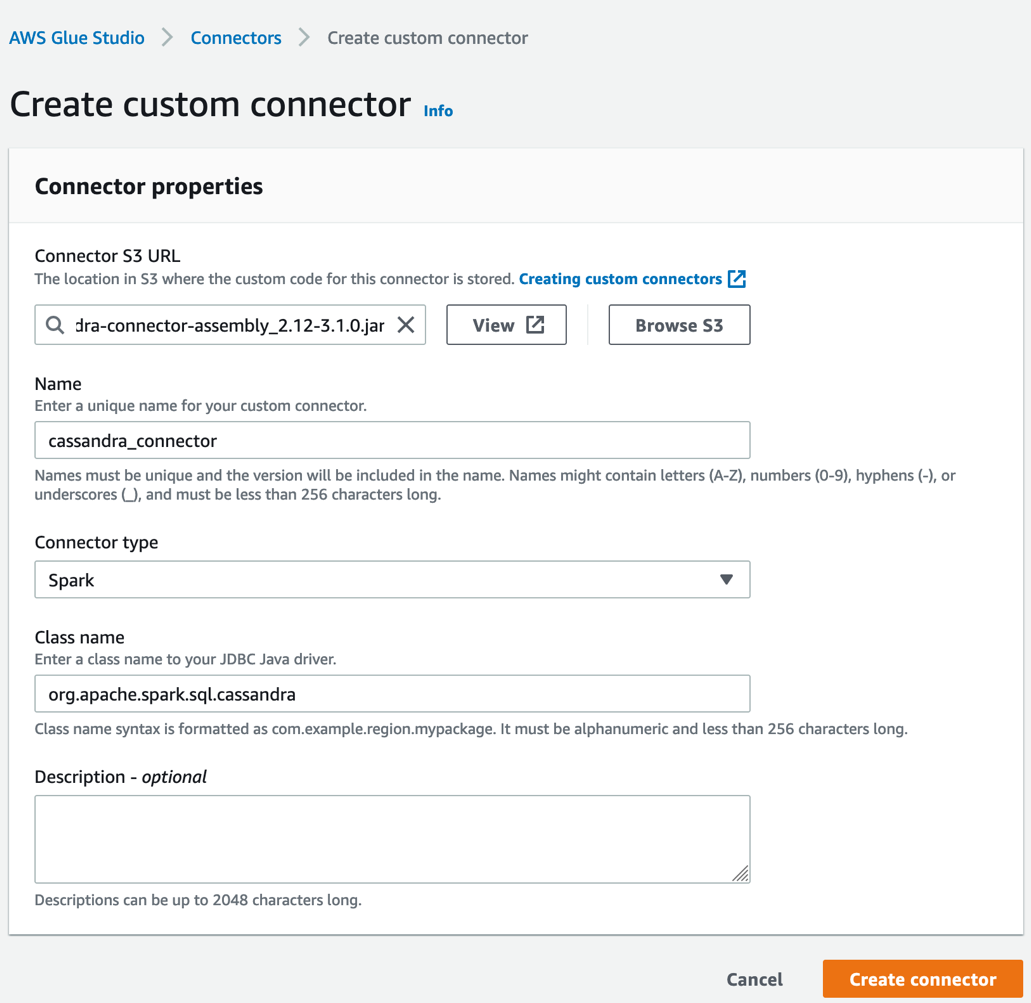
The Apache Cassandra cluster is hosted on Amazon Elastic Compute Cloud (Amazon EC2) instances, spread across three availability zones, and hosted in private subnets. AWS Glue ETL is hosted on Amazon Virtual Private Cloud (Amazon VPC) and thus needs a AWS Glue Studio custom Connectors and Connections to be setup to communicate with the Apache Cassandra nodes hosted on the private subnets in the customer VPC. Thereby, this enables the connection to the Cassandra cluster hosted in the VPC. The DataStax Spark Cassandra Connector must be downloaded and saved onto an Amazon S3 bucket: s3://$MIGRATION_BUCKET/jars/spark-cassandra-connector-assembly_2.12-3.2.0.jar.

Let’s create an AWS Glue Studio custom connector named cassandra_connection and its corresponding connection named conn-cassandra-custom for AWS region us-east-1.

For the connector created, create an AWS Glue Studio connection and populate it with network information VPC, and a Subnet allowing for AWS Glue ETL to establish a connection with Apache Casandra.

  • Name: conn-cassandra-custom
  • Network Options

Let’s begin by creating a keyspace and table in Amazon Keyspaces using Amazon Keyspaces Console or CQLSH, and then create a target keyspace named target_keyspace and a target table named target_table.

CREATE KEYSPACE target_keyspace WITH replication = {'class': 'SingleRegionStrategy'};

CREATE TABLE target_keyspace.target_table (
    userid      uuid,
    level       text,
    gameid      int,
    description text,
    nickname    text,
    zip         text,
    email       text,
    updatetime  text,
    PRIMARY KEY (userid, level, gameid)
) WITH default_time_to_live = 0 AND CUSTOM_PROPERTIES = {
	'capacity_mode':{
		'throughput_mode':'PROVISIONED',
		'write_capacity_units':76388,
		'read_capacity_units':3612
	}
} AND CLUSTERING ORDER BY (level ASC, gameid ASC);

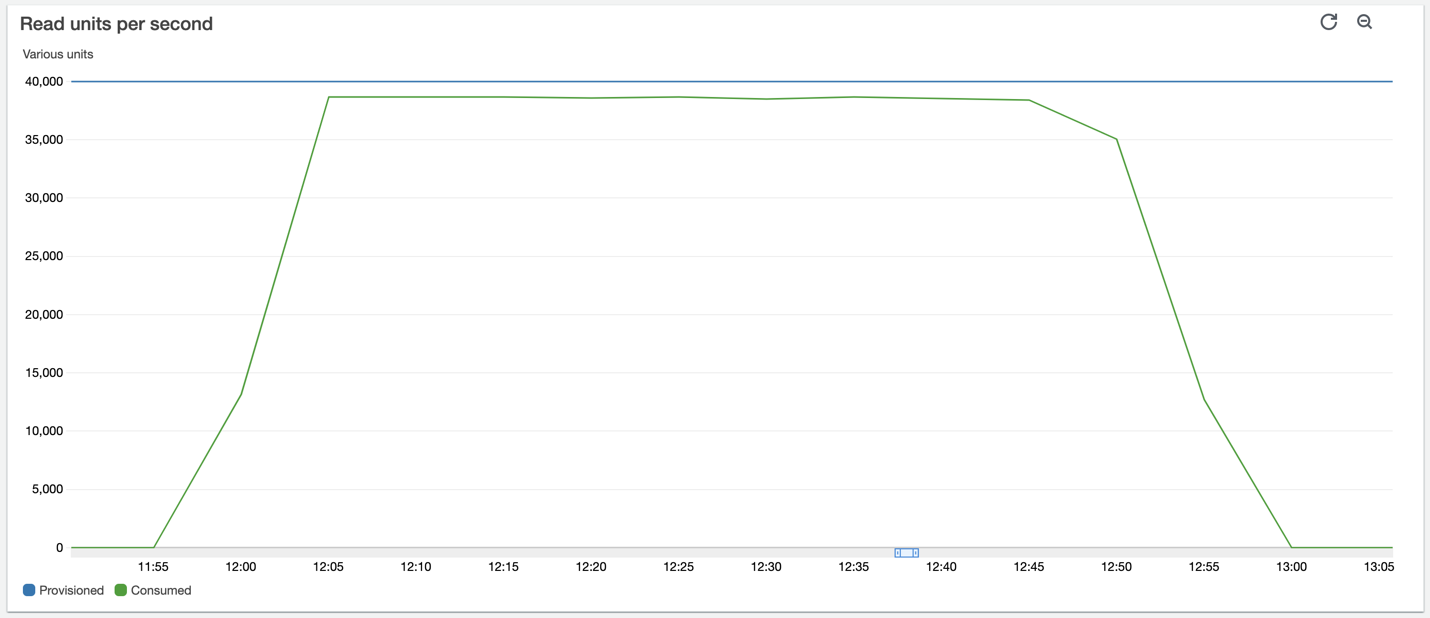
After the table has been created, switch the table to on-demand mode to pre-warm the table and avoid AWS Glue ETL job throttling failures. The following script will update the throughput mode.

ALTER TABLE target_keyspace.target_table 
WITH CUSTOM_PROPERTIES = {
	'capacity_mode':{
		'throughput_mode':'PAY_PER_REQUEST'
	}
} 

Let’s go ahead and create two Amazon S3 buckets to support the migration process. The first bucket (s3://your-spark-cassandra-connector-bucket-name)should store the spark Cassandra connector assembly jar file, Cassandra, and Keyspaces configuration YAML files.

The second bucket (s3://your-migration-stage-bucket-name) will be used to store intermediate parquet files to identify the delta between the Cassandra cluster and the Amazon Keyspaces table to track changes between subsequent executions of the AWS Glue ETL jobs.

In the following KeyspacesConnector.conf, set your contact points to connect to Amazon Keyspaces, and replace the username and the password to the AWS credentials.

Using the RateLimitingRequestThrottler we can make sure that requests don’t exceed the configured Keyspaces capacity. The G1.X DPU creates one executor per worker. The RateLimitingRequestThrottler in this example is set for 1000 requests per second. With this configuration, and G.1X DPU, you’ll achieve 1000 request per AWS Glue worker. Adjust the max-requests-per-second accordingly to fit your workload. Increase the number of workers to scale throughput to a table.

datastax-java-driver {
  basic.request.consistency = "LOCAL_QUORUM"
  basic.contact-points = ["cassandra.us-east-1.amazonaws.com:9142"]
   advanced.reconnect-on-init = true
   basic.load-balancing-policy {
        local-datacenter = "us-east-1"
    }
    advanced.auth-provider = {
       class = PlainTextAuthProvider
       username = "user-at-sample"
       password = "S@MPLE=PASSWORD="
    }
    advanced.throttler = {
       class = RateLimitingRequestThrottler
       max-requests-per-second = 1000
       max-queue-size = 50000
       drain-interval = 1 millisecond
    }
    advanced.ssl-engine-factory {
      class = DefaultSslEngineFactory
      hostname-validation = false
    }
    advanced.connection.pool.local.size = 1
}

Similarly, create a CassandraConnector.conf file, set the contact points to connect to the Cassandra cluster, and replace the username and the password respectively.

datastax-java-driver {
  basic.request.consistency = "LOCAL_QUORUM"
  basic.contact-points = ["127.0.0.1:9042"]
   advanced.reconnect-on-init = true
   basic.load-balancing-policy {
        local-datacenter = "datacenter1"
    }
    advanced.auth-provider = {
       class = PlainTextAuthProvider
       username = "user-at-sample"
       password = "S@MPLE=PASSWORD="
    }
}

Build AWS Glue ETL migration pipeline with Amazon Keyspaces

To build reliable, consistent delta upload Glue ETL pipeline, let’s decouple the migration process into two AWS Glue ETLs.

  • CassandraToS3 Glue ETL: Read data from the Apache Cassandra cluster and transfer the migration workload to Amazon S3 in the Apache Parquet format. To identify incremental changes in the Cassandra tables, the job stores separate parquet files with primary keys with an updated timestamp.
  • S3toKeyspaces Glue ETL: Uploads the migration workload from Amazon S3 to Amazon Keyspaces. During the first run, the ETL uploads the complete data set from Amazon S3 to Amazon Keyspaces, and for the subsequent run calculates the incremental changes by comparing the updated timestamp across two subsequent runs and calculating the incremental difference. The job also takes care of inserting new records, updating existing records, and deleting records based on the incremental difference.

In this example, we’ll use Scala to write the AWS Glue ETL, but you can also use PySpark.

Let’s go ahead and create an AWS Glue ETL job named CassandraToS3 with the following job parameters:

aws glue create-job \
    --name "CassandraToS3" \
    --role "GlueKeyspacesMigration" \
    --description "Offload data from the Cassandra to S3" \
    --glue-version "3.0" \
    --number-of-workers 2 \
    --worker-type "G.1X" \
    --connections "conn-cassandra-custom" \
    --command "Name=glueetl,ScriptLocation=s3://$MIGRATION_BUCKET/scripts/CassandraToS3.scala" \
    --max-retries 0 \
    --default-arguments '{
        "--job-language":"scala",
        "--KEYSPACE_NAME":"source_keyspace",
        "--TABLE_NAME":"source_table",
        "--S3_URI_FULL_CHANGE":"s3://$MIGRATION_BUCKET/full-dataset/",
        "--S3_URI_CURRENT_CHANGE":"s3://$MIGRATION_BUCKET/incremental-dataset/current/",
        "--S3_URI_NEW_CHANGE":"s3://$MIGRATION_BUCKET/incremental-dataset/new/",
        "--extra-files":"s3://$MIGRATION_BUCKET/conf/CassandraConnector.conf",
        "--conf":"spark.cassandra.connection.config.profile.path=CassandraConnector.conf",
        "--class":"GlueApp"
    }'

The CassandraToS3 Glue ETL job reads data from the Apache Cassandra table source_keyspace.source_table and writes it to the S3 bucket in the Apache Parquet format. The job rotates the parquet files to help identify delta changes in the data between consecutive job executions. To identify inserts, updates, and deletes, you must know primary key and columns write times (updated timestamp) in the Cassandra cluster up front. Our primary key consists of several columns userid, level, gameid, and a write time column updatetime. If you have multiple updated columns, then you must use more than one write time columns with an aggregation function. For example, for email and updatetime, take the maximum value between write times for email and updatetime.

The following AWS Glue spark code offloads data to Amazon S3 using the spark-cassandra-connector. The script takes four parameters KEYSPACE_NAME, KEYSPACE_TABLE, S3_URI_CURRENT_CHANGE, S3_URI_CURRENT_CHANGE, and S3_URI_NEW_CHANGE.

To upload the data from Amazon S3 to Amazon Keyspaces, you must create a S3toKeyspaces Glue ETL job using the Glue spark code to read the parquet files from the Amazon S3 bucket created as an output of CassandraToS3 Glue job and identify inserts, updates, deletes, and execute requests against the target table in Amazon Keyspaces. The code sample provided takes four parameters: KEYSPACE_NAME, KEYSPACE_TABLE, S3_URI_CURRENT_CHANGE, S3_URI_CURRENT_CHANGE, and S3_URI_NEW_CHANGE.

Let’s go ahead and create our second AWS Glue ETL job S3toKeyspaces with the following job parameters:

aws glue create-job \
    --name "S3toKeyspaces" \
    --role "GlueKeyspacesMigration" \
    --description "Push data to Amazon Keyspaces" \
    --glue-version "3.0" \
    --number-of-workers 2 \
    --worker-type "G.1X" \
    --command "Name=glueetl,ScriptLocation=s3://amazon-keyspaces-backups/scripts/S3toKeyspaces.scala" \
    --default-arguments '{
        "--job-language":"scala",
        "--KEYSPACE_NAME":"target_keyspace",
        "--TABLE_NAME":"target_table",
        "--S3_URI_FULL_CHANGE":"s3://$MIGRATION_BUCKET/full-dataset/",
        "--S3_URI_CURRENT_CHANGE":"s3://$MIGRATION_BUCKET/incremental-dataset/current/",
        "--S3_URI_NEW_CHANGE":"s3://$MIGRATION_BUCKET/incremental-dataset/new/",
        "--extra-files":"s3://$MIGRATION_BUCKET/conf/KeyspacesConnector.conf",
        "--conf":"spark.cassandra.connection.config.profile.path=KeyspacesConnector.conf",
        "--class":"GlueApp"
    }'

Job scheduling

The final step is to configure AWS Glue Triggers or Amazon EventBridge depending on your scheduling needs to trigger S3toKeyspaces Glue ETL when the job CassandraToS3 has succeeded. If you want to run the CassandraToS3 based on the schedule and configure the schedule option, then the following example showcases how to schedule cassandraToS3 to run every 15 minutes.

Job tuning

There are Spark settings recommended to begin with Amazon Keyspaces, which can then be increased later as appropriate for your workload.

  • Use a Spark partition size (groups multiple Cassandra rows) smaller than 8 MBs to avoid replaying large Spark tasks during a task failure.
  • Use a low concurrent number of writes per DPU with a large number of retries. Add the following options to the job parameters: --conf spark.cassandra.query.retry.count=500 --conf spark.cassandra.output.concurrent.writes=3.
  • Set spark.task.maxFailures to a bounded value. For example, you can start from 32 and increase as needed. This option can help you increase a number of tasks reties during a table pre-warm stage. Add the following option to the job parameters: --conf spark.task.maxFailures=32
  • Another recommendation is to turn off batching to improve random access patterns. Add the following options to the job parameters:
    spark.cassandra.output.batch.size.rows=1
    spark.cassandra.output.batch.grouping.key=none spark.cassandra.output.batch.grouping.buffer.size=100
  • Randomize your workload. Amazon Keyspaces partitions data using partition keys. Although Amazon Keyspaces has built-in logic to help load balance requests for the same partition key, loading the data is faster and more efficient if you randomize the order because you can take advantage of the built-in load balancing of writing to different partitions. To spread the writes across the partitions evenly, you must randomize the data in the dataframe. You might use a rand function to shuffle rows in the dataframe.

Summary

William Hill was able to migrate their workload from Apache Cassandra to Amazon Keyspaces at scale using AWS Glue, without the needs to make any changes on their application tech stack. The adoption of Amazon Keyspaces has provided them with the headroom to focus on their Application and customer experience, as with Amazon Keyspaces there’s no need to manage servers, get performance at scale, highly-scalable, and secure solution with the ability to handle the sudden spike in demand.

In this post, you saw how to use AWS Glue to migrate the Cassandra workload to Amazon Keyspaces, and simultaneously keep your Cassandra source databases completely functional during the migration process. When your applications are ready, you can choose to cut over your applications to Amazon Keyspaces with minimal replication lag in sub minutes between the Cassandra cluster and Amazon Keyspaces. You can also use a similar pipeline to replicate the data back to the Cassandra cluster from Amazon Keyspaces to maintain data consistency, if needed. Here you can find the documents and code to help accelerate your migration to Amazon Keyspaces.


About the Authors

Nikolai Kolesnikov is a Senior Data Architect and helps AWS Professional Services customers build highly-scalable applications using Amazon Keyspaces. He also leads Amazon Keyspaces ProServe customer engagements.

Kunal Gautam is a Senior Big Data Architect at Amazon Web Services. Having experience in building his own Startup and working along with enterprises, he brings a unique perspective to get people, business and technology work in tandem for customers. He is passionate about helping customers in their digital transformation journey and enables them to build scalable data and advance analytics solutions to gain timely insights and make critical business decisions. In his spare time, Kunal enjoys Marathons, Tech Meetups and Meditation retreats.

Sink Amazon Kinesis Data Analytics Apache Flink output to Amazon Keyspaces using Apache Cassandra Connector

Post Syndicated from Pratik Patel original https://aws.amazon.com/blogs/big-data/sink-amazon-kinesis-data-analytics-apache-flink-output-to-amazon-keyspaces-using-apache-cassandra-connector/

Amazon Keyspaces (for Apache Cassandra) is a scalable, highly available, and managed Apache Cassandra–compatible database service. With Amazon Keyspaces you don’t have to provision, patch, or manage servers, and you don’t have to install, maintain, or operate software. Amazon Keyspaces is serverless, so you only pay for the resources that you use and the service can automatically scale tables up and down in response to application traffic. You can use Amazon Keyspaces to store large volumes of data, such as entries in a log file or the message history for a chat application as Amazon Keyspaces offers virtually unlimited throughput and storage. You can also use Amazon Keyspaces to store information about devices for Internet of Things (IoT) applications or player profiles for games.

A popular use case in the wind energy sector is to protect wind turbines from wind speed. Engineers and analysts often want to see real-time aggregated wind turbine speed data to analyze the current situation out in the field. Furthermore, they need access to historical aggregated wind turbine speed data to build machine learning (ML) models which can help them take preventative actions on wind turbines. Customers often ingest high-velocity IoT data into Amazon Kinesis Data Streams and use Amazon Kinesis Data Analytics, AWS Lambda, or Amazon Kinesis Client Library (KCL) applications to aggregate IoT data in real-time and store it in Amazon Keyspaces, Amazon DynamoDB, or Amazon Timestream.

In this post, we demonstrate how to aggregate sensor data using Amazon Kinesis Data Analytics and persist aggregated sensor data in to Amazon Keyspaces using Apache Flink’s Apache Cassandra Connector.

Architecture

BDB-2063-kda-keyspaces-architecture

In the architecture diagram above, Lambda simulates wind speed sensor data and ingests sensor data into Amazon Kinesis Data Stream. Amazon Kinesis Data Analytics Apache Flink application reads wind speed sensor data from Amazon Kinesis Data Stream in real-time and aggregates wind speed sensor data using a five minutes tumbling window and storing aggregated wind speed sensor data into Amazon Keyspaces table. Aggregated wind speed sensor data stored in Amazon Keyspaces can be used by engineers and analysts to review real-time dashboards or to perform historical analysis on specific wind turbine.

Deploying resources using AWS CloudFormation

After you sign in to your AWS account, launch the AWS CloudFormation template by choosing Launch Stack:

BDB-2063-launch-cloudformation-stack

The CloudFormation template configures the following resources in your account:

  • One Lambda function which simulates wind turbine data
  • One Amazon Kinesis Data Stream
  • One Amazon Kinesis Data Analytics Apache Flink application
  • An AWS Identity and Access Management (IAM) role (service execution role) for Amazon Kinesis Data Analytics Apache Flink application
  • One Amazon Keyspaces Table: turbine_aggregated_sensor_data

After you complete the setup, sign in to the Kinesis Data Analytics console. On the Kinesis Data Analytics applications page, choose the Streaming applications tab, where you can see the Streaming application in the ready status. Select the Streaming application, choose Run, and wait until the Streaming application is in running status. It can take a couple of minutes for the Streaming application to get into running status.

Now that we have deployed all of the resources using CloudFormation template, let’s review deployed resources and how they function.

Format of wind speed sensor data

Lambda simulates wind turbine speed data every one minute and ingests it into Amazon Kinesis Data Stream. Each wind turbine sensor data message consists of two attributes: turbineId and speed.

{
  "turbineId": "turbine-0001",
  "speed": 60
}

Schema of destination Amazon Keyspaces table

We’ll store aggregated sensor data in to destination turbine_aggregated_sensor_data Amazon Keyspaces table. turbine_aggregated_sensor_data table has on-demand capacity mode enabled. Amazon Keyspaces (for Apache Cassandra) on-demand capacity mode is a flexible billing option capable of serving thousands of requests per second without capacity planning. This option offers pay-per-request pricing for read and write requests so that you pay only for what you use. When you choose on-demand mode, Amazon Keyspaces can scale the throughput capacity for your table up to any previously reached traffic level instantly, and then back down when application traffic decreases. If a workload’s traffic level hits a new peak, then the service adapts rapidly to increase throughput capacity for your table.

BDB-2063-keyspaces-table BDB-2063-keyspaces-table-def-1 BDB-2063-keyspaces-table-def-2

Apache Flink code to aggregate and persist data in Amazon Keyspaces Table

Apache Flink source code used by this post can be found on the KeyspacesSink section of Kinesis Data Analytics Java Examples public git repository.

The following code snippet demonstrates how incoming wind turbine messages are getting aggregated using a five-minute tumbling window and produces a DataStream of TurbineAggregatedRecord records.

DataStream<TurbineAggregatedRecord> result = input
.map(new WindTurbineInputMap())
.keyBy(t -> t.turbineId)
.window(TumblingProcessingTimeWindows.of(Time.minutes(5)))
.reduce(new AggregateReducer())
.map(new AggregateMap());

The following code snippet demonstrates how Amazon Keyspaces table name and column names are annotated on the TurbineAggregatedRecord class.

@Table(keyspace = "sensor_data", name = "turbine_aggregated_sensor_data", readConsistency = "LOCAL_QUORUM", writeConsistency = "LOCAL_QUORUM")
public class TurbineAggregatedRecord {

@Column(name = "turbineid")
@PartitionKey(0)
private String turbineid = "";

@Column(name = "reported_time")
private long reported_time = 0;

@Column(name = "max_speed")
private long max_speed = 0;

@Column(name = "min_speed")
private long min_speed = 0;

@Column(name = "avg_speed")
private long avg_speed = 0;

The following code snippet demonstrates the implementation of Apache Cassandra Connector to sink aggregated wind speed sensor data TurbineAggregatedRecord into Amazon Keyspaces table. We’re using SigV4AuthProvider with Apache Cassandra Connector. The SigV4 authentication plugin lets you use IAM credentials for users or roles when connecting to Amazon Keyspaces. Instead of requiring a user name and password, this plugin signs API requests using access keys.

CassandraSink.addSink(result)
                .setClusterBuilder(
                        new ClusterBuilder() {

                            private static final long serialVersionUID = 2793938419775311824L;

                            @Override
                            public Cluster buildCluster(Cluster.Builder builder) {
                                return builder
                                        .addContactPoint("cassandra."+ region +".amazonaws.com")
                                        .withPort(9142)
                                        .withSSL()
                                        .withAuthProvider(new SigV4AuthProvider(region))
                                        .withLoadBalancingPolicy(
                                                DCAwareRoundRobinPolicy
                                                        .builder()
                                                        .withLocalDc(region)
                                                        .build())
                                        .withQueryOptions(queryOptions)
                                        .build();
                            }
                        })
                .setMapperOptions(() -> new Mapper.Option[] {Mapper.Option.saveNullFields(true)})
                .setDefaultKeyspace("sensor_data")
                .build();

Review output in Amazon Keyspaces Table

Once Amazon Kinesis Data Analytics Apache Flink application aggregates wind turbine sensor data and persists aggregated data in Amazon Keyspaces table, we can query and review aggregated data using Amazon Keyspaces CQL editor as illustrated in the following.

select * from sensor_data.turbine_aggregated_sensor_data

BDB-2063-cql-editor BDB-2063-cql-editor-result

Clean up

To avoid incurring future charges, complete the following steps:

  1. Empty Amazon S3 bucket created by AWS CloudFormation stack.
  2. Delete AWS CloudFormation stack.

Conclusion

As you’ve learned in this post, you can build Amazon Kinesis Data Analytics Apache Flink application to read sensor data from Amazon Kinesis Data Streams, perform aggregations, and persist aggregated sensor data in Amazon Keyspaces using Apache Cassandra Connector. There are several use cases in IoT and Application development to move data quickly through the analytics pipeline and persist data in Amazon Keyspaces.

We look forward to hearing from you about your experience. If you have questions or suggestions, please leave a comment.


About the Author

Pratik Patel is a Sr Technical Account Manager and streaming analytics specialist. He works with AWS customers and provides ongoing support and technical guidance to help plan and build solutions using best practices and proactively helps in keeping customer’s AWS environments operationally healthy.