All posts by Adam Gatt

Optimize your Amazon Redshift query performance with automated materialized views

Post Syndicated from Adam Gatt original https://aws.amazon.com/blogs/big-data/optimize-your-amazon-redshift-query-performance-with-automated-materialized-views/

Amazon Redshift is a fast, fully managed cloud data warehouse database that makes it cost-effective to analyze your data using standard SQL and business intelligence tools. Amazon Redshift allows you to analyze structured and semi-structured data and seamlessly query data lakes and operational databases, using AWS designed hardware and automated machine learning (ML)-based tuning to deliver top-tier price-performance at scale.

Although Amazon Redshift provides excellent price performance out of the box, it offers additional optimizations that can improve this performance and allow you to achieve even faster query response times from your data warehouse.

For example, you can physically tune tables in a data model to minimize the amount of data scanned and distributed within a cluster, which speeds up operations such as table joins and range-bound scans. Amazon Redshift now automates this tuning with the automatic table optimization (ATO) feature.

Another optimization for reducing query runtime is to precompute query results in the form of a materialized view. Materialized views store precomputed query results that future similar queries can use. This improves query performance because many computation steps can be skipped and the precomputed results returned directly. Unlike a simple cache, many materialized views can be incrementally refreshed when DML changes are applied on the underlying (base) tables and can be used by other similar queries, not just the query used to create the materialized view.

Amazon Redshift introduced materialized views in March 2020. In June 2020, support for external tables was added. With these releases, you could use materialized views on both local and external tables to deliver low-latency performance by using precomputed views in your queries. However, this approach required you to be aware of what materialized views were available on the cluster, and if they were up to date.

In November 2020, materialized view automatic refresh and query rewrite features were added. With materialized view-aware automatic rewriting, data analysts get the benefit of materialized views for their queries and dashboards without having to query the materialized view directly. The analyst may not even be aware the materialized views exist. The auto rewrite feature enables this by rewriting queries to use materialized views without the query needing to explicitly reference them. In addition, auto refresh keeps materialized views up to date when base table data is changed, and there are available cluster resources for the materialized view maintenance.

However, materialized views still have to be manually created, monitored, and maintained by data engineers or DBAs. To reduce this overhead, Amazon Redshift has introduced the Automated Materialized View (AutoMV) feature, which goes one step further and automatically creates materialized views for queries with common recurring joins and aggregations.

This post explains what materialized views are, how manual materialized views work and the benefits they provide, and what’s required to build and maintain manual materialized views to achieve performance improvements and optimization. Then we explain how this is greatly simplified with the new automated materialized view feature.

Manually create materialized views

A materialized view is a database object that stores precomputed query results in a materialized (persisted) dataset. Similar queries can use the precomputed results from the materialized view and skip the expensive tasks of reading the underlying tables and performing joins and aggregates, thereby improving the query performance.

For example, you can improve the performance of a dashboard by materializing the results of its queries into a materialized view or multiple materialized views. When the dashboard is opened or refreshed, it can use the precomputed results from the materialized view instead of rereading the base tables and reprocessing the queries. By creating a materialized view once and querying it multiple times, redundant processing can be avoided, improving query performance and freeing up resources for other processing on the database.

To demonstrate this, we use the following query, which returns daily order and sales numbers. It joins two tables and aggregates at the day level.

SET enable_result_cache_for_session TO OFF;

SELECT o.o_orderdate AS order_date
      ,SUM(l.l_extendedprice) AS ext_price_total
FROM orders o
INNER JOIN lineitem l
   ON o.o_orderkey = l.l_orderkey
WHERE o.o_orderdate >= '1997-01-01'
AND   o.o_orderdate < '1998-01-01'
GROUP BY o.o_orderdate
ORDER BY 1;

At the top of the query, we set enable_result_cache_for_session to OFF. This setting disables the results cache, so we can see the full processing runtime each time we run the query. Unlike a materialized view, the results cache is a simple cache that stores the results of a single query in memory, it can’t be used by other similar queries, is not updated when the base tables are modified, and because it isn’t persisted, can be aged-out of memory by more frequently used queries.

When we run this query on a 10-node ra3.4xl cluster with the TPC-H 3 TB dataset, it returns in approximately 20 seconds. If we need to run this query or similar queries more than once, we can create a materialized view with the CREATE MATERIALIZED VIEW command and query the materialized view object directly, which has the same structure as a table:

CREATE MATERIALIZED VIEW mv_daily_sales
AS
SELECT o.o_orderdate AS order_date
      ,SUM(l.l_extendedprice) AS ext_price_total
FROM orders o
INNER JOIN lineitem l
   ON o.o_orderkey = l.l_orderkey
WHERE o.o_orderdate >= '1997-01-01'
AND   o.o_orderdate < '1998-01-01'
GROUP BY o.o_orderdate;

SELECT order_date
      ,ext_price_total
FROM   mv_daily_sales
ORDER BY 1;

Because the join and aggregations have been precomputed, it runs in approximately 900 milliseconds, a performance improvement of 96%.

As we have just shown, you can query the materialized view directly; however, Amazon Redshift can automatically rewrite a query to use one or more materialized views. The query rewrite feature transparently rewrites the query as it’s being run to retrieve precomputed results from a materialized view. This process is automatically triggered on eligible and up-to-date materialized views, if the query contains the same base tables and joins, and has similar aggregations as the materialized view.

For example, if we rerun the sales query, because it’s eligible for rewriting, it’s automatically rewritten to use the mv_daily_sales materialized view. We start with the original query:

SELECT o.o_orderdate AS order_date
      ,SUM(l.l_extendedprice) AS ext_price_total
FROM orders o
INNER JOIN lineitem l
   ON o.o_orderkey = l.l_orderkey
WHERE o.o_orderdate >= '1997-01-01'
AND   o.o_orderdate < '1998-01-01'
GROUP BY o.o_orderdate
ORDER BY 1;

Internally, the query is rewritten to the following SQL and run. This process is completely transparent to the user.

SELECT order_date
      ,ext_price_total
FROM   mv_daily_sales
ORDER BY 1;

The rewriting can be confirmed by looking at the query’s explain plan:

EXPLAIN SELECT o.o_orderdate AS order_date
      ,SUM(l.l_extendedprice) AS ext_price_total
FROM orders o
INNER JOIN lineitem l
   ON o.o_orderkey = l.l_orderkey
WHERE o.o_orderdate >= '1997-01-01'
AND   o.o_orderdate < '1998-01-01'
GROUP BY o.o_orderdate;

+------------------------------------------------------------------------------------------------+
|QUERY PLAN                                                                                      |
+------------------------------------------------------------------------------------------------+
|XN HashAggregate  (cost=5.47..5.97 rows=200 width=31)                                           |
|  ->  XN Seq Scan on mv_tbl__mv_daily_sales__0 derived_table1  (cost=0.00..3.65 rows=365 width=31)|
+------------------------------------------------------------------------------------------------+

The plan shows the query has been rewritten and has retrieved the results from the mv_daily_sales materialized view, not the query’s base tables: orders and lineitem.

Other queries that use the same base tables and level of aggregation, or a level of aggregation derived from the materialized view’s level, are also rewritten. For example:

EXPLAIN SELECT date_trunc('month', o.o_orderdate) AS order_month
      ,SUM(l.l_extendedprice) AS ext_price_total
FROM orders o
INNER JOIN lineitem l
   ON o.o_orderkey = l.l_orderkey
WHERE o.o_orderdate >= '1997-01-01'
AND   o.o_orderdate < '1998-01-01'
GROUP BY order_month;

+------------------------------------------------------------------------------------------------+
|QUERY PLAN                                                                                      |
+------------------------------------------------------------------------------------------------+
|XN HashAggregate  (cost=7.30..10.04 rows=365 width=19)                                          |
|  ->  XN Seq Scan on mv_tbl__mv_daily_sales__0 derived_table1  (cost=0.00..5.47 rows=365 width=19)|
+------------------------------------------------------------------------------------------------+

If data in the orders or lineitem table changes, mv_daily_sales becomes stale; this means the materialized view isn’t reflecting the state of its base tables. If we update a row in lineitem and check the stv_mv_info system table, we can see the is_stale flag is set to t (true):

UPDATE lineitem
SET l_extendedprice = 5000
WHERE l_orderkey = 2362252519
AND l_linenumber = 1;

SELECT name
      ,is_stale
FROM stv_mv_info
WHERE name = 'mv_daily_sales';

+--------------+--------+
|name          |is_stale|
+--------------+--------+
|mv_daily_sales|t       |
+--------------+--------+

We can now manually refresh the materialized view using the REFRESH MATERIALIZED VIEW statement:

REFRESH MATERIALIZED VIEW mv_daily_sales;

SELECT name
      ,is_stale
FROM stv_mv_info
WHERE name = 'mv_daily_sales';

+--------------+--------+
|name          |is_stale|
+--------------+--------+
|mv_daily_sales|f       |
+--------------+--------+

There are two types of materialized view refresh: full and incremental. A full refresh reruns the underlying SQL statement and rebuilds the whole materialized view. An incremental refresh only updates specific rows affected by the source data change. To see if a materialized view is eligible for incremental refreshes, view the state column in the stv_mv_info system table. A state of 0 indicates the materialized view will be fully refreshed, and a state of 1 indicates the materialized view will be incrementally refreshed.

SELECT name
      ,state
FROM stv_mv_info
WHERE name = 'mv_daily_sales';

+--------------+--------+
|name          |state   |
+--------------+--------+
|mv_daily_sales|       1|
+--------------+--------+

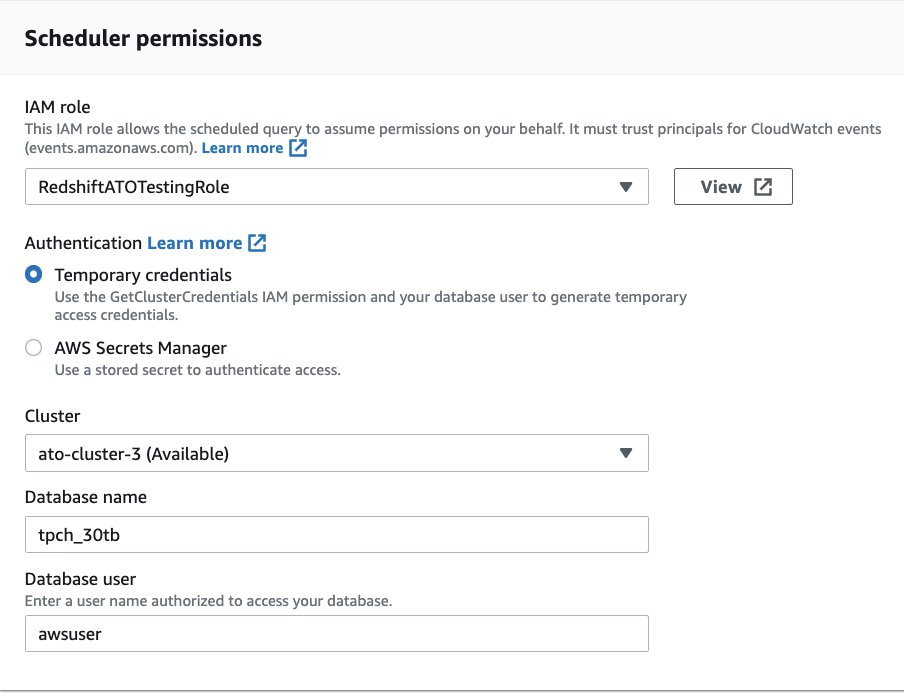
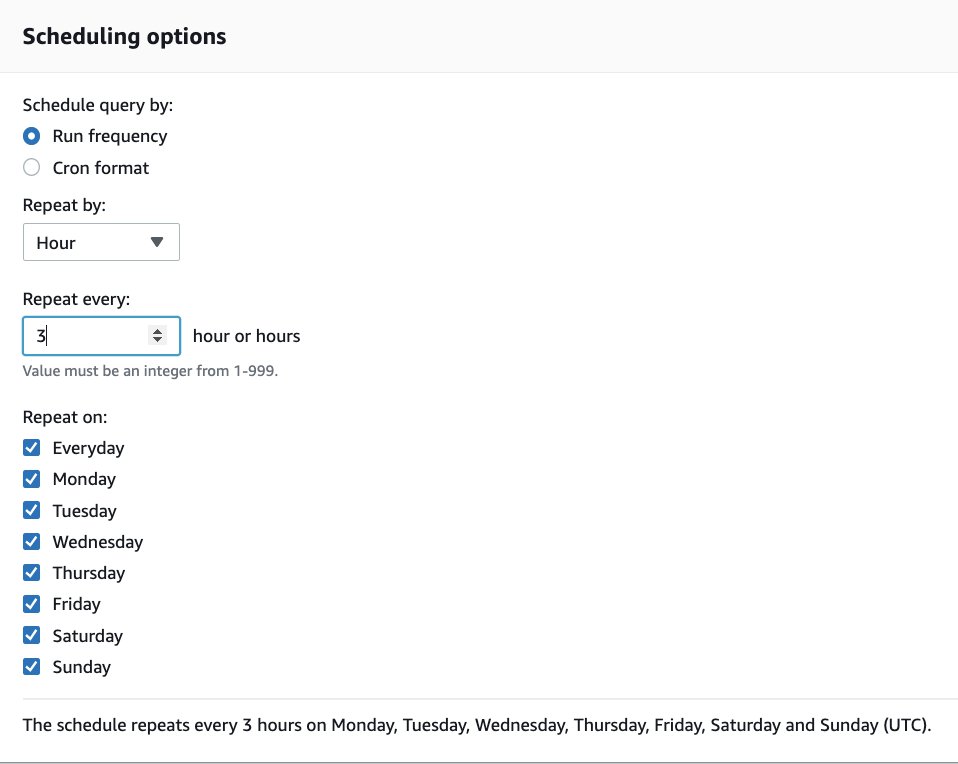
You can schedule manual refreshes on the Amazon Redshift console if you need to refresh a materialized view at fixed periods, such as once per hour. For more information, refer to Scheduling a query on the Amazon Redshift console.

As well as the ability to do a manual refresh, Amazon Redshift can also automatically refresh materialized views. The auto refresh feature intelligently determines when to refresh the materialized view, and if you have multiple materialized views, which order to refresh them in. Amazon Redshift considers the benefit of refreshing a materialized view (how often the materialized view is used, what performance gain the materialized view provides) and the cost (resources required for the refresh, current system load, available system resources).

This intelligent refreshing has a number of benefits. Because not all materialized views are equally important, deciding when and in which order to refresh materialized views on a large system is a complex task for a DBA to solve. Also, the DBA needs to consider other workloads running on the system, and try to ensure the latency of critical workloads is not increased by the effect of refreshing materialized views. The auto refresh feature helps remove the need for a DBA to do these difficult and time-consuming tasks.

You can set a materialized view to be automatically refreshed in the CREATE MATERIALIZED VIEW statement with the AUTO REFRESH YES parameter:

CREATE MATERIALIZED VIEW mv_daily_sales
AUTO REFRESH YES
AS
SELECT ...

Now when the source data of the materialized view changes, the materialized view is automatically refreshed. We can view the status of the refresh in the svl_mv_refresh_status system table. For example:

UPDATE lineitem
SET l_extendedprice = 6000
WHERE l_orderkey = 2362252519
AND l_linenumber = 1;

SELECT mv_name
      ,starttime
      ,endtime
      ,status
      ,refresh_type
FROM svl_mv_refresh_status
WHERE mv_name = 'mv_daily_sales';

+--------------+--------------------------+--------------------------+---------------------------------------------+------------+
|mv_name       |starttime                 |endtime                   |status                                       |refresh_type|
+--------------+--------------------------+--------------------------+---------------------------------------------+------------+
|mv_daily_sales|2022-05-06 14:07:24.857074|2022-05-06 14:07:33.342346|Refresh successfully updated MV incrementally|Auto        |
+--------------+--------------------------+--------------------------+---------------------------------------------+------------+

To remove a materialized view, we use the DROP MATERIALIZED VIEW command:

DROP MATERIALIZED VIEW mv_daily_sales;

Now that you’ve seen what materialized views are, their benefits, and how they are created, used, and removed, let’s discuss the drawbacks. Designing and implementing a set of materialized views to help improve overall query performance on a database requires a skilled resource to perform several involved and time-consuming tasks:

  • Analyzing queries run on the system
  • Identifying which queries are run regularly and provide business benefit
  • Prioritizing the identified queries
  • Determining if the performance improvement is worth creating a materialized view and storing the dataset
  • Physically creating and refreshing the materialized views
  • Monitoring the usage of the materialized views
  • Dropping materialized views that are rarely or never used or can’t be refreshed due to the structure of base tables changing

Significant skill, effort, and time is required to design and create materialized views that provide an overall benefit. Also, ongoing monitoring is needed to identify poorly designed or underutilized materialized views that are occupying resources without providing gains.

Amazon Redshift now has a feature to automate this process, Automated Materialized Views (AutoMVs). We explain how AutoMVs work and how to use them on your cluster in the following sections.

Automatically create materialized views

When the AutoMV feature is enabled on an Amazon Redshift cluster (it’s enabled by default), Amazon Redshift monitors recently run queries and identifies any that could have their performance improved by a materialized view. Expensive parts of the query, such as aggregates and joins that can be persisted into materialized views and reused by future queries, are then extracted from the main query and any subqueries. The extracted query parts are then rewritten into create materialized view statements (candidate materialized views) and stored for further processing.

The candidate materialized views are not just one-to-one copies of queries; extra processing is applied to create generalized materialized views that can be used by queries similar to the original query. In the following example, the result set is limited by the filters o_orderpriority = '1-URGENT' and l_shipmode ='AIR'. Therefore, a materialized view built from this result set could only serve queries selecting that limited range of data.

SELECT o.o_orderdate
      ,SUM(l.l_extendedprice)
FROM orders o
INNER JOIN lineitem l
   ON o.o_orderkey = l.l_orderkey
WHERE o.o_orderpriority = '1-URGENT'
AND   l.l_shipmode ='AIR'
GROUP BY o.o_orderdate;

Amazon Redshift uses many techniques to create generalized materialized views; one of these techniques is called predicate elevation. To apply predicate elevation to this query, the filtered columns o_orderpriority and l_shipmode are moved into the GROUP BY clause, thereby storing the full range of data in the materialized view, which allows similar queries to use the same materialized view. This approach is driven by dashboard-like workloads that often issue identical queries with different filter predicates.

SELECT o.o_orderdate
      ,o.o_orderpriority
      ,l.l_shipmode
      ,SUM(l.l_extendedprice)
FROM orders o
INNER JOIN lineitem l
   ON o.o_orderkey = l.l_orderkey
GROUP BY o.o_orderdate
        ,o.o_orderpriority
        ,l.l_shipmode;

In the next processing step, ML algorithms are applied to calculate which of the candidate materialized views provides the best performance benefit and system-wide performance optimization. The algorithms follow similar logic to the auto refresh feature mentioned previously. For each candidate materialized view, Amazon Redshift calculates a benefit, which corresponds to the expected performance improvement should the materialized view be materialized and used in the workload. In addition, it calculates a cost corresponding to the system resources required to create and maintain the candidate. Existing manual materialized views are also considered; an AutoMV will not be created if a manual materialized view already exists that covers the same scope, and manual materialized views have auto refresh priority over AutoMVs.

The list of materialized views is then sorted in order of overall cost-benefit, taking into consideration workload management (WLM) query priorities, with materialized views related to queries on a higher priority queue ordered before materialized views related to queries on a lower priority queue. After the list of materialized views has been fully sorted, they’re automatically created and populated in the background in the prioritized order.

The created AutoMVs are then monitored by a background process that checks their activity, such as how often they have been queried and refreshed. If the process determines that an AutoMV is not being used or refreshed, for example due to the base table’s structure changing, it is dropped.

Example

To demonstrate this process in action, we use the following query taken from the 3 TB Cloud DW Benchmark, a performance testing benchmark derived from TPC-H. You can load the benchmark data into your cluster and follow along with the example.

SET enable_result_cache_for_session TO OFF;

SELECT /* TPC-H Q12 */
       l_shipmode
     , SUM(CASE
              WHEN o_orderpriority = '1-URGENT'
                 OR o_orderpriority = '2-HIGH'
                 THEN 1
              ELSE 0
   END) AS high_line_count
     , SUM(CASE
              WHEN o_orderpriority  '1-URGENT'
                 AND o_orderpriority  '2-HIGH'
                 THEN 1
              ELSE 0
   END) AS low_line_count
FROM orders
   , lineitem
WHERE o_orderkey = l_orderkey
AND l_shipmode IN ('MAIL', 'SHIP')
AND l_commitdate < l_receiptdate
AND l_shipdate = DATE '1994-01-01'
AND l_receiptdate < DATEADD(YEAR, 1, CAST('1994-01-01' AS DATE))
GROUP BY l_shipmode
ORDER BY l_shipmode;

We run the query three times and then wait for 30 minutes. On a 10-node ra3.4xl cluster, the query runs in approximately 8 seconds.

During the 30 minutes, Amazon Redshift assesses the benefit of materializing candidate AutoMVs. It computes a sorted list of candidate materialized views and creates the most beneficial ones with incremental refresh, auto refresh, and query rewrite enabled. When the query or similar queries run, they’re automatically and transparently rewritten to use one or more of the created AutoMVs.

Ongoing, if data in the base tables is modified (i.e. the AutoMV becomes stale), an incremental refresh automatically runs, inserting, updating, and deleting rows in the AutoMV to bring its data to the latest state.

Rerunning the query shows that it runs in approximately 800 milliseconds, a performance improvement of 90%. We can confirm the query is using the AutoMV by checking the explain plan:

EXPLAIN SELECT /* TPC-H Q12 */
       l_shipmode
     ,
 SUM(CASE
              WHEN o_orderpriority = '1-URGENT'
                 OR o_orderpriority = '2-HIGH'
                 THEN 1
              ELSE 0
   END) AS high_line_count
     , SUM(CASE
              WHEN o_orderpriority <> '1-URGENT'
                 AND o_orderpriority <> '2-HIGH'
                 THEN 1
              ELSE 0
   END) AS low_line_count
FROM orders
   , lineitem
WHERE o_orderkey = l_orderkey
AND l_shipmode IN ('MAIL', 'SHIP')
AND l_commitdate < l_receiptdate
AND l_shipdate < l_commitdate
AND l_receiptdate >= DATE '1994-01-01'
AND l_receiptdate < DATEADD(YEAR, 1, CAST('1994-01-01' AS DATE))
GROUP BY l_shipmode
ORDER BY l_shipmode;

+---------------------------------------------------------------------------------------------------------------------------------------------------------------------+
|QUERY PLAN                                                                                                                                                           |
+---------------------------------------------------------------------------------------------------------------------------------------------------------------------+
|XN Merge  (cost=1000000000354.23..1000000000354.23 rows=1 width=30)                                                                                                  |
|  Merge Key: derived_table1.grvar_1                                                                                                                                  |
|  ->  XN Network  (cost=1000000000354.23..1000000000354.23 rows=1 width=30)                                                                                          |
|        Send to leader                                                                                                                                               |
|        ->  XN Sort  (cost=1000000000354.23..1000000000354.23 rows=1 width=30)                                                                                       |
|              Sort Key: derived_table1.grvar_1                                                                                                                       |
|              ->  XN HashAggregate  (cost=354.21..354.22 rows=1 width=30)                                                                                            |
|                    ->  XN Seq Scan on mv_tbl__auto_mv_2000__0 derived_table1  (cost=0.00..349.12 rows=679 width=30)                                                 |
|                          Filter: ((grvar_2 < '1995-01-01'::date) AND (grvar_2 >= '1994-01-01'::date) AND ((grvar_1 = 'SHIP'::bpchar) OR (grvar_1 = 'MAIL'::bpchar)))|
+---------------------------------------------------------------------------------------------------------------------------------------------------------------------+

To demonstrate how AutoMVs can also improve the performance of similar queries, we change some of the filters on the original query. In the following example, we change the filter on l_shipmode from IN ('MAIL', 'SHIP') to IN ('TRUCK', 'RAIL', 'AIR'), and change the filter on l_receiptdate to the first 6 months of the previous year. The query runs in approximately 900 milliseconds and, looking at the explain plan, we confirm it’s using the AutoMV:

EXPLAIN SELECT /* TPC-H Q12 modified */
       l_shipmode
     , SUM(CASE
              WHEN o_orderpriority = '1-URGENT'
                 OR o_orderpriority = '2-HIGH'
                 THEN 1
              ELSE 0
   END) AS high_line_count
     , SUM(CASE
              WHEN o_orderpriority <> '1-URGENT'
                 AND o_orderpriority <> '2-HIGH'
                 THEN 1
              ELSE 0
   END) AS low_line_count
FROM orders
   , lineitem
WHERE o_orderkey = l_orderkey
AND l_shipmode IN ('TRUCK', 'RAIL', 'AIR')
AND l_commitdate < l_receiptdate
AND l_shipdate < l_commitdate
AND l_receiptdate >= DATE '1993-01-01'
AND l_receiptdate < DATE '1993-07-01'
GROUP BY l_shipmode
ORDER BY l_shipmode;

+---------------------------------------------------------------------------------------------------------------------------------------------------------------------------------------------------+
|QUERY PLAN                                                                                                                                                                                         |
+---------------------------------------------------------------------------------------------------------------------------------------------------------------------------------------------------+
|XN Merge  (cost=1000000000396.30..1000000000396.31 rows=1 width=30)                                                                                                                                |
|  Merge Key: derived_table1.grvar_1                                                                                                                                                                |
|  ->  XN Network  (cost=1000000000396.30..1000000000396.31 rows=1 width=30)                                                                                                                        |
|        Send to leader                                                                                                                                                                             |
|        ->  XN Sort  (cost=1000000000396.30..1000000000396.31 rows=1 width=30)                                                                                                                     |
|              Sort Key: derived_table1.grvar_1                                                                                                                                                     |
|              ->  XN HashAggregate  (cost=396.29..396.29 rows=1 width=30)                                                                                                                          |
|                    ->  XN Seq Scan on mv_tbl__auto_mv_2000__0 derived_table1  (cost=0.00..392.76 rows=470 width=30)                                                                               |
|                          Filter: ((grvar_2 < '1993-07-01'::date) AND (grvar_2 >= '1993-01-01'::date) AND ((grvar_1 = 'AIR'::bpchar) OR (grvar_1 = 'RAIL'::bpchar) OR (grvar_1 = 'TRUCK'::bpchar)))|
+---------------------------------------------------------------------------------------------------------------------------------------------------------------------------------------------------+

The AutoMV feature is transparent to users and is fully system managed. Therefore, unlike manual materialized views, AutoMVs are not visible to users and can’t be queried directly. They also don’t appear in any system tables like stv_mv_info or svl_mv_refresh_status.

Finally, if the AutoMV hasn’t been used for some time by the workload, it’s automatically dropped and the storage released. When we rerun the query after this, the runtime returns to the original 8 seconds because the query is now using the base tables. This can be confirmed by examining the explain plan.

This example illustrates that the AutoMV feature reduces the effort and time required to create and maintain materialized views.

Performance tests and results

To see how well AutoMVs work in practice, we ran tests using the 1 TB and 3 TB versions of the Cloud DW benchmark derived from TPC-H. This test consists of a power run script with 22 queries that is run three times with the results cache off. The tests were run with two different clusters: 4-node ra3.4xlarge and 2-node ra3.16xlarge with a concurrency of 1 and 5.

The Cloud DW benchmark is derived from the TPC-H benchmark. It isn’t comparable to published TPC-H results, because the results of our tests don’t fully comply with the specification.

The following table shows our results.

Suite Scale Cluster Concurrency Number Queries Elapsed Secs – AutoMV Off Elapsed Secs – AutoMV On % Improvement
TPC-H 1 TB 4 node ra3.4xlarge 1 66 1046 913 13%
TPC-H 1 TB 4 node ra3.4xlarge 5 330 3592 3191 11%
TPC-H 3 TB 2 node
ra3.16xlarge
1 66 1707 1510 12%
TPC-H 3 TB 2 node
ra3.16xlarge
5 330 6971 5650 19%

The AutoMV feature improved query performance by up to 19% without any manual intervention.

Summary

In this post, we first presented manual materialized views, their various features, and how to take advantage of them. We then looked into the effort and time required to design, create, and maintain materialized views to provide performance improvements in a data warehouse.

Next, we discussed how AutoMVs help overcome these challenges and seamlessly provide performance improvements for SQL queries and dashboards. We went deeper into the details of how AutoMVs work and discussed how ML algorithms determine which materialized views to create based on the predicted performance improvement and overall benefit they will provide compared to the cost required to create and maintain them. Then we covered some of the internal processing logic such as how predicate elevation creates generalized materialized views that can be used by a range of queries, not just the original query that triggered the materialized view creation.

Finally, we showed the results of a performance test on an industry benchmark where the AutoMV feature improved performance by up to 19%.

As we have demonstrated, automated materialized views provide performance improvements to a data warehouse without requiring any manual effort or specialized expertise. They transparently work in the background, optimizing your workload performance and automatically adapting when your workloads change.

Automated materialized views are enabled by default. We encourage you to monitor any performance improvements they have on your current clusters. If you’re new to Amazon Redshift, try the Getting Started tutorial and use the free trial to create and provision your first cluster and experiment with the feature.


About the Authors

Adam Gatt is a Senior Specialist Solution Architect for Analytics at AWS. He has over 20 years of experience in data and data warehousing and helps customers build robust, scalable and high-performance analytics solutions in the cloud.

Rahul Chaturvedi is an Analytics Specialist Solutions Architect at AWS. Prior to this role, he was a Data Engineer at Amazon Advertising and Prime Video, where he helped build petabyte-scale data lakes for self-serve analytics.

Automate your Amazon Redshift performance tuning with automatic table optimization

Post Syndicated from Adam Gatt original https://aws.amazon.com/blogs/big-data/automate-your-amazon-redshift-performance-tuning-with-automatic-table-optimization/

Amazon Redshift is a cloud data warehouse database that provides fast, consistent performance running complex analytical queries on huge datasets scaling into petabytes and even exabytes with Amazon Redshift Spectrum. Although Amazon Redshift has excellent query performance out of the box, with up to three times better price performance than other cloud data warehouses, you can further improve its performance by physically tuning tables in a data model. You do so by sorting table rows and rearranging rows across a cluster’s nodes. In Amazon Redshift, you implement this by setting sort and distribution key table attributes.

In the past, setting sort and distribution keys was an involved manual process that required a skilled resource to analyze a cluster’s workload and choose and implement the right keys for every table in the data model. More recently, Amazon Redshift Advisor provided suggestions, but these still had to be manually implemented. At AWS re:Invent 2020, Amazon Redshift announced a new feature to automate this process: automatic table optimization (ATO). ATO automatically monitors a cluster’s workload and table metadata, runs artificial intelligence algorithms over the observations, and implements sort and distribution keys online in the background, without requiring any manual intervention, and without interrupting any running queries.

In this post, I explain what sort and distribution keys are and how they improve query performance. I also explain how ATO works and how to enable and disable it. Then I outline the steps to set up and run a test of ATO on the Cloud DW benchmark derived from TPC-H using a 30 TB dataset. Finally, I present the results of a test that show ATO improved performance on this benchmark, without requiring any manual tuning.

Distribution and sort keys

In this section, I give a high-level overview of distribution and sort keys, then I explain how they’re automatically set by ATO.

Distribution keys

Amazon Redshift has a massively parallel processing (MPP) architecture, where data is distributed across multiple compute nodes (see the following diagram). This allows Amazon Redshift to run queries against each compute node in parallel, dramatically increasing query performance.

To achieve the best possible query performance, data needs to be distributed across the compute nodes in a way that is optimal to the specific workload that is being run on the cluster. For example, the optimal way to distribute data for tables that are commonly joined is to store rows with matching join keys on the same nodes. This enables Amazon Redshift to join the rows locally on each node without having to move data around the nodes. Data distribution also affects the performance of GROUP BY operations.

In Amazon Redshift, the data distribution pattern is determined by two physical table settings: distribution style (DISTSTYLE) and distribution key (DISTKEY).

Amazon Redshift has three distribution styles:

  • All – A copy of the entire table is replicated to every node
  • Even – The data in the table is spread evenly across the nodes in a cluster in a round-robin distribution
  • Key – The data is distributed across the nodes by the values in the column defined as the DISTKEY

If a table’s distribution style is key, then a single column in the table can be set as the DISTKEY.

Sort keys

Sort keys determine how rows are physically sorted in a table. Having table rows sorted improves the performance of queries with range-bound filters. Amazon Redshift stores the minimum and maximum values of each of its data blocks in metadata. When a query filters on a column (or multiple columns), the execution engine can use the metadata to skip blocks that are out of the filter’s range. For example, if a table has a sort key on the column created_date and a query has a filter WHERE created_date BETWEEN '2020-02-01' AND '2020-02-02', the execution engine can identify which blocks don’t contain data for February 1 and 2 given their metadata. The execution engine can then skip over these blocks, reducing the amount of data read and the number of rows that need to be materialized and processed, which improves the query performance.

Sort keys can be set on a single column in a table, or multiple columns (known as a compound sort key). They can also be interleaved.

Manually set distribution and sort keys

When you create a table in Amazon Redshift, you can manually set the distribution style and key, and the sort key in the CREATE TABLE DDL.

The following code shows two simplified example DDL statements for creating a dimension and fact table in a typical star schema model that manually set distribution and sort keys:

CREATE TABLE customer_dim (
   customer_key INT  
  ,customer_id INT
  ,first_name VARCHAR(100)
  ,last_name VARCHAR(100)
  ,join_date DATE) 
DISTKEY ( customer_key );

CREATE TABLE sale_fact (
   date_key DATE SORTKEY
  ,customer_key INT  
  ,product_key INT
  ,sale_amount DECIMAL(7,2))
DISTKEY ( customer_key );

Both tables have the customer_key column set as the distribution key (DISTKEY). When rows are inserted into these tables, Amazon Redshift distributes them across the cluster based on the values of the customer_key column. For example, all rows with a customer_key of 100 are moved to the same node, and likewise all rows with a customer_key of 101 are also moved to the same node (this may not be the same node as the key of 100), and so on for every row in the table.

In the sale_fact table, the date_key column has been set as the sort key (SORTKEY). When rows are inserted into this table, they’re physically sorted on the disk in the order of dates in the date_key column.

After data has been loaded into the tables, we can use the svv_table_info system view to see what keys have been set:

INSERT INTO customer_dim (customer_key, customer_id, first_name, last_name, join_date)
VALUES (100, 1001, 'John', 'Smith', SYSDATE);

INSERT INTO sale_fact (date_key, customer_key, product_key, sale_amount)
VALUES (SYSDATE, 100, 203, 98.76);

SELECT ti."table"      
      ,ti.diststyle      
      ,ti.sortkey1
FROM svv_table_info ti
WHERE ti.database = 'dev'
AND ti.schema = 'public'
AND ti."table" IN ('customer_dim', 'sale_fact')
ORDER BY 1;

The following table shows our results.

table diststyle sortkey1
customer_dim KEY(customer_key) AUTO(SORTKEY)
sale_fact KEY(customer_key) date_key

The sort key for customer_dim has been set to AUTO(SORTKEY), which I explain in the next section.

Now, if we populate these tables and run a business analytics query on them, like the following simplified query, we can see how the distribution and sort keys improve the performance of the query:

SELECT cd.customer_id      
     ,SUM(sf.sale_amount) AS sale_amount
FROM sale_fact sf
INNER JOIN customer_dim cd   
   ON sf.customer_key = cd.customer_key
WHERE sf.date_key BETWEEN '2021-03-01' AND '2021-03-07'
GROUP BY cd.customer_id;

The customer_dim table is joined to the sale_fact table on the customer_key column. Because both the table’s rows are distributed on the customer_key column, this means the related rows (such as customer_key of 100) are co-located on the same node, so when Amazon Redshift runs the query on this node, it doesn’t need to move related rows across the cluster from other nodes (a process known as redistribution) for the join. Also, there is a range bound filter on the date_key column (WHERE sf.date_key BETWEEN '2021-03-01' AND '2021-03-07'). Because there is a sort key on this column, the Amazon Redshift execution engine can more efficiently skip blocks that are out of the filter’s range.

Automatically set distribution and sort keys

Amazon Redshift ATO is enabled by default. When you create a table and don’t explicitly set distribution or sort keys in the CREATE TABLE DDL (as in the previous example), the following happens:

  • The distribution style is set to AUTO(ALL) for small tables and AUTO(EVEN) for large tables.
  • The sort key is set to AUTO(SORTKEY). This means no sort key is currently set on the table.

The AUTO keyword indicates the style and key are being managed by ATO.

For example, we can create a table with no keys explicitly defined:

CREATE TABLE customer_dim (
   customer_key INT  
  ,customer_id INT  
  ,first_name VARCHAR(100)
  ,last_name VARCHAR(100)
  ,join_date DATE);

Then we insert some data and look at the results from svv_table_info:

INSERT INTO customer_dim (customer_key, customer_id, first_name, last_name, join_date)
VALUES (100, 1001, 'John', 'Smith', SYSDATE);

SELECT ti."table"      
      ,ti.diststyle      
      ,ti.sortkey1
FROM svv_table_info ti
WHERE ti.database = 'dev'
AND ti.schema = 'public'
AND ti."table" IN ('customer_dim', 'sale_fact')
ORDER BY 1;

The following table shows our results.

table diststyle sortkey1
customer_dim AUTO(ALL) AUTO(SORTKEY)

The distribution and sort key are being managed by ATO, and the distribution style has already been set to ALL.

ATO now monitors queries that access customer_dim and analyzes the table’s metadata, and makes several observations. An example of an observation is the amount of data that is moved across nodes to perform a join, or the number of times a column was used in a range-scan filter that would have benefited from sorted data.

ATO then analyzes the observations using AI algorithms to determine if the introduction or change of a distribution or sort key will improve the workload’s performance.

For distribution keys, Amazon Redshift constructs a graph representation of the SQL join history, and uses this graph to calculate the optimal table distribution to reduce data transfer across nodes when joining tables (see the following diagram). You can find more details of this process in the scientific paper Fast and Effective Distribution-Key Recommendation for Amazon Redshift.

For sort keys, a table’s queries are monitored for columns that are frequently used in filter and join predicates. A column is then chosen based on the frequency and selectivity of those predicates.

When an optimal configuration is found, ATO implements the new keys in the background, redistributing rows across the cluster and sorting tables. For sort keys, another Amazon Redshift feature, automatic table sort, handles physically sorting the rows in the table, and maintains the sort order over time.

This whole process, from monitoring to implementation, completes in hours to days, depending on the number of queries that are run.

Convert existing tables to automatic optimization

You can enable ATO on existing tables by setting the distribution style and sort key to AUTO with the ALTER TABLE statement. For example:

ALTER TABLE customer_dim ALTER DISTSTYLE AUTO;

ALTER TABLE customer_dim ALTER SORTKEY AUTO;

If the table has existing sort and/or distribution keys that were explicitly set, then currently they will be preserved and won’t be changed by ATO.

Disable automatic table optimization

To disable ATO on a table, you can explicitly set a distribution style or key. For example:

ALTER TABLE customer_dim ALTER DISTSTYLE ALL;

ALTER TABLE customer_dim ALTER DISTSTYLE EVEN;

ALTER TABLE customer_dim ALTER DISTKEY customer_id;

You can then explicitly set a sort key or set the sort key to NONE:

ALTER TABLE customer_dim ALTER SORTKEY (join_date);

ALTER TABLE customer_dim ALTER SORTKEY NONE;

Performance test and results

Cloud DW benchmark derived from TPC-H

TPC-H is an industry standard benchmark designed to measure ad hoc query performance for business analytics workloads. It consists of 8 tables and 22 queries designed to simulate a real-world decision support system. For full details of TPC-H, see TPC BENCHMARK H.

The following diagram shows the eight tables in the TPC-H data model.

The Cloud DW Benchmark is derived from TPC-H and uses the same set of tables, queries, and a 30 TB dataset in Amazon Simple Storage Service (Amazon S3), which was generated using the official TPC-H data generator. This provides an easy way to set up and run the test on your own Amazon Redshift cluster.

Because the Cloud DW benchmark is derived from the TPC-H benchmark, it isn’t comparable to published TPC-H results, because the results of our tests don’t fully comply with the specification. This post uses the Cloud DW benchmark.

Set up the test

The following steps outline how to set up the TPC-H tables on an Amazon Redshift cluster, import the data, and set up the Amazon Redshift scheduler to run the queries.

Create an Amazon Redshift cluster

We recommend running this test on a five-node ra3.16xlarge cluster. You can run the test on a smaller cluster, but the query run times will be slower, and you may need to adjust the frequency the test queries are run at, such as every 4 hours instead of every 3 hours. For more information about creating a cluster, see Step 2: Create a sample Amazon Redshift cluster. We also recommend creating the cluster in the us-east-1 Region to reduce the amount of time required to copy the test data.

Set up permissions

For this test, you require permissions to run the COPY command on Amazon Redshift to load the test data, and permissions on the Amazon Redshift scheduler to run the test queries.

AWS Identity and Access Management (IAM) roles grant permissions to AWS services. The following steps describe how to create and set up two separate roles with the required permissions.

The RedshiftCopyRole role grants Amazon Redshift read-only access on Amazon S3 so it can copy the test data.

  1. On the IAM console, on the Role page, create a new role called RedshiftCopyRole using Redshift – Customizable as the trusted entity use case.
  2. Attach the policyamazonS3ReadOnlyAccess.

The RedshiftATOTestingRole role grants the required permissions for setting up and running the Amazon Redshift scheduler.

  1. On the IAM console, create a new role called RedshiftATOTestingRole using Redshift – Customizable as the trusted entity use case.
  2. Attach the following policies:
    1. amazonRedshiftDataFullAccess
    2. amazonEventBridgeFullAccess
  3. Create a new policy called RedshiftTempCredPolicy with the following JSON and attach it to the role. Replace {DB_USER_NAME} with the name of the Amazon Redshift database user that runs the query.
{
	"Version": "2012-10-17",
	"Statement": [
		{
			"Sid": "UseTemporaryCredentials",
			"Effect": "Allow",
			"Action": "redshift:GetClusterCredentials",
			"Resource": [
			"arn:aws:redshift:*:*:dbuser:*/{DB_USER_NAME}"
			]
		}
	]
}

This policy assigns temporary credentials to allow the scheduler to log in to Amazon Redshift.

  1. Check the role has the policies RedshiftTempCredPolicy, amazonEventBridgeFullAccess, and amazonEventBridgeFullAccess attached.
  2. Now edit the role’s trust relationships and add the following policy:
   {
      "Sid": "S1",
      "Effect": "Allow",
      "Principal": {
        "Service": "events.amazonaws.com"
      },
      "Action": "sts:AssumeRole"
    }

The role should now have the trusted entities as shown in the following screenshot.

Now you can attach the role to your cluster.

  1. On the Amazon Redshift console, choose your test cluster.
  2. On the Properties tab, choose Cluster permissions.
  3. Select Manage IAM roles and attach RedshiftCopyRole.

It may take a few minutes for the roles to be applied.

The IAM user that sets up and runs the Amazon Redshift scheduler also needs to have the right permissions. The following steps describe how to assign the required permissions to the user.

  1. On the IAM console, on the Users page, choose the user to define the schedule.
  2. Attach the policy amazonEventBridgeFullAccess directly to the user.
  3. Create a new policy called AssumeATOTestingRolePolicy with the following JSON and attach it to the user. Replace {AWS ACCOUNT_NUMBER} with your AWS account number.
{
	"Version": "2012-10-17",
	"Statement": [
		{
		"Sid": "AssumeIAMRole",
		"Effect": "Allow",
		"Action": "sts:AssumeRole",
		"Resource": "arn:aws:iam::{AWS ACCOUNT_NUMBER}:role/RedshiftATOTestingRole"
		}
	]
}

This policy allows the user to assume the role RedshiftATOTestingRole, which has required permissions for the scheduler.

The user should now have the AssumeATOTestingRolePolicy and amazonEventBridgeFullAccess policies directly attached.

Create the database tables and copy the test data

The following script is an untuned version of the TPC-H ddl.sql file that creates all required tables for the test and loads them with the COPY command. To untune the tables, all the sort and distribution keys have been removed. The original tuned version is available on the amazon-redshift-utils GitHub repo.

Copy the script into your Amazon Redshift SQL client of choice, replace the <AWS ACCOUNT_NUMBER> string with your AWS account number, and run the script. On a five-node ra3.16xlarge cluster in the us-east-1 Region, the copy should take approximately 3 hours.

The script creates tables in the default schema public. For this test, I have created a database called tpch_30tb, which the script is run on.

ddl_untuned.sql

When the copy commands have finished, run the following queries to see the table’s physical settings:

SELECT ti."table"      
      ,ti.tbl_rows      
      ,ti.size      
      ,ti.diststyle      
      ,ti.sortkey1      
      ,ti.sortkey_num      
      ,ti.encoded
FROM svv_table_info ti
WHERE ti.database = 'tpch_30tb'
AND ti.schema = 'public'
ORDER BY ti.size;

The output of this query shows some optimizations have already been implemented by the COPY command. The smaller tables have the diststyle set to ALL (replicating all rows across all data nodes), and the larger tables are set to EVEN (a round-robin distribution of rows across the data nodes). Also, the encoding (compression) has been set for all the tables.

table tbl_rows size diststyle sortkey1 sortkey_num encoded
region 5 30 AUTO(ALL) AUTO(SORTKEY) 0 Y, AUTO(ENCODE)
nation 25 35 AUTO(ALL) AUTO(SORTKEY) 0 Y, AUTO(ENCODE)
supplier 300000000 25040 AUTO(EVEN) AUTO(SORTKEY) 0 Y, AUTO(ENCODE)
part 6000000000 316518 AUTO(EVEN) AUTO(SORTKEY) 0 Y, AUTO(ENCODE)
customer 4500000000 399093 AUTO(EVEN) AUTO(SORTKEY) 0 Y, AUTO(ENCODE)
partsupp 24000000000 1521893 AUTO(EVEN) AUTO(SORTKEY) 0 Y, AUTO(ENCODE)
orders 45000000000 2313421 AUTO(EVEN) AUTO(SORTKEY) 0 Y, AUTO(ENCODE)
lineitem 179997535081 8736977 AUTO(EVEN) AUTO(SORTKEY) 0 Y, AUTO(ENCODE)
SELECT td.tablename      
      ,td."column"      
      ,td.encoding
FROM pg_table_def td
WHERE td.tablename = 'customer'
AND   td.schemaname = 'public';

This output shows the encoding type set for each column of the customer table. Because Amazon Redshift is a columnar database, the compression can be set differently for each column, as opposed to a row-based database, which can only set compression at the row level.

tablename column encoding
customer c_custkey az64
customer c_name lzo
customer c_address lzo
customer c_nationkey az64
customer c_phone lzo
customer c_acctbal az64
customer c_mktsegment lzo
customer c_comment lzo

Schedule the test queries

The TPC-H benchmark uses a set of 22 queries that have a wide variation of complexity, amount of data scanned, answer set size, and elapsed time. For this test, the queries are run in serial from a single script file query0.sql. Because Query 11 (Q11) returns a large number of rows and the goal of this test was to measure execution time, this benchmark included a limit 1000 statement on the query to ensure the time being measured was predominantly execution time, rather than return time. This script is available on the amazon-redshift-utils GitHub repo under the src/BlogContent/ATO directory.

At the top of the script, enable_result_cache_for_session is set to off. This forces Amazon Redshift to rerun the queries on each test run, and not just return the query results from the results cache.

Use the following steps to schedule the test script:

  1. Download query0.sql from GitHub.
  2. Make sure the IAM user has been granted the necessary permissions (set in a previous step).
  3. On the Amazon Redshift console, open the query editor.
  4. If the current tab is blank, enter any text to enable the Schedule button.
  5. Choose Schedule.
  6. Under Scheduler permissions for IAM role, specify the IAM role you created in a previous step (RedshiftATOTestingRole).
  7. For Cluster, choose your cluster.
  8. Enter values for Database name and Database user.
  9. Under Query information, for Scheduled query name, enter tpch-30tb-test.
  10. Choose Upload Query and choose the query0.sql file you downloaded in a previous step.
  11. Under Scheduling options, change Repeat every: to 3 hours.

If you have a smaller cluster, each test run requires more time. To determine the amount of time needed, run query0.sql once to determine the runtime and add an hour for ATO to perform its processing.

  1. For Repeat on:, select Everyday.
  2. Choose Save changes.

The test queries are now set to run in the background at the given schedule. Leave the schedule running for approximately 48 hours to run a full test.

Check the table changes

Amazon Redshift automatically monitors the workload on the cluster and uses AI algorithms to calculate the optimal sort and distribution keys. Then ATO implements the table changes online, without disrupting running queries.

The following queries show the changes ATO has made and when they were made:

SELECT ti."table"      
      ,ti.diststyle      
      ,ti.sortkey1
FROM svv_table_info ti
WHERE ti.database = 'tpch_30tb'
AND ti.schema = 'public'
ORDER BY ti."table";

The following table shows our output.

table diststyle sortkey1
customer AUTO(KEY(c_custkey)) AUTO(SORTKEY)
lineitem AUTO(KEY(l_orderkey)) AUTO(SORTKEY(l_shipdate))
nation AUTO(ALL) AUTO(SORTKEY)
orders AUTO(KEY(o_orderkey)) AUTO(SORTKEY(o_orderdate))
part AUTO(KEY(p_partkey)) AUTO(SORTKEY(p_type))
partsupp AUTO(KEY(ps_partkey)) AUTO(SORTKEY)
region AUTO(ALL) AUTO(SORTKEY)
supplier AUTO(KEY(s_suppkey)) AUTO(SORTKEY(s_nationkey))

Now we can see all the distribution and sort keys that have been set by ATO.

svl_auto_worker_action is an Amazon Redshift system view that allows us to see a log of the changes made by ATO:

SELECT st."table"      
      ,wa.type      
      ,wa.status      
      ,wa.eventtime         
      ,wa.previous_state
FROM svl_auto_worker_action wa
INNER JOIN svv_table_info st   
   ON wa.table_id = st.table_id
ORDER BY eventtime;

Data in the following table has been abbreviated to save space.

table type status eventtime previous_state
supplier distkey Start 2021-06-25 04:16:54.628556
supplier distkey Complete: 100% 2021-06-25 04:17:13.083246 DIST STYLE: diststyle even;
part distkey Start 2021-06-25 04:20:13.087554
part distkey Checkpoint: progress 11.400000% 2021-06-25 04:20:36.626592
part distkey Start 2021-06-25 04:20:46.627278
part distkey Checkpoint: progress 22.829400% 2021-06-25 04:21:06.137430
part distkey Start 2021-06-25 04:23:17.421084
part distkey Checkpoint: progress 80.055012% 2021-06-25 04:23:36.653153
part distkey Start 2021-06-25 04:23:46.653869
part distkey Complete: 100% 2021-06-25 04:24:47.052317 DIST STYLE: diststyle even;
orders distkey Start 2021-06-25 04:27:47.057053
orders distkey Checkpoint: progress 1.500000% 2021-06-25 04:28:03.040231
orders distkey Start 2021-06-25 04:28:13.041467
orders distkey Checkpoint: progress 2.977499% 2021-06-25 04:28:28.049088
orders distkey Start 2021-06-25 04:57:46.254614
orders distkey Checkpoint: progress 97.512168% 2021-06-25 04:58:07.643284
orders distkey Start 2021-06-25 04:58:17.644326
orders distkey Complete: 100% 2021-06-25 05:01:44.110385 DIST STYLE: diststyle even;
customer distkey Start 2021-06-25 05:04:44.115405
customer distkey Checkpoint: progress 9.000000% 2021-06-25 05:04:56.730455
customer distkey Start 2021-06-25 05:05:06.731523
customer distkey Checkpoint: progress 18.008868% 2021-06-25 05:05:19.295817
customer distkey Start 2021-06-25 05:08:03.054506
customer distkey Checkpoint: progress 90.127292% 2021-06-25 05:08:14.604731
customer distkey Start 2021-06-25 05:08:24.605273
customer distkey Complete: 100% 2021-06-25 05:09:19.532081 DIST STYLE: diststyle even;
partsupp distkey Start 2021-06-26 04:34:14.548875
partsupp distkey Checkpoint: progress 2.300000% 2021-06-26 04:34:33.730693
partsupp distkey Start 2021-06-26 04:34:43.731784
partsupp distkey Checkpoint: progress 4.644800% 2021-06-26 04:34:59.185233
partsupp distkey Start 2021-06-26 04:52:42.980895
partsupp distkey Checkpoint: progress 95.985631% 2021-06-26 04:52:59.498615
partsupp distkey Start 2021-06-26 04:53:09.499277
partsupp distkey Complete: 100% 2021-06-26 04:55:55.539695 DIST STYLE: diststyle even;
lineitem distkey Start 2021-06-26 04:58:55.544631
lineitem distkey Checkpoint: progress 0.400000% 2021-06-26 04:59:18.864780
lineitem distkey Start 2021-06-26 04:59:28.865949
lineitem distkey Checkpoint: progress 0.798400% 2021-06-26 04:59:46.540671
lineitem distkey Start 2021-06-26 08:31:43.484178
lineitem distkey Checkpoint: progress 99.525163% 2021-06-26 08:32:05.838456
lineitem distkey Start 2021-06-26 08:32:15.839239
lineitem distkey Complete: 100% 2021-06-26 08:41:17.083716 DIST STYLE: diststyle even;
supplier sortkey Start 2021-06-26 16:17:50.458629
supplier sortkey Complete: 100% 2021-06-26 16:17:51.381247 SORTKEY: None;
part sortkey Start 2021-06-26 16:17:51.381595
part sortkey Complete: 100% 2021-06-26 16:17:52.253288 SORTKEY: None;
orders sortkey Start 2021-06-26 16:17:52.253648
orders sortkey Complete: 100% 2021-06-26 16:17:53.164057 SORTKEY: None;
lineitem sortkey Start 2021-06-26 16:17:53.164408
lineitem sortkey Complete: 100% 2021-06-26 16:17:54.289620 SORTKEY: None;

We can see when each change was implemented by ATO. First, a DISTKEY was added to the supplier table at 4:17 AM on June 25. Because this table is relatively small (300 million rows), ATO was able to apply the DISTKEY in one step.

Next, ATO started implementing a DISTKEY on the part table at 4:20 AM. For DISTKEY changes on large tables (part has 6 billion rows), ATO creates a copy of the source table in the background (a shadow table) and then copies data from the source table into the shadow table, redistributing the data according to the new DISTKEY. This process is done in batches known as checkpoints. After all the data has been copied, the metadata is updated, swapping the shadow table with the source table. There were seven checkpoints for part, and the full conversion was completed at 4:24 AM.

Then from 4:27 AM on June 25 until 4:55 AM on June 26, distribution keys were implemented on orders, customer, and partsupp. The last DISTKEY was then implemented on largest table in the model lineitem (179 billion rows), finishing at 8:41 AM. Because this table was so large, there were 261 checkpoints.

Finally, sort keys on supplier, part, orders and lineitem were created at 4:17 PM on June 26.

View the test results

Now we look at the output of the test and see what impact ATO’s changes had on the overall performance.

The following line graph shows the runtime of the query0.sql script over time. The vertical reference lines show when ATO changed a DISTKEY or SORTKEY. The first distribution keys were created before the test had actually started. This is because ATO was able to use table properties such as constraints to determine appropriate distribution keys. Over time, ATO may change these distribution keys based on workload observations.

The rest of the distribution keys were then added, and lastly the sort keys, reducing the runtime from approximately 4,750 seconds to 3,597.

The data for this graph is taken from the following query:

SELECT q.pid     
      ,COUNT(DISTINCT q.query) num_queries     
      ,MIN(q.starttime) starttime     
      ,MAX(q.endtime) endtime     
      ,DATEDIFF(SECOND, MIN(q.starttime), MAX(q.endtime)) elapsed_sec     
      ,SUM(DATEDIFF(SECOND, c.starttime, c.endtime)) compile_time     
      ,DATEDIFF(SECOND, MIN(q.starttime), MAX(q.endtime)) - SUM(DATEDIFF(SECOND, c.starttime, c.endtime)) exec_time
FROM stl_query q
INNER JOIN svl_compile c   
   ON q.query = c.query
WHERE q.userid > 1  
AND q.label LIKE 'RSPERF TPC-H%'
GROUP BY q.pid
ORDER BY starttime ASC;

The following table shows our results.

pid num_queries starttime endtime elapsed_sec elapsed_hour compile_time_sec exec_time_sec % improvement
1758 32 2021-06-25 12:00:02.475253 2021-06-25 13:39:58.554643 5996 1.67 35 5961
25569 32 2021-06-25 15:00:02.699906 2021-06-25 16:18:54.603617 4732 1.31 5 4727
4226 32 2021-06-25 18:00:02.113902 2021-06-25 19:19:12.088981 4750 1.32 0 4750 BASELINE
35145 32 2021-06-25 21:00:02.625849 2021-06-25 22:19:28.852209 4766 1.32 0 4766 0.34%
12862 32 2021-06-26 00:00:02.226747 2021-06-26 01:19:20.345285 4758 1.32 0 4758 0.17%
36919 32 2021-06-26 03:00:01.794476 2021-06-26 04:18:54.110546 4733 1.31 0 4733 -0.36%
11631 32 2021-06-26 06:00:02.300287 2021-06-26 07:19:52.082589 4790 1.33 21 4769 0.40%
33833 32 2021-06-26 09:00:02.281647 2021-06-26 10:05:40.694966 3938 1.09 27 3911 -17.66%
3830 32 2021-06-26 12:00:01.873699 2021-06-26 13:06:37.702817 3996 1.11 0 3996 -15.87%
24134 32 2021-06-26 15:00:02.203329 2021-06-26 16:06:24.548732 3982 1.11 0 3982 -16.17%
48465 32 2021-06-26 18:00:02.215612 2021-06-26 19:13:07.665636 4385 1.22 6 4379 -7.81%
26016 32 2021-06-26 21:00:02.298997 2021-06-26 22:05:38.413672 3936 1.09 0 3936 -17.14%
2076 32 2021-06-27 00:00:02.297759 2021-06-27 01:01:09.826855 3667 1.02 0 3667 -22.80%
26222 32 2021-06-27 03:00:02.485152 2021-06-27 04:00:39.922720 3637 1.01 0 3637 -23.43%
1518 32 2021-06-27 06:00:02.075845 2021-06-27 07:00:33.151602 3631 1.01 0 3631 -23.56%
23629 32 2021-06-27 09:00:01.776684 2021-06-27 10:00:08.432630 3607 1 0 3607 -24.06%
42169 32 2021-06-27 12:00:02.341020 2021-06-27 13:00:13.290535 3611 1 0 3611 -23.98%
13299 32 2021-06-27 15:00:02.394744 2021-06-27 16:00:00.383514 3598 1 1 3597 -24.27%

We take a baseline measurement of the runtime on the third run, which ensures any additional compile time is excluded from the test. When we look at the test runs from midnight on June 26 (after ATO had made its changes), we can see the performance improvement.

Clean up

After you have viewed the test results and ATO changes, be sure to decommission your cluster to avoid having to pay for unused resources. Also, delete the IAM policy RedshiftTempCredPolicy and the IAM roles RedshiftCopyRole and RedshiftATOTestingRole.

Cloud DW benchmark derived from TPC-H 3 TB results

We ran the same test using the 3 TB version of the Cloud DW benchmark derived from TPC-H. It ran on a 10-node ra3.4xlarge cluster with query0.sql run every 30 minutes. The results of the test showed ATO achieved a significant increase in performance of up to 25%.

Summary

With automatic table optimization, Amazon Redshift has further increased its automation capabilities to cover query performance tuning in addition to administration tasks.

In this post, I explained how distribution and sort keys improve performance and how they’re automatically set by ATO. I showed how ATO increased performance by up to 24% on a 30 TB industry-standard benchmark with no manual tuning required. I also outlined the steps for setting up the same test yourself.

I encourage you to try out ATO by setting up an Amazon Redshift cluster and running the test, or enabling ATO on existing and new tables on your current cluster and monitoring the results.


About the Author

Adam Gatt is a Senior Specialist Solution Architect for Analytics at AWS. He has over 20 years of experience in data and data warehousing and helps customers build robust, scalable and high-performance analytics solutions in the cloud.