Post Syndicated from Amit Gaur original https://aws.amazon.com/blogs/security/enhance-tls-inspection-with-sni-session-holding-in-aws-network-firewall/
AWS Network Firewall is a managed firewall service that filters and controls network traffic in Amazon Virtual Private Cloud (Amazon VPC). Unlike traditional network controls such as security groups or network access control lists (NACLs), Network Firewall can inspect and make decisions based on information from higher layers of the OSI model, including the Transport through Application layers. Furthermore, you can use the TLS inspection capability of Network Firewall to create firewall rules that match the content of encrypted TLS traffic. Network Firewall decrypts the traffic using your configured certificate and matches the decrypted payload against the rules in the firewall policy.
This post introduces Server Name Indication (SNI) session holding, which enhances TLS inspection by stopping TCP or TLS establishment packets from reaching the destination server until TLS inspection rules for SNI have been applied. When SNI is enabled, Network Firewall will not initiate an outbound TCP connection to the target until it has received the client hello and matched its domain information sent through SNI against firewall rules. The TCP session between the firewall and the upstream server is only initiated after the firewall validates traffic to that domain. This offers you additional security controls on outbound traffic with minimal latency and performance overheads, helping protect against malicious targets.
Network Firewall TLS inspection prior to SNI session holding
When TLS inspection is enabled, Network Firewall acts as an intermediary between the client and server, maintaining separate connections with each endpoint. Throughout this process, Network Firewall evaluates outbound traffic against configured rules to determine whether the traffic should be allowed to exit the firewall.As shown in Figure 1, the steps prior to availability of SNI session holding were:
- The client creates a TCP connection, and Network Firewall evaluates the stateless rules to determine if the traffic is allowed. If not, the connection is terminated.
- Network Firewall creates a TCP Connection to the destination server.
- The client sends a
ClientHellomessage, including SNI information, to Network Firewall. The firewall validates that the SNI is valid, otherwise the connection is terminated. - Network Firewall forwards the
ClientHellomessage to the destination server. - The destination server responds with a
ServerHellomessage and its certificate. - Network Firewall validates the certificates downloaded from the destination server.
- At this point, the server name indication is validated against the certificate subject name.
- Network Firewall forwards the server’s certificate to the client and completes the TLS connection with the client.
- The client encrypts the application payload using the session keys it negotiated during TLS handshake and sends it to Network Firewall.
- Network Firewall decrypts the traffic, uses its stateful engine to evaluate rules against the traffic, and determines if it is allowed.
- If traffic is allowed, Network Firewall re-encrypts the application layer payload with the destination server’s session keys and forwards it to the destination server.
- The destination server sends back response data to Network Firewall.
- The Network Firewall stateful engine analyzes the destination server’s response.
- Network Firewall forwards the server response to the client. The communication continues until the client or destination server terminates the connection.
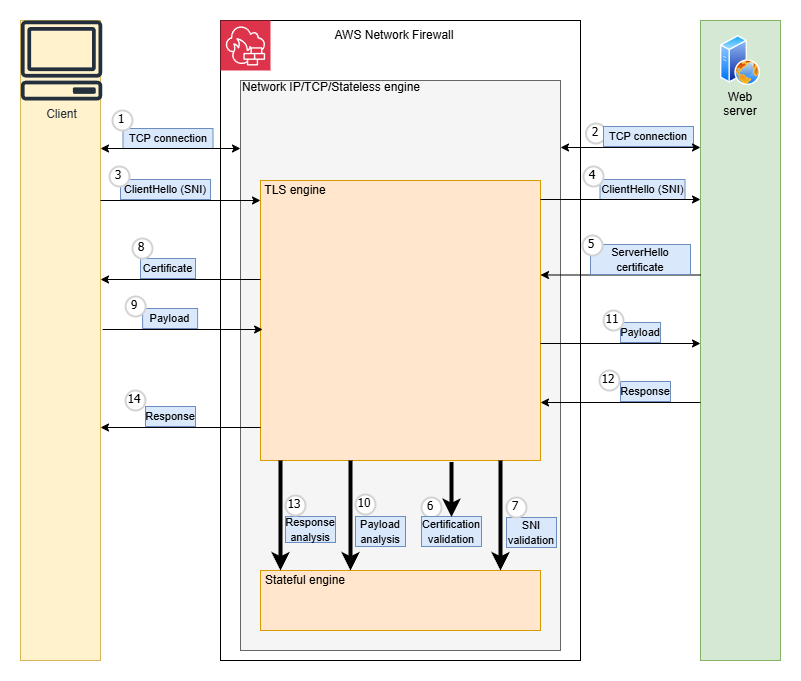
Figure 1: Steps prior to availability of SNI session holding
With the current sequence of traffic inspection, the TCP connection is established before the TLS SNI field is evaluated, which could lead to a server learning about a connection before the firewall inspects the SNI.
For example, when customers configure rules to reject traffic based on TLS SNI fields (such as example.com), they expect these connections to be blocked before opening a connection to the destination server and before data transmission occurs. However, because of the inherent protocol sequence, TCP connections are briefly established before SNI rule validation takes place. This processing order creates a narrow window where sophisticated threat actors could potentially attempt to circumvent data exfiltration prevention controls, even with properly configured SNI-based blocking rules.
Session holding addresses this concern so that the traffic originating from within VPCs cannot connect to destination servers until Network Firewall verifies the TLS SNI.
How TLS inspection works with session holding
SNI session holding implements a two-step validation process. First, the firewall examines the TLS layer and validates the SNI when the client sends the TLS client hello message. After the message is approved, Network Firewall allows the connection to the destination server, permitting encrypted upper-layer protocols like HTTP or SMTP to initiate their negotiations. This approach creates a distinct separation between TLS validation and protocol inspection, where protocol examination only occurs after successful TLS handshake authorization.As shown in Figure 2, the steps in this scenario with SNI session holding are:
Note: Steps 2–5 are part of SNI session holding.
- The client creates a TCP connection, and Network Firewall evaluates the stateless rules to determine if the traffic is allowed. If not, the connection is terminated.
- The Client sends a
ClientHellomessage including SNI information to Network Firewall. Network Firewall performs validation of the SNI. - The firewall evaluates the TLS inspection rules, including the SNI rules, to determine if the traffic is allowed. If not, the connection is terminated.
- Network Firewall creates a TCP connection to the destination server.
- Network Firewall forwards the
ClientHellomessage to the destination server. - The destination server responds with a
ServerHellomessage and its certificate. - Network Firewall validates the certificates downloaded from the destination server.
- Network Firewall forwards the server’s certificate to the client and completes the TLS connection with the client.
- The client encrypts the application payload using the session keys it negotiated during TLS handshake and sends it to Network Firewall.
- Network Firewall decrypts the traffic, uses its stateful engine to evaluate rules against the traffic, and determines if it is allowed.
- If traffic is allowed, Network Firewall re-encrypts the application layer payload with the destination server’s session keys and forwards it to destination server.
- The destination server sends back response data to Network Firewall.
- Network Firewall stateful engine analyzes the destination server response.
- Network Firewall forwards the server response to the client. The communication continues until the client, or the destination server terminates the connection.
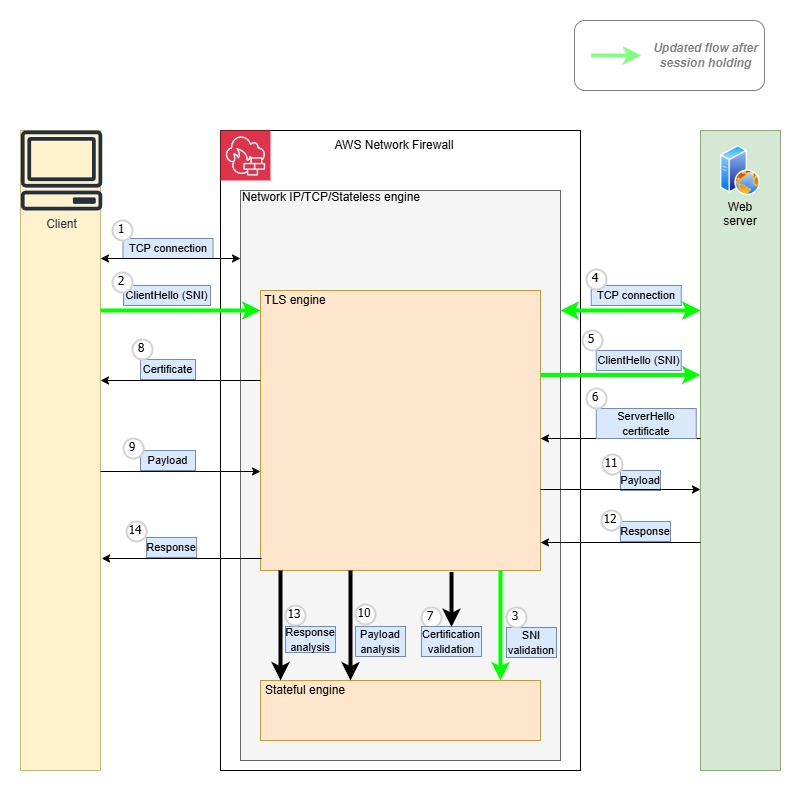
Figure 2: Steps after session holding
Getting started
Session holding can be enabled while creating a TLS inspection configuration directly within a Network Firewall policy using the AWS Management Console, AWS Command Line Interface (AWS CLI), or AWS SDK.
Prerequisites
To get started setting up a Network Firewall policy with session holding, visit the Network Firewall console or see the AWS Network Firewall Developers Guide. Session holding is supported in AWS Regions where Network Firewall is available today, including the AWS GovCloud (US) Regions and China Regions.
If this is your first time using Network Firewall, make sure to complete the following prerequisites. If you already have a firewall and TLS inspection configuration, you can skip this section.
Enable session holding
To enable session holding, follow the steps to create a firewall policy. On the step to Add TLS Inspection configuration, you will have an option to enable session holding by selecting the box as shown in Figure 3.
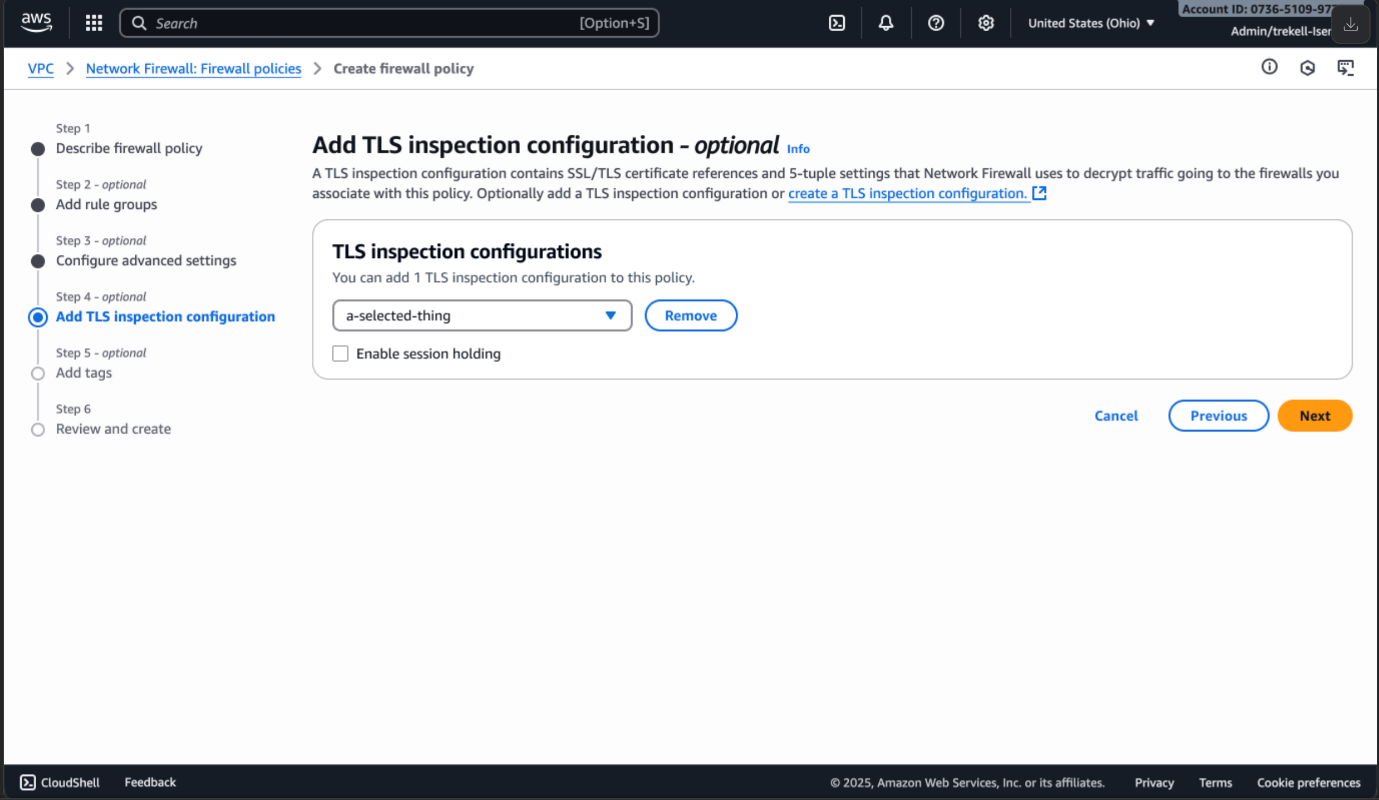
Figure 3: Enable session holding
After adding the TLS inspection configuration and selecting the box to enable session holding, continue to create the new firewall policy and then associate this policy to your firewall.
If you have an existing policy that is attached to a TLS inspection configuration, choose Manage TLS Inspection Configuration on your firewall policy.

Figure 4: TLS inspection configuration
This will provide the option to enable session holding as shown in figure 3.
Pricing
SNI session holding is included in the cost of TLS advanced inspection. For TLS advanced inspection pricing, see AWS Network Firewall pricing.
Considerations
When enabling the session holding, note the following considerations:
- Keywords: Session holding is only applicable to Suricata rules using the
TLS.SNIkeyword. It does not apply to rules using other TLS application keywords, such asTLS.CERTorTLS.VERSION. - Performance: Because TCP connection establishment packets are held until the SNI validation is complete, session holding might introduce latency in the TCP connection establishment. You’ll notice the impact only when there is a surge in new TCP connections being inspected by Network Firewall with TLS inspection enabled.
- Compatibility:
TLS.SNItakes priority overhttp.hostrules when session holding is enabled. When disabled, the traffic can match rules based on thehttp.hostkeyword andtls.snikeyword simultaneously, resulting in an outcome defined by the combination of the actions in these two types of rules. However, when this session holding is enabled, this traffic can only match the rule withTLS.SNIkeyword and the rule withhttp.hostkeyword is applied only when the decrypted traffic has not matched otherTLS.SNI-based pass rules.
Conclusion
As a preventive measure, this session holding helps make sure that SNI validation happens before a connection is established with the destination server, avoiding even initial contact with potentially malicious endpoints. For more information, see What is AWS Network Firewall?
If you have feedback about this post, submit comments in the Comments section below.


