All posts by Aniket Jiddigoudar

Exploring new ETL and ELT capabilities for Amazon Redshift from the AWS Glue Studio visual editor

Post Syndicated from Aniket Jiddigoudar original https://aws.amazon.com/blogs/big-data/exploring-new-etl-and-elt-capabilities-for-amazon-redshift-from-the-aws-glue-studio-visual-editor/

In a modern data architecture, unified analytics enable you to access the data you need, whether it’s stored in a data lake or a data warehouse. In particular, we have observed an increasing number of customers who combine and integrate their data into an Amazon Redshift data warehouse to analyze huge data at scale and run complex queries to achieve their business goals.

One of the most common use cases for data preparation on Amazon Redshift is to ingest and transform data from different data stores into an Amazon Redshift data warehouse. This is commonly achieved via AWS Glue, which is a serverless, scalable data integration service that makes it easier to discover, prepare, move, and integrate data from multiple sources. AWS Glue provides an extensible architecture that enables users with different data processing use cases, and works well with Amazon Redshift. At AWS re:Invent 2022, we announced support for the new Amazon Redshift integration with Apache Spark available in AWS Glue 4.0, which provides enhanced ETL (extract, transform, and load) and ELT capabilities with improved performance.

Today, we are pleased to announce a new and enhanced visual job authoring capabilities for Amazon Redshift ETL and ELT workflows on the AWS Glue Studio visual editor. The new authoring experience gives you the ability to:

  • Get started faster with Amazon Redshift by directly browsing Amazon Redshift schemas and tables from the AWS Glue Studio visual interface
  • Flexible authoring through native Amazon Redshift SQL support as a source or custom preactions and postactions
  • Simplify common data loading operations into Amazon Redshift through new support for INSERT, TRUNCATE, DROP, and MERGE commands

With these enhancements, you can use existing transforms and connectors in AWS Glue Studio to quickly create data pipelines for Amazon Redshift. No-code users can complete end-to-end tasks using only the visual interface, SQL users can reuse their existing Amazon Redshift SQL within AWS Glue, and all users can tune their logic with custom actions on the visual editor.

In this post, we explore the new streamlined user interface and dive deeper into how to use these capabilities. To demonstrate these new capabilities, we showcase the following:

  • Passing a custom SQL JOIN statement to Amazon Redshift
  • Using the results to apply an AWS Glue Studio visual transform
  • Performing an APPEND on the results to load them into a destination table

Set up resources with AWS CloudFormation

To demonstrate the AWS Glue Studio visual editor experience with Amazon Redshift, we provide an AWS CloudFormation template for you to set up baseline resources quickly. The template creates the following resources for you:

  • An Amazon VPC, subnets, route tables, an internet gateway, and NAT gateways
  • An Amazon Redshift cluster
  • An AWS Identity and Access Management (IAM) role associated with the Amazon Redshift cluster
  • An IAM role for running the AWS Glue job
  • An Amazon Simple Storage Service (Amazon S3) bucket to be used as a temporary location for Amazon Redshift ETL
  • An AWS Secrets Manager secret that stores the user name and password for the Amazon Redshift cluster

Note that at the time of writing this post, Amazon Redshift MERGE is in preview, and the cluster created is a preview cluster.

To launch the CloudFormation stack, complete the following steps:

  1. On the AWS CloudFormation console, choose Create stack and then choose With new resources (standard).
  2. For Template source, select Upload a template file, and upload the provided template.
  3. Choose Next.
  4. Enter a name for the CloudFormation stack, then choose Next.
  5. Acknowledge that this stack might create IAM resources for you, then choose Submit.
  6. After the CloudFormation stack is successfully created, follow the steps mentioned at https://docs.aws.amazon.com/redshift/latest/gsg/rs-gsg-create-sample-db.html to load sample tickit data into the created Redshift Cluster

Exploring Amazon Redshift reads

In this section, we go over the new read functionality in the AWS Glue Studio visual editor and demonstrate how we can run a custom SQL statement via the new UI.

  1. On the AWS Glue console, choose ETL jobs in the navigation pane.
  2. Select the Visual with a blank canvas, because we’re authoring a job from scratch, then choose Create.
  3. In the blank canvas, choose the plus sign to add an Amazon Redshift node of type Source.

When you close the node selector, and you should see an Amazon Redshift source node on the canvas along with the data source properties.

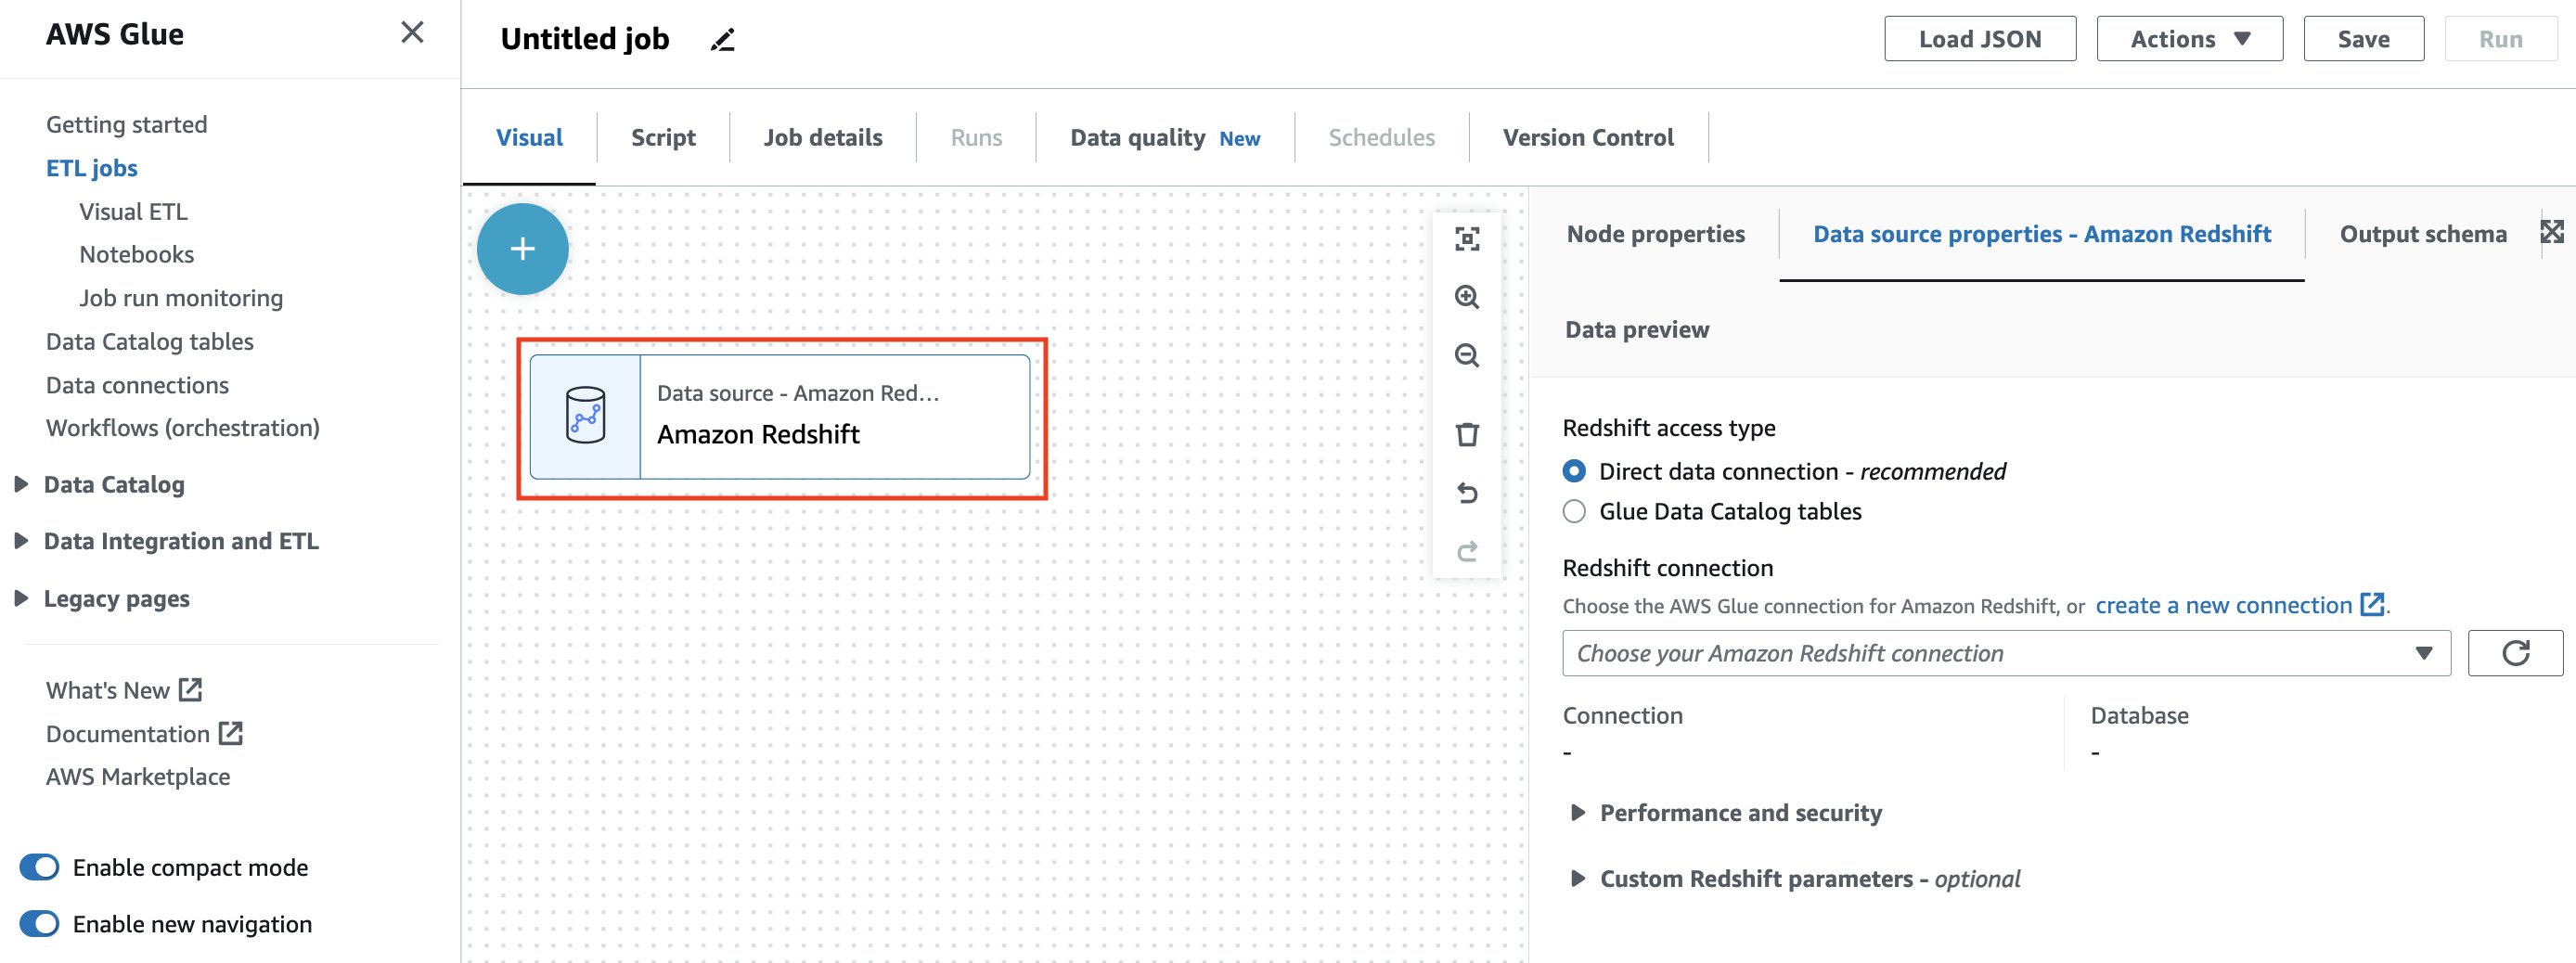
You can choose from two methods of accessing your Amazon Redshift data:

  • Direct data connection – This new method allows you to establish a connection to your Amazon Redshift sources without the need to catalog them
  • Glue Data Catalog tables – This method requires you to have already crawled or generated your Amazon Redshift tables in the AWS Glue Data Catalog

For this post, we use the Direct data connection option.

  1. For Redshift access type, select the Direct data connection.
  2. For Redshift connection, choose your AWS Glue Connection redshift-demo-blog-connection created in the CloudFormation stack.

Specifying the connection automatically configures all the network related details along with the name of the database you wish to connect to.

The UI then presents a choice on how you’d like to access the data from within your selected Amazon Redshift cluster’s database:

  • Choose a single table – This option lets you select a single schema, and a single table from your database. You can browse through all of your available schemas and tables right from the AWS Glue Studio visual editor itself, which makes choosing your source table much easier.
  • Enter a custom query If you’re looking to perform your ETL on a subset of data from your Amazon Redshift tables, you can author an Amazon Redshift query from the AWS Glue Studio UI. This query will be passed to the connected Amazon Redshift cluster, and the returned query result will be available in downstream transformations on AWS Glue Studio.

For the purposes of this post, we write our own custom query that joins data from the preloaded event table and venue table.

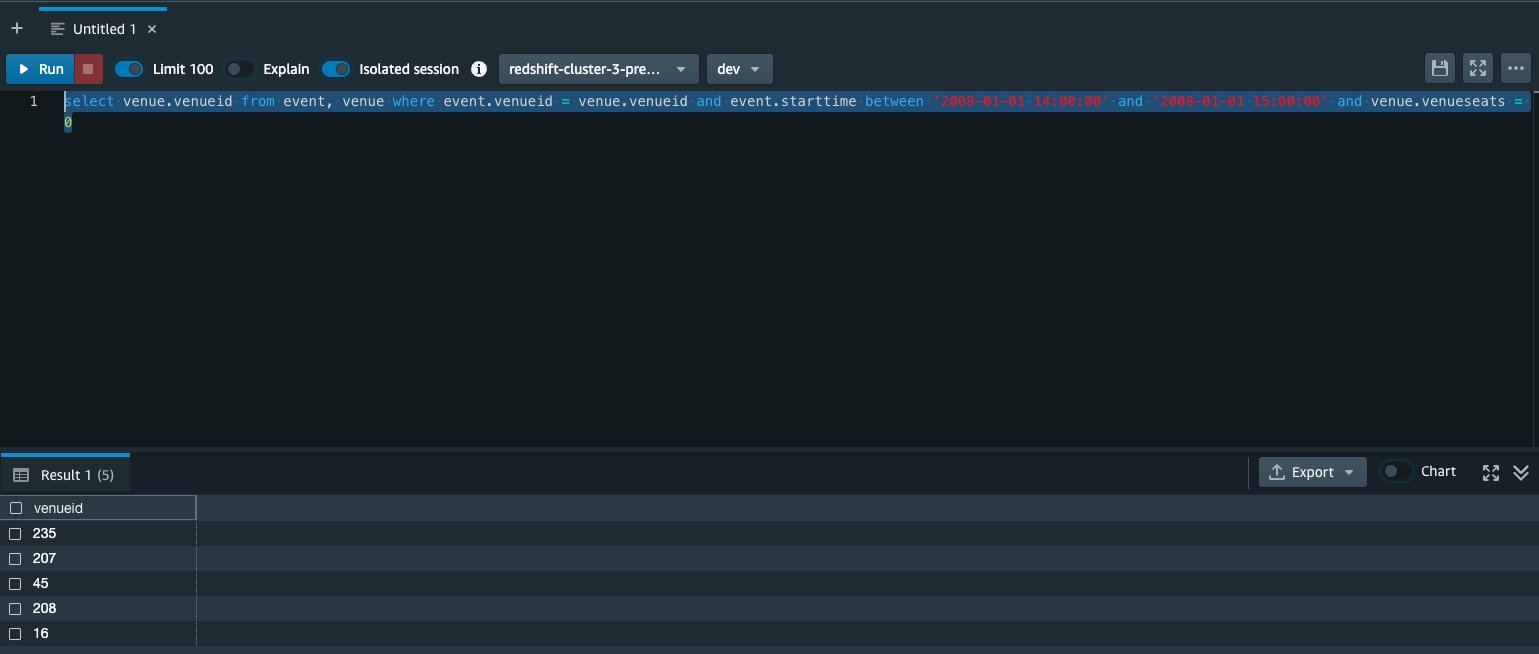
  1. Select Enter a custom query and enter the following query into the query editor:
select venue.venueid from event, venue where event.venueid = venue.venueid and event.starttime between '2008-01-01 14:00:00' and '2008-01-01 15:00:00' and venue.venueseats = 0

The intent of this query is to gather the venueid of locations that have had an event between 2008-01-01 14:00:00 and 2008-01-01 15:00:00 and have had venueseats = 0. If we run a similar query from the Amazon Redshift Query Editor, we can see that there are actually five such venues within that time frame. We wish to merge this data back into Amazon Redshift without including these rows.

  1. Choose Infer schema, which allows the AWS Glue Studio visual editor to understand the schema from the returned columns from your query.

You can see the schema on the Output schema tab.

  1. Under Performance and security, for S3 staging directory, choose the S3 temporary directory location created by the CloudFormation stack ( RedshiftS3TempPath ).
  2. For IAM role, choose the IAM role specified by RedshiftIamRoleARN in the CloudFormation stack.

Now we’re going to add a transform to drop duplicate rows from our join result. This will ensure that the MERGE operation in the following steps won’t have conflicting keys when performing the operation.

  1. Choose the Drop Duplicates node to view the node properties.
  2. On the Transform tab, for Drop duplicates, select Match specific keys.
  3. For Keys to match rows, choose venueid.

In this section, we defined the steps to read the output of a custom JOIN query. We then dropped the duplicate records from the returned value. In the next section, we explore the write path on the same job.

Exploring Amazon Redshift writes

Now we go over the enhancements for writing to Amazon Redshift as a destination. This section goes over all the simplified options for writing to Amazon Redshift, but highlights the new Amazon Redshift MERGE capabilities for the purposes of this post.

The MERGE operator offers great flexibility for conditionally merging rows from a source into a destination table. MERGE is powerful because it simplifies operations that traditionally were only achievable by using multiple insert, update, or delete statements separately. Within AWS Glue Studio, particularly with the custom MERGE option, you can define a more complex matching condition to handle finding the records to update.

  1. From the canvas page of the job used in the previous section, select Amazon Redshift to add an Amazon Redshift node of type Target.

When you close the selector, you should see your Amazon Redshift target node added on the Amazon Glue Studio canvas, along with possible options.

  1. For Redshift access type, select Direct data connection.

Similar to the Amazon Redshift source node, the Direct data connection method allows you to write directly to your Amazon Redshift tables without needing to have them cataloged within the AWS Glue Data Catalog.

  1. For Redshift connection, choose your AWS Glue connection redshift-demo-blog-connection created in the CloudFormation stack.
  2. For Schema, choose public.
  3. For Table, choose the venue table as the destination Amazon Redshift table where we will store the merged data.
  4. Choose MERGE data into target table.

This selection provides the user with two options:

  • Choose keys and simple actions – This is a user-friendly version of the MERGE operation. You simply specify the matching keys, and choose what happens to the rows that match the key (update them or delete them) or don’t have any matches (insert them).
  • Enter custom MERGE statement – This option provides the most flexibility. You can enter your own custom logic for MERGE.

For this post, we use the simple actions method for performing a MERGE operation.

  1. For Handling of data and target table, select MERGE data into target table, and then select Choose keys and simple actions.
  2. For Matching Keys, select venueid .

This field will become our MERGE condition for checking keys

  1. For When matched, select the Delete record in the table
  2. For When not matched, select Insert source data as a new row into the table

With these selections, we’ve configured the AWS Glue job to run a MERGE statement on Amazon Redshift while inserting our data. Moreover, for performing this MERGE operation, we use the as the key (you can select multiple keys). If there is a key match with the destination table’s record, we delete that record. Otherwise, we insert the record into the destination table.

  1. Navigate to the Job details tab.
  2. For Name, enter a name for the job.
  3. For the IAM Role drop down, select the RedshiftIamRole role that was created via the CloudFormation template.
  4. Choose Save.

  5. Choose Run and wait for the job to finish.

You can track its progress on the Runs tab.

  1. After the run reaches a successful state, navigate back to the Amazon Redshift Query Editor.
  2. Run the same query again to discover that those rows have been deleted in accordance to our MERGE specifications.

In this section, we configured an Amazon Redshift target node to write a MERGE statement to conditionally update records in our destination Amazon Redshift table. We then saved and ran the AWS Glue job, and saw the effect of the MERGE statement on our destination Amazon Redshift table.

Other available write options

In addition to MERGE, the AWS Glue Studio visual editor’s Amazon Redshift destination node also supports a number of other common operations:

  • APPEND – Appending to your target table performs an insert into the selected table without updating any of the existing records (if there are duplicates, both records will be retained). In cases where you want to update existing rows in addition to adding new rows (often referred to an UPSERT operation), you can select the Also update existing records in target table option. Note that both APPEND only and UPSERT (APPEND with UPDATE) are a simpler subset of the MERGE functionality discussed earlier.
  • TRUNCATE – The TRUNCATE option clears all the data in the existing table but retains all the existing table schema, followed by an APPEND of all new data to the empty table. This option is often used when the full dataset needs to be refreshed and downstream services or tools depend on the table schema being consistent. For example, every night an Amazon Redshift table needs to be fully updated with the latest customer information that will be consumed by an Amazon QuickSight dashboard. In this case, the ETL developer would choose TRUNCATE to ensure the data is fully refreshed but the table schema is guaranteed not to change.
  • DROP – This option is used when the full dataset needs to be refreshed and the downstream services or tools that depend on the schema or systems can handle possible schema changes without breaking.

How write operations are being handled on the backend

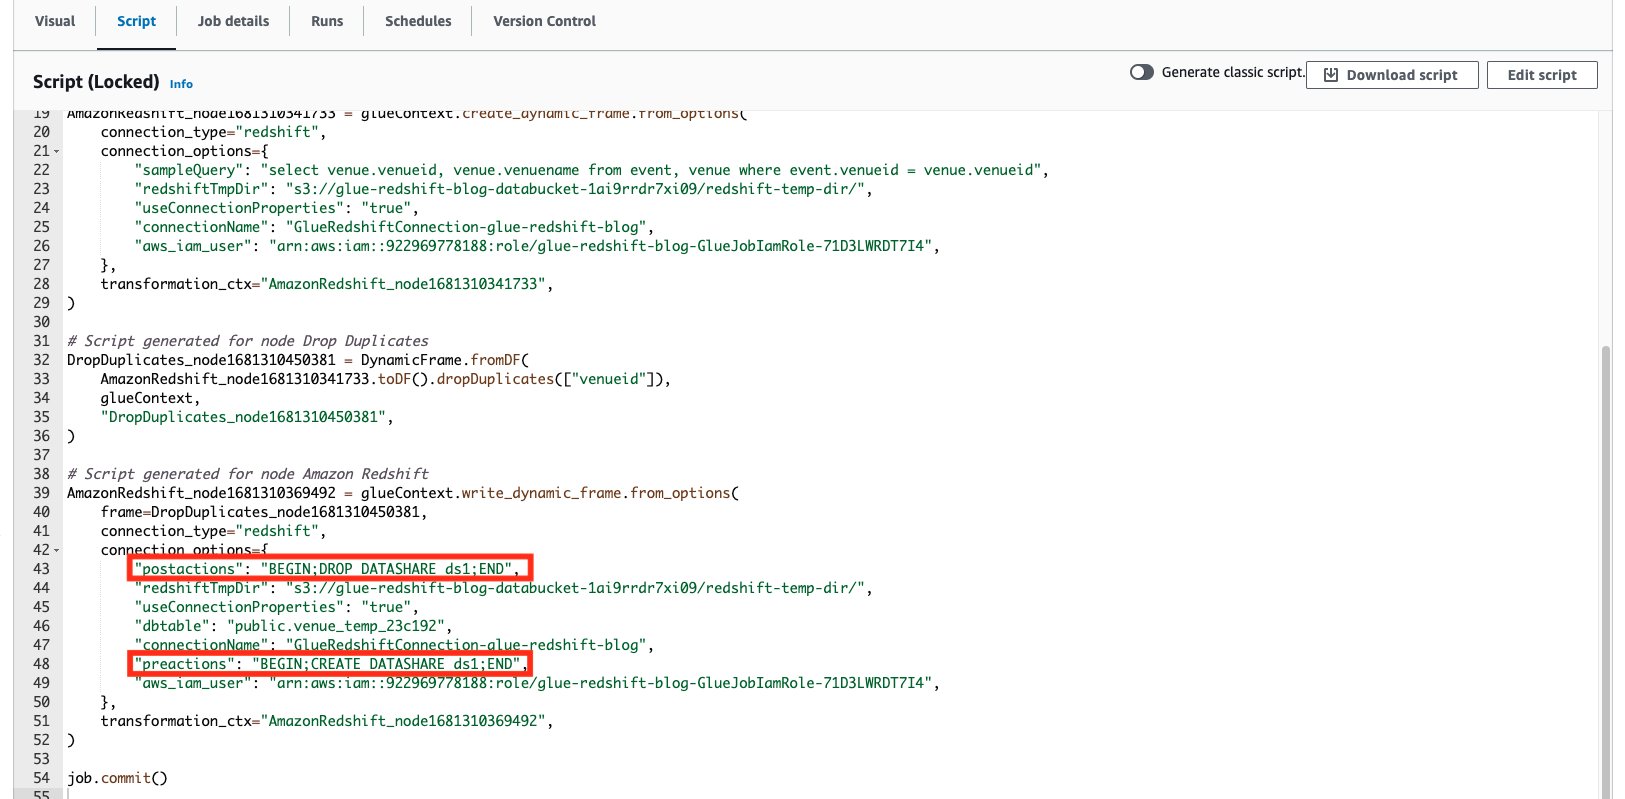
The Amazon Redshift connector supports two parameters called preactions and postactions. These parameters allow you to run SQL statements that will be passed on to the Amazon Redshift data warehouse before and after the actual write operation is carried out by Spark.

On the Script tab on the AWS Glue Studio page, we can see what SQL statements are being run.

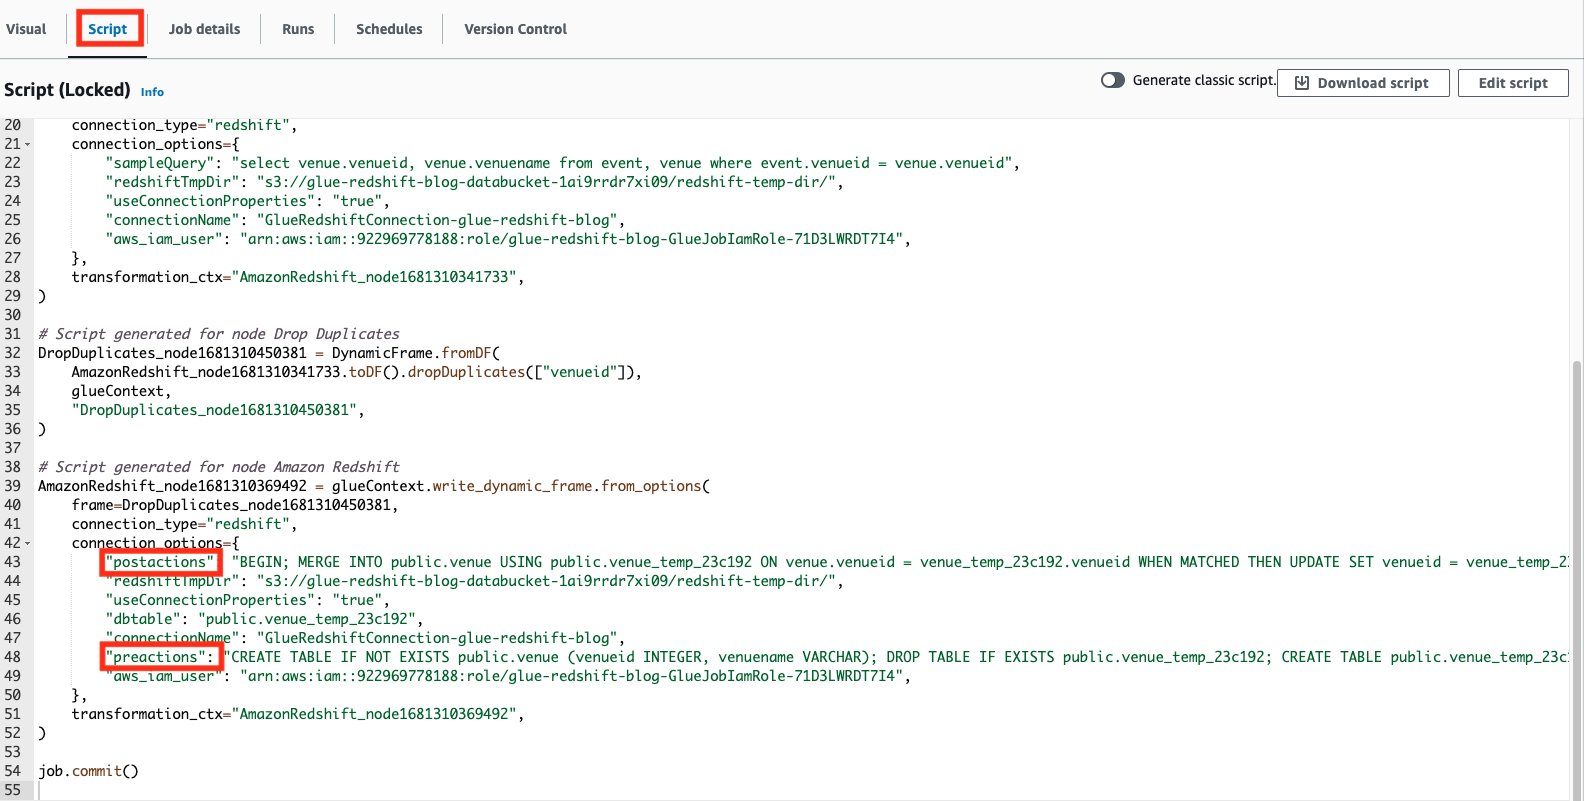
Use a custom implementation for writing data into Amazon Redshift

In the event that the provided presets require more customization, or your use case requires more advanced implementations for writing to Amazon Redshift, AWS Glue Studio also allows you to freely select which preactions and postactions can be run when writing to Amazon Redshift.

To show an example, we create an Amazon Redshift datashare as a preaction, then perform the cleaning up of the same datashare as a postaction via AWS Glue Studio.

NOTE: This section is not executed as part of the above blog and is provided as an example.

  1. Choose the Amazon Redshift data target node.
  2. On the Data target properties tab, expand the Custom Redshift parameters section.
  3. For the parameters, add the following:
    1. Parameter: preactions  with Value BEGIN; CREATE DATASHARE ds1; END
    2. Parameter: postactions with Value BEGIN; DROP DATASHARE ds1; END

As you can see, we can specify multiple Amazon Redshift statements as a part of both the preactions and postactions parameters. Remember that these statements will override any existing preactions or postactions with your specified actions (as you can see in the following generated code).

Cleanup

To avoid additional costs, make sure to delete any unnecessary resources and files:

  • Empty and delete the contents from the S3 temporary bucket
  • If you deployed the sample CloudFormation stack, delete the CloudFormation stack via the AWS CloudFormation console. Make sure to empty the S3 bucket before you delete the bucket.

Conclusion

In this post, we went over the new AWS Glue Studio visual options for performing reads and writes from Amazon Redshift. We also saw the simplicity with which you can browse your Amazon Redshift tables right from the AWS Glue Studio visual editor UI, and how to run your own custom SQL statements against your Amazon Redshift sources. We then explored how to perform simple ETL loading tasks against Amazon Redshift with just a few clicks, and showcased the new Amazon Redshift MERGE statement.

To dive deeper into the new Amazon Redshift integrations for the AWS Glue Studio visual editor, check out Connecting to Redshift in AWS Glue Studio.


About the Authors

Aniket Jiddigoudar is a Big Data Architect on the AWS Glue team. He works with customers to help improve their big data workloads. In his spare time, he enjoys trying out new food, playing video games, and kickboxing.

Sean Ma is a Principal Product Manager on the AWS Glue team. He has an 18+ year track record of innovating and delivering enterprise products that unlock the power of data for users. Outside of work, Sean enjoys scuba diving and college football.

Getting started with AWS Glue Data Quality from the AWS Glue Data Catalog

Post Syndicated from Aniket Jiddigoudar original https://aws.amazon.com/blogs/big-data/getting-started-with-aws-glue-data-quality-from-the-aws-glue-data-catalog/

AWS Glue is a serverless data integration service that makes it simple to discover, prepare, and combine data for analytics, machine learning (ML), and application development. You can use AWS Glue to create, run, and monitor data integration and ETL (extract, transform, and load) pipelines and catalog your assets across multiple data stores.

Hundreds of thousands of customers use data lakes for analytics and machine learning to make data-driven business decisions. Data consumers lose trust in data if it is not accurate and recent, making data quality essential for undertaking optimal and correct decisions.

Evaluation of the accuracy and freshness of data is a common task for engineers. Currently, there are various tools available to evaluate data quality. However, these tools often require manual processes of data discovery and expertise in data engineering and coding.

We are pleased to announce the public preview launch of AWS Glue Data Quality. You can access this feature today without requesting any additional access in the available Regions. AWS Glue Data Quality is a new preview feature of AWS Glue that measures and monitors the data quality of Amazon S3-based data lakes and in AWS Glue ETL jobs. It does not require any expertise in data engineering or coding. It simplifies your experience of monitoring and evaluating the quality of your data.

This is Part 1 of a four-part series of posts to explain how AWS Glue Data Quality works. Check out the next posts in the series:

Getting started with AWS Glue Data Quality

In this post, we will go over the simplicity of using the AWS Glue Data Quality feature by:

  1. Starting data quality recommendations and runs on your data in AWS Glue Data Catalog.
  2. Creating an Amazon CloudWatch alarm for getting notifications when data quality results are below a certain threshold.
  3. Analyzing your AWS Glue Data Quality run results through Amazon Athena.

Set up resources with AWS CloudFormation

The provided CloudFormation script creates the following resources for you:

  1. The IAM role required to run AWS Glue Data Quality runs
  2. An Amazon Simple Storage Service (Amazon S3) bucket to store the NYC Taxi dataset
  3. An S3 bucket to store and analyze the results of AWS Glue Data Quality runs
  4. An AWS Glue database and table created from the NYC Taxi dataset

Steps:

  1. Open the AWS CloudFormation console.
  2. Choose Create stack and then select With new resources (standard).
  3. For Template source, choose Upload a template File, and provide the above attached template file. Then choose Next.
  4. For Stack name, DataQualityDatabase, and DataQualityTable, leave as default. For DataQualityS3BucketName, enter the name of your S3 bucket. Then choose Next.
  5. On the final screen, make sure to acknowledge that this stack would create IAM resources for you, and choose Submit.
  6. Once the stack is successfully created, navigate to the S3 bucket created by the stack and upload the yellow_tripdata_2022-01.parquet file.

Start an AWS Glue Data Quality run on your data in AWS Glue Data Catalog

In this first section, we will generate data quality rule recommendations from the AWS Glue Data Quality service. Using these recommendations, we will then run a data quality task against our dataset to obtain an analysis of our data.

To get started, complete the following steps:

  1. Open AWS Glue console.
  2. Choose Tables under Data Catalog.
  3. Select the DataQualityTable table created via the CloudFormation stack.
  4. Select the Data quality tab.
  5. Choose Recommend ruleset.
  6. On the Recommend data quality rules page, check Save recommended rules as a ruleset. This will allow us to save the recommended rules in a ruleset automatically, for use in the next steps.
  7. For IAM Role, choose the IAM role that was created from the CloudFormation stack.
  8. For Additional configurations -optional, leave the default number of workers and timeout.
  9. Choose Recommend ruleset. This will start a data quality recommendation run, with the given number of workers.
  10. Wait for the ruleset to be completed.
  11. Once completed, navigate back to the Rulesets tab. You should see a successful recommendation run and a ruleset created.

Understand AWS Glue Data Quality recommendations

AWS Glue Data Quality recommendations are suggestions generated by the AWS Glue Data Quality service and are based on the shape of your data. These recommendations automatically take into account aspects like RowCounts, Mean, Standard Deviation etc. of your data, and generate a set of rules, for you to use as a starting point.

The dataset used here was the NYC Taxi dataset. Based on this, the columns in this dataset, and the values of those columns, AWS Glue Data Quality recommends a set of rules. In total, the recommendation service automatically took into consideration all the columns of the dataset, and recommended 55 rules.

Some of these rules are:

  • “RowCount between <> and <> ” → Expect a count of number of rows based on the data it saw
  • “ColumnValues “VendorID” in [ ] → Expect the ”VendorID“ column to be within a specific set of values
  • IsComplete “VendorID” → Expect the “VendorID” to be a non-null value

How do I use the recommended AWS Glue Data Quality rules?

  1. From the Rulesets section, you should see your generated ruleset. Select the generated ruleset, and choose Evaluate ruleset.
    • If you didn’t check the box to Save recommended rules as a ruleset when you ran the recommendation, you can still click on the recommendation task run and copy the rules to create a new ruleset
  2. For Data quality actions under Data quality properties, select Publish metrics to Amazon CloudWatch. If this box isn’t checked, the data quality run will not publish metrics to Amazon CloudWatch.
  3. For IAM role, select the GlueDataQualityBlogRole created in the AWS CloudFormation stack.
  4. For Requested number of workers under Advanced properties, leave as default. 
  5. For Data quality results location, select the value of the GlueDataQualityResultsS3Bucket location that was created via the AWS CloudFormation stack
  6. Choose Evaluate ruleset.
  7. Once the run begins, you can see the status of the run on the Data quality results tab.
  8. After the run reaches a successful stage, select the completed data quality task run, and view the data quality results shown in Run results.

Our recommendation service suggested that we enforce 55 rules, based on the column values and the data within our NYC Taxi dataset. We then converted the collection of 55 rules into a RuleSet. Then, we ran a Data Quality Evaluation task run using our RuleSet against our dataset. In our results above, we see the status of each within the RuleSet.

You can also utilize the AWS Glue Data Quality APIs to carry out these steps.

Get Amazon SNS notifications for my failing data quality runs through Amazon CloudWatch alarms

Each AWS Glue Data Quality evaluation run from the Data Catalog, emits a pair of metrics named glue.data.quality.rules.passed (indicating a number of rules that passed) and glue.data.quality.rules.failed (indicating the number of failed rules) per data quality run. This emitted metric can be used to create alarms to alert users if a given data quality run falls below a threshold.

To get started with setting up an alarm that would send an email via an Amazon SNS notification, follow the steps below:

  1. Open Amazon CloudWatch console.
  2. Choose All metrics under Metrics. You will see an additional namespace under Custom namespaces titled Glue Data Quality.

Note: When starting an AWS Glue Data Quality run, make sure the Publish metrics to Amazon CloudWatch checkbox is enabled, as shown below. Otherwise, metrics for that particular run will not be published to Amazon CloudWatch.

  1. Under the Glue Data Quality namespace, you should be able to see metrics being emitted per table, per ruleset. For the purpose of our blog, we shall be using the glue.data.quality.rules.failed rule and alarm, if this value goes over 1 (indicating that, if we see a number of failed rule evaluations greater than 1, we would like to be notified).
  2. In order to create the alarm, choose All alarms under Alarms.
  3. Choose Create alarm.
  4. Choose Select metric.
  5. Select the glue.data.quality.rules.failed metric corresponding to the table you’ve created, then choose Select metric.
  6. Under the Specify metric and conditions tab, under the Metrics section:
    1. For Statistic, select Sum.
    2. For Period, select 1 minute.
  7. Under the Conditions section:
    1. For Threshold type, choose Static.
    2. For Whenever glue.data.quality.rules.failed is…, select Greater/Equal.
    3. For than…, enter 1 as the threshold value.
    4. Expand the Additional configurations dropdown and select Treat missing data as good

These selections imply that if the glue.data.quality.rules.failed metric emits a value greater than or equal to 1, we will trigger an alarm. However, if there is no data, we will treat it as acceptable.

  1. Choose Next.
  2. On Configure actions:
    1. For the Alarm state trigger section, select In alarm .
    2. For Send a notification to the following SNS topic, choose Create a new topic to send a notification via a new SNS topic.
    3. For Email endpoints that will receive the notification…, enter your email address. Choose Next.
  3. For Alarm name, enter myFirstDQAlarm, then choose Next.
  4. Finally, you should see a summary of all the selections on the Preview and create screen. Choose Create alarm at the bottom.
  5. You should now be able to see the alarm being created from the Amazon CloudWatch alarms dashboard.

In order to demonstrate AWS Glue Data Quality alarms, we are going to go over a real-world scenario where we have corrupted data being ingested, and how we could use the AWS Glue Data Quality service to get notified of this, using the alarm we created in the previous steps. For this purpose, we will use the provided file malformed_yellow_taxi.parquet that contains data that has been tweaked on purpose.

  1. Navigate to the S3 location DataQualityS3BucketName mentioned in the CloudFormation template supplied at the beginning of the blog post.
  2. Upload the malformed_yellow_tripdata.parquet file to this location. This will help us simulate a flow where we have a file with poor data quality coming into our data lakes via our ETL processes.
  3. Navigate to the AWS Glue Data Catalog console, select the demo_nyc_taxi_data_input that was created via the provided AWS CloudFormation template and then navigate to the Data quality tab.
  4. Select the RuleSet we had created in the first section. Then select Evaluate ruleset.
  5. From the Evaluate data quality screen:
    1. Check the box to Publish metrics to Amazon CloudWatch. This checkbox is needed to ensure that the failure metrics are emitted to Amazon CloudWatch.
    2. Select the IAM role created via the AWS CloudFormation template.
    3. Optionally, select an S3 location to publish your AWS Glue Data Quality results.
    4. Select Evaluate ruleset.
  6.  Navigate to the Data Quality results tab. You should now see two runs, one from the previous steps of this blog and one that we currently triggered. Wait for the current run to complete.
  7. As you see, we have a failed AWS Glue Data Quality run result, with only 52 of our original 55 rules passing. These failures are attributed to the new file we uploaded to S3.
  8. Navigate to the Amazon CloudWatch console and select the alarm we created at the beginning of this section.
  9. As you can see, we configured the alarm to fire every time the glue.data.quality.rules.failed metric crosses a threshold of 1. After the above AWS Glue Data Quality run, we see 3 rules failing, which triggered the alarm. Further, you also should have gotten an email detailing the alarm’s firing.

We have thus demonstrated an example where incoming malformed data, coming into our data lakes can be identified via the AWS Glue Data Quality rules, and subsequent alerting mechanisms can be created to notify appropriate personas.

Analyze your AWS Glue Data Quality run results through Amazon Athena

In scenarios where you have multiple AWS Glue Data Quality run results against a dataset, over a period of time, you might want to track the trends of the dataset’s quality over a period of time. To achieve this, we can export our AWS Glue Data Quality run results to S3, and use Amazon Athena to run analytical queries against the exported run. The results can then be further used in Amazon QuickSight to build dashboards to have a graphical representation of your data quality trends

In the third part of this post, we will see the steps needed to start tracking data on your dataset’s quality:

  1. For our data quality runs that we set up in the previous sections, we set the Data quality results location parameter to the bucket location specified by the AWS CloudFormation stack.
  2. After each successful run, you should see a single JSONL file being exported to your selected S3 location, corresponding to that particular run.
  3. Open the Amazon Athena console.
  4. In the query editor, run the following CREATE TABLE statement (replace the <my_table_name> with a relevant value, and <GlueDataQualityResultsS3Bucket_from_cfn> section with the GlueDataQualityResultsS3Bucket value from the provided AWS CloudFormation template):
    CREATE EXTERNAL TABLE `<my_table_name>`(
    `catalogid` string,
    `databasename` string,
    `tablename` string,
    `dqrunid` string,
    `evaluationstartedon` timestamp,
    `evaluationcompletedon` timestamp,
    `rule` string,
    `outcome` string,
    `failurereason` string,
    `evaluatedmetrics` string)
    PARTITIONED BY (
    `year` string,
    `month` string,
    `day` string)
    ROW FORMAT SERDE
    'org.openx.data.jsonserde.JsonSerDe'
    WITH SERDEPROPERTIES (
    'paths'='catalogId,databaseName,dqRunId,evaluatedMetrics,evaluationCompletedOn,evaluationStartedOn,failureReason,outcome,rule,tableName')
    STORED AS INPUTFORMAT
    'org.apache.hadoop.mapred.TextInputFormat'
    OUTPUTFORMAT
    'org.apache.hadoop.hive.ql.io.HiveIgnoreKeyTextOutputFormat'
    LOCATION
    's3://<GlueDataQualityResultsS3Bucket_from_cfn>/'
    TBLPROPERTIES (
    'classification'='json',
    'compressionType'='none',
    'typeOfData'='file')
    
    MSCK REPAIR TABLE `<my_table_name>`

  5. Once the above table is created, you should be able to run queries to analyze your data quality results.

For example, consider the following query that shows me the failed AWS Glue Data Quality runs against my table demo_nyc_taxi_data_input within a time window:

SELECT * from "<my_table_name>"
WHERE "outcome" = 'Failed'
AND "tablename" = '<my_source_table>'
AND "evaluationcompletedon" between
parse_datetime('2022-12-05 17:00:00:000', 'yyyy-MM-dd HH:mm:ss:SSS') AND parse_datetime('2022-12-05 20:00:00:000', 'yyyy-MM-dd HH:mm:ss:SSS');

The output of the above query shows me details about all the runs with “outcome” = ‘Failed’ that ran against my NYC Taxi dataset table ( “tablename” = ‘demo_nyc_taxi_data_input’ ). The output also gives me information about the failure reason ( failurereason ) and the values it was evaluated against ( evaluatedmetrics ).

As you can see, we are able to get detailed information about our AWS Glue Data Quality runs, via the run results uploaded to S3, perform more detailed analysis and build dashboards on top of the data.

Clean up

  • Navigate to the Amazon Athena console and delete the table created for data quality analysis.
  • Navigate to the Amazon CloudWatch console and delete the alarms created.
  • If you deployed the sample CloudFormation stack, delete the CloudFormation stack via the AWS CloudFormation console. You will need to empty the S3 bucket before you delete the bucket.
  • If you have enabled your AWS Glue Data Quality runs to output to S3, empty those buckets as well.

Conclusion

In this post, we talked about the ease and speed of incorporating data quality rules using the AWS Glue Data Quality feature, into your AWS Glue Data Catalog tables. We also talked about how to run recommendations and evaluate data quality against your tables. We then discussed analyzing the data quality results via Amazon Athena, and the process for setting up alarms via Amazon CloudWatch in order to notify users of failed data quality.

To dive into the AWS Glue Data Quality APIs, take a look at the AWS Glue Data Quality API documentation
To learn more about AWS Glue Data Quality, check out the AWS Glue Data Quality Developer Guide


About the authors

Aniket Jiddigoudar is a Big Data Architect on the AWS Glue team.

Joseph Barlan is a Frontend Engineer at AWS Glue. He has over 5 years of experience helping teams build reusable UI components and is passionate about frontend design systems. In his spare time, he enjoys pencil drawing and binge watching tv shows.

Introducing AWS Glue Flex jobs: Cost savings on ETL workloads

Post Syndicated from Aniket Jiddigoudar original https://aws.amazon.com/blogs/big-data/introducing-aws-glue-flex-jobs-cost-savings-on-etl-workloads/

AWS Glue is a serverless data integration service that makes it simple to discover, prepare, and combine data for analytics, machine learning (ML), and application development. You can use AWS Glue to create, run, and monitor data integration and ETL (extract, transform, and load) pipelines and catalog your assets across multiple data stores. Typically, these data integration jobs can have varying degrees of priority and time sensitivity. For example, non-urgent workloads such as pre-production, testing, and one-time data loads often don’t require fast job startup times or consistent runtimes via dedicated resources.

Today, we are pleased to announce the general availability of a new AWS Glue job run class called Flex. Flex allows you to optimize your costs on your non-urgent or non-time sensitive data integration workloads such as pre-production jobs, testing, and one-time data loads. With Flex, AWS Glue jobs run on spare compute capacity instead of dedicated hardware. The start and runtimes of jobs using Flex can vary because spare compute resources aren’t readily available and can be reclaimed during the run of a job

Regardless of the run option used, AWS Glue jobs have the same capabilities, including access to custom connectors, visual authoring interface, job scheduling, and Glue Auto Scaling. With the Flex execution option, customers can optimize the costs of their data integration workloads by configuring the execution option based on the workloads’ requirements, using standard execution option for time-sensitive workloads, and Flex for non-urgent workloads. The Flex execution class is available for AWS Glue 3.0 Spark jobs.

The Flex execution class is available for AWS Glue 3.0 Spark jobs.

In this post, we provide more details about AWS Glue Flex jobs and how to enable Flex capacity.

How do you use Flexible capacity?

The AWS Glue jobs API now supports an additional parameter called execution-class, which lets you choose STANDARD or FLEX when running the job. To use Flex, you simply set the parameter to FLEX.

To enable Flex via the AWS Glue Studio console, complete the following steps:

  1. On the AWS Glue Studio console, while authoring a job, navigate to the Job details tab
  2. Select Flex Execution.
  3. Set an appropriate value for the Job Timeout parameter (defaults to 120 minutes for Flex jobs).
  4. Save the job.
  5. After finalizing all other details, choose Run to run the job with Flex capacity.

On the Runs tab, you should be able to see FLEX listed under Execution class.

You can also enable Flex via the AWS Command Line Interface (AWS CLI).

You can set the --execution-class setting in the start-job-run API, which lets you run a particular AWS Glue job’s run with Flex capacity:

aws glue start-job-run --job-name my-job \
    --execution-class FLEX \
    --timeout 300 \

You can also set the --execution-class during the create-job API. This sets the default run class of all the runs of this job to FLEX:

aws glue create-job \
    --name flexCLI \
    --role AWSGlueServiceRoleDefault \
    --command "Name=glueetl,ScriptLocation=s3://mybucket/myfolder/" \
    --region us-east-2 \
    --execution-class FLEX \
    --worker-type G.1X \
    --number-of-workers 10 \
    --glue-version 3.0

The following are additional details about the relevant parameters:

  • –execution-class – The enum string that specifies if a job should be run as FLEX or STANDARD capacity. The default is STANDARD.
  • –timeout – Specifies the time (in minutes) the job will run before it’s moved into a TIMEOUT state.

When should you use Flexible capacity?

The Flex execution class is ideal for reducing the costs of time-insensitive workloads. For example:

  • Nightly ETL jobs, or jobs that run over weekends for processing workloads
  • One-time bulk data ingestion jobs
  • Jobs running in test environments or pre-production workloads
  • Time-insensitive workloads where it’s acceptable to have variable start and end times

In comparison, the standard execution class is ideal for time-sensitive workloads that require fast job startup and dedicated resources. In addition, jobs that have downstream dependencies are better served by the standard execution class.

What is the typical life-cycle of a Flexible capacity Job?

When a start-job-run API call is issued, with the execution-class set to FLEX, AWS Glue will begin to request compute resources. If no resources are available immediately upon issuing the API call, the job will move into a WAITING state. No billing occurs at this point.

As soon as the job is able to acquire compute resources, the job moves to a RUNNING state. At this point, even if all the computes requested aren’t available, the job begins running on whatever hardware is present. As more Flex capacity becomes available, AWS Glue adds it to the job, up to a maximum value specified by Number of workers.

At this point, billing begins. You’re charged only for the compute resources that are running at any given time, and only for the duration that they ran for.

While the job is running, if Flex capacity is reclaimed, AWS Glue continues running the job on the existing compute resources while it tries to meet the shortfall by requesting more resources. If capacity is reclaimed, billing for that capacity is halted as well. Billing for new capacity will start when it is provisioned again. If the job completes successfully, the job’s state moves to SUCCEEDED. If the job fails due to various user or system errors, the job’s state transitions to FAILED. If the job is unable to complete before the time specified by the --timeout parameter, whether due to a lack of compute capacity or due to issues with the AWS Glue job script, the job goes into a TIMEOUT state.

Flexible job runs rely on the availability of non-dedicated compute capacity in AWS, which in turn depends on several factors, such as the Region and Availability Zone, time of day, day of the week, and the number of DPUs required by a job.

A parameter of particular importance for Flex Jobs is the --timeout value. It’s possible for Flex jobs to take longer to run than standard jobs, especially if capacity is reclaimed while the job is running. As a result, selecting the right timeout value that’s appropriate for your workload is critical. Choose a timeout value such that the total cost of the Flex job run doesn’t exceed a standard job run. If the value is set too high, the job can wait for too long, trying to acquire capacity that isn’t available. If the value is set too low, the job times out, even if capacity is available and the job execution is proceeding correctly.

How are Flex capacity jobs billed?

Flex jobs are billed per worker at the Flex DPU-hour rates. This means that you’re billed only for the capacity that actually ran during the execution of the job, for the duration that it ran.

For example, if you ran an AWS Glue Flex job for 10 workers, and AWS Glue was only able to acquire 5 workers, you’re only billed for five workers, and only for the duration that those workers ran. If, during the job run, two out of those five workers are reclaimed, then billing for those two workers is stopped, while billing for the remaining three workers continues. If provisioning for the two reclaimed workers is successful during the job run, billing for those two will start again.

For more information on Flex pricing, refer to AWS Glue pricing.

Conclusion

This post discusses the new AWS Glue Flex job execution class, which allows you to optimize costs for non-time-sensitive ETL workloads and test environments.

You can start using Flex capacity for your existing and new workloads today. However, note that the Flex class is not supported for Python Shell jobs, AWS Glue streaming jobs, or AWS Glue ML jobs.

For more information on AWS Glue Flex jobs, refer to their latest documentation.

Special thanks to everyone who contributed to the launch: Parag Shah, Sampath Shreekantha, Yinzhi Xi and Jessica Cheng,


About the authors

Aniket Jiddigoudar is a Big Data Architect on the AWS Glue team.

Vaibhav Porwal is a Senior Software Development Engineer on the AWS Glue team.

Sriram Ramarathnam is a Software Development Manager on the AWS Glue team.