All posts by Bezuayehu Wate

Cost-effective ETL with DuckDB and Amazon S3 Tables on AWS Glue

Post Syndicated from Bezuayehu Wate original https://aws.amazon.com/blogs/big-data/cost-effective-etl-with-duckdb-and-amazon-s3-tables-on-aws-glue/

Many data integration jobs are SQL-centric: they filter, join, and aggregate data on a schedule, and they run frequently enough that fast startup matters. For this shape of work, teams want to match the engine to the job and run it quickly and cost-effectively, without standing up and tuning separate infrastructure.

AWS Glue is the serverless data integration service that customers use to run extract, transform, and load (ETL) jobs at any scale, without managing infrastructure. With AWS Glue, you can run DuckDB, an embedded, in-process, vectorized SQL engine, inside a standard AWS Glue job. DuckDB reads Parquet files from Amazon Simple Storage Service (Amazon S3) and writes Apache Iceberg tables directly to Amazon S3 Tables, a capability of Amazon S3. DuckDB is an open source, in-process, vectorized analytical SQL engine that runs embedded in your application, with no separate server or cluster to manage. It reads and writes cloud data formats such as Parquet and Apache Iceberg natively. AWS Glue 6.0 is the latest version, running on a modernized runtime with a 30 percent price reduction over previous versions. DuckDB reads Amazon S3 Parquet through its httpfs extension and commits Iceberg snapshots to Amazon S3 Tables through the Iceberg REST endpoint, so no separate catalog synchronization is required. Running DuckDB in AWS Glue is well suited to SQL-centric transformations such as filters, joins, and aggregations. It also fits frequent, scheduled jobs such as hourly or daily aggregations, incremental loads, and rollups that benefit from fast startup. This pattern complements Apache Spark on AWS Glue rather than replacing it: when a workload needs distributed processing, the same job type runs PySpark with no change to your infrastructure, IAM, or triggers.

This post walks through the pattern with a concrete ETL use case and provides complete, runnable code. It also compares measured cost and runtime against a Spark job performing the same work on the same AWS Glue 6.0 runtime.

When to use this pattern

This pattern is a complement to Spark on AWS Glue, not a replacement. The following table summarizes when each approach yields the best results.

Signal

DuckDB on AWS Glue 6.0

Apache Spark on AWS Glue 6.0

Dataset size per run Scales with worker size Scales horizontally across multiple nodes for datasets of any size
Parallelism requirement Single-node, in-process execution Distributed processing across a managed cluster
SQL complexity Aggregations, joins, window functions Complex graph operations, custom UDFs, ML pipelines
Cost priority Minimize per-run cost and duration Maximize throughput at scale
Iceberg writes DuckDB iceberg extension to S3 Tables Native Spark Iceberg integration

For workloads that need distributed processing, the same glueetl job type runs PySpark with no change to your infrastructure, AWS Identity and Access Management (IAM) configuration, or triggers. You choose the engine that fits each workload.

How DuckDB runs on AWS Glue 6.0

Running DuckDB in an AWS Glue job comes down to two things working together: a runtime modern enough to load DuckDB and its native extensions, and the capabilities DuckDB brings to ETL once it does.

What the AWS Glue 6.0 runtime provides

Modern runtime compatibility. AWS Glue 6.0 runs on Amazon Linux 2023 with glibc 2.34 and Python 3.13. DuckDB 1.5.x and its native C++ extension binaries (httpfs, aws, iceberg) install through pip and load without workarounds. The DuckDB extension binaries require a modern glibc (2.28 or later), which the AWS Glue 6.0 runtime provides.

AWS Glue 6.0 resolves this compatibility requirement. You can add DuckDB 1.5.x to an AWS Glue 6.0 job in two ways. The first is the --additional-python-modules job parameter (duckdb==1.5.1), which pip-installs the package at job startup and loads all extensions without additional steps. Alternatively, you can package the dependencies as a Python virtual environment, upload it to Amazon S3, and reference it using the --python-virtual-env parameter. On AWS Glue 6.0, you can also add --python-virtual-env-storage-prefix to have AWS Glue build and cache the virtual environment automatically. For more information, see Using Python virtual environments with AWS Glue.

What DuckDB provides

DuckDB is an open source, in-process analytical SQL engine. It runs inside an AWS Glue job as a single process, with no separate cluster or coordinator. The following capabilities make it a practical fit for ETL on the AWS Glue 6.0 runtime.

  • Single-node vectorized execution. DuckDB runs inside a single AWS Glue job. For a couple of gigabytes, there is no shuffle, no executor scheduling, and no inter-node network I/O. The work happens in a single vectorized pass over columnar memory.
  • Native Amazon S3 and Parquet access. The httpfs extension reads and writes Amazon S3 objects directly, using the IAM role of the AWS Glue job automatically through CREDENTIAL_CHAIN.
  • Native Amazon S3 Tables writes. The iceberg extension connects to the Amazon S3 Tables Iceberg REST endpoint (ENDPOINT_TYPE s3_tables) and commits standard Iceberg snapshots. With AWS Glue 6.0, you can use two capabilities that matured independently: Amazon S3 Tables and DuckDB Iceberg writes.
  • Larger-than-memory operators. Sort, join, and aggregate spill to /tmp, so datasets larger than available RAM still process without code changes.

The output is a standard Apache Iceberg table in Amazon S3 Tables. It is queryable by Amazon Athena, Amazon Redshift, and Amazon EMR, and other Iceberg-compatible engines that support the Iceberg REST Catalog API.

Sizing guidance. DuckDB runs within a single AWS Glue worker, so its available memory and disk scale with the worker type. This walkthrough uses the minimum glueetl configuration of 2 workers (2 data processing units, or DPUs) with worker type G.1X: each G.1X worker provides 4 vCPUs and 16 GB of memory. DuckDB runs on the driver and processes data in memory, spilling to local disk when a dataset or intermediate result exceeds available RAM. For larger inputs, choose a bigger worker: G.2X provides 8 vCPUs and 32 GB of memory, and the G.4X and G.8X types scale higher. Size the worker to your input volume and the memory footprint of your aggregations and joins. For current specifications, see AWS Glue worker types.

Architecture

The following image shows the architecture described in this post.
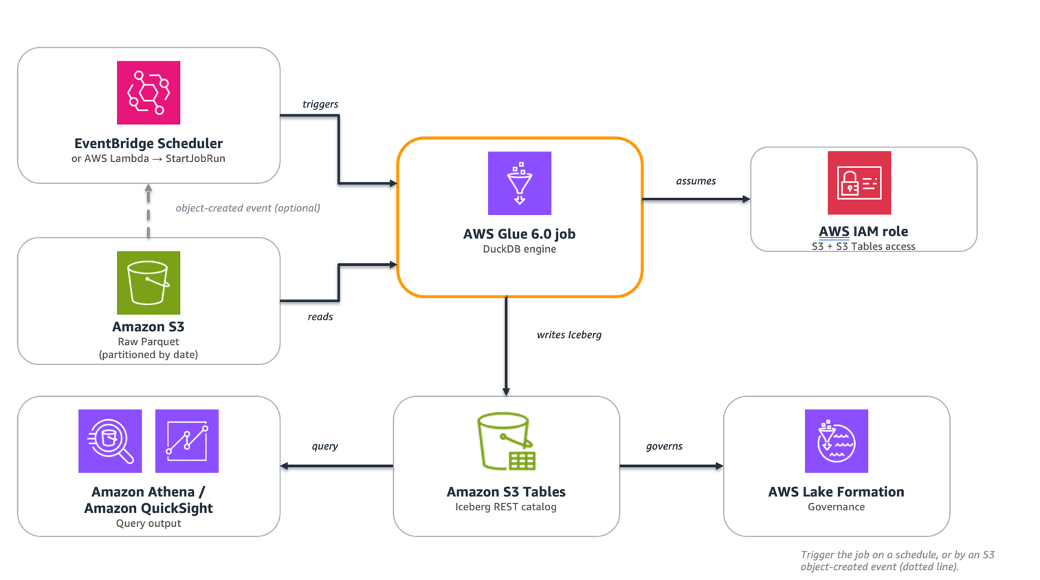
Architecture diagram: raw Parquet files in Amazon S3 flow into an AWS Glue 6.0 job running DuckDB, which writes Apache Iceberg tables to Amazon S3 Tables, with Amazon Athena and Amazon QuickSight querying the output.

Figure 1: Data flows from raw Parquet in Amazon S3 through an AWS Glue 6.0 job running DuckDB, which writes Apache Iceberg tables to Amazon S3 Tables for querying by Amazon Athena and Amazon QuickSight.

The pipeline consists of the following managed components:

Layer

Role

AWS Service

Source Raw Parquet files, partitioned by date Amazon S3
Compute DuckDB SQL engine running on the AWS Glue 6.0 runtime AWS Glue 6.0 (glueetl)
Destination Iceberg analytical tables, queryable by any engine Amazon S3 Tables
Governance Permissions and access control for S3 Tables writes AWS Lake Formation
Query Analytics and business intelligence (BI) on the output tables Amazon Athena, Amazon QuickSight

Raw Parquet files land in Amazon S3 on a schedule. An AWS Glue 6.0 job runs DuckDB. DuckDB reads the files, applies SQL transformations in memory, and writes the aggregated result as an Iceberg table to Amazon S3 Tables through the Iceberg REST catalog. Amazon Athena and Amazon QuickSight can query the output immediately. No separate catalog synchronization is required.

You can trigger the job several ways:

Walkthrough: eCommerce daily order summary

This section walks through a daily ETL pipeline for an eCommerce application. The pipeline reads raw transaction files from Amazon S3, cleanses and aggregates them, and writes a query-ready summary to Amazon S3 Tables.

Step

Operation

Detail

1. Source Read raw Parquet from S3 s3://<amzn-s3-demo-source-bucket>/orders/year=2026/month=08/*.parquet
2. Filter status IN (‘completed’,‘processing’) Drop canceled and test orders
3. Enrich net_revenue, avg_order_value Derived columns via SQL expressions
4. Aggregate GROUP BY order_day, region, category Daily revenue, order count, unique customers
5. Write INSERT into an Amazon S3 Tables Iceberg table Idempotent per-day reload

Prerequisites

  • An AWS account with permissions for AWS Glue, Amazon S3, Amazon S3 Tables, AWS Identity and Access Management (IAM), and AWS Lake Formation.
  • An Amazon S3 bucket containing raw Parquet files (referred to as <amzn-s3-demo-source-bucket> in this post).
  • An Amazon S3 Tables table bucket (referred to as <amzn-s3-demo-table-bucket> in this post). See the Create the S3 Tables table bucket section.
  • An IAM role for the AWS Glue job with:
    • Amazon S3 read access on <amzn-s3-demo-source-bucket>.
    • Amazon S3 Tables read/write access.
    • AWS Glue job execution permissions.
  • AWS Lake Formation grants on the S3 Tables catalog and namespace (required for Iceberg write operations).
  • An AWS Glue 6.0 job (glueetl) with:
    • --additional-python-modules: duckdb==1.5.1.
    • Minimum worker configuration: 2 workers, type G.1X.

Note on DuckDB versions. DuckDB support for writing Apache Iceberg tables through a REST catalog, including Amazon S3 Tables, requires version 1.4.0 or later. This walkthrough uses duckdb==1.5.1. On the AWS Glue 6.0 runtime (Amazon Linux 2023), it installs and all native extensions load without additional configuration.

Create the S3 Tables table bucket

If you don’t already have an Amazon S3 Tables table bucket, create one using the AWS Command Line Interface (AWS CLI):

aws s3tables create-table-bucket \
    --name <amzn-s3-demo-table-bucket> \
    --region <YOUR-REGION>

Note the table bucket Amazon Resource Name (ARN) from the output. It follows the format:

arn:aws:s3tables:<YOUR-REGION>:<YOUR-ACCOUNT-ID>:bucket/<amzn-s3-demo-table-bucket>

Turn on integration with AWS analytics services so the table is discoverable by Amazon Athena, Amazon Redshift, and Amazon EMR. Complete the integration by creating the s3tablescatalog catalog in the AWS Glue Data Catalog using the AWS CLI. For the steps, see Integrating Amazon S3 Tables with AWS analytics services.

After turning on integration, grant the AWS Glue job role Lake Formation permissions on the Amazon S3 Tables catalog and the analytics namespace:

# Allow the job to create the target table on first run (namespace-scoped)
aws lakeformation grant-permissions \
    --principal DataLakePrincipalIdentifier=arn:aws:iam::<YOUR-ACCOUNT-ID>:role/<YOUR-AWS-GLUE-ROLE> \
    --resource '{"Database":{"Name":"analytics","CatalogId":"<YOUR-ACCOUNT-ID>:s3tablescatalog/<amzn-s3-demo-table-bucket>"}}' \
    --permissions '["CREATE_TABLE"]'

# Grant only the operations the job performs on the target table
aws lakeformation grant-permissions \
    --principal DataLakePrincipalIdentifier=arn:aws:iam::<YOUR-ACCOUNT-ID>:role/<YOUR-AWS-GLUE-ROLE> \
    --resource '{"Table":{"DatabaseName":"analytics","Name":"daily_order_summary","CatalogId":"<YOUR-ACCOUNT-ID>:s3tablescatalog/<amzn-s3-demo-table-bucket>"}}' \
    --permissions '["SELECT","INSERT","DELETE"]'

Generate sample data

This walkthrough uses a synthetic eCommerce dataset. Run the following Python script locally or in AWS CloudShell to generate Parquet files that match the schema used in the transform. It produces roughly 8.4 million rows across 12 files (about 94 MB on disk as Parquet, roughly 1.2 GB uncompressed in memory).

import pandas as pd
import numpy as np
import pyarrow as pa
import pyarrow.parquet as pq
import os

np.random.seed(42)

N = 8_400_000  # ~8.4M rows
NUM_FILES = 12  # split across 12 files to mimic a partitioned landing zone

df = pd.DataFrame({
    "order_date": pd.date_range("2026-08-01", periods=N, freq="s"),
    "region": np.random.choice(["US", "EU", "APAC"], N),
    "category": np.random.choice(["electronics", "books", "home", "clothing"], N),
    "status": np.random.choice(
        ["completed", "processing", "cancelled"], N, p=[0.6, 0.3, 0.1]
    ),
    "quantity": np.random.randint(1, 10, N),
    "unit_price": np.round(np.random.uniform(5.0, 200.0, N), 2),
    "customer_id": np.random.randint(1000, 9999, N),
})

os.makedirs("sample_orders", exist_ok=True)

for i, chunk in enumerate(np.array_split(df, NUM_FILES)):
    path = f"sample_orders/orders_part_{i}.parquet"
    pq.write_table(pa.Table.from_pandas(chunk), path)
    print(f"Wrote {path} ({os.path.getsize(path):,} bytes)")

Upload the generated files to your source bucket:

aws s3 cp sample_orders/ \
    s3://<amzn-s3-demo-source-bucket>/orders/ \
    --recursive

Note. The CLI commands and code examples in this walkthrough use angle-bracket placeholders such as <amzn-s3-demo-source-bucket> and <amzn-s3-demo-table-bucket>. Replace these with your own values before running.

Step 1: Configure DuckDB in the AWS Glue 6.0 job

The AWS Glue filesystem is read-only except for /tmp, so DuckDB uses /tmp as a writable home directory for its extension cache and spill files. The job loads DuckDB extensions: httpfs reads and writes Amazon S3 objects directly, aws handles AWS credential resolution, refresh, and AWS Region detection, and iceberg connects to the Amazon S3 Tables REST catalog. The CREDENTIAL_CHAIN provider (from the aws extension) tells DuckDB to use the standard AWS credential provider chain, which automatically picks up the IAM role attached to the AWS Glue job. No access keys or secrets appear in the code.

import os
import duckdb

os.makedirs('/tmp/.duckdb/extensions', exist_ok=True)

con = duckdb.connect(':memory:')
con.execute("SET home_directory='/tmp';")
con.execute("SET extension_directory='/tmp/.duckdb/extensions';")

con.execute("INSTALL httpfs; LOAD httpfs;")
con.execute("INSTALL aws; LOAD aws;")
con.execute("INSTALL iceberg; LOAD iceberg;")

con.execute("CREATE SECRET (TYPE s3, PROVIDER credential_chain);")

The home_directory setting must be applied before loading any extensions. Without it, DuckDB attempts to write to /.duckdb/ and fails with IOError: Permission denied.

Step 2: Read and transform with DuckDB SQL

DuckDB reads Amazon S3 Parquet files directly through the httpfs extension. No local download is required. The read_parquet() function accepts Amazon S3 glob patterns, reading multiple files as a single relation.

import sys
from awsglue.utils import getResolvedOptions

args = getResolvedOptions(sys.argv, ['s3_input_path'])
S3_INPUT = args['s3_input_path']

con.execute(f"""
CREATE OR REPLACE TEMP TABLE _batch AS
SELECT date_trunc('day', order_date) AS order_day,
region, category,
COUNT(*) AS total_orders,
SUM(quantity * unit_price) AS gross_revenue,
SUM(CASE WHEN status = 'completed'
THEN quantity * unit_price ELSE 0 END) AS net_revenue,
COUNT(DISTINCT customer_id) AS unique_customers,
ROUND(AVG(quantity * unit_price), 2) AS avg_order_value,
SUM(CASE WHEN quantity * unit_price > 500
THEN 1 ELSE 0 END) AS high_value_orders
FROM read_parquet('{S3_INPUT}')
WHERE status IN ('completed', 'processing')
GROUP BY ALL
ORDER BY order_day DESC, gross_revenue DESC
""")

GROUP BY ALL is a DuckDB SQL extension that groups by every non-aggregate column in the SELECT list. It’s a convenience feature rather than standard SQL, and support varies across query engines. If you adapt this query for another engine, check whether it supports GROUP BY ALL or list the grouping columns explicitly (GROUP BY order_day, region, category).

The WHERE clause retains both completed and processing orders. The gross_revenue column reflects all in-flight revenue, while net_revenue counts only completed orders. A partition containing only processing orders shows net_revenue = 0. This is by design: the two columns serve different reporting purposes.

Step 3: Write to Amazon S3 Tables

DuckDB attaches the S3 Tables bucket as an Iceberg REST catalog using the ENDPOINT_TYPE s3_tables option. DuckDB commits each write as a new Iceberg snapshot through the catalog.

The write uses an idempotent per-day reload pattern: create the table if it does not exist, delete any existing rows for the batch’s date range, then insert. This way, re-runs don’t produce duplicate rows.

Note: The DELETE and INSERT are not committed atomically. If the job fails between them, the affected partition is left empty. For mitigations, see Error handling for production.

import sys
from awsglue.utils import getResolvedOptions

args = getResolvedOptions(sys.argv, ['s3t_arn'])
S3T_ARN = args['s3t_arn']

con.execute(f"ATTACH '{S3T_ARN}' AS s3t (TYPE iceberg, ENDPOINT_TYPE s3_tables);")
con.execute("CREATE SCHEMA IF NOT EXISTS s3t.analytics;")
con.execute("""
CREATE TABLE IF NOT EXISTS s3t.analytics.daily_order_summary (
order_day DATE,
region VARCHAR,
category VARCHAR,
total_orders BIGINT,
gross_revenue DOUBLE,
net_revenue DOUBLE,
unique_customers BIGINT,
avg_order_value DOUBLE,
high_value_orders BIGINT
);
""")

con.execute("""
DELETE FROM s3t.analytics.daily_order_summary
WHERE order_day IN (SELECT DISTINCT order_day FROM _batch);
""")
con.execute("""
INSERT INTO s3t.analytics.daily_order_summary BY NAME
SELECT * FROM _batch;
""")

count = con.execute(
"SELECT COUNT(*) FROM s3t.analytics.daily_order_summary"
).fetchone()[0]
print(f"S3 Tables now holds {count} rows in analytics.daily_order_summary")

The resulting Iceberg table is immediately readable by Amazon Athena, Amazon Redshift, and Amazon EMR through the S3 Tables REST catalog. Amazon S3 Tables handles compaction, snapshot expiration, and orphan-file cleanup automatically.

Complete AWS Glue 6.0 job script

The following script combines all three steps with structured logging, error handling, and AWS Glue job parameter parsing. It can be used directly as the script for an AWS Glue 6.0 glueetl job.

import os, sys, logging, duckdb
from awsglue.utils import getResolvedOptions

logging.basicConfig(level=logging.INFO,
                    format='%(asctime)s %(levelname)s %(message)s')
logger = logging.getLogger(__name__)

TARGET = 's3t.analytics.daily_order_summary'

DDL = """
CREATE TABLE IF NOT EXISTS s3t.analytics.daily_order_summary (
order_day DATE, region VARCHAR, category VARCHAR,
total_orders BIGINT, gross_revenue DOUBLE, net_revenue DOUBLE,
unique_customers BIGINT, avg_order_value DOUBLE, high_value_orders BIGINT
);
"""

TRANSFORM = """
SELECT date_trunc('day', order_date) AS order_day,
region, category,
COUNT(*) AS total_orders,
SUM(quantity * unit_price) AS gross_revenue,
SUM(CASE WHEN status = 'completed' THEN quantity * unit_price ELSE 0 END) AS net_revenue,
COUNT(DISTINCT customer_id) AS unique_customers,
ROUND(AVG(quantity * unit_price), 2) AS avg_order_value,
SUM(CASE WHEN quantity * unit_price > 500 THEN 1 ELSE 0 END) AS high_value_orders
FROM read_parquet('{s3_input}')
WHERE status IN ('completed', 'processing')
GROUP BY ALL
ORDER BY order_day DESC, gross_revenue DESC
"""

def setup_duckdb():
    os.makedirs('/tmp/.duckdb/extensions', exist_ok=True)
    con = duckdb.connect(':memory:')
    con.execute("SET home_directory='/tmp';")
    con.execute("SET extension_directory='/tmp/.duckdb/extensions';")
    con.execute("INSTALL httpfs; LOAD httpfs;")
    con.execute("INSTALL aws; LOAD aws;")
    con.execute("INSTALL iceberg; LOAD iceberg;")
    con.execute("CREATE SECRET (TYPE s3, PROVIDER credential_chain);")
    logger.info("DuckDB %s initialized with httpfs, aws, and iceberg extensions",
                duckdb.__version__)
    return con

def transform_orders(con, s3_path):
    logger.info("Reading source data: %s", s3_path)
    con.execute("CREATE OR REPLACE TEMP TABLE _batch AS " +
                TRANSFORM.format(s3_input=s3_path))
    return con.execute("SELECT COUNT(*) FROM _batch").fetchone()[0]

def write_to_s3_tables(con, s3t_arn):
    con.execute(f"ATTACH '{s3t_arn}' AS s3t (TYPE iceberg, ENDPOINT_TYPE s3_tables);")
    con.execute("CREATE SCHEMA IF NOT EXISTS s3t.analytics;")
    con.execute(DDL)
    con.execute(f"""
DELETE FROM {TARGET}
WHERE order_day IN (SELECT DISTINCT order_day FROM _batch);
""")
    con.execute(f"INSERT INTO {TARGET} BY NAME SELECT * FROM _batch;")
    count = con.execute(f"SELECT COUNT(*) FROM {TARGET}").fetchone()[0]
    logger.info("Write complete. %s now holds %s rows.", TARGET, count)
    return count

def main():
    args = getResolvedOptions(sys.argv, ['s3_input_path', 's3t_arn'])
    con = setup_duckdb()
    n = transform_orders(con, args['s3_input_path'])
    logger.info("Transformed %s summary rows", n)
    total = write_to_s3_tables(con, args['s3t_arn'])
    logger.info("ETL complete. Table holds %s total rows.", total)

if __name__ == '__main__':
    main()

Create the job using the AWS CLI:

aws glue create-job \
    --name duckdb-order-summary \
    --role <YOUR-AWS-GLUE-ROLE> \
    --glue-version "6.0" \
    --number-of-workers 2 --worker-type G.1X \
    --command '{"Name":"glueetl","ScriptLocation":"s3://<amzn-s3-demo-source-bucket>/scripts/duckdb_job.py","PythonVersion":"3"}' \
    --default-arguments '{
    "--additional-python-modules": "duckdb==1.5.1",
    "--s3_input_path": "s3://<YOUR-SOURCE-BUCKET>/orders/year=2026/month=08/*.parquet",
    "--s3t_arn": "arn:aws:s3tables:<YOUR-REGION>:<YOUR-ACCOUNT-ID>:bucket/<amzn-s3-demo-table-bucket>"
}'

Note. Replace the angle-bracket placeholders (<amzn-s3-demo-source-bucket>, <amzn-s3-demo-table-bucket>, <YOUR-REGION>, <YOUR-ACCOUNT-ID>, <YOUR-AWS-GLUE-ROLE>) with your own values before running.

Lake Formation permissions. Amazon S3 Tables access is governed by AWS Lake Formation. Grant the AWS Glue job role only the permissions the job needs: SELECT, INSERT, and DELETE on the target table (daily_order_summary), plus CREATE_TABLE on the analytics namespace so the job can create the table on first run. For the exact permission names and resource scoping, see the Lake Formation permissions reference. The role also requires the lakeformation:GetDataAccess IAM action. Without these grants, the ATTACH and CREATE TABLE statements fail with an access-denied error.

Error handling for production

For production use, plan for three failure modes:

  • Catalog access. If ATTACH to Amazon S3 Tables returns an access-denied error, verify that the IAM role of the job has the scoped Amazon S3 Tables actions on the table bucket ARN and the required AWS Lake Formation grants. Writes need both.
  • Partial writes. The DELETE and INSERT are not committed atomically, so a failure between them can leave a partition empty. Set MaxRetries to 1 so the idempotent reload re-runs automatically, or write to a staging table and swap on success.
  • Timeouts. Set the job Timeout higher than the expected run time to stop hung runs.

Monitoring

DuckDB runs inside a standard AWS Glue job, so you monitor it with the same Amazon CloudWatch metrics as any AWS Glue job. Two are useful for right-sizing this workload:

  • glue.driver.jvm.heap.usage: driver memory pressure. A high or climbing value means the worker needs more memory or the query is spilling heavily to disk.
  • glue.driver.aggregate.bytesRead: bytes read from Amazon S3, useful for correlating input size with runtime and cost.

The internal execution metrics of DuckDB (query plan, operator timings, spill volume) aren’t exposed to Amazon CloudWatch. Structured logging from the job script is the primary way to observe DuckDB itself: the production script uses logger.info to record the rows transformed and rows written, and those lines appear in the CloudWatch Logs stream of the job. Add more logger.info statements around each stage if you need finer-grained timing.

Measured results

The measurements in this section were collected on AWS Glue 6.0 with DuckDB 1.5.1 writing to Amazon S3 Tables in the US East (N. Virginia) Region (us-east-1). Output tables were verified by querying them in Amazon Athena. Both jobs produced identical output: 1,176 summary rows.

The dataset consisted of 8.4 million rows across 12 Parquet files (approximately 94 MB compressed on disk, approximately 1.2 GB uncompressed). One job ran DuckDB on the AWS Glue 6.0 runtime. The other ran Apache Spark on AWS Glue 6.0 with the equivalent transform and a native Iceberg write.

Metric

DuckDB on AWS Glue 6.0

Spark on AWS Glue 6.0

Compute configuration 2 DPU (2x G.1X) 2 DPU (2x G.1X)
Job Duration ~56 seconds ~117 seconds
Billed duration 1 minute (minimum) 2 minutes
Cost per run $0.0103 $0.0205
Output rows (Athena-verified) 1,176 1,176

On the same AWS Glue 6.0 runtime and the same 2 DPU configuration, DuckDB completed in approximately half the time at approximately half the cost of Spark for this workload.

Cost is calculated at $0.308 per DPU-hour (AWS Glue 6.0 rate). AWS Glue bills in 1-second increments with a 1-minute minimum per run. Verify against the current AWS Glue pricing page for your Region. Results scale with dataset size, query complexity, and Region.

At 20 runs per day, this job costs approximately $75 per year with DuckDB, compared to $150 per year with Spark. Beyond the cost savings, this pattern keeps SQL-centric work quick to iterate on: you express the transformation in SQL, and DuckDB runs it in-process on the AWS Glue worker.

Clean up

To avoid ongoing charges, delete the resources created during this walkthrough:

  1. Delete the AWS Glue job (duckdb-order-summary).
  2. Remove the sample data from your Amazon S3 bucket (s3://<amzn-s3-demo-source-bucket>/orders/).
  3. Drop the Iceberg table in Amazon Athena: DROP TABLE analytics.daily_order_summary;
  4. Delete the Amazon S3 Tables table bucket if it was created for this walkthrough.
  5. Revoke the AWS Lake Formation grants and remove the IAM role if no longer needed.

Conclusion

In this post, we demonstrated how to run DuckDB inside an AWS Glue 6.0 job to read Amazon S3 Parquet, transform it with SQL, and write Apache Iceberg tables directly to Amazon S3 Tables. AWS Glue 6.0 modernized the runtime environment to Amazon Linux 2023, Python 3.13, and Apache Spark 4.1. With that modernization, you can run embedded SQL in the AWS Glue job and write Iceberg tables directly to Amazon S3 Tables. For ETL jobs where the data fits in memory on a single worker, this pattern completed the same work in approximately half the time and half the cost of Spark. The Measured results section describes these measurements. The job uses the same glueetl job type, IAM configuration, and triggering mechanisms as any Spark job on AWS Glue. When a workload outgrows single-worker processing, switching the script back to PySpark requires no infrastructure changes. The result is the ability to match the engine to each job: a scheduled SQL transformation and a large distributed workload can run on one platform, and you pick the engine per job without managing separate systems.

To get started, create an AWS Glue 6.0 job, add duckdb==1.5.1 through the --additional-python-modules parameter, and point it at your Amazon S3 source data and an Amazon S3 Tables bucket. The complete script in this post is a working starting point you can adapt to your own datasets and schedules. For more information, see the AWS Glue Developer Guide and the Amazon S3 Tables user guide. For a complementary pattern that uses DuckDB to read and query data in Amazon S3 Tables, see Streamlining access to tabular datasets stored in Amazon S3 Tables with DuckDB.
About the authors

Bezuayehu Wate

Bezuayehu Wate

Bezuayehu is a Specialist Solutions Architect at AWS, specializing in big data analytics and AI. She works closely with customers to modernize their analytics platforms with AWS data and AI services, and is passionate about emerging technologies and designing cloud solutions that deliver measurable impact for customers.

Manjeet Chayel

Manjeet Chayel

Manjeet Chayel serves as Big Data Manager, Worldwide Specialist Solutions Architects at AWS, where he leads a global team of specialist architects driving customer-facing engagements across Amazon EMR, AWS Glue, and the broader Big Data Analytics portfolio. With over 15 years at Amazon, he brings deep expertise in big data processing and building experiences that operate reliably at massive scale combining work with customers architecting their analytics platforms with a focus on scaling and developing the next generation of technical leaders across AWS.

Automate Spark Scala migration to 4.x with AWS Spark Upgrade Agent

Post Syndicated from Bezuayehu Wate original https://aws.amazon.com/blogs/big-data/automate-spark-scala-migration-to-4-x-with-aws-spark-upgrade-agent/

If you’re a data worker responsible for managing Apache Spark 3.x workloads on Amazon EMR before, you’ve likely faced the challenge of migrating hundreds of jobs to Spark 4.0 without disrupting production pipelines. In this post, you will learn how to automate Spark 3.x to 4.0 migration using the AWS Spark Upgrade Agent covering API deprecations, behavioral changes, build configuration updates, and job validation. What once took months of manual effort can be completed in hours.

This is part 3 of a three-part series on how the AWS Spark Upgrade Agent can automate and simplify Spark upgrades.

Part 1 introduces the agent’s architecture and capabilities. Part 2 walks through a complete PySpark migration from Spark 3.5 to Spark 4.0 on Amazon EMR Serverless. This post walks through Scala migration from Spark 3.3 (Scala 2.12) to Spark 4.0 (Scala 2.13).

Apache Spark 4.0 on Amazon EMR 8.x delivers improvements like native merge_into() support, enhanced Adaptive Query Execution, improved Python UDF performance through Arrow-based serialization, and major Structured Streaming enhancements. For teams on Spark 2.4 or 3.x, the complexity lies in managing API deprecations, behavioral changes, build configuration updates, and re-validating hundreds of jobs while maintaining production pipelines.

Prerequisites

This post assumes you’ve completed the one-time AWS CloudFormation setup and proxy configuration detailed in the introduction post.

What is the Spark Upgrade Agent?

The AWS Spark Upgrade Agent is a fully managed remote server that automates Spark migration using a Model Context Protocol (MCP) interface for code analysis and transformation. For details, see the introduction post.

Architecture: How it works

The architecture follows a least-privilege security model:

  • Scoped IAM roles — AWS IAM roles are scoped to only MCP server calls, Amazon Simple Storage Service (Amazon S3) staging bucket access, and Amazon EMR job submission.
  • Local source code — Your source code stays local, with only minimal diagnostic information transmitted.
  • Encryption in transit — All data is encrypted in transit.
  • Audit trail — AWS CloudTrail records every tool invocation for full auditability.

Example use case: Enterprise-scale Spark migration

To illustrate the capabilities of the agent at scale, consider a real-world migration scenario from a large company. This company runs a data processing platform with thousands of Spark jobs across Scala, PySpark, and Spark SQL workloads, with a code base spanning Spark 3.3 and 3.5.

The data engineering team faces a migration across three workload types with different complexity profiles:

  • Spark SQL applications: The most portable, but still requiring validation of behavioral changes in the query optimizer and join strategies introduced in Spark 4.0.
  • PySpark workloads: Requiring updates to UDF serialization patterns, Arrow-based optimizations, and DataFrame API changes.
  • Scala applications: The most complex, involving build system updates (Maven and SBT), API deprecations, and recompilation against new Spark 4.0 JARs.

To tackle this, the team uses the Spark Upgrade Agent to migrate all three workload types to Spark 4.0 on Amazon EMR 8.x. For each workload, the agent is invoked directly from Kiro or VS Code with Cline, applying targeted transformations and immediately validating results against a live Amazon EMR 8.x Serverless application running Spark 4.0.

Migrations that would traditionally require months of manual engineering effort complete in a fraction of the time. The agent follows an iterative refinement loop: it performs local validation, then submits the job to a remote Amazon EMR cluster. This loop catches and resolves runtime failures automatically, reducing the need for manual debugging cycles. Build configuration files (pom.xml and build.sbt) are updated automatically by the agent, eliminating a common source of migration errors.

Solution walkthrough

The following sections walk through the complete migration workflow, from initial setup through advanced code transformations and validation.

1. Setup

This section lists what you need before starting. Some items, such as Amazon EMR Serverless applications, can be created during the walkthrough using the agent if they don’t already exist.

Must have before starting:

  • AWS Command Line Interface (AWS CLI) configuration: Your AWS CLI must be configured with a profile that has the necessary permissions. See Configuring the AWS CLI for details.
  • IAM role with Amazon EMR permissions: An AWS CloudFormation template is provided in the setup guide to provision the required IAM role. The role is scoped to the permissions needed for the upgrade process: calling the MCP server, reading and writing to the Amazon S3 staging bucket, and submitting Amazon EMR jobs.
  • Amazon S3 staging bucket for artifacts: Used to store code artifacts and Amazon EMR job outputs during the validation phase.
  • Integrated development environment (IDE) installation: Kiro or VS Code with MCP support (Cline extension). Either IDE can interact with the Spark Upgrade Agent through natural language prompts. Consult the setup guide for Kiro and Cline’s documentation to use the MCP server with Cline.
  • One-click MCP server installation: The dataprocessing-mcp server is installed and configured as described in the setup guide.
  • Amazon EMR Serverless applications: An Amazon EMR Serverless application is required for the validation workflow:
    • Target application (Spark 4.0): An Amazon EMR Serverless application configured with release label emr-spark-8.0.0, used to validate migrated jobs against Spark 4.0 on Amazon EMR 8.0.

1.1 Infrastructure setup (AWS CloudFormation)

Two AWS CloudFormation stacks create the required resources: an AWS IAM role, an Amazon S3 staging bucket, an Amazon EMR Serverless application (Spark 4.0), and its execution role.

Stack 1: AWS IAM role and Amazon S3 staging bucket

The spark-upgrade-mcp-setup template creates the AWS IAM role and Amazon S3 staging bucket required by the upgrade agent. Choose the Launch Stack button for your Region. For additional Regions, see the full Region list.

Region Launch
US East (N. Virginia) Launch Stack
US East (Ohio) Launch Stack
US West (Oregon) Launch Stack
Europe (Ireland) Launch Stack

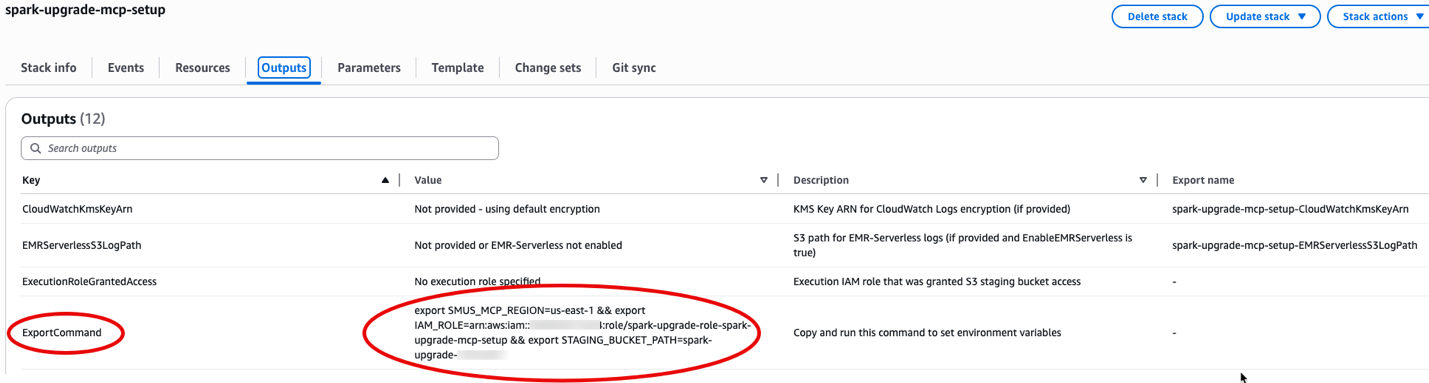
After deployment, open the AWS CloudFormation Outputs tab, copy the ExportCommand value, and run it in your terminal. This sets SMUS_MCP_REGION, IAM_ROLE, and STAGING_BUCKET_PATH automatically.

The following figure shows the Outputs tab with the ExportCommand value.

AWS CloudFormation console Outputs tab with the ExportCommand value ready to copy

Outputs tab of the AWS CloudFormation stack showing the ExportCommand value

# Sets SMUS_MCP_REGION, IAM_ROLE, and STAGING_BUCKET_PATH
export SMUS_MCP_REGION=<YOUR-REGION> && export IAM_ROLE=arn:aws:iam::<YOUR-ACCOUNT-ID>:role/spark-upgrade-role-* && export STAGING_BUCKET_PATH=<amzn-s3-demo-bucket>

Then configure the AWS CLI profile:

aws configure set profile.spark-upgrade-profile.role_arn ${IAM_ROLE}
aws configure set profile.spark-upgrade-profile.source_profile default
aws configure set profile.spark-upgrade-profile.region ${SMUS_MCP_REGION}

Stack 2: Amazon EMR Serverless target application and execution role

The emr-serverless-target-setup template creates an Amazon EMR Serverless application configured with Spark 4.0 (release label emr-spark-8.0.0) and a shared execution role used for job submission during the validation phase. Deploy it as follows:

git clone https://github.com/aws-samples/sample-amazon-emr-spark4-examples
cd sample-amazon-emr-spark4-examples/scala3/demo_1_spark_change_focus

The Scala sample lives at sample-amazon-emr-spark4-examples/scala3/demo_1_spark_change_focus. The CloudFormation template lives at resources/cloudformation/.

Deploy the CloudFormation template to create the target Amazon EMR Serverless application and a shared execution role:

aws cloudformation deploy \
  --template-file resources/cloudformation/emr-serverless-target-setup.yaml \
  --stack-name spark-emr-serverless-upgrade \
  --region ${SMUS_MCP_REGION} \
  --capabilities CAPABILITY_NAMED_IAM \
  --parameter-overrides \
  StagingBucketName=${STAGING_BUCKET_PATH} \
  TargetReleaseLabel=emr-spark-8.0.0 \
  TargetApplicationName=spark-upgrade-target

This creates an Amazon EMR Serverless target application (Spark 4.0) for upgrade validation, with a shared execution role. The application auto-stops after 15 minutes of idle time, so there is no cost when not in use. To upgrade between different Spark versions, override the SourceReleaseLabel and TargetReleaseLabel parameters with the Amazon EMR release labels that you want.

After the stack completes, note the outputs:

aws cloudformation describe-stacks \
  --stack-name spark-emr-serverless-upgrade \
  --region ${SMUS_MCP_REGION} \
  --query "Stacks[0].Outputs" --output table

This gives you the TargetApplicationId and ExecutionRoleArn needed for the upgrade prompt. Make a note of them.

2. Upgrade

This section covers a complete end-to-end upgrade using a representative ecommerce pipeline, a Scala application that processes order events, applies transformations, and writes results using merge-style upsert patterns. The same workflow applies to Scala and Spark SQL workloads covered in subsequent sections.

Step 1: Clone the sample project

Start by cloning the sample project from the AWS samples repository:

git clone https://github.com/aws-samples/sample-amazon-emr-spark4-examples
cd sample-amazon-emr-spark4-examples/scala3/demo_1_spark_change_focus

The repository includes representative PySpark, Scala, and Spark SQL applications designed to demonstrate common Spark 3.x patterns and their Spark 4.0 equivalents.

Step 2: Open in your IDE and connect to the MCP server

Open the project in Kiro or VS Code with the Cline extension. Verify that the dataprocessing-mcp server is active and connected. You can see it listed as an available MCP server in your IDE’s MCP panel. If you haven’t completed the one-time setup, follow the setup guide before proceeding.

Step 3: Start the upgrade with a natural language prompt

Once connected, initiate the upgrade by entering the following request in the agent interface:

Use the dataprocessing-mcp server to upgrade my local project at <path-to-your-project>.
Upgrade my Spark application from Amazon EMR Serverless version 6.9.0 to Amazon EMR Serverless version 8.0.0.
Use Amazon EMR Serverless app-id <your-app-id> for validation.
Store artifacts at s3://amzn-s3-demo-bucket/spark4-upgrade/

The agent responds by invoking generate_spark_upgrade_plan, analyzing your project structure, identifying incompatible patterns, and presenting a prioritized upgrade plan before proceeding with any code changes.

After you confirm the plan, the agent proceeds autonomously through the remaining phases:

  1. Build configuration update — update_build_configuration rewrites pom.xml, build.sbt, or requirements.txt to target Spark 4.0 dependencies.
  2. Environment validation — Java and Python environments are checked and updated as needed.
  3. Code transformation — fix_upgrade_failure applies targeted fixes for each identified incompatibility, iterating until the project compiles cleanly.
  4. Remote validation — run_validation_job submits the upgraded application to your Amazon EMR Serverless target application and monitors execution through check_job_status.
  5. Data quality check (optional) — get_data_quality_summary compares output between the Spark 3.5 baseline and the Spark 4.0 run, confirming correctness before sign-off.

With the sample Scala ecommerce pipeline cloned from the sample-amazon-emr-spark4-examples repository and your IDE connected to the MCP server, you submitted a natural language prompt. This triggered the agent to analyze the project structure and generate a prioritized five-step upgrade plan, all before making any code changes.

Now that the upgrade plan is in place, the following sections walk through the specific code transformations the agent applies for a Scala workload.

Scala workload migration

This section covers the complete migration of a representative Scala Spark application from Amazon EMR Serverless 6.9.0 (Spark 3.3, Scala 2.12) to Amazon EMR Serverless 8.0.0 (Spark 4.0, Scala 2.13), using the demo_1_spark_change_focus sample from the AWSSpark4AutoUpgradeDemo repository.

Sample project: Ecommerce product change focus pipeline

The sample application processes product catalog change events from Amazon S3, applies enrichment transformations, and writes aggregated results back to Amazon S3. It represents a common pattern in ecommerce data platforms: incremental processing of catalog updates with downstream aggregation. In this example, we use VS Code with Cline, but you can also use Kiro or any other MCP-enabled IDE.

Project structure:

demo_1_spark_change_focus/
├── build.sbt
├── project/
│   ├── build.properties
│   └── plugins.sbt
└── src/
    └── main/
        └── scala/
            └── job_script.scala

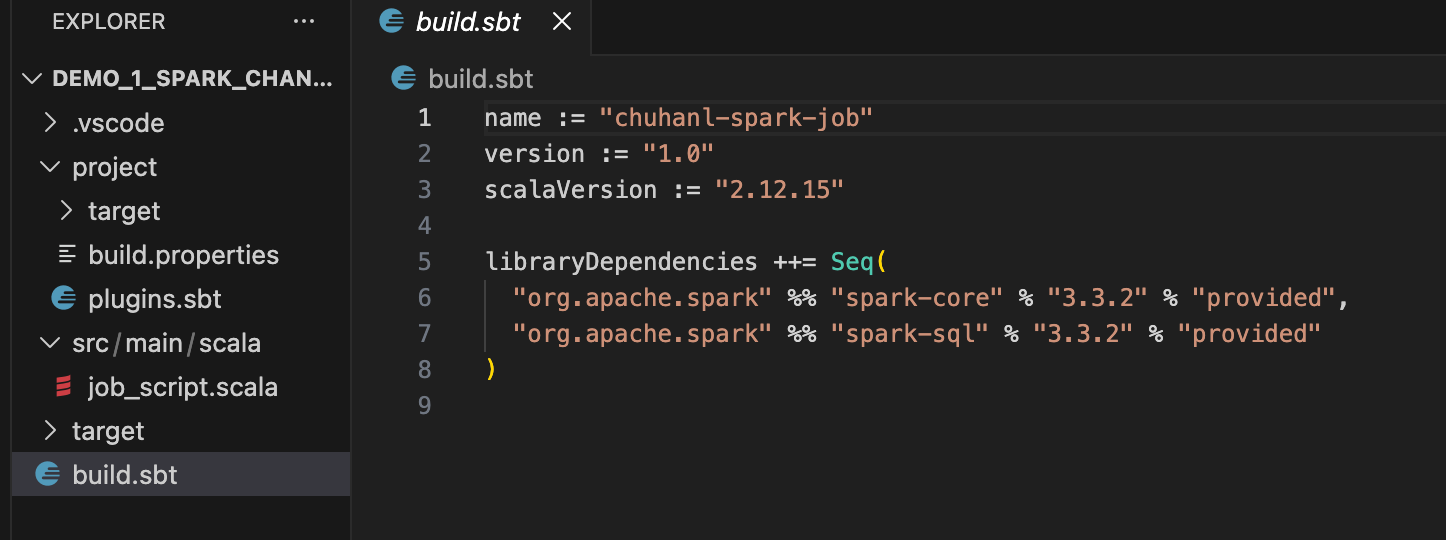
The following figure shows the project structure as it appears in the IDE, with the build configuration and Scala source files.

IDE file tree showing the project layout with build.sbt, the project folder, and the Scala source file

Project structure with build.sbt and Scala source files in the IDE

Step 1: Invoke the upgrade agent

Enter the following prompt:

Use the dataprocessing-mcp server to upgrade my local project at
/Users/<your-path>/AWSSpark4AutoUpgradeDemo/resources/scala/demo_1_spark_change_focus/
from Amazon EMR Serverless version 6.9.0 to Amazon EMR Serverless version 8.0.0.
Use Amazon EMR Serverless app-id <your-app-id> for validation.
Store artifacts at s3://amzn-s3-demo-bucket/spark4-upgrade/scala/

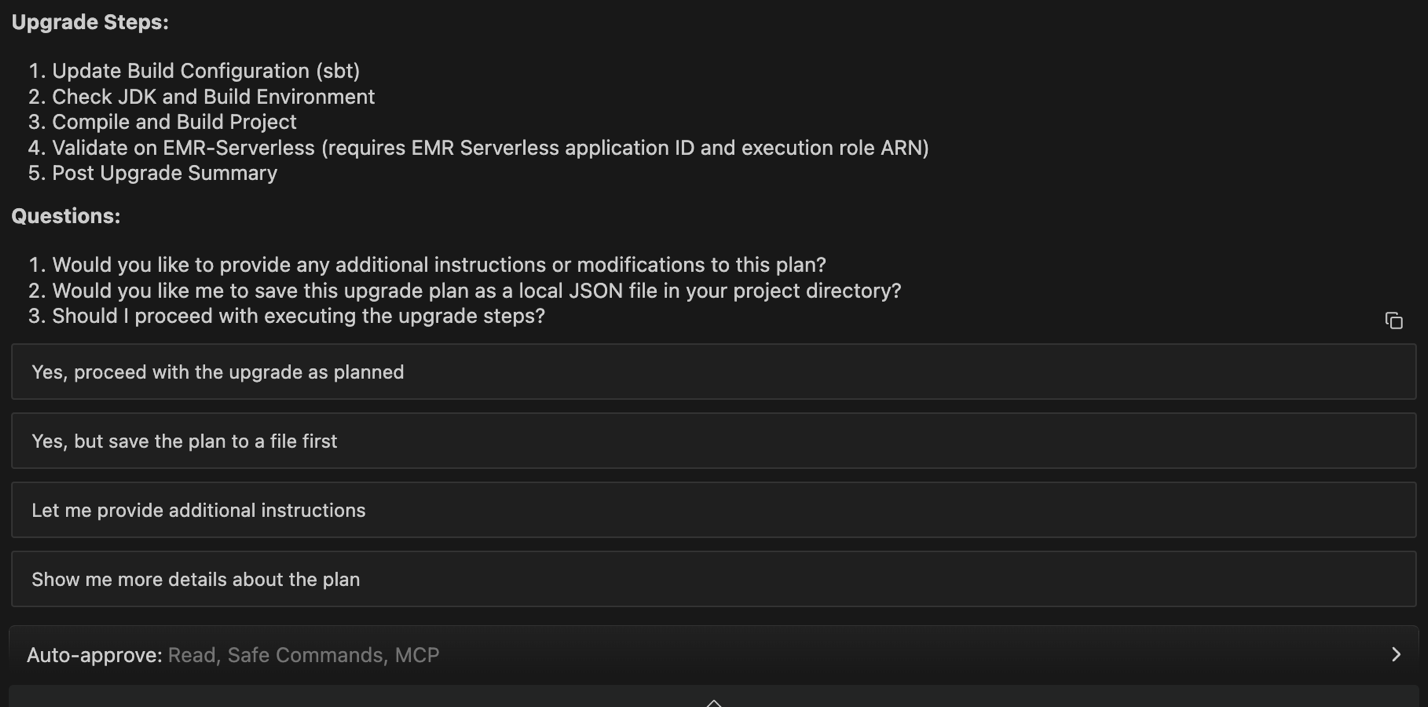
The agent reads your project files, identifies the current Spark and Scala versions, and generates a structured upgrade plan (the analysis ID is logged for traceability). The following figure shows the agent generating the upgrade plan.

Agent output listing the detected Spark 3.3 and Scala 2.12 versions and the generated upgrade plan

Agent generating the upgrade plan with Spark and Scala version analysis

When prompted, choose Yes, proceed with the upgrade as planned, then choose Approve on the subsequent permission dialog to allow the agent to update the build configuration.

Step 2: Build configuration update — build.sbt

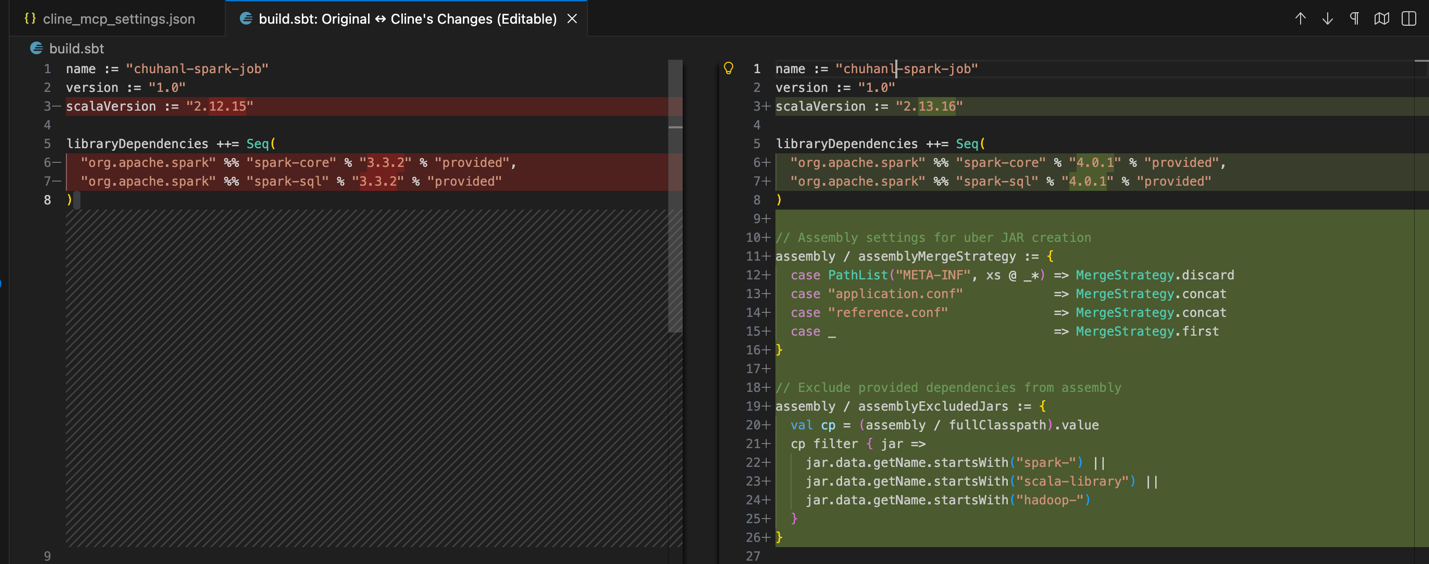
The first action of the agent is to invoke update_build_configuration, rewriting build.sbt to target Spark 4.0 and Scala 2.13, as shown in the following figure.

Agent output showing the build.sbt dependency changes from Spark 3.3 to Spark 4.0.1

Agent output showing build.sbt updates from Spark 3.3 to Spark 4.0

The build configuration update is generated. The following are the recommended changes for build.sbt.

Changes summary:

  1. Scala version: Updated from 2.12.15 to 2.13.16 (required for Spark 4.0).
  2. Spark dependencies: Updated from 3.3 to 4.0.
    • spark-core: 3.3 → 4.0.
    • spark-sql: 3.3 → 4.0.
  3. Assembly settings: Added configuration for creating uber JARs with proper merge strategies.
  4. Dependency exclusions: Added rules to exclude provided dependencies (Spark, Scala, Hadoop) from assembly.

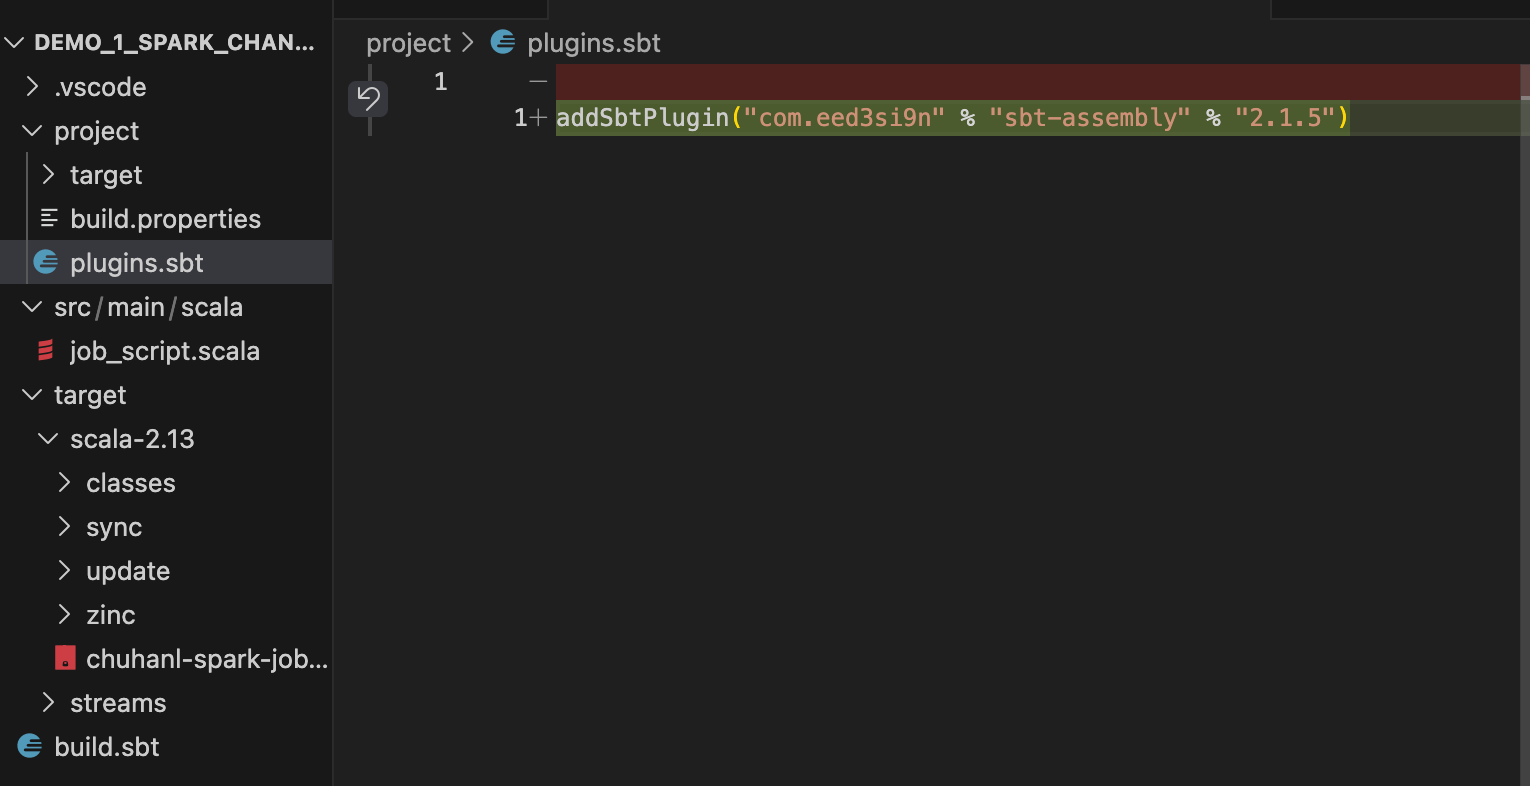
The following figure shows the updated build.sbt and plugins.sbt files after the configuration changes are saved.

The updated build.sbt and plugins.sbt files open in the editor after the configuration changes

Updated build.sbt and plugins.sbt files saved after configuration changes

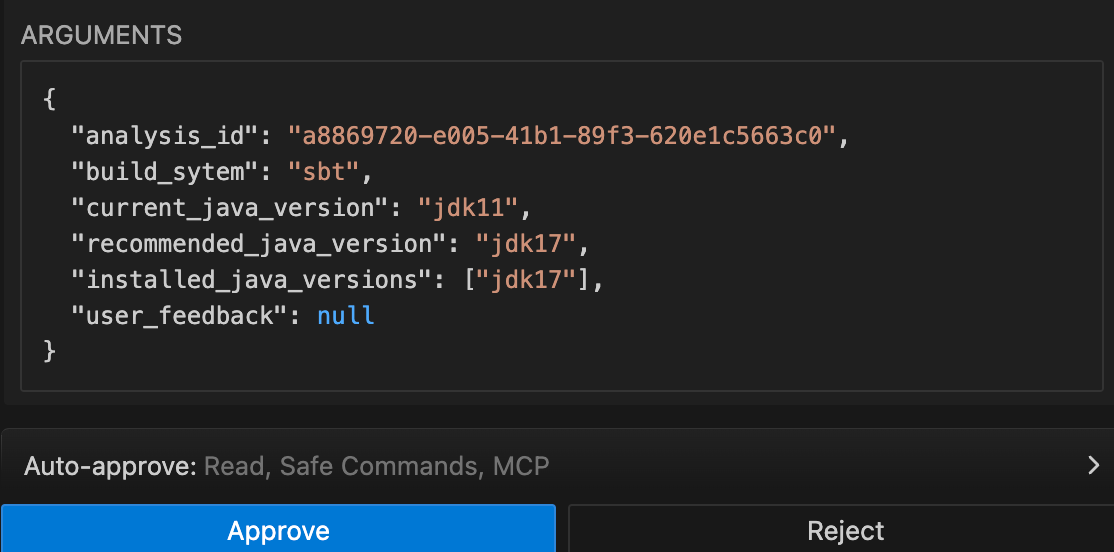
Step 3: Java environment check

Amazon EMR Serverless 8.0.0 runs on Java 17. The agent invokes check_and_update_build_environment to verify your local Java Development Kit (JDK) and upgrade it from Java 11 to Java 17, as shown in the following figure.

Agent output verifying the local Java version and recommending an upgrade to JDK 17

Agent verifying Java environment and recommending JDK 17 for Amazon EMR 8.0

Step 4: Scala source code transformations

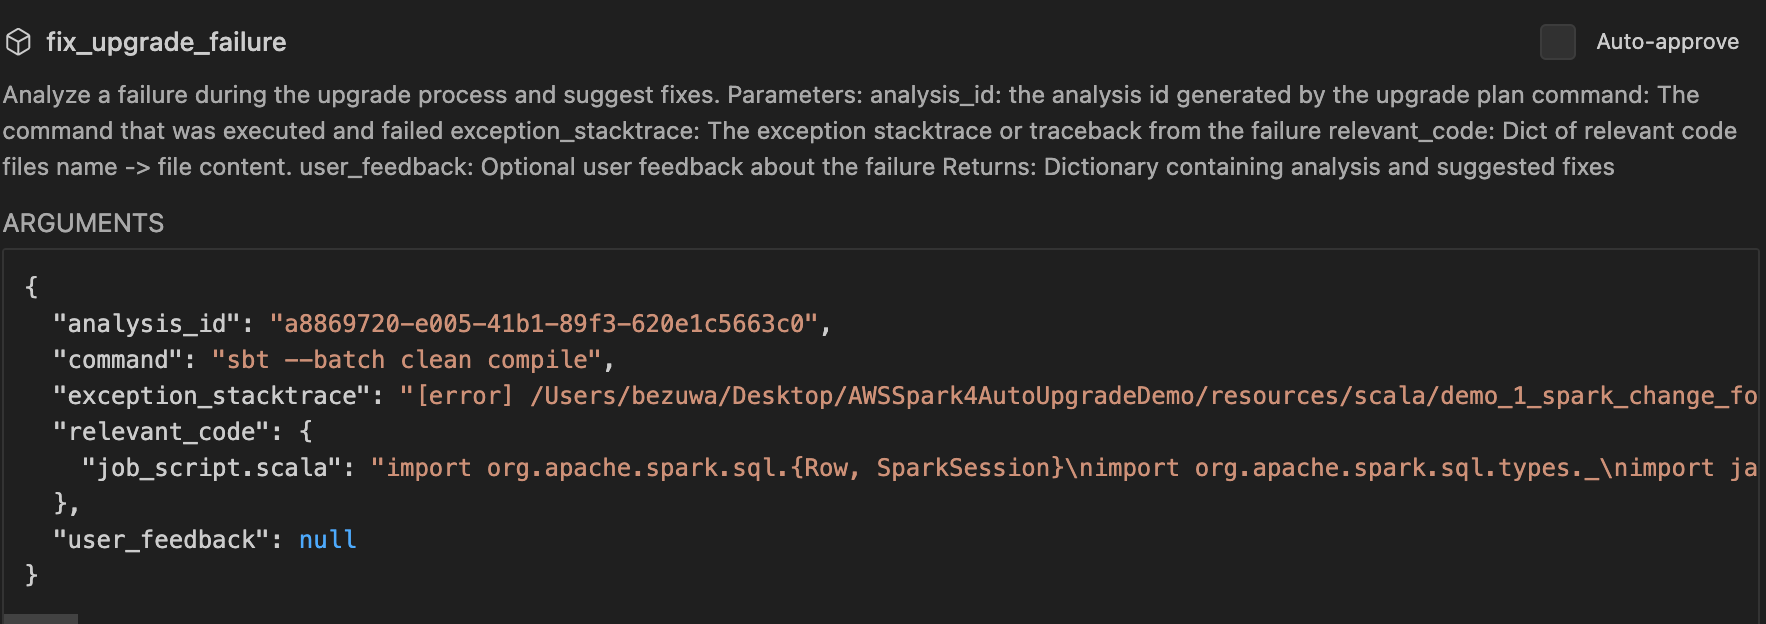
After updating the build configuration, the agent compiles the project and applies fix_upgrade_failure iteratively to resolve Scala 2.13 and Spark 4.0 breaking changes. Scala 2.13 removed several deprecated collection methods that were available in 2.12. The compilation failed with errors related to the Scala 2.13 syntax change. The .to[Set] syntax needs to be updated to .to(Set) for Scala 2.13. The agent used the fix_upgrade_failure tool to resolve the compilation errors. The following are the key transformations applied to job_script.scala.

The following figure shows the agent applying Scala 2.13 source code transformations to resolve the compilation errors.

Agent output showing the Scala 2.13 source code edits applied to job_script.scala

Agent applying Scala 2.13 source code transformations to resolve compilation errors

// Disable ANSI (American National Standards Institute) (SQL compliance mode)(ANSI) mode to handle overflow and malformed cast operations
spark.conf.set("spark.sql.ansi.enabled", "false")

df.createOrReplaceTempView("airports")
// With ANSI mode disabled, overflow values will be handled gracefully
var new_df = spark.sql("SELECT *, CAST(build_time AS SMALLINT) as numeric_build_time FROM airports")
new_df.show()
new_df.createOrReplaceTempView("airports")

// Migration change: The to[Collection] method was replaced by the to(Collection) method.
val airports_in_us: Set[String] = spark.sql("SELECT name FROM airports WHERE country='USA'").collect().map(_.getString(0)).to(Set)
println(airports_in_us)
val airports_in_us_java: java.util.Set[String] = airports_in_us.asJava

// With ANSI mode disabled, malformed CAST operations will return null instead of failing
new_df = spark.sql("SELECT *, CAST(code AS INT) as numeric_code FROM airports")
new_df.show()
new_df.write
  .mode("overwrite")
  .parquet(outputPath)

Before

val airports_in_us: Set[String] = spark.sql("SELECT name FROM airports WHERE country='USA'").collect().map(_.getString(0)).to[Set]

After

val airports_in_us: Set[String] = spark.sql("SELECT name FROM airports WHERE country='USA'").collect().map(_.getString(0)).to(Set)

Code change explanation:

  • Scala 2.13 changed the collection conversion API. The .to[Collection] syntax was replaced with .to(Collection) using parentheses instead of square brackets.
  • Updated collection conversion from .to[Set] to .to(Set) to comply with Scala 2.13+ syntax requirements.
  • Changed import scala.collection.JavaConverters._ to import scala.jdk.CollectionConverters._ and updated .to[Set] to .to(Set).
  • Renamed the object from Spark3_3_Job to Spark4_0_Job. Updated the Parquet config keys from spark.sql.legacy.parquet.int96RebaseModeInRead/Write to spark.sql.parquet.int96RebaseModeInRead/Write.
  • Added spark.conf.set("spark.sql.ansi.enabled", "false") to handle overflow and malformed cast operations gracefully.
  • The output path was updated to s3://xxxxxxxxx/output.

After the compilation succeeds, the agent builds the assembly JAR. Choose Save to create a report for the build result.

Step 5: Runtime validation

Provide the following information to run the validation job on Amazon EMR Serverless.

Amazon EMR Serverless application ID (target application running Spark 4.0 on Amazon EMR 8.0.0):

  • To create an Amazon EMR application, follow the Amazon EMR documentation, or provide a prompt for the agent to create one for you.
  • Format: 00xxxxxxxxxxxxxxxxxxxxxxxxxx.

Execution role Amazon Resource Name (ARN) (IAM role for the job):

  • Set up the execution role following the IAM role guide.
  • Format: arn:aws:iam::123456789012:role/YourRoleName.

Amazon S3 staging path (for uploading the JAR and storing results):

  • Format: s3://amzn-s3-demo-bucket/path/.

AWS profile (the AWS profile to use for CLI commands, found in your mcp_settings.json file):

  • Example: default, dev, pro.

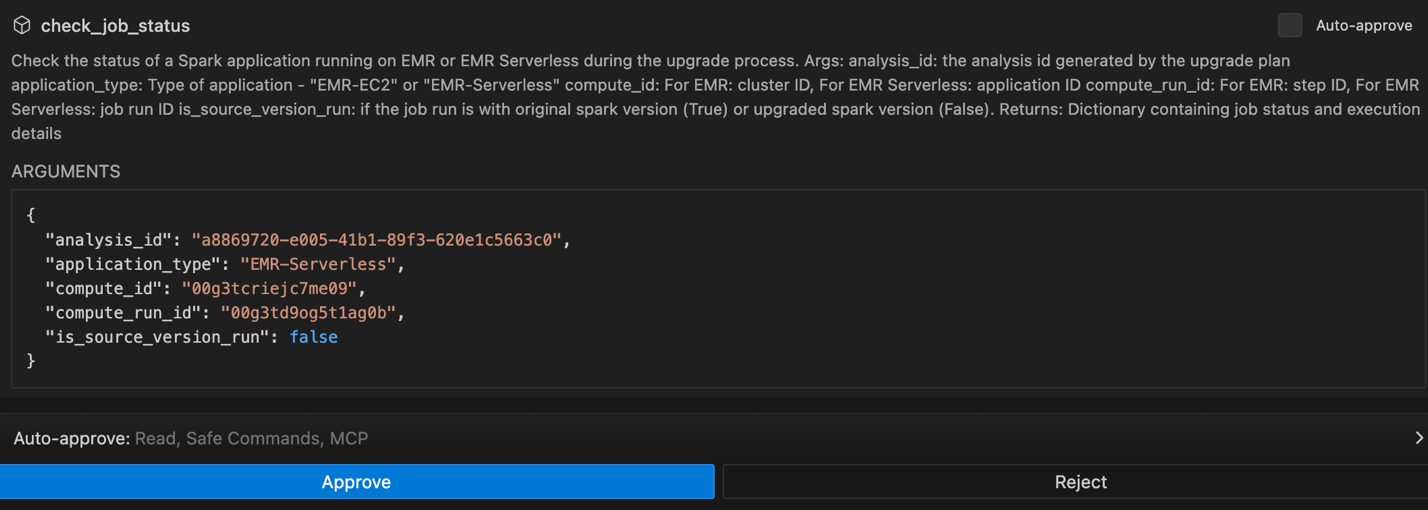
After you submit this information, the agent uploads the JAR to Amazon S3 and submits the validation job with the following arguments:

{
  "analysis_id": "a8869720-e005-41b1-89f3-620e1c5663c0",
  "application_type": "EMR-Serverless",
  "compute_id": "xxxxxxxxxxxxxx",
  "compute_run_config": {
    "executionRoleArn": "arn:aws:iam::xxxxxxxx:role/data-processing-mcp-role",
    "jobDriver": {
      "sparkSubmit": {
        "entryPoint": "s3://xxxxx/xxxxxxx/xxxxxxxxx-xxxxxxx-xxxxxxxx/xxx-job-assembly-1.0.jar",
        "entryPointArguments": [],
        "sparkSubmitParameters": "--class Spark4_0_Job --conf spark.executor.cores=4 --conf spark.executor.memory=16g --conf spark.driver.cores=4 --conf spark.driver.memory=16g --conf spark.executor.instances=2"
      }
    },
    "configurationOverrides": {
      "monitoringConfiguration": {
        "cloudWatchLoggingConfiguration": {
          "enabled": true,
          "logGroupName": "/aws/emr-serverless"
        }
      }
    }
  },
  "enable_data_quality_check": false,
  "s3_staging_path": "s3://xxxxxxx/xxxxxxxxx/",
  "is_source_version_run": false,
  "spark_metadata_file_put_presigned_url": null,
  "static_artifacts_file_paths": null
}

The agent monitors the job status upon approval.

Agent output showing the Amazon EMR Serverless validation job completing with a success status

Amazon EMR Serverless job validation output showing successful completion

Once you receive a success response, the agent proceeds to generate the upgrade summary for your Spark project.

{"success":true,"message":"EMR SERVERLESS job completed successfully","compute_run_id":"xxxxxxxxxx","compute_id":"xxxxxxxxxx","status":"SUCCESS","application_type":"EMR-Serverless","next_action":"Proceed to next step in the plan"}

After the job succeeds, you can optionally cross-check the results by navigating to your Amazon S3 bucket to verify the output files were written successfully, or by reviewing the job run details in the Amazon EMR Serverless console to confirm execution status and logs. Choose Approve to allow the agent to save the summary to a local file and upload it to Amazon S3.

You can also request ANSI mode enablement through the agent interface, and it applies the necessary updates accordingly.

Relevant Spark changes:

  • Migration rule: Spark 4.0 enables ANSI mode by default. To handle type conversion errors gracefully while keeping ANSI mode enabled, use TRY_CAST instead of CAST.
  • Change description: Enabled ANSI mode and replaced CAST with TRY_CAST for operations that might fail, specifically timestamp-to-smallint overflow and string-to-int malformed value conversions.

Applied changes:

  • Code diff — src/main/scala/job_script.scala:
    • Changed spark.conf.set("spark.sql.ansi.enabled", "false") to spark.conf.set("spark.sql.ansi.enabled", "true").
    • Replaced CAST(build_time AS SMALLINT) with TRY_CAST(build_time AS SMALLINT).
    • Replaced CAST(code AS INT) with TRY_CAST(code AS INT).

The agent compiles the change and follows the previous steps to run the job on Amazon EMR Serverless.

Result: SUCCESS

In this Scala workload migration section, the agent automatically upgraded the ecommerce pipeline from Spark 3.3 and Scala 2.12 on Amazon EMR 6.9.0 to Spark 4.0 and Scala 2.13 on Amazon EMR 8.0.0. It rewrote build.sbt and plugins.sbt, upgraded the JDK from 11 to 17, and applied Scala 2.13 syntax fixes (.to(Set), CollectionConverters), Parquet config key updates, and ANSI mode handling with TRY_CAST replacements. The upgraded JAR was compiled, submitted to Amazon EMR Serverless, and validated with a SUCCESS status, completing the full migration without manual code edits.

Clean up

To avoid ongoing charges, delete the resources created during this walkthrough. Start by emptying the Amazon S3 staging bucket, then delete both AWS CloudFormation stacks in reverse order:

  1. Empty the Amazon S3 staging bucket.
    aws s3 rm s3://${STAGING_BUCKET_PATH} --recursive

  2. Delete the Amazon EMR Serverless application stack.
    aws cloudformation delete-stack --stack-name spark-emr-serverless-upgrade

  3. Delete the MCP setup stack (IAM role and Amazon S3 bucket).
    aws cloudformation delete-stack --stack-name spark-upgrade-mcp-setup

Conclusion

The AWS Spark Upgrade Agent transforms what has traditionally been a months-long, error-prone migration process into an automated, IDE-driven workflow that completes in hours. By combining intelligent code analysis, targeted transformations, and an iterative local-to-remote validation loop, the agent handles the complexity of upgrading Scala workloads from Spark 3.x to Spark 4.0 on Amazon EMR 8.x. The demo_1_spark_change_focus walkthrough demonstrates the ability of the agent to automatically update build configurations, apply Scala 2.13 syntax changes, handle Spark 4.0 breaking changes like ANSI mode defaults, and validate results against live Amazon EMR clusters, all through natural language prompts in your IDE. For teams managing large-scale Spark estates, this approach eliminates manual debugging cycles, reduces migration risk, and unlocks the performance gains of Spark 4.0 without the traditional engineering overhead.

Next steps:

  • If you’re new to the Spark Upgrade Agent, start with the introduction post for a lighter-weight introduction before tackling Scala workloads.
  • For a complete PySpark implementation and demo, refer to Upgrade PySpark from Spark 3.5 to Spark 4.0 with AWS Spark Upgrade Agent.
  • When you are ready for production, review the security model in the Architecture section and the IAM role setup guide to confirm your least-privilege configuration before running against production workloads.

Useful resources:

Have questions or feedback? Share your migration experience in the AWS re:Post community or open an issue in the sample repository. We’d love to hear how the agent performs on your workloads.


About the authors

Bezuayehu Wate

Bezuayehu Wate

Bezuayehu is a Specialist Solutions Architect at AWS, specializing in big data analytics and AI-driven data processing. She works closely with customers to modernize analytics platforms using AWS data and AI services. With a passion for emerging technologies and customer success, she thrives on designing innovative cloud solutions that deliver measurable business impact and drive organizational transformation.

Prasad Nadig

Prasad Nadig

Prasad is a Senior Analytics Specialist Solutions Architect at Amazon Web Services (AWS), specializing in large-scale data analytics and AI. He partners with customers to tackle complex, large-scale data challenges guiding them as they design, migrate, and modernize their analytics platforms into solutions that are scalable, performant, and cost-effective. His expertise spans data lakes, data warehousing, and distributed data processing, with a strong focus on architectural best practices, performance tuning, and cost-optimization strategies that help organizations run analytics efficiently at petabyte scale.

Karthik Prabhakar

Karthik Prabhakar

Karthik is a Data Processing Engines Architect for Amazon EMR at Amazon Web Services (AWS). He specializes in distributed systems architecture and query optimization, working with customers to solve complex performance challenges in large-scale data processing workloads. His focus spans engine internals, cost-optimization strategies, and architectural patterns that enable customers to run petabyte-scale analytics efficiently.

Shubham Mehta

Shubham Mehta

Shubham is a Senior Product Manager at AWS Analytics. He leads generative AI feature development across services such as AWS Glue, Amazon EMR, and Amazon Managed Workflows for Apache Airflow (Amazon MWAA), using AI/ML to simplify and enhance the experience of data practitioners building data applications on AWS.

Keerthi Chadalavada

Keerthi Chadalavada

Keerthi is a Senior Software Development Engineer in the AWS analytics organization. She focuses on combining generative AI and data integration technologies to design and build comprehensive solutions for customer data and analytics needs.

Chuhan Liu

Chuhan Liu

Chuhan is a Software Engineer at AWS Glue. He is passionate about building scalable distributed systems for big data processing, analytics, and management. He is also keen on using generative AI technologies to provide brand-new experience to customers. In his spare time, he likes sports and enjoys playing tennis.