Post Syndicated from Emmett Kelly original https://blog.rapid7.com/2022/03/15/insightvm-scanning-demystifying-ssh-credential-elevation/

Written in collaboration with Jimmy Cancilla
The credentials to log into the assets on the network are one of the most critical inputs that can be provided to a vulnerability assessment. In order to capture and report on the full risk of an asset, the scan engine must be able to access the asset so that it can collect vital pieces of information, such as what software is installed and how the system is configured. For UNIX and UNIX-like systems, access to a target is primarily achieved through the Secure Shell Protocol (SSH). Thus, scan engines accessing these systems should have access to the appropriate SSH credentials.
However, this raises the question: What are appropriate SSH credentials? In order for a vulnerability or policy assessment to provide accurate and comprehensive results, the scan engine should ideally be able to gain root-level access to the systems being assessed. Understandably, many security teams are wary about providing the scan engine with root credentials to all of their systems. Instead, security teams prefer to provide a non-root set of credentials that are capable of elevating to become root. In this context, credential elevation means logging into a system with one set of credentials that has fewer privileges and then elevating that credential to gain root-level privileges. In this way, IT administrators can provide service users that can be monitored and easily disabled if necessary.
In the next section, we will look at the different ways that credentials can be elevated.
Elevation options
sudo
The sudo command enables users to run commands with the security privileges of another user, which by default happens to be the root user (superuser). The ability to use the sudo command to elevate to root is a privilege that is provided by the system administrator. The administrator explicitly grants users (or groups) permission to use the sudo command — this is typically done by modifying the /etc/sudoers file on Linux-based systems.
The benefit of having access to the sudo command means that a user does not need to know the root password in order to gain root-level privileges. However, the user attempting to elevate to root-level privileges via sudo may still need to authenticate themselves by providing their own password. This is different from the behaviour of the su command, which will be discussed later.
What this means in terms of configuring sudo elevation in the Security Console is that the Permission Elevation Password on the “Add Credentials” page must be set to the password of the user attempting to elevate to root.

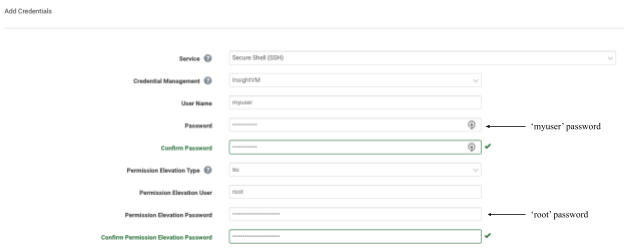
su
Like the sudo command, the su command enables users to run commands with the security privileges of another user, the default being to run the commands as the root user (superuser). However, unlike the sudo command, the su command typically does not require a system administrator to provide explicit permission to use the command. Instead, users can use the su command to switch to any other user on the system but must provide the password of the target user. The implication of this is that in order to use the su command to elevate to root-level privileges, the user must authenticate by providing the root password.
What this means in terms of configuring su elevation in the Security Console, is that the Permission Elevation Password on the “Add Credentials” page must be set to the password of the root user.
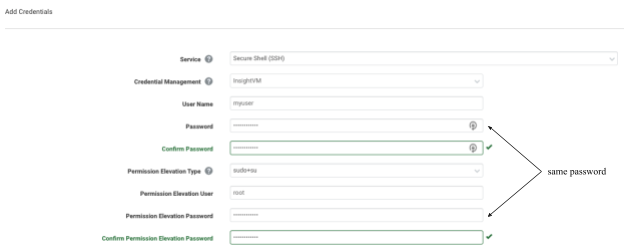
sudo+su
If you have read the above sections on sudo and su, you may be asking yourself why you would need to combine the two commands. The answer comes down to a subtle but important difference between the two commands, namely the environmental context in which those commands are invoked. When using sudo to execute another command with root-level privileges, the command is run within the current user’s environment. This means that any environment-specific properties (for example, environment variables) are retained. When using su to execute another command with root-level privileges, su will invoke the default shell used by root and then run the command within that environment. This implies that any environment-specific properties loaded by default when logging into the root user will be set.
Given this explanation, combining the sudo and su commands provides a best of both worlds situation: It allows a user to elevate their privileges to root by providing their own user password, and it will execute the command within the context of the root environment (as opposed to the user’s environment). How does this work?
The first command executed is sudo, which will prompt the user to authenticate themselves by entering their own password. Then, the su command will be run. However, since it is running with root-level privileges, it won’t prompt for another password but instead will execute any commands within the context of the root environment. So to summarize, sudo+su allows for executing commands with root-level privileges within the context of root’s environment but without requiring knowledge of the root password.
What this means in terms of configuring sudo+su elevation in the Security Console, is that the Permission Elevation Password on the “Add Credentials” page must be set to the password of the user attempting to elevate to root.
Important note about sudo, su and sudo+su
The Permission Elevation User should be root. A common misconfiguration when configuring permission elevation is to set this value to the user’s username. This leads to the scan engine logging in as the initial user, then using permission elevation to attempt to elevate to the same user! The credential status will be reported as successful, but the scan results will not have the same accuracy of a correctly configured scan with root permissions.
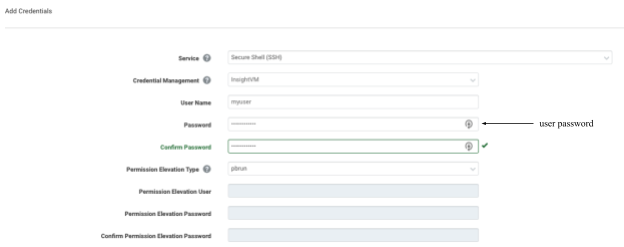
pbrun
The pbrun command is a utility within the PowerBroker application provided by BeyondTrust. It works similarly to the sudo command in that it allows a user to elevate to root-level privileges without having to provide the root password.
Configuring privilege escalation with pbrun in the Security Console is fairly straightforward, as it does not require any additional passwords beyond the user’s password.
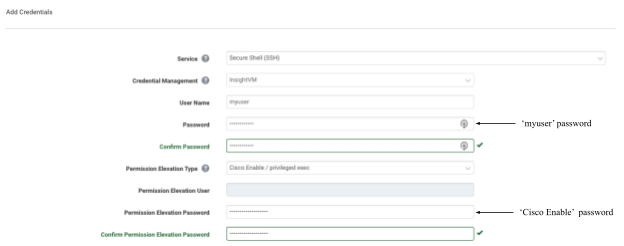
Cisco Enable / Privileged Exec
This option specifically allows a user to elevate to superuser-level privileges on certain Cisco devices using the enable command. Administrators of the Cisco devices will need to have configured an enable password to allow for privilege elevation.
What this means in terms of configuring Cisco Enable / Privileged Exec elevation in the Security Console, is that the Permission Elevation Password on the “Add Credentials” page must be set to the Cisco Enable password configured on the devices.
Perils of not elevating
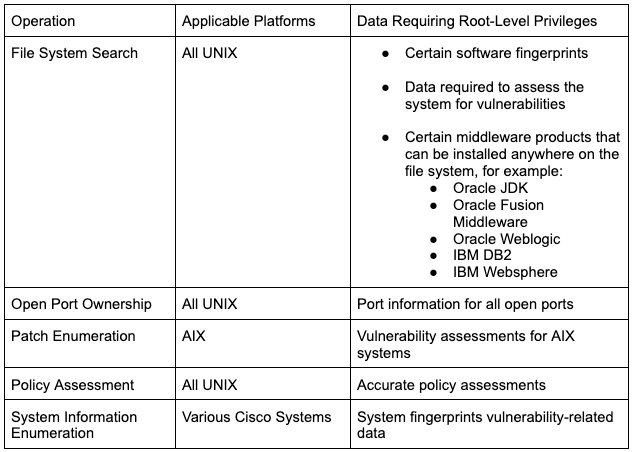
Elevation is critical to accurately assess an asset for vulnerabilities and system configurations. There are several key pieces of information that can only be collected with root-level privileges. Improperly configuring credential elevation is one of the most common causes of inaccurate or incomplete assessment results. The following table outlines a few key operations and pieces of data that require root-level privileges. It is important to note that this is a non-exhaustive list operations and data requiring root-level privileges – an exhaustive list would quickly become outdated as new data collection techniques are constantly being added to the product.
Conclusion
When it comes to vulnerability management, retrieving accurate and comprehensive results is paramount to mitigating risks within your organization. The most accurate data is collected when the scan engine has root-level access to the systems it is scanning. However, not all organizations may be in a position to provide the root password to these systems.
In this case, a best practice is to provide the vulnerability management software with a service account that is capable of elevating its permissions to root. This allows system administrators to more easily manage who is capable of elevating to root and, if necessary, revoke access. However, there are several different ways that an account can elevate its permissions. Each method comes with subtle but important differences. Understanding those differences is critical to ensuring that elevation to the correct level of permissions occurs successfully.
Additional reading