Post Syndicated from Iris Ferreira original https://aws.amazon.com/blogs/security/data-masking-and-granular-access-control-using-amazon-macie-and-aws-lake-formation/
Companies have been collecting user data to offer new products, recommend options more relevant to the user’s profile, or, in the case of financial institutions, to be able to facilitate access to higher credit lines or lower interest rates. However, personal data is sensitive as its use enables identification of the person using a specific system or application and in the wrong hands, this data might be used in unauthorized ways. Governments and organizations have created laws and regulations, such as General Data Protection Regulation (GDPR) in the EU, General Data Protection Law (LGPD) in Brazil, and technical guidance such as the Cloud Computing Implementation Guide published by the Association of Banks in Singapore (ABS), that specify what constitutes sensitive data and how companies should manage it. A common requirement is to ensure that consent is obtained for collection and use of personal data and that any data collected is anonymized to protect consumers from data breach risks.
In this blog post, we walk you through a proposed architecture that implements data anonymization by using granular access controls according to well-defined rules. It covers a scenario where a user might not have read access to data, but an application does. A common use case for this scenario is a data scientist working with sensitive data to train machine learning models. The training algorithm would have access to the data, but the data scientist would not. This approach helps reduce the risk of data leakage while enabling innovation using data.
Prerequisites
To implement the proposed solution, you must have an active AWS account and AWS Identity and Access Management (IAM) permissions to use the following services:
- Amazon Athena
- AWS CloudFormation
- AWS Database Migration Service (AWS DMS)
- Amazon Elastic Compute Cloud (Amazon EC2)
- AWS Glue
- Amazon EventBridge
- IAM
- AWS Key Management Service (AWS KMS)
- Amazon Kinesis Data Firehose
- AWS Lake Formation
- AWS Lambda
- Amazon Macie
- Amazon Relational Database Service (Amazon RDS)
- Amazon Simple Storage Service (Amazon S3)
- AWS Secrets Manager
- Amazon Virtual Private Cloud (Amazon VPC)
Note: If there’s a pre-existing Lake Formation configuration, there might be permission issues when testing this solution. We suggest that you test this solution on a development account that doesn’t yet have Lake Formation active. If you don’t have access to a development account, see more details about the permissions required on your role in the Lake Formation documentation.
You must give permission for AWS DMS to create the necessary resources, such as the EC2 instance where you will run DMS tasks. If you have ever worked with DMS, this permission should already exist. Otherwise, you can use CloudFormation to create the necessary roles to deploy the solution. To see if permission already exists, open the AWS Management Console and go to IAM, select Roles, and see if there is a role called dms-vpc-role. If not, you must create the role during deployment.
We use the Faker library to create dummy data consisting of the following tables:
- Customer
- Bank
- Card
Solution overview
This architecture allows multiple data sources to send information to the data lake environment on AWS, where Amazon S3 is the central data store. After the data is stored in an S3 bucket, Macie analyzes the objects and identifies sensitive data using machine learning (ML) and pattern matching. AWS Glue then uses the information to run a workflow to anonymize the data.

Figure 1: Solution architecture for data ingestion and identification of PII
We will describe two techniques used in the process: data masking and data encryption. After the workflow runs, the data is stored in a separate S3 bucket. This hierarchy of buckets is used to segregate access to data for different user personas.
Figure 1 depicts the solution architecture:
- The data source in the solution is an Amazon RDS database. Data can be stored in a database on an EC2 instance, in an on-premises server, or even deployed in a different cloud provider.
- AWS DMS uses full load, which allows data migration from the source (an Amazon RDS database) into the target S3 bucket — dcp-macie — as a one-time migration. New objects uploaded to the S3 bucket are automatically encrypted using server-side encryption (SSE-S3).
- A personally identifiable information (PII) detection pipeline is invoked after the new Amazon S3 objects are uploaded. Macie analyzes the objects and identifies values that are sensitive. Users can manually identify which fields and values within the files should be classified as sensitive or use the Macie automated sensitive data discovery capabilities.
- The sensitive values identified by Macie are sent to EventBridge, invoking Kinesis Data Firehose to store them in the dcp-glue S3 bucket. AWS Glue uses this data to know which fields to mask or encrypt using an encryption key stored in AWS KMS.
- Using EventBridge enables an event-based architecture. EventBridge is used as a bridge between Macie and Kinesis Data Firehose, integrating these services.
- Kinesis Data Firehose supports data buffering mitigating the risk of information loss when sent by Macie while reducing the overall cost of storing data in Amazon S3. It also allows data to be sent to other locations, such as Amazon Redshift or Splunk, making it available to be analyzed by other products.
- At the end of this step, Amazon S3 is invoked from a Lambda function that starts the AWS Glue workflow, which masks and encrypts the identified data.
- AWS Glue starts a crawler on the S3 bucket dcp-macie (a) and the bucket dcp-glue (b) to populate two tables, respectively, created as part of the AWS Glue service.
- After that, a Python script is run (c), querying the data in these tables. It uses this information to mask and encrypt the data and then store it in the prefixes dcp-masked (d) and dcp-encrypted (e) in the bucket dcp-athena.
- The last step in the workflow is to perform a crawler for each of these prefixes (f) and (g) by creating their respective tables in the AWS Glue Data Catalog.
- To enable fine-grained access to data, Lake Formation maps permissions to the tags you have configured. The implementation of this part is described further in this post.
- Athena can be used to query the data. Other tools, such as Amazon Redshift or Amazon Quicksight can also be used, as well as third-party tools.
If a user lacks permission to view sensitive data but needs to access it for machine learning model training purposes, AWS KMS can be used. The AWS KMS service manages the encryption keys that are used for data masking and to give access to the training algorithms. Users can see the masked data, but the algorithms can use the data in its original form to train the machine learning models.
This solution uses three personas:
secure-lf-admin: Data lake administrator. Responsible for configuring the data lake and assigning permissions to data administrators.
secure-lf-business-analyst: Business analyst. No access to certain confidential information.
secure-lf-data-scientist: Data scientist. No access to certain confidential information.
Solution implementation
To facilitate implementation, we created a CloudFormation template. The model and other artifacts produced can be found in this GitHub repository. You can use the CloudFormation dashboard to review the output of all the deployed features.
Choose the following Launch Stack button to deploy the CloudFormation template.
![]()
Deploy the CloudFormation template
To deploy the CloudFormation template and create the resources in your AWS account, follow the steps below.
- After signing in to the AWS account, deploy the CloudFormation template. On the Create stack window, choose Next.

Figure 2: CloudFormation create stack screen
- In the following section, enter a name for the stack. Enter a password in the TestUserPassword field for Lake Formation personas to use to sign in to the console. When finished filling in the fields, choose Next.
- On the next screen, review the selected options and choose Next.
- In the last section, review the information and select I acknowledge that AWS CloudFormation might create IAM resources with custom names. Choose Create Stack.
Figure 3: List of parameters and values in the CloudFormation stack
- Wait until the stack status changes to CREATE_COMPLETE.


The deployment process should take approximately 15 minutes to finish.
Run an AWS DMS task
To extract the data from the Amazon RDS instance, you must run an AWS DMS task. This makes the data available to Macie in an S3 bucket in Parquet format.
- Open the AWS DMS console.
- On the navigation bar, for the Migrate data option, select Database migration tasks.
- Select the task with the name rdstos3task.
- Choose Actions.
- Choose Restart/Resume. The loading process should take around 1 minute.
When the status changes to Load Complete, you will be able to see the migrated data in the target bucket (dcp-macie-<AWS_REGION>-<ACCOUNT_ID>) in the dataset folder. Within each prefix there will be a parquet file that follows the naming pattern: LOAD00000001.parquet. After this step, use Macie to scan the data for sensitive information in the files.
Run a classification job with Macie
You must create a data classification job before you can evaluate the contents of the bucket. The job you create will run and evaluate the full contents of your S3 bucket to determine the files stored in the bucket contain PII. This job uses the managed identifiers available in Macie and a custom identifier.
- Open the Macie Console, on the navigation bar, select Jobs.
- Choose Create job.
- Select the S3 bucket dcp-macie-<AWS_REGION>-<ACCOUNT_ID> containing the output of the AWS DMS task. Choose Next to continue.
- On the Review Bucket page, verify the selected bucket is dcp-macie-<AWS_REGION>-<ACCOUNT_ID>, and then choose Next.
- In Refine the scope, create a new job with the following scope:
- Sensitive data Discovery options: One-time job (for demonstration purposes, this will be a single discovery job. For production environments, we recommend selecting the Scheduled job option, so Macie can analyze objects following a scheduled).
- Sampling Depth: 100 percent.
- Leave the other settings at their default values.
- On Managed data identifiers options, select All so Macie can use all managed data identifiers. This enables a set of built-in criteria to detect all identified types of sensitive data. Choose Next.
- On the Custom data identifiers option, select account_number, and then choose Next. With the custom identifier, you can create custom business logic to look for certain patterns in files stored in Amazon S3. In this example, the task generates a discovery job for files that contain data with the following regular expression format XYZ- followed by numbers, which is the default format of the false account_number generated in the dataset. The logic used for creating this custom data identifier is included in the CloudFormation template file.
- On the Select allow lists, choose Next to continue.
- Enter a name and description for the job.
- Choose Next to continue.
- On Review and create step, check the details of the job you created and choose Submit.
Figure 4: List of Macie findings detected by the solution

The amount of data being scanned directly influences how long the job takes to run. You can choose the Update button at the top of the screen, as shown in Figure 4, to see the updated status of the job. This job, based on the size of the test dataset, will take about 10 minutes to complete.
Run the AWS Glue data transformation pipeline
After the Macie job is finished, the discovery results are ingested into the bucket dcp-glue-<AWS_REGION>-<ACCOUNT_ID>, invoking the AWS Glue step of the workflow (dcp-Workflow), which should take approximately 11 minutes to complete.
To check the workflow progress:
- Open the AWS Glue console and on navigation bar, select Workflows (orchestration).
- Next, choose dcp-workflow.
- Next, select History to see the past runs of the dcp-workflow.
The AWS Glue job, which is launched as part of the workflow (dcp-workflow), reads the Macie findings to know the exact location of sensitive data. For example, in the customer table are name and birthdate. In the bank table are account_number, iban, and bban. And in the card table are card_number, card_expiration, and card_security_code. After this data is found, the job masks and encrypts the information.
Text encryption is done using an AWS KMS key. Here is the code snippet that provides this functionality:
If your application requires access to the unencrypted text, and because access to the AWS KMS encryption key exists, you can use the following excerpt example to access the information:
After performing all the above steps, the datasets are fully anonymized with tables created in Data Catalog and data stored in the respective S3 buckets. These are the buckets where fine-grained access controls are applied through Lake Formation:
- Masked data —
s3://dcp-athena-<AWS_REGION>-<ACCOUNT_ID>/masked/ - Encrypted data —
s3://dcp-athena-<AWS_REGION>-<ACCOUNT_ID>/encrypted/
Now that the tables are defined, you refine the permissions using Lake Formation.
Enable Lake Formation fine-grained access
After the data is processed and stored, you use Lake Formation to define and enforce fine-grained access permissions and provide secure access to data analysts and data scientists.
To enable fine-grained access, you first add a user (secure-lf-admin) to Lake Formation:
- In the Lake Formation console, clear Add myself and select Add other AWS users or roles.
- From the drop-down menu, select secure-lf-admin.
- Choose Get started.
Figure 5: Lake Formation deployment process

Grant access to different personas
Before you grant permissions to different user personas, you must register Amazon S3 locations in Lake Formation so that the personas can access the data. All buckets have been created with the following pattern <prefix>-<bucket_name>-<aws_region>-<account_id>, where <prefix> matches the prefix you selected when you deployed the Cloudformation template and <aws_region> corresponds to the selected AWS Region (for example, ap-southeast-1), and <account_id> is the 12 numbers that match your AWS account (for example, 123456789012). For ease of reading, we left only the initial part of the bucket name in the following instructions.
- In the Lake Formation console, on the navigation bar, on the Register and ingest option, select Data Lake locations.
- Choose Register location.
- Select the dcp-glue bucket and choose Register Location.
- Repeat for the dcp-macie/dataset, dcp-athena/masked, and dcp-athena/encrypted prefixes.

Figure 6: Amazon S3 locations registered in the solution

You’re now ready to grant access to different users.
Granting per-user granular access
After successfully deploying the AWS services described in the CloudFormation template, you must configure access to resources that are part of the proposed solution.
Grant read-only accesses to all tables for secure-lf-admin
Before proceeding you must sign in as the secure-lf-admin user. To do this, sign out from the AWS console and sign in again using the secure-lf-admin credential and password that you set in the CloudFormation template.
Now that you’re signed in as the user who administers the data lake, you can grant read-only access to all tables in the dataset database to the secure-lf-admin user.
- In the Permissions section, select Data Lake permissions, and then choose Grant.
- Select IAM users and roles.
- Select the secure-lf-admin user.
- Under LF-Tags or catalog resources, select Named data catalog resources.
- Select the database dataset.
- For Tables, select All tables.
- In the Table permissions section, select Alter and Super.
- Under Grantable permissions, select Alter and Super.
- Choose Grant.
You can confirm your user permissions on the Data Lake permissions page.
Create tags to grant access
Return to the Lake Formation console to define tag-based access control for users. You can assign policy tags to Data Catalog resources (databases, tables, and columns) to control access to this type of resources. Only users who receive the corresponding Lake Formation tag (and those who receive access with the resource method named) can access the resources.
- Open the Lake Formation console, then on the navigation bar, under Permissions, select LF-tags.
- Choose Add LF Tag. In the dialog box Add LF-tag, for Key, enter data, and for Values, enter mask. Choose Add, and then choose Add LF-Tag.
- Follow the same steps to add a second tag. For Key, enter segment, and for Values enter campaign.
Assign tags to users and databases
Now grant read-only access to the masked data to the secure-lf-data-scientist user.
- In the Lake Formation console, on the navigation bar, under Permissions, select Data Lake permissions.
- Choose Grant.
- Under IAM users and roles, select secure-lf-data-scientist as the user.
- In the LF-Tags or catalog resources section, select Resources matched by LF-Tags and choose add LF-Tag. For Key, enter data and for Values, enter mask.
Figure 7: Creating resource tags for Lake Formation
- In the section Database permissions, in the Database permissions part and in Grantable permissions, select Describe.
- In the section Table permissions, in the Table permissions part and in Grantable permissions, select Select.
- Choose Grant.
Figure 8: Database and table permissions granted


To complete the process and give the secure-lf-data-scientist user access to the dataset_masked database, you must assign the tag you created to the database.
- On the navigation bar, under Data Catalog, select Databases.
- Select dataset_masked and select Actions. From the drop-down menu, select Edit LF-Tags.
- In the section Edit LF-Tags: dataset_masked, choose Assign new LF-Tag. For Key, enter data, and for Values, enter mask. Choose Save.
Grant read-only accesses to secure-lf-business-analyst
Now grant the secure-lf-business-analyst user read-only access to certain encrypted columns using column-based permissions.
- In the Lake Formation console, under Data Catalog, select Databases.
- Select the database dataset_encrypted and then select Actions. From the drop-down menu, choose Grant.
- Select IAM users and roles.
- Choose secure-lf-business-analyst.
- In the LF-Tags or catalog resources section, select Named data catalog resources.
- In the Database permissions section, in the Database permissions section and in Grantable permissions, select Describe and Alter.
- Choose Grant.
Now give the secure-lf-business-analyst user access to the Customer table, except for the username column.
- In the Lake Formation console, under Data Catalog, select Databases.
- Select the database dataset_encrypted and then, choose View tables.
- From the Actions option in the drop-down menu, select Grant.
- Select IAM users and roles.
- Select secure-lf-business-analyst.
- In the LF-Tags or catalog resources part, select Named data catalog resources.
- In the Database section, leave the dataset_encrypted selected.
- In the tables section, select the customer table.
- In the Table permission section, in the Table permission section and in Grantable permissions, choose Select.
- In the Data Permissions section, select Column-based access.
- Select Include columns and select the id, username, mail, and gender columns, which are the data-less columns encrypted for the secure-lf-business-analyst user to have access to.
- Choose Grant.
Figure 9: Granting access to secure-lf-business-analyst user in the Customer table

Now give the secure-lf-business-analyst user access to the table Card, only for columns that do not contain PII information.
- In the Lake Formation console, under Data Catalog, choose Databases.
- Select the database dataset_encrypted and choose View tables.
- Select the table Card.
- In the Schema section, choose Edit schema.
- Select the cred_card_provider column, which is the column that has no PII data.
- Choose Edit tags.
- Choose Assign new LF-Tag.
- For Assigned keys, enter segment and for Values, enter mask.
Figure 10: Editing tags in Lake Formation tables
- Choose Save, and then choose Save as new version.

In this step you add the segment tag in the column cred_card_provider to the card table. For the user secure-lf-business-analyst to have access, you need to configure this tag for the user.
- In the Lake Formation console, under Permissions, select Data Lake permissions.
- Choose Grant.
- Under IAM users and roles, select secure-lf-business-analyst as the user.
- In the LF-Tags or catalog resources section, select Resources matched by LF-Tags, and choose add LF-tag and for as Key enter segment and for Values, enter campaign.
Figure 11: Configure tag-based access for user secure-lf-business-analyst
- In the Database permissions section, in the Database permissions part and in Grantable permissions, select Describe from both options.
- In the Table permission section, in the Table permission part as well as in Grantable permissions, choose Select.
- Choose Grant.

The next step is to revoke Super access to the IAMAllowedPrincipals group.
The IAMAllowedPrincipals group includes all IAM users and roles that are allowed access to Data Catalog resources using IAM policies. The Super permission allows a principal to perform all operations supported by Lake Formation on the database or table on which it is granted. These settings provide access to Data Catalog resources and Amazon S3 locations controlled exclusively by IAM policies. Therefore, the individual permissions configured by Lake Formation are not considered, so you will remove the concessions already configured by the IAMAllowedPrincipals group, leaving only the Lake Formation settings.
- In the Databases menu, select the database dataset, and then select Actions. From the drop-down menu, select Revoke.
- In the Principals section, select IAM users and roles, and then select the IAMAllowedPrincipals group as the user.
- Under LF-Tags or catalog resources, select Named data catalog resources.
- In the Database section, leave the dataset option selected.
- Under Tables, select the following tables: bank, card, and customer.
- In the Table permissions section, select Super.
- Choose Revoke.
Repeat the same steps for the dataset_encrypted and dataset_masked databases.
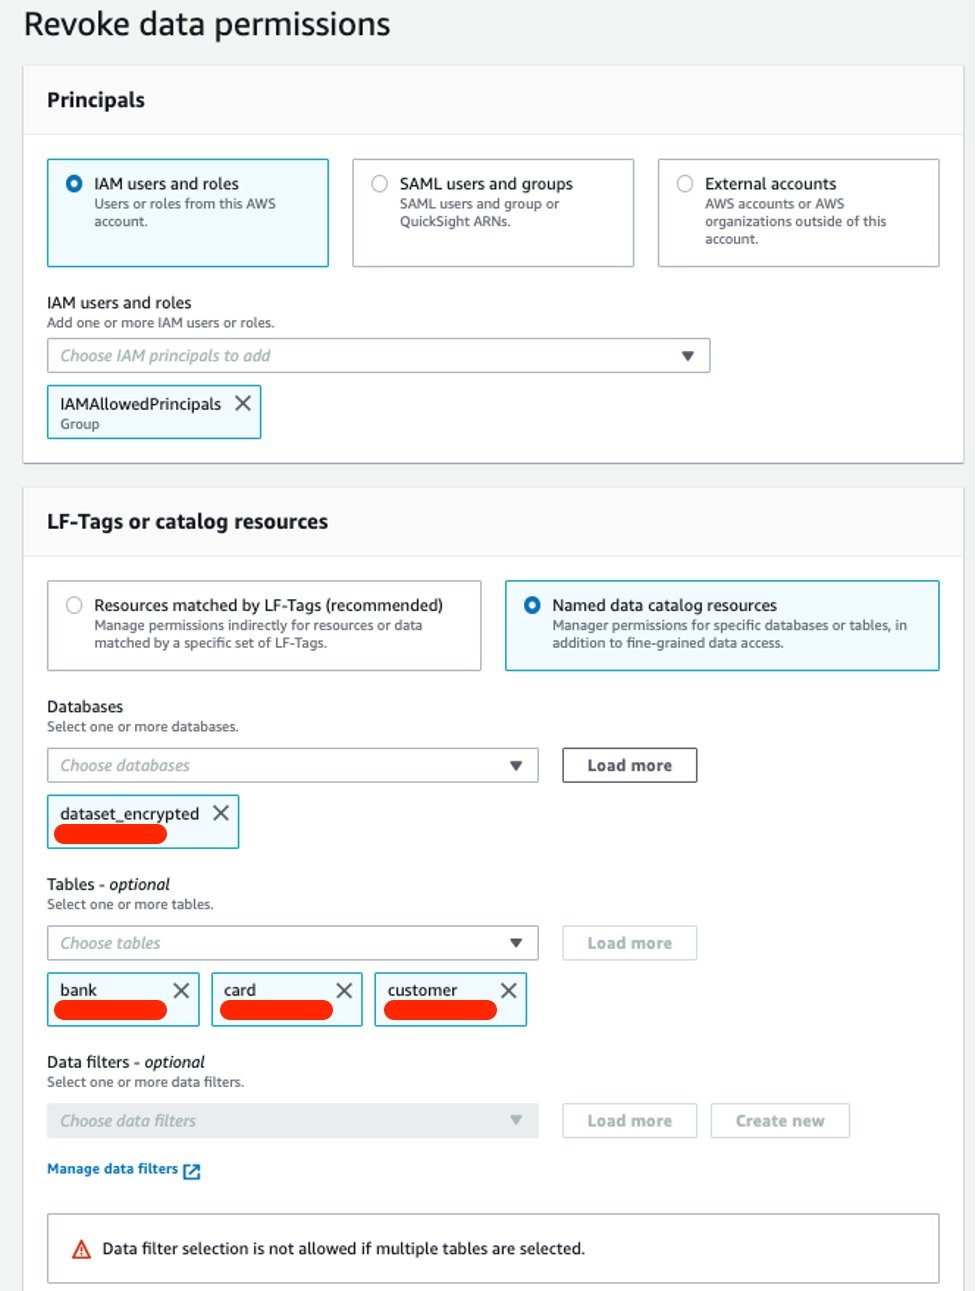
Figure 12: Revoke SUPER access to the IAMAllowedPrincipals group
You can confirm all user permissions on the Data Permissions page.
Querying the data lake using Athena with different personas
To validate the permissions of different personas, you use Athena to query the Amazon S3 data lake.
Ensure the query result location has been created as part of the CloudFormation stack (secure-athena-query-<ACCOUNT_ID>-<AWS_REGION>).
- Sign in to the Athena console with secure-lf-admin (use the password value for TestUserPassword from the CloudFormation stack) and verify that you are in the AWS Region used in the query result location.
- On the navigation bar, choose Query editor.
- Choose Setting to set up a query result location in Amazon S3, and then choose Browse S3 and select the bucket secure-athena-query-<ACCOUNT_ID>-<AWS_REGION>.
- Run a SELECT query on the dataset.
The secure-lf-admin user should see all tables in the dataset database and dcp. As for the banks dataset_encrypted and dataset_masked, the user should not have access to the tables.
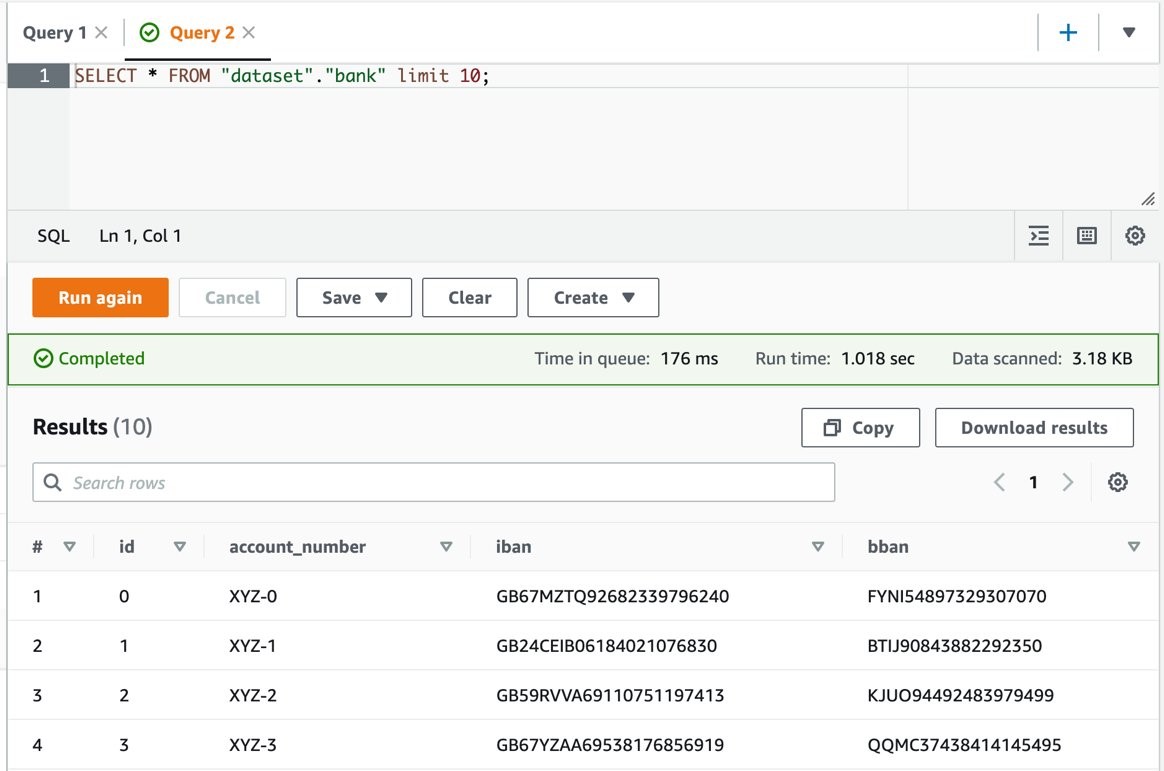
Figure 13: Athena console with query results in clear text
Finally, validate the secure-lf-data-scientist permissions.
- Sign in to the Athena console with secure-lf-data-scientist (use the password value for TestUserPassword from the CloudFormation stack) and verify that you are in the correct Region.
- Run the following query:
The user secure-lf-data-scientist will only be able to view all the columns in the database dataset_masked.
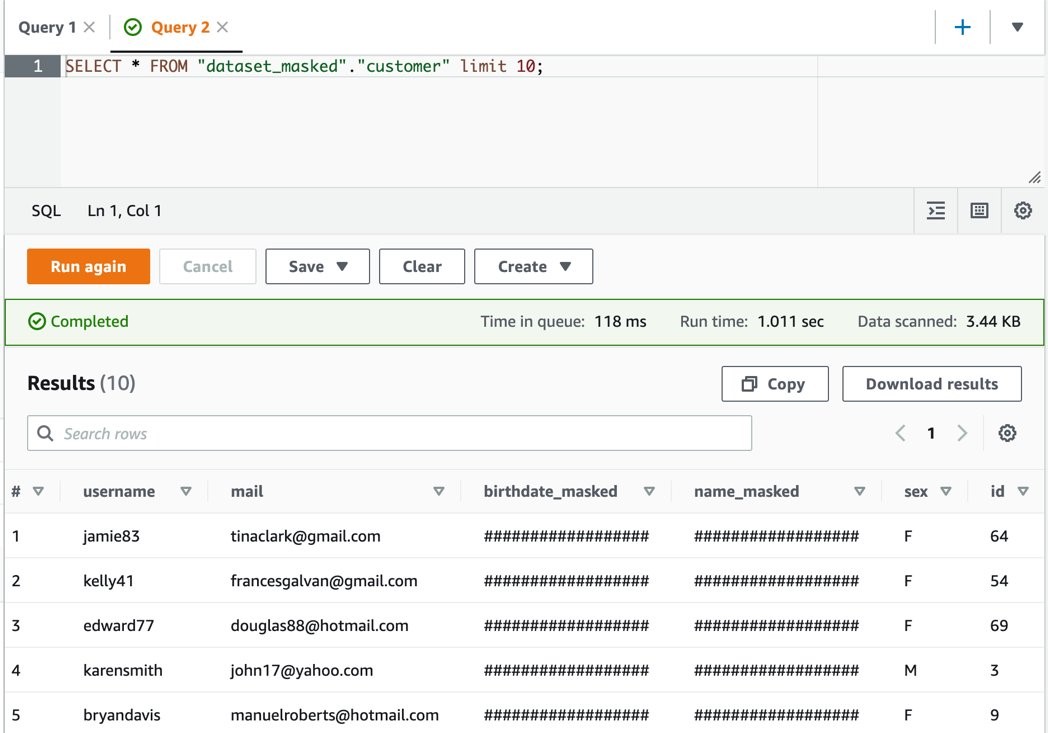
Figure 14: Athena query results with masked data
Now, validate the secure-lf-business-analyst user permissions.
- Sign in to the Athena console as secure-lf-business-analyst (use the password value for TestUserPassword from the CloudFormation stack) and verify that you are in the correct Region.
- Run a SELECT query on the dataset.
Figure 15: Validating secure-lf-business-analyst user permissions to query data

The user secure-lf-business-analyst should only be able to view the card and customer tables of the dataset_encrypted database. In the table card, you will only have access to the cred_card_provider column and in the table Customer, you will have access only in the username, mail, and sex columns, as previously configured in Lake Formation.
Cleaning up the environment
After testing the solution, remove the resources you created to avoid unnecessary expenses.
- Open the Amazon S3 console.
- Navigate to each of the following buckets and delete all the objects within:
- dcp-assets-<AWS_REGION>-<ACCOUNT_ID>
- dcp-athena-<AWS_REGION>-<ACCOUNT_ID>
- dcp-glue-<AWS_REGION>-<ACCOUNT_ID>
- dcp-macie-<AWS_REGION>-<ACCOUNT_ID>
- Open the CloudFormation console.
- Select the Stacks option from the navigation bar.
- Select the stack that you created in Deploy the CloudFormation Template.
- Choose Delete, and then choose Delete Stack in the pop-up window.
- If you also want to delete the bucket that was created, go to Amazon S3 and delete it from the console or by using the AWS CLI.
- To remove the settings made in Lake Formation, go to the Lake Formation dashboard, and remove the data lake locales and the Lake Formation administrator.
Conclusion
Now that the solution is implemented, you have an automated anonymization dataflow. This solution demonstrates how you can build a solution using AWS serverless solutions where you only pay for what you use and without worrying about infrastructure provisioning. In addition, this solution is customizable to meet other data protection requirements such as General Data Protection Law (LGPD) in Brazil, General Data Protection Regulation in Europe (GDPR), and the Association of Banks in Singapore (ABS) Cloud Computing Implementation Guide.
We used Macie to identify the sensitive data stored in Amazon S3 and AWS Glue to generate Macie reports to anonymize the sensitive data found. Finally, we used Lake Formation to implement fine-grained data access control to specific information and demonstrated how you can programmatically grant access to applications that need to work with unmasked data.
Related links
- Building a serverless tokenization solution to mask sensitive data
- Create a secure data lake by masking, encrypting data, and enabling fine-grained access with AWS Lake Formation
- Enabling data classification for Amazon RDS database with Macie
If you have feedback about this post, submit comments in the Comments section below. If you have questions about this post, contact AWS Support.
Want more AWS Security news? Follow us on Twitter.