Post Syndicated from Debika D original https://aws.amazon.com/blogs/big-data/introducing-catalog-federation-for-apache-iceberg-tables-in-the-aws-glue-data-catalog/
Apache Iceberg has become the standard choice of open table format for organizations seeking robust and reliable analytics at scale. However, enterprises increasingly find themselves navigating complex multi-vendor landscapes with disparate catalog systems. Managing data across these has become a major challenge for organizations operating in multi-vendor environments. This fragmentation drives significant operational complexity, particularly around access control and governance. Customers using AWS analytics services such as Amazon Redshift, Amazon EMR, Amazon Athena, Amazon SageMaker, and AWS Glue to analyze Iceberg tables in the AWS Glue Data Catalog want to get the same price-performance for workloads in remote catalogs. Simply migrating or replacing these remote catalogs isn’t practical, leaving teams to implement and maintain synchronization processes that continuously replicate metadata across systems, creating operational overhead, escalating costs, and risking data inconsistencies.
AWS Glue now supports catalog federation for remote Iceberg tables in the Data Catalog. With catalog federation, you can query remote Iceberg tables, stored in Amazon Simple Storage Service (Amazon S3) and cataloged in remote Iceberg catalogs, using AWS analytics engines and without moving or duplicating tables. After a remote catalog is integrated, AWS Glue always fetch the latest metadata in the background, so you always have access to the Iceberg metadata through your preferred AWS analytics services. This capability supports both coarse-grained access control and fine-grained permissions through AWS Lake Formation, giving you the flexibility on how and when remote Iceberg tables are shared with data consumers. With integration for Snowflake Polaris Catalog, Databricks Unity Catalog, and other custom catalogs supporting Iceberg REST specifications, you can federate to remote catalogs, discover databases and tables, configure access permissions, and begin querying remote Iceberg data.
In this post, we discuss how to get started with catalog federation for Iceberg tables in the Data Catalog.
Solution overview
Catalog federation uses the Data Catalog to communicate with remote catalog systems to discover catalog objects and Lake Formation to authorize access to their data in Amazon S3. When you query a remote Iceberg table, the Data Catalog discovers the latest table information in the remote catalog at query runtime, getting the table’s S3 location, current schema, and partition information. Your analytics engine (Athena, Amazon EMR, or Amazon Redshift) Your analytics engine (Athena, EMR, or Redshift) then uses this information to access Iceberg data files directly from Amazon S3. And Lake Formation manages access to the table by vending scoped credentials to the table data stored in Amazon S3, allowing the engines to apply fine-grained permissions to the federated table. This approach avoids metadata and data duplication while providing real-time access to remote Iceberg tables through your preferred AWS analytics engines.
The Data Catalog facilitates connectivity to remote catalog systems that support Apache Iceberg by establishing an AWS Glue connection with the remote catalog endpoint. You can connect the Data Catalog to remote Iceberg REST catalogs using OAuth2 or custom authentication mechanisms using an access token. During integration, administrators configure a principal (service account or identity) with the appropriate permissions to access resources in the remote catalog. The AWS Glue connection object uses this configured principal’s credentials to authenticate and access metadata in the remote catalog server. You can also connect the Data Catalog to remote catalogs that use a private link or proxy for isolating and restricting network access. After it’s connected, this integration uses the standardized Iceberg REST API specification to retrieve the most current table metadata information from these remote catalogs. AWS Glue onboards these remote catalogs as federated catalogs within its own catalog infrastructure, enabling unified metadata access across multiple catalog systems.
Lake Formation serves as the centralized authorization layer for managing user access to federated catalog resources. When users attempt to access tables and databases in federated catalogs, Lake Formation evaluates their permissions and enforces fine-grained access control policies.
Beyond metadata authorization, the catalog federation also manages secure access to the actual underlying data files. It accomplishes this through credential vending mechanisms that issue temporary, scope-limited credentials. AWS Glue federated catalogs work with your preferred AWS analytics engines and query services, enabling consistent metadata access and unified data governance across your analytics workloads.
In the following sections, we walk through the steps to integrate the Data Catalog with your remote catalog server:
- Set up an integration principal in the remote catalog and provide required access on catalog resources to this principal. Enable OAuth based authentication for the integration principal.
- Create a federated catalog in the Data Catalog using the AWS Glue connection. Create an AWS Glue connection that uses the credentials of the integration principal (in Step1) to connect to the Iceberg REST endpoint of the remote catalog. Configure an AWS Identity and Access Management (IAM) role with permission to S3 locations where the remote table data resides. In a cross-account scenario, make sure the bucket policy grants required access to this IAM role. This federated catalog mirrors the catalog object in your remote catalog server.
- Discover Iceberg tables in federated catalogs using Lake Formation or AWS Glue APIs. Query Iceberg tables using AWS analytics engines. During query operations, Lake Formation manages fine-grained permission on federated resources and credential vending to underlying data for the end-users.
Prerequisites
Before you begin, verify you have the following setup in AWS:
- An AWS account.
- The AWS Command Line Interface (AWS CLI) version 2.31.38 or later installed and configured.
- An IAM admin role or user with appropriate permissions to the following services:
- IAM
- AWS Glue Data Catalog
- Amazon S3
- AWS Lake Formation
- AWS Secrets manager
- Amazon Athena
- Create a data lake admin. For instructions, see Create a data lake administrator.
Set up authentication credentials in remote Iceberg catalog
Catalog federation to a remote Iceberg catalog uses the OAuth2 credentials of the principal configured with metadata access. This authentication mechanism allows the AWS Glue Data Catalog to access the metadata of various objects (such as databases, and tables) within the remote catalogs, based on the privileges associated with the principal. To support proper functionality, you must grant the principal with the necessary permissions to read the metadata of these objects. Generate the CLIENT_ID and CLIENT_SECRET to enable OAuth based authentication for the integration principal.
Create AWS Glue catalog federation using connection to remote Iceberg catalog
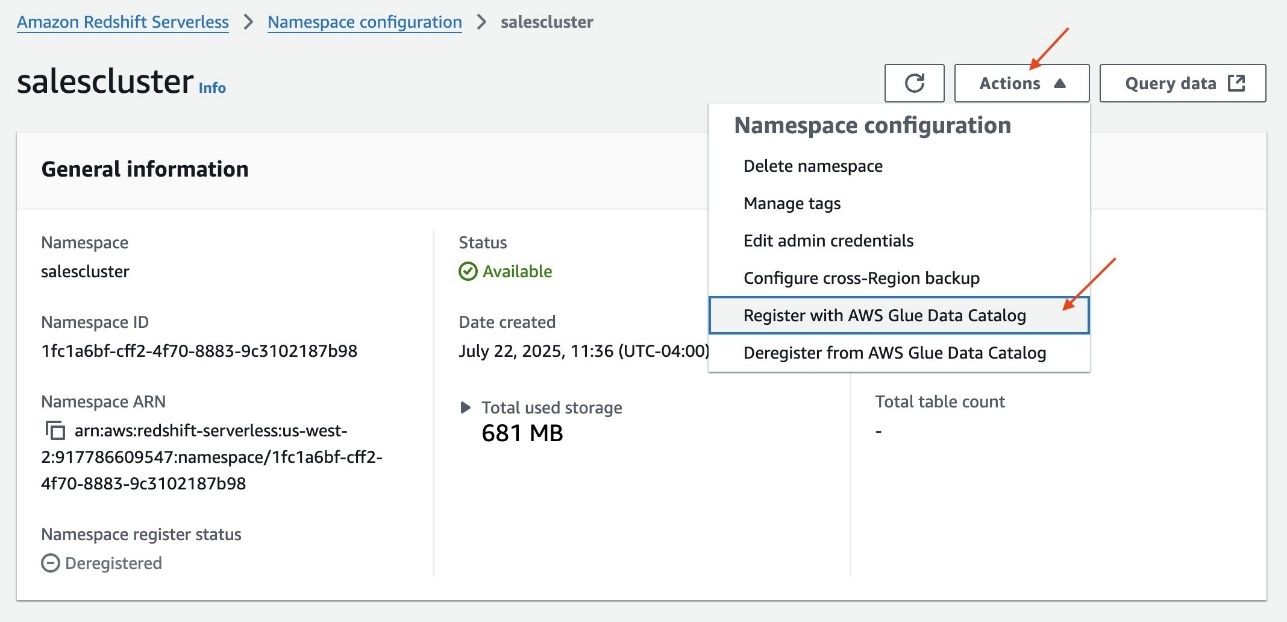
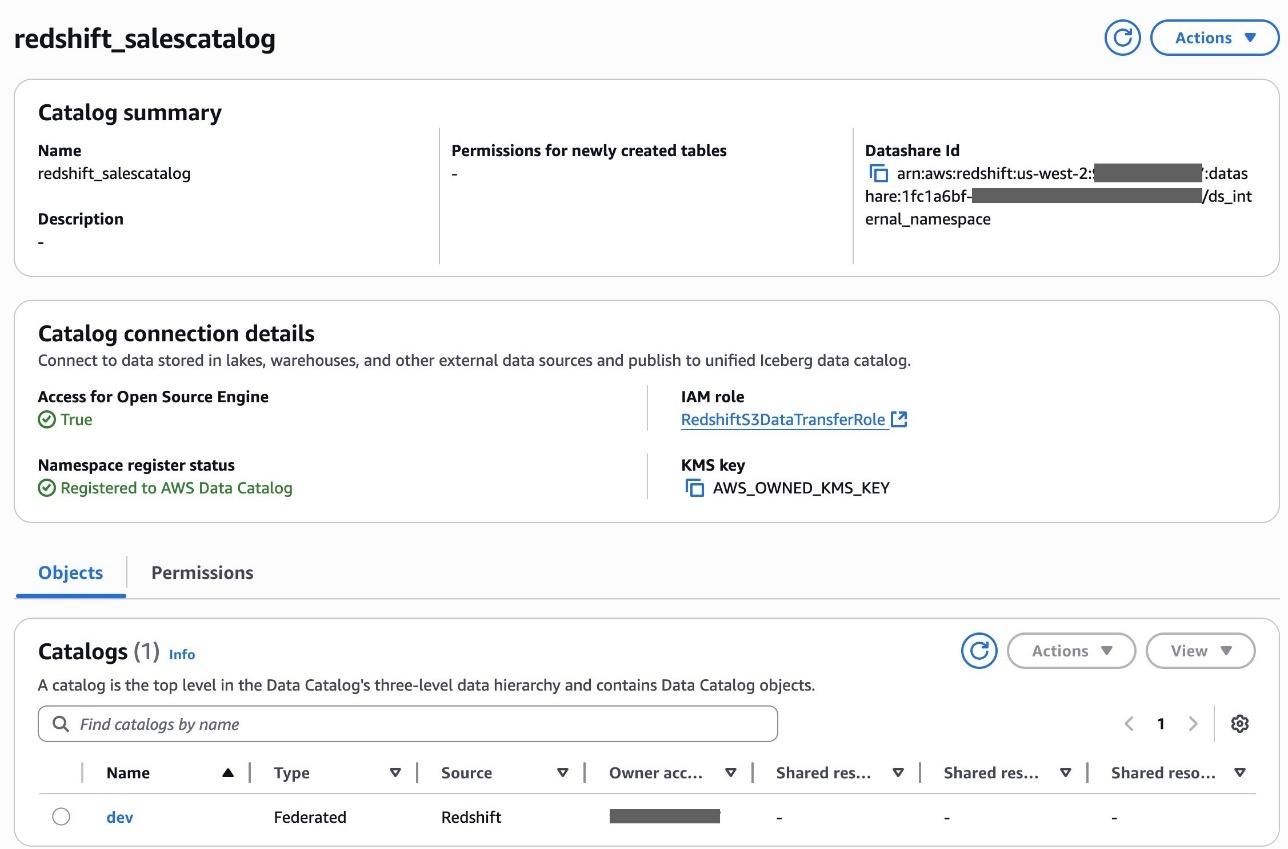
Create a federated catalog in the Data Catalog that mirrors a catalog object in the remote Iceberg catalog server and is used by the AWS Glue service to federate metadata queries such as ListDatabases, ListTables, and GetTable to the remote catalog. As data lake administrator, you can create a federated catalog in the Data Catalog using an AWS Glue connection object that is registered with AWS Lake Formation.
Configure data source connection for AWS Glue connection
Catalog federation uses an AWS Glue connection for metadata access when you provide authentication and Iceberg REST API endpoint configurations in the remote catalog. The AWS Glue connection supports OAuth2 or custom as the authentication method.
Connect using OAuth2 authentication
For the OAuth2 authentication method, you can provide a client secret either directly as input or stored in AWS Secrets Manager and used by the AWS Glue connection object during authentication. AWS Glue internally manages the token refresh upon expiration. To store the client secret in Secrets manager, complete the following steps:
- On the Secrets Manager console, choose Secrets in the navigation pane.
- Choose Store a new secret.
- Choose Other type of secret, provide the key name as
USER_MANAGED_CLIENT_APPLICATION_CLIENT_SECRET, and enter the client secret value. - Choose Next and provide a name for the secret.
- Choose Next and choose Store to save the secret.
Connect using custom authentication
For custom authentication, use Secrets Manager to store and retrieve the access token. This access token is created, refreshed, and managed by the customer’s application or system, providing proper control and management over the authentication process. To store the access token in Secrets Manager, complete the following steps:
- On the Secrets Manager console, choose Secrets in the navigation pane.
- Choose Store a new secret.
- Choose Other type of secret and provide the key name as
BEARER_TOKENwith the value noted as the access token of the integration principal. - Choose Next and provide a name for the secret.
- Choose Next and choose Store to save the secret.
Register AWS Glue connection with Lake Formation
Create an IAM role that Lake Formation can use to vend credentials and attach permission on S3 bucket prefixes where the Iceberg tables are stored. Optionally, if you’re using Secrets Manager to store the client secret or are using a network configuration, you can add permissions for those services to this role. For instruction, refer to Catalog federation to remote Iceberg catalogs.
Complete the following steps to register the connection:
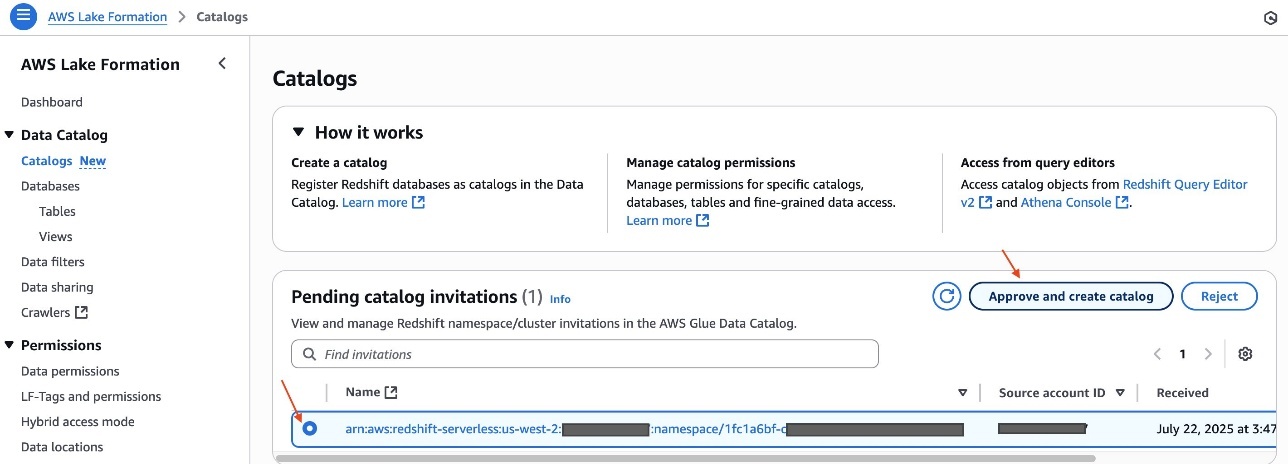
- On the Lake Formation console, choose Catalogs in the navigation pane.
- Choose Create catalog and select the data source.
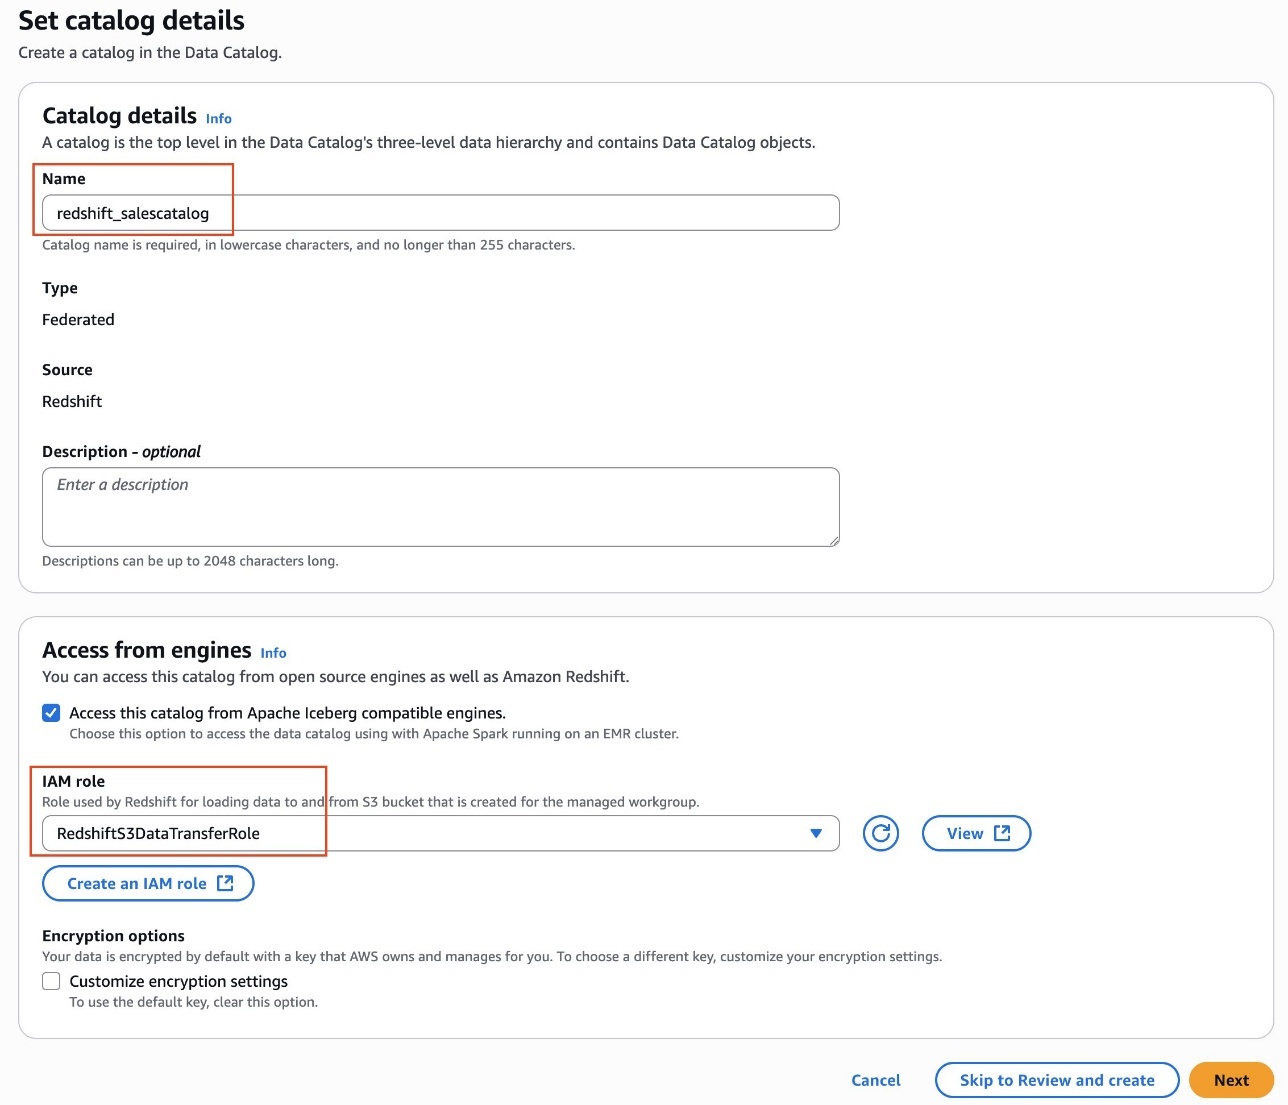
- Provide the federated catalog details:
- Name of the federated catalog.
- Catalog name in the remote catalog server and this needs to match the exact catalog name in remote catalog.
- Provide AWS Glue connection details. To reuse an existing connection, choose Select existing connection and choose the connection to reuse. For a first-time setup, choose Input new connection configuration and provide the following information:
- Provide the AWS Glue connection name.
- Provide the remote catalog Iceberg REST API endpoint.
- Specify the catalog object casing type. The connection can support uppercase objects through the object hierarchy or lowercase objects.
- Configure authentication parameters:
- For OAuth2: Provide the client ID and client secret directly or choose the secret where the client secret is stored, token authorization URL, and scope mapped to the credential.
- For custom: Provide the secret managed by Secrets Manager where the access token is stored.
- Network configuration: If you have a network and/or proxy setup, you can provide this information. Otherwise, leave this section as default.
- Register the connection with Lake Formation using the IAM role with access to the bucket where the remote table metadata and data is stored.
- Verify the connection by choosing Run test.
- After the test is successful, create the catalog.
You can now discover remote objects under the federated catalog. You can onboard other remote catalogs by reusing the existing connection configured to the same external catalog instance.
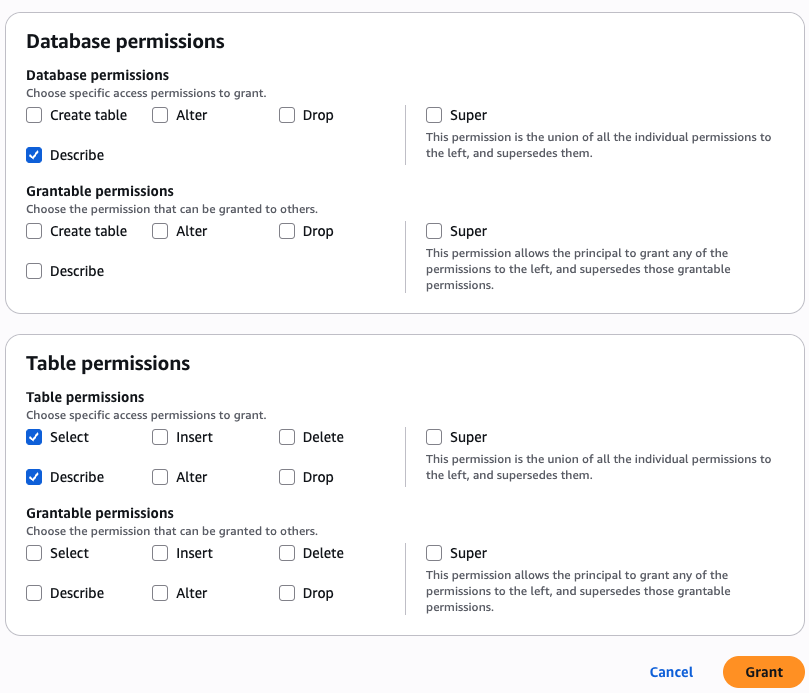
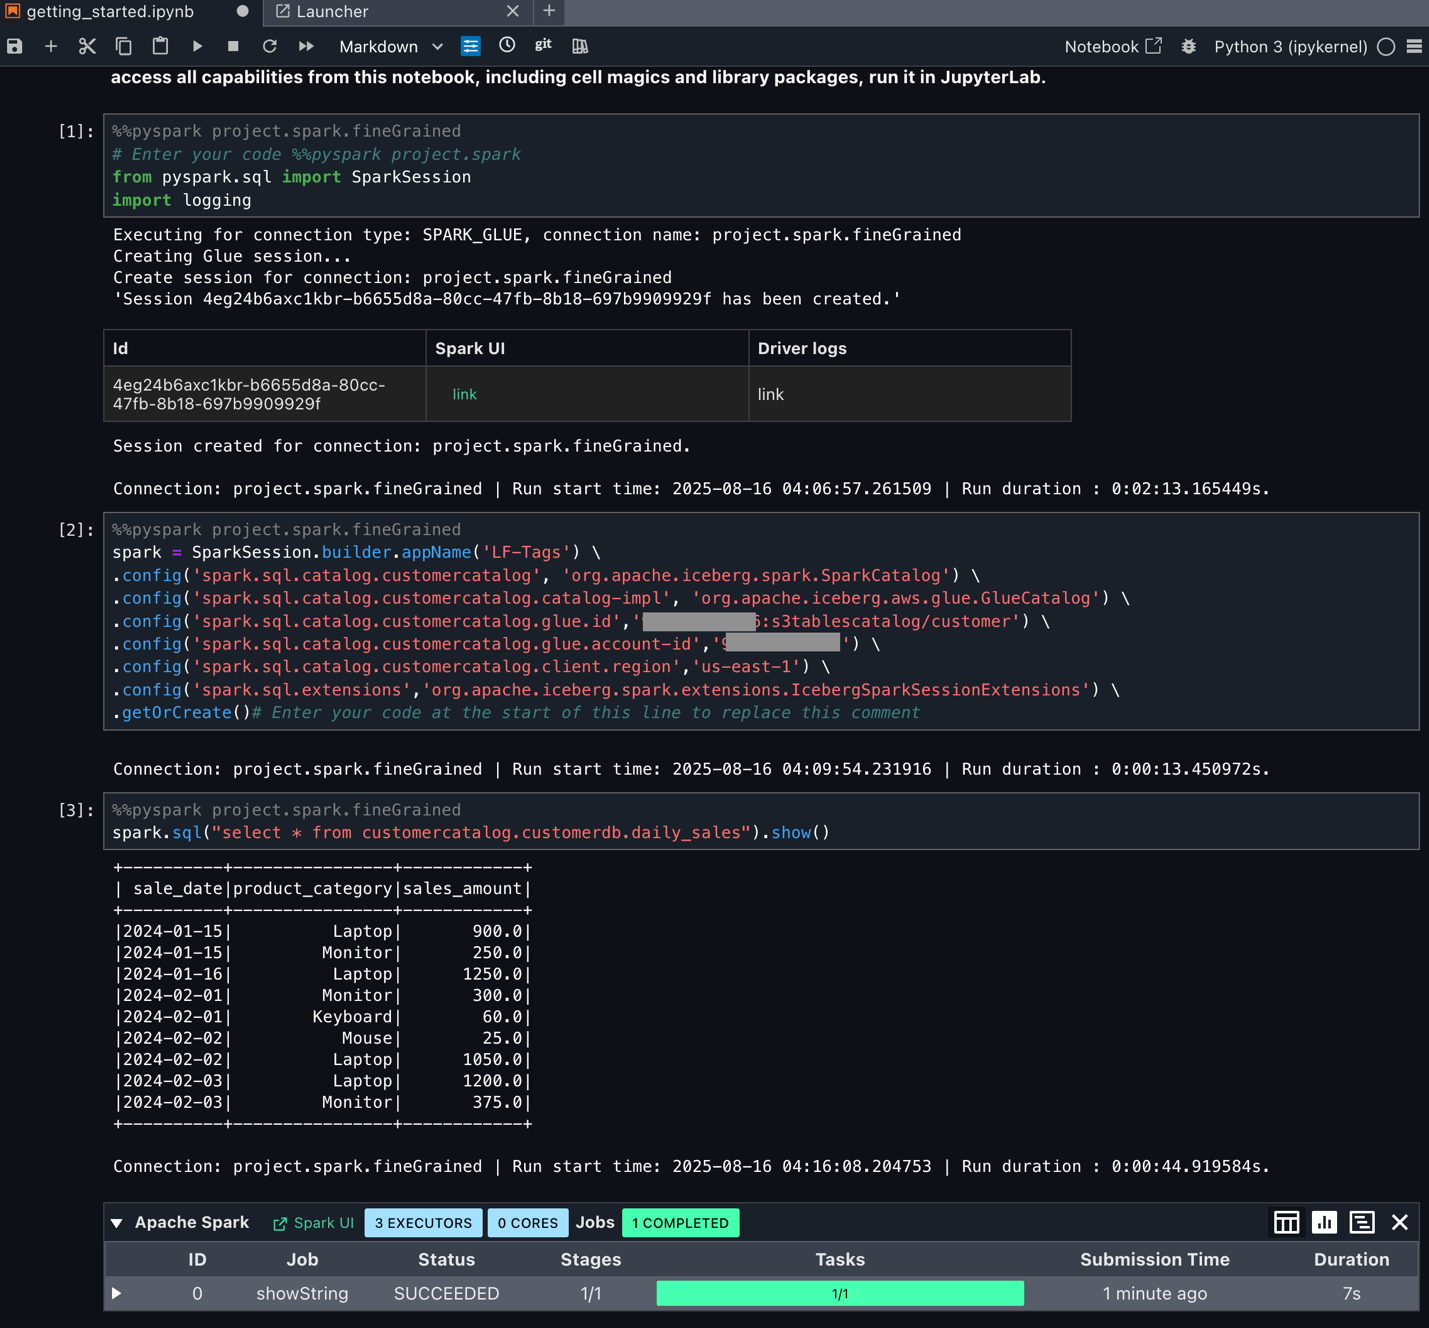
Query the federated catalog objects using AWS analytical engines
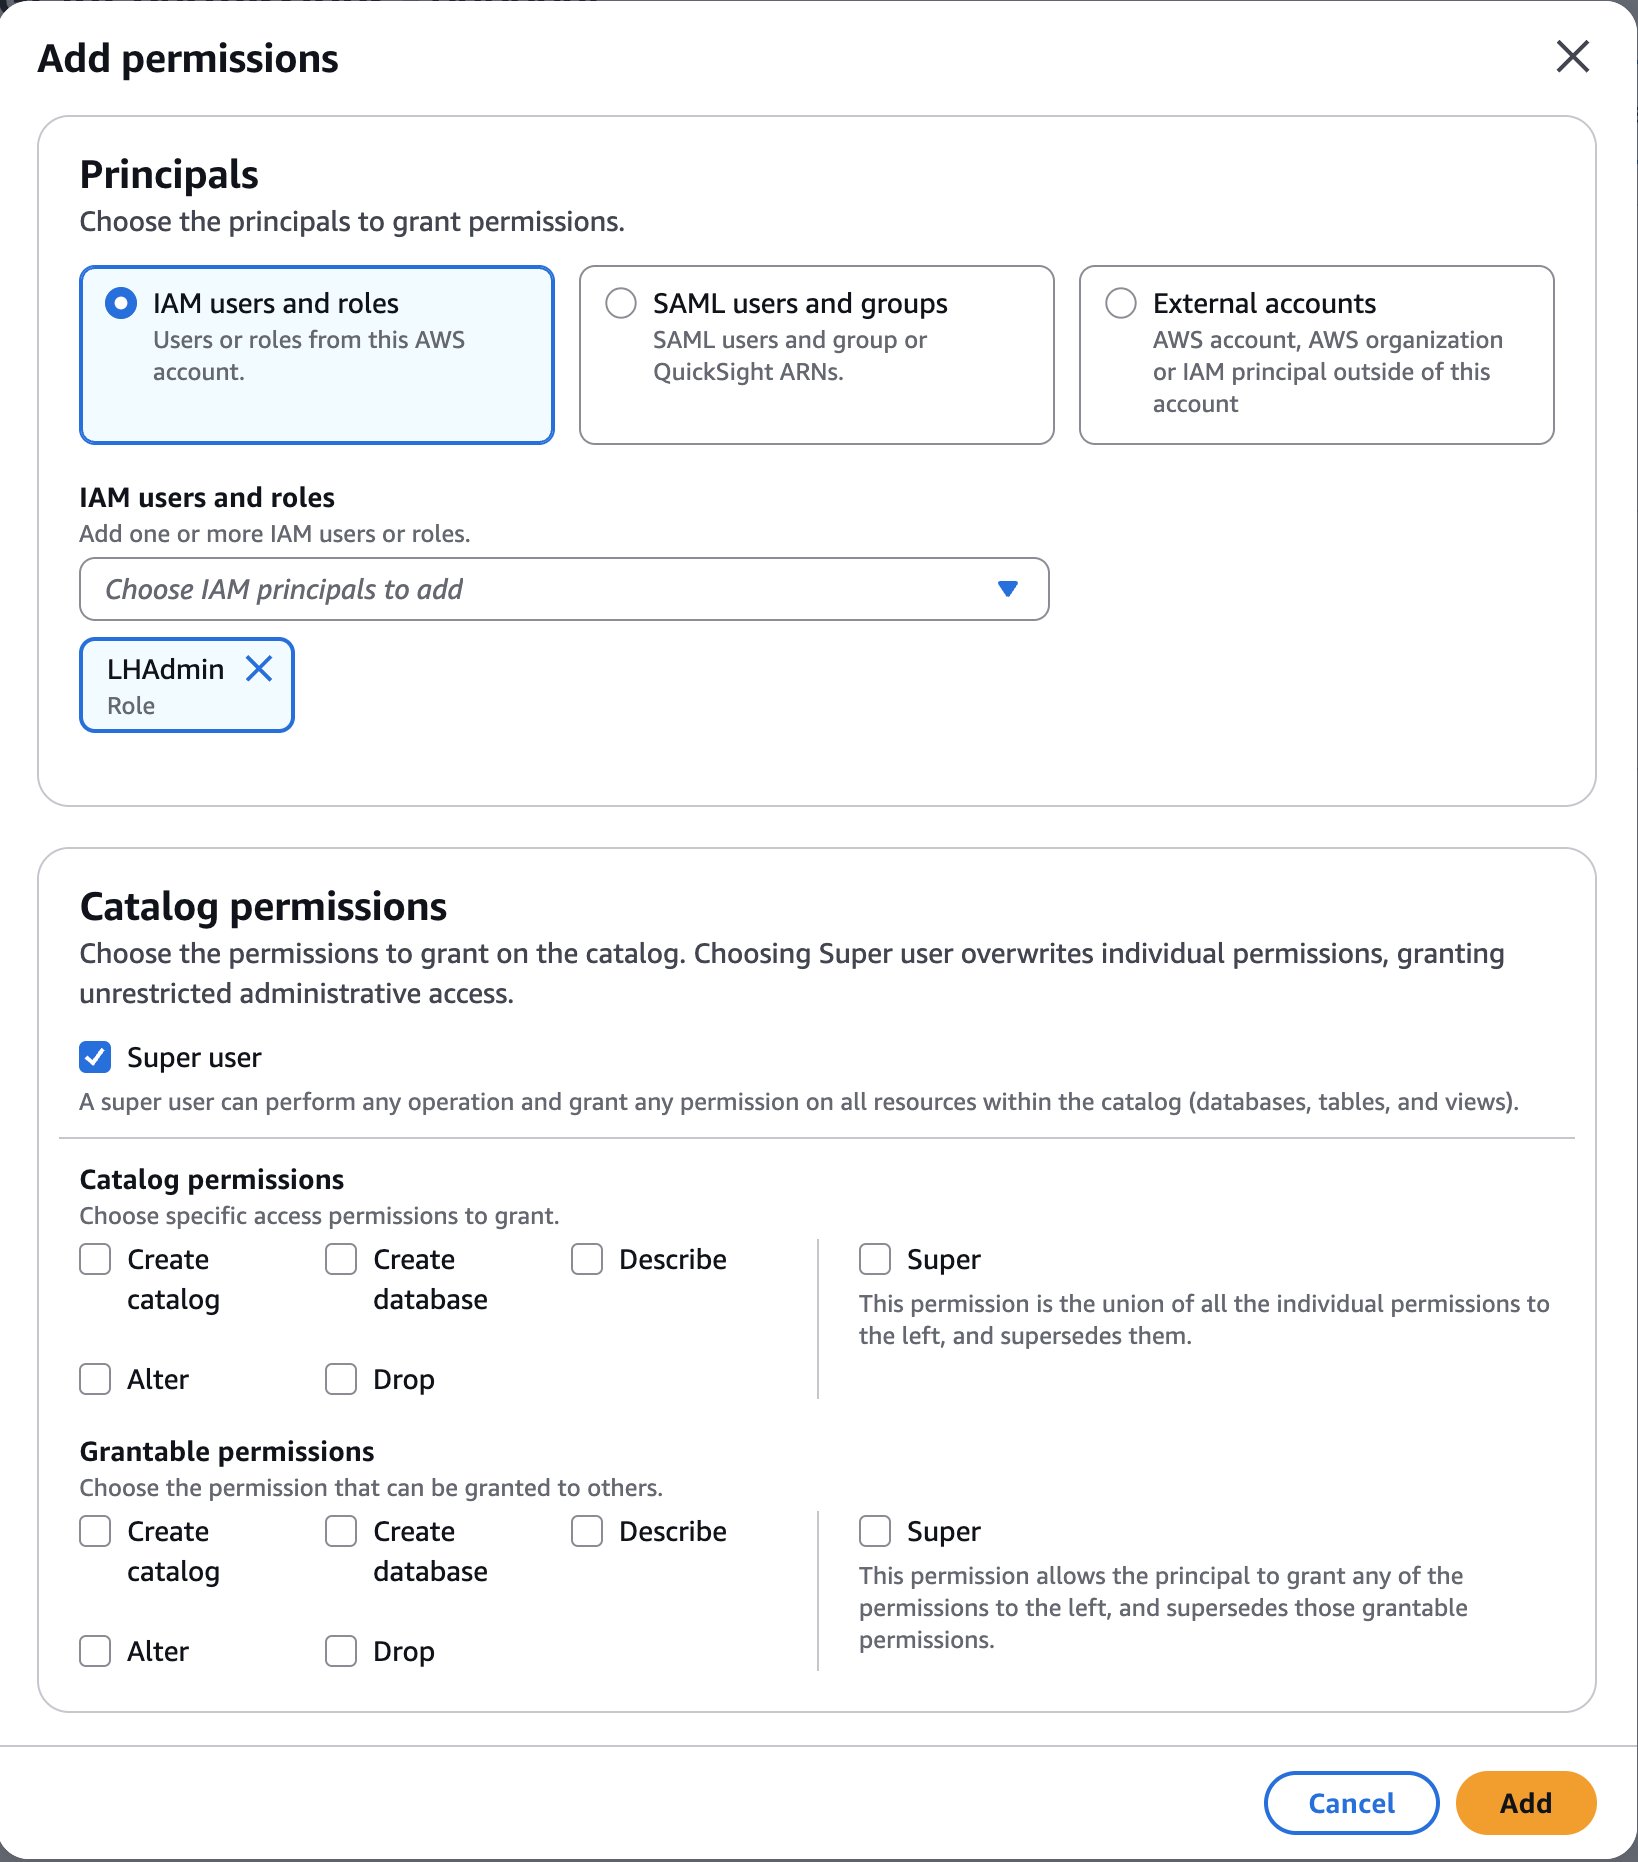
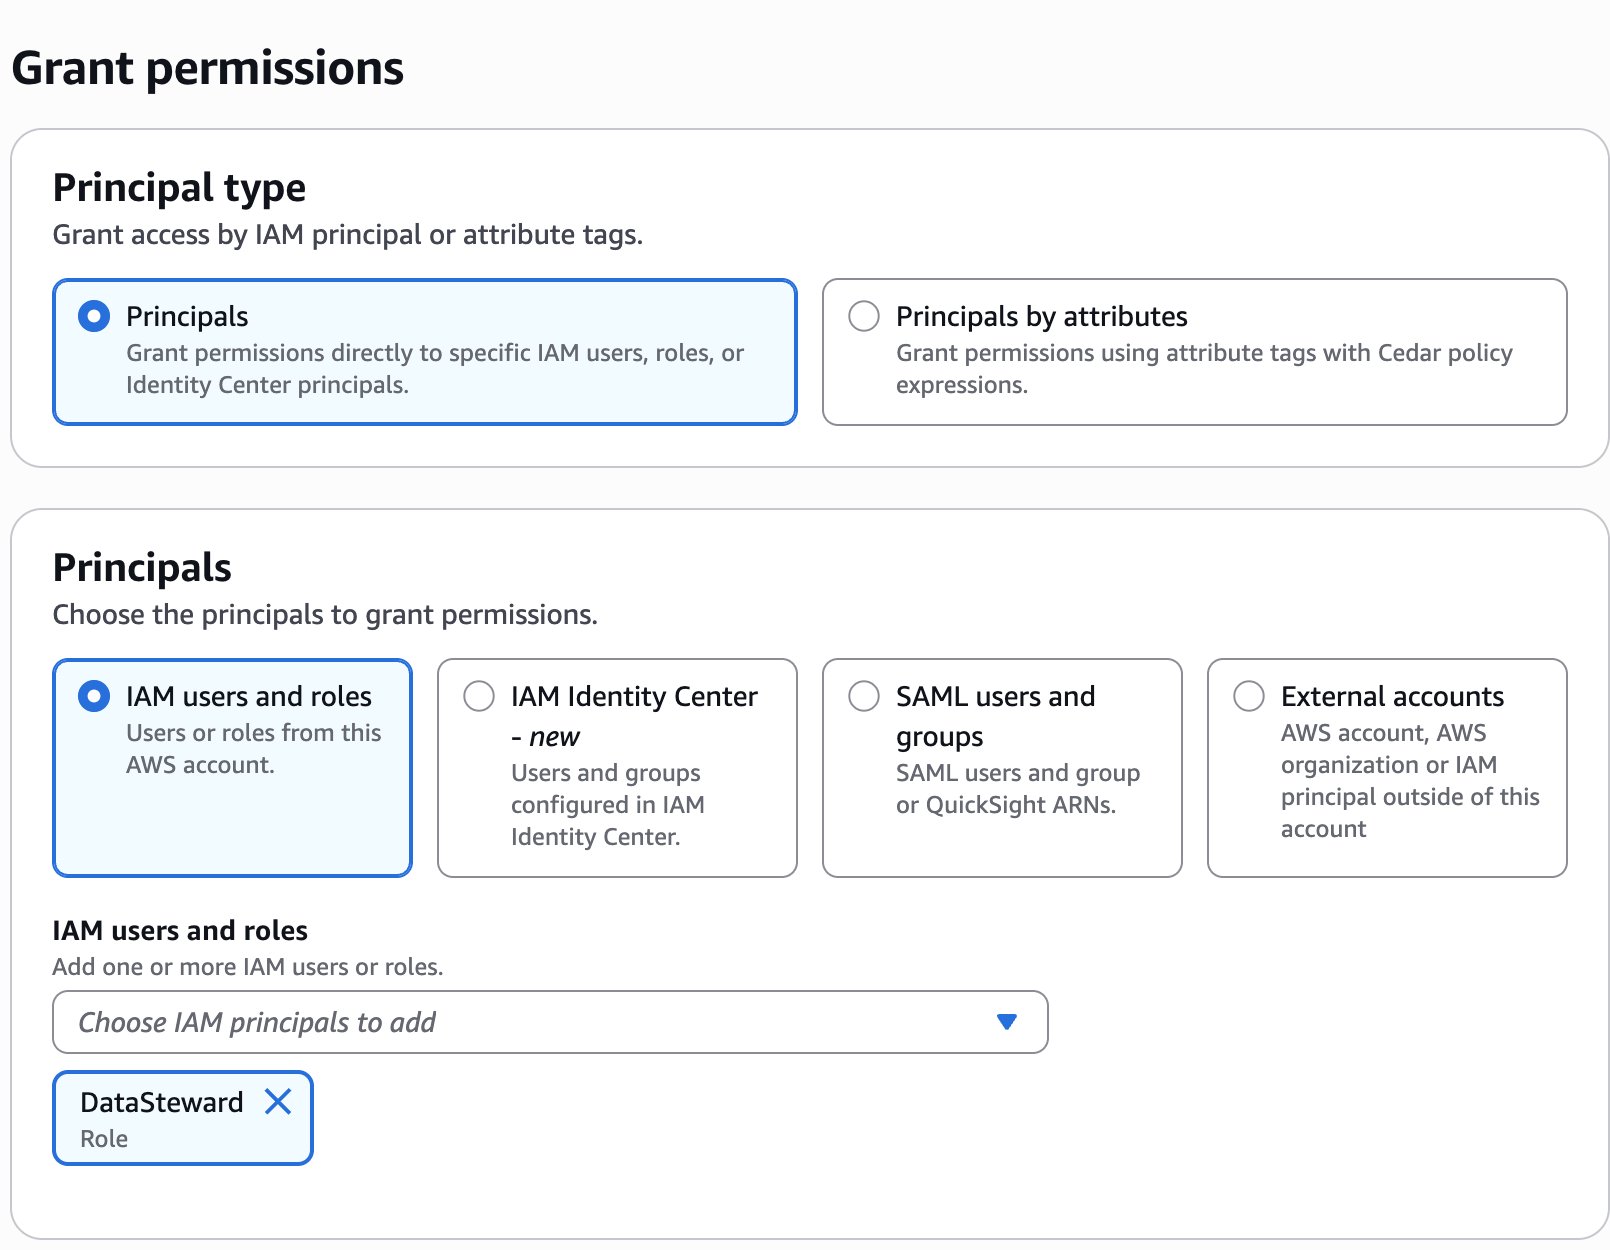
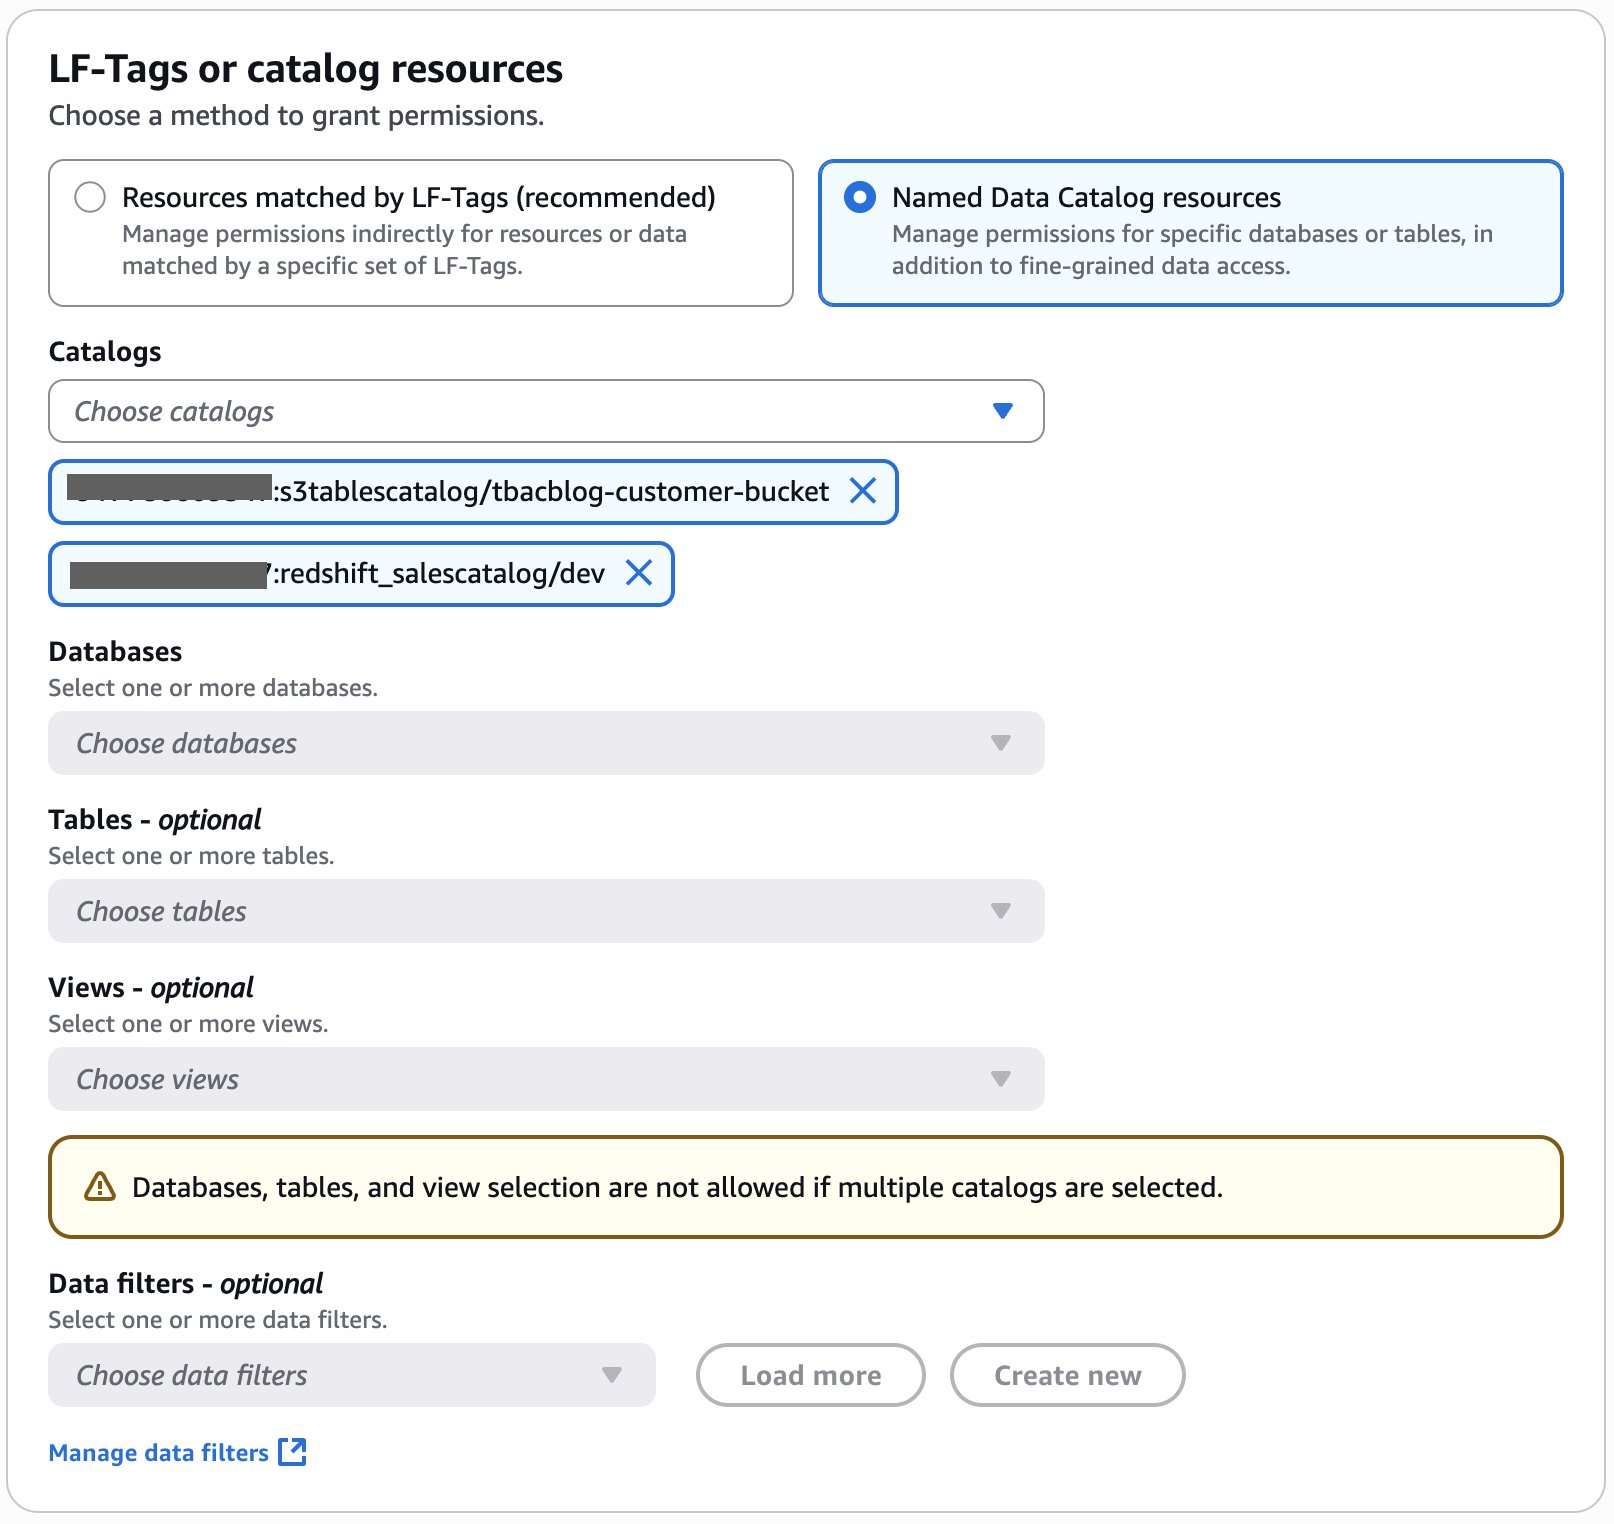
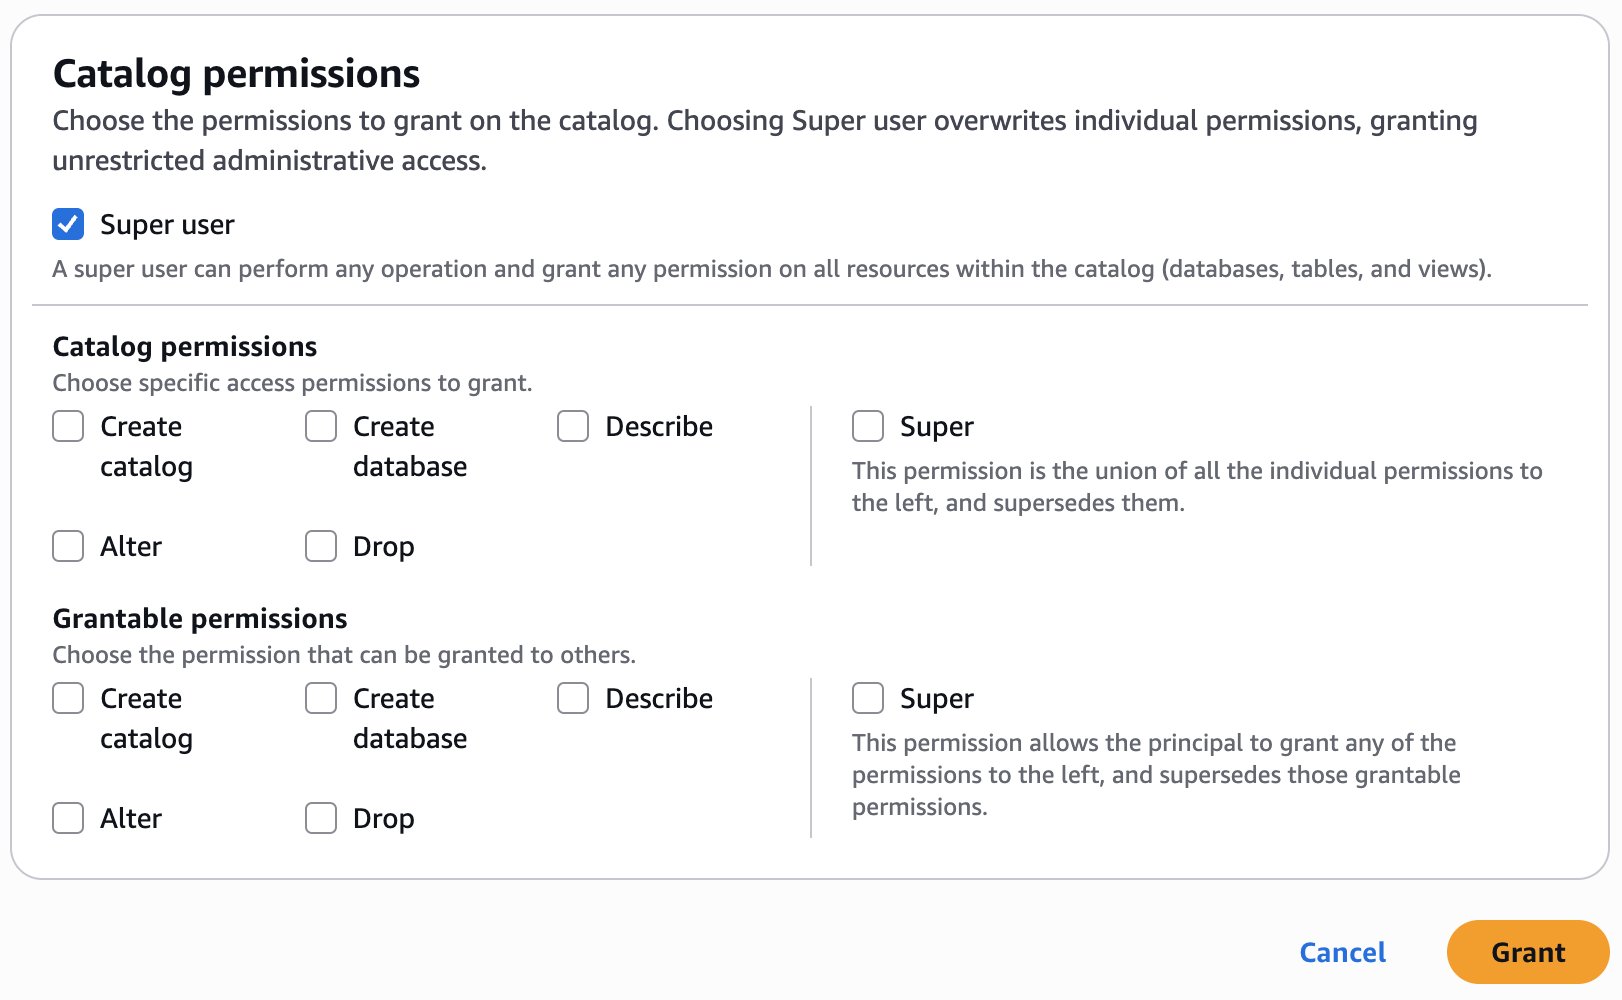
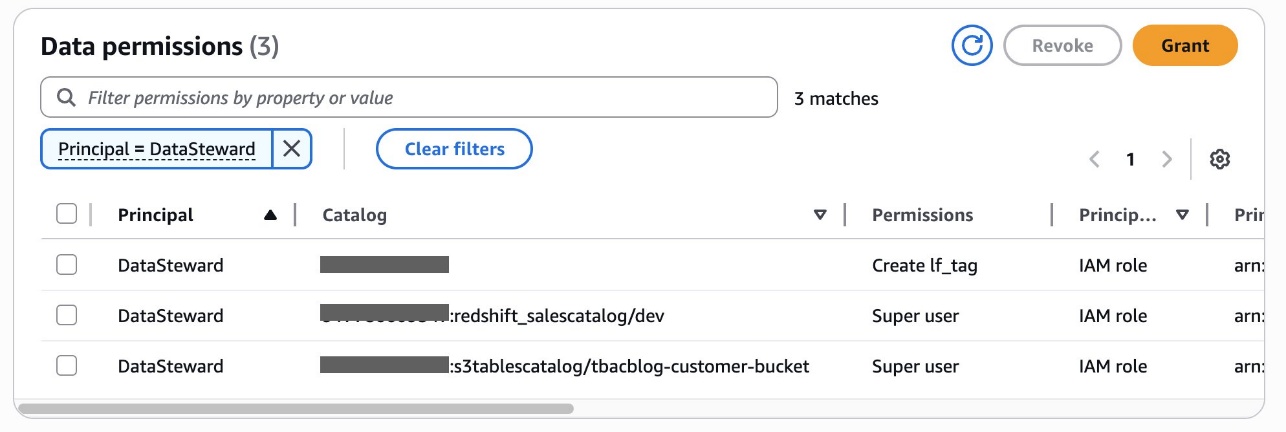
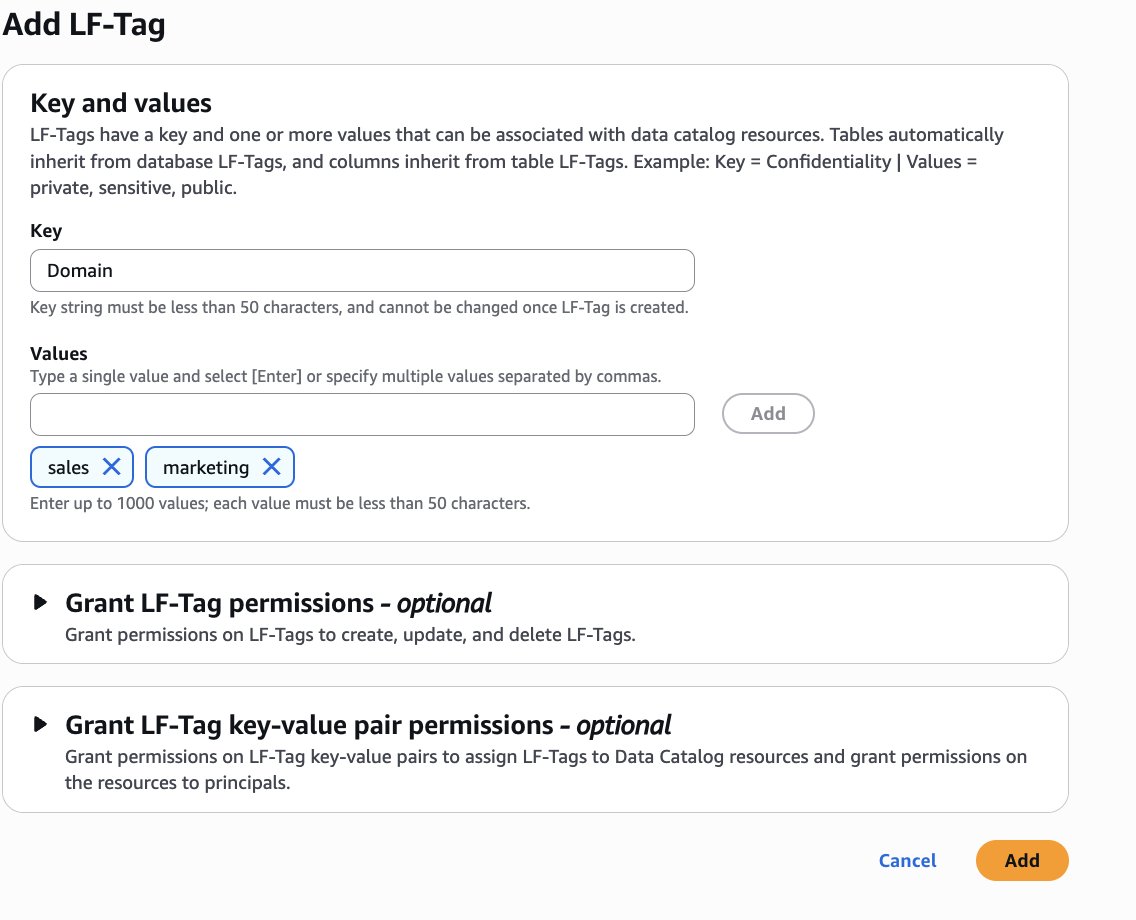
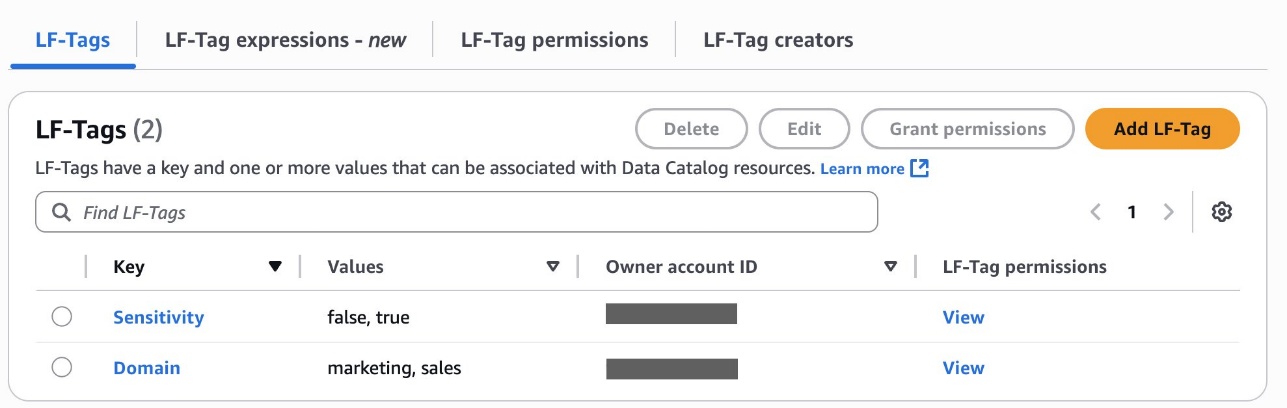
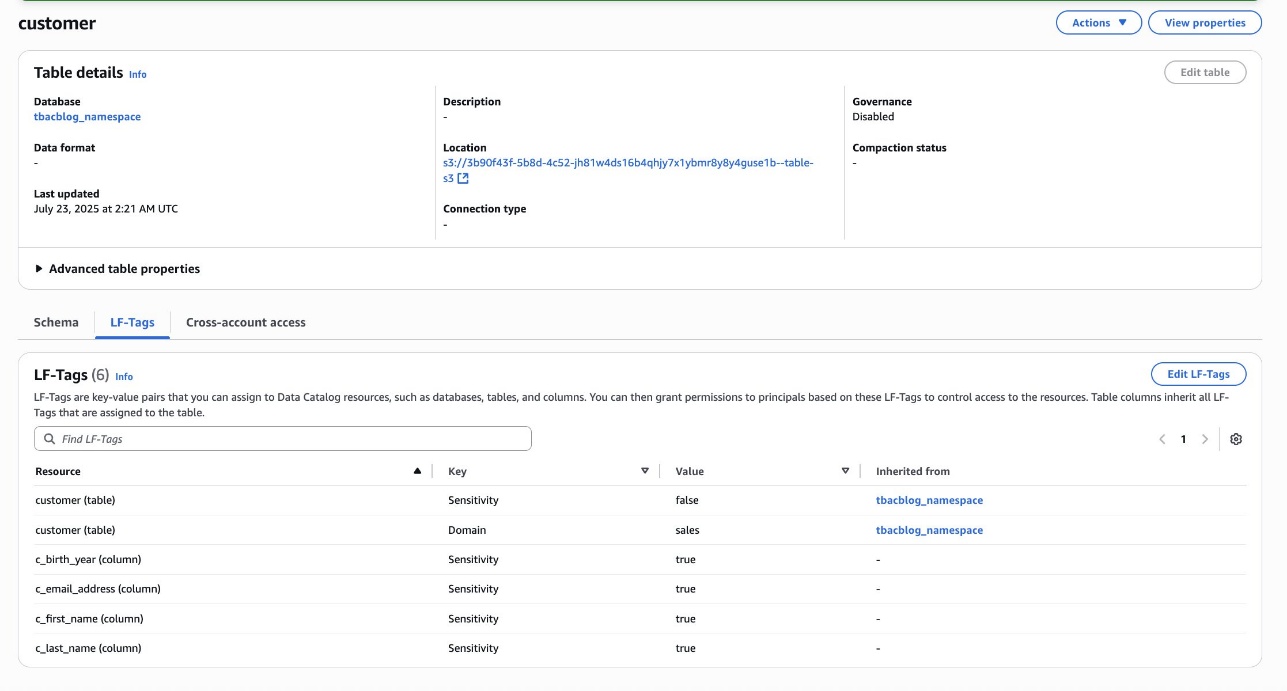
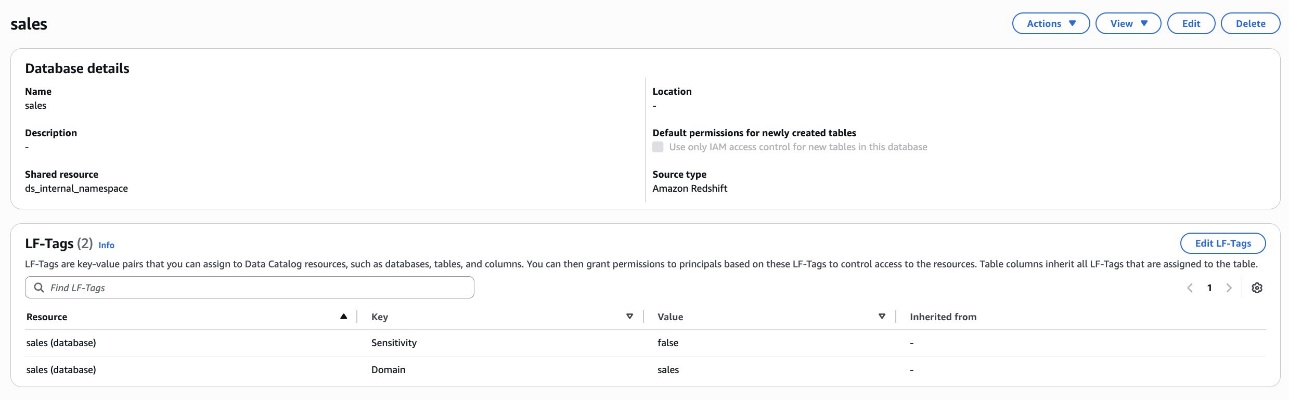
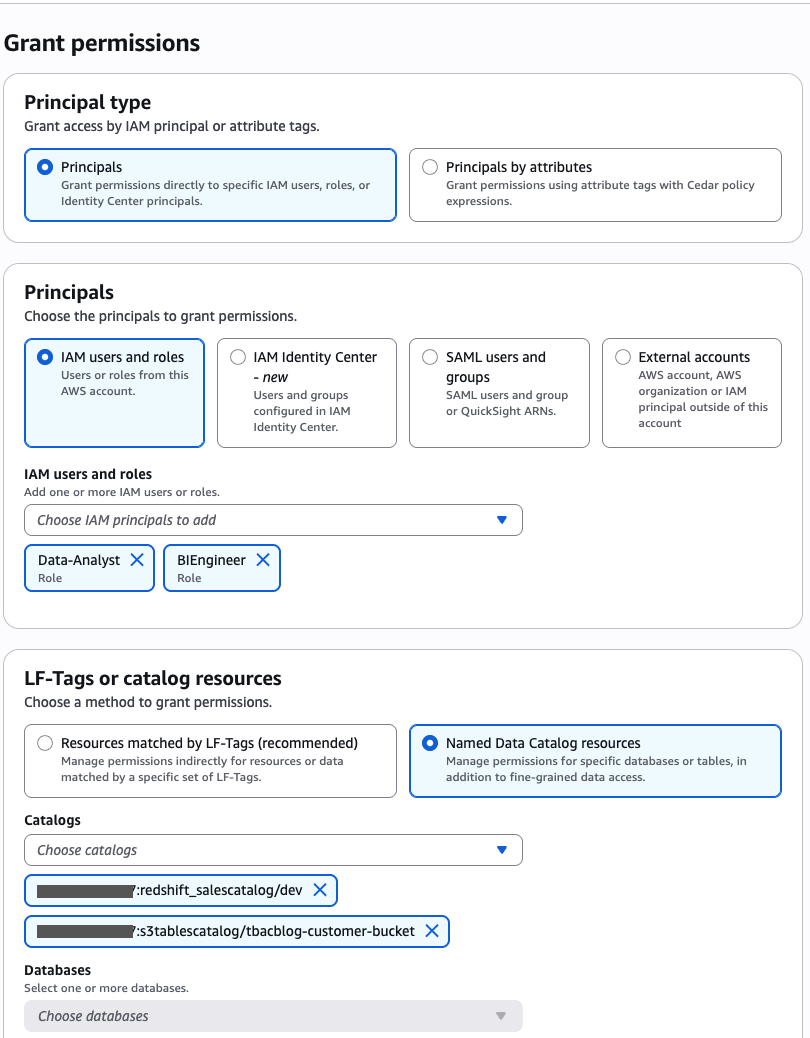
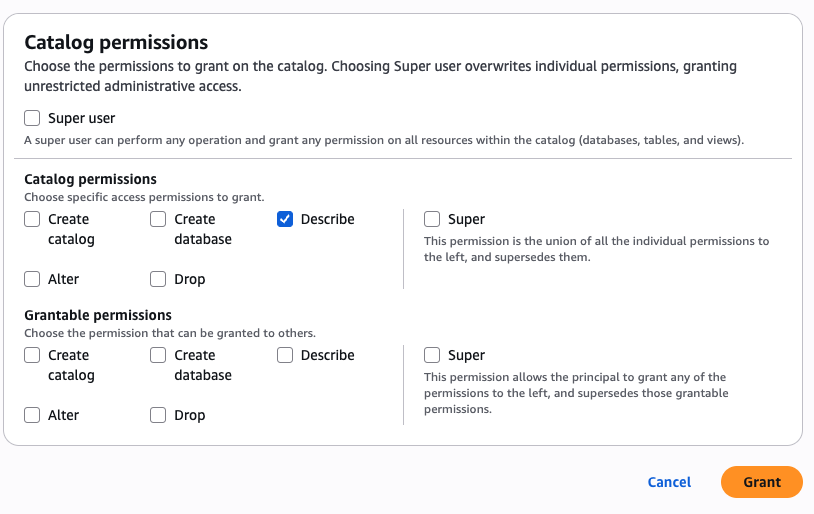
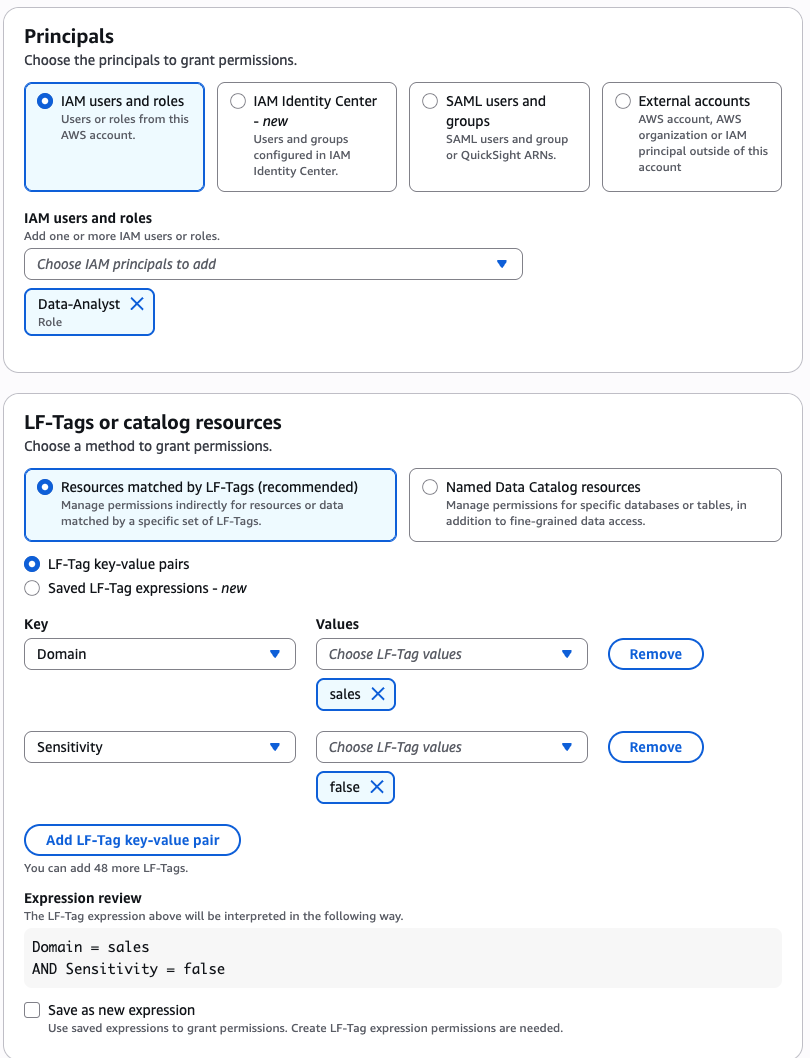
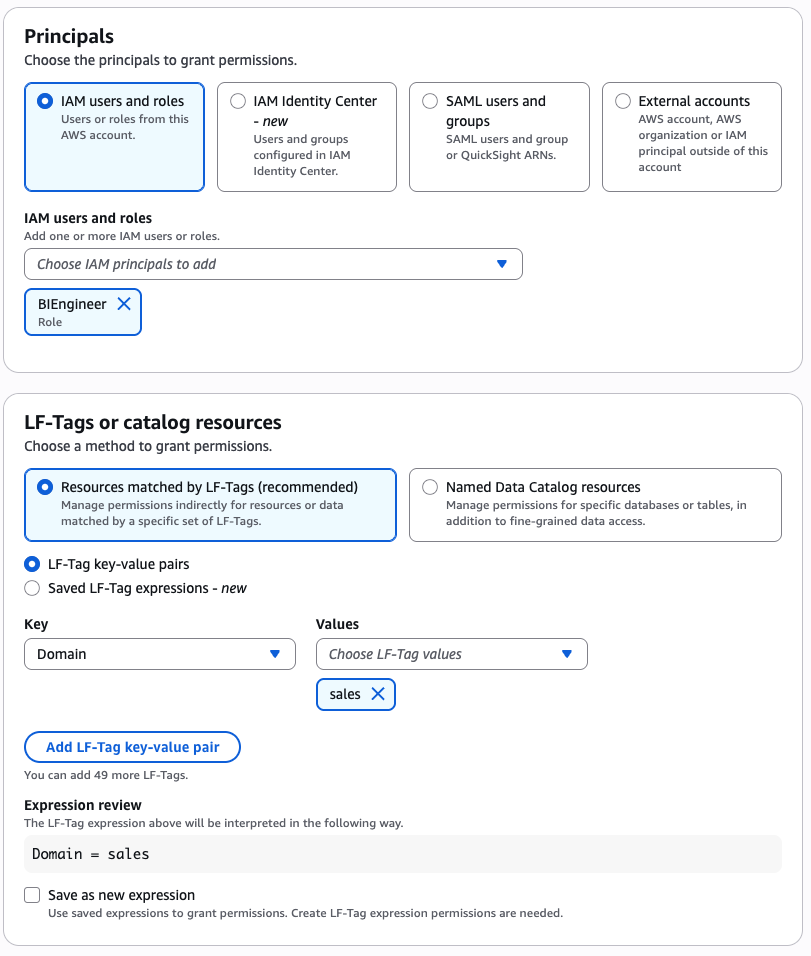
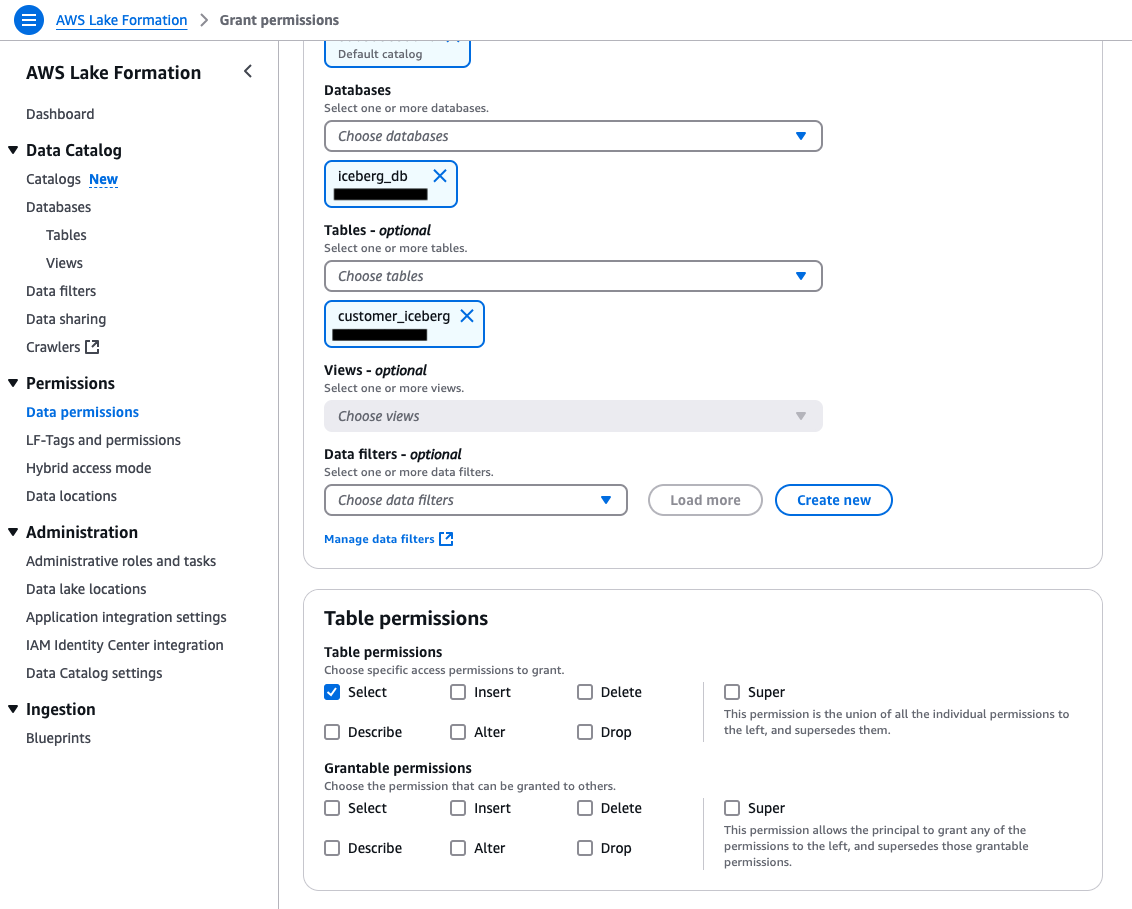
As the data lake administrator, you can now manage access control on databases and tables in a federated catalog using AWS Lake Formation. You can also use tag-based access control to scale your permission model by tagging the resource based on the access control mechanism.
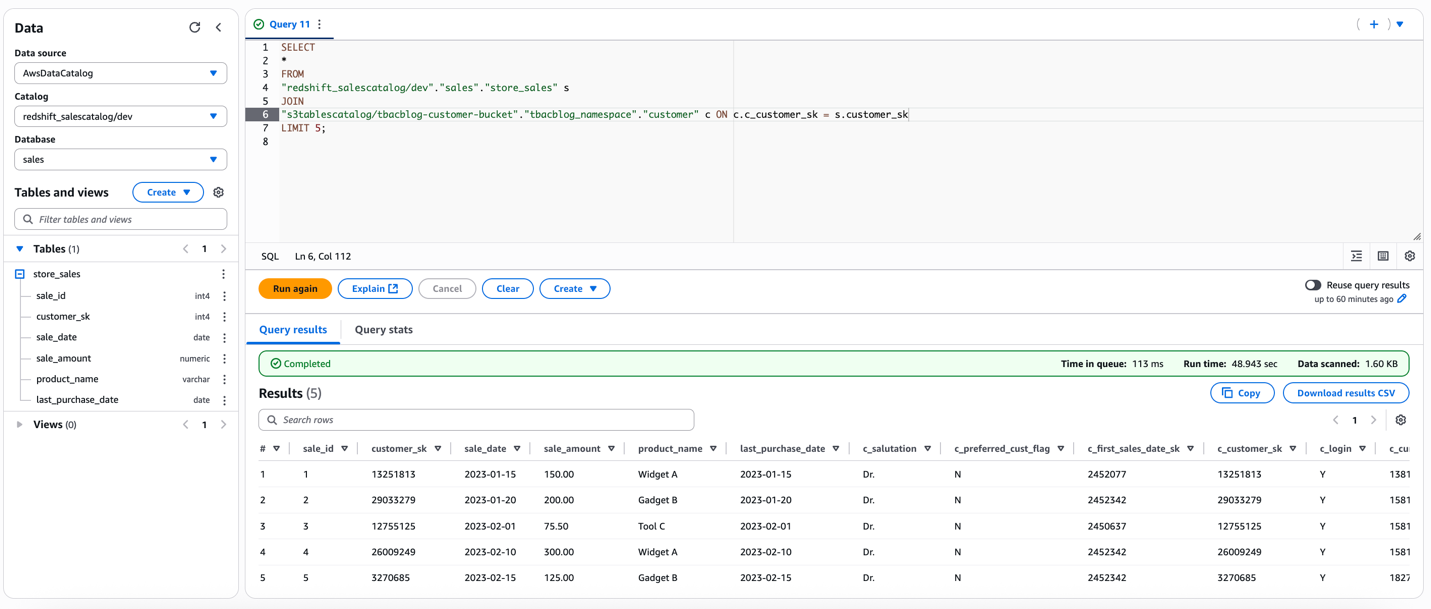
After permissions are granted, an IAM principal or an IAM user can access the federated tables using AWS analytical services including Athena, Amazon Redshift, Amazon EMR, and Amazon SageMaker. Query the federated Iceberg table using Athena as shown in the following example.
Clean up
To avoid incurring ongoing charges, complete the following steps to clean up the resources created during this walkthrough:
- Delete the federated catalog in the Data Catalog:
- Deregister the AWS Glue connection from Lake Formation:
- Revoke Lake Formation permissions (if any were granted):
- Delete the AWS Glue connection:
- Delete IAM roles and policies associated with Lake Formation and the AWS Glue connection:
- Delete the Secrets Manager secret:
This teardown guide doesn’t affect the actual metadata in the remote catalog server nor the data in S3 buckets. It only affects the federation configurations in the Data Catalog and Lake Formation. Any corresponding service principals or configurations in the remote catalog server must be addressed separately.
Make sure you follow the teardown steps in the specified order to avoid dependency conflicts. For example, an AWS Glue connection object can’t be deleted if an AWS Glue catalog object is associated with it.
Additionally, make sure you have the necessary permissions to delete these resources.
Conclusion
In this post, we explored how catalog federation addresses the growing challenge of managing Iceberg tables across multi-vendor catalog environments. We walked through the architecture, demonstrating how the Data Catalog communicates with remote catalog systems, including Snowflake Polaris Catalog, Databricks Unity Catalog, and custom Iceberg REST-compliant catalogs, with centralized authorization and credential vending for secure data access. We covered the setup process, including configuring authentication principals, creating federated catalogs using AWS Glue connections, to implementing fine-grained access controls and querying remote Iceberg tables directly from AWS analytics engines.
Catalog federation offers several advantages:
- Query your Iceberg data where it lives while maintaining security, governance, and price-performance benefits of AWS analytics services
- Remove operational overheads and costs to maintain synchronization processes
- Avoid data duplication and inconsistencies
- Get real-time access to up-to-date table schemas without migrating or replacing existing catalogs.
To learn more, refer to Catalog federation to remote Iceberg catalogs.


 Sandeep Adwankar is a Senior Product Manager with Amazon SageMaker Lakehouse . Based in the California Bay Area, he works with customers around the globe to translate business and technical requirements into products that help customers improve how they manage, secure, and access data.
 Srividya Parthasarathy is a Senior Big Data Architect with Amazon SageMaker Lakehouse. She works with the product team and customers to build robust features and solutions for their analytical data platform. She enjoys building data mesh solutions and sharing them with the community.
 Aarthi Srinivasan is a Senior Big Data Architect with Amazon SageMaker Lakehouse. She works with AWS customers and partners to architect lakehouse solutions, enhance product features, and establish best practices for data governance.
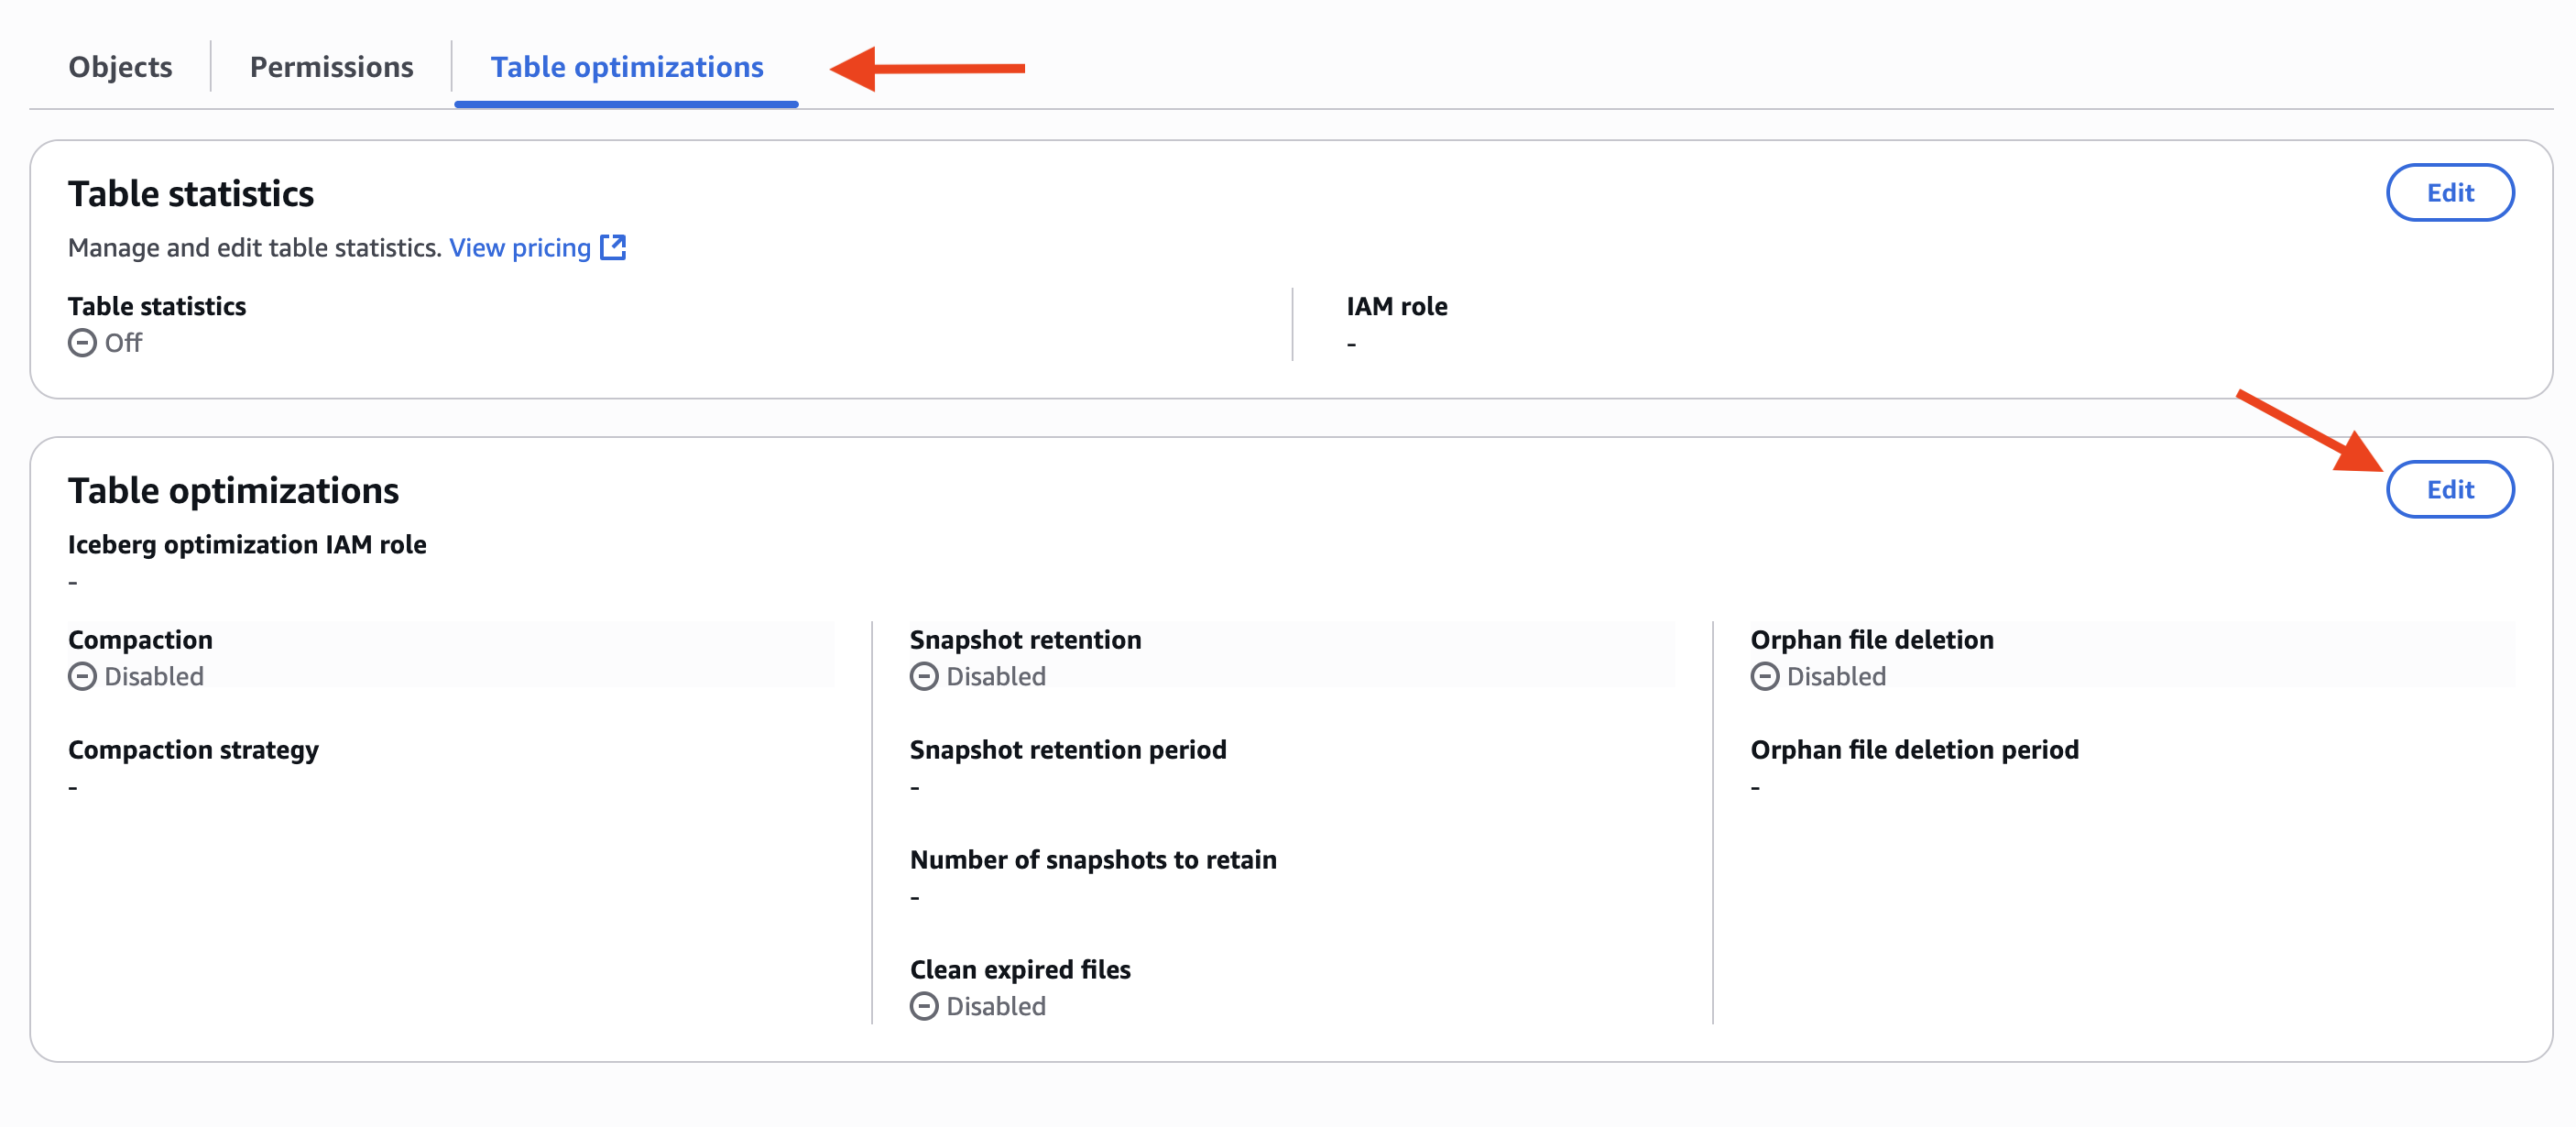

 Tomohiro Tanaka is a Senior Cloud Support Engineer at Amazon Web Services (AWS). He’s passionate about helping customers use Apache Iceberg for their data lakes on AWS. In his free time, he enjoys a coffee break with his colleagues and making coffee at home.
 Noritaka Sekiyama is a Principal Big Data Architect with AWS Analytics services. He’s responsible for building software artifacts to help customers. In his spare time, he enjoys cycling on his road bike.
 Sandeep Adwankar is a Senior Product Manager at Amazon Web Services (AWS). Based in the California Bay Area, he works with customers around the globe to translate business and technical requirements into products customers can use to improve how they manage, secure, and access data.
 Siddharth Padmanabhan Ramanarayanan is a Senior Software Engineer on the AWS Glue and AWS Lake Formation team, where he focuses on building scalable distributed systems for data analytics workloads. He is passionate about helping customers optimize their cloud infrastructure for performance and cost efficiency.


 Jeremy Spell is a Cloud Infrastructure Architect working with Amazon Web Services (AWS) Professional Services. He enjoys architecting and building solutions for customers. In his free time Jeremy makes Texas style BBQ, and spends time with his family and church community.
 Jeff Demuth is a solutions architect who joined Amazon Web Services (AWS) in 2016. He focuses on the geospatial community and is passionate about geographic information systems (GIS) and technology. Outside of work, Jeff enjoys traveling, building Internet of Things (IoT) applications, and tinkering with the latest gadgets.


 Amit Maindola is a Senior Data Architect focused on data engineering, analytics, and AI/ML at Amazon Web Services. He helps customers in their digital transformation journey and enables them to build highly scalable, robust, and secure cloud-based analytical solutions on AWS to gain timely insights and make critical business decisions.
 Srinivas Kandi is a Senior Architect at Stifel focusing on delivering the next generation of cloud data platform on AWS. Prior to joining Stifel, Srini was a delivery specialist in cloud data analytics at AWS helping several customers in their transformational journey into AWS cloud. In his free time, Srini likes to explore cooking, travel and learn new trends and innovations in AI and cloud computing.
 Hossein Johari is a seasoned data and analytics leader with over 25 years of experience architecting enterprise-scale platforms. As Lead and Senior Architect at Stifel Financial Corp. in St. Louis, Missouri, he spearheads initiatives in Data Platforms and Strategic Solutions, driving the design and implementation of innovative frameworks that support enterprise-wide analytics, strategic decision-making, and digital transformation. Known for aligning technical vision with business objectives, he works closely with cross-functional teams to deliver scalable, forward-looking solutions that advance organizational agility and performance.
 Ahmad Rawashdeh is a Senior Architect at Stifel Financial. He supports Stifel and its clients in designing, implementing, and building scalable and reliable data architectures on Amazon Web Services (AWS), with a strong focus on data lake strategies, database services, and efficient data ingestion and transformation pipelines.
 Lei Meng is a data architect at Stifel. His focus is working in designing and implementing scalable and secure data solutions on the AWS and helping Stifel’s cloud migration from on-premises systems.


 Layth Yassin is a Software Development Engineer on the AWS Glue team. He’s passionate about tackling challenging problems at a large scale, and building products that push the limits of the field. Outside of work, he enjoys playing/watching basketball, and spending time with friends and family.
 Noritaka Sekiyama is a Principal Big Data Architect on the AWS Glue team. He is also the author of the book
  Kartik Panjabi is a Software Development Manager on the AWS Glue team. His team builds generative AI features for the Data Integration and distributed system for data integration.
 Matt Su is a Senior Product Manager on the AWS Glue team. He enjoys helping customers uncover insights and make better decisions using their data with AWS Analytics services. In his spare time, he enjoys skiing and gardening.


 This policy uses all the resources, which shouldn’t be used in production workload. To deploy this setup in production, restrict it to only specific zero-ETL integration resources by adding a

 The following code is an example of permissions for catalog settings:


 Narayani Ambashta is an Analytics Specialist Solutions Architect at AWS, focusing on the automotive and manufacturing sector, where she guides strategic customers in developing modern data and AI strategies. With over 15 years of cross-industry experience, she specializes in big data architecture, real-time analytics, and AI/ML technologies, helping organizations implement modern data architectures. Her expertise spans across lakehouse, generative AI, and IoT platforms, enabling customers to drive digital transformation initiatives. When not architecting modern solutions, she enjoys staying active through sports and yoga.
 Raj Ramasubbu is a Senior Analytics Specialist Solutions Architect focused on big data and analytics and AI/ML with AWS. He helps customers architect and build highly scalable, performant, and secure cloud-based solutions on AWS. Raj provided technical expertise and leadership in building data engineering, big data analytics, business intelligence, and data science solutions for over 18 years prior to joining AWS. He helped customers in various industry verticals like healthcare, medical devices, life sciences, retail, asset management, car insurance, residential REIT, agriculture, title insurance, supply chain, document management, and real estate.
 Yadgiri Pottabhathini is a Senior Analytics Specialist Solutions Architect in the media and entertainment sector. He specializes in assisting enterprise customers with their data and analytics cloud transformation initiatives, while providing guidance on accelerating their Generative AI adoption through the development of data foundations and modern data strategies that leverage open-source frameworks and technologies.
 Junpei Ozono is a Sr. Go-to-market (GTM) Data & AI solutions architect at AWS in Japan. He drives technical market creation for data and AI solutions while collaborating with global teams to develop scalable GTM motions. He guides organizations in designing and implementing innovative data-driven architectures powered by AWS services, helping customers accelerate their cloud transformation journey through modern data and AI solutions. His expertise spans across modern data architectures including Data Mesh, Data Lakehouse, and Generative AI, enabling customers to build scalable and innovative solutions on AWS.


 Aarthi Srinivasan is a Senior Big Data Architect with Amazon SageMaker Lakehouse. As part of the SageMaker Lakehouse team, she works with AWS customers and partners to architect lake house solutions, enhance product features, and establish best practices for data governance.
 Praveen Kumar is an Analytics Solutions Architect at AWS with expertise in designing, building, and implementing modern data and analytics platforms using cloud-based services. His areas of interest are serverless technology, data governance, and data-driven AI applications.
 Dhananjay Badaya is a Software Developer at AWS, specializing in distributed data processing engines including Apache Spark and Apache Hadoop. As a member of the Amazon EMR team, he focuses on designing and implementing enterprise governance features for EMR Spark.


 Vetri Natarajan is a Specialist Solutions Architect for Amazon QuickSight. Vetri has 15 years of experience implementing enterprise business intelligence (BI) solutions and greenfield data products. Vetri specializes in integration of BI solutions with business applications and enable data-driven decisions.
 Ismael Murillo is a Solutions Architect for Amazon QuickSight. Before joining AWS, Ismael worked in Amazon Logistics (AMZL) with delivery station management, delivery service providers, and our customer actively in the field. Ismael focused on last mile delivery and delivery success. He designed and implemented many innovative solutions to help reduce cost, influence delivery success. He is also a United States Army Veteran, where he served for eleven years.


 Srividya Parthasarathy is a Senior Big Data Architect on the AWS Lake Formation team. She enjoys building data mesh solutions and sharing them with the community.


 Aarthi Srinivasan is a Senior Big Data Architect with AWS Lake Formation. She collaborates with the service team to enhance product features, works with AWS customers and partners to architect lake house solutions, and establishes best practices.
 Parul Saxena is a Senior Big Data Specialist Solutions Architect in AWS. She helps customers and partners build highly optimized, scalable, and secure solutions. She specializes in Amazon EMR, Amazon Athena, and AWS Lake Formation, providing architectural guidance for complex big data workloads and assisting organizations in modernizing their architectures and migrating analytics workloads to AWS.


 Charlie can now further update the SQL query and use it to power QuickSight dashboards that can be shared with Sales team members.
 Sandeep Adwankar is a Senior Technical Product Manager at AWS. Based in the California Bay Area, he works with customers around the globe to translate business and technical requirements into products that enable customers to improve how they manage, secure, and access data.
 Srividya Parthasarathy is a Senior Big Data Architect on the AWS Lake Formation team. She works with the product team and customers to build robust features and solutions for their analytical data platform. She enjoys building data mesh solutions and sharing them with the community.


 Navnit Shukla serves as an AWS Specialist Solutions Architect with a focus on Analytics. He possesses a strong enthusiasm for assisting clients in discovering valuable insights from their data. Through his expertise, he constructs innovative solutions that empower businesses to arrive at informed, data-driven choices. Notably, Navnit Shukla is the accomplished author of the book titled Data Wrangling on AWS. He can be reached through
  Angel Conde Manjon is a Sr. PSA Specialist on Data & AI, based in Madrid, and focuses on EMEA South and Israel. He has previously worked on research related to data analytics and artificial intelligence in diverse European research projects. In his current role, Angel helps partners develop businesses centered on data and AI.
 Amit Singh currently serves as a Senior Solutions Architect at AWS, specializing in analytics and IoT technologies. With extensive expertise in designing and implementing large-scale distributed systems, Amit is passionate about empowering clients to drive innovation and achieve business transformation through AWS solutions.


 Sakti Mishra is a Principal Solutions Architect at AWS, where he helps customers modernize their data architecture and define end-to end-data strategies, including data security, accessibility, governance, and more. He is also the author of


 Raj Ramasubbu is a Sr. Analytics Specialist Solutions Architect focused on big data and analytics and AI/ML with Amazon Web Services. He helps customers architect and build highly scalable, performant, and secure cloud-based solutions on AWS. Raj provided technical expertise and leadership in building data engineering, big data analytics, business intelligence, and data science solutions for over 20 years prior to joining AWS. He helped customers in various industry verticals like healthcare, medical devices, life science, retail, asset management, car insurance, residential REIT, agriculture, title insurance, supply chain, document management, and real estate.
 Srividya Parthasarathy is a Senior Big Data Architect on the AWS Lake Formation team. She works with product team and customer to build robust features and solutions for their analytical data platform. She enjoys building data mesh solutions and sharing them with the community.
 Pratik Das is a Senior Product Manager with AWS Lake Formation. He is passionate about all things data and works with customers to understand their requirements and build delightful experiences. He has a background in building data-driven solutions and machine learning systems in production.


 Leo Ramsamy is a Platform Architect specializing in data and analytics for ANZ’s Institutional division. He focuses on modern data practices, including Data Mesh architecture, data governance, quality management, and observability. His work aligns data strategies with business goals, improving accessibility and enabling better decision-making across ANZ.
 Srinivasan Kuppusamy is a Senior Cloud Architect – Data at AWS ProServe, where he helps customers solve their business problems using the power of AWS Cloud technology. His areas of interests are data and analytics, data governance, and AI/ML.
 Rada Stanic is a Chief Technologist at Amazon Web Services, where she helps ANZ customers across different segments solve their business problems using AWS Cloud technologies. Her special areas of interest are data analytics, machine learning/AI, and application modernization.