All posts by Janardhan Molumuri

Build your own continuous modernization pipeline with AWS Transform custom

Post Syndicated from Janardhan Molumuri original https://aws.amazon.com/blogs/devops/build-your-own-continuous-modernization-pipeline-with-aws-transform-custom/

Introduction

Development velocity has reached new heights with AI-driven development tools and practices. Organizations are generating code faster than ever before. But that speed carries risk. Researchers Anderson, Parker, and Tan warned in MIT Sloan Management Review, “Legacy systems tend to carry hidden debt; layering AI-generated code on top of them creates additional tangled dependencies.The faster you generate code, the faster technical debt compounds — especially in brownfield environments where outdated frameworks, deprecated libraries, and undocumented services already carry years of accumulated risk.

As organizations accelerate their software development, manual or periodic processes to synchronize dependencies and update documentation no longer keep pace, and technical debt piles up faster than ever. Continuous modernization built into your pipeline enables you to maintain up-to-date dependencies and documentation across repositories on every commit, preventing future tech debt and improving AI agent accuracy and accountability.“

You can embed AI-powered code transformations directly into your CI/CD pipelines, turning modernization from a periodic project into an automated, ongoing practice. AWS gives you two ways to get there. AWS Transform – continuous modernization is the fully managed option, delivering continuous modernization automatically with no pipeline for you to build or maintain. The Do-It-Yourself (DIY) approach assembles the same practices yourself using AWS Transform custom and your existing CI/CD platform. Choose DIY when you need to fit modernization into a specific pipeline (GitHub Actions, AWS CodePipeline, Jenkins, GitLab CI, and so on), or want to customize the workflow with existing tools like Dependabot.

In this post, we cover the DIY approach on how to set up a continuous modernization pipeline using AWS Transform custom and demonstrate it in action.

The Do It Yourself (DIY) path – continuous modernization pipeline with AWS Transform custom

Sample application: instrumentShop

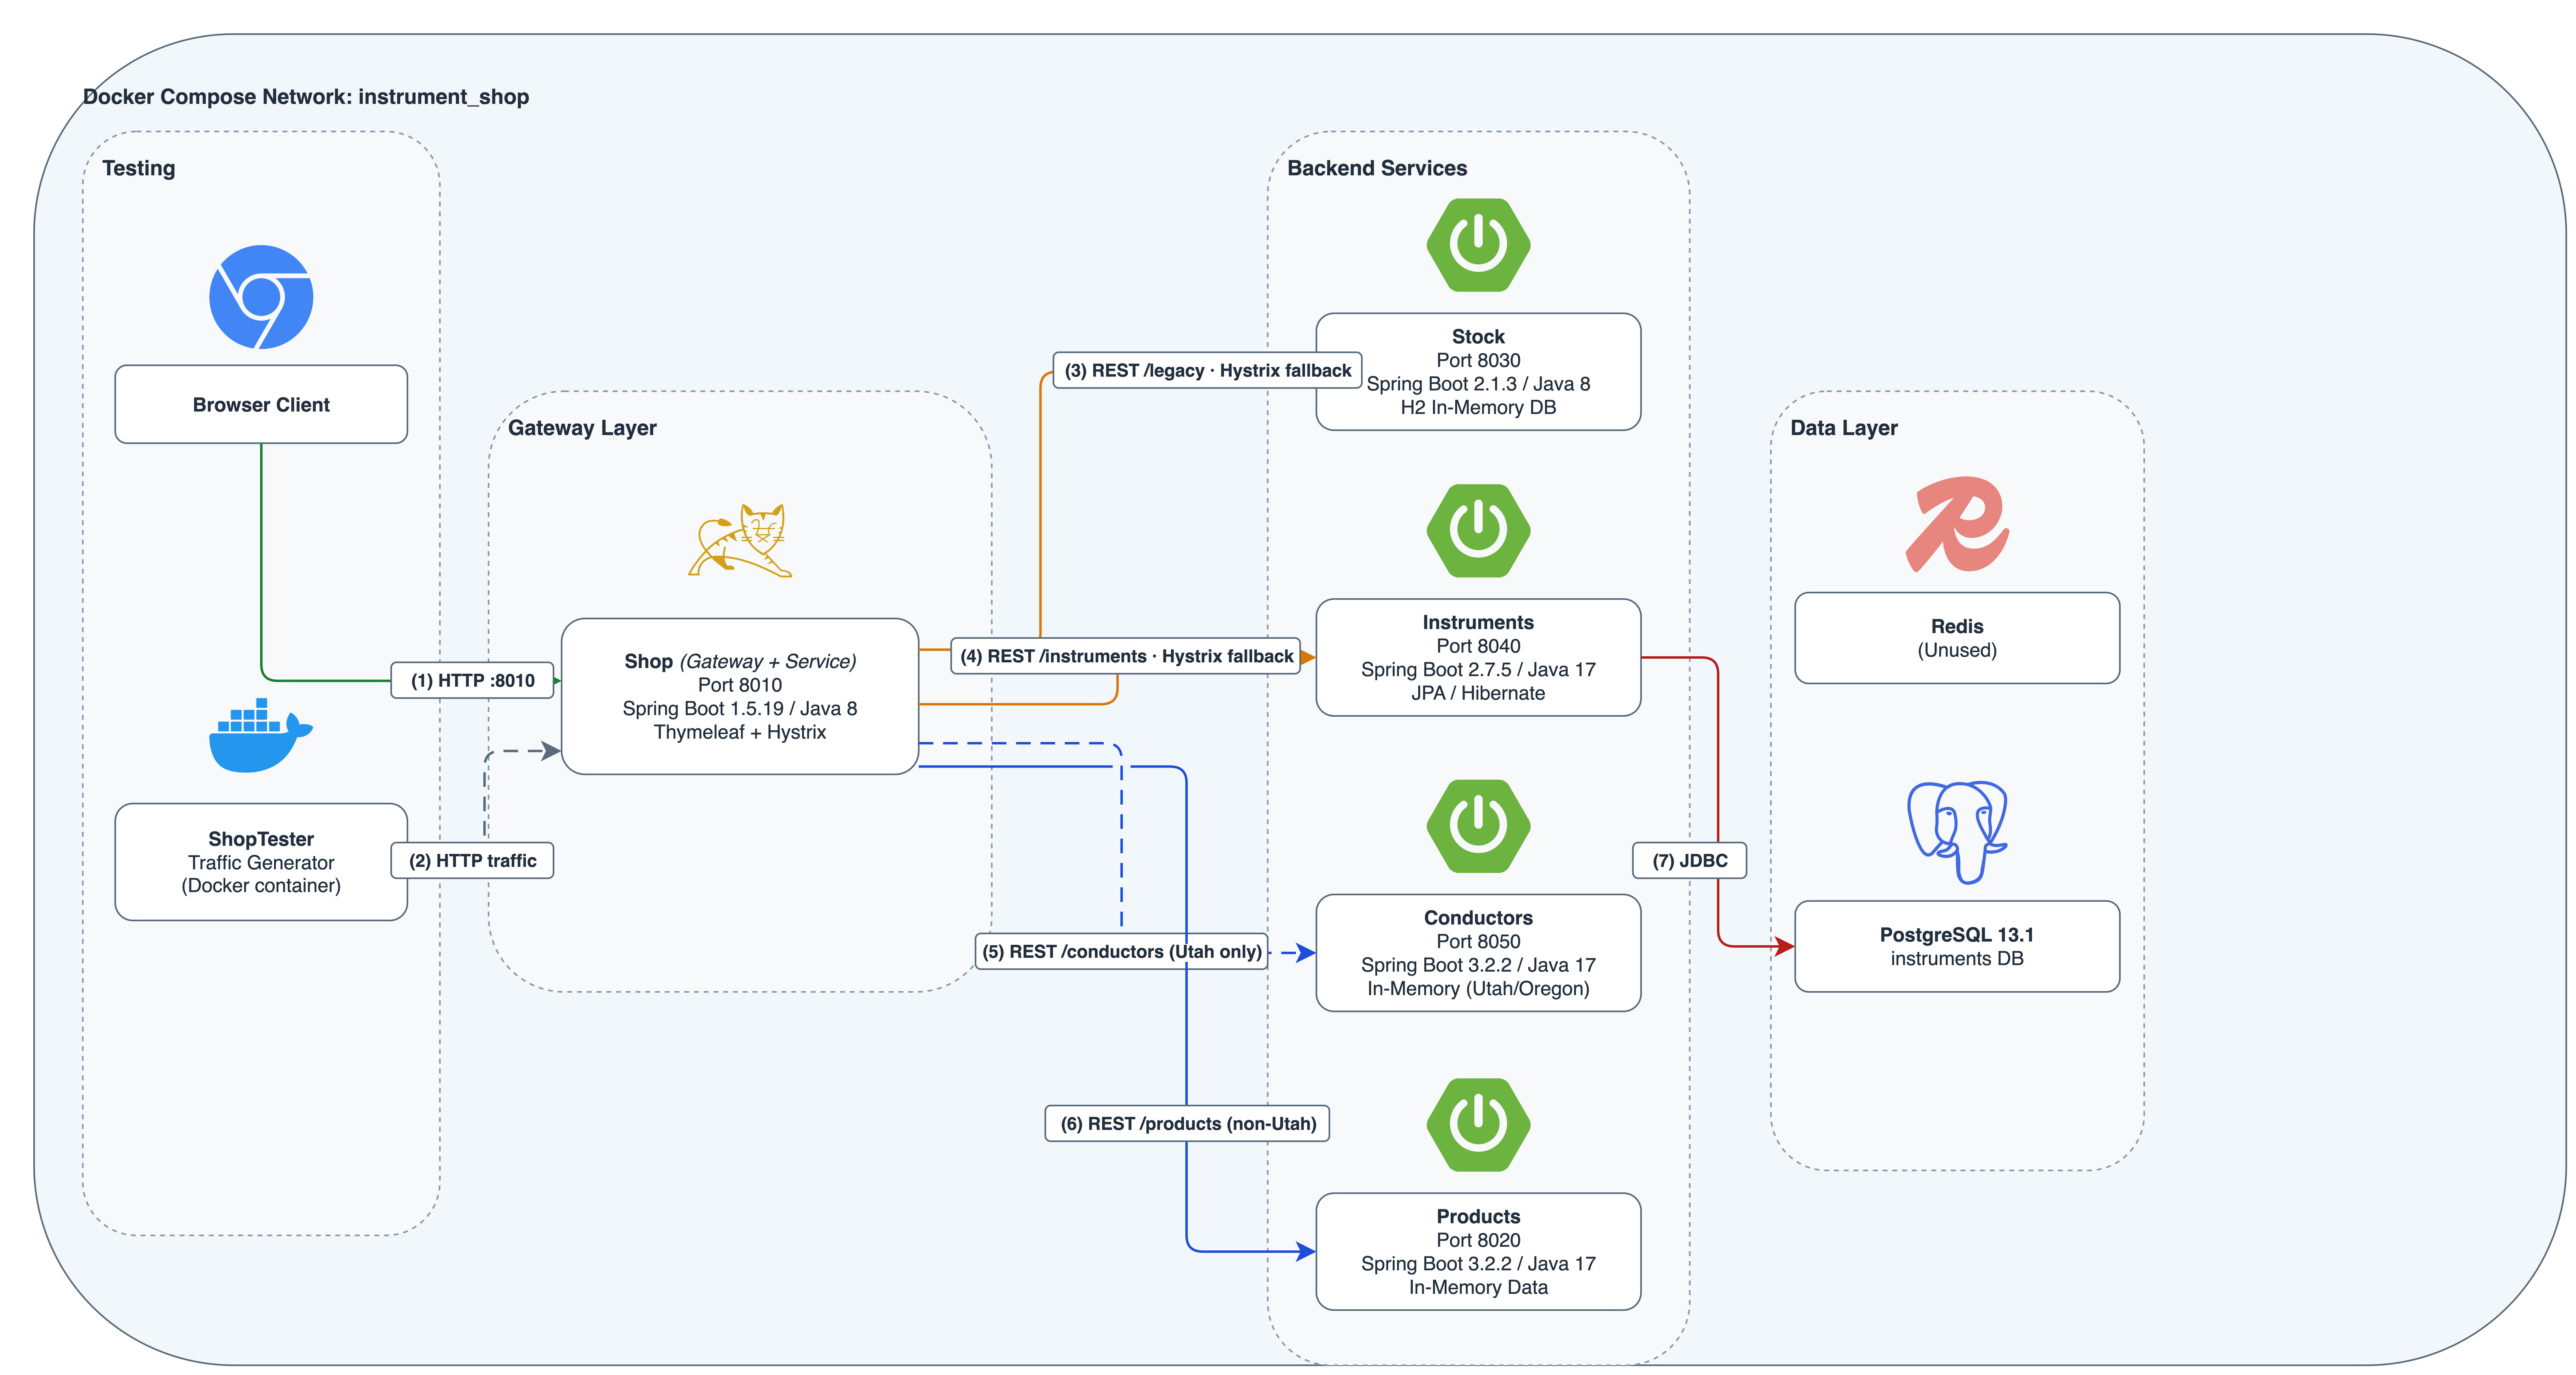
For this walkthrough, we use a dated Java application called instrumentShop (Figure 1) — a Java microservices application built with Spring Boot that simulates an online instrument shop to demonstrate four practices: automated dependency remediation, auto-documentation on every commit, scaling transformations across repositories, and continual learning.

Architecture overview
instrumentShop Java application architecture: a Spring Gateway routing traffic to four REST services (Agents, Instruments, Consumers, Products), with a Thymeleaf client, PostgreSQL persistence, and Hystrix circuit breaking.

Figure 1: instrumentShop Java application architecture

The instrumentShop application is a Spring Boot microservices application with a Spring Gateway (v1.5.19) routing traffic from a single HTTP/8010 entry point to four REST services: Agents, Instruments, Consumers, and Products. A Thymeleaf client provides server-side rendering, PostgreSQL 13.1 handles persistence via JDBC, and Hystrix provides circuit-breaking for inter-service calls. A ShopTester utility generates HTTP traffic for testing.

This application is a strong candidate for continuous modernization:

  • Spring Boot 1.5.19 is years past end of life and carries known CVEs
  • Hystrix has been in maintenance mode since Netflix deprecated it in 2018
  • Cross-service coordination — dependency updates must propagate across multiple microservices
  • Transitive dependency risk — PostgreSQL JDBC drivers and other transitive dependencies accumulate security advisories over time

A typical workflow for the continuous modernization pipeline is shown below (Figure 2):

  • A developer pushes code to main — GitHub Actions triggers the auto-documentation workflow, generating updated architecture docs and technical debt reports.
  • Dependabot detects a vulnerable dependency — A PR opens automatically. GitHub Actions triggers the dependency remediation workflow, runs AWS Transform custom to remediate the code, validates with tests, and pushes the result back to the PR.
  • A platform team defines a new transformation (e.g., “Upgrade Spring Boot to the latest stable release “) — The scheduled GitHub Actions workflow runs the transformation weekly in non-interactive mode across all instrumentShop microservices and other repositories in the portfolio.
  • The agent learns — Knowledge items from each execution improve future runs, reducing manual intervention over time.
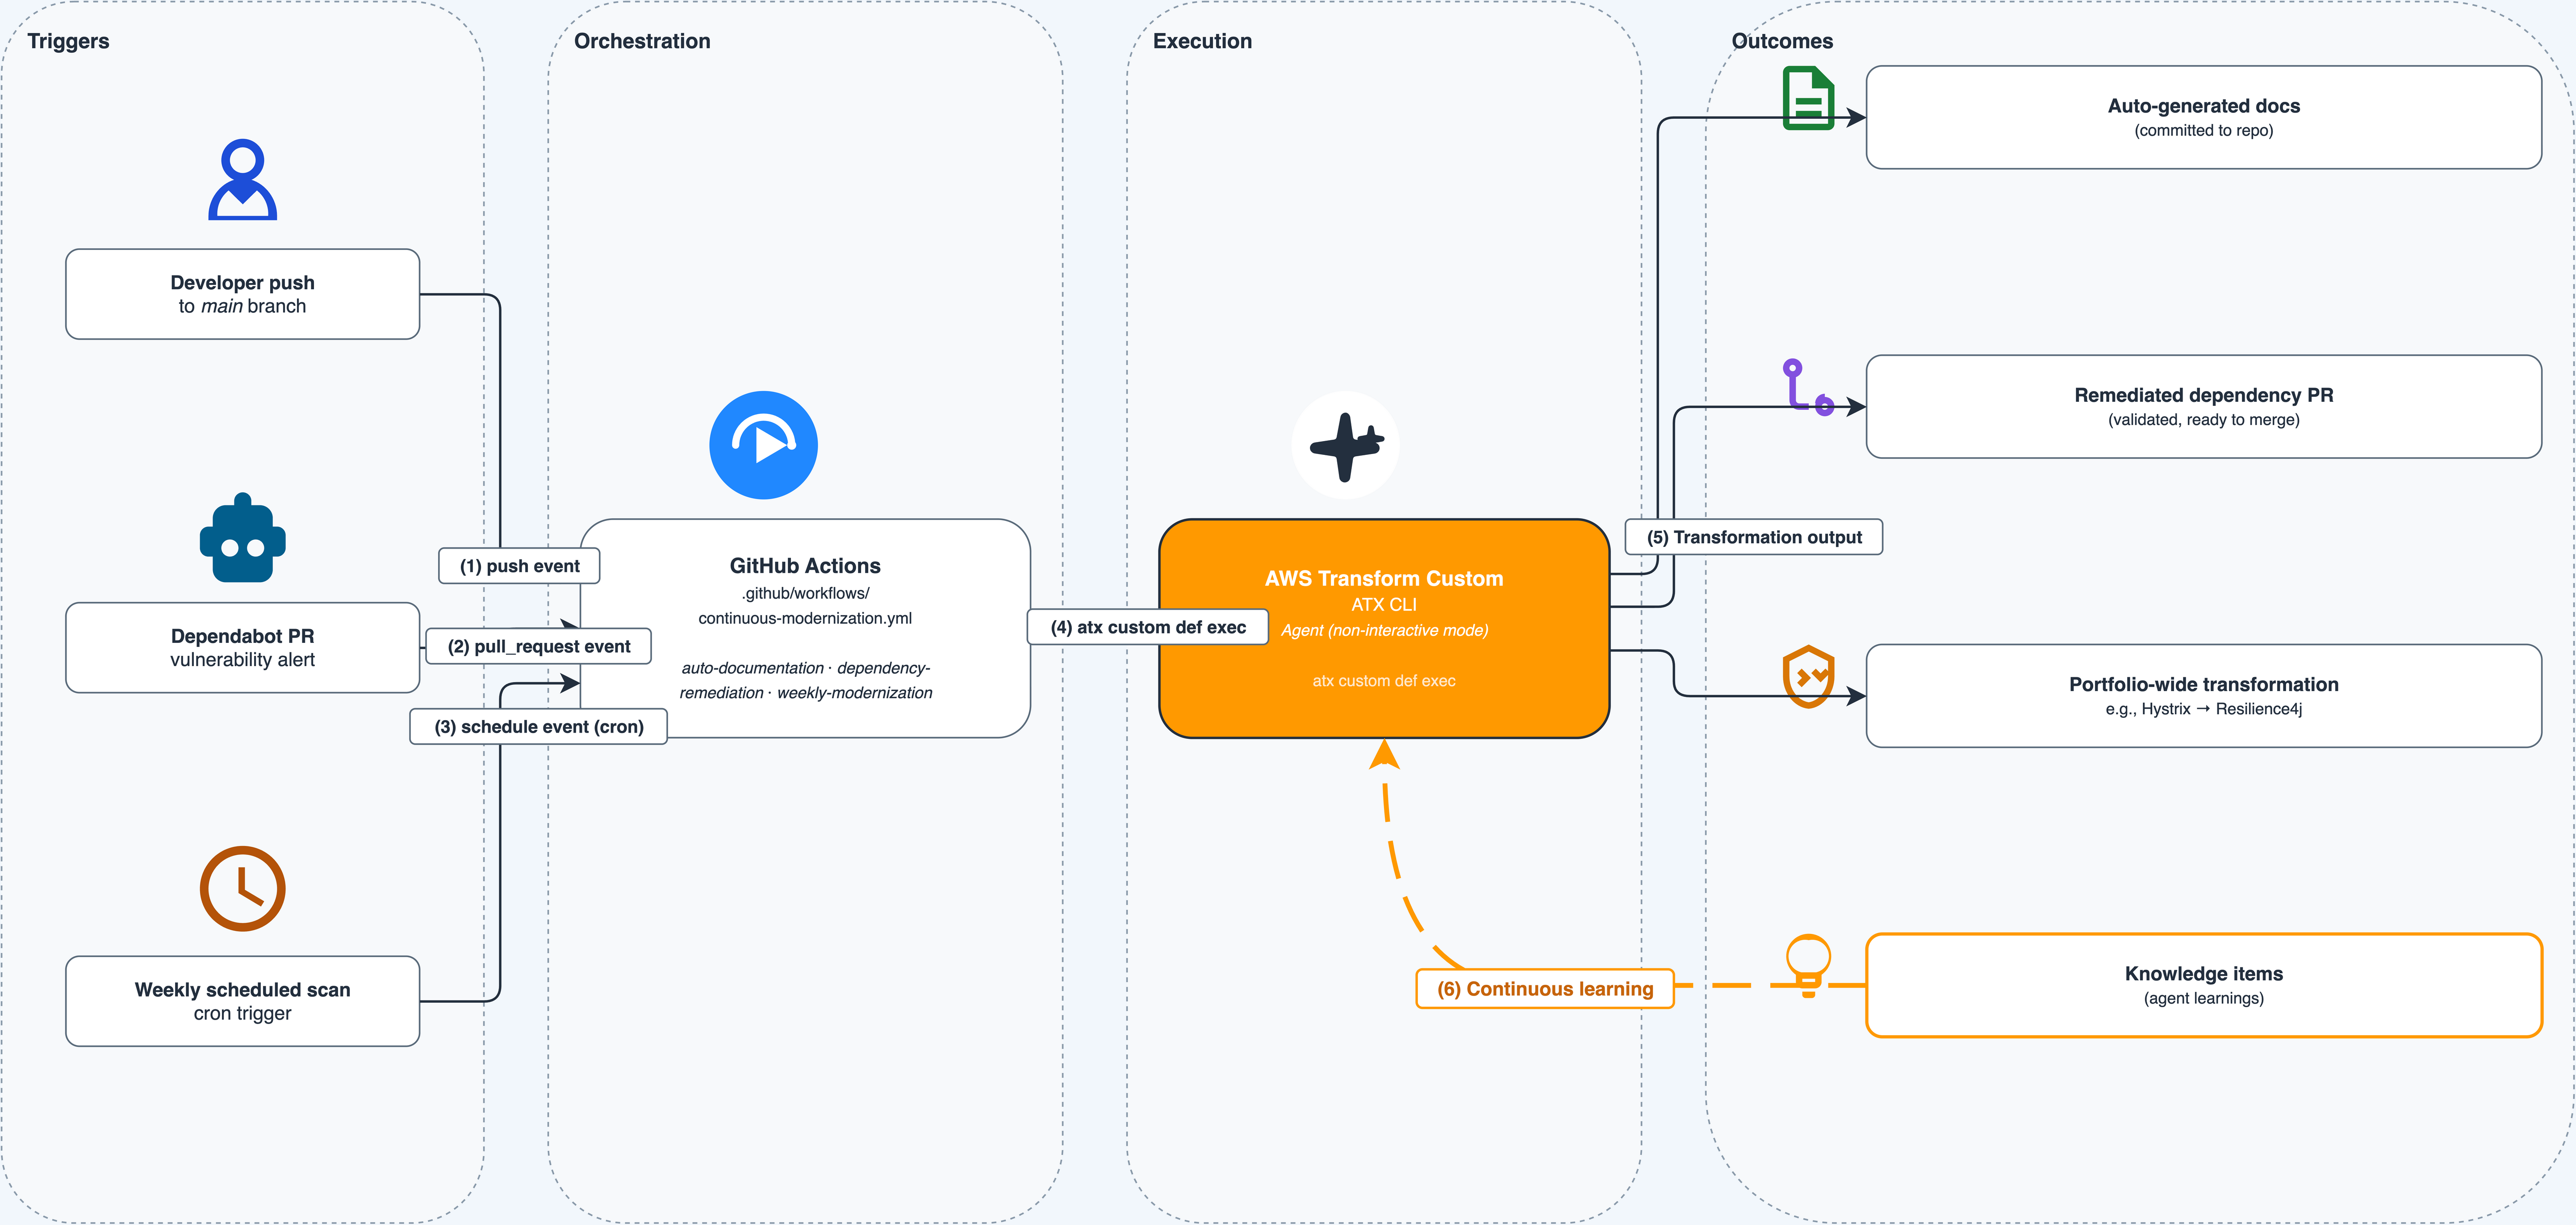
AWS Transform continuous code modernization workflow
Figure 2: AWS Transform continuous code modernization workflow

Prerequisites

  • Before setting up the continuous modernization pipeline, ensure you have the following:
  • An active AWS account with permissions for AWS Transform custom
  • AWS Transform CLI installed and configured in your development environment
  • Authentication with AWS credentials configured locally and proper IAM permissions to call AWS Transform
  • Git installed for cloning sample repositories
  • GitHub Dependabot enabled on your repository for automated vulnerability detection

Continuous modernization through CI/CD in action

Continuous modernization shifts code transformation from a periodic project into an automated, pipeline-driven practice. Instead of scheduling a “modernization sprint” once a year, your CI/CD pipeline identifies and remediates technical debt on every commit, every dependency alert, and across every repository.

We implement this through four practices, each powered by AWS Transform custom running as a step in GitHub Actions workflows.

Note: This post uses GitHub Actions because the instrumentShop demo repository is built with it. The same AWS Transform CLI (atx) commands work with AWS CodePipeline, Jenkins, GitLab CI, CircleCI, or any CI/CD system that runs shell commands. Continuous modernization is a practice, not a tool choice.

Important: Every atx custom def exec invocation in this post uses the –trust-all-tools flag, which allows the agent to execute tools without interactive confirmation. This is required for non-interactive CI/CD execution. Review your organization’s security policies before enabling this flag in production pipelines.

1. Dependency analysis and remediation

GitHub Dependabot scans your repository for known vulnerabilities and generates alerts when a new vulnerability is added or your dependency graph changes—for example, when you push commits that update packages or versions. However, resolving these alerts requires more than bumping a version number. Upgrading a dependency can introduce breaking API changes, require code modifications, or demand configuration updates.

AWS Transform custom helps handle the code changes needed to resolve the alerts. It runs via a GitHub Actions workflow that triggers automatically to:

  • Fetch the list of latest Dependabot alerts
  • Run AWS Transform custom to analyze the alerts and apply code transformations
  • Run your build and test suite to validate the changes
  • Create a new pull request for each resolved alert

The workflow calls a shell script that invokes the AWS Transform CLI in headless mode with retry logic. Place this script at the root of your repository:

run_dependabot_alert_fixes.sh:

#!/usr/bin/env bash
set -euo pipefail

# -------------------------------------------------------------------
# run_dependabot_alert_fixes.sh
# Runs the Dependabot alert remediation transformation in headless mode.
# Retries up to MAX_RETRIES times on failure.
#
# Usage:
#   ./run_dependabot_alert_fixes.sh [-n <transformation-name>] [-p <path>] [-c <build-command>]
#
# Defaults:
#   -n  Remediate-Critical-GitHub-Dependabot-Alerts-Java-Maven
#   -p  .                   (current directory)
#   -c  mvn clean install   (Maven build)
# -------------------------------------------------------------------

TRANSFORMATION_NAME="Remediate-Critical-GitHub-Dependabot-Alerts-Java-Maven"
CODE_PATH="."
BUILD_CMD="mvn clean install"
MAX_RETRIES=3

while getopts "n:p:c:" opt; do
  case $opt in
    n) TRANSFORMATION_NAME="$OPTARG" ;;
    p) CODE_PATH="$OPTARG" ;;
    c) BUILD_CMD="$OPTARG" ;;
    *) echo "Usage: $0 [-n <transformation-name>] [-p <path>] [-c <build-command>]" && exit 1 ;;
  esac
done

echo "=== AWS Transform Custom ==="
echo "Transformation: $TRANSFORMATION_NAME"
echo "Code path:      $CODE_PATH"
echo "Build command:  $BUILD_CMD"
echo "============================"

attempt=1
while [ $attempt -le $MAX_RETRIES ]; do
  echo "--- Attempt $attempt of $MAX_RETRIES ---"

  if atx custom def exec \
    -n "$TRANSFORMATION_NAME" \
    -p "$CODE_PATH" \
    -c "$BUILD_CMD" \
    -x -t; then
    echo "=== Transformation completed successfully ==="
    exit 0
  fi

  echo "Attempt $attempt failed."
  attempt=$((attempt + 1))

  if [ $attempt -le $MAX_RETRIES ]; then
    echo "Retrying in 10 seconds..."
    sleep 10
  fi
done

echo "=== All $MAX_RETRIES attempts failed ==="
exit 1

This script accepts optional flags to override the transformation name (-n), code path (-p), and build command (-c). The -x flag enables non-interactive mode and -t enables --trust-all-tools, both required for CI/CD execution. On failure, it retries up to three times with a 10-second backoff.

Your CI/CD workflow must configure AWS credentials and install the AWS Transform CLI before invoking this script. With this setup, Dependabot alerts are reviewed continuously for any changes — not just a version bump, but the complete code adaptation required to make the upgrade work.

2. Auto documentation

Documentation is one of the most neglected aspects of modern software development. Documentation increases accuracy and acts as a contract between requirements and implementation. AWS Transform custom codebase analysis capability generates structured documentation covering architecture, technical debt, code metrics, and migration planning on every incremental update ensuring every Agent or human that modifies the codebase is working from a true “current state”.

By embedding this as a post-push step in your CI/CD pipeline, your documentation stays current automatically. The workflow triggers on every pull request to main, runs your build and test suite, then calls a shell script that invokes AWS Transform custom to generate documentation and commits it back to the PR branch.

Place this script at the root of your repository:

run_code_analysis.sh:

#!/usr/bin/env bash
set -euo pipefail

# -------------------------------------------------------------------
# run_code_analysis.sh
# Runs an AWS Transform custom transformation in headless mode.
# Retries up to MAX_RETRIES times on failure.
#
# Usage:
#   ./run_code_analysis.sh [-n <name>] [-p <path>] [-c <build-cmd>] [-U <pr-url>]
#
# Defaults:
#   -n  GitHub-PR-Context-Codebase-Analysis
#   -p  .                   (current directory)
#   -c  mvn clean install   (Maven build)
#   -U  (empty)             PR URL
# -------------------------------------------------------------------

TRANSFORMATION_NAME="GitHub-PR-Context-Codebase-Analysis"
CODE_PATH="."
BUILD_CMD="mvn clean install"
PR_URL=""
MAX_RETRIES=3

while getopts "n:p:c:U:" opt; do
  case $opt in
    n) TRANSFORMATION_NAME="$OPTARG" ;;
    p) CODE_PATH="$OPTARG" ;;
    c) BUILD_CMD="$OPTARG" ;;
    U) PR_URL="$OPTARG" ;;
    *) echo "Usage: $0 [-n <name>] [-p <path>] [-c <build-cmd>] [-U <pr-url>]" && exit 1 ;;
  esac
done

echo "=== AWS Transform Custom ==="
echo "Transformation: $TRANSFORMATION_NAME"
echo "Code path:      $CODE_PATH"
echo "Build command:  $BUILD_CMD"
echo "PR URL:         $PR_URL"
echo "============================"

attempt=1
while [ $attempt -le $MAX_RETRIES ]; do
  echo "--- Attempt $attempt of $MAX_RETRIES ---"

  if atx custom def exec \
    -n "$TRANSFORMATION_NAME" \
    -p "$CODE_PATH" \
    -c "$BUILD_CMD" \
    -g "additionalPlanContext=$PR_URL" \
    -x -t; then
    echo "=== Transformation completed successfully ==="
    exit 0
  fi

  echo "Attempt $attempt failed."
  attempt=$((attempt + 1))

  if [ $attempt -le $MAX_RETRIES ]; then
    echo "Retrying in 10 seconds..."
    sleep 10
  fi
done

echo "=== All $MAX_RETRIES attempts failed ==="
exit 1

This script accepts optional flags for the transformation name (-n), code path (-p), build command (-c), and PR URL (-U). Pass the PR URL to the agent via the -g flag as additionalPlanContext, giving it awareness of the pull request context when generating documentation. On failure, it retries up to three times with a 10-second backoff.

Your CI/CD workflow must configure AWS credentials and install the AWS Transform CLI before invoking this script. The workflow commits the generated documentation back to the PR branch automatically, keeping your architecture docs and technical debt reports current with every code change.

Every push now updates the documentation (Figures 3 and 4) — reducing knowledge silos and preserving institutional knowledge.
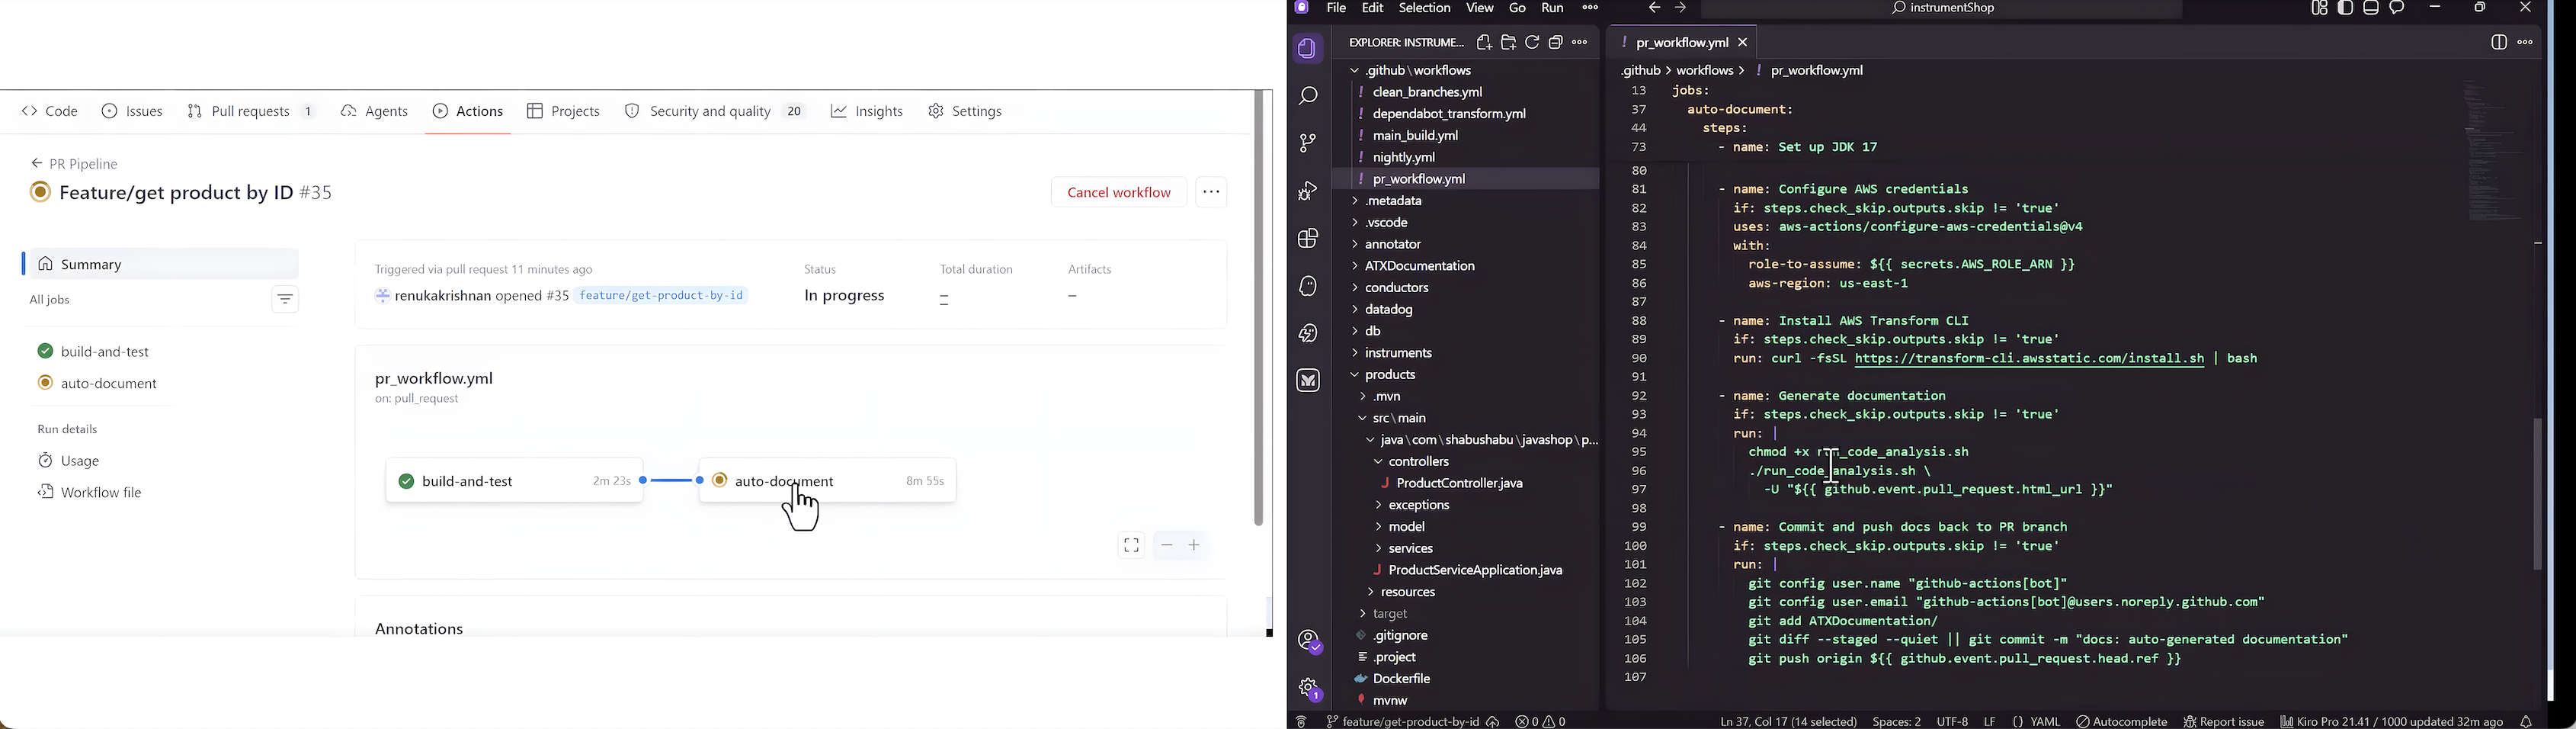
A GitHub pull request triggering the auto-documentation workflow.

Figure 3: PR triggering auto-documentation
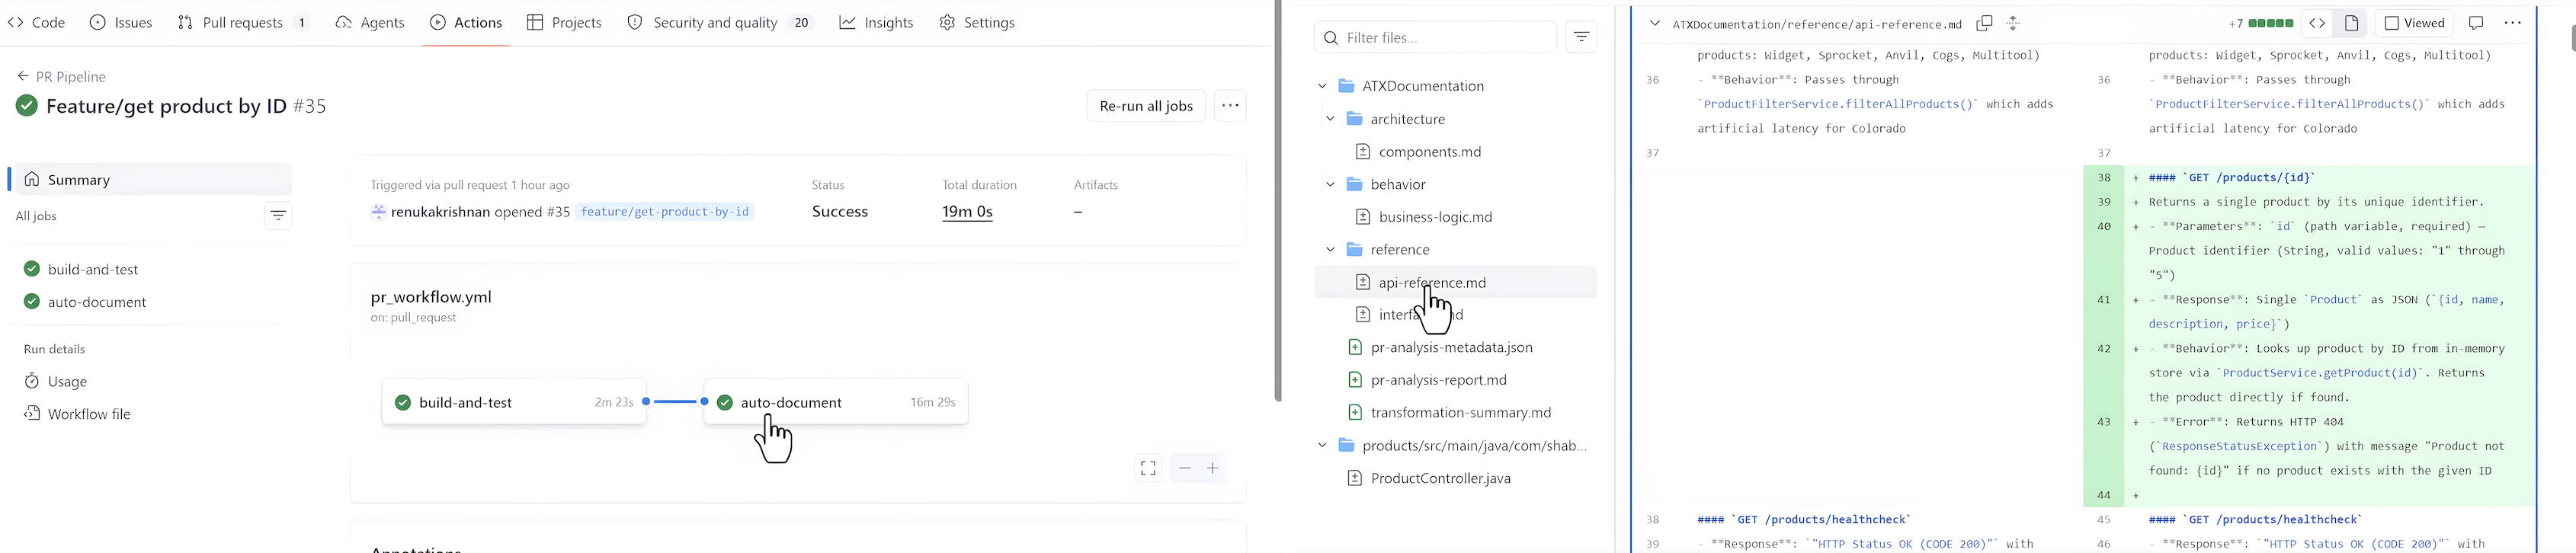
Generated documentation output showing architecture and technical debt reports.

Figure 4 – Generated documentation output

3. Scale across repositories

For organizations with hundreds of microservices, transforming one repository at a time doesn’t scale. AWS Transform custom non-interactive mode combined with GitHub Actions matrix strategy allows you to orchestrate transformations across your entire portfolio in parallel. You can run them on demand or on a recurring schedule, so modernization runs as a continuous practice rather than a one-time project.

# .github/workflows/scale-modernization.yml
name: Scale Modernization
on:
  schedule:
    - cron: '0 6 * * 1'
  workflow_dispatch:

jobs:
  transform-repos:
    runs-on: ubuntu-latest
    strategy:
      matrix:
        repo:
          - magnefique-studios/instrumentShop
          - magnefique-studios/orderService
          - magnefique-studios/paymentGateway
    steps:
      - name: Checkout ${{ matrix.repo }}
        uses: actions/checkout@v4
        with:
          repository: ${{ matrix.repo }}
          token: ${{ secrets.GH_PAT }}

      - name: Configure AWS credentials
        uses: aws-actions/configure-aws-credentials@v4
        with:
          role-to-assume: ${{ secrets.AWS_ROLE_ARN }}
          aws-region: us-east-1

      - name: Install ATX CLI
        run: curl -fsSL https://transform-cli.awsstatic.com/install.sh | bash

      - name: Run transformation
        run: |
          atx custom def exec \
            --transformation-name "spring-boot-3-upgrade" \
            --code-repository-path "." \
            --build-command "mvn clean install" \
            --non-interactive \
            --trust-all-tools

Tip: GitHub Actions matrix strategy runs each repository in parallel automatically — no separate orchestration layer needed. For larger portfolios, you can also wrap this in AWS Batch or AWS Fargate for large-scale parallel execution. The AWS Transform web console tracks progress across all repositories in a single view.

4. Continual learning

Each time AWS Transform custom completes a transformation, a memory agent scans the full execution trajectory and extracts lessons. Lessons include patterns that the agent learned, decisions that the agent made during planning, and feedback you provide during execution. AWS Transform custom automatically attaches these lessons to your transformation definition, which improves accuracy in subsequent runs.

AWS Transform custom applies lessons automatically, and each lesson belongs to a category that groups related lessons for review. You can browse and archive any lesson you do not want AWS Transform custom to apply to future runs.This keeps a human in the loop on what the agent “remembers” which matters when the same transformation runs across many repositories with different conventions.

In practice, this means your “Spring Boot 3 Upgrade” transformation gets sharper with each execution. The first repository surfaces the edge cases; once you review the resulting lessons and archive the ones that do not fit, subsequent runs handle those edge cases without intervention.

For production use, you can combine these practices into a single workflow file:

Note: The individual workflows shown in Practices 1–3 are presented separately for clarity. Combine them into a single workflow file as shown here, or keep them as separate workflow files depending on your team’s preference.

# .github/workflows/continuous-modernization.yml
name: Continuous Modernization
on:
  push:
    branches: [main]
  pull_request:
    types: [opened]
  schedule:
    - cron: '0 6 * * 1'

jobs:
  dependency-remediation:
    if: github.actor == 'dependabot[bot]'
    runs-on: ubuntu-latest
    steps:
      - uses: actions/checkout@v4
        with:
          ref: ${{ github.head_ref }}
      - name: Configure AWS credentials
        uses: aws-actions/configure-aws-credentials@v4
        with:
          role-to-assume: ${{ secrets.AWS_ROLE_ARN }}
          aws-region: us-east-1
      - name: Install ATX CLI
        run: curl -fsSL https://transform-cli.awsstatic.com/install.sh | bash
      - name: Remediate dependency changes
        run: |
          atx custom def exec \
            --transformation-name "dependency-remediation" \
            --code-repository-path "." \
            --build-command "mvn clean install" \
            --non-interactive \
            --trust-all-tools

  auto-documentation:
    if: github.event_name == 'push'
    runs-on: ubuntu-latest
    steps:
      - uses: actions/checkout@v4
      - name: Configure AWS credentials
        uses: aws-actions/configure-aws-credentials@v4
        with:
          role-to-assume: ${{ secrets.AWS_ROLE_ARN }}
          aws-region: us-east-1
      - name: Install ATX CLI
        run: curl -fsSL https://transform-cli.awsstatic.com/install.sh | bash
      - name: Generate documentation
        run: |
          atx custom def exec \
            --transformation-name "codebase-documentation" \
            --code-repository-path "." \
            --build-command "echo 'docs-only'" \
            --non-interactive \
            --trust-all-tools

  weekly-modernization:
    if: github.event_name == 'schedule'
    runs-on: ubuntu-latest
    steps:
      - uses: actions/checkout@v4
      - name: Configure AWS credentials
        uses: aws-actions/configure-aws-credentials@v4
        with:
          role-to-assume: ${{ secrets.AWS_ROLE_ARN }}
          aws-region: us-east-1
      - name: Install ATX CLI
        run: curl -fsSL https://transform-cli.awsstatic.com/install.sh | bash
      - name: Run modernization scan
        run: |
          atx custom def exec \
            --transformation-name "tech-debt-analysis" \
            --code-repository-path "." \
            --build-command "mvn clean install" \
            --non-interactive \
            --trust-all-tools

Conclusion

Continuous modernization moves code transformation out of periodic sprints and into your CI/CD pipeline. By combining GitHub Dependabot’s vulnerability detection with AWS Transform custom agent, orchestrated through GitHub Actions, you can:

  • Remediate dependency vulnerabilities automatically — beyond version bumps to full code adaptation
  • Keep documentation current with every commit, preserving institutional knowledge
  • Scale transformations across hundreds of repositories with consistent quality
  • Improve continuously as the agent accumulates knowledge items from each execution

The instrumentShop sample application demonstrates that even a moderately complex microservices architecture — with end-of-life Spring Boot versions, deprecated libraries like Hystrix, and multiple interconnected services — can be continuously modernized without dedicated modernization sprints.

Ready to get started? This post walked through the do-it-yourself path with AWS Transform custom. If you would rather have continuous modernization delivered as a fully managed service, explore AWS Transform continuous modernization. Either way, visit the AWS Transform documentation to start your continuous modernization journey.

Janardhan Molumuri

Janardhan Molumuri is a Principal Technical Leader at AWS with over two decades of engineering leadership experience, advising customers on cloud and AI Adoption strategies and emerging technologies including generative AI. He has passion for thought leadership, speaking, writing, and enjoys exploring technology trends to solve problems at scale.

Maxine Rosa

Maxine Rosa is a Sr World Wide Generative AI Specialist at AWS focused on developer tooling including AWS Transform and Kiro. With a background in Software Engineering, Solution Engineering and Go-to-Market strategy, she helps AWS customers adopt Generative AI tooling into their current Software Development Lifecycle.

Kola Akinnibi

Kola Akinnibi is an Associate Solutions Architect at AWS focused on observability, partnering with ISVs and large enterprises to bring end-to-end monitoring to AI agents and modern applications. He helps customers design observability solutions that scale, and has a passion for sharing technical content.

Renuka Krishnan

Renuka Krishnan is a Senior Specialist Solutions Architect at AWS, specializing in code modernization using agentic AI and AWS services. She has over 15 years of experience architecting and implementing solutions, and works with customers to accelerate application development and modernization through AI-powered solutions.

Venugopalan Vasudevan

Venugopalan Vasudevan (Venu) is a Principal Specialist Solutions Architect at AWS, where he leads Generative AI initiatives focused on Amazon Q Developer, Kiro, and AWS Transform. He helps customers adopt and scale AI-powered developer and modernization solutions to accelerate innovation and business outcomes.

Leverage Agentic AI for Autonomous Incident Response with AWS DevOps Agent

Post Syndicated from Janardhan Molumuri original https://aws.amazon.com/blogs/devops/leverage-agentic-ai-for-autonomous-incident-response-with-aws-devops-agent/

Introduction

Teams running distributed workloads face a persistent operational challenge: when something breaks, the information needed to resolve it is scattered across logs, deployment pipelines, configuration histories, and third-party monitoring tools. A Site Reliability Engineer (SRE) responding to a 2 AM page must manually correlate telemetry from multiple sources, trace dependencies across services, and form hypotheses — a process that routinely takes hours. As systems grow in complexity, the need for an AI-powered operational teammate — an SRE agent — has become increasingly clear.

The Do It Yourself (DIY) path and its limits

Teams exploring this space often start by using their favorite AI coding tools to help during an investigation, a thin wrapper over an large language model (LLM). On-call engineers wake up and looks at the incident details, tickets, give coding tools access to logs, monitoring tools and ask it to launch investigation. These approaches can deliver value for straightforward scenarios, but real world application architectures at scale require context across accounts, monitoring systems, and application topology awareness, enforce governance and access controls, and retained learning from past incidents to ensure a comprehensive incident management. As environments scale, the gap between a simple coding tool with limited context and a production-grade operational agentic teammate widens.

A fully managed alternative

AWS DevOps Agent is your always-available operations teammate that resolves and proactively prevents incidents, optimizes application reliability and performance, and handles on-demand SRE tasks across AWS, multicloud, and on-prem environments. DevOps Agent delivers a comprehensive agentic SRE paradigm, shifting teams from reactive firefighting to proactive, AI-driven operational excellence.

But what makes AWS DevOps Agent more powerful than what individual SREs can do with their coding agent? In this post, we walk through a serverless URL shortener application on AWS and demonstrate how DevOps Agent — built on topology intelligence, a three-tier skills hierarchy, cross-account investigation, and continuous learning — delivers capabilities that a simple LLM wrapper cannot replicate, acting as a true operational teammate at scale that reduces Mean Time to Resolution (MTTR) from hours to minutes.

Prerequisites

Before getting started with DevOps Agent, ensure you have:

Application Overview

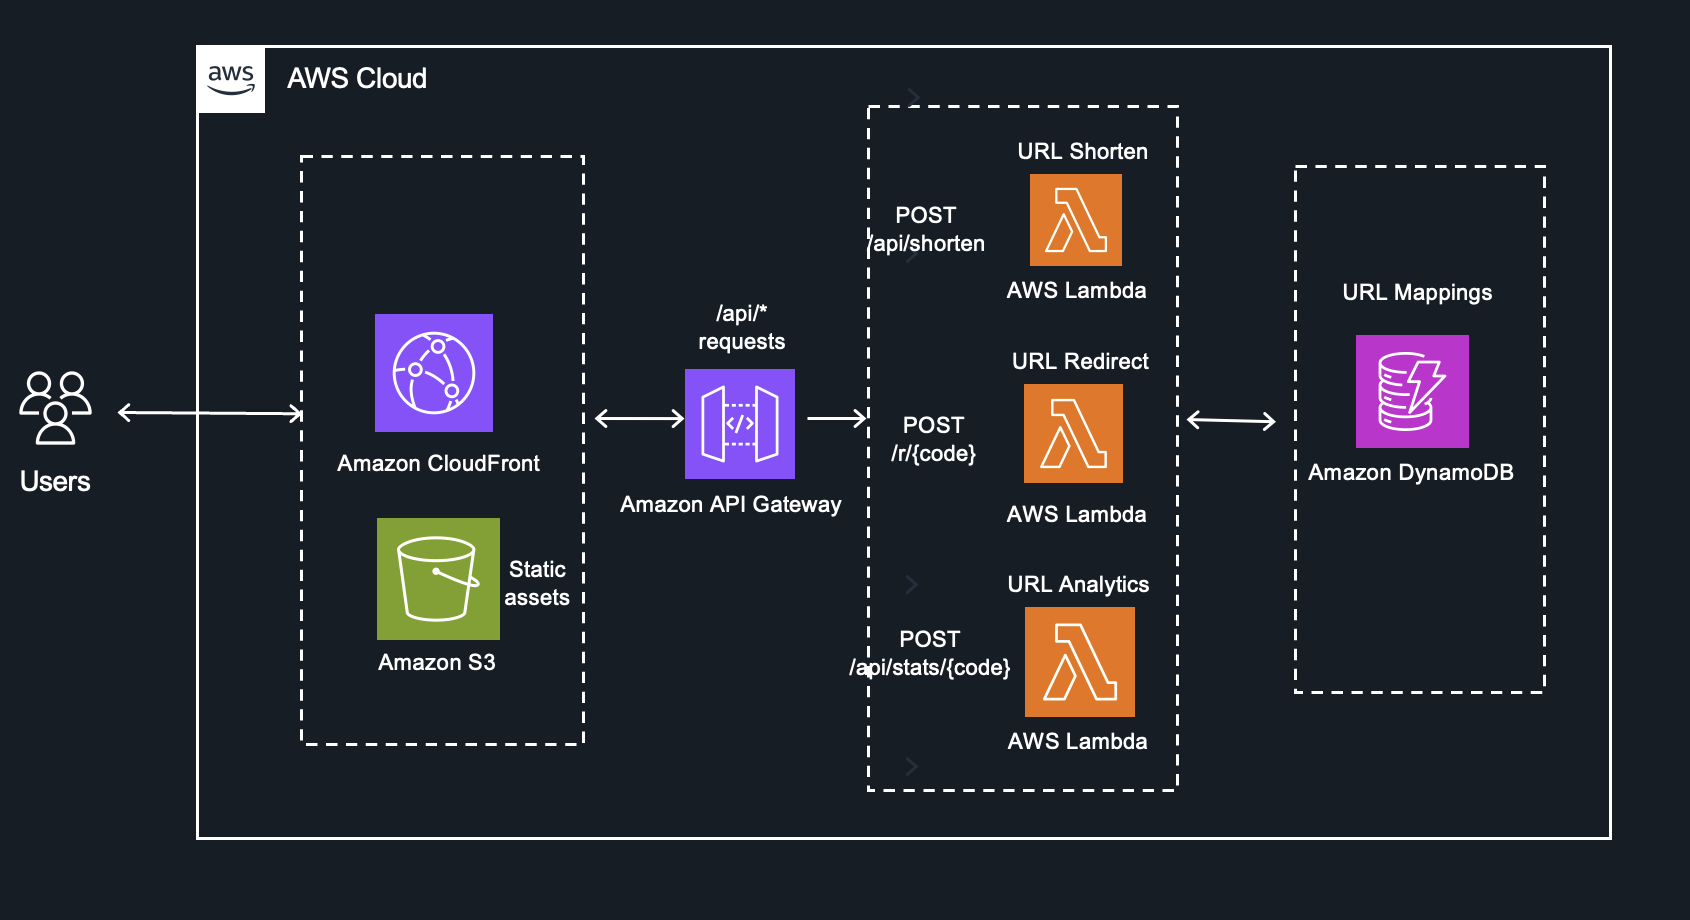
You are an SRE Engineer at a SaaS company that offers URL shortener service deployed on AWS. The application uses fully serverless architecture, creates short codes, redirects to original URLs, and tracks analytics.

Serverless three-tier architecture for a URL shortener application

Fig 1 – URL Shortener Application

This architecture is straightforward to build but operationally complex to troubleshoot. A latency spike in the Redirect function could stem from DynamoDB throttling, a Lambda cold start regression, an API Gateway configuration change, or a CloudFront cache invalidation — and the signals live in different log groups, metrics namespaces, and trace spans. This is exactly where DevOps Agent demonstrates its value as an autonomous operational teammate.

An Investigation in Action

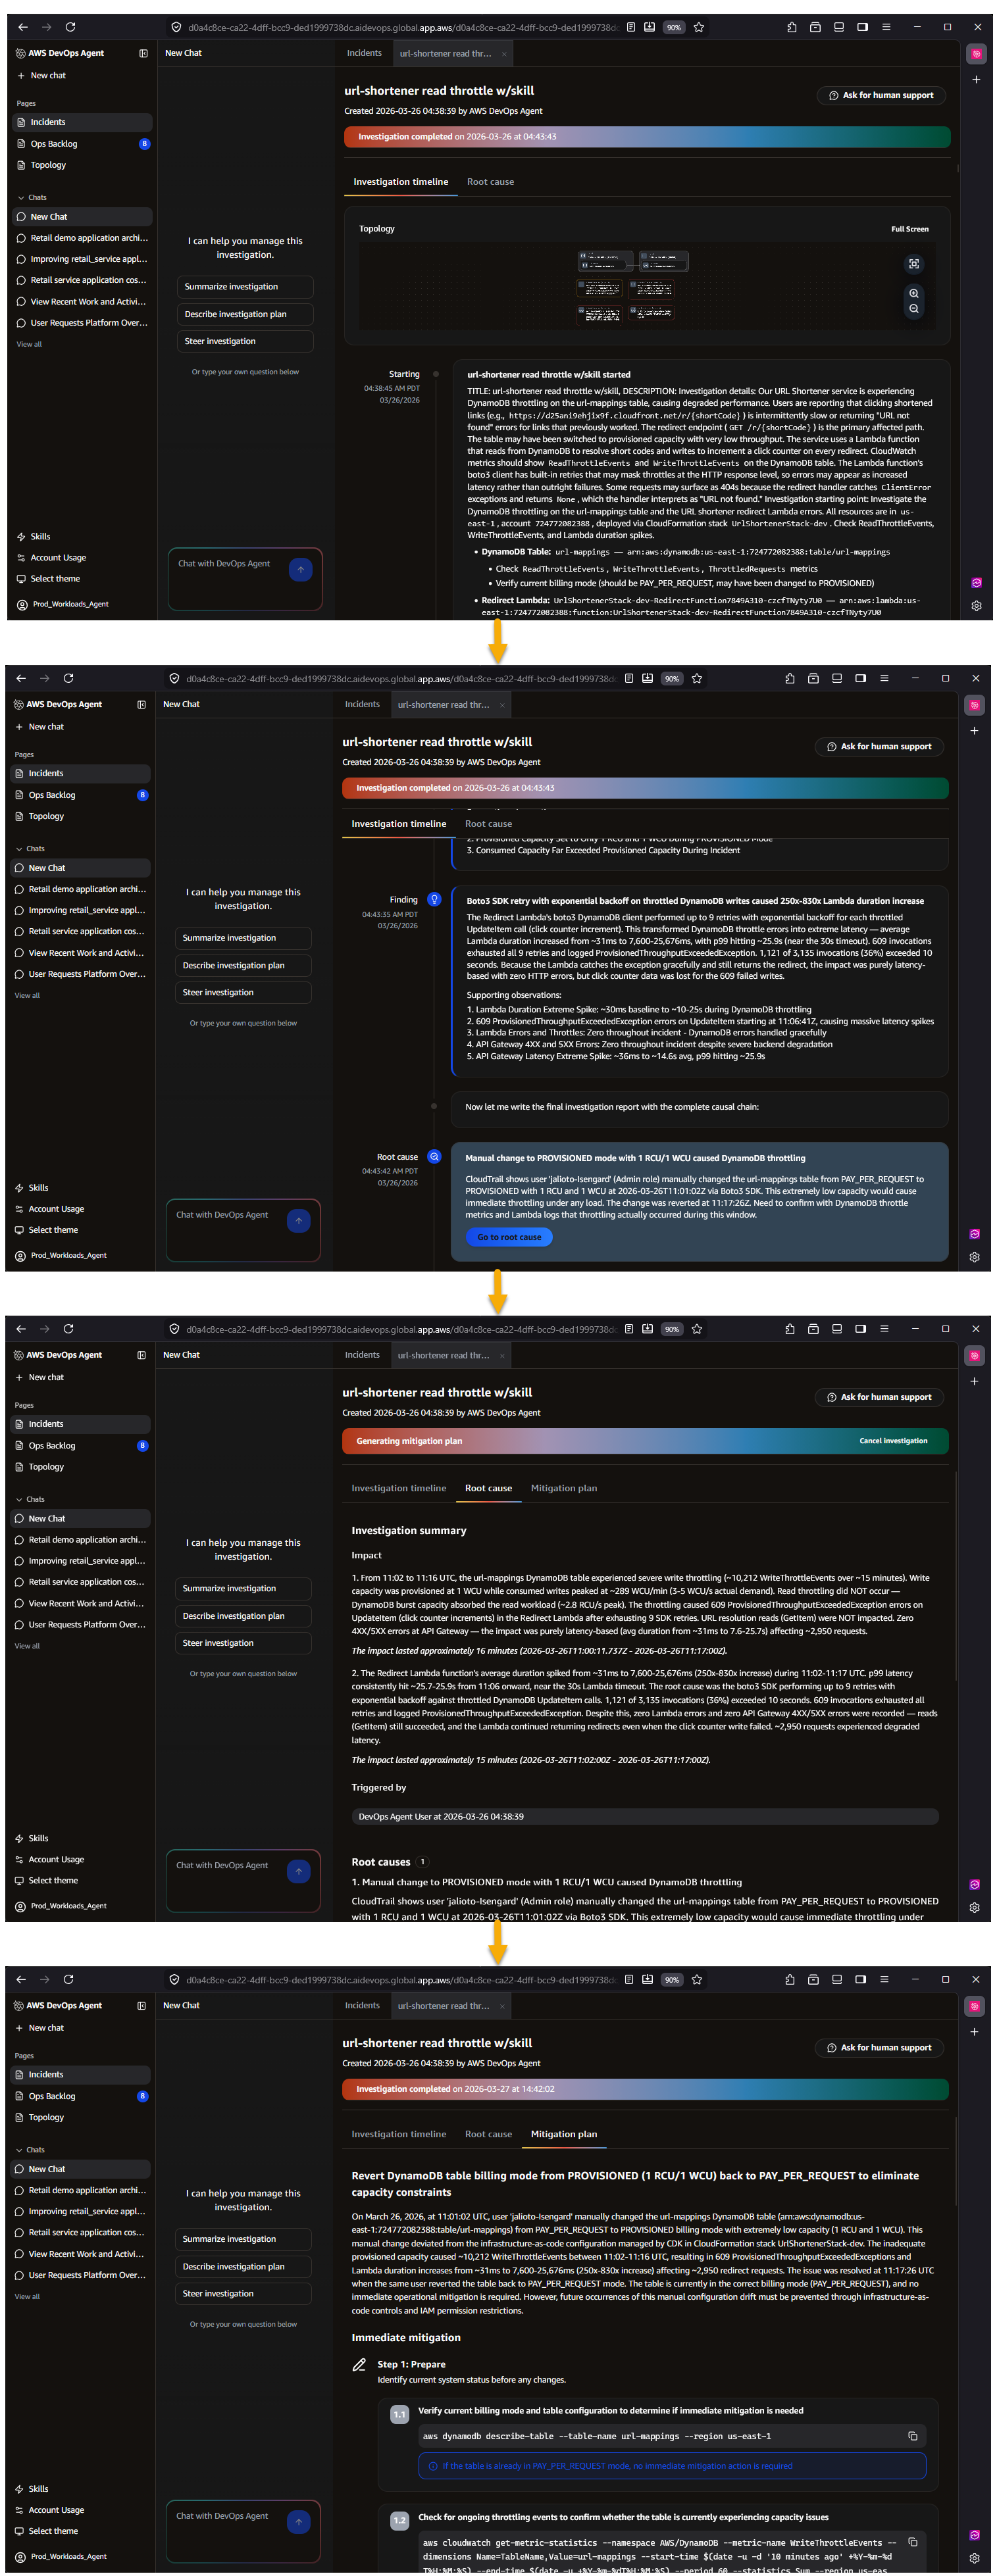
This workflow demonstrates the DevOps Agent autonomously detecting and diagnosing a production incident in just 4 minutes without human intervention, starting when a CloudWatch alarm triggers due to elevated 5xx errors and systematically testing hypotheses until it identifies DynamoDB write throttling caused by a recent code deployment. The DevOps Agent then autonomously posts a complete root cause analysis with specific mitigation recommendations to Slack, including the problematic commit and suggesting either on-demand capacity or a rollback—all accomplished in under 5 minutes from initial alarm to actionable solution.

Diagram showing the step-by-step flow of a logical investigation process

Fig 2. Logical Investigation workflow

Workflow of the AWS DevOps Agent showing how it moves from detecting an incident to analyzing the root cause and suggesting mitigation steps

Figure 3 – AWS DevOps Agent investigation workflow demonstrating the automated flow from initial incident detection through root cause analysis to actionable mitigation recommendations

Why DevOps Agent is Different

DevOps Agent is not a chat interface layered over a large language model. It is built on Amazon Bedrock AgentCore with dedicated infrastructure for memory, policies, evaluations, and observability. Below, we break down six key capabilities — the 6 Cs — that collectively make DevOps Agent a fully functional nextgen operational teammate.

1. Context

An LLM without operational context is limited to generic suggestions. DevOps Agent solves this through Agent Spaces — isolated logical containers that provide cross-account access to cloud resources, telemetry sources, code repositories, CI/CD pipelines, and ticketing systems. Within each Agent Space, DevOps Agent builds an application resource topology by auto-discovering resources — containers, network components, log groups, alarms, and deployments — and mapping their interconnections across AWS, Azure, and on-prem environments. A learning agent runs in the background, analyzing infrastructure, telemetry, and code to generate an inferred topology at the application and service layer . DevOps Agent maintains deep, AWS-native integrations with services like Amazon Elastic Kubernetes Service (EKS), providing introspection into Kubernetes clusters, pod logs, and cluster events for both public and private environments — capabilities that require privileged access external tools don’t have. DevOps Agent doesn’t just know your resource topology, it knows your telemetry, deployment timeline, and infrastructure and application code. It discovers and knows the relationship between resources, alarms, metrics, and log groups. When it detects a latency spike, it automatically checks GitHub, GitLab, Azure DevOps for recent merges, correlates deployment timestamps with metric anomalies, and determines whether a code change is the probable cause. In the URL shortener example, the agent identifies that a commit adding batch DynamoDB writes was deployed 47 minutes before throttling began — a correlation a human SRE might take 30 minutes to discover manually.

In our URL shortener, DevOps Agent maps the dependency chain from CloudFront through API Gateway to each Lambda function and down to the DynamoDB table. When a latency spike hits the URL Redirect function, the agent traces the relationship graph to determine whether the root cause is DynamoDB read throttling, a Lambda concurrency limit, or an API Gateway timeout configuration — correlating CloudWatch metrics, Lambda traces, and DynamoDB consumed capacity in a single investigation.

2. Control

Context without governance creates risk. Agent Spaces provide centralized control over what the agent can access and how it operates. Administrators define which AWS and Azure accounts, telemetry and code integrations, and MCP servers are available within each Agent Space using granular IAM permissions, This eliminates the inconsistency of individual developers configuring their own toolchains — some thoroughly, some partially, some not at all — and removes the need for ad-hoc onboarding processes for new team members. Every reasoning step and action is logged in immutable audit journals that the agent cannot modify after recording, providing complete transparency into decision-making. AWS DevOps Agent is secured from day one with immutable audit trails logging every reasoning step and tool invocation, AWS CloudTrail integration, IAM Identity Center authentication with granular permissions, and Agent Space-level data governance that isolates investigation data and respects organizational security configurations.

For the URL shortener, the administrator configures a single Agent Space with read access to the production account’s CloudWatch logs, the DynamoDB table metrics, the GitHub repository, and the Slack channel for incident coordination. Every SRE on the team inherits this consistent, controlled configuration — no individual setup required.

3. Convenience

Once an Agent Space is configured, every developer and SRE on the team gets immediate, zero-setup access to the agent’s full operational context — topology, telemetry, code repositories, and ticketing integrations — without configuring anything themselves. This is a meaningful departure from the alternative, where each engineer individually connects their coding agent to Model Context Protocol (MCP) servers for CloudWatch, their observability tool, their source repository, and their ticketing system. In practice, some engineers will complete that setup, some will partially configure it, and some never will — resulting in inconsistent tooling across the team and an onboarding burden for every new hire. With DevOps Agent, the admin configures the Agent Space once, and engineers simply log in to the Operator Web App, or interact through Slack — whichever tool they already use. The agent provides context-aware responses, maintains conversation history, and supports natural language queries against the application topology without any per-user setup.

For the URL shortener team, a new SRE joining the on-call rotation doesn’t need to spend a day wiring up access to the three Lambda function log groups, the DynamoDB metrics dashboard, and the GitHub repository. They log in to the Agent Space and immediately ask, “Show me all Lambda functions connected to this DynamoDB table” — the topology, telemetry access, and code context are already there.

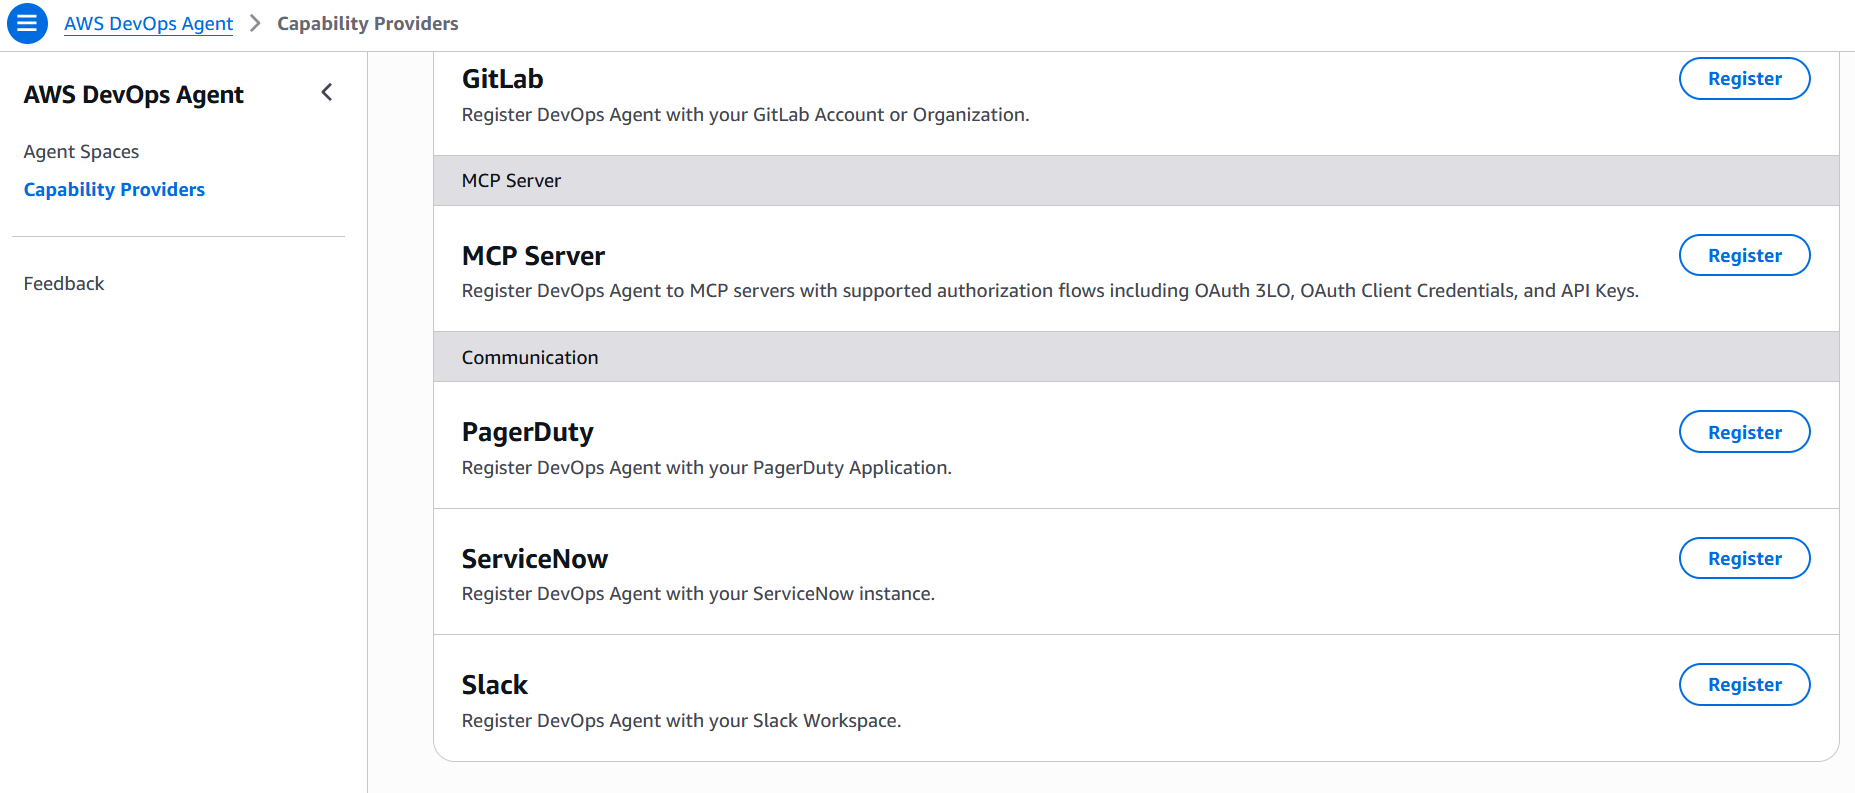
Screenshot showing how the AWS DevOps Agent connects to MCP servers and communication tools

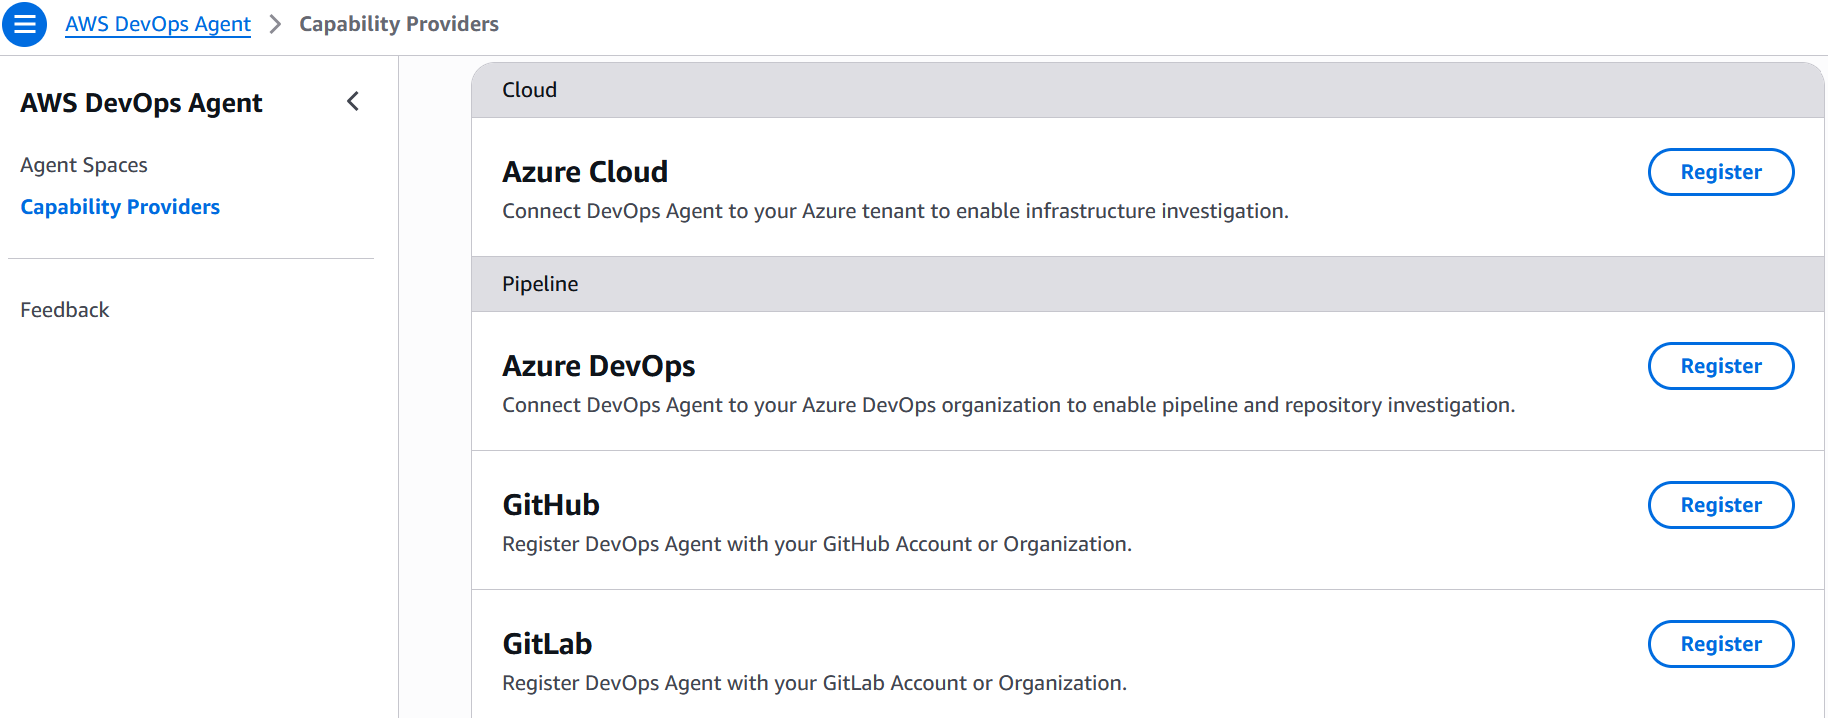
Fig 4 – AWS DevOps Agent MCP server and Communications integrations

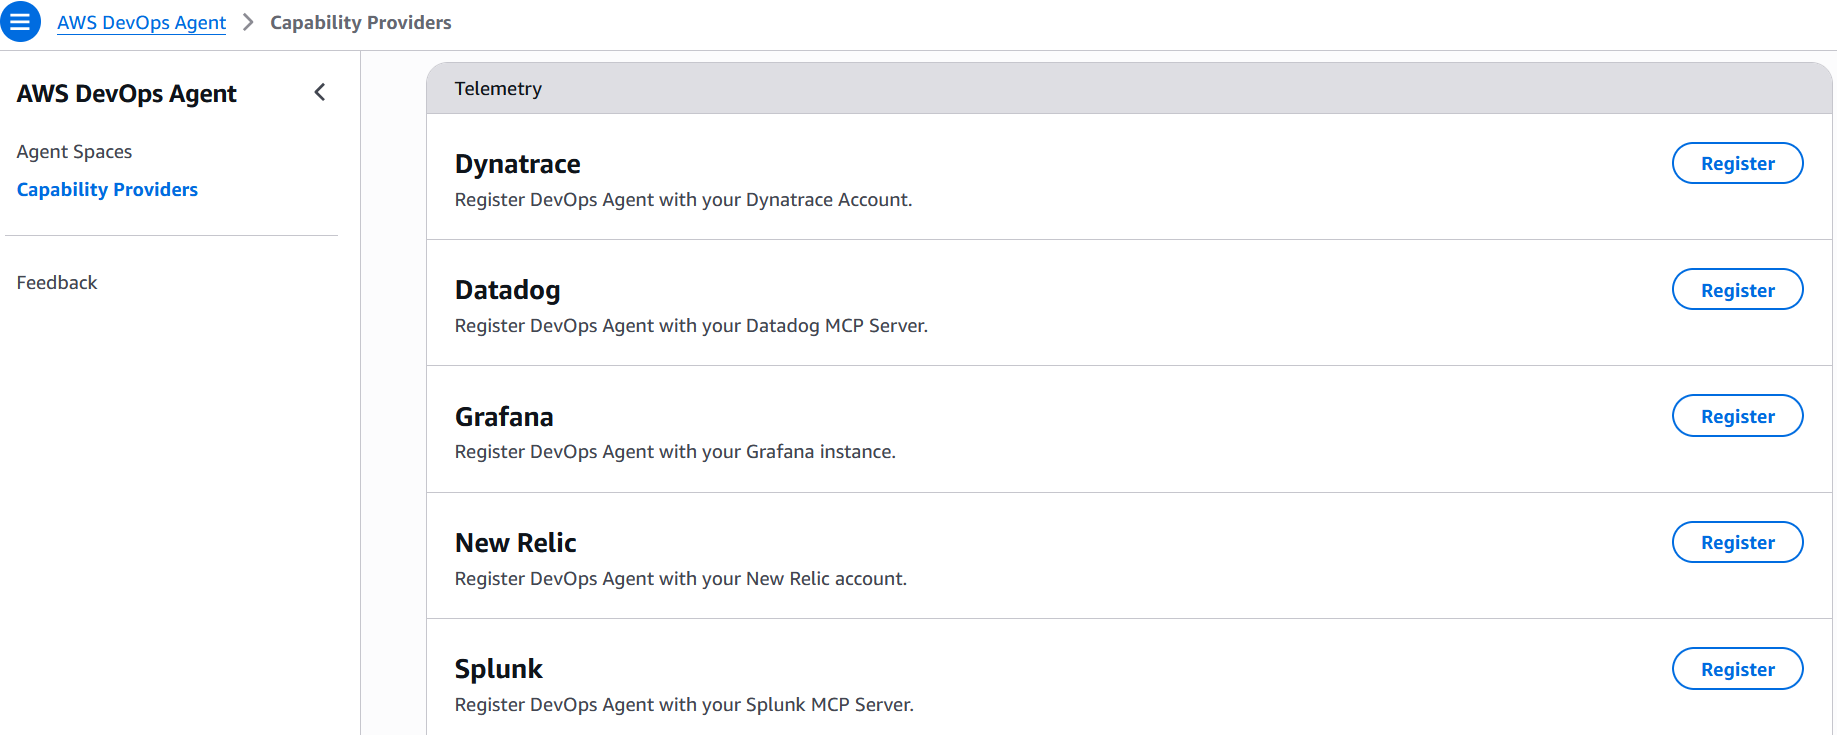
Screenshot showing the AWS DevOps Agent's telemetry integration configuration

Fig 5 – AWS DevOps Agent Telemetry integrations

Screenshot showing the AWS DevOps Agent's multi-cloud and pipeline integration settings

Fig 6 – AWS DevOps Agent Multi-Cloud and pipeline integrations

4. Collaboration

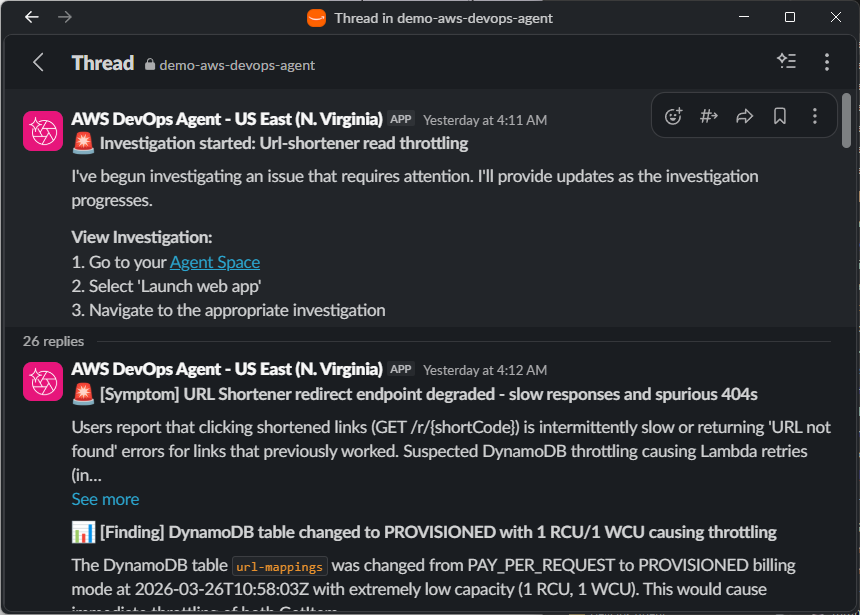
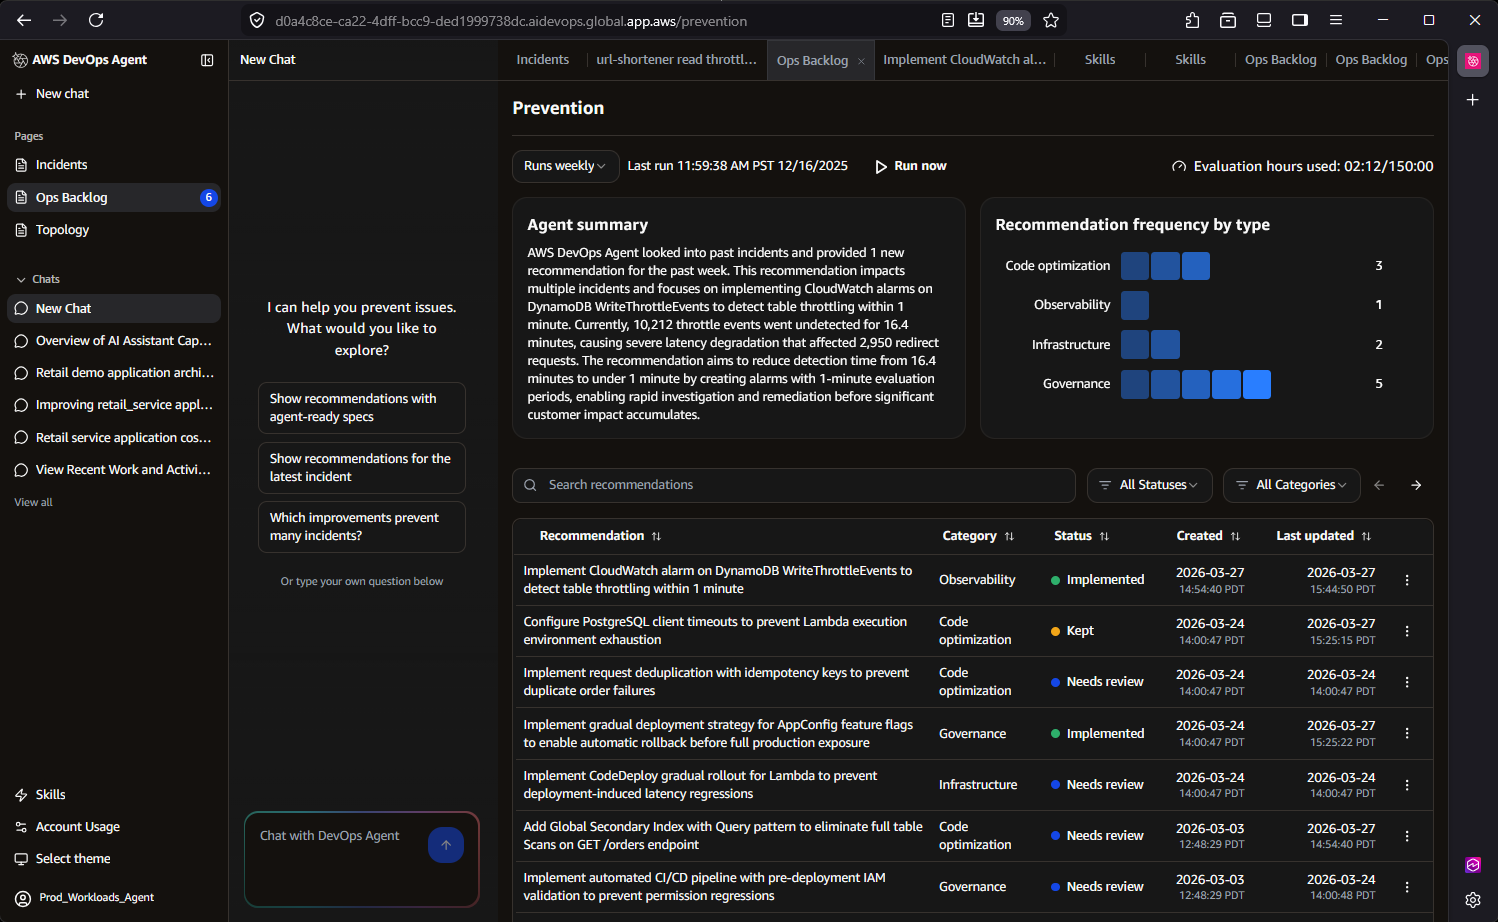
DevOps Agent is not a passive Q&A tool, it is an autonomous teammate. When an incident triggers via a CloudWatch alarm, PagerDuty alert, Dynatrace Problem, ServiceNow ticket, or any other event source you configure through the webhook, the agent begins investigating immediately without human prompting. It generates hypotheses, queries telemetry and code data sources to test them, and coordinates across collaboration channels — posting investigation timelines in Slack, updating ServiceNow tickets, and routing findings to stakeholders. Extensibility through the MCP and built-in integrations with CloudWatch, Datadog, Dynatrace, New Relic, Splunk, Grafana, GitHub, GitLab, and Azure DevOps ensures the agent can pull signals from wherever the team’s operational data lives. The agent also performs proactive weekly prevention recommendations, analyzing recent incidents to suggest specific improvements across code optimization, observability coverage, infrastructure resilience, and governance practices. Additionally, DevOps Agent operates within the broader frontier agent ecosystem, where investigation findings can include agent-ready instructions for Kiro to implement fixes.

When the URL shortener experiences a DynamoDB throttling event at 3 AM, DevOps Agent detects the alarm, investigates autonomously, identifies that a traffic spike exceeded the table’s provisioned capacity, and posts a mitigation plan in Slack — all before the on-call engineer finishes reading the page. The weekly prevention evaluation then recommends switching to on-demand capacity mode and adding a CloudWatch alarm on ConsumedWriteCapacityUnits to catch future spikes earlier.

Screenshot showing Slack notifications sent by the AWS DevOps Agent during an investigation

Fig 7 – AWS DevOps Agent Slack investigation notifications

Screenshot showing prevention recommendations generated by the AWS DevOps Agent in the Ops Backlog

Fig 8 – AWS DevOps Agent prevention recommendations in the Ops Backlog

5. Continuous Learning

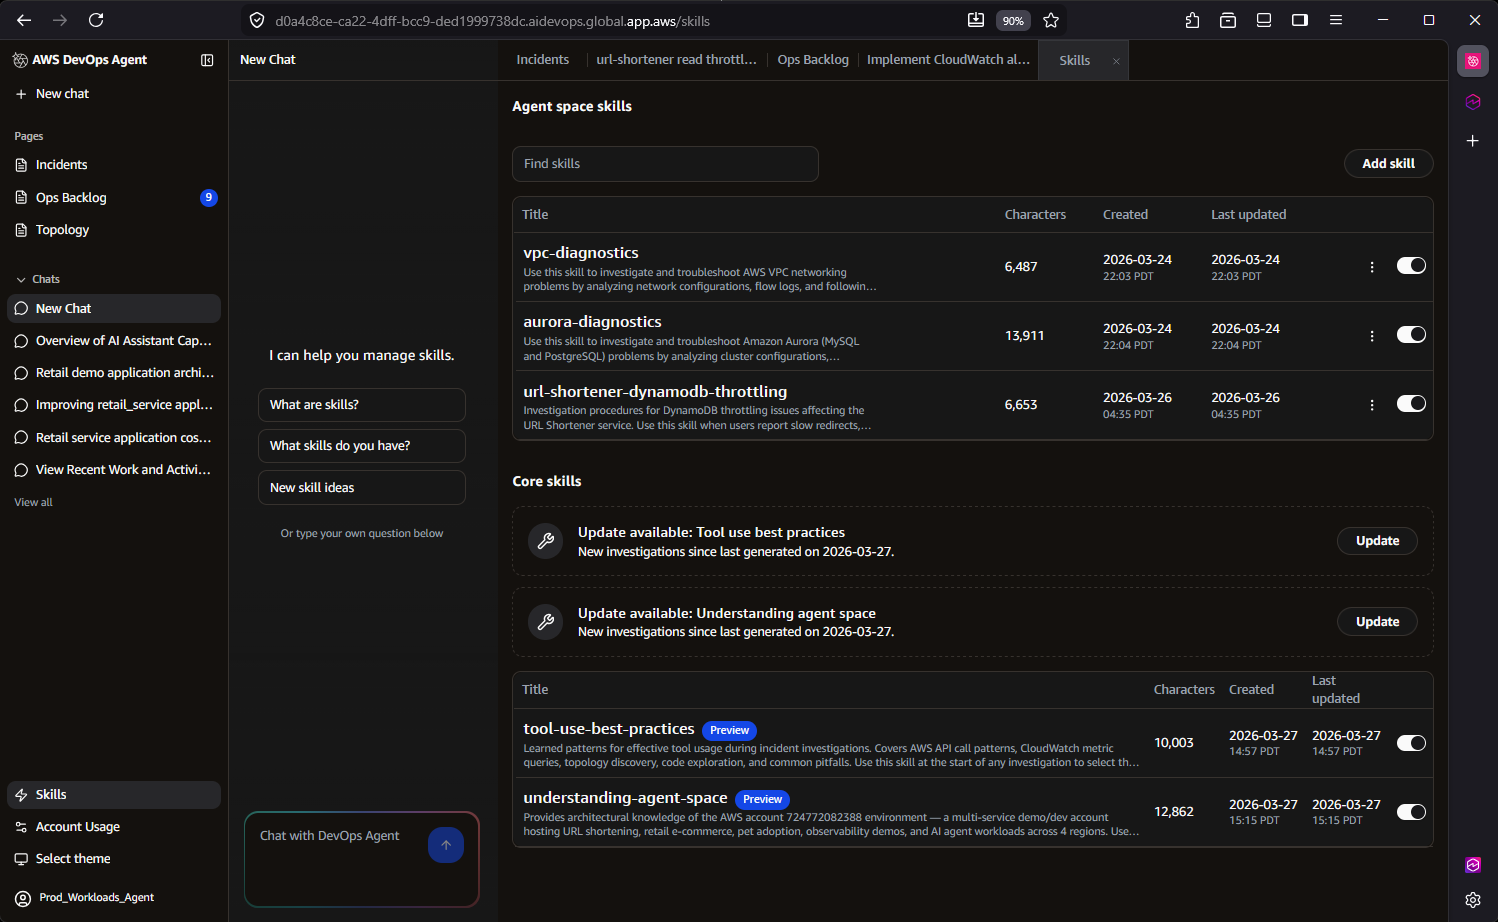
This is where AWS DevOps Agent most clearly separates itself from thin LLM wrappers. The agent implements a sophisticated three-tier skill hierarchy:

  • AWS-provided skills – Built-in capabilities developed by AWS engineers and scientists that reflect proven operational approaches and are continuously maintained under the hood.
  • User-defined skills – Custom skills that you define to help the agent work more effectively within your specific organizational context and workflows.
  • Learned skills – Operating continuously in the background, AWS DevOps Agent includes a learning sub-agent that performs two critical functions. First, it scans your cloud infrastructure, telemetry data, and code repositories to continuously learn and update your application topology—understanding resources and their relationships to help zero in on key logs related to specific alarms. Second, it analyzes past investigations to identify patterns and optimize future troubleshooting workflows, becoming more effective over time.

For the URL shortener, after DevOps Agent resolves three DynamoDB throttling incidents over a month, the Learning Agent identifies the recurring pattern and generates a learned skill that accelerates future investigations of the same class. The next time throttling occurs, the agent skips exploratory hypotheses and immediately checks provisioned capacity against consumed capacity, reducing investigation time further. The SRE team also uploads a runbook describing their canary deployment process, which the agent references when evaluating whether a recent deployment correlates with an incident.

Screenshot showing user-defined and learned skills configured for the AWS DevOps Agent

Fig 9 – AWS DevOps Agent user-defined and learned skills

6. Cost Effective

You could build your own agent, but you would still need to pay for the model tokens it consumes. More importantly, you would need to staff a team to develop, maintain, and operate the agent and its integrations. You would also need to periodically evaluate model quality, latency, and costs as underlying models change. With AWS DevOps Agent, you get a team of AWS engineers and scientists who do all of that for you.

DevOps Agent uses usage-based pricing — you pay only for the time the agent actively works on a task. There is no per-seat licensing or idle infrastructure cost. The agent works at machine speed, completing investigations in minutes that would take a human engineer hours, and only charges for the actual seconds of active computation.

Behind the scenes, DevOps Agent employs significant data retrieval optimizations that reduce cost while improving accuracy. Its query optimization techniques across tools achieve up to 15x faster querying across massive datasets by leveraging AWS-specific access patterns and data characteristics. These optimizations mean the agent consumes less compute per investigation while delivering more precise results — a direct benefit of deep AWS integration that generic LLM wrappers cannot replicate.

For the URL shortener, instead of an SRE spending two hours manually querying CloudWatch Logs Insights across three Lambda function log groups and correlating with DynamoDB metrics, DevOps Agent completes the same investigation in minutes using optimized queries — at a fraction of the cost of engineering time.

Proven real-world results

Customers and partners using AWS DevOps Agent in preview report up to 75% lower MTTR, 80% faster investigations, and 94% root cause accuracy, enabling 3–5x faster incident resolution.

Western Governor’s University (WGU), a leading online university serving over 191,000 students, was among the first organizations to deploy Amazon DevOps Agent into production, doing so even ahead of the preview launch at re:Invent. As a large-scale Dynatrace user, WGU leverages the DevOps Agent’s native Dynatrace integration, enabling Dynatrace Intelligence to automatically route problem records to the Agent for investigation and return enriched findings directly back into Dynatrace.

During a recent production investigation, WGU’s SRE team used the AWS DevOps Agent to analyze a service disruption scenario, reducing total resolution time from an estimated two hours to just 28 minutes—a 77% improvement in MTTR. AWS DevOps Agent quickly pinpointed the root cause within an AWS Lambda function’s configuration, surfacing critical operational knowledge that had previously existed only in undiscovered internal documentation.

Zenchef is a restaurant technology platform that helps restaurants manage reservations, table operations, digital menus, payments, and guest marketing from a single commission-free system. With a focused DevOps team managing several production environments across multiple business units, they faced a real test when an API integration issue affecting a downstream partner surfaced during a company hackathon, with engineers engaged in the event and nothing significant showing up in monitoring to point them in the right direction.

Rather than pulling engineers off the hackathon, the team brought the issue to AWS DevOps Agent. It worked through the problem systematically, ruling out authentication as a contributing factor, shifting investigation focus on Amazon Elastic Container Service (Amazon ECS) deployments, and ultimately tracing the root cause to a code regression in which a new version failed to handle an unrecognized enum value in the database. The full investigation wrapped in 20-30 minutes, roughly a 75% reduction compared to the 1-2 hours it would have taken manually, and the findings were shared directly with the responsible engineer.

Conclusion

AWS DevOps Agent is architecturally distinct from LLM wrappers. Its topology intelligence service maps AWS service relationships to understand application dependencies. Its three-tier skill hierarchy with a validation-based Learning Agent creates compounding operational knowledge specific to each customer environment. Its cross-account investigation capability, governed autonomy model, and immutable audit trails address enterprise requirements that no external wrapper can satisfy.

The 6 Cs — Context, Control, Convenience, Collaboration, Continuous Learning, and Cost Effective — are not marketing categories. They represent concrete engineering investments: Agent Spaces for isolation, topology, optimized log queries for performance, federated credential management for cross-account access, and a skills architecture that learns and improves with every investigation. For any team operating distributed and complex architectural applications on AWS — DevOps Agent reduces the operational burden of incident response while building institutional knowledge that makes every future investigation faster and more accurate.

Ready to get started? Visit the AWS DevOps Agent documentation to explore the setup process, join the AWS DevOps Agent workshop for hands-on experience, and/or contact your AWS account team to configure your first Agent Space.

Tipu Qureshi

Tipu Qureshi is a Senior Principal Technologist in AWS Agentic AI, focusing on operational excellence and incident response automation. He works with AWS customers to design resilient, observable cloud applications and autonomous operational systems.

Bill Fine

Bill Fine is a Product Management Leader for Agentic AI at AWS, where he leads product strategy and customer engagement for AWS DevOps Agent.

Joe Alioto

Joe is a World Wide Senior Specialist Solutions Architect for Cloud Operations focusing on Observability and Centralized Operations Management on AWS. He has over two decades of hands-on operations engineering and architecture experience. When he isn’t working, he enjoys spending time with his family, learning new technologies and pc gaming.

Janardhan Molumuri

Janardhan Molumuri is a Principal Technical Leader at AWS, comes with over two decades of Engineering leadership experience, advising customers on Cloud and AI Adoption strategies and emerging technologies including generative AI. He has passion for thought leadership, speaking, writing, and enjoys exploring technology trends to solve problems at scale.

Announcing the AWS CDK Glue L2 Construct

Post Syndicated from Janardhan Molumuri original https://aws.amazon.com/blogs/devops/announcing-the-aws-cdk-glue-l2-construct/

Today, we’re announcing the release of the new AWS Cloud Development Kit (CDK) L2 construct for AWS Glue. This construct simplifies the correct configuration of Glue jobs, workflows, and triggers. Reviewing Glue documentation and examples of the valid parameters for each job type and language takes time, and having to rely on synth, deploy, and run-time error handling to verify configuration choices can be a frustrating developer experience. With this new construct, developers can leverage constructors that are specific to job type. The new constructors default to opinionated best-practice configuration and leverage convenience functions that reduce the time to build repeatable ETL solutions. The new Glue CDK L2 construct is available in alpha stage and will be rolled into the core CDK library after stabilization.

Background

The AWS CDK is an open-source software development framework to define cloud infrastructure in code using modern programming languages and provision it through AWS CloudFormation. It uses layering through Constructs to provide different levels of abstraction for using cloud components. Layering ensures that you never have to write too much code or have too little access to resource properties when you deploy your infrastructure as code (IaC) stacks. Layer 1 (L1) constructs map directly to CloudFormation primitives, while Layer 2 (L2) constructs provide helper functions and best practice defaults that improve the developer experience and make it easier to do the right thing.

Defining Glue resources at scale presents several challenges that this L2 construct resolves. First, developers must reference documentation to determine the valid combinations of job type, Glue version, worker type, language versions, and other parameters that are only valid in finite combinations. Additionally, developers must already know or look up the networking constraints for data source connections, and there is ambiguity with how to securely store secrets for JDBC connections. Finally, developers want prescriptive guidance via best practice defaults for throughput parameters like number of workers and batching.

The new Glue L2 construct has convenience methods and constructors that work backwards from common use cases and sets required parameters to defaults that align with recommended best practices for each job type. It also provides customers with a balance between flexibility via optional parameter overrides, and opinionated interfaces that discourages anti-patterns, resulting in reduced time to develop and deploy new resources.

Using the L2

The L2 construct only exposes the parameters that apply to each job and workflow type through their respective constructors. For instance, Python and Ray jobs don’t need to configure the Scala job parameters of extra jar files or a main class from which to start execution. Using the construct, the language and job specific configuration elements are in their own interface definitions for properties, keeping the configuration elements that are common across all jobs like job name, job description, and CloudWatch metrics in the parent job class. It also aligns to the same best practice defaults that the Glue Studio console experience provides, which provides a consistent experience when using console and CDK.

Diagram showing the hierarchy of Glue job type and language support showing valid configuration options. Three columns represent languages: Python, Java, and Ray. Three types of jobs are supported across both Python and Java: ETL, Flex ETL, and Streaming ETL. Python Shell jobs and Ray jobs are standalone types within their respective languages.

Figure 1 – Hierarchy of Glue job type and language support showing the configuration options

The new construct automatically sets the Glue job type that maps to the constructor the developer used to create the job, and sets the Glue version and language version to the latest supported version for the service. In addition, it sets defaults for parameters that the developer would otherwise have to experiment with such as timeout, number of workers, and max retries.

These interfaces, inheritance, and default values allow to us to create constructors that only require a few parameters to create a complete job, as opposed to the nearly 2 dozen options and even more numerous permutations of the valid and invalid combinations that could be made experimenting with the L1 construct. Enforcing values via interfaces means that the developer gets fail-fast feedback on the correct allowed configuration before synth or deploy time via autocomplete and Q Developer code recommendations as well.

While the construct is in the alpha stage, you’ll need to follow the process for using experimental construct libraries. After stabilization, the library will be rolled into the core CDK library and you can use it just like any other L1 or L2 construct.

Creating a new Python Spark ETL Glue Job in Typescript

The following example shows how to create a new Python Spark ETL Glue Job in Typescript.

glue_job = new glue.PySparkEtlJob(stack, 'PySparkETLJob', {
  glueIamRole,
  glue.Code.fromAsset('glue-jobs/helloworld.py'),
  jobName: 'PySparkETLJob',
});

If a developer were to override all of the optional values, the most verbose provisioning option would look like this:

glue_job = new glue.PySparkEtlJob(stack, 'PySparkETLJob', {
  jobName: 'PySparkETLJobCustomName',
  description: 'This is PySpark ETL Job',
  glueIamRole,
  glue.Code.fromAsset('glue-jobs/helloworld.py'),
  glueVersion: glue.GlueVersion.V3_0,
  continuousLogging: { enabled: false },
  workerType: glue.WorkerType.G_2X,
  maxConcurrentRuns: 100,
  timeout: cdk.Duration.hours(2),
  connections: [glue.Connection.fromConnectionName(stack, 'Connection', 'connectionName')],
  securityConfiguration: glue.SecurityConfiguration.fromSecurityConfigurationName(stack, 'SecurityConfig', 'securityConfigName'),
  tags: {
    FirstTagKey: 'FirstTagValue',
    SecondTagKey: 'SecondTagValue',
    XTagKey: 'XTagValue',
  },
  numberOfWorkers: 2,
  maxRetries: 2,
});


Creating On-Demand Workflow Triggers

The new construct also simplifies the way workflows and triggers are provisioned, leveraging the existing Schedule class to define the correct frequency of execution. It also provides helper functions to add different types of triggers.

The following example shows how to create a On-Demand Workflow Trigger.

myWorkflow = new glue.Workflow(this, "GlueWorkflow", {
    name: "MyOnDemandWorkflow";
    description: "New On Demand Workflow";
});

myWorkflow.addOnDemandTrigger(this, 'TriggerJobOnDemand', {
    actions: [{ glue_job }]
});

For more examples of how to create other job types and trigger configurations, review the Glue L2 construct documentation.

Considerations when moving to the new construct

The new construct maintained its existing functionality for Connections and Databases, Tables, and Job Run Queueing, since they’re consistent for all job types. It also enables CloudWatch logging and (if applicable) SparkUI logging by default, so using this construct will leverage those best-practice observability features unless you explicitly turn them off.

If you’re currently using an older version of Glue or of the language your Glue job supports, we recommend that you consider using this construct launch as part of an upgrade plan to take advantage of the performance, functionality, and language security enhancements for newer versions. If you prefer to stay on older versions of the service or language, we recommend you migrate to the L1 construct which isn’t opinionated about enforcing the latest versions by default.

Conclusion

The AWS CDK Glue L2 construct will migrate from its current alpha state to the AWS CDK core library after it completes the stabilization phase, which usually takes 3 months. For more details on the new Glue L2 construct and examples of its use, see the Glue CDK documentation. As always, if you have any feedback on the new construct or the CDK in general, you may create a GitHub issue on AWS CDK GitHub repository.

If you’re new to AWS CDK and want to get started, we highly recommend checking out the CDK documentation and the CDK workshop.

Natalie White

Natalie White is a Principal Solutions Architect at Amazon Web Services. She helps Healthcare and Life Sciences customers deploy solutions to AWS, and uses her software development background to accelerate infrastructure as code automation using the AWS Cloud Development Kit (CDK). She also consults engineering leaders on DevOps cultural transformations.

Janardhan Molumuri

Janardhan Molumuri is a Principal Technical Account Manager at AWS. He has over two decades of Engineering leadership experience advising customers on Cloud Adoption strategies and emerging technologies including generative AI. He has passion for speaking, writing, and enjoys exploring technology trends to solve problems at scale.