There’s a particular energy to mid-September in New York. Pumpkin spice lattes are flowing, temperatures are dropping, and it’s nearly sweater weather. The city is back at full speed, and so is the AWS launch calendar. This week that energy showed up in a new frontier model on Amazon Bedrock, a desktop app for Amazon Quick, and a reminder that the developers seeing the biggest gains from AI agents aren’t just using better tools — they’re working differently.
Let’s dive in.
Headlines OpenAI GPT-6 Astra is now generally available on Amazon Bedrock – GPT-6 Astra is OpenAI’s latest and most capable model to date, and you can now run it on Amazon Bedrock. It brings deeper reasoning and judgment, professional-quality writing and design, and advanced computer and browser use to demanding business workflows. The model supports a context window of up to 1 million input tokens, so you can send it large codebases, long contracts, or extensive document collections and ask it to reconcile competing inputs.
You can call GPT-6 Astra through supported Amazon Bedrock APIs, or configure ChatGPT Work and Codex to use the model on Amazon Bedrock. Alongside the launch, OpenAI is introducing new enterprise plugins for ChatGPT Work that extend Astra’s browser-use capabilities across common business applications. Established AWS controls help you secure workloads, govern access, and audit model invocation activity, and your inference data isn’t used for model training. Read more
Last week’s launches Here are some launches and updates from this past week that caught my attention:
Amazon Quick desktop app is now generally available on macOS and Windows – The Amazon Quick desktop app brings Amazon Quick to your computer, where it can work with local files and stay connected to your calendar, email, and business apps in the background. Conversations, context, and agents stay synchronized across desktop and mobile, so work you start on one surface carries over to the other. With this release, Quick agents also keep running after you close your computer, which means you can start a long-running task before you leave the office, add input from the mobile app on the way home, and review the result when you get there. Existing Quick users can download the desktop app, and the mobile app is available from the Apple App Store and Google Play. Read more
AWS Lambda now supports a 90-minute function timeout on Lambda Managed Instances – You can now configure a function timeout of up to 90 minutes for asynchronous and event source mapping (ESM) invocations on Lambda Managed Instances, a 6x increase from the previous 15-minute limit. That opens the door to data processing, media transcoding, financial calculations, AI inference, and batch jobs that need longer continuous execution, without splitting the work across multiple functions. Synchronous invocations keep the existing 15-minute maximum. The longer timeout also applies to steps inside Lambda durable functions, which can still run for up to a year when invoked asynchronously. Read more
Amazon EBS Volume Clones now copies volumes across accounts – Amazon Elastic Block Store (Amazon EBS) Volume Clones can now copy a volume into another AWS account and re-encrypt it with an AWS Key Management Service (AWS KMS) key in the target account. If you keep production and development in separate accounts, you can share a volume with AWS Resource Access Manager (AWS RAM) and let the target account create a fresh copy in the same Availability Zone, for example, cloning a production database volume into an isolated development account. Cross-account copy works for all volume types, including unencrypted volumes and volumes encrypted with customer managed keys. Read more
Second-generation single-rack AWS Outposts is now generally available – The new single-rack AWS Outposts is a self-contained 42U rack that puts compute, storage, and networking into one compact unit for locations that need low latency, local data processing, or data residency, and don’t have room for a larger footprint. A single rack delivers up to 2,688 vCPU and 100 TB of Amazon EBS storage, and supports the latest x86-powered Amazon EC2 instances, including general purpose (M7i, M8i), compute-optimized (C7i, C8i), memory-optimized (R7i, R8i), and Outposts accelerated networking instances. You get the same APIs, console, automation, governance, and security controls as multi-rack Outposts and AWS Regions. Read more
Amazon OpenSearch Serverless is now available on v0 by Vercel – You can now describe a search or AI application in natural language inside v0 by Vercel and get a full-stack app backed by Amazon OpenSearch Serverless. v0 provisions a collection, indexes your data, and uses the OpenSearch Serverless endpoint for full-text search and vector search for retrieval-augmented generation (RAG) workloads, without leaving the v0 interface. OpenSearch Serverless scales capacity up and down for you, so you can focus on the application instead of cluster management. You can provision under a new AWS account or link an existing one. Read more
AWS Transform for .NET modernization is now generally available via CLI – You can trigger an AWS-managed .NET modernization in AWS Transform custom with a single CLI command, then run it interactively or script it into an existing pipeline. The CLI sits alongside the existing AWS Transform for .NET experiences in the web application, Visual Studio IDE, Kiro Power, and MCP agents. Use it to upgrade language versions, migrate frameworks, optimize performance, and analyze codebases with transformations you can run as-is or customize. The .NET modernization transformation includes 50,000 free agent minutes per month. Read more
For a full list of AWS announcements, be sure to keep an eye on the What’s New with AWS page.
Other AWS news Here are some additional posts and resources that you might find interesting:
Clare Liguori on frontier engineering – If you already use an AI coding assistant but don’t feel like you’re shipping much faster, start here. Clare Liguori, Senior Principal Engineer at AWS, published a practitioner’s manifesto on frontier engineering: ten principles, drawn from teams across Amazon, for changing how you build software with AI agents. The argument is direct. Software development has split in two, people who changed how they work with agents, and people who only changed their coding tools. Frontier engineering is not vibe coding. You spend the first weeks writing steering files, refactoring the codebase, and learning to decompose work for agents. Those weeks feel slower. The weeks after feel dramatically faster, because you’re no longer building the software directly — you’re building the agent setup that builds the software.
A free year of Kiro for students around the world – The Kiro Students program is expanding from 11 universities to 121 new schools across 16 countries. Eligible students get one year of Kiro with 1,000 credits per month and full access to paid features such as premium models and Kiro Web, no credit card and no trial timer. You can work in the IDE, the CLI, Kiro Web in a browser, or Kiro Crew. If you’re a student, sign up with your university email.
The state of AI for security: measuring what matters for trust – Security teams are using AI for triage, threat modeling, incident response, and code review, but a tool that flags everything doesn’t save time. In The state of AI for security, Anshumali Shrivastava and Neha Rungta introduce Deception Benchmark, a new evaluation that tests whether a model can tell a real vulnerability from code that looks risky but is actually safe. The benchmark includes 14,822 samples across 16 languages and more than 70 Common Weakness Enumeration (CWE) categories. Under standard prompting, precision landed in the mid-50s, about as likely to be inaccurate as accurate, and none of the 12 models tested kept both false positives and false negatives below 10 percent. The post links to the dataset, whitepaper, and submission workflow for verified scoring.
Build full-stack AWS applications in minutes with AI-powered scaffolding – Version 1.0 of the Nx Plugin for AWS is an open source toolkit of deterministic generators for APIs, websites, databases, and AI agents, plus the AWS infrastructure to run them. Each generator writes working, deployable code with security, observability, and type-safety already in place, so an AI assistant can assemble the foundation and spend its effort on your application logic. Bingo Industries used it to take a multi-agent operations chatbot from idea to production in less than 3 weeks. The plugin is open source on GitHub. Create a workspace with pnpm create @aws/nx-workspace and point your coding agent at the included MCP server.
The oldest architecture in computing – On All Things Distributed, Werner Vogels starts from a question customers always ask “Will AI take my job?”, and lands on memory. After spending time with Kiro Crew, he traces a line from Jeff Hawkins’ A Thousand Brains to how Crew stores, consolidates, and forgets across markdown files, a vector database, and a key-value index. His conclusion: the brain is the oldest architecture in computing, and the people who think hardest about how it works will build the next tools. Now, go build.
For a full list of AWS blog posts, be sure to keep an eye on the AWS Blogs page.
Upcoming AWS events Check your calendar and sign up for upcoming AWS events:
AWS Summits – AWS Summits are free in-person events that bring the cloud and AI community together to connect, learn, and explore the latest technologies. Upcoming stops include Dubai (September 30). Browse the full calendar to find a Summit near you, or stream sessions through the Global Livestream and On-Demand Hub.
Join the AWS Builder Center to connect with builders, share solutions, and access content that supports your development. Browse here for upcoming AWS-led in-person and virtual events and developer-focused events.
That’s all for this week. Check back next Monday for another Weekly Roundup!
— Micah
This post is part of our Weekly Roundup series. Check back each week for a quick roundup of interesting news and announcements from AWS!
Development velocity has reached new heights with AI-driven development tools and practices. Organizations are generating code faster than ever before. But that speed carries risk. Researchers Anderson, Parker, and Tan warned in MIT Sloan Management Review, “Legacy systems tend to carry hidden debt; layering AI-generated code on top of them creates additional tangled dependencies.” The faster you generate code, the faster technical debt compounds — especially in brownfield environments where outdated frameworks, deprecated libraries, and undocumented services already carry years of accumulated risk.
As organizations accelerate their software development, manual or periodic processes to synchronize dependencies and update documentation no longer keep pace, and technical debt piles up faster than ever. Continuous modernization built into your pipeline enables you to maintain up-to-date dependencies and documentation across repositories on every commit, preventing future tech debt and improving AI agent accuracy and accountability.“
You can embed AI-powered code transformations directly into your CI/CD pipelines, turning modernization from a periodic project into an automated, ongoing practice. AWS gives you two ways to get there. AWS Transform – continuous modernization is the fully managed option, delivering continuous modernization automatically with no pipeline for you to build or maintain. The Do-It-Yourself (DIY) approach assembles the same practices yourself using AWS Transform custom and your existing CI/CD platform. Choose DIY when you need to fit modernization into a specific pipeline (GitHub Actions, AWS CodePipeline, Jenkins, GitLab CI, and so on), or want to customize the workflow with existing tools like Dependabot.
In this post, we cover the DIY approach on how to set up a continuous modernization pipeline using AWS Transform custom and demonstrate it in action.
The Do It Yourself (DIY) path – continuous modernization pipeline with AWS Transform custom
Sample application: instrumentShop
For this walkthrough, we use a dated Java application called instrumentShop (Figure 1) — a Java microservices application built with Spring Boot that simulates an online instrument shop to demonstrate four practices: automated dependency remediation, auto-documentation on every commit, scaling transformations across repositories, and continual learning.
The instrumentShop application is a Spring Boot microservices application with a Spring Gateway (v1.5.19) routing traffic from a single HTTP/8010 entry point to four REST services: Agents, Instruments, Consumers, and Products. A Thymeleaf client provides server-side rendering, PostgreSQL 13.1 handles persistence via JDBC, and Hystrix provides circuit-breaking for inter-service calls. A ShopTester utility generates HTTP traffic for testing.
This application is a strong candidate for continuous modernization:
Spring Boot 1.5.19 is years past end of life and carries known CVEs
Hystrix has been in maintenance mode since Netflix deprecated it in 2018
Cross-service coordination — dependency updates must propagate across multiple microservices
Transitive dependency risk — PostgreSQL JDBC drivers and other transitive dependencies accumulate security advisories over time
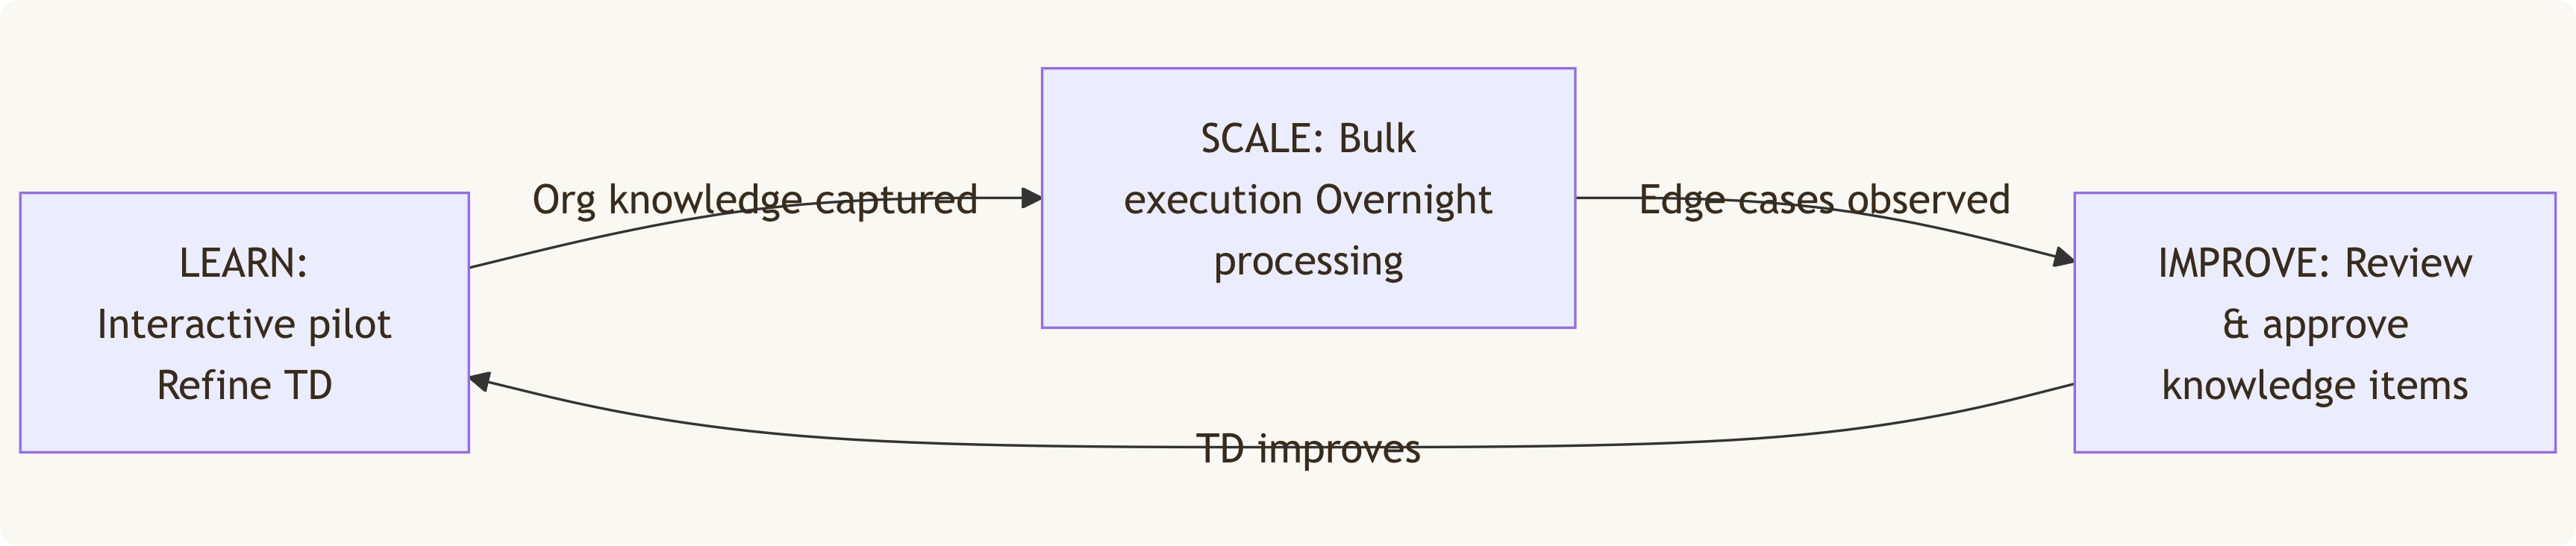
A typical workflow for the continuous modernization pipeline is shown below (Figure 2):
A developer pushes code to main — GitHub Actions triggers the auto-documentation workflow, generating updated architecture docs and technical debt reports.
Dependabotdetects a vulnerable dependency — A PR opens automatically. GitHub Actions triggers the dependency remediation workflow, runs AWS Transform custom to remediate the code, validates with tests, and pushes the result back to the PR.
A platform team defines a new transformation (e.g., “Upgrade Spring Boot to the latest stable release “) — The scheduled GitHub Actions workflow runs the transformation weekly in non-interactive mode across all instrumentShop microservices and other repositories in the portfolio.
The agent learns — Knowledge items from each execution improve future runs, reducing manual intervention over time.
GitHub Dependabot enabled on your repository for automated vulnerability detection
Continuous modernization through CI/CD in action
Continuous modernization shifts code transformation from a periodic project into an automated, pipeline-driven practice. Instead of scheduling a “modernization sprint” once a year, your CI/CD pipeline identifies and remediates technical debt on every commit, every dependency alert, and across every repository.
We implement this through four practices, each powered by AWS Transform custom running as a step in GitHub Actions workflows.
Note: This post uses GitHub Actions because the instrumentShop demo repository is built with it. The same AWS Transform CLI (atx) commands work with AWS CodePipeline, Jenkins, GitLab CI, CircleCI, or any CI/CD system that runs shell commands. Continuous modernization is a practice, not a tool choice.
Important: Every atx custom def exec invocation in this post uses the –trust-all-tools flag, which allows the agent to execute tools without interactive confirmation. This is required for non-interactive CI/CD execution. Review your organization’s security policies before enabling this flag in production pipelines.
1. Dependency analysis and remediation
GitHub Dependabot scans your repository for known vulnerabilities and generates alerts when a new vulnerability is added or your dependency graph changes—for example, when you push commits that update packages or versions. However, resolving these alerts requires more than bumping a version number. Upgrading a dependency can introduce breaking API changes, require code modifications, or demand configuration updates.
AWS Transform custom helps handle the code changes needed to resolve the alerts. It runs via a GitHub Actions workflow that triggers automatically to:
Fetch the list of latest Dependabot alerts
Run AWS Transform custom to analyze the alerts and apply code transformations
Run your build and test suite to validate the changes
Create a new pull request for each resolved alert
The workflow calls a shell script that invokes the AWS Transform CLI in headless mode with retry logic. Place this script at the root of your repository:
run_dependabot_alert_fixes.sh:
#!/usr/bin/env bash
set -euo pipefail

# -------------------------------------------------------------------
# run_dependabot_alert_fixes.sh
# Runs the Dependabot alert remediation transformation in headless mode.
# Retries up to MAX_RETRIES times on failure.
#
# Usage:
#   ./run_dependabot_alert_fixes.sh [-n <transformation-name>] [-p <path>] [-c <build-command>]
#
# Defaults:
#   -n  Remediate-Critical-GitHub-Dependabot-Alerts-Java-Maven
#   -p  .                   (current directory)
#   -c  mvn clean install   (Maven build)
# -------------------------------------------------------------------

TRANSFORMATION_NAME="Remediate-Critical-GitHub-Dependabot-Alerts-Java-Maven"
CODE_PATH="."
BUILD_CMD="mvn clean install"
MAX_RETRIES=3

while getopts "n:p:c:" opt; do
  case $opt in
    n) TRANSFORMATION_NAME="$OPTARG" ;;
    p) CODE_PATH="$OPTARG" ;;
    c) BUILD_CMD="$OPTARG" ;;
    *) echo "Usage: $0 [-n <transformation-name>] [-p <path>] [-c <build-command>]" && exit 1 ;;
  esac
done

echo "=== AWS Transform Custom ==="
echo "Transformation: $TRANSFORMATION_NAME"
echo "Code path:      $CODE_PATH"
echo "Build command:  $BUILD_CMD"
echo "============================"

attempt=1
while [ $attempt -le $MAX_RETRIES ]; do
  echo "--- Attempt $attempt of $MAX_RETRIES ---"

  if atx custom def exec \
    -n "$TRANSFORMATION_NAME" \
    -p "$CODE_PATH" \
    -c "$BUILD_CMD" \
    -x -t; then
    echo "=== Transformation completed successfully ==="
    exit 0
  fi

  echo "Attempt $attempt failed."
  attempt=$((attempt + 1))

  if [ $attempt -le $MAX_RETRIES ]; then
    echo "Retrying in 10 seconds..."
    sleep 10
  fi
done

echo "=== All $MAX_RETRIES attempts failed ==="
exit 1
This script accepts optional flags to override the transformation name (-n), code path (-p), and build command (-c). The -x flag enables non-interactive mode and -t enables --trust-all-tools, both required for CI/CD execution. On failure, it retries up to three times with a 10-second backoff.
Your CI/CD workflow must configure AWS credentials and install the AWS Transform CLI before invoking this script. With this setup, Dependabot alerts are reviewed continuously for any changes — not just a version bump, but the complete code adaptation required to make the upgrade work.
2. Auto documentation
Documentation is one of the most neglected aspects of modern software development. Documentation increases accuracy and acts as a contract between requirements and implementation. AWS Transform custom codebase analysis capability generates structured documentation covering architecture, technical debt, code metrics, and migration planning on every incremental update ensuring every Agent or human that modifies the codebase is working from a true “current state”.
By embedding this as a post-push step in your CI/CD pipeline, your documentation stays current automatically. The workflow triggers on every pull request to main, runs your build and test suite, then calls a shell script that invokes AWS Transform custom to generate documentation and commits it back to the PR branch.
Place this script at the root of your repository:
run_code_analysis.sh:
#!/usr/bin/env bash
set -euo pipefail

# -------------------------------------------------------------------
# run_code_analysis.sh
# Runs an AWS Transform custom transformation in headless mode.
# Retries up to MAX_RETRIES times on failure.
#
# Usage:
#   ./run_code_analysis.sh [-n <name>] [-p <path>] [-c <build-cmd>] [-U <pr-url>]
#
# Defaults:
#   -n  GitHub-PR-Context-Codebase-Analysis
#   -p  .                   (current directory)
#   -c  mvn clean install   (Maven build)
#   -U  (empty)             PR URL
# -------------------------------------------------------------------

TRANSFORMATION_NAME="GitHub-PR-Context-Codebase-Analysis"
CODE_PATH="."
BUILD_CMD="mvn clean install"
PR_URL=""
MAX_RETRIES=3

while getopts "n:p:c:U:" opt; do
  case $opt in
    n) TRANSFORMATION_NAME="$OPTARG" ;;
    p) CODE_PATH="$OPTARG" ;;
    c) BUILD_CMD="$OPTARG" ;;
    U) PR_URL="$OPTARG" ;;
    *) echo "Usage: $0 [-n <name>] [-p <path>] [-c <build-cmd>] [-U <pr-url>]" && exit 1 ;;
  esac
done

echo "=== AWS Transform Custom ==="
echo "Transformation: $TRANSFORMATION_NAME"
echo "Code path:      $CODE_PATH"
echo "Build command:  $BUILD_CMD"
echo "PR URL:         $PR_URL"
echo "============================"

attempt=1
while [ $attempt -le $MAX_RETRIES ]; do
  echo "--- Attempt $attempt of $MAX_RETRIES ---"

  if atx custom def exec \
    -n "$TRANSFORMATION_NAME" \
    -p "$CODE_PATH" \
    -c "$BUILD_CMD" \
    -g "additionalPlanContext=$PR_URL" \
    -x -t; then
    echo "=== Transformation completed successfully ==="
    exit 0
  fi

  echo "Attempt $attempt failed."
  attempt=$((attempt + 1))

  if [ $attempt -le $MAX_RETRIES ]; then
    echo "Retrying in 10 seconds..."
    sleep 10
  fi
done

echo "=== All $MAX_RETRIES attempts failed ==="
exit 1
This script accepts optional flags for the transformation name (-n), code path (-p), build command (-c), and PR URL (-U). Pass the PR URL to the agent via the -g flag as additionalPlanContext, giving it awareness of the pull request context when generating documentation. On failure, it retries up to three times with a 10-second backoff.
Your CI/CD workflow must configure AWS credentials and install the AWS Transform CLI before invoking this script. The workflow commits the generated documentation back to the PR branch automatically, keeping your architecture docs and technical debt reports current with every code change.
Every push now updates the documentation (Figures 3 and 4) — reducing knowledge silos and preserving institutional knowledge.
Figure 3: PR triggering auto-documentation
Figure 4 – Generated documentation output
3. Scale across repositories
For organizations with hundreds of microservices, transforming one repository at a time doesn’t scale. AWS Transform custom non-interactive mode combined with GitHub Actions matrix strategy allows you to orchestrate transformations across your entire portfolio in parallel. You can run them on demand or on a recurring schedule, so modernization runs as a continuous practice rather than a one-time project.
Tip: GitHub Actions matrix strategy runs each repository in parallel automatically — no separate orchestration layer needed. For larger portfolios, you can also wrap this in AWS Batch or AWS Fargate for large-scale parallel execution. The AWS Transform web console tracks progress across all repositories in a single view.
4. Continual learning
Each time AWS Transform custom completes a transformation, a memory agent scans the full execution trajectory and extracts lessons. Lessons include patterns that the agent learned, decisions that the agent made during planning, and feedback you provide during execution. AWS Transform custom automatically attaches these lessons to your transformation definition, which improves accuracy in subsequent runs.
AWS Transform custom applies lessons automatically, and each lesson belongs to a category that groups related lessons for review. You can browse and archive any lesson you do not want AWS Transform custom to apply to future runs.This keeps a human in the loop on what the agent “remembers” which matters when the same transformation runs across many repositories with different conventions.
In practice, this means your “Spring Boot 3 Upgrade” transformation gets sharper with each execution. The first repository surfaces the edge cases; once you review the resulting lessons and archive the ones that do not fit, subsequent runs handle those edge cases without intervention.
For production use, you can combine these practices into a single workflow file:
Note: The individual workflows shown in Practices 1–3 are presented separately for clarity. Combine them into a single workflow file as shown here, or keep them as separate workflow files depending on your team’s preference.
Continuous modernization moves code transformation out of periodic sprints and into your CI/CD pipeline. By combining GitHub Dependabot’s vulnerability detection with AWS Transform custom agent, orchestrated through GitHub Actions, you can:
Remediate dependency vulnerabilities automatically — beyond version bumps to full code adaptation
Keep documentation current with every commit, preserving institutional knowledge
Scale transformations across hundreds of repositories with consistent quality
Improve continuously as the agent accumulates knowledge items from each execution
The instrumentShop sample application demonstrates that even a moderately complex microservices architecture — with end-of-life Spring Boot versions, deprecated libraries like Hystrix, and multiple interconnected services — can be continuously modernized without dedicated modernization sprints.
Ready to get started? This post walked through the do-it-yourself path with AWS Transform custom. If you would rather have continuous modernization delivered as a fully managed service, explore AWS Transform continuous modernization. Either way, visit the AWS Transform documentation to start your continuous modernization journey.
Last week, we brought together AWS Heroes from around the world to connect, collaborate, and celebrate the builders who go above and beyond for the AWS community.
The AWS Heroes Summit, an invite-only annual gathering, brings global experts specializing in fields like AI, serverless, and containers together for direct collaboration, technical deep-dives, and feedback sessions with internal AWS product and service teams.
Day 1 started with an inspiring fireside chat from AWS CEO Matt Garman. From an insightful AMA with James Hamilton on Day 2 to breakout sessions from various product teams that sparked new ideas, our AWS Heroes excelled at sharing knowledge, lifting each other up, and turning conversations into collaborations. To learn more, read the attendee feedback on LinkedIn.
Last week’s launches Here are some launches that got my attention:
Web Search on Amazon Bedrock: Amazon Bedrock now enables OpenAI models (GPT-5.4, GPT-5.5, and GPT-5.6 Sol/Terra/Luna) to browse and retrieve information from the internet, allowing AI applications to access up-to-date information beyond their training data. This capability opens new possibilities for building AI agents and applications that can answer questions using real-time web content while maintaining data residency within your secured AWS environment with zero data egress. To get started, visit the AI blog post and the Amazon Bedrock User Guide.
Vector search for Amazon DynamoDB: You can store and query vector embeddings alongside your existing data in DynamoDB without managing a separate vector database. DynamoDB already supports storing memory for AI agents, and with vector search you can now add semantic retrieval over that memory for agentic grounding, with predictable performance. To learn more, visit Esra’s blog post and Amazon DynamoDB Developer Guide.
Up to 3,000 Mbps for AWS Lambda function bandwidth: AWS Lambda functions now support increased network bandwidth, enabling data-intensive workloads and faster communication between Lambda functions and other AWS services. This feature enables functions outside a VPC that are configured with 2 GB of memory or more to access network bandwidth that scales proportionally, from 625 Mbps at 2 GB up to 3,000 Mbps at 10 GB.
For a full list of AWS announcements, be sure to keep an eye on the What’s New with AWS page.
Other AWS news Here are some additional projects and news items that you may find interesting:
Introducing Dogwood: Runtime Verification for AI Agents: AWS open-sourced Dogwood, a purpose-built governance language for AI agents to support Cedar policies and add temporal conditions. Powering Dogwood, Amazon Bedrock AgentCore introduced temporal policies whose decisions depend on the history of an agent’s actions within a session, not on the current request alone.
AWS supports Agent Plugins: An Open Standard for Portable Agent Extensions: AWS announced support for Agent Plugins, an open source, vendor-neutral specification that gives AI agent extensions a common packaging format so you can package an extension once and ship it to any client, including Kiro, VS Code, Cursor, or any tool that implements the spec.
Introducing Kiro Crew: Kiro Crew is a persistent, self-evolving workspace that keeps work moving, online or off, enabling collaborative multi-agent development workflows within the Kiro IDE. It’s built for engineering work that goes beyond a single chat session, and spans repos, tools, and days. You can run several efforts in parallel or hand work to subagents that report back, so nothing waits in line.
For a full list of AWS blog posts, be sure to keep an eye on the AWS Blogs page.
Development velocity continues to increase. But velocity without maintenance accumulates technical debt at speed. The faster software scales, the faster technical debt compounds. At the same time, more sophisticated exploits and attack vectors are emerging – and the risk is increasing (Figure 1). For organizations, this makes staying on top of tech debt and maintaining a strong security posture across an increasing sphere of responsibility not only important, but business-critical.
Figure 1: Changing landscape of software maintenance
To contend with compounding technical debt, engineering organizations have typically stitched together point tools, spent app-by-app cycles wasting engineering capacity, and relied on self-reports for status that lags reality and hides regressions.
This is the problem continuous modernization capability was built to solve: shift code transformation from a periodic project into an automated, always-on practice. Rather than scheduling modernization sprints or relying on manual audits, your repositories are analyzed on demand or on a recurring schedule, with findings prioritized by severity and impact, and validated pull requests are generated autonomously to resolve them.
In this post, I’ll recap the preview launch and then I’ll walk you through additional capabilities we’ve added since. I’ll also show how you can use it today to get started.
What continuous modernization provides
AWS Transform – continuous modernization connects to your source control systems (GitHub, GitLab, Bitbucket, or local repositories), scans repositories, and generates prioritized findings. At your direction, it autonomously creates pull requests with validated code changes.
The capability supports several analysis types:
Rapid tech debt analysis: fast metadata-only scans of package manifests (pom.xml, package.json, requirements.txt) to identify stale versions and outdated dependencies
Comprehensive tech debt analysis: deep code-level analysis examining source code for debt patterns, code quality issues, architecture concerns, and improvement opportunities
Security analysis: Common vulnerability detection within the source code and dependencies via AWS Security Agent (now part of AWS Continuum)
Agentic readiness: assesses your code base readiness for agent integration
Modernization readiness: evaluates candidates for containerization, serverless migration, and platform upgrades
Custom analysis: run your own transformation definition as an analysis, including organization-specific policies your platform team already enforces
You can run these analyses on demand or schedule them on a recurring cadence. The system accumulates findings over time, giving you trend data and portfolio-wide visibility that periodic manual audits can’t match.
Initiate and schedule recurring analysis from the AWS Transform web app
We’re excited to add the ability to connect your source code management (SCM) provider and initiate an analysis directly from the AWS Transform web application so you can get value from real insights faster than before (Figure 2). You can also schedule recurring analysis, review findings, and create remediations from within the web app. To learn more about the web app and how to set it up, see AWS Transform web application.
Figure 2: Set up continuous modernization in the AWS Transform web application
Interact via your IDE or terminal with the new CLI and developer tools
The new version of the AWS Transform CLI and it’s atx ct(v3.8.0) introduce additional capabilities that simplify how you setup and work with continuous modernization. The new atx ct remote sub-commands allow you to provision infrastructure and run scheduled analyses and remediations with Amazon Elastic Compute Cloud (Amazon EC2) and AWS Batch (Figure 3). To learn more about the CLI commands, refer to working with continuous modernization. The updated AWS Transform Kiro power and plugin make it even easier to configure your source repositories and run analyses directly from your IDE or terminal. To learn more, see developer tools.
You can also leverage labels with your repositories to group them and organize operations in batches. In the example below, I create a subset of repositories from my GitHub organization that I want to run agentic readiness analysis on and trigger a one-time analysis.
Figure 3: Use the AWS Transform cli to analyze your repositories
Real-world results
Across industries, partners and enterprises are already seeing the impact of continuous modernization. The results speak to a consistent theme: what used to take months of manual effort now happens in minutes, at a scale that was previously impractical with manual review.
From weeks of manual assessment to insights in days
Quantiphi ran continuous modernization across a large portfolio and compressed a multi-week assessment into a matter of days:
“At Quantiphi, we’re helping enterprises accelerate application modernization through AI-powered engineering. Using AWS Transform continuous modernization, we analyzed more than 500 repositories and uncovered over 3,000 technical debt findings in less than a week, a time frame that traditionally required nearly three weeks of manual assessment. By automating technical debt discovery and providing actionable remediation insights, we reduced assessment effort by more than 60%, accelerated modernization planning, and enabled our customers to focus engineering investments on innovation instead of analysis. We believe AWS Transform continuous modernization is a foundational capability for delivering continuous, AI-driven enterprise modernization at scale.”
Sanchit Jain, Migration and Modernization Practice Leader, Quantiphi AWS Practice
Shifting from reactive maintenance to proactive modernization
For Hexaware, the value is in continuously surfacing what needs attention across large portfolios, so teams can get ahead of debt rather than react to it:
“At Hexaware, we’re constantly looking for ways to help clients modernize faster while controlling cost and complexity. AWS Transform continuous modernization provides a scalable approach to identifying technical debt, modernization opportunities, and AI-readiness gaps across large application portfolios. By automating analysis and continuously surfacing remediation recommendations, organizations can shift from reactive maintenance to proactive modernization. This capability has the potential to significantly accelerate transformation roadmaps and help enterprises build more resilient, future-ready applications, very quickly.”
Tech Mahindra measured the impact directly, cutting assessment time from 40 hours to 8 across 25 repositories:
“Achieving an 80 percent reduction in assessment time, from 40 hours down to 8, across 25 enterprise repositories is just the beginning of what we see as a transformative shift in how organizations approach continuous modernization. AWS Transform’s scanning and analysis engine is solid, and the structured output allows our teams to validate findings quickly and build prioritized remediation plans with confidence. As the platform matures with features like scan resume capabilities and broader platform support, we expect to embed AWS Transform continuous modernization into our standard delivery methodology while maintaining the depth and accuracy our enterprise clients demand.”
Sanjeev Agarwal, Global Head of AWS Business, Tech Mahindra
Uncovering risks that traditional scanners miss
Cybage found that the continuous modernization capability surfaced hidden security risks that conventional scans overlooked, then fed those findings into their own delivery framework:
“AWS Transform continuous modernization completes codebase analysis in under an hour, work which normally takes weeks, while uncovering risks that traditional scanners miss like disabled security warnings, vulnerable code copied into applications, and security controls intentionally switched off. Cybage’s CLEAR Framework builds on these findings by converting them into a prioritized, customer-specific modernization plan with confidence scoring, technical-debt measurement, and integration with tools like GitHub, Jira, and SonarQube. Together, AWS Transform discovers hidden risks at speed, and CLEAR determines what matters most and how teams move from analysis to execution.”
Mohammad Mahdee-uz Zaman, Vice President, AWS Strategic Alliances, Cybage Software Inc.
Straight from discovery to a concrete migration plan
3Pillar moved directly from discovery to an actionable migration plan:
“For most IT leaders, application modernization is the bane of their existence. We put AWS Transform continuous modernization to the test across more than 25 repos, and came away very impressed. Analysis that would have taken our engineers an estimated 3-4 weeks of manual code reviews surfaced in an hour, uncovering over 190 tech debt findings, including outdated dependencies, dead code, and migration risks. The service’s ability to build migration rules purpose-built for each repo let us move straight from discovery to a concrete migration plan, without weeks of manual mapping. Based on our testing, we estimate AWS Transform continuous modernization can cut 40-50% off the overall modernization lifecycle. This speed means tech leaders can embark on modernization initiatives with confidence that it won’t drag on for many years.”
Pankaj Chawla, CTO, 3Pillar
Conclusion
AWS Transform – continuous modernization helps you go from one-off projects and campaigns to a fully operational tech debt management program: connecting sources, running analyses, triaging findings, launching remediation campaigns, and scheduling recurring scans. The web app dashboard and reports provide prioritization signals directly from your code. When a repository diverges from your baseline, the next analysis can surface the change and help teams understand its severity and breadth. This reduces reliance on manual status collection and periodic code-health audits.
Custom code transformations are the work that no off-the-shelf migrator covers for you. Moving your services off an internal library, enforcing your team’s error-handling conventions, standardizing logging across your fleet of services: that work piles up on your backlog because general-purpose tools weren’t written with your codebase in mind.
AWS Transform custom tackles that kind of work. It’s an agentic AI service that lets you describe your own code transformations in natural language and run them across your codebase. With the Kiro power for AWS Transform, the AWS Transform agent skill, and the AWS Transform IDE plugin (VS Code and Open VSX), you can design and run those transformations from your editor. You can transform up to 3 repositories in parallel on your laptop, or fan out to hundreds of repositories in parallel on AWS Batch with AWS Fargate, without leaving the chat or IDE you already work in.
This post shows you what AWS Transform custom is, how to request a new transformation definition (TD) from chat, and how to run TDs through the power, skill, or IDE plugin. The authoring walkthrough focuses on the chat-driven request workflow. The agent drafts and publishes the TD on your behalf, so you won’t see raw TD syntax in this post.
What makes AWS Transform “custom”
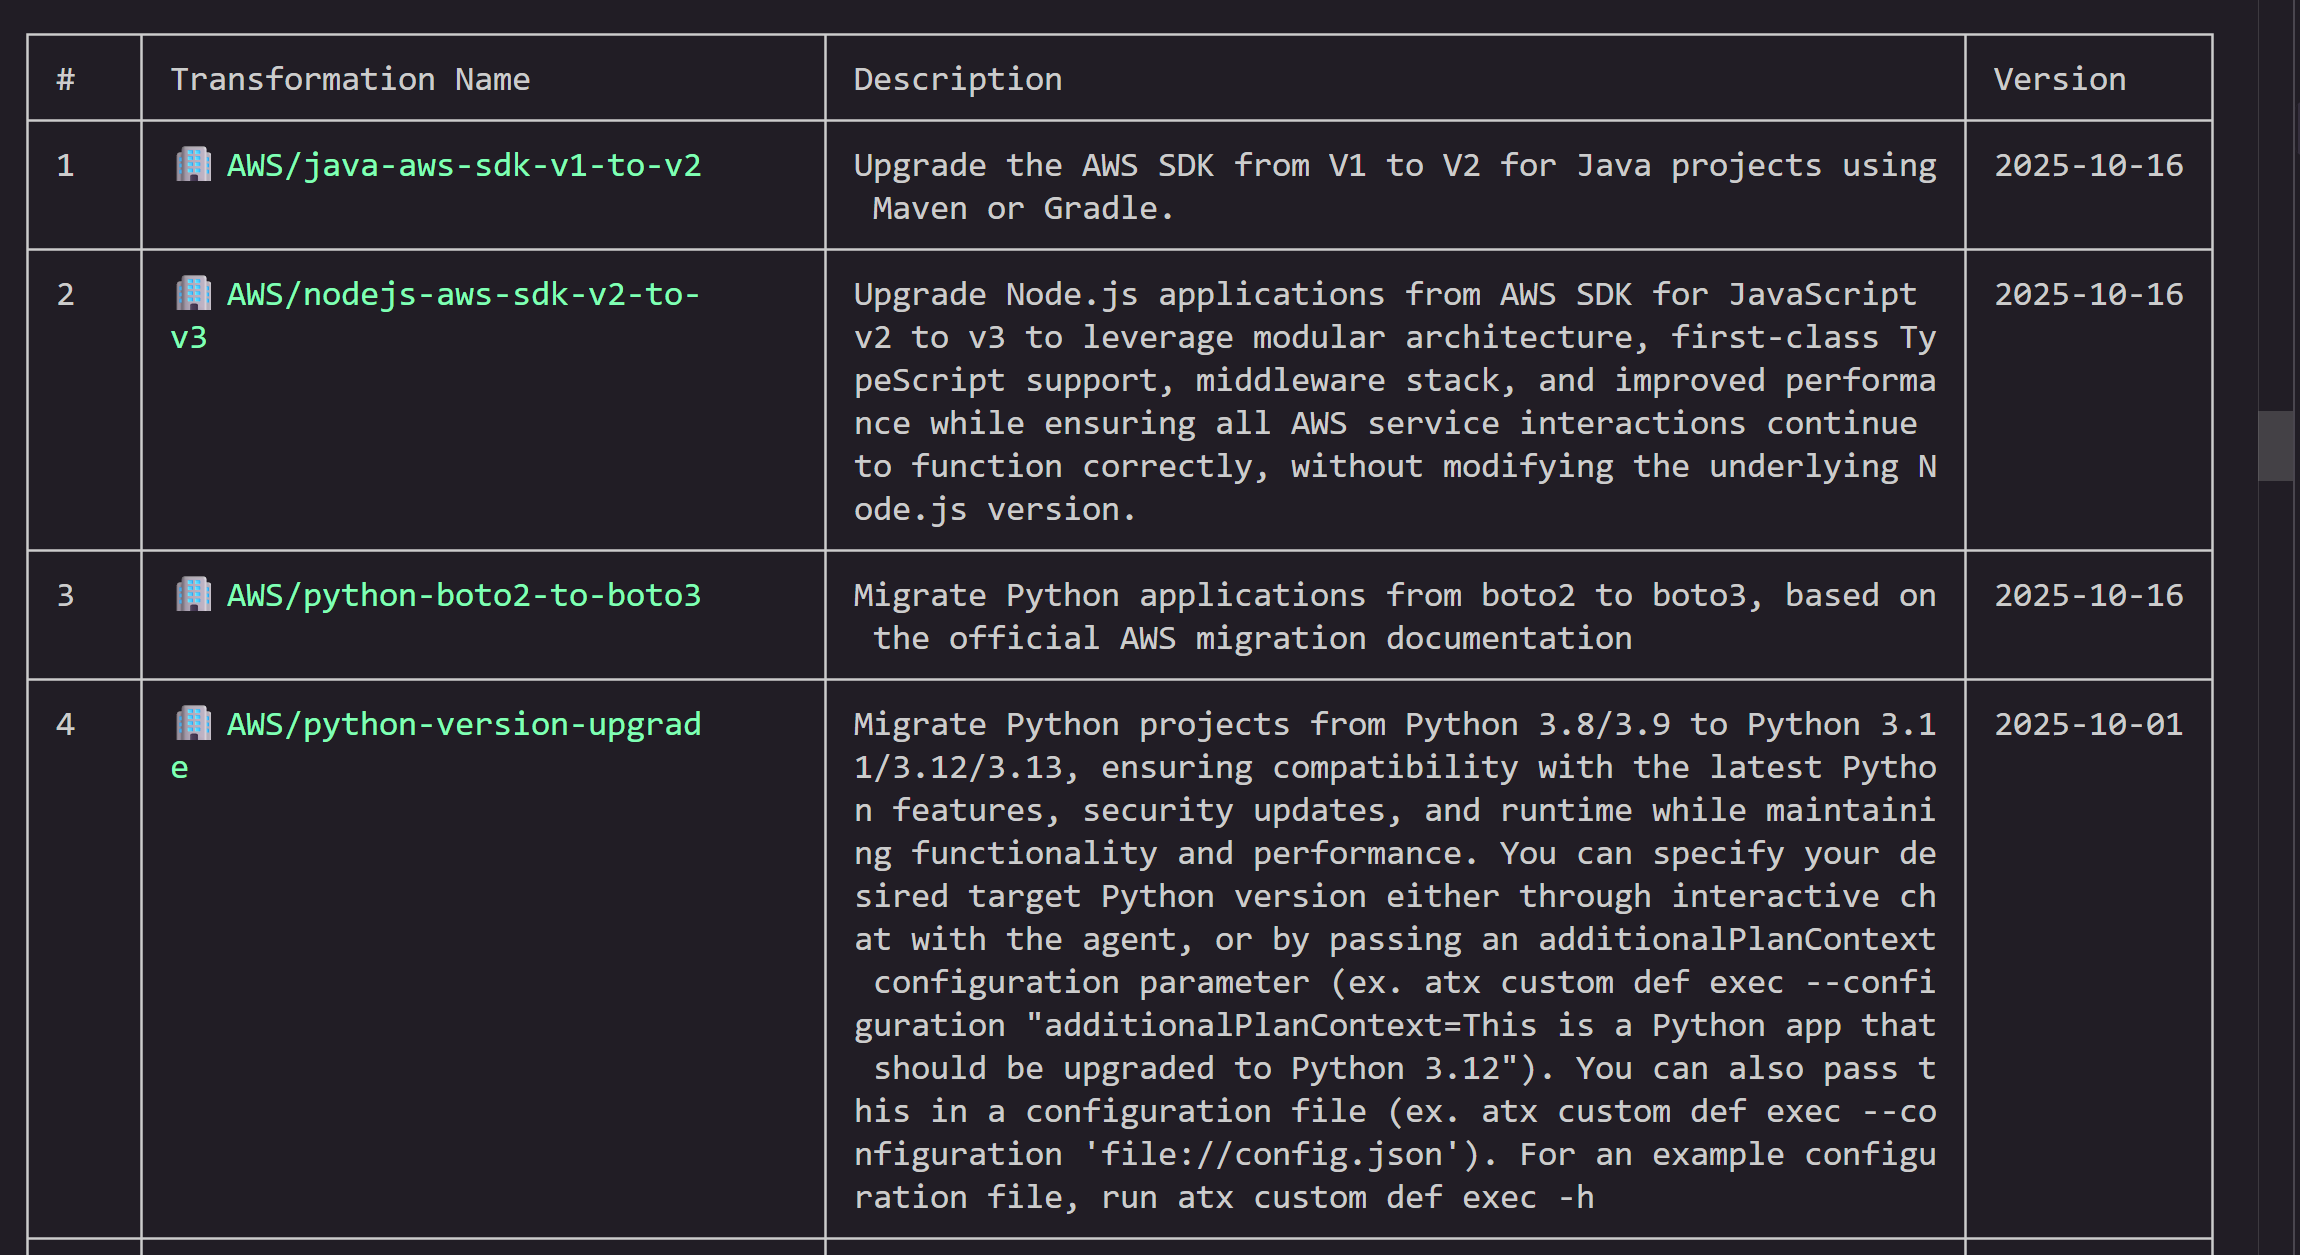
AWS Transform ships with a catalog of out-of-the-box transformation definitions for common scenarios, including Java version upgrades, boto2 to boto3, AWS SDK migrations, framework transitions, and x86 to AWS Graviton. Those cover a lot of ground, but the real unlock is when you define your own.
A transformation definition is a reusable recipe that describes how to perform a transformation. With AWS Transform custom, you author TDs in natural language. A few examples of what that looks like in practice:
“Upgrade my codebase from C++11 to C++17”
“Replace calls to our deprecated internal auth-sdk-v1 with auth-sdk-v2, keeping the retry configuration intact.”
“Enforce our team’s error-handling standard: no bare except blocks, and every exception includes context.”
“Standardize our REST controllers to use our internal @TracedEndpoint annotation.”
Each one encodes something specific to your organization. Once you publish a custom TD to your AWS account, you can apply it to a matching repository, whether that’s one project or a hundred.
Three common ways to work with AWS Transform custom
You can pick the surface that fits how you already work. The power lives inside Kiro IDE, the skill plugs into your compatible agent, and the IDE plugin gives you a UI in VS Code or Open VSX-compatible IDEs. These three surfaces talk to the same underlying service and share your TDs, so you can mix and match across a team.
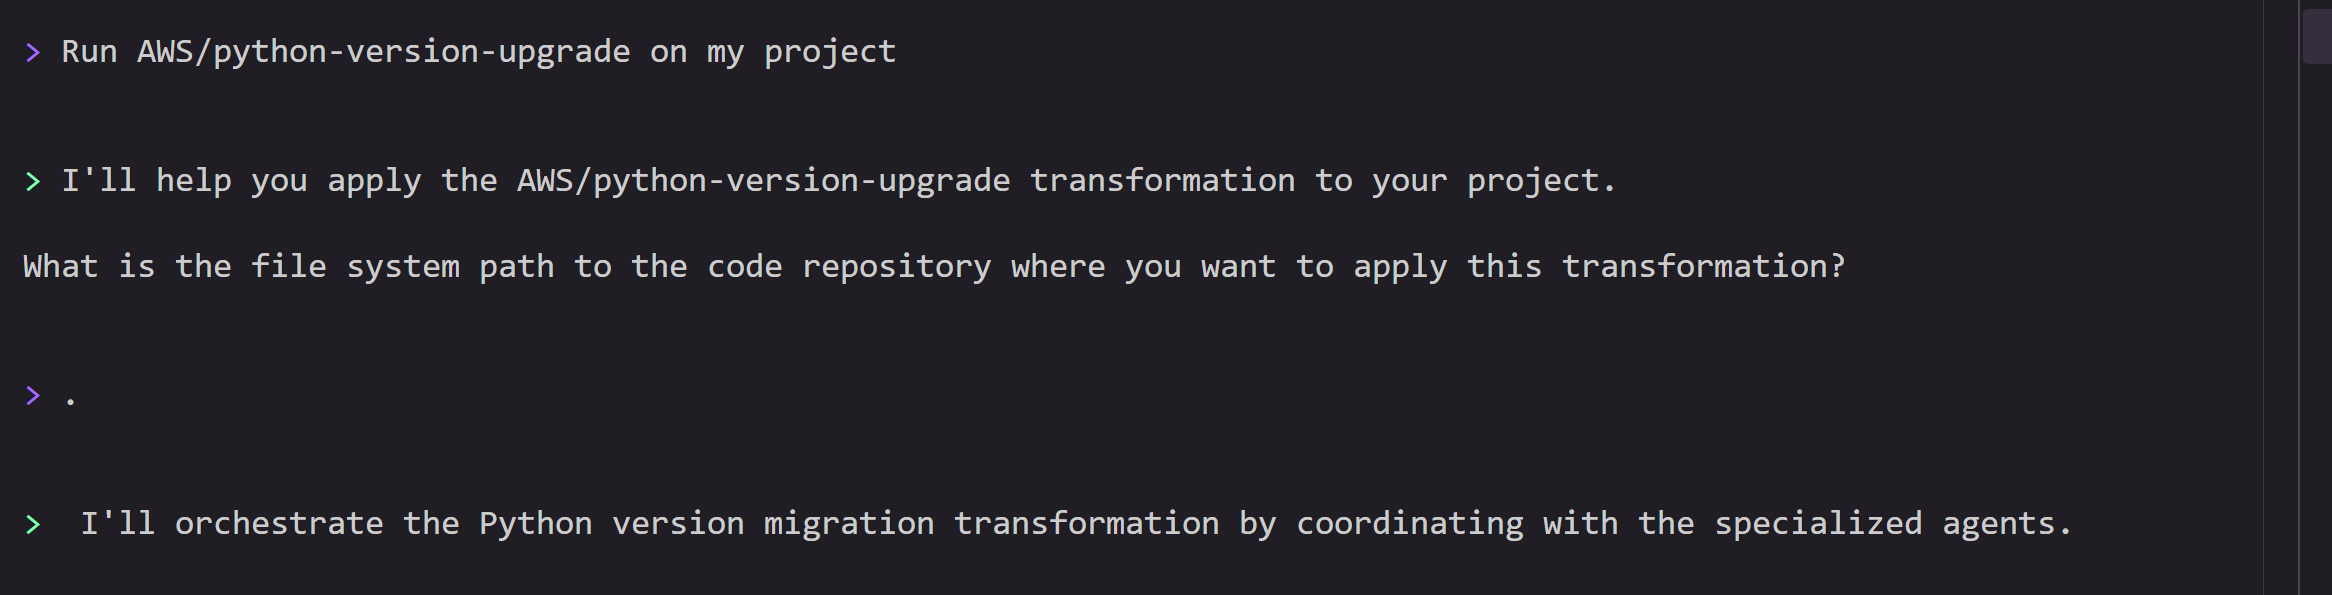
The Kiro power for AWS Transform brings the full AWS Transform workflow into Kiro IDE. You describe what you want in chat, and Kiro inspects your project, matches it against your available TDs, asks for the configuration it needs, and runs the transformation. Progress, artifacts, and diffs show up in your editor.
The AWS Transform agent skill follows the open Agent Skills standard. The same package works across more than 40 compatible agents, including Kiro CLI, Claude Code, Cursor, GitHub Copilot, Gemini CLI, and Windsurf. You get the same workflow you get from the Power, portable across the tools you already use.
The AWS Transform IDE plugin is for when you prefer a UI over chat. You can install it from the VS Code Marketplace and Open VSX. The plugin exposes AWS Transform custom features as first-class IDE actions, including browsing your published TDs and launching transformations.
Creating a custom TD right from chat
Historically, creating a custom TD meant dropping to the terminal and running the AWS Transform custom CLI to step through an interactive authoring session. That path still works and is a good fit for scripting. With the power, skill, or IDE plugin, you can do the same thing entirely in chat.
Tell your agent what you want, for example:
Create a custom AWS Transform custom TD that migrates our internal logger-v1 package to logger-v2. The new API uses logger.info(msg, context) instead of logger.log(level, msg). Keep existing log levels intact.
From there, the agent walks you through a short loop. It asks clarifying questions about the transformation’s scope and behavior, drafts the TD based on your description, lets you review and refine it, and then publishes it to your AWS account. After publishing, your TD is immediately available to the power, skill, and plugin. The next time you ask to run a transformation on a matching repo, your new TD shows up as a candidate.
The CLI path is still there if you prefer it. Run this in a new terminal:
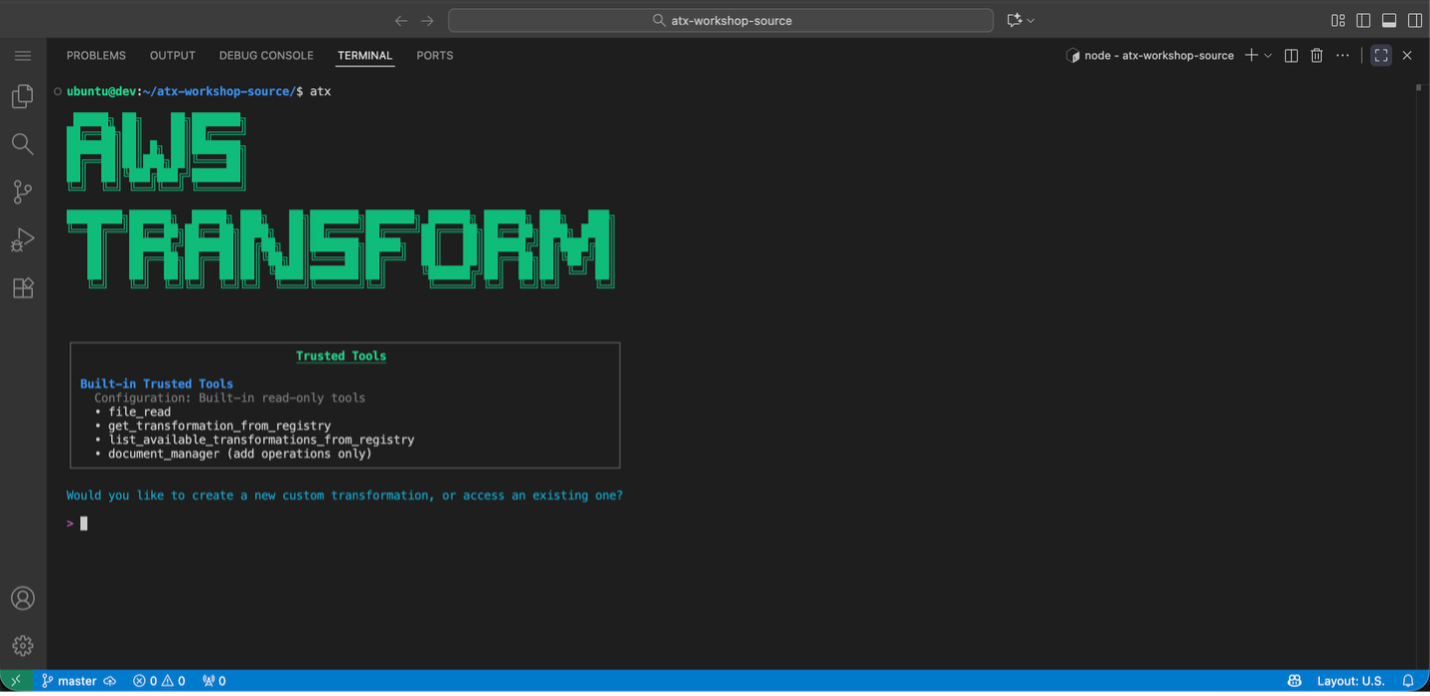
atx
Then follow the interactive prompts.
Running your custom TDs
Once you have one or more TDs published, running them looks the same regardless of surface. When you ask Kiro to run a transformation, the Kiro Power walks through the following steps with you:
Inspect your repositories. The agent reads pom.xml, package.json, requirements.txt, Dockerfiles, and similar config files to understand what it’s looking at.
Match against your TDs. It compares your repos to your published TDs (custom and out-of-the-box) and presents a report showing which ones apply and why.
Collect the configuration it needs. Some TDs require inputs like a target version. The agent prompts you for those before it runs.
Confirm the plan. Nothing executes until you approve.
Execute and monitor. The agent launches the transformation through the AWS Transform CLI, streams progress, and opens artifacts (for example, plan, worklog, and validation summary) in your editor.
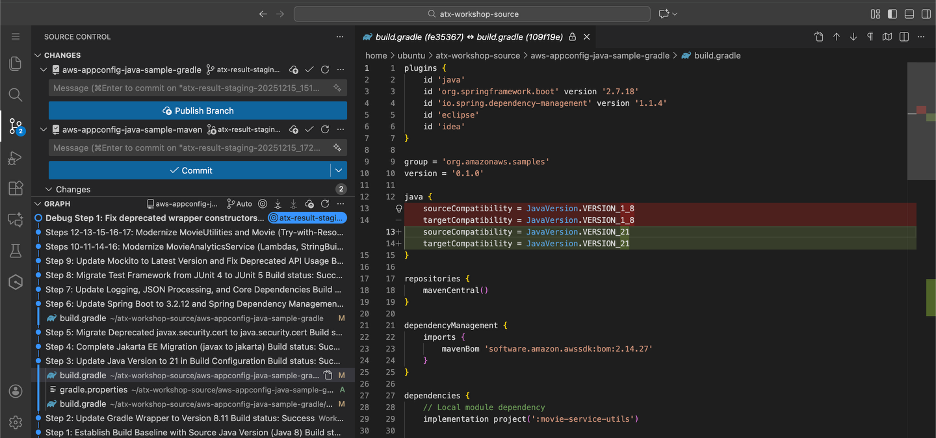
Show results. Every change is a normal git commit you can review.
Local mode and remote mode: scale without the setup tax
Running locally, you can transform up to 3 repositories in parallel on your machine. That’s fine for one-off work, but it doesn’t scale to a real modernization campaign.
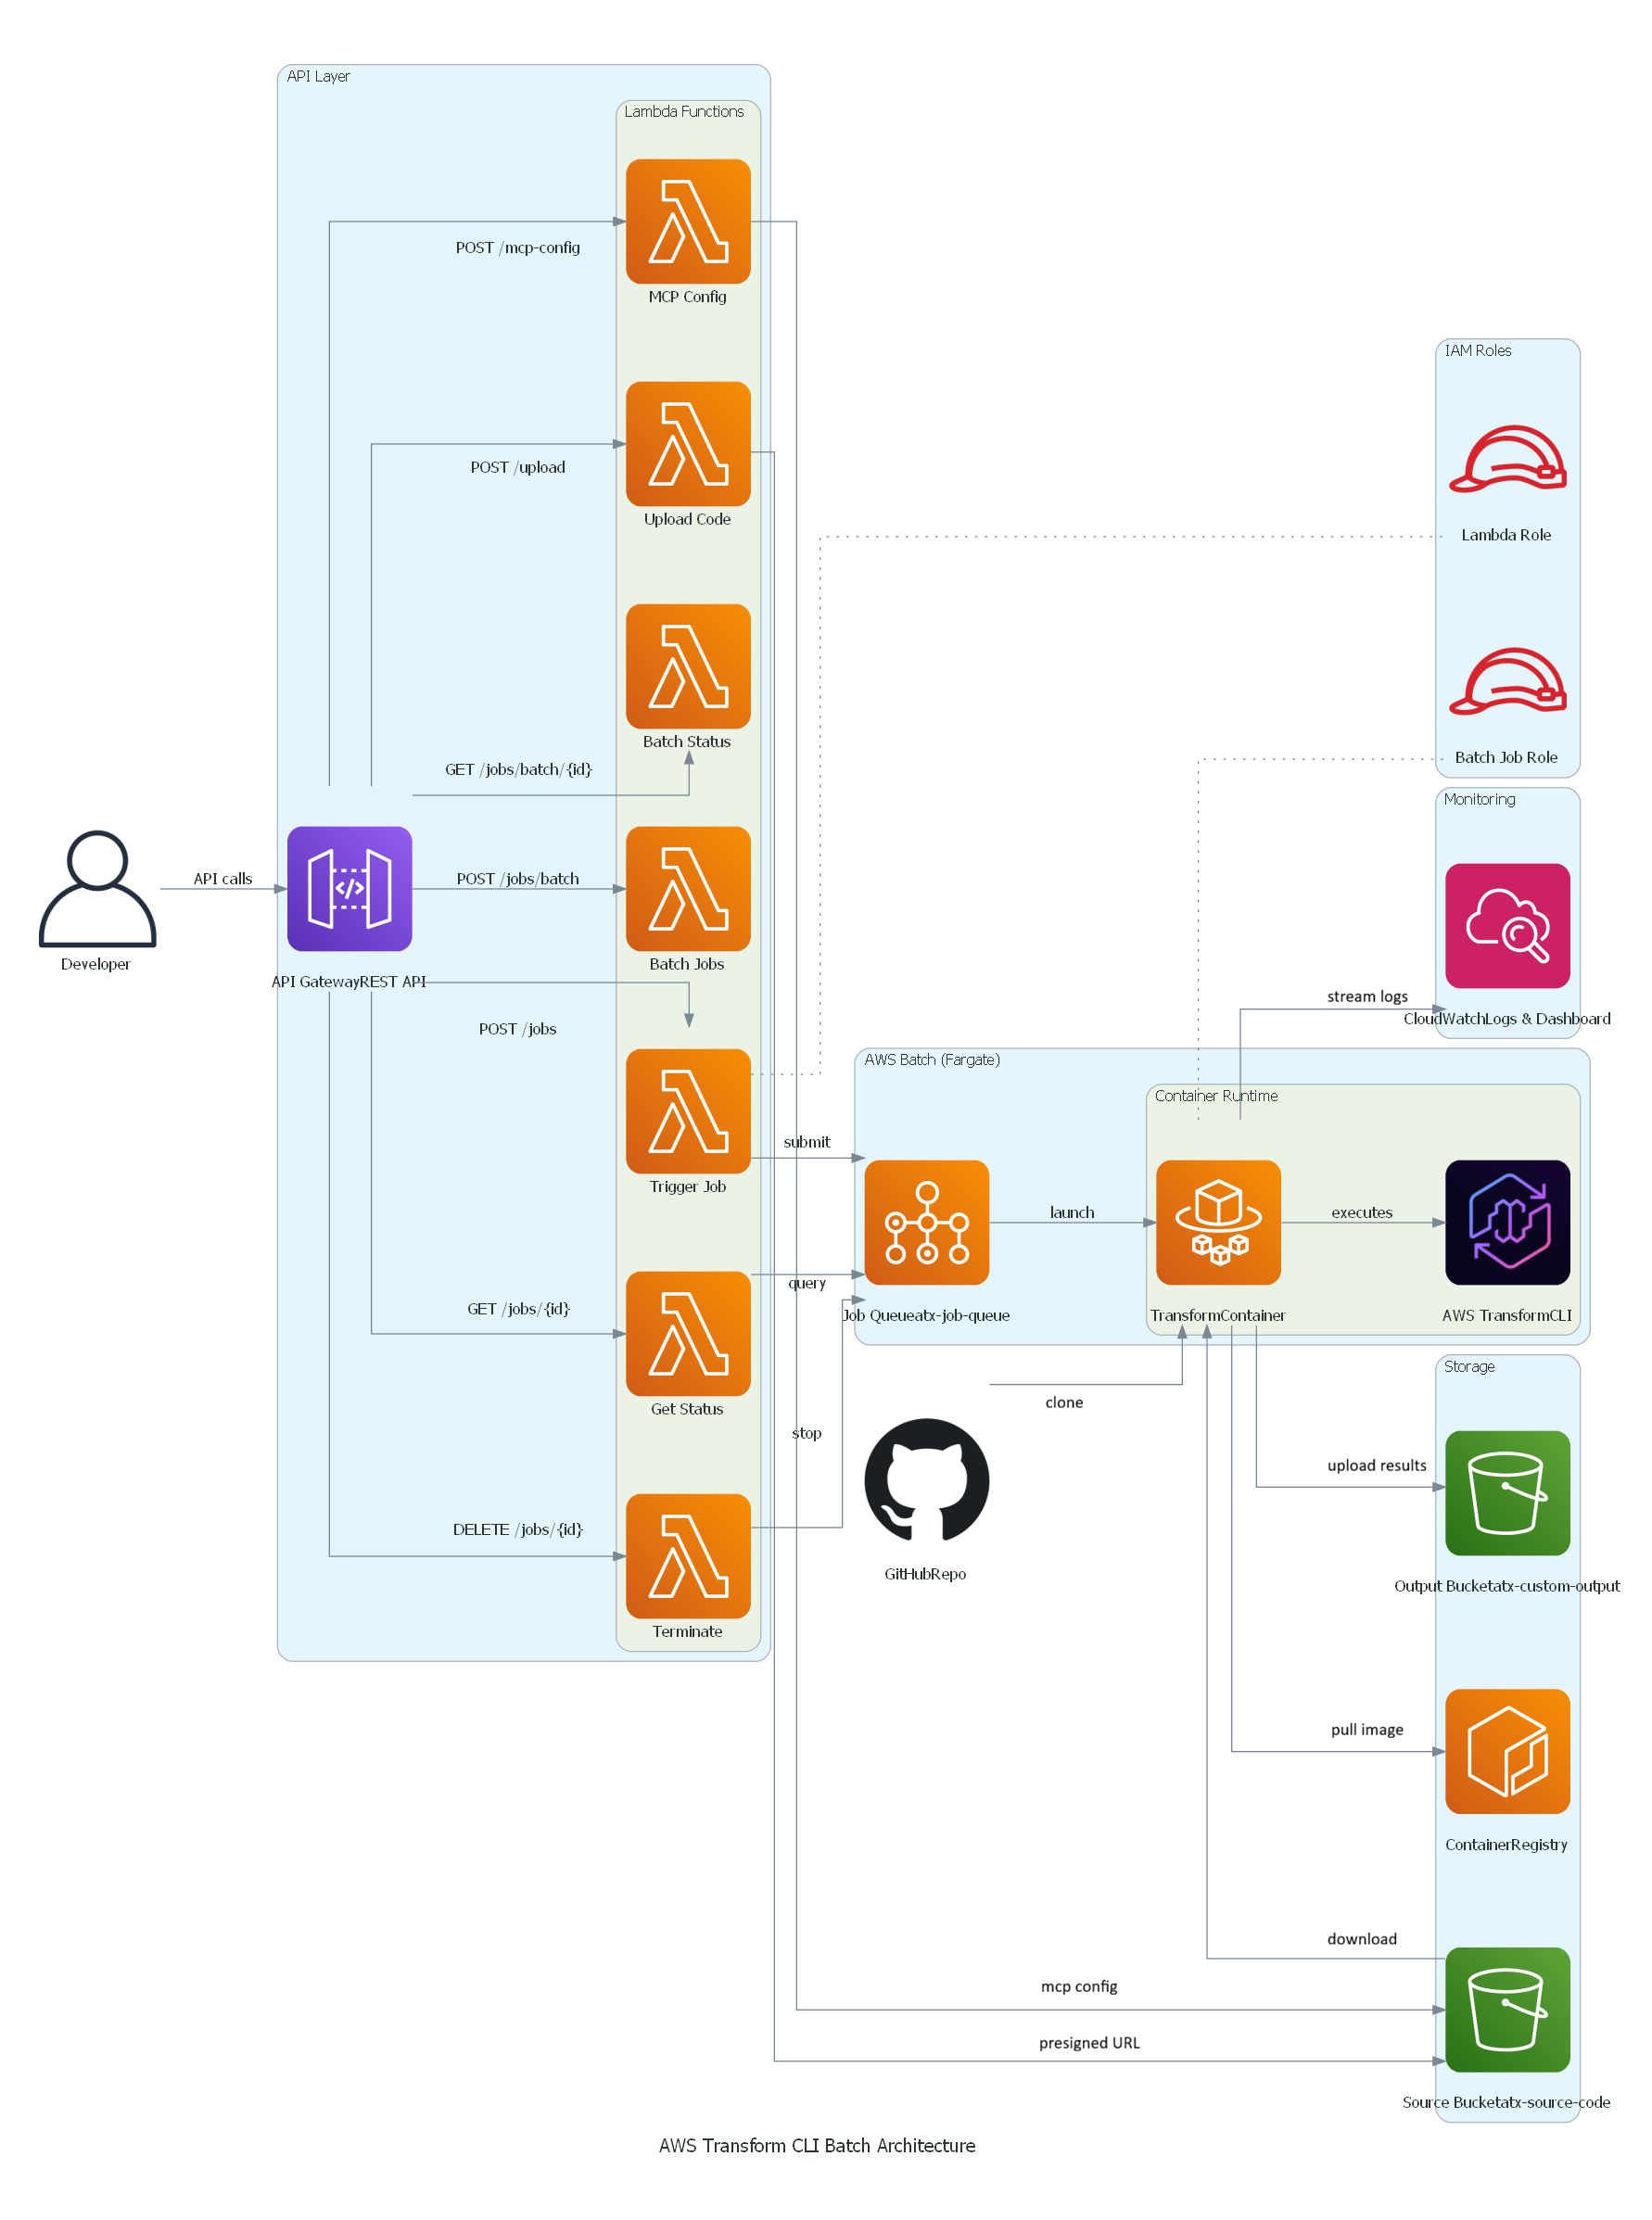
Remote mode is where scale comes in. It runs your transformations on AWS Batch with AWS Fargate, so you can fan out to hundreds of repositories in parallel. No local compute bottleneck, and no leaving your laptop running overnight.
The agent sets remote mode up for you. Ask to run in remote mode, and it provisions the AWS Batch compute environment, job queue, job definitions, IAM roles, and networking automatically. You don’t hand-write CloudFormation, and you don’t navigate the AWS console. Once the infrastructure is in place, you kick off a run the same way as local mode, and the agent streams progress back to your editor while Fargate does the heavy lifting.
Your inputs can be local paths, git URLs, or S3 locations, and the same applies to remote runs. Point the agent at a list of repos and let it go.
Getting started
The first time you use the power, skill, or IDE plugin, the agent walks you through setup. If you’d rather do it by hand, you need a few things in place first.
Install the power (Kiro IDE)
Before you install the power, make sure you have:
AWS Command Line Interface (CLI) installed and configured with aws configure.
AWS credentials with the AWSTransformCustomFullAccess managed policy (or at minimum, transform-custom:* permissions).
macOS or Linux. Native Windows isn’t supported, so use WSL.
A straightforward way to install the power:
Open Kiro IDE and open the Powers panel.
Find AWS Transform in the list and install it.
Open Kiro Chat, then select the Power and choose Try power.
To install from source instead:
In the Powers panel, choose Add Custom Power, then Import power from GitHub.
Follow the prompts to finish the installation. You can also drop the skill folder into your agent’s skills directory manually, for example, .kiro/skills/ for Kiro CLI or .claude/skills/ for Claude Code.
Install the IDE plugin
The IDE plugin is published to two marketplaces:
VS Code Marketplace
Open VSX
Install it the same way you install any other extension in your editor.
Your first custom TD
Once you have a surface installed, try something like:
Create a custom AWS Transform transformation that [describe your transformation].
Then run it against a repo:
Use AWS Transform to run my new transformation on /path/to/my-project.
The agent walks you through creating the TD, modifying it, publishing it, and running it on your repos from start to finish.
Cleanup
If you ran any transformations in remote mode, once they complete, the agent will ask if you want to keep or clean up the remote mode resources deployed to your AWS account. To clean up, simply tell the agent that you want to clean up. The agent will then delete the resources that were created in your AWS account as a part of the initial setup for the remote mode transformations. To delete any user-managed transformation definition that you chose to publish to your registry, simply run atx in a terminal, ask to list all transformation definitions, find your recently published user-managed transformation definition, and ask to delete it from the registry.
Wrapping up: making your migrations faster
The value of AWS Transform custom is in the transformations only you can write, the ones that encode your organization’s libraries, conventions, and standards. The power, skill, and IDE plugin make both sides of that loop, authoring and running, feel native to your editor.
If you’ve been putting off your migrations because the tooling wasn’t there, now’s the time to take another look.
Today at the AWS Summit in New York City, Swami Sivasubramanian, AWS VP of Agentic AI, provided the day’s keynote. Here’s our roundup of the biggest announcements from the event:
New in Amazon Bedrock AgentCore We’re introducing new capabilities on Amazon Bedrock AgentCore: connecting AI agents to organizational, web, and paid knowledge, helping teams find and fix what’s going wrong in production, and enforcing controls that scale as agents grow more capable.
Together, these capabilities help you build more capable agents faster, govern those agents with controls that scale, and improve them continuously. To learn more, read our blog post covering all the new features.
Introducing Amazon Bedrock Managed Knowledge Base for faster, more accurate enterprise AI applications — You can build enterprise RAG pipelines with the managed Knowledge Base on Bedrock. It provides native data connectors, Smart Parsing for automatic multi-format data preparation, and an Agentic Retriever for complex multi-step queries—all integrated with AgentCore Gateway so developers can focus on business outcomes rather than infrastructure management.
AWS WAF adds AI traffic monetization capability to help content owners charge AI bots for content access — You can use a new Bot Control capability that enables content providers and publishers price, meter, and collect payment from AI bots and agents accessing their content and APIs. AWS WAF now lets you set a price for that access, accept payment through third-party providers, and grant scoped access directly at the edge.
Amazon Bedrock AgentCore harness in now generally available — You can do building and running production-grade AI agents in minutes—without coding orchestration loops—by defining your agent’s model, tools, skills, and instructions in configuration, with Bedrock AgentCore harness.
New in AI-based security tools
Introducing AWS Continuum: Security at machine speed — AWS Continuum for code vulnerabilities, available in a gated preview, takes findings from across your environment, prioritizes by business impact, proves which are exploitable, and drives a fix through your own process.
AWS Security Agent (now part of AWS Continuum) adds threat modeling, Kiro power and Claude Code plugin, and more — You can generate the new threat modeling (preview) to understand the full context of your application and identify threats with recommended mitigations using the STRIDE framework. You can also use pull request code scanning with remediation across major Git platforms, and IDE integrations via Kiro power, Claude Code plugin, and MCP — letting developers run security reviews and fix issues without context switching.
New in building AI-based applications
Introducing Kiro for iOS — Kiro introduces a native iOS app, available in a gated preview, built for real engineering work that gives developers a new surface to kick off, monitor, steer, and interact with their Kiro sessions directly from their phone. That means you can now start sessions, check back when they’re done, review diffs, and approve changes all while staying connected to your work with no laptop running.
Proactively reduce tech debt autonomously with AWS Transform – continuous modernization — You can use continuous analysis (preview) to automatically scan your code repositories against configurable baselines and generates findings in hours, not weeks. Once you’ve identified and prioritized findings, you can configure autonomous remediations that generate pull requests for affected repositories automatically.
In addition to the keynote announcements, we have other important launches this week:
Amazon S3 annotations: attach rich, queryable context directly to your objects — Amazon S3 now lets you attach up to 1 GB of rich, mutable, and queryable context directly to your objects using annotations, purpose-built for AI agents and autonomous workflows that need to discover, understand, and act on data at scale without maintaining separate metadata systems.
Today, we’re announcing AWS Transform – continuous modernization (preview), a new capability of AWS Transform for continuous, autonomous tech debt analysis and remediation at scale. AWS Transform already helps enterprises migrate out of data centers, modernize mainframe and Windows applications, and handle the undifferentiated work of software maintenance: upgrading Java versions, swapping deprecated frameworks, and updating AWS Lambda runtimes before they reach end of life. This new experience builds on this. Customers get full visibility into the state of their codebase across thousands of repositories, prioritized findings, and the pull requests that make the fixes.
Engineering organizations typically consume up to 30% of IT budgets. Customers stitch together point tools: one to detect dependency issues, another to flag vulnerabilities, another for code quality. But no existing tool detects, prioritizes, and remediates tech debt continuously and at scale. The result is a manual, app-by-app cycle that drains engineering capacity. Leaders fall back on self-reported team status that lags reality and hides regressions. AI-assisted development makes this worse: as coding agents accelerate the pace of change, tech debt accumulates faster than developers can keep up. Customers need a capability that detects, prioritizes, and remediates tech debt continuously, autonomously, and at scale.
Continuous analysis To address the visibility challenge, this new capability within AWS Transform automatically scans your code repositories against configurable baselines and generates findings in hours, not weeks. Out of the box, AWS Transform – continuous modernization includes policies for detecting end of life dependencies, deprecated frameworks, and other common sources of technical debt. You can also extend these with your own remediation patterns specific to your organization, including approved libraries, internal coding standards, or tech debt policies your platform team already enforces. For example, if your team has deprecated an internal library or prefers a particular logging pattern, you can codify that as a policy and run it across all your repositories continuously.
Unlike periodic manual efforts, continuous analysis provides ground truth directly from your code. When a repository falls behind your baseline, you know immediately, showing which components are behind and by how much, regardless of how the team chooses to address it. This eliminates the need for status check-ins and manual compliance tracking, giving platform teams an always current view of their technical debt landscape.
Autonomous remediation at scale Once you’ve identified and prioritized findings, you can configure autonomous remediations that generate pull requests for affected repositories automatically. This new AWS Transform capability provides out-of-the-box remediation transformations for common scenarios such as Java version upgrades, SDK migrations, and library updates. You can also create custom transformations for organization-specific patterns.
When you launch a remediation, the continuous modernization capability creates pull requests for each affected repository, notifying the owning team with a message like: “This repository is behind on your organization’s baseline for this dependency. Here’s a PR that resolves it.” Teams can review and merge the PR, or choose to remediate using their own approach. Either way, continuous analysis detects when the fix is in place, providing ground truth without requiring manual confirmation.
AWS Transform – continuous modernization integrates with AWS Security Agent to detect and remediate security vulnerabilities at the source-code level, so security findings flow into the same prioritized list and pull-request workflow as other tech debt.
Let’s try it out To get started with, I navigated to the AWS Transform web application. From the dashboard, I can see an overview of my organization’s repositories and their current status against my configured baselines.
First, I connected my source control system and initiated an analysis against my specified policies. Within hours, the analysis returned findings across my repositories, showing which ones were behind the baseline and by how much. I could see the severity, the number of affected files, and the specific tech debt patterns detected.
From here, I selected a group of high-priority findings and launched a remediation campaign. AWS Transform – continuous modernization generated pull requests for each affected repository. I could monitor the campaign’s progress in real time, seeing which PRs were created, which were merged, and which repositories returned to compliance.
Image 1: AWS Transform – continuous modernization dashboard showing a portfolio overview of your technical debt findings across all connected repositories.
Image 2: The detailed findings view listing individual tech debt items by severity, category, and repository with their available remediation options.
Image 3: The sources view showing connected repositories from GitHub and local environments that continuous modernization is tracking for analysis.
Faster ways to modernize These capabilities support two distinct approaches to code modernization. In continuous mode, you can use continuous modernization to keep your codebases current as baselines evolve. Think of this as the day-to-day work of upgrading libraries, applying security patches, and enforcing coding standards across your organization.
For larger modernization projects, such as migrating from one framework to another or upgrading a major runtime version across hundreds of applications, you can use campaign mode for targeted, project-based modernization. AWS Transform custom continues to provide the flexible primitive for these larger efforts. AWS Transform – continuous modernization is purpose-built for the recurring, high-volume work that platform teams manage every day.
Now available AWS Transform – continuous modernization (preview) is available today. You can get started through the AWS Transform web application, via the AWS Transform Kiro Power, or through MCP and skills for integration with your existing coding agents. To learn more, visit the AWS Transform documentation.
In my last Week in Review post, I shared what I’d been hearing from customers in the AI-Driven Development Lifecycle (AI-DLC) workshops I’ve been delivering. Last week I was back at it, this time in Denver for a two-day AI-DLC workshop, where I helped facilitate 17 teams to deliver nearly 20 separate use cases in just two days. The pace of acceleration that AI-DLC unlocks—especially when paired with tools like Claude Code on Amazon Bedrock—is fundamentally changing how businesses operate. Traditional roles within software development teams are collapsing into smaller, AI-augmented squads, and the paradigm shift is beginning to take place right in front of us. To learn more about how to utilize various AI tools, visit the GitHub repository of AI-DLC workflow.
This shift is also reshaping how AWS account teams (solutions architects, customer solutions managers, and technical account managers) collaborate with customers. It’s becoming less about handing off advisory design documents and more about building alongside them in real time. It’s a genuinely exciting moment to be in the middle of the change, and this week’s headline launch — Anthropic’s most capable model yet, now on AWS — is going to push that pace even further.
Now, let’s get into this week’s AWS news…
Headlines Claude Opus 4.8 on AWS — Anthropic’s most capable generally available model is now accessible through both Amazon Bedrock and the Claude Platform on AWS. Opus 4.8 is built for agentic coding, knowledge work, and extended autonomous task execution — it sustains longer autonomous sessions with deeper reasoning, recovers from errors, and synthesizes information across lengthy documents. For coding workloads, it reads codebases like an engineer, plans before it edits, and holds context across long sessions. On Amazon Bedrock, you get AWS-managed features like Guardrails, Knowledge Bases, and data residency; on the Claude Platform on AWS, you get Anthropic’s native APIs unified with AWS billing. To learn more, visit the deep-dive blog post.
Last week’s launches Here are some launches and updates from this past week that caught my attention:
Introducing the next generation of AWS Resilience Hub — A reimagined Resilience Hub gives SREs and developers a unified framework to define resilience standards, evaluate applications against them, and demonstrate compliance across an entire portfolio. It introduces modular resilience policies (covering service-level objectives (SLOs), multi-AZ/Region DR, and data recovery), business-oriented application modeling, generative AI-powered assessments aligned with the Well-Architected and Resilience Analysis Frameworks, and automatic dependency discovery via DNS query log analysis. Integration with AWS Organizations enables organization-wide resilience management from a single delegated administrator account.
Introducing the next generation of Amazon OpenSearch Serverless for building agentic AI applications — Amazon OpenSearch Serverless is now a fully managed search and vector engine purpose-built for agentic AI applications. It scales from zero to thousands of requests per second—roughly 20x faster than the prior generation—delivers up to 60% cost savings versus peak-provisioned clusters, and adds GPU acceleration plus new SEARCH and VECTORSEARCH collection types. Native integrations with Vercel, Kiro, Claude Code, and Cursor through OpenSearch Agent Skills make it straightforward to plug into your agent stack.
New assessment capabilities in AWS Transform — AWS Transform expands with new tools to help you build migration business cases and evaluate TCO before moving workloads to AWS. You can ingest data from RVTools exports, CMDB data, the AWS Transform discovery tool, and third-party discovery tools, then run what-if scenarios across region, utilization, and service mapping for EC2, FSx, S3, SQL Server on EC2, and virtual desktops. The release also adds Agentic Readiness Analysis (ARA) and Modernization Analysis (MODA), which scan code repositories in 5 to 30 minutes per repo to surface severity-tagged findings with file-level evidence and AWS-mapped remediation guidance.
Amazon Aurora MySQL with Kiro Powers — Aurora MySQL now integrates with Kiro Powers, drawing from a curated repository of pre-packaged MCP servers, steering files, and hooks validated by Kiro partners. Developers can execute both data plane tasks (queries, schema management) and control plane tasks (cluster management) in natural language, with dynamic guidance for Aurora MySQL Serverless scaling, RDS-to-Aurora migration, and replication setup. The companion Database Blog post explains how the agent produces the API calls, SQL, and configuration for you to review and run — available via one-click install from the Kiro IDE or webpage.
Amazon WorkSpaces Applications now supports Windows Desktop OS — You can now bring your own Windows Desktop licenses to Amazon WorkSpaces Applications and stream full Windows desktops and applications from AWS-hosted dedicated hardware. BYOL eliminates OS fees (you pay only for compute and streaming infrastructure), supports eligible Microsoft 365 Apps for enterprise, and gives users a matching experience between local and remote environments — same workflows, shortcuts, and navigation in both.
For a full list of AWS announcements, be sure to keep an eye on the What’s New with AWS page.
Other AWS news Here are some additional posts and resources that you might find interesting:
Meet our newest AWS Heroes — May 2026 — An AWS Builder Center post introducing the latest cohort of AWS Heroes recognized for their contributions to the global AWS community.
AI-native, full-stack web apps with Vercel and AWS databases — Database blog post on the new Vercel and AWS Databases integration, which lets you provision Aurora PostgreSQL, DynamoDB, or Aurora DSQL directly from the Vercel dashboard or via v0. The post also highlights the H0 hackathon with $160,000 in prizes for building full-stack apps on this stack.
For Java applications, modern JVMs like Amazon Corretto and OpenJDK are highly optimized for Arm64 and modern applications that are pure Java often require zero changes to run on Graviton. In many cases, applications aren’t fully modernized or purely Java and have a range of dependencies. When you’re responsible for migrating workloads, it’s helpful to use a systematic approach that surfaces issues, proposes solutions, and does the transformation work for you at scale.
That’s why we built the Java x86 to Graviton Migration transformation for AWS Transform custom (ATX). This is an AI-powered agent that analyzes your Java codebase, creates a migration plan, and executes the transformation—complete with version-controlled commits at every step. With ATX you can efficiently assess hundreds of Java applications simultaneously and quickly learn which applications require no changes and which ones need modifications. This streamlines the process of estimating the scope of effort, while also having suggested code updates before you even start.
ATX is available as a Kiro power, a VS Code extension, and an Agent Skill if you’d like to use it directly within other AI assistants to reduce context switching. While we will be using ATX to highlight how you can rapidly accelerate a Graviton migration, we have also published an open source Graviton universal skill based on the Agent Skills open standard so that you have the flexibility to use the skill natively within Kiro, Claude Code, Codex, or the platform of your choice.
AWS Graviton processors, based on the Arm64 architecture, can provide up to 40% better price performance over comparable x86-based instances for a wide variety of workloads. Now customers can use AI tools to quickly migrate workloads to Graviton.
The Java x86 to Graviton migration transformation
At a high level, we recommend customers finish any major version Java updates prior to migrating to Graviton and there’s a separate Java Version Upgrade transformation available for this use case. The Java x86 to Graviton Migration transformation requires a minimum of Java 8 and won’t incorporate Java version updates into the code changes.
The Java x86 to Graviton Migration completes multiple steps with work divided across multiple AI agents within the AWS Transform service, covering things like:
Dependency updates – Updates libraries to versions with Arm64 support
Build configuration – Modifies Maven/Gradle configs for multi-architecture builds
Architecture-specific code – Refactors hard-coded x86 assumptions
Unit Test – Verifies compatibility at runtime given unit tests are in the project
Documentation – Creates migration notes and runbooks for your team
The agent automatically detects your Java version, manages runtime switching as needed during analysis, and handles much of the environment complexity for you such as multi-module project detection or Maven or Gradle auto-detection. Transformation completion times vary, but for many applications you can expect it to take roughly an hour (ATX works well with repos under 300K lines of code).
In this post, we:
Walk through the requirements for running the Java x86 to Graviton Migration transformation.
Help you familiarize yourself with ATX using a single Java application with Interactive Mode
Outline how to assess Graviton compatibility across the Java applications that you want to migrate to Graviton in a single batch and summarize the results with Campaign Mode.
By the end, you should have a good idea of how Java x86 to Graviton Migration transformation functions and have a summary of the expected code changes and dependency updates needed for each of your Java applications, along with version-controlled code updates.
Graviton transformation requirement
The Java x86 to Graviton migration transformation should run on an Arm64 machine.
The agent doesn’t just read your code, it builds, loads native libraries, and validates your application’s runtime behavior on Arm64. If you run the transformation on an x86 machine, the agent can identify compatibility issues but can’t execute build validation or run tests.
If you try to run on x86, you will see the following error message:
⚠  This transformation requires Arm64 architecture.
Detected: x86_64
Please run ATX on an Arm64 environment. See documentation for options.
To get started you need a Graviton instance or Apple Mac laptop running Arm64 with the ATX CLI, build tools, and Java JDKs that your project requires. The project source code should also be loaded locally onto the machine running the ATX CLI. Because Apple silicon is Arm64-based, it’s possible to build, load, and verify Arm64 based dependencies for a quick proof-of-concept. However, we recommend running the transformation in an environment that reflects what you plan to deploy in production to surface any potential OS level incompatibilities.
Requirements
Requirement
Details
AWS Transform custom permissions
AWS Identity and Access Management (IAM) policies for the Transform service (see Authentication docs)
Arm64 execution environment
Amazon Elastic Compute Cloud (Amazon EC2) Graviton instance or Apple Silicon Mac. Running on x86 limits validation to static analysis only. Phase 3 (build/test) requires Arm64.
Node.js 20+
Required by the AWS Transform CLI. Use the official installer at nodejs.org/en/download. Package managers (dnf, yum) can install an older version.
Git
AWS Transform custom uses local Git for version control during the transformation.
AWS Transform CLI
Installed using the setup script (see Client Setup for the curl command).
Java build tooling
A JDK (Arm64 build, e.g. Amazon Corretto or OpenJDK), Maven and/or Gradle as required by the target project. These are not optional for Java transformations. The agent needs them for dependency analysis, native library scanning, and build validation.
Running the Graviton transformation with Interactive Mode
With your code on an Arm64 environment and all the prerequisites for the transformation, we can begin the transformation.
Step 1: Navigate to Your Project and create or clone a git repo
cd /home/developer/workspace # Docker
# or
cd ~/workspace # AMI
git init
We recommend not pointing to the main branch of the repository of your application. You can work in a local git environment or create a separate branch. ATX needs the ability to commit changes as it iteratively transforms your code. The final decision on which commits are pushed is up to the developer.
Step 2: Launch ATX Interactive Mode
Enter the following command to launch ATX interactive mode.
atx
ATX starts in interactive mode:
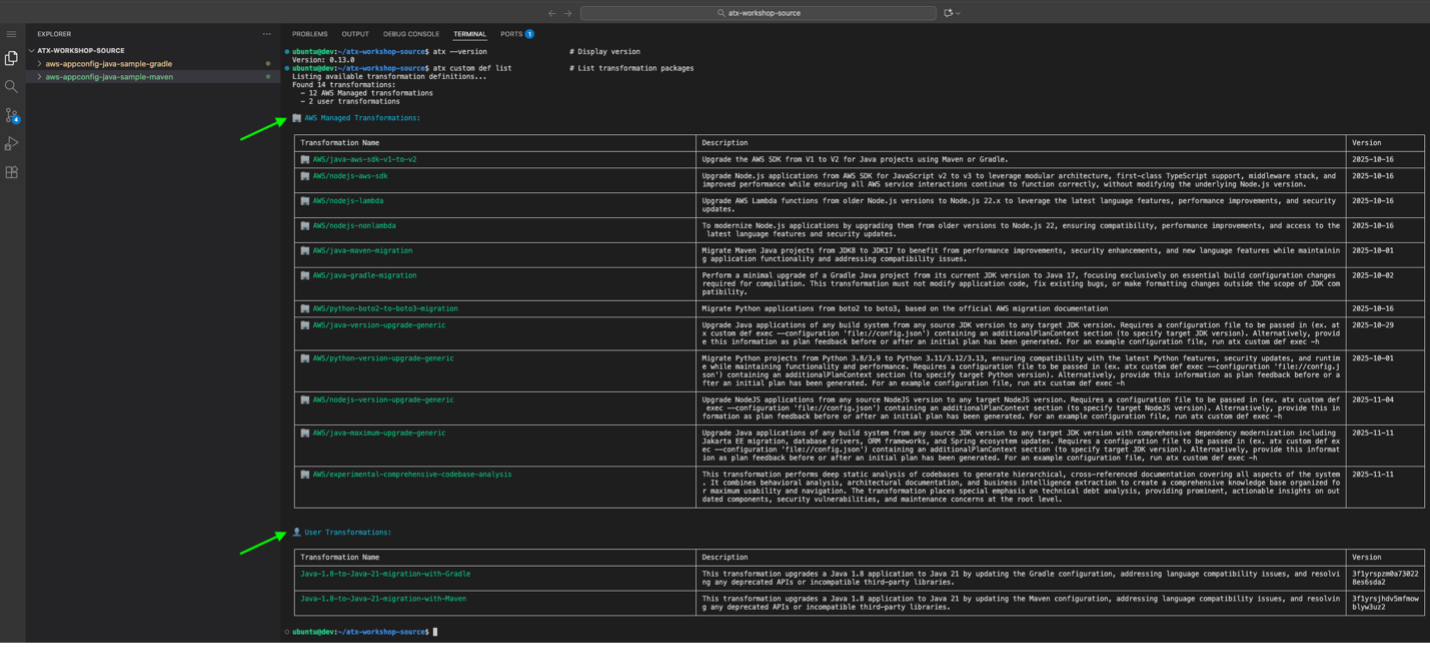
To view available transformations, in a separate terminal enter:
atx custom def list > custom_list.txt
The AWS Managed transformations will be listed first, followed by User-created transformations that you’ve developed.
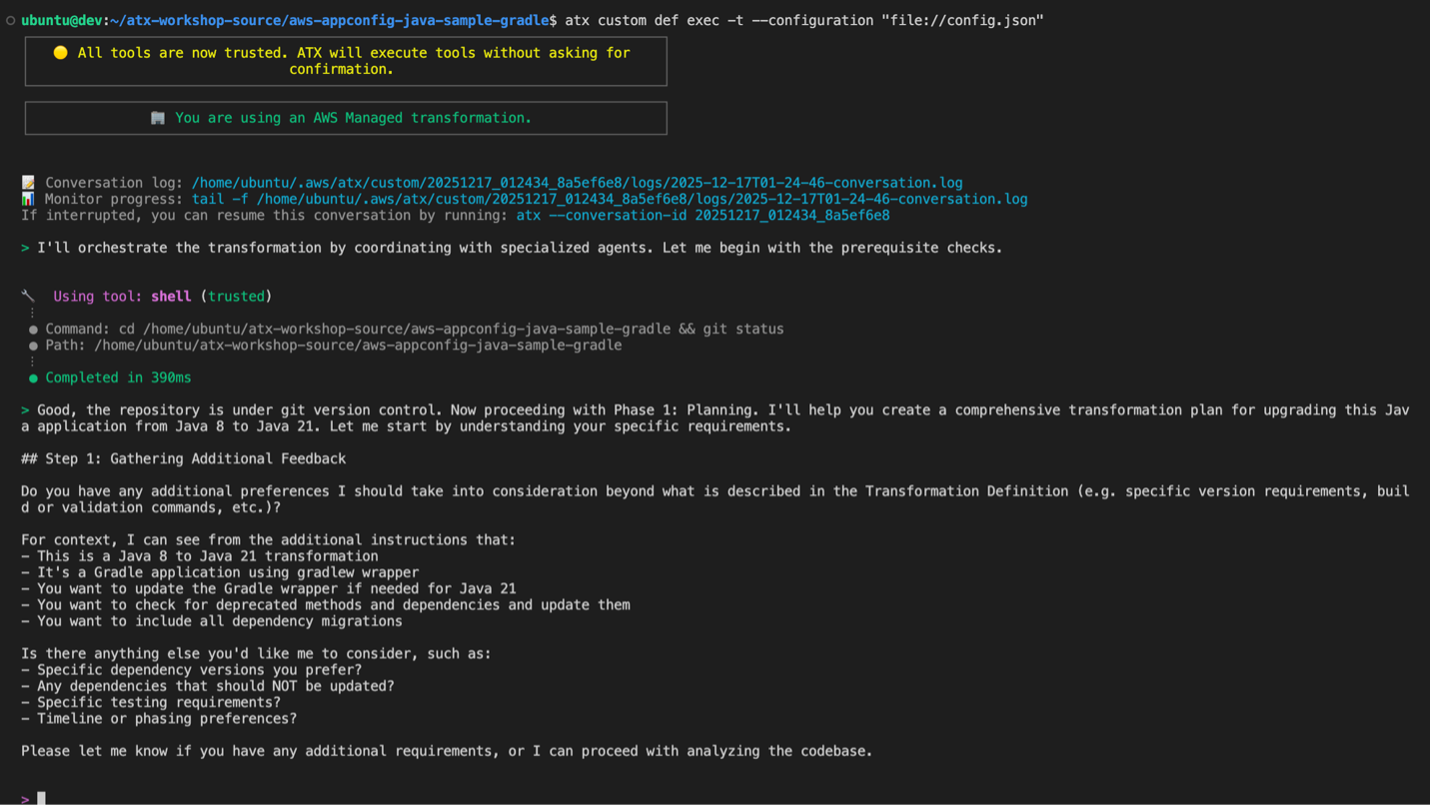
ATX will prompt you for next steps and your project details:
> Would you like to:+ c to abort or provide feedback)
1. View the entire transformation definition
2. View specific sections of the transformation definition
3. Apply this transformation to your code
4. Modify this transformation
> 3
> What is the file system path to the code repository where you want to apply this transformation?
> .
Note that because this is an AWS Managed Transformation, you can’t view the complete transformation definition or modify it. However, you can provide additional context customized to your use case. Keep in mind that the Transformation won’t make permanent changes to your code through the transformation process.
Step 4: Provide additional context
ATX might ask clarifying questions to tailor the transformation:
ATX presents a detailed plan before making changes:
═══════════════════════════════════════════════════════════════
                    MIGRATION PLAN
═══════════════════════════════════════════════════════════════

I've analyzed your project and here's what I'll do:

PHASE 1: Dependency Updates (12 changes)
────────────────────────────────────────
 • Update netty-transport-native-epoll 4.1.85 → 4.1.100
   Reason: Arm64 support added in 4.1.94

 • Update snappy-java 1.1.8.4 → 1.1.10.5
   Reason: Current version lacks Arm64 native binaries

 • Update lz4-java 1.7.1 → 1.8.0
   Reason: Arm64 optimization improvements

 • ... (9 more dependency updates)

PHASE 2: Build Configuration (3 changes)
────────────────────────────────────────
 • Add Arm64 classifier to native dependency declarations
 • Configure multi-architecture Docker build
 • Add Graviton-optimized JVM flags to startup scripts

PHASE 3: Code Modifications (2 changes)
────────────────────────────────────────
 • Refactor ProcessorArchitecture.java
   Current: Hard-coded x86_64 assumption
   Change: Add Arm64 detection logic

 • Update NativeLibraryLoader.java
   Current: Loads x86-specific .so files
   Change: Architecture-aware library loading

PHASE 4: Testing & Validation
────────────────────────────────────────
 • Run build and tests on Arm64
 • Generate migration report and documentation

═══════════════════════════════════════════════════════════════

? How would you like to proceed?
  ❯ Execute the full plan
    Execute phase by phase (review each)
    Modify the plan
    Ask questions about the plan
    Export plan and exit
Step 7: Ask questions, request changes
This is your chance to understand and adjust:
? Ask questions about the plan:

You: Why are you updating netty to 4.1.100?

ATX: Good concern. Netty 4.1.94 was the first version with Arm64
     native transport support, which is required for optimal
     performance on Graviton.

     However, I can adjust this:

     Option 1: Use 4.1.94 (minimum Arm64 support)
     Option 2: Use 4.1.97 (includes Arm64 bug fixes)
     Option 3: Keep 4.1.100 (latest stable with Arm64)

     Which would you prefer?

You: Let's go with 4.1.100.
Step 8: Execute the Transformation
When you’re ready:
? How would you like to proceed?
  ❯ Execute the full plan

Starting transformation...

Phase 1: Dependency Updates
───────────────────────────
[1/12] Updating netty-transport-native-epoll...
       ✓ Modified pom.xml
       ✓ Committed: "chore(deps): update netty to 4.1.97 for Arm64 support"

[2/12] Updating snappy-java...
       ✓ Modified pom.xml
       ✓ Committed: "chore(deps): update snappy-java to 1.1.10.5 for Arm64"

... (progress continues)

Phase 2: Build Configuration
───────────────────────────
[1/3] Adding Arm64 classifiers...
      ✓ Modified pom.xml
      ✓ Committed: "build: add Arm64 native classifiers"

... (progress continues)

Phase 3: Code Modifications
───────────────────────────
[1/2] Refactoring ProcessorArchitecture.java...
      ✓ Modified src/main/java/com/example/util/ProcessorArchitecture.java
      ✓ Committed: "feat: add Arm64 architecture detection"

... (progress continues)

Phase 4: Validation
───────────────────
Running build... ✓
Running tests... ✓ (847 passed, 0 failed)

═══════════════════════════════════════════════════════════════
                 TRANSFORMATION COMPLETE
═══════════════════════════════════════════════════════════════

Summary:
 • 17 files modified
 • 3 files created
 • 14 commits made
 • All tests passing

Generated Artifacts:
 • GRAVITON_MIGRATION_REPORT.html  - Full migration report
 • MIGRATION_RUNBOOK.md            - Deployment guide for your team
 • commit-log.txt                  - All commits with descriptions

Your code is now Graviton-ready!
Each commit is atomic and revertible. If something doesn’t work, you can git revert specific changes.
Migration report
A comprehensive markdown report covering:
What was changed and why
Dependencies that were updated
Code modifications with before and after diffs
Performance optimization recommendations
Migration runbook
A deployment guide for your team:
Pre-deployment checklist
JVM flags designed for Graviton
Monitoring and rollback procedures
Additional resources on migrating to Graviton on an infrastructure level can be found in the Transition Guide.
Assessing Graviton compatibility for multiple Java applications with Campaign Mode
When you’re ready to start migrating multiple applications, you might want to opt for an automated process that removes the manual effort of going back and forth with the transformation agent after each transformation step with campaign mode. The following command allows ATX CLI to go through a full transformation that you can check back in with after it’s completed. This limits the additional customization and context that you might want to provide the agent.
As mentioned in the first step of running a Graviton Transformation, the environment that the code is transformed in and decision of which commits are pulled into the main repo is up to the developer. Running in campaign mode across several applications doesn’t require accepting and pushing code changes. Therefore, this automated method is most useful when you want to gauge a high-level overview of effort required to migrate across several or even hundreds of applications.
This command can be added into scripts, allowing further automations to be built into continuous integration and delivery (CI/CD) pipelines or scaling transformation jobs across several repos without manually entering prompts as previously shown through interactive mode.
The status of transformations running with campaign mode will be displayed in the AWS Transform Web UI. Setting up the Web UI is a prerequisite to running a transformation in campaign mode.
In addition to this view, if you run the transformation across multiple applications, you can generate a consolidated dashboard with an agent of your choice. Gather the transformation results into a centralized directory, then use the following prompt for example:
Analyze all Java application Graviton transformation summaries in <directory>/<path>/ and create a comprehensive dashboard that includes:

1. Executive summary with key metrics (total apps, compatibility rate, code changes required)
2. Application summary table with columns: Application name, Type, Java version, Dependencies count, Code changes, Compatibility %, Status
3. Code changes analysis - which apps needed changes and why
4. Dependency transformation analysis - common dependencies and their ARM64 status, any upgrades required
5. Native library analysis - which apps use native libs and their compatibility
6. Performance expectations - JWT/crypto improvements, general performance gains, cost-performance ratios
7. JVM optimization patterns - common flags used across applications
8. Build system patterns - Maven/Gradle usage, Docker multi-arch support
9. Test results summary - pass/fail rates, pre-existing vs ARM64 issues
10. Common libraries requiring changes (or note if none)
11. Deployment readiness assessment
12. Risk assessment with mitigation strategies
13. Migration recommendations with phased approach
14. Documentation summary - total docs created and their coverage

Read graviton-validation/00-summary.md from each application subdirectory. Consolidate findings into a single comprehensive markdown dashboard with tables, metrics, and actionable insights.

Focus on: compatibility rates, code change requirements, dependency issues, performance expectations, and migration readiness.
Keep in mind that agents might output outcomes of the migration that aren’t sourced from the transformation summaries. As a result, we recommend that you use the summary as a high-level estimate of the technical effort required for migrating to Graviton.
Conclusion
The AWS Transform custom Java x86 to Graviton Migration transformation alleviates the guesswork in Graviton migrations by using AI for dependency analysis, compatibility assessment, code refactoring, and runtime validation. Development teams can evaluate hundreds of Java applications simultaneously, with each transformation providing atomic version-controlled commits for straightforward rollback and clear change tracking. The tool offers two modes: 1) interactive mode for hands-on, application-by-application migration with developer review at each step, or 2) campaign mode for automated assessment across multiple applications. ATX converts unknown Graviton migration effort into defined requirements through automated compilation and runtime testing. This provides a more efficient way to evaluate workload compatibility and migrate to Graviton.
The Java x86 to Graviton Migration transformation is one of a range of pre-built AWS Managed Transformations but you can also create custom transformations unique to your own use case that can be scaled to drive migrations across your organization. Learn more on the AWS Transform custom website or documentation.
In 12 months, thousands of customers migrated hundreds of thousands of servers, saved 1.6+ million hours, and processed 4.5+ billion lines of code with AWS Transform. Celebrating its 1-year anniversary, AWS Transform agents now available in Kiro, Claude, Cursor, and Codex, including the agent builder toolkit Kiro power for building customized transformation agents.
To learn what happened in 12 months, the four things we learned, and how that evolved our roadmap, visit the one-year anniversary blog post.
Last week’s launches Here are last week’s launches that caught my attention:
The general availability of Claude Platform on AWS – You can get direct access to Anthropic’s native Claude Platform experience, including APIs, console, and early-access beta features, directly through your existing AWS account, without managing separate accounts, billing, or tracking. Claude Platform on AWS is operated by Anthropic, and customer data is processed outside the AWS security boundary. To learn more, visit the deep dive blog post.
Amazon EC2 M3 Ultra Mac instances – These instances are built on Apple M3 Ultra Mac Studio computers featuring a 28-core CPU, 60-core GPU, 32-core Neural Engine, and 256GB of unified memory. Compared to EC2 M4 Max Mac instances, M3 Ultra Mac instances provide 2x the unified memory, 1.75x the CPU cores, 1.5x the GPU cores, and 2x the Neural Engine cores, giving Apple developers the headroom to run significantly more Xcode simulators in parallel and accelerate on-device ML workflows to improve product time to market.
Amazon Redshift RG instances powered by AWS Graviton – These instances deliver better performance, running data warehouse and data lake workloads up to 2.4x as fast as previous generation RA3 instances, at 30% lower price per vCPU. RG instances include Redshift’s custom-built vectorized data lake query engine that processes Apache Iceberg and Parquet data on your cluster nodes.
Amazon Bedrock Advanced Prompt Optimization – You can optimize your prompts for any model on Bedrock, while comparing your original prompts to your optimized prompts across up to 5 models simultaneously. You can also use this if you are migrating to a new model or just want to get better performance on your current model.
AWS Security Agent full repository code scanning (preview) – You can use a new capability in AWS Security Agent that performs deep, context-aware security analysis of your entire codebase. When vulnerabilities are found, the scanner generates code remediation—specific fixes tied to the exact file and line—enabling teams to remediate security vulnerabilities faster than ever before. This capability is available at no additional charge for existing AWS Security Agent customers during the preview.
AWS Interconnect – multicloud connectivity with Oracle Cloud Infrastructure (preview) – You can quickly provision resilient, scalable private connections to other cloud providers using AWS Interconnect – multicloud connectivity. OCI is the latest CSP to adopt the open specification that powers AWS Interconnect. This allows AWS to provide a consistent, simple experience to our customers on OCI (preview), Google Cloud (generally available), and Microsoft Azure (coming later in 2026).
Additional updates Here are some additional news items that you might find interesting:
Accelerate AI research and education with Build on Trainium program – Read how the next generation of AI researchers is using Amazon chips to accelerate discovery. AWS invested $110 million to give university researchers access to purpose-built AI chips. AWS Trainium is speeding up AI research at UC Berkeley, MIT, Carnegie Mellon, and more. All research is open source, meaning improvements flow back to the broader developer community.
A full list of AWS Community Days 2026 – There’s something different about an event where the speakers are your peers, the organizers are volunteers who do this out of passion, and the agenda was shaped by the community itself. That’s exactly what AWS Community Days are, and they’re happening in cities across every continent, every year.
The Kiro Startups Credit program is back – Thousands of founders applied in the first round, and now applications are open again. Apply to receive up to one year of Kiro Pro+ credits automatically applied to your organization’s AWS account.
For a full list of AWS blog posts, be sure to keep an eye on the AWS Blogs page.
Learn how AWS Transform custom can help migrate Excel VBA applications to modern Python code while overcoming context window limitations, preserving functional equivalence, and enabling cloud-native deployment—turning weeks of manual rewriting into hours of AI-guided transformation.
Introduction
Many organizations maintain dozens of Excel VBA applications built over decades, containing business-critical logic trapped in workbooks—budget planning tools, demand planning, inventory management, financial modeling, and engineering calculations. Manual migration typically costs thousands of dollars per workbook and takes weeks, while traditional AI tools fail on large codebases that exceed context windows.
This post demonstrates how you can migrate VBA to Python using AWS Transform custom, addressing three key challenges: processing large codebases through intelligent chunking, converting legacy code to maintainable Python while preserving functionality, and validating equivalence through automated testing. You can reuse the transformation across similar projects or apply it to entire portfolios.
With AWS Transform custom, you can accelerate migration timelines, eliminate transcription errors, and scale from single applications to enterprise portfolios.
Solution Overview
The following diagram illustrates how AWS Transform custom migrates VBA source code to Python output through a four-step process powered by an AI agentic system.
Figure1:AWS Transform custom VBA to Python migration architecture
AWS Transform custom provides an interactive workflow where you describe your migration requirements. The system interprets your intent and iteratively refines the transformation definition until it meets your specifications. As the system processes your code, it improves the quality of each subsequent run. Once you finalize a transformation, you can publish it to a registry so your team can reuse it across multiple projects without starting from scratch.
Migration Approach
The migration follows a three-phase process that takes you from defining your transformation through execution and validation and finally scaling across your portfolio.
In the first phase, transformation definition creation, you start an interactive session with AWS Transform custom to describe your migration requirements. You can reference your VBA code, API documentation, and target framework guides as context. The system uses these inputs to automatically generate transformation rules and patterns, which you can iteratively refine through build validation until the definition accurately captures your migration logic.
In the second phase, execution and validation, AWS Transform custom applies the transformation to your codebase. It intelligently chunks large codebases into logical modules and processes them in dependency-aware order, so cross-module references remain intact. Throughout execution, the system continuously validates builds and tests, automatically detecting and correcting errors as they arise.
In the third phase, scale and reuse, you publish your finalized transformation to the registry, making it available for your team to apply across similar projects. You can run campaign-based bulk executions across multiple repositories, extract knowledge items for continuous improvement, and integrate the transformation into your CI/CD pipelines.
Key capabilities
AWS Transform custom addresses the core challenges you face when migrating large VBA codebases to Python.
For context window management, the system automatically segments your codebase into logical modules, tracks cross-module dependencies, preserves interface contracts across chunks, and maintains state throughout the transformation. This means you can process codebases that far exceed standard AI context window limits without losing coherence between modules.
For intelligent code restructuring, AWS Transform custom recognizes VBA idioms and maps them to Python equivalents. It refactors procedural code into object-oriented designs, replaces Windows-specific APIs with cross-platform libraries, and applies proper encapsulation and separation of concerns. The result is a clean, maintainable Python that follows modern coding standards.
For functional equivalence preservation, the system generates automated tests based on the original VBA behavior and runs regression testing after each transformation step. It benchmarks performance metrics such as timing and resource usage and validates edge cases to confirm that your transformed Python code produces the same results as the original VBA application.
Prerequisites
Before you begin, you need an AWS account with the appropriate permissions to use AWS Transform custom. Start by configuring authentication and setting up the AWS CLI for your environment.
VBA application source code (Excel workbook with macros or exported .bas files)
Git repository initialized in source directory
Build/test commands defined (if applicable)
Target Environment Setup (for Python migration)
Python 3.8 or higher installed
Virtual environment tool (venv or virtualenv)
Target framework dependencies (e.g., pygame for game applications, tkinter/PyQt6 for GUI, pandas for data processing, openpyxl for spreadsheet operations)
Walkthrough: VBA to Python Migration
Figure2:AWS Transform custom CLI executing a VBA to Python transformation
Step 1: Prepare Your VBA Application
Initialize Git Repository
AWS Transform Custom requires your code to be in a Git repository. If your code isn’t already in Git:
Figure3:AWS Transform custom interactive session with migration context
When you start the interactive session, provide a natural language description of your migration goal, such as “Migrate VBA application to Python.” Specify the target framework you want to use, for example, pygame for GUI applications or pandas for data processing. You should also include document references to give the system the context it needs — this includes your VBA code files, Python framework documentation, and any API migration guides relevant to your project.
Example conversation:
User: I want to migrate a VBA application to Python. AWS Transform: I’ll help you create a transformation definition. Let me analyze the VBA patterns and generate Python equivalents…
Define Scope and Entry Criteria
Before creating your transformation, review your existing codebase to understand its structure, patterns, and dependencies. Identify the code type and technology stack you are working with, such as an Excel VBA game that uses Windows API calls. Check the transformation registry for existing similar transformations to avoid duplicating work. From there, define a clear objective and scope for your transformation, and document the entry criteria that determine what code qualifies. Outline detailed implementation steps with specific technical mappings, establish validation and exit criteria for measuring success, and name your transformation appropriately so your team can discover and reuse it.
Iterative Refinement
After you provide your migration context, AWS Transform custom generates an initial transformation definition.You can review this definition at: ~/.aws/atx/custom/<session-id>/artifacts/tp-staging/transformation_definition.md.
Examine the generated rules and provide feedback on patterns, edge cases, or missing scenarios. AWS Transform custom incorporates your feedback and regenerates the definition, allowing you to iterate until the transformation accurately captures your migration logic.
Key Patterns to Address
During the transformation definition process, you should account for the common patterns that differ between VBA and Python. AWS Transform custom maps VBA ColorIndex values to standard RGB tuples and converts Range objects to Python data structures such as lists and arrays. Do While loops in VBA translate to event-driven loops in Python. The transformation replaces Windows API calls with cross-platform libraries that provide portable alternatives. VBA UserForms map to Python GUI frameworks like tkinter or PyQt6, where form controls become Python widgets. VBA Property Get/Let constructs convert to Python @property and @setter decorators. Finally, VBA’s 1-based array indexing must be adjusted to Python’s 0-based indexing throughout your codebase.
When you run the transformation, AWS Transform custom begins with agent planning. It analyzes your codebase structure, identifies all VBA components and their dependencies, and generates a step-by-step transformation plan with logical ordering — for example, data models first, then business logic, then UI. Each step in the plan has a clear scope and validation criteria.
Next, the system performs automatic code chunking. It analyzes your codebase size and complexity, then segments the code into logical modules such as constants, game logic, rendering, and controller. These chunks are processed in dependency order based on the plan, and the system manages the context window by focusing on one module at a time.
Throughout execution, AWS Transform custom tracks dependencies by mapping relationships between VBA subroutines, verifying that dependent code references remain valid, and maintaining interface contracts across modules.
The transformation proceeds incrementally, converting one module at a time. After each module is transformed, the system validates the build. If a failure occurs, it automatically rolls back and retries the transformation for that module before moving on.
Sample Output:
Analyzing codebase structure...
Identified 4 logical modules: constants, core_logic, rendering, main_controller
Transforming module 1/4: constants
 - Converting VBA Enums to Python IntEnum
 - Mapping ColorIndex values to RGB tuples
 - Generating color constants
 ✓ Build validation passed
Transforming module 2/4: core_logic
 - Converting collision detection subroutines
 - Refactoring global variables to class attributes
 - Translating VBA arrays to Python lists
 ✓ Build validation passed
Transforming module 3/4: rendering
 - Replacing Range object manipulation with pygame rendering
 - Converting cell-based drawing to pixel-based graphics
 - Implementing screen update logic
 ✓ Build validation passed
Transforming module 4/4: main_controller
 - Converting Do While loop to pygame event loop
 - Replacing GetAsyncKeyState with pygame.event.get()
 - Implementing game state management
 ✓ Build validation passed
Transformation complete! Generated 5 Python modules.
Review Transformed Code
After the transformation completes, check the generated Python files to verify the output. You can review the transformation logs at ~/.aws/atx/custom/<conversation-id>/logs/ to understand the decisions the system made during each step. Examine the build validation results to confirm that the transformed code compiles and passes all checks.
Step 4: Validate Functional Equivalence
Automated Test Generation
AWS Transform generates validation tests based on original VBA behavior:
test_validation.py – Verifies core logic:
# Example generated test (conceptual)
def test_collision_detection():
 """Verify collision logic matches VBA behavior"""
 # Test cases extracted from VBA code analysis

def test_scoring_calculation():
 """Ensure scoring algorithm is preserved"""

def test_state_transitions():
 """Validate game state changes"""
As you refine your transformation, you may encounter a few common issues. Here is how you can address them and provide feedback to AWS Transform custom.
Timing and performance differences can occur when the Python application runs faster or slower than the VBA original. To fix this, adjust timing constants and frame rate limiters. For example, if you notice the game runs too fast because VBA used Sleep(500) for piece drops, you can provide that feedback. AWS Transform custom corrects this by replacing time.sleep() with pygame.time.Clock.tick(60).
Color rendering mismatches happen when colors in the Python output don’t match the VBA version. This is typically caused by incorrect RGB mappings for VBA ColorIndex values. If you notice that ColorIndex 3 should be pure red (255,0,0) but is showing as dark red, provide that feedback. AWS Transform custom updates the COLOR_MAP dictionary with accurate RGB values.
Collision detection bugs may appear when pieces move through walls or other pieces. This requires refining boundary checking and collision logic. For instance, if rotation near walls allows pieces to go out of bounds, you can report this issue. AWS Transform custom adds boundary validation before rotation commits to resolve it.
Continual learning in action
Each time you provide a correction, AWS Transform custom captures it as a knowledge item. Future transformations automatically incorporate these fixes, so the same issues don’t recur. With each execution, the system improves quality for similar migrations across your portfolio.
By using AWS Transform custom, you can reduce tech debt and accelerate enterprise modernization at scale. The service supports diverse transformation use cases beyond VBA to Python, adapting to the specific needs of your codebase and target platform. With continual learning and improvement, each transformation builds on the corrections and knowledge items from previous runs, delivering higher quality results over time. Once you define a transformation, you can apply it everywhere — across similar projects, teams, and entire application portfolios — without recreating the migration logic from scratch.
Architecture Evolution
Before migration, your legacy VBA application is constrained to a Windows-only execution environment, tightly coupled to the Excel runtime. The code follows a procedural style with a global state, and testing and deployment are manual processes.
After migration with AWS Transform custom, your application follows a modular architecture with clean separation of concerns across constants, logic, rendering, and controller layers. The code uses object-oriented design with proper encapsulation and runs cross-platform on Windows, macOS, and Linux. The transformed application is cloud-ready, with a structure that supports containerization through Dockerfile generation, serverless adaptation with decoupled logic and rendering, and standard Python packaging through requirements.txt and setup.py. It also integrates with modern DevOps workflows, including automated testing with pytest, CI/CD pipeline compatibility, and version control through Git.
You can deploy the transformed application in several ways: containerized with Docker and Kubernetes for scalable web applications, serverless with AWS Lambda for event-driven processing, as a standalone desktop executable with PyInstaller, or as a web application with FastAPI or Flask wrappers for browser access.
The following screenshot shows the transformed Tetris application running as a Python pygame application.
Figure4:Transformed Tetris game running as a Python pygame application
Transformation definition creation
When creating your transformation definition, provide comprehensive context by including your VBA code, target framework documentation, and migration guides. Focus on documenting application behavior by describing what the application does functionally, not just its code structure. Identify platform-specific dependencies such as Windows APIs, Excel features, and ActiveX controls that require special handling during migration. Define clear success criteria including performance targets, functional requirements, and test coverage expectations. Be explicit about construct mappings in your transformation definition — the more specific you are, the more consistent the output.
Execution strategy
Start with a pilot project by testing your transformation on a smaller, representative application before applying it broadly. Validate incrementally by reviewing each module transformation before proceeding to the next. Capture corrections as feedback by documenting issues and fixes so the system can incorporate them through continual learning. Iterate on edge cases to refine the transformation for corner cases and error conditions that may not surface during initial runs.
Quality assurance
Generate comprehensive automated test suites from the original VBA behavior to verify functional equivalence. Run performance benchmarking to confirm that non-functional requirements match the original application. Conduct manual validation through user acceptance testing to verify UI and UX consistency. After any refinements, run the full test suite for regression prevention to ensure that fixes in one area haven’t introduced issues elsewhere.
Scaling across your portfolio
When you are ready to scale, categorize your applications by similarity — for example, data processing, UI-heavy, or calculation-focused workbooks. Create transformation variants with customized definitions for each category. Use campaigns for bulk execution to process multiple applications in parallel. Monitor and aggregate results across your portfolio to track success rates, identify common issues, and measure time savings.
Cleanup
Archive Conversation Logs
# Conversation logs are in ~/.aws/atx/custom/<conversation-id>/
# Archive for future reference before cleanup
tar -czf vba-migration-logs.tar.gz ~/.aws/atx/custom/<conversation-id>/
Remove Temporary Files
# Remove conversation data and transformation session artifacts (kept for 30 days automatically)
rm -rf ~/.aws/atx/custom/<conversation-id>

# Remove draft transformations (if not needed)
atx custom def delete --name "VBA-to-Python-Migration-Draft"
Manage Published Transformations
# List your transformations
atx custom def list

# Delete transformations no longer needed
atx custom def delete --name "VBA-to-Python-Migration-Old-Version"

# Update transformation tags for organization
atx custom def tag --transformation-name "VBA-to-Python-Migration" \
  --tags "team:platform-engineering,language:python,status:production"
In this post, you learned how AWS Transform custom can help you migrate Excel VBA applications to Python at scale. With AWS Transform custom, you can reduce weeks of manual migration work to hours. Intelligent chunking handles large codebases that exceed standard AI context window limits, while continuous validation and automated testing preserve functional equivalence throughout the process. Because transformations are reusable, and the system learns from each execution, you gain compound efficiency with every subsequent migration. The transformed applications are cloud-ready, supporting containerization, serverless deployment, and modern DevOps workflows.
AWS Transform custom is a strong fit when you are modernizing a portfolio of dozens or hundreds of similar legacy applications, when functional equivalence must be guaranteed for quality-critical migrations, or when you have repeatable migration patterns across multiple projects.
Next Steps
The transformation demonstrated in this post — VBA to Python migration with context window management, automated restructuring, and functional validation — is a template you can apply to other modernization challenges, such as mainframe COBOL to Java, Progress ABL to Spring Boot, or .NET Framework to .NET Core. The principles remain consistent: intelligent code analysis, dependency-aware processing, continuous validation, and transformation reuse.
Modernizing applications by upgrading language runtimes, migrating SDKs, and refactoring frameworks is important for cloud adoption but can be labor-intensive at scale. Each repository requires analysis of dependencies and transformation needs; custom transformation logic must be built and validated, and changes are often executed sequentially across codebases. If you have hundreds of applications, this stretches timelines from months to years, while introducing inconsistency across your teams.
To address this, Amazon Web Services (AWS) provides a composable set of building blocks. AWS Transform custom enables reusable, CLI-driven code transformations for upgrading runtimes, SDKs, and frameworks consistently across large portfolios. Strands Agents provides a framework for building multi-agent systems that coordinate complex transformation workflows. Amazon Bedrock AgentCore delivers the managed runtime, memory, and observability to operate these agents reliably in production. Together, they replace manual, sequential modernization with an intelligent, automated approach that scales.
In this post, we show you how to combine these services to build a generative AI–powered, agentic modernization system that can automatically analyze application repositories, determine required changes, create missing transformations, and execute them in parallel at scale.
Solution overview
The solution uses an agentic architecture that separates intelligent decision-making from deterministic execution, enabling automation at scale while maintaining consistency and control. In this post, you will build an AI-driven application modernization system that demonstrates how multi-agent workflows can be applied to large-scale code transformation scenarios. You interact with the system through a React-based frontend or API interface, submitting individual repositories or batch workloads via CSV inputs. Requests are processed asynchronously through an API layer that invokes an orchestrator agent running on Amazon Bedrock AgentCore, which coordinates specialized agents to analyze codebases, identify transformation requirements, and manage execution workflows. Results are stored and surfaced through the interface, allowing users to track progress and review outputs in real time.The workflow begins with repository analysis, where the system inspects application codebases to identify languages, dependencies, and required upgrades such as runtime version changes or SDK migrations. Based on this analysis, the system maps each application to an existing transformation when available. If no suitable transformation exists, a creation agent dynamically generates one using natural language instructions and publishes it to a centralized registry for reuse, creating a continuously improving system where transformation coverage expands over time.
Once transformations are identified or created, an execution agent runs them at scale by invoking AWS Batch jobs that execute the AWS Transform custom CLI, enabling parallel processing across multiple repositories. The orchestrator coordinates all agents, maintains workflow state using Amazon Bedrock AgentCore Memory, and ensures reliable execution through structured task decomposition, tool invocation, and error handling. While the example focuses on application re-platforming, the same architectural pattern can be applied to other large-scale code analysis and automation workflows.
The following architecture diagram (Figure 1) illustrates the various components of our solution as outlined in this section:
Figure 1: AWS Transform custom Agentic Orchestration Architecture using Strands agents and Amazon Bedrock AgentCore
Enable access to a Bedrock model for the orchestrator in your deployment region. The default model can be configured through the Amazon Bedrock model access console. To use a different model, set `BEDROCK_MODEL_ID` in `deployment/config.env` before Step 3 and enable access to that model instead. Model access approval can take a few minutes in some accounts, so complete this step before deploying.
Dependencies
The Strands Agents implementation has the following dependencies that are packaged in the DockerFile:
Strands multi-agent framework: strands-agents
Strands agent tools and utilities: strands-agents-tools
HTTP library for API calls: requests
Amazon Bedrock AgentCore SDK: bedrock-agentcore
AWS SDK for Python: boto3
Deploy the solution
The solution is available for download on the GitHub repo. This post walks through the CDK + SAM deployment path (Option A in the repository README). The repository also includes a CDK-only option (Option B); see the repository README for details.
# Subnets must be public (auto-assign public IP enabled) or private with a NAT gateway so Fargate tasks can reach Amazon ECR, Amazon S3, and Git repositories.
Step 4: Deploy Strands Agents to AgentCore runtime using AWS SAM
cd ../sam./deploy.sh
# Invoke the deploy Lambda to create the AgentCore Runtime via the bedrock-agentcore-control SDK (takes 2-5 minutes)
VITE_API_ENDPOINT=$API_URL npx vite build./deploy-aws.sh
# This rebuilds the React application with the correct API endpoint, uploads it to Amazon S3, and invalidates the Amazon CloudFront distribution.
Step 7: Access the application
# After deployment completes, retrieve the CloudFront distribution URL from the AWS CloudFormation outputs and open it in your browser to access the application UI.
The UI exposes five tabs covering the complete modernization workflow: browsing available transformations, executing a transformation on a single repository, creating a new custom transformation with natural language, batch-processing a CSV of repositories, and tracking job status. This section walks through two of the most common flows.
Create a custom transformation from natural language
Open the Create Custom tab, describe the transformation in plain English (for example, “Upgrade Spring Boot 2 applications to Spring Boot 3”), and optionally provide a reference repository URL. The creation agent analyzes the source, generates a transformation definition, and publishes it to the ATX registry for reuse across the portfolio.
Figure 2: Describing a custom transformation in plain English. The form accepts a name, description, optional reference repository, and natural-language requirements.After submitting, the orchestrator clones the reference repository, analyzes the source, and generates a transformation definition tailored to the actual code patterns found in the codebase. This takes 1–5 minutes depending on repository size. The generated definition is then shown for review in the Jobs tab, where it can be edited before publishing to the ATX registry.
Figure 3: The AI-generated transformation definition shown for review in the Jobs tab. The agent analyzed the Flask codebase and produced a detailed definition covering routes, request handling, response patterns, and Blueprint architecture. The user can edit the definition in-place and click Publish to Registry when ready.Once published, the new transformation appears in the Transformations tab alongside AWS-managed transformations and can be executed the same way on any repository.
Run a batch of repositories from a CSV
Open the CSV Batch tab and upload a CSV listing repository URLs and target transformations. A sample `sample-batch.csv` is included in the repository at `agentic-atx-platform/ui/sample-batch.csv`. The preview shows the parsed rows before submission. On Submit All, each row becomes a separate AWS Batch job running in parallel, and the Jobs tab shows live status as repositories complete.
Figure 4: Uploading a batch of repositories for parallel processing. The CSV lists a source repository URL, target transformation, optional validation commands, and additional plan context per row. Each row becomes an independent AWS Batch job on submission.
Clean up
To avoid recurring charges, remove the resources after trying the solution.
Step 1: Delete the SAM Stack
sam delete --stack-name AtxAgentCoreSAM --region us-east-1 --no-prompts
Step 2: Delete the CDK Stacks
Remove the three CDK stacks in reverse order. The S3 buckets are configured with `autoDeleteObjects: true`, so CDK will empty them before deletion.
In this post, you learned how to build a generative AI–powered, agentic system for application modernization that can analyze application repositories, determine required code changes, create missing transformations, and execute those transformations at scale. By combining AWS Transform Custom for transformation execution with Amazon Bedrock AgentCore for orchestration, and Strands Agents for multi-agent coordination and AWS Transform container solution for parallel processing, this approach demonstrates how intelligent automation can be applied to large-scale code transformation workflows.
This solution directly addresses the challenges of traditional modernization approaches. It reduces manual effort by automating repository analysis and transformation mapping, eliminates gaps in transformation coverage by dynamically generating reusable transformations, and significantly improves scalability through parallel execution using AWS Batch.
By introducing a centralized, agent-driven workflow with built-in observability and state management, organizations can achieve faster, more consistent, and governed modernization across large application portfolios. To get started, deploy the solution in your AWS environment, test it with a sample repository or batch workload, and extend it by creating custom transformations tailored to your applications. You can further integrate this approach into your CI/CD pipelines to enable continuous modernization and accelerate your cloud migration initiatives.
About the authors
Kanishk Mahajan is Principal – AI/ML with AWS Professional Services. In this role, he leads GenAI and agentic transformations for some of AWS largest customers in Telco and Media & Entertaintment.
Sandeep Batchu is a Senior Security Architect at Amazon Web Services, with extensive experience in software engineering, solutions architecture, and cybersecurity. Passionate about bridging business outcomes with technological innovation, Sandeep guides customers through their cloud and generative AI journey, helping them design and implement secure, scalable, and resilient architectures in the era of AI-driven transformation.
Venugopalan Vasudeven (Venu) is a Principal Specialist Solutions Architect at AWS, where he leads Agentic AI initiatives focused on AWS Transform. He helps customers adopt and scale AI-powered developer and modernization solutions to accelerate innovation and business outcomes.
Enterprise modernization has reached an inflection point. You can transform one repository easily. Existing tools, including AWS Transform custom, work well for individual repositories, and the process is understood. But what about 50 repositories? 100? 200? When you need to modernize at enterprise scale, transforming code is only part of the challenge. Coordinating people, capturing knowledge, and maintaining quality across your entire portfolio are also important.
In this post, we explore how AWS Transform custom’sbulk automation capabilities address the enterprise coordination problem through intelligent learning and scaled execution. You will see how one customer reduced end-to-end modernization timelines from 7-12 weeks to 2.5 weeks, delivering a 3-5x reduction in delivery time and 10-20x reduction in total effort hours. Most importantly, you will learn how to start your own transformation journey immediately.
The Coordination Problem at Enterprise Scale
Ask any enterprise architect about their last major modernization initiative, and you will hear familiar stories. As an example, an enterprise software company needed to migrate a large legacy codebase to a modern platform. Their projection: 12 weeks of intensive work coordinating across multiple teams.
The code transformation itself took days. The remaining weeks were consumed by the end-to-end activities surrounding it: orchestrating teams across time zones, ensuring consistent patterns across codebases with different histories, and managing dependencies so upstream changes did not break downstream systems. Teams tracked status through meetings and spreadsheets and captured tribal knowledge that existed only in senior developer heads.
This is the enterprise coordination problem. When you scale from one repository to hundreds, coordination overhead explodes. Each additional repository adds not just its own complexity, but new integration points, edge cases, and unanticipated coordination requirements.
The Hidden 70% Gap
In enterprise engagements, we have observed that code transformation represents approximately 30% of the modernization effort. The remaining 70% include things like test generation, validation, comprehensive documentation, business analysis, and organizational coordination across hundreds of moving pieces.
This gap explains why productivity gains from transformation tools rarely materialize. The tools handle code changes, but organizations still struggle with coordination, validation, and knowledge capture. The transformation is completed quickly, but the project takes months.
Here is what we see: traditional approaches fail at enterprise scale because they treat each repository as an independent challenge. Teams repeat work across codebases, make inconsistent decisions, and lose learnings when developers move to different projects. Organizational knowledge remains trapped in individual heads rather than becoming reusable assets.
A New Approach to Enterprise Modernization
AWS Transform custom takes a different approach to enterprise modernization. Rather than repeating the same operation hundreds of times, the service learns from every execution and applies that knowledge to improve future transformations.
The Learn-Scale-Improve Flywheel
The workflow follows a deliberate progression designed to maximize learning while minimizing risk. It begins with a focused learn pilot, scales through bulk automation, and improves through deliberate review, creating a flywheel where each cycle produces better results than the last (Figure 1).
Figure 1: Learn Scale and Improve Flywheel for AWS Transform custom transformation
Learn — You start with two to three representative repositories and execute transformations in interactive mode. You work directly with the AI agent, providing feedback on decisions and validating quality at each step. When the agent encounters ambiguity, it asks questions. You provide guidance, and the system captures that context. At the end of the pilot, you review the feedback and modify the transformation definition. The result is a transformation definition enhanced with your organizational knowledge, ready to scale.
Scale — You shift to non-interactive mode for bulk execution. The system processes dozens or hundreds of repositories overnight without manual intervention, applying patterns learned during the pilot. It validates transformations using your build and test commands and tracks progress across your portfolio in real time. What previously required weeks of team coordination happens overnight. During execution, the system captures observations: new edge cases, unexpected patterns, and optimization opportunities the pilot did not encounter.
Improve — After each round of bulk execution, you review the knowledge items the system captured during processing. These observations surface patterns and edge cases specific to repositories the pilot did not cover. You approve the valuable learnings, and your transformation definition improves for the next iteration. This review step ensures quality control. The system does not self-modify. Transformation owners decide which learnings get incorporated.
The Scale-Improve cycle repeats. Each round of bulk execution generates insights that make the next round more effective. Transformation success rates increase, manual intervention decreases, and edge case handling improves with every iteration.
This flywheel transforms how enterprises capture and share institutional knowledge. Transformation definitions are not automation scripts. They are organizational assets that encode how your company approaches specific modernization scenarios. When an architect defines a transformation strategy, that strategy becomes a reusable definition stored in your registry. When your team identifies best practices, those practices become embedded within the transformation definition and automatically apply across all repositories. Previously, when a senior developer left your team, that knowledge disappears with them. With AWS Transform custom, their expertise is captured in transformation definitions and knowledge items available to the entire organization. Individual expertise becomes an organizational capability.
An Enterprise Customer Modernization Case Study
These productivity gains are production outcomes, not theoretical projections. An enterprise software company needed to migrate a large volume of production-grade Control-M workflows to Apache Airflow, a modernization requiring both technical precision and consistency across a complex, interdependent codebase. Their estimate was 12 weeks of intensive coordination across multiple teams, with risk of inconsistency and integration failures.
Using AWS Transform custom, the company executed an iterative learn-scale-improve workflow. During the pilot phase, they ran interactive transformations on representative repositories, reviewed results, and refined transformation definitions. With each iteration, transformation definitions improved in edge case handling and accuracy. They then shifted to non-interactive bulk execution across their portfolio and completed the full migration in 2.5 weeks.
The validation achieved a 100% success rate across all workflows in scope. Edge case handling improved by 60% compared to the customer’s existing approach, and the transformed code demonstrated a 19% runtime performance improvement while meeting industry expert code quality standards. This proves that organizations can achieve both migration speed and production readiness, with 3-5x faster delivery timelines and 10-20x reduction in total effort hours compared to traditional approaches.
Get Started: Transform Your Repository Portfolio
AWS Transform custom bulk automation capabilities are available as a solution in this Github repo. Follow the learn-scale-improve workflow to begin your transformation journey.
Prerequisites
Before beginning, ensure you have:
An AWS account with AWS Transform custom access enabled
AWS CLI configured with appropriate credentials
Git installed on your local machine or CI/CD environment
IAM permissions for AWS Transform custom operations
AWS Transform custom integrates naturally into your existing development processes. The CLI connects with CI/CD pipelines like Jenkins, GitLab CI, or GitHub Actions. Transformations create code in local Git branches that flow through your standard code review and merge processes. The web interface provides centralized visibility for tracking progress across teams. Validation commands execute automatically during transformation, ensuring code builds successfully and tests pass before changes are considered complete. At the end of the transformation, if validation criteria fail, the transformation is marked as failed.
To accelerate your path to scaled execution, AWS provides an open-source sample repository that gives you a production-ready starting point for running transformations across multiple repositories and transformation definitions simultaneously. The aws-transform-custom-samples scaled execution repository includes scripts that orchestrate bulk execution, manage repository queuing, and handle status tracking across your portfolio. Rather than building orchestration from scratch, you clone the sample, configure it with your repository list and transformation definitions, and begin executing scaled transformations immediately.
Conclusion
Enterprise modernization at scale requires more than code transformation tools. The real challenges are coordination across teams, learning from execution, and capturing knowledge as organizational assets. AWS Transform custom learn-scale-improve workflow addresses these challenges through continual learning that improves quality with every execution, organizational knowledge capture that transforms tribal expertise into reusable assets, and bulk automation that scales consistently across hundreds of repositories. When the next critical security vulnerability requires framework updates across your repositories, or a new runtime version unlocks performance improvements, you respond in days rather than months — using transformation definitions you have already proven.
Real customers have reduced delivery timelines by 3-5x and total effort hours by 10-20x, compressing modernization from months to weeks. These are not aspirational goals. They are production results from organizations using AWS Transform custom today.
Begin Your Transformation Today
Follow the learn-scale-improve workflow on two to three representative repositories, refine your transformation definitions, then scale across your portfolio. To dive deeper into AWS Transform custom bulk automation capabilities, explore these resources:
AWS Transform custom Documentation — Technical documentation covering all capabilities, API references, and integration guides: AWS Transform custom
Scaled Execution Sample Repository — Open-source scripts for running transformations across multiple repositories and transformation definitions: aws-transform-custom-samples
Organizations carry a growing burden of technical debt — aging codebases, outdated runtimes, and legacy frameworks that slow innovation, increase security risk, and inflate maintenance costs. Addressing this debt requires tackling a wide range of code transformation challenges: version upgrades, runtime migrations, framework transitions, and language translations, all of which must be repeated across multiple codebases. Today, most organizations perform these tasks manually, consuming 20–30% of enterprise software development effort. Even where automation exists, it’s typically narrow in scope and requires significant upfront investment — leaving most organizations unable to scale transformations effectively and, as a result, unable to meaningfully reduce the technical debt that continues to compound over time.
AWS Transform custom addresses this gap — an intelligent AI agent that learns organization-specific code transformations, executes them consistently at scale, and improves from developer feedback, without requiring specialized automation expertise. This blog explores how AWS Transform custom tackles one of the most pressing transformation challenges today.
Managing Lambda Runtime Lifecycles
AWS Lambda follows a runtime deprecation policy that aligns with the end of community long-term support for programming languages, with all current deprecation schedules available in the AWS Lambda runtime documentation. As upstream language maintainers deprecate runtime versions – including Python 3.8, Node.js 14, and Java 8 , organizations face the critical challenge of upgrading hundreds or thousands of Lambda functions before these runtimes reach end-of-life.
When a Lambda runtime reaches end of life, functions lose access to security patches and technical support, leaving applications potentially exposed to known vulnerabilities and compliance risks. Performance degrades as optimizations in newer runtimes go unrealized, and technical debt compounds — the longer you wait, the harder and more expensive the migration becomes.
For organizations managing hundreds or thousands of Lambda functions across multiple runtimes and languages, the effort is amplified by the scale of coordination required, the manual burden of testing and validation, and the reality that upgrade expertise is often siloed within a handful of engineers. It’s a recurring, high-stakes cycle that pulls teams away from building features.
This is exactly the type of repeatable, organization-wide transformation that AWS Transform custom code transformations can automate. The following sections explore how you can use AWS Transform custom to address Python runtime upgrades and demonstrate the automated approach with a practical example.
Sample application
This demonstration uses SAM Python CRUD Sample — an open-source serverless application built with AWS SAM that implements a full CRUD API. The application consists of five Lambda functions that create, read, update, list, and delete activity records. The following walkthrough shows how AWS Transform custom automates Python runtime upgrades by migrating these Lambda functions from a deprecated runtime (Python 3.8) to a modern runtime version (Python 3.13).
Prerequisites
Before beginning the transformation process, verify the following requirements:
AWS Transform CLI installed and configured in your development environment
Authentication with AWS credentials configured locally and proper IAM permissions to call AWS Transform
AWS Transform custom supports both interactive and non-interactive execution (non-interactive mode for CI/CD and batch execution is covered at the end). Launch the CLI in interactive mode with -t to trust all tools, which lets you use natural language to invoke and define transformations:
atx -t
Note : The -t flag trusts all tool executions without prompting for confirmation. This is convenient
for walkthroughs but means the agent can run shell commands automatically. Review the Trust settings for details on controlling tool permissions.
From here, you can use natural language to list and invoke transformations.
>list all the transformations available
This lists all available transformations — both AWS-managed and custom. AWS provides built-in transformations for common tasks like language upgrades (Java, Python, Node.js), SDK migrations, and Graviton migration. You can also create your own custom transformations using natural language, docs, and code samples.
Invoke the transformation by specifying the transformation name AWS/python-version-upgrade and project path. The agent will prompt you for additional inputs like target Python version and codebase path during the flow.
> Run AWS/python-version-upgrade on my project
Step 3: Transformation Planning
Before starting the planning process, you can provide any additional feedback if any. You can say proceed if you don’t have specific preferences.
This will start the planning process, where the agent will analyze all the source files, context, additional guidance and generate a step-by-step comprehensive plan detailing:
Runtime version updates (Python 3.8 → 3.13)
Dependency compatibility checks
Code pattern updates for Python 3.13 compatibility
AWS Lambda configuration changes
Infrastructure as Code changes
The transformation plan is designed to help maintain functionality while leveraging Python 3.13’s improvements.
You can review the plan and provide feedback, or tell the agent to go ahead and execute it.
Step 4: Transformation Execution and Validation
After reviewing the plan, AWS Transform custom executes the transformation automatically, updating:
Lambda runtime configuration
Python version-specific syntax
Dependency versions for Python 3.13 compatibility
Any deprecated function calls
Any Infrastructure as code templates as well
At the end of each step, the agent commits the incremental changes to a local git branch. If build or test errors occur, the agent attempts to self-debug and resolve issues. As a user, you can stop the transformation and provide feedback if necessary. Once all the steps are complete, the agent will produce a summary of changes.
Next, the agent runs a full validation — comparing the executed changes against the plan for any deviations, verifying all exit criteria are met, and running build commands and unit tests to confirm everything passes.
Once the validation is complete, the agent will ask for feedback. You can provide feedback on the execution results and ask the agent to modify/add/remove changes if needed.
Step 5: Verify Changes
Once the validation is complete, the agent summarizes the changes:
You can quit the atx session by issuing /quit in the terminal.
All the changes are committed to a local staging branch. You can also view this by executing following commands
git status
git branch
git diff main <atx-result-staging-...>
With these steps, you can upgrade your Lambda functions which are already running on deprecated runtimes or nearing EOL with reduced manual effort.
Non-Interactive mode
You can also run this transformation in a non-interactive mode with the following command supplying all the information, so that agent can run without asking for any user inputs. This mode is designed for headless execution, CI/CD pipeline integration and bulk execution where no human intervention is available or desired.
atx custom def exec -p . -n AWS/python-version-upgrade --configuration "validationCommands=pytest,additionalPlanContext=The target Python version to upgrade to is Python 3.13" -x -t
Parameter breakdown:
-n AWS/python-version-upgrade: Name of the AWS managed Python migration transformation
-p .: Path to the current directory containing your Lambda function
-t : Trust all tools without prompting
-x : non-interactive headless mode
--configuration : Validation commands to be used after the transformation and additional instructions to the agent . This example, configures the agent to use “pytest” as the validation command after transformation is complete and specifies the target version of python3.13 as additionalPlanContext. This helps agent with additional context during planning of the changes.
You can also specify these parameters in a config.json and execute like below.
config.json file contains all the information about the project repository path, transformation name, build and validation commands to use. Save the below snippet to config.json in the current directory.
{
  "codeRepositoryPath": ".",
  "transformationName": "python-version-upgrade",
  "validationCommands": "pytest",
  "additionalPlanContext": "The target Python version to upgrade to is Python 3.13"
}
How to scale this to multiple Lambda function upgrades?
Now that you have successfully used AWS Transform custom to upgrade a single Lambda function, you can scale this to hundreds or thousands of functions across your organization. Central engineering teams can create campaigns through the AWS Transform web application to define the transformation, specify target repositories, and track progress across the organization. For execution at scale, choose the model that fits your environment — both run in your environment, with access to your existing development resources, build systems, and tool chains. You don’t need to move your code anywhere — AWS Transform custom meets you where you are.
Batch script execution — Ideal for teams that want to run transformations directly on developer machines, EC2 instances or existing CI/CD infrastructure. Wrap the AWS Transform custom CLI in a batch processing script that iterates across multiple repositories using a CSV or JSON input file. The script supports both serial and parallel execution modes with configurable job limits, retry mechanisms, and comprehensive logging. Refer to this GitHub repo for the sample batch launcher script and execution instructions.
Containerized execution on AWS — Best suited for enterprise-scale rollouts where you need managed infrastructure, job orchestration, and centralized monitoring. Run transformations using containers deployed on AWS Batch with AWS Fargate. This solution provides a REST API for job submission, automatic IAM credential management, and full Amazon CloudWatch monitoring — all deployable with a single AWS CDK command. To get started, refer to this GitHub repo and blog.
Cleanup
If you followed along with the hands-on example, remove the cloned repository and virtual environment to free up local resources:
deactivate
cd ..
rm -rf ./sam-python-crud-sample
If you created any AWS resources during testing, delete them to avoid ongoing charges.
Conclusion
Keeping Lambda runtimes current is a recurring operational burden that only grows with scale. What starts as a simple version bump quickly compounds into dependency updates, syntax changes, infrastructure modifications, and extensive testing — multiplied across every function in your fleet.
AWS Transform custom turns this into a repeatable, automated workflow. As we demonstrated, upgrading a multi-function Python 3.8 application to Python 3.13 required just a single CLI invocation — the agent can handle planning, code changes, dependency updates, infrastructure configuration, and validation end to end. And with non-interactive mode and the scaled execution options, you can extend this to hundreds of repositories without manual intervention.
To get started:
Install the AWS Transform CLI and try the Python upgrade transformation on one of your own projects.
Software maintenance and modernization is a critical challenge for enterprises managing hundreds or thousands of repositories. Whether upgrading Java versions, migrating to new AWS SDKs, or modernizing frameworks, the scale of transformation work can be overwhelming. AWS Transform custom uses agentic AI to perform large-scale modernization of software, code, libraries, and frameworks to reduce technical debt. It handles diverse scenarios including language version upgrades, API and service migrations, framework upgrades and migrations, code refactoring, and organization-specific transformations. Through continual learning, the agent improves from every execution and developer feedback, delivering high-quality, repeatable transformations without requiring specialized automation expertise.
Organizations need to run transformations using AWS Transform custom concurrently across their entire code estate to meet aggressive modernization timelines and compliance deadlines. Running it at enterprise scale requires a solution to process repositories in parallel, in a controlled remote cloud environment, manage credentials securely, and provide visibility into transformation progress. Today, we’re introducing an open-source solution that brings production-grade scalability, reliability, and monitoring to AWS Transform custom. This infrastructure enables you to run transformations on thousands of repositories in parallel using AWS Batch and AWS Fargate, with REST API access for programmatic control and comprehensive Amazon CloudWatch monitoring.
Requirements for Enterprise-Scale Code Modernization
AWS Transform custom provides powerful AI-driven code transformation capabilities through its CLI. To effectively scale transformations across enterprise codebases, organizations need:
Scale: Ability to run transformations on 1000+ repositories concurrently rather than one-by-one Infrastructure: Dedicated compute resources for long-running transformations beyond developers’ laptops API Access: REST API for programmatic orchestration and seamless integration with CI/CD pipelines Monitoring: Centralized visibility into transformation progress and status across multiple repositories Reliability: Automatic retries, secure credential management, and built-in fault tolerance
The Solution: Batch Infrastructure with REST API
This solution provides complete, production-ready infrastructure that addresses these challenges:
Core Capabilities
Scalable Batch Processing Run transformations on thousands of repositories in parallel using AWS Batch with Fargate. The default configuration (256 max vCPUs, 2 vCPUs per job) supports up to 128 concurrent jobs, with automatic queuing and resource management. The compute environment scales based on your needs and Fargate service quotas.
REST API for Programmatic Access Seven API endpoints provide complete job lifecycle management, enabling you to submit single jobs or bulk batches of thousands in one request. The API offers real-time status tracking and progress monitoring, with Amazon Identity and access Management (IAM) authentication ensuring secure access to transformation operations.
Multi-Language Container The solution includes a container supporting Java (8, 11, 17, 21), Python (3.8-3.13), and Node.js (16-24) with all build tools pre-installed, including Maven, Gradle, npm, and yarn. The AWS Transform CLI and AWS CLI v2 are bundled in. The container is fully extensible for custom requirements—you can add your own libraries, languages, or tools by customizing the Dockerfile to meet their specific needs
Enterprise-Grade Reliability Automatic IAM credential management eliminates long-lived keys, with credentials auto-refreshing every 45 minutes for jobs up to 12 hours. The system includes automatic retries for transient failures (default: 3 attempts), with configurable timeout and retry settings to match your transformation complexity.
Comprehensive Monitoring A CloudWatch dashboard provides job tracking with success and failure rates, trends over time, and API and Lambda health metrics. Real-time log streaming enables you to monitor transformation progress and quickly diagnose issues.
Architecture
The solution uses a serverless architecture built on AWS managed services:
AWS Transform custom Batch solution architecture
Key Components:
API Gateway: REST API with IAM authentication
Lambda Functions: Job orchestration, status tracking, bulk submission
AWS Batch: Job queue and compute environment management
Fargate: Serverless container execution (no EC2 to manage)
S3: Source code input and transformation results output
CloudWatch: Logs, metrics, and operational dashboard
Getting Started
Prerequisites
Before deploying, ensure you have:
AWS Account with appropriate IAM permissions (ECR, S3, IAM, Batch, Lambda, API Gateway, CloudWatch)
AWS CLI v2 configured with credentials or AWS SSO login
This checks that Docker is installed and running, AWS CLI v2 is configured with credentials, Git is available, and your AWS account has the required VPC and public subnets.
cd deployment
chmod +x *.sh
./check-prereqs.sh
Step 4: Set up IAM Permissions (Optional, but recommended)
Generate a least-privilege IAM policy instead of using broad permissions:
./generate-custom-policy.sh
This creates iam-custom-policy.json with minimum permissions scoped to your specific resources.
Create and attach the policy:
aws iam create-policy \
  --policy-name ATXCustomDeploymentPolicy \
  --policy-document file://iam-custom-policy.json
This endpoint is used in all subsequent API calls.
Option 2: Bash Scripts (Alternative)
If you prefer manual control over each deployment step or need to customize individual components, use the bash script deployment. See deployment/README.md for the complete 3-step process with detailed explanations of what each script deploys.
Using the Solution
Single Job Submission
Quick test: Run cd ../test && ./test-apis.sh to validate all API endpoints (MCP, transformations, bulk jobs, campaigns).
Submit a Python version upgrade transformation:
cd ..
python3 utilities/invoke-api.py \
  --endpoint "$API_ENDPOINT" \
  --path "/jobs" \
  --data '{
    "source": "https://github.com/venuvasu/todoapilambda",
    "command": "atx custom def exec -n AWS/python-version-upgrade -p /source/todoapilambda -c noop --configuration \"validationCommands=pytest,additionalPlanContext=The target Python version to upgrade to is Python 3.13. Python 3.13 is already installed at /usr/bin/python3.13\" -x -t"
  }'
This API call triggers a Python version upgrade transformation on the todoapilambda public git repository. The transformation uses the AWS Managed transformation to upgrade from the current Python version to Python 3.13. The configuration parameter specifies additional validation command to be run and plan context to specifies the location of python 3.13 installation in the container and the target version. The -x flag is for non-interactive mode of the transformation , and -t flag is to trust all tools for this transformation.
API returns a job ID for tracking. Job names are auto-generated from the source repository and transformation type.
See api/README.md for complete API documentation with examples for Java, Node.js, and other transformations.
Bulk Job Submission
Transform multiple repositories in a single API call:
This API call triggers a deep static analysis of the codebase to generate hierarchical, cross-referenced documentation for three open source repositories in parallel. The transformation uses the AWS Managed transformation to generate behavioral analysis, architectural documentation, and business intelligence extraction to create a comprehensive knowledge base organized for maximum usability and navigation.
The API submits these jobs in a async manner. i.e the API returns a batch id upon submitting these jobs to AWS Batch. Then you can monitor the progress as specified below.
See api/README.md for status checking, MCP configuration, and other API endpoints.
# Download all results for a specific job
aws s3 sync s3://atx-custom-output-{account-id}/transformations/{job-name}/{timestamp}{conversation-id}/ ./local-results/

# Download just the validation summary
aws s3 cp s3://atx-custom-output-{account-id}/transformations/{job-name}/{timestamp}{conversation-id}/logs/custom/{timestamp}{conversation-id}/artifacts/validation_summary.md ./

# Download transformed code only
aws s3 sync s3://atx-custom-output-{account-id}/transformations/{job-name}/{timestamp}{conversation-id}/code/ ./transformed-code/
Monitoring and Observability
The solution includes a CloudWatch dashboard with operational metrics:
Job Tracking:
Completion rate with hourly trends (completed vs failed)
Recent jobs table showing job name, timestamp, last message, and log stream
Real-time visibility into job execution
CloudWatch Dashboard screenshot for Job tracking
API and Lambda Health:
API Gateway request counts and error rates
Lambda invocation metrics per function
Performance monitoring (duration by function)
CloudWatch Dashboard screenshot for API and Lambda Health
CloudWatch Logs:
All logs are centralized in CloudWatch Logs (/aws/batch/atx-transform) with real-time streaming.
The configuration is stored in S3 and automatically available to all transformations. Test with atx mcp tools to list configured servers.
See api/README.md for status checking, MCP configuration, and other API endpoints.
Customization for Private Repositories
You may need to access private repositories and artifact registries. Extend the base container to add credentials:
To access your private Git repositories or artifact registries during transformations:
Two approaches:
AWS Secrets Manager (RECOMMENDED) – Credentials fetched at runtime, never stored in image
Hardcode in Dockerfile (NOT RECOMMENDED) – For testing only
Steps:
Uncomment placeholders in container/entrypoint.sh (Secrets Manager) or container/Dockerfile (hardcoded)
Redeploy container (see below)
See container/README.md for complete setup instructions, examples, and security best practices.
Redeploying after customization:
If using CDK:
cd cdk && ./deploy.sh
CDK automatically detects Dockerfile changes and rebuilds. If changes aren’t detected, force rebuild:
cd cdk && ./deploy.sh —force
If using bash scripts:
cd deployment
./1-build-and-push.sh --rebuild
./2-deploy-infrastructure.sh
The infrastructure will use your custom container with private repository access. You can also customize the container to add support for additional language versions or entirely new languages based on their specific requirements.
Note: For automated PR creation and pushing changes back to remote repositories after transformation, you have two options: (1) extend container/entrypoint.sh with git commands using your private credentials (see commented placeholder in the script), or (2) use a custom Transformation definition with MCP configured to connect to GitHub/GitLab for more sophisticated PR workflows.
Campaigns
Central platform teams can create campaigns through the AWS Transform web interface to manage enterprise-wide migration and modernization projects. For instance, to upgrade all repositories from Java 8 to Java 21, teams create a campaign with the Java upgrade transformation definition and target repository list. As developers execute transformations, repositories automatically register with the campaign, enabling you to track progress and monitor across your organization.
In the chat, specify the type of the job . For example , “I would like comprehensive code analysis on multiple repos”
Based on your request, AWS Transform will display the list of transformation that matches the criteria, in this case “AWS/early-access-comprehensive-codebase-analysis (Early Access)”
Once you confirm the transformation, AWS Transform will create a campaign and a command to execute for the transformation. You can just copy that command and execute via the API as described below replacing the repo details.
Enterprise software modernization requires infrastructure that can operate at scale with reliability and observability. This solution provides a production-ready platform for running AWS Transform custom transformations on thousands of repositories concurrently.
By combining AWS Batch’s scalability, Fargate’s serverless compute, and a REST API for programmatic access, you can:
Accelerate modernization initiatives
Reduce manual effort and human error
Gain visibility into transformation progress
Integrate with existing DevOps workflows
The code repository is open-source, fully automated, and ready for you to deploy in your AWS account today.
In today’s rapidly evolving software landscape, maintaining and modernizing Java applications is a critical challenge for many organizations. As new Java versions are released and best practices evolve, the need for efficient code transformation becomes increasingly important. Organizations today face significant challenges when modernizing their Java applications. Legacy codebases often contain outdated patterns, deprecated APIs, and inefficient implementations that hinder performance and maintainability. Traditional manual refactoring approaches are time-consuming, error-prone, and difficult to scale across large codebases. In addition, as developers spend more time on new development and deployment, the volume of technical debt continues to rise, requiring transformation of legacy code at-scale.
AWS Transform custom addresses these challenges through intelligent automation, providing AWS-managed transformations – standardized transformation packages for common scenarios like Java version upgrades. These transformations enable teams to achieve quick wins through standardized, tested transformation patterns that can be executed at scale, bringing significant time and cost savings to customers. In addition, customers can create custom user defined transformations to address technical debt with code transformations across languages, frameworks, and more.
This post explores how to leverage AWS Transform custom’s out-of-the-box transformation for Java upgrades. By the end of this post, you’ll understand how to use these standardized transformations to modernize your Java applications efficiently while maintaining full control over the transformation process.
Introduction to AWS Transform custom
AWS Transform custom uses agentic AI to automate large-scale code modernization, handling language version upgrades, API migrations, framework updates, and organization-specific transformations. Through continual learning, the agent improves from every execution and developer feedback, delivering high-quality, repeatable transformations without requiring specialized automation expertise.
Prerequisites
Before starting your Java modernization journey with AWS Transform custom, ensure you have the necessary development environment, build tools, and AWS Transform custom command line interface (CLI) installed. For detailed prerequisites and setup instructions, refer to the AWS Transform custom Prerequisites Guide.
Understanding the Modernization Scenario
We’ll demonstrate AWS Transform custom using a Movie Service application – a Spring Boot REST API built on Java 8 with Gradle. This represents a typical enterprise modernization challenge with legacy dependencies, outdated patterns, and technical debt.
Leveraging AWS-Managed Transformations
AWS Transform custom focuses on leveraging AWS-managed transformations designed for common modernization tasks like Java version upgrades.
AWS-managed transformations are pre-built, AWS-vetted transformations for common use cases that are ready to use without any additional setup. These transformations provide immediate value with minimal configuration, making them ideal for standard upgrade scenarios.
AWS Transform custom provides a comprehensive command-line interface that enables both interactive and automated transformation workflows:
atx --version                    # Display ATX version
atx --help                       # Display general help
atx custom def list              # List transformation packages
atx                              # Start interactive conversation
Use atx custom def list to view all available transformations, including AWS-managed transformations and custom-defined (user-defined) transformations created by your organization. Key AWS-managed transformations include Java/Python/Node.js version upgrades and AWS SDK migrations.
Figure 2: AWS Transform custom lists available AWS Managed and custom-defined (user-defined) transformations
Applying AWS-Managed Transformations
Before applying any transformations, ensure your project is initialized with Git and that all build and test cases are working correctly with Java 8 (Test cases can be skipped when necessary by using the appropriate build command option and instructions to the agent). For Gradle projects, verify that ./gradlew build executes successfully.
The transformation process follows a structured approach:
Ensure Clean Git State:
git status
git add .
git commit -m "Baseline before Java 21 transformation"
Apply Transformation: You can apply transformations using either interactive or direct command modes. In this blog, we will use the interactive mode to walk through the process step-by-step:
Interactive Mode (used in this blog):
First, create a config.json file with your transformation configuration:
{
  "codeRepositoryPath": "/path/to/your/aws-appconfig-java-sample-gradle",
  "transformationName": "AWS/java-version-upgrade",
  "buildCommand": "./gradlew clean build",
  "validationCommands": "build and validate using \"./gradlew clean build\" after transformation to test with java 21",
  "additionalPlanContext": "This is a Java 8 to 21 transformation of a gradle app , also include all dependency migration as well. Use java path /path/to/your/java-8/bin/java and /path/to/your/java-21/bin/java when building before and after transformation. We are using gradle wrapper gradlew, update it if needed for java 21 upgrade. Check for deprecated methods and dependencies and update them."
}
Update the codeRepositoryPath in your config.json to point to your local project directory and update the Java path in additionalPlanContext to match your Java 8 and 21 installation. For more details about configuration files and their parameters, refer to Using Configuration Files.
Then execute the transformation in interactive mode (used for this blog walkthrough):
For Java version upgrade with Gradle using config.json (Interactive Mode):
atx custom def exec -t --configuration file://config.json
Figure 3: AWS Transform custom execute a gradle transformation in interactive mode with transformation configuration supplied from config.json
Direct Command Mode (alternative approach): Use this mode for automated CI/CD pipelines or when you want to execute transformations without interactive prompts.
--configuration: Specifies the configuration file for interactive mode
– -x: Executes the transformation automatically without interactive prompts (direct mode)
– -t: Enables test mode for validation during execution (direct mode)
--configuration: Specifies the configuration file path with file://prefix (direct mode)
ATX Execution Command Executing AWS managed Java version upgrade transformation for Gradle project using ATX CLI
Review Transformation Plan: AWS Transform custom analyzes your project based on the configuration provided in config.json and generates a comprehensive transformation plan. This plan details all proposed changes, including:
Java version updates: Migration from Java 8 to Java 21 configurations
API migration patterns: Automatic updates for deprecated APIs and modern alternatives
Framework modernization: Spring Boot version upgrades and compatibility updates
Dependency modifications: Updated library versions compatible with Java 21
Build system updates: Gradle configuration and plugin changes for Java 21 compatibility
Code pattern improvements: Implementation of modern Java features and best practices
We recommend doing a thorough review of the transformation plan to ensure it encompasses all expected updates. The additionalPlanContext in your config.json helps guide the transformation to include dependency migrations and Gradle wrapper updates. If adjustments are needed, provide feedback through the CLI interface.
Additionally, if you want to customize the transformation to target additional changes, for example upgrading additional legacy dependencies contained in the project, you can provide this as feedback when reviewing the transformation plan. AWS Transform custom incorporates all feedback provided to refine the transformation plan before proceeding.
Apply the Transformation: After confirming the transformation plan meets your requirements, type proceed and press Enter. AWS Transform custom executes the transformation according to the approved plan.
The transformation process automatically:
– Creates a new branch and commits the transformed changes in there
– Updates Gradle configuration for Java 21
– Migrates Java EE to Jakarta EE packages (if applicable)
– Updates framework dependencies for Java 21 compatibility
– Applies all necessary code changes
– Updates test cases and testing frameworks for Java 21 compatibility
– Runs comprehensive validation builds
Results of AWS-Managed Transformations
After applying the Java version upgrade transformation, below changes are observed:
Configuration Updates: – Java version: 1.8 → 21 – Spring Boot version upgrades – Gradle plugin and configuration updates – Dependency version modernization
To validate the changes, switch to Java 21 and run ./gradlew build to ensure the transformation was successful, then test the application functionality.
Figure 5: Updated code where legacy pattern of raw types usage is transformed to generics Figure 6: Second example of updated code where legacy pattern of raw types usage is transformed to generics Figure 7: Updateddependency from javax.security to java.security and uses CertificateFactory to get X509Certificate Figure 8: UpdatedTest cases from junit 4 to junit5
While AWS-managed transformations provide excellent coverage for standard Java modernization scenarios, there are cases where the available AWS-managed transformations may not address your specific transformation requirements. In such situations, AWS Transform custom enables users to create and test their own organization specific, custom-defined transformation definitions.
When to Create Custom-Defined Transformations
Custom-defined transformations become necessary when AWS-managed transformations don’t cover your specific needs, such as proprietary frameworks, organization-specific coding standards, or complex multi-step migration scenarios.
Creating Custom-Defined Transformations
AWS Transform custom enables teams to develop custom transformations using transformation rules and configuration files. This allows organizations to define transformation logic specific to their requirements, test on sample code, and share validated transformations across teams.
AWS Transform custom’s interactive mode (atx) is particularly beneficial for creating Custom-defined transformations, enabling conversational interaction to iteratively refine requirements and get real-time feedback. Custom-defined transformations provide flexibility to extend AWS Transform custom’s capabilities when AWS-managed transformations don’t meet specific modernization needs.
Continual Learning and Knowledge Items
AWS Transform custom automatically learns from each transformation execution to improve future results. For Java upgrades specifically, the service captures patterns like successful refactoring strategies, common dependency conflicts, and framework compatibility matrices across Java versions. This knowledge feeds back into future transformations, making them more accurate at predicting successful upgrade paths and reducing manual intervention.
Knowledge items are account-specific and remain within your AWS account boundaries. Users can enable or disable continual learning, providing full control over this preference.
Conclusion
In this blog, we demonstrated how AWS Transform custom enables efficient Java application modernization using AWS managed transformations. Starting with a legacy Movie Service application running Java 8 and Spring Boot 2.x, we successfully transformed it to Java 21 with modern dependencies and patterns.
The step-by-step process showed how to establish a baseline, discover available transformations using atx custom def list, and apply transformations through AWS Transform custom’s CLI. The result was a fully modernized application with updated Java versions, Spring Boot upgrades, and modern Java features like enhanced switch expressions and local variable type inference – all achieved in minutes rather than weeks of manual refactoring.
Beyond Java Modernization
Beyond Java modernization, AWS Transform custom’s transformation capabilities extend to other programming languages and frameworks, making it a versatile solution for comprehensive application portfolio modernization across diverse technology stacks. The agent supports diverse transformation use cases including:
Version upgrades for Java, Python, and Node.js
Runtime and API migrations (AWS SDK v1→v2, Boto2→Boto3)
Through its define once, transform everywhere approach, AWS Transform custom enables organizations to capture and amplify transformation knowledge by defining transformations once and executing repeatable tasks across the entire organization. This reduces knowledge silos and ensures consistent quality regardless of team or project scope.
Getting Started
Ready to modernize your Java applications with AWS Transform custom? Here’s how to begin:
Install AWS Transform custom CLI (atx) using the installation script and verify your environment
Configure AWS credentials with transform-custom:* permissions
Explore available AWS-managed transformations using atx custom def list
Apply transformations to your Java applications using direct execution mode (atx custom def exec) or interactive mode (atx)
Validate results through comprehensive testing with ./gradlew build for Gradle projects
Scale across your application portfolio for consistent modernization
Additional Resources
For detailed setup instructions and documentation, visit:
The AWS SDK for Java v2 represents a fundamental shift in how Java applications interact with AWS services, addressing critical security requirements while delivering measurable performance improvements. For organizations still operating on v1, this transition extends beyond a routine version upgrade—it’s a strategic imperative for maintaining secure, efficient cloud operations. With v1 reaching end-of-support on December 31, 2025, organizations face a hard deadline where security vulnerabilities will no longer receive patches, potentially violating compliance frameworks that require current, supported software versions.
Security enhancements alone justify the migration, with v2 implementing advanced credential management, modernized encryption clients, and comprehensive TLS security protocols that v1’s architecture cannot accommodate. Beyond security, v2 delivers architectural improvements through non-blocking I/O operations and modular service clients that reduce application footprint while improving response times.
This blog post demonstrates how to automate AWS SDK for Java v1 to v2 upgrades using AWS Transform custom, enabling organizations to modernize their Java applications efficiently while minimizing manual intervention and potential errors.
AWS Transform custom uses agentic AI to perform large-scale modernization of software, code, libraries, and frameworks to reduce technical debt. It handles diverse scenarios including language version upgrades, API and service migrations, framework upgrades and migrations, code refactoring, and organization-specific transformations.
Prerequisites
Before beginning the transformation process, verify the following requirements:
AWS Transform CLI installed and configured in your development environment
The AWS Transform CLI provides AWS-Managed Transformations that are pre-built, AWS-vetted transformations for common use cases that are ready to use without any additional setup. The AWS/java-aws-sdk-v1-to-v2 transformation enables you to upgrade the AWS SDK from v1 to v2 for Java projects. We will use this verified transformation definition to upgrade a sample Java application from AWS SDK for Java v1 to v2.
Step 1: Prepare the Sample Project
Clone the AWS Java sample repository to your local environment:
git clone https://github.com/aws-samples/aws-java-sample
cd aws-java-sample
Step 2: Execute the Transformation
The AWS Transform CLI’s def exec command provides multiple parameters for customizing transformations. View all available options using atx custom def exec --help. For this transformation, execute the following command (replace <path_to_project> with your actual project path):
-n: Name of the transformation definition in the registry
-t: Trusts all tools (no tool prompts)
-c: Command to run when building repository
Step 3: Provide Additional Guidance
Before AWS Transform generates the transformation plan, it asks if there is specific guidance to take into consideration when generating the plan. For example, some organizations may require or have approved the use of specific versions of libraries. If there are specific requirements like this or guidance you would like to provide, please add it here. For this sample, enter the following prompt that demonstrates how you can specify a specific version of a library that may be needed to meet organizational requirements:
Please utilize version 2.34.0 of software.amazon.awssdk
Step 4: Review the Transformation Plan
AWS Transform analyzes your project and generates a comprehensive transformation plan. This plan details all proposed changes, including:
Update Maven dependencies
API migration patterns
Builder pattern implementations
Update exception handling
The transformation plan will be outlined in a plan.json file in the specified directory in the output (Figure 1). We suggest doing a thorough review of the transformation plan to ensure it encapsulates all expected updates. If adjustments are needed, feedback can be provided through the CLI interface. AWS Transform custom incorporates all feedback provided to refine the transformation plan before proceeding.
Figure 1: Transformation plan output
Step 5: Apply the Transformation
After confirming the transformation plan meets your requirements, type proceed and press Enter. AWS Transform custom proceeds to the next step and executes the transformation according to the approved plan.
Step 6: Verify Changes
Once the transformation is complete, you can review the validation summary that was written to the validation_summary.md file in the specified directory. After reviewing the summary, we will use our IDE (VS Code in this case, you can use your preferred mechanism) to examine the transformation results.
POM.xml Updates: The AWS SDK dependency upgrades from version 1.9.6 to 2.34.0 (Figure 2), reflecting the version that was specified during the planning phase.
Figure 2: POM.xml Updates
Code Pattern Updates: The S3Sample.java file shown in Figure 3 demonstrates v2’s builder pattern implementation.
Figure 3: Builder pattern updates
Step 7: Build the application
Since the build command was passed as part of the -c parameter, AWS Transform custom will have already verified that the application builds as expected. We will also validate the transformation by building the application via the following command:
mvn clean package
The application should build successfully and you should see a BUILD SUCCESS message.
Step 7: Test the application
Next, we will verify that the application’s functionality is working as expected after the transformation. Configure your AWS credentials and run the application:
aws configure
mvn clean compile exec:java
The application should execute successfully (as seen in Figure 4), demonstrating that core functionality remains intact after the transformation.
Figure 4: Successful application execution
Custom Transformation Definition
While AWS provides managed transformations for modernizing legacy projects, these standard solutions may not always meet an organization’s unique requirements. Although AWS allows customization of these managed transformations through plan context and feedback mechanisms, some scenarios demand custom solutions. This is particularly true when organizations need to:
Allows organizations to codify their specific modernization requirements
Creates reusable transformation patterns
Enables consistent application of organizational best practices
Facilitates scalable modernization efforts across multiple projects
Preserves and leverages institutional knowledge through documented transformations
By defining these custom transformations once, organizations can efficiently execute standardized modernization tasks across their entire codebase, ensuring consistency and reducing manual effort.
Conclusion
The automated transformation from AWS SDK for Java v1 to v2 using the AWS Transform CLI demonstrates how organizations can modernize their Java applications efficiently while maintaining code quality and functionality. This approach eliminates the manual effort traditionally required for SDK migrations, reducing both time investment and the risk of introducing errors during the upgrade process.
Key benefits realized through this automation:
Accelerated migration timeline – What typically requires weeks of manual refactoring completes in minutes
Consistent transformation patterns – Verified transformations ensure uniform code updates across your entire codebase
Reduced human error – Automated pattern recognition and replacement eliminates common migration mistakes
Immediate security improvements – Applications gain V2’s enhanced security features without extensive manual intervention
As AWS continues to innovate and enhance AWS SDK for Java v2 with new features and optimizations, maintaining current SDK versions becomes increasingly important. By automating this critical upgrade process, development teams can focus on delivering business value while ensuring their applications leverage the latest AWS capabilities and security enhancements. Get started with AWS Transform custom today to begin your modernization journey, or explore additional AWS-Managed Transformations to address other modernization use cases.
Happy New Year! I hope the holidays gave you time to recharge and spend time with your loved ones.
Like every year, I took a few weeks off after AWS re:Invent to rest and plan ahead. I used some of that downtime to plan the next cohort for Become a Solutions Architect (BeSA). BeSA is a free mentoring program that I, along with a few other Amazon Web Services (AWS) employees, volunteer to host as a way to help people excel in their cloud and AI careers. We’re kicking off a 6-week cohort on “Agentic AI on AWS” starting February 21, 2026. Visit the BeSA website to learn more.
There is still time to submit your idea for the Global 10,000 AIdeas Competition and compete for $250,000 in cash prizes, AWS credits, and recognition, including potential featured placement at AWS re:Invent 2026 and across AWS channels.
You will gain hands-on experience with next-generation AI development tools, connect with innovators globally, and access technical enablement through biweekly workshops, AWS User Groups, and AWS Builder Center resources.
The deadline is January 21, 2026, and no code is required yet. If you’re selected as a semifinalist, you’ll build your app then. Your finished app needs to use Kiro for at least part of development, stay within AWS Free Tier limits, and be completely original and not yet published.
Launches from the last few weeks I’d like to highlight some launches that got my attention since our last Week in Review on December 15, 2025:
Amazon EC2 M8gn and M8gb instances – New M8gn and M8gb instances are powered by AWS Graviton4 processors to deliver up to 30% better compute performance than AWS Graviton3 processors. M8gn instances feature the latest 6th generation AWS Nitro Cards, and offer up to 600 Gbps network bandwidth, the highest network bandwidth among network-optimized EC2 instances. M8gb offer up to 150 Gbps of Amazon EBS bandwidth to provide higher EBS performance compared to same-sized equivalent Graviton4-based instances.
AWS Direct Connect supports resilience testing with AWS Fault Injection Service – You can now use AWS Fault Injection Service to test how your applications handle Direct Connect Border Gateway Protocol (BGP) failover in a controlled environment. For example, you can validate that traffic routes to redundant virtual interfaces when a primary virtual interface’s BGP session is disrupted and your applications continue to function as expected.
New AWS Security Hub controls in AWS Control Tower – AWS Control Tower now supports 176 additional Security Hub controls in the Control Catalog, covering use cases including security, cost, durability, and operations. With this launch, you can search, discover, enable, and manage these controls directly from AWS Control Tower to govern additional use cases across your multi-account environment.
AWS Transform supports network conversion for hybrid data center migrations – You can now use AWS Transform for VMware to automatically convert networks from hybrid data centers. This removes manual network mapping for environments running both VMware and other workloads. The service analyzes VLANs and IP ranges across all exported source networks and maps them to AWS constructs such as virtual private clouds (VPCs), subnets, and security groups.
NVIDIA Nemotron 3 Nano available on Amazon Bedrock – Amazon Bedrock now supports NVIDIA Nemotron 3 Nano 30B A3B model, NVIDIA’s latest breakthrough in efficient language modeling that delivers high reasoning performance, built-in tool calling support, and extended context processing with 256K token context window.
Amazon EC2 supports Availability Zone ID across its APIs – You can specify the Availability Zone ID (AZ ID) parameter directly in your Amazon EC2 APIs to guarantee consistent placement of resources. AZ IDs are consistent and static identifiers that represent the same physical location across all AWS accounts, helping you optimize resource placement. Prior to this launch, you had to use an AZ name while creating a resource, but these names could map to different physical locations. This mapping made it difficult to ensure resources were always co-located, especially when operating with multiple accounts.
Amazon ECS Managed Instances supports Amazon EC2 Spot Instances – Amazon ECS Managed Instances now supports Amazon EC2 Spot Instances, extending the range of capabilities available with AWS managed infrastructure. You can use spare EC2 capacity at up to 90% discount compared to On-Demand prices for fault-tolerant workloads in Amazon ECS Managed Instances.
See AWS What’s New for more launch news that I haven’t covered here. That’s all for this week. Check back next Monday for another Weekly Roundup!
Here’s to a fantastic start to 2026. Happy building!
In May, 2025, we launched AWS Transform for mainframe, the first agentic AI service for modernizing mainframe workloads at scale. The AI-powered mainframe agent accelerates mainframe modernization by automating complex, resource-intensive tasks across every phase of modernization—from initial assessment to final deployment. You can streamline the migration of legacy mainframe applications, including COBOL, CICS, DB2, and VSAM to modern cloud environments—cutting modernization timelines from years to months.
Today, we’re announcing enhanced capabilities in AWS Transform for mainframe that include AI-powered analysis features, support for the Reimagine modernization pattern, and testing automation. These enhancements solve two critical challenges in mainframe modernization: the need to completely transform applications rather than merely move them to the cloud, and the extensive time and expertise required for testing.
Reimagining mainframe modernization – This is a new AI-driven approach that completely reimagines the customer’s application architecture using modern patterns or moving from batch process to real-time functions. By combining the enhanced business logic extraction with new data lineage analysis and automated data dictionary generation from the legacy source code through AWS Transform, customers transform monolithic mainframe applications written in languages like COBOL into more modern architectural styles, like microservices.
Automated testing – Customers can use new automated test plan generation, test data collection scripts, and test case automation scripts. AWS Transform for mainframe also provides functional testing tools for data migration, results validation, and terminal connectivity. These AI-powered capabilities work together to accelerate testing timelines and improve accuracy through automation.
Let’s learn more about reimagining mainframe modernization and automated testing capabilities.
How to reimagine mainframe modernization We recognize that mainframe modernization is not a one-size-fits-all proposition. Whereas tactical approaches focus on augmentation and maintaining existing systems, strategic modernization offers distinct paths: Replatform, Refactor, Replace, or the new Reimagine.
In the Reimagine pattern, AWS Transform AI-powered analysis combines mainframe system analysis with organizational knowledge to create detailed business and technical documentation and architecture recommendations. This helps preserve critical business logic while enabling modern cloud-native capabilities.
AWS Transform provides new advanced data analysis capabilities that are essential for successful mainframe modernization, including data lineage analysis and automated data dictionary generation. These features work together to define the structure and meaning to accompany the usage and relationships of mainframe data. Customers gain complete visibility into their data landscape, enabling informed decision-making for modernization. Their technical teams can confidently redesign data architectures while preserving critical business logic and relationships.
The Reimagining strategy follows the principle of human in the loop validation, which means that AI-generated application specifications and code such as AWS Transform and Kiro are continuously validated by domain experts. This collaborative approach between AI capabilities and human judgment significantly reduces transformation risk while maintaining the speed advantages of AI-powered modernization.
The pathway has a three-phase methodology to transform legacy mainframe applications into cloud-native microservices:
Reverse engineering to extract business logic and rules from existing COBOL or job control language (JCL) code using AWS Transform for mainframe.
Forward engineering to generate microservice specification, modernized source code, infrastructure as code (IaC), and modernized database.
Deploy and test to deploy the generated microservices to Amazon Web Services (AWS) using IaC and to test the functionality of the modernized application.
Although microservices architecture offers significant benefits for mainframe modernization, it’s crucial to understand that it’s not the best solution for every scenario. The choice of architectural patterns should be driven by the specific requirements and constraints of the system. The key is to select an architecture that aligns with both current needs and future aspirations, recognizing that architectural decisions can evolve over time as organizations mature their cloud-native capabilities.
The flexible approach supports both do-it-yourself and partner-led development, so you can use your preferred tools while maintaining the integrity of your business processes. You get the benefits of modern cloud architecture while preserving decades of business logic and reducing project risk.
Automated testing in action The new automated testing feature supports IBM z/OS mainframe batch application stack at launch, which helps organizations address a wider range of modernization scenarios while maintaining consistent processes and tooling.
Here are the new mainframe capabilities:
Plan test cases – Create test plans from mainframe code, business logic, and scheduler plans.
Generate test data collection scripts – Create JCL scripts for data collection from your mainframe to your test plan.
Generate test automation scripts – Generate execution scripts to automate testing of modernized applications running in the target AWS environment.
To get started with automated testing, you should set up a workspace, assign a specific role to each user, and invite them to onboard your workspace. To learn more, visit Getting started with AWS Transform in the AWS Transform User Guide.
Choose Create job in your workspace. You can see all types of supported transformation jobs. For this example, I select the Mainframe Modernization job to modernize mainframe applications.
After a new job is created, you can kick off modernization for tests generation. This workflow is sequential and it is a place for you to answer the AI agent’s questions, providing the necessary input. You can add your collaborators and specify resource location where the codebase or documentation is located in your Amazon Simple Storage Service (Amazon S3) bucket.
I use a sample application for a credit card management system as the mainframe banking case with the presentation (BMS screens), business logic (COBOL) and data (VSAM/DB2), including online transaction processing and batch jobs.
After finishing the steps of analyzing code, extracting business logic, decomposing code, planning migration wave, you can experience new automated testing capabilities such as planning test cases, generating test data collection scripts, and test automation scripts.
The new testing workflow creates a test plan for your modernization project and generates test data collection scripts. You will have three planning steps:
Configure test plan inputs – You can link your test plan to your other job files. The test plan is generated based on analyzing the mainframe application code and can provide more details optionally using the extracted business logic, the technical documentation, the decomposition, and using a scheduler plan.
Define test plan scope – You can define the entry point, the specific program where the application’s execution flow begins. For example, the JCL for a batch job. In the test plan, each functional test case is designed to start the execution from a specific entry point.
Refine test plan – A test plan is made up of sequential test cases. You can reorder them, add new ones, merge multiple cases, or split one into two on the test case detail page. Batch test cases are composed of a sequence of JCLs following the scheduler plan.
Generating test data collection scripts collects test data from mainframe applications for functional equivalence testing. This step actively generates JCL scripts that will help you gather test data from the sample application’s various data sources (such as VSAM files or DB2 databases) for use in testing the modernized application. The step is designed to create automated scripts that can extract test data from VSAM datasets, query DB2 tables for sample data, collect sequential data sets, and generate data collection workflows. After this step is completed, you’ll have comprehensive test data collection scripts ready to use.
Now available The new capabilities in AWS Transform for mainframe are available today in all AWS Regions where AWS Transform for mainframe is offered. For Regional availability and future roadmap, visit the AWS Capabilities by Region. Currently, we offer our core features—including assessment and transformation—at no cost to AWS customers. To learn more, visit AWS Transform Pricing page.
Earlier this year in May, we announced the general availability of AWS Transform for .NET, the first agentic AI service for modernizing .NET applications at scale. During the early adoption period of the service, we received valuable feedback indicating that, in addition to .NET application modernization, you would like to modernize SQL Server and legacy UI frameworks. Your applications typically follow a three-tier architecture—presentation tier, application tier, and database tier—and you need a comprehensive solution that can transform all of these tiers in a coordinated way.
Today, based on your feedback, we’re excited to announce AWS Transform for full-stack Windows modernization, to offload complex, tedious modernization work across the Windows application stack. You can now identify application and database dependencies and modernize them in an orchestrated way through a centralized experience.
AWS Transform accelerates full-stack Windows modernization by up to five times across application, UI, database, and deployment layers. Along with porting .NET Framework applications to cross-platform .NET, it migrates SQL Server databases to Amazon Aurora PostgreSQL-Compatible Edition with intelligent stored procedure conversion and dependent application code refactoring. For validation and testing, AWS Transform deploys applications to Amazon Elastic Compute Cloud (Amazon EC2) Linux or Amazon Elastic Container Service (Amazon ECS), and provides customizable AWS CloudFormation templates and deployment configurations for production use. AWS Transform has also added capabilities to modernize ASP.NET Web Forms UI to Blazor.
There is much to explore, so in this post I’ll provide the first look at AWS Transform for full-stack Windows modernization capabilities across all layers.
Create a full-stack Windows modernization transformation job AWS Transform connects to your source code repositories and database servers, analyzes application and database dependencies, creates modernization waves, and orchestrates full-stack transformations for each wave.
To get started with AWS Transform, I first complete the onboarding steps outlined in the getting started with AWS Transform user guide. After onboarding, I sign in to the AWS Transform console using my credentials and create a job for full-stack Windows modernization.
After creating the job, I complete the prerequisites. Then, I configure the database connector for AWS Transform to securely access SQL Server databases running on Amazon EC2 and Amazon Relational Database Service (Amazon RDS). The connector can connect to multiple databases within the same SQL Server instance.
Furthermore, I have the option to choose if I would like AWS Transform to deploy the transformed applications. I choose Yes and provide the target AWS account ID and AWS Region for deploying the applications. The deployment option can be configured later as well.
After the connectors are set up, AWS Transform connects to the resources and runs the validation to verify IAM roles, network settings, and related AWS resources.
After the successful validation, AWS Transform discovers databases and their associated source code repositories. It identifies dependencies between databases and applications to create waves for transforming related components together. Based on this analysis, AWS Transform creates a wave-based transformation plan.
Assessing database and dependent applications For the assessment, I review the databases and source code repositories discovered by AWS Transform and choose the appropriate branches for code repositories. AWS Transform scans these databases and source code repositories, then presents a list of databases along with their dependent .NET applications and transformation complexity.
I choose the target databases and repositories for modernization. AWS Transform analyzes these selections and generates a comprehensive SQL Modernization Assessment Report with a detailed wave plan. I download the report to review the proposed modernization plan. The report includes an executive summary, wave plan, dependencies between databases and code repositories, and complexity analysis.
Wave transformation at scale The wave plan generated by AWS Transform consists of four steps for each wave. First, it converts the SQL Server schema to PostgreSQL. Second, it migrates the data. Third, it transforms the dependent .NET application code to make it PostgreSQL compatible. Finally, it deploys the application for testing.
Before converting the SQL Server schema, I can either create a new PostgreSQL database or choose an existing one as the target database.
After I choose the source and target databases, AWS Transform generates conversion reports for my review. AWS Transform converts the SQL Server schema to PostgreSQL-compatible structures, including tables, indexes, constraints, and stored procedures.
For any schema that AWS Transform can’t automatically convert, I can manually address them in the AWS Database Migration Service (AWS DMS) console. Alternatively, I can fix them in my preferred SQL editor and update the target database instance.
After completing schema conversion, I have the option to proceed with data migration, which is an optional step. AWS Transform uses AWS DMS to migrate data from my SQL Server instance to the PostgreSQL database instance. I can choose to perform data migration later, after completing all transformations, or work with test data by loading it into my target database.
The next step is code transformation. I specify a target branch for AWS Transform to upload the transformed code artifacts. AWS Transform updates the codebase to make the application compatible with the converted PostgreSQL database.
With this release, AWS Transform for full-stack Windows modernization supports only codebases in .NET 6 or later. For codebases in .NET Framework 3.1+, I first use AWS Transform for .NET to port them to cross-platform .NET. I’ll expand on this in a following section.
After the conversion is completed, I can view the source and target branches along with their code transformation status. I can also download and review the transformation report.
Modernizing .NET Framework applications with UI layer One major feature we’re releasing today is the modernization of UI frameworks from ASP.NET Web Forms to Blazor. This is added to existing support for modernizing model-view-controller (MVC) Razor views to ASP.NET Core Razor views.
As mentioned previously, if I have a .NET application in legacy .NET Framework, then I continue using AWS Transform for .NET to port it to cross-platform .NET. For legacy applications with UIs built on ASP.NET Web Forms, AWS Transform now modernizes the UI layer to Blazor along with porting the backend code.
AWS Transform for .NET converts ASP.NET Web Forms projects to Blazor on ASP.NET Core, facilitating the migration of ASP.NET websites to Linux. The UI modernization feature is enabled by default in AWS Transform for .NET on both the AWS Transform web console and Visual Studio extension.
During the modernization process, AWS Transform handles the conversion of ASPX pages, ASCX custom controls, and code-behind files, implementing them as server-side Blazor components rather than web assembly. The following project and file changes are made during the transformation:
From
To
Description
*.aspx, *.ascx
*.razor
.aspx pages and .ascx custom controls become .razor files
Web.config
appsettings.json
Web.config settings become appsettings.json settings
Global.asax
Program.cs
Global .asax code becomes Program.cs code
*.master
*layout.razor
Master files become layout.razor files
Other new features in AWS Transform for .NET Along with UI porting, AWS Transform for .NET has added support for more transformation capabilities and enhanced developer experience. These new features include the following:
Port to .NET 10 and .NET Standard – AWS Transform now supports porting to .NET 10, the latest Long-Term Support (LTS) release, which was released on November 11, 2025. It also supports porting class libraries to .NET Standard, a formal specification for a set of APIs that are common across all .NET implementations. Furthermore, AWS Transform is now available with AWS Toolkit for Visual Studio 2026.
Editable transformation report – After the assessment is complete, you can now view and customize the transformation plan based on your specific requirements and preferences. For example, you can update package replacement details.
Real-time transformation updates with estimated remaining time – Depending on the size and complexity of the codebase, AWS Transform can take some time to complete the porting. You can now track transformation updates in real-time along with the estimated remaining time.
Next steps markdown – After the transformation is complete, AWS Transform now generates a next steps markdown file with the remaining tasks to complete the porting. You can use this as a revised plan to repeat the transformation with AWS Transform or use AI code-companions to complete the porting.
Things to know Some more things to know are:
AWS Regions – AWS Transform for full-stack Windows modernization is generally available today in the US East (N. Virginia) Region. For Regional availability and future roadmap, visit the AWS Capabilities by Region.
Pricing – Currently, there is no added charge for Windows modernization features of AWS Transform. Any resources you create or continue to use in your AWS account using the output of AWS Transform are billed according to their standard pricing. For limits and quotas, refer to the AWS Transform User Guide.
SQL Server versions supported – AWS Transform supports the transformation of SQL Server versions from 2008 R2 through 2022, including all editions (Express, Standard, and Enterprise). SQL Server must be hosted on Amazon RDS or Amazon EC2 in the same Region as AWS Transform.
Entity Framework versions supported – AWS Transform supports the modernization of Entity Framework versions 6.3 through 6.5 and Entity Framework Core 1.0 through 8.0.
Getting started – To get started, visit AWS Transform for full-stack Windows modernization User Guide.
To provide the best experiences, we use technologies like cookies to store and/or access device information. Consenting to these technologies will allow us to process data such as browsing behavior or unique IDs on this site. Not consenting or withdrawing consent, may adversely affect certain features and functions.
Functional
Always active
The technical storage or access is strictly necessary for the legitimate purpose of enabling the use of a specific service explicitly requested by the subscriber or user, or for the sole purpose of carrying out the transmission of a communication over an electronic communications network.
Preferences
The technical storage or access is necessary for the legitimate purpose of storing preferences that are not requested by the subscriber or user.
Statistics
The technical storage or access that is used exclusively for statistical purposes.The technical storage or access that is used exclusively for anonymous statistical purposes. Without a subpoena, voluntary compliance on the part of your Internet Service Provider, or additional records from a third party, information stored or retrieved for this purpose alone cannot usually be used to identify you.
Marketing
The technical storage or access is required to create user profiles to send advertising, or to track the user on a website or across several websites for similar marketing purposes.
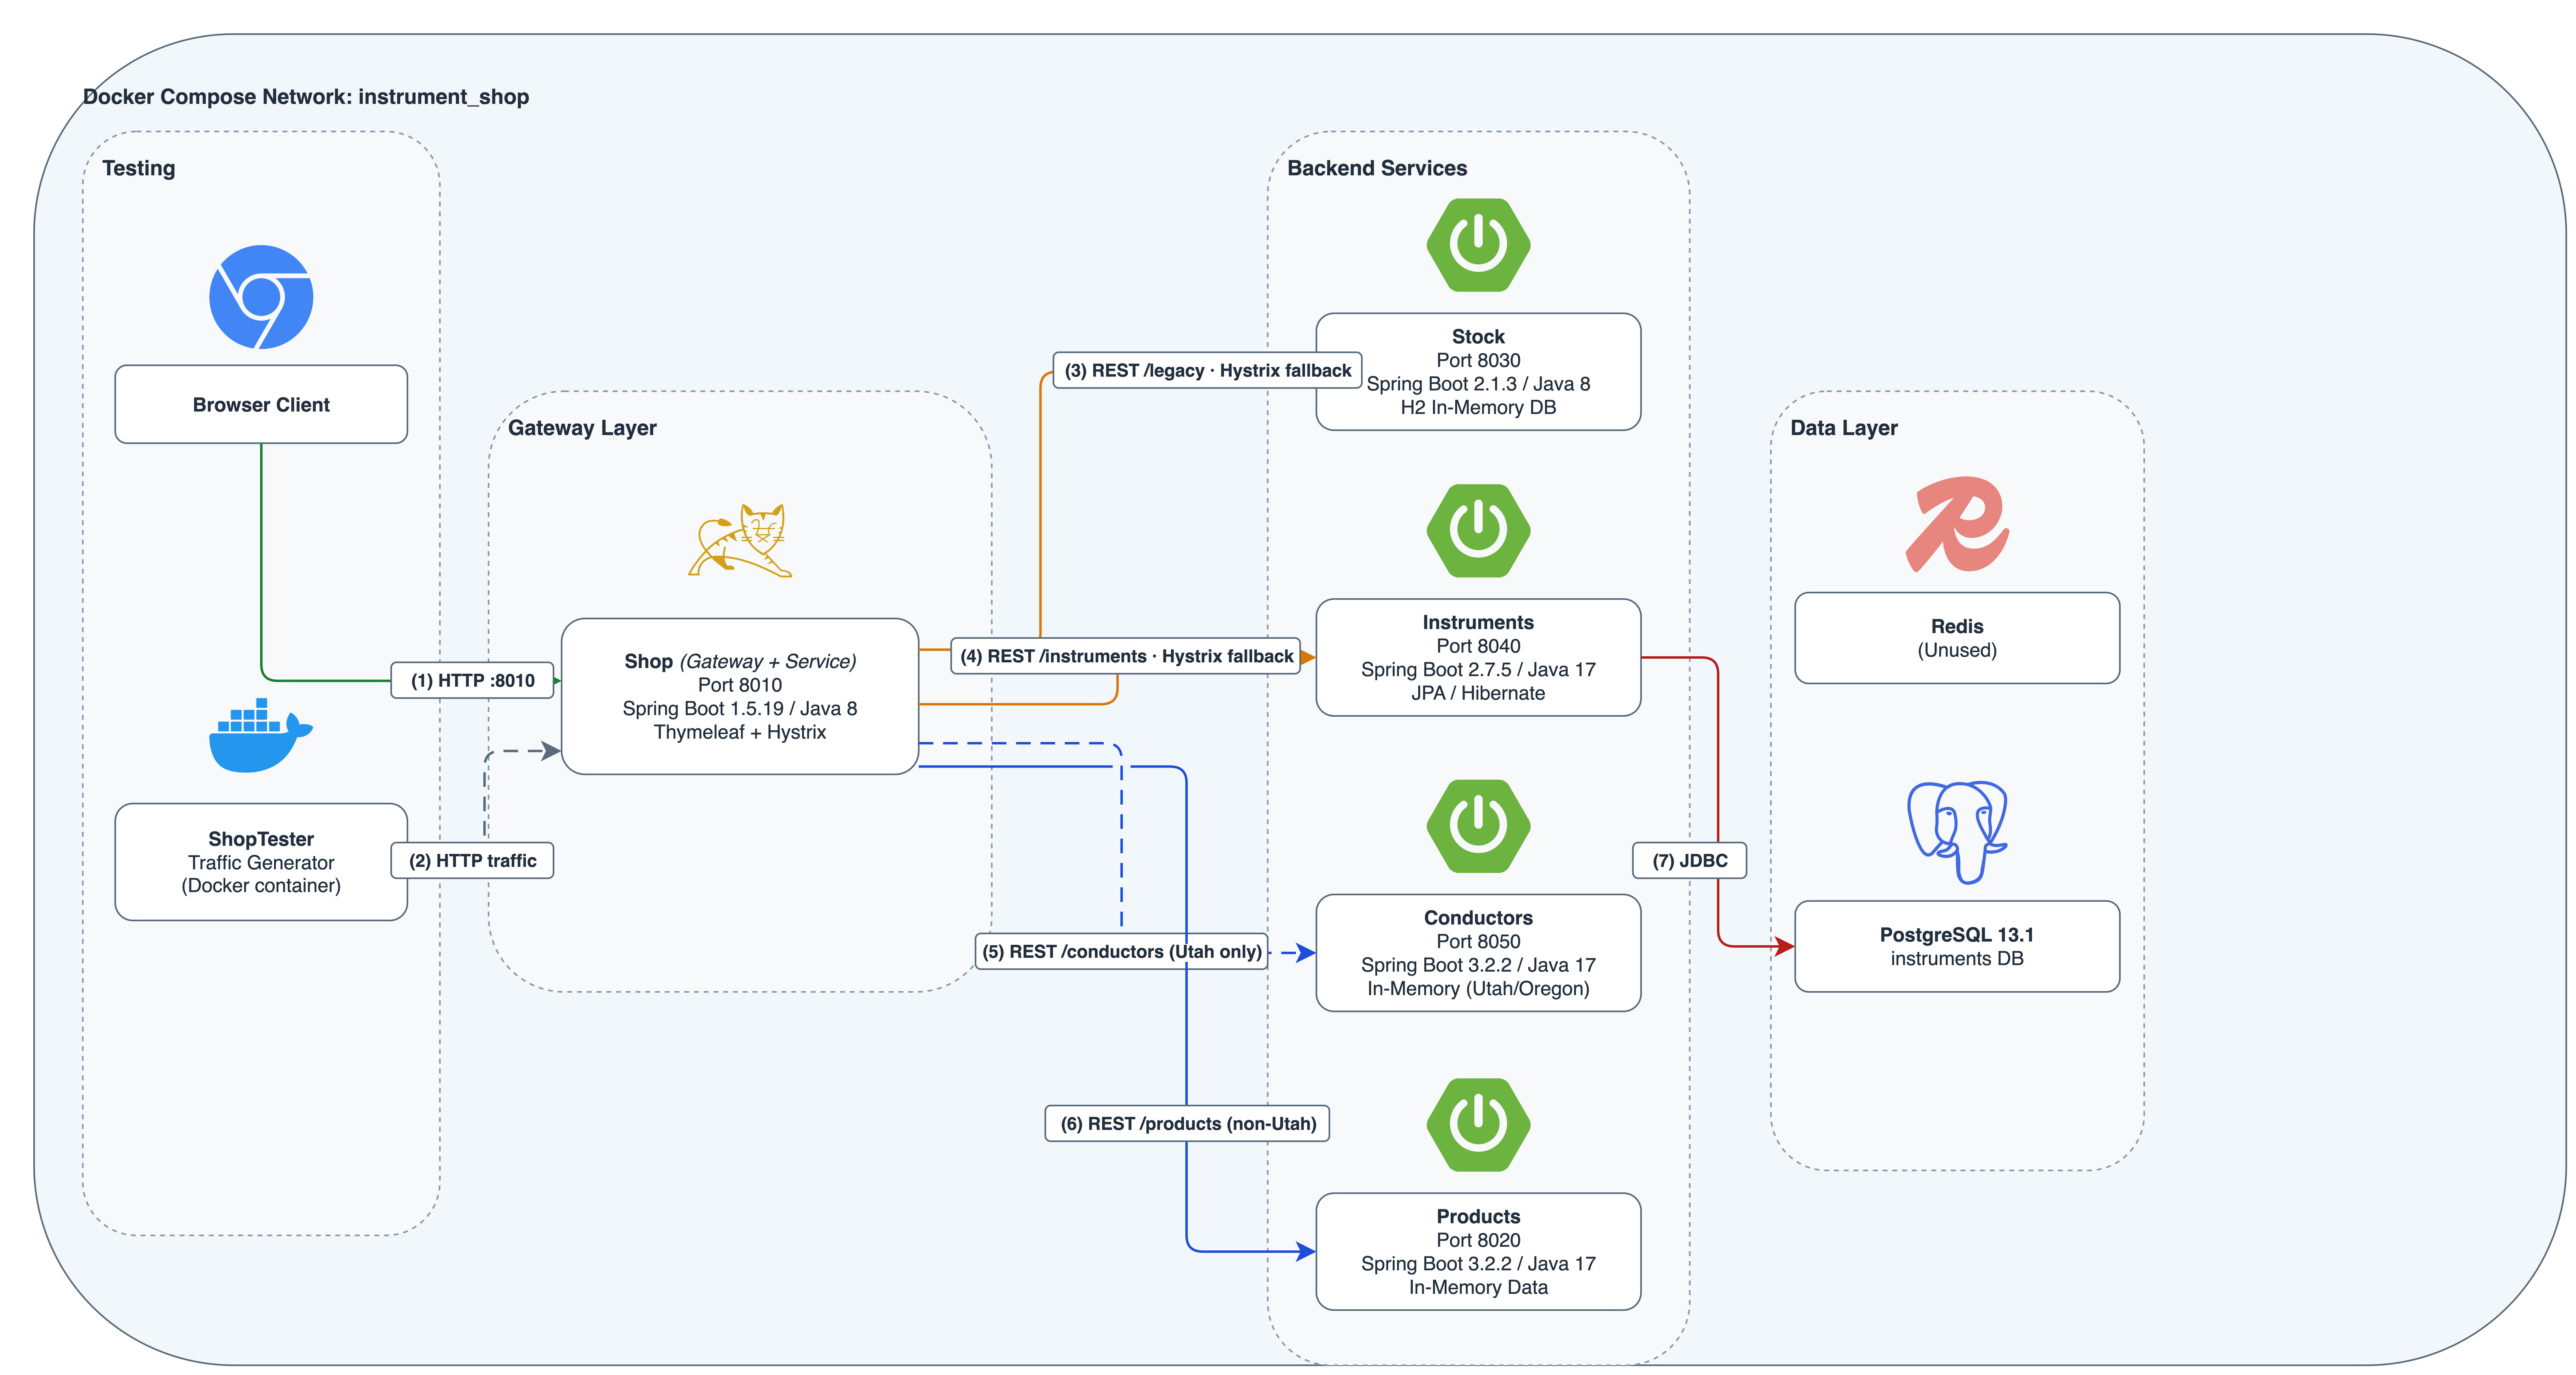
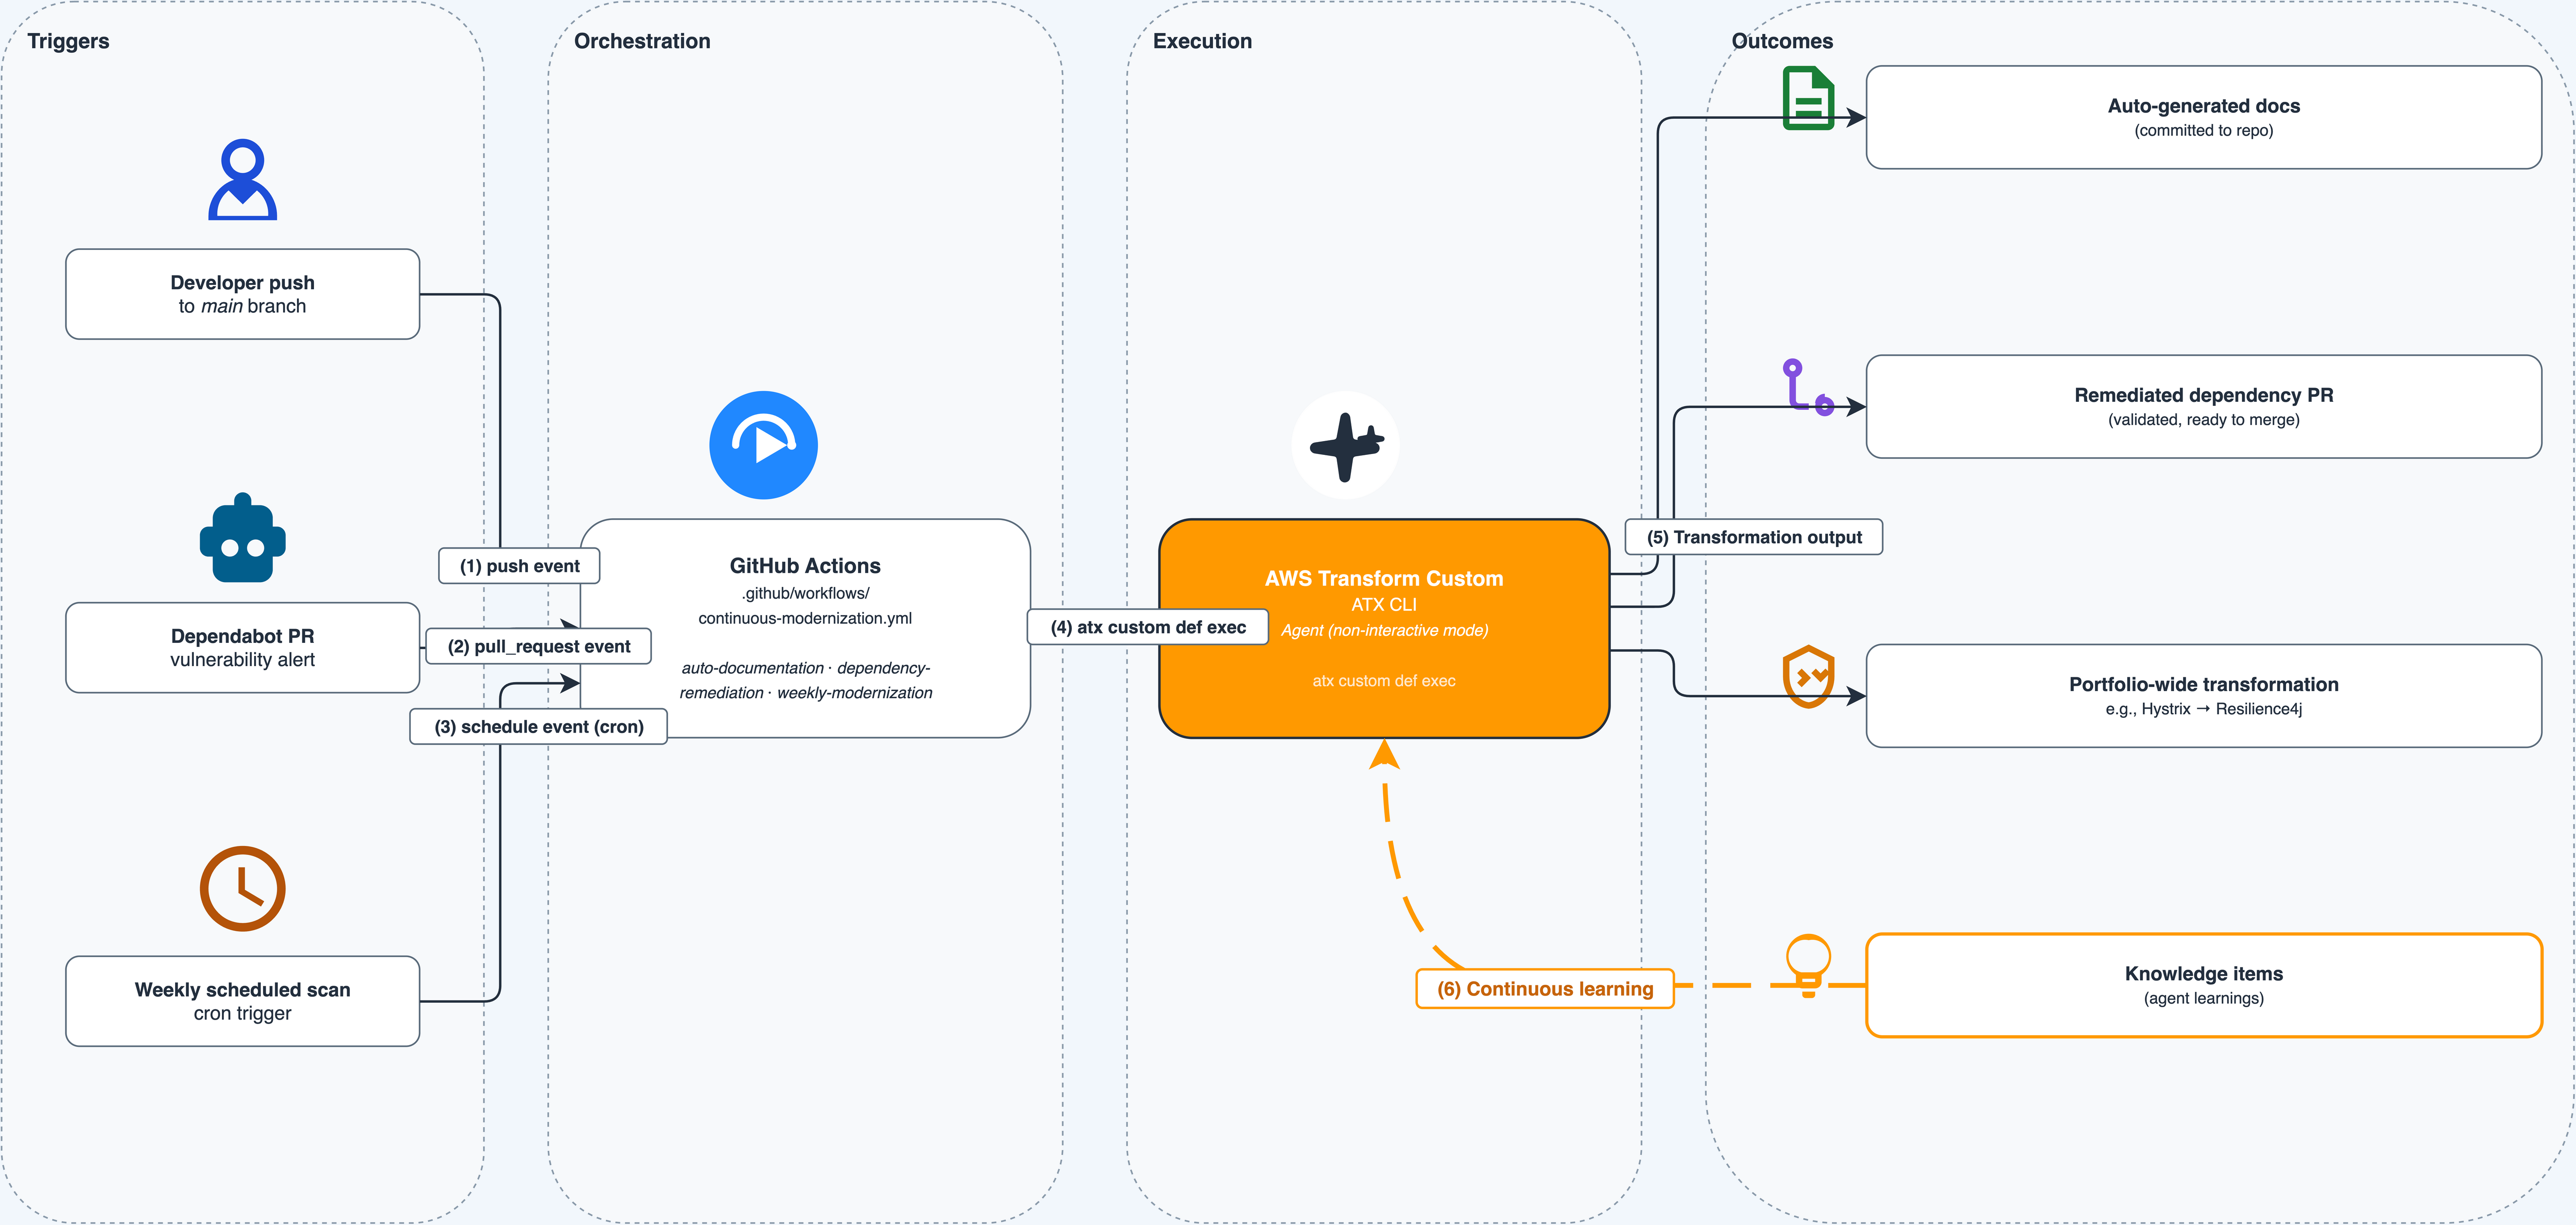
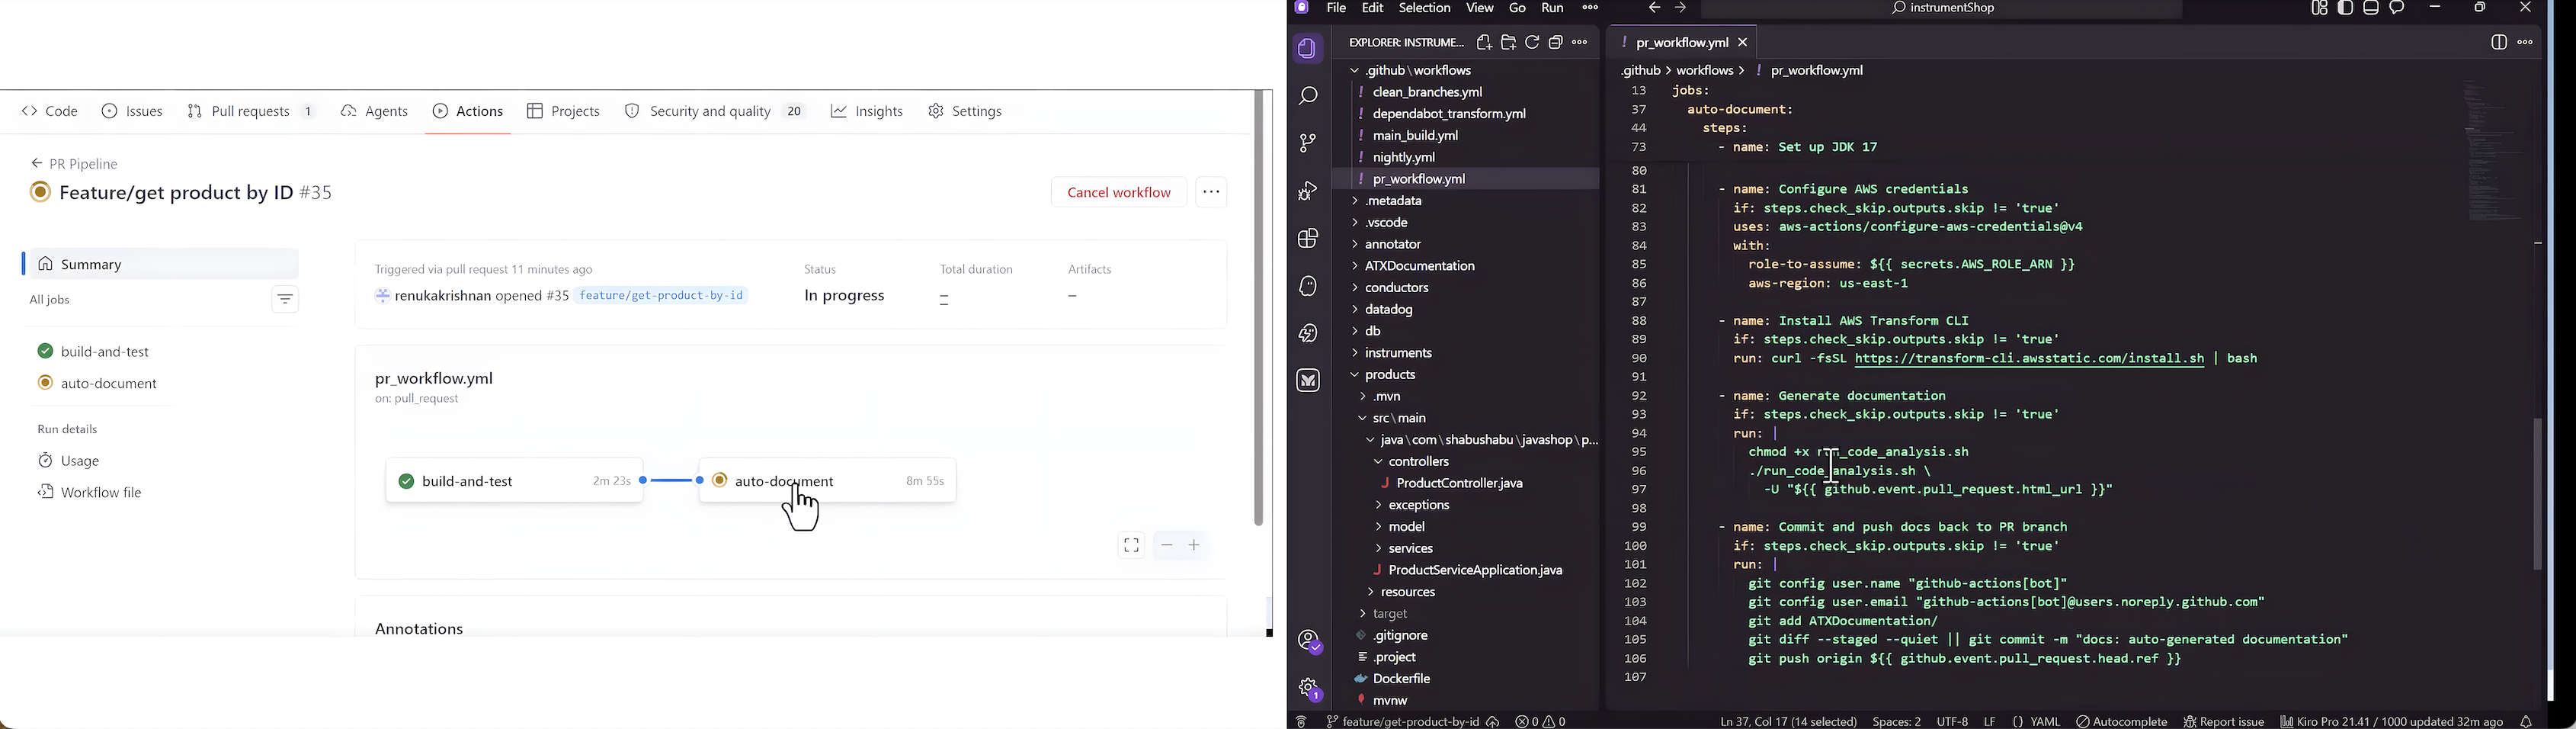
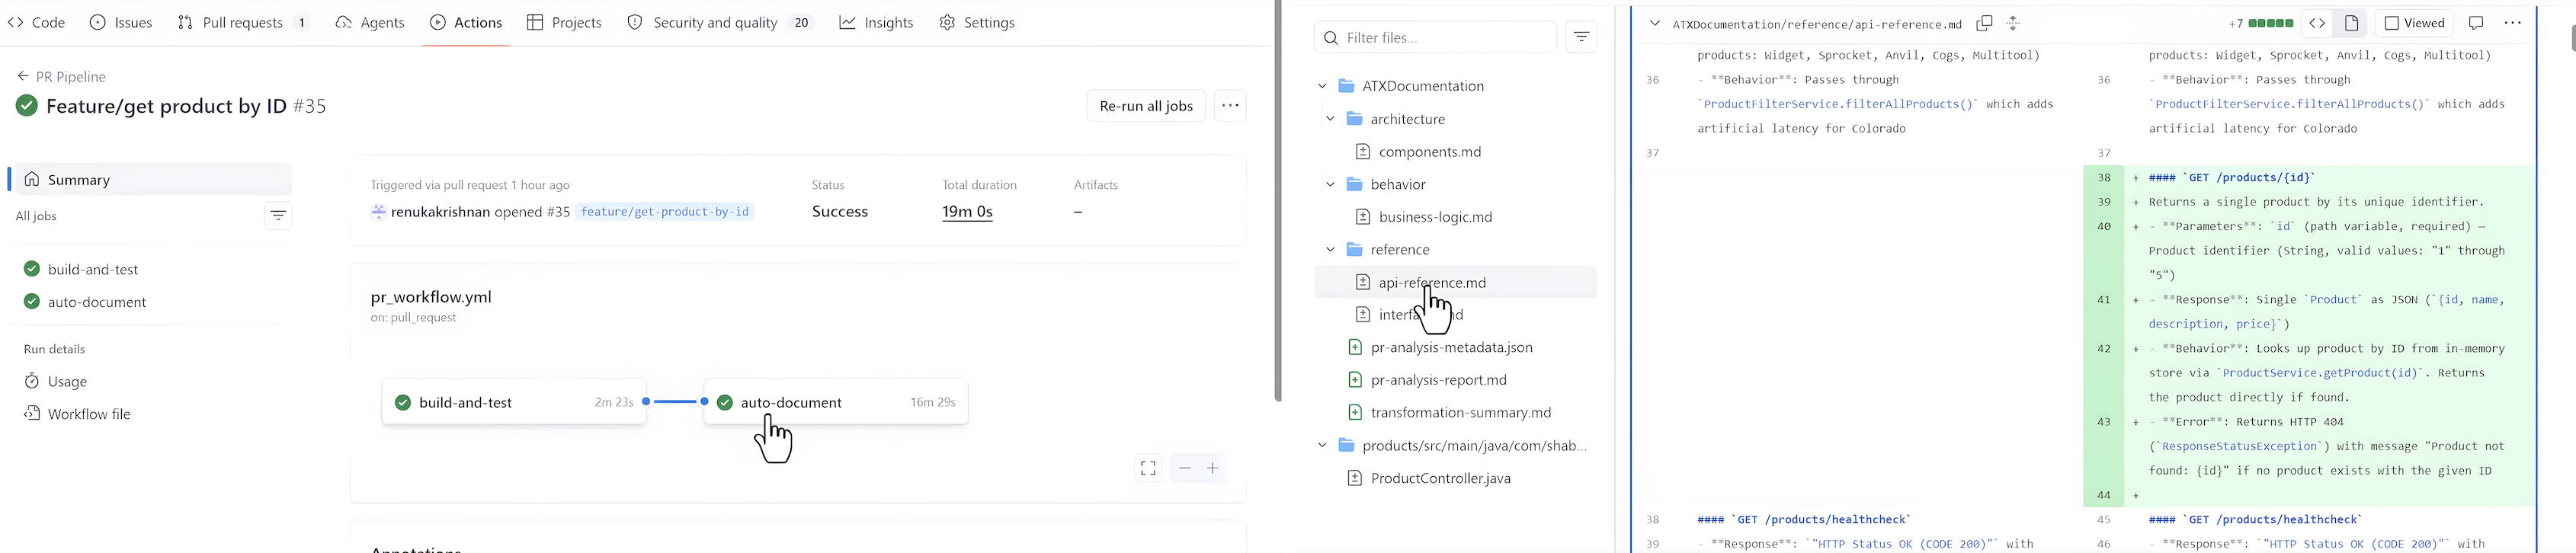
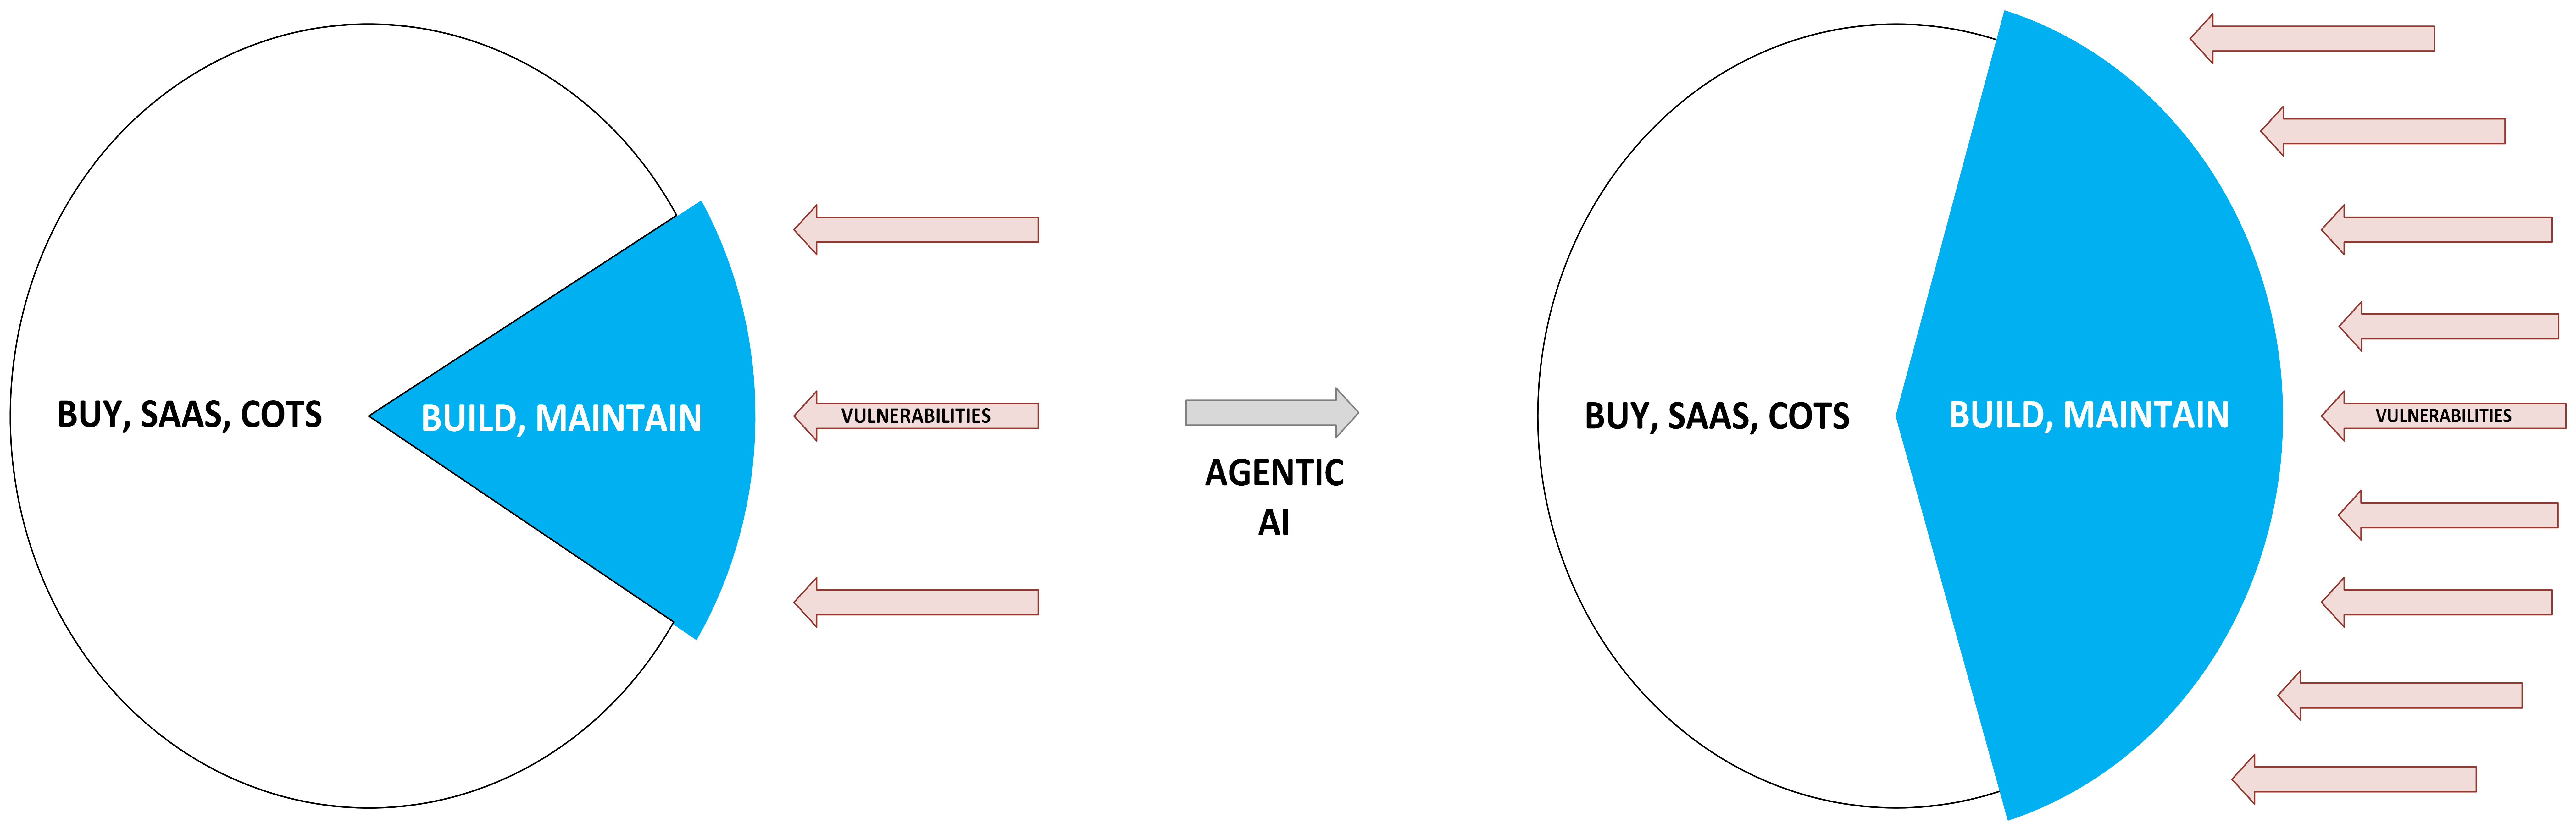
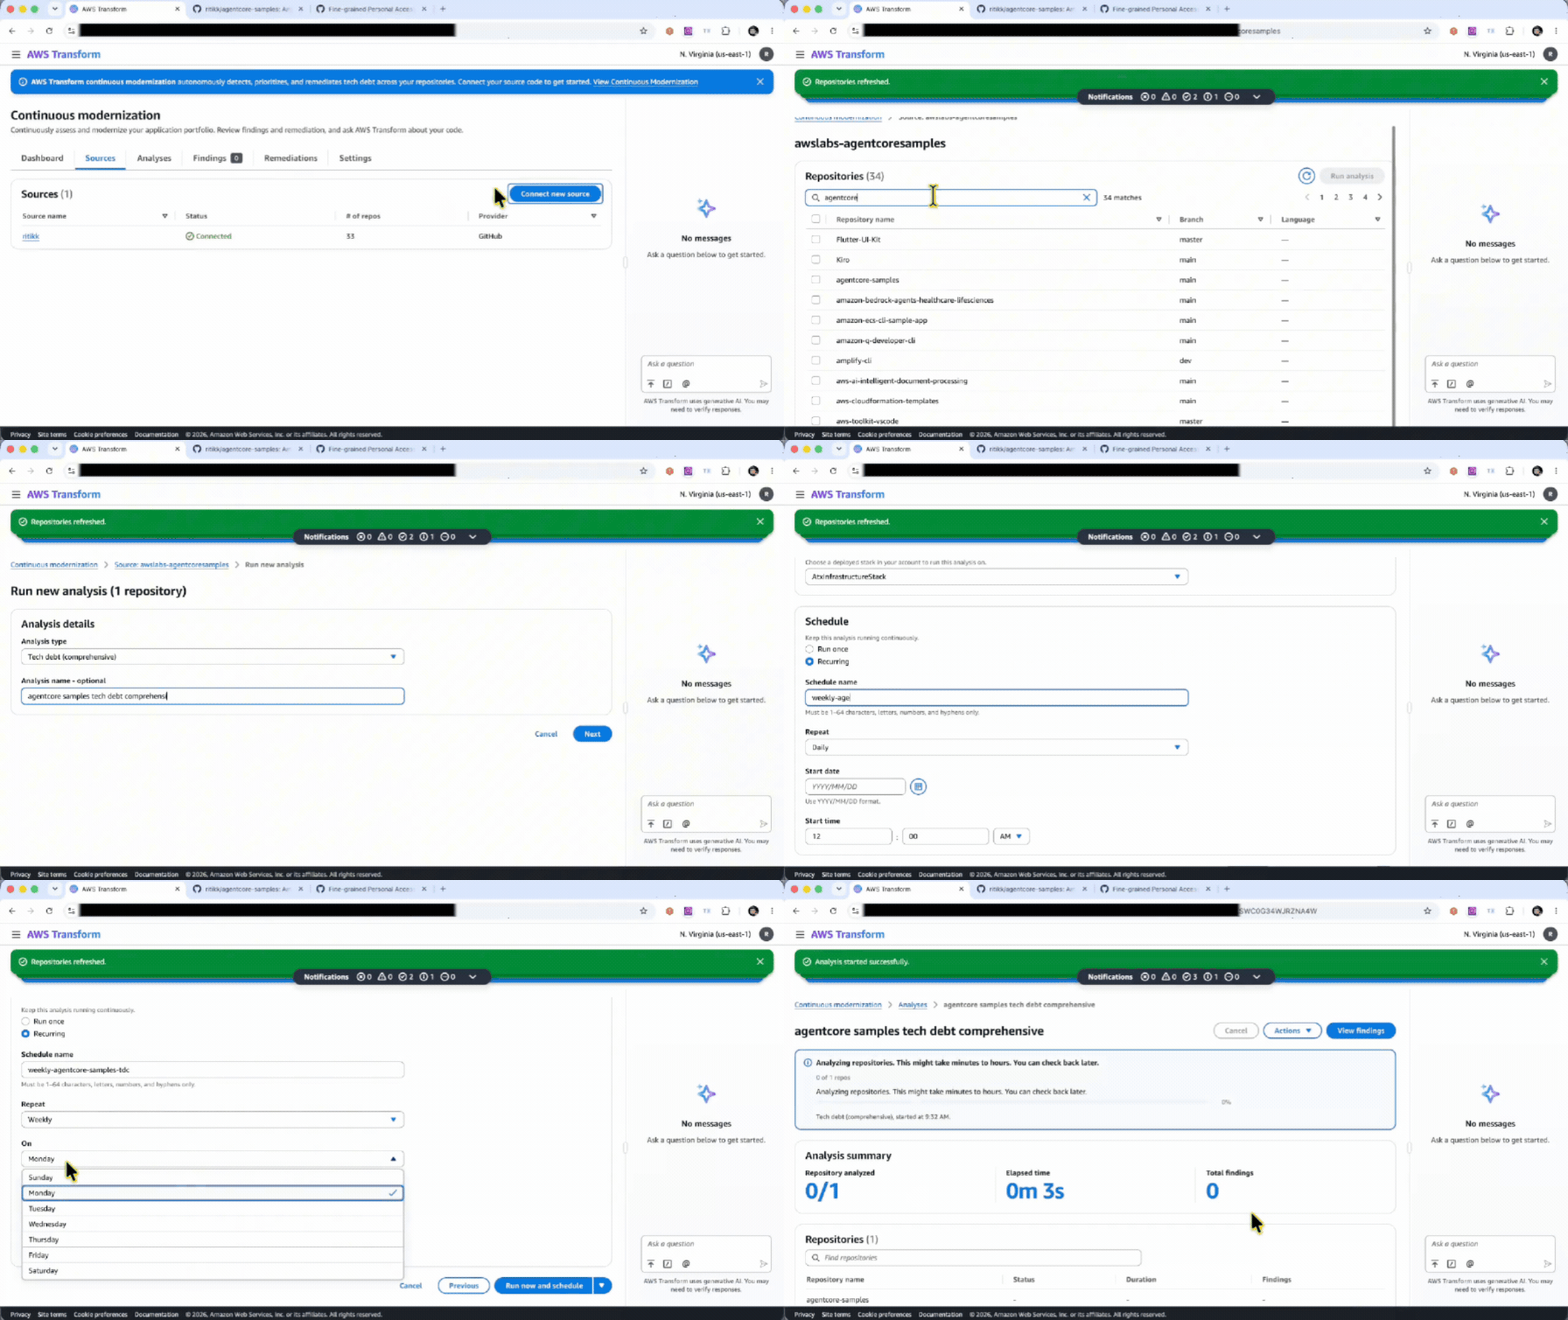
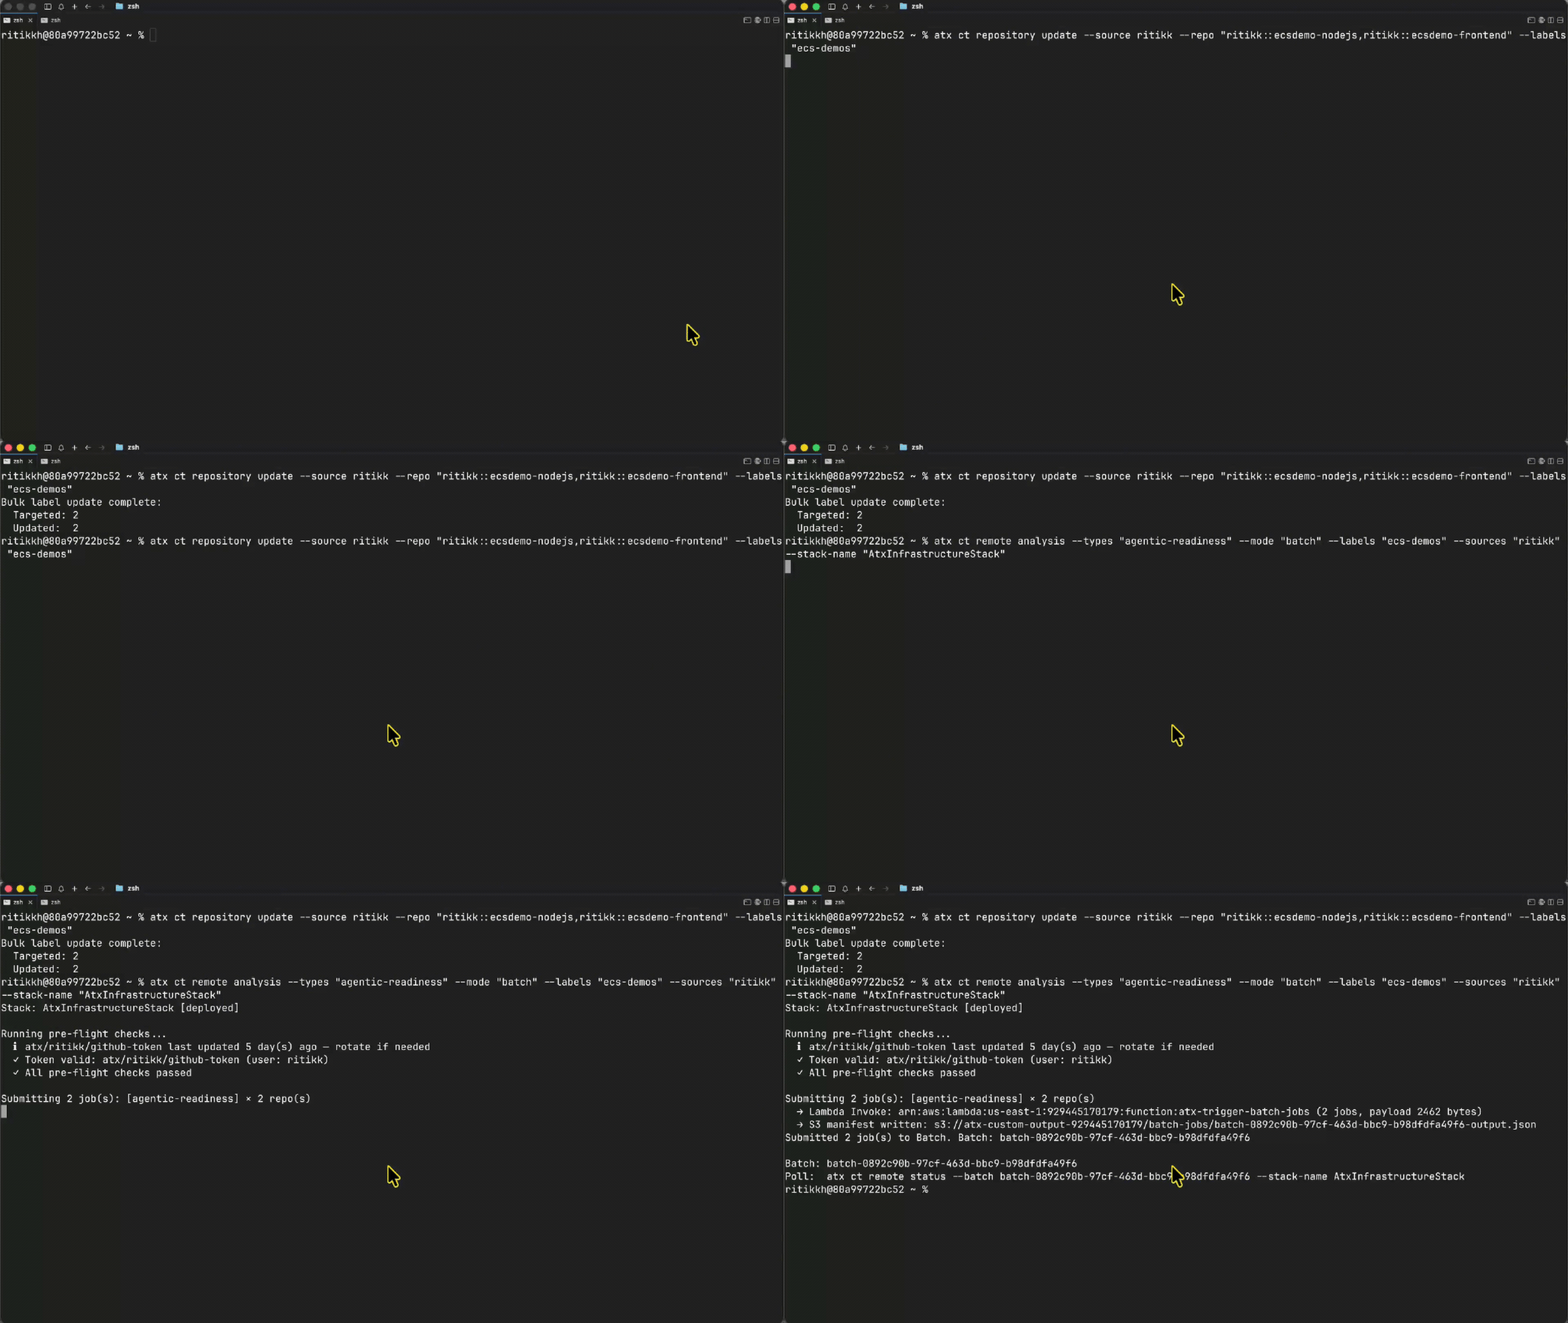
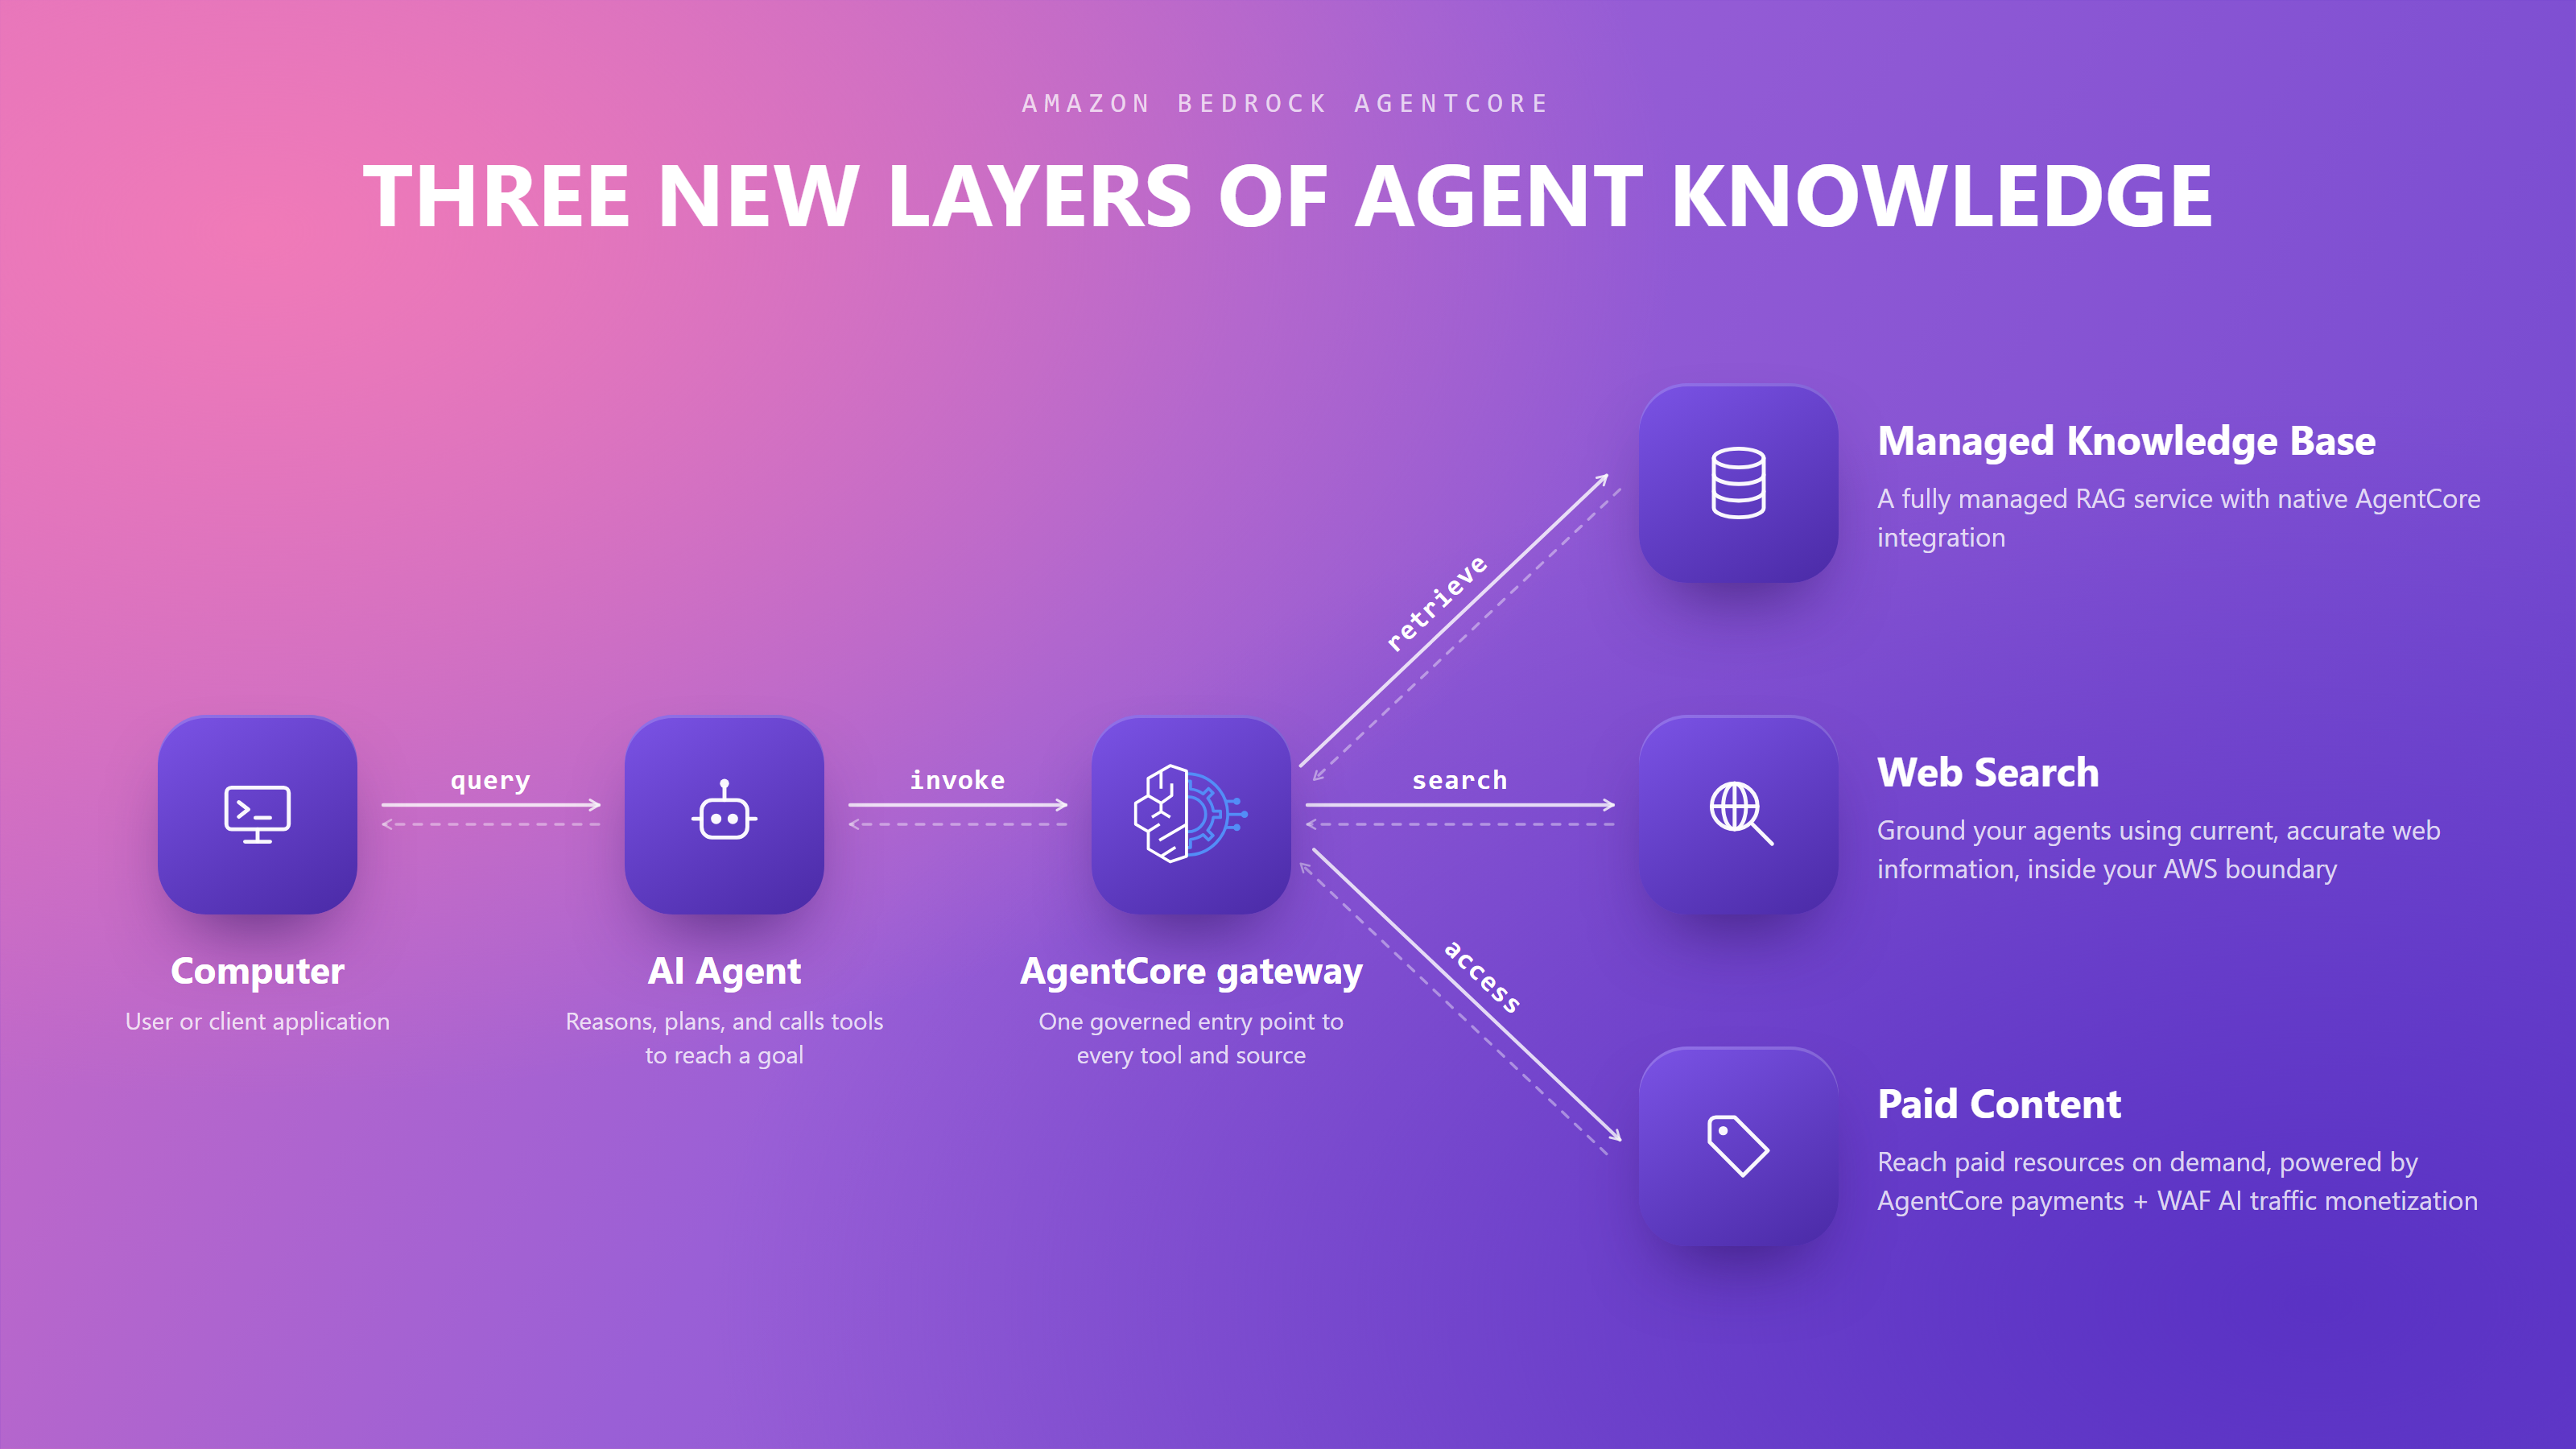
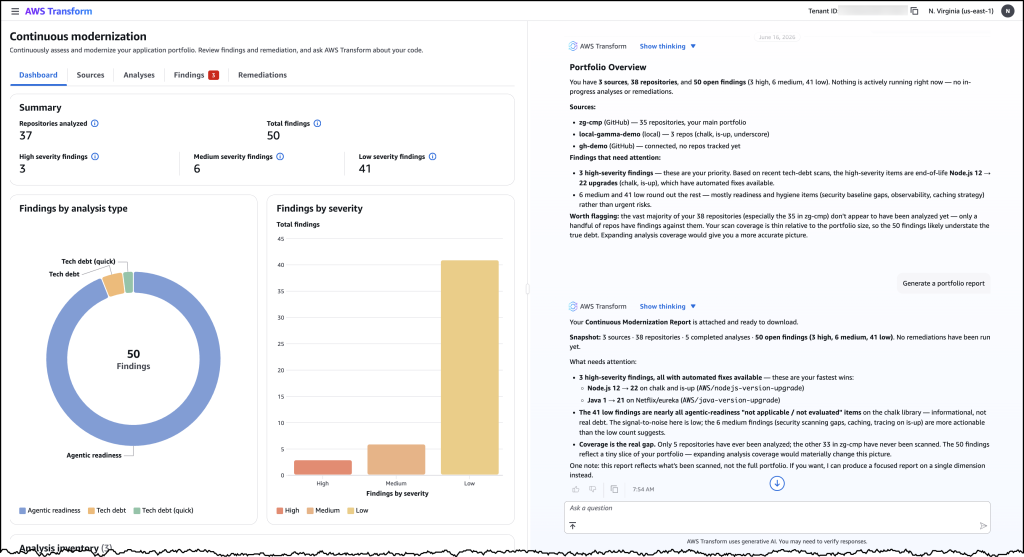
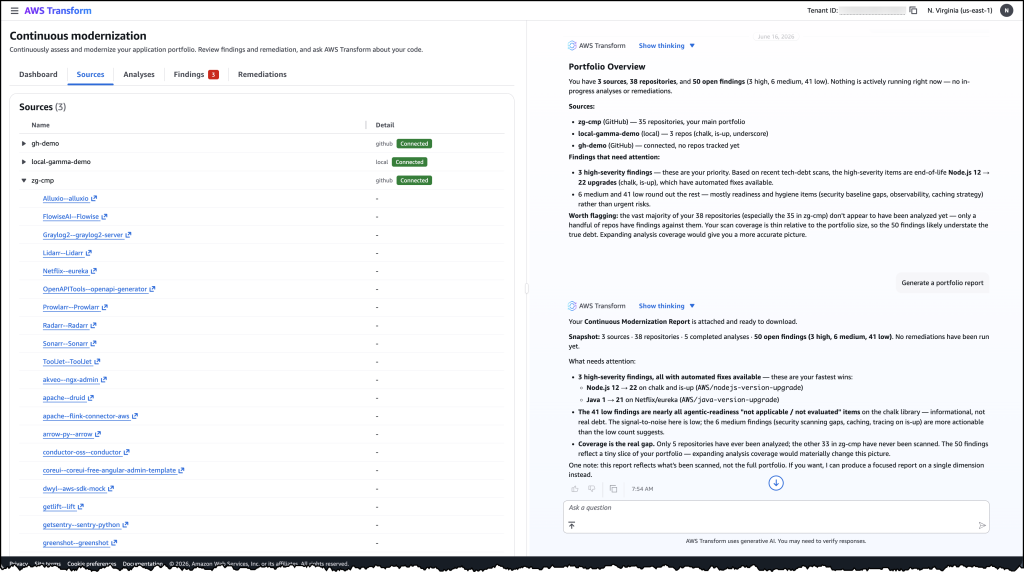
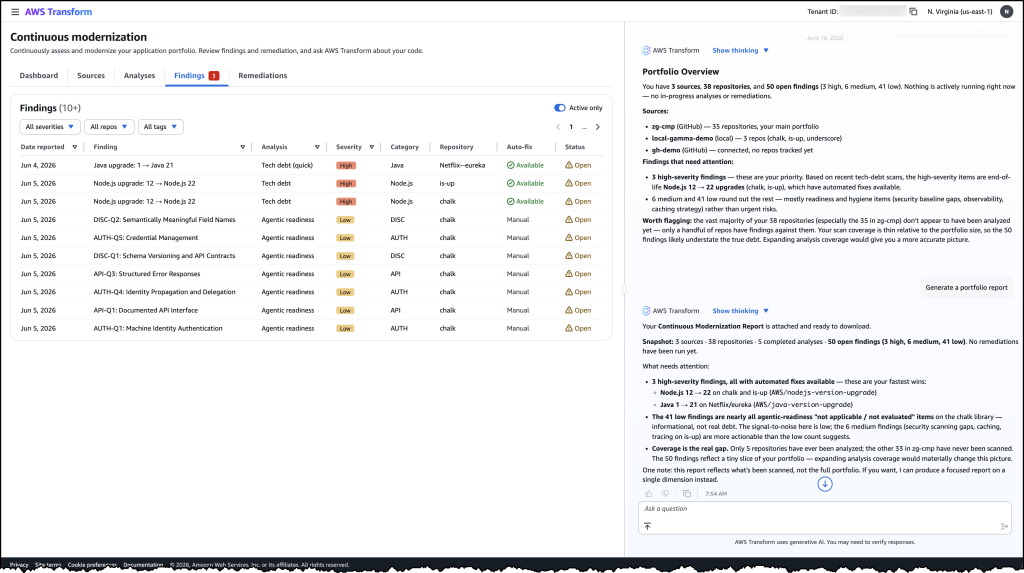
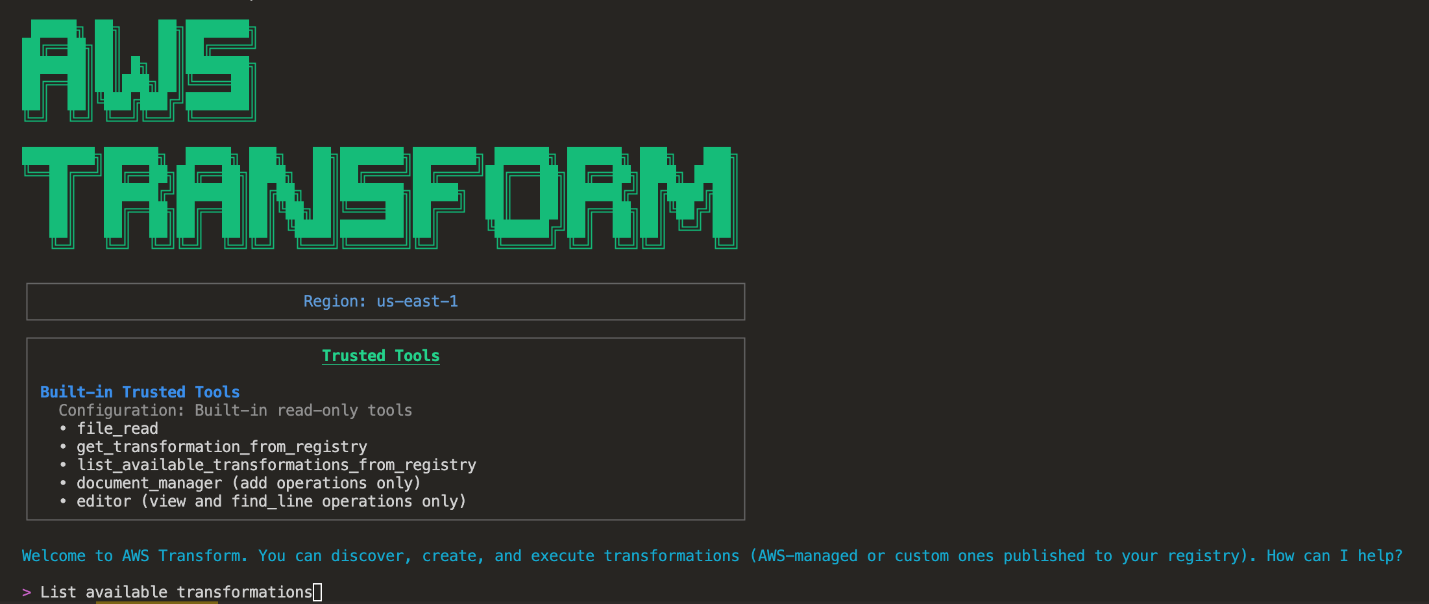
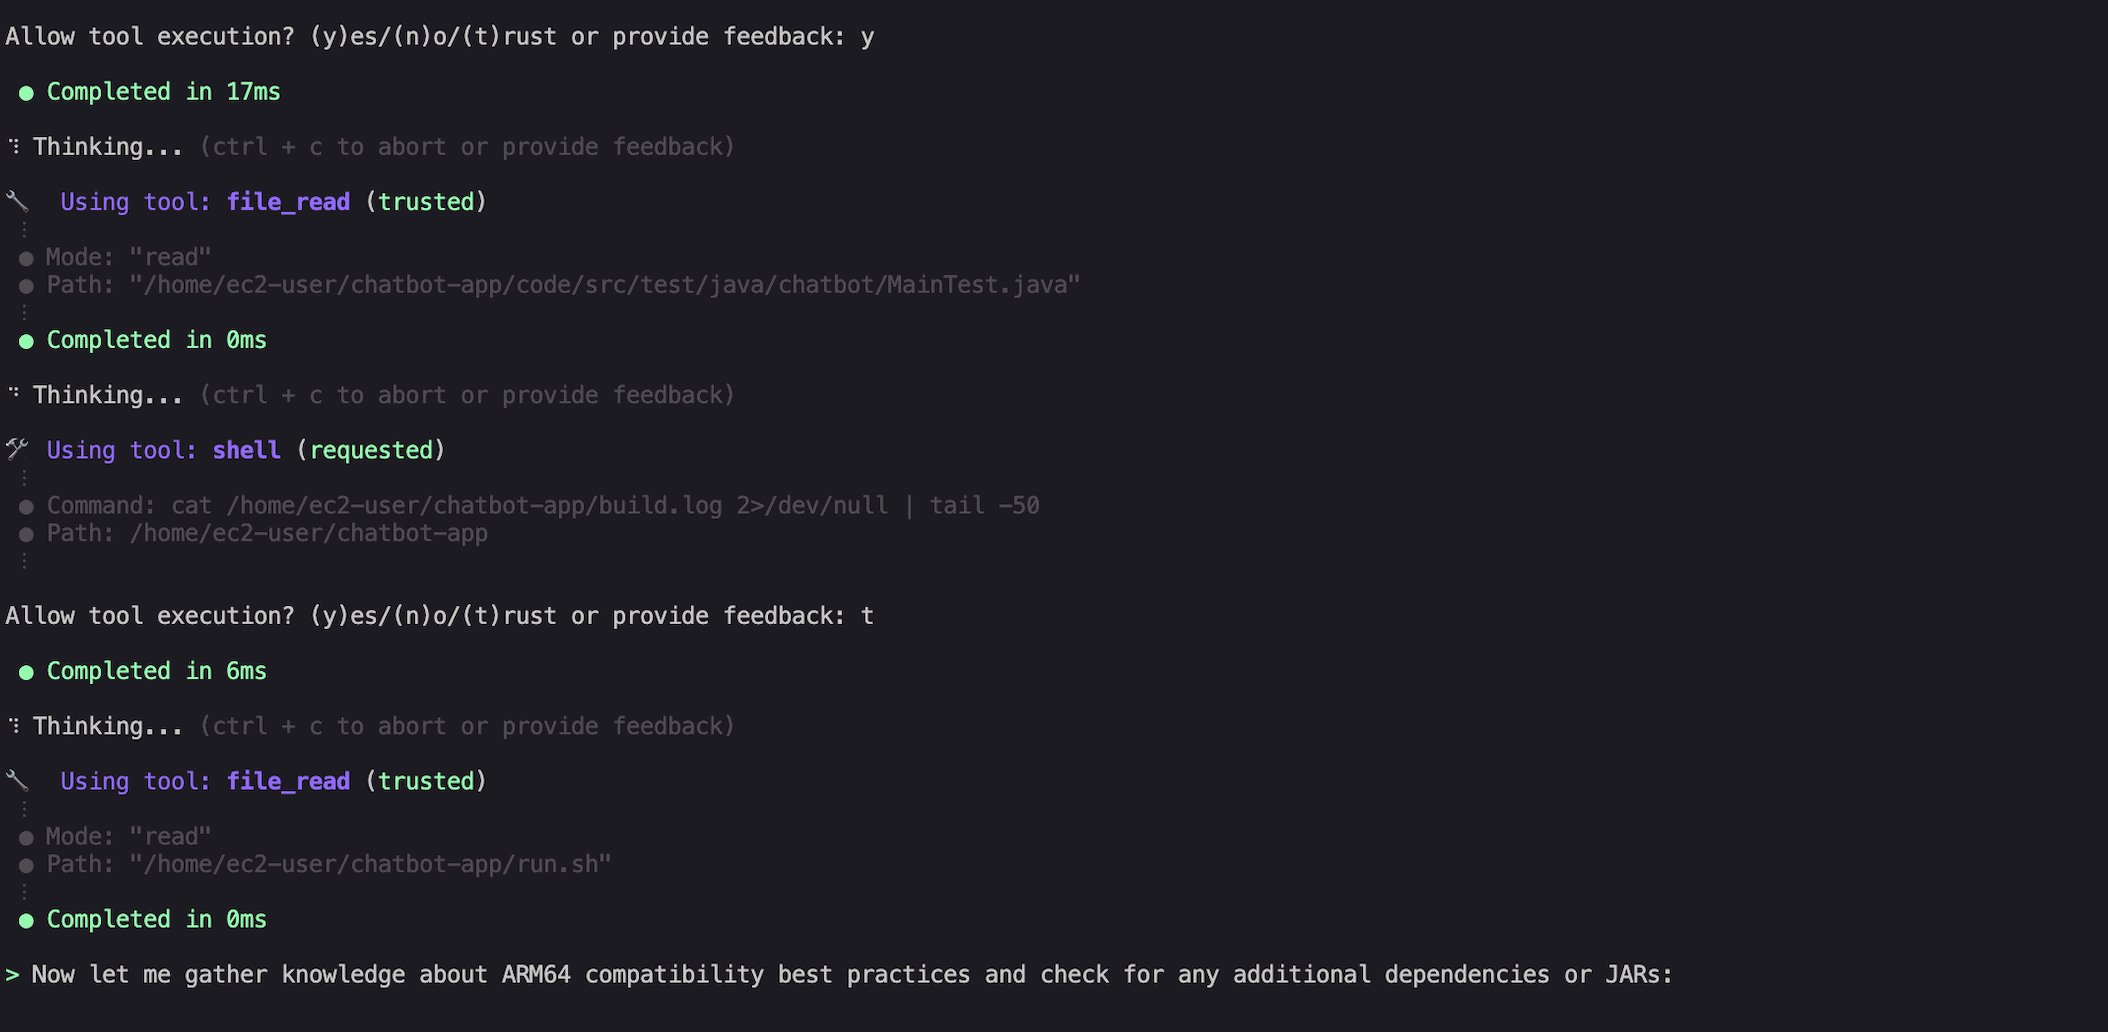
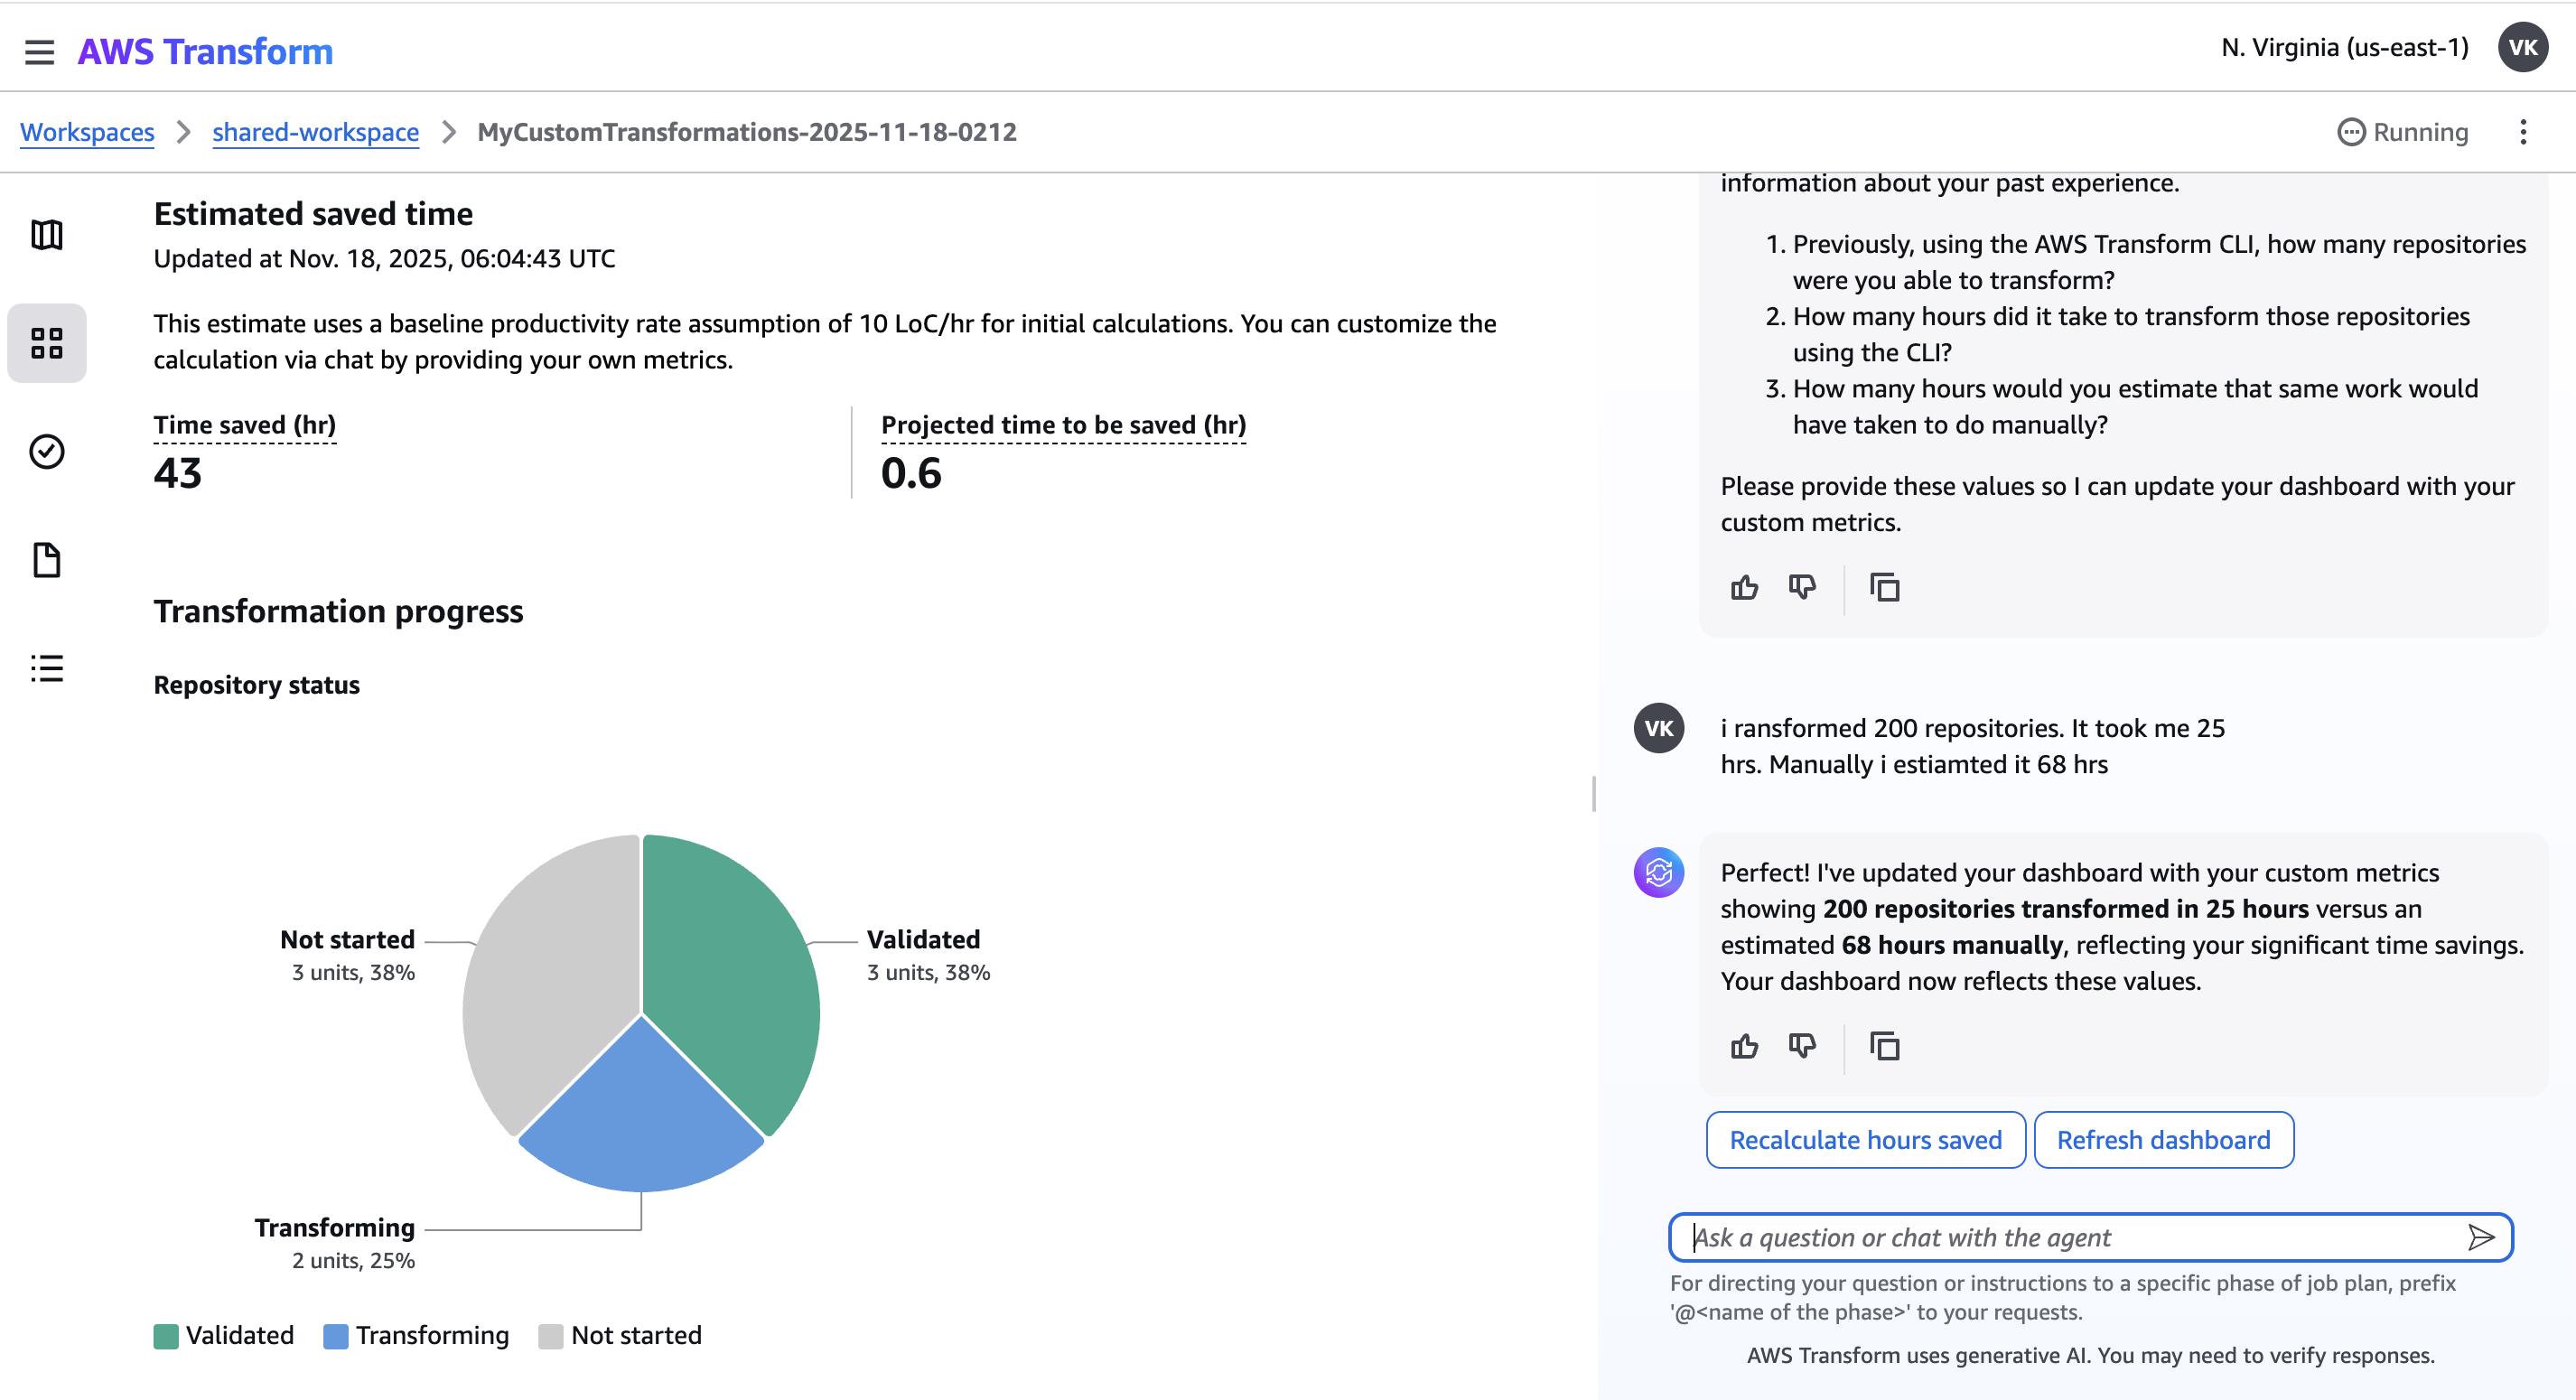
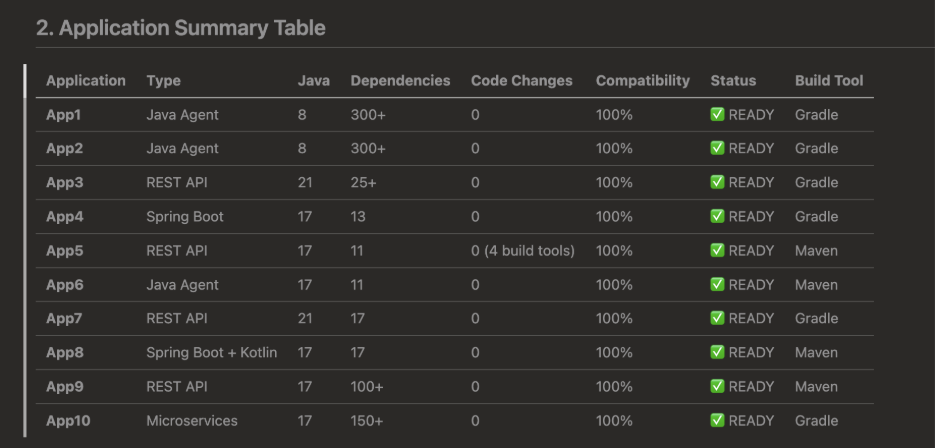
 Just a year ago, we launched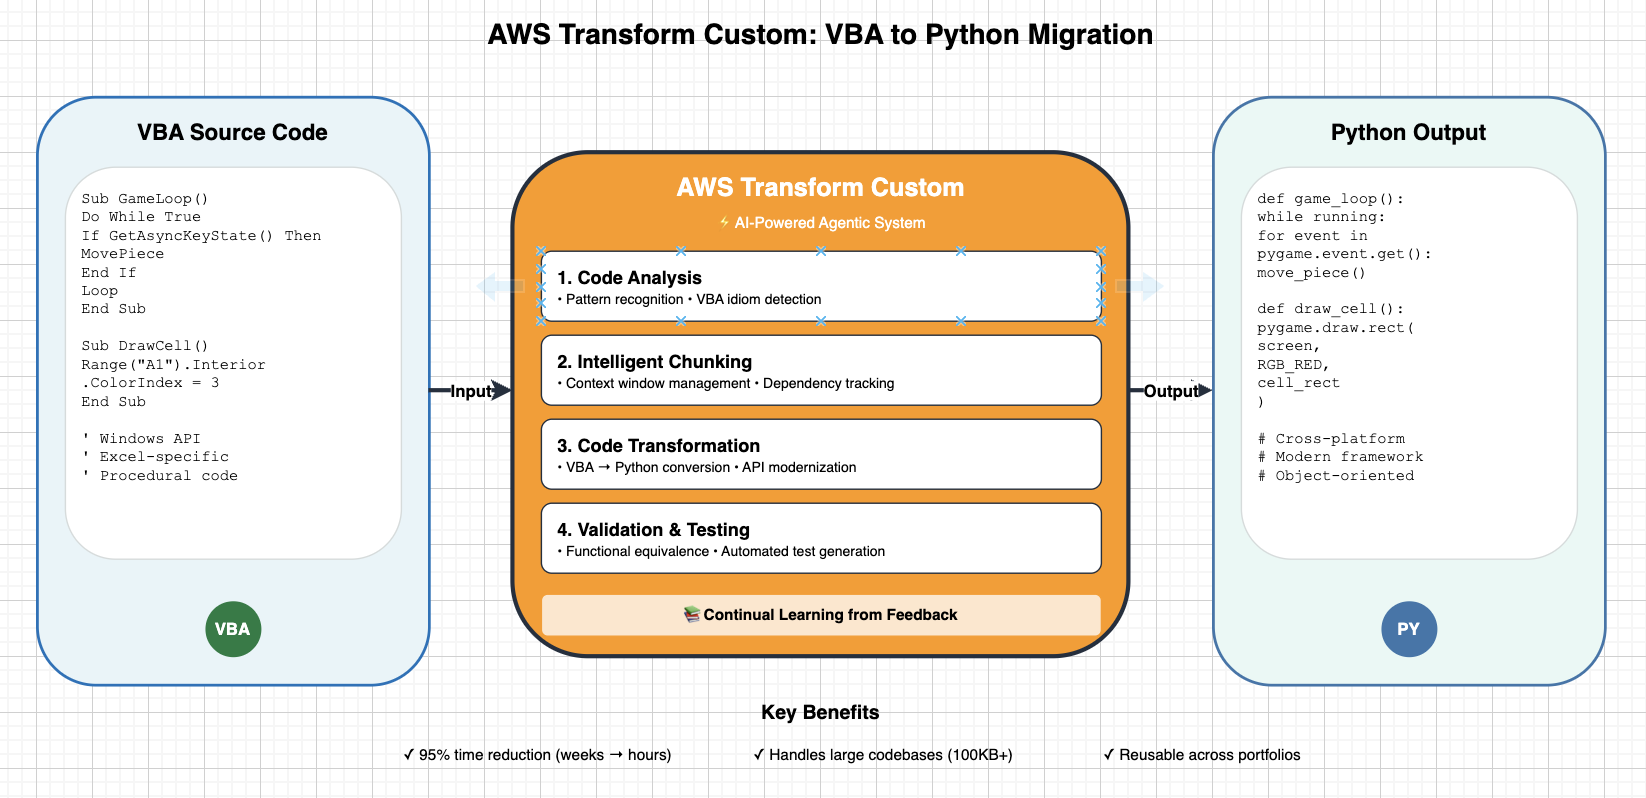
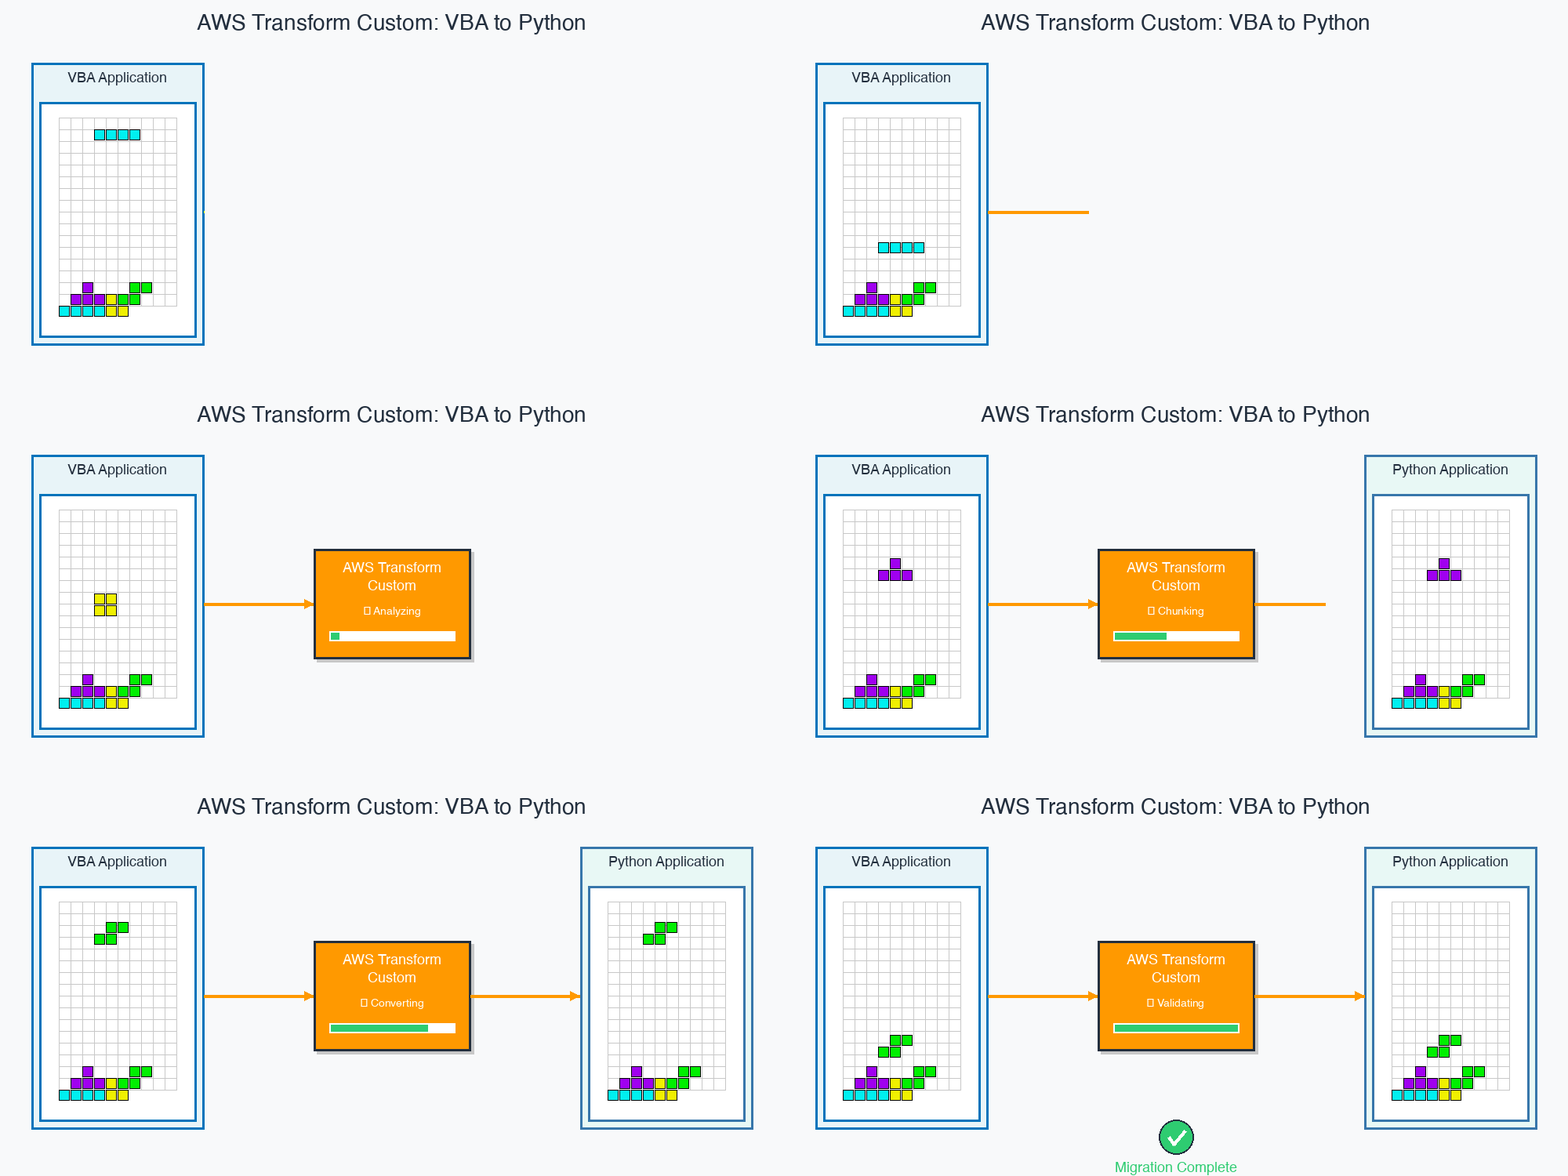
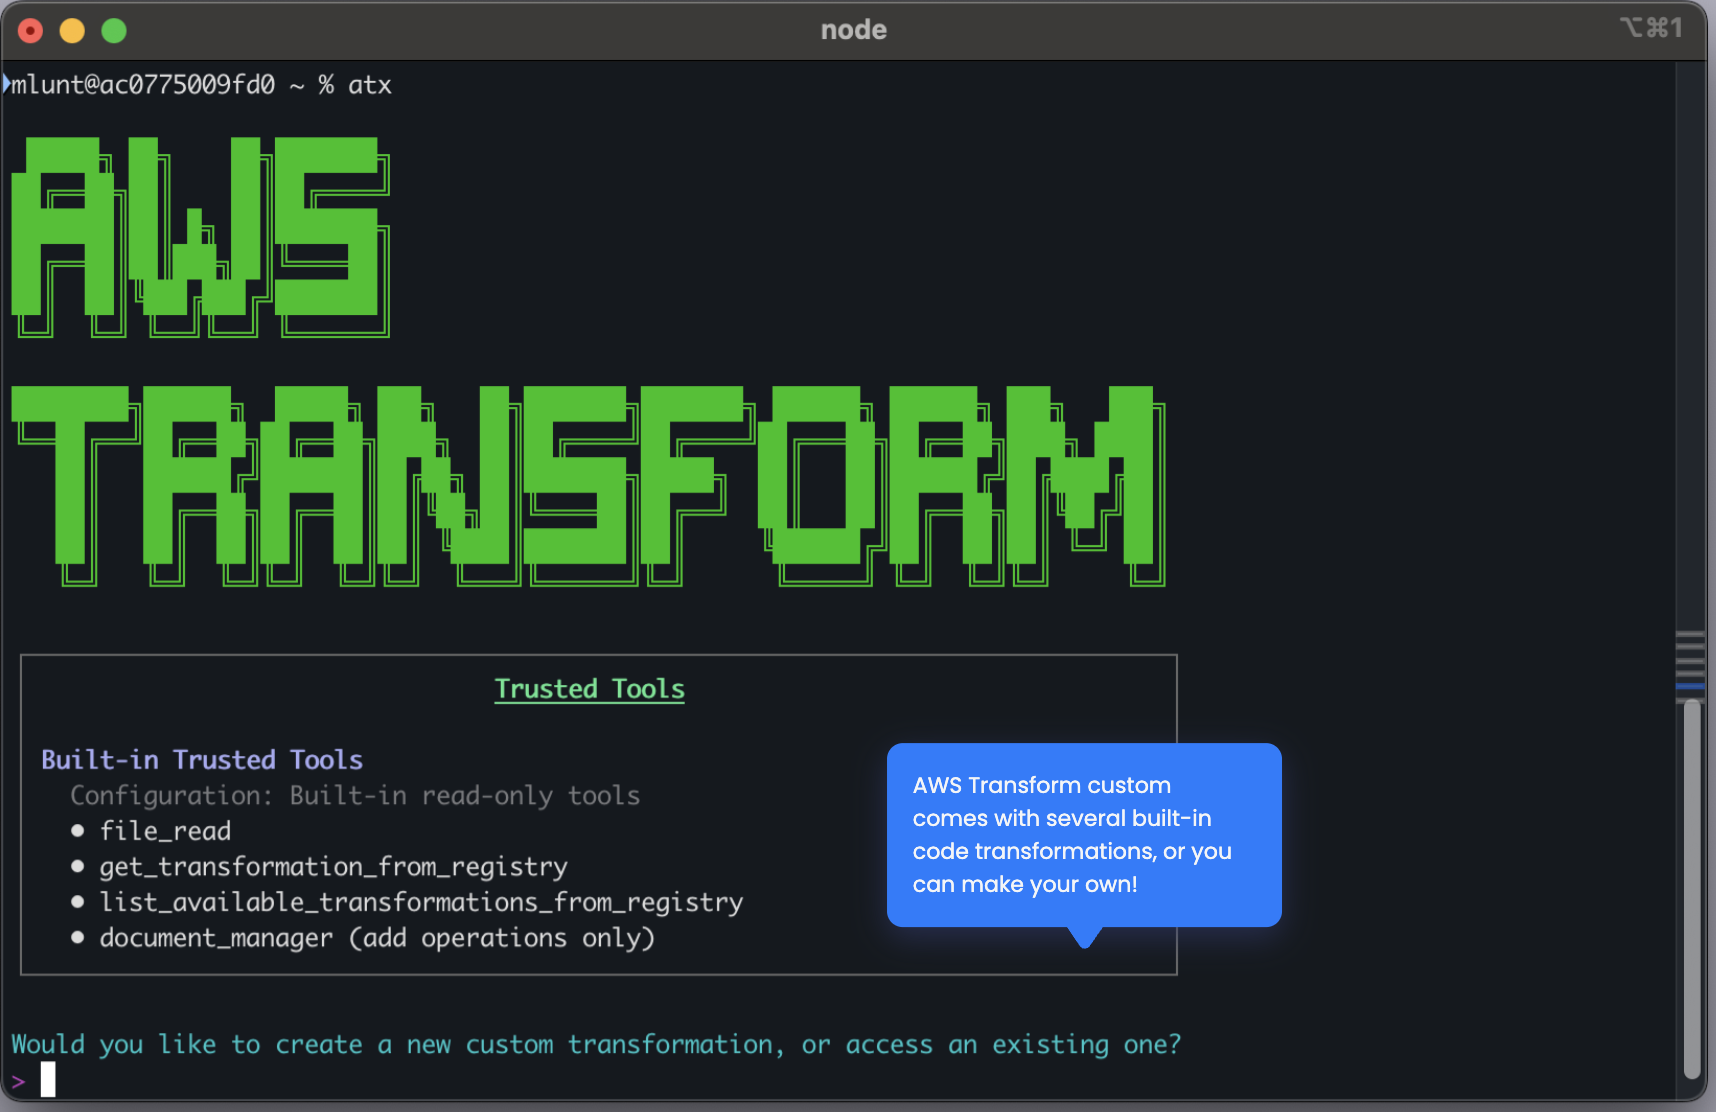
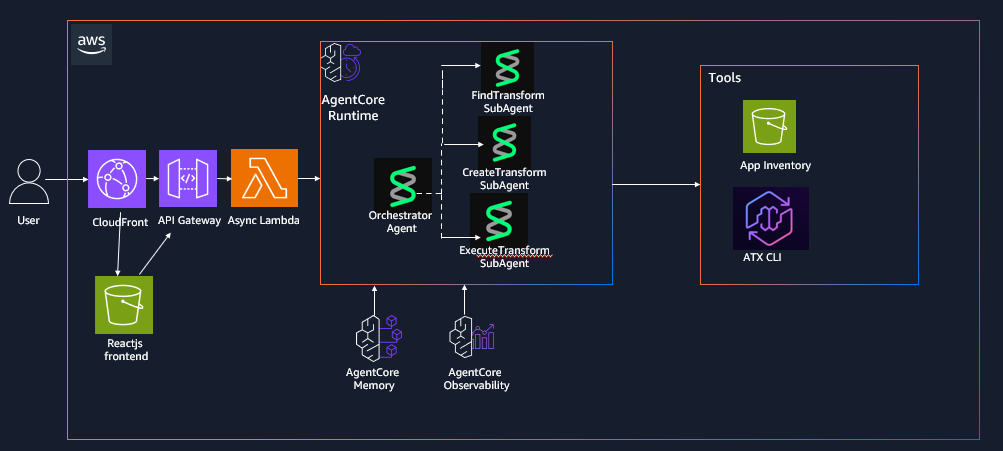
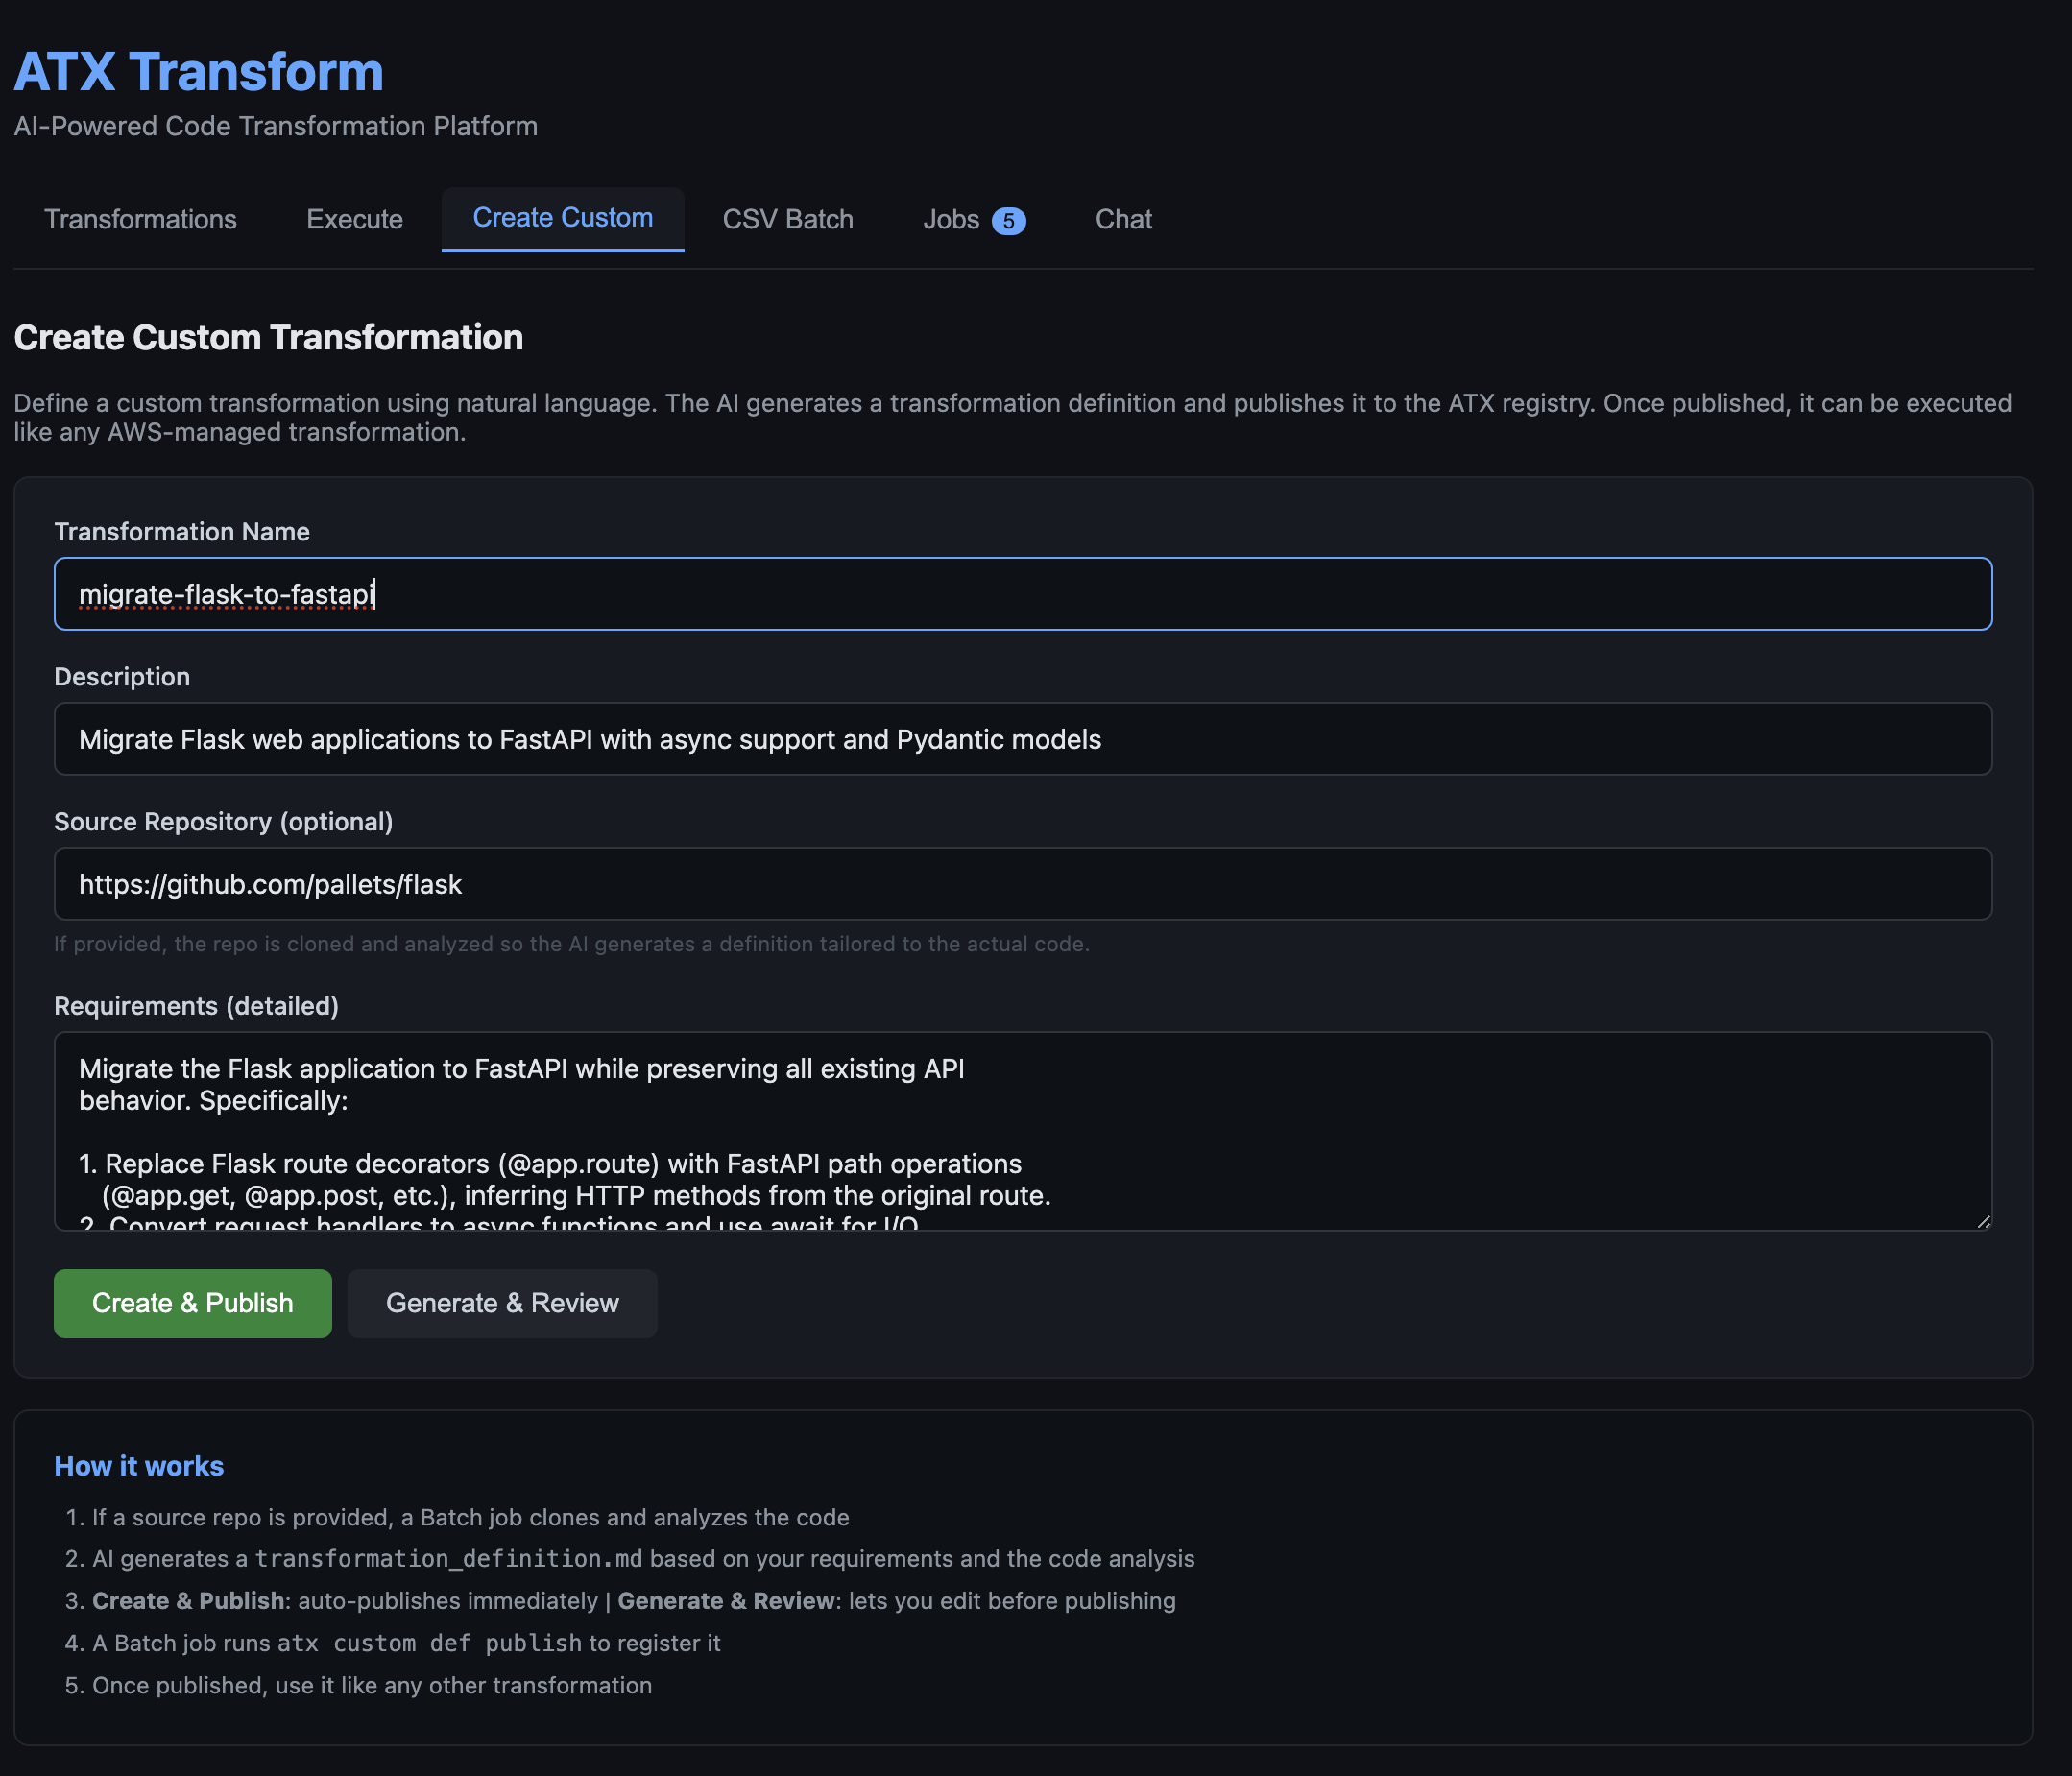
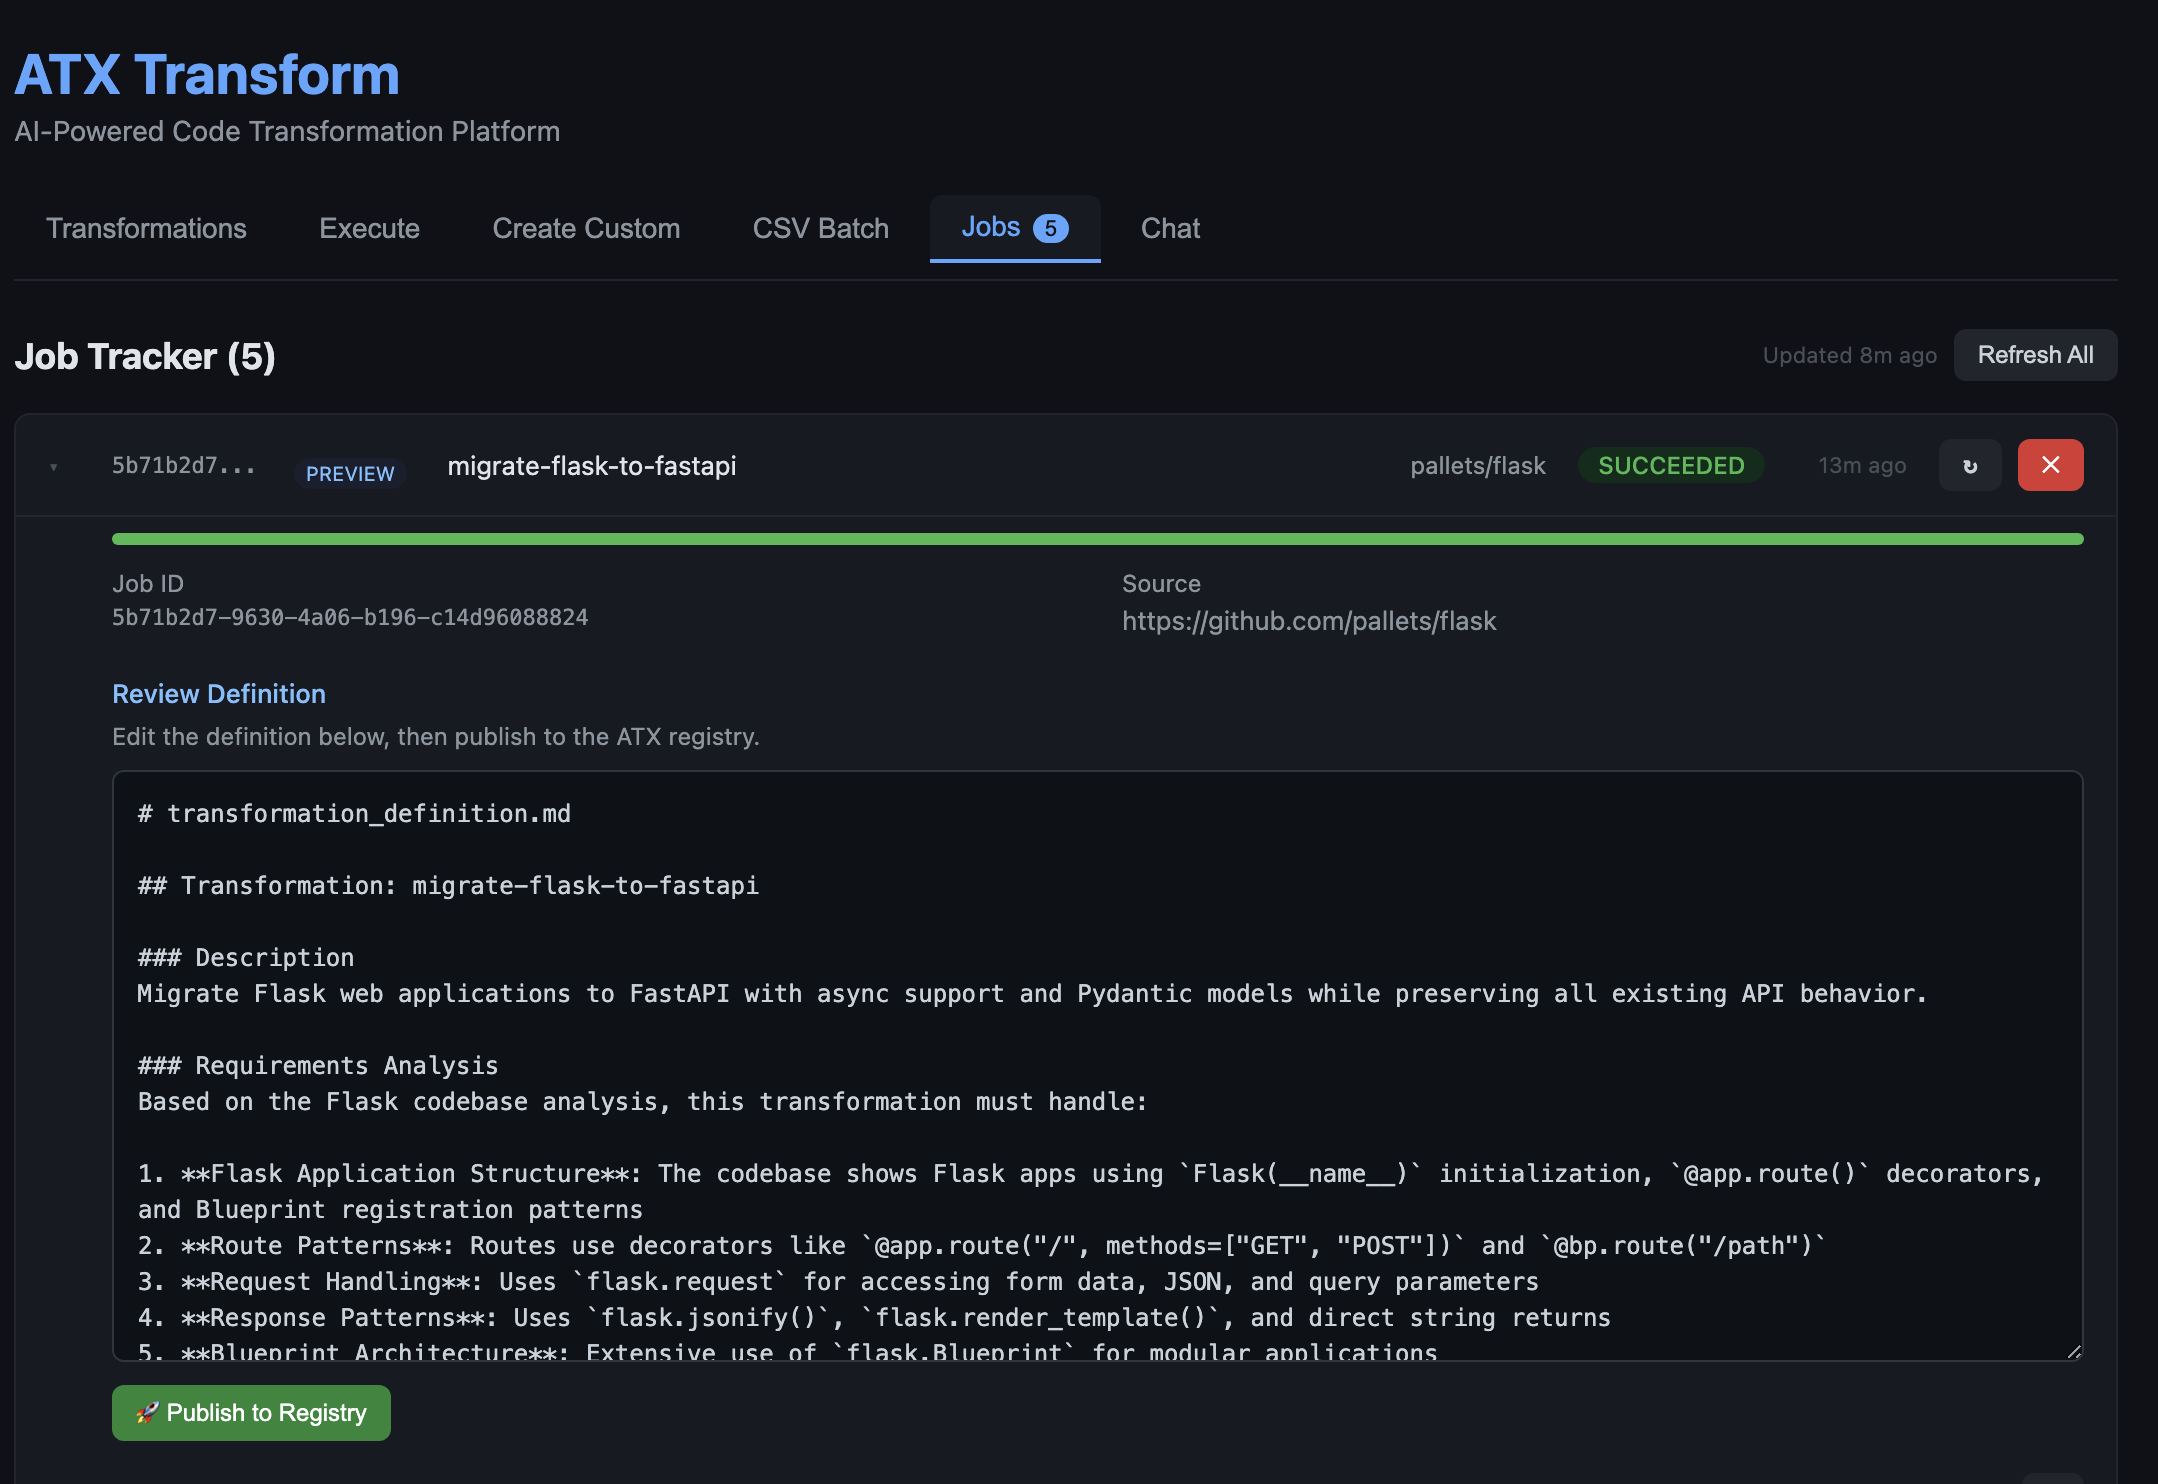
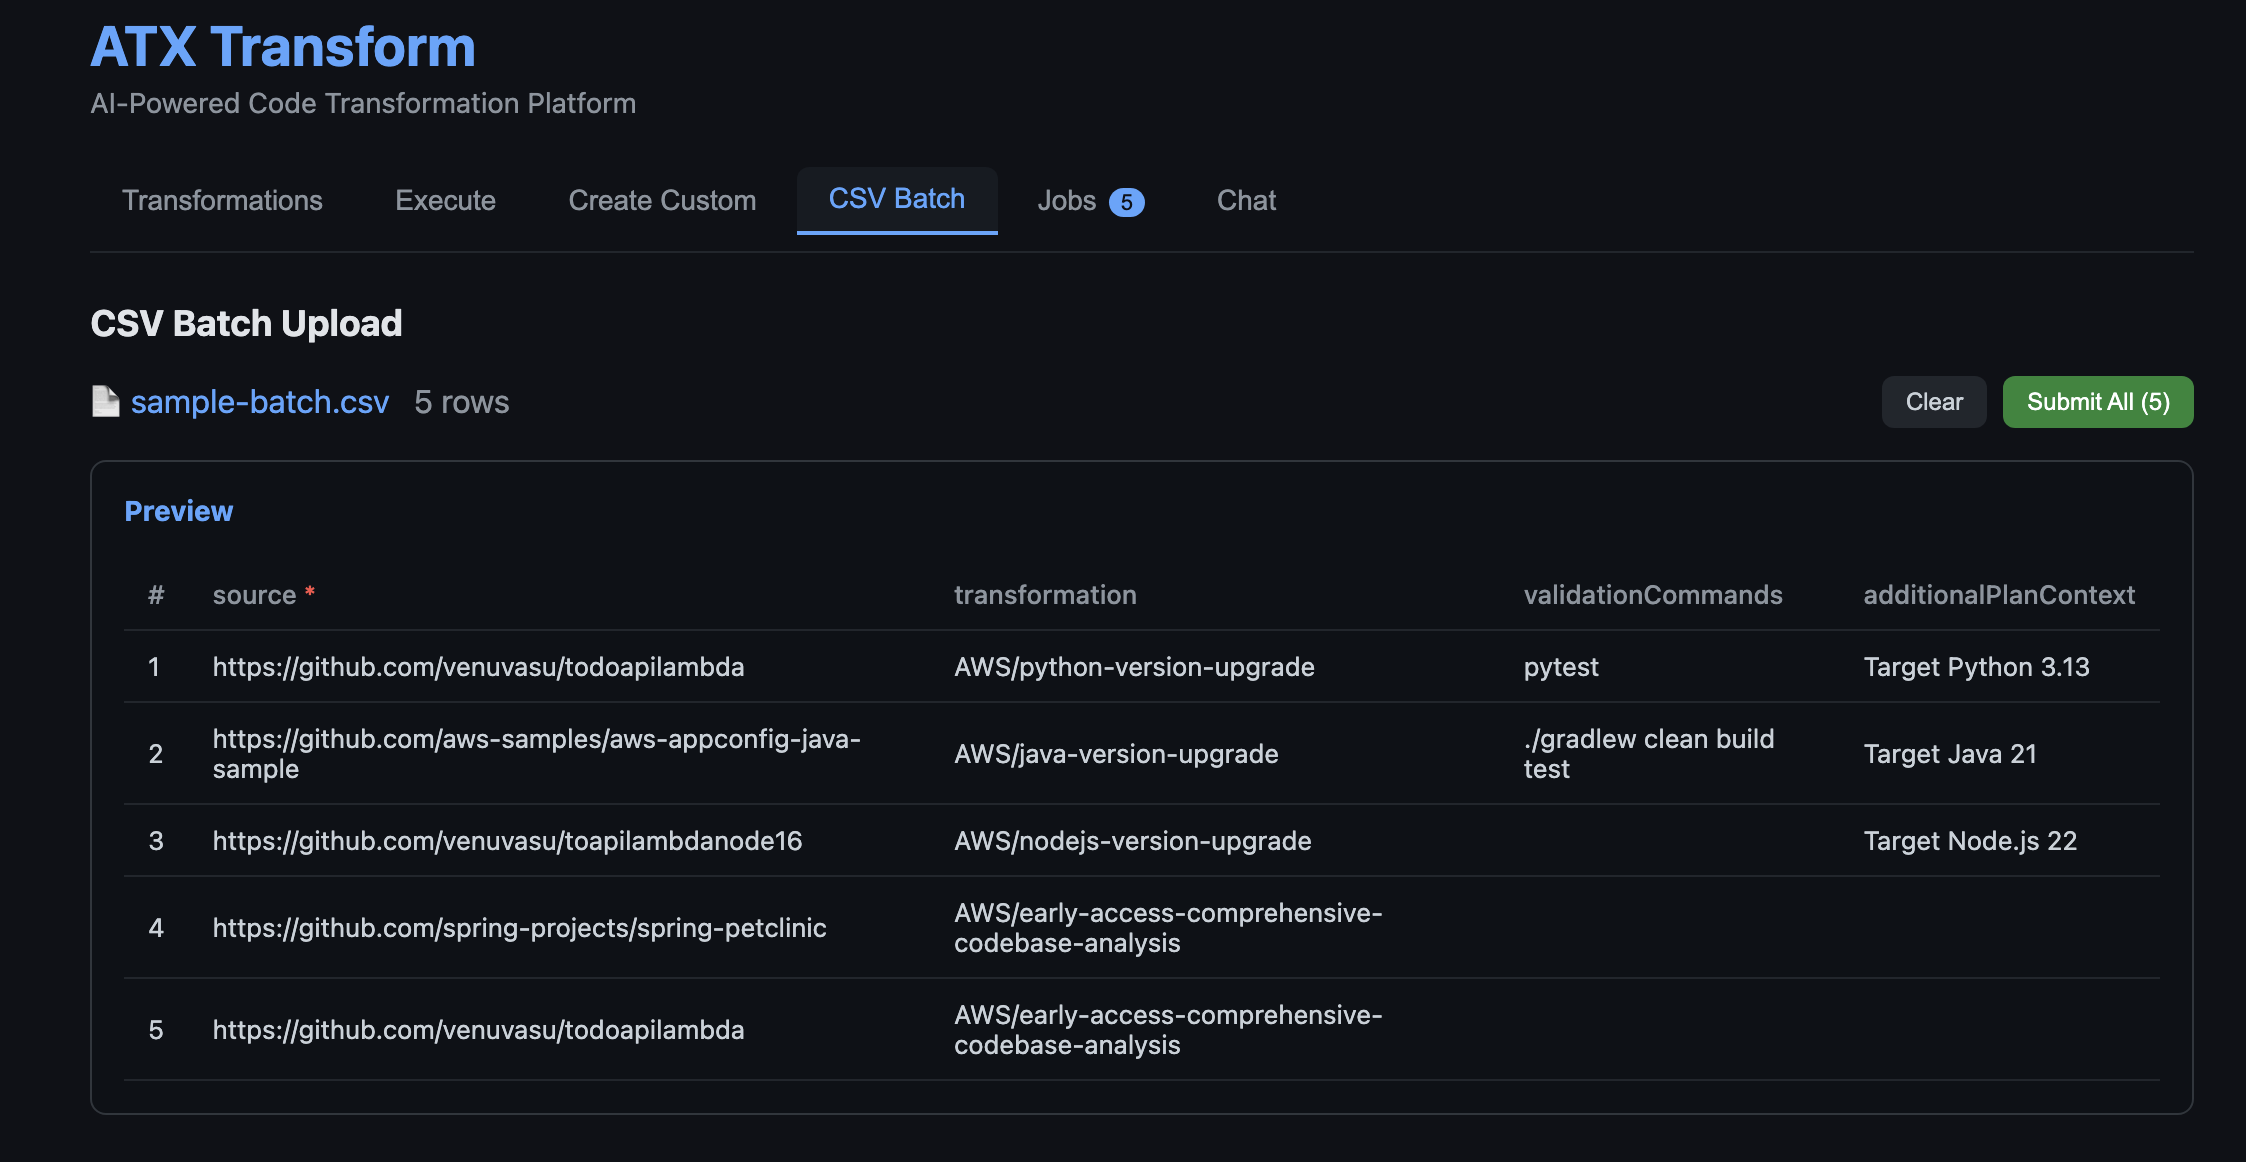

 Sandeep Batchu is a Senior Security Architect at Amazon Web Services, with extensive experience in software engineering, solutions architecture, and cybersecurity. Passionate about bridging business outcomes with technological innovation, Sandeep guides customers through their cloud and generative AI journey, helping them design and implement secure, scalable, and resilient architectures in the era of AI-driven transformation.