Post Syndicated from Kayla Jing original https://aws.amazon.com/blogs/security/discover-sensitive-data-by-using-custom-data-identifiers-with-amazon-macie/
As you put more and more data in the cloud, you need to rely on security automation to keep it secure at scale. AWS recently launched Amazon Macie, a fully managed service that uses machine learning and pattern matching to help you detect, classify, and better protect your sensitive data stored in the AWS Cloud.
Many data breaches are not the result of malicious activity from unauthorized users, but rather from mistakes made by authorized users. To monitor and manage the security of sensitive data, you must first be able to identify it. In this post, we show you how to use custom data identifiers with Macie to identify sensitive data. Once you know what’s sensitive, you can start designing security controls that operate at scale to monitor and remediate risk automatically.
Macie comes with a set of managed data identifiers that you can use to discover many types of sensitive data. These are somewhat generic and broadly applicable to many organizations. What makes Macie unique is its ability to help you address specific data needs. Macie enables you to expand your sensitive data detection through the new custom data identifiers. Custom data identifiers can be used to highlight organizational proprietary data, intellectual property, and specific scenarios.
Custom Data Identifiers in Macie help you find and identify sensitive data based on your own organization’s specific needs. In this post, we show you a step-by-step walkthrough of how to define and run custom data identifiers to automatically discover specific, sensitive data. Before you begin using Custom Data Identifiers, you need to enable Macie and configure detailed logging. Follow these instructions to enable Macie and follow these instructions to configure detailed logging, if you haven’t done that already.
When to use the Custom Data Identifier resource
To begin, imagine you’re an IT administrator for a manufacturing company that’s headquartered in France. Your company has acquired a few additional local subsidiaries, including an R&D facility in São Paulo, Brazil. The company is migrating to AWS, and in the process is classifying registration information, employee information, and product data into encrypted and non-encrypted storage.
You want to identify sensitive data for the following three scenarios:
- SIRET-NIC: SIRET-NIC is a unique number assigned to businesses in France. This number is issued by their National Institute of Statistics (INSEE) when a business is registered. A sample file that contains SIRET-NIC information is shown in the following figure. Each record in the file includes the GUID, employee name, employee email, the company name, the date it was issued, and the SIRET-NIC number.

Figure 1: SIRET-NIC dataset
- Brazil CPF (Cadastro de Pessoas Físicas – Natural Persons Register): CPF is a unique number assigned by the Brazilian revenue agency to people subject to taxes in the country. Each of your employees residing in the Brazilian office has a CPF.
- Prototyping naming convention: Your company has products that are publicly available, but also products that are still in the prototyping stage and should be kept confidential. A sample file that contains Brazil CPF numbers and the prototype names is shown in the following figure.

Figure 2: Brazil CPF and prototype number dataset


Configure the Custom Data Identifier resource in the Macie console
To use custom data identifiers to identify your organization’s sensitive information, you must:
- Create custom data identifiers.
- Create a job to scan your Amazon Simple Storage Service (Amazon S3) bucket to locate the data patterns that match your custom data identifiers.
- Respond to the returned results.
The following steps introduce you to the Custom Data Identifier resource in Macie.
Designing Custom Data Identifiers for use with Amazon Macie
In the previous section you discovered 3 scenarios that your company will like to protect SIRET-NIC, Brazil CPF, and your prototyping naming convention. You now need to first create a specific REGEX pattern for each of these scenarios. There are different syntaxes and dialects of regular expression languages. Amazon Macie supports a subset of the Perl Compatible Regular Expressions (PCRE) library, and you can learn more about it in Regex support in custom data identifiers section. Once the patterns are ready, follow the instructions below to create the custom data identifiers.
Creating Custom Data Identifiers in Amazon Macie
- Sign in to the AWS Management Console.
- Enter Amazon Macie in the AWS services search box.
- Choose Amazon Macie.
- In the navigation pane on the left-hand side, under Settings, choose Custom data identifiers as shown in the following figure.

Figure 3: Custom data identifiers console

Create a custom data identifier
- Choose Create on the custom data identifier console.
- Name: Enter a name for your custom data identifier. Make it descriptive so you know what it does. For example, enter SIRET-NIC for the SIRET-NIC number you use.
- Description: Enter a description of the custom data identifier.
- Regular expression (regex): Define the pattern you want to identify. Use a Regular Expression (“regex”) to create the desired pattern. For example, a SIRET-NIC number contains 14 digits—9 numbers followed by a hyphen and then 5 more numbers. The first part, 9 numbers, can stay together or separated by spaces into 3 groups of 3. The specific regex pattern for this is \b(\d{3}\s?){2}\d{3}\-\d{5}\b
- Keywords: Define expressions that identify the text to match. The SIRET-NIC number itself is publicly accessible information. But in your case, you want to encrypt the information about the company that was registered during the month the acquisition happened (April 2020), thus the information will not leak to your competitors. So, the keywords here will be all the days in April.
- (Optional) Ignore words: Use this box to enter text that you want to be ignored. In this example scenario, you know your security training materials always use an example SIRET-NICs of 12345789-12345 and 000000000-00000. You can enter these values here, so that your security training materials are not flagged as sensitive data containing SIRET-NICs.
- Maximum match distance: Use this box to define the proximity between the result and the keywords. If you enter 20, Macie will provide results that include the specified keyword and 20 characters on either side of it.
Note: Do not select Submit yet. After entering the settings and before selecting Submit, you should test your custom data identifier with sample data to confirm that it works.
With all the attributes set, your console will look like what is shown in Figure 4.
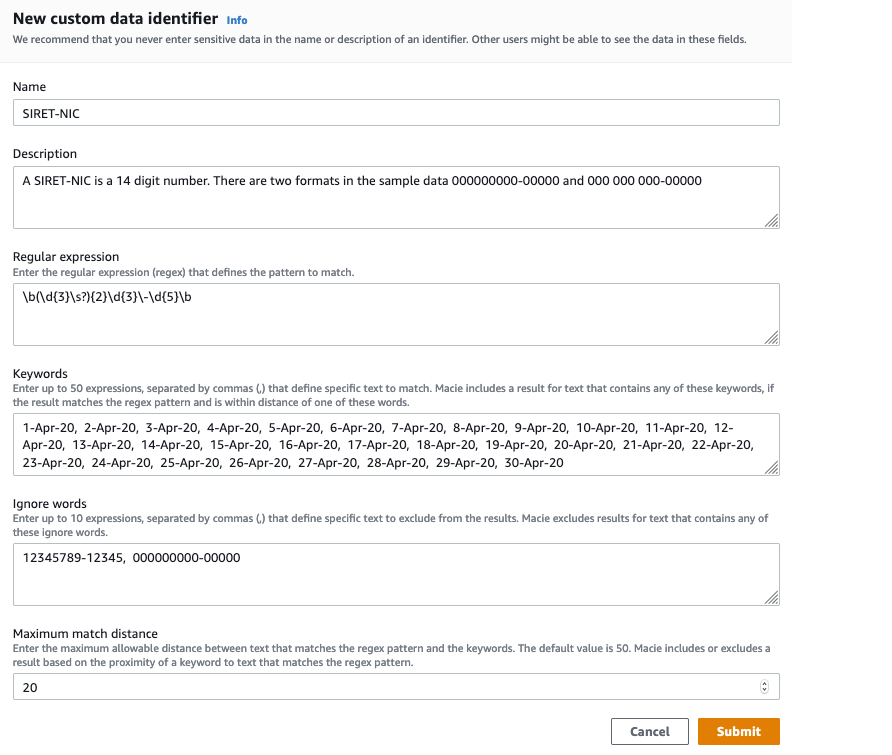
Figure 4: SIRET-NIC custom data identifier creation
Test your SIRET-NIC custom data identifier
Use the Evaluate section on the right-hand panel of the Macie console to confirm that the regex pattern and other configurations for your custom data identifier are correct.
Follow the steps below to use the Evaluate section.
- Enter test data in the sample data box.
- Select Submit. There will be one match per record in the file if the configurations are correct and your custom data identifier is ready.The following figure is an example of the Evaluate section using test data. The test data has 3 records, each record has 5 fields which are GUID, employee name, employee email, company name, date SIRET-NIC was issued, and the SIRET-NIC number.

Figure 5: Evaluate, showing sample data
- After verifying your SIRET-NIC custom data identifier works in the Evaluate section, now select Submit on the New custom data identifier window to create the custom data identifier.

Create a Brazil CPF Custom Data Identifier
Congrats on creating your first custom data identifier! Now use the same steps to create and test custom data identifiers for the Brazil CPF and prototyping naming convention scenarios. The Brazil CPF number usually shows up in the format of 000.000.000-00.
Use the following values for the Brazil CPF scenario, as shown in the following figure:
- Name: Brazil CPF
- Description: The format for Brazil CPF in our sample data is 000.000.000-00
- Regular expression: \b(\d{3}\.){2}\d{3}\-\d{2}\b

Figure 6: Brazil CPF custom data identifier

Create a Prototype Name Custom Data Identifier
Assume that your company has a very strict and regular naming scheme for prototype part numbers. It is P, followed by a hyphen, and then 2 letters and 4 digits. E.g., P-AB1234. You want to identify objects in S3 that contain references to private prototype parts. This is a small pattern, and so if we’re not careful it will cause Macie to flag objects that do not actually contain one of our prototype numbers. We suggest adding \b at the beginning and the end of the regular expression. The \b symbol means a “word boundary” and word boundaries are basically whitespace, punctuation, or other things that are not letters and numbers. With \b, you limit the pattern so that you only match if the entire word matches the pattern. For example, P-AB1234 will match the pattern, but STEP-AB123456 and P-XY123 will not match the pattern. This gives you finer grained control and reduces false positives.
Use the following values for the prototyping name scenario, as shown in the following figure:
- Name: Prototyping Naming
- Description: Any prototype name start with P means it’s private. The format for private prototype name is P-2 capital letters and 4 numbers
- Regular expression: \bP\-[A-Z]{2}\d{4}\b
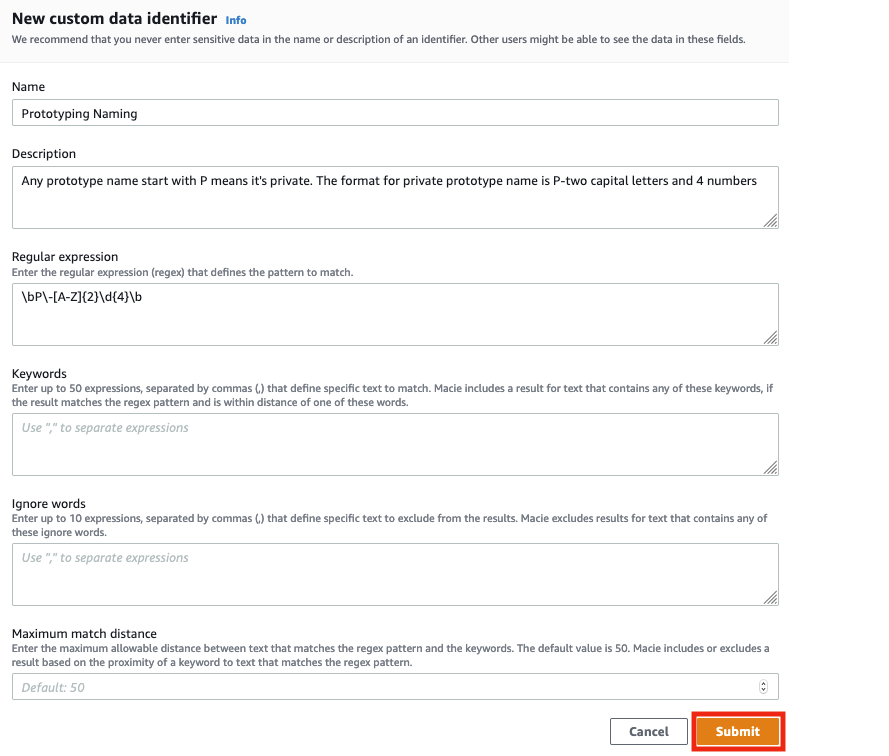
Figure 7: Prototyping naming custom data identifier
You should now see a page like the following figure, indicating that the SIRET-NIC, Brazil CPF, and Prototyping Naming custom data identifiers are successfully configured.

Figure 8: Successfully configured custom data identifier
Set up a Test Bucket to Demonstrate Macie
Before we can see Macie do its work, we have to create a bucket with some test data that we can scan. We’ve provided some sample data files that you can download. Follow these instructions to create a test bucket and load our test data into the test bucket.
- Download the sample data and unzip it.
- Sign in to the AWS Management Console and open the Amazon S3 console at https://console.aws.amazon.com/s3/.
- Choose Create bucket. The Create bucket wizard opens.
- In Bucket name, enter a DNS-compliant name for your bucket. The bucket name must:
- Be unique across all of Amazon S3.
- Be between 3 and 63 characters long.
- Not contain uppercase characters.
- Start with a lowercase letter or number.
We created a bucket called bucketformacieuse; you have to choose another name because this one is already taken by us.
- In Region, choose the AWS Region where you want the bucket to reside.
- Select Create, to finish the bucket creation.
- Open the bucket you just created and upload the two Excel files you downloaded in step 1.
Use Macie to create a job to scan your data
Now you can create a job to scan your Amazon S3 bucket to detect and locate the data patterns defined in the SIRET-NIC, Brazil CPF, and Prototyping Naming custom data identifiers.
To create a job
- In the navigation pane, choose Jobs, and then select Create Job on the upper right.
- Select Amazon S3 buckets: Select the S3 bucket you want to analyze. In this case, we are using the bucket previously created, bucketformacieuse.
- Review Amazon S3 buckets: Verify that you selected the S3 bucket you want the job to scan and analyze.
- Scope: Select your scope. For this example, choose the One-time job option as your scope. The scope specifies how often you want the job to run. This can be either a one-time job or a scheduled job. If you choose a scheduled job, you can define how often you want your job to scan your Amazon S3 bucket.
- Custom data identifiers: Select the 3 custom data identifiers you created to be associated with this job, and then select Next. This is shown in the following figure.

Figure 9: Select your custom data identifiers
- Name and description: Enter a name and description for the job.
- Review and create: Review and verify all your settings, and then select Create.

You now have a job in Macie to scan the Amazon S3 buckets you’ve chosen using the 3 custom data identifiers you created. More information about creating jobs is available in Running sensitive data discovery jobs in Amazon Macie.
Respond to results
Macie will help you be secure when you’re effectively responding to the findings that it produces. For our example, we’ll show you how to review your findings manually. You can look at your findings by bucket, type, or job, or see a collective summary of all findings. In this example, let’s look at all findings.
To review your results
- In the navigation pane on the left-hand side, choose Findings. Findings include the severity, the type, the resources affected, and when the findings were last updated.
- The following figure shows an example of the results you might see on the findings page. There are two findings for the selected job. The compagnie_français.csv and the empresa_brasileira.csv files contain the custom data identifiers that you created earlier and added to the job.

Figure 10: Findings
- Let’s look at the details of one of the findings so you can review the results. From the page showing the 4r findings, select the file that contains your custom data identifier for the Brazil CPF: empresa_brasileira.csv. The number of custom data identifiers found in the document is shown in the Result section on the right, as shown in the following figure.

Figure 11: Findings detail page for the Brazil CPF custom data identifiers
- Now look at the findings details for the compagnie_français.csv file. It shows the number of custom data identifiers found in the file. In this case Macie found 13 SIRET-NIC numbers as shown in the following figure.

Figure 12: Findings page for the French company file
- If you configured detailed logging, the results will be saved in the Amazon S3 bucket you specified. The S3 bucket location can be found in the Details section after Detailed result location as shown in the preceding figure.


Now that you’ve used Macie and the Custom Data Identifiers resource to obtain these findings, you can identify what data to place in encrypted storage, and what can be placed in non-encrypted storage when migrating to AWS. Macie and custom data identifiers provide an automated tool to help you enhance protection of your sensitive data by providing you the information to help detect and classify your data in the AWS Cloud.
Using Macie at Scale
Custom Data Identifiers help you tell Macie what to look for. As you move more and more data to the cloud, you’ll need to make new identifiers and new rules. As your rules and identifiers grow you will need to create automation that responds to things that are found. For example, perhaps a lambda function turns on encryption in a bucket when it finds sensitive data in that bucket. Or perhaps a function automatically applies tags to buckets where sensitive data is found, and those buckets and their owners start to appear on reports for audit and compliance. Once you’ve done this at small scale, think about how you will automate responses at larger scale.
Conclusion
The new Custom Data Identifier resource in the newly enhanced Macie can help you detect, classify, and protect sensitive data types unique to your organization. This post focused on the functionality and use of custom data identifiers to automatically discover sensitive data stored in Amazon S3. You can also review the managed data identifiers to see a list of personally identifiable information (PII) that Macie can detect by default. Visit What is Amazon Macie? to learn more.
If you have feedback about this post, submit comments in the Comments section below. If you have questions about this post, start a new thread on the Amazon Macie forum or contact AWS Support.
Want more AWS Security how-to content, news, and feature announcements? Follow us on Twitter.