Post Syndicated from Kiran Anand original https://aws.amazon.com/blogs/big-data/enable-remote-reads-from-azure-adls-with-sas-tokens-using-spark-in-amazon-emr/
Organizations use data from many sources to understand, analyze, and grow their business. These data sources are often spread across various public cloud providers. Enterprises may also expand their footprint by mergers and acquisitions, and during such events they often end up with data spread across different public cloud providers. These scenarios can create the need for AWS services to remotely access, in an ad hoc and temporary fashion, data stored in another public cloud provider such as Microsoft Azure to enable business as usual or facilitate a transition.
In such scenarios, data scientists and analysts are presented with a unique challenge when working to complete a quick data analysis because data typically has to be duplicated or migrated to a centralized location. Doing so introduces time delays, increased cost, and higher complexity as pipelines or replication processes are stood up by data engineering teams. In the end, the data may not even be needed, resulting in further loss of resources and time. Having quick, secure, and constrained access to the maximum amount of data is critical for enterprises to improve decision-making. Amazon EMR, with its open-source Hadoop modules and support for Apache Spark and Jupyter and JupyterLab notebooks, is a good choice to solve this multi-cloud data access problem.
Amazon EMR is a top-tier cloud big data solution for petabyte-scale data processing, interactive analytics, and machine learning using open-source frameworks such as Apache Spark, Apache Hive, and Presto. Amazon EMR Notebooks, a managed environment based on Jupyter and JupyterLab notebooks, enables you to interactively analyze and visualize data, collaborate with peers, and build applications using EMR clusters running Apache Spark.
In this post, we demonstrate how to set up quick, constrained, and time-bound authentication and authorization to remote data sources in Azure Data Lake Storage (ADLS) using a shared access signature (SAS) when running Apache Spark jobs via EMR Notebooks attached to an EMR cluster. This access enables data scientists and data analysts to access data directly when operating in multi-cloud environments and join datasets in Amazon Simple Storage Service (Amazon S3) with datasets in ADLS using AWS services.
Overview of solution
Amazon EMR inherently includes Apache Hadoop at its core and integrates other related open-source modules. The hadoop-aws and hadoop-azure modules provide support for AWS and Azure integration, respectively. For ADLS Gen2, the integration is done through the abfs connector, which supports reading and writing data in ADLS. Azure provides various options to authorize and authenticate requests to storage, including SAS. With SAS, you can grant restricted access to ADLS resources over a specified time interval (maximum of 7 days). For more information about SAS, refer to Delegate access by using a shared access signature.
Out of the box, Amazon EMR doesn’t have the required libraries and configurations to connect to ADLS directly. There are different methods to connect Amazon EMR to ADLS, and they all require custom configurations. In this post, we focus specifically on connecting from Apache Spark in Amazon EMR using SAS tokens generated for ADLS. The SAS connectivity is possible in Amazon EMR version 6.9.0 and above, which bundles hadoop-common 3.3.0 where support for HADOOP-16730 has been implemented. However, although the hadoop-azure module provides a SASTokenProvider interface, it is not yet implemented as a class. For accessing ADLS using SAS tokens, this interface should be implemented as a custom class JAR and presented as a configuration within the EMR cluster.
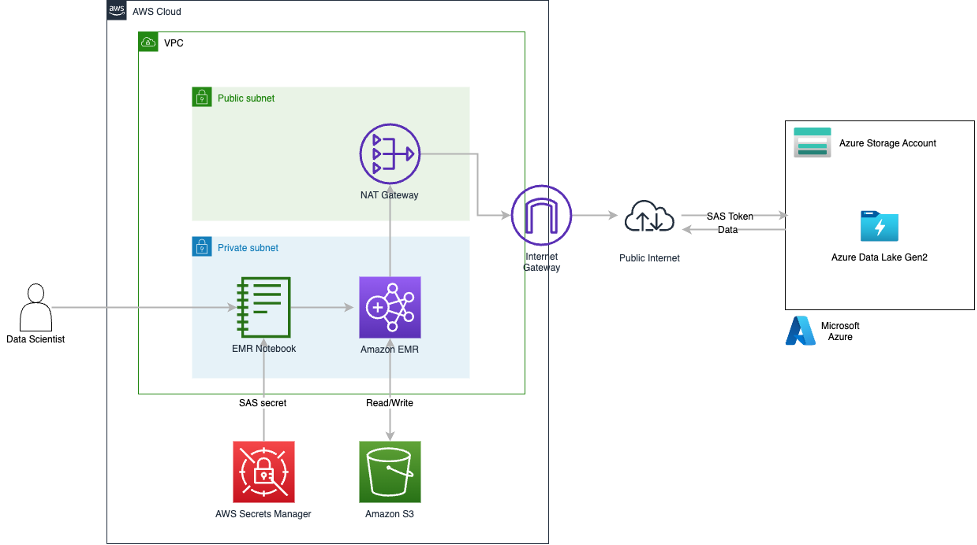
You can find a sample implementation of the SASTokenProvider interface on GitHub. In this post, we use this sample implementation of the SASTokenProvider interface and package it as a JAR file that can be added directly to an EMR environment on version 6.9.0 and above. To enable the JAR, a set of custom configurations are required on Amazon EMR that enable the SAS token access to ADLS. The provided JAR needs to be added to the HADOOP_CLASSPATH, and then the HADOOP_CLASSPATH needs to be added to the SPARK_DIST_CLASSPATH. This is all handled in the sample AWS CloudFormation template provided with this post. At a high level, the CloudFormation template deploys the Amazon EMR cluster with the custom configurations and has a bootstrapping script that stages the JAR on the nodes of the EMR cluster. The CloudFormation template also stages a sample Jupyter notebook and datasets into an S3 bucket. When the EMR cluster is ready, the EMR notebook needs to be attached to it and the sample Jupyter notebook loaded. After the SAS token configurations are done in the notebook, we can start reading data remotely from ADLS by running the cells within the notebook. The following diagram provides a high-level view of the solution architecture.
We walk through the following high-level steps to implement the solution:
- Create resources using AWS CloudFormation.
- Set up sample data on ADLS and create a delegated access with an SAS token.
- Store the SAS token securely in AWS Secrets Manager.
- Deploy an EMR cluster with the required configurations to securely connect and read data from ADLS via the SAS token.
- Create an EMR notebook and attach it to the launched EMR cluster.
- Read data via Spark from ADLS within the JupyterLab notebook.
For this setup, data is going over the public internet, which is not a best practice nor an AWS recommendation, but it’s sufficient to showcase the Amazon EMR configurations that enable remote reads from ADLS. Solutions such as AWS Direct Connect or AWS Site-to-Site VPN should be utilized to secure data traffic in enterprise deployments.
For an AWS Command Line Interface (AWS CLI)-based deployment example, refer to the appendix at the end of this post.
Prerequisites
To get this solution working, we have a set of prerequisites for both AWS and Microsoft Azure:
- An AWS account that can create AWS Identity and Access Management (IAM) resources with custom names and has access enabled for Amazon EMR, Amazon S3, AWS CloudFormation, and Secrets Manager.
- The old Amazon EMR console enabled.
- An Azure account with a storage account and container.
- Access to blob data in ADLS with Azure AD credentials. The user must have the required role assignments in Azure. Refer to Assign an Azure role for more details.
We are following the best practice of using Azure AD credentials to create a user delegation SAS when applications need access to data storage using shared access signature tokens. In this post, we create and use a user delegation SAS with read and list permissions for ADLS access. For more information about creating SAS tokens using the Azure portal, refer to Use the Azure portal.
Before we generate the user delegation SAS token, we need to ensure the credential that will be used to generate the token has appropriate permissions to access data on the ADLS storage account. Requests submitted to the ADLS account using the user delegation SAS token are authorized with the Azure AD credentials that were used to create the SAS token.
The following minimum Azure role-based access control is required at the storage account level to access the data on ADLS storage:
- Reader – Allow viewing resources such as listing the Azure storage account and its configuration
- Storage Blob Data Reader – Allow reading and listing Azure storage containers and blobs
- Storage Blob Delegator – In addition to the permissions to access the data on the ADLS account, you also need this role to generate a user delegation SAS token
Create an EMR cluster and S3 artifacts with AWS CloudFormation
To create the supported version of an EMR cluster with the required SAS configurations and stage all the required artifacts in Amazon S3, complete the following steps:
- Sign in to the AWS Management Console in your Region (for this post, we use
us-east-1). - Choose Launch Stack to deploy the CloudFormation template:

- Choose Next.

- For Stack name, enter an appropriate lowercase name.
- For EmrRelease, leave as default.
As of this writing, the stack has been tested against 6.9.0 and 6.10.0.
- Choose Next.

- On the next page, choose Next.
- Review the details and select I acknowledge that AWS CloudFormation might create IAM resources with custom names.
- Choose Create stack.
- Monitor the progress of the stack creation until it’s complete (about 15–20 minutes).
- When the stack creation is complete, navigate to the stack detail page.
- On the Resources tab, find the logical ID with the name
S3ArtifactsBucket. - Choose the link for the physical ID that starts with
emr-spark-on-adls-<GUID>to be redirected to the bucket on the Amazon S3 console. - On the Objects tab, open the
EMR/folder.

- Open the
artifacts/folder. -


There are five artifacts staged by the CloudFormation stack in this path:
- azsastknprovider-1.0-SNAPSHOT.jar – The custom implementation of the
SASTokenProviderinterface. - EMR-Direct-Read-From-ADLS.ipynb – The Jupyter notebook that we’ll use with the EMR cluster to read data from ADLS.
- env-staging.sh – A bash script that the Amazon EMR bootstrap process runs to stage
azsastknprovider-1.0-SNAPSHOT.jaracross cluster nodes. - Medallion_Drivers_-_Active.csv – A sample dataset that needs to be staged in the ADLS container from which we will read.
- self-signed-certs.zip – The openSSL self-signed certificates used by AWS CloudFormation to encrypt data in transit. This example is a proof of concept demonstration only. Using self-signed certificates is not recommended and presents a potential security risk. For production systems, use a trusted certification authority (CA) to issue certificates.
- Select
Medallion_Drivers_-_Active.csvand choose Download. - Select
EMR-Direct-Read-From-ADLS.ipynband choose Download.
Create the SAS token and stage sample data
To generate the user delegation SAS token from the Azure portal, log in to the Azure portal with your account credentials and complete the following steps:
- Navigate to Storage account, Access Control, and choose Add role assignment.
- Add the following roles to your user: Reader, Storage Blob Data Reader, and Storage Blob Delegator.
- Navigate to Storage account, Containers, and choose the container you want to use.
- Under Settings in the navigation pane, choose Shared access tokens.
- Select User delegation key for Signing method.
- On the Permissions menu, select Read and List.

- For Start and expiry date/time, define the start and expiry times for the SAS token.
- Choose Generate SAS token and URL.
- Copy the token under Blob SAS token and save this value.

- Choose Overview in the navigation pane.
- Choose Upload and upload the
Medallion_Drivers_-_Active.csvfile downloaded earlier. -


Store the SAS token in Secrets Manager
Next, we secure the SAS token in Secrets Manager so it can be programmatically pulled from the Jupyter notebook.
- Open the Secrets Manager console in the same Region you have been working in (in this case,
us-east-1). - Choose Store a new secret.

- For Secret type, select Other type of secret.
- In the Key/value pairs section, enter a name for the key and enter the blob SAS token for the value.
- For Encryption key, choose the default AWS managed key.
- Choose Next.

- For Secret name, enter a name for your secret.
- Leave the optional fields as default and choose Next.
- On the next page, leave the settings as default and choose Next.


Setting up a secret rotation is a best practice but out of scope for this post. You can do so via Azure RM PowerShell, which can be integrated with the Lambda rotation function from Secrets Manager.
- Choose Store.
- Refresh the Secrets section and choose your secret.
- In the Secret details section, copy the value for Secret ARN to use in the Jupyter notebook.


Configure an EMR notebook with the SAS token and read ADLS data
Finally, we create the EMR notebook environment, integrate the SAS token into the downloaded Jupyter notebook, and perform a read against ADLS.
- Open the Amazon EMR console in the same Region you have been working in (in this case.
us-east-1). - Under EMR on EC2 in the navigation pane, choose Clusters.
- In the cluster table, choose Cluster with ADLS SAS Access.


On the Summary tab, you will find the applications deployed on the cluster.

On the Configurations tab, you can see the configurations deployed by the CloudFormation stack loading the customer JAR in the appropriate classpaths.

- Under EMR on EC2 in the navigation pane, choose Notebooks.
- Choose Create notebook.
- Enter an appropriate name for the notebook for Notebook name.
- For Cluster, select Choose an existing cluster, then choose the cluster you created earlier.
- Leave all other settings as default and choose Create notebook.

- When the notebook environment is set up, choose Open in JupyterLab.
- On your local machine, navigate to where you saved the
EMR-Direct-Read-From-ADLS.ipynbnotebook. - Drag and drop it into the left pane of the JupyterLab environment.
- Choose
EMR-Direct-Read-From-ADLS.ipynbfrom the left pane and ensure that the interpreter selected for the notebook in the top-right corner is PySpark.

- In the notebook, under the
SAS TOKEN SETUPmarkup cell, replace <AWS_REGION> with the Region you are using (in this case,us-east-1). - In the same code cell, replace <ADLS_SECRET_MANAGER_SECRET_ARN> with your secret ARN and <SECRET_KEY> with your secret key.


You can get the secret key from Secrets Manager in the Secret value section for the secret you created earlier.

- In the code cell below the HADOOP
CONFIGURATIONSmarkup cell, replace <YOUR_STORAGE_ACCOUNT> with your Azure storage account where the SAS token was set up earlier. - In the code cell below the
READ TEST DATAmarkup cell, replace <YOUR_CONTAINER> and <YOUR_STORAGE_ACCOUNT> with your Azure container and storage account name, respectively. - On the Run menu, choose Run All Cells.


After all notebook cells run, you should see 10 rows in a tabular format containing the data coming from ADLS, which now can be used directly in the notebook or can be written to Amazon S3 for further use.

Clean up
Deploying a CloudFormation template incurs cost based on the resources deployed. The EMR cluster is configured to stop after an hour of inactivity, but to avoid incurring ongoing charges and to fully clean up the environment, complete the following steps:
- On the Amazon EMR console, choose Notebooks in the navigation pane.
- Select the notebook you created and choose Delete, and wait for the delete to complete before proceeding to the next step.
- On the Amazon EMR console, choose Clusters in the navigation pane.
- Select the cluster Cluster With ADLS SAS Access and choose Terminate.
- On the Amazon VPC console, choose Security groups in the navigation pane.
- Find the
ElasticMapReduce-Master-Private,ElasticMapReduce-Slave-Private,ElasticMapReduce-ServiceAccess,ElasticMapReduceEditors-Livy, andElasticMapReduceEditors-Editorsecurity groups attached to the VPC created by the CloudFormation stack and delete their inbound and outbound rules. - Select these five security groups and on the Actions menu, choose Delete security groups.
- On the AWS CloudFormation console, choose Stacks in the navigation pane.
- Select the stack and choose Delete.
- On the Secrets Manager console, choose Secrets in the navigation pane.
- Select the stored SAS secret and on the Actions menu, choose Delete secret.
- On the IAM console, choose Roles in the navigation pane.
- Select the role
EMR_Notebooks_DefaultRoleand choose Delete.
Conclusion
In this post, we used AWS CloudFormation to deploy an EMR cluster with the appropriate configurations to connect to Azure Data Lake Storage using SAS tokens over the public internet. We provided an implementation of the SASTokenProvider interface to enable the SAS token-based connectivity to ADLS. We also provided relevant information on the SAS token creation steps on the Azure side. Furthermore, we showed how data scientists and analysts can use EMR notebooks connected to an EMR cluster to read data directly from ADLS with a minimum set of configurations. Finally, we used Secrets Manager to secure the storage of the SAS token and integrated it within the EMR notebook.
We encourage you to review the CloudFormation stack YAML template and test the setup on your own. If you implement the example and run into any issues or just have feedback, please leave a comment.
Appendix
AWS CLI-based deployment model
If you prefer to use command line options, this section provides AWS CLI commands to deploy this solution. Note that this is an alternative deployment model different from the CloudFormation template provided in the previous sections. Sample scripts and commands provided here include placeholders for values that need to be updated to suit your environment. The AWS CLI commands provided in this section should be used as guidance to understand the deployment model. Update the commands as needed to follow all the security procedures required by your organization.
Prerequisites for an AWS CLI-based deployment
The following are the assumptions made while using this AWS CLI-based deployment:
- You will be deploying this solution in an existing AWS environment that has all the necessary security configurations enabled
- You already have an Azure environment where you have staged the data that needs to be accessed through AWS services
You must also complete additional requirements on the AWS and Azure sides.
For AWS, complete the following prerequisites:
- Install the AWS CLI on your local computer or server. For instructions, see Installing, updating, and uninstalling the AWS CLI.
- Create an Amazon Elastic Compute Cloud (Amazon EC2) key pair for SSH access to your Amazon EMR nodes. For instructions, see Create a key pair using Amazon EC2.
- Create an S3 bucket to store the EMR configuration files, bootstrap shell script, and custom JAR file. Make sure that you create a bucket in the same Region as where you plan to launch your EMR cluster.
- Copy and save the SAS token from ADLS to use in Amazon EMR.
For Azure, complete the following prerequisites:
- Generate the user delegation SAS token on the ADLS container where your files are present, with the required levels of access granted. In this post, we are use SAS tokens with only read and list access.
- Copy and save the generated SAS token to use with Amazon EMR.
Update configurations
We have created a custom class that implements the SASTokenProvider interface and created a JAR file called azsastknprovider-1.0-SNAPSHOT.jar, which is provided as a public artifact for this post. A set of configurations are required on the Amazon EMR side to use the SAS tokens to access ADLS. A sample configuration file in JSON format called EMR-HadoopSpark-ADLS-SASConfig.json is also provided as a public artifact for this post. Download the JAR and sample config files.
While copying the code or commands from this post, make sure to remove any control characters or extra newlines that may get added.
- Create a shell script called env-staging-hadoopspark.sh to copy the custom JAR file
azsastknprovider-1.0-SNAPSHOT.jar(provided in this post) to the EMR cluster nodes’ local storage during the bootstrap phase. The following code is a sample bootstrap shell script: - Update the bootstrap shell script to include your S3 bucket and the proper path where the custom JAR file is uploaded in your AWS environment.
- Upload the JAR file, config file, and the bootstrap shell script to your S3 bucket.
- Keep a copy of the updated configuration file
EMR-HadoopSpark-ADLS-SASConfig.jsonlocally in the same directory from where you plan to run the AWS CLI commands.
Launch the EMR cluster using the AWS CLI
We use the create-cluster command in the AWS CLI to deploy an EMR cluster. We need a bootstrap action at cluster creation to copy the custom JAR file to the EMR cluster nodes’ local storage. We also need to add a few custom configurations on Amazon EMR to connect to ADLS. For this, we need to supply a configuration file in JSON format. The following code launches and configures an EMR cluster that can connect to your Azure account and read objects in ADLS through Hadoop and Spark:
Additional configurations for Spark jobs
The following additional properties should be set inside your Spark application code to access data in ADLS through Amazon EMR. These should be set on the Spark session object used within your Spark application code.
These additional configurations can be set in the core-site.xml file for the EMR cluster. However, setting these in the application code is more secure and recommended because it won’t expose the SAS token in the Amazon EMR configurations.
Submit the Spark application in Amazon EMR using the AWS CLI
You can run a Spark application on Amazon EMR in different ways:
- Log in to an EMR cluster node through SSH using the EC2 key pair you created earlier and then run the application using spark-submit
- Submit a step via the console while creating the cluster or after the cluster is running
- Use the AWS CLI to submit a step to a running cluster:
To read files in ADLS within a Spark application that is running on an EMR cluster, you need to use the abfs driver and refer to the file in the following format, just as you would have done in your Azure environment:
The following sample PySpark script reads a CSV file in ADLS using SAS tokens and writes it to Amazon S3, and can be run from the EMR cluster you created:
Clean up using the AWS CLI
Delete the EMR cluster created using the delete-cluster command.
About the authors
 Kiran Anand is a Principal Solutions Architect with the AWS Data Lab. He is a seasoned professional with more than 20 years of experience in information technology. His areas of expertise are databases and big data solutions for data engineering and analytics. He enjoys music, watching movies, and traveling with his family.
 Andre Hass is a Sr. Solutions Architect with the AWS Data Lab. He has more than 20 years of experience in the databases and data analytics field. Andre enjoys camping, hiking, and exploring new places with his family on the weekends, or whenever he gets a chance. He also loves technology and electronic gadgets.
 Stefan Marinov is a Sr. Solutions Architecture Manager with the AWS Data Lab. He is passionate about big data solutions and distributed computing. Outside of work, he loves spending active time outdoors with his family.
 Hari Thatavarthy is a Senior Solutions Architect on the AWS Data Lab team. He helps customers design and build solutions in the data and analytics space. He believes in data democratization and loves to solve complex data processing-related problems.
 Hao Wang is a Senior Big Data Architect at AWS. Hao actively works with customers building large scale data platforms on AWS. He has a background as a software architect on implementing distributed software systems. In his spare time, he enjoys reading and outdoor activities with his family.