All posts by Luke Edwards

An Open-Source CMS on the Cloudflare Stack: Introductory Post

Post Syndicated from Luke Edwards original https://blog.cloudflare.com/production-saas-intro/

An Open-Source CMS on the Cloudflare Stack: Introductory Post

An Open-Source CMS on the Cloudflare Stack: Introductory Post

The Cloudflare documentation is a great resource when learning concepts, reviewing API usage notes, or when you’re in need of a concise snippet to illustrate those APIs or concepts. But, as comprehensive as it is, new users to the Cloudflare Workers platform must bridge a large gap to go from the introductory example snippets to a real, production-ready application. While some of this may be specific to Workers (as with any platform), developers everywhere are figuring out how applications should be built in a serverless world. Building large serverless applications entails a learning curve journey, regardless of a developer’s experience level.

At Cloudflare, we’re intimately aware of this because we also had to go through the same transition. Our engineers are world-class and expertfully design and craft products that compliment the distributed paradigm… but experts aren’t born overnight! We have been there, and we want to help jumpstart and aid others’ understanding.

With this in mind, we decided to do something unique to the industry: we are developing an example feature-complete SaaS application that will be built entirely on the Cloudflare stack. It is and will continue to be completely free, open-sourced on GitHub, and developed in public. This will be an incredible time as it can be used as a template for launching your own SaaS applications, too! In fact, you can clone the GitHub repository, update a few service tokens, and deploy the pre-built application to your own Cloudflare account within minutes!

Of course, examples and templates are great, but technologies and best practices never stop evolving. Cloudflare is no exception and is constantly iterating and introducing new products and product features. By extension, this requires the SaaS application to be a living example that evolves alongside the Workers platform — and this is part of our commitment.

|| Don’t miss out! Watch the project on GitHub to track its development progress and stay current with our latest changes and recommendations.

Application Overview

Now, aside from actually building the application, we needed to find a balance between picking an example SaaS application that is both complex enough to serve as a convincing case study and simple — or self-contained — enough so that developers can quickly dive in, follow the source, and understand the components involved and the reasons why and/or how they are used.

Ultimately we decided to build an example content management system (CMS) which, as an application archetype, has also transformed over the years. Traditionally, a CMS operated on rented hardware, which was home to a long-lived server that handled incoming requests and queried an SQL-like database in order to retrieve the requested content, render it to an HTML page, and repeat the process over and over again. WordPress was — and still is — a very common example of this approach.

Naturally, this application architecture was improved over the years: layers of caching were introduced, database schemas were redesigned to minimize the number of rows processed, and some frameworks began to skip the database entirely, preferring a build-step to render all content upfront as static HTML pages. (This is now known as “static-site generation” and is still a very popular approach.)

Today, in the serverless era, there are a number of “headless CMS” options available. These are made “headless” because they are not monolithic web servers that render HTML for each request. Instead, they offer API endpoints that will return the content as raw JSON data. This allows web developers to build completely custom templates for their website using whatever tools and/or frameworks they prefer. This approach grants an enormous amount of flexibility to the developer without losing the ability to organize their content, image assets, etc. WordPress, the seasoned veteran, is one of few that is able to offer a headless and a “headful” mode. Other headless choices, like Sanity.io and Contentful, are also quite popular.

The CMS application model is a great case study for our open-source example. One of the primary tenets of an edge-first design is that content should be made available as close as physically possible to the users asking for it. And the serverless architecture means that there’s no longer — or should not be — a single point of failure. These both directly benefit the CMS archetype and, when implemented, will yield clear performance gains.

Current Progress

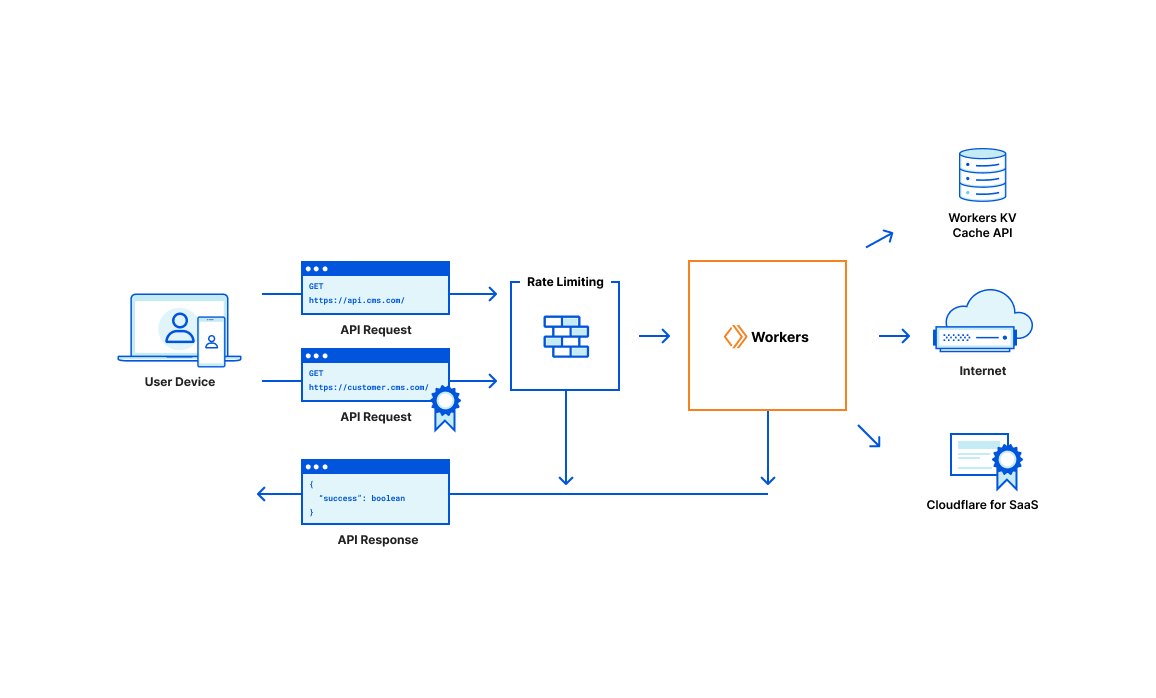
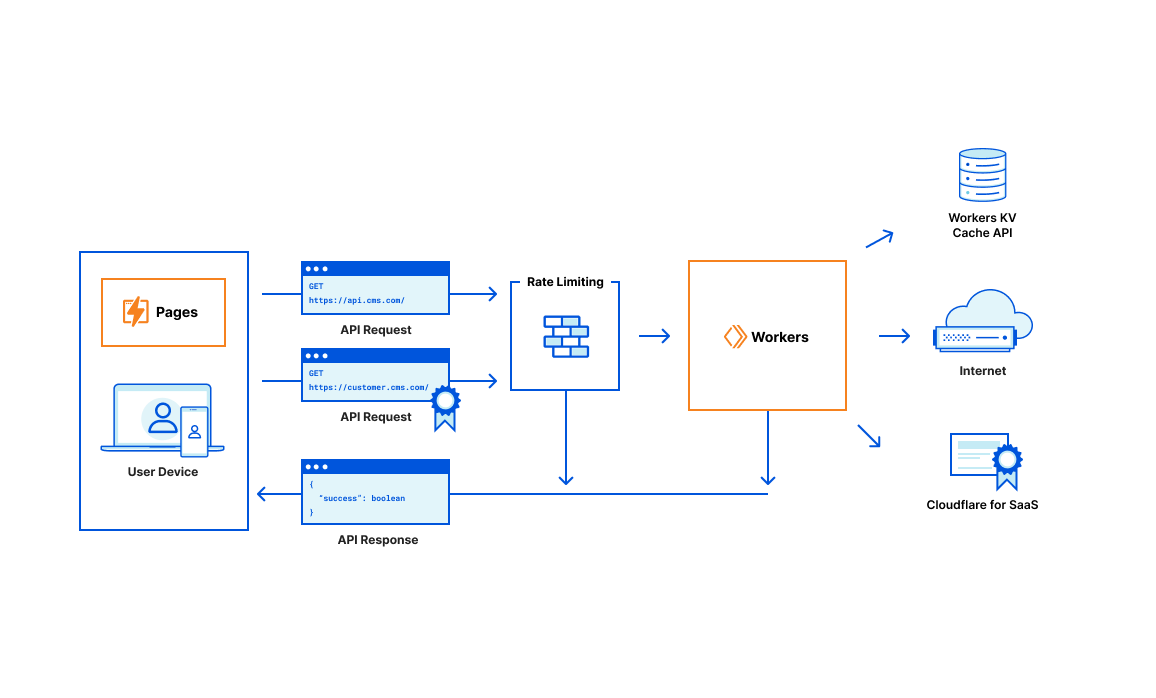
Before diving into the roadmap and explaining how this project will progress, it’s important to call out that this project has already been — and will continue to be — an ongoing effort! Today, you can find the project on GitHub and inspect the work that’s already been completed. As of now, the application already combines Workers, Workers KV, Cloudflare for SaaS, and Rate Limiting with Pages and Durable Objects additions to come in later milestones.

Phase 1 (see below) is nearing completion and, when finished, will mark the end of a very significant milestone. A new update to this blog post series will be issued, covering the highlights and technical overview of the project so far. This is important and immediately useful because on its own, Phase 1 qualifies for a successful, full-stack application.

Development Milestones

The CMS application will progress in milestones. We have already released the project and will continue to build upon it in accordance with the roadmap (below). GitHub stargazers will be able to keep tabs on its progress, or at the very least, only subscribe to updates for the milestones they’re interested in following.

Each milestone is a sizable checkpoint on its own. As you’ll see below, the project roadmap is planned in a way such that each phase adds a considerable amount of new features and/or integrates with a new Cloudflare product. At every point, the application will remain functional and maintain a live, interactive demo to immediately demonstrate the latest functionality to passersby.

This format is chosen because it’s how real applications — and real products — are developed. Our goal is to ensure that the GitHub repository is never out of date. And, because of the development structure, one may always traverse the list of past milestones to review the changes that were necessary to migrate X or how product Y was integrated.

|| Note: Visit the GitHub milestones to view more details and to subscribe for updates. There is so much more than can be listed here.

Phase 1 – JSON API

The project must begin with some API endpoints to start managing and manipulating data. Using Workers and Workers KV, the work within this milestone will focus on building a robust JSON API that handles the core functionality that the rest of the application will need.

There is no HTML, CSS, or client-side JavaScript involved in this phase. Instead, work here should focus solely on the data: how it’s accessed, how models relate to one another, and how best to structure and store these relationships within Workers KV. For example, individuals should be able to create and manage workspaces that belong to their personal user accounts or to the organization(s) that they belong to.

Additionally, when creating content, the document should be validated against an existing schema that the document was assigned. This feature is critical in any CMS platform that plans to handle thousands of documents within a workspace. Without it, there’s very little confidence that your contents’ JSON representation is consistently structured.

A number of other features are planned — subscription management and invoicing through Stripe, sending transactional emails through SendGrid, and assigning vanity domains to workspaces through Cloudflare for SaaS. Finally, of course, the standard house-keeping tasks will be set up. This includes continuous integration (CI) with API testing and automated, continuous deployments (CD).

An Open-Source CMS on the Cloudflare Stack: Introductory Post

By the end of this phase, the project will exist as a collection of API endpoints that, on its own, is a complete application. While it may only be accessible through curl commands — or any other preferred method for manually constructing HTTP requests, the completion of Phase 1 already qualifies the project as a full-stack application and could serve a real-world SaaS product.

Additionally, the repository will include all the best practices for writing tests, automating deployments, and organizing the source in a way for long-term growth and maintenance. And, because we started with the JSON API, the project is immediately useful and capable of integrating with your existing build tools and frameworks. In other words, stargazers could deploy the project to their own accounts as their own personalized Headless CMS. Perhaps some of you will build Gatsby or Eleventy plugins — if you do, please let us know!

Phase 2 — Dashboard UI

As fun as curl may be, most people prefer some form of visual interface they can interact with. This phase will be all about assembling a frontend to serve as the CMS application’s dashboard.

We will use Svelte, a JavaScript framework for building user interfaces. While not everyone may enjoy or agree with this decision, the templating syntax resembles standard HTML markup, which will allow non-frontend developers to follow along and gauge what’s going on.

Svelte will be paired with Tailwind CSS for the design system. Tailwind is a very popular, utility-first CSS framework that allows developers to compose styles through predefined, reusable HTML ”class” names.

The result will be a single-page application (SPA) and will be hosted on Cloudflare Pages. This means that, out of the box, the dashboard will be able to take advantage of Access-protected preview deployments, instant rollbacks, automated deployments, comprehensive analytics, and more.

An Open-Source CMS on the Cloudflare Stack: Introductory Post

Finally, now that Pages integrates with Workers directly, the JSON API from Phase 1 will migrate into a new repository structure. While this may seem like an innocent refactor, it actually unlocks an incredible set of features for the JSON API: Access-protected preview deployments, instant rollbacks, and automated deployments. Yes — these are the same Pages features mentioned above! This is amazing because it means that our API is continuously and atomically versioned, allowing its development to continue safely alongside the client dashboard that depends on it. In other words, there is zero risk of the API and the dashboard diverging, which would have allowed their expectations of one another to misalign. Instant rollbacks will also apply to the API since the entire application operates as a single Pages unit.

The previous phase will have built the core SaaS product functionality, but completing this phase will make it feel like a real-world product that can be launched and used on a daily basis. In fact, the end of Phase 2 marks the application as a possible contender in the Headless CMS service space.

Phase 3 — Article Edge-Rendering

The previous phases are focused on assembling a minimum viable Headless CMS product, but Phase 3 looks to grow outside this archetypal box. This will happen by allowing the application to render HTML web pages by injecting the JSON content into predefined templates.

Like WordPress, the CMS application should allow its users to choose whether they want to continue using the “headless” feature or enlist the complete template engine. Should they opt for HTML output, the Cloudflare project will only include a few premade templates that a user may select from — but, of course, this can be customized in your own projects.

Even though this phase reintroduces the monolithic CMS archetype, it’s a significantly safer, faster, and more resilient architecture than the single, all-in-one server of yesteryear. The CMS contents will still be distributed around the world, close to the customers’ readers — but now, the content can be rendered from anywhere in the world at extremely low latencies, too.

Phase 4 — Feature Upgrades

At this stage, the application is — for the most part — complete. It’s functional, looks nice, performs well globally, and can be used in two very distinct ways.

In the context of a real SaaS product, development begins to shift towards adding new features that excite users or towards maintenance health of the project. For example, Phase 4 will utilize Durable Objects to introduce a document editor that allows multiple users to edit the same document in a real-time, collaborative environment.

It’s also very likely that Cloudflare R2 Storage will be introduced as a backend for media assets, allowing users to upload and manage images within a workspace. Or perhaps we decide to use Cloudflare Images for this and R2 is used for importing and exporting content backups.

As you may expect, this milestone is full of unknowns, but that’s because the future holds unlimited possibilities. The project will continue to evolve and expand with Cloudflare and with time.

Of course, if you have ideas or suggestions for features, start a discussion with us on GitHub. We would love to hear from you!

Next Steps

This was the introductory post of (what will be) an ongoing series. When each milestone is completed, we will publish a new post in this series with a retrospective and with technical walkthroughs of key aspects from that chapter’s work.

We’re at the beginning of an exciting journey, and we hope you’re as interested as we are!

You can show your support by starring or following the project on GitHub. All releases, discussions, and milestone tracking will reside within the repository. The next generation of SaaS applications will be built on Cloudflare — subscribe and dive in early!

Building the Cloudflare Summer Challenge Application

Post Syndicated from Luke Edwards original https://blog.cloudflare.com/building-the-cloudflare-summer-challenge-application/

Building the Cloudflare Summer Challenge Application

Building the Cloudflare Summer Challenge Application

If you haven’t already heard, we’re hosting the Cloudflare Summer Developer Challenge, a contest for the Cloudflare community at large. Anybody – yes, including you – can sign up for free and compete for a chance to win one of 300 available prizes. To submit you need to use  at least two products from the Cloudflare developer platform — which makes this contest a great opportunity to give them a try if you haven’t already! The top 300 submissions will receive a box of our most popular swag, so you should give it a go!

Coincidentally, the Cloudflare Summer Developer Challenge’s landing page and signup workflow qualifies as a valid project submission (so meta), so if you’re looking for some inspiration, this walkthrough will shed some light on how it was built.

Overview

At its core, the application is a series of static HTML pages, most of which have a form to submit, with a backend API to handle those submissions, and a storage layer to persist the data. In a Cloudflare lens, this would point towards using Pages, a Worker, and Workers KV. And while this should be the preferred stack for a project like this, truthfully, this “application” was originally intended to be a single HTML page with a single form, but its list of requirements grew over time, as things tend to do. So instead, this project began as–and remains–a Workers Site project, comprised of a single Worker and a single Workers KV namespace.

Workers Sites, the precursor to our Pages product, is a pattern where your Worker handles all the requests for your site’s assets. While doing this, your Worker Site can still include backend-y things, like offering a collection of JSON API endpoints. Basically, Workers Sites is a coined term for building monoliths within a Worker, but without the negative associations that the word “monolith” can bring. Given that a Workers Site is still a Worker, this means your monolith is deployed globally – tough to beat!

As with all Workers Sites, routing is the primary concern. For this, I used the worktop web framework, which includes a router among many other utilities. (Disclosure: I am also the author of worktop.) This allowed me to quickly structure the layout of the entire application:

import { Router } from 'worktop';
import * as Cache from 'worktop/cache';

const API = new Router;

API.add('GET', '/', (req, res) => {
  res.send(200, 'TODO: send HTML for landing page');
});

API.add('GET', '/rules', (req, res) => {
  res.send(200, 'TODO: send HTML for terms & conditions');
});

API.add('POST', '/signup', (req, res) => {
  res.send(201, 'TODO: parse & save initial registration');
});

API.add('GET', '/submit', (req, res) => {
  res.send(200, 'TODO: render the unique submission form');
});

API.add('POST', '/submit', (req, res) => {
  res.send(201, 'TODO: parse, validate, save submission data');
});

// init; w/ Cache API
Cache.listen(API.run);

At this point, nothing useful is happening, but having an application skeleton laid out like this is my preferred format for a TODO list. It’s very satisfying to go through and fill out the handler bodies as development progresses. Additionally, the Cache.listen helper at the bottom of the file integrates the entire application with the Cache API, which I know I’ll want since most of the requests will be for the static HTML pages anyway.

Building and Optimizing the Client pages

Historically, deploying a Workers Site meant uploading all of your assets into a KV namespace. Then you would include something like @cloudflare/kv-asset-handler into your Worker so that incoming requests would seamlessly route to keys within the namespace. However, I chose to go a different route.

Knowing that each of my static pages would – at most – have one CSS stylesheet and sometimes only one JavaScript file, I thought it would be pretty nifty to include a build system that would inline these assets into the built HTML page. This would mean that my static HTML pages would have absolutely zero network requests for additional resources, which is generally good news for performance.

And while I would love to say that I did this purely for performance reasons, I must also admit that the lazy-me appreciated that I didn’t have to set up additional URL routing, deal with KV asset uploading, or deal with additional Cache lifespans. A win-win in this case!

The trouble is: avoiding any external assets is not a common goal. In fact, this is very much a side quest I bestowed upon myself. And since no frameworks (that I know of, at least) can do this, I had to assemble my own miniature toolkit to accommodate my needs.

In the end, it proved to be a fun detour and didn’t take very long at all to put together. I incorporated Stylus, my preferred CSS preprocessor, and came up with a rather simple convention to inline CSS and/or JS files where needed. Instead of fancy AST parsers and transformers, I opted to simply read the HTML file contents as strings and search for HTML comments that matched the <!-- inject:(path) --> format:

<!-- submit/index.html -->
<!DOCTYPE html>
<html lang="en">
  <head>
    <meta charset="utf-8"/>
    <title>Submit Project | Cloudflare Developer Summer Challenge</title>
    <meta name="viewport" content="width=device-width, initial-scale=1.0">
    <link rel="icon" type="image/png" href="https://www.cloudflare.com/favicon-128.png">
    <!-- inject:submit/index.styl -->
    <!-- inject:index.js -->
  </head>
  <body>
    <!-- ... -->
  </body>
</html>

In this example, the submit/index.html file is injecting the submit/index.styl, which is its own stylesheet, and the index.js script, which does not live within the `submit` directory because it’s used by other pages. The toolkit looks at both asset paths, converts the Stylus to plain CSS, and then embeds the contents into the appropriate <script> or <style> HTML tags.

Finally, for production builds, the setup will pass the final HTML source through a minifier, which compresses the entire document, including any CSS or JavaScript that was injected. This step is optional, but it never hurts to send fewer bytes down the wire.

Once these pages were built, I was satisfied with the Network Activity panel when loading the main page:

Building the Cloudflare Summer Challenge Application

You can see how the localhost document loads, only dispatching a single request for the favicon-128.png file, which is hosted externally. The three data:image/* requests are Blob URLs and don’t actually transfer network packets. All in all, this means that the HTML document is fully self-contained.

Including HTML into the Worker

Workers can send anything in a Response. Of course, this includes a HTML string. If I wanted to make things incredibly difficult for myself, I could have skipped the /src directory with its own build system, and instead written the HTML, CSS, and JS entirely within a JS string. This would certainly work, but it would be a nightmare to maintain and (for me, at least) be extremely error prone:

API.add('GET', '/', (req, res) => {
  // Note: Worktop APIs
  res.setHeader('Content-Type', 'text/html;charset=utf-8');
  res.send(200, `
    <!doctype html>
    <html lang="en">
      <head>
        <title>Demo | Insanity</title>
        <style>
          body {
            background: #fff;
            color: #424242;
          }
          /* more */
        </style>
        <script>
          $('form').onsubmit = function (ev) {
            ev.preventDefault();
            // ...
          });
        </script>
      </head>
      <body>
        <!-- my entire page content -->
      </body>
    </html>
  `);
});

Thankfully, I planned ahead and already have a build system that produces better HTML files anyway. So now I just needed a way to load those built outputs into my Worker code.

Now for the second half of this project’s toolkit; I find it perfectly acceptable to have a two-step build pipeline. Here, this means that the static site should be built first, followed by building the Worker. I was planning to use TypeScript to author my Worker anyway, which meant I was already going to need a build step – the only change here is that these build steps would now have to be sequential and ordered.

The Worker is built using esbuild, which is an extremely quick JavaScript bundler and compiler that is capable of translating TypeScript, too. It also has its own plugin system, which allowed me the opportunity to add the “inline my HTML files” behavior I needed. The Worker’s build script actually isn’t too intimidating and allows the Worker to `import` HTML files directly. This allows the insanity from above can be safely replaced with this pattern:

import { Router } from 'worktop';
import * as Cache from 'worktop/cache';

// loaded via esbuild plugin
import LANDING from 'index.html';
import RULES from 'rules/index.html';

API.add('GET', '/', (req, res) => {
  res.setHeader('Content-Type', 'text/html;charset=utf-8');
  res.setHeader('Cache-Control', 'public,max-age=60');
  res.send(200, LANDING);
});

API.add('GET', '/rulees', (req, res) => {
  res.setHeader('Content-Type', 'text/html;charset=utf-8');
  res.setHeader('Cache-Control', 'public,max-age=1800');
  res.send(200, RULES);
});

// ...

// init; w/ Cache API
Cache.listen(API.run);

Of course, this is much cleaner and sensible in the long-run. Clarity makes it easier to identify and extract common patterns into utility functions. I took the opportunity to introduce a render function, the first of many reusable helpers this project would encounter:

// worker/utils.ts
import type { ServerResponse } from 'worktop/response';

export function render(res: ServerResponse, template: string) {
  res.setHeader('Content-Type', 'text/html;charset=UTF-8');
  res.send(200, template);
}

// worker/index.ts
import * as utils from './utils';

API.add('GET', '/', (req, res) => {
  res.setHeader('Cache-Control', 'public,max-age=60');
  return utils.render(res, LANDING);
});

API.add('GET', '/rulees', (req, res) => {
  res.setHeader('Cache-Control', 'public,max-age=1800');
  return utils.render(res, RULES);
});

Finally, most of the pages need to dynamically insert values into the HTML markup. For example, the submission form should render with the participant’s name and email address and the landing page is required to reflect the current value of remaining prizes. Much like any other monolithic application, the Worker Site is fully aware – and capable – of injecting these values where needed.

To do this, I standardized the {{ variable }} syntax in my project’s HTML. Each of these variables would be replaced during the Worker request with the appropriate value. Of course, it also requires that each endpoint actually provide the correct information to make the substitutions. With this in mind, I modified the `render` utility and updated the landing page’s route handler:

// worker/utils.ts
import type { KV } from 'worktop/kv';
import type { ServerResponse } from 'worktop/response';

// TypeScript placeholder
// Defines the `DATA` KV binding
declare const DATA: KV.Namespace;

export function render(res: ServerResponse, template: string, values: Record<string, string> = {}) {
  for (let key in values) {
    template = template.replace('{{ ' + key + ' }}', values[key]);
  }
  res.setHeader('Content-Type', 'text/html;charset=UTF-8');
  res.send(200, template);
}
  
export function toCount(): Promise<string> {
  return DATA.get('::remain', 'text').then(v => v || '300+');
}
  
// worker/index.ts
import * as utils from './utils';

API.add('GET', '/', async (req, res) => {
  // Get the "::remain" count from KV
  const count = await utils.toCount();
  
  // Short-term TTL for remaining swag updates
  res.setHeader('Cache-Control', 'public,max-age=60');
  
  // Render the HTML, passing in `count` variable
  return utils.render(res, LANDING, { count });
});

With these changes, the landing page will always check the KV namespace for the latest ::remain value and inject it into the correct location. If you’re interested in checking out the project’s source code, you’ll find that this pattern is used in nearly every HTML response.

Accepting Form Submissions

As expected, this application made heavy use of form submissions. Luckily, the Fetch API offers a variety of built-in body parsers to make retrieval of the data trivial. Additionally, worktop offers a convenience function that will automatically invoke the correct parser based on the request’s Content-Type header. It’s aptly named req.body().

It’s easy to parse and retrieve user data, but it still has to be validated. There are a number of ways to do this, all of which boil down to an input object, a group of rules, and a loop through those rules, collecting any error messages into an errors object. This is precisely what my utils.validate helper does, allowing me to clearly define and manage my rules inline.

Let’s see how this looks within the POST /submit handler, which accepts the initial registration form:

// worker/index.ts
import * as utils from './utils';

API.add('POST', '/signup', async (req, res) => {
  try {
    var input = await req.body<Entry>();
  } catch (err) {
    return toError(res, 400, 'Error parsing input');
  }

  let { email, firstname, lastname } = input || {};
  firstname = String(firstname||'').trim();
  lastname = String(lastname||'').trim();
  email = String(email||'').trim();

  let { errors, invalid } = utils.validate({
    email, firstname, lastname
  }, {
    email(val: string) {
      if (val.length < 1) return 'Required';
      return utils.isEmail(val) || 'Invalid email address';
    },
    firstname(val: string) {
      return val.length > 1 || 'Required';
    },
    lastname(val: string) {
      return val.length > 1 || 'Required';
    }
  });

  if (invalid) {
    return res.send(422, errors);
  }
      
  // The `input` is valid!
  
  return res.send(200, 'TODO: finish me');
});

Only after the data is considered valid can data be stored into KV for future use. For the initial registration, a number of things need to happen:

  1. Ensure that the input.email hasn’t already been registered;
  2. Persist the new registration using the `input` values, identifying each document with the user:<email> key;
  3. Generate and save a unique code for the registration, which will be used later to ensure (a) that unregistered persons cannot submit projects and (b) that a registrant can only submit once;
  4. Send the user an email, containing their unique submission link; and
  5. Render a confirmation page, reminding the user to check their inbox for their link.

It can seem like a lot, but after piecing together a few utility helpers and abstractions, it can actually feel quite approachable:

// worker/index.ts
import * as utils from './utils';
import * as Sparkpost from './emails';
import * as Signup from './signup';
import * as Code from './code';

function toError(res: ServerResponse, status: number, reason: string) {
  return res.send(status, { status, reason });
}

API.add('POST', '/signup', async (req, res) => {
  try {
    var input = await req.body<Entry>();
  } catch (err) {
    return toError(res, 400, 'Error parsing input');
  }
  
  let { email, firstname, lastname } = input || {};
  firstname = String(firstname||'').trim();
  lastname = String(lastname||'').trim();
  email = String(email||'').trim();
  
  // truncated: validation
  
  // Ensure email is not already in use
  let exists = await Signup.find(email);
  if (exists) return toError(res, 400, 'You have already signed up');

  // Generate new `Entry` record
  let entry = Signup.prepare({ email, firstname, lastname });

  // create "user:<unique email>" document
  let isOK = await Signup.save(entry);
  if (!isOK) return toError(res, 500, 'Error persisting entry');

  // create "code:<unique value>" document
  isOK = await Code.save(entry);
  if (!isOK) return toError(res, 500, 'Error saving unique code');

  // dispatch "We received your registration" email
  let sent = await Sparkpost.confirm(entry);
  if (!sent) return toError(res, 500, 'Error sending confirmation email');

  // render "Thank you, check your {{ email }} for next steps" page
  return utils.render(res, CONFIRM, { email: entry.email });
});

A full HTML response is returned, which means that the client-side form handler should be able to see this content and render it directly in the browser window. This can be seen in the following index.js snippet, which was referenced earlier in the submit/index.html as an injected asset:

// (client) index.js

$('form').onsubmit = async function (ev) {
  ev.preventDefault();

  var form = ev.target;
  var res = await fetch(form.action, {
    method: form.method || 'POST',
    body: new FormData(form),
  });

  // truncate: clear existing errors

  if (res.ok) {
    form.reset();
    // Receive HTML response
    let html = await res.text();
    // Force-write the new HTML into this window
    document.documentElement.innerHTML = html;
  } else {
    // truncate: render errors
  }
};

BONUS: Because a full HTML response is returned, and all the client-side <form> elements are semantically correct, the form submission workflow will work with JavaScript disabled! The client-side validation will remain functional, but be a degraded experience – the error dialog won’t popup and any error messages will not appear beneath their respective form inputs.

Sending Transactional Emails

It should (hopefully) come as no surprise that programmatically sending an email is pretty straightforward these days. We chose to use SparkPost, but practically every service has the same API mechanics:

  • Obtain an API Token
  • Send a POST request to an endpoint with:
    • your API Token as an Authorization header
    • your recipient, sender identity, and text and/or HTML content as the POST body
  • Wait for a 200-level response, or deal with any API errors

Most email-as-a-service providers allow you to define templates, which allow you to replace variables with unique values per email – essentially the same thing our utils.render function is doing with our HTML contents. The benefit of this is that you only have to worry about writing your emails once; then you’re just POST’ing new values to the API endpoint.

SparkPost allows templates to be referenced by a custom name rather than a randomly generated identifier, which makes it easy to track and debug templates over time.

// worker/emails.ts
import type { Entry } from './signup';

// wrangler secret
// @see https://developers.sparkpost.com/api/#header-authentication
declare const SPARKPOST_KEY: string;

/**
 * Assemble the POST request for all SparkPost email triggers
 * @see https://developers.sparkpost.com/api/transmissions/#transmissions-post-send-a-template
 */
async function send(
  templateid: string,
  recipient: Entry,
  values?: Record<string, string>
): Promise<boolean> {
  const res = await fetch('https://api.sparkpost.com/api/v1/transmissions', {
    method: 'POST',
    headers: {
      'Content-Type': 'application/json',
      'Authorization': SPARKPOST_KEY,
    },
    body: JSON.stringify({
      content: {
        template_id: templateid,
      },
      recipients: [{
        address: {
          email: recipient.email,
          name: recipient.firstname + ' ' + recipient.lastname,
        },
        substitution_data: values || {},
      }]
    })
  });

  let data = await res.json() as {
    results: {
      id: string;
      total_rejected_recipients: number;
      total_accepted_recipients: number;
    }
  };

  return res.ok && data.results.total_accepted_recipients === 1;
}
    
/**
 * Confirming user's signup
 * Sending unique submission form
 */
export function confirm(entry: Entry): Promise<boolean> {
  return send('devchallenge-confirm', entry, {
    firstname: entry.firstname,
    code: entry.code,
  });
}

The above snippet includes the entire POST request formatter – there’s nearly more type-hinting than there is code! Also shown is an example confirm method, which is responsible for sending the unique submission link to the newly-registered user. You’ll notice that firstname and code are the injected variables, required by the “devchallenge-confirm” template.

Overall Performance

I’d call this a success!

Even though this certainly wasn’t my first Worker project – and definitely won’t be my last – I’m consistently amazed how much the Workers runtime lets me get away with. I mean, if you could only take away two points from this article, they should be:

  1. I was able to build a moderately complex application, from scratch, while incorporating a Cache layer, a globally-replicated storage layer, and a super-performant JS runtime, all of which live under the same roof.
  2. I (probably) spent more time fussing with a custom client-side build pipeline than I did piecing together the mission-critical API form handlers.

The cherry on top: Should this contest go viral and lure in millions of visitors, I’d only be paying a couple of dollars at the end of the month. Obviously I have a bias here, but it’s pretty amazing really.

Finally, performance-wise, this may justify the time spent fiddling with the HTML build output:

Building the Cloudflare Summer Challenge Application

Lessons Learned

As I alluded to earlier, if I were to rebuild this application, or if I were to add more to it down the road, I would replace the Workers Site architecture with a Pages project and deploy a Worker in front of it for my API requirements and dynamic KV injections.

Since the static assets would no longer be embedded into the Worker’s source, I would need to replace the `utils.render` approach for another utility that fetches the URL from Pages (which becomes my “origin server”) and then uses HTMLRewriter to inject the variables. Also, not that I was anywhere near the 1MB size limit, the largest contributor to my Worker’s bytesize would disappear.

But, more significantly, this refactor would also reduce my total tooling since the majority of the project’s complexity lies in the custom build system for the frontend assets. In other words, the entire /src directory could have been built and deployed like a normal static website, which would allow me to make use of existing frameworks and/or toolkits instead of taking my self-imposed detour. There would have been no need to create a custom frontend toolkit and its bridge to get the static assets loaded into my Worker.

However, none of this is to say that Workers Sites was a bad approach for this application. It’s quite the contrary! This is all to highlight the flexibility of Worker Sites – and the Workers platform at large. Cloudflare Pages exists so that I, the developer, can lean into existing, well-traveled paths and let the experts worry about toolkits, build pipelines, and deployments… But that doesn’t prevent you, the resident expert, from customizing every aspect if that’s your desire.

Resources