Cloudflare and Anthropic have collaborated to integrate Claude Managed Agents with Cloudflare Sandboxes. Our new integration gives you more control over your agent sandboxes, secures connections to private services, and improves observability.
In the past year, Cloudflare’s Developer Platform has expanded to give more developers the tools they need to run agents at scale. This includes:
Sandboxes for full stateful Linux microVMs at scale
Agents SDK, providing simple and customizable agent framework
Browser Run, which gives agents fully programmable and observable browsers
Dynamic Workers, allowing for dynamic sandboxed code execution at massive scale
Our goal is to make Cloudflare the simplest, most secure, and most programmable cloud for agents.
Integrating with Claude Managed Agents is another step in this direction. You can run your agent loop on the Claude Platform, while using Cloudflare to execute code, secure connections, and run custom tool calls.
Enhanced security – Run all agent traffic through customizable proxies. This allows you to securely inject credentials, prevent data exfiltration, and better observe how your agents interact with the outside world.
Sandbox control and observability – Get detailed sandbox metrics and logs. SSH into running machines. Customize sandbox images.
Lightweight sandboxes – Writing and executing untrusted code can be done in a traditional microVM or a lightweight isolate. This lets you hit massive scale, boot sandboxes in milliseconds, and minimize infrastructure spend.
Private service connectivity – Connect agents to private internal services without ever exposing them to the Internet.
Browser Control and Observability – Get an audit trail of every agent’s browser sessions, including session recording and human-in-the-loop flows.
Email – Give each of your agents its own email address and ability to send emails.
Custom tools – Extend your agents with tools without needing additional infrastructure. Just write functions and deploy.
You get all of this out of the box when deploying the integration, and you can easily customize if you need more.
Let’s take a brief look at Claude Managed Agents, see how to integrate a Cloudflare-based environment, then explore how to get the most out of Claude on Cloudflare.
An overview of Claude Managed Agents
Claude Managed Agents allow developers to easily define and run agents on the Anthropic platform. In these managed environments, Claude can read files, run commands, browse the web, and execute code. The harness supports built-in prompt caching, compaction, and various agent-first performance optimizations.
Until now, using Claude Managed Agents has meant running the entire stack on Anthropic-provided infrastructure. While this is great for some developers, others may need more control over their infrastructure choice, whether this is for security, compliance, or performance reasons. Self-managed environments for Claude Agents provide just that.
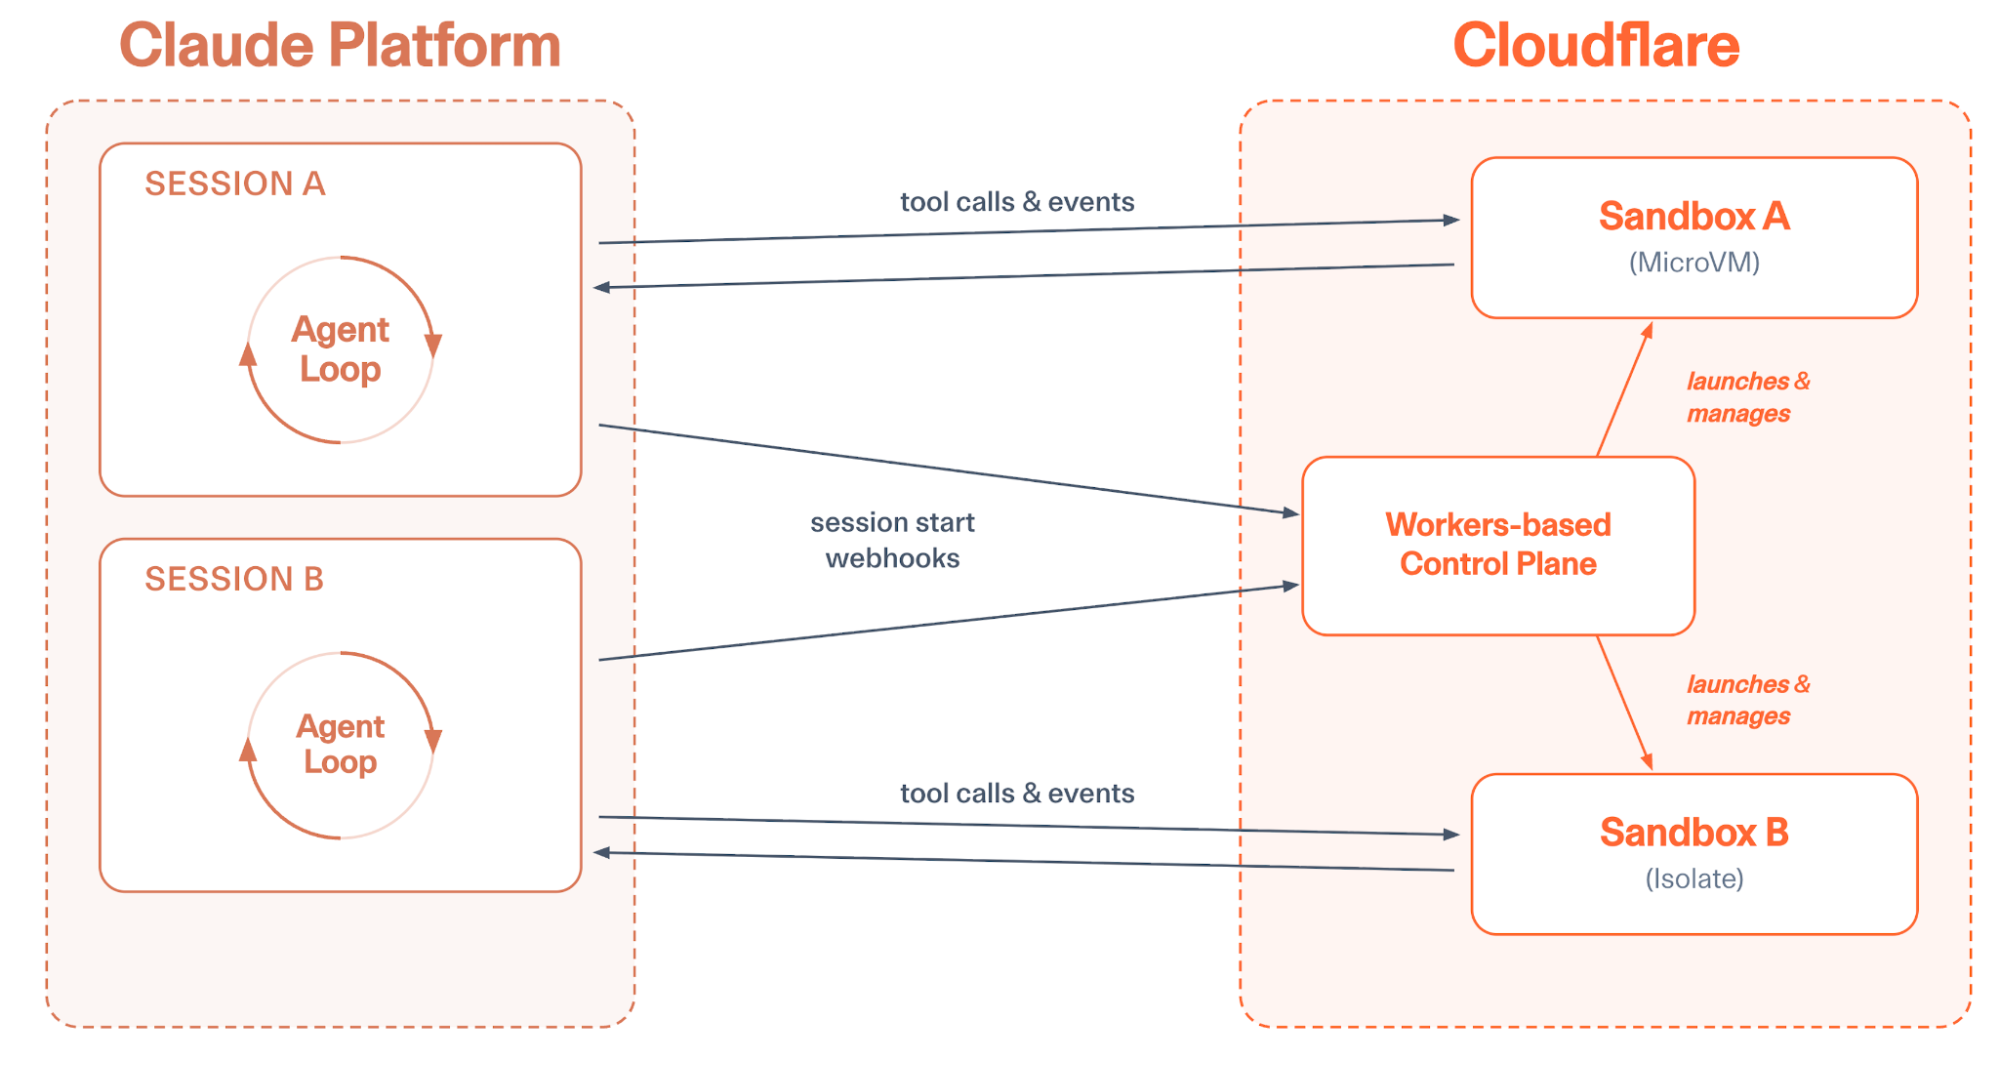
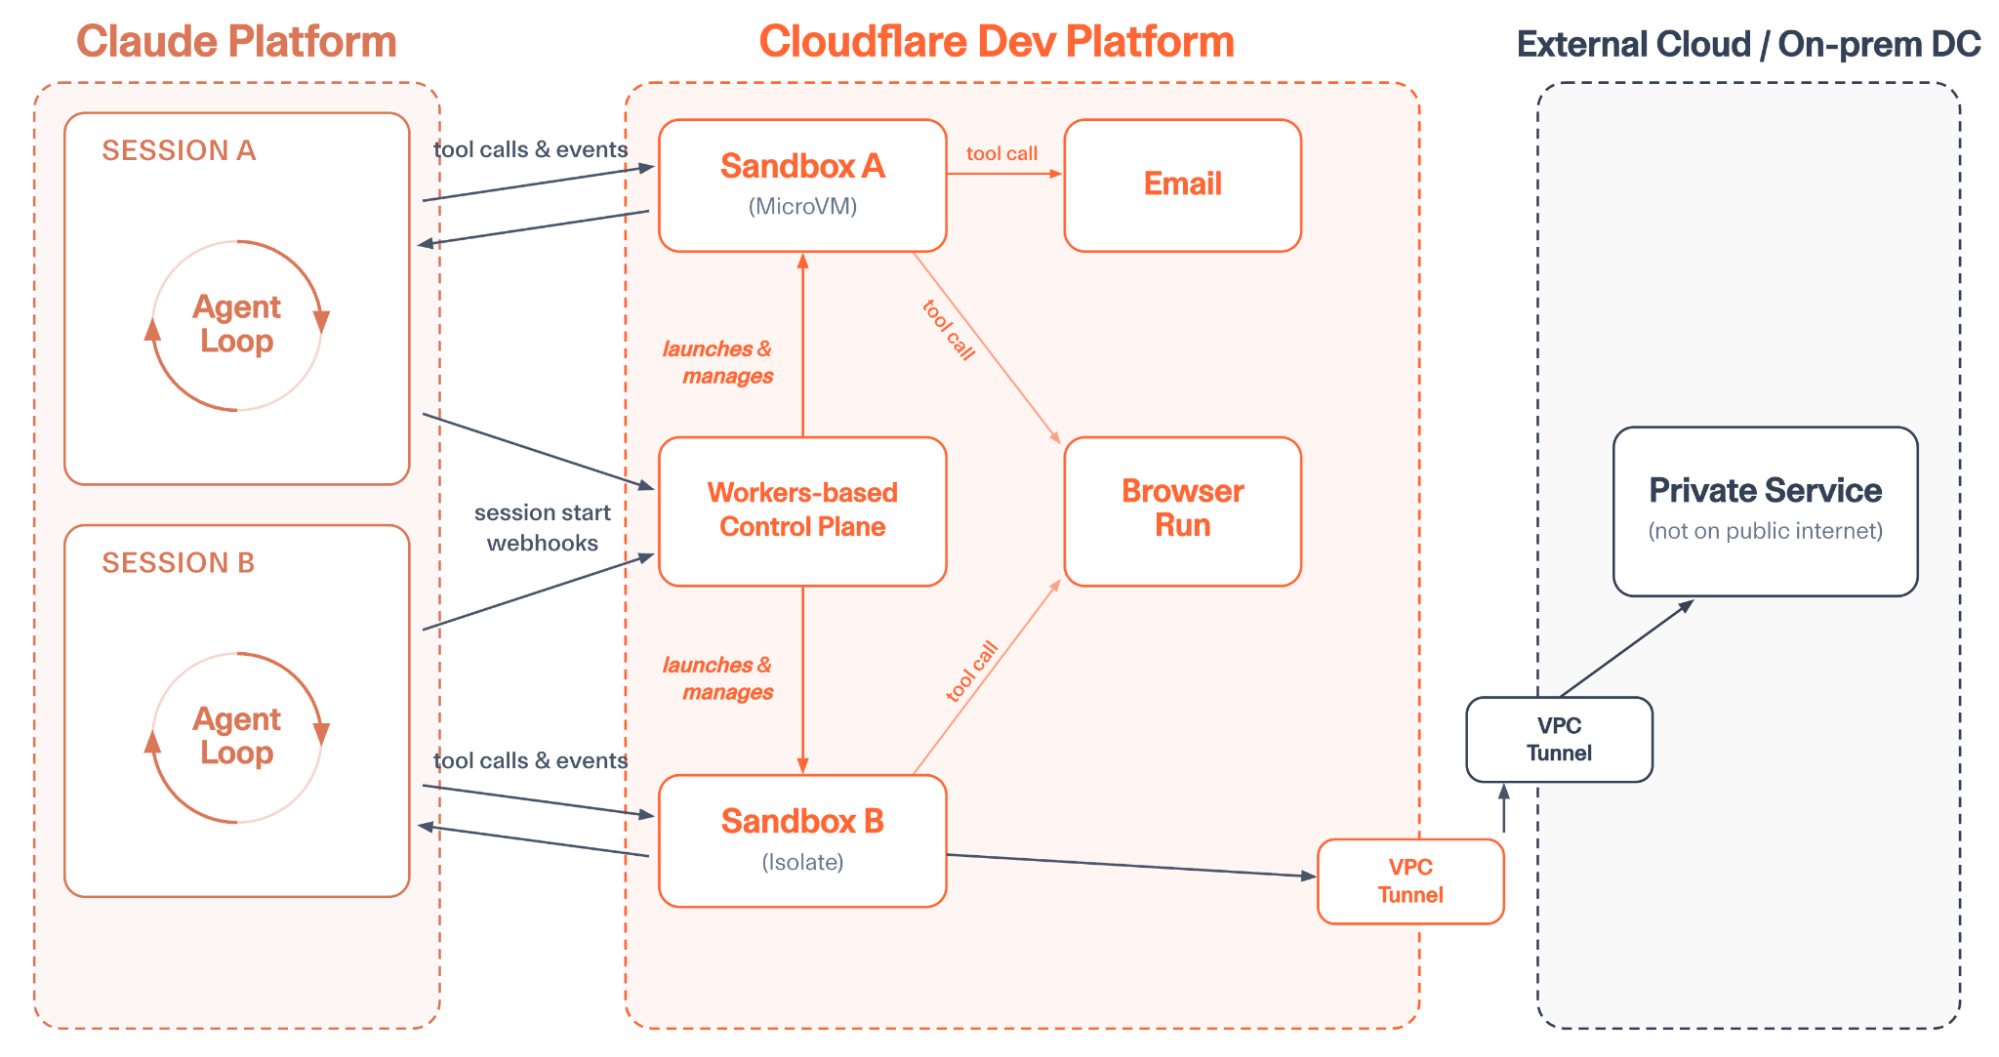
Anthropic describes this as “decoupling the brain from the hands.” The core agent loop runs in Anthropic (the “brain”), but the infrastructure for running and executing code (the “hands”) can be run anywhere, including Cloudflare.
The Cloudflare environment
Our new integration gives your agents a Cloudflare-based environment for running and executing code within minutes.
Follow the onboarding guide to get started. Then fork the repo and customize your integration as you see fit.
After setup, when a Claude Agent starts a session, it sends a message to your new Cloudflare-based control plane. The Workers-based control plane gives each agent session a sandboxed environment for executing code, developing applications, running CLI tools, and more. State is automatically persisted across session sleeps.
Sandboxes write files and execute code in response to the Claude-based Agent loop
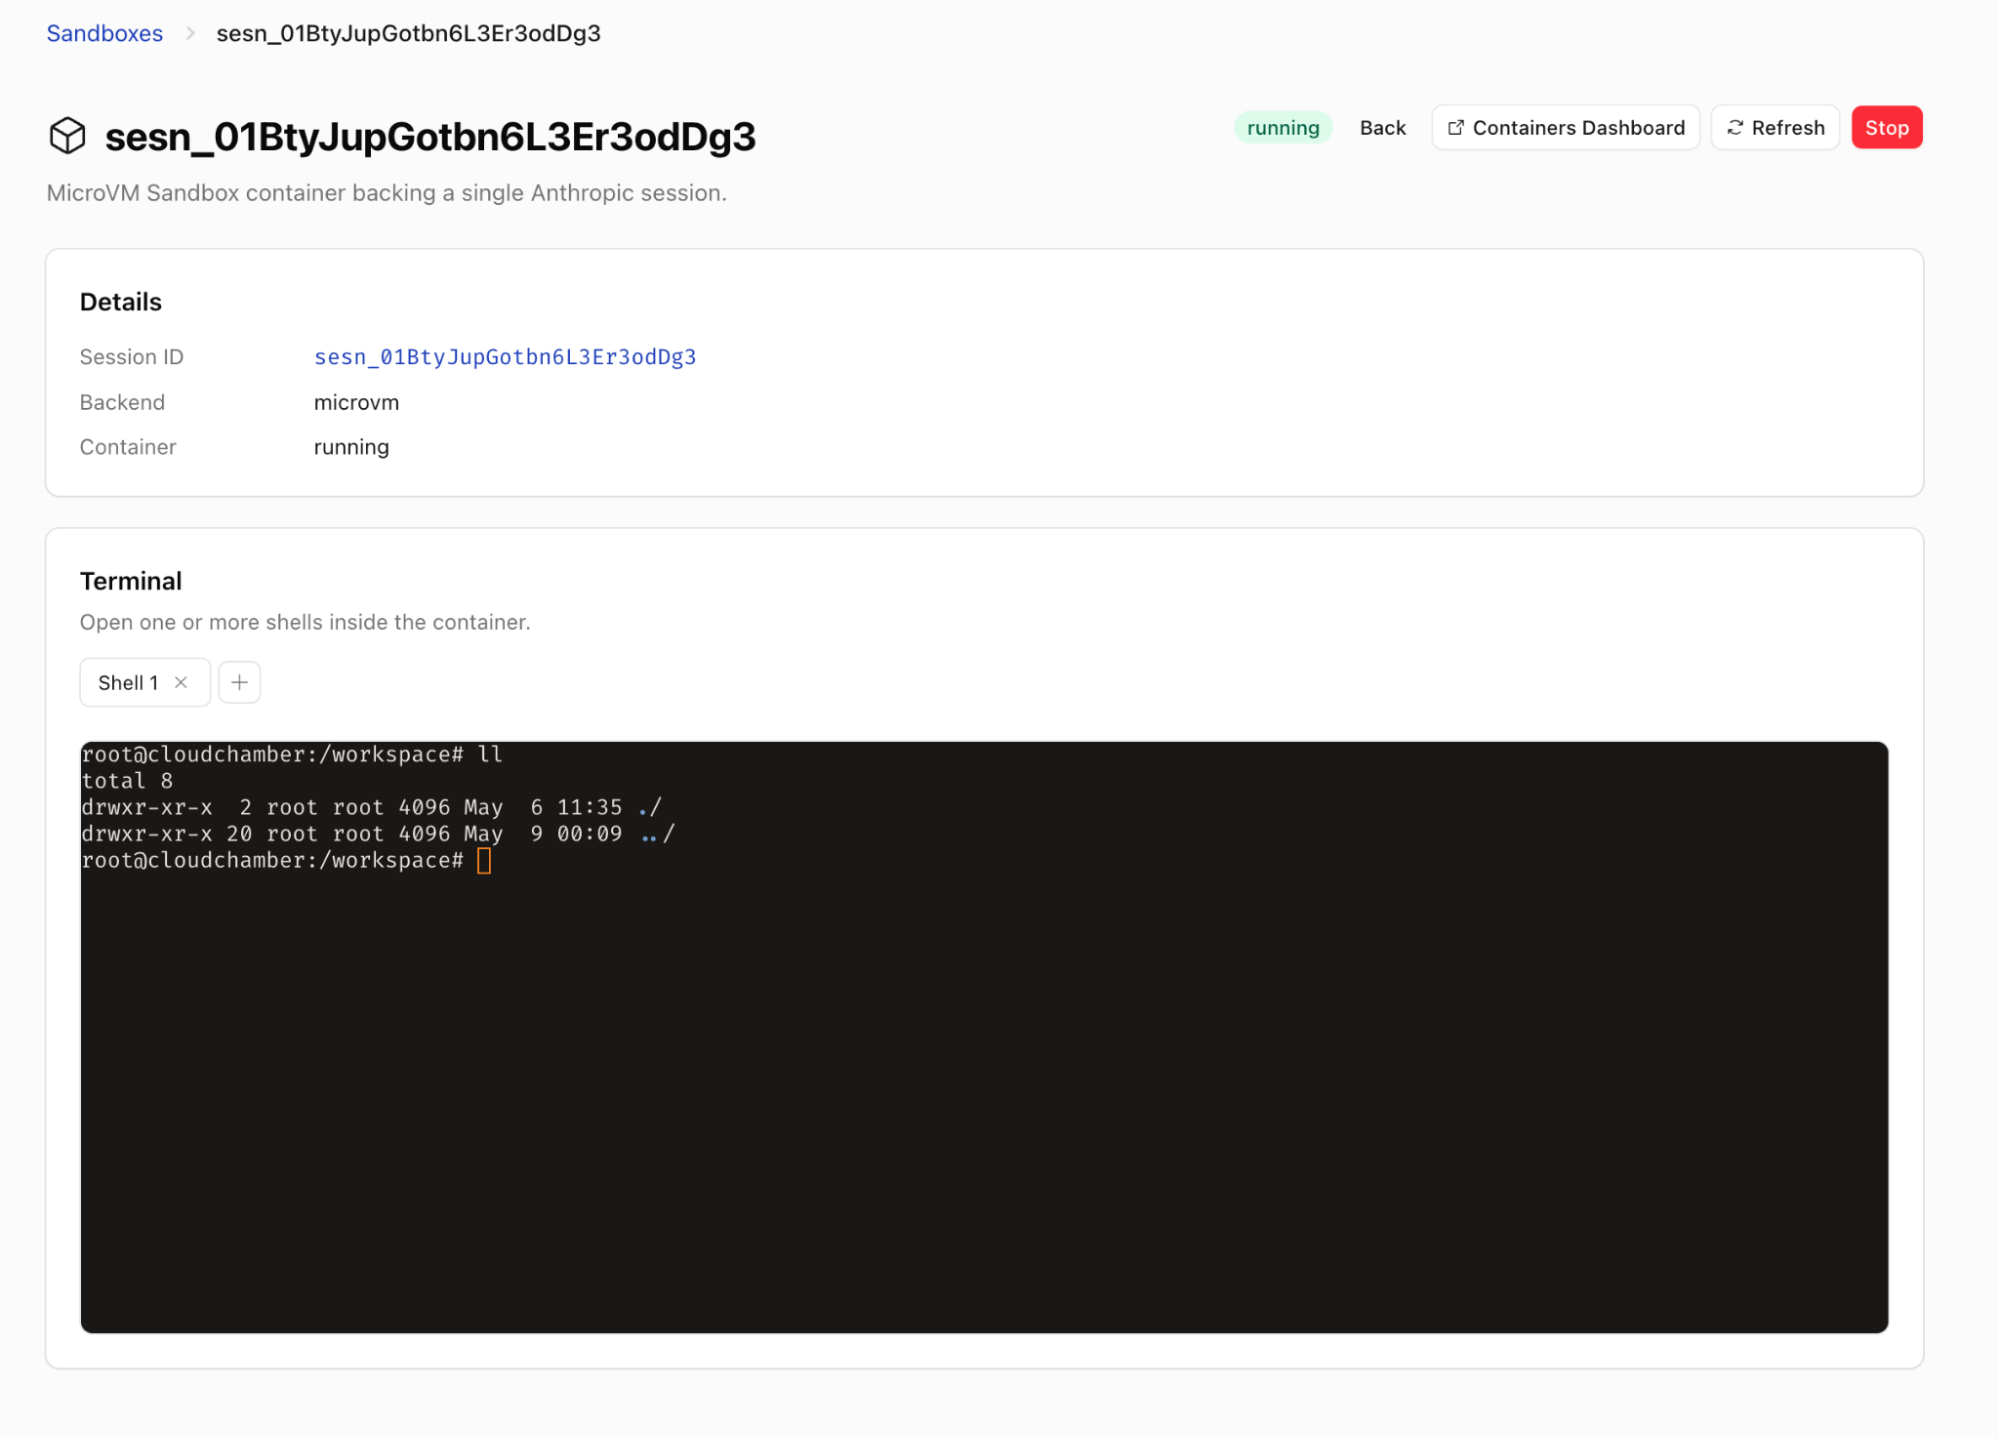
You can optionally configure sandbox instance sizes or customize the container image that runs within VM-based sandboxes. Each sandbox can be observed in the Cloudflare dashboard, sandbox logs can be queried or shipped to external providers like Datadog or Splunk, and the control plane ships with a built-in UI, making it easy to track the state of sandboxes or SSH into specific machines.
Get interactive shell sessions into your agent’s sandbox
Enabling agents at Internet scale
What if your agent backend booted in a few milliseconds, and you didn’t have to pay for the resources of a full VM when running the agent?
But as models get better, we expect more and more workflows to be managed by agents. Each of your customers should be able to run many agents simultaneously; each of your employees should have tens of agents running at once. If we’re constantly running a full microVM per agent, we’ll be unnecessarily burning a ton of resources and money to enable this scale.
That’s why we’re providing a faster and cheaper sandbox for your Claude Agents. This sandbox is based on the AgentsSDK. You can execute arbitrary code in Dynamic Workers using Codemode, and you still get a file system, but your agent is doing all of this within a V8 isolate instead of a microVM.
If you need agents to act as a developer, building full applications and running Linux-based tools, you can still reach for a microVM-based sandbox. For this, we provide Cloudflare Containers, which Claude Managed Agents can also use.
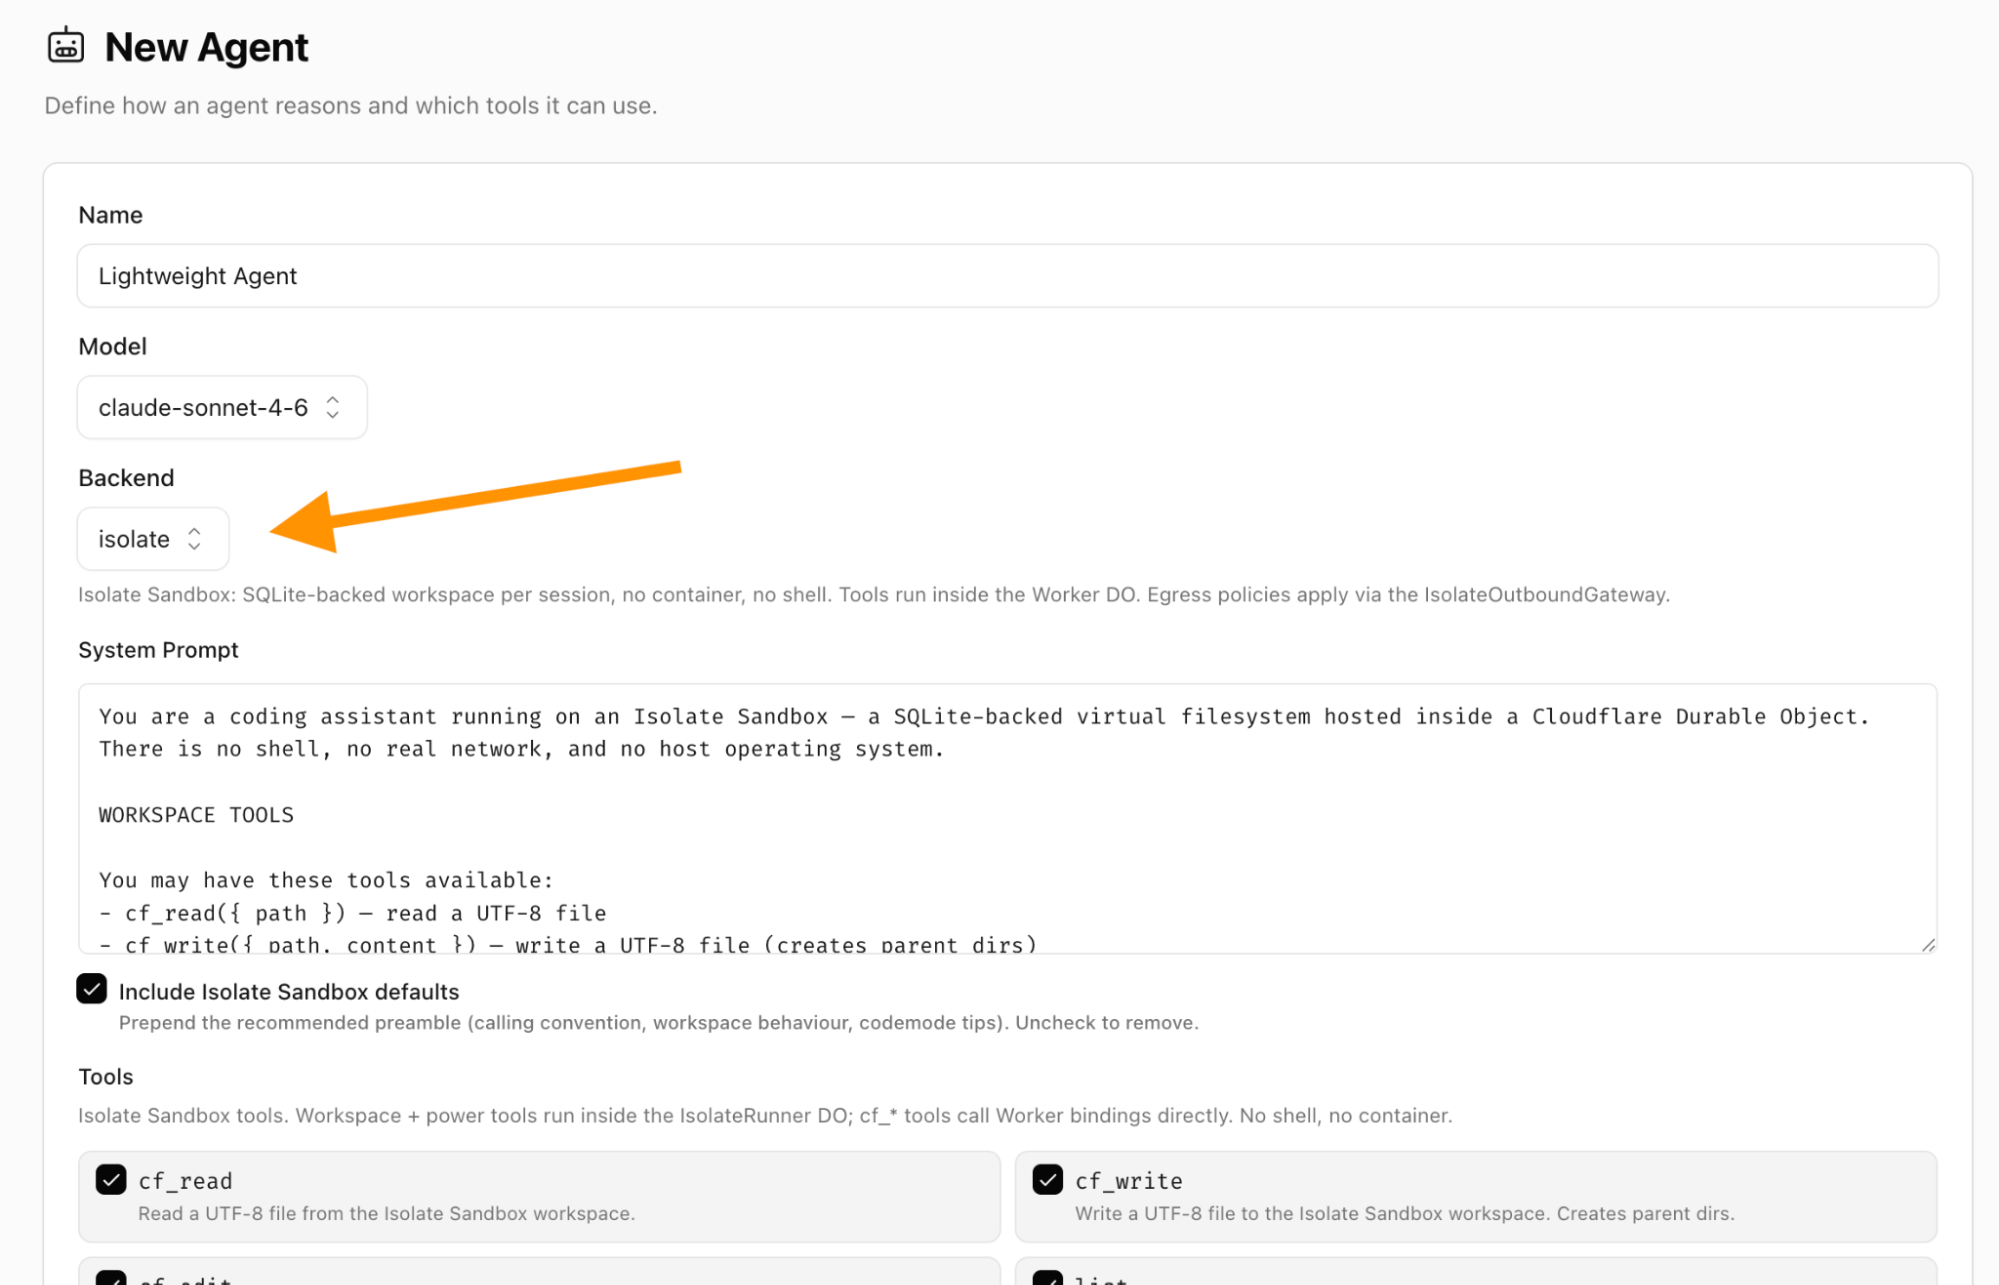
But if you want a faster, cheaper, and more scalable alternative you can use isolates instead of microVMs easily. Just select “isolate” for backend type when setting up an Agent.
Setting up an “isolate” backend gives you a lightweight V8 isolate sandbox instead of a microVM
If you want to handle bursts of tens of thousands of concurrent agents or more, running with isolates will allow you to scale in a way that no VM-based solution allows.
Securing your agentic workloads
Agents are far more powerful when they connect to your organization’s context. This usually means accessing private services and data.
As we’ve written before, sandboxed workloads on Cloudflare can use an outbound proxy for fully dynamic, customizable, and zero-trust authentication between sandboxes and external services. This lets you inject secrets into requests outside the sandbox, so the agent never has access to them. This protects against exfiltration attacks.
And sometimes internal services shouldn’t ever be exposed to the open Internet. We recently launched Cloudflare Mesh and Cloudflare Workers VPC to better connect to these private services, whether they’re running on a cloud provider like AWS or on-premises. This allows you to connect to internal services using post-quantum encrypted networking without a VPN or bastion host.
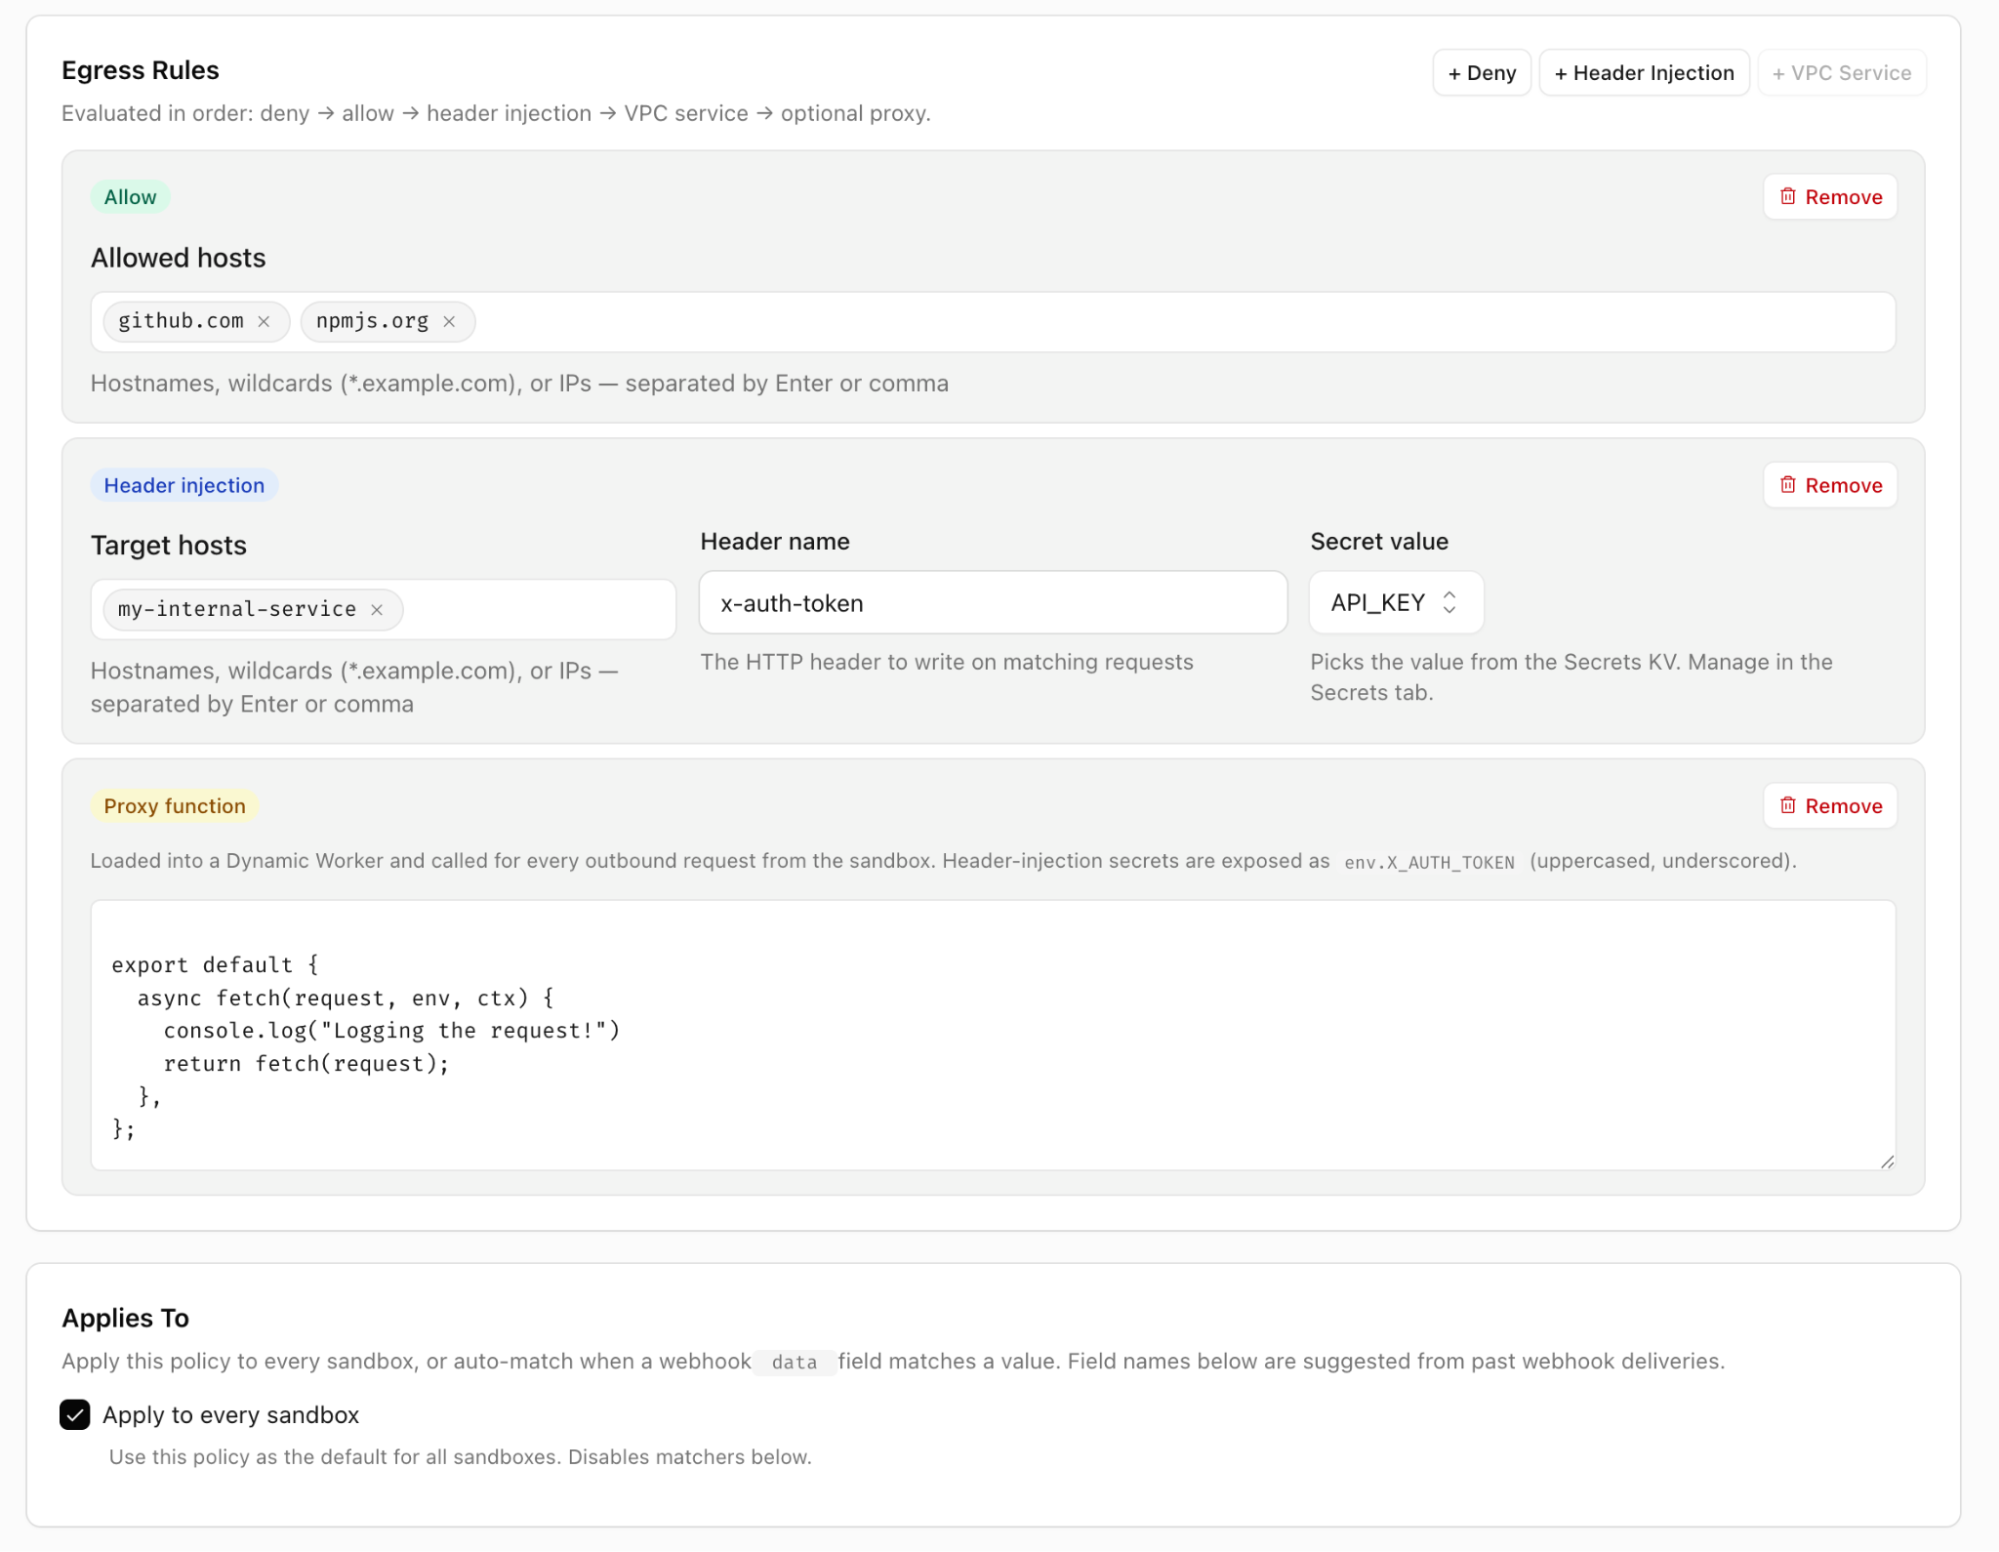
Claude Managed Agents can easily connect to private services with header injection or private VPC/Mesh tunnels. This is done via customizable outbound proxies. You can define egress policies that expose only the services you choose to the agent sandboxes that you choose. You can allowlist specific endpoints, perform zero-trust injection of encrypted credentials, access private services via Cloudflare Mesh, and even write custom proxy middleware.
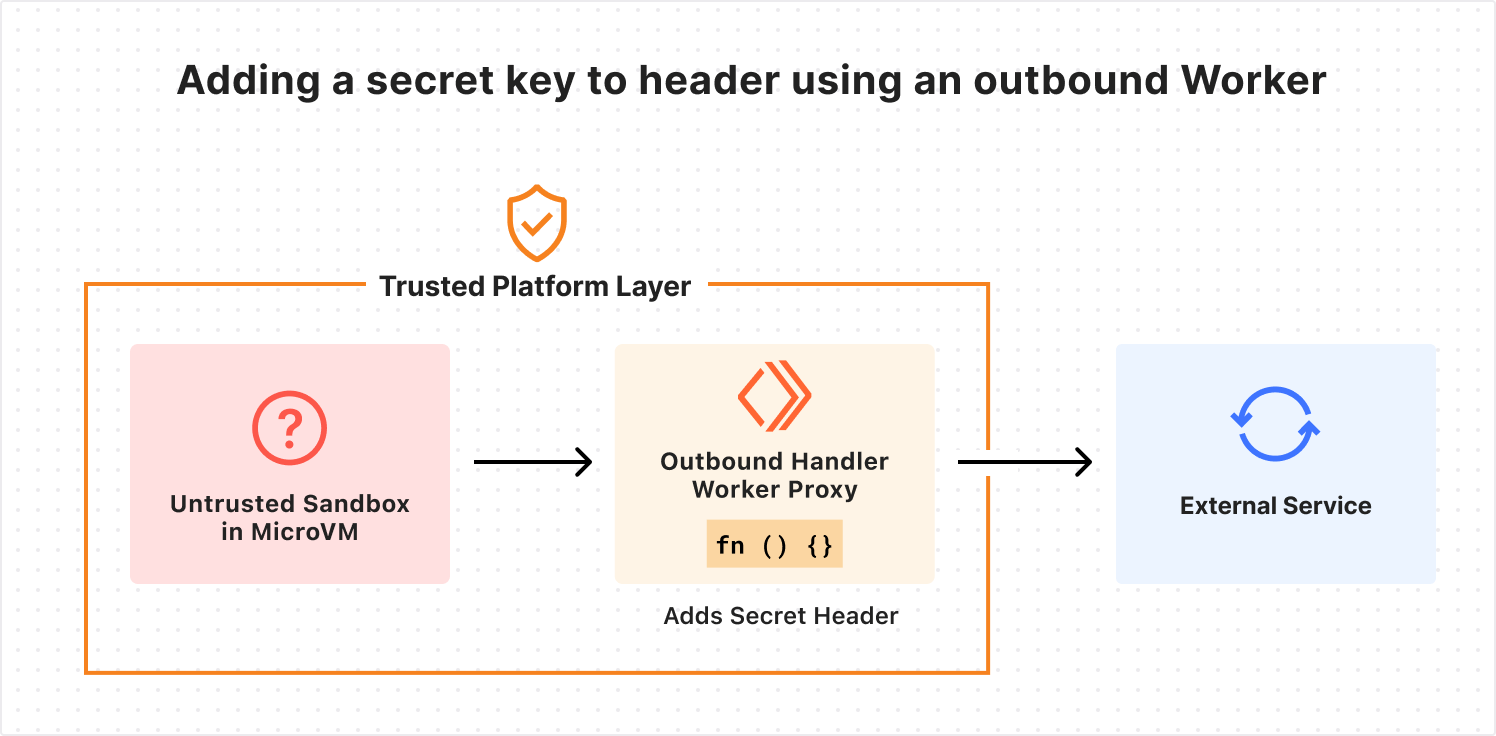
The integration uses outbound Workers to handle egress however you see fit
You’re able to apply policies per tenant, per agent, or based on whatever metadata is useful. This gives you full control over how your agents connect to external services.
Doing more with the Cloudflare Developer Platform
Agents need more than just a code execution environment. Cloudflare’s Developer Platform provides the tools you need by default to let your agents do more.
Sandboxes can make tool calls on Cloudflare and safely access external services.
Here are a few of the tools you’ll find most useful as you deploy agents on Cloudflare:
Browser Run via Claude
One of the most common tools agents need is a browser. While curl can get you pretty far, when you want an agent to act like a human, this often means interacting with the web like one: rendering JS-heavy applications, taking screenshots for QA validation, filling out forms, etc. Browser Run is Cloudflare’s tool to give agents browsers.
A Browser Run session recording lets you watch how your agents used a browser. One of many built-in tools.
The Claude Managed Agents integration ships with multiple browser-related tools that can be enabled immediately. These include browser_search, browser_execute, screenshot, browse, fetch_to_markdown, and a Cloudflare-specific implementation of web_fetch allows your agent to control a browser that runs on Cloudflare infrastructure. This not only lets your agent do more, but it also makes it easy to audit every action your agent’s browser is taking on the web, apply allowlists and denylist to browser sessions, and save recordings of browser sessions for future debugging.
Agent inboxes
The integration also comes with built-in support for email with the send_email, email_read, and email_list tools.
You can also kick off new sessions via email, or configure the agent to send emails using any domain and address configured with the Cloudflare Email Service. This allows the agent to act on your behalf when it needs to, reply to context in forwarded emails, and autonomously interact with others via email.
Custom tools and more
Other built-in tools include call_service, which uses Cloudflare Mesh or Workers VPC to connect to private services, and image_generate, which uses Workers AI to generate images on Cloudflare. This pairs well with Claude providing text-based inference.
Additionally, we encourage forking the repo to easily add customized tools. For example, you could add a custom tool to host a public file on Cloudflare’s R2 object storage. Just add the relevant binding in wrangler config, write a zod definition, and short function in custom-tools.js:
defineTool({
  name: "r2_host_file",
  description: "Upload from sandbox to R2 and get a public URL.",
  inputSchema: z.object({
    key: z.string().describe("Object key"),
    content: z.string().describe("UTF-8 file body"),
    contentType: z.string().describe("MIME type"),
  }),
  run: async ({ key, content, contentType }, { env }) => {
    await env.PUBLIC_BUCKET.put(
      key, content, { httpMetadata: { contentType }}
    );
    return `${env.PUB_R2_URL.replace(/\/$/, "")}/${encodeURI(key)}`;
  }
}),
The Cloudflare Developer Platform provides all sorts of possibilities for extending your agents: give each agent session a git-backed repo with Artifacts, run edge inference with Workers AI, host applications written on the fly with Dynamic Workers, and more.
You don’t have to worry about infrastructure or scaling – just write a few lines of code and hit deploy.
Claude + Cloudflare
We’re excited to be working together with Anthropic to bring Cloudflare’s flexibility, scale, and security to more users. Whether you want to run tens of millions of agents using isolates, securely connect to private services with Workers VPC, or write custom tools that take advantage of all of Cloudflare, our new integration makes it easy.
As AI Large Language Models and harnesses like OpenCode and Claude Code become increasingly capable, we see more users kicking off sandboxed agents in response to chat messages, Kanban updates, vibe coding UIs, terminal sessions, GitHub comments, and more.
The sandbox is an important step beyond simple containers, because it gives you a few things:
Security: Any untrusted end user (or a rogue LLM) can run in the sandbox and not compromise the host machine or other sandboxes running alongside it. This is traditionally (but not always) accomplished with a microVM.
Speed: An end user should be able to pick up a new sandbox quickly and restore the state from a previously used one quickly.
Control: The trusted platform needs to be able to take actions within the untrusted domain of the sandbox. This might mean mounting files in the sandbox, or controlling which requests access it, or executing specific commands.
Today, we’re excited to add another key component of control to our Sandboxes and all Containers: outbound Workers. These are programmatic egress proxies that allow users running sandboxes to easily connect to different services, add observability, and, importantly for agents, add flexible and safe authentication.
How it works
Here’s a quick look at adding a secret key to a header using an outbound Worker:
Any time code running in the sandbox makes a request to “github.com”, the request is proxied through the handler. This allows you to do anything you want on each request, including logging, modifying, or cancelling it. In this case, we’re safely injecting a secret (more on this later). The proxy runs on the same machine as any sandbox, has access to distributed state, and can be easily modified with simple JavaScript.
We’re excited about all the possibilities this adds to Sandboxes, especially around authentication for agents. Before going into details, let’s back up and take a quick tour of traditional forms of auth, and why we think there’s something better.
Common auth for agentic workloads
The core issue with agentic auth is that we can’t fully trust the workload. While our LLMs aren’t nefarious (at least not yet), we still need to be able to apply protections to ensure they don’t use data inappropriately or take actions they shouldn’t.
A few common methods exist to provide auth to agents, and each has downsides:
Standard API tokens are the most basic method of authentication, typically injected into applications via environment variables or in mounted secrets files. This is the arguably simplest method, but least secure. You have to trust that the sandbox won’t somehow be compromised or accidentally exfiltrate the token while making a request. Since you can’t fully trust the agent, you’ll need to set up token expiry and rotation, which can be a hassle.
Workload identity tokens, such as OIDC tokens, can solve some of this pain. Rather than granting the agent a token with general permissions, you can grant it a token that attests its identity. Now, rather than the agent having direct access to some service with a token, it can exchange an identity token for a very short-lived access token. The OIDC token can be invalidated after a specific agent’s workflow completes, and expiry is easier to manage. One of the biggest downsides of workload identity tokens is the potential inflexibility of integrations. Many services don’t have first-class support for OIDC, so in order to get working integrations with upstream services, platforms will need to roll their own token-exchanging services. This makes adoption difficult.
Custom proxies provide maximum flexibility, and can be paired with workload identity tokens. If you can pass some or all of your sandbox egress through a trusted piece of code, you can insert whatever rules you need. Maybe the upstream service your agent is communicating with has a bad RBAC story, and it can’t provide granular permissions. No problem, just write the controls and permissions yourself! This is a great option for agents that you need to lock down with granular controls. However, how do you intercept all of a sandbox’s traffic? How do you set up a proxy that is dynamic and easily programmable? How do you proxy traffic efficiently? These aren’t easy problems to solve.
With those imperfect methods in mind, what does an ideal auth mechanism look like?
Ideally, it is:
Zero trust. No token is ever granted to an untrusted user for any amount of time.
Simple. Easy to author. Doesn’t involve a complex system of minting, rotating, and decrypting tokens.
Flexible. We don’t rely on the upstream system to provide the granular access we need. We can apply whatever rules we want.
Identity-aware. We can identify the sandbox making the call and apply specific rules for it.
Observable. We can easily gather information about what calls are being made.
Performant. We aren’t round-tripping to a centralized or slow source of truth.
Transparent. The sandboxed workload doesn’t have to know about it. Things just work.
Dynamic. We can change rules on the fly.
We believe outbound Workers for Sandboxes fit the bill on all of these. Let’s see how.
Outbound Workers in practice
Basics: restriction and observability
First, we’ll look at a very basic example: logging requests and denying specific actions.
In this case, we’ll use the outbound function, which intercepts all outgoing HTTP requests from the sandbox. With a few lines of JavaScript, it’s easy to ensure only GETs are made and log then deny any disallowed methods.
class MySandboxedApp extends Sandbox {
  static outbound = (req, env, ctx) => {
    // Deny any non-GET action and log
    if (req.method !== 'GET') {
      console.log(`Container making ${req.method} request to: ${req.url}`);
      return new Response('Not Allowed', { status: 405, statusText: 'Method Not Allowed'});
    }

    // Proceed if it is a GET request
    return fetch(req);
  };
}
This proxy runs on Workers and runs on the same machine as the sandboxed VM. Workers were built for quick response times, often sitting in front of cached CDN traffic, so additional latency is extremely minimal.
Because this is running on Workers, we get observability out of the box. You can view logs and outbound requests in the Workers dashboard or export them to your application performance monitoring tool of choice.
Zero trust credential injection
How would we use this to enforce a zero trust environment for our agent? Let’s imagine we want to make a request to a private GitHub instance, but we never want our LLM to access a private token.
We can use outboundByHost to define functions for specific domains or IPs. In this case, we’ll inject a protected credential if the domain is “my-internal-vcs.dev”. The sandboxed agent never has access to these credentials.
It is also easy to conditionalize the response based on the identity of the container. You don’t have to inject the same tokens for every sandbox instance.
 static outboundByHost = {
  "my-internal-vcs.dev": (request, env, ctx) => {
    // note: KV is encrypted at rest and in transit
    const authKey = await env.KEYS.get(ctx.containerId);

    const requestWithAuth = new Request(request);
    requestWithAuth.headers.set("x-auth-token", authKey);
    return fetch(requestWithAuth);
  }
}
Using the Cloudflare Developer Platform
As you may have noticed in the last example, another major advantage of using outbound Workers is that it makes integration into the Workers ecosystem easier. Previously, if a user wanted to access R2, they would have to inject an R2 credential, then make a call from their container to the public R2 API. Same for KV, Agents, other Containers, other Worker services, etc.
Now, you just call any binding from your outbound Workers.
Rather than parsing tokens and setting up policies, we can easily conditionalize access with code and whatever logic we want. In the R2 example, we also were able to use the sandbox’s ID to further scope access with ease.
Making controls dynamic
Networking control should also be dynamic. On many platforms, config for Container and VM networking is static, looking something like this:
This is better than nothing, but we can do better. For many sandboxes, we might want to apply a policy on start, but then override it with another once specific operations have been performed.
For instance, we can boot a sandbox, grab our dependencies via NPM and Github, and then lock down egress after that. This ensures that we open up the network for as little time as possible.
To achieve this, we can use outboundHandlers, which allows us to define arbitrary outbound handlers that can be applied programmatically using the setOutboundHandler method. Each of these also takes params, allowing you to customize behavior from code. In this case, we will allow some hostnames with the custom “allowHosts” policy, then turn off HTTP.
This could be extended even further. Your agent might ask the end user a question like “Do you want to allow POST requests to cloudflare.com?” based on whatever tools it needs at that time. With dynamic outbound Workers, you can easily modify the sandbox rules on the fly to provide this level of control.
TLS support with MITM Proxying
To do anything useful with requests beyond allowing or denying them, you need to have access to the content. This means that if you’re making HTTPS requests, they need to be decrypted by the Workers proxy.
To achieve this, a unique ephemeral certificate authority (CA) and private key are created for each Sandbox instance, and the CA is placed into the sandbox. By default, sandbox instances will trust this CA, while standard container instances can opt into trusting it, for instance by calling sudo update-ca-certificates.
export class MyContainer extends Container {
  interceptHttps = true;
}

MyContainer.outbound = (req, env, ctx) => {
  // All HTTP(S) requests will trigger this hook.
  return fetch(req);
};
TLS traffic is proxied by a Cloudflare isolated network process by performing a TLS handshake. It creates a leaf CA from an ephemeral and unique private key and uses the SNI extracted in the ClientHello. It will then invoke in the same machine the configured Worker to handle the HTTPS request.
Our ephemeral private key and CA will never leave our container runtime sidecar process, and is never shared across other container sidecar processes.
With this in place, outbound Workers act as a truly transparent proxy. The sandbox doesn’t need any awareness of specific protocols or domains — all HTTP and HTTPS traffic flows through the outbound handler for filtering or modification.
Under the hood
To enable the functionality shown above in both Container and Sandbox, we added new methods to the ctx.container object: interceptOutboundHttp and interceptOutboundHttps, which intercept outgoing requests on specific hostnames (with basic glob matching), IP ranges, and it can be used to intercept all outbound requests. These methods are called with a WorkerEntrypoint, which gets set up as the front door to the outbound Worker.
export class MyWorker extends WorkerEntrypoint {
 fetch() {
   return new Response(this.ctx.props.message);
 }
}

// ... inside your container DurableObject ...
this.ctx.container.start({ enableInternet: false });
const outboundWorker = this.ctx.exports.MyWorker({ props: { message: 'hello' } });
await this.ctx.container.interceptOutboundHttp('15.0.0.1:80', outboundWorker);

// From now on, all HTTP requests to 15.0.0.1:80 return "hello"
await this.waitForContainerToBeHealthy();

// You can decide to return another message now...
const secondOutboundWorker = this.ctx.exports.MyWorker({ props: { message: 'switcheroo' } });
await this.ctx.container.interceptOutboundHttp('15.0.0.1:80', secondOutboundWorker);
// all HTTP requests to 15.0.0.1 now show "switcheroo", even on connections that were
// open before this interceptOutboundHttp

// You can even set hostnames, CIDRs, for both IPv4 and IPv6
await this.ctx.container.interceptOutboundHttp('example.com', secondOutboundWorker);
await this.ctx.container.interceptOutboundHttp('*.example.com', secondOutboundWorker);
await this.ctx.container.interceptOutboundHttp('123.123.123.123/23', secoundOutboundWorker);
All proxying to Workers happens locally on the same machine that runs the sandbox VM. Even though communication between container and Worker is “authless”, it is secure.
These methods can be called at any time, before or after starting the container, even while connections are still open. Connections that send multiple HTTP requests will automatically pick up a new entrypoint, so updating outbound Workers will not break existing TCP connections or interrupt HTTP requests.
Local development with wrangler dev also has support for egress interception. To make it possible, we automatically spawn a sidecar process inside the local container’s network namespace. We called this sidecar component proxy-everything. Once proxy-everything is attached, it applies the appropriate TPROXY nftable rules, routing matching traffic from the local Container to workerd, Cloudflare’s open source JavaScript runtime, which runs the outbound Worker. This allows the local development experience to mirror what happens in prod, so testing and development remain simple.
It is almost the end of Developer Week and we haven’t talked about containers: until now. As some of you may know, we’ve been working on a container platform behind the scenes for some time.
In late June, we plan to release Containers in open beta, and today we’ll give you a sneak peek at what makes it unique.
Workers are the simplest way to ship software around the world with little overhead. But sometimes you need to do more. You might want to:
Run user-generated code in any language
Execute a CLI tool that needs a full Linux environment
Use several gigabytes of memory or multiple CPU cores
Port an existing application from AWS, GCP, or Azure without a major rewrite
Cloudflare Containers let you do all of that while being simple, scalable, and global.
Through a deep integration with Workers and an architecture built on Durable Objects, Workers can be your:
API Gateway: Letting you control routing, authentication, caching, and rate-limiting before requests reach a container
Service Mesh: Creating private connections between containers with a programmable routing layer
Orchestrator: Allowing you to write custom scheduling, scaling, and health checking logic for your containers
Instead of having to deploy new services, write custom Kubernetes operators, or wade through control plane configuration to extend the platform, you just write code.
Let’s see what it looks like.
Deploying different application types
A stateful workload: executing AI-generated code
First, let’s take a look at a stateful example.
Imagine you are building a platform where end-users can run code generated by an LLM. This code is untrusted, so each user needs their own secure sandbox. Additionally, you want users to be able to run multiple requests in sequence, potentially writing to local files or saving in-memory state.
To do this, you need to create a container on-demand for each user session, then route subsequent requests to that container. Here’s how you can accomplish this:
First, you write some basic Wrangler config, then you route requests to containers via your Worker:
import { Container } from "cloudflare:workers";

export default {
  async fetch(request, env) {
    const url = new URL(request.url);

    if (url.pathname.startsWith("/execute-code")) {
      const { sessionId, messages } = await request.json();
      // pass in prompt to get the code from Llama 4
      const codeToExecute = await env.AI.run("@cf/meta/llama-4-scout-17b-16e-instruct", { messages });

// get a different container for each user session
      const id = env.CODE_EXECUTOR.idFromName(sessionId);
      const sandbox = env.CODE_EXECUTOR.get(id);

// execute a request on the container
      return sandbox.fetch("/execute-code", { method: "POST", body: codeToExecute });
    }

    // ... rest of Worker ...
  },
};

// define your container using the Container class from cloudflare:workers
export class CodeExecutor extends Container {
defaultPort = 8080;
sleepAfter = "1m";
}
Then, deploy your code with a single command: wrangler deploy. This builds your container image, pushes it to Cloudflare’s registry, readies containers to boot quickly across the globe, and deploys your Worker.
$ wrangler deploy
That’s it.
How does it work?
Your Worker creates and starts up containers on-demand. Each time you call env.CODE_EXECUTOR.get(id) with a unique ID, it sends requests to a unique container instance. The container will automatically boot on the first fetch, then put itself to sleep after a configurable timeout, in this case 1 minute. You only pay for the time that the container is actively running.
When you request a new container, we boot one in a Cloudflare location near the incoming request. This means that low-latency workloads are well-served no matter the region. Cloudflare takes care of all the pre-warming and caching so you don’t have to think about it.
This allows each user to run code in their own secure environment.
Stateless and global: FFmpeg everywhere
Stateless and autoscaling applications work equally well on Cloudflare Containers.
Imagine you want to run a container that takes a video file and turns it into an animated GIF using FFmpeg. Unlike the previous example, any container can serve any request, but you still don’t want to send bytes across an ocean and back unnecessarily. So, ideally the app can be deployed everywhere.
To do this, you declare a container in Wrangler config and turn on autoscaling. This specific configuration ensures that one instance is always running and if CPU usage increases beyond 75% of capacity, additional instances are added:
To route requests, you just call env.GIF_MAKER.fetch and requests are automatically sent to the closest container:
import { Container } from "cloudflare:workers";

export class GifMaker extends Container {
  defaultPort: 1337,
}

export default {
  async fetch(request, env) {
    const url = new URL(request.url);

    if (url.pathname === "/make-gif") {
      return env.GIF_MAKER.fetch(request)
    }

    // ... rest of Worker ...
  },
};
Going beyond the basics
From the examples above, you can see that getting a basic container service running on Workers just takes a few lines of config and a little Workers code. There’s no need to worry about capacity, artifact registries, regions, or scaling.
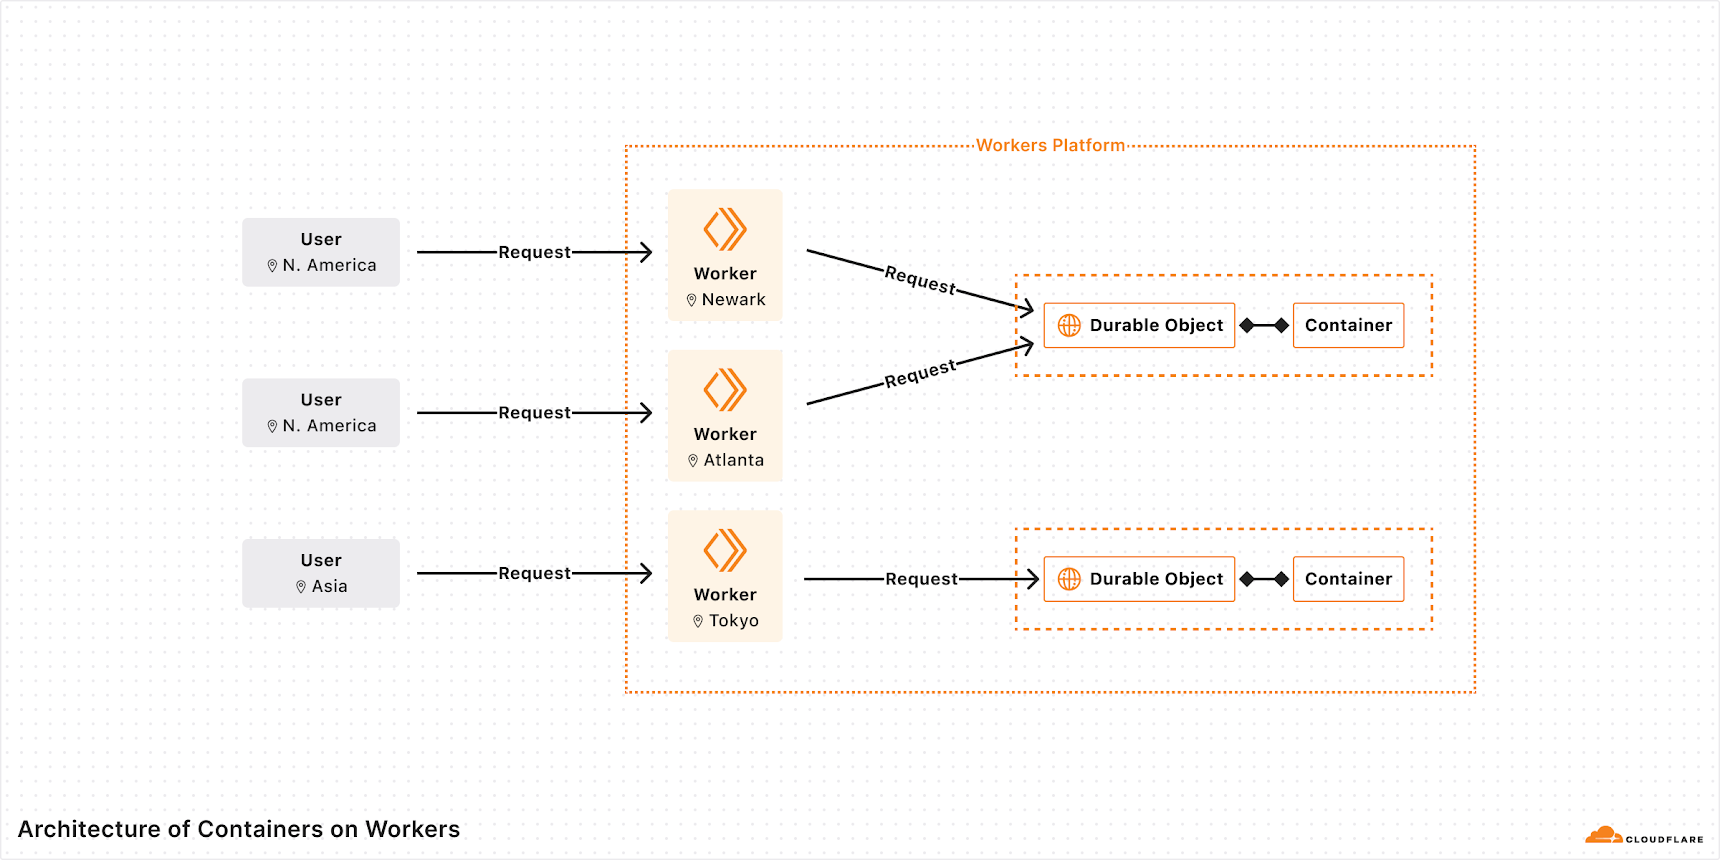
For more advanced use, we’ve designed Cloudflare Containers to run on top of Durable Objects and work in tandem with Workers. Let’s take a look at the underlying architecture and see some of the advanced use cases it enables.
Durable Objects as programmable sidecars
Routing to containers is enabled using Durable Objects under the hood. In the examples above, the Container class from cloudflare:workers just wraps a container-enabled Durable Object and provides helper methods for common patterns. In the rest of this post, we’ll look at examples using Durable Objects directly, as this should shed light on the platform’s underlying design.
Each Durable Object acts as a programmable sidecar that can proxy requests to the container and manages its lifecycle. This allows you to control and extend your containers in ways that are hard on other platforms.
You can manually start, stop, and execute commands on a specific container by calling RPC methods on its Durable Object, which now has a new object at this.ctx.container:
class MyContainer extends DurableObject {
	// these RPC methods are callable from a Worker
        async customBoot(entrypoint, envVars) {
	            this.ctx.container.start({ entrypoint, env: envVars });
        }

       async stopContainer() {
                   const SIGTERM = 15;
	           this.ctx.container.signal(SIGTERM);
        }

        async startBackupScript() {
	            await this.ctx.container.exec(["./backup"]);
        }
}
You can also monitor your container and run hooks in response to Container status changes.
For instance, say you have a CI job that runs builds in a Container. You want to post a message to a Queue based on the exit status. You can easily program this behavior:
And lastly, if you have state that needs to be loaded into a container each time it runs, you can use status hooks to persist state from the container before it sleeps and to reload state into the container after it starts:
import { startAndWaitForPort } from "./helpers"

class MyContainer extends DurableObject {
  constructor(ctx, env) {
    super(ctx, env)
    this.ctx.blockConcurrencyWhile(async () => {
      this.ctx.storage.sql.exec('CREATE TABLE IF NOT EXISTS state (value TEXT)');
      this.ctx.storage.sql.exec('INSERT INTO state (value) SELECT '' WHERE NOT EXISTS (SELECT * FROM state)');
      await startAndWaitForPort(this.ctx.container, 8080);
      await this.setupContainer();
      this.ctx.container.monitor().then(this.onContainerExit);
    });
  }

  async setupContainer() {
    const initialState = this.ctx.storage.sql.exec('SELECT * FROM state LIMIT 1').one().value;
    return this.ctx.container
      .getTcpPort(8080)
      .fetch("http://container/state", { body: initialState, method: 'POST' });
  }

  async onContainerExit() {
    const response = await this.ctx.container
      .getTcpPort(8080)
      .fetch('http://container/state');
    const newState = await response.text();
    this.ctx.storage.sql.exec('UPDATE state SET value = ?', newState);
  }
}
Building around your Containers with Workers
Not only do Durable Objects allow you to have fine-grained control over the Container lifecycle, the whole Workers platform allows you to extend routing and scheduling behavior as you see fit.
Using Workers as an API gateway
Workers provide programmable ingress logic from over 300 locations around the world. In this sense, they provide similar functionality to an API gateway.
For instance, let’s say you want to route requests to a different version of a container based on information in a header. This is accomplished in a few lines of code:
Or you want to rate limit and authenticate requests to the container:
async fetch(request, env) {
  const url = new URL(request.url);

  if (url.pathname.startsWith('/api/')) {
    const token = request.headers.get("token");

    const isAuthenticated = await authenticateRequest(token);
    if (!isAuthenticated) {
      return new Response("Not authenticated", { status: 401 });
    }

    const { withinRateLimit } = await env.MY_RATE_LIMITER.limit({ key: token });
    if (!withinRateLimit) {
      return new Response("Rate limit exceeded for token", { status: 429 });
    }

    return env.MY_APP.fetch(request);
  }
  // ...
}
Using Workers as a service mesh
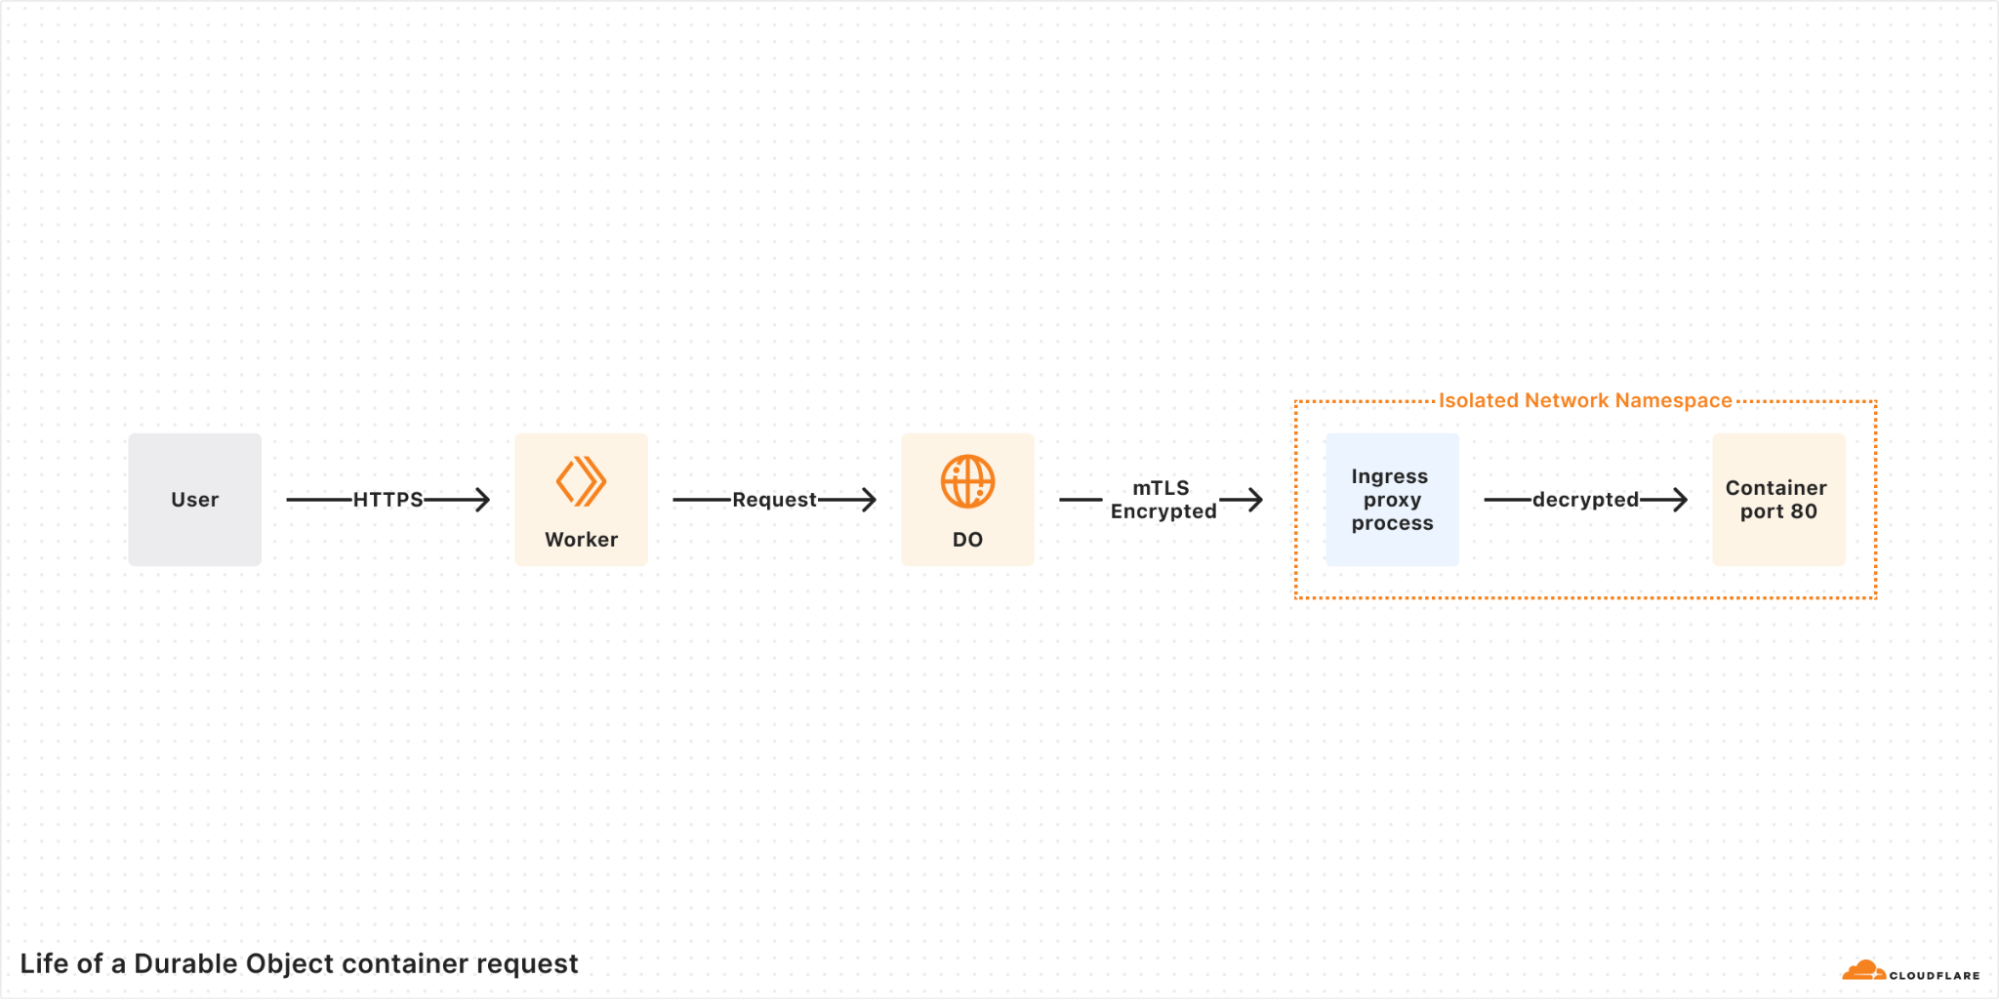
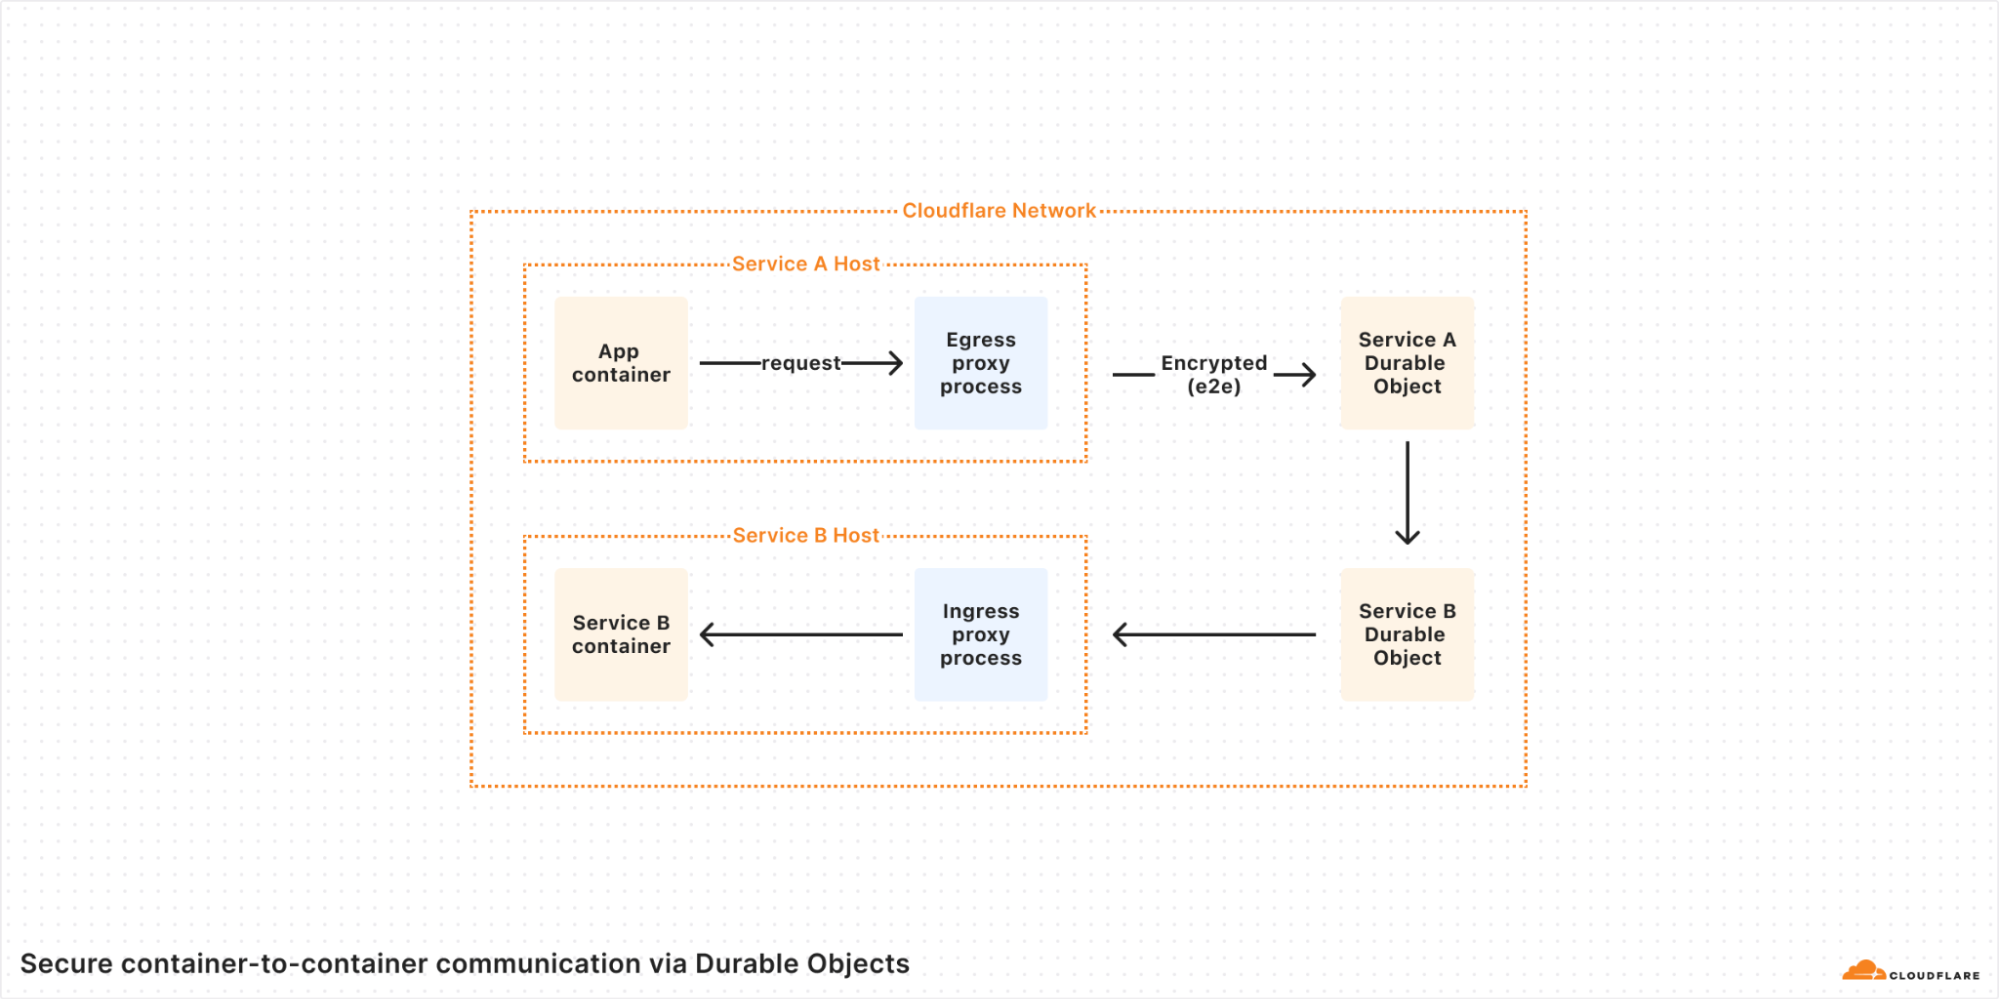
By default, Containers are private and can only be accessed via Workers, which can connect to one of many container ports. From within the container, you can expose a plain HTTP port, but requests will still be encrypted from the end user to the moment we send the data to the container’s TCP port in the host. Due to the communication being relayed through the Cloudflare network, the container does not need to set up TLS certificates to have secure connections in its open ports.
You can connect to the container through a WebSocket from the client too. See this repository for a full example of using Websockets.
Just as the Durable Object can act as proxy to the container, it can act as a proxy from the container as well. When setting up a container, you can toggle Internet access off and ensure that outgoing requests pass through Workers.
// ... when starting the container...
this.ctx.container.start({
  workersAddress: '10.0.0.2:8080',
  enableInternet: false, // 'enableInternet' is false by default
});

// ... container requests to '10.0.0.2:8080' securely route to a different service...
override async onContainerRequest(request: Request) {
 const containerId = this.env.SUB_SERVICE.idFromName(request.headers['X-Account-Id']);
 return this.env.SUB_SERVICE.get(containerId).fetch(request);
}
You can ensure all traffic in and out of your container is secured and encrypted end to end without having to deal with networking yourself.
This allows you to protect and connect containers within Cloudflare’s network… or even when connecting to external private networks.
Using Workers as an orchestrator
You might require custom scheduling and scaling logic that goes beyond what Cloudflare provides out of the box.
We don’t want you having to manage complex chains of API calls or writing an operator to get the logic you need. Just write some Worker code.
For instance, imagine your containers have a long startup period that involves loading data from an external source. You need to pre-warm containers manually, and need control over the specific region to prewarm. Additionally, you need to set up manual health checks that are accessible via Workers. You’re able to achieve this fairly simply with Workers and Durable Objects.
import { Container, DurableObject } from "cloudflare:workers";

// A singleton Durable Object to manage and scale containers

class ContainerManager extends DurableObject {
  scale(region, instanceCount) {
    for (let i = 0; i < instanceCount; i++) {
      const containerId = env.CONTAINER.idFromName(`instance-${region}-${i}`);
      // spawns a new container with a location hint
      await env.CONTAINER.get(containerId, { locationHint: region }).start();
    }
  }

  async setHealthy(containerId, isHealthy) {
    await this.ctx.storage.put(containerId, isHealthy);
  }
}

// A Container class for the underlying compute

class MyContainer extends Container {
  defaultPort = 8080;

  async onContainerStart() {
    // run healthcheck every 500ms
    await this.scheduleEvery(0.5, 'healthcheck');
  }

  async healthcheck() {
    const manager = this.env.MANAGER.get(
      this.env.MANAGER.idFromName("manager")
    );
    const id = this.ctx.id.toString();

    await this.container.fetch("/_health")
      .then(() => manager.setHealthy(id, true))
      .catch(() => manager.setHealthy(id, false));
  }
}
The ContainerManager Durable Object exposes the scale RPC call, which you can call as needed with a region and instanceCount which scales up the number of active Container instances in a given region using a location hint. The this.schedule code executes a manually defined healthcheck method on the Container and tracks its state in the Manager for use by other logic in your system.
These building blocks let users handle complex scheduling logic themselves. For a more detailed example using standard Durable Objects, see this repository.
We are excited to see the patterns you come up with when orchestrating complex applications built with containers, and trust that between Workers and Durable Objects, you’ll have the tools you need.
Integrating with more of Cloudflare’s Developer Platform
Let’s finish up by taking a quick look at how you can integrate Containers with these two tools.
Running a short-lived job with Workflows & R2
You need to download a large file from R2, compress it, and upload it. You want to ensure that this succeeds, but don’t want to write retry logic and error handling yourself. Additionally, you don’t want to deal with rotating R2 API tokens or worry about network connections — it should be secure by default.
This is a perfect opportunity for a Workflow using Containers. The container can do the heavy lifting of compressing files, Workers can stream the data to and from R2, and the Workflow can ensure durable execution.
Lastly, imagine you have an AI agent that needs to spin up cloud infrastructure (you like to live dangerously). To do this, you want to use Terraform, but since it’s run from the command line, you can’t run it on Workers.
By defining a tool, you can enable your Agent to run the shell commands from a container:
// Make tools that call to a container from an agent

const createExternalResources = tool({
  description: "runs Terraform in a container to create resources",
  parameters: z.object({ sessionId: z.number(), config: z.string() }),
  execute: async ({ sessionId, config }) => {
    return this.env.TERRAFORM_RUNNER.get(sessionId).applyConfig(config);
  },
});

// Expose RPC Methods that call to the container

class TerraformRunner extends DurableObject {
  async applyConfig(config) {
    await this.ctx.container.getTcpPort(8080).fetch(APPLY_URL, {
      method: 'POST',
      body: JSON.stringify({ config }),
    });
  }

  // ...rest of DO...
}
Containers are so much more powerful when combined with other tools. Workers make it easy to do so in a secure and simple way.
Pay for what you use and use the right tool
The deep integration between Workers and Containers also makes it easy to pick the right tool for the job with regards to cost.
With Cloudflare Containers, you only pay for what you use. Charges start when a request is sent to the container or it is manually started. Charges stop after the container goes to sleep, which can happen automatically after a configurable timeout. This makes it easy to scale to zero, and allows you to get high utilization even with highly-variable traffic.
Containers are billed for every 10ms that they are actively running at the following rates:
Memory: $0.0000025 per GB-second
CPU: $0.000020 per vCPU-second
Disk $0.00000007 per GB-second
After 1 TB of free data transfer per month, egress from a Container will be priced per-region. We’ll be working out the details between now and the beta, and will be launching with clear, transparent pricing across all dimensions so you know where you stand.
Workers are lighter weight than containers and save you money by not charging when waiting on I/O. This means that if you can, running on a Worker helps you save on cost. Luckily, on Cloudflare it is easy to route requests to the right tool.
Cost comparison
Comparing containers and functions services on paper is always going to be an apples to oranges exercise, and results can vary so much depending on use case. But to share a real example of our own, a year ago when Cloudflare acquired Baselime, Baselime was a heavy user of AWS Lambda. By moving to Cloudflare, they lowered their cloud compute bill by 80%.
Below we wanted to share one representative example that compares costs for an application that uses both containers and serverless functions together. It’d be easy for us to come up with a contrived example that uses containers sub-optimally on another platform, for the wrong types of workloads. We won’t do that here. We know that navigating cloud costs can be challenging, and that cost is a critical part of deciding what type of compute to use for which pieces of your application.
In the example below, we’ll compare Cloudflare Containers + Workers against Google Cloud Run, a very well-regarded container platform that we’ve been impressed by.
Example application
Imagine that you run an application that serves 50 million requests per month, and each request consumes an average 500 ms of wall-time. Requests to this application are not all the same though — half the requests require a container, and the other half can be served just using serverless functions.
Requests per month
Wall-time (duration)
Compute required
Cloudflare
Google Cloud
25 million
500ms
Container + serverless functions
Containers + Workers
Google Cloud Run + Google Cloud Run Functions
25 million
500ms
Serverless functions
Workers
Google Cloud Run Functions
Container pricing
On both Cloud Run and Cloudflare Containers, a container can serve multiple requests. On some platforms, such as AWS Lambda, each container instance is limited to a single request, pushing cost up significantly as request count grows. In this scenario, 50 requests can run simultaneously on a container with 4 GB memory and half of a vCPU. This means that to serve 25 million requests of 500ms each, we need 625,000 seconds worth of compute
In this example, traffic is bursty and we want to avoid paying for idle-time, so we’ll use Cloud Run’s request-based pricing.
Price per vCPU second
Price per GB-second of memory
Price per 1m requests
Monthly Price for Compute + Requests
Cloudflare Containers
$0.000020
$0.0000025
$0.30
$20.00
Google Cloud Run
$0.000024
$0.0000025
$0.40
$23.75
* Comparison does not include free tiers for either provider and uses a single Tier 1 GCP region
Compute pricing for both platforms are comparable. But as we showed earlier in this post, Containers on Cloudflare run anywhere, on-demand, without configuring and managing regions. Each container has a programmable sidecar with its own database, backed by Durable Objects. It’s the depth of integration with the rest of the platform that makes containers on Cloudflare uniquely programmable.
Function pricing
The other requests can be served with less compute, and code written in JavaScript, TypeScript, Python or Rust, so we’ll use Workers and Cloud Run Functions.
These 25 million requests also run for 500 ms each, and each request spends 480 ms waiting on I/O. This means that Workers will only charge for 20 ms of “CPU-time”, the time that the Worker actually spends using compute. This ratio of low CPU time to high wall time is extremely common when building AI apps that make inference requests, or even when just building REST APIs and other business logic. Most time is spent waiting on I/O. Based on our data, we typically see Workers use less than 5 ms of CPU time per request vs seconds of wall time (waiting on APIs or I/O).
The Cloud Run Function will use an instance with 0.083 vCPU and 128 MB memory and charge on both CPU-s and GiB-s for the full 500 ms of wall-time.
Total Price for “wall-time”
Total Price for “CPU-time”
Total Price for Compute + Requests
Cloudflare Workers
N/A
$0.83
$8.33
Google Cloud Run Functions
$1.44
N/A
$11.44
* Comparison does not include free tiers and uses a single Tier 1 GCP region.
This comparison assumes you have configured Google Cloud Run Functions with a max of 20 concurrent requests per instance. On Google Cloud Run Functions, the maximum number of concurrent requests an instance can handle varies based on the efficiency of your function, and your own tolerance for tail latency that can be introduced by traffic spikes.
Workers automatically scale horizontally, don’t require you to configure concurrency settings (and hope to get it right), and can run in over 300 locations.
A holistic view of costs
The most important cost metric is the total cost of developing and running an application. And the only way to get the best results is to use the right compute for the job. So the question boils down to friction and integration. How easily can you integrate the ideal building blocks together?
As more and more software makes use of generative AI, and makes inference requests to LLMs, modern applications must communicate and integrate with a myriad of services. Most systems are increasingly real-time and chatty, often holding open long-lived connections, performing tasks in parallel. Running an instance of an application in a VM or container and calling it a day might have worked 10 years ago, but when we talk to developers in 2025, they are most often bringing many forms of compute to the table for particular use cases.
This shows the importance of picking a platform where you can seamlessly shift traffic from one source of compute to another. If you want to rate-limit, serve server-side rendered pages, API responses and static assets, handle authentication and authorization, make inference requests to AI models, run core business logic via Workflows, or ingest streaming data, just handle the request in Workers. Save the heavier compute only for where it is actually the only option. With Cloudflare Workers and Containers, this is as simple as an if-else statement in your Worker. This makes it easy to pick the right tool for the job.
Coming June 2025
We are collecting feedback and putting the finishing touches on our APIs now, and will release the open beta to the public in late June 2025.
From day one of building Cloudflare Workers, it’s been our goal to build an integrated platform, where Cloudflare products work together as a system, rather than just as a collection of separate products. We’ve taken this same approach with Containers, and aim to make Cloudflare not only the best place to deploy containers across the globe, but the best place to deploy the types of complete applications that developers are building, that use containers in tandem with serverless functions, Workflows, Agents, and much more.
We’re excited to get this into your hands soon. Stay on the lookout this summer.
The collective thoughts of the interwebz
Manage Consent
To provide the best experiences, we use technologies like cookies to store and/or access device information. Consenting to these technologies will allow us to process data such as browsing behavior or unique IDs on this site. Not consenting or withdrawing consent, may adversely affect certain features and functions.
Functional
Always active
The technical storage or access is strictly necessary for the legitimate purpose of enabling the use of a specific service explicitly requested by the subscriber or user, or for the sole purpose of carrying out the transmission of a communication over an electronic communications network.
Preferences
The technical storage or access is necessary for the legitimate purpose of storing preferences that are not requested by the subscriber or user.
Statistics
The technical storage or access that is used exclusively for statistical purposes.The technical storage or access that is used exclusively for anonymous statistical purposes. Without a subpoena, voluntary compliance on the part of your Internet Service Provider, or additional records from a third party, information stored or retrieved for this purpose alone cannot usually be used to identify you.
Marketing
The technical storage or access is required to create user profiles to send advertising, or to track the user on a website or across several websites for similar marketing purposes.