Tag Archives: Containers

Build production-ready applications without infrastructure complexity using Amazon ECS Express Mode

Post Syndicated from Donnie Prakoso original https://aws.amazon.com/blogs/aws/build-production-ready-applications-without-infrastructure-complexity-using-amazon-ecs-express-mode/

Deploying containerized applications to production requires navigating hundreds of configuration parameters across load balancers, auto scaling policies, networking, and security groups. This overhead delays time to market and diverts focus from core application development.

Today, I’m excited to announce Amazon ECS Express Mode, a new capability from Amazon Elastic Container Service (Amazon ECS) that helps you launch highly available, scalable containerized applications with a single command. ECS Express Mode automates infrastructure setup including domains, networking, load balancing, and auto scaling through simplified APIs. This means you can focus on building applications while deploying with confidence using Amazon Web Services (AWS) best practices. Furthermore, when your applications evolve and require advanced features, you can seamlessly configure and access the full capabilities of the resources, including Amazon ECS.

You can get started with Amazon ECS Express Mode by navigating to the Amazon ECS console.

Amazon ECS Express Mode provides a simplified interface to the Amazon ECS service resource with new integrations for creating commonly used resources across AWS. ECS Express Mode automatically provisions and configures ECS clusters, task definitions, Application Load Balancers, auto scaling policies, and Amazon Route 53 domains from a single entry point.

Getting started with ECS Express Mode
Let me walk you through how to use Amazon ECS Express Mode. I’ll focus on the console experience, which provides the quickest way to deploy your containerized application.

For this example, I’m using a simple container image application running on Python with the Flask framework. Here’s the Dockerfile of my demo, which I have pushed to an Amazon Elastic Container Registry (Amazon ECR) repository:


# Build stage
FROM python:3.6-slim as builder
WORKDIR /app
COPY requirements.txt .
RUN pip install --no-cache-dir --user -r requirements.txt gunicorn

# Runtime stage
FROM python:3.6-slim
WORKDIR /app
COPY --from=builder /root/.local /root/.local
COPY app.py .
ENV PATH=/root/.local/bin:$PATH
EXPOSE 80
CMD ["gunicorn", "--bind", "0.0.0.0:80", "app:app"]

On the Express Mode page, I choose Create. The interface is streamlined — I specify my container image URI from Amazon ECR, then select my task execution role and infrastructure role. If you don’t already have these roles, choose Create new role in the drop down to have one created for you from the AWS Identity and Access Management (IAM) managed policy.

If I want to customize the deployment, I can expand the Additional configurations section to define my cluster, container port, health check path, or environment variables.

In this section, I can also adjust CPU, memory, or scaling policies.

Setting up logs in Amazon CloudWatch Logs is something I always configure so I can troubleshoot my applications if needed. When I’m happy with the configurations, I choose Create.

After I choose Create, Express Mode automatically provisions a complete application stack, including an Amazon ECS service with AWS Fargate tasks, Application Load Balancer with health checks, auto scaling policies based on CPU utilization, security groups and networking configuration, and a custom domain with an AWS provided URL. I can also follow the progress in Timeline view on the Resources tab.

If I need to do a programmatic deployment, the same result can be achieved with a single AWS Command Line Interface (AWS CLI) command:

aws ecs create-express-gateway-service \
--image [ACCOUNT_ID].ecr.us-west-2.amazonaws.com/myapp:latest \
--execution-role-arn arn:aws:iam::[ACCOUNT_ID]:role/[IAM_ROLE] \
--infrastructure-role-arn arn:aws:iam::[ACCOUNT_ID]:role/[IAM_ROLE]

After it’s complete, I can see my application URL in the console and access my running application immediately.

After the application is created, I can see the details by visiting the specified cluster, or the default cluster if I didn’t specify one, in the ECS service to monitor performance, view logs, and manage the deployment.

When I need to update my application with a new container version, I can return to the console, select my Express service, and choose Update. I can use the interface to specify a new image URI or adjust resource allocations.

Alternatively, I can use the AWS CLI for updates:

aws ecs update-express-gateway-service \
  --service-arn arn:aws:ecs:us-west-2:[ACCOUNT_ID]:service/[CLUSTER_NAME]/[APP_NAME] \
  --primary-container '{
    "image": "[IMAGE_URI]"
  }'

I find the entire experience reduces setup complexity while still giving me access to all the underlying resources when I need more advanced configurations.

Additional things to know
Here are additional things about ECS Express Mode:

  • Availability – ECS Express Mode is available in all AWS Regions at launch.
  • Infrastructure as Code support – You can use IaC tools such as AWS CloudFormation, AWS Cloud Development Kit (CDK), or Terraform to deploy your applications using Amazon ECS Express Mode.
  • Pricing – There is no additional charge to use Amazon ECS Express Mode. You pay for AWS resources created to launch and run your application.
  • Application Load Balancer sharing – The ALB created is automatically shared across up to 25 ECS services using host-header based listener rules. This helps distribute the cost of the ALB significantly.

Get started with Amazon ECS Express Mode through the Amazon ECS console. Learn more on the Amazon ECS documentation page.

Happy building!
Donnie

Amazon Elastic Kubernetes Service gets independent affirmation of its zero operator access design

Post Syndicated from Manuel Mazarredo original https://aws.amazon.com/blogs/security/amazon-elastic-kubernetes-service-gets-independent-affirmation-of-its-zero-operator-access-design/

Today, we’re excited to announce the Amazon Elastic Kubernetes Service (Amazon EKS) zero operator access posture.

Because security is our top priority at Amazon Web Services (AWS), we designed an operational architecture to meet the data privacy posture our regulated and most stringent customers want in a managed Kubernetes service, giving them continued confidence to run their most critical and data-sensitive workloads on AWS services. Our services are designed to prevent AWS personnel from having technical pathways to read, copy, extract, modify, or otherwise access customer content in the management of Amazon EKS.

At AWS, earning trust isn’t only a goal, it’s one of the core Leadership Principles that guides every decision we make. Customers choose AWS because they trust us to provide the most secure global cloud infrastructure on which to build, migrate, and run their workloads, and to store their data. To build on this trust, we launched the AWS Trust Center to make information about how we secure our customers’ assets in the AWS Cloud more accessible. Along with this launch, we’re describing how we approach operator access to demonstrate an industry leading data privacy posture, and how we fulfill our part of the AWS Shared Responsibility Model in the AWS Cloud.

Many of the AWS core systems and services are designed with zero operator access, meaning they operate based on an architecture and model that, at the minimum, prevents any form of access to customer content in the management of the service. Instead, their systems and services are administered through automation and secure APIs that protect customer content from inadvertent or even coerced disclosure. Some of these services are AWS Key Management Service (AWS KMS), Amazon Elastic Compute Cloud (Amazon EC2) (through the AWS Nitro System), AWS Lambda, Amazon EKS, and AWS Wickr.

When AWS made its Digital Sovereignty Pledge, we committed to providing greater transparency and assurance to customers about how AWS services are designed and operated, especially when it comes to handling customer content. As part of that increased transparency, we engaged NCC Group, a leading cybersecurity consulting firm based in the United Kingdom, to conduct an independent architecture review of Amazon EKS, and the security assurances we provide to our customers. NCC Group has now issued its report and affirmed our claims. The report states:

“NCC Group found no architectural gaps that would directly compromise the security claims asserted by AWS.”

Specifically, the report validates the following statements about the Amazon EKS security posture:

  • There are no technical means for AWS personnel to gain interactive access to a managed Kubernetes control plane instance.
  • There are no technical means available to AWS personnel to read, copy, extract, modify, or otherwise access customer content in a managed Kubernetes control plane instance.
  • Internal administrative APIs used by AWS personnel to manage the Kubernetes control plane instances cannot access customer content in the Kubernetes data plane.
  • Changes to internal administrative APIs used to manage the Kubernetes control plane always requires multi-party review and approval.
  • There are no technical means available to AWS personnel to access customer content in backup storage for the etcd database. No AWS personnel can access any plaintext encryption keys used for securing data in the etcd database.
  • AWS personnel can only interact with the Kubernetes cluster API endpoint using internal administrative APIs without access to customer content in the managed Kubernetes control plane or the Kubernetes data plane. All actions performed on the Kubernetes cluster API endpoint by AWS personnel are visible to customers through customer enabled audit logs.
  • Access to internal administrative APIs always requires authentication and authorization. All operational actions performed by internal administrative APIs are logged and audited.
  • A managed Kubernetes control plane instance can only run tested software that has been deployed by a trusted pipeline. No AWS personnel can deploy software to a managed Kubernetes control plane instance outside of this pipeline.

The detailed NCC Group report examines each of these claims, including the scope, methodology, and steps that NCC Group used to evaluate the claims.

How Amazon EKS is designed for zero operator access

AWS has always used a least privilege model to minimize the number of humans that have access to systems processing customer content. This means that we design our products and services to provide each Amazonian access to only the minimum set of systems required to do their assigned task or responsibility and limit that access to when it’s needed. Any ccess to systems that store or process customer data is logged, monitored for anomalies, and audited. AWS designs all of its systems to prevent access by AWS personnel to customer content for unauthorized purposes. We commit to that in our AWS Customer Agreement and AWS Service Terms. AWS operations never require us to access, copy, or move a customer’s content without that customer’s knowledge and authorization.

Our operational architecture includes the exclusive use of AWS Nitro System-based instances to provide a confidential compute baseline for the managed Kubernetes control plane.

We use a set of restricted administrative APIs to enable precise control of access so our operators can conduct precise, allow-listed actions for troubleshooting and diagnostics without requiring direct or interactive access to the Kubernetes control plane instances. These APIs have been purposefully engineered without technical means to access customer content in the Kubernetes control plane or the customer’s Kubernetes data plane.

Following our standard change management mechanisms, we enforce a built-in, multi-party review and approval process for modifications to these restricted administrative APIs, and the accompanied policies that further strengthen the guardrails of how we operate the service. This model is implemented consistently across Amazon EKS clusters, regardless of the customer’s chosen launch mode for the Kubernetes data plane.

Additionally, every interaction with these restricted administrative APIs generates logs, with mandatory authentication and authorization, following the least privilege principle. By enabling their cluster’s audit logs, customers can maintain visibility into all actions performed by AWS personnel on the cluster’s API endpoint.

By default, we envelope encrypt all Kubernetes API data before it is stored at rest in the etcd database, and further secure backup storage of the etcd database to add multi-layered protection to prevent access to customer content in cluster snapshots. Furthermore, our system is designed so that no AWS personnel can access any of the plaintext encryption keys used to secure data in the etcd database and its backups.

These operator access controls apply uniformly to the Amazon EKS control plane, regardless of how you run your worker nodes—whether self-managed, through Amazon EKS Auto Mode, or with AWS Fargate. As stated in the AWS Shared Responsibility Model, customers remain responsible for securing the configurations of the Kubernetes worker nodes, with the exception of Amazon EKS Auto Mode and Fargate launch modes. For more information about the security of these AWS managed data plane launch modes in Amazon EKS, see the relevant links in the Learn more section.

Conclusion

Amazon EKS is designed and built to make sure that no AWS employee can read, copy, modify, or otherwise access customer content in Amazon EKS. By using AWS Nitro System‑based confidential compute, tightly‑scoped administrative APIs, multi‑party change‑approval processes, and end‑to‑end encryption, AWS avoids technical pathways for operator access. Independent validation from the NCC Group found no architectural gaps that would undermine these guarantees. In short, Amazon EKS delivers a zero operator access model that can meet the strictest regulatory and sovereignty requirements, giving organizations the confidence to run their most sensitive, mission‑critical workloads on AWS.

Learn more

If you have feedback about this post, submit comments in the Comments section below. If you have questions about this post, contact AWS Support.

Micah Hausler

Micah Hausler

Micah is a Principal Software Engineer at AWS and focuses on Kubernetes and container security.

Lukonde Mwila

Lukonde Mwila

Lukonde is a Senior Product Manager at AWS in the Amazon EKS team, focusing on networking, resiliency, and operational security. He has years of experience in application development, solution architecture, cloud engineering, and DevOps workflows.

Manuel Mazarredo

Manu Mazarredo

Manu is a program manager at AWS based in Amsterdam, the Netherlands. Manu leads compliance and security assurance audits and engagements across AWS Regions and industries. For the past 20 years, he has worked in information systems audits, ethical hacking, project management, quality assurance, and vendor management

Tari Dongo

Tari Dongo

Tari is a Security Assurance Program Manager at AWS, based in London. Tari is responsible for third-party and customer audits, attestations, certifications, and assessments across EMEA. Previously, Tari worked in Security Assurance and Technology Risk in the big four and financial services industry.

BASF Digital Farming builds a STAC-based solution on Amazon EKS

Post Syndicated from Kevin S. Ridolfi original https://aws.amazon.com/blogs/architecture/basf-digital-farming-builds-a-stac-based-solution-on-amazon-eks/

This post was co-written with Frederic Haase and Julian Blau with BASF Digital Farming GmbH.

At xarvio – BASF Digital Farming, our mission is to empower farmers around the world with cutting-edge digital agronomic decision-making tools. Central to this mission is our crop optimization platform, xarvio FIELD MANAGER, which delivers actionable insights through a range of geospatial assets, including satellite imagery, drone data, and application maps from sprayers.

In this post, we show you how we built a scalable geospatial data solution on AWS to efficiently catalog, manage, and visualize both raster and vector datasets through the web. We walk you through our solution based on the SpatioTemporal Asset Catalog (STAC) specification and the open source eoAPI ecosystem, detailing the solution architecture, key technologies, and lessons learned during deployment. This builds upon a previous post on efficient satellite imagery ingestion using AWS Serverless, extending our discussion to the full lifecycle of geospatial data management at scale.

Requirements for our geospatial data solution

BASF Digital Farming’s xarvio FIELD MANAGER platform operates at exceptional scale in the geospatial data ecosystem, processing hundreds of millions of satellite images that translate into STAC items, which further decompose into billions of individual geospatial artifacts. Unlike traditional satellite data providers such as European Space Agency (ESA) who work with predictable, structured data flows, we operate in an inherently dynamic agricultural environment where we ingest near-daily satellite imagery per field from a diverse array of sensors and providers globally. Our mission to support farmers worldwide with advanced digital agronomic decision advice demands a reliable, cloud-based infrastructure capable of handling this massive data velocity and volume and applying advanced quality assurance processes including cloud detection and anomaly detection algorithms. The platform’s true value emerges through our machine learning (ML) pipelines that transform raw satellite data into actionable insights. For example, estimating accurate absolute biomass such as Leaf Area Index (LAI) helps farmers make precise, data-driven agronomic decisions that optimize crop yield and resource utilization across fields worldwide.

STAC and eoAPI ecosystem

To efficiently manage our growing archive of geospatial data, we adopted the Spatio Temporal Asset Catalog (STAC) specification, an open standard that provides a common language to describe and catalog raster and vector datasets. With STAC, we can standardize metadata across diverse sources like satellite imagery, UAV datasets, and prescription maps, making it straightforward to search, filter, and retrieve assets across our platform. We built our platform using the eoAPI ecosystem, an integrated suite of open source tools designed to handle the full lifecycle of geospatial data on the cloud. At its core is pgSTAC, which provides a performant PostGIS-backed STAC API implementation. With pgSTAC, we can index millions of STACi Items efficiently, with support for spatial, temporal, and attribute-based filtering at scale. On top of that, we use Tiles in PostGIS (TiPG) to serve tiled vector data directly from our PostGIS database. This enables real-time visualization of field boundaries, management zones, and application histories as lightweight Mapbox Vector Tiles (MVT), without requiring an external tile server. For raster assets, including satellite and drone imagery, we rely on TiTiler, a modern dynamic tile server built for Cloud Optimized GeoTIFFs (COGs). With TiTiler, we can stream imagery on-demand as WMTS or XYZ tiles, perform dynamic rendering (such as NDVI or false color composites), and integrate seamlessly into web maps and mobile apps.

Solution overview

The following architecture diagram shows how we implemented our geospatial data platform on AWS. In this section, we explain each component of the architecture and how they work together to process millions of satellite images and geospatial assets daily. The solution uses Amazon Elastic Kubernetes Service (Amazon EKS) as the core computing platform, with Amazon Simple Storage Service (Amazon S3) for storage and Amazon Relational Database Service (Amazon RDS) for metadata management. We break down the architecture into four main layers: core services, storage, database, and ingestion.

A detailed AWS Cloud architecture visualization showcasing a complete geospatial data processing system across four distinct layers. The database layer features an EKS Cluster managing STAC, raster, and vector services, all connected to Amazon RDS through a proxy instance. The client layer supports both desktop and mobile access via Amazon API Gateway. The ingestion layer processes geospatial data streams through a STAC ingestor, feeding into a robust storage layer utilizing Cloud Optimized GeoTIFF and FlatGeobuf technologies. The architecture emphasizes scalability and efficient spatial data handling through PostgreSQL with pgstac extension, enabling seamless integration of various geospatial services and data formats.

Core services layer

The solution uses an EKS cluster hosting three key services:

  • stac-service – Implements the STAC API specification to catalog and serve metadata for both raster and vector datasets
  • raster-service – Powered by TiTiler, this service dynamically renders and tiles cloud-optimized raster data (for example, COGs) for seamless integration into web and mobile maps
  • vector-service – Built with TiPG, this component serves vector data (for example, boundaries or application zones) as tiled MVT layers directly from the database or from Amazon S3

These services are containerized and orchestrated within Kubernetes, allowing for high availability, modular separation, and simplified continuous integration and delivery (CI/CD) workflows.

KEDA-based automatic scaling

We use Kubernetes Event-Driven Autoscaling (KEDA) to scale our platform services dynamically based on real-time workloads. With KEDA, we can scale individual pods based on precise event-driven metrics such as the STAC ingestion queue depth or visualization request load. This supports responsive performance during peak activity while maintaining lean resource usage during idle periods, aligning perfectly with our need for elasticity in a data-intensive, variable-load environment.

Geospatial asset storage layer

The platform stores all raw and processed geospatial assets in S3 buckets, optimized for performance and durability. This layer holds COGs for raster imagery and FlatGeobuf or similar formats for vector data. These formats are chosen for their support of streaming access, indexing, and cloud-based performance.

Database layer

The metadata backbone of the system is a PostgreSQL database hosted on Amazon RDS, extended with the pgSTAC plugin. This setup enables efficient indexing and querying of millions of STAC items and collections. An RDS proxy sits in front of the database, providing connection pooling and resiliency, especially under bursty or concurrent access patterns common in geospatial applications.

Ingestion layer

An independent ingestion component handles batch or streaming geospatial data inputs. This component processes satellite imagery, drone data, or prescription maps and pushes relevant metadata into the STAC API and storage assets into Amazon S3. The ingestion engine is decoupled from serving infrastructure, enabling asynchronous and large-scale data loading.

Amazon API Gateway and clients

Public access to the platform is handled through Amazon API Gateway, allowing clients—whether browser-based or mobile—to interact securely with the services. The API gateway provides a unified entrypoint and is used for applying rate limiting, authorization, and routing policies.

Solution benefits

The solution offers the following benefits:

  • Rapid onboarding with STAC standardization – By aligning with the STAC specification, we’ve significantly reduced the time to onboard new data domains like sprayer application maps. Compared to previous approaches in our legacy system, metadata modeling and integration are now both standardized and automated, so we can expose new geospatial data products to clients in days instead of weeks or months.
  • Optimized storage with COGs and Amazon S3 – Storing raster and vector assets in Amazon S3 using cloud-optimized formats (such as COGs for imagery or FlatGeobuff for vectors) reduces storage costs while enabling low-latency, streaming access. This avoids the need for preprocessing or extract, transform, and load (ETL)-heavy pipelines and simplifies client delivery.
  • Large-scale ingestion with a batch STAC ingestor – Our custom STAC ingestor supports both real-time and batch-mode operations. This has made it possible to onboard satellite constellations, drone imagery, and historical datasets in bulk without disrupting running services. The ingestion service uses optimized database ingestion functions, capable of ingesting thousands of items per second, providing high-throughput and reliable data integration at scale.
  • PostgreSQL, pgSTAC, and Amazon RDS Proxy for a scalable metadata backbone – With pgSTAC and Amazon RDS Proxy, we benefit from advanced spatial-temporal querying while making sure database connection management is handled gracefully, even under high concurrency. This combination offers reliability without compromising performance.
  • Scalable deployment with Amazon EKS – Hosting the solution on Amazon EKS provides full control over deployments, resource tuning, and service orchestration. Combined with automatic scaling, we dynamically adjust compute capacity based on demand, facilitating resilience and cost-efficiency.

Learnings

As part of building this solution, we learned the following:

  • RDS Proxy is essential for automatically scaled environments – Given our use of automatic scaling pods in Amazon EKS, we found that RDS Proxy is critical. It handles connection pooling efficiently and protects the underlying PostgreSQL database from connection exhaustion during sudden scale-up events. Without it, we encountered spiky load failures and blocked connections during high-ingest periods.
  • Batch STAC ingestor is a core component – Our custom STAC ingestor proved to be an indispensable piece of the system. It interfaces directly with pgSTAC to perform large-scale, automated ingestions of geospatial metadata from streams and archives. Without this tool, onboarding data providers or processing legacy imagery at scale would have been labor-intensive and error-prone.
  • COGs are non-negotiable – For fast, scalable visualization of large raster datasets, COGs are essential, particularly if raster datasets exceed several gigabytes. They enable efficient HTTP range requests, alleviate the need for preprocessing, and work seamlessly with TiTiler for real-time tile rendering. Non-COG formats led to noticeably slower performance and weren’t suitable for cloud-based visualization.
  • Serverless-compliant, optimized for Amazon EKS (for now) – Although the architecture is designed to be serverless-compatible, we opted for an Amazon EKS first approach due to the nature of our other application landscape. Components like TiTiler and TiPG benefit from persistent, memory-tuned environments that are harder to achieve in a serverless runtime. However, the solution remains modular and stateless by design, and certain subsystems (such as ingestion triggers, notifications, or monitoring) are already candidates for future serverless migration to further improve elasticity and reduce operational overhead.

Conclusion

BASF Digital Farming GmbH has successfully implemented a STAC-based geospatial data platform on Amazon EKS, enabling efficient management and visualization of satellite imagery, drone data, and application maps. This architecture helps us onboard new data sources within weeks rather than months. The new platform also processes twice as much data in a single day while cutting costs by 50%, thanks to reduced data handling through the STAC schema and the efficiencies of automatic scaling. By adopting the STAC standard, the architecture improves data discoverability, reduces search latency, and supports more efficient analytic workflows.

Organizations looking to build similar geospatial data solutions can use AWS services like Amazon EKS, Amazon S3, and Amazon RDS along with open source tools like STAC and eoAPI to create scalable, cost-effective solutions. Learn more about building containerized applications on AWS at Containers on AWS.

Deploy your own AI vibe coding platform — in one click!

Post Syndicated from Ashish Kumar Singh original https://blog.cloudflare.com/deploy-your-own-ai-vibe-coding-platform/

It’s an exciting time to build applications. With the recent AI-powered “vibe coding” boom, anyone can build a website or application by simply describing what they want in a few sentences. We’re already seeing organizations expose this functionality to both their users and internal employees, empowering anyone to build out what they need.


Today, we’re excited to open-source an AI vibe coding platform, VibeSDK, to enable anyone to run an entire vibe coding platform themselves, end-to-end, with just one click.

Want to see it for yourself? Check out our demo platform that you can use to create and deploy applications. Or better yet, click the button below to deploy your own AI-powered platform, and dive into the repo to learn about how it’s built.

Deploying VibeSDK sets up everything you need to run your own AI-powered development platform:

  • Integration with LLM models to generate code, build applications, debug errors, and iterate in real-time, powered by Agents SDK

  • Isolated development environments that allow users to safely build and preview their applications in secure sandboxes.

  • Infinite scale that allows you to deploy thousands or even millions of applications that end users deploy, all served on Cloudflare’s global network

  • Observability and caching across multiple AI providers, giving you insight into costs and performance with built-in caching for popular responses. 

  • Project templates that the LLM can use as a starting point to build common applications and speed up development.

  • One-click project export to the user’s Cloudflare account or GitHub repo, so users can take their code and continue development on their own.


Building an AI vibe coding platform from start to finish

Step 0: Get started immediately with VibeSDK

We’re seeing companies build their own AI vibe coding platforms to enable both internal and external users. With a vibe coding platform, internal teams like marketing, product, and support can build their own landing pages, prototypes, or internal tools without having to rely on the engineering team. Similarly, SaaS companies can embed this capability into their product to allow users to build their own customizations. 

Every platform has unique requirements and specializations. By building your own, you can write custom logic to prompt LLMs for your specific needs, giving your users more relevant results. This also grants you complete control over the development environment and application hosting, giving you a secure platform that keeps your data private and within your control. 

We wanted to make it easy for anyone to build this themselves, which is why we built a complete platform that comes with project templates, previews, and project deployment. Developers can repurpose the whole platform, or simply take the components they need and customize them to fit their needs.

Step 1: Finding a safe, isolated environment for running untrusted, AI generated code

AI can now build entire applications, but there’s a catch: you need somewhere safe to run this untrusted, AI-generated code. Imagine if an LLM writes an application that needs to install packages, run build commands, and start a development server — you can’t just run this directly on your infrastructure where it might affect other users or systems.

With Cloudflare Sandboxes, you don’t have to worry about this. Every user gets their own isolated environment where the AI-generated code can do anything a normal development environment can do: install npm packages, run builds, start servers, but it’s fully contained in a secure, container-based environment that can’t affect anything outside its sandbox. 


The platform assigns each user to their own sandbox based on their session, so that if a user comes back, they can continue to access the same container with their files intact:

// Creating a sandbox client for a user session
const sandbox = getSandbox(env.Sandbox, sandboxId);

// Now AI can safely write and execute code in this isolated environment
await sandbox.writeFile('app.js', aiGeneratedCode);
await sandbox.exec('npm install express');
await sandbox.exec('node app.js');

Step 2: Generating the code

Once the sandbox is created, you have a development environment that can bring the code to life. VibeSDK orchestrates the whole workflow from writing the code, installing the necessary packages, and starting the development server. If you ask it to build a to-do app, it will generate the React application, write the component files, run bun install to get the dependencies, and start the server, so you can see the end result. 

Once the user submits their request, the AI will generate all the necessary files, whether it’s a React app, Node.js API, or full-stack application, and write them directly to the sandbox:

async function generateAndWriteCode(instanceId: string) {
    // AI generates the application structure
    const aiGeneratedFiles = await callAIModel("Create a React todo app");
    
    // Write all generated files to the sandbox
    for (const file of aiGeneratedFiles) {
        await sandbox.writeFile(
            `${instanceId}/${file.path}`,
            file.content
        );
        // User sees: "✓ Created src/App.tsx"
        notifyUser(`✓ Created ${file.path}`);
    }
}

To speed this up even more, we’ve provided a set of templates, stored in an R2 bucket, that the platform can use and quickly customize, instead of generating every file from scratch. This is just an initial set, but you can expand it and add more examples. 

Step 3: Getting a preview of your deployment

Once everything is ready, the platform starts the development server and uses the Sandbox SDK to expose it to the internet with a public preview URL which allows users to instantly see their AI-generated application running live:

// Start the development server in the sandbox
const processId = await sandbox.startProcess(
    `bun run dev`, 
    { cwd: instanceId }
);

// Create a public preview URL 
const preview = await sandbox.exposePort(3000, { 
    hostname: 'preview.example.com' 
});

// User instantly gets: "https://my-app-xyz.preview.example.com"
notifyUser(`✓ Preview ready at: ${preview.url}`);

Step 4: Test, log, fix, repeat

But that’s not all! Throughout this process, the platform will capture console output, build logs, and error messages and feed them back to the LLM for automatic fixes. As the platform makes any updates or fixes, the user can see it all happening live — the file editing, installation progress, and error resolution. 

Deploying applications: From Sandbox to Region Earth

Once the application is developed, it needs to be deployed. The platform packages everything in the sandbox and then uses a separate specialized “deployment sandbox” to deploy the application to Cloudflare Workers. This deployment sandbox runs wrangler deploy inside the secure environment to publish the application to Cloudflare’s global network. 

Since the platform may deploy up to thousands or millions of applications, Workers for Platforms is used to deploy the Workers at scale. Although all the Workers are deployed to the same Namespace, they are all isolated from one another by default, ensuring there’s no cross-tenant access. Once deployed, each application receives its own isolated Worker instance with a unique public URL like my-app.vibe-build.example.com

async function deployToWorkersForPlatforms(instanceId: string) {
    // 1. Package the app from development sandbox
    const devSandbox = getSandbox(env.Sandbox, instanceId);
    const packagedApp = await devSandbox.exec('zip -r app.zip .');
    
    // 2. Transfer to specialized deployment sandbox
    const deploymentSandbox = getSandbox(env.DeployerServiceObject, 'deployer');
    await deploymentSandbox.writeFile('app.zip', packagedApp);
    await deploymentSandbox.exec('unzip app.zip');
    
    // 3. Deploy using Workers for Platforms dispatch namespace
    const deployResult = await deploymentSandbox.exec(`
        bunx wrangler deploy \\\\
        --dispatch-namespace vibe-sdk-build-default-namespace
    `);
    
    // Each app gets its own isolated Worker and unique URL
    // e.g., https://my-app.example.com
    return `https://${instanceId}.example.com`;
}

Exportable Applications 

The platform also allows users to export their application to their own Cloudflare account and GitHub repo, so they can continue the development on their own. 


Observability, caching, and multi-model support built in! 

It’s no secret that LLM models have their specialties, which means that when building an AI-powered platform, you may end up using a few different models for different operations. By default, VibeSDK leverages Google’s Gemini models (gemini-2.5-pro, gemini-2.5-flash-lite, gemini-2.5-flash) for project planning, code generation, and debugging. 

VibeSDK is automatically set up with AI Gateway, so that by default, the platform is able to:

  • Use a unified access point to route requests across LLM providers, allowing you to use models from a range of providers (OpenAI, Anthropic, Google, and others)

  • Cache popular responses, so when someone asks to “build a to-do list app”, the gateway can serve a cached response instead of going to the provider (saving inference costs)

  • Get observability into the requests, tokens used, and response times across all providers in one place

  • Track costs across models and integrations

Open sourced, so you can build your own Platform! 

We’re open-sourcing VibeSDK for the same reason Cloudflare open-sourced the Workers runtime — we believe the best development happens in the open. That’s why we wanted to make it as easy as possible for anyone to build their own AI coding platform, whether it’s for internal company use, for your website builder, or for the next big vibe coding platform. We tied all the pieces together for you, so you can get started with the click of a button instead of spending months figuring out how to connect everything yourself. To learn more, check out our reference architecture for vibe coding platforms. 


Partnering with OpenAI to bring their new open models onto Cloudflare Workers AI

Post Syndicated from Michelle Chen original https://blog.cloudflare.com/openai-gpt-oss-on-workers-ai/

OpenAI has just announced their latest open-weight models — and we are excited to share that we are working with them as a Day 0 launch partner to make these models available in Cloudflare’s Workers AI. Cloudflare developers can now access OpenAI’s first open model, leveraging these powerful new capabilities on our platform. The new models are available starting today at @cf/openai/gpt-oss-120b and @cf/openai/gpt-oss-20b.

Workers AI has always been a champion for open models and we’re thrilled to bring OpenAI’s new open models to our platform today. Developers who want transparency, customizability, and deployment flexibility can rely on Workers AI as a place to deliver AI services. Enterprises that need the ability to run open models to ensure complete data security and privacy can also deploy with Workers AI. We are excited to join OpenAI in fulfilling their mission of making the benefits of AI broadly accessible to builders of any size.

The technical model specs

The OpenAI models have been released in two sizes: a 120 billion parameter model and a 20 billion parameter model. Both of them are Mixture-of-Experts models – a popular architecture for recent model releases – that allow relevant experts to be called for a query instead of running through all the parameters of the model. Interestingly, these models run natively at an FP4 quantization, which means that they have a smaller GPU memory footprint than a 120 billion parameter model at FP16. Given the quantization and the MoE architecture, the new models are able to run faster and more efficiently than more traditional dense models of that size.

These models are text-only; however, they have reasoning capabilities, tool calling, and two new exciting features with Code Interpreter and Web Search (support coming soon). We’ve implemented Code Interpreter on top of Cloudflare Containers in a novel way that allows for stateful code execution (read on below).

The model on Workers AI

We’re landing these new models with a few tweaks: supporting the new Responses API format as well as the historical Chat Completions API format (coming soon). The Responses API format is recommended by OpenAI to interact with their models, and we’re excited to support that on Workers AI.

If you call the model through:

  • Workers Binding, it will accept/return Responses API – env.AI.run(“@cf/openai/gpt-oss-120b”)

  • REST API on /run endpoint, it will accept/return Responses API – https://api.cloudflare.com/client/v4/accounts/<account_id>/ai/run/@cf/openai/gpt-oss-120b

  • REST API on new /responses endpoint, it will accept/return Responses API – https://api.cloudflare.com/client/v4/accounts/<account_id>/ai/v1/responses

  • REST API for OpenAI Compatible endpoint, it will return Chat Completions (coming soon)– https://api.cloudflare.com/client/v4/accounts/<account_id>/ai/v1/chat/completions

curl https://api.cloudflare.com/client/v4/accounts/<account_id>/ai/v1/responses \
  -H "Content-Type: application/json" \
  -H "Authorization: Bearer $CLOUDFLARE_API_KEY" \
  -d '{
    "model": "@cf/openai/gpt-oss-120b",
    "reasoning": {"effort": "medium"},
    "input": [
      {
        "role": "user",
        "content": "What are the benefits of open-source models?"
      }
    ]
  }'

Code Interpreter + Cloudflare Sandboxes = the perfect fit

To effectively answer user queries, Large Language Models (LLMs) often struggle with logical tasks such as mathematics or coding. Instead of attempting to reason through these problems, LLMs typically utilize a tool call to execute AI-generated code that solves these problems. OpenAI’s new models are specifically trained for stateful Python code execution and include a built-in feature called Code Interpreter, designed to address this challenge.

We’re particularly excited about this. Cloudflare not only has an inference platform (Workers AI), but we also have an ecosystem of compute and storage products that allow people to build full applications on top of our Developer Platform. This means that we are uniquely suited to support the model’s Code Interpreter capabilities, not only for one-time code execution, but for stateful code execution as well.

We’ve built support for Code Interpreter on top of Cloudflare’s Sandbox product that allows for a secure environment to run AI-generated code. The Sandbox SDK is built on our latest Containers product and Code Interpreter is the perfect use case to bring all these products together. When you use Code Interpreter, we spin up a Sandbox container scoped to your session that stays alive for 20 minutes, so the code can be edited for subsequent queries to the model. We’ve also pre-warmed Sandboxes for Code Interpreter to ensure the fastest start up times.

We’ll be publishing an example of how you can use the gpt-oss model on Workers AI and Sandboxes with the OpenAI SDK to make calls to Code Interpreter on our Developer Docs.

Give it a try!

We’re beyond excited for OpenAI’s new open models, and we hope you are too. Super grateful to our friends from vLLM and HuggingFace for supporting efficient model serving on launch day. Read up on the Developer Docs to learn more about the details and how to get started on building with these new models and capabilities.


Optimize traffic costs of Amazon MSK consumers on Amazon EKS with rack awareness

Post Syndicated from Austin Groeneveld original https://aws.amazon.com/blogs/big-data/optimize-traffic-costs-of-amazon-msk-consumers-on-amazon-eks-with-rack-awareness/

Are you incurring significant cross Availability Zone traffic costs when running an Apache Kafka client in containerized environments on Amazon Elastic Kubernetes Service (Amazon EKS) that consume data from Amazon Managed Streaming for Apache Kafka (Amazon MSK) topics?

If you’re not familiar with Apache Kafka’s rack awareness feature, we strongly recommend starting with the blog post on how to Reduce network traffic costs of your Amazon MSK consumers with rack awareness for an in-depth explanation of the feature and how Amazon MSK supports it.

Although the solution described in that post uses an Amazon Elastic Compute Cloud (Amazon EC2) instance deployed in a single Availability Zone to consume messages from an Amazon MSK topic, modern cloud-native architectures demand more dynamic and scalable approaches. Amazon EKS has emerged as a leading platform for deploying and managing distributed applications. The dynamic nature of Kubernetes introduces unique implementation challenges compared to static client deployments. In this post, we walk you through a solution for implementing rack awareness in consumer applications that are dynamically deployed across multiple Availability Zones using Amazon EKS.

Here’s a quick recap of some key Apache Kafka terminology from the referenced blog. An Apache Kafka client consumer will register to read against a topic. A topic is the logical data structure that Apache Kafka organizes data into. A topic is segmented into a single or many partitions. Partitions are the unit of parallelism in Apache Kafka. Amazon MSK provides high availability by replicating each partition of a topic across brokers in different Availability Zones. Because there are replicas of each partition that reside across the different brokers that make up your MSK cluster, Amazon MSK also tracks whether a replica partition is in sync with the most recent data for that partition. This means there is one partition that Amazon MSK recognizes as containing the most up-to-date data, and this is known as the leader partition. The collection of replicated partitions is called in-sync replicas. This list of in-sync replicas is used internally when the cluster needs to elect a new leader partition if the current leader were to become unavailable.

When consumer applications read from a topic, the Apache Kafka protocol facilitates a network exchange to determine which broker currently has the leader partition that the consumer needs to read from. This means that the consumer could be told to read from a broker in a different Availability Zone than itself, leading to cross-zone traffic charge in your AWS account. To help optimize this cost, Amazon MSK supports the rack awareness feature, using which clients can ask an Amazon MSK cluster to provide a replica partition to read from, within the same Availability Zone as the client, even if it isn’t the current leader partition. The cluster accomplishes this by checking for an in-sync replica on a broker within the same Availability Zone as the consumer.

The challenge with Kafka clients on Amazon EKS

In Amazon EKS, the underlying units of computes are EC2 instances that are abstracted as Kubernetes nodes. The nodes are organized into node groups for ease of management, scaling, and grouping of applications on certain EC2 instance types. As a best practice for resilience, the nodes in a node group are spread across multiple Availability Zones. Amazon EKS uses the underlying Amazon EC2 metadata about the Availability Zone that it’s located in, and it injects that information into the node’s metadata during node configuration. In particular, the Availability Zone (AZ ID) is injected into the node metadata.

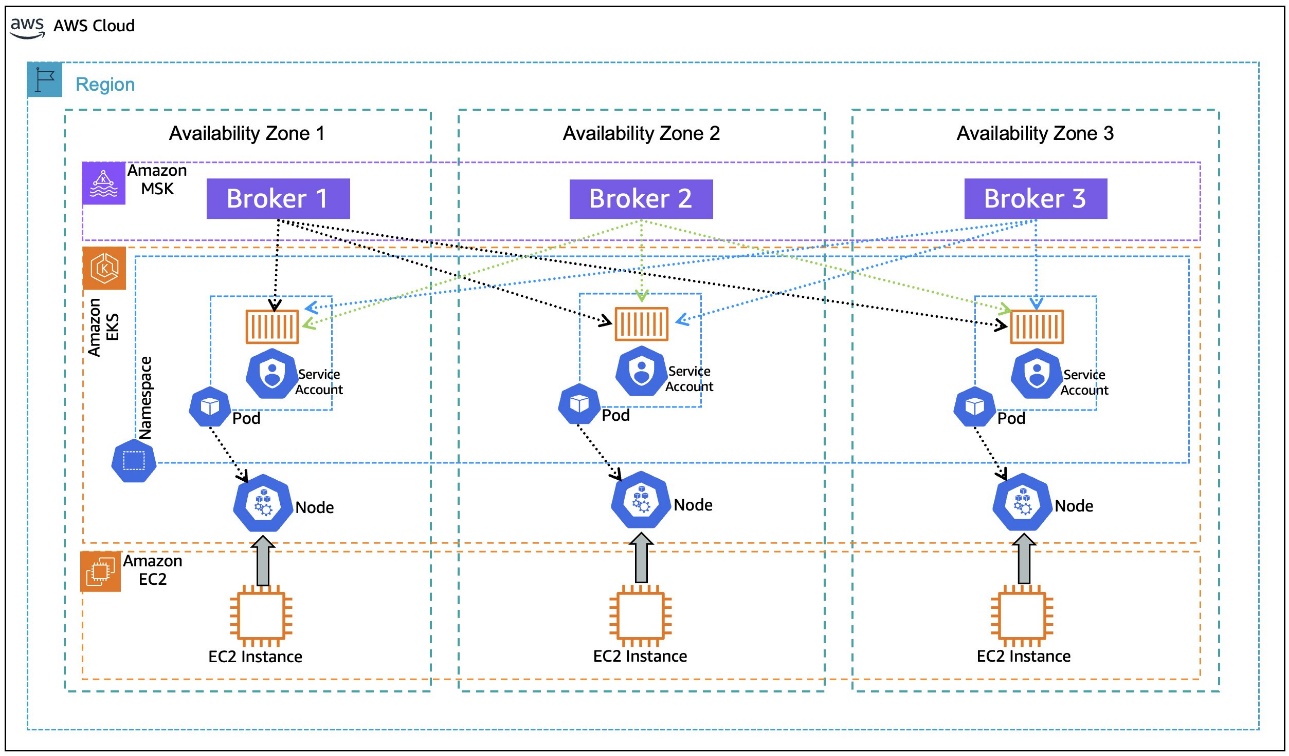
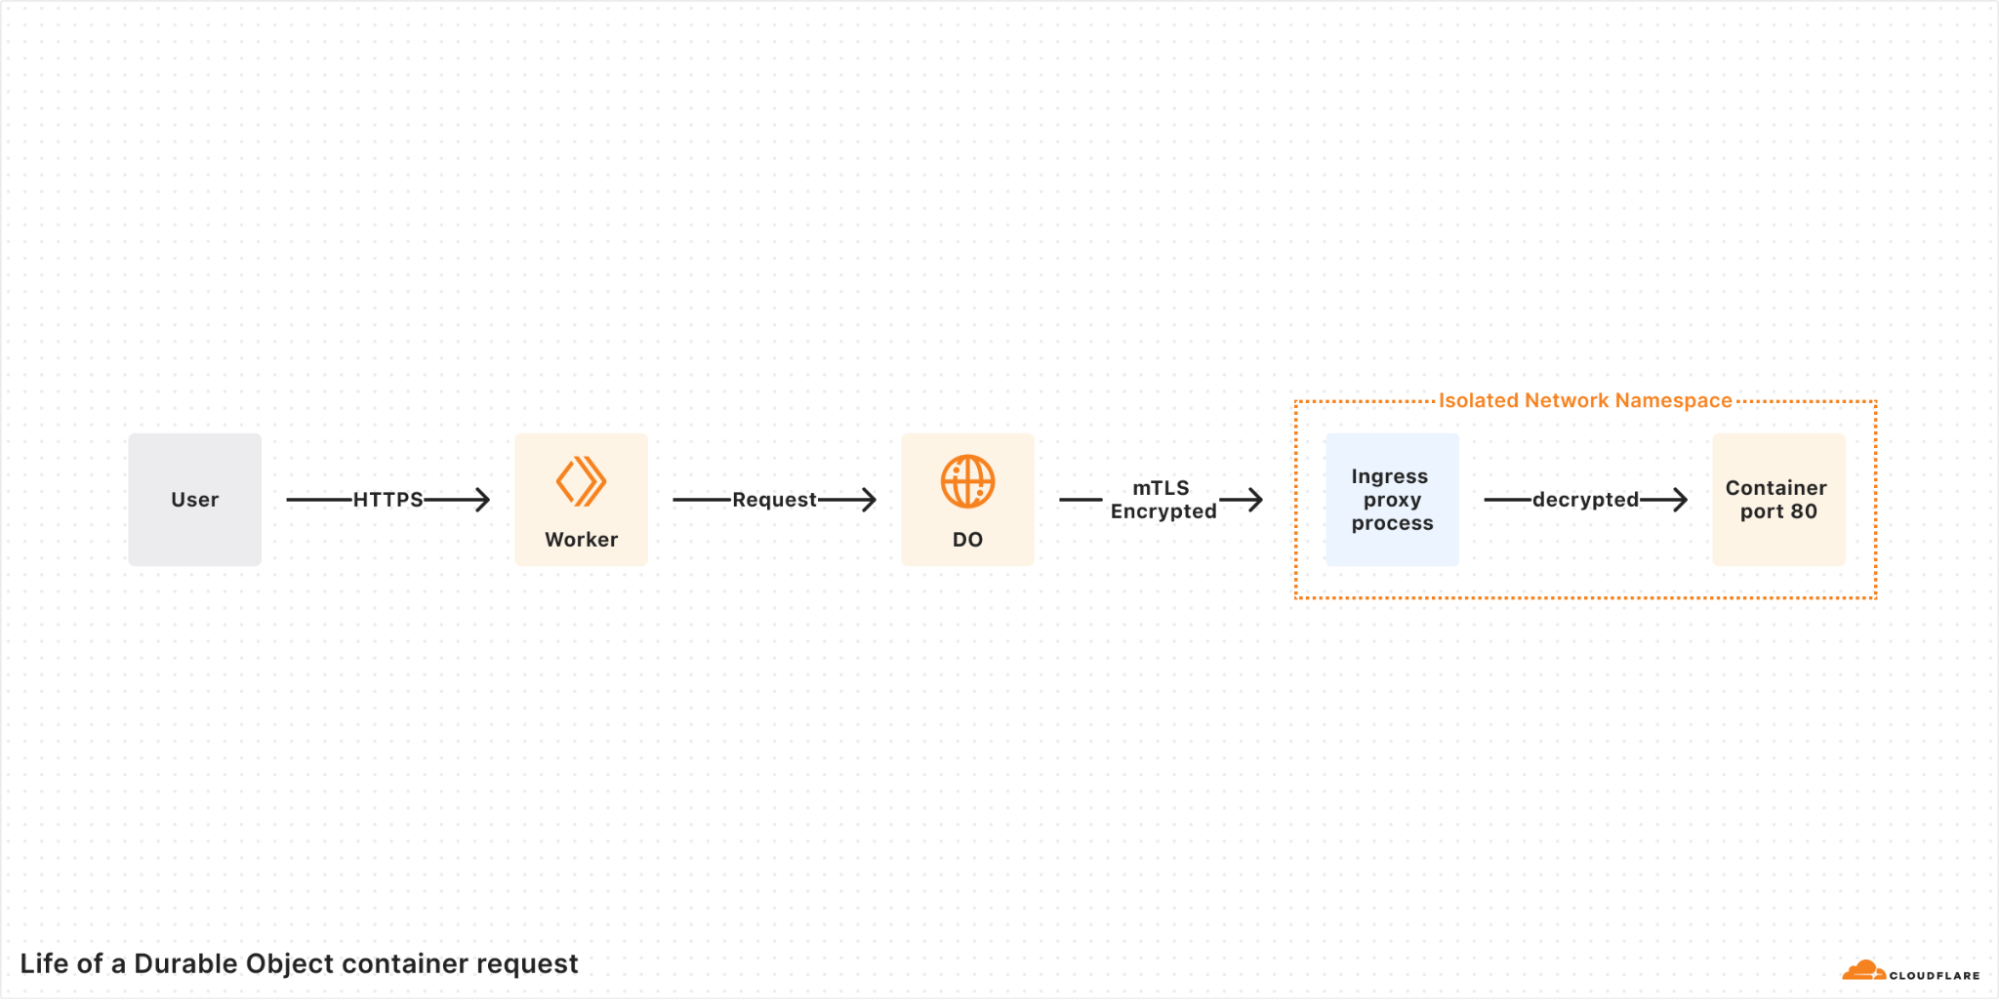
When an application is deployed in a Kubernetes Pod on Amazon EKS, it goes through a process of binding to a node that meets the pod’s requirements. As shown in the following diagram, when you deploy client applications on Amazon EKS, the pod for the application can be bound to a node with available capacity in any Availability Zone. Also, the pod doesn’t automatically inherit the Availability Zone information from the node that it’s bound to, a piece of information necessary for rack awareness. The following architecture diagram illustrates Kafka consumers running on Amazon EKS without rack awareness.

AWS Cloud architecture showing MSK brokers, EKS pods, and EC2 instances in three Availability Zones

To set the client configuration for rack awareness, the pod needs to know what Availability Zone it’s located in, dynamically, as it is bound to a node. During its lifecycle, the same pod can be evicted from the node it was bound to previously and moved to a node in a different Availability Zone, if the matching criteria permit that. Making the pod aware of its Availability Zone dynamically sets the rack awareness parameter client.rack during the initialization of the application container that is encapsulated in the pod.

After rack awareness is enabled on the MSK cluster, what happens if the broker in the same Availability Zone as the client (hosted on Amazon EKS or elsewhere) becomes unavailable? The Apache Kafka protocol is designed to support a distributed data storage system. Assuming customers follow the best practice of implementing a replication factor > 1, Apache Kafka can dynamically reroute the consumer client to the next available in-sync replica on a different broker. This resilience remains consistent even after implementing nearest replica fetching, or rack awareness. Enabling rack awareness optimizes the networking exchange to prefer a partition within the same Availability Zone, but it doesn’t compromise the consumer’s ability to operate if the nearest replica is unavailable.

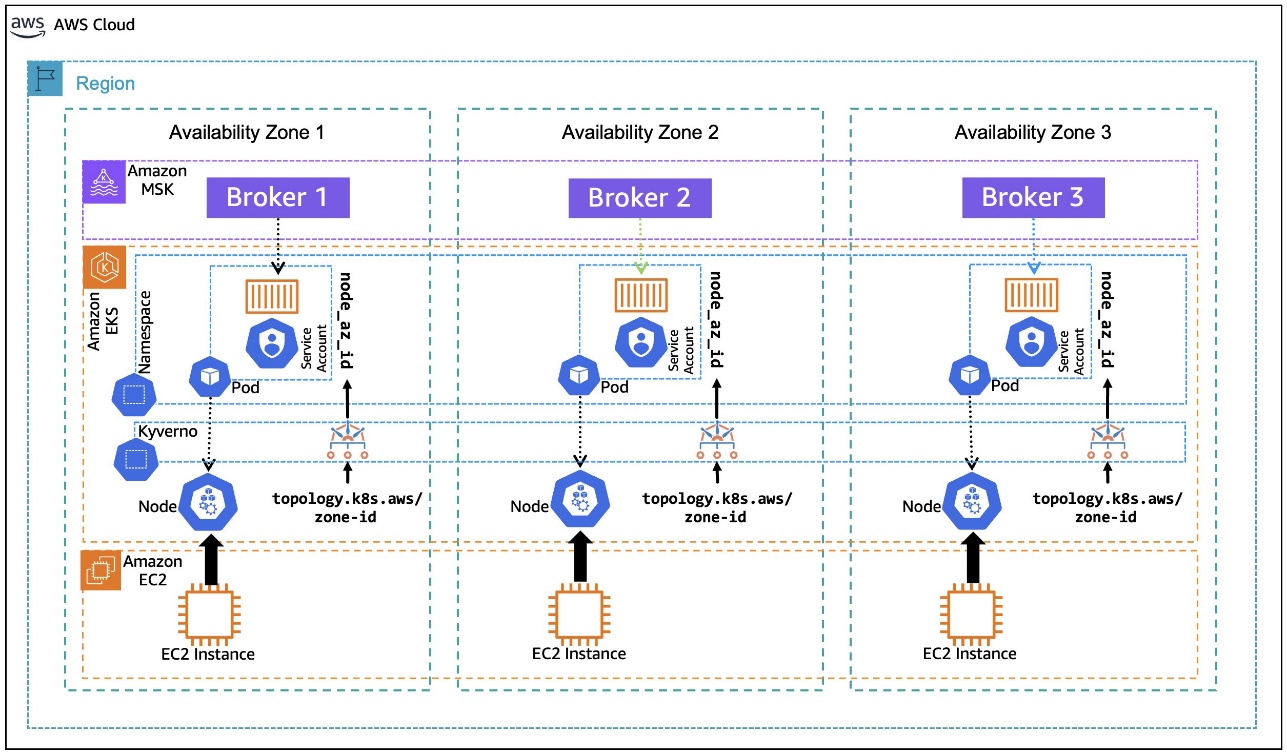
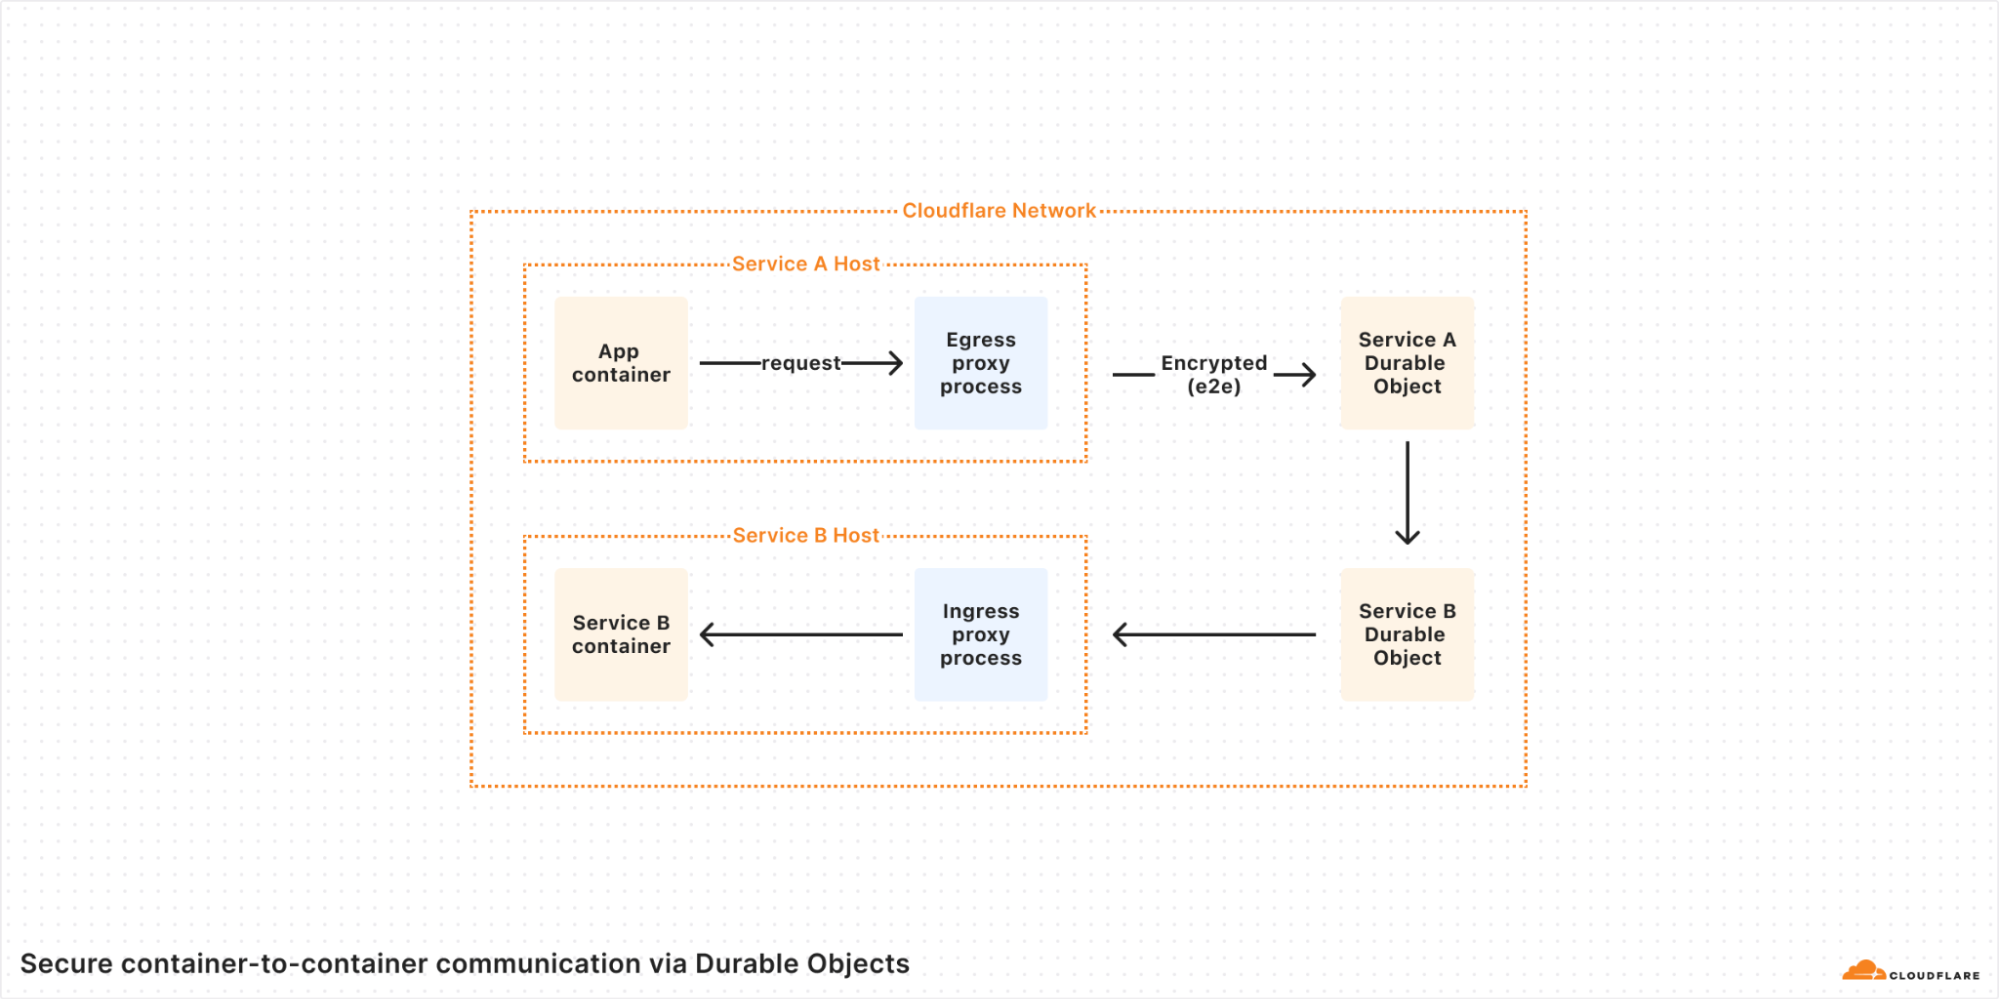
In this post, we walk you through an example of how to use the Kubernetes metadata label, topology.k8s.aws/zone-id, assigned to each node by Amazon EKS, and use an open source policy engine, Kyverno, to deploy a policy that mutates the pods that are in the binding state to dynamically inject the node’s AZ ID into the pod’s metadata as an annotation, as depicted in the following diagram. This annotation, in turn, is used by the container to create an environment variable that is assigned the pod’s annotated AZ ID information. The environment variable is then used in the container postStart lifecycle hook to generate the Kafka client configuration file with rack awareness setting. The following architecture diagram illustrates Kafka consumers running on Amazon EKS with rack awareness.

AWS architecture with MSK, EKS, Kyverno, and EC2 across three Availability Zones, detailing topology

Solution Walkthrough

Prerequisites

For this walkthrough, we use AWS CloudShell to run the scripts that are provided inline as you progress. For a smooth experience, before getting started, make sure to have kubectl and eksctl installed and configured in the AWS CloudShell environment, following the installation instructions for Linux (amd64). Helm is also required to be install on AWS CloudShell, using the instructions for Linux.

Also, check if the envsubst tool is installed in your CloudShell environment by invoking:

which envsubst

If the tool isn’t installed, you can install it using the command:

sudo dnf -y install gettext-devel

We also assume you already have an MSK cluster deployed in an Amazon Virtual Private Cloud (VPC) in three Availability Zones with the name MSK-AZ-Aware. In this walkthrough, we use AWS Identity and Access Management (IAM) authentication for client access control to the MSK cluster. If you’re using a cluster in your account with a different name, replace the instances of MSK-AZ-Aware in the instructions.

We follow the same MSK cluster configuration mentioned in the Rack Awareness blog mentioned previously, with some modifications. (Ensure you’ve set replica.selector.class = org.apache.kafka.common.replica.RackAwareReplicaSelector for the reasons discussed there). In our configuration, we add one line: num.partitions = 6. Although not mandatory, this ensures that topics that are automatically created will have multiple partitions to support clearer demonstrations in subsequent sections.

Finally, we use the Amazon MSK Data Generator with the following configuration:

{
"name": "msk-data-generator",
    "config": {
    "connector.class": "com.amazonaws.mskdatagen.GeneratorSourceConnector",
    "genkp.MSK-AZ-Aware-Topic.with": "#{Internet.uuid}",
    "genv.MSK-AZ-Aware-Topic.product_id.with": "#{number.number_between '101','200'}",
    "genv.MSK-AZ-Aware-Topic.quantity.with": "#{number.number_between '1','5'}",
    "genv.MSK-AZ-Aware-Topic.customer_id.with": "#{number.number_between '1','5000'}"
    }
}

Running the MSK Data Generator with this configuration will automatically create a six-partition topic named MSK-AZ-Aware-Topic on our cluster for us, and it will push data to that topic. To follow along with the walkthrough, we recommend and assume that you deploy the MSK Data Generator to create the topic and populate it with simulated data.

Create the EKS cluster

The first step is to install an EKS cluster in the same Amazon VPC subnets as the MSK cluster. You can modify the name of the MSK cluster by changing that environment variable MSK_CLUSTER_NAME if your cluster is created with a different name than suggested. You can also change the Amazon EKS cluster name by changing EKS_CLUSTER_NAME.

The environment variables that we define here are used throughout the walkthrough.

The last step is to update the kubeconfig with an entry for the EKS cluster:

AWS_ACCOUNT=$(aws sts get-caller-identity --output text --query Account)
export AWS_ACCOUNT
export AWS_REGION=${AWS_DEFAULT_REGION}
export MSK_CLUSTER_NAME=MSK-AZ-Aware
export EKS_CLUSTER_NAME=EKS-AZ-Aware
export EKS_CLUSTER_SIZE=3
export K8S_VERSION=1.32
export POD_ID_VERSION=1.3.5
 
MSK_BROKER_SG=$(aws kafka list-clusters \
  --query  'ClusterInfoList[?ClusterName==`'${MSK_CLUSTER_NAME}'`].BrokerNodeGroupInfo.SecurityGroups'  \
  --output text | xargs)
export MSK_BROKER_SG

MSK_BROKER_CLIENT_SUBNETS=$(aws kafka list-clusters \
  --query  'ClusterInfoList[?ClusterName==`'${MSK_CLUSTER_NAME}'`].BrokerNodeGroupInfo.ClientSubnets'  \
  --output text | xargs)
export MSK_BROKER_CLIENT_SUBNETS
 
VPC_ID=$(aws ec2 describe-subnets \
  --subnet-ids "$(echo "${MSK_BROKER_CLIENT_SUBNETS}" | cut -d' ' -f1)" \
  --query 'Subnets[0].VpcId' \
  --output text)
export VPC_ID

EKS_SUBNETS=$(echo ${MSK_BROKER_CLIENT_SUBNETS} | sed 's/ \+/,/g')
export EKS_SUBNETS

# Create a minimal config file for encrypted node volumes
cat > eks-config.yaml << EOF
apiVersion: eksctl.io/v1alpha5
kind: ClusterConfig
metadata:
  name: ${EKS_CLUSTER_NAME}
  region: ${AWS_REGION}
  version: "${K8S_VERSION}"
vpc:
  id: "${VPC_ID}"
  subnets:
    public:
$(for subnet in ${MSK_BROKER_CLIENT_SUBNETS}; do
  AZ=$(aws ec2 describe-subnets --subnet-ids "$subnet" --query 'Subnets[0].AvailabilityZone' --output text)
  echo "      $AZ: { id: $subnet }"
done)
nodeGroups:
  - name: ng1
    instanceType: m5.xlarge
    desiredCapacity: ${EKS_CLUSTER_SIZE}
    minSize: ${EKS_CLUSTER_SIZE}
    maxSize: ${EKS_CLUSTER_SIZE}
    securityGroups:
      attachIDs: ["${MSK_BROKER_SG}"]
    volumeSize: 100
    volumeType: gp3
    volumeEncrypted: true
EOF

eksctl create cluster -f eks-config.yaml

aws eks update-kubeconfig \
  --region "${AWS_REGION}" \
  --name ${EKS_CLUSTER_NAME}

Next, you need to create an IAM policy, MSK-AZ-Aware-Policy, to allow access from the Amazon EKS pods to the MSK cluster. Note here that we’re using MSK-AZ-Aware as the cluster name.

Create a file, msk-az-aware-policy.json, with the IAM policy template:

cat > msk-az-aware-policy.json << EOF
{
    "Version": "2012-10-17",
    "Statement": [
        {
            "Effect": "Allow",
            "Action": [
                "kafka-cluster:Connect",
                "kafka-cluster:AlterCluster",
                "kafka-cluster:DescribeCluster",
                "kafka-cluster:DescribeClusterDynamicConfiguration",
                "kafka-cluster:AlterClusterDynamicConfiguration"
            ],
            "Resource": [
                "arn:aws:kafka:${AWS_REGION}:${AWS_ACCOUNT}:cluster/${MSK_CLUSTER_NAME}/*"
            ]
        },
        {
            "Effect": "Allow",
            "Action": [
                "kafka-cluster:*Topic*",
                "kafka-cluster:WriteData",
                "kafka-cluster:ReadData"
            ],
            "Resource": [
                "arn:aws:kafka:${AWS_REGION}:${AWS_ACCOUNT}:topic/${MSK_CLUSTER_NAME}/*"
            ]
        },
        {
            "Effect": "Allow",
            "Action": [
                "kafka-cluster:AlterGroup",
                "kafka-cluster:DescribeGroup"
            ],
            "Resource": [
                "arn:aws:kafka:${AWS_REGION}:${AWS_ACCOUNT}:group/${MSK_CLUSTER_NAME}/*"
            ]
        }
    ]
}
EOF

To create the IAM policy, use the following command. It first replaces the placeholders in the policy file with values from relevant environment variables, and then creates the IAM policy:

envsubst < msk-az-aware-policy.json | \
xargs -0 -I {} aws iam create-policy \
            --policy-name MSK-AZ-Aware-Policy \
            --policy-document {}

Configure EKS Pod Identity

Amazon EKS Pod Identity offers a simplified experience for obtaining IAM permissions for pods on Amazon EKS. This requires installing an add-on Amazon EKS Pod Identity Agent to the EKS cluster:

eksctl create addon \
  --cluster ${EKS_CLUSTER_NAME} \
  --name eks-pod-identity-agent \
  --version ${POD_ID_VERSION}

Confirm that the add-on has been installed and its status is ACTIVE and that the status of all the pods associated with the add-on is Running.

eksctl get addon \
  --cluster ${EKS_CLUSTER_NAME} \
  --region "${AWS_REGION}" \
  --name eks-pod-identity-agent -o json

kubectl get pods \
  -n kube-system \
  -l app.kubernetes.io/instance=eks-pod-identity-agent

After you’ve installed the add-on, you need to create a pod identity association between a Kubernetes service account and the IAM policy created earlier:

eksctl create podidentityassociation \
  --namespace kafka-ns \
  --service-account-name kafka-sa \
  --role-name EKS-AZ-Aware-Role \
  --permission-policy-arns arn:aws:iam::"${AWS_ACCOUNT}":policy/MSK-AZ-Aware-Policy \
  --cluster ${EKS_CLUSTER_NAME} \
  --region "${AWS_REGION}"

Install Kyverno

Kyverno is an open source policy engine for Kubernetes that allows for validation, mutation, and generation of Kubernetes resources using policies written in YAML, thus simplifying the enforcement of security and compliance requirements. You need to install Kyverno to dynamically inject metadata into the Amazon EKS pods as they enter the binding state to inform them of Availability Zone ID.

In AWS CloudShell, create a file named kyverno-values.yaml. This file defines the Kubernetes RBAC permissions for Kyverno’s Admission Controller to read Amazon EKS node metadata because the default Kyverno (v. 1.13 onwards) settings don’t allow this:

cat > kyverno-values.yaml << EOF
admissionController:
  rbac:
    clusterRole:
      extraResources:
        - apiGroups:
            - ""
          resources:
            - "nodes"
          verbs:
            - get
            - list
            - watch
EOF

After this file is created, you can install Kyverno using helm and providing the values file created in the previous step:

helm repo add kyverno https://kyverno.github.io/kyverno/
helm repo update

helm install kyverno kyverno/kyverno \
  -n kyverno \
  --create-namespace \
  --version 3.3.7 \
  -f kyverno-values.yaml

Starting with Kyverno v 1.13, the Admission Controller is configured to ignore the AdmissionReview requests for pods in binding state. This needs to be changed by editing the Kyverno ConfigMap:

kubectl -n kyverno edit configmap kyverno

The kubectl edit command uses the default editor configured in your environment (in our case Linux VIM).

This will open the ConfigMap in a text editor.

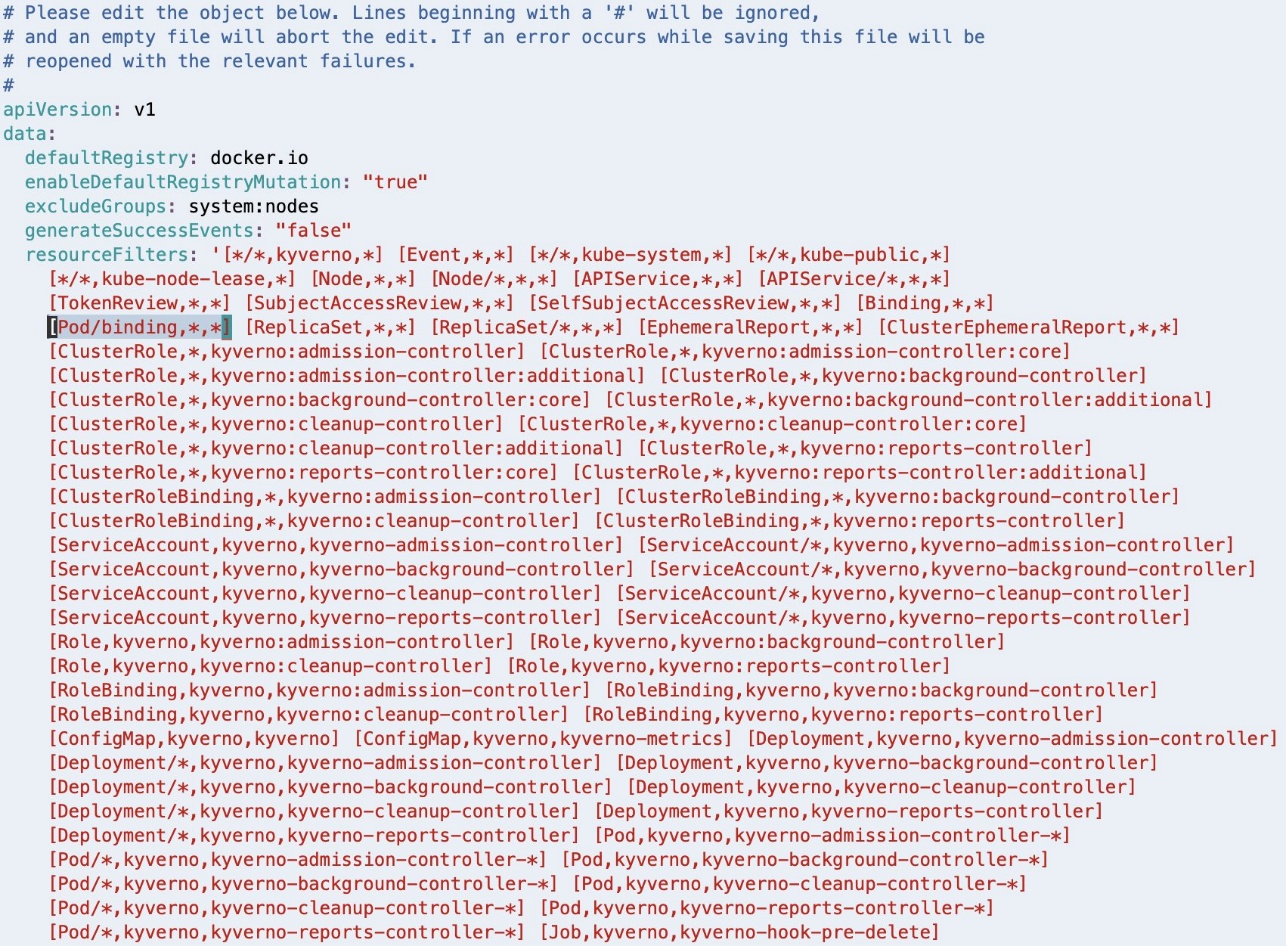
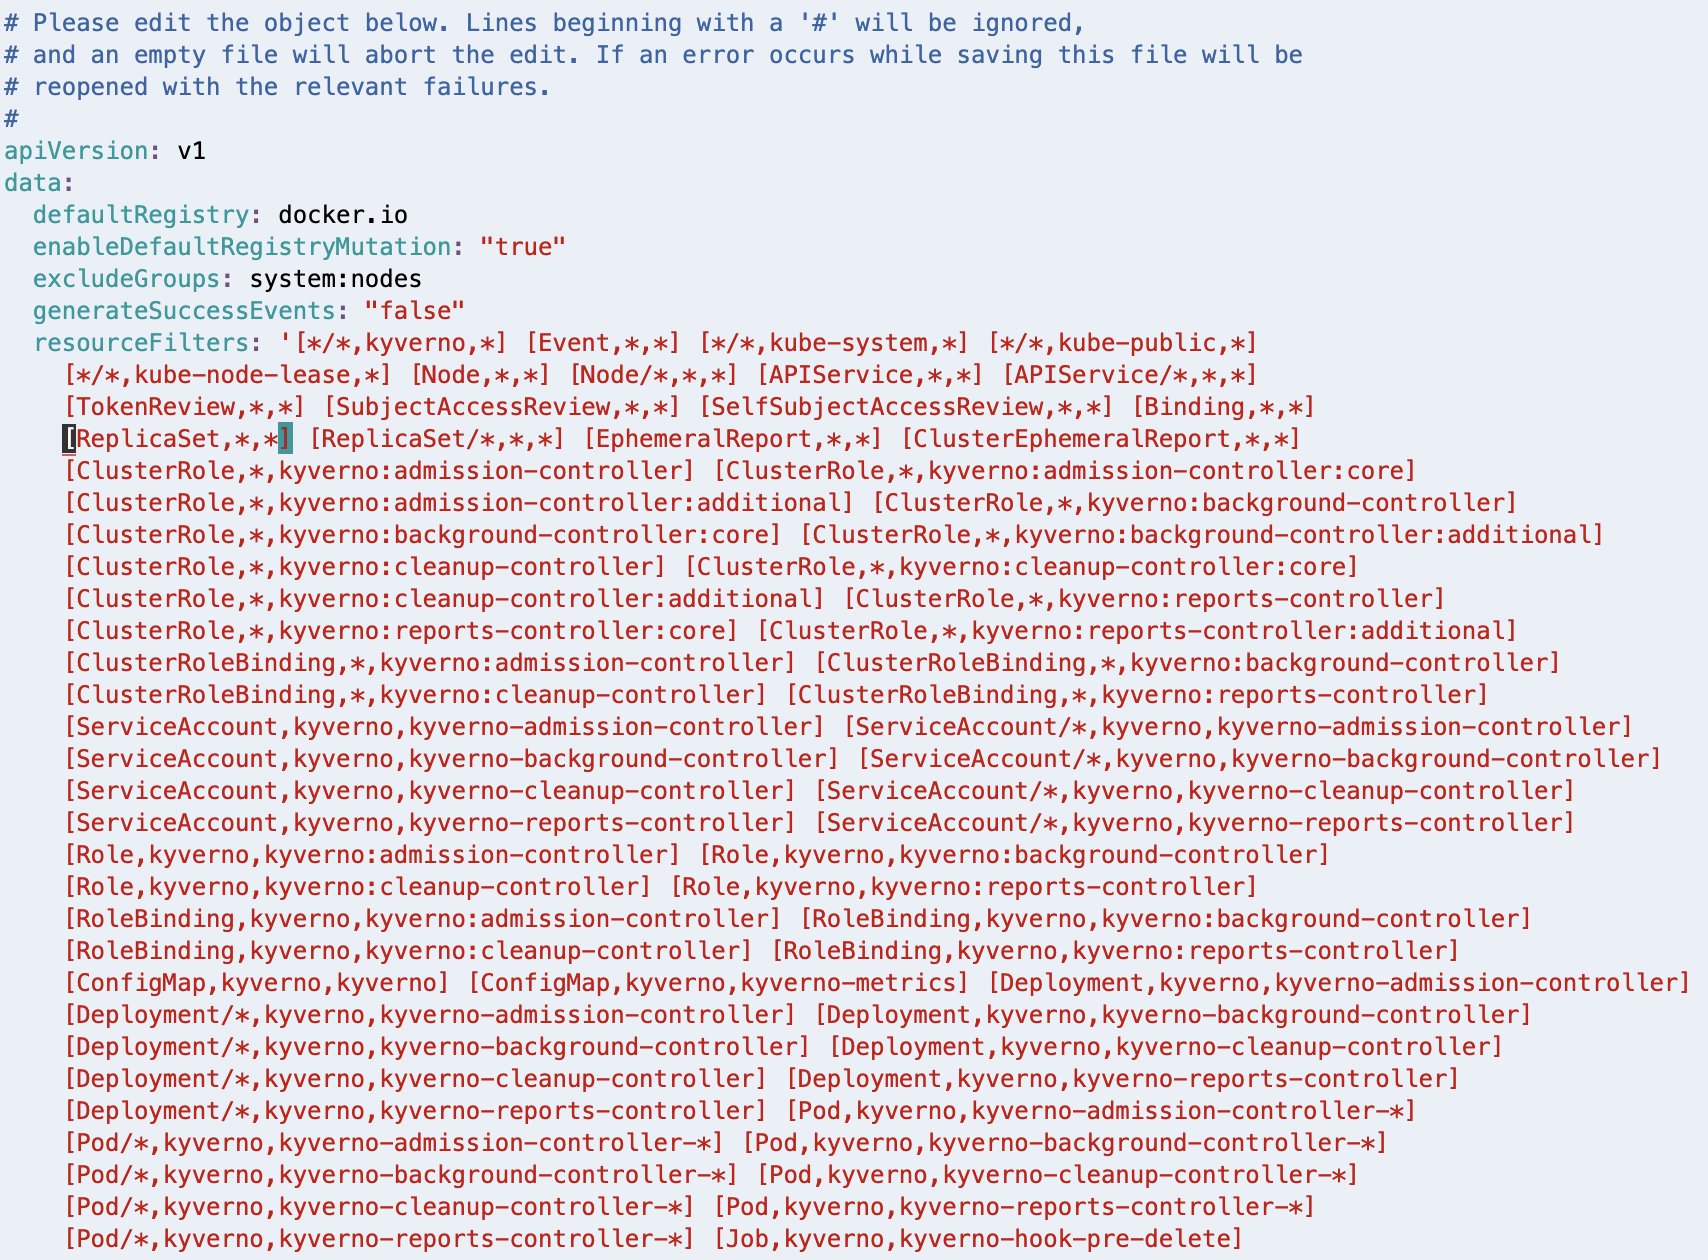
As highlighted in the following screenshot, [Pod/binding,*,*] should be removed from the resourceFilters field for the Kyverno Admission Controller to process AdmissionReview requests for pods in binding state.

Kubernetes YAML configuration detailing Kyverno policy resource filters and cluster roles

If Linux VIM is your default editor, you can delete the entry using VIM command 18x, meaning delete (or cut) 18 characters from the current cursor position. Save the modified configuration using the VIM command :wq, meaning write (or save) the file and quit.

After deleting, the resourceFilters field should look similar to the following screenshot.

Kubernetes YAML configuration with ReplicaSet resource filter highlighted for Kyverno policy management

If you have a different editor configured in your environment, follow the appropriate steps to achieve a similar outcome.

Configure Kyverno policy

You need to configure the policy that will make the pods rack aware. This policy is adapted from the suggested approach in the Kyverno blog post, Assigning Node Metadata to Pods. Create a new file with the name kyverno-inject-node-az-id.yaml:

cat > kyverno-inject-node-az-id.yaml  << EOF
apiVersion: kyverno.io/v2beta1
kind: ClusterPolicy
metadata:
  name: inject-node-az-id
spec:
  background: false
  rules:
    - name: inject-node-az-id
      match:
        any:
        - resources:
            kinds:
            - Pod/binding
      context:
      - name: node
        variable:
          jmesPath: request.object.target.name
          default: ''
      - name: node_az_id
        apiCall:
          urlPath: "/api/v1/nodes/{{node}}"
          jmesPath: "metadata.labels.\"topology.k8s.aws/zone-id\" || 'empty'"
      mutate:
        patchStrategicMerge:
          metadata:
            annotations:
              node_az_id: "{{ node_az_id }}"
EOF

It instructs Kyverno to watch for pods in binding state. After Kyverno receives the AdmissionReview request for a pod, it sets the variable node to the name of the node to which the pod is being bound. It also sets another variable node_az_id to the Availability Zone ID by calling the Kubernetes API /api/v1/nodes/node to get the node metadata label topology.k8s.aws/zone-id. Finally, it defines a mutate rule to inject the obtained AZ ID into the pod’s metadata as an annotation node_az_id.
After you’ve created the file, apply the policy using the following command:

kubectl apply -f kyverno-inject-node-az-id.yaml

Deploy a pod without rack awareness

Now let’s visualize the problem statement. To do this, connect to one of the EKS pods and check how it interacts with the MSK cluster when you run a Kafka consumer from the pod.

First, get the bootstrap string of the MSK cluster. Look up the Amazon Resource Names (ARNs) of the MSK cluster:

MSK_CLUSTER_ARN=$(
    aws kafka list-clusters \
      --query 'ClusterInfoList[?ClusterName==`'${MSK_CLUSTER_NAME}'`].ClusterArn' \
      --output text)
export MSK_CLUSTER_ARN

Using the cluster ARN, you can get the bootstrap string with the following command:

BOOTSTRAP_SERVER_LIST=$(
    aws kafka get-bootstrap-brokers \
        --cluster-arn "${MSK_CLUSTER_ARN}" \
        --query 'BootstrapBrokerStringSaslIam' \
        --output text)
export BOOTSTRAP_SERVER_LIST

Create a new file named kafka-no-az.yaml:

cat > kafka-no-az.yaml << EOF
apiVersion: v1
kind: Namespace
metadata:
 name: kafka-ns
---
apiVersion: v1
kind: ServiceAccount
metadata:
 name: kafka-sa
 namespace: kafka-ns
automountServiceAccountToken: false
---
apiVersion: apps/v1
kind: Deployment
metadata:
  name: kafka-no-az
  namespace: kafka-ns
  labels:
    app: kafka-no-az
  annotations:
    node_az_id: ''
spec:
  replicas: 3
  selector:
    matchLabels:
      app: kafka-no-az
  template:
    metadata:
      labels:
        app: kafka-no-az
    spec:
      serviceAccountName: kafka-sa
      containers:
      - image: bitnami/kafka:3.8.0
        name: kafka-no-az
        command: ["/bin/sh", "-ec", "while :; do echo '.'; sleep 5 ; done"]
        env:
        - name: BootstrapServerString
          value: ${BOOTSTRAP_SERVER_LIST}
        - name: MSK_TOPIC
          value: "MSK-AZ-Aware-Topic"
        - name: KAFKA_HOME
          value: /opt/bitnami/kafka
        - name: KAFKA_BIN
          value: /opt/bitnami/kafka/bin
        - name: KAFKA_CONFIG
          value: /opt/bitnami/kafka/config
        - name: KAFKA_LIBS
          value: /opt/bitnami/kafka/libs
        - name: KAFKA_LOG4J_OPTS
          value: "-Dlog4j.configuration=file:/opt/bitnami/kafka/config/log4j.properties"
        lifecycle:
          postStart:
            exec:
              command: 
              - "sh"
              - "-c"
              - |
                export KAFKA_HOME=/opt/bitnami/kafka
                export KAFKA_BIN=\${KAFKA_HOME}/bin
                export KAFKA_CONFIG=\${KAFKA_HOME}/config
                cat > \${KAFKA_CONFIG}/client.properties << EOF1
                security.protocol=SASL_SSL
                sasl.mechanism=AWS_MSK_IAM
                sasl.jaas.config=software.amazon.msk.auth.iam.IAMLoginModule required;
                sasl.client.callback.handler.class=software.amazon.msk.auth.iam.IAMClientCallbackHandler
                EOF1
                
                cat >> \${KAFKA_CONFIG}/log4j.properties << EOF2
                #
                # Enable logging of Kafka Client to stderr
                #
                log4j.rootLogger=WARN, stderr
                log4j.logger.org.apache.kafka.clients.consumer.internals.AbstractFetch=DEBUG
                log4j.appender.stderr=org.apache.log4j.ConsoleAppender
                log4j.appender.stderr.layout=org.apache.log4j.PatternLayout
                log4j.appender.stderr.layout.ConversionPattern=[%d] %p %m (%c)%n
                log4j.appender.stderr.Target=System.err
                EOF2
                cd \${KAFKA_HOME}/libs
                /usr/bin/curl -sS -L https://github.com/aws/aws-msk-iam-auth/releases/download/v2.2.0/aws-msk-iam-auth-2.2.0-all.jar --output \${KAFKA_LIBS}/aws-msk-iam-auth-2.2.0-all.jar
EOF

This pod manifest doesn’t make use of the Availability Zone ID injected into the metadata annotation and hence doesn’t add client.rack to the client.properties configuration.

Deploy the pods using the following command:

kubectl apply -f kafka-no-az.yaml

Run the following command to confirm that the pods have been deployed and are in the Running state:

kubectl -n kafka-ns get pods

Select a pod id from the output of the previous command, and connect to it using:

kubectl -n kafka-ns exec -it POD_ID -- sh

Run the Kafka consumer:

"${KAFKA_BIN}"/kafka-console-consumer.sh \
  --bootstrap-server  "${BootstrapServerString}" \
  --consumer.config  "${KAFKA_CONFIG}"/client.properties \
  --topic "${MSK_TOPIC}" \
  --from-beginning /tmp/non-rack-aware-consumer.log 2>&1 &

This command will dump all the resulting logs into the file, non-rack-aware-consumer.log. There’s a lot of information in those logs, and we encourage you to open them and take a deeper look. Next, examine the EKS pod in action. To do this, run the following command to tail the file to view fetch request results to the MSK cluster. You’ll notice a handful of meaningful logs to review as the consumer access various partitions of the Kafka topic:

grep -E "DEBUG.*Added read_uncommitted fetch request for partition MSK-AZ-Aware-Topic-[0-9]+" /tmp/rack-aware-consumer.log | tail -5

Observe your log output, which should look similar to the following:

[2025-03-12 23:59:05,308] DEBUG [Consumer clientId=console-consumer, groupId=console-consumer-24102] Added read_uncommitted fetch request for partition MSK-AZ-Aware-Topic-3 at position FetchPosition{offset=100, offsetEpoch=Optional[0], currentLeader=LeaderAndEpoch{leader=Optional[b-2.mskazaware.hxrzlh.c6.kafka.us-east-1.amazonaws.com:9098 (id: 2 rack: use1-az6)], epoch=0}} to node b-2.mskazaware.hxrzlh.c6.kafka.us-east-1.amazonaws.com:9098 (id: 2 rack: use1-az6) (org.apache.kafka.clients.consumer.internals.AbstractFetch)
[2025-03-12 23:59:05,308] DEBUG [Consumer clientId=console-consumer, groupId=console-consumer-24102] Added read_uncommitted fetch request for partition MSK-AZ-Aware-Topic-0 at position FetchPosition{offset=83, offsetEpoch=Optional[0], currentLeader=LeaderAndEpoch{leader=Optional[b-2.mskazaware.hxrzlh.c6.kafka.us-east-1.amazonaws.com:9098 (id: 2 rack: use1-az6)], epoch=0}} to node b-2.mskazaware.hxrzlh.c6.kafka.us-east-1.amazonaws.com:9098 (id: 2 rack: use1-az6) (org.apache.kafka.clients.consumer.internals.AbstractFetch)
[2025-03-12 23:59:05,542] DEBUG [Consumer clientId=console-consumer, groupId=console-consumer-24102] Added read_uncommitted fetch request for partition MSK-AZ-Aware-Topic-5 at position FetchPosition{offset=100, offsetEpoch=Optional[0], currentLeader=LeaderAndEpoch{leader=Optional[b-1.mskazaware.hxrzlh.c6.kafka.us-east-1.amazonaws.com:9098 (id: 1 rack: use1-az4)], epoch=0}} to node b-1.mskazaware.hxrzlh.c6.kafka.us-east-1.amazonaws.com:9098 (id: 1 rack: use1-az4) (org.apache.kafka.clients.consumer.internals.AbstractFetch)
[2025-03-12 23:59:05,542] DEBUG [Consumer clientId=console-consumer, groupId=console-consumer-24102] Added read_uncommitted fetch request for partition MSK-AZ-Aware-Topic-2 at position FetchPosition{offset=107, offsetEpoch=Optional[0], currentLeader=LeaderAndEpoch{leader=Optional[b-1.mskazaware.hxrzlh.c6.kafka.us-east-1.amazonaws.com:9098 (id: 1 rack: use1-az4)], epoch=0}} to node b-1.mskazaware.hxrzlh.c6.kafka.us-east-1.amazonaws.com:9098 (id: 1 rack: use1-az4) (org.apache.kafka.clients.consumer.internals.AbstractFetch)
[2025-03-12 23:59:05,720] DEBUG [Consumer clientId=console-consumer, groupId=console-consumer-24102] Added read_uncommitted fetch request for partition MSK-AZ-Aware-Topic-4 at position FetchPosition{offset=84, offsetEpoch=Optional[0], currentLeader=LeaderAndEpoch{leader=Optional[b-3.mskazaware.hxrzlh.c6.kafka.us-east-1.amazonaws.com:9098 (id: 3 rack: use1-az2)], epoch=0}} to node b-3.mskazaware.hxrzlh.c6.kafka.us-east-1.amazonaws.com:9098 (id: 3 rack: use1-az2) (org.apache.kafka.clients.consumer.internals.AbstractFetch)
[2025-03-12 23:59:05,720] DEBUG [Consumer clientId=console-consumer, groupId=console-consumer-24102] Added read_uncommitted fetch request for partition MSK-AZ-Aware-Topic-1 at position FetchPosition{offset=85, offsetEpoch=Optional[0], currentLeader=LeaderAndEpoch{leader=Optional[b-3.mskazaware.hxrzlh.c6.kafka.us-east-1.amazonaws.com:9098 (id: 3 rack: use1-az2)], epoch=0}} to node b-3.mskazaware.hxrzlh.c6.kafka.us-east-1.amazonaws.com:9098 (id: 3 rack: use1-az2) (org.apache.kafka.clients.consumer.internals.AbstractFetch)
[2025-03-12 23:59:05,811] DEBUG [Consumer clientId=console-consumer, groupId=console-consumer-24102] Added read_uncommitted fetch request for partition MSK-AZ-Aware-Topic-3 at position FetchPosition{offset=100, offsetEpoch=Optional[0], currentLeader=LeaderAndEpoch{leader=Optional[b-2.mskazaware.hxrzlh.c6.kafka.us-east-1.amazonaws.com:9098 (id: 2 rack: use1-az6)], epoch=0}} to node b-2.mskazaware.hxrzlh.c6.kafka.us-east-1.amazonaws.com:9098 (id: 2 rack: use1-az6) (org.apache.kafka.clients.consumer.internals.AbstractFetch)
[2025-03-12 23:59:05,811] DEBUG [Consumer clientId=console-consumer, groupId=console-consumer-24102] Added read_uncommitted fetch request for partition MSK-AZ-Aware-Topic-0 at position FetchPosition{offset=83, offsetEpoch=Optional[0], currentLeader=LeaderAndEpoch{leader=Optional[b-2.mskazaware.hxrzlh.c6.kafka.us-east-1.amazonaws.com:9098 (id: 2 rack: use1-az6)], epoch=0}} to node b-2.mskazaware.hxrzlh.c6.kafka.us-east-1.amazonaws.com:9098 (id: 2 rack: use1-az6) (org.apache.kafka.clients.consumer.internals.AbstractFetch)

You’ve now connected to a specific pod in the EKS cluster and run a Kafka consumer to read from the MSK topic without rack awareness. Remember that this pod is running within a single Availability Zone.

Reviewing the log output, you find rack: values as use1-az2, use1-az4, and use1-az6 as the pod makes calls to different partitions of the topic. These rack values represent the Availability Zone IDs that our brokers are running within. This means that our EKS pod is creating networking connections to brokers across three different Availability Zones, which would be accruing networking charges in our account.

Also notice that you have no way to check which node, and therefore Availability Zone, this EKS pod is running in. You can observe in the logs that it’s calling to MSK brokers in different Availability Zones, but there is no way to know which broker is in the same Availability Zone as the EKS pod you’ve connected to. Delete the deployment when you’re done:

kubectl -n kafka-ns delete -f kafka-no-az.yaml

Deploy a pod with rack awareness

Now that you have experienced the consumer behavior without rack awareness, you need to inject the Availability Zone ID to make your pods rack-aware.

Create a new file named kafka-az-aware.yaml:

cat > kafka-az-aware.yaml << EOF
apiVersion: v1
kind: Namespace
metadata:
 name: kafka-ns
---
apiVersion: v1
kind: ServiceAccount
metadata:
 name: kafka-sa
 namespace: kafka-ns
automountServiceAccountToken: false
---
apiVersion: apps/v1
kind: Deployment
metadata:
  name: kafka-az-aware
  namespace: kafka-ns
  labels:
    app: kafka-az-aware
  annotations:
    node_az_id: ''
spec:
  replicas: 3
  selector:
    matchLabels:
      app: kafka-az-aware
  template:
    metadata:
      labels:
        app: kafka-az-aware
    spec:
      serviceAccountName: kafka-sa
      containers:
      - image: bitnami/kafka:3.8.0
        name: kafka-az-aware
        command: ["/bin/sh", "-ec", "while :; do echo '.'; sleep 5 ; done"]
        env:
        - name: BootstrapServerString
          value: ${BOOTSTRAP_SERVER_LIST}
        - name: MSK_TOPIC
          value: "MSK-AZ-Aware-Topic"
        - name: KAFKA_HOME
          value: /opt/bitnami/kafka
        - name: KAFKA_BIN
          value: /opt/bitnami/kafka/bin
        - name: KAFKA_CONFIG
          value: /opt/bitnami/kafka/config
        - name: KAFKA_LIBS
          value: /opt/bitnami/kafka/libs
        - name: KAFKA_LOG4J_OPTS
          value: "-Dlog4j.configuration=file:/opt/bitnami/kafka/config/log4j.properties"
        - name: NODE_AZ_ID
          valueFrom:
            fieldRef:
              fieldPath: metadata.annotations['node_az_id']
        lifecycle:
          postStart:
            exec:
              command: 
              - "sh"
              - "-c"
              - |
                export KAFKA_HOME=/opt/bitnami/kafka
                export KAFKA_BIN=\${KAFKA_HOME}/bin
                export KAFKA_CONFIG=\${KAFKA_HOME}/config
                cat > \${KAFKA_CONFIG}/client.properties << EOF1
                security.protocol=SASL_SSL
                sasl.mechanism=AWS_MSK_IAM
                sasl.jaas.config=software.amazon.msk.auth.iam.IAMLoginModule required;
                sasl.client.callback.handler.class=software.amazon.msk.auth.iam.IAMClientCallbackHandler
                EOF1
                if [ \$NODE_AZ_ID ]
                then
                  echo "client.rack=\$NODE_AZ_ID" >> \${KAFKA_CONFIG}/client.properties
                fi
                
                cat >> \${KAFKA_CONFIG}/log4j.properties << EOF2
                #
                # Enable logging of Kafka Client to stderr
                #
                log4j.rootLogger=WARN, stderr
                log4j.logger.org.apache.kafka.clients.consumer.internals.AbstractFetch=DEBUG
                log4j.appender.stderr=org.apache.log4j.ConsoleAppender
                log4j.appender.stderr.layout=org.apache.log4j.PatternLayout
                log4j.appender.stderr.layout.ConversionPattern=[%d] %p %m (%c)%n
                log4j.appender.stderr.Target=System.err
                EOF2
                
                /usr/bin/curl -sS -L https://github.com/aws/aws-msk-iam-auth/releases/download/v2.2.0/aws-msk-iam-auth-2.2.0-all.jar --output \${KAFKA_LIBS}/aws-msk-iam-auth-2.2.0-all.jar
EOF

As you can observe, the pod manifest defines an environment variable NODE_AZ_ID, assigning it the value from the pod’s own metadata annotation node_az_id that was injected by Kyverno. The manifest then uses the pod’s postStart lifecycle script to add client.rack into the client.properties configuration, setting it equal to the value in the environment variable NODE_AZ_ID.

Deploy the pods using the following command:

kubectl apply -f kafka-az-aware.yaml

Run the following command to confirm that the pods have been deployed and are in the Running state:

kubectl -n kafka-ns get pods

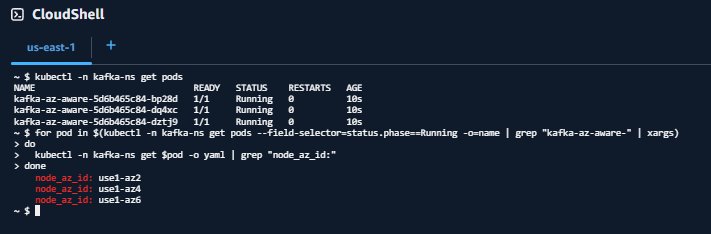
Verify that Availability Zone Ids have been injected into the pods

for pod in $(kubectl -n kafka-ns get pods --field-selector=status.phase==Running -o=name | grep "pod/kafka-az-aware-" | xargs)
do
  kubectl -n kafka-ns get "$pod" -o yaml | grep "node_az_id:"
done

Your output should look similar to:

node_az_id: use1-az2
node_az_id: use1-az4
node_az_id: use1-az6

Or:

AWS CloudShell showing Kafka namespace pods and node assignments in Kubernetes cluster

Select a pod id from the output of the get pods command and shell-in to it.

kubectl -n kafka-ns exec -it POD_ID -- sh

The output of the get $pod command matches the order of results from the get pods command. This matching will help you understand what Availability Zone your pod is running in so you can compare it to log outputs later.

After you’ve connected to your pod, run the Kafka consumer:

"${KAFKA_BIN}"/kafka-console-consumer.sh \
  --bootstrap-server  "${BootstrapServerString}" \
  --consumer.config  "${KAFKA_CONFIG}"/client.properties \
  --topic "${MSK_TOPIC}" \
  --from-beginning /tmp/non-rack-aware-consumer.log 2>&1 &

Similar to before, this command will dump all the resulting logs into the file, rack-aware-consumer.log. You create a new file so there’s no overlap between the Kafka consumers you’ve run. There’s a lot of information in those logs, and we encourage you to open them and take a deeper look. If you want to see the rack awareness of your EKS pod in action, run the following command to tail the file to view fetch request results to the MSK cluster. You can observe a handful of meaningful logs to review here as the consumer access various partitions of the Kafka topic:

grep -E "DEBUG.*Added read_uncommitted fetch request for partition MSK-AZ-Aware-Topic-[0-9]+" /tmp/rack-aware-consumer.log | tail -5

Observe your log output, which should look similar to the following:

[2025-03-13 00:47:51,695] DEBUG [Consumer clientId=console-consumer, groupId=console-consumer-86303] Added read_uncommitted fetch request for partition MSK-AZ-Aware-Topic-5 at position FetchPosition{offset=527, offsetEpoch=Optional[0], currentLeader=LeaderAndEpoch{leader=Optional[b-1.mskazaware.hxrzlh.c6.kafka.us-east-1.amazonaws.com:9098 (id: 1 rack: use1-az4)], epoch=0}} to node b-2.mskazaware.hxrzlh.c6.kafka.us-east-1.amazonaws.com:9098 (id: 2 rack: use1-az6) (org.apache.kafka.clients.consumer.internals.AbstractFetch)
[2025-03-13 00:47:51,695] DEBUG [Consumer clientId=console-consumer, groupId=console-consumer-86303] Added read_uncommitted fetch request for partition MSK-AZ-Aware-Topic-4 at position FetchPosition{offset=509, offsetEpoch=Optional[0], currentLeader=LeaderAndEpoch{leader=Optional[b-3.mskazaware.hxrzlh.c6.kafka.us-east-1.amazonaws.com:9098 (id: 3 rack: use1-az2)], epoch=0}} to node b-2.mskazaware.hxrzlh.c6.kafka.us-east-1.amazonaws.com:9098 (id: 2 rack: use1-az6) (org.apache.kafka.clients.consumer.internals.AbstractFetch)
[2025-03-13 00:47:51,695] DEBUG [Consumer clientId=console-consumer, groupId=console-consumer-86303] Added read_uncommitted fetch request for partition MSK-AZ-Aware-Topic-3 at position FetchPosition{offset=527, offsetEpoch=Optional[0], currentLeader=LeaderAndEpoch{leader=Optional[b-2.mskazaware.hxrzlh.c6.kafka.us-east-1.amazonaws.com:9098 (id: 2 rack: use1-az6)], epoch=0}} to node b-2.mskazaware.hxrzlh.c6.kafka.us-east-1.amazonaws.com:9098 (id: 2 rack: use1-az6) (org.apache.kafka.clients.consumer.internals.AbstractFetch)
[2025-03-13 00:47:51,695] DEBUG [Consumer clientId=console-consumer, groupId=console-consumer-86303] Added read_uncommitted fetch request for partition MSK-AZ-Aware-Topic-2 at position FetchPosition{offset=522, offsetEpoch=Optional[0], currentLeader=LeaderAndEpoch{leader=Optional[b-1.mskazaware.hxrzlh.c6.kafka.us-east-1.amazonaws.com:9098 (id: 1 rack: use1-az4)], epoch=0}} to node b-2.mskazaware.hxrzlh.c6.kafka.us-east-1.amazonaws.com:9098 (id: 2 rack: use1-az6) (org.apache.kafka.clients.consumer.internals.AbstractFetch)
[2025-03-13 00:47:51,695] DEBUG [Consumer clientId=console-consumer, groupId=console-consumer-86303] Added read_uncommitted fetch request for partition MSK-AZ-Aware-Topic-1 at position FetchPosition{offset=533, offsetEpoch=Optional[0], currentLeader=LeaderAndEpoch{leader=Optional[b-3.mskazaware.hxrzlh.c6.kafka.us-east-1.amazonaws.com:9098 (id: 3 rack: use1-az2)], epoch=0}} to node b-2.mskazaware.hxrzlh.c6.kafka.us-east-1.amazonaws.com:9098 (id: 2 rack: use1-az6) (org.apache.kafka.clients.consumer.internals.AbstractFetch)
[2025-03-13 00:47:51,695] DEBUG [Consumer clientId=console-consumer, groupId=console-consumer-86303] Added read_uncommitted fetch request for partition MSK-AZ-Aware-Topic-0 at position FetchPosition{offset=520, offsetEpoch=Optional[0], currentLeader=LeaderAndEpoch{leader=Optional[b-2.mskazaware.hxrzlh.c6.kafka.us-east-1.amazonaws.com:9098 (id: 2 rack: use1-az6)], epoch=0}} to node b-2.mskazaware.hxrzlh.c6.kafka.us-east-1.amazonaws.com:9098 (id: 2 rack: use1-az6) (org.apache.kafka.clients.consumer.internals.AbstractFetch)

For each log line, you can now observe two rack: values. The first rack: value shows the current leader, the second rack: shows the rack that is being used to fetch messages.

For example, look at MSK-AZ-Aware-Topic-5. The leader is identified as rack: use1-az4, but the fetch request is sent to use1-az6 as indicated by to node b-2.mskazaware.hxrzlh.c6.kafka.us-east-1.amazonaws.com:9098 (id: 2 rack: use1-az6) (org.apache.kafka.clients.consumer.internals.AbstractFetch)

You’ll notice something similar in all other log lines. The fetch is always to the broker in use1-az6, which maps to our expectation, given the pod we connected to was in this Availability Zone.

Congratulations! You’re consuming from the closest replica on Amazon EKS.

Clean Up

Delete the deployment when finished:

kubectl -n kafka-ns delete -f kafka-az-aware.yaml

To delete the EKS Pod Identity association:

eksctl delete podidentityassociation \
--cluster ${EKS_CLUSTER_NAME} \
--namespace kafka-ns \
--service-account-name kafka-sa

To delete the IAM policy:

aws iam delete-policy \
  --policy-arn arn:aws:iam::"${AWS_ACCOUNT}":policy/MSK-AZ-Aware-Policy

To delete the EKS cluster:

eksctl delete cluster -n ${EKS_CLUSTER_NAME} --disable-nodegroup-eviction

If you followed along with this post using the Amazon MSK Data Generator, be sure to delete your deployment so it’s no longer attempting to generate and send data after you delete the rest of your resources.

Clean up will depend on which deployment option you used. To read more about the deployment options and the resources created for the Amazon MSK Data Generator, refer to Getting Started in the GitHub repository.

Creating an MSK cluster was a prerequisite of this post, and if you’d like to clean up the MSK cluster as well, you can use the following command:

aws kafka delete-cluster --cluster-arn "${MSK_CLUSTER_ARN}"

There is no additional cost to using AWS CloudShell, but if you’d like to delete your shell, refer to the Delete a shell session home directory in the AWS CloudShell User Guide.

Conclusion

Apache Kafka nearest replica fetching, or rack awareness, is a strategic cost-optimization technique. By implementing it for Amazon MSK consumers on Amazon EKS, you can significantly reduce cross-zone traffic costs while maintaining robust, distributed streaming architectures. Open source tools such as Kyverno can simplify complex configuration challenges and drive meaningful savings.The solution we’ve demonstrated provides a powerful, repeatable approach to dynamically injecting Availability Zone information into Kubernetes pods, optimize Kafka consumer routing, and minimize reduce transfer costs.

Additional resources

To learn more about rack awareness with Amazon MSK, refer to Reduce network traffic costs of your Amazon MSK consumers with rack awareness.


About the authors

Austin Groeneveld is a Streaming Specialist Solutions Architect at Amazon Web Services (AWS), based in the San Francisco Bay Area. In this role, Austin is passionate about helping customers accelerate insights from their data using the AWS platform. He is particularly fascinated by the growing role that data streaming plays in driving innovation in the data analytics space. Outside of his work at AWS, Austin enjoys watching and playing soccer, traveling, and spending quality time with his family.

Farooq Ashraf is a Senior Solutions Architect at AWS, specializing in SaaS, Generative AI, and MLOps. He is passionate about blending multi-tenant SaaS concepts with Cloud services to innovate scalable solutions for the digital enterprise, and has several blog posts, and workshops to his credit.

Accelerate safe software releases with new built-in blue/green deployments in Amazon ECS

Post Syndicated from Donnie Prakoso original https://aws.amazon.com/blogs/aws/accelerate-safe-software-releases-with-new-built-in-blue-green-deployments-in-amazon-ecs/

While containers have revolutionized how development teams package and deploy applications, these teams have had to carefully monitor releases and build custom tooling to mitigate deployment risks, which slows down shipping velocity. At scale, development teams spend valuable cycles building and maintaining undifferentiated deployment tools instead of innovating for their business.

Starting today, you can use the built-in blue/green deployment capability in Amazon Elastic Container Service (Amazon ECS) to make your application deployments safer and more consistent. This new capability eliminates the need to build custom deployment tooling while giving you the confidence to ship software updates more frequently with rollback capability.

Here’s how you can enable the built-in blue/green deployment capability in the Amazon ECS console.

You create a new “green” application environment while your existing “blue” environment continues to serve live traffic. After monitoring and testing the green environment thoroughly, you route the live traffic from blue to green. With this capability, Amazon ECS now provides built-in functionality that makes containerized application deployments safer and more reliable.

Below is a diagram illustrating how blue/green deployment works by shifting application traffic from the blue environment to the green environment. You can learn more at the Amazon ECS blue/green service deployments workflow page.

Amazon ECS orchestrates this entire workflow while providing event hooks to validate new versions using synthetic traffic before routing production traffic. You can validate new software versions in production environments before exposing them to end users and roll back near-instantaneously if issues arise. Because this functionality is built directly into Amazon ECS, you can add these safeguards by simply updating your configuration without building any custom tooling.

Getting started
Let me walk you through a demonstration that showcases how to configure and use blue/green deployments for an ECS service. Before that, there are a few setup steps that I need to complete, including configuring AWS Identity and Access Management (IAM) roles, which you can find on the Required resources for Amazon ECS blue/green deployments Documentation page.

For this demonstration, I want to deploy a new version of my application using the blue/green strategy to minimize risk. First, I need to configure my ECS service to use blue/green deployments. I can do this through the ECS console, AWS Command Line Interface (AWS CLI), or using infrastructure as code.

Using the Amazon ECS console, I create a new service and configure it as usual:

In the Deployment Options section, I choose ECS as the Deployment controller type, then Blue/green as the Deployment strategy. Bake time is the time after the production traffic has shifted to green, when instant rollback to blue is available. When the bake time expires, blue tasks are removed.

We’re also introducing deployment lifecycle hooks. These are event-driven mechanisms you can use to augment the deployment workflow. I can select which AWS Lambda function I’d like to use as a deployment lifecycle hook. The Lambda function can perform the required business logic, but it must return a hook status.

Amazon ECS supports the following lifecycle hooks during blue/green deployments. You can learn more about each stage on the Deployment lifecycle stages page.

  • Pre scale up
  • Post scale up
  • Production traffic shift
  • Test traffic shift
  • Post production traffic shift
  • Post test traffic shift

For my application, I want to test when the test traffic shift is complete and the green service handles all of the test traffic. Since there’s no end-user traffic, a rollback at this stage will have no impact on users. This makes Post test traffic shift suitable for my use case as I can test it first with my Lambda function.

Switching context for a moment, let’s focus on the Lambda function that I use to validate the deployment before allowing it to proceed. In my Lambda function as a deployment lifecycle hook, I can perform any business logic, such as synthetic testing, calling another API, or querying metrics.

Within the Lambda function, I must return a hookStatus. A hookStatus can be SUCCESSFUL, which will move the process to the next step. If the status is FAILED, it rolls back to the blue deployment. If it’s IN_PROGRESS, then Amazon ECS retries the Lambda function in 30 seconds.

In the following example, I set up my validation with a Lambda function that performs file upload as part of a test suite for my application.

import json
import urllib3
import logging
import base64
import os

# Configure logging
logger = logging.getLogger()
logger.setLevel(logging.DEBUG)

# Initialize HTTP client
http = urllib3.PoolManager()

def lambda_handler(event, context):
    """
    Validation hook that tests the green environment with file upload
    """
    logger.info(f"Event: {json.dumps(event)}")
    logger.info(f"Context: {context}")
    
    try:
        # In a real scenario, you would construct the test endpoint URL
        test_endpoint = os.getenv("APP_URL")
        
        # Create a test file for upload
        test_file_content = "This is a test file for deployment validation"
        test_file_data = test_file_content.encode('utf-8')
        
        # Prepare multipart form data for file upload
        fields = {
            'file': ('test.txt', test_file_data, 'text/plain'),
            'description': 'Deployment validation test file'
        }
        
        # Send POST request with file upload to /process endpoint
        response = http.request(
            'POST', 
            test_endpoint,
            fields=fields,
            timeout=30
        )
        
        logger.info(f"POST /process response status: {response.status}")
        
        # Check if response has OK status code (200-299 range)
        if 200 <= response.status < 300:
            logger.info("File upload test passed - received OK status code")
            return {
                "hookStatus": "SUCCEEDED"
            }
        else:
            logger.error(f"File upload test failed - status code: {response.status}")
            return {
                "hookStatus": "FAILED"
            }
            
    except Exception as error:
        logger.error(f"File upload test failed: {str(error)}")
        return {
            "hookStatus": "FAILED"
        }

When the deployment reaches the lifecycle stage that is associated with the hook, Amazon ECS automatically invokes my Lambda function with deployment context. My validation function can run comprehensive tests against the green revision—checking application health, running integration tests, or validating performance metrics. The function then signals back to ECS whether to proceed or abort the deployment.

As I chose the blue/green deployment strategy, I also need to configure the load balancers and/or Amazon ECS Service Connect. In the Load balancing section, I select my Application Load Balancer.

In the Listener section, I use an existing listener on port 80 and select two Target groups.

Happy with this configuration, I create the service and wait for ECS to provision my new service.

Testing blue/green deployments
Now, it’s time to test my blue/green deployments. For this test, Amazon ECS will trigger my Lambda function after the test traffic shift is completed. My Lambda function will return FAILED in this case as it performs file upload to my application, but my application doesn’t have this capability.

I update my service and check Force new deployment, knowing the blue/green deployment capability will roll back if it detects a failure. I select this option because I haven’t modified the task definition but still need to trigger a new deployment.

At this stage, I have both blue and green environments running, with the green revision handling all the test traffic. Meanwhile, based on Amazon CloudWatch Logs of my Lambda function, I also see that the deployment lifecycle hooks work as expected and emit the following payload:

[INFO]	2025-07-10T13:15:39.018Z	67d9b03e-12da-4fab-920d-9887d264308e	Event: 
{
    "executionDetails": {
        "testTrafficWeights": {},
        "productionTrafficWeights": {},
        "serviceArn": "arn:aws:ecs:us-west-2:123:service/EcsBlueGreenCluster/nginxBGservice",
        "targetServiceRevisionArn": "arn:aws:ecs:us-west-2:123:service-revision/EcsBlueGreenCluster/nginxBGservice/9386398427419951854"
    },
    "executionId": "a635edb5-a66b-4f44-bf3f-fcee4b3641a5",
    "lifecycleStage": "POST_TEST_TRAFFIC_SHIFT",
    "resourceArn": "arn:aws:ecs:us-west-2:123:service-deployment/EcsBlueGreenCluster/nginxBGservice/TFX5sH9q9XDboDTOv0rIt"
}

As expected, my AWS Lambda function returns FAILED as hookStatus because it failed to perform the test.

[ERROR]	2025-07-10T13:18:43.392Z	67d9b03e-12da-4fab-920d-9887d264308e	File upload test failed: HTTPConnectionPool(host='xyz.us-west-2.elb.amazonaws.com', port=80): Max retries exceeded with url: / (Caused by ConnectTimeoutError(<urllib3.connection.HTTPConnection object at 0x7f8036273a80>, 'Connection to xyz.us-west-2.elb.amazonaws.com timed out. (connect timeout=30)'))

Because the validation wasn’t completed successfully, Amazon ECS tries to roll back to the blue version, which is the previous working deployment version. I can monitor this process through ECS events in the Events section, which provides detailed visibility into the deployment progress.

Amazon ECS successfully rolls back the deployment to the previous working version. The rollback happens near-instantaneously because the blue revision remains running and ready to receive production traffic. There is no end-user impact during this process, as production traffic never shifted to the new application version—ECS simply rolled back test traffic to the original stable version. This eliminates the typical deployment downtime associated with traditional rolling deployments.

I can also see the rollback status in the Last deployment section.

Throughout my testing, I observed that the blue/green deployment strategy provides consistent and predictable behavior. Furthermore, the deployment lifecycle hooks provide more flexibility to control the behavior of the deployment. Each service revision maintains immutable configuration including task definition, load balancer settings, and Service Connect configuration. This means that rollbacks restore exactly the same environment that was previously running.

Additional things to know
Here are a couple of things to note:

  • Pricing – The blue/green deployment capability is included with Amazon ECS at no additional charge. You pay only for the compute resources used during the deployment process.
  • Availability – This capability is available in all commercial AWS Regions.

Get started with blue/green deployments by updating your Amazon ECS service configuration in the Amazon ECS console.

Happy deploying!
Donnie

Containers are available in public beta for simple, global, and programmable compute

Post Syndicated from Gabi Villalonga Simón original https://blog.cloudflare.com/containers-are-available-in-public-beta-for-simple-global-and-programmable/

We’re excited to announce that Cloudflare Containers are now available in beta for all users on paid plans.

You can now run new kinds of applications alongside your Workers. From media and data processing at the edge, to backend services in any language, to CLI tools in batch workloads — Containers open up a world of possibilities.

Containers are tightly integrated with Workers and the rest of the developer platform, which means that:

  • Your workflow stays simple: just define a Container in a few lines of code, and run wrangler deploy, just like you would with a Worker.

  • Containers are global: as with Workers, you just deploy to Region:Earth. No need to manage configs across 5 different regions for a global app.

  • You can use the right tool for the job: routing requests between Workers and Containers is easy. Use a Worker when you need to be ultra light-weight and scalable. Use a Container when you need more power and flexibility.

  • Containers are programmable: container instances are spun up on-demand and controlled by Workers code. If you need custom logic, just write some JavaScript instead of spending time chaining together API calls or writing Kubernetes operators.

Want to try it today? Deploy your first Container-enabled Worker:

A tour of Containers

Let’s take a deeper look at Containers, using an example use case: code sandboxing.

Let’s imagine that you want to run user-generated (or AI-generated) code as part of a platform you’re building. To do this, you want to spin up containers on demand. Each user needs their own isolated container, the users are distributed globally, and you need to start each container quickly so the users aren’t waiting.

You can set this up easily on Cloudflare Containers.

Configuring a Container

In your Worker, use the Container class and wrangler.jsonc to declare some basic configuration, such as your Container’s default port, a sleep timeout, and which image to use, then route to it via the Worker.

For each unique ID passed to the Container’s binding, Cloudflare will spin up a new Container instance and route requests to it. When a new instance is requested, Cloudflare picks the best location across our global network where we’ve pre-provisioned a ready-to-go container. This means that you can deploy a container close to an end user no matter where they are. And the initial container start takes just a few seconds. You don’t have to worry about routing, provisioning, or scaling.

This example Worker will route requests to a unique container instance for each sandbox ID given at the path /sandbox/ID and will be handled by standard Worker JavaScript otherwise:

export class MyContainer extends Container {
  defaultPort = 8080; // The default port for the container to listen on
  sleepAfter = '5m'; // Sleep the container if no requests are made in this timeframe
}

export default {
  async fetch(request, env) {
    const pathname = new URL(request.url).pathname;

    // handle request with an on-demand container instance
    if (pathname.startsWith('/sandbox/')) {
      const sessionId = pathname.split("/")[2]
      const containerInstance = getContainer(env.CONTAINER_SANDBOX, sessionId)
      return await containerInstance.fetch(request);
    }

    // handle request with my Worker code otherwise
    return myWorkerRequestHandler(request);
  },
};

Familiar and easy development workflow with wrangler dev

To configure which container image to use, you can provide an image URL in wrangler config or a path to a local Dockerfile. 

This config tells wrangler to use a locally defined image:

"containers": [
  {
    "class_name": "ContainerSandbox",
    "image": "./Dockerfile",
    "max_instances": 80,
    "instance_type": "basic"
  }
]

When developing your application, you just run wrangler dev and the container image will be automatically built and routable via your local Worker. This makes it easy to iterate on container code while making changes to your Worker at the same time. When you want to rebuild your image, just press “R” on your keyboard from your terminal running wrangler dev, and the Container is rebuilt and restarted.

Shipping your Container-enabled Worker to production with wrangler deploy

When it’s time to deploy, just run wrangler deploy. Wrangler will push your image to your account, then it will be provisioned in various locations across Cloudflare’s global network.

You don’t have to worry about “artifact management”, or distribution, or auth, or jump through hoops to integrate your container with Workers. You just write your code and deploy it.

Observability is built-in

Once your Container is in production, you have the visibility you need into how things are going, with end-to-end observability. 

From the Cloudflare dashboard, you can easily track status and resource usage across Container instances with built-in metrics:


And if you need to dive deeper, you can dig into logs, which will be retained in the Cloudflare UI for seven days or pushed to an external sink of your choice:


Try it yourself

Want to give it a shot? Check out this example Worker for running sandboxed code in a Container, and deploy it with one click.

Or better yet, if you have an image sitting around that you’ve been dying to deploy to Cloudflare, you can get started with our docs here

A world of possibilities

We’re excited about all the new types of applications that are now possible to build on Workers. We’ve heard many of you tell us over the years that you would love to run your entire application on Cloudflare, if only you could deploy this one piece that needs to run in a container.

Today, you can run libraries that you couldn’t run in Workers before. For instance, try this Worker that uses FFmpeg to convert video to a GIF

Or you can run a container as part of a cron job. Or deploy a static frontend with a containerized backend. Or even run a Cloudflare Agent that uses a Container to run Claude Code on your behalf.

The integration with the rest of the Developer Platform makes Containers even more powerful: use Durable Objects for state management, Workflows, Queues, and Agents to compose complex behaviors, R2 to store Container data or media, and more.

Pricing and packaging

As with the rest of our Cloudflare developer products, we wanted to apply the same principles to our developer platform with transparent pricing that scales up and down with your usage.

Today, you can select from the following instances at launch (and yes, we plan to add larger instances over time):

Name

Memory

CPU

Disk

dev

256 MiB

1/16 vCPU

2 GB

basic

1 GiB

1/4 vCPU

4 GB

standard

4 GiB

1/2 vCPU

4 GB

You only pay for what you use — charges start when a request is sent to the container or when it is manually started. Charges stop after the container instance goes to sleep, which can happen automatically after a timeout. This makes it easy to scale to zero, and allows you to get high utilization even with bursty traffic.

Containers are billed for every 10ms that they are actively running at the following rates, with monthly amounts included in Workers Standard:

  • Memory: $0.0000025 per GiB-second, with 25 GiB-hours included

  • CPU: $0.000020 per vCPU-second, with 375 vCPU-minutes included

  • Disk $0.00000007 per GB-second, with 200 GB-hours included

Egress from Containers is priced at the following rates, with monthly amounts included in Workers Standard:

  • North America and Europe: $0.025 per GB with 1 TB included

  • Australia, New Zealand, Taiwan, and Korea: $0.050 per GB with 500 GB included

  • Everywhere else: $0.040 per GB with 500 GB included

See our previous blog post for a more in-depth look into pricing with an example app.

What’s coming next?

With today’s release, we’ve only just begun to scratch the surface of what Containers will do on Workers. This is the first step of many towards our vision of a simple, global, and highly programmable Container platform.

We’re already thinking about what’s next, and wanted to give you a preview:

  • Higher limits and larger instances – We currently limit your concurrent instances to 40 total GiB of memory and 40 total vCPU. This is enough for some workloads, but many users will want to go higher —  a lot higher. Select customers are already scaling well into the thousands of concurrent containers, and we want to bring this ability to more users. We will be raising our limits over the coming months to allow for more total containers and larger instance sizes.

  • Global autoscaling and latency-aware routing – Currently, containers are addressed by ID and started on-demand. For many use cases, users want to route to one of many stateless container instances deployed across the globe, then autoscale live instances automatically. Autoscaling will be activated with a single line of code, and will enable easy routing to the nearest ready instance.

class MyBackend extends Container {
  defaultPort = 8080;
  autoscale = true; // global autoscaling on - new instances spin up when memory or CPU utilization is high
}

// routes requests to the nearest ready container and load balance globally
async fetch(request, env) {
  return getContainer(env.MY_BACKEND).fetch(request);
}
  • More ways to communicate between Containers and Workers – We will be adding more ways for your Worker to communicate with your container and vice versa. We will add an exec command to run shell commands in your instance and handlers for HTTP requests from the container to Workers. This will allow you to more easily extend your containers with functionality from the entire developer platform, reach out to other containers, and programmatically set up each container instance.

class MyContainer extends Container {
  // sets up container-to-worker communication with handlers
  handlers = {
    "example.cf": "handleRequestFromContainer"
  };

  handleRequestFromContainer(req) {
    return new Response("You are responding from Workers to a Container request to a specific hostname")
  }

  // use exec to run commands in your container instance
  async cloneRepo(repoUrl) {
    let command = this.exec(`git clone ${repoUrl}`)
    await command.print()
  }  
}
  • Further integrations with the Developer Platform – We will continue to integrate with the developer platform with first-party APIs for our various services. We want it to be dead simple to mount R2 buckets, reach Hyperdrive, access KV, and more.

And we are just getting started. Stay tuned for more updates this summer and over the course of the entire year.

Try Containers today

The first step is to deploy your own container. Run npm create cloudflare@latest -- --template=cloudflare/templates/containers-template or click the button below to deploy your first Container to Workers.

We’re excited to see all the ways you will use Containers. From new languages and tools, to simplified Cloudflare-only architectures, to advanced programmatic control over container creation, you now have the ability to do even more on the Developer Platform. It is just a wrangler deploy away.

Enhance AI-assisted development with Amazon ECS, Amazon EKS and AWS Serverless MCP server

Post Syndicated from Elizabeth Fuentes original https://aws.amazon.com/blogs/aws/enhance-ai-assisted-development-with-amazon-ecs-amazon-eks-and-aws-serverless-mcp-server/

Today, we’re introducing specialized Model Context Protocol (MCP) servers for Amazon Elastic Container Service (Amazon ECS), Amazon Elastic Kubernetes Service (Amazon EKS), and AWS Serverless, now available in the AWS Labs GitHub repository. These open source solutions extend AI development assistants capabilities with real-time, contextual responses that go beyond their pre-trained knowledge. While Large Language Models (LLM) within AI assistants rely on public documentation, MCP servers deliver current context and service-specific guidance to help you prevent common deployment errors and provide more accurate service interactions.

You can use these open source solutions to develop applications faster, using up-to-date knowledge of Amazon Web Services (AWS) capabilities and configurations during the build and deployment process. Whether you’re writing code in your integrated development environment (IDE), or debugging production issues, these MCP servers support AI code assistants with deep understanding of Amazon ECS, Amazon EKS, and AWS Serverless capabilities, accelerating the journey from code to production. They work with popular AI-enabled IDEs, including Amazon Q Developer on the command line (CLI), to help you build and deploy applications using natural language commands.

  • The Amazon ECS MCP Server containerizes and deploys applications to Amazon ECS within minutes by configuring all relevant AWS resources, including load balancers, networking, auto-scaling, monitoring, Amazon ECS task definitions, and services. Using natural language instructions, you can manage cluster operations, implement auto-scaling strategies, and use real-time troubleshooting capabilities to identify and resolve deployment issues quickly.
  • For Kubernetes environments, the Amazon EKS MCP Server provides AI assistants with up-to-date, contextual information about your specific EKS environment. It offers access to the latest EKS features, knowledge base, and cluster state information. This gives AI code assistants more accurate, tailored guidance throughout the application lifecycle, from initial setup to production deployment.
  • The AWS Serverless MCP Server enhances the serverless development experience by providing AI coding assistants with comprehensive knowledge of serverless patterns, best practices, and AWS services. Using AWS Serverless Application Model Command Line Interface (AWS SAM CLI) integration, you can handle events and deploy infrastructure while implementing proven architectural patterns. This integration streamlines function lifecycles, service integrations, and operational requirements throughout your application development process. The server also provides contextual guidance for infrastructure as code decisions, AWS Lambda specific best practices, and event schemas for AWS Lambda event source mappings.

Let’s see it in action
If this is your first time using AWS MCP servers, visit the Installation and Setup guide in the AWS Labs GitHub repository to installation instructions. Once installed, add the following MCP server configuration to your local setup:

Install Amazon Q for command line and add the configuration to ~/.aws/amazonq/mcp.json. If you’re already an Amazon Q CLI user, add only the configuration.

{
  "mcpServers": {
    "awslabs.aws-serverless-mcp":  {
      "command": "uvx",
      "timeout": 60,
      "args": ["awslabs.aws_serverless_mcp_server@latest"],
    },
    "awslabs.ecs-mcp-server": {
      "disabled": false,
      "command": "uv",
      "timeout": 60,
      "args": ["awslabs.ecs-mcp-server@latest"],
    },
    "awslabs.eks-mcp-server": {
      "disabled": false,
      "timeout": 60,
      "command": "uv",
      "args": ["awslabs.eks-mcp-server@latest"],
    }
  }
}

For this demo I’m going to use the Amazon Q CLI to create an application that understands video using 02_using_converse_api.ipynb from Amazon Nova model cookbook repository as sample code. To do this, I send the following prompt:

I want to create a backend application that automatically extracts metadata and understands the content of images and videos uploaded to an S3 bucket and stores that information in a database. I'd like to use a serverless system for processing. Could you generate everything I need, including the code and commands or steps to set up the necessary infrastructure, for it to work from start to finish? - Use 02_using_converse_api.ipynb as example code for the image and video understanding.

Amazon Q CLI identifies the necessary tools, including the MCP serverawslabs.aws-serverless-mcp-server. Through a single interaction, the AWS Serverless MCP server determines all requirements and best practices for building a robust architecture.

I ask to Amazon Q CLI that build and test the application, but encountered an error. Amazon Q CLI quickly resolved the issue using available tools. I verified success by checking the record created in the Amazon DynamoDB table and testing the application with the dog2.jpeg file.

To enhance video processing capabilities, I decided to migrate my media analysis application to a containerized architecture. I used this prompt:

I'd like you to create a simple application like the media analysis one, but instead of being serverless, it should be containerized. Please help me build it in a new CDK stack.

Amazon Q Developer begins building the application. I took advantage of this time to grab a coffee. When I returned to my desk, coffee in hand, I was pleasantly surprised to find the application ready. To ensure everything was up to current standards, I simply asked:

please review the code and all app using the awslabsecs_mcp_server tools 

Amazon Q Developer CLI gives me a summary with all the improvements and a conclusion.

I ask it to make all the necessary changes, once ready I ask Amazon Q developer CLI to deploy it in my account, all using natural language.

After a few minutes, I review that I have a complete containerized application from the S3 bucket to all the necessary networking.

I ask Amazon Q developer CLI to test the app send it the-sea.mp4 video file and received a timed out error, so Amazon Q CLI decides to use the fetch_task_logs from awslabsecs_mcp_server tool to review the logs, identify the error and then fix it.

After a new deployment, I try it again, and the application successfully processed the video file

I can see the records in my Amazon DynamoDB table.

To test the Amazon EKS MCP server, I have code for a web app in the auction-website-main folder and I want to build a web robust app, for that I asked Amazon Q CLI to help me with this prompt:

Create a web application using the existing code in the auction-website-main folder. This application will grow, so I would like to create it in a new EKS cluster

Once the Docker file is created, Amazon Q CLI identifies generate_app_manifests from awslabseks_mcp_server as a reliable tool to create a Kubernetes manifests for the application.

Then create a new EKS cluster using the manage_eks_staks tool.

Once the app is ready, the Amazon Q CLI deploys it and gives me a summary of what it created.

I can see the cluster status in the console.

After a few minutes and resolving a couple of issues using the search_eks_troubleshoot_guide tool the application is ready to use.

Now I have a Kitties marketplace web app, deployed on Amazon EKS using only natural language commands through Amazon Q CLI.

Get started today
Visit the AWS Labs GitHub repository to start using these AWS MCP servers and enhance your AI-powered developmen there. The repository includes implementation guides, example configurations, and additional specialized servers to run AWS Lambda function, which transforms your existing AWS Lambda functions into AI-accessible tools without code modifications, and Amazon Bedrock Knowledge Bases Retrieval MCP server, which provides seamless access to your Amazon Bedrock knowledge bases. Other AWS specialized servers in the repository include documentation, example configurations, and implementation guides to begin building applications with greater speed and reliability.

To learn more about MCP Servers for AWS Serverless and Containers and how they can transform your AI-assisted application development, visit the Introducing AWS Serverless MCP Server: AI-powered development for modern applications, Automating AI-assisted container deployments with the Amazon ECS MCP Server, and Accelerating application development with the Amazon EKS MCP server deep-dive blogs.

— Eli

Amazon Inspector enhances container security by mapping Amazon ECR images to running containers

Post Syndicated from Elizabeth Fuentes original https://aws.amazon.com/blogs/aws/amazon-inspector-enhances-container-security-by-mapping-amazon-ecr-images-to-running-containers/

When running container workloads, you need to understand how software vulnerabilities create security risks for your resources. Until now, you could identify vulnerabilities in your Amazon Elastic Container Registry (Amazon ECR) images, but couldn’t determine if these images were active in containers or track their usage. With no visibility if these images were being used on running clusters, you had limited ability to prioritize fixes based on actual deployment and usage patterns.

Starting today, Amazon Inspector offers two new features that enhance vulnerability management, giving you a more comprehensive view of your container images. First, Amazon Inspector now maps Amazon ECR images to running containers, enabling security teams to prioritize vulnerabilities based on containers currently running in your environment. With these new capabilities, you can analyze vulnerabilities in your Amazon ECR images and prioritize findings based on whether they are currently running and when they last ran in your container environment. Additionally, you can see the cluster Amazon Resource Name (ARN), number EKS pods or ECS tasks where an image is deployed, helping you prioritize fixes based on usage and severity.

Second, we’re extending vulnerability scanning support to minimal base images including scratch, distroless, and Chainguard images, and extending support for additional ecosystems including Go toolchain, Oracle JDK & JRE, Amazon Corretto, Apache Tomcat, Apache httpd, WordPress (core, themes, plugins), and Puppeteer, helping teams maintain robust security even in highly optimized container environments.

Through continual monitoring and tracking of images running on containers, Amazon Inspector helps teams identify which container images are actively running in their environment and where they’re deployed, detecting Amazon ECR images running on containers in Amazon Elastic Container Service (Amazon ECS) and Amazon Elastic Kubernetes Service (Amazon EKS), and any associated vulnerabilities. This solution supports teams managing Amazon ECR images across single AWS accounts, cross-account scenarios, and AWS Organizations with delegated administrator capabilities, enabling centralized vulnerability management based on container images running patterns.

Let’s see it in action
Amazon ECR image scanning helps identify vulnerabilities in your container images through enhanced scanning, which integrates with Amazon Inspector to provide automated, continual scanning of your repositories. To use this new feature you have to enable enhanced scanning through the Amazon ECR console, you can do it by following the steps in the Configuring enhanced scanning for images in Amazon ECR documentation page. I already have Amazon ECR enhanced scanning, so I don’t have to do any action.

In the Amazon Inspector console, I navigate to General settings and select ECR scanning settings from the navigation panel. Here, I can configure the new Image re-scan mode settings by choosing between Last in-use date and Last pull date. I leave it as it is by default with Last in-use date and set the Image last in use date to 14 days. These settings make it so that Inspector monitors my images based on when they were running in the last 14 days in my Amazon ECS or Amazon EKS environments. After applying these settings, Amazon Inspector starts tracking information about images running on containers and incorporating it into vulnerability findings, helping me focus on images actively running in containers in my environment.

After it’s configured, I can view information about images running on containers in the Details menu, where I can see last in-use and pull dates, along with EKS pods or ECS tasks count.

When selecting the number of Deployed ECS Tasks/EKS Pods, I can see the cluster ARN, last use dates, and Type for each image.

For cross-account visibility demonstration, I have a repository with EKS pods deployed in two accounts. In the Resources coverage menu, I navigate to Container repositories, select my repository name and choose the Image tag. As before, I can see the number of deployed EKS pods/ECS tasks.

When I select the number of deployed EKS pods/ECS tasks, I can see that it is running in a different account.

In the Findings menu, I can review any vulnerabilities, and by selecting one, I can find the Last in use date and Deployed ECS Tasks/EKS Pods involved in the vulnerability under Resource affected data, helping me prioritize remediation based on actual usage.

In the All Findings menu, you can now search for vulnerabilities within account management, using filters such as Account ID, Image in use count and Image last in use at.

Key features and considerations
Monitoring based on container image lifecycle – Amazon Inspector now determines image activity based on: image push date ranging duration 14, 30, 60, 90, or 180 days or lifetime, image pull date from 14, 30, 60, 90, or 180 days, stopped duration from never to 14, 30, 60, 90, or 180 days and status of image running on the container. This flexibility lets organizations tailor their monitoring strategy based on actual container image usage rather than only repository events. For Amazon EKS and Amazon ECS workloads, last in use, push and pull duration are set to 14 days, which is now the default for new customers.

Image runtime-aware finding details – To help prioritize remediation efforts, each finding in Amazon Inspector now includes the lastInUseAt date and InUseCount, indicating when an image was last running on the containers and the number of deployed EKS pods/ ECS tasks currently using it. Amazon Inspector monitors both Amazon ECR last pull date data and images running on Amazon ECS tasks or Amazon EKS pods container data for all accounts, updating this information at least once daily. Amazon Inspector integrates these details into all findings reports and seamlessly works with Amazon EventBridge. You can filter findings based on the lastInUseAt field using rolling window or fixed range options, and you can filter images based on their last running date within the last 14, 30, 60, or 90 days.

Comprehensive security coverage – Amazon Inspector now provides unified vulnerability assessments for both traditional Linux distributions and minimal base images including scratch, distroless, and Chainguard images through a single service. This extended coverage eliminates the need for multiple scanning solutions while maintaining robust security practices across your entire container ecosystem, from traditional distributions to highly optimized container environments. The service streamlines security operations by providing comprehensive vulnerability management through a centralized platform, enabling efficient assessment of all container types.

Enhanced cross-account visibility – Security management across single accounts, cross-account setups, and AWS Organizations is now supported through delegated administrator capabilities. Amazon Inspector shares images running on container information within the same organization, which is particularly valuable for accounts maintaining golden image repositories. Amazon Inspector provides all ARNs for Amazon EKS and Amazon ECS clusters where images are running, if the resource belongs to the account with an API, providing comprehensive visibility across multiple AWS accounts. The system updates deployed EKS pods or ECS tasks information at least one time daily and automatically maintains accuracy as accounts join or leave the organization.

Availability and pricing – The new container mapping capabilities are available now in all AWS Regions where Amazon Inspector is offered at no additional cost. To get started, visit the AWS Inspector documentation. For pricing details and Regional availability, refer to the AWS Inspector pricing page.

PS: Writing a blog post at AWS is always a team effort, even when you see only one name under the post title. In this case, I want to thank Nirali Desai, for her generous help with technical guidance, and expertise, which made this overview possible and comprehensive.

— Eli


How is the News Blog doing? Take this 1 minute survey!

(This survey is hosted by an external company. AWS handles your information as described in the AWS Privacy Notice. AWS will own the data gathered via this survey and will not share the information collected with survey respondents.)

Simple, scalable, and global: Containers are coming to Cloudflare Workers in June 2025

Post Syndicated from Mike Nomitch original https://blog.cloudflare.com/cloudflare-containers-coming-2025/

It is almost the end of Developer Week and we haven’t talked about containers: until now. As some of you may know, we’ve been working on a container platform behind the scenes for some time.

In late June, we plan to release Containers in open beta, and today we’ll give you a sneak peek at what makes it unique.

Workers are the simplest way to ship software around the world with little overhead. But sometimes you need to do more. You might want to:

  • Run user-generated code in any language

  • Execute a CLI tool that needs a full Linux environment

  • Use several gigabytes of memory or multiple CPU cores

  • Port an existing application from AWS, GCP, or Azure without a major rewrite

Cloudflare Containers let you do all of that while being simple, scalable, and global.

Through a deep integration with Workers and an architecture built on Durable Objects, Workers can be your:

  • API Gateway: Letting you control routing, authentication, caching, and rate-limiting before requests reach a container

  • Service Mesh: Creating private connections between containers with a programmable routing layer

  • Orchestrator: Allowing you to write custom scheduling, scaling, and health checking logic for your containers

Instead of having to deploy new services, write custom Kubernetes operators, or wade through control plane configuration to extend the platform, you just write code.

Let’s see what it looks like.

Deploying different application types

A stateful workload: executing AI-generated code

First, let’s take a look at a stateful example.

Imagine you are building a platform where end-users can run code generated by an LLM. This code is untrusted, so each user needs their own secure sandbox. Additionally, you want users to be able to run multiple requests in sequence, potentially writing to local files or saving in-memory state.

To do this, you need to create a container on-demand for each user session, then route subsequent requests to that container. Here’s how you can accomplish this:

First, you write some basic Wrangler config, then you route requests to containers via your Worker:

import { Container } from "cloudflare:workers";

export default {
  async fetch(request, env) {
    const url = new URL(request.url);

    if (url.pathname.startsWith("/execute-code")) {
      const { sessionId, messages } = await request.json();
      // pass in prompt to get the code from Llama 4
      const codeToExecute = await env.AI.run("@cf/meta/llama-4-scout-17b-16e-instruct", { messages });

// get a different container for each user session
      const id = env.CODE_EXECUTOR.idFromName(sessionId);
      const sandbox = env.CODE_EXECUTOR.get(id);

// execute a request on the container
      return sandbox.fetch("/execute-code", { method: "POST", body: codeToExecute });
    }

    // ... rest of Worker ...
  },
};

// define your container using the Container class from cloudflare:workers
export class CodeExecutor extends Container {
defaultPort = 8080;
sleepAfter = "1m";
}

Then, deploy your code with a single command: wrangler deploy. This builds your container image, pushes it to Cloudflare’s registry, readies containers to boot quickly across the globe, and deploys your Worker.

$ wrangler deploy

That’s it.

How does it work?

Your Worker creates and starts up containers on-demand. Each time you call env.CODE_EXECUTOR.get(id) with a unique ID, it sends requests to a unique container instance. The container will automatically boot on the first fetch, then put itself to sleep after a configurable timeout, in this case 1 minute. You only pay for the time that the container is actively running.

When you request a new container, we boot one in a Cloudflare location near the incoming request. This means that low-latency workloads are well-served no matter the region. Cloudflare takes care of all the pre-warming and caching so you don’t have to think about it.

This allows each user to run code in their own secure environment.

Stateless and global: FFmpeg everywhere

Stateless and autoscaling applications work equally well on Cloudflare Containers.

Imagine you want to run a container that takes a video file and turns it into an animated GIF using FFmpeg. Unlike the previous example, any container can serve any request, but you still don’t want to send bytes across an ocean and back unnecessarily. So, ideally the app can be deployed everywhere.

To do this, you declare a container in Wrangler config and turn on autoscaling. This specific configuration ensures that one instance is always running and if CPU usage increases beyond 75% of capacity, additional instances are added:

"containers": [
  {
    "class_name": "GifMaker",
    "image": "./Dockerfile", // container source code can be alongside Worker code
    "instance_type": "basic",
    "autoscaling": {
      "minimum_instances": 1,
      "cpu_target": 75,
    }
  }
],
// ...rest of wrangler.jsonc...

To route requests, you just call env.GIF_MAKER.fetch and requests are automatically sent to the closest container:

import { Container } from "cloudflare:workers";

export class GifMaker extends Container {
  defaultPort: 1337,
}

export default {
  async fetch(request, env) {
    const url = new URL(request.url);

    if (url.pathname === "/make-gif") {
      return env.GIF_MAKER.fetch(request)
    }

    // ... rest of Worker ...
  },
};

Going beyond the basics

From the examples above, you can see that getting a basic container service running on Workers just takes a few lines of config and a little Workers code. There’s no need to worry about capacity, artifact registries, regions, or scaling.

For more advanced use, we’ve designed Cloudflare Containers to run on top of Durable Objects and work in tandem with Workers. Let’s take a look at the underlying architecture and see some of the advanced use cases it enables.

Durable Objects as programmable sidecars

Routing to containers is enabled using Durable Objects under the hood. In the examples above, the Container class from cloudflare:workers just wraps a container-enabled Durable Object and provides helper methods for common patterns. In the rest of this post, we’ll look at examples using Durable Objects directly, as this should shed light on the platform’s underlying design.


Each Durable Object acts as a programmable sidecar that can proxy requests to the container and manages its lifecycle. This allows you to control and extend your containers in ways that are hard on other platforms. 

You can manually start, stop, and execute commands on a specific container by calling RPC methods on its Durable Object, which now has a new object at this.ctx.container:

class MyContainer extends DurableObject {
	// these RPC methods are callable from a Worker
        async customBoot(entrypoint, envVars) {
	            this.ctx.container.start({ entrypoint, env: envVars });
        }

       async stopContainer() {
                   const SIGTERM = 15;
	           this.ctx.container.signal(SIGTERM);
        }

        async startBackupScript() {
	            await this.ctx.container.exec(["./backup"]);
        }
}

You can also monitor your container and run hooks in response to Container status changes.

For instance, say you have a CI job that runs builds in a Container. You want to post a message to a Queue based on the exit status. You can easily program this behavior:

class BuilderContainer extends DurableObject {
  constructor(ctx, env) {
    super(ctx, env)
    async function onContainerExit() {
      await this.env.QUEUE.send({ status: "success", message: "Build Complete" });
    }

    async function onContainerError(err) {
      await this.env.QUEUE.send({ status: "error", message: err});
    }

    this.ctx.container.start();
    this.ctx.container.monitor().then(onContainerExit).catch(onContainerError); 
  }

  async isRunning() { return this.ctx.container.running; }
}

And lastly, if you have state that needs to be loaded into a container each time it runs, you can use status hooks to persist state from the container before it sleeps and to reload state into the container after it starts:

import { startAndWaitForPort } from "./helpers"

class MyContainer extends DurableObject {
  constructor(ctx, env) {
    super(ctx, env)
    this.ctx.blockConcurrencyWhile(async () => {
      this.ctx.storage.sql.exec('CREATE TABLE IF NOT EXISTS state (value TEXT)');
      this.ctx.storage.sql.exec('INSERT INTO state (value) SELECT '' WHERE NOT EXISTS (SELECT * FROM state)');
      await startAndWaitForPort(this.ctx.container, 8080);
      await this.setupContainer();
      this.ctx.container.monitor().then(this.onContainerExit); 
    });
  }

  async setupContainer() {
    const initialState = this.ctx.storage.sql.exec('SELECT * FROM state LIMIT 1').one().value;
    return this.ctx.container
      .getTcpPort(8080)
      .fetch("http://container/state", { body: initialState, method: 'POST' });
  }

  async onContainerExit() {
    const response = await this.ctx.container
      .getTcpPort(8080)
      .fetch('http://container/state');
    const newState = await response.text();
    this.ctx.storage.sql.exec('UPDATE state SET value = ?', newState);
  }
}

Building around your Containers with Workers

Not only do Durable Objects allow you to have fine-grained control over the Container lifecycle, the whole Workers platform allows you to extend routing and scheduling behavior as you see fit.

Using Workers as an API gateway

Workers provide programmable ingress logic from over 300 locations around the world. In this sense, they provide similar functionality to an API gateway.

For instance, let’s say you want to route requests to a different version of a container based on information in a header. This is accomplished in a few lines of code:

export default {
  async fetch(request, env) {
    const isExperimental = request.headers.get("x-version") === "experimental";
    
    if (isExperimental) {
      return env.MY_SERVICE_EXPERIMENTAL.fetch(request);
    } else {
      return env.MY_SERVICE_STANDARD.fetch(request);
    }
  },
};

Or you want to rate limit and authenticate requests to the container:

async fetch(request, env) {
  const url = new URL(request.url);

  if (url.pathname.startsWith('/api/')) {
    const token = request.headers.get("token");

    const isAuthenticated = await authenticateRequest(token);
    if (!isAuthenticated) {
      return new Response("Not authenticated", { status: 401 });
    }

    const { withinRateLimit } = await env.MY_RATE_LIMITER.limit({ key: token });
    if (!withinRateLimit) {
      return new Response("Rate limit exceeded for token", { status: 429 });
    }

    return env.MY_APP.fetch(request);
  }
  // ...
}

Using Workers as a service mesh


By default, Containers are private and can only be accessed via Workers, which can connect to one of many container ports. From within the container, you can expose a plain HTTP port, but requests will still be encrypted from the end user to the moment we send the data to the container’s TCP port in the host. Due to the communication being relayed through the Cloudflare network, the container does not need to set up TLS certificates to have secure connections in its open ports.

You can connect to the container through a WebSocket from the client too. See this repository for a full example of using Websockets.

Just as the Durable Object can act as proxy to the container, it can act as a proxy from the container as well. When setting up a container, you can toggle Internet access off and ensure that outgoing requests pass through Workers.

// ... when starting the container...
this.ctx.container.start({ 
  workersAddress: '10.0.0.2:8080',
  enableInternet: false, // 'enableInternet' is false by default
});

// ... container requests to '10.0.0.2:8080' securely route to a different service...
override async onContainerRequest(request: Request) {
 const containerId = this.env.SUB_SERVICE.idFromName(request.headers['X-Account-Id']);
 return this.env.SUB_SERVICE.get(containerId).fetch(request);
}

You can ensure all traffic in and out of your container is secured and encrypted end to end without having to deal with networking yourself.


This allows you to protect and connect containers within Cloudflare’s network… or even when connecting to external private networks.

Using Workers as an orchestrator

You might require custom scheduling and scaling logic that goes beyond what Cloudflare provides out of the box.

We don’t want you having to manage complex chains of API calls or writing an operator to get the logic you need. Just write some Worker code.

For instance, imagine your containers have a long startup period that involves loading data from an external source. You need to pre-warm containers manually, and need control over the specific region to prewarm. Additionally, you need to set up manual health checks that are accessible via Workers. You’re able to achieve this fairly simply with Workers and Durable Objects.

import { Container, DurableObject } from "cloudflare:workers";

// A singleton Durable Object to manage and scale containers

class ContainerManager extends DurableObject {
  scale(region, instanceCount) {
    for (let i = 0; i < instanceCount; i++) {
      const containerId = env.CONTAINER.idFromName(`instance-${region}-${i}`);
      // spawns a new container with a location hint
      await env.CONTAINER.get(containerId, { locationHint: region }).start();
    }
  }

  async setHealthy(containerId, isHealthy) {
    await this.ctx.storage.put(containerId, isHealthy);
  }
}

// A Container class for the underlying compute

class MyContainer extends Container {
  defaultPort = 8080;

  async onContainerStart() {
    // run healthcheck every 500ms
    await this.scheduleEvery(0.5, 'healthcheck');
  }

  async healthcheck() {
    const manager = this.env.MANAGER.get(
      this.env.MANAGER.idFromName("manager")
    );
    const id = this.ctx.id.toString();

    await this.container.fetch("/_health")
      .then(() => manager.setHealthy(id, true))
      .catch(() => manager.setHealthy(id, false));
  }
}

The ContainerManager Durable Object exposes the scale RPC call, which you can call as needed with a region and instanceCount which scales up the number of active Container instances in a given region using a location hint. The this.schedule code executes a manually defined healthcheck method on the Container and tracks its state in the Manager for use by other logic in your system.

These building blocks let users handle complex scheduling logic themselves. For a more detailed example using standard Durable Objects, see this repository.

We are excited to see the patterns you come up with when orchestrating complex applications built with containers, and trust that between Workers and Durable Objects, you’ll have the tools you need.

Integrating with more of Cloudflare’s Developer Platform

Since it is Developer Week 2025, we would be remiss to not talk about Workflows, which just went GA, and Agents, which just got even better.

Let’s finish up by taking a quick look at how you can integrate Containers with these two tools.

Running a short-lived job with Workflows & R2

You need to download a large file from R2, compress it, and upload it. You want to ensure that this succeeds, but don’t want to write retry logic and error handling yourself. Additionally, you don’t want to deal with rotating R2 API tokens or worry about network connections — it should be secure by default.

This is a perfect opportunity for a Workflow using Containers. The container can do the heavy lifting of compressing files, Workers can stream the data to and from R2, and the Workflow can ensure durable execution.

export class EncoderWorkflow extends WorkflowEntrypoint<Env, Params> {
    async run(event: WorkflowEvent<Params>, step: WorkflowStep) {
        const id = this.env.ENCODER.idFromName(event.instanceId);
        const container = this.env.ENCODER.get(id);

        await step.do('init container', async () => {
            await container.init();
        });

        await step.do('compress the object with zstd', async () => {
            await container.ensureHealthy();
            const object = await this.env.ARTIFACTS.get(event.payload.r2Path);
            const result = await container.fetch('http://encoder/zstd', {
                method: 'POST', body: object.body 
            });
            await this.env.ARTIFACTS.put(`results${event.payload.r2Path}`, result.body);
        });

        await step.do('cleanup container', async () => {
            await container.destroy();
        });
    }
}

Calling a Container from an Agent

Lastly, imagine you have an AI agent that needs to spin up cloud infrastructure (you like to live dangerously). To do this, you want to use Terraform, but since it’s run from the command line, you can’t run it on Workers.

By defining a tool, you can enable your Agent to run the shell commands from a container:

// Make tools that call to a container from an agent

const createExternalResources = tool({
  description: "runs Terraform in a container to create resources",
  parameters: z.object({ sessionId: z.number(), config: z.string() }),
  execute: async ({ sessionId, config }) => {
    return this.env.TERRAFORM_RUNNER.get(sessionId).applyConfig(config);
  },
});

// Expose RPC Methods that call to the container

class TerraformRunner extends DurableObject {
  async applyConfig(config) {
    await this.ctx.container.getTcpPort(8080).fetch(APPLY_URL, {
      method: 'POST',
      body: JSON.stringify({ config }),
    });
  }

  // ...rest of DO...
}

Containers are so much more powerful when combined with other tools. Workers make it easy to do so in a secure and simple way.

Pay for what you use and use the right tool

The deep integration between Workers and Containers also makes it easy to pick the right tool for the job with regards to cost.

With Cloudflare Containers, you only pay for what you use. Charges start when a request is sent to the container or it is manually started. Charges stop after the container goes to sleep, which can happen automatically after a configurable timeout. This makes it easy to scale to zero, and allows you to get high utilization even with highly-variable traffic.

Containers are billed for every 10ms that they are actively running at the following rates:

  • Memory: $0.0000025 per GB-second

  • CPU: $0.000020 per vCPU-second

  • Disk $0.00000007 per GB-second

After 1 TB of free data transfer per month, egress from a Container will be priced per-region. We’ll be working out the details between now and the beta, and will be launching with clear, transparent pricing across all dimensions so you know where you stand.

Workers are lighter weight than containers and save you money by not charging when waiting on I/O. This means that if you can, running on a Worker helps you save on cost. Luckily, on Cloudflare it is easy to route requests to the right tool.

Cost comparison

Comparing containers and functions services on paper is always going to be an apples to oranges exercise, and results can vary so much depending on use case. But to share a real example of our own, a year ago when Cloudflare acquired Baselime, Baselime was a heavy user of AWS Lambda. By moving to Cloudflare, they lowered their cloud compute bill by 80%.

Below we wanted to share one representative example that compares costs for an application that uses both containers and serverless functions together. It’d be easy for us to come up with a contrived example that uses containers sub-optimally on another platform, for the wrong types of workloads. We won’t do that here. We know that navigating cloud costs can be challenging, and that cost is a critical part of deciding what type of compute to use for which pieces of your application.

In the example below, we’ll compare Cloudflare Containers + Workers against Google Cloud Run, a very well-regarded container platform that we’ve been impressed by.

Example application

Imagine that you run an application that serves 50 million requests per month, and each request consumes an average 500 ms of wall-time. Requests to this application are not all the same though — half the requests require a container, and the other half can be served just using serverless functions.

Requests per month

Wall-time (duration)

Compute required

Cloudflare

Google Cloud

25 million

500ms

Container + serverless functions

Containers + Workers

Google Cloud Run + Google Cloud Run Functions

25 million

500ms

Serverless functions

Workers

Google Cloud Run Functions

Container pricing

On both Cloud Run and Cloudflare Containers, a container can serve multiple requests. On some platforms, such as AWS Lambda, each container instance is limited to a single request, pushing cost up significantly as request count grows. In this scenario, 50 requests can run simultaneously on a container with 4 GB memory and half of a vCPU. This means that to serve 25 million requests of 500ms each, we need 625,000 seconds worth of compute

In this example, traffic is bursty and we want to avoid paying for idle-time, so we’ll use Cloud Run’s request-based pricing.

Price per vCPU second

Price per GB-second of memory

Price per 1m requests

Monthly Price for Compute + Requests

Cloudflare Containers

$0.000020

$0.0000025

$0.30

$20.00

Google Cloud Run

$0.000024

$0.0000025

$0.40

$23.75

* Comparison does not include free tiers for either provider and uses a single Tier 1 GCP region

Compute pricing for both platforms are comparable. But as we showed earlier in this post, Containers on Cloudflare run anywhere, on-demand, without configuring and managing regions. Each container has a programmable sidecar with its own database, backed by Durable Objects. It’s the depth of integration with the rest of the platform that makes containers on Cloudflare uniquely programmable.

Function pricing

The other requests can be served with less compute, and code written in JavaScript, TypeScript, Python or Rust, so we’ll use Workers and Cloud Run Functions.

These 25 million requests also run for 500 ms each, and each request spends 480 ms waiting on I/O. This means that Workers will only charge for 20 ms of “CPU-time”, the time that the Worker actually spends using compute. This ratio of low CPU time to high wall time is extremely common when building AI apps that make inference requests, or even when just building REST APIs and other business logic. Most time is spent waiting on I/O. Based on our data, we typically see Workers use less than 5 ms of CPU time per request vs seconds of wall time (waiting on APIs or I/O).

The Cloud Run Function will use an instance with 0.083 vCPU and 128 MB memory and charge on both CPU-s and GiB-s for the full 500 ms of wall-time.

Total Price for “wall-time”

Total Price for “CPU-time”

Total Price for Compute + Requests

Cloudflare Workers

N/A

$0.83

$8.33

Google Cloud Run Functions

$1.44

N/A

$11.44

* Comparison does not include free tiers and uses a single Tier 1 GCP region.

This comparison assumes you have configured Google Cloud Run Functions with a max of 20 concurrent requests per instance. On Google Cloud Run Functions, the maximum number of concurrent requests an instance can handle varies based on the efficiency of your function, and your own tolerance for tail latency that can be introduced by traffic spikes. 

Workers automatically scale horizontally, don’t require you to configure concurrency settings (and hope to get it right), and can run in over 300 locations.

A holistic view of costs

The most important cost metric is the total cost of developing and running an application. And the only way to get the best results is to use the right compute for the job. So the question boils down to friction and integration. How easily can you integrate the ideal building blocks together?

As more and more software makes use of generative AI, and makes inference requests to LLMs, modern applications must communicate and integrate with a myriad of services. Most systems are increasingly real-time and chatty, often holding open long-lived connections, performing tasks in parallel. Running an instance of an application in a VM or container and calling it a day might have worked 10 years ago, but when we talk to developers in 2025, they are most often bringing many forms of compute to the table for particular use cases.

This shows the importance of picking a platform where you can seamlessly shift traffic from one source of compute to another. If you want to rate-limit, serve server-side rendered pages, API responses and static assets, handle authentication and authorization, make inference requests to AI models, run core business logic via Workflows, or ingest streaming data, just handle the request in Workers. Save the heavier compute only for where it is actually the only option. With Cloudflare Workers and Containers, this is as simple as an if-else statement in your Worker. This makes it easy to pick the right tool for the job.

Coming June 2025

We are collecting feedback and putting the finishing touches on our APIs now, and will release the open beta to the public in late June 2025.

From day one of building Cloudflare Workers, it’s been our goal to build an integrated platform, where Cloudflare products work together as a system, rather than just as a collection of separate products. We’ve taken this same approach with Containers, and aim to make Cloudflare not only the best place to deploy containers across the globe, but the best place to deploy the types of complete applications that developers are building, that use containers in tandem with serverless functions, Workflows, Agents, and much more.

We’re excited to get this into your hands soon. Stay on the lookout this summer.


How Netflix Accurately Attributes eBPF Flow Logs

Post Syndicated from Netflix Technology Blog original https://netflixtechblog.com/how-netflix-accurately-attributes-ebpf-flow-logs-afe6d644a3bc

By Cheng Xie, Bryan Shultz, and Christine Xu

In a previous blog post, we described how Netflix uses eBPF to capture TCP flow logs at scale for enhanced network insights. In this post, we delve deeper into how Netflix solved a core problem: accurately attributing flow IP addresses to workload identities.

A Brief Recap

FlowExporter is a sidecar that runs alongside all Netflix workloads. It uses eBPF and TCP tracepoints to monitor TCP socket state changes. When a TCP socket closes, FlowExporter generates a flow log record that includes the IP addresses, ports, timestamps, and additional socket statistics. On average, 5 million records are produced per second.

In cloud environments, IP addresses are reassigned to different workloads as workload instances are created and terminated, so IP addresses alone cannot provide insights on which workloads are communicating. To make the flow logs useful, each IP address must be attributed to its corresponding workload identity. FlowCollector, a backend service, collects flow logs from FlowExporter instances across the fleet, attributes the IP addresses, and sends these attributed flows to Netflix’s Data Mesh for subsequent stream and batch processing.

The eBPF flow logs provide a comprehensive view of service topology and network health across Netflix’s extensive microservices fleet, regardless of the programming language, RPC mechanism, or application-layer protocol used by individual workloads.

The Problem with Misattribution

Accurately attributing flow IP addresses to workload identities has been a significant challenge since our eBPF flow logs were introduced.

As noted in our previous blog post, our initial attribution approach relied on Sonar, an internal IP address tracking service that emits an event whenever an IP address in Netflix’s AWS VPCs is assigned or unassigned to a workload. FlowCollector consumes a stream of IP address change events from Sonar and uses this information to attribute flow IP addresses in real-time.

The fundamental drawback of this method is that it can lead to misattribution. Delays and failures are inevitable in distributed systems, which may delay IP address change events from reaching FlowCollector. For instance, an IP address may initially be assigned to workload X but later reassigned to workload Y. However, if the change event for this reassignment is delayed, FlowCollector will continue to assume that the IP address belongs to workload X, resulting in misattributed flows. Additionally, event timestamps may be inaccurate depending on how they are captured.

Misattribution rendered the flow data unreliable for decision-making. Users often depend on flow logs to validate workload dependencies, but misattribution creates confusion. Without expert knowledge of expected dependencies, users would struggle to identify or confirm misattribution. Moreover, misattribution occurred frequently for critical services with a large footprint due to frequent IP address changes. Overall, misattribution makes fleet-wide dependency analysis impractical.

As a workaround, we made FlowCollector hold received flows for 15 minutes before attribution, allowing time for delayed IP address change events. While this approach reduced misattribution, it did not eliminate it. Moreover, the waiting period made the data less fresh, reducing its utility for real-time analysis.

Fully eliminating misattribution is crucial because it only takes a single misattributed flow to produce an incorrect workload dependency. Solving this problem required a complete rethinking of our approach. Over the past year, Netflix developed a new attribution method that has finally eliminated misattribution, as detailed in the rest of this post.

Attributing Local IP Addresses

Each socket has two IP addresses: a local IP address and a remote IP address. Previously, we used the same method to attribute both. However, attributing the local IP address should be a simpler task since the local IP address belongs to the instance where FlowExporter captures the socket. Therefore, FlowExporter should determine the local workload identity from its environment and attribute the local IP address before sending the flow to FlowCollector.

This is straightforward for workloads running directly on EC2 instances, as Netflix’s Metatron provisions workload identity certificates to each EC2 instance at boot time. FlowExporter can simply read these certificates from the local disk to determine the local workload identity.

Attributing local IP addresses for container workloads running on Netflix’s container platform, Titus, is more challenging. FlowExporter runs at the container host level, where each host manages multiple container workloads with different identities. When FlowExporter’s eBPF programs receive a socket event from TCP tracepoints in the kernel, the socket may have been created by one of the container workloads or by the host itself. Therefore, FlowExporter must determine which workload to attribute the socket’s local IP address to. To solve this problem, we leveraged IPMan, Netflix’s container IP address assignment service. IPManAgent, a daemon running on every container host, is responsible for assigning and unassigning IP addresses. As container workloads are launched, IPManAgent writes an IP-address-to-workload-ID mapping to an eBPF map, which FlowExporter’s eBPF programs can then use to look up the workload ID associated with a socket local IP address.

Another challenge was to accommodate Netflix’s IPv6 to IPv4 translation mechanism on Titus. To facilitate IPv6 migration, Netflix developed a mechanism that enables IPv6-only containers to communicate with IPv4 destinations without incurring NAT64 overhead. This mechanism intercepts connect syscalls and replaces the underlying socket with one that uses a shared IPv4 address assigned to the container host. This confuses FlowExporter because the kernel reports the same local IPv4 address for sockets created by different container workloads. To disambiguate, local port information is additionally required. We modified Titus to write a mapping of (local IPv4 address, local port) to the workload ID into an eBPF map whenever a connect syscall is intercepted. FlowExporter’s eBPF programs then use this map to correctly attribute sockets created by the translation mechanism.

With these problems solved, we can now accurately attribute the local IP address of every flow.

Attributing Remote IP Addresses

Once the local IP address attribution problem is solved, accurately attributing remote IP addresses becomes feasible. Now, each flow reported by FlowExporter includes the local IP address, the local workload identity, and connection start/end timestamps. As FlowCollector receives these flows, it can learn the time ranges during which each workload owns a given IP address. For instance, if FlowCollector sees a flow with local IP address 10.0.0.1 associated with workload X that starts at t1 and ends at t2, it can deduce that 10.0.0.1 belonged to workload X from t1 to t2. Since Netflix uses Amazon Time Sync across its fleet, the timestamps (captured by FlowExporter) are reliable.

The FlowCollector service cluster consists of many nodes. Every node must be capable of attributing arbitrary remote IP addresses and, therefore, requires knowledge of all workload IP addresses and their recent ownership records. To represent this knowledge, each node maintains an in-memory hashmap that maps an IP address to a list of time ranges, as illustrated by the following Go structs:

type IPAddressTracker struct {
ipToTimeRanges map[netip.Addr]timeRanges
}

type timeRanges []timeRange

type timeRange struct {
workloadID string
start time.Time
end time.Time
}

To populate the hashmap, FlowCollector extracts the local IP address, local workload identity, start time, and end time from each received flow and creates/extends the corresponding time ranges in the map. The time ranges for each IP address are sorted in ascending order, and they are non-overlapping since an IP address cannot belong to two different workloads simultaneously.

Since each flow is only sent to one FlowCollector node, each node must share the time ranges it learned from received flows with other nodes. We implemented a broadcasting mechanism using Kafka, where each node publishes learned time ranges to all other nodes. Although more efficient broadcasting implementations exist, the Kafka-based approach is simple and has worked well for us.

Now, FlowCollector can attribute remote IP addresses by looking them up in the populated map, which returns a list of time ranges. It then uses the flow’s start timestamp to determine the corresponding time range and associated workload identity. If the start time does not fall within any time range, FlowCollector will retry after a delay, eventually giving up if the retry fails. Such failures may occur when flows are lost or broadcast messages are delayed. For our use cases, it is acceptable to leave a small percentage of flows unattributed, but any misattribution is unacceptable.

This new method achieves accurate attribution thanks to the continuous heartbeats, each associated with a reliable time range of IP address ownership. It handles transient issues gracefully — a few delayed or lost heartbeats do not lead to misattribution. In contrast, the previous method relied solely on discrete IP address assignment and unassignment events. Lacking heartbeats, it had to presume an IP address remained assigned until notified otherwise (which can be hours or days later), making it vulnerable to misattribution when the notifications were delayed.

One detail is that when FlowCollector receives a flow, it cannot attribute its remote IP address right away because it requires the latest observed time ranges for the remote IP address. Since FlowExporter reports flows in batches every minute, FlowCollector must wait until it receives the flow batch from the remote workload FlowExporter for the last minute, which may not have arrived yet. To address this, FlowCollector temporarily stores received flows on disk for one minute before attributing their remote IP addresses. This introduces a 1-minute delay, but it is much shorter than the 15-minute delay with the previous approach.

In addition to producing accurate attribution, the new method is also cost-effective thanks to its simplicity and in-memory lookups. Because the in-memory state can be quickly rebuilt when a FlowCollector node starts up, no persistent storage is required. With 30 c7i.2xlarge instances, we can process 5 million flows per second across the entire Netflix fleet.

Attributing Cross-Regional IP Addresses

For simplicity, we have so far glossed over one topic: regionalization. Netflix’s cloud microservices operate across multiple AWS regions. To optimize flow reporting and minimize cross-regional traffic, a FlowCollector cluster runs in each major region, and FlowExporter agents send flows to their corresponding regional FlowCollector. When FlowCollector receives a flow, its local IP address is guaranteed to be within the region.

To minimize cross-region traffic, the broadcasting mechanism is limited to FlowCollector nodes within the same region. Consequently, the IP address time ranges map contains only IP addresses from that region. However, cross-regional flows have a remote IP address in a different region. To attribute these flows, the receiving FlowCollector node forwards them to nodes in the corresponding region. FlowCollector determines the region for a remote IP address by looking up a trie built from all Netflix VPC CIDRs. This approach is more efficient than broadcasting IP address time range updates across all regions, as only 1% of Netflix flows are cross-regional.

Attributing Non-Workload IP Addresses

So far, FlowCollector can accurately attribute IP addresses belonging to Netflix’s cloud workloads. However, not all flow IP addresses fall into this category. For instance, a significant portion of flows goes through AWS ELBs. For these flows, their remote IP addresses are associated with the ELBs, where we cannot run FlowExporter. Consequently, FlowCollector cannot determine their identities by simply observing the received flows. To attribute these remote IP addresses, we continue to use IP address change events from Sonar, which crawls AWS resources to detect changes in IP address assignments. Although this data stream may contain inaccurate timestamps and be delayed, misattribution is not a main concern since ELB IP address reassignment occurs very infrequently.

Verifying Correctness

Verifying that the new method has eliminated misattribution is challenging due to the lack of a definitive source of truth for workload dependencies to validate flow logs against; the flow logs themselves are intended to serve as this source of truth, after all. To build confidence, we analyzed the flow logs of a large service with well-understood dependencies. A large footprint is necessary, as misattribution is more prevalent in services with numerous instances, and there must be a reliable method to determine the dependencies for this service without relying on flow logs.

Netflix’s cloud gateway, Zuul, served this purpose perfectly due to its extensive footprint (handling all cloud ingress traffic), its large number of downstream dependencies, and our ability to derive its dependencies from its routing configurations as the source of truth for comparison with flow logs. We found no misattribution for flows through Zuul over a two-week window. This provided strong confidence that the new attribution method has eliminated misattribution. In the previous approach, approximately 40% of Zuul’s dependencies reported by the flow logs were misattributed.

Conclusion

With misattribution solved, eBPF flow logs now deliver dependable, fleet-wide insights into Netflix’s service topology and network health. This advancement unlocks numerous exciting opportunities in areas such as service dependency auditing, security analysis, and incident triage, while helping Netflix engineers develop a better understanding of our ever-evolving distributed systems.

Acknowledgments

We would like to thank Martin Dubcovsky, Joanne Koong, Taras Roshko, Nabil Schear, Jacob Meyers, Parsha Pourkhomami, Hechao Li, Donavan Fritz, Rob Gulewich, Amanda Li, John Salem, Hariharan Ananthakrishnan, Keerti Lakshminarayan, and other stunning colleagues for their feedback, inspiration, and contributions to the success of this effort.


How Netflix Accurately Attributes eBPF Flow Logs was originally published in Netflix TechBlog on Medium, where people are continuing the conversation by highlighting and responding to this story.

Manage authorization within a containerized workload using Amazon Verified Permissions

Post Syndicated from Manuel Heinkel original https://aws.amazon.com/blogs/security/manage-authorization-within-a-containerized-workload-using-amazon-verified-permissions/

Containerization offers organizations significant benefits such as portability, scalability, and efficient resource utilization. However, managing access control and authorization for containerized workloads across diverse environments—from on-premises to multi-cloud setups—can be challenging.

This blog post explores four architectural patterns that use Amazon Verified Permissions for application authorization in Kubernetes environments. Verified Permissions is a scalable permissions management and fine-grained authorization service for your applications.

In this blog post, we cover the following patterns and discuss their trade-offs:

  • Calling Verified Permissions from an Amazon API Gateway API fronting your application in Kubernetes
  • Calling Verified Permissions from a Kubernetes Ingress controller component
  • Calling Verified Permissions from a sidecar container running in the same pod as the application container
  • Calling Verified Permissions from the application container

Understanding these patterns and their implications can help you implement secure and consistent authorization mechanisms across your entire infrastructure without compromising the scalability, portability, and resource efficiency of your containerized workloads.

Consistent authorization through centralized policy management

Access to application resources can be secured more effectively with a centralized and consistent approach to authorization. Especially in containerized environments with distributed architectures and shared resources, traditional access control methods, like embedding authorization logic within individual application code or relying on local access control policies, can become difficult to manage and prone to errors. This becomes even more challenging when you have a combination of on-premises and cloud setups.

A centralized authorization solution empowers developers to implement consistent access control across individual components of an application efficiently. Benefits include reduced duplicate work, an improved security posture, and lower complexity in managing and enforcing access control policies.

Verified Permissions benefits in a containerized environment

Amazon Verified Permissions provides several key benefits as an external authorization service:

  • Benefits for the platform engineering team – Centralized authorization enables platform engineering teams to implement, maintain, and govern authorization policies across the organization without requiring changes to individual applications. This aligns with modern platform engineering practices, where platform engineering teams can provide authorization as a service to application teams, promoting consistent security standards while reducing the operational burden on development teams.
  • Consistent authorization across environments – With Verified Permissions, you can define and manage access control policies in a centralized location. This makes it easier to apply consistent authorization rules across your entire infrastructure, including on-premises deployments and different cloud environments.
  • Simplified application development – Externalizing authorization logic from applications reduces development complexity. Developers can focus on core application functionality without having to implement and maintain authorization mechanisms within each service or component. This separation of concerns promotes code modularity, reusability, and faster iteration cycles.
  • Scalable and highly available – Verified Permissions is a managed service, designed to be scalable and highly available out of the box. As your containerized workloads grow in scale and complexity, Verified Permissions can handle increasing authorization request volumes while maintaining performance and availability.
  • Fine-grained access control – Verified Permissions supports attribute-based access control (ABAC) and role-based access control (RBAC). This allows you to define granular policies in the open source Cedar language based on various attributes like user roles, resource properties, environmental factors, and more.

Integration patterns for authorization

Kubernetes provides many options for architecting applications. Therefore, there are multiple locations in a typical architecture where authorization decisions can be enforced, as shown in Figure 1.

Figure 1: Integration points for authorization in containerized workloads

Figure 1: Integration points for authorization in containerized workloads

The workflow is as follows:

  1. API Gateway. Organizations can use entry points to the application outside of the Kubernetes cluster, such as an API gateway, to obtain an authorization decision. In AWS, Amazon API Gateway enables customers to use authorizer Lambda functions to send an authorization request to Verified Permissions.
  2. Ingress controller. The Kubernetes API defines Ingress objects, which provide load balancing and routing functions on layer 7. Common Ingress controllers like Traefik offer the option to integrate external authorization services.
  3. Sidecar proxy container. You can intercept every request routed to the application by using a sidecar container running in the same pod as the application container. This sidecar container calls Verified Permissions for authorization decisions.
  4. Application container. Developers can use the Amazon SDK to communicate with Verified Permissions from inside the application when an authorization decision is needed.

In the following sections, we explore each of these patterns in detail, examining their implementation, use cases, and specific considerations. At the end of our discussion, we provide a comprehensive comparison table to help you choose the most appropriate pattern based on factors such as scalability, performance, maintenance overhead, and specific use case requirements. This will help you make an informed decision about which pattern best suits your application’s needs.

Authorization workflow

Independent of which of the four mentioned options for authorization you choose, the overall authorization workflow, shown in Figure 2, will stay the same.

Figure 2: Authorization workflow with Amazon Verified Permissions

Figure 2: Authorization workflow with Amazon Verified Permissions

The workflow is as follows:

  1. Authentication. The user first authenticates with an identity provider to obtain a JSON Web Token (JWT). You can configure the identity provider to write relevant information like user roles, tenant ID, or other needed user attributes into the JWT. You can then use this information later to make an authorization decision.
  2. API request. The user makes a request to your application that includes the JWT.
  3. Authorization information. Your application extracts the relevant information that is needed to make an authorization decision from the request. This can include principal information from the JWT, information about the resource that the user requests, and what action the user wants to perform.
  4. (Optional) Policy information point lookup. Depending on your policies, you might need additional information in order for Verified Permissions to make an authorization decision. For example, you can query ownership details for a document from a database.
  5. Authorization decision. You then send the relevant information to Verified Permissions, which returns a decision stating whether the request is permitted or forbidden.
  6. Authorization enforcement. You then enforce the decision from Verified Permissions in your application by allowing or denying an action. For a REST API, this would result in sending back an HTTP 403 forbidden status if the request was denied, or processing the request if it was allowed and sending an HTTP 200 OK status.

Authorization outside of the cluster by using Amazon API Gateway

In this pattern, authorization decisions are made at the API gateway layer before requests reach the Kubernetes cluster. When a request arrives at the API gateway, it triggers an authorization check with Verified Permissions to evaluate the request against defined policies. Based on the Verified Permissions response, the gateway either forwards the request to the containerized application or denies access.

This pattern excels in scenarios where you need coarse-grained access control that can be enforced with information accessible at the API level (such as an HTTP header or ID or access token) and that supports RBAC and ABAC. Consider a document management application where different users have access to different documents based on group membership or identity attribute.

This approach to authorization works consistently regardless of whether your application runs in containers, virtual machines, or serverless environments. The API gateway acts as a unified control point for enforcing access policies across backend services.

For implementations that use Amazon API Gateway specifically, you can use Lambda authorizers to integrate with Verified Permissions. For each incoming API request, API Gateway invokes the authorizer Lambda function, which makes a call to Verified Permissions to evaluate the request against the defined authorization policies, as shown in Figure 3.

Figure 3: Integration of Amazon Verified Permissions in Amazon API Gateway

Figure 3: Integration of Amazon Verified Permissions in Amazon API Gateway

AWS provides a quick-start solution that demonstrates this integration by using Amazon API Gateway and Amazon Cognito, making it easier to implement this pattern. The setup process is detailed in the blog post Authorize API Gateway APIs using Amazon Verified Permissions and Amazon Cognito or bring your own identity provider.

Authorization in a Kubernetes Ingress

Another option to implement coarse-grained access control in use cases as described in the previous section is to use a Kubernetes Ingress layer. Some customers prefer Kubernetes-native solutions, especially if they need to run Kubernetes clusters within and outside of AWS.

Kubernetes provides an API to create and maintain Ingress objects, operating at layer 7 (the application layer), which enables routing decisions based on HTTP attributes. This layer 7 capability makes Ingress controllers ideal for implementing authorization checks.

One Kubernetes Ingress controller that supports external authorization is Traefik Proxy. With this feature, you can delegate authorization decisions to an external service like Verified Permissions before routing requests to the application container.

Assuming that the authorization endpoint is backed by a service in the same Kubernetes cluster, the architecture looks as shown in Figure 4.

Figure 4: Integration of Amazon Verified Permissions in a Kubernetes Ingress

Figure 4: Integration of Amazon Verified Permissions in a Kubernetes Ingress

The workflow is as follows:

  1. Authenticated users access the service through an Elastic Load Balancer of type Network Load Balancer (NLB).
  2. The NLB—operating at layer 4—exposes a Kubernetes Ingress inside the cluster that provides layer 7 capabilities. The Ingress object is implemented by an Ingress controller that supports external authorization, as described earlier.
  3. The Ingress forwards the request—or parts of it—that needs authorization to a local authorization service in the cluster. We use a dedicated authorization service in this architecture because the Ingress backend service allows an external endpoint to be called for authorization.
  4. The authorization service is deployed into its own Kubernetes namespace with a dedicated Kubernetes service account. EKS Pod Identity provides the ability to link the service account in this namespace to an AWS Identity and Access Management (IAM) role that grants access to Verified Permissions by injecting temporary AWS access credentials into the pod at runtime.
  5. The authorization service extracts relevant information from the request and sends it to Verified Permissions for an authorization decision.
  6. The Ingress for the backend service awaits the response of the authorization service and forwards it to the backend service, if access is granted. The Ingress expects the authorization service to respond with HTTP status code 200 for authorized requests. If the Ingress receives HTTP status code 403, the requester is not allowed to access the requested resource, and the Ingress will block the request at this stage.
  7. Only authorized requests are forwarded to registered backend pods.

Because integration with external authorization services is not part of the Kubernetes Ingress API, you need to consult the documentation of the Ingress controller that you decide to use to determine the availability of this feature and its implementation details. Forward authentication of the Traefik Kubernetes Ingress supports this pattern and can be configured with the vendor-specific annotations described in the Traefik documentation.

Authorization in sidecar containers

Not all Ingress controllers support integration with an external authorization service. Amazon Elastic Kubernetes Service (Amazon EKS) customers might prefer the AWS Load Balancer Controller to manage the lifecycle of NLBs and ALBs for their services. Customers can continue using their existing Ingress controller, even if it does not support calling external authorization services today. You can move the authorization of requests behind the Ingress layer with the sidecar container pattern.

Sidecar containers are a common pattern for extending an application’s functionality in Kubernetes. A sidecar is a container running in the same pod as the application it relates to. This means that the sidecar and application follow the same lifecycle and share resources, such as the network ID. This pattern is a good fit when the authorization logic is service-specific. Because the authorization service is deployed alongside the application, this pattern also provides better support in situations where changes to the application demand changes in the authorization logic.

Consider a document management system where access control depends on document metadata and team structures. When a user attempts to edit a document, the sidecar queries the document’s metadata, such as the classification level, tags, and department ownership. The sidecar can also check the organizational team hierarchy to understand reporting relationships and access privileges. This context enables fine-grained authorization decisions that consider not just who the user is, but also, for example, their organizational context or the individual document’s metadata.

Although it’s possible to configure sidecar proxies such as Envoy for individual pods manually, the more convenient option is to introduce a service mesh. A service mesh provides a control plane to manage proxies, including centralized configuration, automated injection of sidecars, and an Ingress layer for traffic routing. Istio is a popular option for a service mesh in Kubernetes.

The diagram in Figure 5 shows the deployment architecture to implement authorization with Verified Permissions in a service mesh.

Figure 5: Integration of Amazon Verified Permissions in a Kubernetes Ingress

Figure 5: Integration of Amazon Verified Permissions in a Kubernetes Ingress

The workflow is as follows:

  1. Authenticated users access the application through an NLB.
  2. The request is routed through an Ingress in the Kubernetes cluster.
  3. The Ingress forwards the request directly to the backend service.
  4. Pods of the backend service consist of multiple containers. Each request is routed through an Envoy proxy first.
  5. The Envoy proxy forwards the request to a co-located container running the authorization service.
  6. Pod Identity is used to map an IAM role to a Kubernetes service account bound to the pod, which enables the authorization sidecar to invoke Verified Permissions for an authorization decision. Note that each container in this pod has access to the IAM credentials that are mapped to the service account.
  7. The Envoy proxy awaits the response of the authorization sidecar and blocks or forwards the request to the backend container, depending on the Verified Permissions authorization decision.

When Istio is deployed into a Kubernetes cluster, it introduces Custom Resource Definitions (CRDs) for managing the service mesh. The authorization workflow can be implemented using the ServiceEntry CRD and an Istio Authorization Policy. The authorization service running as a local container in the application pod becomes a registered service entry in the mesh. This service entry can then be configured in an authorization policy as the target for request authorization in the proxy. For more details, see the External Authorization section in the Istio documentation.

Application container

When it comes to integrating Verified Permissions directly within your application container, you have the advantage of fine-grained control over authorization decisions at the application level. This approach allows for more context-aware authorization checks and can be useful when you need to make authorization decisions based on application-specific data that you can query from a policy information point.

Unlike the sidecar pattern, where authorization happens before the request reaches your application code, this approach lets you gather the necessary context from your application state, databases, or other services before making the authorization call. This is particularly valuable when the authorization logic is deeply intertwined with business logic or requires data that’s only available within the application context. This pattern also supports minimizing the number of authorization requests, if, for example, only a subset of requests processed by a monolithic service require authorization.

However, it’s important to note that this tight coupling between authorization and business logic makes the system more brittle and susceptible to breakage when functional or business logic changes occur. This means that modifications to your application code might require careful consideration of their impact on the authorization logic, potentially increasing maintenance complexity.

The architecture for authorization requests from the application container is shown in Figure 6.

Figure 6: Integration of Amazon Verified Permissions in the application container

Figure 6: Integration of Amazon Verified Permissions in the application container

The workflow is as follows:

  1. Authenticated users access the application through an Elastic Load Balancer—either Application Load Balancer (ALB) or NLB depending on workload requirements.
  2. The Kubernetes service or Ingress for the backend application is directly registered at the ALB or NLB by the AWS Load Balancer Controller.
  3. Requests are directly routed to a pod that is backing the service.
  4. The backend application’s logic is responsible for identifying whether a request needs authorization. The backend uses an IAM role injected at runtime through Pod Identity, when an authorization decision from Verified Permission is needed. The backend application returns HTTP status code 403 if the decision is a deny; otherwise it will continue processing the request.

See the Simplify fine-grained authorization with Amazon Verified Permissions and Amazon Cognito blog post for details on calling Verified Permissions within an application.

Choosing the right pattern for your app

You now have a set of patterns to introduce authorization into your containerized workloads. You need to consider multiple factors and understand the trade-offs that come with each pattern to identify the best option for a given scenario. In the following table, we list certain areas with influence on your architectural decisions.

Granularity of authorization decisions
API gateway
  • Authorization on API or service level
  • Decision based on information from HTTP request
  • Suitable for consistent coarse-grained authorization
Ingress controller
  • Authorization on API or service level
  • Decision based on information from HTTP request
  • Suitable for consistent coarse-grained authorization
Sidecar proxy
  • Authorization on service level
  • Decision based on information from HTTP request and service domain (such as policy information point or static service-specific rules)
  • Suitable for service-specific authorization with low or mid-level complexity for decisions
Application container
  • Authorization on code level
  • Decision based on information from HTTP request and arbitrary business logic
  • Suitable for highly complex decision logic
Resource overhead
API gateway
  • No cluster resources needed for authorization
  • Unauthorized requests don’t consume cluster resources
Ingress controller
  • Central Ingress pods consume cluster resources
  • Unauthorized requests don’t consume application pod resources
Sidecar proxy
  • Authorization services increases resource demand of each pod in the cluster
  • Unauthorized requests consume application pod resources
Application container
  • Authorization service consumes resources only when authorization is performed
  • Unauthorized requests consume CPU cycles of application logic until the authorization logic is triggered
Scalability
API gateway
  • Fully managed serverless service
Ingress controller
  • Scaling of Ingress pods needs to be defined
  • Cluster auto-scaling or capacity planning for compute resources in cluster needed
Sidecar proxy
  • Existing scaling policies can be leveraged
Application container
  • Existing scaling policies can be leveraged
Performance
API gateway
  • Invokes Verified Permission in AWS for each request that needs authorization
  • Supports caching to reduce number of requests to Verified Permission out of the box
Ingress controller
  • Invokes Verified Permission in AWS for each request that needs authorization
  • (Optional) Integration of avp-local-agent to minimize number of requests to Verified Permissions
Sidecar proxy
  • Invokes Verified Permissions in AWS for each request that needs authorization
  • (Optional) Integration of avp-local-agent to minimize number of requests to Verified Permissions
Application container
  • Invokes Verified Permissions in AWS only if the business logic processing a request requires authorization
  • (Optional) Integration of avp-local-agent to minimize number of requests to Verified Permissions
Cost
API gateway
  • Consumption-based costs depending on requests received and data transferred out, and optionally cache size
  • Consumption-based costs to invoke Verified Permissions
  • Enabling a cache potentially reduces costs per requests
Ingress controller
  • Adds to infrastructure costs depending on the underlying compute resources needed to run the fleet of pods for Ingress and authorization service
  • Consumption-based costs to invoke Verified Permissions, which can be minimized by integrating avp-local-agent
Sidecar proxy
  • Adds to infrastructure costs depending on the underlying compute resources needed to run the sidecar containers for the proxy and authorization service in each pod
  • Consumption-based costs to invoke Verified Permissions, which can be minimized by integrating avp-local-agent
Application container
  • Typically minimal additional costs, since authorization code shares the application’s resources
  • Consumption-based costs to invoke Verified Permissions, which can be minimized by integrating avp-local-agent
Portability
API gateway
  • Portability is limited and depends on API Gateway with functionality for custom authorization
Ingress controller
  • Portable across Kubernetes environments with Ingress controller supporting external authorization
Sidecar proxy
  • Portable across Kubernetes environments
Application container
  • Highly portable without dependencies to underlying components
Complexity
API gateway
  • Offered as central component by platform engineering team to offload complexity of authorization from product teams
  • Changes in authorization service impact product teams
Ingress controller
  • Offered as central component by platform engineering team to offload complexity of authorization from product teams
  • Changes in authorization service impact product teams
Sidecar proxy
  • Platform engineering teams provide standardized patterns (and optionally implementation) for authorization that can be integrated and implemented by product teams
  • Increases autonomy of individual teams
Application container
  • Full responsibility for authorization lies with the product teams
  • Increases autonomy of individual teams

Not all services have the same requirements for authorization. You can also combine the patterns discussed in this post. You can, for example, put a basic authorization workflow with coarse-grained access control in front of the majority of your services. You can then rely on sidecar proxies with policy information points to inject additional, dynamic context into authorization decisions for specific services. Lastly, if certain use cases of a service demand complex authorization decisions, you can fall back to application-level authorization for specific parts of your code base.

Conclusion

In this blog post, we explored four patterns for integrating Verified Permissions into a containerized environment. We discussed the benefits and considerations of implementing Verified Permissions at different levels: from an API gateway outside of Kubernetes clusters, by means of Ingress controllers and sidecar proxies as network components inside the Kubernetes cluster, to authorization within the application itself. We saw how each pattern offers unique advantages. We also discussed considerations for finding a suitable option for your situation and when to combine patterns.

By using Verified Permissions, organizations can implement consistent, fine-grained authorization across their containerized workloads, whether they’re running on-premises, in the cloud, or in hybrid environments. This centralized approach to authorization can enhance security and simplify policy management and application development.

To learn more about implementing these patterns and best practices, visit the Amazon Verified Permissions User Guide. For hands-on experience, we recommend exploring the Verified Permissions workshop, which provides practical examples and guided exercises.

 
If you have feedback about this post, submit comments in the Comments section below. If you have questions about this post, contact AWS Support.
 

Manuel Heinkel
Manuel Heinkel

Manuel is a Solutions Architect at AWS, working with software companies in Germany to build innovative and secure applications in the cloud. He supports customers in solving business challenges and achieving success with AWS. Manuel has a track record of diving deep into security and SaaS topics. Outside of work, he enjoys spending time with his family and exploring the mountains.
Markus Kokott
Markus Kokott

Markus is a Senior Solutions Architect at AWS, specializing in guiding software companies to become successful SaaS providers. With over a decade of experience in consulting as well as designing, building, and operating software products, he excels in bridging the gap between business and technology. Markus is passionate about containers, platform engineering, and DevOps in general, using his expertise to drive innovation and efficiency.

Container Insights with enhanced observability now available in Amazon ECS

Post Syndicated from Donnie Prakoso original https://aws.amazon.com/blogs/aws/container-insights-with-enhanced-observability-now-available-in-amazon-ecs/

Last year, we announced enhanced observability in Amazon CloudWatch Container Insights, a new capability to improve your observability for Amazon Elastic Kubernetes Service (Amazon EKS). This capability helps you detect and fix container issues faster by providing detailed performance metrics and logs.

Expanding this capability, today we’re launching enhanced observability for your container workloads running on Amazon Elastic Container Service (Amazon ECS). This new capability will help reduce your mean time to detect (MTTD) and mean time to repair (MTTR) for your overall applications, helping prevent issues that could negatively impact your user experience.

Here’s a quick look at Container Insights with enhanced observability for Amazon ECS.

Container Insights with enhanced observability addresses a critical gap in container monitoring. Previously, correlating metrics with logs and events was a time-consuming process, often requiring manual searches and expertise in application architecture. Now, with this capability, CloudWatch and Amazon ECS automatically collect granular performance metrics such as CPU utilization at both the task and container levels while providing visual drill downs enabling easy root-cause analysis.

This new capability enables the following use cases:

  • Quickly identify root causes by viewing granular resource usage patterns and correlating telemetry data.
  • Proactively manage your ECS resources using curated dashboards based on AWS best practices.
  • Track your recent deployments and root causes of your deployment failures with the matching infrastructure anomalies enabling faster issue detection and quicker rollbacks when necessary.
  • Effortlessly monitor resources across multiple accounts without manual setup. Built-in cross-account support reduces operational overhead with single pane of glass observability.
  • Integration with other CloudWatch services such as Application Signals and CloudWatch Logs provides a seamless experience to correlate infrastructure with the services running and identify the impacted services.

Using container insights with enhanced observability for Amazon ECS
There are two ways to enable Container Insights with enhanced observability:

  1. Cluster-level onboarding – You can enable it for specific clusters individually.
  2. Account-level onboarding – You can also enable it at the account level, which automatically enables observability for all new clusters created in your account. This approach saves time and effort by eliminating the need to manually enable it for each new cluster.

To enable this feature at the account level, I navigate to the Amazon ECS console and select Account settings. Under the CloudWatch Container Insights observability section, I can see it’s currently disabled. I choose Update.

On this page, I find a new option called Container Insights with enhanced observability. I select this option and then choose Save changes.

If I need to enable this capability at the cluster level, I can do so when creating a new cluster.

I can also enable this capability for my existing clusters. To do so, I select Update cluster, and then choose the option.

Once enabled, I can see task-level metrics by navigating to the Metrics tab in my cluster overview console. To access health and performance metrics across my clusters, I can select View Container Insights, which will redirect me to the Container Insights page.

To get a big picture of all my workloads across different clusters, I can navigate to Amazon CloudWatch and then to Container Insights.

This view addresses the challenge of effectively monitoring clusters, services, tasks, and containers by providing a honeycomb visualization that offers an intuitive, high-level summary of cluster health. The dashboard employs a dual-state monitoring approach:

  1. Alarm state (red or green) – Reflects customer-defined thresholds and alerts, allowing teams to configure monitoring based on their specific requirements
  2. Utilization state (dark blue or light blue) – Uses CloudWatch built-in best practices to monitor resource usage patterns across containers. The darker blue indicates clusters operating under higher utilization, enabling teams to proactively identify potential resource constraints before they impact performance

Let’s say there’s an issue in one of my clusters. I can hover over the cluster to display all the alarms created under that cluster at different layers, from the cluster layer down to the container layer.

I also have the option to view all clusters in a list format. The list format is essential for cross-account observability, displaying account IDs and labels for cluster ownership. This helps DevOps engineers quickly identify and collaborate with account owners to resolve potential application issues.

Now, I’d like to explore further. I select my cluster link, which redirects me to the Container Insights detailed dashboard view. Here, I can see a spike in memory utilization for this cluster.

I can dive deeper into container-level details, which help me quickly identify which services are causing this issue.

Another useful feature I found is the Filters option, which helps me conduct more thorough investigations across containers, services, or tasks in this cluster.

If I need to delve deeper into the application logs to understand the root cause of this issue, I can select the task, choose Actions, and choose which logs I would like to view.

On top of using AWS X-Ray traces, I can investigate another two types of logs here. First, I can use performance logs—structured logs containing metric data—to drill down and identify container-level root causes. Second, I examine collected application or container logs . These logs give me detailed insights into application behavior within the container, helping me trace the sequence of events that led to any issues.

In this case, I use application logs.

This streamlines my journey to troubleshoot my application. In this case, the issue is on the downstream calls to third-party applications, which return timeouts.

This enhanced capability also works with Amazon CloudWatch Application Signals to automatically instrument my application. I can monitor current application health and track long-term application performance against service-level objectives.

I select the Application Signals tab.

This integration with Amazon CloudWatch Application Signals provides me with end-to-end visibility, helping me correlate container performance with end-user experience.

When I select datapoints in the graphs, I can see associated traces, which show me all correlated services and their impact. I can also access relevant logs to understand root causes.

Additional things to know
Here are a couple of important points to note:

  • Availability – Container Insights with enhanced observability for ECS is now available in all AWS Regions including the China Regions.
  • Pricing – Container Insights with enhanced observability for ECS comes with a flat metric pricing, visit the Amazon CloudWatch Pricing page.

Get started today and experience improved observability for your container workloads. Learn more on the Amazon CloudWatch documentation page.

Happy monitoring,
Donnie Prakoso

Streamline container application networking with built-in Amazon ECS support in Amazon VPC Lattice

Post Syndicated from Donnie Prakoso original https://aws.amazon.com/blogs/aws/streamline-container-application-networking-with-native-amazon-ecs-support-in-amazon-vpc-lattice/

Since its launch, Amazon VPC Lattice has streamlined complex networking tasks. As a result, my perspective on how to build and connect modern, multi-service applications has changed. As my colleague Danilo wrote in his post announcing the general availability of VPC Lattice:

“By using VPC Lattice, you can focus on your application logic and improve productivity and deployment flexibility with consistent support for instances, containers, and serverless computing.”

Today, we’re announcing Amazon VPC Lattice built-in support for Amazon Elastic Container Service (Amazon ECS). With this new built-in integration, Amazon ECS services can now be directly associated with VPC Lattice target groups without the need for intermediate load balancers.

Here’s a quick look at how you can find Amazon VPC Lattice integration while creating an Amazon ECS service:

The Amazon VPC Lattice integration with Amazon ECS works by registering and deregistering IP addresses from ECS tasks within a service as targets in a VPC Lattice target group. As ECS tasks for the service are launched, Amazon ECS will automatically register those tasks to the VPC Lattice target group.

Furthermore, if ECS tasks fail VPC Lattice health checks, Amazon ECS will automatically replace the tasks. Also, if any task is terminated or scales down, it’s removed from the target group.

Using the Amazon VPC Lattice integration
Let me walk you through how to use this new integration. In the following demo, I will deploy a simple application server running as an ECS service and configure the integration with VPC Lattice. Then, I’ll test the application server by connecting to the VPC Lattice domain name without having to configure additional load balancers on Amazon ECS.

Before I can start with this integration, I need to make sure Amazon ECS will have the required permissions to register and deregister targets into VPC Lattice. To learn more, please visit the Amazon ECS infrastructure IAM role documentation page.

To use the integration with VPC Lattice, I need to define a task definition with at least one container and one port mapping. This is an example of my task definition.

{
    "containerDefinitions": [
        {
            "name": "webserver",
            "image": "public.ecr.aws/ecs-sample-image/amazon-ecs-sample:latest",
            "cpu": 0,
            "portMappings": [
                {
                    "name": "web-80-tcp",
                    "containerPort": 80,
                    "hostPort": 80,
                    "protocol": "tcp",
                    "appProtocol": "http"
                }
            ],
            ...
            *redacted for brevity*
}

Then, I navigate to my ECS cluster and choose Create.

Next, I need to select the task definition and assign the service name.

In the VPC Lattice integration section, I choose Turn on VPC Lattice to start configuring the target group for VPC Lattice. I don’t need to specify a load balancer because I’ll use VPC Lattice. By default, VPC Lattice will use a round-robin routing algorithm to route requests to healthy targets.

Now, I can start defining the integration for my ECS service in VPC Lattice. First, I select the infrastructure role for Amazon ECS. Then, I need to select the virtual private cloud (VPC) where I want my service to run. After that, I need to define the Target groups that will receive traffic. After I’m done configuring the service with VPC Lattice integration, I create this service.

After a few minutes, I have my ECS service ready. I navigate to the service and choose Configuration and networking. If I scroll down to the VPC Lattice section, I can see the VPC Lattice target group created.

To get more information on this target group, I select the target group name, which will redirect me to the VPC Lattice target group page. Here, I can see that Amazon ECS successfully registered the IP address of the running task.

Now, I need to create a VPC Lattice service and service network. My preference is always to create the VPC Lattice service then associate with the VPC Lattice service network later on. So, let’s do that.

I choose Services under the VPC Lattice section and choose Create service.

I fill in all the details required to create a VPC Lattice service and choose Next.

Then, I add a listener, and for the Forward to target group on the Listener default action, I select the newly created target group.

On the next page, because I’m going to create the VPC Lattice service network later, I skip this step and choose Next, review the configurations, and create the service.

With VPC Lattice service created, now it’s time to create VPC Lattice service networks. I navigate to Service networks under the VPC Lattice section and choose Create service network.

First, I fill the VPC Lattice service network name.

Then, on the Service associations page, I select the service that I have created.

I associate this service network to my VPC as well as the security group.

For the simplicity of this demo, I set None for the Auth type. However, I highly recommend you to read how you can use IAM to manage access to VPC Lattice. Then, I choose Create service network.

At this stage, we have everything setup for this integration. My VPC Lattice service network is now associated with my VPC Lattice service and my VPC.

With everything set up, I copy the Domain name from my VPC Lattice service page.

Then, to access the service, I log in to the instance in the same VPC and call the service by using the domain name from VPC Lattice.

[ec2-user@ ~]$ curl http://service-a-XYZ.XYZ.vpc-lattice-svcs.XYZ.on.aws

"Hello there! I'm Amazon ECS."

One thing to note is if you’re not receiving traffic to your Amazon ECS workloads, check the security groups as described in the Control traffic in VPC Lattice using security groups documentation page.

I’m personally excited about this integration because it unlocks various possibilities while streamlining application architectures and improving overall system reliability. Now that all AWS compute types are inherently supported in VPC Lattice, I can unify services across all my ECS clusters, AWS accounts, and VPCs.

Things to know
Here are a couple of important points to note:

Try this new capability of Amazon VPC Lattice today and see how it can streamline your container application communication running on Amazon ECS.

Happy building!

Donnie Prakoso

Noisy Neighbor Detection with eBPF

Post Syndicated from Netflix Technology Blog original https://netflixtechblog.com/noisy-neighbor-detection-with-ebpf-64b1f4b3bbdd

By Jose Fernandez, Sebastien Dabdoub, Jason Koch, Artem Tkachuk

The Compute and Performance Engineering teams at Netflix regularly investigate performance issues in our multi-tenant environment. The first step is determining whether the problem originates from the application or the underlying infrastructure. One issue that often complicates this process is the "noisy neighbor" problem. On Titus, our multi-tenant compute platform, a "noisy neighbor" refers to a container or system service that heavily utilizes the server's resources, causing performance degradation in adjacent containers. We usually focus on CPU utilization because it is our workload's most frequent source of noisy neighbor issues.

Detecting the effects of noisy neighbors is complex. Traditional performance analysis tools such as perf can introduce significant overhead, risking further performance degradation. Additionally, these tools are typically deployed after the fact, which is too late for effective investigation. Another challenge is that debugging noisy neighbor issues requires significant low-level expertise and specialized tooling. In this blog post, we'll reveal how we leveraged eBPF to achieve continuous, low-overhead instrumentation of the Linux scheduler, enabling effective self-serve monitoring of noisy neighbor issues. Learn how Linux kernel instrumentation can improve your infrastructure observability with deeper insights and enhanced monitoring.

Continuous Instrumentation of the Linux Scheduler

To ensure the reliability of our workloads that depend on low latency responses, we instrumented the run queue latency for each container, which measures the time processes spend in the scheduling queue before being dispatched to the CPU. Extended waiting in this queue can be a telltale of performance issues, especially when containers are not utilizing their total CPU allocation. Continuous instrumentation is critical to catching such matters as they emerge, and eBPF, with its hooks into the Linux scheduler with minimal overhead, enabled us to monitor run queue latency efficiently.

To emit a run queue latency metric, we leveraged three eBPF hooks: sched_wakeup, sched_wakeup_new, and sched_switch.

The sched_wakeup and sched_wakeup_new hooks are invoked when a process changes state from 'sleeping' to 'runnable.' They let us identify when a process is ready to run and is waiting for CPU time. During this event, we generate a timestamp and store it in an eBPF hash map using the process ID as the key.

struct {
__uint(type, BPF_MAP_TYPE_HASH);
__uint(max_entries, MAX_TASK_ENTRIES);
__uint(key_size, sizeof(u32));
__uint(value_size, sizeof(u64));
} runq_lat SEC(".maps");

SEC("tp_btf/sched_wakeup")
int tp_sched_wakeup(u64 *ctx)
{
struct task_struct *task = (void *)ctx[0];
u32 pid = task->pid;
u64 ts = bpf_ktime_get_ns();

bpf_map_update_elem(&runq_lat, &pid, &ts, BPF_NOEXIST);
return 0;
}

Conversely, the sched_switch hook is triggered when the CPU switches between processes. This hook provides pointers to the process currently utilizing the CPU and the process about to take over. We use the upcoming task's process ID (PID) to fetch the timestamp from the eBPF map. This timestamp represents when the process entered the queue, which we had previously stored. We then calculate the run queue latency by simply subtracting the timestamps.

SEC("tp_btf/sched_switch")
int tp_sched_switch(u64 *ctx)
{
struct task_struct *prev = (struct task_struct *)ctx[1];
struct task_struct *next = (struct task_struct *)ctx[2];
u32 prev_pid = prev->pid;
u32 next_pid = next->pid;

// fetch timestamp of when the next task was enqueued
u64 *tsp = bpf_map_lookup_elem(&runq_lat, &next_pid);
if (tsp == NULL) {
return 0; // missed enqueue
}

// calculate runq latency before deleting the stored timestamp
u64 now = bpf_ktime_get_ns();
u64 runq_lat = now - *tsp;

// delete pid from enqueued map
bpf_map_delete_elem(&runq_lat, &next_pid);
....

One of the advantages of eBPF is its ability to provide pointers to the actual kernel data structures representing processes or threads, also known as tasks in kernel terminology. This feature enables access to a wealth of information stored about a process. We required the process's cgroup ID to associate it with a container for our specific use case. However, the cgroup information in the struct is safeguarded by an RCU (Read Copy Update) lock.

To safely access this RCU-protected information, we can leverage kfuncs in eBPF. kfuncs are kernel functions that can be called from eBPF programs. There are kfuncs available to lock and unlock RCU read-side critical sections. These functions ensure that our eBPF program remains safe and efficient while retrieving the cgroup ID from the task struct.

void bpf_rcu_read_lock(void) __ksym;
void bpf_rcu_read_unlock(void) __ksym;

u64 get_task_cgroup_id(struct task_struct *task)
{
struct css_set *cgroups;
u64 cgroup_id;
bpf_rcu_read_lock();
cgroups = task->cgroups;
cgroup_id = cgroups->dfl_cgrp->kn->id;
bpf_rcu_read_unlock();
return cgroup_id;
}

Having the data ready, we must package it and send it to userspace. For this purpose, we chose the eBPF ring buffer. It is efficient, high-performing, and user-friendly. It can handle variable-length data records and allows data reading without necessitating extra memory copying or syscalls. However, the sheer amount of data points was causing the userspace program to use too much CPU, so we implemented a rate limiter in eBPF to sample the data effectively.

struct {
__uint(type, BPF_MAP_TYPE_RINGBUF);
__uint(max_entries, 256 * 1024);
} events SEC(".maps");

struct {
__uint(type, BPF_MAP_TYPE_PERCPU_HASH);
__uint(max_entries, MAX_TASK_ENTRIES);
__uint(key_size, sizeof(u64));
__uint(value_size, sizeof(u64));
} cgroup_id_to_last_event_ts SEC(".maps");

struct runq_event {
u64 prev_cgroup_id;
u64 cgroup_id;
u64 runq_lat;
u64 ts;
};

SEC("tp_btf/sched_switch")
int tp_sched_switch(u64 *ctx)
{
// ....
// The previous code
// ....

u64 prev_cgroup_id = get_task_cgroup_id(prev);
u64 cgroup_id = get_task_cgroup_id(next);

// per-cgroup-id-per-CPU rate-limiting
// to balance observability with performance overhead
u64 *last_ts =
bpf_map_lookup_elem(&cgroup_id_to_last_event_ts, &cgroup_id);
u64 last_ts_val = last_ts == NULL ? 0 : *last_ts;

// check the rate limit for the cgroup_id in consideration
// before doing more work
if (now - last_ts_val < RATE_LIMIT_NS) {
// Rate limit exceeded, drop the event
return 0;
}

struct runq_event *event;
event = bpf_ringbuf_reserve(&events, sizeof(*event), 0);

if (event) {
event->prev_cgroup_id = prev_cgroup_id;
event->cgroup_id = cgroup_id;
event->runq_lat = runq_lat;
event->ts = now;
bpf_ringbuf_submit(event, 0);
// Update the last event timestamp for the current cgroup_id
bpf_map_update_elem(&cgroup_id_to_last_event_ts, &cgroup_id,
&now, BPF_ANY);

}

return 0;
}

Our userspace application, developed in Go, processes events from the ring buffer to emit metrics to our metrics backend, Atlas. Each event includes a run queue latency sample with a cgroup ID, which we associate with running containers on the host. We categorize it as a system service if no such association is found. When a cgroup ID correlates with a container, we emit a percentile timer Atlas metric (runq.latency) for that container. We also increment a counter metric (sched.switch.out) to monitor preemptions occurring for the container's processes. Access to the prev_cgroup_id of the preempted process allows us to tag the metric with the cause of the preemption, whether it's due to a process within the same container (or cgroup), a process in another container, or a system service.

It's important to highlight that both the runq.latency metric and the sched.switch.out metrics are needed to determine if a container is affected by noisy neighbors, which is the goal we aim to achieve — relying solely on the runq.latency metric can lead to misconceptions. For example, if a container is at or over its cgroup CPU limit, the scheduler will throttle it, resulting in an apparent spike in run queue latency due to delays in the queue. If we were only to consider this metric, we might incorrectly attribute the performance degradation to noisy neighbors when it's actually because the container is hitting its CPU request limits. However, simultaneous spikes in both metrics, mainly when the cause is a different container or system process, clearly indicate a noisy neighbor issue.

A Noisy Neighbor Story

Below is the runq.latency metric for a server running a single container with ample CPU overhead. The 99th percentile averages 83.4µs (microseconds), serving as our baseline. Although there are some spikes reaching 400µs, the latency remains within acceptable parameters.

container1’s 99th percentile runq.latency averages 83µs (microseconds), with spikes up to 400µs, without adjacent containers. This serves as our baseline for a container not contending for CPU on a host.

At 10:35, launching container2, which fully utilized all CPUs on the host, caused a significant 131-millisecond spike (131,000 microseconds) in container1's P99 run queue latency. This spike would be noticeable in the userspace application if it were serving HTTP traffic. If userspace app owners reported an unexplained latency spike, we could quickly identify the noisy neighbor issue through run queue latency metrics.

Launching container2 at 10:35, which maxes out all CPUs on the host, caused a 131-millisecond spike in container1’s P99 run queue latency due to increased preemptions by system processes. This indicates a noisy neighbor issue, where system services compete for CPU time with containers.

The sched.switch.out metric indicates that the spike was due to increased preemptions by system processes, highlighting a noisy neighbor issue where system services compete with containers for CPU time. Our metrics show that the noisy neighbors were actually system processes, likely triggered by container2 consuming all available CPU capacity.

Optimizing eBPF Code

We developed an open-source eBPF process monitor called bpftop to measure the overhead of eBPF code in this hot kernel path. Our estimates suggest that the instrumentation adds less than 600 nanoseconds to each sched_* hook. We conducted a performance analysis on a Java service running in a container, and the instrumentation did not introduce significant overhead. The performance variance with the run queue profiling code active versus inactive was not measurable in milliseconds.

During our research on how eBPF statistics are measured in the kernel, we identified an opportunity to improve its calculation. We submitted this patch, which was included in the Linux kernel 6.10 release.

Through trial and error and using bpftop, we identified several optimizations that helped maintain low overhead for this code:

  • We found that BPF_MAP_TYPE_HASH was the most performant for storing enqueued timestamps. Using BPF_MAP_TYPE_TASK_STORAGE resulted in nearly a twofold performance decline. BPF_MAP_TYPE_PERCPU_HASH was slightly less performant than BPF_MAP_TYPE_HASH, which was unexpected and requires further investigation.
  • The BPF_CORE_READ helper adds 20–30 nanoseconds per invocation. In the case of raw tracepoints, specifically those that are "BTF-enabled" (tp_btf/*), it is safe and more efficient to access the task struct members directly. Andrii Nakryiko recommends this approach in this blog post.
  • BPF_MAP_TYPE_LRU_HASH maps are 40–50 nanoseconds slower per operation than regular hash maps. Due to space concerns from PID churn, we initially used them for enqueued timestamps. We have since increased the map size, mitigating this risk.
  • The sched_switch, sched_wakeup, and sched_wakeup_new are all triggered for kernel tasks, which are identifiable by their PID of 0. We found monitoring these tasks unnecessary, so we implemented several early exit conditions and conditional logic to prevent executing costly operations, such as accessing BPF maps, when dealing with a kernel task. Notably, kernel tasks operate through the scheduler queue like any regular process.

Conclusion

Our findings highlight the value of low-overhead continuous instrumentation of the Linux kernel with eBPF. We have integrated these metrics into customer dashboards, enabling actionable insights and guiding multitenancy performance discussions. We can also now use these metrics to refine CPU isolation strategies to minimize the impact of noisy neighbors. Additionally, thanks to these metrics, we've gained deeper insights into the Linux scheduler.

This project has also deepened our understanding of eBPF technology and underscored the importance of tools like bpftop for optimizing eBPF code. As eBPF adoption increases, we foresee more infrastructure observability and business logic shifting to it. One promising project in this space is sched_ext, potentially revolutionizing how scheduling decisions are made and tailored to specific workload needs.


Noisy Neighbor Detection with eBPF was originally published in Netflix TechBlog on Medium, where people are continuing the conversation by highlighting and responding to this story.

Making sense of secrets management on Amazon EKS for regulated institutions

Post Syndicated from Piyush Mattoo original https://aws.amazon.com/blogs/security/making-sense-of-secrets-management-on-amazon-eks-for-regulated-institutions/

Amazon Web Services (AWS) customers operating in a regulated industry, such as the financial services industry (FSI) or healthcare, are required to meet their regulatory and compliance obligations, such as the Payment Card Industry Data Security Standard (PCI DSS) or Health Insurance Portability and Accountability Act (HIPPA).

AWS offers regulated customers tools, guidance and third-party audit reports to help meet compliance requirements. Regulated industry customers often require a service-by-service approval process when adopting cloud services to make sure that each adopted service aligns with their regulatory obligations and risk tolerance. How financial institutions can approve AWS services for highly confidential data walks through the key considerations that customers should focus on to help streamline the approval of cloud services. In this post we cover how regulated customers, especially FSI customers, can approach secrets management on Amazon Elastic Kubernetes Service (Amazon EKS) to help meet data protection and operational security requirements. Amazon EKS gives you the flexibility to start, run, and scale Kubernetes applications in the AWS Cloud or on-premises.

Applications often require sensitive information such as passwords, API keys, and tokens to connect to external services or systems. Kubernetes has secrets objects for managing these types of sensitive information. Additional tools and approaches have evolved to supplement the Kubernetes Secrets to help meet the compliance requirements of regulated organizations. One of the driving forces behind the evolution of these tools for regulated customers is that the native Kubernetes Secrets values aren’t encrypted but encoded as base64 strings; meaning that their values can be decoded by a threat actor with either API access or authorization to create a pod in a namespace containing the secret. There are options such as GoDaddy Kubernetes External Secrets, AWS Secrets and Configuration Provider (ASCP) for the Kubernetes Secrets Store CSI Driver, Hashicorp Vault, and Bitnami Sealed secrets that you can use to can help to improve the security, management, and audibility of your secrets usage.

In this post, we cover some of the key decisions involved in choosing between External Secrets Operator (ESO), Sealed Secrets, and ASCP for the Kubernetes Secrets Store Container Storage Interface (CSI) Driver, specifically for FSI customers with regulatory demands. These decision points are also broadly applicable to customers operating in other regulated industries.

AWS Shared Responsibility Model

Security and compliance is a shared responsibility between AWS and the customer. The AWS Shared Responsibility Model describes this as security of the cloud and security in the cloud:

  • AWS responsibility – Security of the cloud: AWS is responsible for protecting the infrastructure that runs the services offered in the AWS Cloud. For Amazon EKS, AWS is responsible for the Kubernetes control plane, which includes the control plane nodes and etcd database. Amazon EKS is certified by multiple compliance programs for regulated and sensitive applications. The effectiveness of the security controls are regularly tested and verified by third-party auditors as part of the AWS compliance programs.
  • Customer responsibility – Security in the cloud: Customers are responsible for the security and compliance of customer configured systems and services deployed on AWS. This includes responsibility for securely deploying, configuring and managing ESO within their Amazon EKS cluster. For Amazon EKS, the customer responsibility depends upon the worker nodes you pick to run your workloads and cluster configuration as shown in Figure 1. In the case of Amazon EKS deployment using Amazon Elastic Compute Cloud (Amazon EC2) hosts, the customer responsibility includes the following areas:
    • The security configuration of the data plane, including the configuration of the security groups that allow traffic to pass from the Amazon EKS control plane into the customer virtual private cloud (VPC).
    • The configuration of the nodes and the containers themselves.
    • The nodes’ operating system, including updates and security patches.
    • Other associated application software:
    • The sensitivity of your data, such as personally identifiable information (PII), keys, passwords, and tokens
      • Customers are responsible for enforcing access controls to protect their data and secrets.
      • Customers are responsible for monitoring and logging activities related to secrets management including auditing access, detecting anomalies and responding to security incidents.
    • Your company’s requirements, applicable laws and regulations
    • When using AWS Fargate, the operational overhead for customers is reduced in the following areas:
      • The customer is not responsible for updating or patching the host system.
      • Fargate manages the placement and scaling of containers.
Figure 1: AWS Shared Responsibility Model with Fargate and Amazon EC2 based workflows

Figure 1: AWS Shared Responsibility Model with Fargate and Amazon EC2 based workflows

As an example of the Shared Responsibility Model in action, consider a typical FSI workload accepting or processing payments cards and subject to PCI DSS requirements. PCI DSS v4.0 requirement 3 focuses on guidelines to secure cardholder data while at rest and in transit:

Control ID Control description
3.6 Cryptographic keys used to protect stored account data are secured.
3.6.1.2 Store secret and private keys used to encrypt and decrypt cardholder data in one (or more) of the following forms:

  • Encrypted with a key-encrypting key that is at least as strong as the data-encrypting key, and that is stored separately from the data-encrypting key.
  • Stored within a secure cryptographic device (SCD), such as a hardware security module (HSM) or PTS-approved point-of-interaction device.
  • Has at least two full-length key components or key shares, in accordance with an industry-accepted method. Note: It is not required that public keys be stored in one of these forms.
3.6.1.3 Access to cleartext cryptographic key components is restricted to the fewest number of custodians necessary.

NIST frameworks and controls are also broadly adopted by FSI customers. NIST Cyber Security Framework (NIST CSF) and NIST SP 800-53 (Security and Privacy Controls for Information Systems and Organizations) include the following controls that apply to secrets:

Regulation or framework Control ID Control description
NIST CSF PR.AC-1 Identities and credentials are issued, managed, verified, revoked, and audited for authorized devices, users and processes.
NIST CSF PR.DS-1 Data-at-rest is protected.
NIST 800-53.r5 AC-2(1)
AC-3(15)
Secrets should have automatic rotation enabled.
Delete unused secrets.

Based on the preceding objectives, the management of secrets can be categorized into two broad areas:

  • Identity and access management ensures separation of duties and least privileged access.
  • Strong encryption, using a dedicated cryptographic device, introduces a secure boundary between the secrets data and keys, while maintaining appropriate management over the cryptographic keys.

Choosing your secrets management provider

To help choose a secrets management provider and apply compensating controls effectively, in this section we evaluate three different options based on the key objectives derived from the PCI DSS and NIST controls described above and other considerations such as operational overhead, high availability, resiliency, and developer or operator experience.

Architecture and workflow

The following architecture and component descriptions highlight the different architectural approaches and responsibilities of each solution’s components, ranging from controllers and operators, command-line interface (CLI) tools, custom resources, and CSI drivers working together to facilitate secure secrets management within Kubernetes environments.

External Secrets Operator (ESO) extends the Kubernetes API using a custom resource definition (CRD) for secret retrieval. ESO enables integration with external secrets management systems such as AWS Secrets Manager, HashiCorp Vault, Google Secrets Manager, Azure Key Vault, IBM Cloud Secrets Manager, and various other systems. ESO watches for changes to an external secret store and keeps Kubernetes secrets in sync. These services offer features that aren’t available with native Kubernetes Secrets, such as fine-grained access controls, strong encryption, and automatic rotation of secrets. By using these purpose-built tools outside of a Kubernetes cluster, you can better manage risk and benefit from central management of secrets across multiple Amazon EKS clusters. For more information, see the detailed walkthrough of using ESO to synchronize secrets from Secrets Manager to your Amazon EKS Fargate cluster.

ESO is comprised of a cluster-side controller that automatically reconciles the state within the Kubernetes cluster and updates the related secrets anytime the external API’s secret undergoes a change.

Figure 2: ESO workflow

Figure 2: ESO workflow

Sealed Secrets is an open source project by Bitnami comprised of a Kubernetes controller coupled with a client-side CLI tool with the objective to store secrets in Git in a secure fashion. Sealed Secrets encrypts your Kubernetes secret into a SealedSecret, which can also be deployed to a Kubernetes cluster using kubectl. For more information, see the detailed walkthough of using tools from the Sealed Secrets open source project to manage secrets in your Amazon EKS clusters.

Sealed Secrets comprises of three main components: First, there is an operator or a controller which is deployed onto a Kubernetes cluster. The controller is responsible for decrypting your secrets. Second, you have a CLI tool called Kubeseal that takes your secret and encrypts it. Third, you have a CRD. Instead of creating regular secrets, you create SealedSecrets, which is a CRD defined within Kubernetes. That is how the operator knows when to perform the decryption process within your Kubernetes cluster.

Upon startup, the controller looks for a cluster-wide private-public key pair and generates a new 4096-bit RSA public-private key pair if one doesn’t exist. The private key is persisted in a secret object in the same namespace as the controller. The public key portion of this is made publicly available to anyone wanting to use Sealed Secrets with this cluster.

Figure 3: Sealed Secrets workflow

Figure 3: Sealed Secrets workflow

The AWS Secrets Manager and Config Provider (ASCP) for Secret Store CSI driver is an open source tool from AWS that allows secrets from Secrets Manager and Parameter Store, a capability of AWS Systems Manager, to be mounted as files inside Amazon EKS pods. It uses a CRD called SecretProviderClass to specify which secrets or parameters to mount. Upon a pod start or restart, the CSI driver retrieves the secrets or parameters from AWS and writes them to a tmpfs volume mounted in the pod. The volume is automatically cleaned up when the pod is deleted, making sure that secrets aren’t persisted. For more information, see the detailed walkthrough on how to set up and configure the ASCP to work with Amazon EKS.

ASCP comprises of a cluster-side controller acting as the provider, allowing secrets from Secrets Manager, and parameters from Parameter Store to appear as files mounted in Kubernetes pods. Secrets Store CSI Driver is a DaemonSet with three containers: node-driver-registrar, which registers the CSI driver with Kubelet; secrets-store, which implements the CSI Node service gRPC services for mounting and unmounting volumes during pod creation and deletion; and  liveness-probe, which monitors the health of the CSI driver and reports to Kubernetes for automatic issue detection and pod restart.

Figure 4: AWS Secrets Manager and configuration provider

Figure 4: AWS Secrets Manager and configuration provider

In the next section, we cover some of the key decisions involved in choosing whether to use ESO, Sealed Secrets, or ASCP for regulated customers to help meet their regulatory and compliance needs.

Comparing ESO, Sealed Secrets, and ASCP objectives

All three solutions address different aspects of secure secrets management and aim to help FSI customers meet their regulatory compliance requirements while upholding the protection of sensitive data in Kubernetes environments.

ESO synchronizes secrets from external APIs into Kubernetes, targeting the cluster operator and application developer personas. The cluster operator is responsible for setting up ESO and managing access policies. The application developer is responsible for defining external secrets and the application configuration.

Sealed Secrets encrypts your Kubernetes secrets before storing them in version control systems such as public Git repositories. This is the case if you decide to check in your Kubernetes manifest to a Git repository granting access to your sensitive secrets to anyone who has access to the Git repository. This is ultimately the reason why Sealed Secrets was created and the sealed secret can be decrypted only by the controller running in the target cluster.

Using ASCP, you can securely store and manage your secrets in Secrets Manager and retrieve them through your applications running on Kubernetes without having to write custom code. Secrets Manager provides features such as rotation, auditing, and access control that can help FSI customers meet regulatory compliance requirements and maintain a robust security posture.

Installation

The deployment and configuration details that follow highlight the different approaches and resources used by each solution to integrate with Kubernetes and external secret stores, catering to the specific requirements of secure secrets management in containerized environments.

ESO provides Helm charts for ease of operator deployment. External Secrets provides custom resources like SecretStore and ExternalSecret for configuring the required operator functionality to synchronize external secrets to your cluster. For instance, SecretStore can be used by the cluster operator to be able to connect to AWS Secrets Manager using appropriate credentials to pull in the secrets.

To install Sealed Secrets, you can deploy the Sealed Secrets Controller onto the Kubernetes cluster. You can deploy the manifest by itself or you can use a Helm chart to deploy the Sealed Secrets Controller for you. After the controller is installed, you use the Kubeseal client-side utility to encrypt secrets using asymmetric cryptography. If you don’t already have the Kubeseal CLI installed, see the installation instructions.

ASCP provides Helm charts to assist in operator deployment. The ASCP operator provides custom resources such as SecretProviderClass to provide provider-specific parameters to the CSI driver. During pod start and restart, the CSI driver will communicate with the provider using gRPC to retrieve the secret content from the external secret store you specified in the SecretProviderClass custom resource. Then the volume is mounted in the pod as tmpfs and the secret contents are written to the volume.

Encryption and key management

These solutions use robust encryption mechanisms and key management practices provided by external secret stores and AWS services such as AWS Key Management Service (AWS KMS) and Secrets Manager. However, additional considerations and configurations might be required to meet specific regulatory requirements, such as PCI DSS compliance for handling sensitive data.

ESO relies on encryption features within the external secrets management system. For instance, Secrets Manager supports envelope encryption with AWS KMS which is FIPS 140-2 Level 3 certified. Secrets Manager has several compliance certifications making it a great fit for regulated workloads. FIPS 140-2 Level 3 ensures only strong encryption algorithms approved by NIST can be used to protect data. It also defines security requirements for the cryptographic module, creating logical and physical boundaries.

Both AWS KMS and Secrets Manager help you to manage key lifecycle and to integrate with other AWS Services. In terms of key rotation, both provide automatic rotation of secrets that runs on a schedule (which you define), and abstract the complexity of managing different versions of keys. For AWS managed keys, the key rotation happens automatically once every year by default. With customer managed keys (CMKs), automatic key rotation is available but not enabled by default.

When using SealedSecrets, you use the Kubeseal tool to convert a standard Kubernetes Secret into a Sealed Secrets resource. The contents of the Sealed Secrets are encrypted with the public key served by the Sealed Secrets Controller as described in the Sealed Secrets project homepage.

In the absence of cloud native secrets management integration, you might have to add compensating controls to achieve the regulatory standards required by your organization. In cases where the underlying SealedSecrets data is sensitive in nature, such as cardholder PII, PCI requires that you store sensitive secrets in a cryptographic device such as a hardware security module (HSM). You can use Secrets Manager to store the master key generated to seal the secrets. However, this you will have to enable additional integration with Amazon EKS APIs to fetch the master key securely from the EKS cluster. You will also have to modify your deployment process to use a master key from Secrets Manager. The applications running in the EKS cluster must have permissions to fetch the SealedSecret and master key from Secrets Manager. This might involve configuring the application to interact with Amazon EKS APIs and Secrets Manager. For non-sensitive data, Kubeseal can be used directly within the EKS cluster to manage secrets and sealing keys.

For key rotation, you can store the controller generated private key in Parameter Store as a SecureString. You can use the advanced tier in Parameter Store if the file containing the private keys exceeds the Standard tier limit of up to 4,096 characters. In addition, if you want to add key rotation, you can use AWS KMS.

The ASCP relies on encryption features within the chosen secret store, such as Secrets Manager. Secrets Manager supports integration with AWS KMS for an additional layer of security by storing encryption keys separately. The Secrets Store CSI Driver facilitates secure interaction with the secret store, but doesn’t directly encrypt secrets. Encrypting mounted content can provide further protection, but introduces operational overhead related to key management.

ASCP relies on Secrets Manager and AWS KMS for encryption and decryption capabilities. As a recommendation, you can encrypt mounted content to further protect the secrets. However, this introduces the additional operational overhead of managing encryption keys and addressing key rotation.

Additional considerations

These solutions address various aspects of secure secrets management, ranging from centralized management, compliance, high availability, performance, developer experience, and integration with existing investments, catering to the specific needs of FSI customers in their Kubernetes environments.

ESO can be particularly useful when you need to manage an identical set of secrets across multiple Kubernetes clusters. Instead of configuring, managing, and rotating secrets at each cluster level individually, you can synchronize your secrets across your clusters. This simplifies secrets management by providing a single interface to manage secrets across multiple clusters and environments.

External secrets management systems typically offer advanced security features such as encryption at rest, access controls, audit logs, and integration with identity providers. This helps FSI customers ensure that sensitive information is stored and managed securely in accordance with regulatory requirements.

FSI customers usually have existing investments in their on-premises or cloud infrastructure, including secrets management solutions. ESO integrates seamlessly with existing secrets management systems and infrastructure, allowing FSI customers to use their investment in these systems without requiring significant changes to their workflow or tooling. This makes it easier for FSI customers to adopt and integrate ESO into their existing Kubernetes environments.

ESO provides capabilities for enforcing policies and governance controls around secrets management such as access control, rotation policies, and audit logging when using services like Secrets Manager. For FSI customers, audits and compliance are critical and ESO verifies that access to secrets is tracked and audit trails are maintained, thereby simplifying the process of demonstrating adherence to regulatory standards. For instance, secrets stored inside Secrets Manager can be audited for compliance with AWS Config and AWS Audit Manager. Additionally, ESO uses role-based access control (RBAC) to help prevent unauthorized access to Kubernetes secrets as documented in the ESO security best practices guide.

High availability and resilience are critical considerations for mission critical FSI applications such as online banking, payment processing, and trading services. By using external secrets management systems designed for high availability and disaster recovery, ESO helps FSI customers ensure secrets are available and accessible in the event of infrastructure failure or outages, thereby minimizing service disruption and downtime.

FSI workloads often experience spikes in transaction volumes, especially during peak days or hours. ESO is designed to efficiently managed a large volume of secrets by using external secrets management that’s optimized for performance and scalability.

In terms of monitoring, ESO provides Prometheus metrics to enable fine-grained monitoring of access to secrets. Amazon EKS pods offer diverse methods to grant access to secrets present on external secrets management solutions. For example, in non-production environments, access can be granted through IAM instance profiles assigned to the Amazon EKS worker nodes. For production, using IAM roles for service accounts (IRSA) is recommended. Furthermore, you can achieve namespace level fine-grained access control by using annotations.

ESO also provides options to configure operators to use a VPC endpoint to comply with FIPS requirements.

Additional developer productivity benefits provided by ESO include support for JSON objects (Secret key/value in the AWS Management console) or strings (Plaintext in the console). With JSON objects, developers can programmatically update multiple values atomically when rotating a client certificate and private key.

The benefit of Sealed Secrets, as discussed previously, is when you upload your manifest to a Git repository. The manifest will contain the encrypted SealedSecrets and not the regular secrets. This assures that no one has access to your sensitive secrets even when they have access to your Git repository. Sealed Secrets offer a few benefits to developers in terms of developer experience. Sealed Secrets gives you access to manage your secrets, making them more readily available to developers. Sealed Secrets offers VSCode extension to assist in integrating it into the software development lifecycle (SDLC). Using Sealed Secrets, you can store the encrypted secrets in the version control systems such as Gitlab and GitHub. Sealed Secrets can reduce operational overhead related to updating dependent objects because whenever a secret resource is updated, the same update is applied to the dependent objects.

ASCP integration with the Kubernetes Secrets Store CSI Driver on Amazon EKS offers enhanced security through seamless integration with Secrets Manager and Parameter Store, ensuring encryption, access control, and auditing. It centralizes management of sensitive data, simplifying operations and reducing the risk of exposure. The dynamic secrets injection capability facilitates secure retrieval and injection of secrets into Kubernetes pods, while automatic rotation provides up-to-date credentials without manual intervention. This combined solution streamlines deployment and management, providing a secure, scalable, and efficient approach to handling secrets and configuration settings in Kubernetes applications.

Consolidated threat model

We created a threat model based on the architecture of the three solution offerings. The threat model provides a comprehensive view of the potential threats and corresponding mitigations for each solution, allowing organizations to proactively address security risks and ensure the secure management of secrets in their Kubernetes environments.

X = Mitigations applicable to the solution

Threat Mitigations ESO Sealed Secrets ASCP
Unauthorized access or modification of secrets
  • Implement least privilege access principles
  • Rotate and manage credentials securely
  • Enable RBAC and auditing in Kubernetes
X X X
Insider threat (for example, a rogue administrator who has legitimate access)
  • Implement least privilege access principles
  • Enable auditing and monitoring
  • Enforce separation of duties and job rotation
X X
Compromise of the deployment process
  • Secure and harden the deployment pipeline
  • Implement secure coding practices
  • Enable auditing and monitoring
X
Unauthorized access or tampering of secrets during transit
  • Enable encryption in transit using TLS
  • Implement mutual TLS authentication between components
  • Use private networking or VPN for secure communication
X X X
Compromise of the Kubernetes API server because of vulnerabilities or misconfiguration
  • Secure and harden the Kubernetes API server
  • Enable authentication and authorization mechanisms (for example, mutual TLS and RBAC)
  • Keep Kubernetes components up-to-date and patched
  • Enable Kubernetes audit logging and monitoring
X
Vulnerability in the external secrets controller leading to privilege escalation or data exposure
  • Keep the external secrets controller up-to-date and patched
  • Regularly monitor for and apply security updates
  • Implement least privilege access principles
  • Enable auditing and monitoring
X
Compromise of the Secrets Store CSI Driver, node-driver-registrar, Secrets Store CSI Provider, kubelet, or Pod could lead to unauthorized access or exposure of secrets
  • Implement least privilege principles and role-based access controls
  • Regularly patch and update the components
  • Monitor and audit the component activities
X
Unauthorized access or data breach in Secrets Manager could expose sensitive secrets
  • Implement strong access controls and access logging for Secrets Manager
  • Encrypt secrets at rest and in transit
  • Regularly rotate and update secrets
X X

Shortcomings and limitations

The following limitations and drawbacks highlight the importance of carefully evaluating the specific requirements and constraints of your organization before adopting any of these solutions. You should consider factors such as team expertise, deployment environments, integration needs, and compliance requirements to promote a secure and efficient secrets management solution that aligns with your organization’s needs.

ESO doesn’t include a default way to restrict network traffic to and from ESO using network policies or similar network or firewall mechanisms. The application team is responsible for properly configuring network policies to improve the overall security posture of ESO within your Kubernetes cluster.

Any time an external secret associated with ESO is rotated, you must restart the deployment that uses that particular external secret. Given the inherent risks associated with integrating an external entity or third-party solution into your system, including ESO, it’s crucial to implement a comprehensive threat model similar to the Kubernetes Admission Control Threat Model.

Also, ESO set up is complicated and the controller must be installed on the Kubernetes cluster.

SealedSecrets cannot be reused across namespaces unless they’re re-encrypted or made cluster-wide, which makes it challenging to manage secrets across multiple namespaces consistently. The need to manually rotate and re-encrypt SealedSecrets with new keys can introduce operational overhead, especially in large-scale environments with numerous secrets. The old sealing keys pose a potential risk of misuse by unauthorized users, which increases the risk. To mitigate both risks (high overhead and old secrets), you should implement additional controls such as deleting older keys as part of the key rotation process or periodically rotate sealing keys and make sure that old sealed secret resources are re-encrypted with the new keys. Sealed Secrets doesn’t support external secret stores such as HashiCorp Vault, or cloud provider services such as Secrets Manager, Parameter Store, or Azure Key Vault. Sealed Secrets requires a Kubeseal client-side binary to encrypt secrets. This can be a concern in FSI environments where client-side tools are restricted by security policies.

While ASCP provides seamless integration with Secrets Manager and Parameter Store, teams unfamiliar with these AWS services might need to invest some additional effort to fully realize the benefits. This additional effort is justified by the long-term benefits of centralized secrets management and access control provided by these services. Additionally, relying primarily on AWS services for secrets management can potentially limit flexibility in deploying to alternative cloud providers or on-premises environments in the future. These factors should be carefully evaluated based on the specific needs and constraints of the application and deployment environment.

Conclusion

We have provided a summary of three options for managing secrets in Amazon EKS, ESO, Sealed Secrets, and AWS Secrets and Configuration Provider (ASCP), and the key considerations for FSI customers when choosing between them. The choice depends on several factors including existing investments in secrets management systems, specific security needs and compliance requirements, preference for a Kubernetes native solution or willingness to accept vendor lock-in.

The guidance provided here covers the strengths, limitations, and trade-offs of each option, allowing regulated institutions to make an informed decision based on their unique requirements and constraints. This guidance can be adapted and tailored to fit the specific needs of an organization, providing a secure and efficient secrets management solution for their Amazon EKS workloads, while aligning with the stringent security and compliance standards of the regulated institutions.

 
If you have feedback about this post, submit comments in the Comments section below. If you have questions about this post, contact AWS Support.

Piyush Mattoo

Piyush Mattoo
Piyush is a Senior Solution Architect for Financial Services Data Provider segment at Amazon Web Services. He is a software technology leader with over a decade long experience building scalable and distributed software systems to enable business value through the use of technology. He is based out of Southern California and current interests include outdoor camping and nature walks.

Ruy Cavalcanti

Ruy Cavalcanti
Ruy is a Senior Security Architect for the Latin American Financial market at AWS. He has been working in IT and Security for over 19 years, helping customers create secure architectures in the AWS Cloud. Ruy’s interests include jamming on his guitar, firing up the grill for some Brazilian-style barbecue, and enjoying quality time with his family and friends.

Chetan Pawar

Chetan Pawar
Chetan is a Cloud Architect specializing in infrastructure within AWS Professional Services. As a member of the Containers Technical Field Community, he provides strategic guidance on enterprise Infrastructure and DevOps for clients across multiple industries. He has an 18-year track record building large-scale Infrastructure and containerized platforms. Outside of work, he is an avid traveler and motorsport enthusiast.

How to create a pipeline for hardening Amazon EKS nodes and automate updates

Post Syndicated from Nima Fotouhi original https://aws.amazon.com/blogs/security/how-to-create-a-pipeline-for-hardening-amazon-eks-nodes-and-automate-updates/

Amazon Elastic Kubernetes Service (Amazon EKS) offers a powerful, Kubernetes-certified service to build, secure, operate, and maintain Kubernetes clusters on Amazon Web Services (AWS). It integrates seamlessly with key AWS services such as Amazon CloudWatch, Amazon EC2 Auto Scaling, and AWS Identity and Access Management (IAM), enhancing the monitoring, scaling, and load balancing of containerized applications. It’s an excellent choice for organizations shifting to AWS with existing Kubernetes setups because of its support for open-source Kubernetes tools and plugins.

In another blog post, I showed you how to create Amazon Elastic Container Service (Amazon ECS) hardened images using a Center for Internet Security (CIS) Docker Benchmark. In this blog post, I will show you how to enhance the security of your managed node groups using a CIS Amazon Linux benchmark for Amazon Linux 2 and Amazon Linux 2023. This approach will help you align with organizational or regulatory security standards.

Overview of CIS Amazon Linux Benchmarks

Security experts develop CIS Amazon Linux Benchmarks collaboratively, providing guidelines to enhance the security of Amazon Linux-based images. Through a consensus-based process that includes input from a global community of security professionals, these benchmarks are comprehensive and reflective of current cybersecurity challenges and best practices.

When running your container workloads on Amazon EKS, it’s essential to understand the shared responsibility model to clearly know which components fall under your purview to secure. This awareness is essential because it delineates the security responsibilities between you and AWS; although AWS secures the infrastructure, you are responsible for protecting your applications and data. Applying CIS benchmarks to Amazon EKS nodes represents a strategic approach to security enhancements, operational optimizations, and considerations for container host security. This strategy includes updating systems, adhering to modern cryptographic policies, configuring secure filesystems, and disabling unnecessary kernel modules among other recommendations.

Before implementing these benchmarks, I recommend conducting a thorough threat analysis to identify security risks within your environment. This proactive step makes sure that the application of CIS benchmarks is targeted and effective, addressing specific vulnerabilities and threats. Understanding the unique risks in your environment allows you to use the benchmarks strategically to mitigate these risks. This approach helps you to not blindly implement the benchmarks, but to interpret and use them intelligently, tailoring your application to best suit their specific needs. CIS benchmarks should be viewed as a critical tool in your security toolbox, intended for use alongside a broader understanding of your cybersecurity landscape. This balanced and informed application verifies an effective security posture, emphasizing that while CIS benchmarks are an excellent starting point, understanding your environment’s specific security risks is equally important for a comprehensive security strategy.

The benchmarks are widely available, enabling organizations of any size to adopt security measures without significant financial outlays. Furthermore, applying the CIS benchmarks aids in aligning with various security and privacy regulations such as National Institute of Standards and Technology (NIST), Health Insurance Portability and Accountability Act (HIPAA), and Payment Card Industry Data Security Standard (PCI DSS), simplifying compliance efforts.

In this solution, you’ll be implementing the recommendations outlined in the CIS Amazon Linux 2 Benchmark v2.0.0 or Amazon Linux 2023 v1.0.0. To apply the Benchmark’s guidance, you’ll use the Ansible role for the Amazon Linux 2 CIS Baseline, and the Ansible role for Amazon2023 CIS Baseline provided by Ansible Lockdown.

Solution overview

EC2 Image Builder is a fully managed AWS service designed to automate the creation, management and deployment of secure, up-to-date base images. In this solution, we’ll use Image Builder to apply the CIS Amazon Linux Benchmark to an Amazon EKS-optimized Amazon Machine Image (AMI). The resulting AMI will then be used to update your EKS clusters’ node groups. This approach is customizable, allowing you to choose specific security controls to harden your base AMI. However, it’s advisable to review the specific controls offered by this solution and consider how they may interact with your existing workloads and applications to maintain seamless integration and uninterrupted functionality.

Therefore, it’s crucial to understand each security control thoroughly and select those that align with your operational needs and compliance requirements without causing interference.

Additionally, you can specify cluster tags during the deployment of the AWS CloudFormation template. These tags help filter EKS clusters included in the node group update process. I have provided an CloudFormation template to facilitate the provisioning of the necessary resources.

Figure 1: Amazon EKS node group update workflow

Figure 1: Amazon EKS node group update workflow

As shown in Figure 1, the solution involves the following steps:

  1. Image Builder
    1. The AMI image pipeline clones the Ansible role from the GitHub base on the parent image you specify in the CloudFormation template and applies the controls to the base image.
    2. The pipeline publishes the hardened AMI.
    3. The pipeline validates the benchmarks applied to the base image and publishes the results to an Amazon Simple Storage Service (Amazon S3) bucket. It also invokes Amazon Inspector to run a vulnerability scan on the published image.
  2. State machine initiation
    1. When the AMI is successfully published, the pipeline publishes a message to the AMI status Amazon Simple Notification Service (Amazon SNS) topic. The SNS topic invokes the State machine initiation AWS Lambda function.
    2. The State machine initiation Lambda function extracts the image ID of the published AMI and uses it as the input to initiate the state machine.
  3. State machine
    1. The first state gathers information related to Amazon EKS clusters’ node groups. It creates a new launch template version with the hardened AMI image ID for the node groups that are launched with custom launch template.
    2. The second state uses the new launch template to initiate a node group update on EKS clusters’ node groups.
  4. Image update reminder
    1. A weekly scheduled rule invokes the Image update reminder Lambda function.
    2. The Image update reminder Lambda function retrieves the value for LatestEKSOptimizedAMI from the CloudFormation template and extracts the last modified date of the Amazon EKS-optimized AMI used as the parent image in the Image Builder pipeline. It compares the last modified date of the AMI with the creation date of the latest AMI published by the pipeline. If a new base image is available, it publishes a message to the Image update reminder SNS topic.
    3. The Image update reminder SNS topic sends a message to subscribers notifying them of a new base image. You need to create a new version of your image recipe to update it with the new AMI.

Prerequisites

To follow along with this walkthrough, make sure that you have the following prerequisites in place or the CloudFormation deployment might fail:

  • An AWS account
  • Permission to create required resources
  • An existing EKS cluster with one or more managed node groups deployed with your own launch template
  • AWS Command Line Interface (AWS CLI) installed
  • Amazon Inspector for Amazon Elastic Compute Cloud (Amazon EC2) enabled in your AWS account
  • Have the AWSServiceRoleForImageBuilder service-linked role enabled in your account

Walkthrough

To deploy the solution, complete the following steps.

Step 1: Download or clone the repository

The first step is to download or clone the solution’s repository.

To download the repository

  1. Go to the main page of the repository on GitHub.
  2. Choose Code, and then choose Download ZIP.

To clone the repository

  1. Make sure that you have Git installed.
  2. Run the following command in your terminal:

    git clone https://github.com/aws-samples/pipeline-for-hardening-eks-nodes-and-automating-updates.git

Step 2: Create the CloudFormation stack

In this step, deploy the solution’s resources by creating a CloudFormation stack using the provided CloudFormation template. Sign in to your account and choose an AWS Region where you want to create the stack. Make sure that the Region you choose supports the services used by this solution. To create the stack, follow the steps in Creating a stack on the AWS CloudFormation console. Note that you need to provide values for the parameters defined in the template to deploy the stack. The following table lists the parameters that you need to provide.

Parameter Description
AnsiblePlaybookArguments Ansible-playbook command arguments.
CloudFormationUpdaterEventBridgeRuleState Amazon EventBridge rule that invokes the Lambda function that checks for a new version of the Image Builder parent image.
ClusterTags Tags in JSON format to filter the EKS clusters that you want to update.

[{“tag”= “value”}]

ComponentName Name of the Image Builder component.
DistributionConfigurationName Name of the Image Builder distribution configuration.
EnableImageScanning Choose whether to enable Amazon Inspector image scanning.
ImagePipelineName Name of the Image Builder pipeline.
InfrastructureConfigurationName Name of the Image Builder infrastructure configuration.
InstanceType Image Builder infrastructure configuration EC2 instance type.
LatestEKSOptimizedAMI EKS-optimized AMI parameter name. For more information, see Retrieving Amazon EKS optimized Amazon Linux AMI IDs.
RecipeName Name of the Image Builder recipe.

Note: To make sure that the AWS Task Orchestrator and Executor (AWSTOE) application functions correctly within Image Builder, and to enable updated nodes with the hardened image to join your EKS cluster, it’s necessary to pass the following minimum Ansible parameters:

  • Amazon Linux 2:
    --extra-vars '{"amazon2cis_firewall":"external"}' --skip-tags rule_6.2.11,rule_6.2.12,rule_6.2.13,rule_6.2.14,rule_6.2.15,rule_6.2.16,rule_6.2.17

  • Amazon Linux 2023:
    --extra-vars '{"amzn2023cis_syslog_service":"external","amzn2023cis_selinux_disable":"true"}' --skip-tags rule_1.1.2.3,rule_1.1.4.3,rule_1.2.1,rule_1.3.1,rule_1.3.3,firewalld,accounts,logrotate,rule_6.2.10

Step 3: Set up Amazon SNS topic subscribers

Amazon Simple Notification Service (Amazon SNS) is a web service that coordinates and manages the sending and delivery of messages to subscribing endpoints or clients. An SNS topic is a logical access point that acts as a communication channel.

The solution in this post creates two Amazon SNS topics to keep you informed of each step of the process. The following is a list of the topics that the solution creates and their purpose.

  • AMI status topic – a message is published to this topic upon successful creation of an AMI.
  • Image update reminder topic – a message is published to this topic if a newer version of the base Amazon EKS-optimized AMI is published by AWS.

You need to manually modify the subscriptions for each topic to receive messages published to that topic.

To modify the subscriptions for the topics created by the CloudFormation template

  1. Sign in to the AWS Management Console and go to the Amazon SNS console.
  2. In the left navigation pane, choose Subscriptions.
  3. On the Subscriptions page, choose Create subscription.
  4. On the Create subscription page, in the Details section, do the following:
    • For Topic ARN, choose the Amazon Resource Name (ARN) of one of the topics that the CloudFormation topic created.
    • For Protocol, choose Email.
    • For Endpoint, enter the endpoint value. In this example, the endpoint is an email address, such as the email address of a distribution list.
    • Choose Create subscription.
  5. Repeat the preceding steps for the other topic.

Step 4: Run the pipeline

The Image Builder pipeline that the solution creates consists of an image recipe with one component, an infrastructure configuration, and a distribution configuration. I’ve set up the image recipe to create an AMI, select a parent image, and choose components. There’s only one component where building and testing steps are defined. For the building step, the solution applies the CIS Amazon Linux 2 Benchmark Ansible playbook and cleans up the unnecessary files and folders. In the test step, the solution runs Amazon Inspector, a continuous assessment service that scans your AWS workloads for software vulnerabilities and unintended network exposure, and Audit configuration for Amazon Linux 2 CIS. Optionally, you can create your own components and associate them with the image recipe to make further modifications to the base image.

You will need to manually run the pipeline by using either the console or AWS CLI.

To run the pipeline (console)

  1. Open the EC2 Image Builder console.
  2. From the pipeline details page, choose the name of your pipeline.
  3. From the Actions menu at the top of the page, select Run pipeline.

To run the pipeline (AWS CLI)

  1. You have two options to retrieve the ARN of the pipeline created by this solution:
    1. Using the CloudFormation console:
      1. On the Stacks page of the CloudFormation console, select the stack name. CloudFormation displays the stack details for the selected stack.
      2. From the stack output pane, note ImagePipelineArn.
    2. Using AWS CLI:
      1. Make sure that you have properly configured your AWS CLI.
      2. Run the following command. Replace <pipeline region> with your own information.
        aws imagebuilder list-image-pipelines --region <pipeline region>

      3. From the list of pipelines, find the pipeline named EKS-AMI-hardening-Pipeline and note the pipeline ARN, which you will use in the next step.
  2. Run the pipeline. Make sure to replace <pipeline arn> and <region> with your own information.
    aws imagebuilder start-image-pipeline-execution --image-pipeline-arn <pipeline arn> --region <region>

The following is a process overview of the image hardening and instance refresh:

  1. Image hardening – when you start the pipeline, Image Builder creates the required infrastructure to build your AMI, applies the Ansible role (CIS Amazon Linux 2 or Amazon Linux 2023 Benchmark) to the base AMI, and publishes the hardened AMI. A message is published to the AMI status topic as well.
  2. Image testing – after publishing the AMI, Image Builder scans the newly created AMI with Amazon Inspector and reports the findings back. For Amazon Linux 2 parent images, It also runs Audit configuration for Amazon Linux 2 CIS to verify the changes that the Ansible role made to the base AMI and publishes the results to an S3 bucket.
  3. State machine initiation – after a new AMI is successfully published, the AMI status topic invokes the State machine initiation Lambda function. The Lambda function invokes the EKS node group update state machine and passes on the AMI info.
  4. Update node groups – the EKS update node group state machine has two steps:
    1. Gathering node group information – a Lambda function gathers information regarding EKS clusters and their associated Amazon EC2 managed node groups. It only selects and processes node groups launched with custom launch templates that are in Active state. For each node group, the Lambda function creates a new launch template version including the hardened AMI ID published by the pipeline, and user data including bootstrap.sh arguments required for bootstrapping. View Customizing managed nodes with launch templates to learn more about requirements of specifying an AMI ID in the imageId field of EKS node group’s launch template. When you create the CloudFormation stack, if you pass a tag or a list of tags, only clusters with matching tags are processed in this step.
    2. Node group update – the state machine uses the output of the first Lambda function (first state) and starts updating node groups in parallel (second state).

This solution also creates an EventBridge rule that’s invoked weekly. This rule invokes the Image update reminder Lambda function and notifies you if a new version of your base AMI has been published by AWS so that you can run the pipeline and update your hardened AMI. You can check this EventBridge rule by getting it’s Physical ID on the CloudFormation Resources output, identified by ImageUpdateReminderEventBridgeRule.

After the build is finished the Image status will transition to Available in the EC2 Image Builder console, and you will be able to check the new AMI details by choosing the version link, and validate the security findings. The image will then be ready to be distributed across your environment.

Conclusion

In this blog post, I showed you how to create a workflow to harden Amazon EKS-optimized AMIs by using the CIS Amazon Linux 2 or Amazon Linux 2023 Benchmark and to automate the update of EKS node groups. This automated workflow has several advantages. First, it helps ensure a consistent and standardized process for image hardening, reducing potential human errors and inconsistencies. By automating the entire process, you can apply security and compliance standards across your instances. Second, the tight integration with AWS Step Functions enables smooth, orchestrated updates to the EKS node groups, enhancing the reliability and predictability of deployments. This automation also reduces manual intervention, helping you save time so that your teams can focus on more value-driven tasks. Moreover, this systematic approach helps to enhance the security posture of your Amazon EKS workloads because you can address vulnerabilities rapidly and systematically, helping to keep the environment resilient against potential threats.

 
If you have feedback about this post, submit comments in the Comments section below. If you have questions about this post, contact AWS Support.

Nima Fotouhi

Nima Fotouhi
Nima is a Security Consultant at AWS. He’s a builder with a passion for infrastructure as code (IaC) and policy as code (PaC) and helps customers build secure infrastructure on AWS. In his spare time, he loves to hit the slopes and go snowboarding.

Securing Amazon ECS workloads on AWS Fargate with customer managed keys

Post Syndicated from Maish Saidel-Keesing original https://aws.amazon.com/blogs/compute/securing-amazon-ecs-workloads-on-aws-fargate-with-customer-managed-keys/

As Amazon CTO Werner Vogels said, “Encryption is the tool we have to make sure that nobody else has access to your data. Amazon Web Services (AWS) built encryption into nearly all of its 165 cloud services. Make use of it. Dance like nobody is watching. Encrypt like everyone is.”

Security is the top priority at AWS, underpinning everything we do. With AWS Fargate, every Amazon Elastic Container Service (Amazon ECS) task is launched on to a new single use, single tenant unit of compute. The ephemeral storage for this compute is always encrypted, and the AWS Key Management Service (AWS KMS) encryption key used for this encryption is managed by AWS Fargate.

Today, AWS is announcing that you can bring your own customer managed keys (CMKs). Once added to AWS KMS, you can use these to encrypt the underlying ephemeral storage of an Amazon ECS task on AWS Fargate. With this new capability, customers operating in heavily regulated environments can now have more control and visibility into their task’s ephemeral storage encryption.

This post dives into AWS Fargate task ephemeral storage and shows how the new customer managed key (CMK) feature can be enabled and audited.

Overview

AWS Fargate is a serverless compute engine for containerized workloads running on Amazon ECS and Amazon Elastic Kubernetes Service (Amazon EKS). Each time a new piece of work is scheduled on to AWS Fargate, as an Amazon ECS task or an Amazon EKS Pod, this workload is placed on a single use, single-tenant instance of compute.

For Amazon ECS tasks, that unit of compute has 20GiBs of ephemeral storage attached. This can be increased up to 200GiB by specifying the ephemeralStorage parameter in your task definition. This ephemeral storage is bound to the lifecycle of the Amazon ECS task, and once the Amazon ECS task has stopped, along with the underlying compute, this ephemeral storage is deleted.

If you are using AWS Fargate platform version 1.4.0 or higher, this ephemeral storage volume is encrypted by default. It is encrypted using an AWS Key Management Service (KMS) key with the AES-256 encryption algorithm. The key, and its lifecycle, is owned by the AWS Fargate service. You can learn more about Fargate-managed ephemeral storage encryption in the AWS Fargate Security Whitepaper.

With today’s launch, as an alternative to the Fargate-managed encryption, you can choose to encrypt the ephemeral storage with customer managed keys (CMKs). This helps regulation-sensitive customers meet their internal security policies and regulatory requirements.

Customers can import their own existing keys into AWS KMS or create a new CMK to encrypt the ephemeral storage. CMKs used by AWS Fargate can be managed through the normal AWS KMS lifecycle actions such as being rotated, disabled, and deleted. See the Amazon ECS documentation for more details on managing the KMS key. Additionally, all access from AWS Fargate to the KMS key can be audited in AWS CloudTrail Logs.

In January 2024, AWS announced that additional Amazon Elastic Block Store (Amazon EBS) volumes can now be attached to Amazon ECS tasks running on AWS Fargate. These EBS volumes unlock additional use cases for AWS Fargate customers, using higher capacity and high-performance volumes for use in their tasks alongside the ephemeral storage. These additional EBS volumes are managed differently to the ephemeral storage, and these volumes can already be encrypted with customer managed KMS keys (CMKs).

AWS Fargate falls under the scope of the following compliance programs regarding AWS’s side of the shared responsibility model. The compliance programs covered by AWS Fargate include:

You can download third-party audit reports using AWS Artifact. For more information, see Downloading Reports in AWS Artifact. Many of these compliance programs require customers to encrypt their data at rest within their Amazon ECS on AWS Fargate resources.

Customers also have additional internal risk management policies for key handling, where they must generate their own keys, have backups for these keys off-cloud, and manage the lifecycle of these keys. Until today, these customers could not use AWS Fargate’s default encryption solution for the workloads subject to their internal security policies.

Enabling CMK for ephemeral storage on an Amazon ECS Cluster

Following today’s launch a single KMS key can now be attached to a new or existing Amazon ECS Cluster. Once a key has been attached, all new tasks launched on to AWS Fargate use this KMS key. If you have existing tasks running in the Amazon ECS cluster, they must be redeployed to use the new encryption key. If these tasks are part of an Amazon ECS service, passing the –force-new-deployment flag to an amazon ecs update-service command forces all tasks to be redeployed with the new KMS key (while respecting the minimumHealthyPercent of the service).

To attach a KMS key to a new or existing cluster, specify the KeyId to the new managedStorageConfiguration field:

aws ecs create-cluster \
  --cluster clusterName \
  --configuration '{"managedStorageConfiguration":{"fargateEphemeralStorageKmsKeyId":"arn:aws:kms:us-west-2:012345678901:key/a1b2c3d4-5678-90ab-cdef-EXAMPLE11111"}}'

Here is an example of the output of a DescribeClusters API request to an Amazon ECS cluster with a customer managed key:

aws ecs describe-clusters --clusters ecs-fargate-self-managed-key-cluster --region us-west-2 --include CONFIGURATIONS

Result of describe-clusters query

Aside from auditing CloudTrail Logs for encryption events, you can also verify that an ECS task is using the KMS key by using the DescribeTask API on an existing task:

{
    "tasks": [
        {
            ....
            "clusterArn": "arn:aws:ecs:us-west-2:1234567890:cluster/mycluster",
            "taskArn": "arn:aws:ecs:us-west-2:1234567890:task/11223342-1111-4fde-b6ca-273c5cfc00a1]",
            "fargateEphemeralStorage": {
                "sizeInGiB": 20,
                "kmsKeyId": "arn:aws:kms:us-west-2:1234567890:key/082222a1-1111-4fde-b6ca-273c5cfc00a1"
            }
        }
    ]
}

Enforcing encryption with customer managed keys

The new AWS Identity and Access Management (IAM) condition key ensures that your Amazon ECS clusters are created with a customer managed key. This can be applied as Service Control Policy in your AWS Organization or as part of your IAM permissions.

Here is an IAM policy example snippet that ensures a cluster can only be created when a specific AWS KMS key is used:

{
  "Version": "2012-10-17",
  "Statement": [
    {
      "Effect": "Allow",
      "Action": [
        "ecs:CreateCluster"
      ],
      "Resource": "*",
      "Condition": {
        "StringEquals": {
          "ecs:fargate-ephemeral-storage-kms-key": "arn:aws:kms:us-east-1:123456789012:key/1234abcd-12ab-34cd-56ef-1234567890ab"
        }
      }
    }
  ]
}

Audit encryption events

Encryption events are logged in AWS CloudTrail. The following is an example of a CloudTrail event that includes the volume ID, cluster name, and AWS Account ID of the operation. You can find more details about the type of events that are logged in Managing AWS KMS keys for Fargate ephemeral storage.

{
    "eventVersion": "1.08",
    "userIdentity": {
        "type": "AWSService",
        "invokedBy": "ec2-frontend-api.amazonaws.com"
    },
    "eventTime": "2024-04-23T18:08:13Z",
    "eventSource": "kms.amazonaws.com",
    "eventName": "CreateGrant",
    "awsRegion": "us-west-2",
    "sourceIPAddress": "ec2-frontend-api.amazonaws.com",
    "userAgent": "ec2-frontend-api.amazonaws.com",
    "requestParameters": {
        "keyId": "arn:aws:kms:us-west-2:123456789012:key/9b52b885-3f4d-40af-9843-d6b24b735559",
        "granteePrincipal": "fargate.us-west-2.amazonaws.com",
        "operations": [
            "Decrypt"
        ],
        "constraints": {
            "encryptionContextSubset": {
                "aws:ecs:clusterAccount": "123456789012",
                "aws:ebs:id": "vol-01234567890abcdef",
                "aws:ecs:clusterName": "ecs-fargate-self-managed-key-cluster"
            }
        },
        "retiringPrincipal": "ec2.us-west-2.amazonaws.com"
    },
    "responseElements": {
        "grantId": "e3b0c44298fc1c149afbf4c8996fb92427ae41e4649b934ca495991b7852b855",
        "keyId": "arn:aws:kms:us-west-2:123456789012:key/9b52b885-3f4d-40af-9843-d6b24b735559"
    },
    "requestID": "be4d1a4e4730e0dceca51f87ee7454d5db76400d80e22bfbf3c4ca01e893b60c",
    "eventID": "bf36027c-86bd-40f2-a561-960cbe148c4c",
    "readOnly": false,
    "resources": [
        {
            "accountId": "AWS Internal",
            "type": "AWS::KMS::Key",
            "ARN": "arn:aws:kms:us-west-2:123456789012:key/9b52b885-3f4d-40af-9843-d6b24b735559"
        }
    ],
    "eventType": "AwsApiCall",
    "managementEvent": true,
    "recipientAccountId": "123456789012",
    "sharedEventID": "bf36027c-86bd-40f2-a561-960cbe148c4c",
    "eventCategory": "Management"
}

Conclusion

With the use of AWS KMS customer managed keys, you can now meet your security requirements for your data inside your Amazon ECS workloads running on AWS Fargate.

To learn more about compliance on your Amazon ECS workloads you can reference the FSI Services Spotlight: Amazon Elastic Container Service (ECS) with AWS Fargate blog post or the security overview of AWS Fargate whitepaper. To learn more about the use of customer managed keys in AWS Fargate, refer to the AWS documentation. This feature was requested by our customers on the AWS Containers roadmap.

Introducing Amazon EMR on EKS with Apache Flink: A scalable, reliable, and efficient data processing platform

Post Syndicated from Kinnar Kumar Sen original https://aws.amazon.com/blogs/big-data/introducing-amazon-emr-on-eks-with-apache-flink-a-scalable-reliable-and-efficient-data-processing-platform/

AWS recently announced that Apache Flink is generally available for Amazon EMR on Amazon Elastic Kubernetes Service (EKS). Apache Flink is a scalable, reliable, and efficient data processing framework that handles real-time streaming and batch workloads (but is most commonly used for real-time streaming). Amazon EMR on EKS is a deployment option for Amazon EMR that allows you to run open source big data frameworks such as Apache Spark and Flink on Amazon Elastic Kubernetes Service (Amazon EKS) clusters with the EMR runtime. With the addition of Flink support in EMR on EKS, you can now run your Flink applications on Amazon EKS using the EMR runtime and benefit from both services to deploy, scale, and operate Flink applications more efficiently and securely.

In this post, we introduce the features of EMR on EKS with Apache Flink, discuss their benefits, and highlight how to get started.

EMR on EKS for data workloads

AWS customers deploying large-scale data workloads are adopting the EMR runtime with Amazon EKS as the underlying orchestrator to benefit from complimenting features. This also enables multi-tenancy and allows data engineers and data scientists to focus on building the data applications, and the platform engineering and the site reliability engineering (SRE) team can manage the infrastructure. Some key benefits of Amazon EKS for these customers are:

  • The AWS-managed control plane, which improves resiliency and removes undifferentiated heavy lifting
  • Features like multi-tenancy and resource-based access policies (RBAC), which allow you to build cost-efficient platforms and enforce organization-wide governance policies
  • The extensibility of Kubernetes, which allows you to install open source add-ons (observability, security, notebooks) to meet your specific needs

The EMR runtime offers the following benefits:

  • Takes care of the undifferentiated heavy lifting of managing installations, configuration, patching, and backups
  • Simplifies scaling
  • Optimizes performance and cost
  • Implements security and compliance by integrating with other AWS services and tools

Benefits of EMR on EKS with Apache Flink

The flexibility to choose instance types, price, and AWS Region and Availability Zone according to the workload specification is often the main driver of reliability, availability, and cost-optimization. Amazon EMR on EKS natively integrates tools and functionalities to enable these—and more.

Integration with existing tools and processes, such as continuous integration and continuous development (CI/CD), observability, and governance policies, helps unify the tools used and decreases the time to launch new services. Many customers already have these tools and processes for their Amazon EKS infrastructure, which you can now easily extend to your Flink applications running on EMR on EKS. If you’re interested in building your Kubernetes and Amazon EKS capabilities, we recommend using EKS Blueprints, which provides a starting place to compose complete EKS clusters that are bootstrapped with the operational software that is needed to deploy and operate workloads.

Another benefit of running Flink applications with Amazon EMR on EKS is improving your applications’ scalability. The volume and complexity of data processed by Flink apps can vary significantly based on factors like the time of the day, day of the week, seasonality, or being tied to a specific marketing campaign or other activity. This volatility makes customers trade off between over-provisioning, which leads to inefficient resource usage and higher costs, or under-provisioning, where you risk missing latency and throughput SLAs or even service outages. When running Flink applications with Amazon EMR on EKS, the Flink auto scaler will increase the applications’ parallelism based on the data being ingested, and Amazon EKS auto scaling with Karpenter or Cluster Autoscaler will scale the underlying capacity required to meet those demands. In addition to scaling up, Amazon EKS can also scale your applications down when the resources aren’t needed so your Flink apps are more cost-efficient.

Running EMR on EKS with Flink allows you to run multiple versions of Flink on the same cluster. With traditional Amazon Elastic Compute Cloud (Amazon EC2) instances, each version of Flink needs to run on its own virtual machine to avoid challenges with resource management or conflicting dependencies and environment variables. However, containerizing Flink applications allows you to isolate versions and avoid conflicting dependencies, and running them on Amazon EKS allows you to use Kubernetes as the unified resource manager. This means that you have the flexibility to choose which version of Flink is best suited for each job, and also improves your agility to upgrade a single job to the next version of Flink rather than having to upgrade an entire cluster, or spin up a dedicated EC2 instance for a different Flink version, which would increase your costs.

Key EMR on EKS differentiations

In this section, we discuss the key EMR on EKS differentiations.

Faster restart of the Flink job during scaling or failure recovery

This is enabled by task local recovery via Amazon Elastic Block Store (Amazon EBS) volumes and fine-grained recovery support in Adaptive Scheduler.

Task local recovery via EBS volumes for TaskManager pods is available with Amazon EMR 6.15.0 and higher. The default overlay mount comes with 10 GB, which is sufficient for jobs with a lower state. Jobs with large states can enable the automatic EBS volume mount option. The TaskManager pods are automatically created and mounted during pod creation and removed during pod deletion.

Fine-grained recovery support in the adaptive scheduler is available with Amazon EMR 6.15.0 and higher. When a task fails during its run, fine-grained recovery restarts only the pipeline-connected component of the failed task, instead of resetting the entire graph, and triggers a complete rerun from the last completed checkpoint, which is more expensive than just rerunning the failed tasks. To enable fine-grained recovery, set the following configurations in your Flink configuration:

jobmanager.execution.failover-strategy: region
restart-strategy: exponential-delay or fixed-delay

Logging and monitoring support with customer managed keys

Monitoring and observability are key constructs of the AWS Well-Architected framework because they help you learn, measure, and adapt to operational changes. You can enable monitoring of launched Flink jobs while using EMR on EKS with Apache Flink. Amazon Managed Service for Prometheus is deployed automatically, if enabled while installing the Flink operator, and it helps analyze Prometheus metrics emitted for the Flink operator, job, and TaskManager.

You can use the Flink UI to monitor health and performance of Flink jobs through a browser using port-forwarding. We have also enabled collection and archival of operator and application logs to Amazon Simple Storage Service (Amazon S3) or Amazon CloudWatch using a FluentD sidecar. This can be enabled through a monitoringConfiguration block in the deployment customer resource definition (CRD):

monitoringConfiguration:
    s3MonitoringConfiguration:
      logUri: S3 BUCKET
      encryptionKeyArn: CMK ARN FOR S3 BUCKET ENCRYPTION
    cloudWatchMonitoringConfiguration:
      logGroupName: LOG GROUP NAME
      logStreamNamePrefix: LOG GROUP STREAM PREFIX
    sideCarResources:
      limits:
        cpuLimit: 500m
        memoryLimit: 250Mi
    containerLogRotationConfiguration:
        rotationSize: 2Gb
        maxFilesToKeep: 10

Cost-optimization using Amazon EC2 Spot Instances

Amazon EC2 Spot Instances are an Amazon EC2 pricing option that provides steep discounts of up to 90% over On-Demand prices. It’s the preferred choice to run big data workloads because it helps improve throughput and optimize Amazon EC2 spend. Spot Instances are spare EC2 capacity and can be interrupted with notification if Amazon EC2 needs the capacity for On-Demand requests. Flink streaming jobs running on EMR on EKS can now respond to Spot Instance interruption, perform a just-in-time (JIT) checkpoint of the running jobs, and prevent scheduling further tasks on these Spot Instances. When restarting the job, not only will the job restart from the checkpoint, but a combined restart mechanism will provide a best-effort service to restart the job either after reaching target resource parallelism or the end of the current configured window. This can also prevent consecutive job restarts caused by Spot Instances stopping in a short interval and help reduce cost and improve performance.

To minimize the impact of Spot Instance interruptions, you should adopt Spot Instance best practices. The combined restart mechanism and JIT checkpoint is offered only in Adaptive Scheduler.

Integration with the AWS Glue Data Catalog as a metadata store for Flink applications

The AWS Glue Data Catalog is a centralized metadata repository for data assets across various data sources, and provides a unified interface to store and query information about data formats, schemas, and sources. Amazon EMR on EKS with Apache Flink releases 6.15.0 and higher support using the Data Catalog as a metadata store for streaming and batch SQL workflows. This further enables data understanding and makes sure that it is transformed correctly.

Integration with Amazon S3, enabling resiliency and operational efficiency

Amazon S3 is the preferred cloud object store for AWS customers to store not only data but also application JARs and scripts. EMR on EKS with Apache Flink can fetch application JARs and scripts (PyFlink) through deployment specification, which eliminates the need to build custom images in Flink’s Application Mode. When checkpointing on Amazon S3 is enabled, a managed state is persisted to provide consistent recovery in case of failures. Retrieval and storage of files using Amazon S3 is enabled by two different Flink connectors. We recommend using Presto S3 (s3p) for checkpointing and s3 or s3a for reading and writing files including JARs and scripts. See the following code:

...
spec:
  flinkConfiguration:
    taskmanager.numberOfTaskSlots: "2"
    state.checkpoints.dir: s3p://<BUCKET-NAME>/flink-checkpoint/
...
job:
jarURI: "s3://<S3-BUCKET>/scripts/pyflink.py" # Note, this will trigger the artifact download process
entryClass: "org.apache.flink.client.python.PythonDriver"
...

Role-based access control using IRSA

IAM Roles for Service Accounts (IRSA) is the recommended way to implement role-based access control (RBAC) for deploying and running applications on Amazon EKS. EMR on EKS with Apache Flink creates two roles (IRSA) by default for Flink operator and Flink jobs. The operator role is used for JobManager and Flink services, and the job role is used for TaskManagers and ConfigMaps. This helps limit the scope of AWS Identity and Access Management (IAM) permission to a service account, helps with credential isolation, and improves auditability.

Get started with EMR on EKS with Apache Flink

If you want to run a Flink application on recently launched EMR on EKS with Apache Flink, refer to Running Flink jobs with Amazon EMR on EKS, which provides step-by-step guidance to deploy, run, and monitor Flink jobs.

We have also created an IaC (Infrastructure as Code) template for EMR on EKS with Flink Streaming as part of Data on EKS (DoEKS), an open-source project aimed at streamlining and accelerating the process of building, deploying, and scaling data and ML workloads on Amazon Elastic Kubernetes Service (Amazon EKS). This template will help you to provision a EMR on EKS with Flink cluster and evaluate the features as mentioned in this blog. This template comes with the best practices built in, so you can use this IaC template as a foundation for deploying EMR on EKS with Flink in your own environment if you decide to use it as part of your application.

Conclusion

In this post, we explored the features of recently launched EMR on EKS with Flink to help you understand how you might run Flink workloads on a managed, scalable, resilient, and cost-optimized EMR on EKS cluster. If you are planning to run/explore Flink workloads on Kubernetes consider running them on EMR on EKS with Apache Flink. Please do contact your AWS Solution Architects, who can be of assistance alongside your innovation journey.


About the Authors

Kinnar Kumar Sen is a Sr. Solutions Architect at Amazon Web Services (AWS) focusing on Flexible Compute. As a part of the EC2 Flexible Compute team, he works with customers to guide them to the most elastic and efficient compute options that are suitable for their workload running on AWS. Kinnar has more than 15 years of industry experience working in research, consultancy, engineering, and architecture.

Alex Lines is a Principal Containers Specialist at AWS helping customers modernize their Data and ML applications on Amazon EKS.

Mengfei Wang is a Software Development Engineer specializing in building large-scale, robust software infrastructure to support big data demands on containers and Kubernetes within the EMR on EKS team. Beyond work, Mengfei is an enthusiastic snowboarder and a passionate home cook.

Jerry Zhang is a Software Development Manager in AWS EMR on EKS. His team focuses on helping AWS customers to solve their business problems using cutting-edge data analytics technology on AWS infrastructure.