Post Syndicated from Nitin Kumar original https://aws.amazon.com/blogs/big-data/unlock-real-time-data-insights-with-schema-evolution-using-amazon-msk-serverless-iceberg-and-aws-glue-streaming/
Efficient real-time synchronization of data within data lakes present challenges. Any data inaccuracies or latency issues can significantly compromise analytical insights and subsequent business strategies. Organizations increasingly require synchronized data in near real-time to extract actionable intelligence and respond promptly to evolving market dynamics. Additionally, scalability remains a concern for data lake implementations, which must accommodate expanding volumes of streaming data and maintain optimal performance without incurring high operational costs.
Schema evolution is the process of modifying the structure (schema) of a data table to accommodate changes in the data over time, such as adding or removing columns, without disrupting ongoing operations or requiring a complete data rewrite. Schema evolution is vital in streaming data environments for several reasons. Unlike batch processing, streaming pipelines operate continuously, ingesting data in real time from sources that are actively serving production applications. Source systems naturally evolve over time as businesses add new features, refine data models, or respond to changing requirements. Without proper schema evolution capabilities, even minor changes to source schemas can force streaming pipeline shutdowns, requiring developers to manually reconcile schema differences and rebuild tables.
Such disruptions reduce the core value proposition of streaming architectures—continuous, low-latency data processing. Organizations can maintain uninterrupted data flows and keep source systems evolving independently by using the seamless schema evolution provided by Apache Iceberg. This reduces operational friction and maintains the availability of real-time analytics and applications even as underlying data structures change.
Apache Iceberg is an open table format, delivering essential capabilities for streaming workloads, including robust schema evolution support. This critical feature enables table schemas to adapt dynamically as source database structures evolve, maintaining operational continuity. Consequently, when database columns undergo additions, removals, or modifications, the data lake accommodates these changes seamlessly without requiring manual intervention or risking data inconsistencies.
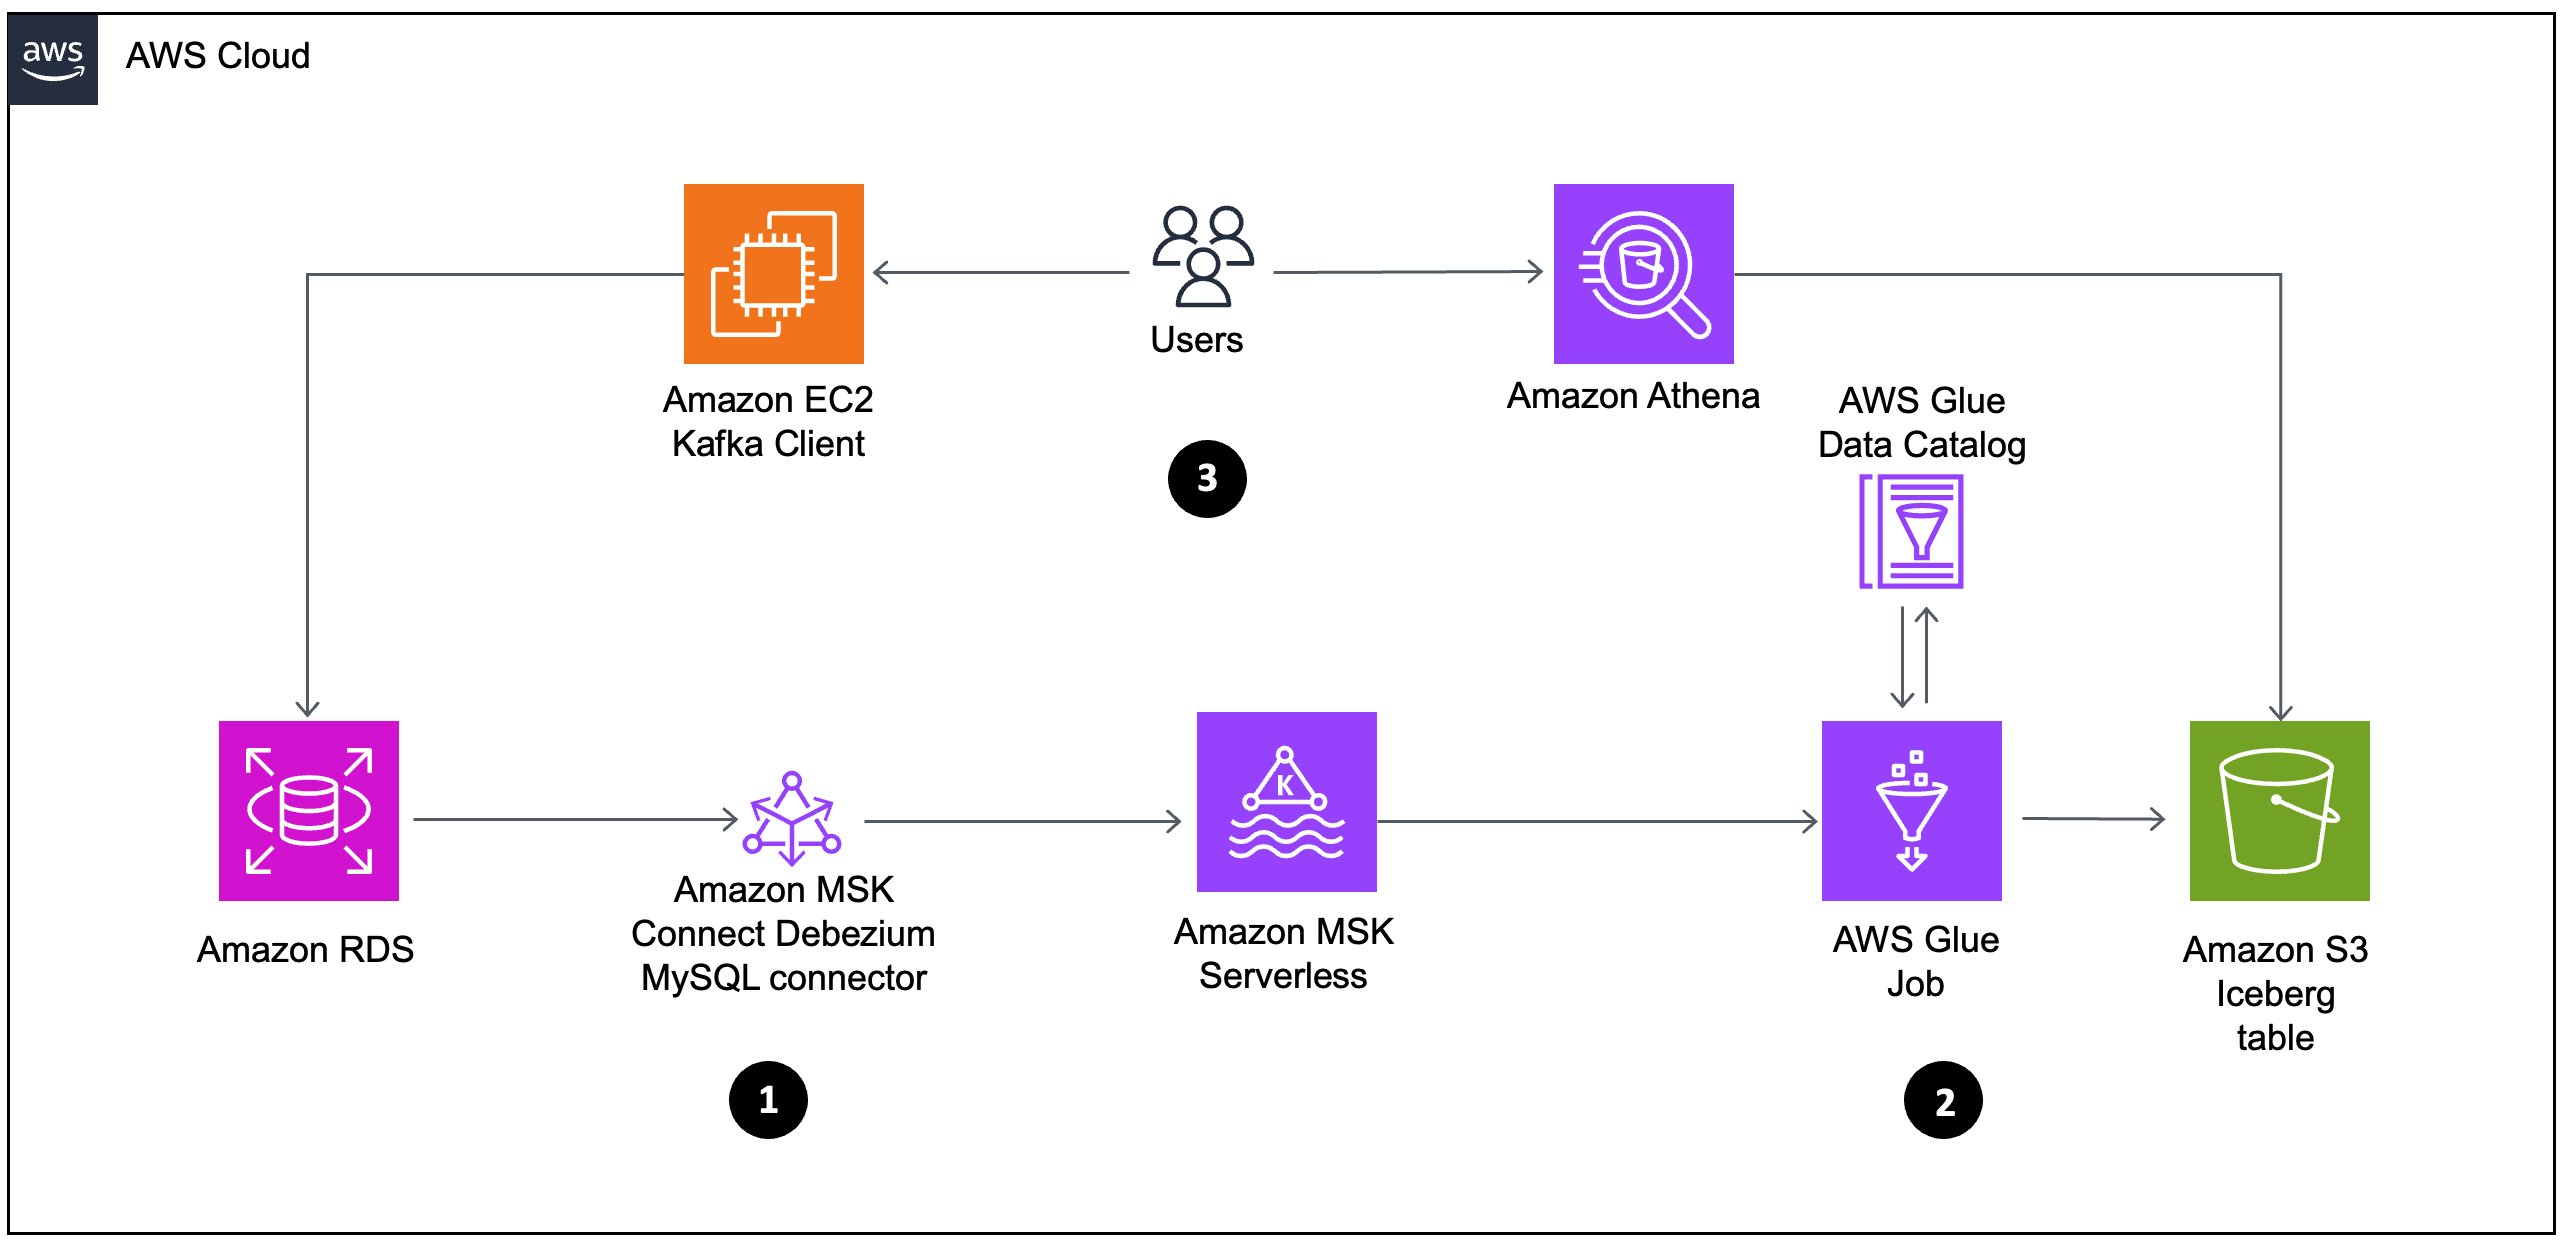
Our comprehensive solution showcases an end-to-end real-time CDC pipeline that enables immediate processing of data modifications from Amazon Relational Database Service (Amazon RDS) for MySQL, streaming altered records directly to AWS Glue streaming jobs using Amazon Managed Streaming for Apache Kafka (Amazon MSK) Serverless. These jobs continually process incoming changes and update Iceberg tables on Amazon Simple Storage Service (Amazon S3) so that the data lake reflects the current state of the operational database environment in real time. By using Apache Iceberg’s comprehensive schema evolution support, our ETL pipeline automatically adapts to database schema modifications, providing data lake consistency and currentness without manual intervention. This approach combines complete process control with instantaneous analytics on operational data, eliminating traditional latency, and future-proofs the solution to address evolving organizational data needs. The architecture’s inherent flexibility facilitates adaptation to diverse use cases requiring immediate data insights.
Solution overview
To effectively address streaming challenges, we propose an architecture using Amazon MSK Serverless, a comprehensive managed Apache Kafka service that autonomously provisions and scales computational and storage resources. This solution offers a frictionless mechanism for ingesting and processing streaming data without the complexity of capacity management. Our implementation uses Amazon MSK Connect with the Debezium MySQL connector to capture and stream database modifications in real time. Rather than employing traditional batch processing methodologies, we implement an AWS Glue streaming job that directly consumes data from Kafka topics, processes CDC events as they occur, and writes transformed data to Apache Iceberg tables on Amazon S3.
The workflow consists of the following:
- Data flows from Amazon RDS through Amazon MSK Connect using the Debezium MySQL connector to Amazon MSK Serverless. This represents a CDC pipeline that captures database changes from the relational database and streams them to Kafka.
- From Amazon MSK Serverless, the data then moves to AWS Glue job, which processes the data and stores it in Amazon S3 as Iceberg tables. The AWS Glue job interacts with the AWS Glue Data Catalog to maintain metadata about the datasets.
- Analyze the data using the serverless interactive query service Amazon Athena, which can be used to query the iceberg table created in Data Catalog. This allows for interactive data analysis without managing infrastructure.
The following diagram illustrates the architecture that we implement through this post. Each number corresponds to the preceding list and shows major components that you implement.
Prerequisites
Before getting started, make sure you have the following:
- An active AWS account with billing enabled
- An AWS Identity and Access Management (IAM) user with specific permissions to create and manage resources, such as a virtual private cloud (VPC), subnet, security group, IAM roles, NAT gateway, internet gateway, Amazon Elastic Compute Cloud (Amazon EC2) client, MSK Serverless, MSK Connector and its plugin AWS Glue job, and S3 buckets.
- Sufficient VPC capacity in your chosen AWS Region.
For this post, we create the solution resources in the US East (N. Virginia) – us-east-1 Region using AWS CloudFormation templates. In the following sections, we show you how to configure your resources and implement the solution.
Configuring CDC and processing using AWS CloudFormation
In this post, you use the CloudFormation template vpc-msk-mskconnect-rds-client-gluejob.yaml. This template sets up the streaming CDC pipeline resources such as a VPC, subnet, security group, IAM roles, NAT, internet gateway, EC2 client, MSK Serverless, MSK Connect, Amazon RDS, S3 buckets, and AWS Glue job.
To create the solution resources for the CDC pipeline, complete the following steps:
- Launch the stack
vpc-msk-mskconnect-rds-client-gluejob.yamlusing the CloudFormation template:

- Provide the parameter values as listed in the following table.
A B C 1 Parameters Description Sample value 2 EnvironmentName An environment name that is prefixed to resource names. msk-iceberg-cdc-pipeline 3 DatabasePassword Database admin account password. **** 4 InstanceType MSK client EC2 instance type. t2.micro 5 LatestAmiId Latest AMI ID of Amazon Linux 3 for ec2 instance. You can use the default value. /aws/service/ami-amazon-linux-latest/al2023-ami-kernel-default-x86_64 6 VpcCIDR IP range (CIDR notation) for this VPC. 10.192.0.0/16 7 PublicSubnet1CIDR IP range (CIDR notation) for the public subnet in the first Availability Zone. 10.192.10.0/24 8 PublicSubnet2CIDR IP range (CIDR notation) for the public subnet in the second Availability Zone. 10.192.11.0/24 9 PrivateSubnet1CIDR IP range (CIDR notation) for the private subnet in the first Availability Zone. 10.192.20.0/24 10 PrivateSubnet2CIDR IP range (CIDR notation) for the private subnet in the second Availability Zone. 10.192.21.0/24 11 NumberOfWorkers Number of workers for AWS Glue streaming job. 3 12 GlueWorkerType Worker type for AWS Glue streaming job. For example, G.1X. G.1X 13 GlueDatabaseName Name of the AWS Glue Data Catalog database. glue_cdc_blogdb 14 GlueTableName Name of the AWS Glue Data Catalog table. iceberg_cdc_tbl
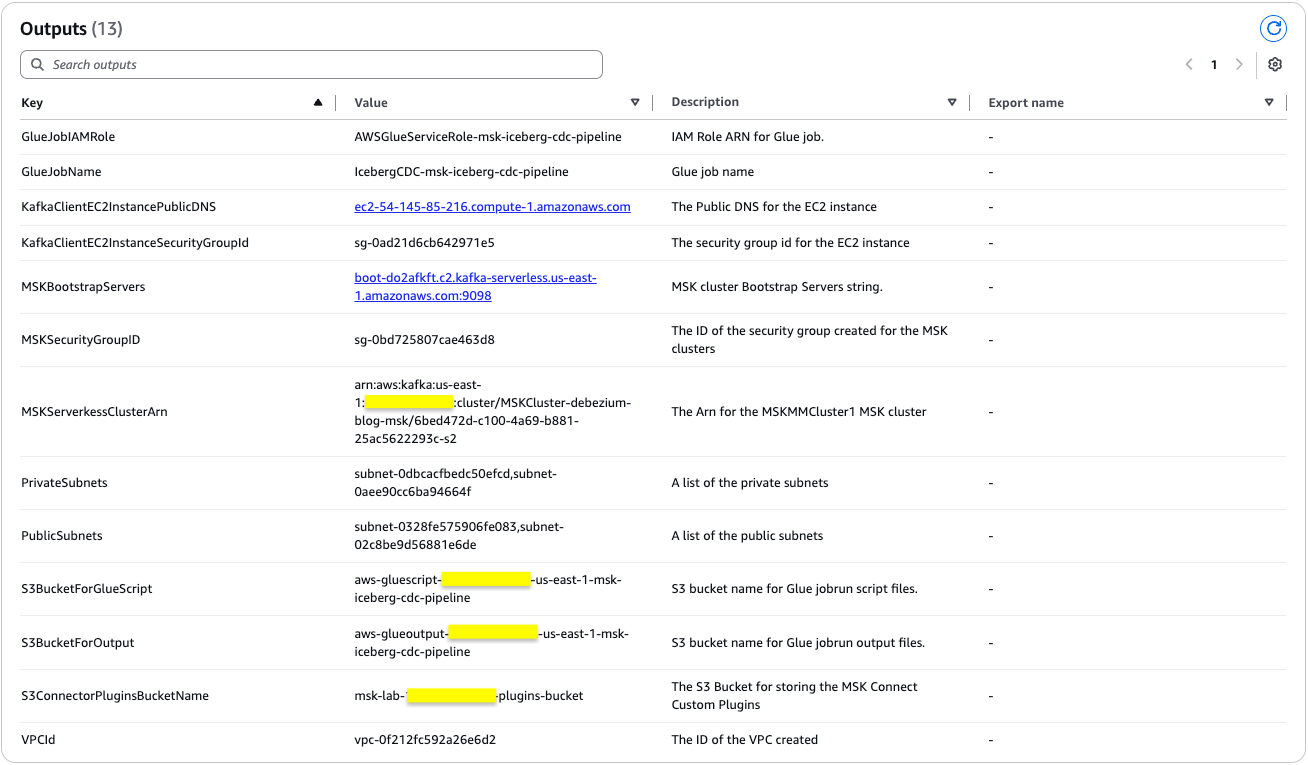
The stack creation process can take approximately 25 minutes to complete. You can check the Outputs tab for the stack after the stack is created, as shown in the following screenshot.
Following the successful deployment of the CloudFormation stack, you now have a fully operational Amazon RDS database environment. The database instance contains the salesdb database with the customer table populated with 30 data records.
These records have been streamed to the Kafka topic through the Debezium MySQL connector implementation, establishing a reliable CDC pipeline. With this foundation in place, proceed to the next phase of the data architecture: near real-time data processing using the AWS Glue streaming job.
Run the AWS Glue streaming job
To transfer the data load from the Kafka topic (created by the Debezium MySQL connector for database table customer) to the Iceberg table, run the AWS Glue streaming job configured by the CloudFormation setup. This process will migrate all existing customer data from the source database table to the Iceberg table. Complete the following steps:
- On the CloudFormation console, choose the stack vpc-msk-mskconnect-rds-client-gluejob.yaml
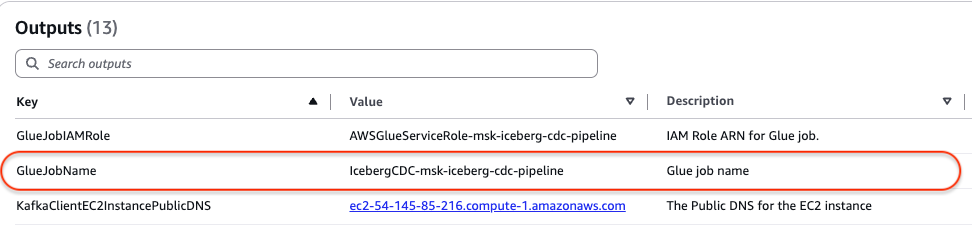
- On the Outputs tab, retrieve the name of the AWS Glue streaming job from the GlueJobName row. In the following screenshot, the name is IcebergCDC-msk-iceberg-cdc-pipeline.

- On the AWS Glue console, choose ETL jobs in the navigation pane.
- Search for the AWS Glue job named IcebergCDC-msk-iceberg-cdc-pipeline.
- Choose the job name to open its details page.
- Choose Run to start the job. On the Runs tab, confirm if the job ran without failure.


You need to wait approximately 2 minutes for the job to process before continuing. This pause allows the jobrun to fully process records from the Kafka topic (initial load) and create the Iceberg table.
Query the Iceberg table using Athena
After the AWS Glue streaming job has successfully started and the Iceberg table has been created in the Data Catalog, follow these steps to validate the data using Athena:
- On the Athena console, navigate to the query editor.
- Choose the Data Catalog as the data source.
- Choose the database glue_cdc_blogdb.
- To validate the data, enter the following query to preview the data and find the total count:
The following screenshot shows the output of the example query.


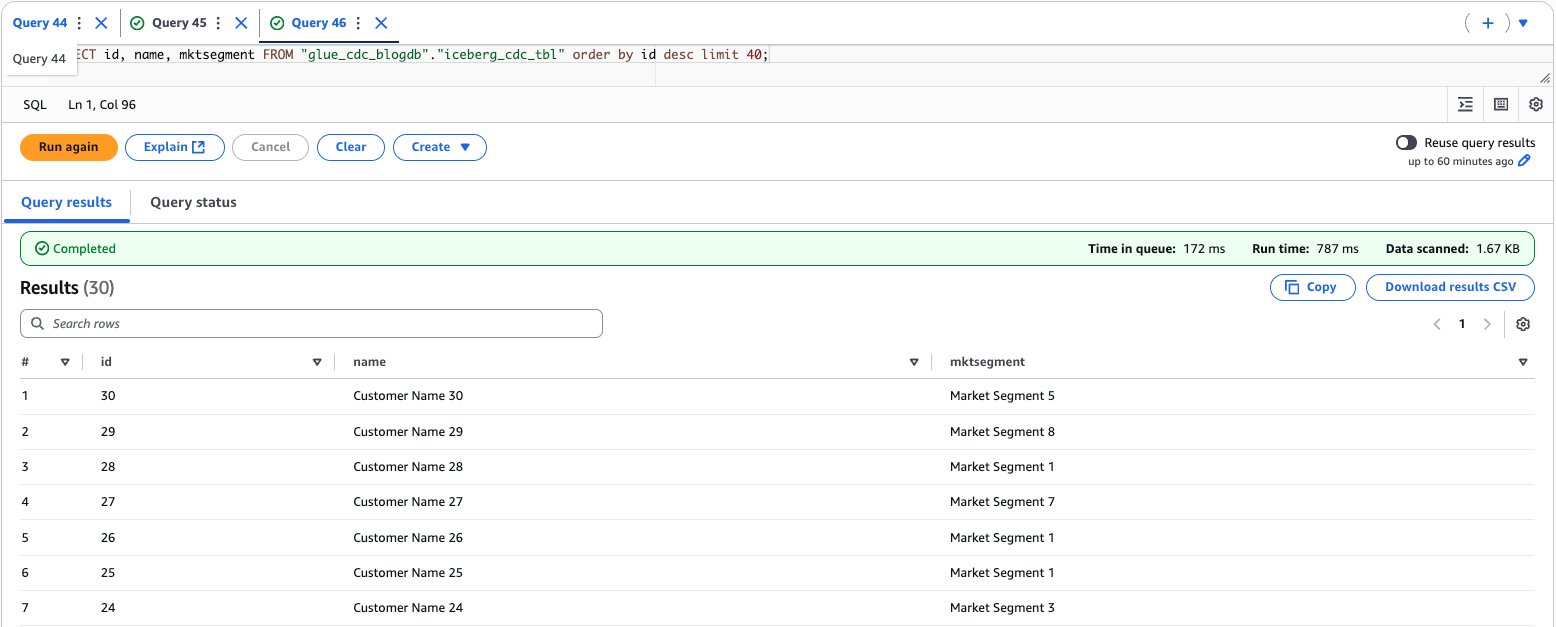
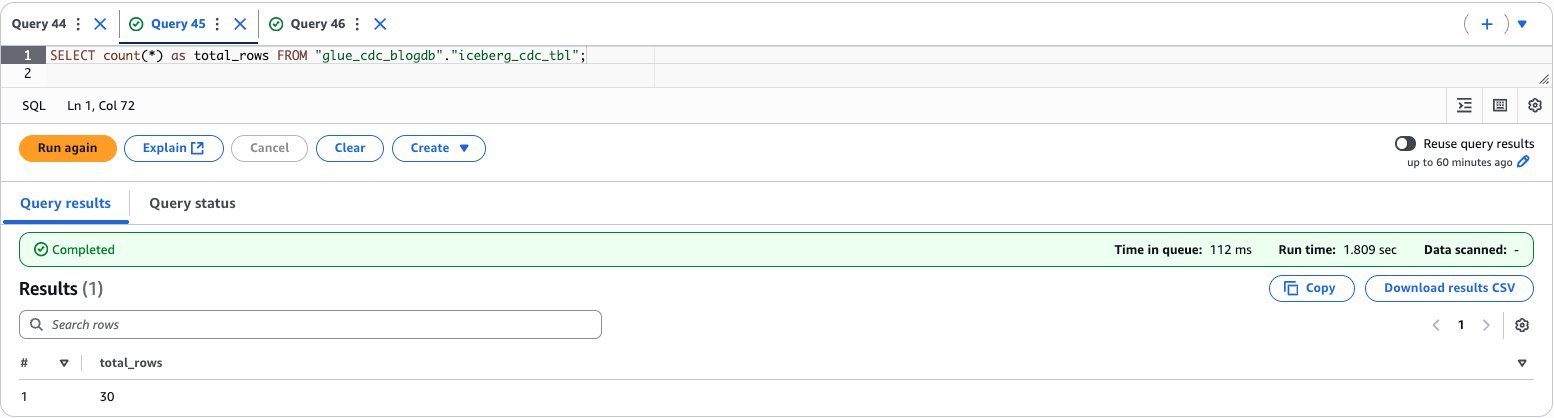
After performing the preceding steps, you’ve established a complete near real-time data processing pipeline by running an AWS Glue streaming job that transfers data from Kafka topics to an Apache Iceberg table, then verified the successful data migration by querying the results through Amazon Athena.
Upload incremental (CDC) data for further processing
Now that you’ve successfully completed the initial full data load, it’s time to focus on the dynamic aspects of the data pipeline. In this section, we explore how the system handles ongoing data modifications such as insertions, updates, and deletions in Amazon RDS for MySQL database. These changes won’t go unnoticed. Our Debezium MySQL connector stands ready to capture each modification event, transforming database changes into a continuous stream of data. Working in tandem with our AWS Glue streaming job, this architecture is designed to promptly process and propagate every change in our source database through our data pipeline.Let’s see this real-time data synchronization mechanism in action, demonstrating how our modern data infrastructure maintains consistency across systems with minimal latency. Follow these steps:
- On the Amazon EC2 console, access the EC2 instance that you created using the CloudFormation template named as KafkaClientInstance.

- Log in to the EC2 instance using AWS Systems Manager Agent (SSM Agent). Select the instance named as KafkaClientInstance and then choose Connect.

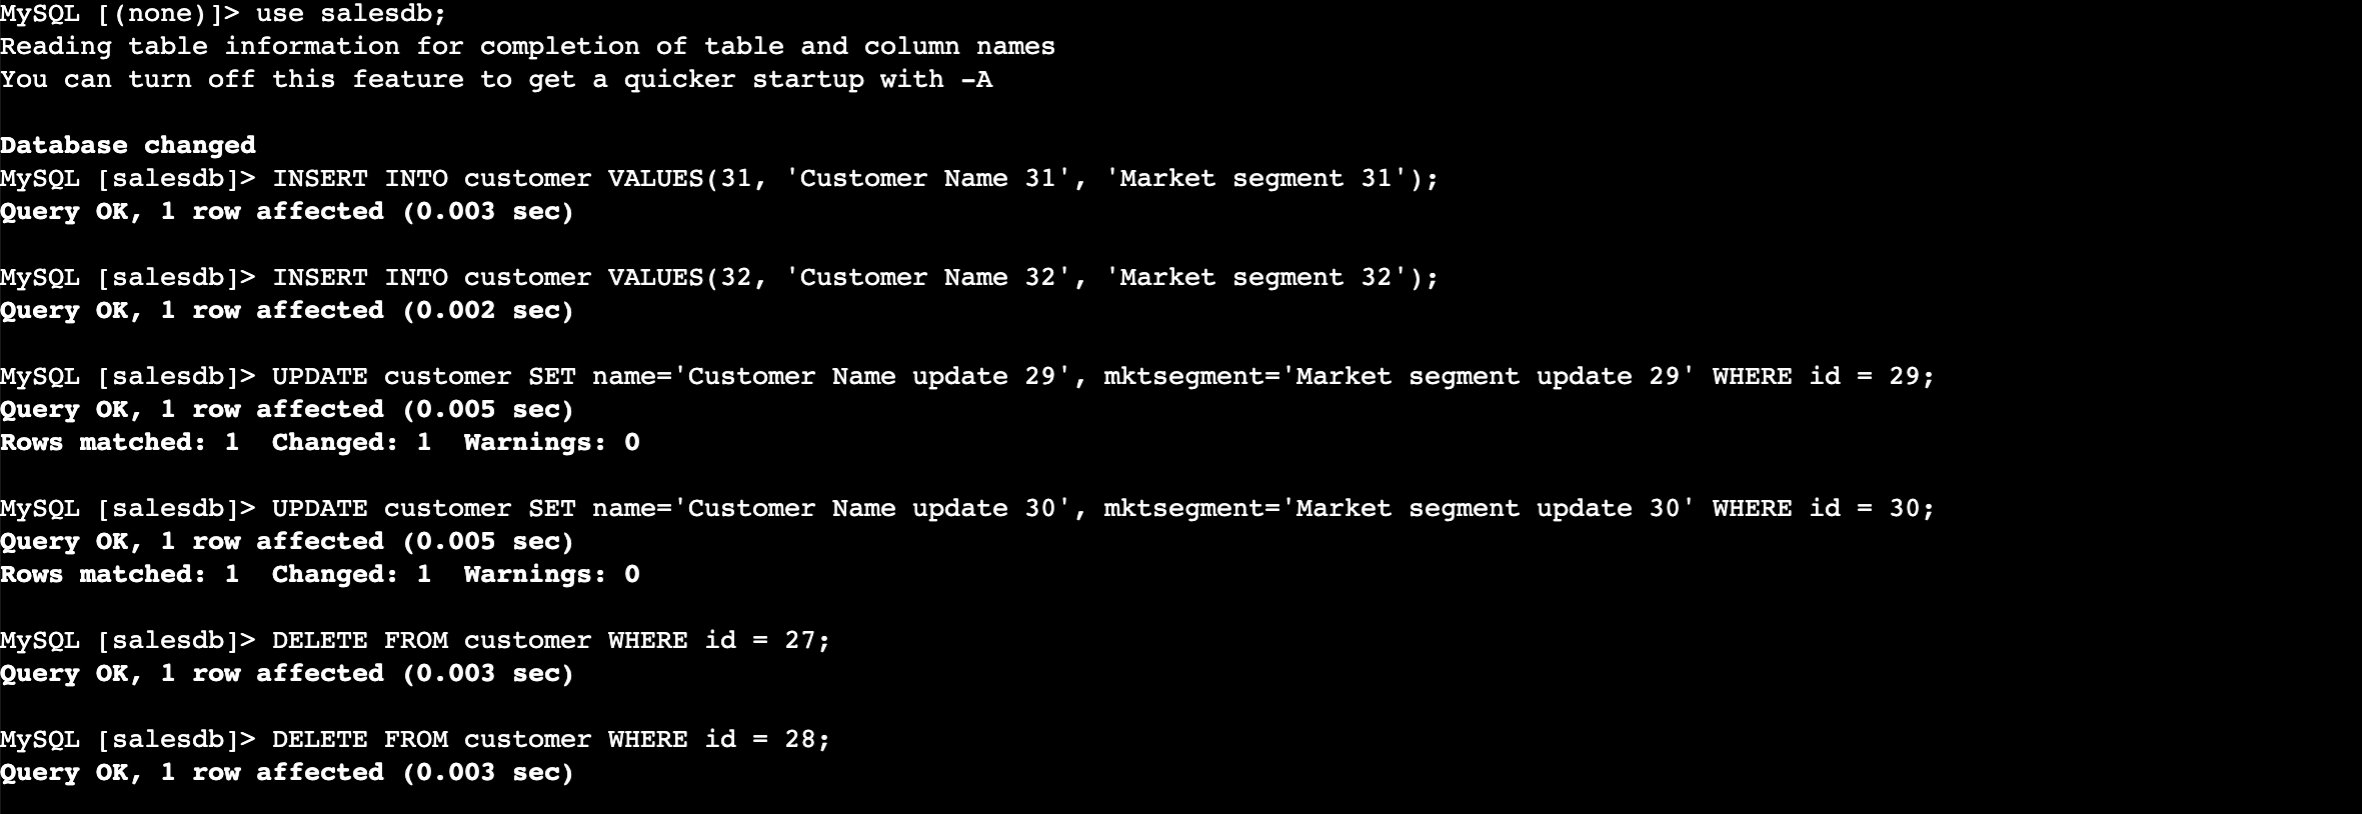
- Enter the following commands to insert the data into the RDS table. Use the same database password you entered when you created the CloudFormation stack.
- Now perform the insert, update, and delete in the CUSTOMER table.

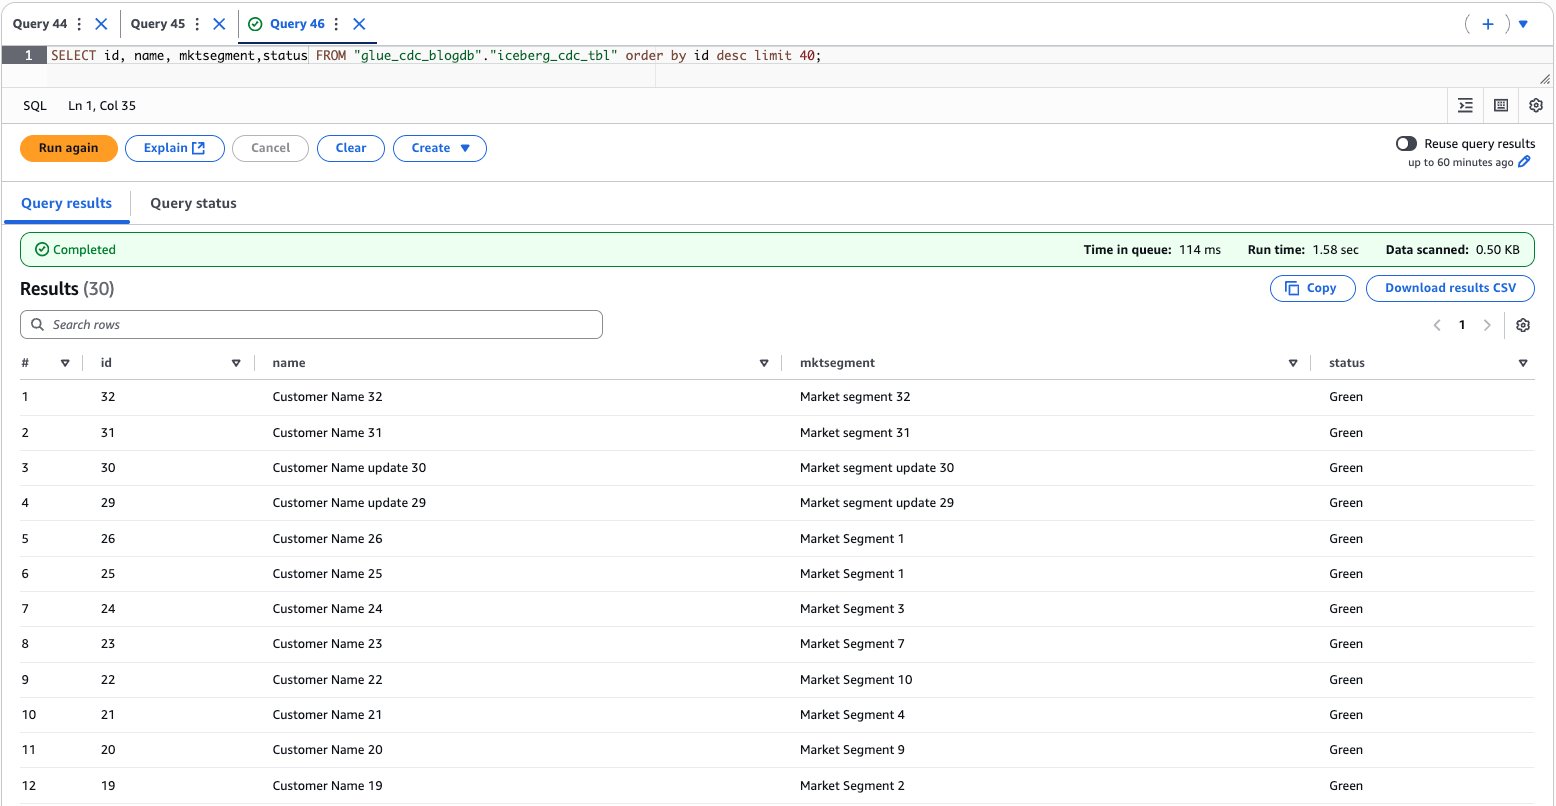
- Validate the data to verify the insert, update, and delete records in the Iceberg table from Athena, as shown in the following screenshot.


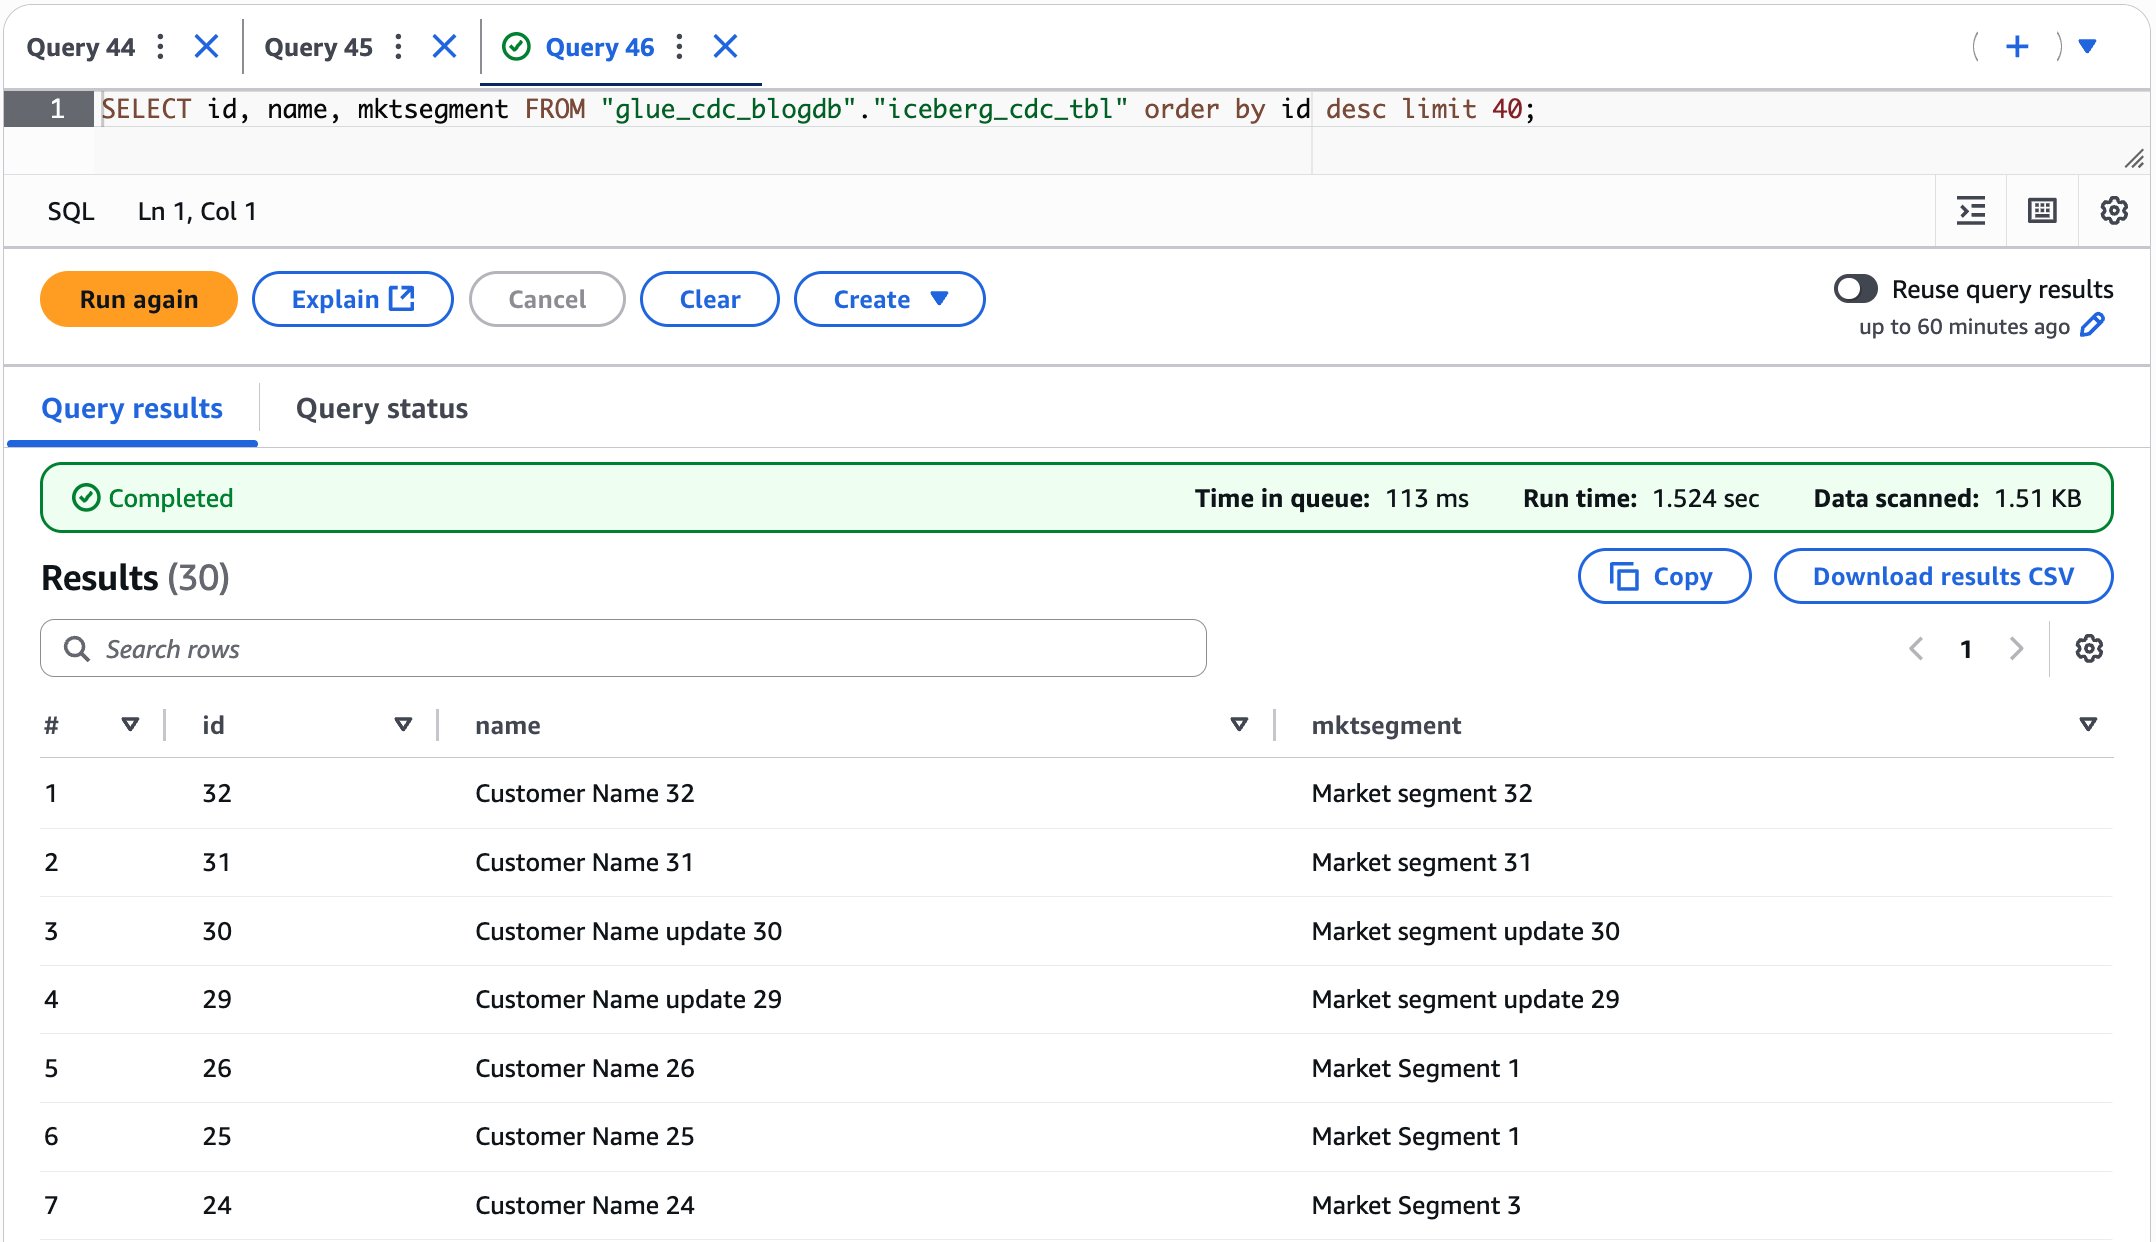
After performing the preceding steps, you’ve learned how our CDC pipeline handles ongoing data modifications by performing insertions, updates, and deletions in the MySQL database and verifying how these changes are automatically captured by Debezium MySQL connector, streamed through Kafka, and reflected in the Iceberg table in near real time.
Schema evolution: Adding new columns to the Iceberg table
The schema evolution mechanism in this implementation provides an automated approach to detecting and adding new columns from incoming data to existing Iceberg tables. Although Iceberg inherently supports robust schema evolution capabilities (including adding, dropping, and renaming columns, updating types, and reordering), this code specifically automates the column addition process for streaming environments. This automation uses Iceberg’s underlying schema evolution capabilities, which guarantee correctness through unique column IDs that ensure new columns never read existing values from another column. By handling column additions programmatically, the system reduces operational overhead in streaming pipelines where manual schema management would create bottlenecks. However, dropping and renaming columns, updating types, and reordering still required manual intervention.
When new data arrives through Kafka streams, the handle_schema_evolution() function orchestrates a four-step process to ensure seamless table schema updates.
- It analyzes the incoming batch DataFrame to infer its schema structure, cataloging all column names and their corresponding data types.
- It retrieves the existing Iceberg table’s schema from the AWS Glue catalog to establish a baseline for comparison.
- The system then performs a schema comparison using method compare_schemas() between batch schema with existing table schema.
- If the incoming frame contains fewer columns than the catalog table, no action is taken.
- It identifies any new columns present in the incoming data that don’t exist in the current table structure and returns a list of new columns that need to be added.
- New columns will be added at the last.
- Handle type evolution isn’t supported. If needed, you can handle the same at comment # Handle type evolution in the compare_schemas() method.
- If the destination table has columns that are dropped in the source table, it doesn’t drop those columns. If that is required for your use case, you can use drop column manually using
ALTER TABLE ... DROP COLUMN. - Renaming the column isn’t supported. To rename the column use case, manually evolve the schema using ALTER TABLE … RENAME COLUMN.
- Finally, if new columns are discovered, the function executes ALTER TABLE … ADD COLUMN statements to evolve the Iceberg table schema, adding the new columns with their appropriate data types.
This approach eliminates the need for manual schema management and prevents data pipeline failures that would typically occur when encountering unexpected fields in streaming data. The implementation also includes proper error handling and logging to track schema evolution events, making it particularly valuable for environments where data structures frequently change.
In this section, we demonstrate how our system handles structural changes to the underlying data model by adding a new status column to the customer table and populating it with default values. Our architecture is designed to seamlessly propagate these schema modifications throughout the pipeline so that downstream analytics and processing capabilities remain uninterrupted while accommodating the enhanced data model. This flexibility is essential for maintaining a responsive, business-aligned data infrastructure that can evolve alongside changing organizational needs.
- Add a new
statuscolumn to thecustomertable and populate it with default values asGreen.
- Use the Athena console to validate the data and schema evolution, as shown in the following screenshot.


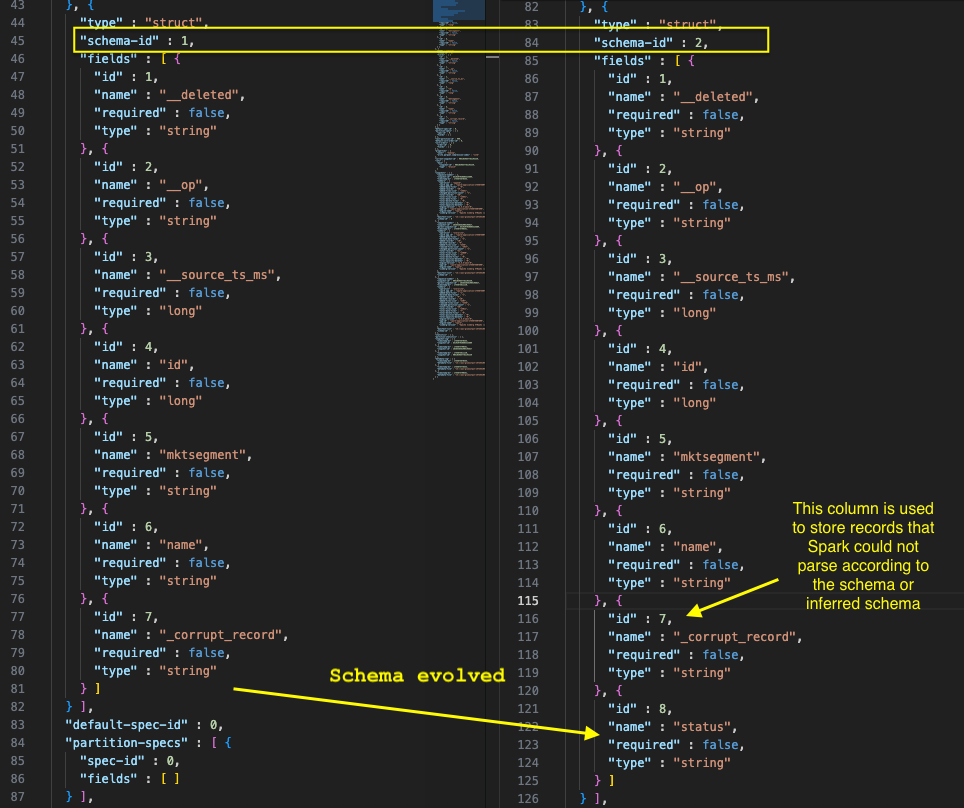
When schema evolution occurs in an Iceberg table, the metadata.json file undergoes specific updates to track and manage these changes. In job when schema evolution detected, it ran the following query to evolve the schema for the Iceberg table.
We checked the metadata.json file in Amazon S3 for iceberg table location, and the following screenshot shows how the schema evolved.
We now explain how our implementation handles schema evolution by automatically detecting and adding new columns from incoming data streams to existing Iceberg tables. The system employs a four-step process that analyzes incoming data schemas, compares them with existing table structures, identifies new columns, and executes the necessary ALTER TABLE statements to evolve the schema without manual intervention, though certain schema changes still require manual handling.
Clean up
To clean up your resources, complete the following steps:
- Stop the running AWS Glue streaming job:
- On the AWS Glue console, choose ETL jobs in the navigation pane.
- Search for the AWS Glue job named IcebergCDC-msk-iceberg-cdc-pipeline.
- Choose the job name to open its details page.
- On the Runs tab, select running jobrun and choose Stop job run. Confirm that the job stopped successfully.
- Remove the AWS Glue database and table:
- On the AWS Glue console, choose Tables in the navigation pane, select
iceberg_cdc_tbl, and choose Delete. - Choose Databases in the navigation pane, select
glue_cdc_blogdb, and choose Delete.
- On the AWS Glue console, choose Tables in the navigation pane, select
- Delete the CloudFormation stack vpc-msk-mskconnect-rds-client-gluejob.yaml.
Conclusion
This post showcases a solution that businesses can use to access real-time data insights without the traditional delays between data creation and analysis. By combining Amazon MSK Serverless, Debezium MySQL connector, AWS Glue streaming, and Apache Iceberg tables, the architecture captures database changes instantly and makes them immediately available for analytics through Amazon Athena. A standout feature is the system’s ability to automatically adapt when database structures change—such as adding new columns—without disrupting operations or requiring manual intervention. This eliminates the technical complexity typically associated with real-time data pipelines and provides business users with the most current information for decision-making, effectively bridging the gap between operational databases and analytical systems in a cost-effective, scalable way.


 Nitin Kumar is a Cloud Engineer (ETL) at Amazon Web Services, specialized in AWS Glue. With a decade of experience, he excels in aiding customers with their big data workloads, focusing on data processing and analytics. He is committed to helping customers overcome ETL challenges and develop scalable data processing and analytics pipelines on AWS. In his free time, he likes to watch movies and spend time with his family.
 Shubham Purwar is a Cloud Engineer (ETL) at AWS Bengaluru, specialized in AWS Glue and Amazon Athena. He is passionate about helping customers solve issues related to their ETL workload and implement scalable data processing and analytics pipelines on AWS. In his free time, Shubham loves to spend time with his family and travel around the world.
 Pramod Kumar P is a Solutions Architect at Amazon Web Services. With 19 years of technology experience and close to a decade of designing and architecting connectivity solutions (IoT) on AWS, he guides customers to build solutions with the right architectural tenets to meet their business outcomes.
 Madhavi Watve is a Senior Solutions Architect at Amazon Web Services, providing help and guidance to a broad range of customers to build highly secure, scalable, reliable, and cost-efficient applications on the cloud. She brings over 20 years of technology experience in software development and architecture and is data analytics specialist.
 Swathi S is a Technical Account Manager with the Enterprise Support team in Amazon Web Services. She has over 6 years of experience with AWS on big data technologies and specializes in analytics frameworks. She is passionate about helping AWS customers navigate the cloud space and enjoys assisting with design and optimization of analytics workloads on AWS.