All posts by Rohit Bansal

Implement model versioning with Amazon Redshift ML

Post Syndicated from Rohit Bansal original https://aws.amazon.com/blogs/big-data/implement-model-versioning-with-amazon-redshift-ml/

Amazon Redshift ML allows data analysts, developers, and data scientists to train machine learning (ML) models using SQL. In previous posts, we demonstrated how you can use the automatic model training capability of Redshift ML to train classification and regression models. Redshift ML allows you to create a model using SQL and specify your algorithm, such as XGBoost. You can use Redshift ML to automate data preparation, preprocessing, and selection of your problem type (for more information, refer to Create, train, and deploy machine learning models in Amazon Redshift using SQL with Amazon Redshift ML). You can also bring a model previously trained in Amazon SageMaker into Amazon Redshift via Redshift ML for local inference. For local inference on models created in SageMaker, the ML model type must be supported by Redshift ML. However, remote inference is available for model types that are not natively available in Redshift ML.

Over time, ML models grow old, and even if nothing drastic happens, small changes accumulate. Common reasons why ML models needs to be retrained or audited include:

  • Data drift – Because your data has changed over time, the prediction accuracy of your ML models may begin to decrease compared to the accuracy exhibited during testing
  • Concept drift – The ML algorithm that was initially used may need to be changed due to different business environments and other changing needs

You may need to refresh the model on a regular basis, automate the process, and reevaluate your model’s improved accuracy. As of this writing, Amazon Redshift doesn’t support versioning of ML models. In this post, we show how you can use the bring your own model (BYOM) functionality of Redshift ML to implement versioning of Redshift ML models.

We use local inference to implement model versioning as part of operationalizing ML models. We assume that you have a good understanding of your data and the problem type that is most applicable for your use case, and have created and deployed models to production.

Solution overview

In this post, we use Redshift ML to build a regression model that predicts the number of people that may use the city of Toronto’s bike sharing service at any given hour of a day. The model accounts for various aspects, including holidays and weather conditions, and because we need to predict a numerical outcome, we used a regression model. We use data drift as a reason for retraining the model, and use model versioning as part of the solution.

After a model is validated and is being used on a regular basis for running predictions, you can create versions of the models, which requires you to retrain the model using an updated training set and possibly a different algorithm. Versioning serves two main purposes:

  • You can refer to prior versions of a model for troubleshooting or audit purposes. This enables you to ensure that your model still retains high accuracy before switching to a newer model version.
  • You can continue to run inference queries on the current version of a model during the model training process of the new version.

At the time of this writing, Redshift ML doesn’t have native versioning capabilities, but you can still achieve versioning by implementing a few simple SQL techniques by using the BYOM capability. BYOM was introduced to support pre-trained SageMaker models to run your inference queries in Amazon Redshift. In this post, we use the same BYOM technique to create a version of an existing model built using Redshift ML.

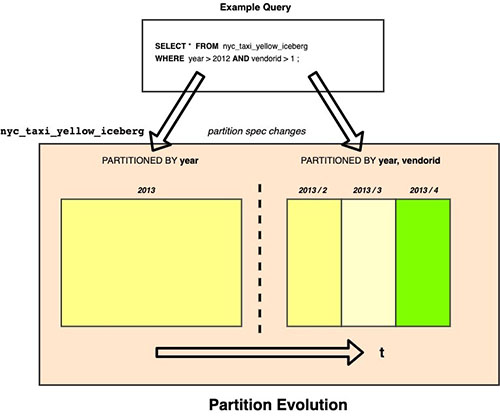
The following figure illustrates this workflow.

In the following sections, we show you how to can create a version from an existing model and then perform model retraining.

Prerequisites

As a prerequisite for implementing the example in this post, you need to set up a Redshift cluster or Amazon Redshift Serverless endpoint. For the preliminary steps to get started and set up your environment, refer to Create, train, and deploy machine learning models in Amazon Redshift using SQL with Amazon Redshift ML.

We use the regression model created in the post Build regression models with Amazon Redshift ML. We assume that it is already been deployed and use this model to create new versions and retrain the model.

Create a version from the existing model

The first step is to create a version of the existing model (which means saving developmental changes of the model) so that a history is maintained and the model is available for comparison later on.

The following code is the generic format of the CREATE MODEL command syntax; in the next step, you get the information needed to use this command to create a new version:

CREATE MODEL model_name
    FROM ('job_name' | 's3_path' )
    FUNCTION function_name ( data_type [, ...] )
    RETURNS data_type
    IAM_ROLE { default }
    [ SETTINGS (
      S3_BUCKET 'bucket', | --required
      KMS_KEY_ID 'kms_string') --optional
    ];

Next, we collect and apply the input parameters to the preceding CREATE MODEL code to the model. We need the job name and the data types of the model input and output values. We collect these by running the show model command on our existing model. Run the following command in Amazon Redshift Query Editor v2:

show model predict_rental_count;

Note the values for AutoML Job Name, Function Parameter Types, and the Target Column (trip_count) from the model output. We use these values in the CREATE MODEL command to create the version.

The following CREATE MODEL statement creates a version of the current model using the values collected from our show model command. We append the date (the example format is YYYYMMDD) to the end of the model and function names to track when this new version was created.

CREATE MODEL predict_rental_count_20230706 
FROM 'redshiftml-20230706171639810624' 
FUNCTION predict_rental_count_20230706 (int4, int4, int4, int4, int4, int4, int4, numeric, numeric, int4)
RETURNS float8 
IAM_ROLE default
SETTINGS (
S3_BUCKET '<<your S3 Bucket>>');

This command may take few minutes to complete. When it’s complete, run the following command:

show model predict_rental_count_20230706;

We can observe the following in the output:

  • AutoML Job Name is the same as the original version of the model
  • Function Name shows the new name, as expected
  • Inference Type shows Local, which designates this is BYOM with local inference

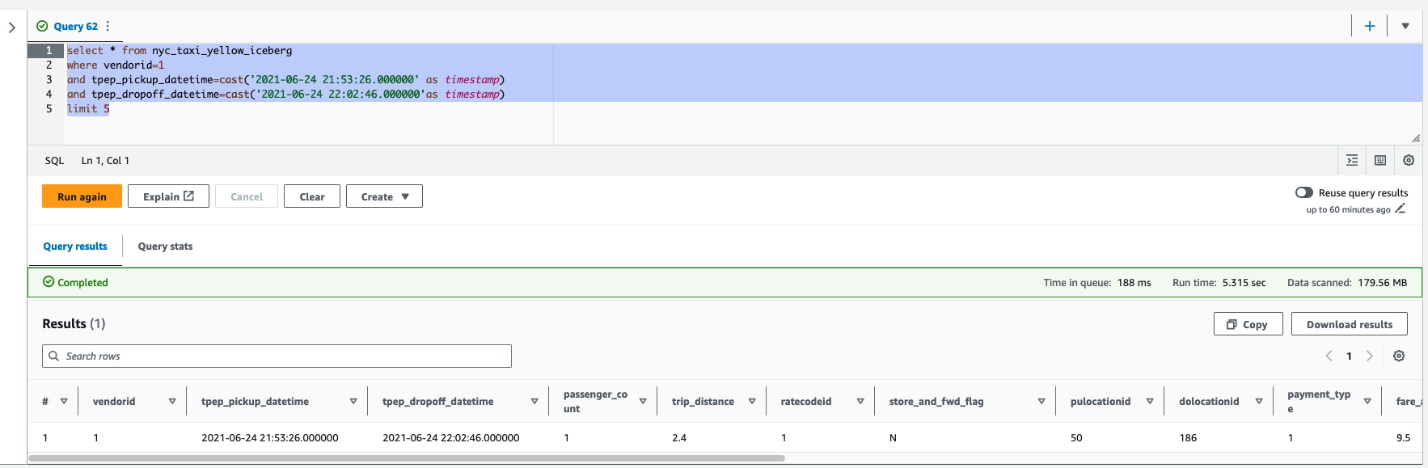
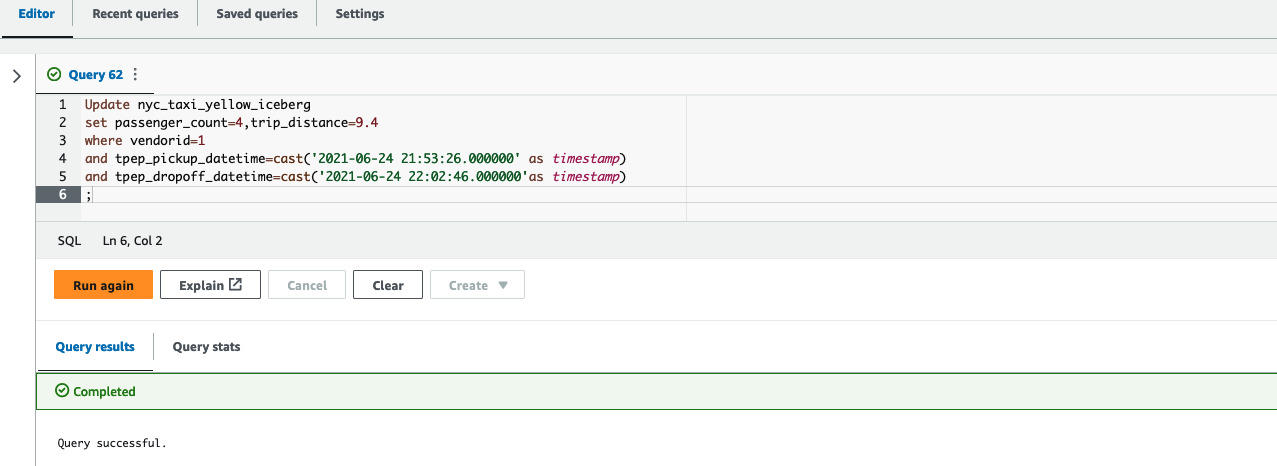
You can run inference queries using both versions of the model to validate the inference outputs.

The following screenshot shows the output of the model inference using the original version.

The following screenshot shows the output of model inference using the version copy.

As you can see, the inference outputs are the same.

You have now learned how to create a version of a previously trained Redshift ML model.

Retrain your Redshift ML model

After you create a version of an existing model, you can retrain the existing model by simply creating a new model.

You can create and train a new model using same CREATE MODEL command but using different input parameters, datasets, or problem types as applicable. For this post, we retrain the model on newer datasets. We append _new to the model name so it’s similar to the existing model for identification purposes.

In the following code, we use the CREATE MODEL command with a new dataset available in the training_data table:

CREATE MODEL predict_rental_count_new
FROM training_data
TARGET trip_count
FUNCTION predict_rental_count_new
IAM_ROLE 'arn:aws:iam::<accountid>:role/RedshiftML'
PROBLEM_TYPE regression
OBJECTIVE 'mse'
SETTINGS (s3_bucket 'redshiftml-<your-account-id>',
          s3_garbage_collect off,
          max_runtime 5000);

Run the following command to check the status of the new model:

show model predict_rental_count_new;

Replace the existing Redshift ML model with the retrained model

The last step is to replace the existing model with the retrained model. We do this by dropping the original version of the model and recreating a model using the BYOM technique.

First, check your retrained model to ensure the MSE/RMSE scores are staying stable between model training runs. To validate the models, you can run inferences by each of the model functions on your dataset and compare the results. We use the inference queries provided in Build regression models with Amazon Redshift ML.

After validation, you can replace your model.

Start by collecting the details of the predict_rental_count_new model.

Note the AutoML Job Name value, the Function Parameter Types values, and the Target Column name in the model output.

Replace the original model by dropping the original model and then creating the model with the original model and function names to make sure the existing references to the model and function names work:

drop model predict_rental_count;
CREATE MODEL predict_rental_count
FROM 'redshiftml-20230706171639810624' 
FUNCTION predict_rental_count(int4, int4, int4, int4, int4, int4, int4, numeric, numeric, int4)
RETURNS float8 
IAM_ROLE default
SETTINGS (
S3_BUCKET ’<<your S3 Bucket>>’);

The model creation should complete in a few minutes. You can check the status of the model by running the following command:

show model predict_rental_count;

When the model status is ready, the newer version predict_rental_count of your existing model is available for inference and the original version of the ML model predict_rental_count_20230706 is available for reference if needed.

Please refer to this GitHub repository for sample scripts to automate model versioning.

Conclusion

In this post, we showed how you can use the BYOM feature of Redshift ML to do model versioning. This allows you to have a history of your models so that you can compare model scores over time, respond to audit requests, and run inferences while training a new model.

For more information about building different models with Redshift ML, refer to Amazon Redshift ML.


About the Authors

Rohit Bansal is an Analytics Specialist Solutions Architect at AWS. He specializes in Amazon Redshift and works with customers to build next-generation analytics solutions using other AWS Analytics services.

Phil Bates is a Senior Analytics Specialist Solutions Architect at AWS. He has more than 25 years of experience implementing large-scale data warehouse solutions. He is passionate about helping customers through their cloud journey and using the power of ML within their data warehouse.

Query your Iceberg tables in data lake using Amazon Redshift (Preview)

Post Syndicated from Rohit Bansal original https://aws.amazon.com/blogs/big-data/query-your-iceberg-tables-in-data-lake-using-amazon-redshift-preview/

Amazon Redshift is a fast, fully managed petabyte-scale cloud data warehouse that makes it simple and cost-effective to analyze all your data using standard SQL and your existing business intelligence (BI) tools. Tens of thousands of customers today use Amazon Redshift to analyze exabytes of data and run analytical queries, making it the most widely used cloud data warehouse. Amazon Redshift is available in both serverless and provisioned configurations.

Amazon Redshift enables you to directly access data stored in Amazon Simple Storage Service (Amazon S3) using SQL queries and join data across your data warehouse and data lake. With Amazon Redshift, you can query the data in your S3 data lake using a central AWS Glue metastore from your Redshift data warehouse.

Amazon Redshift supports querying a wide variety of data formats, such as CSV, JSON, Parquet, and ORC, and table formats like Apache Hudi and Delta. Amazon Redshift also supports querying nested data with complex data types such as struct, array, and map.

With this capability, Amazon Redshift extends your petabyte-scale data warehouse to an exabyte-scale data lake on Amazon S3 in a cost-effective manner.

Apache Iceberg is the latest table format that is supported now in preview by Amazon Redshift. In this post, we show you how to query Iceberg tables using Amazon Redshift, and explore Iceberg support and options.

Solution overview

Apache Iceberg is an open table format for very large petabyte-scale analytic datasets. Iceberg manages large collections of files as tables, and it supports modern analytical data lake operations such as record-level insert, update, delete, and time travel queries. The Iceberg specification allows seamless table evolution such as schema and partition evolution, and its design is optimized for usage on Amazon S3.

Iceberg stores the metadata pointer for all the metadata files. When a SELECT query is reading an Iceberg table, the query engine first goes to the Iceberg catalog, then retrieves the entry of the location of the latest metadata file, as shown in the following diagram.

Amazon Redshift now provides support for Apache Iceberg tables, which allows data lake customers to run read-only analytics queries in a transactionally consistent way. This enables you to easily manage and maintain your tables on transactional data lakes.

Amazon Redshift supports Apache Iceberg’s native schema and partition evolution capabilities using the AWS Glue Data Catalog, eliminating the need to alter table definitions to add new partitions or to move and process large amounts of data to change the schema of an existing data lake table. Amazon Redshift uses the column statistics stored in the Apache Iceberg table metadata to optimize its query plans and reduce the file scans required to run queries.

In this post, we use the Yellow taxi public dataset from NYC Taxi & Limousine Commission as our source data. The dataset contains data files in Apache Parquet format on Amazon S3. We use Amazon Athena to convert this Parquet dataset and then use Amazon Redshift Spectrum to query and join with a Redshift local table, perform row-level deletes and updates and partition evolution, all coordinated through the AWS Glue Data Catalog in an S3 data lake.

Prerequisites

You should have the following prerequisites:

Convert Parquet data to an Iceberg table

For this post, you need the Yellow taxi public dataset from the NYC Taxi & Limousine Commission available in Iceberg format. You can download the files and then use Athena to convert the Parquet dataset into an Iceberg table, or refer to Build an Apache Iceberg data lake using Amazon Athena, Amazon EMR, and AWS Glue blog post to create the Iceberg table.

In this post, we use Athena to convert the data. Complete the following steps:

  1. Download the files using the previous link or use the AWS Command Line Interface (AWS CLI) to copy the files from the public S3 bucket for year 2020 and 2021 to your S3 bucket using the following command:
    aws s3 cp "s3://nyc-tlc/trip data/" s3://<Your S3 bucket name>/Parquet/  --exclude "*"  --include  "yellow_tripdata_2020*" –recursive
    aws s3 cp "s3://nyc-tlc/trip data/" s3://<Your S3 bucket name>/Parquet/  --exclude "*"  --include  "yellow_tripdata_2021*" –recursive

For more information, refer to Setting up the Amazon Redshift CLI.

  1. Create a database Icebergdb and create a table using Athena pointing to the Parquet format files using the following statement:
    CREATE DATABASE Icebergdb; 
    CREATE EXTERNAL TABLE icebergdb.nyc_taxi_yellow_parquet(
    	vendorid int,
    	tpep_pickup_datetime timestamp,
    	tpep_dropoff_datetime timestamp,
    	passenger_count bigint,
    	trip_distance double,
    	ratecodeid bigint,
    	store_and_fwd_flag string,
    	pulocationid int,
    	dolocationid int,
    	payment_type integer,
    	fare_amount double,
    	extra double,
    	mta_tax double,
    	tip_amount double,
    	tolls_amount double,
    	improvement_surcharge double,
    	total_amount double,
    	congestion_surcharge double,
    	airport_fee double
    )
    STORED AS PARQUET
    LOCATION 's3://<Your S3 Bucket>/Parquet/’

  2. Validate the data in the Parquet table using the following SQL:
    SELECT vendorid,
    	tpep_pickup_datetime,
    	tpep_dropoff_datetime,
    	trip_distance,
    	fare_amount,
    	tip_amount,
    	tolls_amount,
    	total_amount,
    	congestion_surcharge,
    	airport_fee
    FROM icebergdb.nyc_taxi_yellow_parquet
    limit 5;

  3. Create an Iceberg table in Athena with the following code. You can see the table type properties as an Iceberg table with Parquet format and snappy compression in the following create table statement. You need to update the S3 location before running the SQL. Also note that the Iceberg table is partitioned with the Year key.
    CREATE  TABLE nyc_taxi_yellow_iceberg(
      vendorid int, 
      tpep_pickup_datetime timestamp, 
      tpep_dropoff_datetime timestamp, 
      passenger_count bigint, 
      trip_distance double, 
      ratecodeid bigint, 
      store_and_fwd_flag string, 
      pulocationid int, 
      dolocationid int, 
      payment_type bigint, 
      fare_amount double, 
      extra double, 
      mta_tax double, 
      tip_amount double, 
      tolls_amount double, 
      improvement_surcharge double, 
      total_amount double, 
      congestion_surcharge double, 
      airport_fee double)
    PARTITIONED BY (year(tpep_pickup_datetime))
    LOCATION ‘s3://<Your S3 bucket name>/iceberg/iceberg'
    TBLPROPERTIES (
      'table_type'='iceberg',
      'write_compression'='snappy',
      'format'='parquet');

  4. After you create the table, load the data into the Iceberg table using the previously loaded Parquet table nyc_taxi_yellow_parquet with the following SQL:
    insert into nyc_taxi_yellow_iceberg (
    	vendorid,tpep_pickup_datetime,
    	tpep_dropoff_datetime,
    	passenger_count,trip_distance,
    	ratecodeid,store_and_fwd_flag,
    	pulocationid,dolocationid,
    	payment_type,fare_amount,
    	extra,mta_tax,tip_amount,
    	tolls_amount,total_amount,
    	congestion_surcharge,airport_fee
    	)
    select vendorid,tpep_pickup_datetime,
    	tpep_dropoff_datetime,
    	passenger_count,trip_distance,
    	ratecodeid,store_and_fwd_flag,
    	pulocationid,dolocationid,
    	payment_type,fare_amount,
    	extra,mta_tax,tip_amount,
    	tolls_amount,total_amount,
    	congestion_surcharge,airport_fee
    from nyc_taxi_yellow_parquet;

  5. When the SQL statement is complete, validate the data in the Iceberg table nyc_taxi_yellow_iceberg. This step is required before moving to the next step.
    SELECT * FROM nyc_taxi_yellow_iceberg LIMIT 5;

  6. You can validate that the nyc_taxi_yellow_iceberg table is in Iceberg format table and partitioned on the Year column using the following command:
    SHOW CREATE TABLE nyc_taxi_yellow_iceberg;

Create an external schema in Amazon Redshift

In this section, we demonstrate how to create an external schema in Amazon Redshift pointing to the AWS Glue database icebergdb to query the Iceberg table nyc_taxi_yellow_iceberg that we saw in the previous section using Athena.

Log in to the Redshift via Query Editor v2 or a SQL client and run the following command (note that the AWS Glue database icebergdb and Region information is being used):

CREATE external schema spectrum_iceberg_schema
from data catalog
database 'icebergdb'
region 'us-east-1'
iam_role default;

To learn about creating external schemas in Amazon Redshift, refer to create external schema

After you create the external schema spectrum_iceberg_schema, you can query the Iceberg table in Amazon Redshift.

Query the Iceberg table in Amazon Redshift

Run the following query in Query Editor v2. Note that spectrum_iceberg_schema is the name of the external schema created in Amazon Redshift and nyc_taxi_yellow_iceberg is the table in the AWS Glue database used in the query:

SELECT * FROM"dev"."spectrum_iceberg_schema"."nyc_taxi_yellow_iceberg";

The query data output in the following screenshot shows that the AWS Glue table with Iceberg format is queryable using Redshift Spectrum.

Check the explain plan of querying the Iceberg table

You can use the following query to get the explain plan output, which shows the format is ICEBERG:

EXPLAIN 
SELECT vendorid,count(*) 
FROM "dev"."spectrum_iceberg_schema"."nyc_taxi_yellow_iceberg"
GROUP BY vendorid; 

Validate updates for data consistency

After the update is complete on the Iceberg table, you can query Amazon Redshift to see the transactionally consistent view of the data. Let’s run a query by picking a vendorid and for a certain pick-up and drop-off:

SELECT * FROM nyc_taxi_yellow_iceberg
WHERE vendorid=1
AND tpep_pickup_datetime=cast('2021-06-24 21:53:26' AS timestamp)
AND tpep_dropoff_datetime=cast('2021-06-24 22:02:46'AS timestamp)
LIMIT 5;

Next, update the value of passenger_count to 4 and trip_distance to 9.4 for a vendorid and certain pick-up and drop-off dates in Athena:

UPDATE nyc_taxi_yellow_iceberg
SET passenger_count=4,trip_distance=9.4
WHERE vendorid=1
AND tpep_pickup_datetime=cast('2021-06-24 21:53:26' AS timestamp)
AND tpep_dropoff_datetime=cast('2021-06-24 22:02:46'AS timestamp);

Finally, run the following query in Query Editor v2 to see the updated value of passenger_count and trip_distance:

SELECT * 
FROM "dev"."spectrum_iceberg_schema"."nyc_taxi_yellow_iceberg"
WHERE vendorid=1
AND tpep_pickup_datetime=cast('2021-06-24 21:53:26' AS timestamp)
AND tpep_dropoff_datetime=cast('2021-06-24 22:02:46' AS timestamp)
LIMIT 5;

As shown in the following screenshot, the update operations on the Iceberg table are available in Amazon Redshift.

Create a unified view of the local table and historical data in Amazon Redshift

As a modern data architecture strategy, you can organize historical data or less frequently accessed data in the data lake and keep frequently accessed data in the Redshift data warehouse. This provides the flexibility to manage analytics at scale and find the most cost-effective architecture solution.

In this example, we load 2 years of data in a Redshift table; the rest of the data stays on the S3 data lake because that dataset is less frequently queried.

  1. Use the following code to load 2 years of data in the nyc_taxi_yellow_recent table in Amazon Redshift, sourcing from the Iceberg table:
    CREATE TABLE nyc_taxi_yellow_recent
    AS
    SELECT *
    FROM "dev"."spectrum_iceberg_schema"."nyc_taxi_yellow_iceberg"
    WHERE extract(year from tpep_pickup_datetime)>2020;

  2. Next, you can remove the last 2 years of data from the Iceberg table using the following command in Athena because you loaded the data into a Redshift table in the previous step:
    DELETE FROM nyc_taxi_yellow_iceberg 
    WHERE EXTRACT(year from tpep_pickup_datetime)>2020;

After you complete these steps, the Redshift table has 2 years of the data and the rest of the data is in the Iceberg table in Amazon S3.

  1. Create a view using the nyc_taxi_yellow_iceberg Iceberg table and nyc_taxi_yellow_recent table in Amazon Redshift:
    create or replace view nyc_taxi_yellow as
    select 'nyc_taxi_yellow_iceberg' as source,vendorid,tpep_pickup_datetime,
        tpep_dropoff_datetime,
        passenger_count,trip_distance,
        ratecodeid,store_and_fwd_flag,
        pulocationid,dolocationid,
        payment_type,fare_amount,
        extra,mta_tax,tip_amount,
        tolls_amount,total_amount,
        congestion_surcharge,airport_fee
    from "dev"."spectrum_iceberg_schema"."nyc_taxi_yellow_iceberg"
    union all
    select 'nyc_taxi_yellow_recent' as source,vendorid,tpep_pickup_datetime,
        tpep_dropoff_datetime,
        passenger_count,trip_distance,
        ratecodeid,store_and_fwd_flag,
        pulocationid,dolocationid,
        payment_type,fare_amount,
        extra,mta_tax,tip_amount,
        tolls_amount,total_amount,
        congestion_surcharge,airport_fee
    from  public.nyc_taxi_yellow_recent
    with no schema binding;

  2. Now query the view, depending on the filter conditions, Redshift Spectrum will scan either the Iceberg data, the Redshift table, or both. The following example query returns a number of records from each of the source tables by scanning both tables:
    SELECT source,count(1)
    FROM  nyc_taxi_yellow
    GROUP BY source;

Partition evolution

Iceberg uses hidden partitioning, which means you don’t need to manually add partitions for your Apache Iceberg tables. New partition values or new partition specs (add or remove partition columns) in Apache Iceberg tables are automatically detected by Amazon Redshift and no manual operation is needed to update partitions in the table definition. The following example demonstrates this.

In our example, if the Iceberg table nyc_taxi_yellow_iceberg was originally partitioned by year and later the column vendorid was added as an additional partition column, then Amazon Redshift can seamlessly query the Iceberg table nyc_taxi_yellow_iceberg with two different partition schemes over a period of time.

Considerations when querying Iceberg tables using Amazon Redshift

During the preview period, consider the following when using Amazon Redshift with Iceberg tables:

  • Only Iceberg tables defined in the AWS Glue Data Catalog are supported.
  • CREATE or ALTER external table commands are not supported, which means the Iceberg table should already exist in an AWS Glue database.
  • Time travel queries are not supported.
  • Iceberg versions 1 and 2 are supported. For more details on Iceberg format versions, refer to Format Versioning.
  • For a list of supported data types with Iceberg tables, refer to Supported data types with Apache Iceberg tables (preview).
  • Pricing for querying an Iceberg table is the same as accessing any other data formats using Amazon Redshift.

For additional details on considerations for Iceberg format tables preview, refer to Using Apache Iceberg tables with Amazon Redshift (preview).

Customer feedback

“Tinuiti, the largest independent performance marketing firm, handles large volumes of data on a daily basis and must have a robust data lake and data warehouse strategy for our market intelligence teams to store and analyze all our customer data in an easy, affordable, secure, and robust way,” says Justin Manus, Chief Technology Officer at Tinuiti. “Amazon Redshift’s support for Apache Iceberg tables in our data lake, which is the single source of truth, addresses a critical challenge in optimizing performance and accessibility and further simplifies our data integration pipelines to access all the data ingested from different sources and to power our customers’ brand potential.”

Conclusion

In this post, we showed you an example of querying an Iceberg table in Redshift using files stored in Amazon S3, cataloged as a table in the AWS Glue Data Catalog, and demonstrated some of the key features like efficient row-level update and delete, and the schema evolution experience for users to unlock the power of big data using Athena.

You can use Amazon Redshift to run queries on data lake tables in various files and table formats, such as Apache Hudi and Delta Lake, and now with Apache Iceberg (preview), which provides additional options for your modern data architectures needs.

We hope this gives you a great starting point for querying Iceberg tables in Amazon Redshift.


About the Authors

Rohit Bansal is an Analytics Specialist Solutions Architect at AWS. He specializes in Amazon Redshift and works with customers to build next-generation analytics solutions using other AWS Analytics services.

Satish Sathiya is a Senior Product Engineer at Amazon Redshift. He is an avid big data enthusiast who collaborates with customers around the globe to achieve success and meet their data warehousing and data lake architecture needs.

Ranjan Burman is an Analytics Specialist Solutions Architect at AWS. He specializes in Amazon Redshift and helps customers build scalable analytical solutions. He has more than 16 years of experience in different database and data warehousing technologies. He is passionate about automating and solving customer problems with cloud solutions.

Improve federated queries with predicate pushdown in Amazon Athena

Post Syndicated from Rohit Bansal original https://aws.amazon.com/blogs/big-data/improve-federated-queries-with-predicate-pushdown-in-amazon-athena/

In modern data architectures, it’s common to store data in multiple data sources. However, organizations embracing this approach still need insights from their data and require technologies that help them break down data silos. Amazon Athena is an interactive query service that makes it easy to analyze structured, unstructured, and semi-structured data stored in Amazon Simple Storage Service (Amazon S3) in addition to relational, non-relation, object, and custom data sources through its query federation capabilities. Athena is serverless, so there’s no infrastructure to manage, and you only pay for the queries that you run.

Organizations building a modern data architecture want to query data in-place from purpose-built data stores without building complex extract, transform, and load (ETL) pipelines. Athena’s federated query feature allows organizations to achieve this and makes it easy to:

  • Create reports and dashboards from data stored in relational, non-relational, object, and custom data sources
  • Run on-demand analysis on data spread across multiple systems of record using a single tool and single SQL dialect
  • Join multiple data sources together to produce new input features for machine learning model training workflows

However, when querying and joining huge amounts of data from different data stores, it’s important for queries to run quickly, at low cost, and without impacting source systems. Predicate pushdown is supported by many query engines and is a technique that can drastically reduce query processing time by filtering data at the source early in the processing workflow. In this post, you’ll learn how predicate pushdown improves query performance and how you can validate when Athena applies predicate pushdown to federated queries.

Benefits of predicate pushdown

The key benefits of predicate pushdown are as follows:

  • Improved query runtime
  • Reduced network traffic between Athena and the data source
  • Reduced load on the remote data source
  • Reduced cost resulting from reduced data scans

Let’s explore a real-world scenario to understand when predicate pushdown is applied to federated queries in Athena.

Solution overview

Imagine a hypothetical ecommerce company with data stored in

Record counts for these tables are as follows.

Data Store Table Name Number of Records Description
Amazon Redshift Catalog_Sales 4.3 billion Current and historical Sales data fact Table
Amazon Redshift Date_dim 73,000 Date Dimension table
DynamoDB Part 20,000 Realtime Parts and Inventory data
DynamoDB Partsupp 80,000 Realtime Parts and supplier data
Aurora MySQL Supplier 1,000 Latest Supplier transactions
Aurora MySQL Customer 15,000 Latest Customer transactions

Our requirement is to query these sources individually and join the data to track pricing and supplier information and compare recent data with historical data using SQL queries with various filters applied. We’ll use Athena federated queries to query and join data from these sources to meet this requirement.

The following diagram depicts how Athena federated queries use data source connectors run as Lambda functions to query data stored in sources other than Amazon S3.

When a federated query is submitted against a data source, Athena invokes the data source connector to determine how to read the requested table and identify filter predicates in the WHERE clause of the query that can be pushed down to the source. Applicable filters are automatically pushed down by Athena and have the effect of omitting unnecessary rows early in the query processing workflow and improving overall query execution time.

Let’s explore three use cases to demonstrate predicate pushdown for our ecommerce company using each of these services.

Prerequisites

As a prerequisite, review Using Amazon Athena Federated Query to know more about Athena federated queries and how to deploy these data source connectors.

Use case 1: Amazon Redshift

In our first scenario, we run an Athena federated query on Amazon Redshift by joining its Catalog_sales and Date_dim tables. We do this to show the number of sales orders grouped by order date. The following query gets the information required and takes approximately 14 seconds scanning approximately 43 MB of data:

SELECT "d_date" AS Order_date,
     count(1) AS Total_Orders
 FROM "lambda:redshift"."order_schema"."catalog_sales" l,
     "lambda:redshift"."order_schema"."date_dim" d
 WHERE l.cs_sold_date_sk = d_date_sk
     and cs_sold_date_sk between 2450815 and 2450822 --Date keys for first week of Jan 1998
 GROUP BY "d_date"
 order by "d_date" 

Athena pushes the following filters to the source for processing:

  • cs_sold_date_sk between 2450815 and 2450822 for the Catalog_Sales table in Amazon Redshift.
  • d_date_sk between 2450815 and 2450822; because of the join l.cs_sold_date_sk=d_date_sk in the query, the Date_dim table is also filtered at the source, and only filtered data is moved from Amazon Redshift to Athena.

Let’s analyze the query plan by using recently released visual explain tool to confirm the filter predicates are pushed to the data source:

As shown above (only displaying the relevant part of the visual explain plan), because of the predicate pushdown, the Catalog_sales and Date_dim tables have filters applied at the source. Athena processes only the resulting filtered data.

Using the Athena console, we can see query processing details using the recently released query stats to interactively explore processing details with predicate pushdown at the query stage:

Displaying only the relevant query processing stages, Catalog_sales table has approximately 4.3 billion records, and Date_dim has approximately 73,000 records in Amazon Redshift. Only 11 million records from the Catalog_sales (Stage 4) and 8 records from the Date_dim (Stage 5) are passed from source to Athena, because the predicate pushdown pushes query filter conditions to the data sources. This filters out unneeded records at the source, and only brings the required rows to Athena.

Using predicate pushdown resulted in scanning 99.75% less data from Catalog_sales and 99.99% less data from Date_dim. This results in a faster query runtime and lower cost.

Use case 2: Amazon Redshift and Aurora MySQL

In our second use case, we run an Athena federated query on Aurora MySQL and Amazon Redshift data stores. This query joins the Catalog_sales and Date_dim tables in Amazon Redshift with the Customer table in the Aurora MySQL database to get the total number of orders with the total amount spent by each customer for the first week in January 1998 for the market segment of AUTOMOBILE. The following query gets the information required and takes approximately 35 seconds scanning approximately 337 MB of data:

SELECT  cs_bill_customer_sk Customer_id ,"d_date" Order_Date 
 ,count("cs_order_number") Total_Orders ,sum(l.cs_net_paid_inc_ship_tax) AS Total_Amount
 FROM "lambda:mysql".sales.customer c,"lambda:redshift"."order_schema"."catalog_sales" l
 ,"lambda:redshift"."order_schema"."date_dim" d
 WHERE c_mktsegment = 'AUTOMOBILE'
 AND c_custkey = cs_bill_customer_sk
 AND l.cs_sold_date_sk=d_date_sk 
 AND cs_sold_date_sk between 2450815 and 2450822 --Date keys for first week of Jan 1998
 GROUP BY cs_bill_customer_sk,"d_date"  
 ORDER BY cs_bill_customer_sk,"d_date"

Athena pushes the following filters to the data sources for processing:

  • cs_sold_date_sk between 2450815 and 2450822 for the Catalog_Sales table in Amazon Redshift.
  • d_date_sk between 2450815 and 2450822; because of the join l.cs_sold_date_sk=d_date_sk in the query, the Date_dim table is also filtered at the source (Amazon Redshift) and only filtered data is moved from Amazon Redshift to Athena.
  • c_mktsegment = 'AUTOMOBILE' for the Customer table in the Aurora MySQL database.

Now let’s consult the visual explain plan for this query to show the predicate pushdown to the source for processing:

As shown above (only displaying the relevant part of the visual explain plan), because of the predicate pushdown, Catalog_sales and Date_dim have the query filter applied at the source (Amazon Redshift), and the customer table has the market segment AUTOMOBILE filter applied at the source (Aurora MySQL). This brings only the filtered data to Athena.

As before, we can see query processing details using the recently released query stats to interactively explore processing details with predicate pushdown at the query stage:

Displaying only the relevant query processing stages, Catalog_sales has 4.3 billion records, Date_Dim has 73,000 records in Amazon Redshift, and Customer has 15,000 records in Aurora MySQL. Only 11 million records from Catalog_sales (Stage 6), 8 records from Date_dim (Stage 7), and 3,000 records from Customer (Stage 5) are passed from the respective sources to Athena because the predicate pushdown pushes query filter conditions to the data sources. This filters out unneeded records at the source and only brings the required rows to Athena.

Here, predicate pushdown resulted in scanning 99.75% less data from Catalog_sales, 99.99% less data from Date_dim, and 79.91% from Customer. Furthermore, this results in a faster query runtime and reduced cost.

Use case 3: Amazon Redshift, Aurora MySQL, and DynamoDB

For our third use case, we run an Athena federated query on Aurora MySQL, Amazon Redshift, and DynamoDB data stores. This query joins the Part and Partsupp tables in DynamoDB, the Catalog_sales and Date_dim tables in Amazon Redshift, and the Supplier and Customer tables in Aurora MySQL to get the quantities available at each supplier for orders with the highest revenue during the first week of January 1998 for the market segment of AUTOMOBILE and parts manufactured by Manufacturer#1.

The following query gets the information required and takes approximately 33 seconds scanning approximately 428 MB of data in Athena:

SELECT "d_date" Order_Date 
     ,c_mktsegment
     ,"cs_order_number"
     ,l.cs_item_sk Part_Key
     ,p.p_name Part_Name
     ,s.s_name Supplier_Name
     ,ps.ps_availqty Supplier_Avail_Qty
     ,l.cs_quantity Order_Qty
     ,l.cs_net_paid_inc_ship_tax Order_Total
 FROM "lambda:dynamo".default.part p, 
     "lambda:mysql".sales.supplier s, 
     "lambda:redshift"."order_schema"."catalog_sales" l, 
     "lambda:dynamo".default.partsupp ps, 
     "lambda:mysql".sales.customer c,
     "lambda:redshift"."order_schema"."date_dim" d
 WHERE 
     c_custkey = cs_bill_customer_sk
     AND l.cs_sold_date_sk=d_date_sk 
     AND c.c_mktsegment = 'AUTOMOBILE'
     AND cs_sold_date_sk between 2450815 and 2450822 --Date keys for first week of Jan 1998
     AND p.p_partkey=ps.ps_partkey
     AND s.s_suppkey=ps.ps_suppkey
     AND p.p_partkey=l.cs_item_sk
     AND p.p_mfgr='Manufacturer#1'

Athena pushes the following filters to the data sources for processing:

  • cs_sold_date_sk between 2450815 and 2450822 for the Catalog_Sales table in Amazon Redshift.
  • d_date_sk between 2450815 and 2450822; because of the join l.cs_sold_date_sk=d_date_sk in the query, the Date_dim table is also filtered at the source and only filtered data is moved from Amazon Redshift to Athena.
  • c_mktsegment = 'AUTOMOBILE' for the Customer table in the Aurora MySQL database.
  • p.p_mfgr='Manufacturer#1' for the Part table in DynamoDB.

Now let’s run the explain plan for this query to confirm predicates are pushed down to the source for processing:

As shown above (displaying only the relevant part of the plan), because of the predicate pushdown, Catalog_sales and Date_dim have the query filter applied at the source (Amazon Redshift), the Customer table has the market segment AUTOMOBILE filter applied at the source (Aurora MySQL), and the Part table has the part manufactured by Manufacturer#1 filter applied at the source (DynamoDB).

We can analyze query processing details using the recently released query stats to interactively explore processing details with predicate pushdown at the query stage:

Displaying only the relevant processing stages, Catalog_sales has 4.3 billion records, Date_Dim has 73,000 records in Amazon Redshift, Customer has 15,000 records in Aurora MySQL, and Part has 20,000 records in DynamoDB. Only 11 million records from Catalog_sales (Stage 5), 8 records from Date_dim (Stage 9), 3,000 records from Customer (Stage 8), and 4,000 records from Part (Stage 4) are passed from their respective sources to Athena, because the predicate pushdown pushes query filter conditions to the data sources. This filters out unneeded records at the source, and only brings the required rows from the sources to Athena.

Considerations for predicate pushdown

When using Athena to query your data sources, consider the following:

  • Depending on the data source, data source connector, and query complexity, Athena can push filter predicates to the source for processing. The following are some of the sources Athena supports predicate pushdown with:
  • Athena also performs predicate pushdown on data stored in an S3 data lake. And, with predicate pushdown for supported sources, you can join all your data sources in one query and achieve fast query performance.
  • You can use the recently released query stats as well as EXPLAIN and EXPLAIN ANALYZE on your queries to confirm predicates are pushed down to the source.
  • Queries may not have predicates pushed to the source if the query’s WHERE clause uses Athena-specific functions (for example, WHERE log2(col)<10).

Conclusion

In this post, we demonstrated three federated query scenarios on Aurora MySQL, Amazon Redshift, and DynamoDB to show how predicate pushdown improves federated query performance and reduces cost and how you can validate when predicate pushdown occurs. If the federated data source supports parallel scans, then predicate pushdown makes it possible to achieve performance that is close to the performance of Athena queries on data stored in Amazon S3. You can utilize the patterns and recommendations outlined in this post when querying supported data sources to improve overall query performance and minimize data scanned.


About the authors

Rohit Bansal is an Analytics Specialist Solutions Architect at AWS. He has nearly two decades of experience helping customers modernize their data platforms. He is passionate about helping customers build scalable, cost-effective data and analytics solutions in the cloud. In his spare time, he enjoys spending time with his family, travel, and road cycling.

Ruchir Tripathi is a Senior Analytics Solutions Architect aligned to Global Financial Services at AWS. He is passionate about helping enterprises build scalable, performant, and cost-effective solutions in the cloud. Prior to joining AWS, Ruchir worked with major financial institutions and is based out of New York Office.