All posts by Shubha Kumbadakone

Monitoring AWS Outposts capacity

Post Syndicated from Shubha Kumbadakone original https://aws.amazon.com/blogs/compute/monitoring-aws-outposts-capacity/

This post is authored by Mike Burbey, Sr. Outposts SA

AWS Outposts is a fully managed service that offers the same AWS infrastructure, AWS services, APIs, and tools to any data center, colocation space, or on-premises facility for a consistent hybrid experience. AWS Outposts is ideal for workloads that require low latency, access to on-premises systems, local data processing, data residency, and migration of applications with local system interdependencies.

As part of the AWS Shared Responsibility Model, customers are responsible for capacity planning while using AWS Outposts. Customers must forecast compute and storage needs in addition to data center space, power, and HVAC requirements along with associated lead times. This blog demonstrates how to create a dashboard and alarms to assist in capacity planning. Amazon CloudWatch is used to capture the metrics and create dashboards while Amazon Simple Notification Service (SNS) sends notifications when capacity exceeds a threshold.

Solution

Create a dashboard

  1. First, log into the account that the AWS Outpost is installed in. In the AWS console go to CloudWatch, then click on Dashboards, then click on Create dashboard to create a dashboard for AWS Outposts capacity.
  2. Provide the dashboard a name and click Create dashboard.
  3. Select a line widget and click Next.                                               
  4. This widget is metrics-based. Select Metrics and click Configure.
  5. Click Outposts.                                                                            
  6. Click By Outpost and Instance Family.                          
  7. Select all of the InstanceFamily options where the Metric Name is InstanceFamilyCapacityUtilization then click Create widget.                                                                                          
  8. The first widget has been added to the dashboard. This widget displays the percent of capacity used for the entire instance family. Additional widgets may be created to display the capacity available or for a specific instance type (in this case, c5.2xlarge).                                                                                  
  9. Now, I add an Amazon EBS capacity widget to the dashboard. To do this, click Add widget, select Line as the widget type and Metrics as the data source.
  10. Click Outposts.                                                                          
  11. Click Outpostid, VolumeType.                                          
  12. Select EBSVolumeTypeCapacityUtilization and then Create widget.
  13. The dashboard now has two widgets setup. Click Save dashboard. If you do not save the dashboard, your changes do not save. The following image shows what your two dashboards should look like.
  14. Dashboards are useful for monitoring capacity over time. It is unlikely that someone is looking at the dashboard at the moment when usage increases. To ensure you are notified when an increase in utilization happens, you can create an alarm that sends a notification to Amazon Simple Notification Service (SNS).

Create alarms

When creating CloudWatch alarms, only one metric can be configured per alarm. So, a single alarm can only report on a single EC2 instance family. Additional alarms must be configured for each EC2 instance family deployed in an AWS Outpost. To learn more about CloudWatch alarms, visit the technical documentation.

  1. To create a new alarm, click Create alarm.                        
  2. Click Select metric.                                                                                                                
  3. To select a metric for EC2 capacity utilization, select Outposts, By Outpost and Instance Family. Select the Instance Family to create an alarm for. In this example, the alarm is created for the C5 Instance Family and is based on capacity utilization. Click Select metric.                                              
  4. Define the threshold to alarm when the metric is greater than or equal to 80% and click Next.
  5. When setting up the first alarm, an Amazon SNS topic must be created. The topic can be re-used when setting up additional alarms. Click Create topic. Enter a name for the SNS topic and email addresses that should receive the notification. Click Add notification, then click Next.                                        
  6. Enter a name and description for the alarm, click Next, and click Create alarm.

Amazon SNS requires topic subscriptions to be confirmed. Each email address receives an email message from AWS Notifications. Remember to create an alarm for each EC2 family type and EBS volume to ensure that alerts are received for all resources on the AWS Outpost. For more information on Amazon SNS, visit the developer guide.

Conclusion

You now have visibility into the compute and storage capacity of the AWS Outposts. This provides visibility to inform capacity planning activities. To learn about additional CloudWatch metrics available for AWS Outposts, visit the user guide.

For additional information on AWS Outposts capacity management check out this webinar to learn more about additional AWS Outposts metrics and the installation process.

Managing your AWS Outposts capacity using Amazon CloudWatch and AWS Lambda

Post Syndicated from Shubha Kumbadakone original https://aws.amazon.com/blogs/compute/managing-your-aws-outposts-capacity-using-amazon-cloudwatch-and-aws-lambda/

This post is authored by Carlos Castro, AWS Principal Solutions Architect and Kevin Wang, AWS Associate Solutions Architect

Customers are excited about using AWS Outposts to bring services and capabilities available on AWS to on-premises for workloads that require low-latency, local data processing, or local data storage. As part of this, the responsibility for managing capacity shifts from the AWS to the customer. Customers can purchase AWS Outposts configurations from a broad selection of instance types based on the use cases they plan to run on AWS Outposts. When additional capacity is needed, customers can expand their AWS Outposts. When operating in an AWS Region, customers don’t have to worry about redundant capacity. However, with AWS Outposts, customers must ensure that there is sufficient compute and storage capacity to restore services in the event of a hardware or software failure. This allows customers to meet the business continuity and disaster recovery (BCDR) requirements for the workloads that run on their Outpost.

This post shows how you can combine Region-based AWS services for a common management task, ensuring there is available capacity to support an N+M high availability model, where N is the required capacity and M is the spare capacity designed into the solution. I monitor the Amazon EC2 and Amazon EBS capacity on an Outpost and show how to automate governance to ensure that there are available resources to recover from failures. With this, customers can create a “hot-spare” failover mechanism.

Overview of the solution

I use integrations between services in the AWS Outposts’ home Region with the services deployed on the Outpost to accomplish the goal. AWS Outposts provides available and utilized capacity metrics in Amazon CloudWatch. It is a best practice for administrators to create Amazon CloudWatch Events to monitor capacity. For this use case, events trigger fan-out actions to inform (via Amazon Simple Notification Service) and act (via an AWS Lambda function) on the condition. The action from an event can include triggering a workflow to stop low-priority resources, restricting the use of remaining capacity to a subset of the administrators or sending a notification to the appropriate team to plan adding incremental capacity. In this case, I act on the event by updating the permissions policy associated with administrators in AWS Identity and Access Management (IAM). If the threshold has been exceeded, I remove the capability to create more resources by updating an AWS IAM policy. This action allows me to reserve that capacity in the event of a failure. Once the threshold normalizes, I return permissions to the administrators. AWS administrators have the flexibility of assigning the IAM policies you control with the solution to selected IAM users, groups, or roles. For example, application system administrators can be assigned the policies with dynamic resource creation permissions while AWS Outposts infrastructure administrators maintain full access to creating resources.

The following image represents this flow.

Solution Architecture Diagram and Workflow

Tutorial

Now, you are ready to set up this environment. First, create resources using the AWS Management Console and AWS CloudFormation. You can also use the AWS Command Line Interface (CLI) or your preferred infrastructure as code framework.

The suggested sequence of steps is as follows:

  1. Create AWS IAM policies
  2. Launch AWS CloudFormation stack
  3. Review created resources
  4. Validate your work

Prerequisites

For this walkthrough, you must have the following prerequisites:

Before you deploy the solution’s resources, clone the solution’s GitHub repository. Once you’ve cloned the repository, you must upload a copy of the compressed AWS Lambda code artifacts (.zip files) to the top-level folder of an S3 bucket in your account.

Create AWS IAM policies

This approach updates AWS IAM policies to reflect the current capacity available in your AWS Outpost. This enables users to create resources (such as EC2 instances) when there is capacity available and denies them the ability to do so when the capacity threshold has been exceeded. Since this solution automates  remediation via AWS Lambda, you must create a policy that allows the function to make changes in IAM. These permissions are restricted to creating and deleting policy versions. Please review the IAM service documentation for additional information or more in-depth examples.

To create an IAM policy

  1. Log in to AWS IAM console.
  2. Select Policies from the left side navigation tree and click the Create Policy button.
  3. Navigate to the JSON tab and replace the contents with the code below.
    {
        "Version": "2012-10-17",
        "Statement": [
            {
                "Effect": "Deny",
                "Action": "ec2:RunInstances",
                "Resource": [
                    "arn:aws:ec2:*:*:subnet/",
                    "arn:aws:ec2:*:*:network-interface/*",
                    "arn:aws:ec2:*:*:instance/*",
                    "arn:aws:ec2:*:*:volume/*",
                    "arn:aws:ec2:*::image/ami-*",
                    "arn:aws:ec2:*:*:key-pair/*",
                    "arn:aws:ec2:*:*:security-group/*"
                ]
            }
        ]
     }
    
  4. Select Review Policy.
  5. Provide a name for your policy, e.g., outposts-ec2-capacity and select Create Policy.
  6. Record the Amazon Resource Name (ARN) for the created policy in your text editor of choice.
  7. Repeat steps 2-6 to create a capacity policy for EBS, e.g., outposts-ebs-capacity using the JSON code below:
    {
        "Version": "2012-10-17",
        "Statement": [
            {
                "Effect": "Deny",
                "Action": "ec2:CreateVolume",
                "Resource": [
                    "arn:aws:ec2:*:*:subnet/",
                    "arn:aws:ec2:*:*:network-interface/*",
                    "arn:aws:ec2:*:*:instance/*",
                    "arn:aws:ec2:*:*:volume/*",
                    "arn:aws:ec2:*::image/ami-*",
                    "arn:aws:ec2:*:*:key-pair/*",
                    "arn:aws:ec2:*:*:security-group/*"
                ]
            }
        ]
     }
    
  8. Assign the created policies to a role mapped to your Outposts users.

Now, you have the correct IAM policies in place, and you can move on to launch an AWS CloudFormation stack.

Launch AWS CloudFormation stack

Create an AWS CloudFormation stack using the outposts-manage-capacity.yml template that is included in your local clone of the repository. For illustration purposes, the template creates resources to monitor a subset of the Amazon EC2 instance types supported on AWS Outposts. If you have a different configuration, adjust the template by modifying the CloudWatch alarm resources accordingly (Type: AWS::CloudWatch::Alarm).

Provide all necessary parameters using the following descriptions:

Review created resources

Now that you have launched your AWS CloudFormation stack, you are ready to review the resources you created. In order to automate the monitoring of our capacity, I use Amazon CloudWatch alarms to monitor the default metrics published by AWS Outposts and trigger an action when a particular condition has been met. Review the metric alarms created by navigating to the Amazon CloudWatch console. There are alarms for sample instance types in your Outposts. There is also an alarm for EBS capacity. The thresholds for these alarms are based on the parameters (ComputeThreshold, StorageThreshold) provided to your AWS CloudFormation stack.

I use an Amazon CloudWatch Event rule to fan-out notifications about capacity events in our AWS Outposts. Review the event rule created by navigating to the Amazon CloudWatch console. The rule triggers an action to send a message to an SNS topic to inform administrators via email. Review the created topics by navigating to the Amazon SNS console. After your email subscription is created, you must confirm it using the confirmation email message delivered to the account provided.

You then automate remediation by creating a second action in the event rule to trigger the AWS Lambda function. Remediation is based on the current capacity conditions and the state of our CloudWatch alarms. These functions use the boto3 python library to update the version of our previously created Amazon IAM policy and reflect the correct privilege for our administrators based on the system state. Review the created AWS Lambda functions using the console. Navigate to the function’s Configuration tab to see that Amazon CloudWatch Events are configured as triggers as shown in the figure below.

Lambda Function's Configuration tab to check if CloudWatch events are configured as a trigger

Lambda Function’s Configuration tab to check if CloudWatch events are configured as a trigger

Validate your work

To validate your work, assign the IAM policy created for Amazon EC2 and Amazon EBS to the IAM users or IAM roles assigned to your AWS Outposts administrators. Once assigned, use one of these IAM principals to create enough EC2 or EBS resources on your AWS Outpost to breach the thresholds you previously established. This depends on your AWS Outposts configuration and the capacity it is populated with. When capacity is exceeded, your administrators should receive an error similar to the following image when attempting to create resources in addition to an email notification of the condition. You can also circumvent this by using the ‘Set_Alarm_State’ function through the SDK/CLI to modify the state of your target alarms.

This error should be removed once the capacity returns to the normal state. Please note that AWS Outposts CloudWatch metrics have a default resolution period of five minutes so allow time for a period update to register before changes are made.

Cleaning up

To avoid incurring future charges, delete the resources created during this blog by deleting the AWS CloudFormation stack.

Conclusion

One of the benefits of AWS Outposts is a truly consistent hybrid experience. This post showed how you can use the same management and monitoring services in the AWS Cloud across on-premises and in-Region AWS environments. This simplifies the responsibility to manage capacity to meet your workload requirements. For additional information on the benefits of AWS Outposts, visit its product detail page.

Integrating AWS Outposts with existing security zones

Post Syndicated from Shubha Kumbadakone original https://aws.amazon.com/blogs/compute/integrating-aws-outposts-with-existing-security-zones/

This post is contributed by Santiago Freitas and Matt Lehwess.

AWS Outposts is a fully managed service that extends AWS infrastructure, services, APIs, and tools to your on-premises facility. This blog post explains how the resources created on an Outpost can be integrated with security zones of an existing infrastructure. Integrating Outposts with existing security zones is important for customers that segment their environment into multiple domains based on their security policy.

Background

It’s common for customers to have different security zones within their infrastructure. For example, a customer might have a DMZ security zone where internet facing systems are located, an extra-net security zone where systems used to communicate with business partners are hosted, and an internal security zone where the systems accessible only by employees operate.

As illustrated in the following figure, customers often use firewalls and network ACLs to perform packet inspection and filtering for traffic that flows between security zones. Customers also usually use similar security controls for traffic flowing between different application tiers.


Example of firewall being used for security zone segmentation

Enabling connectivity from an Outposts VPC to your on-premises network

During your Outpost deployment, AWS works with you to establish connectivity to your local network. During this installation process, AWS creates an address pool based on an IP range you assign to the Outpost out of your local network’s IP ranges. This address pool is known as a customer-owned IP address pool or CoIP pool.

When resources running on Outposts (like an EC2 instance) need to communicate with existing on-premises systems, you must assign an Elastic IP address to them. This Elastic IP address comes from the CoIP pool. The resources in your local area network (LAN), including firewalls and network ACLs, see the Elastic IP address as the source IP of the packets sent from the resources running on Outposts. This Elastic IP address is also used as the destination IP for traffic from your on-premises systems to the instance on the Outpost.

How to enable connectivity from an Outposts VPC to your on-premises network

With a typical Outpost deployment, as shown in the following diagram, the following items are required to enable connectivity from the Outpost’s VPC to your on-premises network:

  1. VPC routing: Routes to your on-premises network in the route table of the VPC’s Outpost subnet.
  2. CoIP pool: Assigned by you, the customer, and created by AWS at time of install, for example, 192.168.1.0/26 in the diagram. It’s used to allocate Elastic IP addresses that can then be associated with instances or other resources on the Outpost.
  3. Elastic IP address association: Customer configured, association of Elastic IP addresses from the CoIP pool with EC2 instances and other resources on the Outpost. For example, VPC IP 10.0.3.112 from instance Y has Elastic IP address 192.168.1.15 associated with it.
  4. Routing advertisement: The Outpost advertises the assigned CoIP range to the local devices within your on-premises network via Border Gateway Protocol (BGP). This is configured by AWS during installation and based on the CoIP pool IP range you provide.


AWS Outposts – typical network topology

Integrating Outposts with existing security zones

CoIP pools, and AWS Resource Access Manager (RAM) are used to facilitate the integration of Outposts with your existing security zones. AWS RAM lets you share your resources with AWS account or through AWS Organizations.

When AWS deploys your Outposts, you can ask AWS to create multiple CoIP pools. Each CoIP pool is configured with an IP range assigned by you during initial installation. If after the initial installation you need AWS to create additional CoIP pools for an existing Outpost, you can open a case with AWS Support and request the creation of additional pools.

CoIP pools are owned initially by the AWS account that owns the Outpost. In a multi-account Outpost deployment, you can share your customer-owned IP pool(s) with other AWS accounts in your AWS Organization using AWS RAM.

VPCs that have subnets on the Outpost must be created in the same account that owns the Outpost. After creation of these subnets within the Outpost account, AWS RAM can then be used to share these subnets with other accounts or organizational units that are in the same organization from AWS Organizations.

After you’ve shared the CoIP pool with the account where you’d like to run your workloads, and you’ve shared an Outpost subnet with that same account, users of that account can deploy resources in the shared Outpost subnet. For the Outposts resources that must communicate with resources in your existing infrastructure, users can assign Elastic IP addresses from one or more of the shared CoIP pools to those Outposts resources.

Multiple CoIP pools and the ability to share them and Outpost subnets with a particular account, gives you granular control over the IP range used by Outpost resources requiring connectivity to your on-premises LAN.

The following figure illustrates the sharing of a subnet and CoIP pool from Account 1, which is the account where the Outpost was initially deployed, with Account 2. As the CoIP pool was shared with Account 2, the users in Account 2 are able to assign an Elastic IP address to the EC2 instance running within Account 2.

AWS Outposts and VPC Sharing

Creating an AWS RAM resource share

The following screenshots demonstrate how to use AWS RAM to share a CoIP pool and a subnet with another account in the same organization from AWS Organizations.

Step 1. Navigate to the AWS RAM service page within the AWS Management Console, and click Create Resource Share. This step is done within the AWS account that owns the Outpost.

Step 2. Next, give the share an appropriate name.

Step 3. Select one or more subnets you’d like to share with your application owner’s account. In this case, select a subnet that exists in your VPC on the Outpost.

Step 4. In this case, share the CoIP range. You can find that in the resources type list.

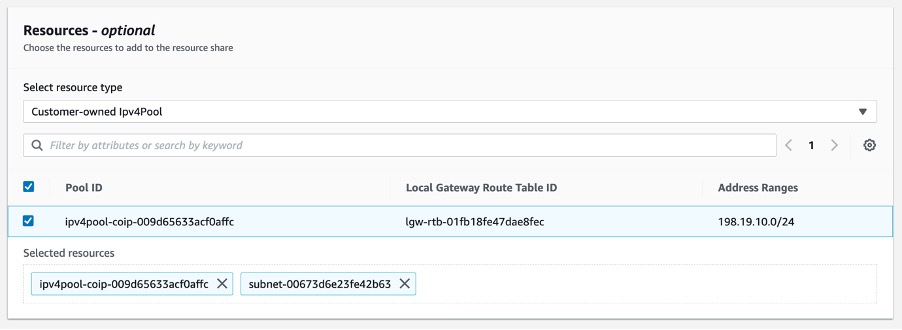
Step 5. Select the Customer-owned Ipv4Pool resource type, and then select the CoIP to be shared. Selecting the the CoIP adds it to the list of shared resources along with the subnet selected earlier.

Step 6. Add the account number for the account you’d like to share the Outposts subnet and CoIP pool with.

Step 7. Click Create Resource. After clicking the Create Resource share button, you should see the resource share listed and be in the state “active.”

Now that you’ve successfully shared the subnet and CoIP pool with your application account (that’s in the same organization), you can now go in to that account and allocate an Elastic IP address from the CoIP pool. You can then assign the Elastic IP address to an instance launched in the subnet previously shared, which is on the Outpost.

Allocating and associating the Elastic IP address from your CoIP pool

Step 1. From within the application account, allocate an Elastic IP address from the CoIP pool. This is done by navigating to the VPC console, then to Elastic IP addresses, and then click Allocate Elastic IP address.

Step 2. Select Customer owned pool of IPv4 addresses, select the CoIP pool that’s been shared with this account previously, then click Allocate. You can see this step in the following image.

Step 3. You can now see the new Elastic IP address that has been allocated from the shared CoIP pool. You can now associate that Elastic IP address with an instance in our shared subnet.

Note: When using the AWS Management Console to allocate an Elastic IP address, the ElasticIP address is automatically allocated from the CoIPpool. If you’re using the AWS CLI, you have the option to select a specific Elastic IP address from the CoIP pool by using the --customer-owned-ipv4-pool <value> option.

Step 4. You can now associate the Elastic IP address of type CoIP with an instance. Click Associate after selecting the instance that is running on your Outpost in the shared subnet. This step is represented in the following image.

Step 5 – Once the operation is complete, you can see the CoIP Elastic IP address in the Elastic IP address console, and that it’s assigned to the instance that’s running in your shared subnet.

The steps preceding demonstrated how to share the Outpost with other accounts through the use of AWS Resource Access Manager, subnet sharing, and CoIP sharing.

Use case

Let’s apply the capabilities described prior into a design. A customer is running a 3-tier web application and would like to host the web and application tiers on Outposts. The database tier is hosted on the existing infrastructure. The application’s user traffic comes from the internet, through an external firewall towards the web tier hosted on the Outpost. Traffic between web and application tiers is secured with security groups and remains within the Outpost. Application servers connect to the database servers via the existing internal firewalls. The customer uses independent external and internal firewalls.

During the Outposts installation, the customer asks AWS to create two CoIP pools. The first CoIP pool, referenced in the following image as CoIP Web, is assigned the IP range 172.0.1.0/24. The second CoIP pool, referenced in the following image as CoIP App, is assigned the IP range 172.0.2.0/24. The customer then creates two additional AWS accounts, one for the web tier and another for the app tier. Within the account that owns the Outpost, the customer creates two VPCs and within each of those VPCs a subnet is created.

The subnet with IP address 10.0.1.0/24 is shared with the web tier account and the subnet with IP address 10.1.2.0/24 is shared with the app tier account. The customer then configures VPC peering between the VPCs to enable communication between the web and app tiers. VPC peering configuration is performed within the account that owns the Outposts.

Note: With VPC peering traffic between the VPCs remains within the Outpost. However, data transfer charges for VPC peering applies. This use-case could also be built with the web tier and app tier using different subnets within the same VPC to save on data transfer costs over VPC peering.

The following image shows initial setup with two CoIP pools, two accounts, and two VPCs.


Initial setup with two CoIP pools, two accounts and two VPCs

After the initial setup the customer then shares each CoIP pool with the appropriate account using AWS RAM. The customer can then create their web and application servers within the respective accounts. As shown in the prior image, the web server is assigned IP address 10.0.1.5 and the application server is assigned IP address 10.1.2.10. Each IP address is part of their respective VPC IP range and are reachable only within the Outpost at this point.

To enable the integration of the web and application servers with the existing infrastructure, the customer assigns an Elastic IP address from the CoIP pool shared with each account to their respective Amazon EC2 instances.

With this configuration, the customer can integrate the web and application servers into the existing security zones. To integrate the web servers, path “A” in the following image, the customer creates a rule in their external firewall that allows communication from any source (internet) to Elastic IP address 172.0.1.5 on port 443 (HTTPS) which has been assigned to the web server.

For the communication between the web and application servers, path “B” in the following image, the customer has configured VPC peering between the two VPCs and created the required security groups.

To integrate the application servers into the Internal Security Zone, path “C” in the following image, the customer has assigned Elastic IP address 172.0.2.10 to the application server and has configured a rule on the Internal Firewall allowing the IP range 172.0.2.0/24 that is assigned to the app CoIP pool to communicate with the database server.


End to end traffic flow from users to web tier and from app tier to database tier

In addition to setting up their Outposts as covered in the preceding details, to enable the communication between the Outposts hosted resources and the existing infrastructure you must create a custom route table and associate it with an Outpost subnet.

Conclusion

AWS Outposts extends AWS infrastructure, services, APIs, and tools to your on-premises facility. During deployment of your Outposts, AWS works with you to establish connectivity to your local network. This blog post builds upon this initial deployment of an Outpost to allow the Outpost’s resources to integrate into your existing security zones. The design is applicable for customers that segment their environment into multiple security zones.


Santiago Freitas is AWS Head of Technology for Central Eastern Europe (CEE), Middle East, North Africa (MENA), Sub Saharan Africa (SSA), Turkey (TUR), and Russia and Commonwealth of Independent States (RUS-CIS). Previously he was an AWS Global Solutions Architect for financial services. Before joining AWS, Santiago was a Distinguished Engineer at Cisco. He is based in Dubai, United Arab Emirates.

Matt is a Principal Developer Advocate for Amazon Web Services where he has spent the last 7 years working with AWS customers and partners, helping them to build best-in-class AWS networking solutions. He is co-author of the AWS Certified Advanced Networking Official Study Guide, as well as an Amazon Re:Invent speaker extraordinaire (5 years and counting!). His primary focus at AWS is to help evangelize AWS networking solutions and more recently, AWS Outposts.

Announcing Outposts and local gateway sharing for multi-account access

Post Syndicated from Shubha Kumbadakone original https://aws.amazon.com/blogs/compute/announcing-outposts-and-local-gateway-sharing-for-multi-account-access/

This post was contributed by James Devine, Sr. Outposts SA

AWS Outposts enables customers to run AWS services in their on-premises environments. With the release of Outposts and local gateway (LGW) sharing, customers can now configure multi-account access and sharing within an AWS Organization.

Prior to this release, an Outpost was only viable within a single AWS account. VPC sharing was the main way to enable multiple accounts to use Outposts capacity. With the release of Outposts and LGW sharing support, there is now additional functionality to enable multi-account access Outpost capacity within an AWS Organization.

Outposts and LGW sharing is facilitated through AWS Resource Access Manager (RAM). It enables Outposts and LGWs to be shared with AWS accounts within the same AWS Organization. The account that orders Outposts is the owner account that can create resource shares. The accounts that have access to the share are called consumer accounts. Each consumer account can create its own VPCs with subnets that reside on the shared Outpost.

This post will discuss how to start using this new functionality and considerations to take into account.

Use cases

Per AWS best practices, customers typically deploy a number of AWS accounts. Utilizing multiple accounts allows for reduced blast radius and the ability to provide infrastructure isolation by line of business, environment type, and even down to individual workloads. Outposts sharing enables customers to extend their existing AWS account structures to seamlessly integrate with Outposts.

Getting started – creating a resource share

Before any resources can be shared, the first step is to configure an AWS Organization (if one does not already exist). Outposts resources can only be shared with accounts under the same AWS Organization. The Outposts can reside in any account under an organization. For centralized management of Outposts, it is recommend to create a dedicated account, or set of accounts, to host Outposts.

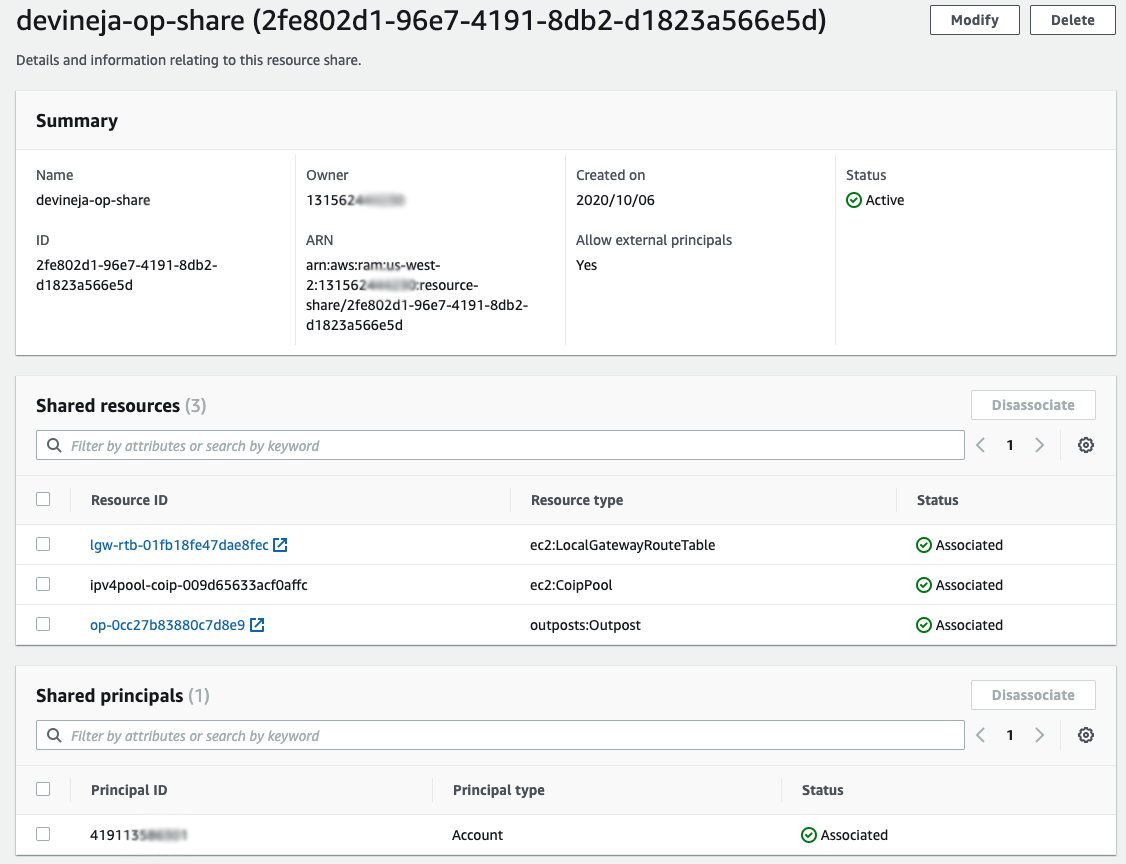
Once an organization is created with member AWS accounts, resources shares can then be created. It’s possible to place multiple resources into a resource share. To facilitate Outposts, LGW, and customer-owned IP (CoIP) sharing, a single resource share can be created that includes all three resources. Principals can then be added to the resource share. The principals can be both organizational units (OUs) and individual AWS account IDs within the AWS Organization. In this case, I’ve shared all three resources with a consumer account ID as a principal, as demonstrated in the following screenshot.

Screen shot of resource sharing.

Sharing an Outpost

After an Outposts is provisioned, the logical Outpost ID can be shared with any account under the AWS Organization. The consumer account then has access to provision resources on the Outposts, such as Amazon EBS volumes and Outposts subnets, as well as launching instances on the shared Outpost.

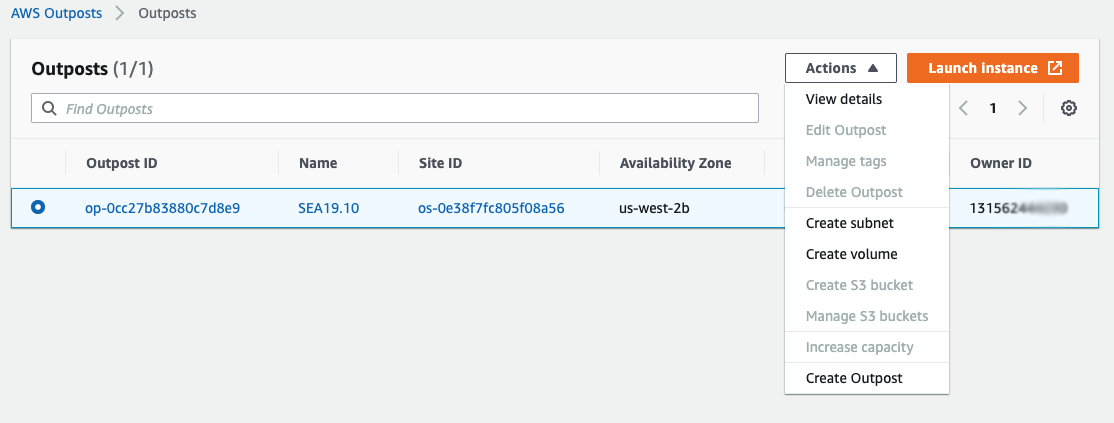
From the AWS Management Console in the consumer account, I can see the shared Outposts ID, its associated Availability Zone, and the owner account ID.

From the AWS Management Console in the consumer account, I can see the shared Outposts ID, its associated Availability Zone, and the owner account ID.

Once the Outposts ID is selected, I can use the Actions drop down menu to create Outposts subnets and EBS volumes. I can also select Launch instance to provision instances on the Outpost.

Once the Outposts ID is selected, I can use the Actions drop down menu to create Outposts subnets and EBS volumes. I can also select Launch instance to provision instances on the Outpost.

Sharing an LGW

Each consumer account can create their own Outposts subnets within their own VPCs. LGW sharing enables the consumer account to create routes an Outposts subnet route table that has a shared LGW as the destination. This enables Outposts subnets in the consumer account to have communication with the on-premises network through the shared LGW.

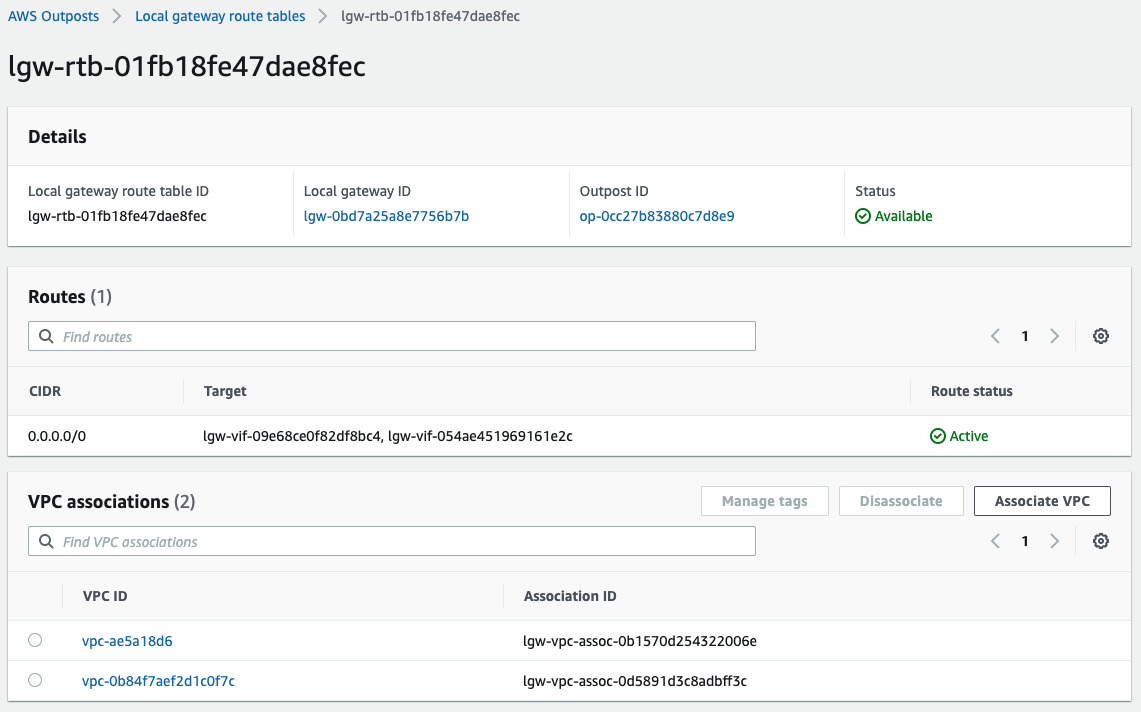
The consumer account view shared LGWs, as shown in the following screenshot.

The consumer account view shared LGWs, as shown in the following screenshot.

The consumer account can then select VPCs within the account to associate with the LGW route table. This enables routing to on-premises if a CoIP is assigned to an instance.

This enables routing to on-premises if a CoIP is assigned to an instance.

Considerations

LGW and Outposts sharing is meant to enable sharing of resources between various accounts within a larger organizational structure. It is not suitable for multi-tenancy outside of an AWS Organization. Additional considerations around capacity planning, access, and local network connectivity should be taken into account.

Resources created in the consumer account are only visible from within the consumer account. The AWS account that owns the Outpost does not have the ability to view instances, EBS volumes, VPCs, subnets, or any other resource created within the consumer account. Since the consumer account is part of an AWS Organization, it is possible to use the default OrganizationAccountAccessRole role that is created by AWS Organizations. This allows for visibility and management of Outpost resources across the AWS Organization.

Capacity information is not shared with the consumer account. However, it is possible to use cross-account CloudWatch metric sharing. Outposts utilization metrics from the account that owns the Outpost can be shared with the consumer account. This allows the consumer account to see what capacity is available on the shared Outposts. I’ve configured the cross-account sharing, and from my consumer account I can see that there is ample c5.xlarge capacity on the shared Outposts.

I’ve configured the cross-account sharing, and from my consumer account I can see that there is ample c5.xlarge capacity on the shared Outposts.

If a principal (consumer account or organizational unit) no longer requires access to Outposts capacity, the resource share can be deleted through RAM in the primary Outposts account. It is important to note that this does not delete subnets, EBS volumes, instances, or other resources running on the shared Outposts. Proper cleanup of Outposts resources within the consumer account (EBS volumes, instances, subnets, etc.) should be planned for whenever removing principals from a resource share to ensure that the capacity is released.

Conclusion 

In the blog post, I described the Outposts and LGW sharing capabilities and demonstrated how they can be used to enable multi-account sharing of an Outpost within an AWS Organization. These new capabilities unlock even more customer use cases and allow for stronger blast-radius and account isolation. It’s exciting to see continued functionality come to Outposts! You can start using LGW and Outposts sharing today. There’s no need to upgrade or modify your Outposts in any way to take advantage of this new and exciting functionality.