All posts by Srikanth Baheti

Enable complex row-level security in embedded dashboards for non-provisioned users in Amazon QuickSight with OR-based tags

Post Syndicated from Srikanth Baheti original https://aws.amazon.com/blogs/big-data/enable-complex-row-level-security-in-embedded-dashboards-for-non-provisioned-users-in-amazon-quicksight-with-or-based-tags/

Amazon QuickSight is a fully managed, cloud-native business intelligence (BI) service that makes it easy to connect to your data, create interactive dashboards, and share these with tens of thousands of users, both within QuickSight and embedded in your software as a service (SaaS) applications.

QuickSight Enterprise edition started supporting nested conditions within row-level security (RLS) tags where you can combine AND and OR conditions to simplify multi-tenant access patterns. Previously, QuickSight only supported the AND operator for all tags. When users are assigned multiple roles, which enables them to view data in multiple dimensions, you need both AND and OR operators to express RLS rules. QuickSight enables authors and developers to use the OR operator in the form of OR of AND, which allows you to satisfy even the most complex data security scenarios. In this post, we look at how this can be implemented.

Feature overview

When you embed QuickSight dashboards in your application for users who aren’t provisioned (registered) in QuickSight, this is called anonymous embedding. In this scenario, even though the user is anonymous to QuickSight, you can still customize the data that user sees in the dashboard using RLS tags.

You can do this in three simple steps:

  1. Add RLS tags to a dataset.
  2. Add the OR condition to RLS tags.
  3. Assign values to those tags at runtime using the GenerateEmbedUrlForAnonymousUser API operation. For more information, see Embedding QuickSight data dashboards for anonymous (unregistered) users.

To see this feature in action, see Using tag-based rules.

Use case overview

AnyHealth Inc. is a fictitious independent software vendor (ISV) in the healthcare space. They have a SaaS application for different hospitals across different regions of the country to manage their revenue. AnyHealth Inc has thousands of healthcare employees accessing their application portal. Part of their application portal has embedded operational insights related to their business within a QuickSight dashboard. AnyHealth doesn’t want to manage their users in QuickSight separately, and wants to secure data based on who the user is and the hospital the user is affiliated to. AnyHealth decided to authorize data access to their users at runtime, enabling row-level security using tags.

AnyHealth has hospitals (North Hospital, South Hospital, and Downtown Hospital) in regions Central, East, South, and West.

In this example, the following users access AnyHealth’s application with the embedded dashboard. Each user has a certain level of data restriction that define what they can access in the dashboards. PowerUser is a super user that can see the data for all hospitals and regions.

AnyHealth’s

Application Users

Hospital Region Condition Payor State
NorthMedicaidUser North Hospital Central and East OR Medicaid New York
SouthMedicareUser South Hospital South OR Medicare All states
NorthAdmin North Hospital All regions
SouthAdmin South Hospital All regions
PowerUser All hospitals All regions

These users are only application-level users and haven’t been provisioned in QuickSight. AnyHealth wants to continue with user management and their roles at the application level as a single source of truth. This way, when the user accesses the embedded QuickSight dashboard from the application, AnyHealth must secure the data on the dashboard based on the roles and permissions that user has. AnyHealth has different combinations of user permissions; for example, all AnyHealth administrators have access to all the data that can be achieved by PowerUser permissions. A hospital admin, for example NorthAdmin, is a user who is the administrator at North Hospital and can only view all the data related to that hospital. A hospital user, for example SouthUser, is a user who has access to data at South Hospital in a specific region.

Additionally, when there are Medicaid and Medicare claims, there are special users who monitor these programs. For example, there can be a user at North Hospital who has access to all the data in North Hospital in regions Central and East. But this user also manages Medicaid for New York. In this case, to show all the relevant data, RLS rules have to be defined such that the user can see data where (Hospital = North Hospital and Region in (Central, East)) or (payor = Medicaid and State = New York). This can be achieved with the new RLS with OR tags feature in QuickSight.

Solution overview

Setup involves two steps:

  1. Create tag keys.
  2. Set SessionTags for each user.

Create tag keys

AnyHealth creates tag keys on the dataset they’re using to power the dashboard. This can be done in two ways, either through an UpdateDataset API call or through the QuickSight console.

Configuration using the API

In the UpdateDataset API call, the RowLevelPermissionTagConfiguration element is set as follows. Note that the items within an item in TagRuleConfigurations will always run a logical AND when the rules are passed, and if there is more than one item in the list, then the items are run with a logical OR. We use the following sample configuration to address our use case:

"RowLevelPermissionTagConfiguration": {
            "Status": "ENABLED",
            "TagRules": [
                {
                    "TagKey": "region",
                    "ColumnName": "Region",
                    "TagMultiValueDelimiter": ",",
                    "MatchAllValue": "*"
                },
                {
                    "TagKey": "hospital",
                    "ColumnName": "Hospital",
                    "TagMultiValueDelimiter": ",",
                    "MatchAllValue": "*"
                },
                {
                    "TagKey": "payor",
                    "ColumnName": "Payor Segment",
                    "TagMultiValueDelimiter": "*",
                    "MatchAllValue": ","
                },
                {
                    "TagKey": "state",
                    "ColumnName": "State",
                    "TagMultiValueDelimiter": ",",
                    "MatchAllValue": "*"
                }
            ],
            "TagRuleConfigurations": [
                [
                    "region",
                    "hospital"
                ],
                [
                    "payor",
                    "state"
                ]
            ]
        }

Configuration using the QuickSight console

To use the QuickSight console, complete the following steps:

  1. On the QuickSight console, choose Datasets in the navigation pane.
  2. Choose the dataset from the list to apply tag-based RLS tags (for this post, we use the patientinfo dataset).
  3. Choose Edit under Row-level security.
  4. On the Set up row-level security page, expand Tag-based rules.
  5. To begin adding rules, choose columns on the Column drop-down menu under Manage tags.
  6. Create rules as per the permissions table.

To grant access to QuickSight provisioned users, you still need to configure user-based rules.

  1. Repeat these steps to add the required tags.
  2. After all the tags are added, choose Add OR Condition under Manage rules.
  3. Choose your tags for the OR condition and choose Update.

Note that you need to explicitly update the first condition that automatically created AND for all fields added.

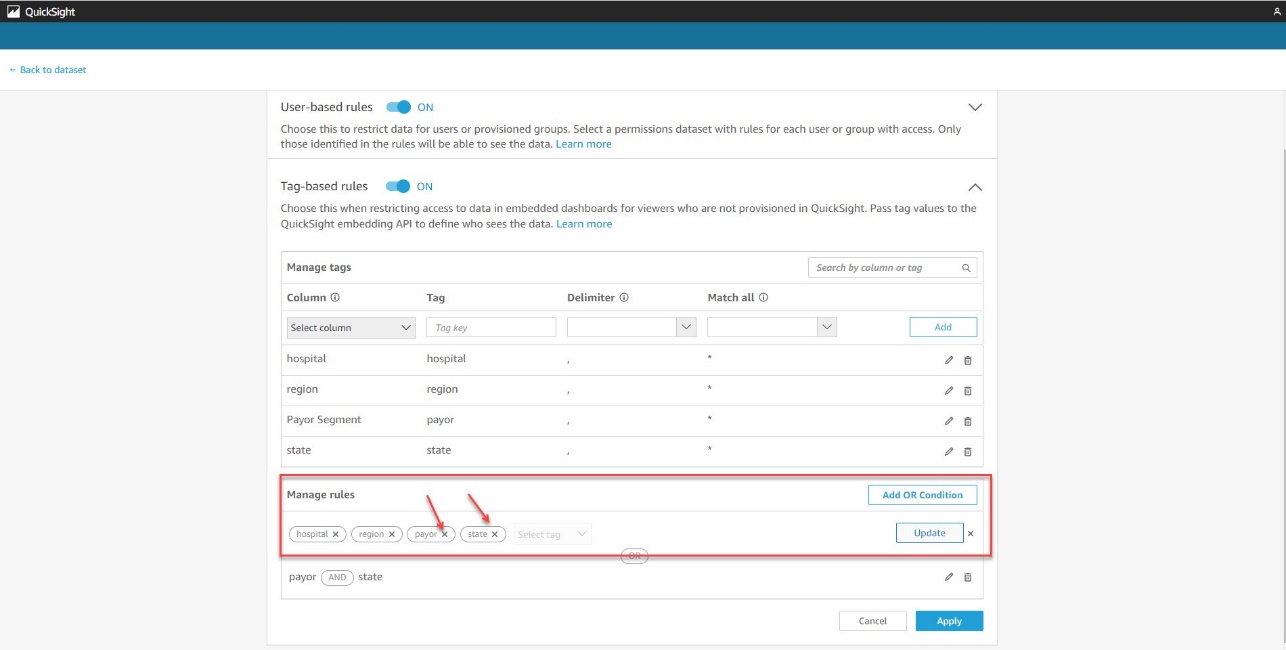
  1. Once the rules are created, choose Apply.

Set SessionTags

At runtime, when embedding the dashboards via the GenerateDahboardEmbedURLForAnonymousUser API, set SessionTags for each user.

SessionTags for NorthAdmin are as follows:

{
    "SessionTags": [
        {
            "Key": "hospital",
            "Value": "North Hospital"
        },
        {
            "Key": "region",
            "Value": "*"
        }
    ]
}

SessionTags for SouthAdmin are as follows:

{
    "SessionTags": [
        {
            "Key": "hospital",
            "Value": "South Hospital"
        },
        {
            "Key": "region",
            "Value": "*"
        }
    ]
}

SessionTags for PowerUser are as follows:

{
    "SessionTags": [
        {
            "Key": "hospital",
            "Value": "*"
        },
        {
            "Key": "region",
            "Value": "*"
        }
    ]
}

SessionTags for NorthMedicaidUser are as follows:

{
    "SessionTags": [
        {
            "Key": "hospital",
            "Value": "North Hospital"
        },
        {
            "Key": "region",
            "Value": "East"
        }, 
        {
            "Key": "payor",
            "Value": "Medicaid"
        },
        {
            "Key": "state",
            "Value": "New York"
        }
    ]
}

SessionTags for SouthMedicareUser are as follows:

{
    "SessionTags": [
        {
            "Key": "hospital",
            "Value": "South Hospital"
        },
        {
            "Key": "region",
            "Value": "South"
        }, 
        {
            "Key": "payor",
            "Value": "Medicare"
        },
        {
            "Key": "state",
            "Value": "*"
        }
    ]
}

The following screenshot shows what NorthMedicaidUser sees pertaining to all North hospitals in the East region and Medicaid in New York state.

The following screenshot shows what SouthMedicaidUser sees pertaining to all South hospitals in the South region or Medicare in all states.

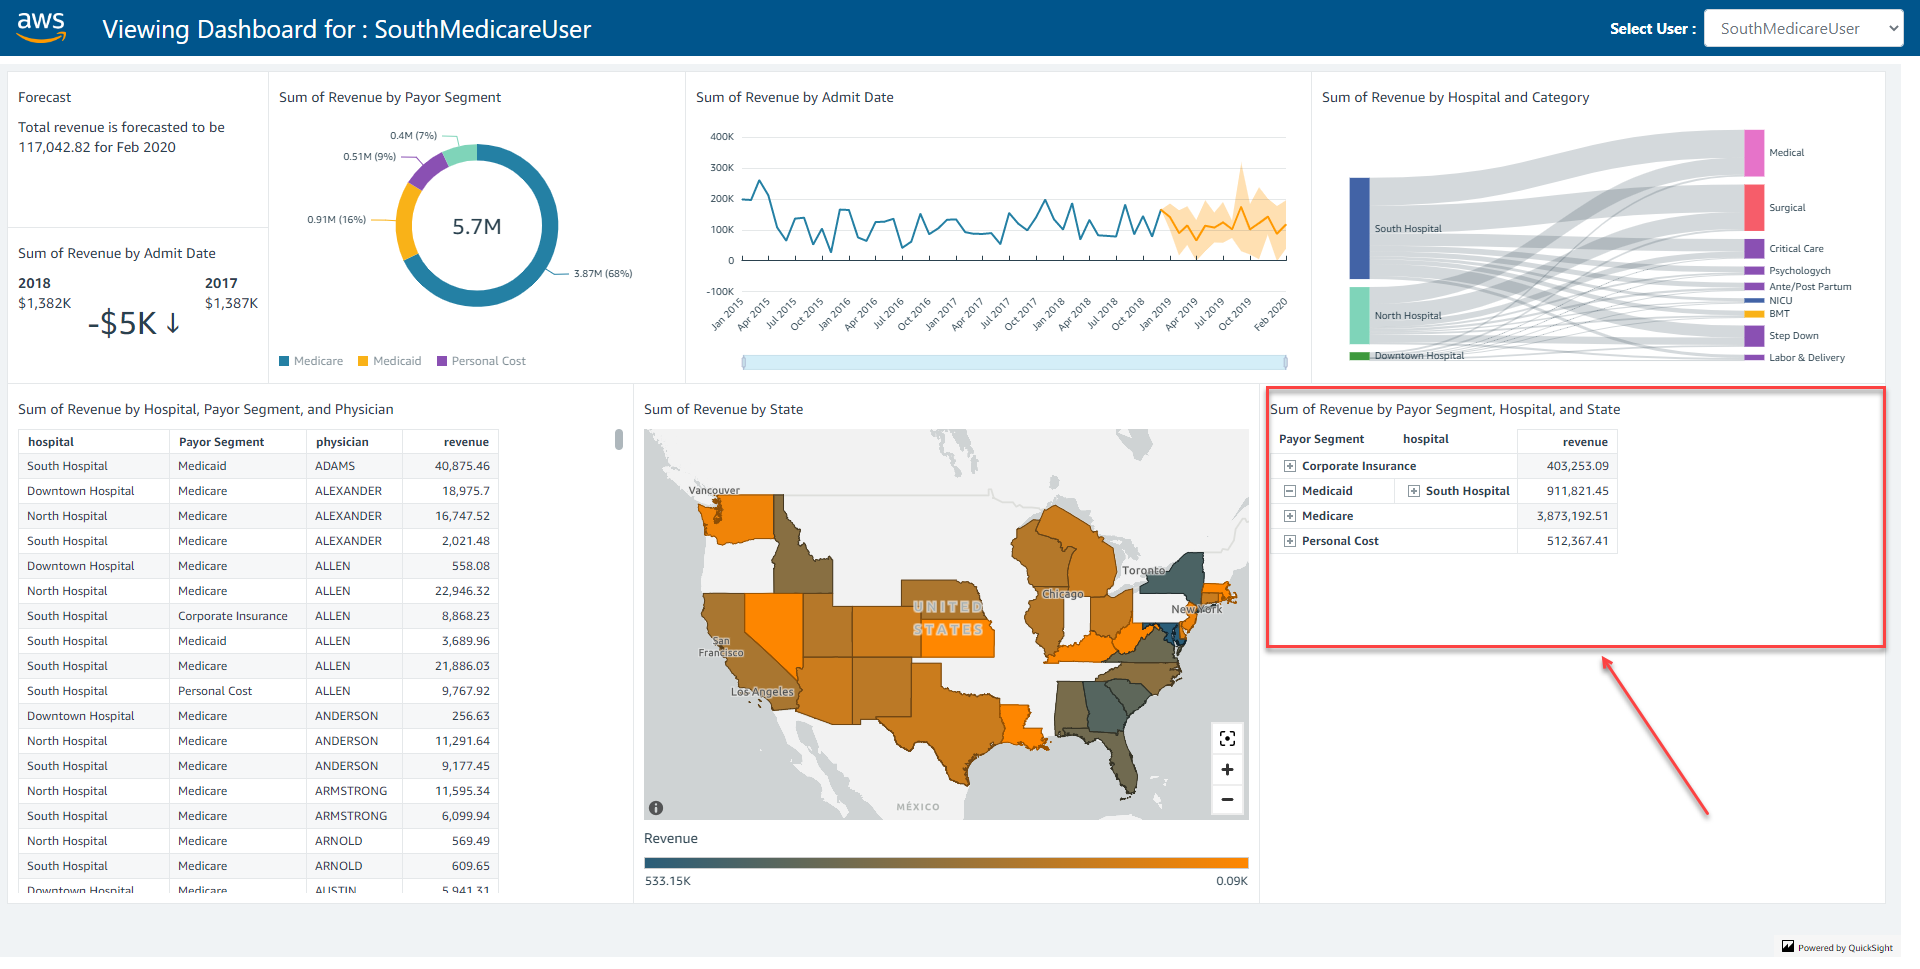
Based on session tags with OR of AND’s support, AnyHealth has secured data on the embedded dashboards such that each user only sees specific data based on their access. You can access the dashboard as one of the users (by changing the user on the drop-down menu on the top right) and see how the data changes based on the user selected.

Overall, with row-level security using OR of AND, AnyHealth is able to provide a compelling analytics experience within their SaaS application, while making sure that each user only sees the appropriate data without having to provision and manage users in QuickSight. QuickSight provides a highly scalable, secure analytics option that you can set up and roll out to production in days, instead of weeks or months previously.

Conclusion

The combination of embedding dashboards for users not provisioned in QuickSight and row-level security using tags with OR of AND enables developers and ISVs to quickly set up sophisticated, customized analytics for their application users—all without any infrastructure setup or user management, while scaling to millions of users. For more updates from QuickSight embedded analytics, see What’s New in the Amazon QuickSight User Guide.

If you have any questions or feedback, please leave a comment. For additional discussions and help getting answers to your questions, check out the QuickSight Community.


About the Authors

Srikanth Baheti is a Specialized World Wide Principal Solution Architect for Amazon QuickSight. He started his career as a consultant and worked for multiple private and government organizations. Later he worked for PerkinElmer Health and Sciences & eResearch Technology Inc, where he was responsible for designing and developing high traffic web applications, highly scalable and maintainable data pipelines for reporting platforms using AWS services and Serverless computing.

Raji Sivasubramaniam is a Sr. Solutions Architect at AWS, focusing on Analytics. Raji is specialized in architecting end-to-end Enterprise Data Management, Business Intelligence and Analytics solutions for Fortune 500 and Fortune 100 companies across the globe. She has in-depth experience in integrated healthcare data and analytics with wide variety of healthcare datasets including managed market, physician targeting and patient analytics.

Mayank Agarwal is a product manager for Amazon QuickSight, AWS’ cloud-native, fully managed BI service. He focuses on embedded analytics and developer experience. He started his career as an embedded software engineer developing handheld devices. Prior to QuickSight he was leading engineering teams at Credence ID, developing custom mobile embedded device and web solutions using AWS services that make biometric enrollment and identification fast, intuitive, and cost-effective for Government sector, healthcare and transaction security applications.

Perform secure database write-backs with Amazon QuickSight

Post Syndicated from Srikanth Baheti original https://aws.amazon.com/blogs/big-data/perform-secure-database-write-backs-with-amazon-quicksight/

Amazon QuickSight is a scalable, serverless, machine learning (ML)-powered business intelligence (BI) solution that makes it easy to connect to your data, create interactive dashboards, get access to ML-enabled insights, and share visuals and dashboards with tens of thousands of internal and external users, either within QuickSight itself or embedded into any application.

A write-back is the ability to update a data mart, data warehouse, or any other database backend from within BI dashboards and analyze the updated data in near-real time within the dashboard itself. In this post, we show how to perform secure database write-backs with QuickSight.

Use case overview

To demonstrate how to enable a write-back capability with QuickSight, let’s consider a fictional company, AnyCompany Inc. AnyCompany is a professional services firm that specializes in providing workforce solutions to their customers. AnyCompany determined that running workloads in the cloud to support its growing global business needs is a competitive advantage and uses the cloud to host all its workloads. AnyCompany decided to enhance the way its branches provide quotes to its customers. Currently, the branches generate customer quotes manually, and as a first step in this innovation journey, AnyCompany is looking to develop an enterprise solution for customer quote generation with the capability to dynamically apply local pricing data at the time of quote generation.

AnyCompany currently uses Amazon Redshift as their enterprise data warehouse platform and QuickSight as their BI solution.

Building a new solution comes with the following challenges:

  • AnyCompany wants a solution that is easy to build and maintain, and they don’t want to invest in building a separate user interface.
  • AnyCompany wants to extend the capabilities of their existing QuickSight BI dashboard to also enable quote generation and quote acceptance. This will simplify feature rollouts because their employees already use QuickSight dashboards and enjoy the easy-to-use interface that QuickSight provides.
  • AnyCompany wants to store the quote negotiation history that includes generated, reviewed, and accepted quotes.
  • AnyCompany wants to build a new dashboard with quote history data for analysis and business insights.

This post goes through the steps to enable write-back functionality to Amazon Redshift from QuickSight. Note that the traditional BI tools are read-only with little to no options to update source data.

Solution overview

This solution uses the following AWS services:

  • Amazon API Gateway – Hosts and secures the write-back REST API that will be invoked by QuickSight
  • AWS Lambda – Runs the compute function required to generate the hash and a second function to securely perform the write-back
  • Amazon QuickSight – Offers BI dashboards and quote generation capabilities
  • Amazon Redshift – Stores quotes, prices, and other relevant datasets
  • AWS Secrets Manager – Stores and manages keys to sign hashes (message digest)

Although this solution uses Amazon Redshift as the data store, a similar approach can be implemented with any database that supports creating user-defined functions (UDFs) that can invoke Lambda.

The following figure shows the workflow to perform write-backs from QuickSight.

The first step in the solution is to generate a hash or a message digest of the set of attributes in Amazon Redshift by invoking a Lambda function. This step prevents request tampering. To generate a hash, Amazon Redshift invokes a scalar Lambda UDF. The hashing mechanism used here is the popular BLAKE2 function (available in the Python library hashlib). To further secure the hash, keyed hashing is used, which is a faster and simpler alternative to hash-based message authentication code (HMAC). This key is generated and stored by Secrets Manager and should be accessible only to allowed applications. After the secure hash is generated, it’s returned to Amazon Redshift and combined in an Amazon Redshift view.

Writing the generated quote back to Amazon Redshift is performed by the write-back Lambda function, and an API Gateway REST API endpoint is created to secure and pass requests to the write-back function. The write-back function performs the following actions:

  1. Generate the hash based on the API input parameters received from QuickSight.
  2. Sign the hash by applying the key from Secrets Manager.
  3. Compare the generated hash with the hash received from the input parameters using the compare_digest method available in the HMAC module.
  4. Upon successful validation, write the record to the quote submission table in Amazon Redshift.

The following section provide detailed steps with sample payloads and code snippets.

Generate the hash

The hash is generated using a Lambda UDF in Amazon Redshift. Additionally, a Secrets Manager key is used to sign the hash. To create the hash, complete the following steps:

  1. Create the Secrets Manager key from the AWS Command Line Interface (AWS CLI):
aws secretsmanager create-secret --name “name_of_secret” --description "Secret key to sign hash" --secret-string '{" name_of_key ":"value"}' --region us-east-1
  1. Create a Lambda UDF to generate a hash for encryption:
import boto3	
import base64
import json
from hashlib import blake2b
from botocore.exceptions import ClientError

def get_secret(): 	#This key is used by the Lambda function to further secure the hash.

    secret_name = "<name_of_secret>"
    region_name = "<aws_region_name>"

    # Create a Secrets Manager client
    session = boto3.session.Session()
    client = session.client(service_name='secretsmanager', region_name=<aws_region_name>    )

    # In this sample we only handle the specific exceptions for the 'GetSecretValue' API.
    # See https://docs.aws.amazon.com/secretsmanager/latest/apireference/API_GetSecretValue.html
    # We rethrow the exception by default.

    try:
        get_secret_value_response = client.get_secret_value(SecretId=secret_name)
    except Exception as e:
            raise e

   if "SecretString" in get_secret_value_response:
       access_token = get_secret_value_response["SecretString"]
   else:
       access_token = get_secret_value_response["SecretBinary"]

   return json.loads(access_token)[<token key name>]

SECRET_KEY = get_secret()
AUTH_SIZE = 16 

def sign(payload):
    h = blake2b(digest_size=AUTH_SIZE, key=SECRET_KEY)
    h.update(payload)
    return h.hexdigest().encode('utf-8')

def lambda_handler(event, context):
ret = dict()
 try:
  res = []
  for argument in event['arguments']:
   
   try:
     msg = json.dumps(argument)
     signed_key = sign(str.encode(msg))
     res.append(signed_key.decode('utf-8'))
     
   except:
   res.append(None)     
   ret['success'] = True
   ret['results'] = res
    
except Exception as e:
  ret['success'] = False
  ret['error_msg'] = str(e)
  
 return json.dumps(ret)
  1. Define an Amazon Redshift UDF to call the Lambda function to create a hash:
CREATE OR REPLACE EXTERNAL FUNCTION udf_get_digest (par1 varchar)
RETURNS varchar STABLE
LAMBDA 'redshift_get_digest'
IAM_ROLE 'arn:aws:iam::<AWSACCOUNTID>role/service-role/<role_name>';

The AWS Identity and Access Management (IAM) role in the preceding step should have the following policy attached to be able to invoke the Lambda function:

{
    "Version": "2012-10-17",
    "Statement": [
        {
            "Effect": "Allow",
            "Action": "lambda:InvokeFunction",
            "Resource": "arn:aws:lambda:us-east-1:<AWSACCOUNTID>1:function:redshift_get_digest"
        }
}
  1. Fetch the key from Secrets Manager.

This key is used by the Lambda function to further secure the hash. This is indicated in the get_secret function in Step 2.

Set up Amazon Redshift datasets in QuickSight

The quote generation dashboard uses the following Amazon Redshift view.

Create an Amazon Redshift view that uses all the preceding columns along with the hash column:

create view quote_gen_vw as select *, udf_get_digest 
( customername || BGCheckRequired || Skill|| Shift ||State ||Cost ) from billing_input_tbl

The records will look like the following screenshot.

The preceding view will be used as the QuickSight dataset to generate quotes. A QuickSight analysis will be created using the dataset. For near-real-time analysis, you can use QuickSight direct query mode.

Create API Gateway resources

The write-back operation is initiated by QuickSight invoking an API Gateway resource, which invokes the Lambda write-back function. As a prerequisite for creating the calculated field in QuickSight to call the write-back API, you must first create these resources.

API Gateway secures and invokes the write-back Lambda function with the parameters created as URL query string parameters with mapping templates. The mapping parameters can be avoided by using the Lambda proxy integration.

Create a REST API resource of method type GET that uses Lambda functions (created in the next step) as the integration type. For instructions, refer to Creating a REST API in Amazon API Gateway and Set up Lambda integrations in API Gateway.

The following screenshot shows the details for creating a query string parameter for each parameter passed to API Gateway.

The following screenshot shows the details for creating a mapping template parameter for each parameter passed to API Gateway.

Create the Lambda function

Create a new Lambda function for the API Gateway to invoke. The Lambda function performs the following steps:

  1. Receive parameters from QuickSight through API Gateway and hash the concatenated parameters.

The following code example retrieves parameters from the API Gateway call using the event object of the Lambda function:

   customer= event['customer’])
    bgc = event['bgc']

The function performs the hashing logic as shown in the create hash step earlier using the concatenated parameters passed by QuickSight.

  1. Compare the hashed output with the hash parameter.

If these don’t match, the write-back won’t happen.

  1. If the hashes match, perform a write-back. Check for the presence of a record in the quote generation table by generating a query from the table using the parameters passed from QuickSight:
query_str = "select * From tbquote where cust = '" + cust + "' and bgc = '" + bgc +"'" +" and skilledtrades = '" + skilledtrades + "'  and shift = '" +shift + "' and jobdutydescription ='" + jobdutydescription + "'"
  1. Complete the following action based on the results of the query:
    1. If no record exists for the preceding combination, generate and run an insert query using all parameters with the status as generated.
    2. If a record exists for the preceding combination, generate and run an insert query with the status as in review. The quote_Id for the existing combination will be reused.

Create a QuickSight visual

This step involves creating a table visual that uses a calculated field to pass parameters to API Gateway and invoke the preceding Lambda function.

  1. Add a QuickSight calculated field named Generate Quote to hold the API Gateway hosted URL that will be triggered to write back the quote history into Amazon Redshift:
concat("https://xxxxx.execute-api.us-east-1.amazonaws.com/stage_name/apiresourcename/?cust=",customername,"&bgc=",bgcheckrequired,"&billrate=",toString(billrate),"&skilledtrades=",skilledtrades,"&shift=",shift,"&jobdutydescription=",jobdutydescription,"&hash=",hashvalue)
  1. Create a QuickSight table visual.
  2. Add required fields such as Customer, Skill, and Cost.
  3. Add the Generate Quote calculated field and style this as a hyperlink.

Choosing this link will write the record into Amazon Redshift. This is incumbent on the same hash value returning when the Lambda function performs the hash on the parameters.

The following screenshot shows a sample table visual.

Write to the Amazon Redshift database

The Secrets Manager key is fetched and used by the Lambda function to generate the hash for comparison. The write-back will be performed only if the hash matches with the hash passed in the parameter.

The following Amazon Redshift table will capture the quote history as populated by the Lambda function. Records in green represent the most recent records for the quote.

Considerations and next steps

Using secure hashes prevents the tampering of payload parameters that are visible in the browser window when the write-back URL is invoked. To further secure the write-back URL, you can employ the following techniques:

  • Deploy the REST API in a private VPC that is accessible only to QuickSight users.
  • To prevent replay attacks, a timestamp can be generated alongside the hashing function and passed as an additional parameter in the write-back URL. The backend Lambda function can then be modified to only allow write-backs within a certain time-based threshold.
  • Follow the API Gateway access control and security best practices.
  • Mitigate potential Denial of Service for public-facing APIs.

You can further enhance this solution to render a web-based form when the write-back URL is opened. This could be implemented by dynamically generating an HTML form in the backend Lambda function to support the input of additional information. If your workload requires a high number of write-backs that require higher throughput or concurrency, a purpose-built data store like Amazon Aurora PostgreSQL-Compatible Edition might be a better choice. For more information, refer to Invoking an AWS Lambda function from an Aurora PostgreSQL DB cluster. These updates can then be synchronized into Amazon Redshift tables using federated queries.

Conclusion

This post showed how to use QuickSight along with Lambda, API Gateway, Secrets Manager, and Amazon Redshift to capture user input data and securely update your Amazon Redshift data warehouse without leaving your QuickSight BI environment. This solution eliminates the need to create an external application or user interface for database update or insert operations, and reduces related development and maintenance overhead. The API Gateway call can also be secured using a key or token to ensure only calls originating from QuickSight are accepted by the API Gateway. This will be covered in subsequent posts.


About the Authors

Srikanth Baheti is a Specialized World Wide Principal Solutions Architect for Amazon QuickSight. He started his career as a consultant and worked for multiple private and government organizations. Later he worked for PerkinElmer Health and Sciences & eResearch Technology Inc, where he was responsible for designing and developing high traffic web applications, highly scalable and maintainable data pipelines for reporting platforms using AWS services and Serverless computing.

Raji Sivasubramaniam is a Sr. Solutions Architect at AWS, focusing on Analytics. Raji is specialized in architecting end-to-end Enterprise Data Management, Business Intelligence and Analytics solutions for Fortune 500 and Fortune 100 companies across the globe. She has in-depth experience in integrated healthcare data and analytics with wide variety of healthcare datasets including managed market, physician targeting and patient analytics.

Secure your database credentials with AWS Secrets Manager and encrypt data with AWS KMS in Amazon QuickSight

Post Syndicated from Srikanth Baheti original https://aws.amazon.com/blogs/big-data/secure-your-database-credentials-with-aws-secrets-manager-and-encrypt-data-with-aws-kms-in-amazon-quicksight/

Amazon QuickSight is a fully managed, cloud-native business intelligence (BI) service that makes it easy to connect to your data, create interactive dashboards, and share them with tens of thousands of users, either directly within a QuickSight application, or embedded in web apps and portals.

Let’s consider AnyCompany, which owns healthcare facilities across the country. The central IT team of AnyCompany is responsible for setting up and maintaining IT infrastructure and services for all the facilities in each state. Because AnyCompany is in the healthcare industry and holds sensitive data, they want to store their database credentials safely and don’t want to share them with individuals in the reporting or BI teams. Additionally, they need to encrypt their data at rest using their own encryption key instead of service-managed keys to satisfy their regulatory requirements. AnyCompany is able to audit access of their SPICE (the QuickSight robust in-memory calculation engine) datasets. In an unlikely case of a security incident, AnyCompany is in full control to immediately lock down access to their data by universally revoking access to their AWS Key Management Service (AWS KMS) keys. QuickSight is one of the services used by AnyCompany, and central IT needs to be able to set up these security measures.

QuickSight Enterprise Edition now supports storing database credentials in AWS Secrets Manager, a feature that allows you to put these credentials in Secrets Manager and not share with every BI user for data source creation. Secrets Manager is a secret storage service that you can use to protect database credentials, API keys, and other secret information. Using a key helps you ensure that the secret can’t be compromised by someone examining your code, because the secret isn’t stored in the code.

Additionally, QuickSight supports account administrators to use their own customer managed key (CMK) to encrypt and manage datasets in SPICE, through integration with AWS KMS. AWS KMS lets you create, manage, and control cryptographic keys across your applications and more than 100 AWS services. With AWS KMS, you can encrypt data across your AWS workloads, digitally sign data, encrypt within your applications using the AWS Encryption SDK, and generate and verify message authentication codes (MACs). Using a QuickSight SPICE CMK enables QuickSight users to revoke access to SPICE datasets with one click, and maintain an auditable log that tracks how SPICE datasets are accessed.

Both features help increase the level of security and transparency, give you more control over QuickSight, and help satisfy security requirements by company and government agency policies.

In this post, we walk you through the steps to use these features.

Solution overview

To enable both features (storing of database credentials in Secrets Manager and using KMS keys for encryption), we require an administrator of the QuickSight account. In the following sections, we walk you through the high-level steps to implement this solution:

  1. Enable Secrets Manager integration from the QuickSight management console.
  2. Create or update a data source with secret credentials using the QuickSight API.
  3. Create a dataset using the data source you created.
  4. Enable KMS keys from the QuickSight management console.
  5. Audit CMK usage and dataset access in AWS CloudTrail.
  6. Revoke access to CMK-encrypted datasets.

Prerequisites

Make sure you have the following prerequisites:

  • A QuickSight subscription with Enterprise Edition
  • A secret in Secrets Manager with your database credentials
  • KMS keys to encrypt data in SPICE

Enable Secrets Manager integration

With this integration, you no longer need to manually enter data source credentials; you can store them in Secrets Manager and manage access via Secrets Manager. You can also rotate the keys and credentials in one place instead of updating all the data sources. Complete the following steps to enable the integration:

  1. Sign in to your QuickSight account.
  2. On the user name drop-down menu, choose Manage QuickSight.
    Manage Quicksight
  3. Choose Security & permissions in the navigation pane.
  4. Under QuickSight access to AWS services, choose Manage.
    Security & Permissions
  5. From the list of services, choose Select secrets under AWS Secrets Manager.
    QuickSight access to AWS services
  6. Select the appropriate secret from the list of secrets and choose Finish.
    Finish

QuickSight creates an AWS Identity and Access Management (IAM) role called aws-quicksight-secretsmanager-role-v0 in your account. It grants users in the account read-only access to the specified secrets and looks similar to the following code:

Identity and Access Management

Create a data source with secret credentials using the QuickSight API

At the time of this writing, creation of data sources using the stored secret in Secrets Manager is only available through the CreateDatasource public API.

The following code is an example API call to create a data source in QuickSight. This example uses the create-data-source API operation. You can also use the update-data-source operation to update an existing data source. For more information, see CreateDataSource and UpdateDataSource.

aws quicksight create-data-source --aws-account-id AWSACCOUNTID \ --data-source-id DATASOURCEID \ --name NAME \ --type MYSQL \ --permissions '[{"Principal": "arn:aws:quicksight:region:accountID:user/namespace/username", "Actions": ["quicksight:DeleteDataSource", "quicksight:DescribeDataSource", "quicksight:DescribeDataSourcePermissions", "quicksight:PassDataSource", "quicksight:UpdateDataSource", "quicksight:UpdateDataSourcePermissions"]}]' \    --data-source-parameters='{"MySQLParameters":{"Database": "database", "Host":"hostURL", "Port":"port"}}' \ --credentials='{"SecretArn":"arn:aws:secretsmanager:region:accountID:secret:secretname"}' \ --region us-west-2

In the preceding call, QuickSight authorizes secretsmanager:GetSecretValue access to the secret based on the API caller’s IAM policy, not the IAM service role’s policy. The IAM service role acts on the account level and is used when an analysis or dashboard is viewed by a user. It can’t be used to authorize secret access when a user creates or updates the data source.

We get the following response:

{
   "Arn": "string",
   "CreationStatus": "string",
   "DataSourceId": "string",
   "RequestId": "string"
}

In the initial response, the creation status is CREATION_IN_PROGRESS. To check if the data source was successfully created, use the DescribeDatasource API to receive a description of the data source:

aws quicksight describe-data-source --aws-account-id AWSACCOUNTID \ --data-source-id DATASOURCEID

A successful API call returns the data source object that includes status and data source details:

{
   "Status": integer,
   "DataSource":{
      "Arn": "string",
 "DataSourceId": "string",
   	 "Name": "string"
   	 "Type": "string"
   	 "Status": "string"
   	 "CreatedTime": "string"
   	 "LastUpdatedTime": "string"
   	 "DataSourceParameters": {
       }
   	 "VpcConnectionProperties": {
 "VpcConnectionArn":"string"
  }
	 "SslProperties": {
            "DisableSsl": boolean
        },
       "SecretArn": "string"
}
     "RequestId": "string"
}

Create a dataset using the new data source

For instructions on creating a new SPICE dataset using the data source you just created, refer to Creating a dataset using an existing data source.

Enable KMS keys

To enable KMS keys, complete the following steps:

  1. On the QuickSight start page, choose Manage QuickSight.
    Managing QuickSight
  2. Choose KMS keys in the navigation pane.
  3. Choose Manage.
    Manage
  4. On the KMS Keys page, choose Select key.
    Select Key
  5. In the Select key pop-up box, on the Key menu, choose the key that you want to add.
    Key Menu

If your key isn’t on the list, you can manually enter the key’s ARN.

  1. Choose Use as default encryption key for all new SPICE datasets in this QuickSight account to set the selected key as your default key.

A blue badge appears next to the default key to indicate its status.

When you choose a default key, all new SPICE datasets that are created in the Region that hosts your QuickSight account are encrypted with the default key.

Default Key

  1. Optionally, add more keys by repeating the previous steps.

Although you can add as many keys as you want, you can only have one default key at one time.

  1. Optionally, change or remove CMKs by changing or deleting the default key for all new SPICE datasets.

For existing datasets, you need to perform a full refresh after changing or deleting the default key to take effect.

Audit CMK usage and dataset access in CloudTrail

When a key is used (for example, when a CMK-encrypted SPICE dataset is accessed), an audit log is created in CloudTrail. You can use the log to track the key’s usage. For more information, see Logging operations with AWS CloudTrail. If you need to know which key a SPICE dataset is encrypted by, you can find this information in CloudTrail. Complete the following steps:

  1. On the CloudTrail console, navigate to your CloudTrail log.
  2. Locate the CMK usage (CMK-encrypted SPICE dataset access), using the following search arguments:
    1. The event name (eventName) is GenerateDataKey or Decrypt.
    2. The eventTime denotes when the CMK is used (a CMK-encrypted SPICE dataset is accessed).
    3. The request parameters (requestParameters) contain the QuickSight ARN for the dataset.
    4. The request parameters (requestParameters) contain the KMS ARN (keyId) of the CMK.

See the following code:

{
    "eventVersion": "1.08",
    "userIdentity": {
        "type": "AWSService",
        "invokedBy": "quicksight.amazonaws.com"
    },
    "eventTime": "2022-10-26T00:06:06Z",
    "eventSource": "kms.amazonaws.com",
    "eventName": "Decrypt",
    "awsRegion": "us-west-2",
    "sourceIPAddress": "quicksight.amazonaws.com",
    "userAgent": "quicksight.amazonaws.com",
    "requestParameters": {
        "constraints": {
            "encryptionContextSubset": {
                "aws:quicksight:arn": "arn:aws:quicksight:us-west-2:111122223333:dataset/12345678-1234-1234-1234-123456789012"
            }
        },
        "keyId": "arn:aws:kms:us-west-2:111122223333:key/87654321-4321-4321-4321-210987654321",
        "encryptionAlgorithm": "SYMMETRIC_DEFAULT"
    },
....
}

Now we can verify the CMK that’s currently used by a SPICE dataset.

  1. In your CloudTrail log, locate the most recent grant events for the SPICE dataset using the following search arguments:
    1. The event name (eventName) contains Grant.
    2. The request parameters (requestParameters) contain the QuickSight ARN for the dataset.

See the following code:

{
    "eventVersion": "1.08",
    "userIdentity": {
        "type": "AWSService",
        "invokedBy": "quicksight.amazonaws.com"
    },
    "eventTime": "2022-10-26T00:11:08Z",
    "eventSource": "kms.amazonaws.com",
    "eventName": "CreateGrant",
    "awsRegion": "us-west-2",
    "sourceIPAddress": "quicksight.amazonaws.com",
    "userAgent": "quicksight.amazonaws.com",
    "requestParameters": {
        "constraints": {
            "encryptionContextSubset": {
                "aws:quicksight:arn": "arn:aws:quicksight:us-west-2:111122223333:dataset/12345678-1234-1234-1234-123456789012"
            }
        },
        "retiringPrincipal": "quicksight.amazonaws.com",
        "keyId": "arn:aws:kms:us-west-2:111122223333:key/87654321-4321-4321-4321-210987654321",
        "granteePrincipal": "quicksight.amazonaws.com",
        "operations": [
            "Encrypt",
            "Decrypt",
            "DescribeKey",
            "GenerateDataKey"
        ]
    },
....
}

Depending on the event type, one of the following applies:

  • CreateGrant – You can find the most recently used CMK in the key ID (keyID) for the last CreateGrant event for the SPICE dataset
  • RetireGrant – If latest CloudTrail event of the SPICE dataset is RetireGrant, there is no key ID and the SPICE dataset is no longer CMK encrypted

Revoke access to CMK-encrypted datasets

You can revoke access to your CMK-encrypted SPICE datasets. When you revoke access to a key that is used to encrypt a dataset, access to the dataset is denied until you undo the revoke. The following method is one example of how you can revoke access:

  1. On the AWS KMS console, choose Customer managed keys in the navigation pane.
  2. Select the key that you want to turn off.
  3. On the Key actions menu, choose Disable.

After you revoke access by using any method, it can take up to 15 minutes for the SPICE dataset to become inaccessible.

Sample implementation

The following code shows a sample CreateDatasource API call for creating a QuickSight data source:

aws quicksight create-data-source --aws-account-id <AccountID> --data-source-id hospitaldataASM --name hospipataldataASM --type POSTGRESQL --credentials={\"SecretArn\":\"arn:aws:secretsmanager:us-east-1:<AccountiD>:secret:<SecretID>\"} --data-source-parameters={\"PostgreSqlParameters\":{\"Database\":\"postgres\",\"Host\":\"xxxx.xxxxxx.us-east-1.rds.amazonaws.com\",\"Port\":5432}} --vpc-connection-properties={\"VpcConnectionArn\":\"arn:aws:quicksight:us-east-1:<AccountID>:vpcConnection/<vpcConnectionName>\"} --permissions="Principal=arn:aws:quicksight:us-east-1:380249061054:user/default/<username>,Actions=quicksight:DescribeDataSource,quicksight:DescribeDataSourcePermissions,quicksight:PassDataSource,quicksight:UpdateDataSourcePermissions,quicksight:DeleteDataSource,quicksight:UpdateDataSource"

We get the following response:

Response

To monitor the status of the new data source, run the DescribeDataSource API:

aws quicksight describe-data-source --aws-account-id <AccountId> \     --data-source-id hospitaldataASM

aws quicksight describe-data-source –aws-account-id <AccountId> \ –data-source-id hospitaldataASM

We get the following response:

Response 2

To validate the KMS keys used, navigate to CloudTrail logs, as shown in the following code:

Cloud Trails Log

Finally, audit the CMK usage (dataset access) via CloudTrail logs. And in the unlikely case of a security incident, access to data can be locked down universally by revoking access to the KMS keys.

Clean up

Clean up the resources created as part of this post with the following steps:

  1. To remove the Secrets Manager integration, update the data source with regular service-level credentials.
  2. Remove the secret from the QuickSight admin console.
  3. On the QuickSight start page, choose Manage QuickSight.
  4. Choose KMS keys in the navigation pane.
  5. Choose Manage.
  6. Choose the Actions menu (three dots) on the row of the default key, then choose Delete.
  7. In the pop-up box that appears, choose Remove.

Conclusion

This post showcased the new features released in QuickSight to secure database credentials through integration with Secrets Manager and AWS KMS. We also demonstrated how to set up customer managed keys to enable encryption of data at rest in QuickSight SPICE, track key usage history using CloudTrail, and lock down access to data by revoking access to KMS keys.

Try out QuickSight support for Secrets Manager and AWS KMS integration to secure your credentials and data with QuickSight, and share your feedback and questions in the comments. For more information, refer to Key management and Using AWS Secrets Manager secrets instead of database credentials in Amazon QuickSight.


About the authors

Srikanth Baheti is a Specialized World Wide Sr. Solution Architect for Amazon QuickSight. He started his career as a consultant and worked for multiple private and government organizations. Later he worked for PerkinElmer Health and Sciences & eResearch Technology Inc, where he was responsible for designing and developing high traffic web applications, highly scalable and maintainable data pipelines for reporting platforms using AWS services and Serverless computing.

Raji Sivasubramaniam is a Sr. Solutions Architect at AWS, focusing on Analytics. Raji is specialized in architecting end-to-end Enterprise Data Management, Business Intelligence and Analytics solutions for Fortune 500 and Fortune 100 companies across the globe. She has in-depth experience in integrated healthcare data and analytics with wide variety of healthcare datasets including managed market, physician targeting and patient analytics.

Govern and manage permissions of Amazon QuickSight assets with the new centralized asset management console

Post Syndicated from Srikanth Baheti original https://aws.amazon.com/blogs/big-data/govern-and-manage-permissions-of-amazon-quicksight-assets-with-the-new-centralized-asset-management-console/

Amazon QuickSight is a fully-managed, cloud-native business intelligence (BI) service that makes it easy to connect to your data, create interactive dashboards, and share these with tens of thousands of users, either within the QuickSight interface or embedded in software as a service (SaaS) applications or web portals. With QuickSight providing insights to power daily decisions across the organization, it becomes more important than ever for administrators to ensure they can easily govern and manage permissions of all the assets in their account.

We recently announced the launch of a new admin asset management console in QuickSight, which enables administrators at enterprises and independent software vendors (ISVs) to govern their QuickSight account at scale and have self-service support capabilities by providing easy visibility and access to all the assets across the entire account, including in a multi-tenant setup. In addition, admins can perform actions that were previously possible only via API, such as bulk transfer of assets from one user or group to another, share multiple assets with someone at once, or revoke a user’s access to an asset.

This launch also supports APIs for searching assets which allows administrators to automate and govern at scale. Administrators and developers can programmatically search for assets a user or group has access to and search for assets by name. Additionally, they can describe and manage assets permissions.

In this post, we show how to access this console and some of the administration and governance use cases that you can achieve.

Feature overview

The QuickSight admin asset management console is available for admins with AWS Identity and Access Management (IAM) permissions who have access to QuickSight admin console pages. The following IAM policy allows an IAM user get access to all the features in the asset management console:

{
    "Version": "2012-10-17",
    "Statement": [
        {
            "Effect": "Allow",
            "Action": [          
                "quicksight:SearchGroups",
                "quicksight:SearchUsers",            
                "quicksight:ListNamespaces",            
                "quicksight:DescribeAnalysisPermissions",
                "quicksight:DescribeDashboardPermissions",
                "quicksight:DescribeDataSetPermissions",
                "quicksight:DescribeDataSourcePermissions",
                "quicksight:DescribeFolderPermissions",
                "quicksight:ListAnalyses",
                "quicksight:ListDashboards",
                "quicksight:ListDataSets",
                "quicksight:ListDataSources",
                "quicksight:ListFolders",
                "quicksight:SearchAnalyses",
                "quicksight:SearchDashboards",
                "quicksight:SearchFolders",
                "quicksight:SearchDataSets",
                "quicksight:SearchDataSources",
                "quicksight:UpdateAnalysisPermissions",
                "quicksight:UpdateDashboardPermissions",
                "quicksight:UpdateDataSetPermissions",
                "quicksight:UpdateDataSourcePermissions",
                "quicksight:UpdateFolderPermissions"
            ],
            "Resource": "*"
        }
    ]
}

APIs

Assets can be searched by using the following public APIs:

Permissions of the assets can be described and managed by using the following public APIs:

Access the QuickSight asset management console

To access the new QuickSight asset management console, complete the following steps:

  1. On the QuickSight console, navigate to the user menu and choose Manage QuickSight.
  2. In the navigation pane, choose Manage assets.

The landing page presents three ways to list assets:

  • Search for assets owned by a user or a group in a namespace
  • Search for assets by name
  • Browse all assets or filter by asset type in the account

If you have only one namespace, you won’t see namespace drop-down, as shown in the following screenshot.

Use case overview

Let’s consider a fictional company, AnyCompany, which is an ISV that provides services to thousands of customers across the globe. QuickSight is one of the services used by AnyCompany for providing multi-tenant BI and analytics solutions. They have already implemented multi-tenancy in QuickSight using namespaces to isolate users and groups. Within each tenant, assets are organized using folders.

Previously, there was no single pane of glass view in the QuickSight user interface that could show them all the assets by tenant users or groups and associated permissions. To get a holistic view, they were dependent on IT administrators to run tenant-specific API calls and export that information on a regular basis to validate the asset permissions.

With this feature, AnyCompany is no longer dependent on IT administrators for the asset information, and doesn’t have to go through the tedious task of reconciliation and access validation. This not only removes a dependency on IT administrators’ availability, but also provides a centralized solution for asset governance.

AnyCompany has the following key administration and governance needs that they deem critical:

  • Transfer assets – They want to be able to quickly transfer assets from one user or group to another in case the original owner is leaving the company or is on an extended leave
  • Onboard new employees – They want to be able to speed up onboarding of new employees by giving them access to assets their teammates have
  • Support authors – They want their in-house BI engineers to be able to easily and quickly support authors in other tenants by getting access to their dashboards
  • Revoke access – They want the capability to quickly audit and revoke permissions when changes occur

In the following sections, we discuss how AnyCompany meets their asset management needs in more detail.

Transfer assets

One of the business analysts, who was responsible for authoring some the key dashboards for use within the management team in headquarters and common dashboards that were being shared with all the tenants, recently switched organizations within AnyCompany. The central administrator wants to transfer all the assets to another team member and to maintain continuity.

To transfer assets, complete the following steps:

  1. Log in to QuickSight and navigate to Manage assets.
  2. Choose the namespace of the business analyst who left.
  3. Enter at least the first three characters of the username or the email of the analyst who left and choose the user from the search results.

A list of all the assets that the analyst is owner or viewer of is displayed.

  1. Use the filters to list assets of which the analyst is the sole owner.
  2. You can also choose to list only a single type of asset, such as dashboards.
  3. Select all the assets on the first page.
  4. On the Actions menu, choose Transfer.
  5. Choose the namespace the new user belongs to.
  6. Search for the analyst to whom all the assets will be transferred to by entering at least the first three characters of the username or the email.
  7. Choose the appropriate user from the search results.
  8. For Permissions, you can choose to replicate permissions that the analyst had to the new user, or make the new user owner or viewer of all assets being transferred.
  9. Choose Transfer.
  10. When the transfer is complete, choose Done.
  11. Repeat these steps if there is more than one page of assets listed.

Onboard new employees

A new analyst has joined AnyCompany, and the manager wants this analyst to have access to all QuickSight assets as one of the existing analyst.

To share assets, the administrator takes the following steps:

  1. Log in to QuickSight and navigate to Manage assets.
  2. Choose the namespace the existing business analyst belongs to.
  3. Search for the existing analyst by entering at least the first three characters of the username or the email and choose the user from the search results.

A list of all the assets that the analyst is owner or viewer of is displayed.

  1. Select all the assets on the first page.
  2. On the Actions menu, choose Share.
  3. Choose the namespace the new user belongs to.
  4. Search for the analyst who just joined the team by entering at least the first three characters of the username or the email and choose the appropriate user from the search results.
  5. You can choose to replicate permissions that the analyst had to the new user, or make the new user the owner or viewer of all assets being shared.
  6. Choose Share.
  7. When the share is complete, choose Done.

Support authors

AnyCompany often receives support requests from their tenant authors who are creating and sharing dashboards within the boundary of their tenant, which is achieved by namespaces in QuickSight. AnyCompany’s support team wants to get easy access to other tenant authors’ assets and provide the necessary support quickly.

To get access to an author’s assets, complete the following steps:

  1. Log in to QuickSight and navigate to Manage assets.
  2. For Search by asset name, enter the name of the asset that the support team wants to get access to.

A list of assets that contain the search text is displayed.

  1. Select the assets you want to give the support team access to.
  2. Choose Share.
  3. Choose the namespace the support team belongs to.
  4. Choose the group the support team belongs to.
  5. Choose the Owner permission in order for the support team to have complete access to the asset.
  6. Choose Share.
  7. When the share is complete, choose Done.

Revoke access

In case of policy changes or if the central administrator discovers that a QuickSight user shouldn’t have access to certain assets, you can revoke asset access.

To revoke a user’s access to an asset, complete the following steps:

  1. Log in to QuickSight and navigate to Manage assets.
  2. Choose the namespace the existing business analyst belongs to.
  3. Search for the user you want to remove access to by entering at least the first three characters of the username or the email and choose the appropriate user from the search results.

A list of all the assets that the analyst is owner or viewer of is displayed.

  1. Choose the menu icon (three vertical dots) in the Actions column of the assets you want to revoke access to and choose Revoke access.
  2. Choose Revoke.
  3. After access has been revoked, choose Done.

Conclusion

With the asset management console, admins now have easy visibility to all the assets in an account and can govern and manage permissions of all the assets in an account. Try out the asset management console for your centralized governance in QuickSight and share your feedback and questions in the comments. For more information, refer to Asset Management Console user guide.

Stay tuned for more new admin capabilities, and follow What’s New with Analytics for the latest on QuickSight.


About the Authors

Srikanth Baheti is a Specialized World Wide Sr. Solution Architect for Amazon QuickSight. He started his career as a consultant and worked for multiple private and government organizations. Later he worked for PerkinElmer Health and Sciences & eResearch Technology Inc, where he was responsible for designing and developing high traffic web applications, highly scalable and maintainable data pipelines for reporting platforms using AWS services and Serverless computing.

Raji Sivasubramaniam is a Sr. Solutions Architect at AWS, focusing on Analytics. Raji is specialized in architecting end-to-end Enterprise Data Management, Business Intelligence and Analytics solutions for Fortune 500 and Fortune 100 companies across the globe. She has in-depth experience in integrated healthcare data and analytics with wide variety of healthcare datasets including managed market, physician targeting and patient analytics.

Mayank Agarwal is a product manager for Amazon QuickSight, AWS’ cloud-native, fully managed BI service. He focuses on account administration, governance and developer experience. He started his career as an embedded software engineer developing handheld devices. Prior to QuickSight he was leading engineering teams at Credence ID, developing custom mobile embedded device and web solutions using AWS services that make biometric enrollment and identification fast, intuitive, and cost-effective for Government sector, healthcare and transaction security applications.

Automate your Amazon QuickSight deployment with the new API-based account creation and deletion

Post Syndicated from Srikanth Baheti original https://aws.amazon.com/blogs/big-data/automate-your-amazon-quicksight-deployment-with-the-new-api-based-account-creation-and-deletion/

Amazon QuickSight is a fully managed, cloud-native business intelligence (BI) service that makes it easy to connect to your data, create interactive dashboards, and share these with tens of thousands of users, either within the QuickSight interface, or embedded in software as a service (SaaS) applications or web portals.

We’re excited to announce the availability of QuickSight APIs that enable administrators and developers to programmatically create and delete accounts with QuickSight Enterprise and Enterprise + Q editions. This allows developers and administrators to automate the deployment and teardown of QuickSight accounts in their organization at scale.

Feature overview

To create and delete QuickSight accounts programmatically, you can use the following APIs:

You need to have the correct AWS Identity and Access Management (IAM) permissions to sign up for QuickSight. For more information, see IAM policy examples for Amazon QuickSight. If your IAM policy includes both the Subscribe and CreateAccountSubscription actions, make sure that both actions are set to Allow. If either action is set to Deny, the Deny action prevails and your API call fails.

Create a QuickSight account

Use the CreateAccountSubscription API to create a QuickSight account:

POST /account/AwsAccountId HTTP/1.1 
Content-type: application/json 
{ 
    "AccountName": "string", 
    "ActiveDirectoryName": "string", 
    "AdminGroup": [ "string" ], 
    "AuthenticationMethod": "string", 
    "AuthorGroup": [ "string" ], 
    "ContactNumber": "string", 
    "DirectoryId": "string", 
    "Edition": "string", 
    "EmailAddress": "string", 
    "FirstName": "string", 
    "LastName": "string", 
    "NotificationEmail": "string", 
    "ReaderGroup": [ "string" ], 
    "Realm": "string" 
}

You can choose to subscribe to Enterprise or Enterprise + Q edition of QuickSight. You can choose the user authentication method: IAM only, IAM and QuickSight, or Active Directory. If you choose Active Directory, you need to provide an Active Directory name and an admin group associated with your Active Directory. Provide the notification email address that you want QuickSight to send notifications to regarding your QuickSight account or QuickSight subscription.

The following code shows the response for CreateAccountSubscription:

HTTP/1.1 Status
Content-type: application/json
{
   "RequestId": "string",
   "SignupResponse": { 
      "accountName": "string",
      "directoryType": "string",
      "IAMUser": boolean,
      "userLoginName": "string"
   }
}

Describe a QuickSight account

Use the DescribeAccountSubscription API to receive a description of a QuickSight account’s subscription:

GET /account/AwsAccountId HTTP/1.1

A successful API call returns an AccountInfo object that includes an account’s name, subscription status, authentication type, edition, and notification email address:

HTTP/1.1 Status 
Content-type: application/json 
{ 
    "AccountInfo": { 
        "AccountName": "string", 
        "AccountSubscriptionStatus": "string", 
        "AuthenticationType": "string", 
        "Edition": "string", 
        "NotificationEmail": "string" 
    },
    "RequestId": "string" 
}

Update and delete a QuickSight account

To avoid accidental deletion, a termination protection flag has been introduced. When a new QuickSight account is provisioned through the CreateAccountSubscription API or user interface, the termination protection flag is set to True by default. You can use the existing DescribeAccountSettings API to inquire the current value of the termination protection flag:

GET /account/AwsAccountId HTTP/1.1

The following code shows the response for DescribeAccountSettings:

HTTP/1.1 Status 
Content-type: application/json
{ 
    "AccountSettings": { 
        "AccountName": "string", 
        "Edition": "string", 
        "DefaultNamespace": "string", 
        "PublicSharingEnabled": "boolean", 
        "NotificationEmail": "string",
        "TerminationProtectionEnabled": "boolean"
    },
    "RequestId": "string" 
}

Use the UpdateAccountSettings API to disable the termination protection flag before proceeding with deleting the account. Optionally, this API can be used to update notification email:

PUT /accounts/{AwsAccountId}/settings HTTP/1.1 
Content-type: application/json 
{ 
    "AwsAccountId": "string", 
    "DefaultNamespace": "string", //Currently only supports default namespace: default 
    "TerminationProtectionEnabled": "boolean",
     "NotificationEmail": "string"
}

After the termination protection has been set to False, use the DeleteAccountSubscription API to delete the QuickSight account:

DELETE /account/{AwsAccountId} HTTP/1.1 
Content-type: application/json

Sample use case

Let’s consider a fictional company, AnyCompany, which owns healthcare facilities across the country. The central IT team of AnyCompany is responsible for setting up and maintaining the IT infrastructure and services for all the facilities in each state. Because AnyCompany is scaling their business, they want to automate the onboarding and maintenance of the IT infrastructure as much as possible. QuickSight is one of the services used by AnyCompany sites, and central IT needs to be able to set up and tear down QuickSight accounts automatically.

The following code shows their sample CreateAccountSubscription API call for setting up a QuickSight Enterprise account:

aws quicksight create-account-subscription --edition ENTERPRISE 
--authentication-method IAM_AND_QUICKSIGHT --aws-account-id XXXXXXXXXXXX 
--account-name quicksight-enterprise-reporting --notification-email XXXXXXXXXX 
--region us-west-2

The following screenshot shows the response.

They use the DescribeAccountSubscription API to monitor the status of new QuickSight account’s subscription:

aws quicksight describe-account-subscription --aws-account-id XXXXXXXXXXX

The following screenshot shows the response.

In case of a site closing event, the following code turns off the account protection using the UpdateAccountSettings API call:

 aws quicksight update-account-settings --aws-account-id XXXXXXXXXXXX 
 --default-namespace default --no-termination-protection-enabled 
 --region us-west-2

The following screenshot shows the response.

The following code deletes the QuickSight account using the DeleteAccountSubscription API call:

aws quicksight delete-account-subscription --aws-account-id XXXXXXXXXXXX 
--region us-west-2

The following screenshot shows the response.

Conclusion

Provisioning and deleting QuickSight accounts enables IT teams to automate their deployments of QuickSight instances across their organization. You can scale and keep up with the rapidly growing business, and minimize human error such as choosing the wrong authentication method. For more information, refer to Amazon QuickSight and What’s New in the Amazon QuickSight User Guide.

Try out QuickSight account provisioning and deletion APIs to automate your QuickSight deployments, and share your feedback and questions in the comments.


About the authors

Srikanth Baheti is a Specialized World Wide Sr. Solution Architect for Amazon QuickSight. He started his career as a consultant and worked for multiple private and government organizations. Later he worked for PerkinElmer Health and Sciences & eResearch Technology Inc, where he was responsible for designing and developing high traffic web applications, highly scalable and maintainable data pipelines for reporting platforms using AWS services and Serverless computing.

Raji Sivasubramaniam is a Sr. Solutions Architect at AWS, focusing on Analytics. Raji is specialized in architecting end-to-end Enterprise Data Management, Business Intelligence and Analytics solutions for Fortune 500 and Fortune 100 companies across the globe. She has in-depth experience in integrated healthcare data and analytics with wide variety of healthcare datasets including managed market, physician targeting and patient analytics.

Mayank Agarwal is a product manager for Amazon QuickSight, AWS’ cloud-native, fully managed BI service. He focuses on account administration, governance and developer experience. He started his career as an embedded software engineer developing handheld devices. Prior to QuickSight he was leading engineering teams at Credence ID, developing custom mobile embedded device and web solutions using AWS services that make biometric enrollment and identification fast, intuitive, and cost-effective for Government sector, healthcare and transaction security applications.

Enable federation to Amazon QuickSight accounts with Ping One

Post Syndicated from Srikanth Baheti original https://aws.amazon.com/blogs/big-data/enable-federation-to-amazon-quicksight-accounts-with-ping-one/

Amazon QuickSight is a scalable, serverless, embeddable, machine learning (ML)-powered business intelligence (BI) service built for the cloud that supports identity federation in both Standard and Enterprise editions. Organizations are working towards centralizing their identity and access strategy across all of their applications, including on-premises, third-party, and applications on AWS. Many organizations use Ping One to control and manage user authentication and authorization centrally. If your organization uses Ping One for cloud applications, you can enable federation to all of your QuickSight accounts without needing to create and manage users in QuickSight. This authorizes users to access QuickSight assets—analyses, dashboards, folders, and datasets—through centrally managed Ping One.

In this post, we go through the steps to configure federated single sign-on (SSO) between a Ping One instance and a QuickSight account. We demonstrate registering an SSO application in Ping One, creating groups, and mapping to an AWS Identity and Access Management (IAM) role that translates to QuickSight user license types (admin, author, and reader). These QuickSight roles represent three different personas supported in QuickSight. Administrators can publish the QuickSight app in Ping One to enable users to perform SSO to QuickSight using their Ping credentials.

Prerequisites

To complete this walkthrough, you must have the following prerequisites:

  • A Ping One subscription
  • One or more QuickSight account subscriptions

Solution overview

The walkthrough includes the following steps:

  1. Create groups in Ping One for each of the QuickSight user license types.
  2. Register an AWS application in Ping One.
  3. Add Ping One as your SAML identity provider (IdP) in AWS.
  4. Configure an IAM policy.
  5. Configure an IAM role.
  6. Configure your AWS application in Ping One.
  7. Test the application from Ping One.

Create groups in Ping One for each of the QuickSight roles

To create groups in Ping One, complete the following steps:

  1. Sign in to the Ping One portal using an administrator account.
  2. Under Identities, choose Groups.
  3. Choose the plus sign to add a group.
    BDB-2210-Ping-Groups
  4. For Group Name, enter QuickSightReaders.
  5. Choose Save.
    BDB-2210-Ping-Groups-Save
  6. Repeat these steps to create the groups QuickSightAdmins and QuickSightAuthors.

Register an AWS application in Ping One

To configure the integration of an AWS application in Ping One, you need to add AWS to your list of managed software as a service (SaaS) apps.

  1. Sign in to the Ping One portal using an administrator account.
  2. Under Connections, choose Application Catalog.
  3. In the search box, enter amazon web services.
  4. Choose Amazon Web Services – AWS from the results to add the application.  BDB-2210-Ping-AWS-APP
  5. For Name, enter Amazon QuickSight.
  6. Choose Next.
    BDB-2210-Ping-AWS-SAVE
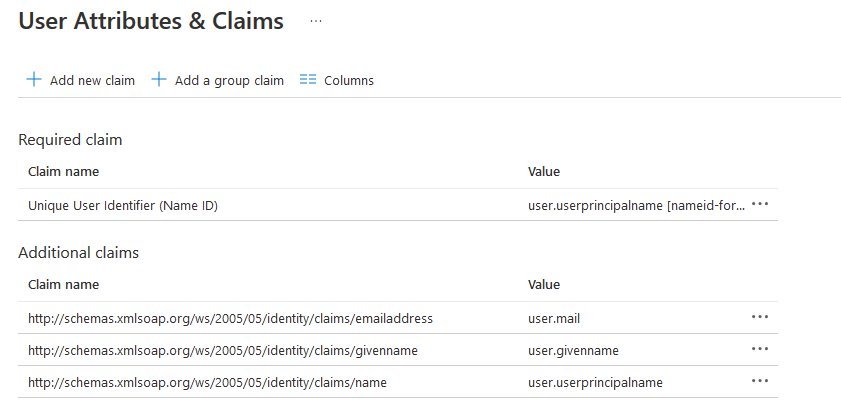
Under Map Attributes, there should be four attributes.
  7. Delete the attribute related to SessionDuration.
  8. Choose Username as the value for all the remaining attributes for now.
    We update these values in later steps.
  9. Choose Next.
    BDB-2210-Ping-AWS-Attributes
  10. In the Select Groups section, add the QuickSightAdmins, QuickSightAuthors, and QuickSightReaders groups you created.
  11. Choose Save.
    BDB-2210-Ping-AWS-Attributes-Save
  12. After the application is created, choose the application again and download the federation metadata XML.

You use this in the next step.
BDB-2210-Ping-AWS-Metadata

Add Ping One as your SAML IdP in AWS

To configure Ping One as your SAML IdP, complete the following steps:

  1. Open a new tab in your browser.
  2. Sign in to the IAM console in your AWS account with admin permissions.
  3. On the IAM console, under Access Management in the navigation pane, choose Identity providers.
  4. Choose Add provider.
    BDB-2210-Ping-AWS-IAM
  5. For Provider name, enter PingOne.
  6. Choose file to upload the metadata document you downloaded earlier.
  7. Choose Add provider.
  8. In the banner message that appears, choose View provider.
  9. Copy the IdP ARN to use in a later step.
    BDB-2210-Ping-AWS-IAM_ARN

Configure an IAM policy

In this step, you create an IAM policy to map three different roles with permissions in QuickSight.

Use the following steps to set up QuickSightUserCreationPolicy. This policy grants privileges in QuickSight to the federated user based on the assigned groups in Ping One.

  1. On the IAM console, choose Policies.
  2. Choose Create policy.
  3. On the JSON tab, replace the existing text with the following code:
    {
       "Version": "2012-10-17",
        "Statement": [ 
             {  
                "Sid": "VisualEditor0", 
                 "Effect": "Allow", 
                 "Action": "quicksight:CreateAdmin", 
                 "Resource": "*", 
                 "Condition": { 
                     "StringEquals": { 
                         "aws:PrincipalTag/user-role": "QuickSightAdmins" 
     
                    } 
                 } 
             }, 
             { 
                 "Sid": "VisualEditor1", 
                 "Effect": "Allow", 
                 "Action": "quicksight:CreateUser", 
                 "Resource": "*", 
                 "Condition": { 
                     "StringEquals": { 
                         "aws:PrincipalTag/user-role": "QuickSightAuthors" 
                     } 
                 } 
             }, 
             { 
                 "Sid": "VisualEditor2", 
                 "Effect": "Allow", 
                 "Action": "quicksight:CreateReader", 
                 "Resource": "*", 
                 "Condition": { 
                     "StringEquals": { 
                         "aws:PrincipalTag/user-role": "QuickSightReaders" 
                     } 
                 } 
             } 
         ] 
     } 
  4. Choose Review policy.
    BDB-2210-AWS-IAM-Policy
  5. For Name, enter QuickSightUserCreationPolicy.
    BDB-2210-AWS-IAM-Policy-Save
  6. Choose Create policy.

Configure an IAM role

Next, create the role that Ping One users assume when federating into QuickSight. Use the following steps to set up the federated role:

  1. On the IAM console, choose Roles.
  2. Choose Create role.
  3. For Trusted entity type, select SAML 2.0 federation.
  4. For SAML 2.0-based provider, choose the provider you created earlier (PingOne).
  5. Select Allow programmatic and AWS Management Console access.
  6. For Attribute, choose SAML:aud.
  7. For Value, enter https://signin.aws.amazon.com/saml.
  8. Choose Next.
    BDB-2210-Ping-IAM-Role
  9. Under Permissions policies, select the QuickSightUserCreationPolicy IAM policy you created in the previous step.
  10. Choose Next.
    BDB-2210-Ping-IAM-Role_Permissions
  11. For Role name, enter QSPingOneFederationRole.
    DBD-2210-PingOne-IAM-Role-Name
  12. Choose Create role.
  13. On the IAM console, in the navigation pane, choose Roles.
  14. Choose the QSPingOneFederationRole role you created to open the role’s properties.
  15. Copy the role ARN to use in later steps.
  16. On the Trust relationships tab, under Trusted entities, verify that the IdP you created is listed.
  17. Under Condition in the policy code, verify that SAML:aud with a value of https://signin.aws.amazon.com/saml is present.
  18. Choose Edit trust policy to add an additional condition.
    DBD-2210-PingOne-IAM-TrustPolicy
  19. Under Condition, add the following code:
    "StringLike": {
    "aws:RequestTag/user-role": "*"
    }

  20. Under Action, add the following code:
      "sts:TagSession"

    BDB-2210-PingOne-Role-Save

  21. Choose Update policy to save changes.

Configure an AWS application in Ping One

To configure your AWS application, complete the following steps:

  1. Sign in to the Ping One portal using a Ping One administrator account.
  2. Under Connections, choose Application.
  3. Choose the Amazon QuickSight application you created earlier.
  4. On the Profile tab, choose Enable Advanced ConfigurationBDB-2210-Ping-AdvancedConfig
  5. Choose Enable in the pop-up window.
    BDB-2210-Ping-AdvancedConfig1
  6. On the Configuration tab, choose the pencil icon to edit the configuration.
    BDB-2210-Ping-AdvancedConfig2
  7. Under SIGNING KEY, select Sign Assertion & Response.
    BDB-2210-Ping-AdvancedConfig4
  8. Under SLO BINDING, for Assertion Validity Duration In Seconds, enter a duration, such as 900.
  9. For Target Application URL, enter https://quicksight.aws.amazon.com/.
  10. Choose Save.
    BDB-2210-Ping-AdvancedConfig5On the Attribute Mappings tab, you now add or update the attributes as in the following table.
Attribute Name Value
saml_subject Username
https://aws.amazon.com/SAML/Attributes/RoleSessionName Username
https://aws.amazon.com/SAML/Attributes/Role ‘arn:aws:iam::xxxxxxxxxx:role/QSPingOneFederationRole,
arn:aws:iam::xxxxxxxxxx:saml-provider/PingOne’
https://aws.amazon.com/SAML/Attributes/PrincipalTag:user-role user.memberOfGroupNames[0]
  1. Enter https://aws.amazon.com/SAML/Attributes/PrincipalTag:user-role for the attribute name and use the corresponding value from the table for the expression.
  2. Choose Save.
  3. If you have more than one QuickSight user role (for this post, QuickSightAdmins, QuicksightAuthors, and QuickSightReaders), you can add all the appropriate role names as follows:
    #data.containsAny(user.memberOfGroupNames,{'QuickSightAdmins'})? 'QuickSightAdmins' : 
    
    #data.containsAny(user.memberOfGroupNames,{'QuickSightAuthorss'}) ? 'QuickSightAuthors' : 
    
    #data.containsAny(user.memberOfGroupNames,{'QuickSightReaders'}) ?'QuickSightReaders' : null

  4. To edit the role attribute, choose the gear icon next to the role.
  5. Populate the corresponding expression from the table and choose Save.

The format of the expression is the role ARN (copied in the role creation step) followed by the IdP ARN (copied in the IdP creation step) separated by a comma.

Test the application

In this section, you test your Ping One SSO configuration by using a Microsoft application.

  1. In the Ping One portal, under Identities, choose Groups.
  2. Choose a group and choose Add Users Individually.
  3. From the list of users, add the appropriate users to the group by choosing the plus sign.
  4. Choose Save.
  5. To test the connectivity, under Environment, choose Properties, then copy the URL under APPLICATION PORTAL URL.
  6. Browse to the URL in a private browsing window.
  7. Enter your user credentials and choose Sign On.
    Upon a successful sign-in, you’re redirected to the All Applications page with a new application called Amazon QuickSight.
  8. Choose the Amazon QuickSight application to be redirected to the QuickSight console.

Note in the following screenshot that the user name at the top of the page shows as the Ping One federated user.

Summary

This post provided step-by-step instructions to configure federated SSO between Ping One and the QuickSight console. We also discussed how to create policies and roles in IAM and map groups in Ping One to IAM roles for secure access to the QuickSight console.

For additional discussions and help getting answers to your questions, check out the QuickSight Community.


About the authors

Srikanth Baheti is a Specialized World Wide Sr. Solution Architect for Amazon QuickSight. He started his career as a consultant and worked for multiple private and government organizations. Later he worked for PerkinElmer Health and Sciences & eResearch Technology Inc, where he was responsible for designing and developing high traffic web applications, highly scalable and maintainable data pipelines for reporting platforms using AWS services and Serverless computing.

Raji Sivasubramaniam is a Sr. Solutions Architect at AWS, focusing on Analytics. Raji is specialized in architecting end-to-end Enterprise Data Management, Business Intelligence and Analytics solutions for Fortune 500 and Fortune 100 companies across the globe. She has in-depth experience in integrated healthcare data and analytics with wide variety of healthcare datasets including managed market, physician targeting and patient analytics.

Raj Jayaraman is a Senior Specialist Solutions Architect for Amazon QuickSight. Raj focuses on helping customers develop sample dashboards, embed analytics and adopt BI design patterns and best practices.

Enable federation to multiple Amazon QuickSight accounts with Microsoft Azure Active Directory

Post Syndicated from Srikanth Baheti original https://aws.amazon.com/blogs/big-data/enable-federation-to-multiple-amazon-quicksight-accounts-with-microsoft-azure-active-directory/

Amazon QuickSight is a scalable, serverless, embeddable, machine learning (ML)-powered business intelligence (BI) service built for the cloud that supports identity federation in both Standard and Enterprise editions. Organizations are working towards centralizing their identity and access strategy across all of their applications, including on-premises, third-party, and applications on AWS. Many organizations use Microsoft Azure Active Directory (Azure AD) to control and manage user authentication and authorization centrally. If your organization uses Azure AD for cloud applications and multiple QuickSight accounts, you can enable federation to all of your QuickSight accounts without needing to create and manage users multiple times. This authorizes users to access QuickSight assets—analyses, dashboards, folders, and datasets—through centrally managed Azure AD.

In this post, we go through the steps to configure federated single sign-on (SSO) between a single Azure AD instance and multiple QuickSight accounts. We demonstrate registering an SSO application in Azure AD, creating roles in Azure AD, and assigning these roles to map to QuickSight roles (admin, author, and reader) These QuickSight roles represent three different personas supported in QuickSight. Administrators can publish the QuickSight app in the Azure App portal to enable users to SSO to QuickSight using their Azure AD credentials.

Prerequisites

To complete this walkthrough, you must have the following prerequisites:

  • An Azure AD subscription
  • One or more QuickSight account subscriptions

Solution overview

The walkthrough includes the following steps:

  1. Register an AWS Single Sign-On (AWS SSO) application in Azure AD.
  2. Configure the application in Azure AD.
  3. Add Azure AD as your SAML identity provider (IdP) in AWS.
  4. Configure AWS Identity and Access Management (IAM) policies.
  5. Configure IAM roles.
  6. Create roles in Microsoft Graph Explorer.
  7. Assign the newly created roles through Graph Explorer to users in Azure AD.
  8. Test the application from Azure AD.

Register an AWS SSO application in Azure AD

To configure the integration of an AWS SSO application in Azure AD, you need to add AWS SSO to your list of managed software as a service (SaaS) apps.

  1. Sign in to the Azure portal using a Microsoft account.
  2. Under Azure services, choose Azure Active Directory.

  1. In the navigation pane, under Manage, choose Enterprise Applications.

  1. Choose All applications.
  2. Choose New application.

  1. In the Browse Azure AD Gallery section, search for AWS Single Sign-On.
  2. Choose AWS Single Sign-On from the results panel and add the application.

  1. For Name, enter Amazon QuickSight.
  2. After the application is created, copy the Object ID value from the application overview.

You need this object ID in the later steps.

Configure an AWS SSO application in Azure AD

Follow these steps to enable Azure AD SSO in the Azure portal.

  1. In the Azure portal, on the AWS SSO application registered in first step, in the Manage section, choose single sign-on.
  2. On the Select a single sign-on method page, choose SAML.
  3. Choose the pencil icon.
  4. For Identifier (Entity ID), enter URN:AMAZON:WEBSERVICES.
  5. For Reply URL, enter https://signin.aws.amazon.com/saml.
  6. Leave Sign on URL blank
  7. For Relay State, enter https://quicksight.aws.amazon.com.
  8. Leave Logout URL blank.
  9. Choose Save.

  1. On the Set up Single Sign-On with SAML page, under User Attributes & Claims, choose Edit.

  1. In the Additional Claims section, configure SAML token attributes by using the values in the following table.
Name Source attribute Namespace
RoleSessionName user.userprincipalname https://aws.amazon.com/SAML/Attributes
Role user.assignedroles https://aws.amazon.com/SAML/Attributes
SessionDuration Provide a value from 900 seconds (15 minutes) to 43,200 seconds (12 hours) https://aws.amazon.com/SAML/Attributes
  1. In the SAML Signing Certificate section, choose Download to download the federation metadata XML file.

You this XML document later when setting up the SAML provider in IAM.

Add Azure AD as your SAML IdP in AWS

To configure Azure AD as your SAML IdP, complete the following steps:

  1. Open a new tab in your browser.
  2. Sign in to the IAM console in your AWS account with admin permissions.
  3. On the IAM console, under Access Management in the navigation pane, choose Identity providers.
  4. Choose Add provider.

  1. For Provider name, enter AzureActiveDirectory.
  2. Choose Choose file to upload the metadata document you downloaded in the earlier step.
  3. Choose Add provider.

  1. In the banner message that appears, choose View provider.

  1. Copy the ARN to use in a later step.

  1. Repeat these steps in other accounts where you want to enable SSO.

Configure IAM policies

In this step, you create three IAM policies for mapping to three different roles with permissions in QuickSight (admin, author, and reader).

Use the following steps to set up the QuickSight-Admin-Account1 policy. This policy grants admin privileges in QuickSight to the federated user.

  1. On the IAM console, choose Policies.
  2. Choose Create policy.
  3. Choose JSON and replace the existing text with the code from the following table for QuickSight-Admin-Account1.
Policy Name JSON Text
QuickSight-Admin-Account1
{
"Version": "2012-10-17",
"Statement": [
{
"Effect": "Allow",
"Action": "quicksight:CreateAdmin",
"Resource": "*"
}
]
}

QuickSight-Author-Account1
{
"Version": "2012-10-17",
"Statement": [
{
"Effect": "Allow",
"Action": "quicksight:CreateUser",
"Resource": "*"
}
]
}

QuickSight-Reader-Account1
{
"Version": "2012-10-17",
"Statement": [
{
"Effect": "Allow",
"Action": " quicksight:CreateReader",
"Resource": "*"
}
]
}

  1. Choose Review policy
  2. For Name, enter QuickSight-Admin-Account1.
  3. Choose Create policy.
  4. Repeat the steps for QuickSight-Author-Account1 and QuickSight-Reader-Account1.
  5. Repeat these steps in other accounts where you want to enable SSO.

Configure IAM roles

Next, create the roles that your Azure AD users assume when federating into QuickSight. Use the following steps to set up the admin role:

  1. On the IAM console, choose Roles.
  2. Choose Create role.
  3. For Select type of trusted entity, choose SAML 2.0 federation.
  4. For SAML provider, choose the provider you created earlier (AzureActiveDirectory).
  5. Select Allow programmatic and AWS Management Console access.
  6. For Attribute, choose SAML:aud.
  7. For Value, enter https://signin.aws.amazon.com/saml.

  1. Choose Next: Permissions.
  2. Choose the QuickSight-Admin-Account1 IAM policy you created in the previous step.
  3. Choose Next: Tags.
  4. Choose Next: Review
  5. For Role name, enter QuickSight-Admin-Role.
  6. For Role description, enter a description.
  7. Choose Create role.

  1. On the IAM console, in the navigation pane, choose Roles.
  2. Choose the QuickSight-Admin-Role role you created to open the role’s properties.
  3. Copy the role ARN to the notepad.
  4. On the Trust Relationships tab, choose Edit Trust Relationship.
  5. Under Trusted Entities, verify that the IdP you created is listed.
  6. Under Conditions, verify that SAML:aud with a value of https://signin.aws.amazon.com/saml is present.

  1. Repeat these steps to create your author and reader roles and attach the appropriate policies:
    1. For QuickSight-Author-Role, use the policy QuickSight-Author-Account1.
    2. For QuickSight-Reader-Role, use the policy QuickSight-Reader-Account1.
  2. Repeat these steps in other accounts where you want to enable SSO.

Create roles in Microsoft Graph Explorer

Optionally, you can create roles within Azure AD with paid subscriptions. Open Microsoft Graph Explorer, and then do the following:

  1. Sign in to the Microsoft Graph Explorer site with the domain account for your tenant.

You need sufficient permissions to create the roles.

  1. To grant permissions, choose the ellipsis (three dots) next to your name and choose Select permissions.

  1. On the Permission list, expand Directory.
  2. Select the three directory-level permissions as shown in the following screenshot and choose Consent.

  1. Sign in to Graph Explorer again, and accept the site usage conditions.
  2. Choose GET for the method, and 0 for the version.
  3. In the query box, enter https://graph.microsoft.com/v1.0/servicePrincipals/<objectId> (use the object ID you saved earlier).
  4. In the Response preview pane, copy the response to an editor of your choice to modify.

  1. Extract the appRoles property from the service principal object.

Now you generate new roles for your application. These roles must match the IAM roles in AWS that you created earlier.

  1. From the notepad, use the format <Role ARN>, <IdP ARN> to create your roles:
    1. arn:aws:iam::5xxxxxxxxxx9:role/QuickSight-Admin-Role,arn:aws:iam::5xxxxxxxxxx9:saml-provider/AzureActiveDirectory
    2. arn:aws:iam::5xxxxxxxxxx9:role/QuickSight-Author-Role,arn:aws:iam::5xxxxxxxxxx9:saml-provider/AzureActiveDirectory
    3. arn:aws:iam::5xxxxxxxxxx9:role/QuickSight-Reader-Role,arn:aws:iam::5xxxxxxxxxx9:saml-provider/AzureActiveDirectory
    4. arn:aws:iam::0xxxxxxxxxx2:role/QS-Admin-AZAd-Role,arn:aws:iam::0xxxxxxxxxx2:saml-provider/AzureAd-Acct2
    5. arn:aws:iam::0xxxxxxxxxx2:role/QS-Author-AZAd-Role,arn:aws:iam::0xxxxxxxxxx2:saml-provider/AzureAd-Acct2
    6. arn:aws:iam::0xxxxxxxxxx2:role/QS-Reader-AZAd-Role,arn:aws:iam::0xxxxxxxxxx2:saml-provider/AzureAd-Acct2
  2. The following JSON code is an example of the appRoles Create a similar object to add the roles for your application:
            "appRoles": [
                {
                    "allowedMemberTypes": [
                        "User"
                    ],
                    "description": "User",
                    "displayName": "User",
                    "id": "8774f594-1d59-4279-b9d9-59ef09a23530",
                    "isEnabled": true,
                    "origin": "Application",
                    "value": null
                },
                {
                    "allowedMemberTypes": [
                        "User"
                    ],
                    "description": "msiam_access",
                    "displayName": "msiam_access",
                    "id": "e7f1a7f3-9eda-48e0-9963-bd67bf531afd",
                    "isEnabled": true,
                    "origin": "Application",
                    "value": null
                },
                {
                    "allowedMemberTypes": [
                        "User"
                    ],
                    "description": "Raji Quicksight Admin",
                    "displayName": "RajiQSAdmin",
                    "id": "9a07d03d-667f-405d-b5d7-68bec5b64584",
                    "isEnabled": true,
                    "origin": "ServicePrincipal",
                    "value": "arn:aws:iam::0xxxxxxxxxx2:role/QS-Admin-AZAd-Role,arn:aws:iam::0xxxxxxxxxx2:saml-provider/AzureAd-Acct2"
                },
                {
                    "allowedMemberTypes": [
                        "User"
                    ],
                    "description": "Sri Quicksight Admin",
                    "displayName": "SriQSAdmin",
                    "id": "77dd76d1-f897-4093-bf9a-8f3aaf25f30e",
                    "isEnabled": true,
                    "origin": "ServicePrincipal",
                    "value": "arn:aws:iam::5xxxxxxxxxx9:role/QuickSight-Admin-Role,arn:aws:iam::5xxxxxxxxxx9:saml-provider/AzureActiveDirectory"
                }
            ]

New roles must be followed by msiam_access for the patch operation. You can also add multiple roles, depending on your organization’s needs. Azure AD sends the value of these roles as the claim value in the SAML response.

When adding new roles, you must provide a new GUID for each ID attribute in the JSON payload. You can use online GUID generation tool for generating a new unique GUID per role.

  1. In Microsoft Graph Explorer, change the method from GET to PATCH.
  2. Patch the service principal object with the roles you want by updating the appRoles property, like the one shown in the preceding example.
  3. Choose Run Query to run the patch operation. A success message confirms the creation of the role for your AWS application.

After the service principal is patched with new roles, you can assign users and groups to their respective roles.

  1. In the Azure portal, go to the QuickSight application you created and choose Users and Groups.
  2. Create your groups.

We recommend creating a new group for every AWS role in order to assign a particular role to the group. This one-to-one mapping means that one group is assigned to one role. You can then add members to the group.

  1. After you create the groups, choose the group and assign it to the application.

Nested groups are not allowed.

  1. To assign the role to the group, choose the role, then choose Assign.

Test the application

In this section, you test your Azure AD SSO configuration by using Microsoft Applications.

  1. Navigate to Microsoft Applications.
  2. On the My Apps page, choose AWS Single Sign-On.

  1. Choose a specific role for the QuickSight account you want to use.

You’re redirected to the QuickSight console.

Summary

This post provided step-by-step instructions to configure federated SSO between a single Azure AD instance and multiple QuickSight accounts. We also discussed how to create new roles and map users and groups in Azure AD to IAM for secure access into multiple QuickSight accounts.

For information about federating from Azure AD to a single QuickSight account, see Enabling Amazon QuickSight federation with Azure AD.


About the Authors


Srikanth Baheti is a Specialized World Wide Sr. Solution Architect for Amazon QuickSight. He started his career as a consultant and worked for multiple private and government organizations. Later he worked for PerkinElmer Health and Sciences & eResearch Technology Inc, where he was responsible for designing and developing high traffic web applications, highly scalable and maintainable data pipelines for reporting platforms using AWS services and Serverless computing.


Raji Sivasubramaniam is a Specialist Solutions Architect at AWS, focusing on Analytics. Raji has 20 years of experience in architecting end-to-end Enterprise Data Management, Business Intelligence and Analytics solutions for Fortune 500 and Fortune 100 companies across the globe. She has in-depth experience in integrated healthcare data and analytics with wide variety of healthcare datasets including managed market, physician targeting and patient analytics. In her spare time, Raji enjoys hiking, yoga and gardening.


Padmaja Suren is a Senior Solutions Architect specialized in QuickSight. She has 20+ years of experience in building scalable data platforms for Reporting, Analytics and AI/ML using a variety of technologies. Prior to AWS, in her role as BI Architect at ERT, she designed, engineered and cloud-enabled the BI and Analytics platform for the management of large scale clinical trial data conducted across the world. She dedicates her free time on her passion project SanghWE which helps sexual trauma survivors in developing nations heal and recover.