In this post, we introduce the AWS provider for the Secrets Store CSI Driver, a new AWS Secrets Manager add-on for Amazon Elastic Kubernetes Service (Amazon EKS) that you can use to fetch secrets from Secrets Manager and parameters from AWS Systems Manager Parameter Store and mount them as files in Kubernetes pods. The add-on is straightforward to install and configure, works on Amazon Elastic Compute Cloud (Amazon EC2) instances and hybrid nodes, and includes the latest security updates and bugfixes. It provides a secure and reliable way to retrieve your secrets in Kubernetes workloads.
Amazon EKS add-ons provide installation and management of a curated set of add-ons for EKS clusters. You can use these add-ons to help ensure that your EKS clusters are secure and stable and reduce the number of steps required to install, configure, and update add-ons.
Secrets Manager helps you manage, retrieve, and rotate database credentials, application credentials, OAuth tokens, API keys, and other secrets throughout their lifecycles. By using Secrets Manager to store credentials, you can avoid using hard-coded credentials in application source code, helping to avoid unintended or inadvertent access.
New EKS add-on: AWS provider for the Secrets Store CSI Driver
We recommend installing the provider as an Amazon EKS add-on instead of the legacy installation methods (Helm, kubectl) to reduce the amount of time it takes to install and configure the provider. The add-on can be installed in several ways: using eksctl—which you will use in this post—the AWS Management Console, the Amazon EKS API, AWS CloudFormation, or the AWS Command Line Interface (AWS CLI).
Security considerations
The open-source Secrets Store CSI Driver maintained by the Kubernetes community enables mounting secrets as files in Kubernetes clusters. The AWS provider relies on the CSI driver and mounts secrets as file in your EKS clusters. Security best practice recommends caching secrets in memory where possible. If you prefer to adopt the native Kubernetes experience, please follow the steps in this blog post. If you prefer to cache secrets in memory, we recommend using the AWS Secrets Manager Agent.
IAM principals require Secrets Manager permissions to get and describe secrets. If using Systems Manager Parameter Store, principals also require Parameter Store permissions to get parameters. Resource policies on secrets serve as another access control mechanism, and AWS principals must be explicitly granted permissions to access individual secrets if they’re accessing secrets from a different AWS account (see Access AWS Secrets Manager secrets from a different account). The Amazon EKS add-on provides security features including support for using FIPS endpoints. AWS provides a managed IAM policy, AWSSecretsManagerClientReadOnlyAccess, which we recommend using with the EKS add-on.
Solution walkthrough
In the following sections, you’ll create an EKS cluster, create a test secret in Secrets Manager, install the Amazon EKS add-on, and use it to retrieve the test secret and mount it as a file in your cluster.
Prerequisites
AWS credentials, which must be configured in your environment to allow AWS API calls and are required to allow access to Secrets Manager
With the prerequisites in place, you’re ready to run the commands in the following steps in your terminal:
Create an EKS cluster
Create a shell variable in your terminal with the name of your cluster:
CLUSTER_NAME="my-test-cluster”
Create an EKS cluster:
eksctl create cluster $CLUSTER_NAME
eksctl will automatically use a recent version of Kubernetes and create the resources needed for the cluster to function. This command typically takes about 15 minutes to finish setting up the cluster.
Create a test secret
Create a secret named addon_secret in Secrets Manager:
Create an AWS Identity and Access Management (IAM) role that the EKS Pod Identity service principal can assume and save it in a shell variable (replace <region> with the AWS Region configured in your environment):
Note: AWS provides a managed policy for client-side consumption of secrets through Secrets Manager: AWSSecretsManagerClientReadOnlyAccess. This policy grants access to get and describe secrets for the secrets in your account. If you want to further follow the principle of least privilege, create a custom policy scoped down to only the secrets you want to retrieve.
Attach the managed policy to the IAM role that you just created:
aws iam attach-role-policy \
  --role-name nginx-deployment-role \
  --policy-arn arn:aws:iam::aws:policy/AWSSecretsManagerClientReadOnlyAccess
Deploy your SecretProviderClass (make sure you’re in the same directory as the spc.yaml you just created):
kubectl apply -f spc.yaml
To learn more about the SecretProviderClass, see the GitHub readme for the provider.
Deploy your pod to your EKS cluster
For brevity, we’ve omitted the content of the Kubernetes deployment file. The following is an example deployment file for Pod Identity in the GitHub repository for the provider—use this file to deploy your pod:
In this post, you learned how to use the new Amazon EKS add-on for the AWS Secrets Store CSI Driver provider to securely retrieve your secrets and parameters and mount them as files in your Kubernetes clusters. The new EKS add-on provides benefits such as the latest security patches and bug fixes, tighter integration with Amazon EKS, and reduces the time it takes to install and configure the AWS Secrets Store CSI Driver provider. The add-on is validated by EKS to work with EC2 instances and hybrid nodes.
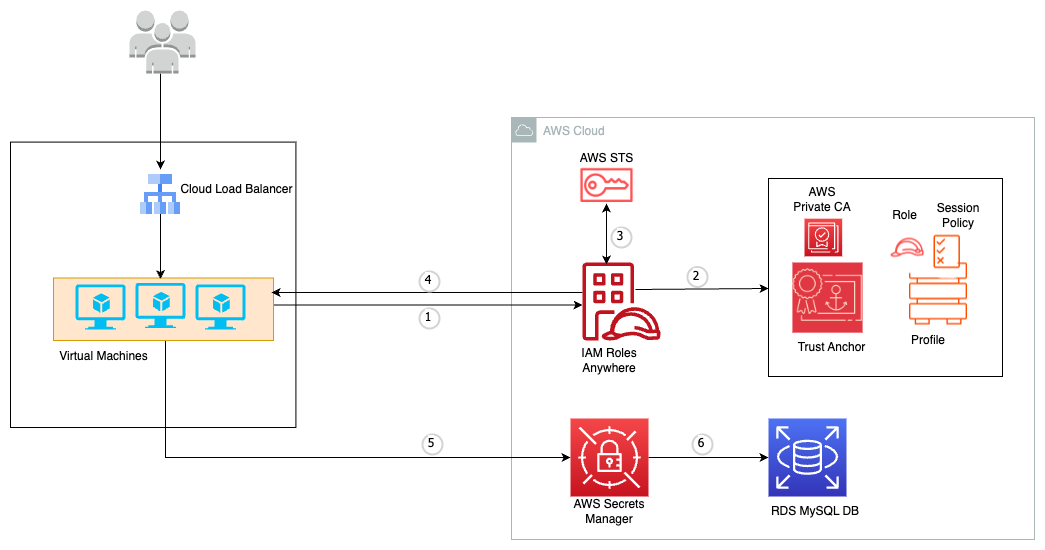
Although AWS Secrets Manager excels at managing the lifecycle of Amazon Web Services (AWS) secrets, managing credentials from third-party software providers presents unique challenges for organizations as they scale usage of their cloud applications. Organizations using multiple third-party services frequently develop different security approaches for each provider’s credentials because there hasn’t been a standardized way to manage them. When storing these third-party credentials in Secrets Manager, organizations frequently maintain additional metadata within secret values to facilitate service connections. This approach requires updating entire secret values when metadata changes and implementing provider-specific secret rotation processes that are manual and time consuming. Organizations looking to automate secret rotation typically develop custom functions tailored to each third-party software provider, requiring specialized knowledge of both third-party and AWS systems.
To help customers streamline third-party secrets management, we’re introducing a new feature in AWS Secrets Manager called managed external secrets. In this post, we explore how this new feature simplifies the management and rotation of third-party software credentials while maintaining security best practices.
Introducing managed external secrets
AWS Secrets Manager has a proven track record of helping customers secure and manage secrets for AWS services such as Amazon Relational Database Service (Amazon RDS) or Amazon DocumentDB through managed rotation capabilities. Building on this success, Secrets Manager now introduces managed external secrets, a new secret type that extends this same seamless experience to third-party software applications like Salesforce, simplifying secret management challenges through standardized formats and automated rotation.
You can use this capability to store secrets vended by third-party software providers in predefined formats. These formats were developed in collaboration with trusted integration partners to define both the secret structure and required metadata for rotation, eliminating the need for you to define your own custom storage strategies. Managed external secrets also provides automated rotation by directly integrating with software providers. With no rotation functions to maintain, you can reduce your operational overhead while benefiting from essential security controls, including fine-grained permissions management using AWS Identity and Access Management (IAM), secret access monitoring through Amazon CloudWatch and AWS CloudTrail, and automated secret-specific threat detection through Amazon GuardDuty. Moreover, you can implement centralized and consistent secret management practices across both AWS and third-party secrets from a single service, eliminating the need to operate multiple secrets management solutions at your organization. Managed external secrets follows standard Secrets Manager pricing, with no additional cost for using this new secret type.
Prerequisites
To create a managed external secret, you need an active AWS account with appropriate access to Secrets Manager. The account must have sufficient permissions to create and manage secrets, including the ability to access the AWS Management Console or programmatic access through the AWS Command Line Interface (AWS CLI) or AWS SDKs. At minimum, you need IAM permissions for the following actions: secretsmanager:DescribeSecret, secretsmanager:GetSecretValue, secretsmanager:UpdateSecret, and secretsmanager:UpdateSecretVersionStage.
You must have valid credentials and necessary access permissions for the third-party software provider you plan to have AWS manage secrets for.
For secret encryption, you must decide whether to use an AWS managedAWS Key Management Service (AWS KMS) key or a customer managed KMS key. For customer managed keys, make sure you have the necessary key policies configured. The AWS KMS key policy should allow Secrets Manager to use the key for encryption and decryption operations.
Create a managed external secret
Today, managed external secrets supports three integration partners: Salesforce, Snowflake, and BigID. Secrets Manager will continue to expand its partner list and more third-party software providers will be added over time. For the latest list, refer to Integration Partners.
To create a managed external secret, follow the steps in the following sections.
Note: This example demonstrates the steps for retrieving Salesforce External Client App Credentials, but a similar process can be followed for other third-party vendor credentials integrated with Secrets Manager.
To select secret type and add details:
Go to the Secrets Manager service in the AWS Management Console and choose Store a new secret.
Under Secret type, select Managed external secret.
In the AWS Secrets Manager integrated third-party vendor credential section, select your provider from the available options. For this walkthrough, we select Salesforce External Client App Credential.
Enter your configurations in the Salesforce External Client App Credential secret details section. The Salesforce External Client App credentials consist of several key components:
The Consumer key (client ID), which serves as the credential identifier for OAuth 2.0. You can retrieve the consumer key directly from the Salesforce External Client App Manager OAuth settings.
The Consumer secret (client secret), which functions as the private password for OAuth 2.0 authentication. You can retrieve the consumer secret directly from the Salesforce External Client App Manager OAuth settings.
Select the Encryption key from the dropdown menu. You can use an AWS managed KMS key or a customer managed KMS key.
Choose Next.
Figure 1: Choose secret type
To configure a secret:
In this section, you need to provide information for your secret’s configuration.
In Secret name, enter a descriptive name and optionally enter a detailed Description that helps identify the secret’s purpose and usage. You also have additional configuration choices available: you can attach Tags for better resource organization, set specific Resource permissions to control access, and select Replicate secret for multi-Region resilience.
Choose Next.
Figure 2: Configure secret
To configure rotation and permissions (optional):
In the optional Configure rotation step, the new secret configuration introduces two key sections focused on metadata management, which are stored separately from the secret value itself.
Under Rotation metadata, specify the API version your Salesforce app is using. To find the API version, refer to List Available REST API Versions in the Salesforce documentation. Note: The minimum version needed is v65.0.
Select an Admin secret ARN, which contains the administrative OAuth credentials that are used to rotate the Salesforce client secret.
In the Service permissions for secret rotation section, Secrets Manager automatically creates a role with necessary permissions to rotate your secret values. These default permissions are transparently displayed in the interface for review when you choose view permission details. You can deselect the default permissions for more granular control over secret rotation management.
Choose Next.
Figure 3: Configure rotation
To review:
In the final step, you’ll be presented with a summary of your secret’s configuration. On the Review page, you can verify parameters before proceeding with secret creation.
After confirming that the configurations are correct, choose Store to complete the process and create your secret with the specified settings.
Figure 4: Review
After successful creation, your secret will appear on the Secrets tab. You can view, manage, and monitor aspects of your secret, including its configuration, rotation status, and permissions. After creation, review your secret configuration, including encryption settings and resource policies for cross-account access, and examine the sample code provided for different AWS SDKs to integrate secret retrieval into your applications. The Secrets tab provides an overview of your secrets, allowing for central management of secrets. Select your secret to view Secret details.
Figure 5: View secret details
Your managed external secret has been successfully created in Secrets Manager. You can access and manage this secret through the Secrets Manager console or programmatically using AWS APIs.
Onboard as an integration partner with Secrets Manager
With the new managed external secret type, third-party software providers can integrate with Secrets Manager and offer their customers a programmatic way to securely manage secrets vended by their applications on AWS. This integration provides their customers with a centralized solution for managing both the lifecycle of AWS and third-party secrets, including automatic rotation capabilities from the moment of secret creation. Software providers like Salesforce are already using this capability.
“At Salesforce, we believe security shouldn’t be a barrier to innovation, it should be an enabler. Our partnership with AWS on managed external secrets represents security-by-default in action, removing operational burden from our customers while delivering enterprise-grade protection. With AWS Secrets Manager now extending to partners and automated zero-touch rotation eliminating human risk, we’re setting a new industry standard where secure credentials become seamless without specialized expertise or additional costs.” — Jay Hurst, Sr. Vice President, Product Management at Salesforce
There is no additional cost to onboard with Secrets Manager as an integration partner. To get started, partners must follow the process listed on the partner onboarding guide. If you have questions about becoming an integration partner, contact our team at [email protected] with Subject: [Partner Name] Onboarding request.
Conclusion
In this post, we introduced managed external secrets, a new secret type in Secrets Manager that addresses the challenges of securely managing the lifecycle of third-party secrets through predefined formats and automated rotation. By eliminating the need to define custom storage strategies and develop complex rotation functions, you can now consistently manage your secrets—whether from AWS services, custom applications, or third-party providers—from a single service. Managed external secrets provide the same security features as standard Secrets Manager secrets, including fine-grained permissions management, observability, and compliance controls, while adding built-in integration with trusted partners at no additional cost.
To get started, refer to the technical documentation. For information on migrating your existing partner secrets to managed external secrets, see Migrating existing secrets. The feature is available in all AWS Regions where AWS Secrets Manager is available. For a list of Regions where Secrets Manager is available, see the AWS Region table. If you have feedback about this post, submit comments in the Comments section below. If you have questions about this post, start a new thread on Secrets Manager re:Post or contact AWS Support.
AWS Secrets Manager is a service that you can use to manage, retrieve, and rotate database credentials, application credentials, API keys, and other secrets throughout their lifecycles. You can also use Secrets Manager to replace hard-coded credentials in application source code with runtime calls to retrieve credentials dynamically when needed.
Managing secrets in Amazon Elastic Kubernetes Service (Amazon EKS) environments creates three main challenges: dependency on language-specific AWS SDKs, network dependencies from direct API calls, and complex secret rotation across multiple pods.
The AWS Secrets Manager Agent addresses these challenges by providing a language-agnostic HTTP interface that runs locally within your compute environment. In this post, we show you how to deploy the Secrets Manager Agent as a sidecar container in Amazon EKS to retrieve secrets through HTTP calls.
New approach: Secrets Manager Agent
The Secrets Manager Agent is a client-side agent that you can use to standardize consumption of secrets from Secrets Manager across your AWS compute environments. The agent pulls and caches secrets in your compute environment and allows your applications to consume secrets directly from the in-memory cache through a local HTTP endpoint (localhost:2773).
Instead of making network calls to Secrets Manager, you fetch secret values from the local agent, improving application availability while reducing API calls. Because the Secrets Manager Agent is language agnostic, you can use it across different programming languages without requiring AWS SDK dependencies.
Post-quantum cryptography protection
The Secrets Manager Agent implements ML-KEM (Machine Learning-based Key Encapsulation Mechanism) key exchange, which provides additional cryptographic protection for secret retrieval operations. This feature is enabled by default and requires no additional configuration.
Authentication and access control
This solution uses Amazon EKS Pod Identity for secure authentication to AWS services. Pod Identity provides a simplified way to associate AWS Identity and Access Management (IAM) roles with Kubernetes service accounts, avoiding the need for OpenID Connect (OIDC) provider configuration. IAM principals need GetSecretValue and DescribeSecret permissions to retrieve secrets through the agent.
The Secrets Manager Agent offers protection against server-side request forgery (SSRF). When you install the agent, it generates a random SSRF token and stores it in /var/run/awssmatoken. The agent actively blocks requests that don’t include this token in the X-Aws-Parameters-Secrets-Token header.
Solution overview
In this solution, you deploy the Secrets Manager Agent as a sidecar container in an Amazon EKS pod alongside an NGINX application. The sidecar pattern helps make sure that each pod has its own agent instance, providing isolation and fine-grained security boundaries.
This post demonstrates the Secrets Manager Agent sidecar approach, complementing the AWS Secrets and Configuration Provider (ASCP) guidance covered in Announcing ASCP integration with Pod Identity.
Amazon EKS supports multiple patterns for consuming Secrets Manager secrets. The ASCP for the Kubernetes Secrets Store CSI Driver works well when you want secrets mounted as files and prefer Kubernetes-native secret management. Use the Secrets Manager Agent when you need HTTP-based secret access, want to avoid pod restarts during secret rotation, or need granular refresh control via the refreshNow parameter.
Choosing between Secrets Manager Agent and CSI Driver:
Kubernetes-native secret management and file-based secret consumption
Each secret management approach has specific advantages for different use cases. The Secrets Manager Agent works well for applications requiring HTTP-based access and dynamic secret updates, while the ASCP with CSI Driver is ideal for applications that need file-based secret mounting. Consider your application’s specific requirements, operational patterns, and security needs when choosing between these approaches.
To deploy the solution, you build the agent binary, containerize it, and deploy it to Amazon EKS using Kubernetes manifests with Amazon EKS Pod Identity for secure access to Secrets Manager.
Figure 1: Solution workflow
The workflow of the solution is shown in Figure 1 and includes the following steps:
The application container sends GET /secretsmanager/get (localhost:2773) to retrieve secret
Secrets Manager Agent checks the local cache to determine if the secret is already stored in memory
If not cached, authenticate using Pod Identity to establish secure access to AWS Secrets Manager
Assume the IAM role to retrieve the secret from AWS Secrets Manager
Return the secret to the sidecar container for caching
Return the secret to the application container to fulfill the original request
Prerequisites
To build the solution in this post, you must have the following:
Please note, the AWS Secrets Manager Agent supports the versions of Amazon EKS and Kubernetes available since its initial launch, providing universal compatibility for secure secrets management across cluster versions.
In this section, you install the Secrets Manager Agent. With the agent installed, you then create the Pod Identity association, Secrets Manager binary image, push the binary image to Amazon Elastic Container Registry (Amazon ECR), and create a secret in Secrets Manager.
Verify the Pod Identity Agent installation:
kubectl get daemonset eks-pod-identity-agent -n kube-system
Create the Pod Identity association using the following commands:
Create a file named install and add the following content:
#!/bin/bash -e
PATH=/bin:/usr/bin:/sbin:/usr/sbin # Use a safe path
AGENTTARGETDIR=/opt/aws/secretsmanageragent
AGENTSOURCEDIR=/etc/aws_secretsmanager_agent/configuration
AGENTBIN=aws_secretsmanager_agent
TOKENGROUP=awssmatokenreader
AGENTUSER=awssmauser
TOKENSCRIPT=/etc/aws_secretsmanager_agent/configuration/awssmaseedtoken
AGENTSCRIPT=awssmastartup
if [ `id -u` -ne 0 ]; then
	echo "This script must be run as root" >&2
	exit 1
fi
if [ ! -r ${TOKENSCRIPT} ]; then
	echo "Can not read ${TOKENSCRIPT}" >&2
	exit 1
fi
if [ ! -r ${AGENTSOURCEDIR}/${AGENTBIN} ]; then
	echo "Can not read ${AGENTBIN}" >&2
	exit 1
fi
groupadd -f ${TOKENGROUP}
useradd -r -m -g ${TOKENGROUP} -d ${AGENTTARGETDIR} ${AGENTUSER} || true
chmod 755 ${AGENTTARGETDIR}
install -D -T -m 755
${AGENTSOURCEDIR}/${AGENTBIN} ${AGENTTARGETDIR}/bin/${AGENTBIN}
chown -R ${AGENTUSER} ${AGENTTARGETDIR}
exit 0
Build the agent binary on a Linux based instance using the following commands:
#!/bin/bash -e
# Here we are building the Secrets Manager Agent Binary for Linux x86_64 architecture
sudo yum -y groupinstall "Development Tools"
sudo yum install -y git
curl --proto '=https' --tlsv1.2 -sSf https://sh.rustup.rs | sh -s -- -y
source $HOME/.cargo/env
git clone https://github.com/aws/aws-secretsmanager-agent
cd aws-secretsmanager-agent
mv ../install aws_secretsmanager_agent/configuration
cargo build --release --target x86_64-unknown-linux-gnu
Create a file named startup.sh for the entry point and add the following content:
#!/bin/bash
set -e

echo "Starting AWS Secrets Manager Agent initialization..."

# Step 1: Run the install script (equivalent to install-agent init container)
echo "Running agent installation..."
/etc/aws_secretsmanager_agent/configuration/install

# Step 2: Initialize the token (equivalent to token-init init container)
echo "Starting token initialization..."
chmod +x
/etc/aws_secretsmanager_agent/configuration/awssmaseedtoken /etc/aws_secretsmanager_agent/configuration/awssmaseedtoken start

# Step 3: Start the main secrets manager agent
echo "Starting secrets manager agent..."
exec
/etc/aws_secretsmanager_agent/configuration/aws_secretsmanager_agent
Create a file named Docker-eks and add the following content:
FROM public.ecr.aws/amazonlinux/amazonlinux:2023

# Install required dependencies
RUN yum install -y ca-certificates bash shadow-utils && yum clean all
RUN mkdir -p /opt/aws/secretsmanageragent /var/run

# Copy in the agent binary and configuration scripts
COPY aws_secretsmanager_agent/configuration/
/etc/aws_secretsmanager_agent/configuration
COPY target/x86_64-unknown-linux-
gnu/release/aws_secretsmanager_agent
/etc/aws_secretsmanager_agent/configuration

# Make binaries and scripts executable
RUN chmod -R +x /etc/aws_secretsmanager_agent/configuration

# Copy and setup startup script
COPY startup.sh /startup.sh
RUN chmod +x /startup.sh

WORKDIR /
# Use the startup script as entrypoint
ENTRYPOINT ["/startup.sh"]
Build and publish the image using the following commands:
#!/bin/bash -e

#Create the ECR Repo ( us-west-2 region)
aws ecr create-repository --repository-name secrets-manager-agent --image-tag-mutability MUTABLE

#Build the image
docker build -f Dockerfile-eks -t secrets-manager-agent:eks .

#Tag the image
docker tag secrets-manager-agent:eks <ACCOUNT_ID>.dkr.ecr.us-west-2.amazonaws.com/secrets-manager-agent:eks

# Login into ECR
aws ecr get-login-password --region us-west-2 | docker login --username AWS --password-stdin <ACCOUNT_ID>.dkr.ecr.us-west-2.amazonaws.com

#Push the image
docker push  <ACCOUNT_ID>.dkr.ecr.us-west-2.amazonaws.com/secrets-manager-agent:eks
When successful, your private Amazon ECR repo will display the published image.
Create the secret
With the image successfully published, you’re ready to create the secret.
Create a secret in Secrets Manager by using the AWS CLI to enter the following command in a terminal.
2. Enter the following command in a terminal to create the IAM role: aws iam create-role --role-name eks-secrets-manager-role\ --assume-role-policy-document file://eks_iam_policy.json 3. Create a file named iam_permission.json with the following content, replacing <SECRET_ARN> with the secret ARN you noted earlier:
4. Enter the following command to create a policy: aws iam create-policy \ --policy-name get-secret-policy \ --policy-document file://iam_permission.json 5. Record the policy ARN to use in the next step.
6. Enter the following command to add this policy to the IAM role, replacing <POLICY_ARN> with the value you just noted: aws iam attach-role-policy \ --role-name eks-secrets-manager-role \ --policy-arn <POLICY_ARN>
Configure the application and deploy Secrets Manager Agent to Amazon EKS
Here is the sample Kubernetes deployment YAML for installing the Secrets Manager Agent as a sidecar container along with an application container. Replace <ACCOUNT_ID> with your AWS account number and run the code to deploy the NGINX application to the Amazon EKS cluster.
If successful, the pod will run with two active containers.
Retrieve the secret
Now you can run the following command to use the local web server to retrieve the agent. kubectl exec into the app container to retrieve the secret with a REST API call from the web server. kubectl exec -it nginx-with-secrets-c7945f8dc-7hrzr -c nginx -- sh curl -v -H “X-Aws-Parameters-Secrets-Token: $(cat /var/run/awssmatoken)” ‘http://localhost:2773/secretsmanager/get?secretId=<SecretID>'
You should see a Success 200 message and the secret value if IAM permissions are configured correctly.
Clean up
Run the following cleanup script to delete the resources created for the solution: bash chmod +x cleanup.sh ./cleanup.sh
When done, you can check the file named cleanup.sh in the repo to verify that the cleanup was successful:
bash
#!/bin/bash
set -e

echo "Cleaning up EKS resources..."
kubectl delete deployment nginx-with-secrets-simplified --ignore-not-found=true
kubectl delete service nginx-service --ignore-not-found=true
kubectl delete serviceaccount secrets-manager-sa --ignore-not-found=true

echo "Cleaning up Pod Identity association..."
# Replace with your actual cluster name
read -p "Enter your CLUSTER_NAME: " CLUSTER_NAME

if [ -n "$CLUSTER_NAME" ]; then
	ASSOCIATION_ID=$(aws eks list-pod-identity-associations \
                     --cluster-name $CLUSTER_NAME \
                     --query 'associations[?serviceAccount==`secrets-manager-sa`].associationId' \
                     --output text)

if [ -n "$ASSOCIATION_ID" ] && [ "$ASSOCIATION_ID" !=
"None" ]; then
		aws eks delete-pod-identity-association \
			--cluster-name $CLUSTER_NAME \
			--association-id $ASSOCIATION_ID || echo "Pod Identity
association already deleted"
		echo "Pod Identity association deleted"
	else
		eiifcbfhcfglkdirgljchvkildrknntukkidjtldeekk
echo "No Pod Identity association found"
	fi
fi

echo "Cleaning up IAM resources..."
# Replace with your actual policy ARN from the create-policy
output
read -p "Enter your POLICY_ARN: " POLICY_ARN

if [ -n "$POLICY_ARN" ]; then
		aws iam detach-role-policy \
			--role-name eks-secrets-manager-role \
			--policy-arn $POLICY_ARN || echo "Policy already detached"

		aws iam delete-policy --policy-arn $POLICY_ARN || echo
"Policy already deleted"
fi
aws iam delete-role --role-name eks-secrets-manager-role || echo
"Role already deleted"

echo "Cleaning up secret..."
aws secretsmanager delete-secret --secret-id MySecret || echo
"Secret already deleted"

echo "Cleaning up container image..."
aws ecr delete-repository \
	--repository-name secrets-manager-agent \
	--force || echo "Repository already deleted"

echo "Cleanup complete!"
Conclusion
In this post, we showed you how to deploy the AWS Secrets Manager Agent as a sidecar container in Amazon EKS. This approach provides a language-agnostic way to retrieve secrets through HTTP calls, reducing SDK dependencies while maintaining security through SSRF protection and IAM-based access controls.
The Secrets Manager Agent can be deployed as either a sidecar container or DaemonSet. Use sidecar deployment for isolated secrets and fine-grained security boundaries and use DaemonSet deployment for shared secrets across multiple applications with optimized resource utilization.
This approach complements existing secret management patterns and provides teams with HTTP-based secret access, immediate refresh control, and consistent interfaces across AWS compute environments.
AWS Secrets Manager is a service that you can use to manage, retrieve, and rotate database credentials, application credentials, API keys, and other secrets throughout their lifecycles. You can use Secrets Manager to replace hard-coded credentials in application source code with a runtime call to the Secrets Manager service to retrieve credentials dynamically when you need them. Storing the credentials in Secrets Manager helps avoid unintended access by anyone who inspects your application’s source code, configuration, or components.
Until today, your AWS bill would reflect the total cost of Secrets Manager in any given account, and you had no option to break out the cost per secret to a given cost center or organization.
In this post, we introduce a new feature—Secrets Manager Costs Allocation Tags—and walk through how you can use them for improved visibility into your Secrets Manager costs. Before getting into the details of this new feature, we want to give you primer about cost allocation tags.
A tag is a key-value pair that you assign to an AWS resource. In AWS Cost Explorer, you can activate tags as cost allocation tags. With tags activated, you can categorize and track costs by cost allocation tags. For example, you can create a tag named Group with value Engineering and assign it to resources owned by the engineering team of your company. After activating the Group tag as a cost allocation tag, you can track charges with this tag, filter or group by tags in Cost Explorer, and add tags to reports such as cost and usage reports for further analysis and visualization.
Cost allocation in AWS is a four step process:
Create the required cost allocation tags
Attach cost allocation tags to your resources
Activate your tags in the Cost Allocation Tags section of the AWS Billing console
Filter the tags, group by tags in Cost Explorer, and create cost categories
After you create and attach the tags to resources, they appear in the AWS Billing console Cost Allocation Tags section under User-defined cost allocation tags within 24 hours. You must activate these tags for AWS to start tracking them for your resources and for the tags to show up in Cost Explorer. When the tags appear under Tags in the Filter or Group by fields in Cost Explorer, you can start filtering or grouping by tag to view usage and charges by tag.
AWS Secrets Manager now supports cost allocation tags
Secrets Manager now supports cost allocation tags, giving you more granular control and visibility into your Secrets Manager costs. You can use this feature to categorize and track your Secrets Manager usage charges at a more detailed level, helping you to better understand and manage your AWS spending and assign costs per secret back to cost centers or organizations.
Solution overview: Enhanced cost visibility and management
With this new capability, you can:
Break down Secrets Manager costs by department, project, environment, or other dimensions important to your organization
View itemized Secrets Manager usage in Cost Explorer as well as in cost and usage reports
Improve cost allocation and chargeback processes across your business units and organizations
Prerequisites
To walk through the examples in this post, you need to have the following:
Create user-defined tags for cost allocation purposes using the console
In this example, we assume that you want to manage the cost of your secrets by different cost centers in your organization. Here, we create a tag with CostCenter as a key and the value equal to the cost center codes of the teams that are using secrets.
You’ll walk through two examples, the first one with a cost center for Engineering and a second one with a cost center for Finance. You will reuse those examples throughout this post.
In this example, start by creating and assigning a tag called cost allocation center with the key name: CostCenter and assign a cost center value of 7263 for the engineering department to an existing or new secret.
To assign a user-defined tag to a new or existing secret:
In the Secrets Manager console, choose Secrets from the navigation pane.
In the list of available secrets, select the secret to edit the tags or choose Store A New Secret to create a new secret.
When the secret is displayed, select the Tags option and choose Edit Tags to add new or edit existing tags.
Figure 1: Assign a user-defined tag to an existing secret
Repeat the process, but assign the cost center value of 7263 for the engineering department and 1121 for the finance department to a second secret.
Create user-defined tags for cost allocation purposes using the AWS CLI
Optionally, you can use the AWS CLI to create the same tags as in the preceding example.
To use the AWS CLI to create tags:
Use the following AWS CLI command to create the first tag:
This command produces no output in case of a successful execution.
Use the second AWS CLI command with a value of 1121 for the second secret.
Turn tags into cost allocation tags using the AWS Billing and Cost Management console
The next step is to activate the user-defined tags within the AWS Billing and Cost Management console so they can be used.
To activate cost allocation tags:
Go to the AWS Billing and Cost Management console and choose Cost allocation tags in the navigation pane.
Select the option for user-defined cost allocation tags.
Select the tag keys that you want to activate.
Choose Activate.
Note: After you create and apply user-defined tags to your resources, it can take up to 24 hours for the tag keys to appear on your cost allocation tags page for activation. It can then take up to 24 hours for tag keys to activate.
Figure 2: Activate cost allocation tags
Turn tags into cost allocation tags using the AWS CLI
You can also activate user-defined tags within the AWS Billing and Cost Management Console using the AWS CLI.
To activate tags using the AWS CLI:
For activation of the first user-defined tag use the following AWS CLI command:
aws ce update-cost-allocation-tags-status \
    --cost-allocation-tags-status TagKey=Role,Status=Active
To activate the second user-defined tag use the following AWS CLI command:
aws ce update-cost-allocation-tags-status \
    --cost-allocation-tags-status TagKey=CostCenter,Status=Active
View the results in Cost Explorer
The last step is to view the results for secrets in Cost Explorer. When the tag CostCenter shows up under Tags in the Filter or Group By fields in Cost Explorer, you can start filtering or grouping by the tag to view usage and charges by tag.
When applying the tag filter for Secrets Manager, Cost Explorer displays charges only for resources tagged with the selected tag values. And when grouped by a particular tag, the charges are grouped by each value of the selected tag.
To view results:
As an example, use the following parameters to view results.
In the Cost Center console, select the right arrow (>) icon to open the report parameters options to the right of the billing dashboard.
On the Report parameters window:
For Date Range, enter the desired time range.
Under Group by, for Dimension, select Tag, and for Tag select Cost Center.
For Filters, Service, select Secrets Manager.
Figure 3: Configure report parameters
You can use the resulting report to clearly identify the cost and usage of the two secrets, broken down into the two cost centers: engineering 7263 and finance 1121. Now, you can cross-charge secrets to the corresponding cost centers in your organization and provide a report similar to Figure 4.
Figure 4: Cost and usage report
Conclusion
In this post, we introduced the AWS Secrets Manager Cost Allocation Tags feature and showed you how to use AWS Cost Explorer Costs and Usage Reports to gain secrets usage insights. You can now allocate the cost for every secret to one or more cost centers and charge them accordingly. See the AWS Secrets Manager Cost Allocation Tag documentation to learn more about how you can use Secrets Manager Cost Allocation Tags in your accounts.
These three services were chosen because they are security-critical AWS services with the most urgent need for post-quantum confidentiality. These three AWS services have previously deployed support for CRYSTALS-Kyber, the predecessor of ML-KEM. Support for CRYSTALS-Kyber will continue through 2025, but will be removed across all AWS service endpoints in 2026 in favor of ML-KEM.
Our migration to post-quantum cryptography
AWS is committed to following our post-quantum cryptography migration plan. As part of this commitment, and part of the AWS post-quantum shared responsibility model, AWS plans to deploy support for ML-KEM to all AWS services with HTTPS endpoints over the coming years. AWS customers must update their TLS clients and SDKs to offer ML-KEM when connecting to AWS service HTTPS endpoints. This will protect against future harvest now, decrypt later threats posed by quantum computing advancements. Meanwhile, AWS service HTTPS endpoints will be responsible for selecting ML-KEM when offered by clients.
The effect of hybrid post-quantum ML-KEM on TLS performance
Migrating from an Elliptic Curve Diffie-Hellman (ECDH)-only key agreement to an ECDH+ML-KEM hybrid key agreement necessarily requires that the TLS handshake send more data and perform more cryptographic operations. Switching from a classical to a hybrid post-quantum key agreement will transfer approximately 1600 additional bytes during the TLS handshake and will require approximately 80–150 microseconds more compute time to perform ML-KEM cryptographic operations. This is a one-time TLS connection startup cost and is amortized over the lifetime of the TLS connection across the HTTP requests sent over that connection.
AWS is working to provide a smooth migration to hybrid post-quantum key agreement for TLS. This work includes performing benchmarks on example workloads to help customers understand the impact of enabling hybrid post-quantum key agreement with ML-KEM.
Using the AWS SDK for Java v2, AWS has measured the number of AWS KMS GenerateDataKey requests per second that a single thread can issue serially between an Amazon Elastic Compute Cloud (Amazon EC2) C6in.metal client and the public AWS KMS endpoint. Both the client and server were in the us-west-2 Region. Classical TLS connections to AWS KMS negotiated the P256 elliptic curve for key agreement, and hybrid post-quantum TLS connections negotiated the X25519 elliptic curve with ML-KEM-768 for their hybrid key agreement. Your own performance characteristics might differ and will depend on your environment, including your instance type, your workload profiles, the amount of parallelism and number of threads used, and your network location and capacity. The HTTP request transaction rates were measured with TLS connection reuse both enabled and disabled.
Figure 1 shows the number of requests per second issued at different percentiles when TLS 1.3 connection reuse is disabled. It shows that in the worst-case scenario—when the cost of a TLS handshake is never amortized and every HTTP request must perform a full TLS handshake—enabling hybrid post-quantum TLS decreases the transactions per second (TPS) by about 2.3 percent on average, from 108.7 TPS to 106.2 TPS.
Figure 1: AWS KMS GenerateDataKey requests per second without TLS connection reuse
Figure 2 shows the number of requests per second issued at different percentiles when TLS connection reuse is enabled. Reusing TLS connections and amortizing the cost of a TLS handshake over many HTTP requests is the default setting in the AWS SDK for Java v2. We show that enabling hybrid post-quantum TLS when using default SDK settings leaves the TPS rate almost unchanged, with only a 0.05 percent decrease on average, from 216.1 TPS to 216.0 TPS.
Figure 2: AWS KMS GenerateDataKey requests per second with TLS connection reuse
Our results show that the performance impact of enabling hybrid post-quantum TLS is negligible when using typical configuration settings in your SDK. Our measurements show that enabling hybrid post-quantum TLS for a default-case example workload only lowered maximum TPS rate by 0.05 percent. Our results also show that overriding SDK defaults to force the worst-case scenario of performing a new TLS handshake for every request only decreased maximum TPS rate by 2.3 percent.
The following table shows the benchmark data that we measured. Each benchmark performed 500 one-second TPS measurements for varying TLS key agreement settings and TLS connection reuse settings. The measurements used v2.30.22 of the AWS SDK for Java v2. The TLS key agreement was switched between classical and hybrid post-quantum by toggling the postQuantumTlsEnabled() configuration. TLS connection reuse was toggled by injecting a Connection: close HTTP header into each HTTP request. This header forces the TLS connection to be shut down after each HTTP request and requires that a new TLS connection be created for each HTTP request.
TLS key agreement
TLS conn resuse
Total HTTP requests
Average (TPS)
p01 (TPS)
p10 (TPS)
p25 (TPS)
p50 (TPS)
p75 (TPS)
p90 (TPS)
p99 (TPS)
Classical (P256)
No
54,367
108.7
78
86
96
102
129
137
145
Hybrid post-quantum (X25519MLKEM768)
No
53,106
106.2
76
85
93
100
126
134
141
Classical (P256)
Yes
108,052
216.1
181
194
200
216
233
240
245
Hybrid post-quantum (X25519MLKEM768)
Yes
107,994
216
177
194
200
216
233
239
245
Removing support for draft post-quantum standards
AWS service endpoints with support for CRYSTALS-Kyber, the predecessor of ML-KEM, will continue to support CRYSTALS-Kyber through 2025. We will slowly phase out support for the pre-standard CRYSTALS-Kyber implementations after customers have moved to the ML-KEM standard. Customers using previous versions of the AWS SDK for Java with CRYSTALS-Kyber support should upgrade to the latest SDK versions that have ML-KEM support. No code changes are necessary for customers using a generally available release of the AWS SDK for Java v2 to upgrade from CRYSTALS-Kyber to ML-KEM.
Customers currently negotiating CRYSTALS-Kyber who do not upgrade their AWS Java SDK v2 clients by 2026 will see their clients gracefully fall back to a classical key agreement once CRYSTALS-Kyber is removed from AWS service HTTPS endpoints.
How to use hybrid post-quantum key agreement
If using the AWS SDK for Rust, you can enable the hybrid post-quantum key agreement by adding the rustls package to your crate and enabling the prefer-post-quantum feature flag. See the rustls documentation for more information.
If using the AWS SDK for Java 2.x, you can enable hybrid post-quantum key agreement by calling .postQuantumTlsEnabled(true) when building your AWS Common Runtime HTTP client.
Step 1: Add the AWS Common Runtime HTTP client to your Java dependencies.
Add the AWS Common Runtime HTTP client to your Maven dependencies. We recommend using the latest available version. Use version 2.30.22 or greater to enable the use of ML-KEM.
Step 2: Enable post-quantum TLS in your Java SDK client configuration
When configuring your AWS service client, use the AwsCrtAsyncHttpClient configured with post-quantum TLS.
// Configure an AWS Common Runtime HTTP client with Post-Quantum TLS enabled
SdkAsyncHttpClient awsCrtHttpClient = AwsCrtAsyncHttpClient.builder()
          .postQuantumTlsEnabled(true)
          .build();

// Create an AWS service client that uses the AWS Common Runtime client
KmsAsyncClient kmsAsync = KmsAsyncClient.builder()
         .httpClient(awsCrtHttpClient)
         .build();

// Make a request over a TLS connection that uses post-quantum key agreement
ListKeysReponse keys = kmsAsync.listKeys().get();
Here are some ideas about how to use this post-quantum-enabled client:
Run load tests and benchmarks. The AwsCrtAsyncHttpClient is heavily optimized for performance and uses AWS Libcrypto on Linux-based environments. If you aren’t already using the AwsCrtAsyncHttpClient, try it today to see the performance benefits compared to the default SDK HTTP client. After using AwsCrtAsyncHttpClient, enable post-quantum TLS support. See if using AwsCrtAsyncHttpClient with post-quantum TLS is an overall performance gain to using the default SDK HTTP client without post-quantum TLS.
Try connecting from different network locations. Depending on the network path that your request takes, you might discover that intermediate hosts, proxies, or firewalls with deep packet inspection (DPI) block the request. If this is the case, you might need to work with your security team or IT administrators to update firewalls in your network to unblock these new TLS algorithms. We want to hear from you about how your infrastructure interacts with this new variant of TLS traffic.
Conclusion
Support for ML-KEM-based hybrid key agreement has been deployed to three security-critical AWS service endpoints. The performance impact of enabling hybrid post-quantum TLS is likely to be negligible when TLS connection reuse is enabled. Our measurements showed only a 0.05 percent decrease to maximum transactions per second when calling AWS KMS GenerateDataKey.
Starting with version 2.30.22, the AWS SDK for Java v2 now supports ML-KEM-based hybrid key agreement on Linux-based platforms when using the AWS Common Runtime HTTP client. Try enabling post quantum key agreement for TLS in your Java SDK client configuration today.
AWS plans to deploy support for ML-KEM-based hybrid post-quantum key agreement to every AWS service HTTPS endpoint over the coming years as part of our post-quantum cryptography migration plan. AWS customers will be responsible for updating their TLS clients and SDKs to help ensure that ML-KEM key agreement is offered when connecting to AWS service HTTPS endpoints. This will protect against future harvest now, decrypt later threats posed by quantum computing advancements.
For additional information, blog posts, and periodic updates on our post-quantum cryptography migration, keep watching the AWS Post-Quantum Cryptography page. To learn more about post-quantum cryptography with AWS, contact the post-quantum cryptography team.
[Amazon Simple Email Service] provides a secure email solution that scales with your business needs. Unfortunately, all email systems, including Amazon SES, remain the primary target for spammers and bad actors due to email’s widespread use and accessibility.
While SES offers powerful features for application-based email sending, its SMTP credentials require careful management to prevent unauthorized access. Compromised credentials enable bad actors to send malicious emails through legitimate domains, which can bypass security filters and damage sender reputation.
To protect your SES implementation, you must encrypt SMTP credentials during storage and transmission. Additionally, implementing role-based access controls helps restrict credential access to authorized personnel only. Regular credential rotation at fixed intervals, typically every 90 days, minimizes potential security breaches. Automating this rotation process eliminates human error and ensures consistent security practices across your organization.
Problem Statement
Imagine you are the administrator for a large financial institution. You recently began using Amazon SES to send email from two dozen on-premises servers. Your email servers authenticate with SES using SMTP credentials to access the SES SMTP interface. Your organization’s security policies mandate regular credential rotation, including the ability to rotate them on-demand. How can you automate SMTP credential rotation such that you can meet your organization’s security policies?
This blog post will present two solutions that automate the secure management and automatic rotation of SMTP credentials for Amazon SES. Each will help enhance email security, comply with regulations, and minimize operational overhead.
Both solutions provide SES customers who use SMTP with additional tools to improve email security, ensure compliance, and reduce operational overhead. You can deploy the option that best suites your needs by following the guidance in this blog post.
If your environment supports automated rotation, AWS Systems Manager Documents (SSM Documents) can help by providing pre-defined or custom automation workflows for securely managing secrets rotation, deploy Option 1.
If your environment does not support automated rotation, you can still implement an auditable, managed rotation solution by storing your secrets in AWS Systems Manager Parameter Store by deploying Option 2.
As a pay-per-use platform, the underlying AWS services used in either deployment option will only charge you for the resources that you actually consume. You can leverage the AWS Pricing Calculator to estimate the run-time costs for your specific workload. Alternatively, you can work directly with your AWS account team to understand the pricing for these solutions.
Getting SES SMTP Credentials
To send emails through the Amazon SES SMTP interface, email servers must first authenticate with SES using dedicated SES SMTP credentials. Typically, a systems administrator logs into the AWS SES console, clicks the Create SMTP Credentials button, and navigates to the AWS Identity and Access Management] (IAM) console. There, the administrator creates an IAM user with permissions for SES. The administrator then uses the IAM user’s secret access key to generate the SES SMTP password, which they use to configure their email servers or SMTP-enabled applications for use with SES.
The SES SMTP interface authenticates requests using an SMTP credential derived from an IAM user’s access key ID and secret access key. Since temporary access keys cannot be used to derive SES SMTP credentials, you must deploy and regularly rotate a long-lived key.
While the manual process of creating SES SMTP credentials works for a small number of credentials, it becomes cumbersome for customers with numerous email servers or strict password rotation policies. These customers may find the automated credential rotation mechanisms described in the following solutions better suited to their production needs.
Option 1 – Fully Automated Credential Rotation:
The fully automated version of this solution uses a custom Lambda function to create an SMTP password, which is stored in AWS Secrets Manager. AWS Secrets Manager’s built-in rotation feature then triggers the rotation of SES SMTP credentials. AWS Systems Manager Documents utilize AWS Systems Manager Agents to automatically make the changes to the authentication configuration on email servers.
The key advantages of using AWS Systems Manager to make the email server configuration changes include:
Ability to deploy changes to on-premises and Amazon EC2 hosts, allowing rotation of secrets across a hybrid estate. Customization of the document to specific email software configurations. Targeting the secret (SMTP credential) rotation document on all email servers based on tags.
Let’s dive deep into Option 1 – Fully Automated Credential Rotation.
How Option 1 works:
Refer to the image above for the workflow:
AWS Secrets Manager initiates a rotation request, either on a schedule or via an authorized user’s request, triggering the “rotation Lambda” to rotate the SES SMTP credentials.
The SES Secret Rotation Function Lambda (see figure x above):
a. Creates a new IAM secret access key for the designated SES IAM user, derives the new SES SMTP password, and stores it in AWS Secrets Manager.
b. Connects to SES to verify the new SMTP password can authenticate.
c. Initiates an AWS Systems Manager Run Command to update the new SMTP password on target email servers using a pre-configured Systems Manager Document.
d. (and e.) Monitors the status of the Systems Manager Document execution until all updates complete successfully
f. Deletes the old IAM access and secret access keys.
With this fully automated solution, SES SMTP credentials can be rotated on a schedule or triggered manually, with no impact to email service uptime.
Deploying the Fully Automated Solution in Your AWS Account (Option 1)
Prerequisites for the Fully Automated Solution
AWS Account Access, typically with admin-level permission to allow for the deployment.
Alternatively, you can use the AWS CLI from the AWS CloudShell in your browser.
Clone the Github repository (for this solution, you only need the README.md and sesautomaticrotation.yaml files found in /ses-credential-rotation/automatic-rotation).
Note – We follow the principles of least privilege in this solution. The CloudFormation templates we’ve supplied require you to specify an identity, or configuration-set resource to use in the SES sending operation. You can find guidance on defining these values at Actions, resources, and condition keys for Amazon SES. Additionally, we’ve limited the IAM User to the ses:SendRawEmail action, which you can adjust as appropriate).
Console access to your AWS SES account that is properly configured to send emails via at least one verified identity.
Target email server(s) properly configured to send email via SES using SES SMTP authentication.
The AWS Systems Manager agent(s) must be correctly installed and configured on your target email server(s) as detailed in Setting up AWS Systems Manager.
The target email servers must be decorated with the tag (“SSMServerTag“) and value (“SSMServerTagValue“). These values allow the Systems Manager Document to identify them.
We use the tag “EmailServer” and the value “True” in our example, but you can use any tag and value that you wish).
An email address (or list) to receive SMTP rotation notifications.
Console access to your AWS Secrets Manager.
Console access to your AWS Systems Manager.
Deployment Steps
Clone the GitHub repository to your IDE
If using AWS CloudShell, ensure you are in the same region as your AWS Systems and Secrets Manager
Update the appropriate AWS Systems Manager sample document created by the CloudFormation Template to reflect your email server environments. These can be found in the AWS Systems Manager console under Documents > Owned by me
The ExampleWindowsIISSMTPSESpasswordrotator sample provides an example for Microsoft Windows hosts using the runPowerShellScript action to update the server’s SMTP credentials.
The ExamplePostfixSESpasswordrotator sample provides an example for Linux hosts using the runShellScript action to update the server’s SMTP credentials.
The partially automated version uses a custom AWS Lambda function to create an SMTP password, which is stored in AWS Systems Manager Parameter Store. This solution simplifies credential rotation, where manual changes must be conducted by support staff. By wrapping the manual change process with AWS Step Functions, you can ensure a robust and auditable process to regularly rotate the SES SMTP credential.
How Option 2 works:
The credential rotation AWS Step Function creates a new SES SMTP credential and updates it in AWS Systems Manager Parameter Store.
It retrieves a list of servers from an Amazon DynamoDB table and launches a manual confirmation AWS Step Function execution for each server to initiate and track the manual step.
The manual confirmation AWS Step Function emails the designated address, requesting support staff to arrange the rotation. The email includes a link specific to that server.
The person completing the manual change confirms back to the AWS Step Function via the link that the rotation is complete.
Once the rotation on a server is confirmed, the manual confirmation AWS Step Function for that server is marked as complete.
After all server rotations are complete, the credential rotation AWS Step Function continues, disabling the old SES SMTP credential and deleting it after a few days.
AWS Step Function executions can last up to 365 days, providing sufficient time for the manual rotation and confirmation.
The screenshot below shows a graphical representation of the credential rotation AWS Step Function execution status, providing a real-time view of the rotation progress.
You can also track the status of individual servers via the manual rotation step function execution list.
The partially automated solution for rotating Amazon SES SMTP credentials is illustrated and detailed below:
Refer to the image above for the option 2 workflow:
EventBridge Scheduler Trigger: An EventBridge scheduler rule triggers a custom Starter Function Lambda (SF Lambda) on the last day of every 3rd month (this can be adjusted to suit your needs in the CloudFormation template).
Credential Rotation Step Function: The Starter Function Lambda triggers the Credential Rotation AWS Step Function, providing a clearly defined name to facilitate auditing (“password-rotation-dd-mm-yy“).
Credential Rotation Step Function Actions:
Creates a new IAM (Identity and Access Management) secret access key for the SES IAM user.
Triggers the SMTP Credential Generator Lambda to derive the SES SMTP password from the newly created IAM secret access key (using the algorithm provided in the SES documentation.
Reads a list of servers that are utilizing this credential from a DynamoDB table.
Manual Confirmation Step Function:
For each server, a manual confirmation AWS Step Function is triggered, sending a message on the Amazon Simple Notification Service (SNS) topic.
The SNS notification prompts the server administrator via email to manually rotate the SMTP credentials on the on-premises email server.
The server administrator uses a link in the email to confirm the credential has been rotated and tested on the server.
The link triggers the Confirmation Lambda exposed via API Gateway, which marks the ManualConfirmation step function as complete.
Credential Rotation Completion: The CredentialRotation step function waits until all manual confirmation step functions have completed before proceeding.
Old IAM Access Key Deletion: Once confirmation has been received for all servers, the step function deletes the old IAM access key.
Deployment
To deploy the partially automated solution in your AWS account, you will need the following prerequisites:
Prerequisites for the Partially Automated Solution
AWS Account Access, typically with admin-level permission to allow for the deployment.
SES enabled, configured, and properly sending emails.
External email server(s) currently configured to use SES with SMTP.
Administrator email address to receive notifications.
AWS Secrets Manager and AWS Systems Manager set up.
AWS Systems Manager agent(s) correctly installed and configured on your target email servers as detailed in Setting up AWS Systems Manager.
Amazon EC2 instance with Postfix configured to send emails through SES
Target email servers must be decorated with a tag (“SSMServerTag“) and value (“SSMServerTagValue“) that will be used to identify them by the Systems Manager Document (we used “server” and “email”)
AWS Parameter Store and AWS Step Functions.
Once you have the prerequisites in place, follow the instructions in the GitHub project.
Conclusion
Implementing an automated credential rotation process for Amazon SES SMTP enhances security and compliance, streamlines operations, and reduces the risk of downtime and human error. By leveraging AWS Secrets Manager and AWS Systems Manager (option 1) or AWS Systems Manager Parameter Store and Step Functions (option 2), organizations can centralize SES SMTP credential management, maintain an audit trail, and quickly update email application servers with new SMTP credentials.
Need additional guidance?
Join the conversation and connect with other administrators and security professionals on the AWS re:Post community to share insights and learn best practices.
Amazon EKS introduced Pod Identity in 2023 as a feature that streamlines the process of configuring IAM permissions for Kubernetes applications. Pod Identity simplifies the identity management of applications running on top of Amazon EKS by allowing you to set up permissions directly through EKS interfaces, reducing the number of steps required and alleviating the need to switch between the EKS and IAM services. Pod Identity enables the use of a single IAM role across multiple clusters without updating trust policies, and it supports role session tags for more granular access control. This approach not only simplifies policy management by allowing the reuse of permission policies across roles, but also enhances security by enabling access to AWS resources based on matching tags.
Background
When your applications that are running on top of Amazon EKS require sensitive information like credentials to access a database, or a key to authenticate through an API, we call this kind of information secrets. You can secure, store, and manage secrets in AWS Secrets Manager. ASCP allows Kubernetes applications to securely retrieve the secrets stored in Secrets Manager and Systems Manager Parameter Store. Previously, ASCP relied on IAM roles for service accounts (IRSA) for authentication. Although IRSA provided improvements over previous methods, Pod Identity offers even greater security and simplicity.
Pod Identity provides a more secure and efficient way to integrate IAM roles with applications running on EKS, granting more granular AWS permissions to individual Pods, so that you don’t need instance-level credentials or IRSA.
This integration provides the following key benefits over using IRSA:
Enhanced security: Pod Identity provides a more granular and secure way to manage permissions at the Pod level, alleviating the need to expose the IAM role annotation on Kubernetes ServiceAccount objects.
Simplified configuration:Pod Identity streamlines and simplifies the setup process, reducing the potential for misconfiguration, especially in high-scale environments.
Improved operation: Pod Identity reduces the operational overhead compared to previous methods, centralizing the management with the AWS API.
Native EKS integration: Pod Identity is the new standard for IAM integration for applications running on EKS and provides a more cohesive experience.
Solution overview
With this integration, ASCP uses Pod Identity to authenticate and authorize access to AWS services. When a Pod requires access to a secret, the workflow is as shown in Figure 1.
Figure 1: The workflow performed by the Pod Identity and ASCP integration to provide access to a secret stored on AWS Secrets Manager for a Pod running on Amazon EKS
The workflow is as follows:
A user creates an IAM role and a Pod Identity association between the IAM role and the Kubernetes ServiceAccount assigned to the Pod.
EKS API validates the Pod Identity association, allowing ASCP to use this role to authenticate with AWS services.
If authorized, the Pod Identity agent allows ASCP to assume the IAM role assigned to the Pod through the use of a ServiceAccount token.
The Pod retrieves the requested secrets values and makes them available to the Pod through the use of a mounted volume.
Prerequisites
You need to have the following prerequisites in place in order to implement this solution:
An Amazon EKS cluster (version 1.24 or later)
Pod Identity enabled on your cluster
Access to two AWS accounts (for cross-account access)
This guide presents two scenarios: single-account setup and cross-account setup. Complete the single-account steps in Account A before proceeding to the cross-account configuration, which involves Account B. The cross-account setup builds on the single-account foundation to demonstrate secure secrets management across AWS accounts.
Amazon EKS cluster setup
Before you start, you’ll need to set up an Amazon EKS cluster with the required add-ons in a single account (Account A).
(Optional) Use the following commands to set environment variables and create an Amazon EKS cluster:
kubectl --namespace=kube-system get pods -l "app=secrets-store-csi-driver"
You should see this expected output:
NAME READY STATUS RESTARTS AGE
csi-secrets-store-secrets-store-csi-driver-fcxf6 3/3 Running 0 41s
csi-secrets-store-secrets-store-csi-driver-j9wqh 3/3 Running 0 41s
Now that you’ve set up your Amazon EKS cluster, in this use case, you’ll create an AWS Secrets Manager secret in the same account where the cluster and the applications reside (Account A).
Create a secret in AWS Secrets Manager with tags kubernetes-namespace and eks-cluster-name within the same AWS account as the EKS cluster:
In the preceding example IAM role permission policy, the use of conditions with kubernetes-namespace and eks-cluster-name tags helps enforce fine-grained access control by specifying that secrets can only be accessed by Pods from specific namespace and clusters. This allows secretsmanager actions only if the secret is tagged with the matching kubernetes-namespace and eks-cluster-name values.
Notice that the preceding example IAM role trust policy allows the Amazon EKS Pod Identity service (pods.eks.amazonaws.com) to assume the role and tag the session. These actions are necessary for Pod Identity to function correctly, enabling Pods to securely access AWS resources.
Finally, apply the role and trust policy:
aws iam create-role --role-name ascp-podidentity --assume-role-policy-document file://trust.json
aws iam put-role-policy --role-name ascp-podidentity --policy-name ascp-podidentity --policy-document file://policy.json
Note the ARN of the new role. You will use it in the next step.
Create a Kubernetes ServiceAccount and add the Pod Identity association between the ServiceAccount and the IAM role:
Create a SecretProviderClass to use the newly created secret in your Amazon EKS cluster.
cat << EOF | kubectl apply -f -

apiVersion: secrets-store.csi.x-k8s.io/v1
kind: SecretProviderClass
metadata:
  name: aws-secrets-manager
spec:
  provider: aws
  parameters:
    objects: |
      - objectName: "secret-a" # Secret name or ARN to be mounted to the Pod
        objectType: "secretsmanager"
    usePodIdentity: "true" # Indicator to use Pod Identity instead of IRSA

EOF
Create a new deployment to consume your newly created secret using Pod Identity as a mounted volume.
cat << EOF | kubectl apply -f -

apiVersion: apps/v1
kind: Deployment
metadata:
  labels:
    app: application-a
  name: application-a
spec:
  replicas: 1
  selector:
    matchLabels:
      app: application-a
  template:
    metadata:
      labels:
        app: application-a
    spec:
      containers:
      - image: public.ecr.aws/amazonlinux/amazonlinux:2023-minimal
        name: amazonlinux
        args:
        - infinity
        command:
        - sleep
 volumeMounts:
 - name: secrets-store-inline
 mountPath: "/mnt/secret" # Directory where secret will be mounted to
 readOnly: true
 volumes:
 - name: secrets-store-inline
 csi:
 driver: secrets-store.csi.k8s.io
 readOnly: true
 volumeAttributes:
 secretProviderClass: "aws-secrets-manager" # Match SecretProviderClass name created
 serviceAccountName: serviceaccount-a # Specify service account created

EOF
Validate that the deployment was created successfully and confirm the secret was mounted correctly.
kubectl get pods -l app=application-a
kubectl exec -it $(kubectl get pods -l app=application-a -o name) -- cat /mnt/secret/secret-a
You should see this expected output:
NAME READY STATUS RESTARTS AGE
application-a-b98d44bb8-bzvn4 1/1 Running 0 3s

{"user":"user1","password":"passwd1"}%
Working with cross-account secrets through resource policies
For this second use case, you’ll also use the Amazon EKS cluster on Account A, and create a new Secrets Manager secret in a different account (Account B).
In order to access a secret in a different account, you can’t use the default AWS Key Management Service (AWS KMS) key, but will use aws/secretsmanager to encrypt this secret. So you need to first create a new AWS KMS key that allows cross-account access.
On Account B
Create a customer managed key on AWS KMS with cross-account permissions:
Create a SecretProviderClass to use the cross-account secret created in Account B in your Amazon EKS cluster:
cat << EOF | kubectl apply -f -

apiVersion: secrets-store.csi.x-k8s.io/v1
kind: SecretProviderClass
metadata:
  name: aws-secrets-manager-cross
spec:
  provider: aws
  parameters:
    objects: |
      - objectName: "$SECRET_CROSS_ARN" # Full ARN of the Secret in the ACCOUNT B to be mounted on Pod
        objectType: "secretsmanager"
    usePodIdentity: "true" # Indicator to use Pod Identity instead of IRSA

EOF
Create a new deployment to consume your newly created secret using Pod Identity as a mounted volume:
cat << EOF | kubectl apply -f -

apiVersion: apps/v1
kind: Deployment
metadata:
  labels:
    app: application-b
  name: application-b
spec:
  replicas: 1
  selector:
    matchLabels:
      app: application-b
  template:
    metadata:
      labels:
        app: application-b
    spec:
      containers:
      - image: public.ecr.aws/amazonlinux/amazonlinux:2023-minimal
        name: amazonlinux
        args:
        - infinity
        command:
        - sleep
 volumeMounts:
 - name: secrets-store-cross
 mountPath: "/mnt/secret" # Directory where secret will be mounted to readOnly: true
 volumes:
 - name: secrets-store-cross
 csi:
 driver: secrets-store.csi.k8s.io
 readOnly: true
 volumeAttributes:
 secretProviderClass: "aws-secrets-manager-cross" # Match SecretProviderClass name created for cross-account access serviceAccountName: serviceaccount-b # Specify service account created for cross-account access

EOF
Validate that the deployment was created successfully and confirm the mounted secret:
kubectl get pods -l app=application-b
kubectl exec -it $(kubectl get pods -l app=application-b -o name) -- cat /mnt/secret/$SECRET_CROSS_ARN
Note that the volume name is the secret ARN, because it’s a cross-account secret.
You should see this expected output:
NAME READY STATUS RESTARTS AGE
application-b-67b755444f-ngrhv 1/1 Running 0 8s

"This is a Cross Account Secret"%
Conclusion
The integration of ASCP with Pod Identity marks a significant step forward in secrets management for Amazon EKS. It offers enhanced security, simplified configuration, and improved operations. We encourage all EKS users to explore this new integration and take advantage of its benefits.
The integration of ASCP with Pod Identity offers these benefits over IRSA:
Simplified setup: With Pod Identity, you don’t need to create and manage service accounts for each application.
Enhanced security: Pod Identity provides more granular control over permissions at the Pod level.
Improved scalability: Pod Identity is easier to implement in large-scale environments.
Consistent AWS experience: Pod Identity aligns more closely with AWS best practices for IAM management.
We’re pleased to announce an enhanced version of the AWS Secrets Manager transform: AWS::SecretsManager-2024-09-16. This update is designed to simplify infrastructure management by reducing the need for manual security updates, bug fixes, and runtime upgrades.
AWS Secrets Manager helps you manage, retrieve, and rotate database credentials, API keys, and other secrets throughout their lifecycles. Some AWS services offer managed rotation of secrets, but for other secrets, you perform rotation by using an AWS Lambda function that updates your secret and the database or service.
The AWS::SecretsManager transforms are used in conjunction with the AWS::SecretsManager::RotationScheduleresource type and HostedRotationLambdaproperty to automatically extend your CloudFormation template to include a nested stack that creates the appropriate rotation Lambda function for your database or service. The transforms provide a convenient way to deploy an AWS vended rotation Lambda function into your own account as part of your CloudFormation templates, without having to rely on creating rotation Lambda functions through the AWS Serverless Application Repository or the AWS Management Console.
In this post, we’ll explore the new features of the transform, compare them to the previous version, and guide you through updating an existing Lambda function that was created using the old transform version to use the new transform version.
New features in AWS::SecretsManager-2024-09-16
The new transform version introduces several enhancements over the previous version (AWS::SecretsManager-2020-07-23):
Automatic Lambda upgrades: Your rotation Lambda functions’ runtime configuration and internal dependencies now update automatically when you update your CloudFormation stacks. This helps you verify that you’re using the most secure and stable versions of Secrets Manager vended rotation Lambda function code and runtimes. Currently, AWS Lambda supports Python runtimes 3.9 and above. With Python 3.8 being deprecated, this feature allows for a seamless transition to newer supported runtimes. For more information on runtime deprecations, see the AWS Lambda runtimes documentation and the Python version guide.
Additional resource attributes: The new transform now supports additional resource attributes for the AWS::SecretsManager::RotationSchedule resource type when used with the HostedRotationLambda property. The following attributes are applied to the nested stack (of type AWS::CloudFormation::Stack) that creates the rotation Lambda function:
The following table shows which resource attributes are supported by the two versions of the Secrets Manager transform.
Attribute
AWS::SecretsManager-2020-07-23
AWS::SecretsManager-2024-09-16
DeletionPolicy
Supported
Supported
UpdateReplacePolicy
Supported
Supported
CreationPolicy
Not Supported
Supported
DependsOn
Not Supported
Supported
Metadata
Not Supported
Supported
UpdatePolicy
Not Supported
Supported
Condition
Not Supported
Supported
Important considerations
Before you use the AWS::SecretsManager-2024-09-16 transform, it’s essential to be aware of the following considerations so that you can make sure your CloudFormation stacks are properly created or updated:
Non-backward compatibility: The new transform version isn’t backward compatible with the previous version. If you downgrade from AWS::SecretsManager-2024-09-16 to AWS::SecretsManager-2020-07-23, the additional resource attributes won’t be supported, which might change the behavior of existing stacks.
Rollback behavior during upgrade: When you upgrade to the AWS::SecretsManager-2024-09-16 transform from the previous version and a stack rollback occurs for any reason, the rotation Lambda function might not revert to its previous state. This is because the older transform’s nested stack might not use the same Lambda deployment package that was used before the upgrade.
Direct Lambda changes: If you make direct changes to the Lambda function created by the new transform outside of a CloudFormation stack update, those modifications might be overwritten during subsequent CloudFormation stack updates or rollbacks.
Lambda runtime management: When you use the new transform version, the rotation Lambda function’s runtime aligns with the compiled binaries that are vended in Secrets Manager rotation Lambda templates, without you needing to specify a Runtime value in the HostedRotationLambda property. If you specify a Runtime value, make sure it’s the same version that is supported by Secrets Manager vended rotation Lambda templates. Otherwise, the Lambda runtime will be incompatible with the binaries that are published in the rotation Lambda function. For more information on the supported runtime, see the rotation function templates documentation.
End of support plans: AWS Secrets Manager will end support for the previous transform version (AWS::SecretsManager-2020-07-23) in the future. We recommend that you migrate your stacks to the new transform to benefit from improvements and security enhancements going forward.
How to upgrade
To upgrade to the new transform version, follow these steps:
Review your existing CloudFormation stacks that use the AWS::SecretsManager-2020-07-23 transform.
Update your CloudFormation stack templates to use AWS::SecretsManager-2024-09-16 in the Transform key at the top of your template: Transform: AWS::SecretsManager-2024-09-16
If you have previously defined a Runtime value in the HostedRotationLambda property, remove it from your template so that your rotation Lambda function’s runtime is updated properly in future stack updates.
Incorporate the new resource attributes as needed. We recommend that you minimize all other template changes while upgrading to reduce the likelihood of rollbacks.
Deploy the changes by updating your CloudFormation stack with the revised template.
By following these steps, your Secrets Manager vended rotation Lambda functions will benefit from the latest improvements and security enhancements. Remember to test the changes in a non-production environment before you apply them to your production stacks. If you encounter any issues during the upgrade process, refer to our documentation or contact AWS Support for assistance.
If you have feedback about this post, submit comments in the Comments section below. If you have questions about this post, contact AWS Support.
AWS offers regulated customers tools, guidance and third-party audit reports to help meet compliance requirements. Regulated industry customers often require a service-by-service approval process when adopting cloud services to make sure that each adopted service aligns with their regulatory obligations and risk tolerance. How financial institutions can approve AWS services for highly confidential data walks through the key considerations that customers should focus on to help streamline the approval of cloud services. In this post we cover how regulated customers, especially FSI customers, can approach secrets management on Amazon Elastic Kubernetes Service (Amazon EKS) to help meet data protection and operational security requirements. Amazon EKS gives you the flexibility to start, run, and scale Kubernetes applications in the AWS Cloud or on-premises.
Applications often require sensitive information such as passwords, API keys, and tokens to connect to external services or systems. Kubernetes has secrets objects for managing these types of sensitive information. Additional tools and approaches have evolved to supplement the Kubernetes Secrets to help meet the compliance requirements of regulated organizations. One of the driving forces behind the evolution of these tools for regulated customers is that the native Kubernetes Secrets values aren’t encrypted but encoded as base64 strings; meaning that their values can be decoded by a threat actor with either API access or authorization to create a pod in a namespace containing the secret. There are options such as GoDaddy Kubernetes External Secrets, AWS Secrets and Configuration Provider (ASCP) for the Kubernetes Secrets Store CSI Driver, Hashicorp Vault, and Bitnami Sealed secrets that you can use to can help to improve the security, management, and audibility of your secrets usage.
Security and compliance is a shared responsibility between AWS and the customer. The AWS Shared Responsibility Model describes this as security of the cloud and security in the cloud:
AWS responsibility – Security of the cloud: AWS is responsible for protecting the infrastructure that runs the services offered in the AWS Cloud. For Amazon EKS, AWS is responsible for the Kubernetes control plane, which includes the control plane nodes and etcd database. Amazon EKS is certified by multiple compliance programs for regulated and sensitive applications. The effectiveness of the security controls are regularly tested and verified by third-party auditors as part of the AWS compliance programs.
Customer responsibility – Security in the cloud: Customers are responsible for the security and compliance of customer configured systems and services deployed on AWS. This includes responsibility for securely deploying, configuring and managing ESO within their Amazon EKS cluster. For Amazon EKS, the customer responsibility depends upon the worker nodes you pick to run your workloads and cluster configuration as shown in Figure 1. In the case of Amazon EKS deployment using Amazon Elastic Compute Cloud (Amazon EC2) hosts, the customer responsibility includes the following areas:
The security configuration of the data plane, including the configuration of the security groups that allow traffic to pass from the Amazon EKS control plane into the customer virtual private cloud (VPC).
The configuration of the nodes and the containers themselves.
The nodes’ operating system, including updates and security patches.
Other associated application software:
Setting up and managing network controls, such as firewall rules.
The sensitivity of your data, such as personally identifiable information (PII), keys, passwords, and tokens
Customers are responsible for enforcing access controls to protect their data and secrets.
Customers are responsible for monitoring and logging activities related to secrets management including auditing access, detecting anomalies and responding to security incidents.
Your company’s requirements, applicable laws and regulations
When using AWS Fargate, the operational overhead for customers is reduced in the following areas:
The customer is not responsible for updating or patching the host system.
Fargate manages the placement and scaling of containers.
Figure 1: AWS Shared Responsibility Model with Fargate and Amazon EC2 based workflows
As an example of the Shared Responsibility Model in action, consider a typical FSI workload accepting or processing payments cards and subject to PCI DSS requirements. PCI DSS v4.0 requirement 3 focuses on guidelines to secure cardholder data while at rest and in transit:
Control ID
Control description
3.6
Cryptographic keys used to protect stored account data are secured.
3.6.1.2
Store secret and private keys used to encrypt and decrypt cardholder data in one (or more) of the following forms:
Encrypted with a key-encrypting key that is at least as strong as the data-encrypting key, and that is stored separately from the data-encrypting key.
Stored within a secure cryptographic device (SCD), such as a hardware security module (HSM) or PTS-approved point-of-interaction device.
Has at least two full-length key components or key shares, in accordance with an industry-accepted method. Note: It is not required that public keys be stored in one of these forms.
3.6.1.3
Access to cleartext cryptographic key components is restricted to the fewest number of custodians necessary.
NIST frameworks and controls are also broadly adopted by FSI customers. NIST Cyber Security Framework (NIST CSF) and NIST SP 800-53 (Security and Privacy Controls for Information Systems and Organizations) include the following controls that apply to secrets:
Regulation or framework
Control ID
Control description
NIST CSF
PR.AC-1
Identities and credentials are issued, managed, verified, revoked, and audited for authorized devices, users and processes.
NIST CSF
PR.DS-1
Data-at-rest is protected.
NIST 800-53.r5
AC-2(1) AC-3(15)
Secrets should have automatic rotation enabled. Delete unused secrets.
Based on the preceding objectives, the management of secrets can be categorized into two broad areas:
Identity and access management ensures separation of duties and least privileged access.
Strong encryption, using a dedicated cryptographic device, introduces a secure boundary between the secrets data and keys, while maintaining appropriate management over the cryptographic keys.
Choosing your secrets management provider
To help choose a secrets management provider and apply compensating controls effectively, in this section we evaluate three different options based on the key objectives derived from the PCI DSS and NIST controls described above and other considerations such as operational overhead, high availability, resiliency, and developer or operator experience.
Architecture and workflow
The following architecture and component descriptions highlight the different architectural approaches and responsibilities of each solution’s components, ranging from controllers and operators, command-line interface (CLI) tools, custom resources, and CSI drivers working together to facilitate secure secrets management within Kubernetes environments.
External Secrets Operator (ESO) extends the Kubernetes API using a custom resource definition (CRD) for secret retrieval. ESO enables integration with external secrets management systems such as AWS Secrets Manager, HashiCorp Vault, Google Secrets Manager, Azure Key Vault, IBM Cloud Secrets Manager, and various other systems. ESO watches for changes to an external secret store and keeps Kubernetes secrets in sync. These services offer features that aren’t available with native Kubernetes Secrets, such as fine-grained access controls, strong encryption, and automatic rotation of secrets. By using these purpose-built tools outside of a Kubernetes cluster, you can better manage risk and benefit from central management of secrets across multiple Amazon EKS clusters. For more information, see the detailed walkthrough of using ESO to synchronize secrets from Secrets Manager to your Amazon EKS Fargate cluster.
ESO is comprised of a cluster-side controller that automatically reconciles the state within the Kubernetes cluster and updates the related secrets anytime the external API’s secret undergoes a change.
Figure 2: ESO workflow
Sealed Secrets is an open source project by Bitnami comprised of a Kubernetes controller coupled with a client-side CLI tool with the objective to store secrets in Git in a secure fashion. Sealed Secrets encrypts your Kubernetes secret into a SealedSecret, which can also be deployed to a Kubernetes cluster using kubectl. For more information, see the detailed walkthough of using tools from the Sealed Secrets open source project to manage secrets in your Amazon EKS clusters.
Sealed Secrets comprises of three main components: First, there is an operator or a controller which is deployed onto a Kubernetes cluster. The controller is responsible for decrypting your secrets. Second, you have a CLI tool called Kubeseal that takes your secret and encrypts it. Third, you have a CRD. Instead of creating regular secrets, you create SealedSecrets, which is a CRD defined within Kubernetes. That is how the operator knows when to perform the decryption process within your Kubernetes cluster.
Upon startup, the controller looks for a cluster-wide private-public key pair and generates a new 4096-bit RSA public-private key pair if one doesn’t exist. The private key is persisted in a secret object in the same namespace as the controller. The public key portion of this is made publicly available to anyone wanting to use Sealed Secrets with this cluster.
Figure 3: Sealed Secrets workflow
The AWS Secrets Manager and Config Provider (ASCP) for Secret Store CSI driver is an open source tool from AWS that allows secrets from Secrets Manager and Parameter Store, a capability of AWS Systems Manager, to be mounted as files inside Amazon EKS pods. It uses a CRD called SecretProviderClass to specify which secrets or parameters to mount. Upon a pod start or restart, the CSI driver retrieves the secrets or parameters from AWS and writes them to a tmpfs volume mounted in the pod. The volume is automatically cleaned up when the pod is deleted, making sure that secrets aren’t persisted. For more information, see the detailed walkthrough on how to set up and configure the ASCP to work with Amazon EKS.
ASCP comprises of a cluster-side controller acting as the provider, allowing secrets from Secrets Manager, and parameters from Parameter Store to appear as files mounted in Kubernetes pods. Secrets Store CSI Driver is a DaemonSet with three containers: node-driver-registrar, which registers the CSI driver with Kubelet; secrets-store, which implements the CSI Node service gRPC services for mounting and unmounting volumes during pod creation and deletion; and liveness-probe, which monitors the health of the CSI driver and reports to Kubernetes for automatic issue detection and pod restart.
Figure 4: AWS Secrets Manager and configuration provider
In the next section, we cover some of the key decisions involved in choosing whether to use ESO, Sealed Secrets, or ASCP for regulated customers to help meet their regulatory and compliance needs.
Comparing ESO, Sealed Secrets, and ASCP objectives
All three solutions address different aspects of secure secrets management and aim to help FSI customers meet their regulatory compliance requirements while upholding the protection of sensitive data in Kubernetes environments.
ESO synchronizes secrets from external APIs into Kubernetes, targeting the cluster operator and application developer personas. The cluster operator is responsible for setting up ESO and managing access policies. The application developer is responsible for defining external secrets and the application configuration.
Sealed Secrets encrypts your Kubernetes secrets before storing them in version control systems such as public Git repositories. This is the case if you decide to check in your Kubernetes manifest to a Git repository granting access to your sensitive secrets to anyone who has access to the Git repository. This is ultimately the reason why Sealed Secrets was created and the sealed secret can be decrypted only by the controller running in the target cluster.
Using ASCP, you can securely store and manage your secrets in Secrets Manager and retrieve them through your applications running on Kubernetes without having to write custom code. Secrets Manager provides features such as rotation, auditing, and access control that can help FSI customers meet regulatory compliance requirements and maintain a robust security posture.
Installation
The deployment and configuration details that follow highlight the different approaches and resources used by each solution to integrate with Kubernetes and external secret stores, catering to the specific requirements of secure secrets management in containerized environments.
ESO provides Helm charts for ease of operator deployment. External Secrets provides custom resources like SecretStore and ExternalSecret for configuring the required operator functionality to synchronize external secrets to your cluster. For instance, SecretStore can be used by the cluster operator to be able to connect to AWS Secrets Manager using appropriate credentials to pull in the secrets.
To install Sealed Secrets, you can deploy the Sealed Secrets Controller onto the Kubernetes cluster. You can deploy the manifest by itself or you can use a Helm chart to deploy the Sealed Secrets Controller for you. After the controller is installed, you use the Kubeseal client-side utility to encrypt secrets using asymmetric cryptography. If you don’t already have the Kubeseal CLI installed, see the installation instructions.
ASCP provides Helm charts to assist in operator deployment. The ASCP operator provides custom resources such as SecretProviderClass to provide provider-specific parameters to the CSI driver. During pod start and restart, the CSI driver will communicate with the provider using gRPC to retrieve the secret content from the external secret store you specified in the SecretProviderClass custom resource. Then the volume is mounted in the pod as tmpfs and the secret contents are written to the volume.
Encryption and key management
These solutions use robust encryption mechanisms and key management practices provided by external secret stores and AWS services such as AWS Key Management Service (AWS KMS) and Secrets Manager. However, additional considerations and configurations might be required to meet specific regulatory requirements, such as PCI DSS compliance for handling sensitive data.
ESO relies on encryption features within the external secrets management system. For instance, Secrets Manager supports envelope encryption with AWS KMS which is FIPS 140-2 Level 3 certified. Secrets Manager has several compliance certifications making it a great fit for regulated workloads. FIPS 140-2 Level 3 ensures only strong encryption algorithms approved by NIST can be used to protect data. It also defines security requirements for the cryptographic module, creating logical and physical boundaries.
Both AWS KMS and Secrets Manager help you to manage key lifecycle and to integrate with other AWS Services. In terms of key rotation, both provide automatic rotation of secrets that runs on a schedule (which you define), and abstract the complexity of managing different versions of keys. For AWS managed keys, the key rotation happens automatically once every year by default. With customer managed keys (CMKs), automatic key rotation is available but not enabled by default.
When using SealedSecrets, you use the Kubeseal tool to convert a standard Kubernetes Secret into a Sealed Secrets resource. The contents of the Sealed Secrets are encrypted with the public key served by the Sealed Secrets Controller as described in the Sealed Secrets project homepage.
In the absence of cloud native secrets management integration, you might have to add compensating controls to achieve the regulatory standards required by your organization. In cases where the underlying SealedSecrets data is sensitive in nature, such as cardholder PII, PCI requires that you store sensitive secrets in a cryptographic device such as a hardware security module (HSM). You can use Secrets Manager to store the master key generated to seal the secrets. However, this you will have to enable additional integration with Amazon EKS APIs to fetch the master key securely from the EKS cluster. You will also have to modify your deployment process to use a master key from Secrets Manager. The applications running in the EKS cluster must have permissions to fetch the SealedSecret and master key from Secrets Manager. This might involve configuring the application to interact with Amazon EKS APIs and Secrets Manager. For non-sensitive data, Kubeseal can be used directly within the EKS cluster to manage secrets and sealing keys.
For key rotation, you can store the controller generated private key in Parameter Store as a SecureString. You can use the advanced tier in Parameter Store if the file containing the private keys exceeds the Standard tier limit of up to 4,096 characters. In addition, if you want to add key rotation, you can use AWS KMS.
The ASCP relies on encryption features within the chosen secret store, such as Secrets Manager. Secrets Manager supports integration with AWS KMS for an additional layer of security by storing encryption keys separately. The Secrets Store CSI Driver facilitates secure interaction with the secret store, but doesn’t directly encrypt secrets. Encrypting mounted content can provide further protection, but introduces operational overhead related to key management.
ASCP relies on Secrets Manager and AWS KMS for encryption and decryption capabilities. As a recommendation, you can encrypt mounted content to further protect the secrets. However, this introduces the additional operational overhead of managing encryption keys and addressing key rotation.
Additional considerations
These solutions address various aspects of secure secrets management, ranging from centralized management, compliance, high availability, performance, developer experience, and integration with existing investments, catering to the specific needs of FSI customers in their Kubernetes environments.
ESO can be particularly useful when you need to manage an identical set of secrets across multiple Kubernetes clusters. Instead of configuring, managing, and rotating secrets at each cluster level individually, you can synchronize your secrets across your clusters. This simplifies secrets management by providing a single interface to manage secrets across multiple clusters and environments.
External secrets management systems typically offer advanced security features such as encryption at rest, access controls, audit logs, and integration with identity providers. This helps FSI customers ensure that sensitive information is stored and managed securely in accordance with regulatory requirements.
FSI customers usually have existing investments in their on-premises or cloud infrastructure, including secrets management solutions. ESO integrates seamlessly with existing secrets management systems and infrastructure, allowing FSI customers to use their investment in these systems without requiring significant changes to their workflow or tooling. This makes it easier for FSI customers to adopt and integrate ESO into their existing Kubernetes environments.
ESO provides capabilities for enforcing policies and governance controls around secrets management such as access control, rotation policies, and audit logging when using services like Secrets Manager. For FSI customers, audits and compliance are critical and ESO verifies that access to secrets is tracked and audit trails are maintained, thereby simplifying the process of demonstrating adherence to regulatory standards. For instance, secrets stored inside Secrets Manager can be audited for compliance with AWS Config and AWS Audit Manager. Additionally, ESO uses role-based access control (RBAC) to help prevent unauthorized access to Kubernetes secrets as documented in the ESO security best practices guide.
High availability and resilience are critical considerations for mission critical FSI applications such as online banking, payment processing, and trading services. By using external secrets management systems designed for high availability and disaster recovery, ESO helps FSI customers ensure secrets are available and accessible in the event of infrastructure failure or outages, thereby minimizing service disruption and downtime.
FSI workloads often experience spikes in transaction volumes, especially during peak days or hours. ESO is designed to efficiently managed a large volume of secrets by using external secrets management that’s optimized for performance and scalability.
In terms of monitoring, ESO provides Prometheus metrics to enable fine-grained monitoring of access to secrets. Amazon EKS pods offer diverse methods to grant access to secrets present on external secrets management solutions. For example, in non-production environments, access can be granted through IAM instance profiles assigned to the Amazon EKS worker nodes. For production, using IAM roles for service accounts (IRSA) is recommended. Furthermore, you can achieve namespace level fine-grained access control by using annotations.
ESO also provides options to configure operators to use a VPC endpoint to comply with FIPS requirements.
Additional developer productivity benefits provided by ESO include support for JSON objects (Secret key/value in the AWS Management console) or strings (Plaintext in the console). With JSON objects, developers can programmatically update multiple values atomically when rotating a client certificate and private key.
The benefit of Sealed Secrets, as discussed previously, is when you upload your manifest to a Git repository. The manifest will contain the encrypted SealedSecrets and not the regular secrets. This assures that no one has access to your sensitive secrets even when they have access to your Git repository. Sealed Secrets offer a few benefits to developers in terms of developer experience. Sealed Secrets gives you access to manage your secrets, making them more readily available to developers. Sealed Secrets offers VSCode extension to assist in integrating it into the software development lifecycle (SDLC). Using Sealed Secrets, you can store the encrypted secrets in the version control systems such as Gitlab and GitHub. Sealed Secrets can reduce operational overhead related to updating dependent objects because whenever a secret resource is updated, the same update is applied to the dependent objects.
ASCP integration with the Kubernetes Secrets Store CSI Driver on Amazon EKS offers enhanced security through seamless integration with Secrets Manager and Parameter Store, ensuring encryption, access control, and auditing. It centralizes management of sensitive data, simplifying operations and reducing the risk of exposure. The dynamic secrets injection capability facilitates secure retrieval and injection of secrets into Kubernetes pods, while automatic rotation provides up-to-date credentials without manual intervention. This combined solution streamlines deployment and management, providing a secure, scalable, and efficient approach to handling secrets and configuration settings in Kubernetes applications.
Consolidated threat model
We created a threat model based on the architecture of the three solution offerings. The threat model provides a comprehensive view of the potential threats and corresponding mitigations for each solution, allowing organizations to proactively address security risks and ensure the secure management of secrets in their Kubernetes environments.
X = Mitigations applicable to the solution
Threat
Mitigations
ESO
Sealed Secrets
ASCP
Unauthorized access or modification of secrets
Implement least privilege access principles
Rotate and manage credentials securely
Enable RBAC and auditing in Kubernetes
X
X
X
Insider threat (for example, a rogue administrator who has legitimate access)
Implement least privilege access principles
Enable auditing and monitoring
Enforce separation of duties and job rotation
X
X
Compromise of the deployment process
Secure and harden the deployment pipeline
Implement secure coding practices
Enable auditing and monitoring
X
Unauthorized access or tampering of secrets during transit
Enable encryption in transit using TLS
Implement mutual TLS authentication between components
Use private networking or VPN for secure communication
X
X
X
Compromise of the Kubernetes API server because of vulnerabilities or misconfiguration
Secure and harden the Kubernetes API server
Enable authentication and authorization mechanisms (for example, mutual TLS and RBAC)
Keep Kubernetes components up-to-date and patched
Enable Kubernetes audit logging and monitoring
X
Vulnerability in the external secrets controller leading to privilege escalation or data exposure
Keep the external secrets controller up-to-date and patched
Regularly monitor for and apply security updates
Implement least privilege access principles
Enable auditing and monitoring
X
Compromise of the Secrets Store CSI Driver, node-driver-registrar, Secrets Store CSI Provider, kubelet, or Pod could lead to unauthorized access or exposure of secrets
Implement least privilege principles and role-based access controls
Regularly patch and update the components
Monitor and audit the component activities
X
Unauthorized access or data breach in Secrets Manager could expose sensitive secrets
Implement strong access controls and access logging for Secrets Manager
Encrypt secrets at rest and in transit
Regularly rotate and update secrets
X
X
Shortcomings and limitations
The following limitations and drawbacks highlight the importance of carefully evaluating the specific requirements and constraints of your organization before adopting any of these solutions. You should consider factors such as team expertise, deployment environments, integration needs, and compliance requirements to promote a secure and efficient secrets management solution that aligns with your organization’s needs.
ESO doesn’t include a default way to restrict network traffic to and from ESO using network policies or similar network or firewall mechanisms. The application team is responsible for properly configuring network policies to improve the overall security posture of ESO within your Kubernetes cluster.
Any time an external secret associated with ESO is rotated, you must restart the deployment that uses that particular external secret. Given the inherent risks associated with integrating an external entity or third-party solution into your system, including ESO, it’s crucial to implement a comprehensive threat model similar to the Kubernetes Admission Control Threat Model.
Also, ESO set up is complicated and the controller must be installed on the Kubernetes cluster.
SealedSecrets cannot be reused across namespaces unless they’re re-encrypted or made cluster-wide, which makes it challenging to manage secrets across multiple namespaces consistently. The need to manually rotate and re-encrypt SealedSecrets with new keys can introduce operational overhead, especially in large-scale environments with numerous secrets. The old sealing keys pose a potential risk of misuse by unauthorized users, which increases the risk. To mitigate both risks (high overhead and old secrets), you should implement additional controls such as deleting older keys as part of the key rotation process or periodically rotate sealing keys and make sure that old sealed secret resources are re-encrypted with the new keys. Sealed Secrets doesn’t support external secret stores such as HashiCorp Vault, or cloud provider services such as Secrets Manager, Parameter Store, or Azure Key Vault. Sealed Secrets requires a Kubeseal client-side binary to encrypt secrets. This can be a concern in FSI environments where client-side tools are restricted by security policies.
While ASCP provides seamless integration with Secrets Manager and Parameter Store, teams unfamiliar with these AWS services might need to invest some additional effort to fully realize the benefits. This additional effort is justified by the long-term benefits of centralized secrets management and access control provided by these services. Additionally, relying primarily on AWS services for secrets management can potentially limit flexibility in deploying to alternative cloud providers or on-premises environments in the future. These factors should be carefully evaluated based on the specific needs and constraints of the application and deployment environment.
Conclusion
We have provided a summary of three options for managing secrets in Amazon EKS, ESO, Sealed Secrets, and AWS Secrets and Configuration Provider (ASCP), and the key considerations for FSI customers when choosing between them. The choice depends on several factors including existing investments in secrets management systems, specific security needs and compliance requirements, preference for a Kubernetes native solution or willingness to accept vendor lock-in.
The guidance provided here covers the strengths, limitations, and trade-offs of each option, allowing regulated institutions to make an informed decision based on their unique requirements and constraints. This guidance can be adapted and tailored to fit the specific needs of an organization, providing a secure and efficient secrets management solution for their Amazon EKS workloads, while aligning with the stringent security and compliance standards of the regulated institutions.
If you have feedback about this post, submit comments in the Comments section below. If you have questions about this post, contact AWS Support.
In today’s digital landscape, managing secrets, such as passwords, API keys, tokens, and other credentials, has become a critical task for organizations. For some Amazon Web Services (AWS) customers, centralized management of secrets can be a robust and efficient solution to address this challenge. In this post, we delve into using AWS data protection services such as AWS Secrets Manager and AWS Key Management Service (AWS KMS) to help make secrets management easier in your environment by centrally managing them from a designated AWS account.
Centralized secrets management involves the consolidation of sensitive information into a single, secure repository. This repository acts as a centralized vault where secrets are stored, accessed, and managed with strict security controls. Centralizing secrets can help organizations enforce uniform security policies, streamline access control, and mitigate the risk of unauthorized access or leakage.
This approach offers several key benefits. First, it can enhance security by reducing the threat surface and providing a single point of control for managing access to sensitive information. Additionally, centralized secrets management can facilitate compliance with regulatory requirements by enforcing strict access controls and audit trails.
Furthermore, centralization promotes efficiency and scalability by enabling automated workflows for secret rotation, provisioning, and revocation. This automation reduces administrative tasks and minimizes the risk of human error, enhancing overall operational excellence.
Overview
In this post, we’ll walk you through how to set up a centralized account for managing your secrets and their lifecycle by using AWS Lambda rotation functions. Furthermore, to facilitate efficient access and management across multiple member accounts, we’ll discuss how to establish tunnelling through VPC peering to enable seamless communication between the Centralized Security Account in this architecture and the associated member accounts.
Notably, applications within the member accounts will directly access the secrets stored in the Centralized Security Account through the use of resource policies, streamlining the retrieval process. Additionally, using AWS provided DNS within the Centralized Security Account’s virtual private cloud (VPC) will automate the resolution of database host addresses to their respective control plane IP addresses. This functionality allows AWS Lambda function traffic to efficiently traverse the peering connection, enhancing overall system performance and reliability.
Figure 1 shows the solution architecture. The architecture has four accounts that are managed through AWS Organizations. Out of these four accounts, there are three workload accounts designated as Account A, Account B, and Account C that host the application and database for serving user requests, and a Centralized Security Account from which the secrets will be maintained and managed. VPC 1 from every workload account (Account A, Account B, and Account C) is peered with VPC 1 (part of the Centralized Security Account) to allow communication between workload accounts and the secrets management account. For high availability, secrets are also replicated to a different AWS Region.
Figure 1: Sample solution architecture for centrally managing secrets
Deploy the solution
Follow the steps in this section to deploy the solution.
Step 1: Create secrets, including database secrets, in your Centralized Security Account
First, create the secrets you want to use for this walkthrough. For example, the database secrets will have a following parameters:
Important: Make sure that you do NOT use aws/secretsmanager, because it is an AWS managed key for Secrets Manager and you cannot modify the key policy.
Figure 3: Select the encryption key to encrypt the secret created
AWS Secrets Manager makes it possible for you to replicate secrets across multiple AWS Regions to provide regional access and low-latency requirements. If you turn on rotation for your primary secret, Secrets Manager rotates the secret in the primary Region, and the new secret value propagates to the associated Regions. Rotation of replicated secrets does not have to be individually managed.
Note: When replicating a secret in Secrets Manager, you have the option to choose between using a multi-Region key (MRK) or an independent KMS key in the Region where the secrets are replicated. Your choice depends on your specific requirements such as operational preferences, regulatory compliance, and ease of management.
For Database, select the database from the list of supported database types displayed and provide the host URL in the server address field, the database name, and the port number. Choose Next.
Figure 4: Selecting the database and providing the database details
For Configure secret, provide a secret name (for example, PostgresAppUser) and optionally add a description and tags. The resource permissions required to access the secret from across accounts will be explained later in this post.
(Optional) Under Replicate secret, select other Regions and customer managed KMS keys from respective Regions to replicate this secret for high availability purposes, and then choose Next.
The next screen will ask you to configure automatic rotation, but you can skip this step for now because you will create the rotation Lambda function in Step 2. Choose Next and then Store to finish saving the secret.
Note: Secrets Manager rotation uses a Lambda function to update the secret and the database or service. After the secret is created, you must create a rotation Lambda function separately and attach it to the secret for rotating it. This detailed process is covered in the following steps.
Step 2: Deploy the rotation Lambda function where needed
For secrets that require automatic rotation to be turned on, deploy the rotation Lambda function from the serverless application list.
In the left navigation menu, choose Applications, and then choose Create application.
Choose Serverless Application and then choose the Public Applications tab.
Make sure you have selected the checkbox for Show apps that create custom IAM roles or resource policies.
Figure 5: Create a rotation Lambda function in the centralized security account for secret rotation
In the search field under Serverless application, search for SecretsManager, and the available functions for rotation will be displayed. Choose the Lambda function based on your DB engine type. For example, if the DB engine type is Postgres SQL, select SecretsManagerRDSPostgreSQLRotationSingleUser from the list by choosing the application name.
Figure 6: Choosing the AWS provided PostgreSQL rotation function (optionally you may choose a different rotation Lambda function)
On the next page, under Application settings, provide the requested details for the following settings:
functionName (for example, PostgresDBUserRotationLambda)
endpoint – For the SecretsManagerRDSPostgreSQLRotationSingleUser option, in the endpoint field, add https://secretsmanager.us-east-1.amazonaws.com. (Choose the Secrets Manager service endpoint based on the Region where the rotation Lambda is created.)
kmsKeyArn – Used by the secret for encryption.
vpcSecurityGroupIds Provide the security group ID for the rotation Lambda function. Under the outbound rules tab of the security group attached to the rotation Lambda, add the required rules for the Lambda function to communicate with the Secrets Manager service endpoint and database. Also, make sure that the security groups attached to your database or service allow inbound connections from the Lambda rotation function.
vpcSubnetIds – When you provide vpcSubnetIDs, provide subnets of a VPC from the Centralized Security Account where you are planning to deploy your rotation Lambda functions.
Figure 7: Set up rotation Lambda configuration
Select the checkbox next to I acknowledge that this app creates custom IAM roles and resource policies, and then choose Deploy. This will create the required Lambda function to rotate your secret.
Navigate to the Secrets Manager console and edit the secret to turn on automatic rotation (for instructions, see the Secrets Manager documentation).
Figure 8: Editing the rotation in the Secrets Manager console
Set a rotation schedule according to your organization’s data security strategy.
For Lambda rotation function, select the new Lambda function PostgresDbUserRotationLambda that you created in the previous step to associate it with the secret.
Figure 9: The rotation configuration settings in the Secrets Manager console
Step 3: Set up networking for Lambda to reach the Secrets Manager service endpoint
To provide connectivity to the Lambda function, you can either deploy a VPC endpoint with Private DNS enabled or a NAT gateway.
Deploy a VPC endpoint with Private DNS enabled
To create an Amazon VPC endpoint for AWS Secrets Manager (recommended)
Open the Amazon VPC console, choose Endpoints, and then choose Create endpoint.
For Service category, select AWS services. In the Service Name list, select the Secrets Manager endpoint service named com.amazonaws.<Region>.secretsmanager.
Figure 10: Create a VPC endpoint for Secrets Manager
For VPC, specify the VPC you want to create the endpoint in. This should be the VPC that you selected for hosting centralized secret rotation using the AWS Lambda function.
To create a VPC endpoint, you need to specify the private IP address range in which the endpoint will be accessible. To do this, select the subnet for each Availability Zone (AZ). This restricts the VPC endpoint to the private IP address range specific to each AZ and also creates an AZ-specific VPC endpoint. Specifying more than one subnet-AZ combination helps improve fault tolerance and make the endpoint accessible from a different AZ in case of an AZ failure.
Select the Enable DNS name checkbox for the VPC endpoint. Private DNS resolves the standard Secrets Manager DNS hostname https://secretsmanager.<Region>.amazonaws.com. to the private IP addresses associated with the VPC endpoint specific DNS hostname.
Figure 11: Set up VPC endpoint configurations
Associate a security group with this endpoint (for instructions, see the AWS PrivateLink documentation). The security group enables you to control the traffic to the endpoint from resources in your VPC. The attached security group should accept inbound connections from the Lambda function for rotation on port 443.
Figure 12: Attaching the security group to the VPC endpoint
Create a NAT gateway
Alternatively, you can give your function internet access. Place the function in private subnets and route the outbound traffic to a NAT gateway in a public subnet. The NAT gateway has a public IP address and connects to the internet through the VPC’s internet gateway. To create a NAT gateway, follow the steps described in this AWS re:post article.
Step 4: Deploy VPC peering
Next, deploy VPC peering between the Centralized Security Account and the member accounts that hold the database.
In the left navigation pane, choose Peering connections, and then choose Create peering connection.
Configure the following information, and choose Create peering connection when you are done:
Name – You can optionally name your VPC peering connection, for example central_secret_management_vpc_peer.
VPC ID (Requester) – Select the centralized secret management AWS Lambda VPC in your account with which you want to create the VPC peering connection.
Account – Choose Another account.
Account ID – Enter the ID of the AWS account that owns the database.
Figure 13: Create VPC peering connection
VPC ID (Accepter) – Enter the ID of the database VPC with which to create the VPC peering connection.
Figure 14: Create VPC peering connection – Entering the VPC ID
From the database account, navigate to the Amazon VPC console. Choose Peering connections and then choose Accept request.
Figure 15: Accepting the VPC peering request from the database account (Accounts A, B, and C)
Add a route to the route tables in both VPCs so that you can send and receive traffic across the peering connection. Each table has a local route and a route that sends traffic for the peer VPC to the VPC peering connection.
Figure 16: Sample table to show VPC peering connections between the Centralized Security Account and application/database accounts
Perform the following steps in the Centralized Security Account:
Select the Centralized Security Account Lambda VPC. Under Details, choose Main route table.
Choose Edit routes, and then choose Add routes. Under Destination, add the database VPC CIDR (172.31.0.0/16) in an empty field. Under Target, select the peering connection you created in Step 3.
Perform the following steps in Account 2, where the application/database is hosted:
Select the Centralized Security Account Lambda VPC and then, under Details, choose Main route table.
Choose Edit routes, and then choose Add routes. Under Destination, add the rotation Lambda VPC CIDR (10.0.0.0/16) in an empty field. Under Target, select the peering connection you created in Step 3.
Step 5: Set up resource-based policies on each secret
After the secrets are deployed into the Centralized Security Account, to allow application roles or users in other accounts to access the secrets (known as cross-account access), you must allow access in both a resource policy and in an identity policy. This is different than granting access to identities in the same account rather than the secret.
To set up resource-based policies on each secret
Attach a resource policy to the secret in the Centralized Security Account by using the following steps:
Attach an identity policy to the identity in the accounts where you hosted your applications to provide access to the secret and the KMS key used to encrypt the secret.
The access policies mentioned here are just for the example in this post. In a production environment, only provide the needed granular permissions by exercising least privilege principles.
What challenges does this solution present, and how can you overcome them?
Along with the advantages discussed in this post, there are a few challenges you should anticipate while deploying this solution:
Currently there is a maximum of 20,480 characters allowed in a resource-based permissions policy attached to a secret. For organizations where a large number of external accounts need to be given access to a secret, you will need to keep this quota in mind.
There is also a limit on the total number of active VPC peering connections per VPC. By default, the limit is 50 connections, but this is adjustable up to 125. If you require more connections across VPCs, you can use other solutions, like a transit gateway, as an alternative.
As the number of applications that require access to secrets from the Centralized Security Account increases, the number of external accesses will also increase, and access control might become difficult over time. To reduce the number of external accounts that have access to the Centralized Security Account, you may choose to use AWS IAM Access Analyzer.
Conclusion
In this post, we provided you with a step-by-step solution to establish a Centralized Security Account that uses the AWS Secrets Manager service for securely storing your secrets in a central place. The post outlined the process of deploying AWS Lambda functions to facilitate automatic rotation of necessary secrets. Furthermore, we delved into the implementation of VPC peering to provide uninterrupted connectivity between the rotation function and your databases or applications housed in different AWS accounts, helping to ensure smooth rotation.
Finally, we discussed the essential policies that are needed to enable applications to use these secrets through resource-based policies. This implementation provides a way for you to conveniently monitor and audit your secrets.
If you have feedback about this post, submit comments in the Comments section below. If you have questions about this post, contact AWS Support.
AWS Secrets Manager is a service that helps you manage, retrieve, and rotate database credentials, application credentials, OAuth tokens, API keys, and other secrets throughout their lifecycles. You can use Secrets Manager to replace hard-coded credentials in application source code with a runtime call to the Secrets Manager service to retrieve credentials dynamically when you need them. Storing the credentials in Secrets Manager helps to avoid unintended access by anyone who inspects your application’s source code, configuration, or components.
In this blog post, we introduce a new feature, the Secrets Manager Agent, and walk through how you can use it to retrieve Secretes Manager secrets.
New approach: Secrets Manager Agent
Previously, if you had an application that used Secrets Manager and needed to retrieve secrets, you had to use the AWS SDK or one of our existing caching libraries. Both these options are specific to a certain coding language and allow only limited scope for customization.
The Secrets Manager Agent is a client-side agent that allows you to standardize consumption of secrets from Secrets Manager across your AWS compute environments. (AWS has published the code for the agent as open source code.) Secrets Manager Agent pulls and caches secrets in your compute environment and allows your applications to consume secrets directly from the in-memory cache. The Secrets Manager Agent opens a localhost port inside your application environment. With this port, you fetch the secret value from the local agent instead of making network calls to the service. This allows you to improve the overall availability of your application while reducing your API calls. Because the Secrets Manager Agent is language agnostic, you can install the binary file of the agent on many types of AWS compute environments.
Although you can use this feature to retrieve and cache secrets in your application’s compute environment, the access controls for Secrets Manager secrets remain unchanged. This means that AWS Identity and Access Management (IAM) principals need the same permissions as if they were to retrieve each of the secrets. You will need to provide GetSecretValue and DescribeSecret permissions to the secrets that you want to consume by using the Secrets Manager Agent.
The Secrets Manager Agent offers protection against server-side request forgery (SSRF). When you install the Secrets Manager Agent, the script generates a random SSRF token on startup and stores it in the file /var/run/awssmatoken. The token is readable by the awssmatokenreader group that the install script creates. The Secrets Manager Agent denies requests that don’t have an SSRF token in the header or that have an invalid SSRF token.
After the instance is in running state, type the following command to connect to the EC2 instance, replacing <INSTANCE_ID> with the value you noted earlier:
aws ssm start-session --target <INSTANCE_ID>
Leave the session open, because you will use it in the next step.
Install the Secrets Manager Agent to the EC2 instance
Use the steps in this section to install the Secrets Manager Agent in the EC2 instance. You will run these commands in the EC2 instance you created earlier.
To download the Secrets Manager Agent code
Type the following command to install git in the EC2 instance:
sudo yum install -y git
Type the following command to download the Secrets Manager Agent code:
cd ~;git clone https://github.com/awslabs/aws-secretsmanager-agent
To install the Secrets Manager Agent
Type the following command to install the Secrets Manager Agent:
cd aws-secretsmanager-agent/release
sudo ./install
To grant permission to read the token file
Type the following command to copy the token file and grant permission for the current user (ec2-user) to read it:
Now you can use the local web server to retrieve the agent. Processes running in this EC2 instance can retrieve the secret with a REST API call from the web server.
To retrieve a secret
Retrieving a secret is now possible for the process in this EC2 instance, thanks to the local agent.
In this post, we introduced the Secrets Manager Agent and showed how to install it in an EC2 instance, allowing the retrieval of secrets from Secrets Manager. An application can call this web server to retrieve secrets without using the AWS SDK. See the AWS Secrets Manager Agent documentation to learn more about how you can use this Secrets Manager Agent in other compute environments.
While traditional channels like email and SMS remain important, businesses are increasingly exploring alternative messaging services to reach their customers more effectively. In recent years, WhatsApp has emerged as a simple and effective way to engage with users. According to statista, as of 2024, WhatsApp is the most popular mobile messenger app worldwide and has reached over two billion monthly active users in January 2024.
Amazon Cognito lets you add user sign-up and authentication to your mobile and web applications. Among many other features, Cognito provides a custom SMS sender AWS Lambda trigger for using third-party providers to send notifications. In this post, we’ll be using WhatsApp as the third-party provider to send verification codes or multi-factor authentication (MFA) codes instead of SMS during Cognito user pool sign up.
Note: WhatsApp is a third-party service subject to additional terms and charges. Amazon Web Services (AWS) isn’t responsible for third-party services that you use to send messages with a custom SMS sender in Amazon Cognito.
Overview
By default, Amazon Cognito uses Amazon Simple Notification Service (Amazon SNS) for delivery of SMS text messages. Cognito also supports custom triggers that will allow you to invoke an AWS Lambda function to support additional providers such as WhatsApp.
The architecture shown in Figure 1 depicts how to use a custom SMS sender trigger and WhatsApp to send notifications. The steps are as follows:
A user signs up to an Amazon Cognito user pool.
Cognito invokes the custom SMS sender Lambda function and sends the user’s attributes, including the phone number and a one-time code to the Lambda function. This one-time code is encrypted using a custom symmetric encryption AWS Key Management Service (AWS KMS) key that you create.
The Lambda function decrypts the one-time code using a Decrypt API call to your AWS KMS key.
The Lambda function then obtains the WhatsApp access token from AWS Secrets Manager. The WhatsApp access token needs to be generated through Meta Business Settings (which are covered in the next section) and added to Secrets Manager. Lambda also parses the phone number, user attributes, and encrypted secrets.
Lambda sends a POST API call to the WhatsApp API and WhatsApp delivers the verification code to the user as a message. The user can then use the verification code to verify their contact information and confirm the sign-up.
Figure 1: Custom SMS sender trigger flow
Prerequisites
Create an AWS account if you don’t already have one and sign in. The AWS Identity and Access Management (IAM) role that you use must have sufficient permissions to make the necessary AWS service calls and manage AWS resources such as creating and updating Lambda functions, Amazon Cognito user pools, Secrets Manager, AWS KMS keys, and IAM roles.
In the next steps, we look at how to create a Meta app, create a new system user, get the WhatsApp access token and create the template to send the WhatsApp token.
Create and configure an app for WhatsApp communication
To get started, create a Meta app with WhatsApp added to it, along with the customer phone number that will be used to test.
To create and configure an app
Open the Meta for Developers console, choose My Apps and then choose Create App (or choose an existing Business type app and skip to step 4).
Select Other choose Next and then select Business as the app type and choose Next.
Enter an App name, App contact email, choose whether or not to attach a Business portfolio and choose Create app.
Open the app Dashboard and in the Add product to your app section, under WhatsApp, choose Set up.
Create or select an existing Meta business portfolio and choose Continue.
In the left navigation pane, under WhatsApp,choose API Setup.
Under Send and receive messages, take a note of the Phone number ID, which will be needed in the AWS CDK template later.
Under To, add the customer phone number you want to use for testing. Follow the instructions to add and verify the phone number.
Note: You must have WhatsApp registered with the number and the WhatsApp client installed on your mobile device.
Create a user for accessing WhatsApp
Create a system user in Meta’s Business Manager and assign it to the app created in the previous step. The access tokens generated for this user will be used to make the WhatsApp API calls.
To create a user
Open Meta’s Business Manager and select the business you created or associated your application with earlier from the dropdown menu under Business settings.
Under Users, select System users and then choose Add to create a new system user.
Enter a name for the System Username and set their role as Admin and choose Create system user.
Choose Assign assets.
From the Select asset type list, select Apps. Under Select assets, select your WhatsApp application’s name. Under Partial access, turn on the Test app option for the user. Choose Save Changes and then choose Done.
Choose Generate New Token, select the WhatsApp application created earlier, and leave the default 60 days as the token expiration. Under Permissions select WhatsApp_business_messaging and WhatsApp_business_management and choose Generate Token at the bottom.
Use the Secrets Manager console to create a Secrets Manager secret and set the secret to the WhatsApp access token.
To create a secret
Open the AWS Management Console and go to Secrets Manager.
Figure 2: Open the Secrets Manager console
Choose Store a new secret.
Figure 3: Store a new secret
Under Choose a secret type, choose Other type of secret and under Key/value pairs, select the Plaintext tab and enter Bearer followed by the WhatsApp access token (Bearer<WhatsApp access token>).
Figure 4: Add the secret
For the encryption key, you can use either the AWS KMS key that Secrets Manager creates or a customer managed AWS KMS key that you create and then choose Next.
Provide the secret name as the WhatsAppAccessToken, choose Next, and then choose Store to create the secret.
Note the secret Amazon Resource Name (ARN) to use in later steps.
Deploy the solution
In this section, you clone the GitHub repository and deploy the stack to create the resources in your account.
To clone the repository
Create a new directory, navigate to that directory in a terminal and use the following command to clone the GitHub repository that has the Lambda and AWS CDK code:
Open the lib/constants.ts file and edit the fields. The SELF_SIGNUP value must be set to true for the purpose of this proof of concept. The SELF_SIGNUP value represents the Boolean value for the Amazon Cognito user pool sign-up option, which when set to true allows public users to sign up.
Warning: If you activate user sign-up (enable self-registration) in your user pool, anyone on the internet can sign up for an account and sign in to your applications.
Install the AWS CDK required dependencies by running the following command:
npm install
This project uses typescript as the client language for AWS CDK. Run the following command to compile typescript to JavaScript:
npm run build
From the command line, configure AWS CDK (if you have not already done so):
cdk bootstrap <account number>/<AWS Region>
Install and run Docker. We’re using the aws-lambda-python-alpha package in the AWS CDK code to build the Lambda deployment package. The deployment package installs the required modules in a Lambda compatible Docker container.
Deploy the stack:
cdk synth
cdk deploy --all
Test the solution
Now that you’ve completed implementation, it’s time to test the solution by signing up a user on Amazon Cognito and confirming that the Lambda function is invoked and sends the verification code.
Select the WhatsappOtpStack that was deployed through AWS CDK.
On the Outputs tab, copy the value of cognitocustomotpsenderclientappid.
Run the following AWS Command Line Interface (AWS CLI) command, replacing the client ID with the output of cognitocustomotpsenderclientappid, username, password, email address, name, phone number, and AWS Region to sign up a new Amazon Cognito user.
Note: Password requirements are a minimum length of eight characters with at least one number, one lowercase letter, and one special character.
The new user should receive a message on WhatsApp with a verification code that they can use to complete their sign-up.
Cleanup
Run the following command to delete the resources that were created. It might take a few minutes for the CloudFormation stack to be deleted.
cdk destroy --all
Delete the secret WhatsAppAccessToken that was created from the Secrets Manager console.
Conclusion
In this post, we showed you how to use an alternative messaging platform such as WhatsApp to send notification messages from Amazon Cognito. This functionality is enabled through the Amazon Cognito custom SMS sender trigger, which invokes a Lambda function that has the custom code to send messages through the WhatsApp API. You can use the same method to use other third-party providers to send messages.
If you have feedback about this post, submit comments in the Comments section below. If you have questions about this post, start a new thread on the Amazon Cognito re:Post or contact AWS Support.
seThis post is written by Eder de Mattos, Sr. Cloud Security Consultant, AWS and Fernando Galves, Outpost Solutions Architect, AWS.
In this post, you will learn how to deploy an Amazon EMR cluster on AWS Outposts and use it to process data from an on-premises database. Many organizations have regulatory, contractual, or corporate policy requirements to process and store data in a specific geographical location. These strict requirements become a challenge for organizations to find flexible solutions that balance regulatory compliance with the agility of cloud services. Amazon EMR is the industry-leading cloud big data platform for data processing, interactive analysis, and machine learning (ML) that uses open-source frameworks. With Amazon EMR on Outposts, you can seamlessly use data analytics solutions to process data locally in your on-premises environment without moving data to the cloud. This post focuses on creating and configuring an Amazon EMR cluster on AWS Outposts rack using Amazon Virtual Private Cloud (Amazon VPC) endpoints and keeping the networking traffic in the on-premises environment.
Architecture overview
In this architecture, there is an Amazon EMR cluster created in an AWS Outposts subnet. The cluster retrieves data from an on-premises PostgreSQL database, employs a PySpark Step for data processing, and then stores the result in a new table within the same database. The following diagram shows this architecture.
Figure 1 Architecture overview
Networking traffic on premises: The communication between the EMR cluster and the on-premises PostgreSQL database is through the Local Gateway. The core Amazon Elastic Compute Cloud (Amazon EC2) instances of the EMR cluster are associated with Customer-owned IP addresses (CoIP), and each instance has two IP addresses: an internal IP and a CoIP IP. The internal IP is used to communicate locally in the subnet, and the CoIP IP is used to communicate with the on-premises network.
Amazon VPC endpoints: Amazon EMR establishes communication with the VPC through an interface VPC endpoint. This communication is private and conducted entirely within the AWS network instead of connecting over the internet. In this architecture, VPC endpoints are created on a subnet in the AWS Region.
The support files used to create the EMR cluster are stored in an Amazon Simple Storage Service (Amazon S3) bucket. The communication between the VPC and Amazon S3 stays within the AWS network. The following files are stored in this S3 bucket:
get-postgresql-driver.sh: This is a bootstrap script to download the PostgreSQL driver to allow the Spark step to communicate to the PostgreSQL database through JDBC. You can download it through the GitHub repository for this Amazon EMR on Outposts blog post.
postgresql-42.6.0.jar: PostgreSQL binary JAR file for the JDBC driver.
spark-step-example.py: Example of a Step application in PySpark to simulate the connection to the PostgreSQL database.
AWS Systems Manager is configured to manage the EC2 instances that belong to the EMR cluster. It uses an interface VPC endpoint to allow the VPC to communicate privately with the Systems Manager.
The database credentials to connect to the PostgreSQL database are stored in AWS Secrets Manager. Amazon EMR integrates with Secrets Manager. This allows the secret to be stored in the Secrets Manager and be used through its ARN in the cluster configuration. During the creation of the EMR cluster, the secret is accessed privately through an interface VPC endpoint and stored in the variable DBCONNECTION in the EMR cluster.
In this solution, we are creating a small EMR cluster with one primary and one core node. For the correct sizing of your cluster, see Estimating Amazon EMR cluster capacity.
Under EMR on EC2, in the left navigation pane, select Clusters, and then choose Create Cluster.
On the Create cluster page, enter a unique cluster name for the Name
For Amazon EMR release, choose emr-6.13.0.
In the Application bundle field, select Spark 3.4.1and Zeppelin 0.10.1, and unselect all the other options.
For the Operating system options, select Amazon Linux release.
Figure 2: Create Cluster
Step 2: Choose Cluster configuration method
Under the Cluster configuration, select Uniform instance groups.
For the Primary and the Core, select the EC2 instance type available in the Outposts rack that is supported by the EMR cluster.
Remove the instance group Task 1 of 1.
Figure 3: Remove the instance group Task 1 of 1
Step 3: Set up Cluster scaling and provisioning, Networking and Cluster termination
In the Cluster scaling and provisioning option, choose Set cluster size manually and type the value 1 for the Core
On the Networking, select the VPC and the Outposts subnet.
For Cluster termination, choose Manually terminate cluster.
Step 4: Configure the Bootstrap actions
A. In the Bootstrap actions, add an action with the following information:
Name: copy-postgresql-driver.sh
Script location: s3://<bucket-name>/copy-postgresql-driver.sh. Modify the <bucket-name> variable to the bucket name you specified as a parameter in Step 1.
Figure 4: Add bootstrap action
Step 5: Configure Cluster logs and Tags
a. Under Cluster logs, choose Publish cluster-specific logs to Amazon S3 and enter s3://<bucket-name>/logs for the field Amazon S3 location. Modify the <bucket-name> variable to the bucket name you specified as a parameter in Step 1.
Figure 5: Amazon S3 location for cluster logs
b. In Tags, add new tag. You must enter for-use-with-amazon-emr-managed-policies for the Key field and true for Value.
Figure 6: Add tags
Step 6: Set up Software settings and Security configuration and EC2 key pair
a. In the Software settings, enter the following configuration replacing the Secret ARN created in Step 1:
b. For the Security configuration and EC2 key pair, choose the SSH key pair.
Step 7: Choose Identity and Access Management (IAM) roles
a. Under Identity and Access Management (IAM) roles:
In the Amazon EMR service role:
Choose AmazonEMR-outposts-cluster-role for the Service role.
In EC2 instance profile for Amazon EMR
Choose AmazonEMR-outposts-EC2-role.
Figure 8: Choose the service role and instance profile
Step 8: Create cluster
Choose Create cluster to launch the cluster and open the cluster details page.
Now, the EMR cluster is starting. When your cluster is ready to process tasks, its status changes to Waiting. This means the cluster is up, running, and ready to accept work.
Figure 9: Result of the cluster creation
3. Add CoIPs to EMR core nodes
You need to allocate an Elastic IP from the CoIP pool and associate it with the EC2 instance of the EMR core nodes. This is necessary to allow the core nodes to access the on-premises environment. To allocate an Elastic IP, follow the instructions in Allocate an Elastic IP address in Amazon EC2 User Guide for Linux Instances. In Step 5, choose the Customer-owned pool of IPV4 addresses.
Make sure the EC2 instance of the core nodes can ping the IP of the PostgreSQL database.
Connect to the Core node EC2 instance using Systems Manager and ping the IP address of the PostgreSQL database.
Figure 10: Connectivity test
Make sure the Status of the EMR cluster is Waiting.
Figure 11: Cluster is ready and waiting
Adding a step to the Amazon EMR cluster
You can use the following Spark application to simulate the data processing from the PostgreSQL database.
spark-step-example.py:
import os
from pyspark.sql import SparkSession

if __name__ == "__main__":

    # ---------------------------------------------------------------------
    # Step 1: Get the database connection information from the EMR cluster
    #         configuration
    dbconnection = os.environ.get('DBCONNECTION')
    #    Remove brackets
    dbconnection_info = (dbconnection[1:-1]).split(",")
    #    Initialize variables
    dbusername = ''
    dbpassword = ''
    dbhost = ''
    dbport = ''
    dbname = ''
    dburl = ''
    #    Parse the database connection information
    for dbconnection_attribute in dbconnection_info:
        (key_data, key_value) = dbconnection_attribute.split(":", 1)

        if key_data == "username":
            dbusername = key_value
        elif key_data == "password":
            dbpassword = key_value
        elif key_data == 'host':
            dbhost = key_value
        elif key_data == 'port':
            dbport = key_value
        elif key_data == 'dbname':
            dbname = key_value

    dburl = "jdbc:postgresql://" + dbhost + ":" + dbport + "/" + dbname

    # ---------------------------------------------------------------------
    # Step 2: Connect to the PostgreSQL database and select data from the
    #         pg_catalog.pg_tables table
    spark_db = SparkSession.builder.config("spark.driver.extraClassPath",
               "/opt/spark/postgresql/driver/postgresql-42.6.0.jar") \
               .appName("Connecting to PostgreSQL") \
               .getOrCreate()

    #    Connect to the database
    data_db = spark_db.read.format("jdbc") \
        .option("url", dburl) \
        .option("driver", "org.postgresql.Driver") \
        .option("query", "select count(*) from pg_catalog.pg_tables") \
        .option("user", dbusername) \
        .option("password", dbpassword) \
        .load()

    # ---------------------------------------------------------------------
    # Step 3: To do the data processing
    #
    #    TO-DO

    # ---------------------------------------------------------------------
    # Step 4: Save the data into the new table in the PostgreSQL database
    #
    data_db.write \
        .format("jdbc") \
        .option("url", dburl) \
        .option("dbtable", "results_proc") \
        .option("user", dbusername) \
        .option("password", dbpassword) \
        .save()

    # ---------------------------------------------------------------------
    # Step 5: Close the Spark session
    #
    spark_db.stop()
    # ---------------------------------------------------------------------
You must upload the file spark-step-example.py to the bucket created in Step 1 of this post before submitting the Spark application to the EMR cluster. You can get the file at this GitHub repository for a Spark step example.
Submitting the Spark application step using the Console
for the Application location, choose s3://<bucket-name>/spark-step-example.py and replace the <bucket-name> variable to the bucket name you specified as a parameter in Step 1
leave the Spark-submit options field blank
Figure 12: Add a step to the EMR cluster
The Step is created with the Status Pending. When it is done, the Status changes to Completed.
Figure 13: Step executed successfully
Cleaning up
When the EMR cluster is no longer needed, you can delete the resources created to avoid incurring future costs by following these steps:
Amazon EMR on Outposts allows you to use the managed services offered by AWS to perform big data processing close to your data that needs to remain on-premises. This architecture eliminates the need to transfer on-premises data to the cloud, providing a robust solution for organizations with regulatory, contractual, or corporate policy requirements to store and process data in a specific location. With the EMR cluster accessing the on-premises database directly through local networking, you can expect faster and more efficient data processing without compromising on compliance or agility. To learn more, visit the Amazon EMR on AWS Outposts product overview page.
In this blog post, we delve into using Amazon Web Services (AWS) data protection services such as Amazon Secrets Manager,AWS Key Management Service (AWS KMS), and AWS Certificate Manager (ACM) to help fortify both the security of the pipeline and security in the pipeline. We explore how these services contribute to the overall security of the DevOps pipeline infrastructure while enabling seamless integration of data protection measures. We also provide practical insights by demonstrating the implementation of these services within a DevOps pipeline for a three-tier WordPress web application deployed using Amazon Elastic Kubernetes Service (Amazon EKS).
DevOps pipelines involve the continuous integration, delivery, and deployment of cloud infrastructure and applications, which can store and process sensitive data. The increasing adoption of DevOps pipelines for cloud infrastructure and application deployments has made the protection of sensitive data a critical priority for organizations.
Some examples of the types of sensitive data that must be protected in DevOps pipelines are:
Credentials: Usernames and passwords used to access cloud resources, databases, and applications.
Configuration files: Files that contain settings and configuration data for applications, databases, and other systems.
Certificates: TLS certificates used to encrypt communication between systems.
Secrets: Any other sensitive data used to access or authenticate with cloud resources, such as private keys, security tokens, or passwords for third-party services.
Unintended access or data disclosure can have serious consequences such as loss of productivity, legal liabilities, financial losses, and reputational damage. It’s crucial to prioritize data protection to help mitigate these risks effectively.
The concept of security of the pipeline encompasses implementing security measures to protect the entire DevOps pipeline—the infrastructure, tools, and processes—from potential security issues. While the concept of security in the pipeline focuses on incorporating security practices and controls directly into the development and deployment processes within the pipeline.
By using Secrets Manager, AWS KMS, and ACM, you can strengthen the security of your DevOps pipelines, safeguard sensitive data, and facilitate secure and compliant application deployments. Our goal is to equip you with the knowledge and tools to establish a secure DevOps environment, providing the integrity of your pipeline infrastructure and protecting your organization’s sensitive data throughout the software delivery process.
Sample application architecture overview
WordPress was chosen as the use case for this DevOps pipeline implementation due to its popularity, open source nature, containerization support, and integration with AWS services. The sample architecture for the WordPress application in the AWS cloud uses the following services:
Amazon Route 53: A DNS web service that routes traffic to the correct AWS resource.
Amazon CloudFront: A global content delivery network (CDN) service that securely delivers data and videos to users with low latency and high transfer speeds.
AWS WAF: A web application firewall that protects web applications from common web exploits.
AWS Key Management Service (AWS KMS): A key management service that allows you to create and manage the encryption keys used to protect your data at rest.
AWS Secrets Manager: A service that provides the ability to rotate, manage, and retrieve database credentials.
AWS CodePipeline: A fully managed continuous delivery service that helps to automate release pipelines for fast and reliable application and infrastructure updates.
AWS CodeBuild: A fully managed continuous integration service that compiles source code, runs tests, and produces ready-to-deploy software packages.
AWS CodeCommit: A secure, highly scalable, fully managed source-control service that hosts private Git repositories.
Before we explore the specifics of the sample application architecture in Figure 1, it’s important to clarify a few aspects of the diagram. While it displays only a single Availability Zone (AZ), please note that the application and infrastructure can be developed to be highly available across multiple AZs to improve fault tolerance. This means that even if one AZ is unavailable, the application remains operational in other AZs, providing uninterrupted service to users.
Figure 1: Sample application architecture
The flow of the data protection services in the post and depicted in Figure 1 can be summarized as follows:
First, we discuss securing your pipeline. You can use Secrets Manager to securely store sensitive information such as Amazon RDS credentials. We show you how to retrieve these secrets from Secrets Manager in your DevOps pipeline to access the database. By using Secrets Manager, you can protect critical credentials and help prevent unauthorized access, strengthening the security of your pipeline.
Next, we cover data encryption. With AWS KMS, you can encrypt sensitive data at rest. We explain how to encrypt data stored in Amazon RDS using AWS KMS encryption, making sure that it remains secure and protected from unauthorized access. By implementing KMS encryption, you add an extra layer of protection to your data and bolster the overall security of your pipeline.
Lastly, we discuss securing connections (data in transit) in your WordPress application. ACM is used to manage SSL/TLS certificates. We show you how to provision and manage SSL/TLS certificates using ACM and configure your Amazon EKS cluster to use these certificates for secure communication between users and the WordPress application. By using ACM, you can establish secure communication channels, providing data privacy and enhancing the security of your pipeline.
Note: The code samples in this post are only to demonstrate the key concepts. The actual code can be found on GitHub.
Securing sensitive data with Secrets Manager
In this sample application architecture, Secrets Manager is used to store and manage sensitive data. The AWS CloudFormation template provided sets up an Amazon RDS for MySQL instance and securely sets the master user password by retrieving it from Secrets Manager using KMS encryption.
Here’s how Secrets Manager is implemented in this sample application architecture:
Creating a Secrets Manager secret.
Create a Secrets Manager secret that includes the Amazon RDS database credentials using CloudFormation.
The secret is encrypted using an AWS KMS customer managed key.
The ManageMasterUserPassword: true line in the CloudFormation template indicates that the stack will manage the master user password for the Amazon RDS instance. To securely retrieve the password for the master user, the CloudFormation template uses the MasterUserSecret parameter, which retrieves the password from Secrets Manager. The KmsKeyId: !Ref RDSMySqlSecretEncryption line specifies the KMS key ID that will be used to encrypt the secret in Secrets Manager.
By setting the MasterUserSecret parameter to retrieve the password from Secrets Manager, the CloudFormation stack can securely retrieve and set the master user password for the Amazon RDS MySQL instance without exposing it in plain text. Additionally, specifying the KMS key ID for encryption adds another layer of security to the secret stored in Secrets Manager.
Retrieving secrets from Secrets Manager.
The secrets store CSI driver is a Kubernetes-native driver that provides a common interface for Secrets Store integration with Amazon EKS. The secrets-store-csi-driver-provider-aws is a specific provider that provides integration with the Secrets Manager.
To set up Amazon EKS, the first step is to create a SecretProviderClass, which specifies the secret ID of the Amazon RDS database. This SecretProviderClass is then used in the Kubernetes deployment object to deploy the WordPress application and dynamically retrieve the secrets from the secret manager during deployment. This process is entirely dynamic and verifies that no secrets are recorded anywhere. The SecretProviderClass is created on a specific app namespace, such as the wp namespace.
When using Secrets manager, be aware of the following best practices for managing and securing Secrets Manager secrets:
Use AWS Identity and Access Management (IAM) identity policies to define who can perform specific actions on Secrets Manager secrets, such as reading, writing, or deleting them.
Secrets Manager resource policies can be used to manage access to secrets at a more granular level. This includes defining who has access to specific secrets based on attributes such as IP address, time of day, or authentication status.
Encrypt the Secrets Manager secret using an AWS KMS key.
Using CloudFormation templates to automate the creation and management of Secrets Manager secrets including rotation.
Use AWS CloudTrail to monitor access and changes to Secrets Manager secrets.
Use CloudFormation hooks to validate the Secrets Manager secret before and after deployment. If the secret fails validation, the deployment is rolled back.
Encrypting data with AWS KMS
Data encryption involves converting sensitive information into a coded form that can only be accessed with the appropriate decryption key. By implementing encryption measures throughout your pipeline, you make sure that even if unauthorized individuals gain access to the data, they won’t be able to understand its contents.
Here’s how data at rest encryption using AWS KMS is implemented in this sample application architecture:
Amazon RDS secret encryption
Encrypting secrets: An AWS KMS customer managed key is used to encrypt the secrets stored in Secrets Manager to ensure their confidentiality during the DevOps build process.
Enable encryption for an Amazon RDS instance using CloudFormation. Specify the KMS key ARN in the CloudFormation stack and RDS will use the specified KMS key to encrypt data at rest.
Sample code:
RDSMySQL:
Type: AWS::RDS::DBInstanceProperties:
KmsKeyId: !Ref RDSMySqlDataEncryptionStorageEncrypted: trueRDSMySqlDataEncryption:Type: "AWS::KMS::Key"Properties:KeyPolicy:Id: rds-mysql-data-encryptionStatement:- Sid: Allow administration of the keyEffect: Allow"Action": ["kms:Create*","kms:Describe*","kms:Enable*","kms:List*","kms:Put*",...]- Sid: Allow use of the keyEffect: Allow"Action": ["kms:Decrypt","kms:GenerateDataKey","kms:DescribeKey"]
Kubernetes Pods storage
Use encrypted Amazon Elastic Block Store (Amazon EBS) volumes to store configuration data. Create a managed encrypted Amazon EBS volume using the following code snippet, and then deploy a Kubernetes pod with the persistent volume claim (PVC) mounted as a volume.
Create a KMS key for Amazon ECR and use that key to encrypt the data at rest.
Automate the creation of encrypted ECR repositories and enable encryption at rest using a DevOps pipeline, use CodePipeline to automate the deployment of the CloudFormation stack.
Define the creation of encrypted Amazon ECR repositories as part of the pipeline.
AWS best practices for managing encryption keys in an AWS environment
To effectively manage encryption keys and verify the security of data at rest in an AWS environment, we recommend the following best practices:
Use separate AWS KMS customer managed KMS keys for data classifications to provide better control and management of keys.
Enforce separation of duties by assigning different roles and responsibilities for key management tasks, such as creating and rotating keys, setting key policies, or granting permissions. By segregating key management duties, you can reduce the risk of accidental or intentional key compromise and improve overall security.
Use CloudTrail to monitor AWS KMS API activity and detect potential security incidents.
Rotate KMS keys as required by your regulatory requirements.
Use CloudFormation hooks to validate KMS key policies to verify that they align with organizational and regulatory requirements.
Following these best practices and implementing encryption at rest for different services such as Amazon RDS, Kubernetes Pods storage, and Amazon ECR, will help ensure that data is encrypted at rest.
Securing communication with ACM
Secure communication is a critical requirement for modern environments and implementing it in a DevOps pipeline is crucial for verifying that the infrastructure is secure, consistent, and repeatable across different environments. In this WordPress application running on Amazon EKS, ACM is used to secure communication end-to-end. Here’s how to achieve this:
Provision TLS certificates with ACM using a DevOps pipeline
To provision TLS certificates with ACM in a DevOps pipeline, automate the creation and deployment of TLS certificates using ACM. Use AWS CloudFormation templates to create the certificates and deploy them as part of infrastructure as code. This verifies that the certificates are created and deployed consistently and securely across multiple environments.
Provisioning of ALB and integration of TLS certificate using AWS ALB Ingress Controller for Kubernetes
Use a DevOps pipeline to create and configure the TLS certificates and ALB. This verifies that the infrastructure is created consistently and securely across multiple environments.
To secure communication between CloudFront and the ALB, verify that the traffic from the client to CloudFront and from CloudFront to the ALB is encrypted using the TLS certificate.
To secure communication between the ALB and the Kubernetes Pods, use the Kubernetes ingress resource to terminate SSL/TLS connections at the ALB. The ALB sends the PROTO metadata http connection header to the WordPress web server. The web server checks the incoming traffic type (http or https) and enables the HTTPS connection only hereafter. This verifies that pod responses are sent back to ALB only over HTTPS.
Additionally, using the X-Forwarded-Proto header can help pass the original protocol information and help avoid issues with the $_SERVER[‘HTTPS’] variable in WordPress.
To secure communication between the Kubernetes Pods in Amazon EKS and the Amazon RDS database, use SSL/TLS encryption on the database connection.
Configure an Amazon RDS MySQL instance with enhanced security settings to verify that only TLS-encrypted connections are allowed to the database. This is achieved by creating a DB parameter group with a parameter called require_secure_transport set to ‘1‘. The WordPress configuration file is also updated to enable SSL/TLS communication with the MySQL database. Then enable the TLS flag on the MySQL client and the Amazon RDS public certificate is passed to ensure that the connection is encrypted using the TLS_AES_256_GCM_SHA384 protocol. The sample code that follows focuses on enhancing the security of the RDS MySQL instance by enforcing encrypted connections and configuring WordPress to use SSL/TLS for communication with the database.
Sample code:
RDSDBParameterGroup:
Type: 'AWS::RDS::DBParameterGroup'Properties:
DBParameterGroupName: 'rds-tls-custom-mysql'Parameters:
require_secure_transport: '1'RDSMySQL:
Type: AWS::RDS::DBInstanceProperties:
DBName: 'wordpress'DBParameterGroupName: !Ref RDSDBParameterGroupwp-config-docker.php:
// Enable SSL/TLS between WordPress and MYSQL databasedefine('MYSQL_CLIENT_FLAGS', MYSQLI_CLIENT_SSL);//This activates SSL modedefine('MYSQL_SSL_CA', '/usr/src/wordpress/amazon-global-bundle-rds.pem');
In this architecture, AWS WAF is enabled at CloudFront to protect the WordPress application from common web exploits. AWS WAF for CloudFront is recommended and use AWS managed WAF rules to verify that web applications are protected from common and the latest threats.
Here are some AWS best practices for securing communication with ACM:
Use SSL/TLS certificates: Encrypt data in transit between clients and servers. ACM makes it simple to create, manage, and deploy SSL/TLS certificates across your infrastructure.
Use ACM-issued certificates: This verifies that your certificates are trusted by major browsers and that they are regularly renewed and replaced as needed.
Implement certificate revocation: Implement certificate revocation for SSL/TLS certificates that have been compromised or are no longer in use.
Implement strict transport security (HSTS): This helps protect against protocol downgrade attacks and verifies that SSL/TLS is used consistently across sessions.
Configure proper cipher suites: Configure your SSL/TLS connections to use only the strongest and most secure cipher suites.
Monitoring and auditing with CloudTrail
In this section, we discuss the significance of monitoring and auditing actions in your AWS account using CloudTrail. CloudTrail is a logging and tracking service that records the API activity in your AWS account, which is crucial for troubleshooting, compliance, and security purposes. Enabling CloudTrail in your AWS account and securely storing the logs in a durable location such as Amazon Simple Storage Service (Amazon S3) with encryption is highly recommended to help prevent unauthorized access. Monitoring and analyzing CloudTrail logs in real-time using CloudWatch Logs can help you quickly detect and respond to security incidents.
In a DevOps pipeline, you can use infrastructure-as-code tools such as CloudFormation, CodePipeline, and CodeBuild to create and manage CloudTrail consistently across different environments. You can create a CloudFormation stack with the CloudTrail configuration and use CodePipeline and CodeBuild to build and deploy the stack to different environments. CloudFormation hooks can validate the CloudTrail configuration to verify it aligns with your security requirements and policies.
It’s worth noting that the aspects discussed in the preceding paragraph might not apply if you’re using AWS Organizations and the CloudTrail Organization Trail feature. When using those services, the management of CloudTrail configurations across multiple accounts and environments is streamlined. This centralized approach simplifies the process of enforcing security policies and standards uniformly throughout the organization.
By following these best practices, you can effectively audit actions in your AWS environment, troubleshoot issues, and detect and respond to security incidents proactively.
Complete code for sample architecture for deployment
The complete code repository for the sample WordPress application architecture demonstrates how to implement data protection in a DevOps pipeline using various AWS services. The repository includes both infrastructure code and application code that covers all aspects of the sample architecture and implementation steps.
The infrastructure code consists of a set of CloudFormation templates that define the resources required to deploy the WordPress application in an AWS environment. This includes the Amazon Virtual Private Cloud (Amazon VPC), subnets, security groups, Amazon EKS cluster, Amazon RDS instance, AWS KMS key, and Secrets Manager secret. It also defines the necessary security configurations such as encryption at rest for the RDS instance and encryption in transit for the EKS cluster.
The application code is a sample WordPress application that is containerized using Docker and deployed to the Amazon EKS cluster. It shows how to use the Application Load Balancer (ALB) to route traffic to the appropriate container in the EKS cluster, and how to use the Amazon RDS instance to store the application data. The code also demonstrates how to use AWS KMS to encrypt and decrypt data in the application, and how to use Secrets Manager to store and retrieve secrets. Additionally, the code showcases the use of ACM to provision SSL/TLS certificates for secure communication between the CloudFront and the ALB, thereby ensuring data in transit is encrypted, which is critical for data protection in a DevOps pipeline.
Conclusion
Strengthening the security and compliance of your application in the cloud environment requires automating data protection measures in your DevOps pipeline. This involves using AWS services such as Secrets Manager, AWS KMS, ACM, and AWS CloudFormation, along with following best practices.
By automating data protection mechanisms with AWS CloudFormation, you can efficiently create a secure pipeline that is reproducible, controlled, and audited. This helps maintain a consistent and reliable infrastructure.
Monitoring and auditing your DevOps pipeline with AWS CloudTrail is crucial for maintaining compliance and security. It allows you to track and analyze API activity, detect any potential security incidents, and respond promptly.
By implementing these best practices and using data protection mechanisms, you can establish a secure pipeline in the AWS cloud environment. This enhances the overall security and compliance of your application, providing a reliable and protected environment for your deployments.
If you have feedback about this post, submit comments in the Comments section below. If you have questions about this post, contact AWS Support.
Want more AWS Security news? Follow us on Twitter.
It’s common to manage numerous workloads in an EKS cluster, each necessitating access to a distinct set of secrets. You can verify adherence to the principle of least privilege by creating separate permission policies for each workload to restrict their access. To scale and reduce overhead, Amazon Web Services (AWS) recommends using ABAC to manage workloads’ access to secrets. ABAC helps reduce the number of permission policies needed to scale with your environment.
What is ABAC?
In IAM, a traditional authorization approach is known as role-based access control (RBAC). RBAC sets permissions based on a person’s job function, commonly known as IAM roles. To enforce RBAC in IAM, distinct policies for various job roles are created. As a best practice, only the minimum permissions required for a specific role are granted (principle of least privilege), which is achieved by specifying the resources that the role can access. A limitation of the RBAC model is its lack of flexibility. Whenever new resources are introduced, you must modify policies to permit access to the newly added resources.
Attribute-based access control (ABAC) is an approach to authorization that assigns permissions in accordance with attributes, which in the context of AWS are referred to as tags. You create and add tags to your IAM resources. You then create and configure ABAC policies to permit operations requested by a principal when there’s a match between the tags of the principal and the resource. When a principal uses temporary credentials to make a request, its associated tags come from session tags, incoming transitive sessions tags, and IAM tags. The principal’s IAM tags are persistent, but session tags, and incoming transitive session tags are temporary and set when the principal assumes an IAM role. Note that AWS tags are attached to AWS resources, whereas session tags are only valid for the current session and expire with the session.
How External Secrets Operator works
External Secrets Operator (ESO) is a Kubernetes operator that integrates external secret management systems including Secrets Manager with Kubernetes. ESO provides Kubernetes custom resources to extend Kubernetes and integrate it with Secrets Manager. It fetches secrets and makes them available to other Kubernetes resources by creating Kubernetes Secrets. At a basic level, you need to create an ESO SecretStore resource and one or more ESO ExternalSecret resources. The SecretStore resource specifies how to access the external secret management system (Secrets Manager) and allows you to define ABAC related properties (for example, session tags and transitive tags).
You declare what data (secret) to fetch and how the data should be transformed and saved as a Kubernetes Secret in the ExternalSecret resource. The following figure shows an overview of the process for creating Kubernetes Secrets. Later in this post, we review the steps in more detail.
Figure 1: ESO process
How to use ESO for ABAC
Before creating any ESO resources, you must make sure that the operator has sufficient permissions to access Secrets Manager. ESO offers multiple ways to authenticate to AWS. For the purpose of this solution, you will use the controller’s pod identity. To implement this method, you configure the ESO service account to assume an IAM role for service accounts (IRSA), which is used by ESO to make requests to AWS.
To adhere to the principle of least privilege and verify that each Kubernetes workload can access only its designated secrets, you will use ABAC policies. As we mentioned, tags are the attributes used for ABAC in the context of AWS. For example, principal and secret tags can be compared to create ABAC policies to deny or allow access to secrets. Secret tags are static tags assigned to secrets symbolizing the workload consuming the secret. On the other hand, principal (requester) tags are dynamically modified, incorporating workload specific tags. The only viable option to dynamically modifying principal tags is to use session tags and incoming transitive session tags. However, as of this writing, there is no way to add session and transitive tags when assuming an IRSA. The workaround for this issue is role chaining and passing session tags when assuming downstream roles. ESO offers role chaining, meaning that you can refer to one or more IAM roles with access to Secrets Manager in the SecretStore resource definition, and ESO will chain them with its IRSA to access secrets. It also allows you to define session tags and transitive tags to be passed when ESO assumes the IAM roles with its primary IRSA. The ability to pass session tags allows you to implement ABAC and compare principal tags (including session tags) with secret tags every time ESO sends a request to Secrets Manager to fetch a secret. The following figure shows ESO authentication process with role chaining in one Kubernetes namespace.
Figure 2: ESO AWS authentication process with role chaining (single namespace)
Architecture overview
Let’s review implementing ABAC with a real-world example. When you have multiple workloads and services in your Amazon EKS cluster, each service is deployed in its own unique namespace, and service secrets are stored in Secrets Manager and tagged with a service name (key=service, value=service name). The following figure shows the required resources to implement ABAC with EKS and Secrets Manager.
Create an IAM role to access Secrets Manager secrets
You must create an IAM role with access to Secrets Manager secrets. Start by creating a customer managed policy to attach to your role. Your policy should allow reading secrets from Secrets Manager. The following example shows a policy that you can create for your role:
Secrets Manager uses an AWS managed key for Secrets Manager by default to encrypt your secrets. It’s recommended to specify another encryption key during secret creation and have separate keys for separate workloads. Modify the resource element of the second policy statement and replace <KMS Key ARN> with the KMS key ARNs used to encrypt your secrets. If you use the default key to encrypt your secrets, you can remove this statement.
The policy statement conditionally allows access to all secrets. The condition element permits access only when the value of the principal tag, identified by the key service, matches the value of the secret tag with the same key. You can include multiple conditions (in separate statements) to match multiple tags.
After you create your policy, follow the guide for Creating IAM roles to create your role, attaching the policy you created. Use the default value for your role’s trust relationship for now, you will update the trust relationship in the next step. Note the role’s ARN after creation.
Create an IAM role for the ESO service account
Use eksctl to create the IAM role for the ESO service account (IRSA). Before creating the role, you must create an IAM policy. ESO IRSA only needs permission to assume the Secrets Manager access role that you created in the previous step.
Use the following example of an IAM policy that you can create. Replace <Secrets Manager Access Role ARN> with the ARN of the role you created in the previous step and follow creating a customer managed policy to create the policy. After creating the policy, note the policy ARN.
Next, run the following command to get the account name of the ESO service. You will see a list of service accounts, pick the one that has the same name as your helm release, in this example, the service account is external-secrets.
kubectl get serviceaccounts -n external-secrets
Next, create an IRSA and configure an ESO service account to assume the role. Run the following command to create a new role and associate it with the ESO service account. Replace the variables in brackets (<example>) with your specific information:
eksctl create iamserviceaccount --name <ESO service account> \
--namespace <ESO namespace> --cluster <cluster name> \
--role-name <IRSA name> --override-existing-serviceaccounts \
--attach-policy-arn <policy arn you created earlier> --approve
You can validate the operation by following the steps listed in Configuring a Kubernetes service account to assume an IAM role. Note that you had to pass the ‑‑override-existing-serviceaccounts argument because the ESO service account was already created.
After you’ve validated the operation, run the following command to retrieve the IRSA ARN (replace <IRSA name> with the name you used in the previous step):
aws iam get-role --role-name <IRSA name> --query Role.Arn
Modify the trust relationship of the role you created previously and limit it to your newly created IRSA. The following should resemble your trust relationship. Replace <IRSA Arn> with the IRSA ARN returned in the previous step:
Note that you will be using session tags to implement ABAC. When using session tags, trust policies for all roles connected to the identity provider (IdP) passing the tags must have the sts:TagSession permission. For roles without this permission in the trust policy, the AssumeRole operation fails.
Moreover, the condition block of the second statement limits ESO’s ability to pass session tags with the key name ekssecret. We’re using this condition to verify that the ESO role can only create session tags used for accessing secrets manager, and doesn’t gain the ability to set principal tags that might be used for any other purpose. This way, you’re creating a namespace to help prevent further privilege escalations or escapes.
Create secrets in Secrets Manager
You can create two secrets in Secrets Manager and tag them.
Follow the steps in Create an AWS Secrets Manager secret to create two secrets named service1_secret and service2_secret. Add the following tags to your secrets:
service1_secret:
key=ekssecret, value=service1
service2_secret:
key=ekssecret, value=service2
Run the following command to verify both secrets are created and tagged properly:
Assume that service1-ns hosts service1 and service2-ns hosts service2. After creating the namespaces for your services, verify that each service is restricted to accessing secrets that are tagged with a specific key-value pair. In this example the key should be ekssecret and the value should match the name of the corresponding service. This means that service1 should only have access to service1_secret, while service2 should only have access to service2_secret. Next, declare session tags in SecretStore object definitions.
Edit the following command snippet using the text editor of your choice and replace every instance of <Secrets Manager Access Role ARN> with the ARN of the IAM role you created earlier to access Secrets Manager secrets. Copy and paste the edited command in your terminal and run it to create a .yaml file in your working directory that contains the SecretStore definitions. Make sure to change the AWS Region to reflect the Region of your Secrets Manager.
Create SecretStore objects by running the following command:
kubectl apply -f secretstore.yml
Validate object creation by running the following command:
kubectl describe secretstores.external-secrets.io -A
Check the status and events section for each object and make sure the store is validated.
Next, create two ExternalSecret objects requesting service1_secret and service2_secret. Copy and paste the following command in your terminal and run it. The command will create a .yaml file in your working directory that contains ExternalSecret definitions.
Verify the objects are created by running following command:
kubectl get externalsecrets.external-secrets.io -A
Each ExternalSecret object should create a Kubernetes secret in the same namespace it was created in. Kubernetes secrets are accessible to services in the same namespace. To demonstrate that both Service A and Service B has access to their secrets, run the following command.
kubectl get secrets -A
You should see service1-ns-secret1 created in service1-ns namespace which is accessible to Service 1, and service1-ns-secret2 created in service2-ns which is accessible to Service2.
Try creating an ExternalSecrets object in service1-ns referencing service2_secret. Notice that your object shows SecretSyncedError status. This is the expected behavior, because ESO passes different session tags for ExternalSecret objects in each namespace, and when the tag where key is ekssecret doesn’t match the secret tag with the same key, the request will be rejected.
What about AWS Secrets and Configuration Provider (ASCP)?
Today, customers who use AWS Fargate with Amazon EKS can’t use the ASCP method due to the incompatibility of daemonsets on Fargate. Kubernetes also doesn’t provide a mechanism to add specific claims to JSON web tokens (JWT) used to assume IAM roles. Today, when using ASCP in Kubernetes, which assumes IAM roles through IAM roles for service accounts (IRSA), there’s a constraint in appending session tags during the IRSA assumption due to JWT claim restrictions, limiting the ability to implement ABAC.
With ESO, you can create Kubernetes Secrets and have your pods retrieve secrets from them instead of directly mounting secrets as volumes in your pods. ESO is also capable of using its controller pod’s IRSA to retrieve secrets, so you don’t need to set up IRSA for each pod. You can also role chain and specify secondary roles to be assumed by ESO IRSA and pass session tags to be used with ABAC policies. ESO’s role chaining and ABAC capabilities help decrease the number of IAM roles required for secrets retrieval. See Leverage AWS secrets stores from EKS Fargate with External Secrets Operator on the AWS Containers blog to learn how to use ESO on an EKS Fargate cluster to consume secrets stored in Secrets Manager.
Conclusion
In this blog post, we walked you through how to implement ABAC with Amazon EKS and Secrets Manager using External Secrets Operator. Implementing ABAC allows you to create a single IAM role for accessing Secrets Manager secrets while implementing granular permissions. ABAC also decreases your team’s overhead and reduces the risk of misconfigurations. With ABAC, you require fewer policies and don’t need to update existing policies to allow access to new services and workloads.
If you have feedback about this post, submit comments in the Comments section below.
AWS Secrets Manager is a service that helps you manage, retrieve, and rotate database credentials, application credentials, OAuth tokens, API keys, and other secrets throughout their lifecycles. You can use Secrets Manager to help remove hard-coded credentials in application source code. Storing the credentials in Secrets Manager helps avoid unintended or inadvertent access by anyone who can inspect your application’s source code, configuration, or components. You can replace hard-coded credentials with a runtime call to the Secrets Manager service to retrieve credentials dynamically when you need them.
In this blog post, we introduce a new Secrets Manager API call, BatchGetSecretValue, and walk you through how you can use it to retrieve multiple Secretes Manager secrets.
New API — BatchGetSecretValue
Previously, if you had an application that used Secrets Manager and needed to retrieve multiple secrets, you had to write custom code to first identify the list of needed secrets by making a ListSecrets call, and then call GetSecretValue on each individual secret. Now, you don’t need to run ListSecrets and loop. The new BatchGetSecretValue API reduces code complexity when retrieving secrets, reduces latency by running bulk retrievals, and reduces the risk of reaching Secrets Manager service quotas.
Security considerations
Though you can use this feature to retrieve multiple secrets in one API call, the access controls for Secrets Manager secrets remain unchanged. This means AWS Identity and Access Management (IAM) principals need the same permissions as if they were to retrieve each of the secrets individually. If secrets are retrieved using filters, principals must have both permissions for list-secrets and get-secret-value on secrets that are applicable. This helps protect secret metadata from inadvertently being exposed. Resource policies on secrets serve as another access control mechanism, and AWS principals must be explicitly granted permissions to access individual secrets if they’re accessing secrets from a different AWS account (see Cross-account access for more information). Later in this post, we provide some examples of how you can restrict permissions of this API call through an IAM policy or a resource policy.
Solution overview
In the following sections, you will configure an AWS Lambda function to use the BatchGetSecretValue API to retrieve multiple secrets at once. You also will implement attribute based access control (ABAC) for Secrets Manager secrets, and demonstrate the access control mechanisms of Secrets Manager. In following along with this example, you will incur costs for the Secrets Manager secrets that you create, and the Lambda function invocations that are made. See the Secrets Manager Pricing and Lambda Pricing pages for more details.
Prerequisites
To follow along with this walk-through, you need:
Five resources that require an application secret to interact with, such as databases or a third-party API key.
Create an IAM role to be used as a Lambda execution role.
Create a Lambda function.
Step 1: Create secrets
First, create multiple secrets with the same resource tag key-value pair using the AWS CLI. The resource tag will be used for ABAC. These secrets might look different depending on the resources that you decide to use in your environment. You can also manually create these secrets in the Secrets Manager console if you prefer.
Run the following commands in the AWS CLI, replacing the secret-string values with the credentials of the resources that you will be accessing:
aws secretsmanager create-secret --name MyTestSecret1 --description "My first test secret created with the CLI for resource 1." --secret-string "{\"user\":\"username\",\"password\":\"EXAMPLE-PASSWORD-1\"}" --tags "[{\"Key\":\"app\",\"Value\":\"app1\"},{\"Key\":\"environment\",\"Value\":\"production\"}]"
aws secretsmanager create-secret --name MyTestSecret2 --description "My second test secret created with the CLI for resource 2." --secret-string "{\"user\":\"username\",\"password\":\"EXAMPLE-PASSWORD-2\"}" --tags "[{\"Key\":\"app\",\"Value\":\"app1\"},{\"Key\":\"environment\",\"Value\":\"production\"}]"
aws secretsmanager create-secret --name MyTestSecret3 --description "My third test secret created with the CLI for resource 3." --secret-string "{\"user\":\"username\",\"password\":\"EXAMPLE-PASSWORD-3\"}" --tags "[{\"Key\":\"app\",\"Value\":\"app1\"},{\"Key\":\"environment\",\"Value\":\"production\"}]"
aws secretsmanager create-secret --name MyTestSecret4 --description "My fourth test secret created with the CLI for resource 4." --secret-string "{\"user\":\"username\",\"password\":\"EXAMPLE-PASSWORD-4 \"}" --tags "[{\"Key\":\"app\",\"Value\":\"app1\"},{\"Key\":\"environment\",\"Value\":\"production\"}]"
aws secretsmanager create-secret --name MyTestSecret5 --description "My fifth test secret created with the CLI for resource 5." --secret-string "{\"user\":\"username\",\"password\":\"EXAMPLE-PASSWORD-5\"}" --tags "[{\"Key\":\"app\",\"Value\":\"app1\"},{\"Key\":\"environment\",\"Value\":\"production\"}]"
Next, create a secret with a different resource tag value for the app key, but the same environment key-value pair. This will allow you to demonstrate that the BatchGetSecretValue call will fail when an IAM principal doesn’t have permissions to retrieve and list the secrets in a given filter.
Create a secret with a different tag, replacing the secret-string values with credentials of the resources that you will be accessing.
aws secretsmanager create-secret --name MyTestSecret6 --description "My test secret created with the CLI." --secret-string "{\"user\":\"username\",\"password\":\"EXAMPLE-PASSWORD-6\"}" --tags "[{\"Key\":\"app\",\"Value\":\"app2\"},{\"Key\":\"environment\",\"Value\":\"production\"}]"
Step 2: Create an execution role for your Lambda function
In this example, create a Lambda execution role that only has permissions to retrieve secrets that are tagged with the app:app1 resource tag.
Select change default execution role and attach the execution role you just created.
Choose Create Function.
Figure 1: create a Lambda function to access secrets
In the Code tab, copy and paste the following code:
import json
import boto3
from botocore.exceptions import ClientError
import urllib.request
import json

session = boto3.session.Session()
# Create a Secrets Manager client
client = session.client(
        service_name='secretsmanager'
    )


def lambda_handler(event, context):

     application_secrets = client.batch_get_secret_value(Filters =[
        {
        'Key':'tag-key',
        'Values':[event["TagKey"]]
        },
        {
        'Key':'tag-value',
        'Values':[event["TagValue"]]
        }
        ])


    ### RESOURCE 1 CONNECTION ###
    try:
        print("TESTING CONNECTION TO RESOURCE 1")
        resource_1_secret = application_secrets["SecretValues"][0]
        ## IMPLEMENT RESOURCE CONNECTION HERE

        print("SUCCESFULLY CONNECTED TO RESOURCE 1")

    except Exception as e:
        print("Failed to connect to resource 1")
        return e

    ### RESOURCE 2 CONNECTION ###
    try:
        print("TESTING CONNECTION TO RESOURCE 2")
        resource_2_secret = application_secrets["SecretValues"][1]
        ## IMPLEMENT RESOURCE CONNECTION HERE

        print("SUCCESFULLY CONNECTED TO RESOURCE 2")

    except Exception as e:
        print("Failed to connect to resource 2",)
        return e


    ### RESOURCE 3 CONNECTION ###
    try:
        print("TESTING CONNECTION TO RESOURCE 3")
        resource_3_secret = application_secrets["SecretValues"][2]
        ## IMPLEMENT RESOURCE CONNECTION HERE

        print("SUCCESFULLY CONNECTED TO DB 3")

    except Exception as e:
        print("Failed to connect to resource 3")
        return e

    ### RESOURCE 4 CONNECTION ###
    try:
        print("TESTING CONNECTION TO RESOURCE 4")
        resource_4_secret = application_secrets["SecretValues"][3]
        ## IMPLEMENT RESOURCE CONNECTION HERE

        print("SUCCESFULLY CONNECTED TO RESOURCE 4")

    except Exception as e:
        print("Failed to connect to resource 4")
        return e

    ### RESOURCE 5 CONNECTION ###
    try:
        print("TESTING ACCESS TO RESOURCE 5")
        resource_5_secret = application_secrets["SecretValues"][4]
        ## IMPLEMENT RESOURCE CONNECTION HERE

        print("SUCCESFULLY CONNECTED TO RESOURCE 5")

    except Exception as e:
        print("Failed to connect to resource 5")
        return e

    return {
        'statusCode': 200,
        'body': json.dumps('Successfully Completed all Connections!')
    }
You need to configure connections to the resources that you’re using for this example. The code in this example doesn’t create database or resource connections to prioritize flexibility for readers. Add code to connect to your resources after the “## IMPLEMENT RESOURCE CONNECTION HERE” comments.
Choose Deploy.
Step 4: Configure the test event to initiate your Lambda function
Above the code source, choose Test and then Configure test event.
In the Event JSON, replace the JSON with the following:
{
"TagKey": "app",
“TagValue”:”app1”
}
Enter a Name for your event.
Choose Save.
Step 5: Invoke the Lambda function
Invoke the Lambda by choosing Test.
Step 6: Review the function output
Review the response and function logs to see the new feature in action. Your function logs should show successful connections to the five resources that you specified earlier, as shown in Figure 2.
Figure 2: Review the function output
Step 7: Test a different input to validate IAM controls
In the Event JSON window, replace the JSON with the following:
You should now see an error message from Secrets Manager in the logs similar to the following:
User: arn:aws:iam::123456789012:user/JohnDoe is not authorized to perform:
secretsmanager:GetSecretValue because no resource-based policy allows the secretsmanager:GetSecretValue action
As you can see, you were able to retrieve the appropriate secrets based on the resource tag. You will also note that when the Lambda function tried to retrieve secrets for a resource tag that it didn’t have access to, Secrets Manager denied the request.
How to restrict use of BatchGetSecretValue for certain IAM principals
When dealing with sensitive resources such as secrets, it’s recommended that you adhere to the principle of least privilege. Service control policies, IAM policies, and resource policies can help you do this. Below, we discuss three policies that illustrate this:
Policy 1: IAM ABAC policy for Secrets Manager
This policy denies requests to get a secret if the principal doesn’t share the same project tag as the secret that the principal is trying to retrieve. Note that the effectiveness of this policy is dependent on correctly applied resource tags and principal tags. If you want to take a deeper dive into ABAC with Secrets Manager, see Scale your authorization needs for Secrets Manager using ABAC with IAM Identity Center.
Policy 3: Restrict actions to specified principals
Finally, let’s take a look at an example resource policy from our data perimeters policy examples. This resource policy restricts Secrets Manager actions to the principals that are in the organization that this secret is a part of, except for AWS service accounts.
In this blog post, we introduced the BatchGetSecretValue API, which you can use to improve operational excellence, performance efficiency, and reduce costs when using Secrets Manager. We looked at how you can use the API call in a Lambda function to retrieve multiple secrets that have the same resource tag and showed an example of an IAM policy to restrict access to this API.
Designing a system to be either stateful or stateless is an important choice with tradeoffs regarding its performance and scalability. In a stateful system, data from one session is carried over to the next. A stateless system doesn’t preserve data between sessions and depends on external entities such as databases or cache to manage state.
Stateful and stateless architectures are both widely adopted.
Stateful applications are typically simple to deploy. Stateful applications save client session data on the server, allowing for faster processing and improved performance. Stateful applications excel in predictable workloads and offer consistent user experiences.
Stateless architectures typically align with the demands of dynamic workload and changing business requirements. Stateless application design can increase flexibility with horizontal scaling and dynamic deployment. This flexibility helps applications handle sudden spikes in traffic, maintain resilience to failures, and optimize cost.
Figure 1 provides a conceptual comparison of stateful and stateless architectures.
Figure 1. Conceptual diagram for stateful vs stateless architectures
For example, an eCommerce application accessible from web and mobile devices manages several aspects of the customer transaction life cycle. This lifecycle starts with account creation, then moves to placing items in the shopping cart, and proceeds through checkout. Session and user profile data provide session persistence and cart management, which retain the cart’s contents and render the latest updated cart from any device. A stateless architecture is preferable for this application because it decouples user data and offloads the session data. This provides the flexibility to scale each component independently to meet varying workloads and optimize resource utilization.
In this blog, we outline the process and benefits of converting from a stateful to stateless architecture.
Solution overview
This section walks you through the steps for converting stateful to stateless architecture:
Identifying and understanding the stateful requirements
Decoupling user profile data
Offloading session data
Scaling each component dynamically
Designing a stateless architecture
Step 1: Identifying and understanding the stateful components
Transforming a stateful architecture to a stateless architecture starts with reviewing the overall architecture and source code of the application, and then analyzing dataflow and dependencies.
Review the architecture and source code
It’s important to understand how your application accesses and shares data. Pay attention to components that persist state data and retain state information. Examples include user credentials, user profiles, session tokens, and data specific to sessions (such as shopping carts). Identifying how this data is handled serves as the foundation for planning the conversion to a stateless architecture.
Analyze dataflow and dependencies
Analyze and understand the components that maintain state within the architecture. This helps you assess the potential impact of transitioning to a stateless design.
You can use the following questionnaire to assess the components. Customize the questions according to your application.
What data is specific to a user or session?
How is user data stored and managed?
How is the session data accessed and updated?
Which components rely on the user and session data?
Are there any shared or centralized data stores?
How does the state affect scalability and tolerance?
Can the stateful components be decoupled or made stateless?
Step 2: Decoupling user profile data
Decoupling user data involves separating and managing user data from the core application logic. Delegate responsibilities for user management and secrets, such as application programming interface (API) keys and database credentials, to a separate service that can be resilient and scale independently. For example, you can use:
AWS Secrets Manager to decouple user data by storing secrets in a secure, centralized location. This means that the application code doesn’t need to store secrets, which makes it more secure.
Amazon S3 to store large, unstructured data, such as images and documents. Your application can retrieve this data when required, eliminating the need to store it in memory.
Amazon DynamoDB to store information such as user profiles. Your application can query this data in near-real time.
Step 3: Offloading session data
Offloading session data refers to the practice of storing and managing session related data external to the stateful components of an application. This involves separating the state from business logic. You can offload session data to a database, cache, or external files.
Factors to consider when offloading session data include:
Stateless architecture gives the flexibility to scale each component independently, allowing the application to meet varying workloads and optimize resource utilization. While planning for scaling, consider using:
AWS Autoscaling, which supports automatic scaling of resources based on predefined policies and metrics.
AWS Load Balancer, which supports dynamic scaling by automatically adding or removing instances based on the configured scaling policies and health checks.
After you identify which state and user data need to be persisted, and your storage solution of choice, you can begin designing the stateless architecture. This involves:
Understanding how the application interacts with the storage solution.
Planning how session creation, retrieval, and expiration logic work with the overall session management.
Refactoring application logic to remove references to the state information that’s stored on the server.
Rearchitecting the application into smaller, independent services, as described in steps 2, 3, and 4.
Performing thorough testing to ensure that all functionalities produce the desired results after the conversion.
The following figure is an example of a stateless architecture on AWS. This architecture separates the user interface, application logic, and data storage into distinct layers, allowing for scalability, modularity, and flexibility in designing and deploying applications. The tiers interact through well-defined interfaces and APIs, ensuring that each component focuses on its specific responsibilities.
Figure 2. Example of a stateless architecture
Benefits
Benefits of adopting a stateless architecture include:
Scalability: Stateless components don’t maintain a local state. Typically, you can easily replicate and distribute them to handle increasing workloads. This supports horizontal scaling, making it possible to add or remove capacity based on fluctuating traffic and demand.
Reliability and fault tolerance: Stateless architectures are inherently resilient to failures. If a stateless component fails, it can be replaced or restarted without affecting the overall system. Because stateless applications don’t have a shared state, failures in one component don’t impact other components. This helps ensure continuity of user sessions, minimizes disruptions, and improves fault tolerance and overall system reliability.
Cost-effectiveness: By leveraging on-demand scaling capabilities, your application can dynamically adjust resources based on actual demand, avoiding overprovisioning of infrastructure. Stateless architectures lend themselves to serverless computing models, paying for the actual run time and resulting in cost savings.
Performance: Externalizing session data by using services optimized for high-speed access, such as in-memory caches, can reduce the latency compared to maintaining session data internally.
Flexibility and extensibility: Stateless architectures provide flexibility and agility in application development. Offloaded session data provides more flexibility to adopt different technologies and services within the architecture. Applications can easily integrate with other AWS services for enhanced functionality, such as analytics, near real-time notifications, or personalization.
Conclusion
Converting stateful applications to stateless applications requires careful planning, design, and implementation. Your choice of architecture depends on your application’s specific needs. If an application is simple to develop and debug, then a stateful architecture might be a good choice. However, if an application needs to be scalable and fault tolerant, then a stateless architecture might be a better choice. It’s important to understand the current application thoroughly before embarking on a refactoring journey.
Amazon Redshift is a fully managed, petabyte-scale data warehouse service in the cloud. You can start with just a few hundred gigabytes of data and scale to a petabyte or more. Today, tens of thousands of AWS customers—from Fortune 500 companies, startups, and everything in between—use Amazon Redshift to run mission-critical business intelligence (BI) dashboards, analyze real-time streaming data, and run predictive analytics. With the constant increase in generated data, Amazon Redshift customers continue to achieve success in delivering better service to their end-users, improving their products, and running an efficient and effective business.
Until now, you would have needed to configure your Amazon Redshift admin credentials in plaintext, or let Amazon Redshift generate credential for you. To store these credentials in Secrets Manager, you either needed to manually create a secret, or configure scripts with the credentials hardcoded or generated. Both options required a human to retrieve them. Amazon Redshift now allows you to create and store admin credentials automatically without a human needing to see the credentials. As part of this workflow, the admin credentials are configured to rotate every 30 days automatically. By reducing the need for humans to see the secret during configuration, you can increase the security posture of your Amazon Redshift data warehouse and improve the accuracy of your audit trails.
In this post, we show how to integrate Amazon Redshift admin credentials with Secrets Manager for both new and previously provisioned Redshift clusters and Amazon Redshift Serverless namespaces.
Prerequisites
Complete the following prerequisites before starting:
In this section, we provide steps to configure either a Redshift provisioned cluster or a Redshift Serverless workgroup with Secrets Manager.
Create a Redshift provisioned cluster
To get started using Secrets Manager with a new Redshift provisioned cluster, complete the following steps:
On the Amazon Redshift console, choose Create cluster.
Define the Cluster configuration and Sample data sections as needed.
In the Database configurations section, specify your desired admin user name.
To use Secrets Manager to automatically create and store your password, select Manage admin credentials in AWS Secrets Manager.
You can also customize the encryption settings with your own AWS customer managed KMS key by creating a key or choosing an existing one. This is the key that is used to encrypt the secret in Secrets Manager. If you don’t select Customize encryption settings, an AWS managed key will be used as default.
Provide the information in Cluster permissions and Additional configurations as appropriate and choose Create cluster.
When the cluster is available, you can check the ARN of the secret containing the admin password on the Properties tab of the cluster in the Database configurations section.
Create a Redshift Serverless workgroup
To get started using Secrets Manager with Redshift Serverless, create a Redshift Serverless workgroup with the following steps:
On the Amazon Redshift Serverless dashboard, choose Create workgroup.
Define the Workgroup name, Capacity, and Network and security sections as appropriate and choose Next.
Select Create a new namespace and provide a suitable name
In the Database name and password section, select Customize admin user and credentials.
Provide an admin user name.
In the Admin password section, select Manage admin credentials in AWS Secrets Manager.
You can also customize the encryption settings with your own AWS customer managed KMS key by creating a key or choosing an existing one. This is the key that is used to encrypt the secret in Secrets Manager. If you don’t select Customize encryption settings, an AWS managed key will be used as default.
Provide the information in the Permissions and Encryption and security sections as appropriate and choose Next.
Review the selected options and choose Create.
When the status of the newly created workgroup and namespace is Available, choose the namespace.
You can find the Secrets Manager ARN with admin credentials under General information.
Enable Secrets Manager for an existing Redshift cluster
In this section, we provide steps to enable Secrets Manager for an existing Redshift provisioned cluster or a Redshift Serverless namespace.
Configure an existing Redshift provisioned cluster
To enable Secrets Manager for an existing Redshift cluster, follow these steps:
On the Amazon Redshift console, choose the cluster that you want to modify.
On the Properties tab, choose Edit admin credentials.
Select Manage admin credentials in AWS Secrets Manager.
To use AWS KMS to encrypt the data, select Customize encryption options and either choose an existing KMS key or choose Create an AWS KMS key.
Choose Save changes.
When the cluster is available, you can check the ARN of the secret containing the admin password on the Properties tab of the cluster in the Database configurations section.
Configure an existing Redshift Serverless namespace
To enable Secrets Manager on an existing Amazon Redshift Serverless namespace, follow these steps:
On the Amazon Redshift Serverless Dashboard, choose the namespace that you want to modify.
On the Actions menu, choose Edit admin credentials.
Select Customize admin user credentials.
Select Manage admin credentials in AWS Secrets Manager.
To use AWS KMS to encrypt the data, select Customize encryption settings and either choose an existing AWS KMS key or choose Create an AWS KMS key.
Choose Save changes.
When the namespace status is Available, you can see the Secrets Manager ARN under Admin password ARN in the General information section.
Manage secrets in Secrets Manager
To manage the admin credentials in Secrets Manager, follow these steps:
On the Secrets Manager console, choose the secret that you want to modify.
Amazon Redshift creates the secret with rotation enabled by default and a rotation schedule of every 30 days.
To view the admin credentials, choose Retrieve secret value.
To change the secret rotation, choose Edit rotation.
Define the new rotation frequency and choose Save.
To rotate the secret immediately, choose Rotate secret immediately and choose Rotate.
Secrets Manager can be integrated with your application via the AWS SDK, which is available in Java, JavaScript, C#, Python3, Ruby, and Go. The supported language code snippet is available in the Sample code section.
Choose the tab for your preferred language and use the code snippet provided in your application.
Restore a snapshot
New warehouses can be launched from both serverless and provisioned snapshots. You have the choice to configure the restored cluster to use Secrets Manager credentials, even if the source cluster didn’t use Secrets Manager, by following these steps:
Navigate to either the Redshift snapshot dashboard for snapshots of provisioned clusters or the Redshift data backup dashboard for snapshots of serverless workgroups and choose the snapshot you’d like to restore from. On the provisioned snapshot dashboard, on the Restore snapshot menu, choose Restore to provisioned cluster or Restore to serverless namespace. On the serverless snapshot dashboard, on the Actions menu, under Restore serverless snapshot, choose Restore to provisioned cluster or Restore to serverless namespace. If you’re restoring to a serverless endpoint from either option, you will need to have the target serverless namespace configured in advance.
If you’re restoring to a warehouse using a snapshot that doesn’t have Secrets Manager credentials configured, you can enable it in the Database configuration section of the snapshot restoration page by selecting Manage admin credentials in AWS Secrets Manager.
You can also customize the encryption settings with your own AWS customer managed KMS key by creating a key or choosing an existing one. If you don’t select Customize encryption settings, an AWS managed key will be used as default.
If the snapshot was taken from a cluster that was using Secrets Manager to manage its admin credentials and you’re restoring to a provisioned cluster, you can optionally choose to update the key used to encrypt credentials in Secrets Manager. Otherwise, if you’d like to use the same configuration as the source snapshot, you can choose the same key as before.
After you configure all the necessary details, choose Restore cluster from snapshot/Save changes to launch your provisioned cluster, or choose Restore to write the snapshot data to the namespace.
Connect to Amazon Redshift via Query Editor v2 using Secrets Manager
To connect to Amazon Redshift using Query Editor v2, complete the following steps:
On the Amazon Redshift console, choose the cluster that you want to connect to.
On the Properties tab, locate the admin user and admin password ARN.
Make a note of the ARN to be used in the later steps.
At the top of the cluster details page, on the Query data menu, choose Query in query editor v2.
Locate the Redshift cluster or Redshift Serverless workgroup you want to connect to and choose the options menu (three dots) next to its name, then choose Create connection.
In the connection window, select AWS Secrets Manager.
For Secret, choose the appropriate secret for your cluster.
The connection should be established to your cluster now and you will be able to see the database objects in your cluster as well as run queries against your cluster
Conclusion
In this post, we demonstrated how the Secrets Manager integration with Amazon Redshift has simplified storing admin credentials. It’s a simple-to-use feature that is available immediately and automates the important task of maintaining admin credentials and rotating them for your Redshift data warehouse. Try it out today and leave a comment if you have any questions or suggestions.
About the Authors
Tahir Aziz is an Analytics Solution Architect at AWS. He has worked with building data warehouses and big data solutions for over 15 years. He loves to help customers design end-to-end analytics solutions on AWS. Outside of work, he enjoys traveling and cooking.
Julia Beck is an Analytics Specialist Solutions Architect at AWS. She supports customers in validating analytics solutions by architecting proof of concept workloads designed to meet their specific needs.
Ekta Ahuja is a Senior Analytics Specialist Solutions Architect at AWS. She is passionate about helping customers build scalable and robust data and analytics solutions. Before AWS, she worked in several different data engineering and analytics roles. Outside of work, she enjoys baking, traveling, and board games.
AWS Secrets Manager helps you manage, retrieve, and rotate database credentials, API keys, and other secrets throughout their lifecycles. You might already use Secrets Manager to store and manage secrets in your applications built on Amazon Web Services (AWS), but what about secrets for applications that are hosted in your on-premises data center, or hosted by another cloud service provider? You might even be in the process of moving applications out of your data center as part of a phased migration, where the application is partially in AWS, but other components still remain in your data center until the migration is complete. In this blog post, we’ll describe the potential benefits of using Secrets Manager for workloads outside AWS, outline some recommended practices for using Secrets Manager for hybrid workloads, and provide a basic sample application to highlight how to securely authenticate and retrieve secrets from Secrets Manager in a multicloud workload.
In order to make an API call to retrieve secrets from Secrets Manager, you need IAM credentials. While it is possible to use an AWS Identity and Access Management (IAM) user, AWS recommends using temporary, or short-lived, credentials wherever possible to reduce the scope of impact of an exposed credential. This means we will allow our hybrid application to assume an IAM role in this example. We’ll use IAM Roles Anywhere to provide a mechanism for our applications outside AWS to assume an IAM Role based on a trust configured with our Certificate Authority (CA).
IAM Roles Anywhere offers a solution for on-premises or multicloud applications to acquire temporary AWS credentials, helping to eliminate the necessity for creating and handling long-term AWS credentials. This removal of long-term credentials enhances security and streamlines the operational process by reducing the burden of managing and rotating the credentials.
In this post, we assume that you have a basic understanding of IAM. For more information on IAM roles, see the IAM documentation. We’ll start by examining some potential use cases at a high level, and then we’ll highlight recommended practices to securely fetch secrets from Secrets Manager from your on-premises or hybrid workload. Finally, we’ll walk you through a simple application example to demonstrate how to put these recommendations together in a workload.
Selected use cases for accessing secrets from outside AWS
Following are some example scenarios where it may be necessary to securely retrieve or manage secrets from outside AWS, such from applications hosted in your data center, or another cloud provider.
Centralize secrets management for applications in your data center and in AWS
It’s beneficial to offer your application teams a single, centralized environment for managing secrets. This can simplify managing secrets because application teams are only required to understand and use a single set of APIs to create, retrieve, and rotate secrets. It also provides consistent visibility into the secrets used across your organization because Secrets Manager is integrated with AWS CloudTrail to log API calls to the service, including calls to retrieve or modify a secret value.
In scenarios where your application is deployed either on-premises or in a multicloud environment, and your database resides in Amazon Relational Database Service (Amazon RDS), you have the opportunity to use both IAM Roles Anywhere and Secrets Manager to store and retrieve secrets by using short-term credentials. This approach allows central security teams to have confidence in the management of credentials and builder teams to have a well-defined pattern for credential management. Note that you can also choose to configure IAM database authentication with RDS, instead of storing database credentials in Secrets Manager, if this is supported by your database environment.
Hybrid or multicloud workloads
At AWS, we’ve generally seen that customers get the best experience, performance, and pricing when they choose a primary cloud provider. However, for a variety of reasons, some customers end up in a situation where they’re running IT operations in a multicloud environment. In these scenarios, you might have hybrid applications that run in multiple cloud environments, or you might have data stored in AWS that needs to be accessed from a different application or workload running in another cloud provider. You can use IAM Roles Anywhere to securely access or manage secrets in Secrets Manager for these use cases.
Phased application migrations to AWS
Consider a situation where you are migrating a monolithic application to AWS from your data center, but the migration is planned to take place in phases over a number of months. You might be migrating your compute into AWS well before your databases, or vice versa. In this scenario, you can use Secrets Manager to store your application secrets and access them from both on premises and in AWS. Because your secrets are accessible from both on premises and AWS through the same APIs, you won’t need to refactor your application to retrieve these secrets as the migration proceeds.
Recommended practices for retrieving secrets for hybrid and multicloud workloads
In this section, we’ll outline some recommended practices that will help you provide least-privilege access to your application secrets, wherever the access is coming from.
Client-side caching of secrets
Client-side caching of secrets stored in Secrets Manager can help you improve performance and decrease costs by reducing the number of API requests to Secrets Manager. After retrieving a secret from Secrets Manager, your application can get the secret value from its in-memory cache without making further API calls. The cached secret value is automatically refreshed after a configurable time interval, called the cache duration, to help ensure that the application is always using the latest secret value. AWS provides client-side caching libraries for .NET, Java, JDBC, Python, and Go to enable client-side caching. You can find more detailed information on client-side caching specific to Python libraries in this blog post.
Consider a hybrid application with an application server on premises, that needs to retrieve database credentials stored in Secrets Manager in order to query customer information from a database. Because the API calls to retrieve the secret are coming from outside AWS, they may incur increased latency simply based on the physical distance from the closest AWS data center. In this scenario, the performance gains from client-side caching become even more impactful.
Enforce least-privilege access to secrets through IAM policies
You can use a combination of IAM policy types to granularly restrict access to application secrets when you’re using IAM Roles Anywhere and Secrets Manager. You can use conditions in trust policies to control which systems can assume the role. In our example, this is based on the system’s certificate, meaning that you need to appropriately control access to these certificates. We use a policy condition to specify an IP address in our example, but you could also use a range of IP addresses. Other examples would be conditions that specify a time range for when resources can be accessed, conditions that allow or deny building resources in certain AWS Regions, and more. You can find example policies in the IAM documentation.
You should use identity policies to provide Secrets Manager with permissions to the IAM role being assumed, following the principle of least privilege. You can find IAM policy examples for Secrets Manager use cases in the Secrets Manager documentation.
By combining different policy types, like identity policies and trust policies, you can limit the scope of systems that can assume a role, and control what those systems can do after assuming a role. For example, in the trust policy for the IAM role with access to the secret in Secrets Manager, you can allow or deny access based on the common name of the certificate that’s being used to authenticate and retrieve temporary credentials in order to assume a role using IAM Roles Anywhere. You can then attach an identity policy to the role being assumed that provides only the necessary API actions for your application, such as the ability to retrieve a secret value—but not to a delete a secret. See this blogpost for more information on when to use different policy types.
Transform long-term secrets into short-term secrets
You may already be wondering, “why should I use short-lived credentials to access a long-term secret?” Frequently rotating your application secrets in Secrets Manager will reduce the impact radius of a compromised secret. Imagine that you rotate your application secret every day. If that secret is somehow publicly exposed, it will only be usable for a single day (or less). This can greatly reduce the risk of compromised credentials being used to get access to sensitive information. You can find more information about the value of using short-lived credentials in this AWS Well-Architected best practice.
Instead of using static database credentials that are rarely (or never) rotated, you can use Secrets Manager to automatically rotate secrets up to every four hours. This method better aligns the lifetime of your database secret with the lifetime of the short-lived credentials that are used to assume the IAM role by using IAM Roles Anywhere.
Sample workload: How to retrieve a secret to query an Amazon RDS database from a workload running in another cloud provider.
Now we’ll demonstrate examples of the recommended practices we outlined earlier, such as scoping permissions with IAM policies. We’ll also showcase a sample application that uses a virtual machine (VM) hosted in another cloud provider to access a secret in Secrets Manager.
The reference architecture in Figure 1 shows the basic sample application.
Figure 1: Application connecting to Secrets Manager by using IAM Roles Anywhere to retrieve RDS credentials
In the sample application, an application secret (for example, a database username and password) is being used to access an Amazon RDS database from an application server hosted in another cloud provider. The following process is used to connect to Secrets Manager in order to retrieve and use the secret:
The application server makes a request to retrieve temporary credentials by using IAM Roles Anywhere.
IAM validates the request against the relevant IAM policies and verifies that the certificate was issued by a CA configured as a trust anchor.
If the request is valid, AWS Security Token Service (AWS STS) provides temporary credentials that the application can use to assume an IAM role.
IAM Roles Anywhere returns temporary credentials to the application.
The application assumes an IAM role with Secrets Manager permissions and makes a GetSecretValue API call to Secrets Manager.
The application uses the returned database credentials from Secrets Manager to query the RDS database and retrieve the data it needs to process.
Configure IAM Roles Anywhere
Before you configure IAM Roles Anywhere, it’s essential to have an IAM role created with the required permission for Amazon RDS and Secrets Manager. If you’re following along on your own with these instructions, refer to this blog post and the IAM Roles Anywhere User Guide for the steps to configure IAM Roles Anywhere in your environment.
Obtain temporary security credentials
You have several options to obtain temporary security credentials using IAM Roles Anywhere:
Using the credential helper — The IAM Roles Anywhere credential helper is a tool that manages the process of signing the CreateSession API with the private key associated with an X.509 end-entity certificate and calls the endpoint to obtain temporary AWS credentials. It returns the credentials to the calling process in a standard JSON format. This approach is documented in the IAM Roles Anywhere User Guide.
Using the AWS SDKs
IAM Roles Anywhere through the AWS credentials file in the AWS SDK — In this approach, you aren’t using long-lived IAM user credentials, but are storing temporary credentials in the AWS credentials file. However, this approach might not be appropriate for highly sensitive workloads. You can find step-by-step instructions to configure this method in this workshop.
IAM Roles Anywhere natively in the AWS SDK — You can also retrieve and use credentials from IAM Roles Anywhere directly from your application with the AWS SDK. In this approach, you don’t need to use the AWS credentials file to store temporary credentials. You can refer to this workshop for an example of how to retrieve and use credentials in this way. You will need to create a signature to be used in the HTTP request, then create a session using the CreateSession API. There are four steps to create a signature, and this signing process is identical to AWS Signature Version 4:
Use policy controls to appropriately scope access to secrets
In this section, we demonstrate the process of restricting access to temporary credentials by employing condition statements based on attributes extracted from the X.509 certificate. This additional step gives you granular control of the trust policy, so that you can effectively manage which resources can obtain credentials from IAM Roles Anywhere. For more information on establishing a robust data perimeter on AWS, refer to this blog post.
Prerequisites
IAM Roles Anywhere using AWS Private Certificate Authority or your own PKI as the trust anchor
IAM Roles Anywhere profile
An IAM role with Secrets Manager permissions
Restrict access to temporary credentials
You can restrict access to temporary credentials by using specific PKI conditions in your role’s trust policy, as follows:
Sessions issued by IAM Roles Anywhere have the source identity set to the common name (CN) of the subject you use in end-entity certificate authenticating to the target role.
IAM Roles Anywhere extracts values from the subject, issuer, and Subject Alternative Name (SAN) fields of the authenticating certificate and makes them available for policy evaluation through the sourceIdentity and principal tags.
To examine the contents of a certificate, use the following command:
openssl x509 -text -noout -in certificate.pem
To establish a trust relationship for IAM Roles Anywhere, use the following steps:
In the navigation pane of the IAM console, choose Roles.
The console displays the roles for your account. Choose the name of the role that you want to modify, and then choose the Trust relationships tab on the details page.
Choose Edit trust relationship.
Example: Restrict access to a role based on the common name of the certificate
The following example shows a trust policy that adds a condition based on the Subject Common Name (CN) of the certificate.
If you try to access the temporary credentials using a different certificate which has a different CN, you will receive the error “Error when retrieving credentials from custom-process: 2023/07/0X 23:46:43 AccessDeniedException: Unable to assume role for arn:aws:iam::64687XXX207:role/RDS_SM_Role”.
Example: Restrict access to a role based on the issuer common name
The following example shows a trust policy that adds a condition based on the Issuer CN of the certificate.
Define session policies to further scope down the sessions delivered by IAM Roles Anywhere. Here, for demonstration purposes, we added an inline policy to only allow requests coming from the specified IP address by using the following steps.
Navigate to the Roles Anywhere console.
Under Profiles, choose Create a profile.
On the Create a profile page, enter a name for the profile.
For Roles, select the role that you created in the previous step, and select the Inline policy.
The following example shows how to allow only the requests from a specific IP address. You will need to replace <X.X.X.X/32> in the policy example with your own IP address.
Retrieve secrets securely from a workload running in another cloud environment
In this section, we’ll demonstrate the process of connecting virtual machines (VMs) running in another cloud provider to an Amazon RDS MySQL database, where the database credentials are securely stored in Secrets Manager.
Create a database and manage Amazon RDS master database credentials in Secrets Manager
In this section, you will create a database instance and use Secrets Manager to manage the master database credentials.
To create an Amazon RDS database and manage master database credentials in Secrets Manager
Select your preferred database creation method. For this post, we chose Standard create.
Under Engine options, for Engine type, choose your preferred database engine. In this post, we use MySQL.
Under Settings, for Credentials Settings, select Manage master credentials in AWS Secrets Manager.
Figure 2: Manage master credentials in Secrets Manager
You have the option to encrypt the managed master database credentials. In this example, we will use the default AWS KMS key.
(Optional) Choose other settings to meet your requirements. For more information, see Settings for DB instances.
Choose Create Database, and wait a few minutes for the database to be created.
Retrieve and use temporary credentials to access a secret in Secrets Manager
The next step is to use the AWS Roles Anywhere service to obtain temporary credentials for an IAM role. These temporary credentials are essential for accessing AWS resources securely. Earlier, we described the options available to you to retrieve temporary credentials by using IAM Roles Anywhere. In this section, we will assume you’re using the credential helper to retrieve temporary credentials and make an API call to Secrets Manager.
After you retrieve temporary credentials and assume an IAM role with permissions to access the secret in Secrets Manager, you can run a simple script on the VM to get the database username and password from Secrets Manager and update the database. The steps are summarized here:
Retrieve secrets from Secrets Manager. Using the obtained temporary credentials, you can create a boto3 session object and initialize a secrets_client from boto3.client(‘secretsmanager’). The secrets_client is responsible for interacting with the Secrets Manager service. You will retrieve the secret value from Secrets Manager, which contains the necessary credentials (for example, database username and password) for accessing an RDS database.
Establish a connection to the RDS database. The retrieved secret value is parsed, extracting the database connection information. You can then establish a connection to the RDS database using the extracted details, such as username and password.
Perform database operations. Once the database connection is established, the script performs the operation to update a record in the database.
The following is an example Python script to retrieve credentials from Secrets Manager and connect to the RDS for database operations.
And that’s it! You’ve retrieved temporary credentials using IAM Roles Anywhere, assumed a role with permissions to access the database username and password in Secrets Manager, and then retrieved and used the database credentials to update a database from your application running on another cloud provider. This is a simple example application for the purpose of the blog post, but the same concepts will apply in real-world use cases.
Conclusion
In this post, we’ve demonstrated how you can securely store, retrieve, and manage application secrets and database credentials for your hybrid and multicloud workloads using Secrets Manager. We also outlined some recommended practices for least-privilege access to your secrets when accessing Secrets Manager from outside AWS by using IAM Roles Anywhere. Lastly, we demonstrated a simple example of using IAM Roles Anywhere to assume a role, then retrieve and use database credentials from Secrets Manager in a multicloud workload. To get started managing secrets, open the Secrets Manager console. To learn more about Secrets Manager, refer to the Secrets Manager documentation.
If you have feedback about this post, submit comments in the Comments section below. If you have questions about this post, contact AWS Support.
Want more AWS Security news? Follow us on Twitter.
Security is fundamental for each product and service you are building with. Whether you are working on the back-end or the data and machine learning components of a system, the solution should be securely built.
In 2022, we discussed security in our post Let’s Architect! Architecting for Security. Today, we take a closer look at general security practices for your cloud workloads to secure both networks and applications, with a mix of resources to show you how to architect for security using the services offered by Amazon Web Services (AWS).
In this edition of Let’s Architect!, we share some practices for protecting your workloads from the most common attacks, introduce the Zero Trust principle (you can learn how AWS itself is implementing it!), plus how to move to containers and/or alternative approaches for managing your secrets.
This session from AWS re:Invent, security engineers guide you through the most common threat vectors and vulnerabilities that AWS customers faced in 2022. For each possible threat, you can learn how it’s implemented by attackers, the weaknesses attackers tend to leverage, and the solutions offered by AWS to avert these security issues. We describe this as fundamental architecting for security: this implies adopting suitable services to protect your workloads, as well as follow architectural practices for security.
What is Zero Trust? It is a security model that produces higher security outcomes compared with the traditional network perimeter model.
How does Zero Trust work in practice, and how can you start adopting it? This AWS re:Invent 2022 session defines the Zero Trust models and explains how to implement one. You can learn how it is used within AWS, as well as how any architecture can be built with these pillars in mind. Furthermore, there is a practical use case to show you how Delphix put Zero Trust into production.
Nowadays, it’s vital to have a thorough understanding of a container’s underlying security layers. AWS services, like Amazon Elastic Kubernetes Service and Amazon Elastic Container Service, have harnessed these Linux security-layer protections, keeping a sharp focus on the principle of least privilege. This approach significantly minimizes the potential attack surface by limiting the permissions and privileges of processes, thus upholding the integrity of the system.
This re:Inforce 2023 session discusses best practices for securing containers for your distributed systems.
Secrets play a critical role in providing access to confidential systems and resources. Ensuring the secure and consistent management of these secrets, however, presents a challenge for many organizations.
Anti-patterns observed in numerous organizational secrets management systems include sharing plaintext secrets via unsecured means, such as emails or messaging apps, which can allow application developers to view these secrets in plaintext or even neglect to rotate secrets regularly. This detailed guidance walks you through the steps of discovering and classifying secrets, plus explains the implementation and migration processes involved in transferring secrets to AWS Secrets Manager.
To provide the best experiences, we use technologies like cookies to store and/or access device information. Consenting to these technologies will allow us to process data such as browsing behavior or unique IDs on this site. Not consenting or withdrawing consent, may adversely affect certain features and functions.
Functional
Always active
The technical storage or access is strictly necessary for the legitimate purpose of enabling the use of a specific service explicitly requested by the subscriber or user, or for the sole purpose of carrying out the transmission of a communication over an electronic communications network.
Preferences
The technical storage or access is necessary for the legitimate purpose of storing preferences that are not requested by the subscriber or user.
Statistics
The technical storage or access that is used exclusively for statistical purposes.The technical storage or access that is used exclusively for anonymous statistical purposes. Without a subpoena, voluntary compliance on the part of your Internet Service Provider, or additional records from a third party, information stored or retrieved for this purpose alone cannot usually be used to identify you.
Marketing
The technical storage or access is required to create user profiles to send advertising, or to track the user on a website or across several websites for similar marketing purposes.
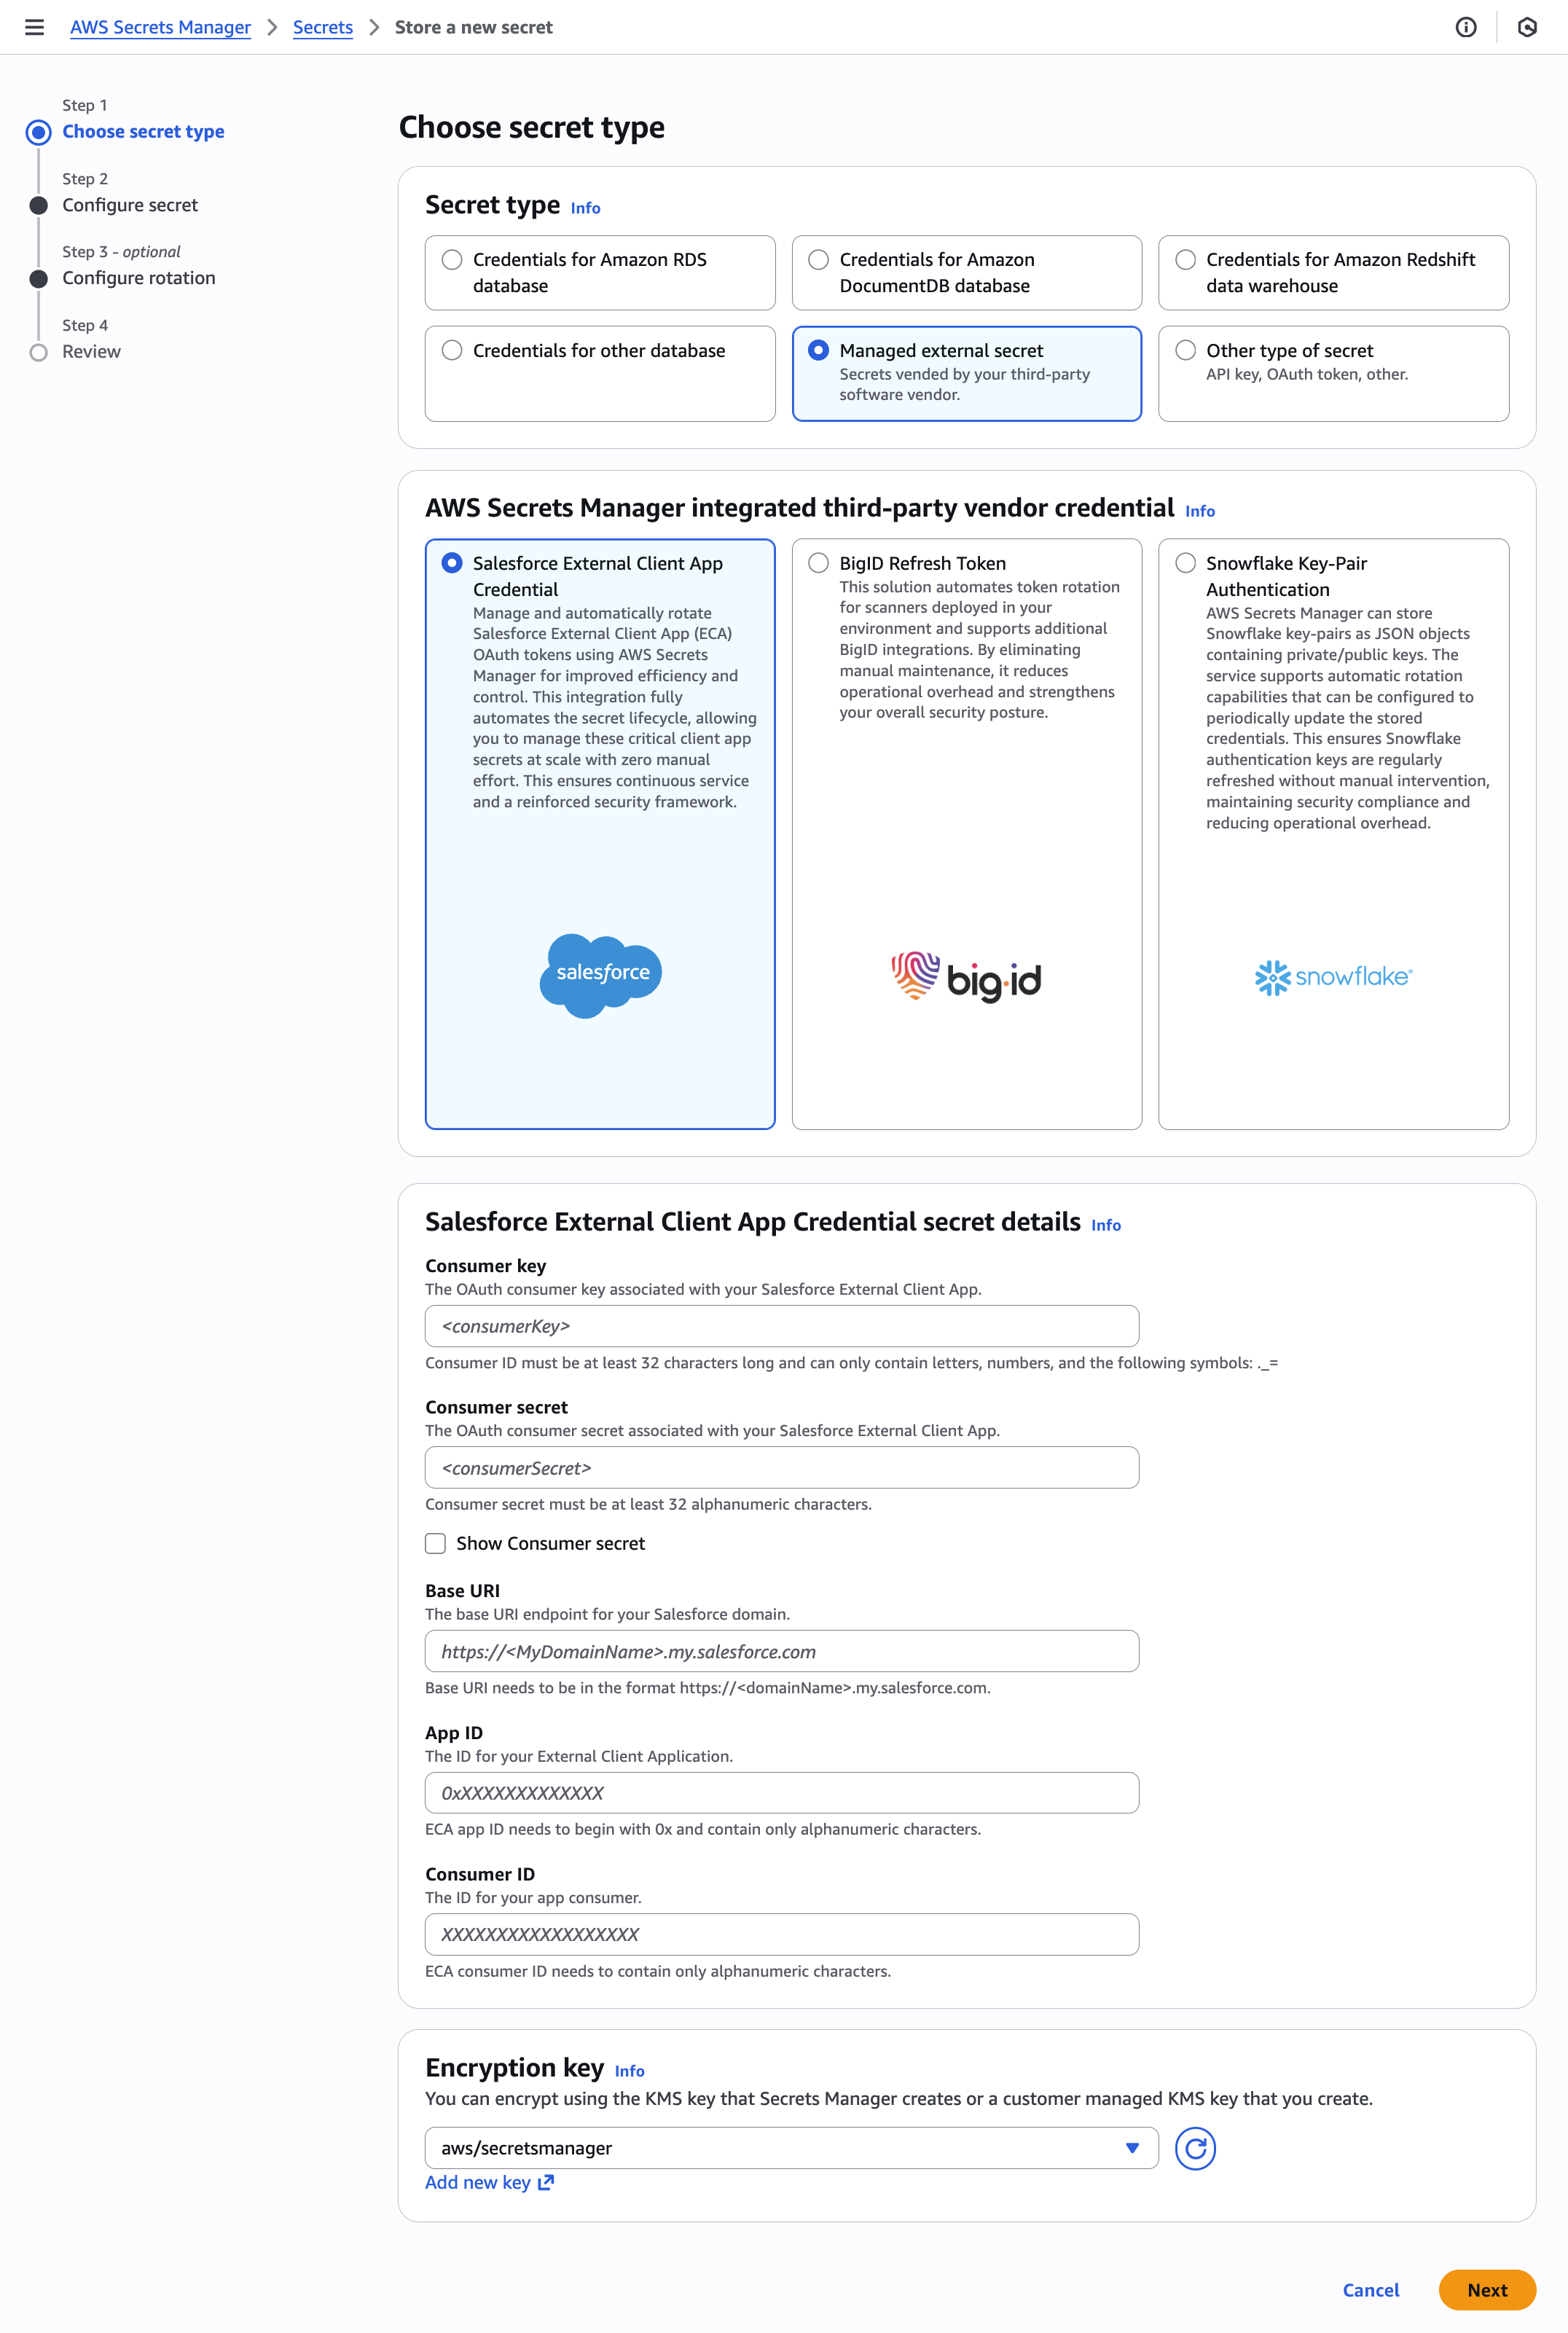
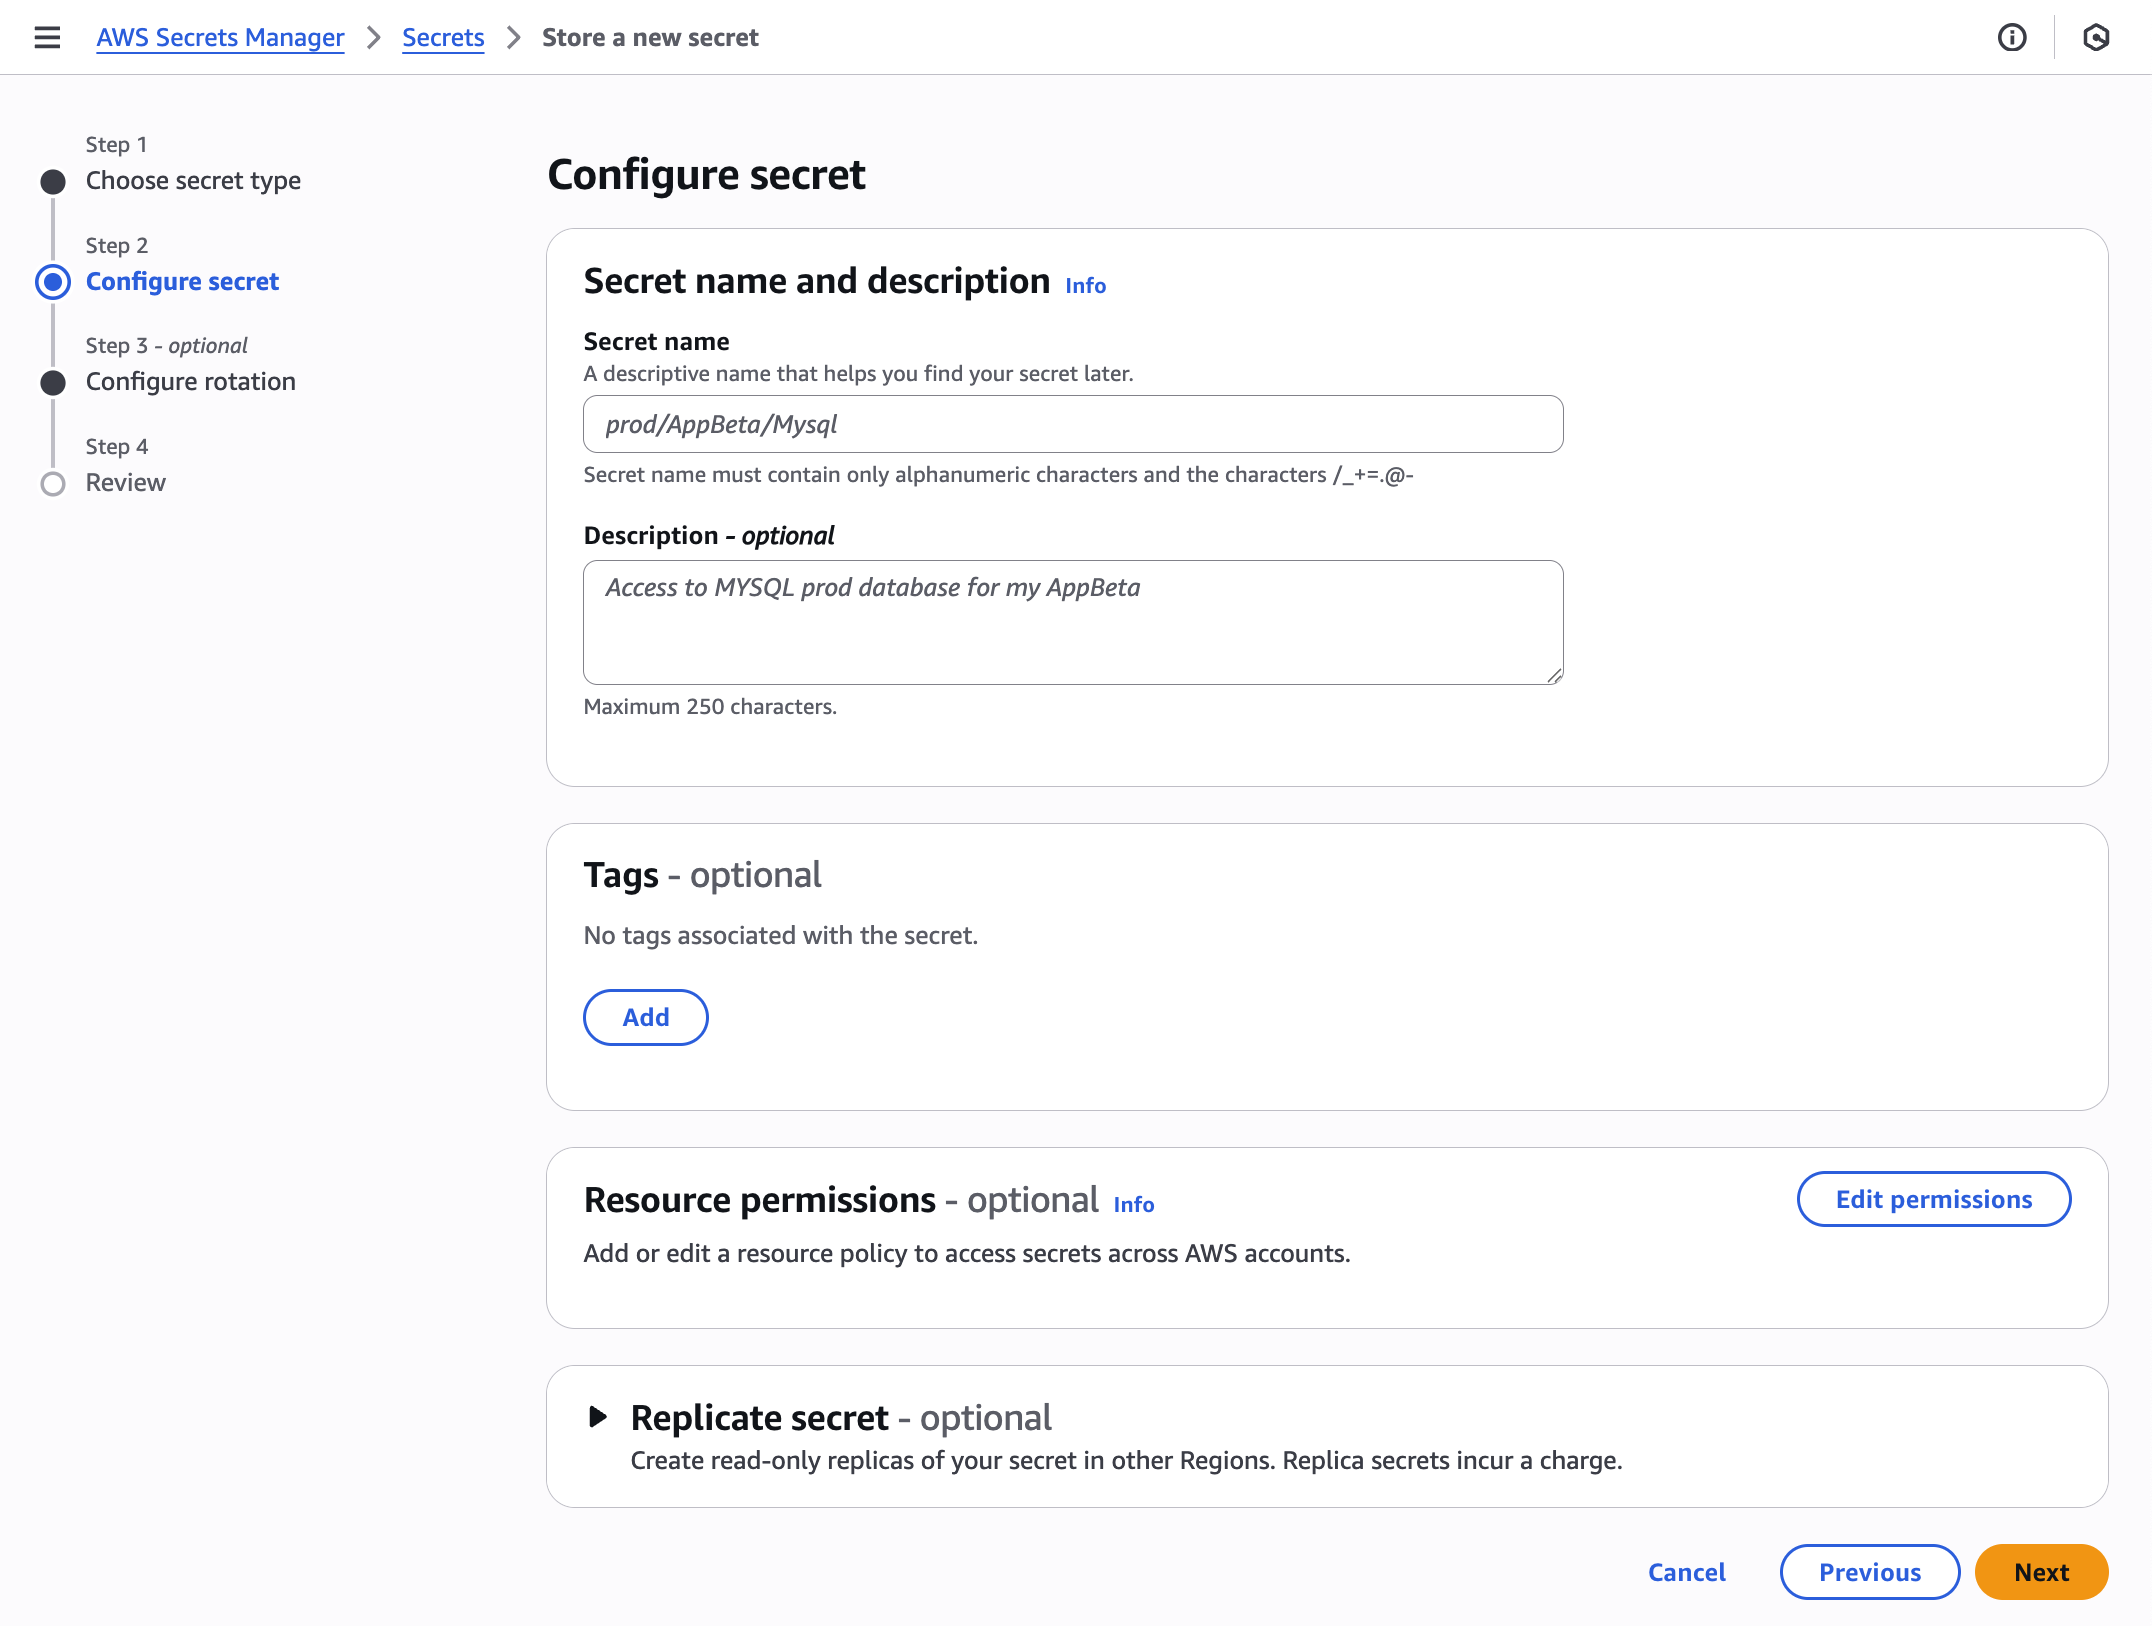
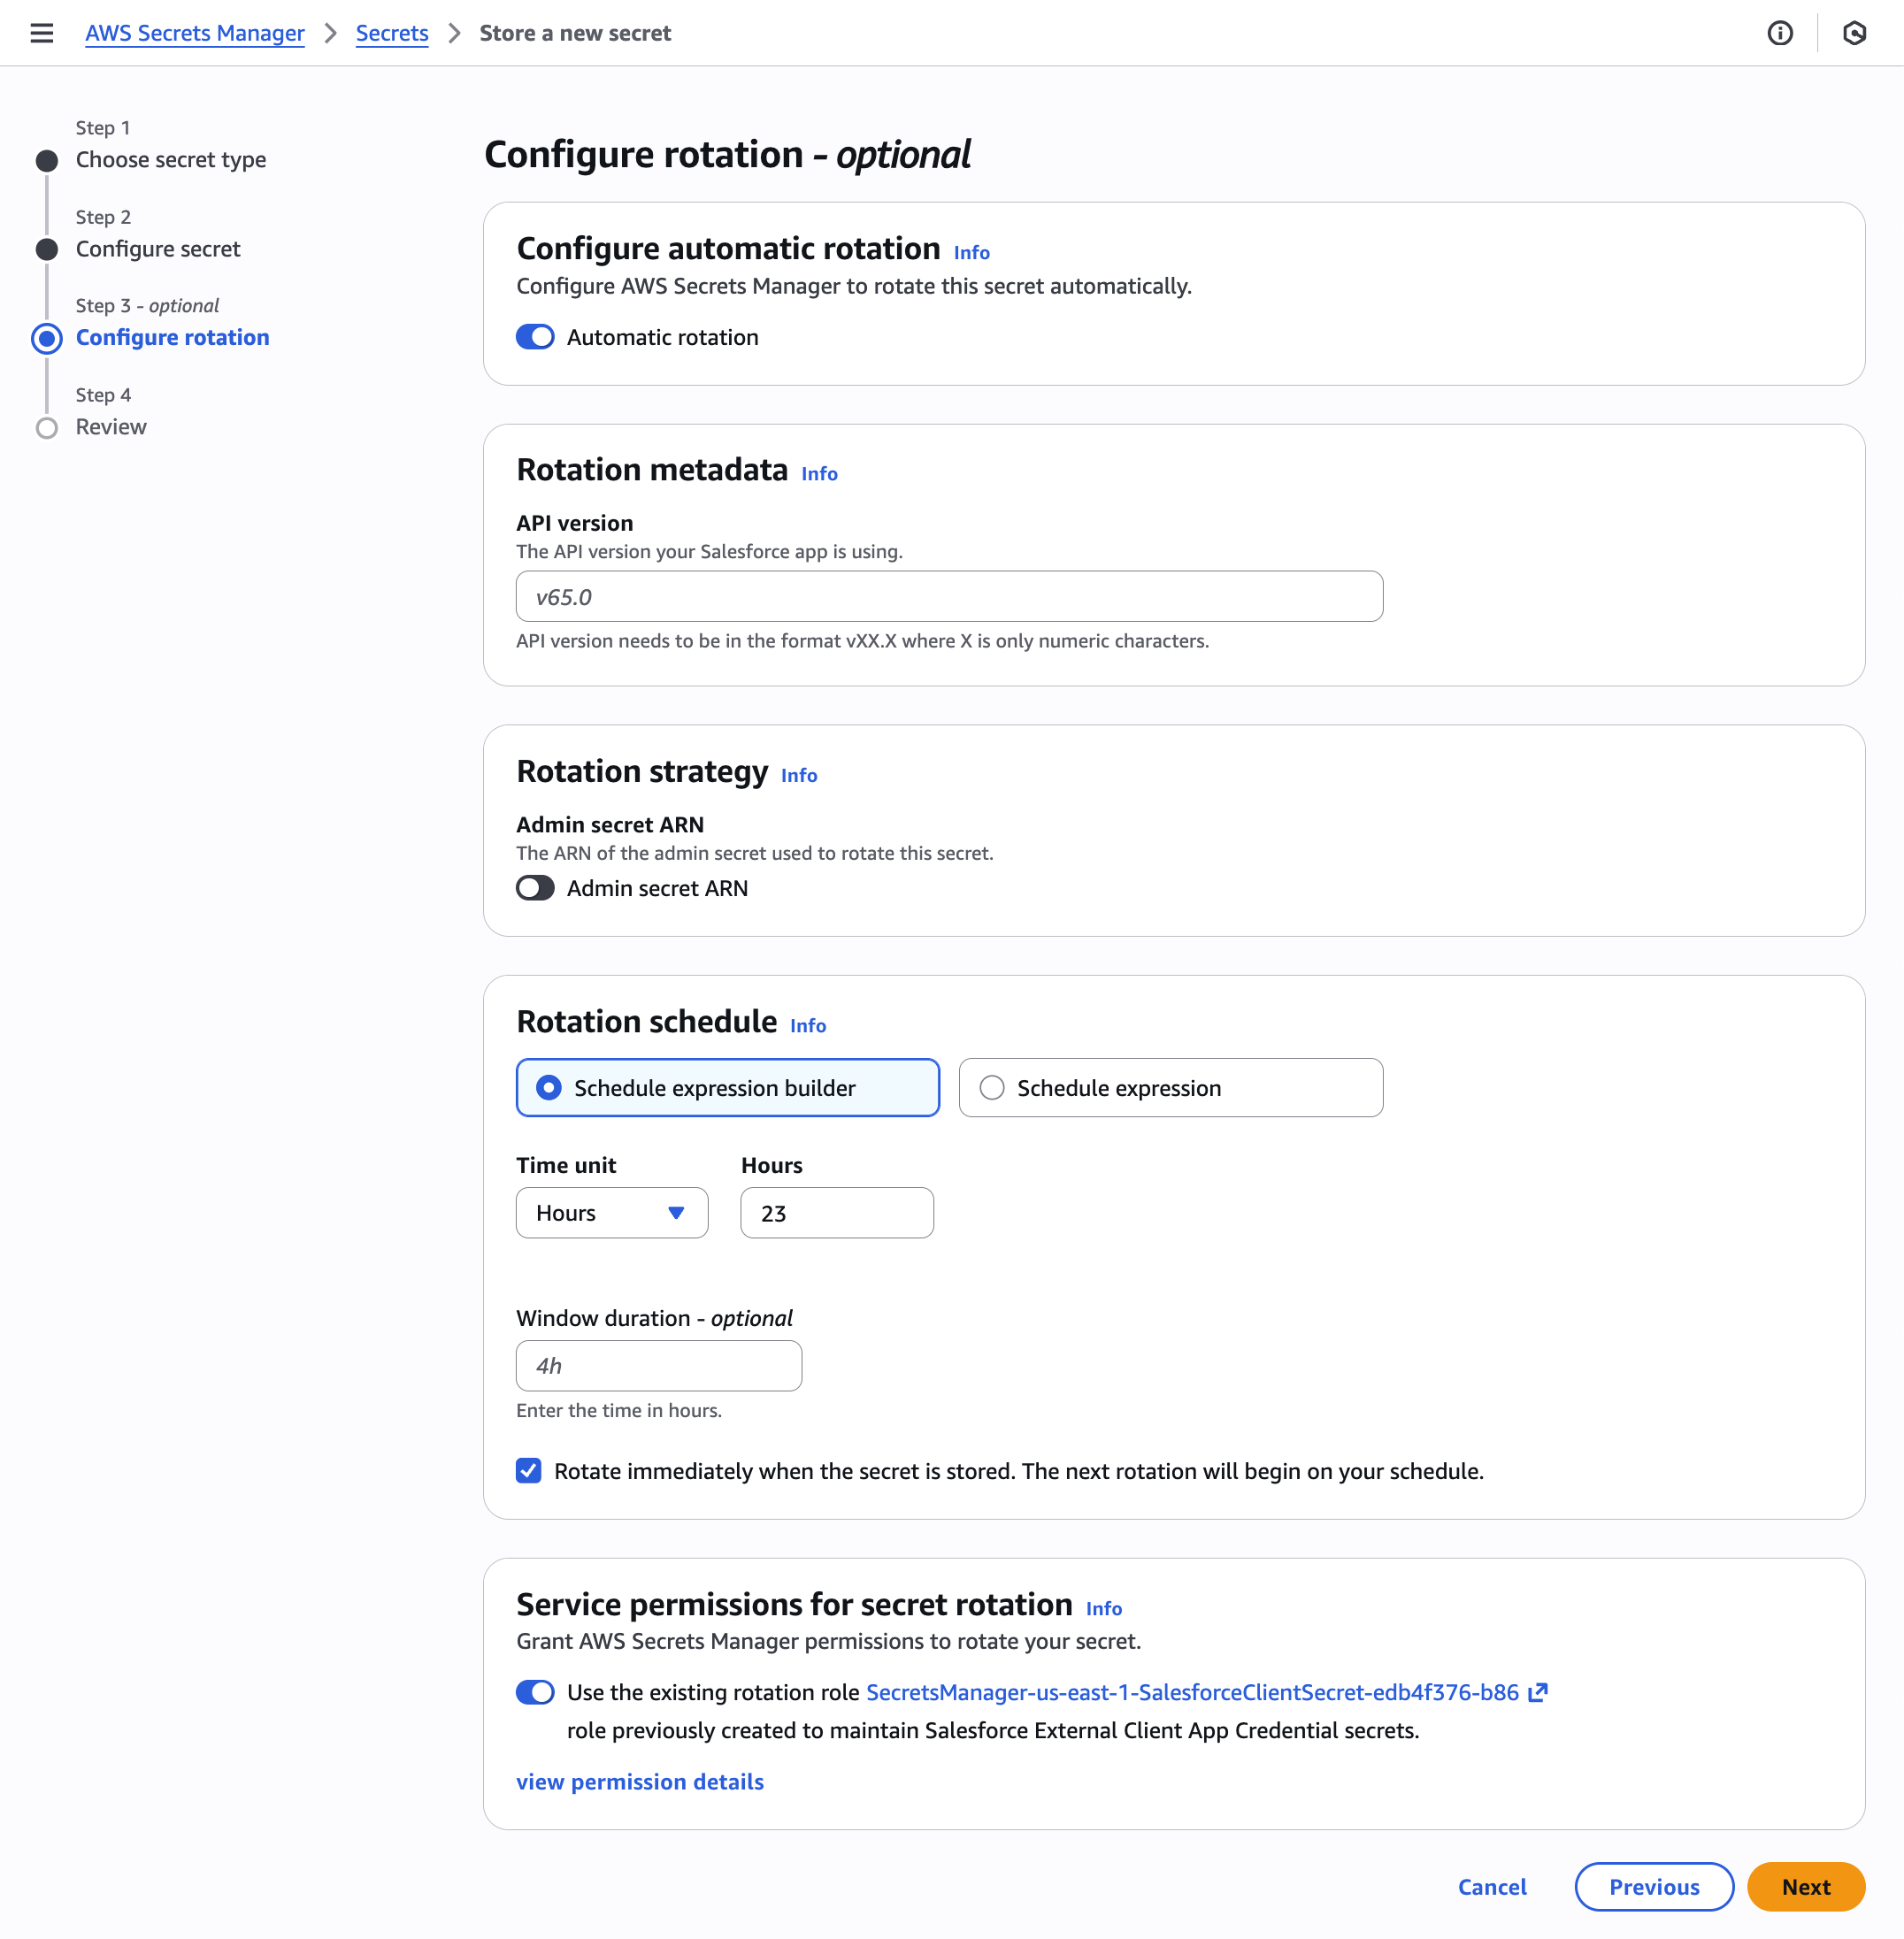
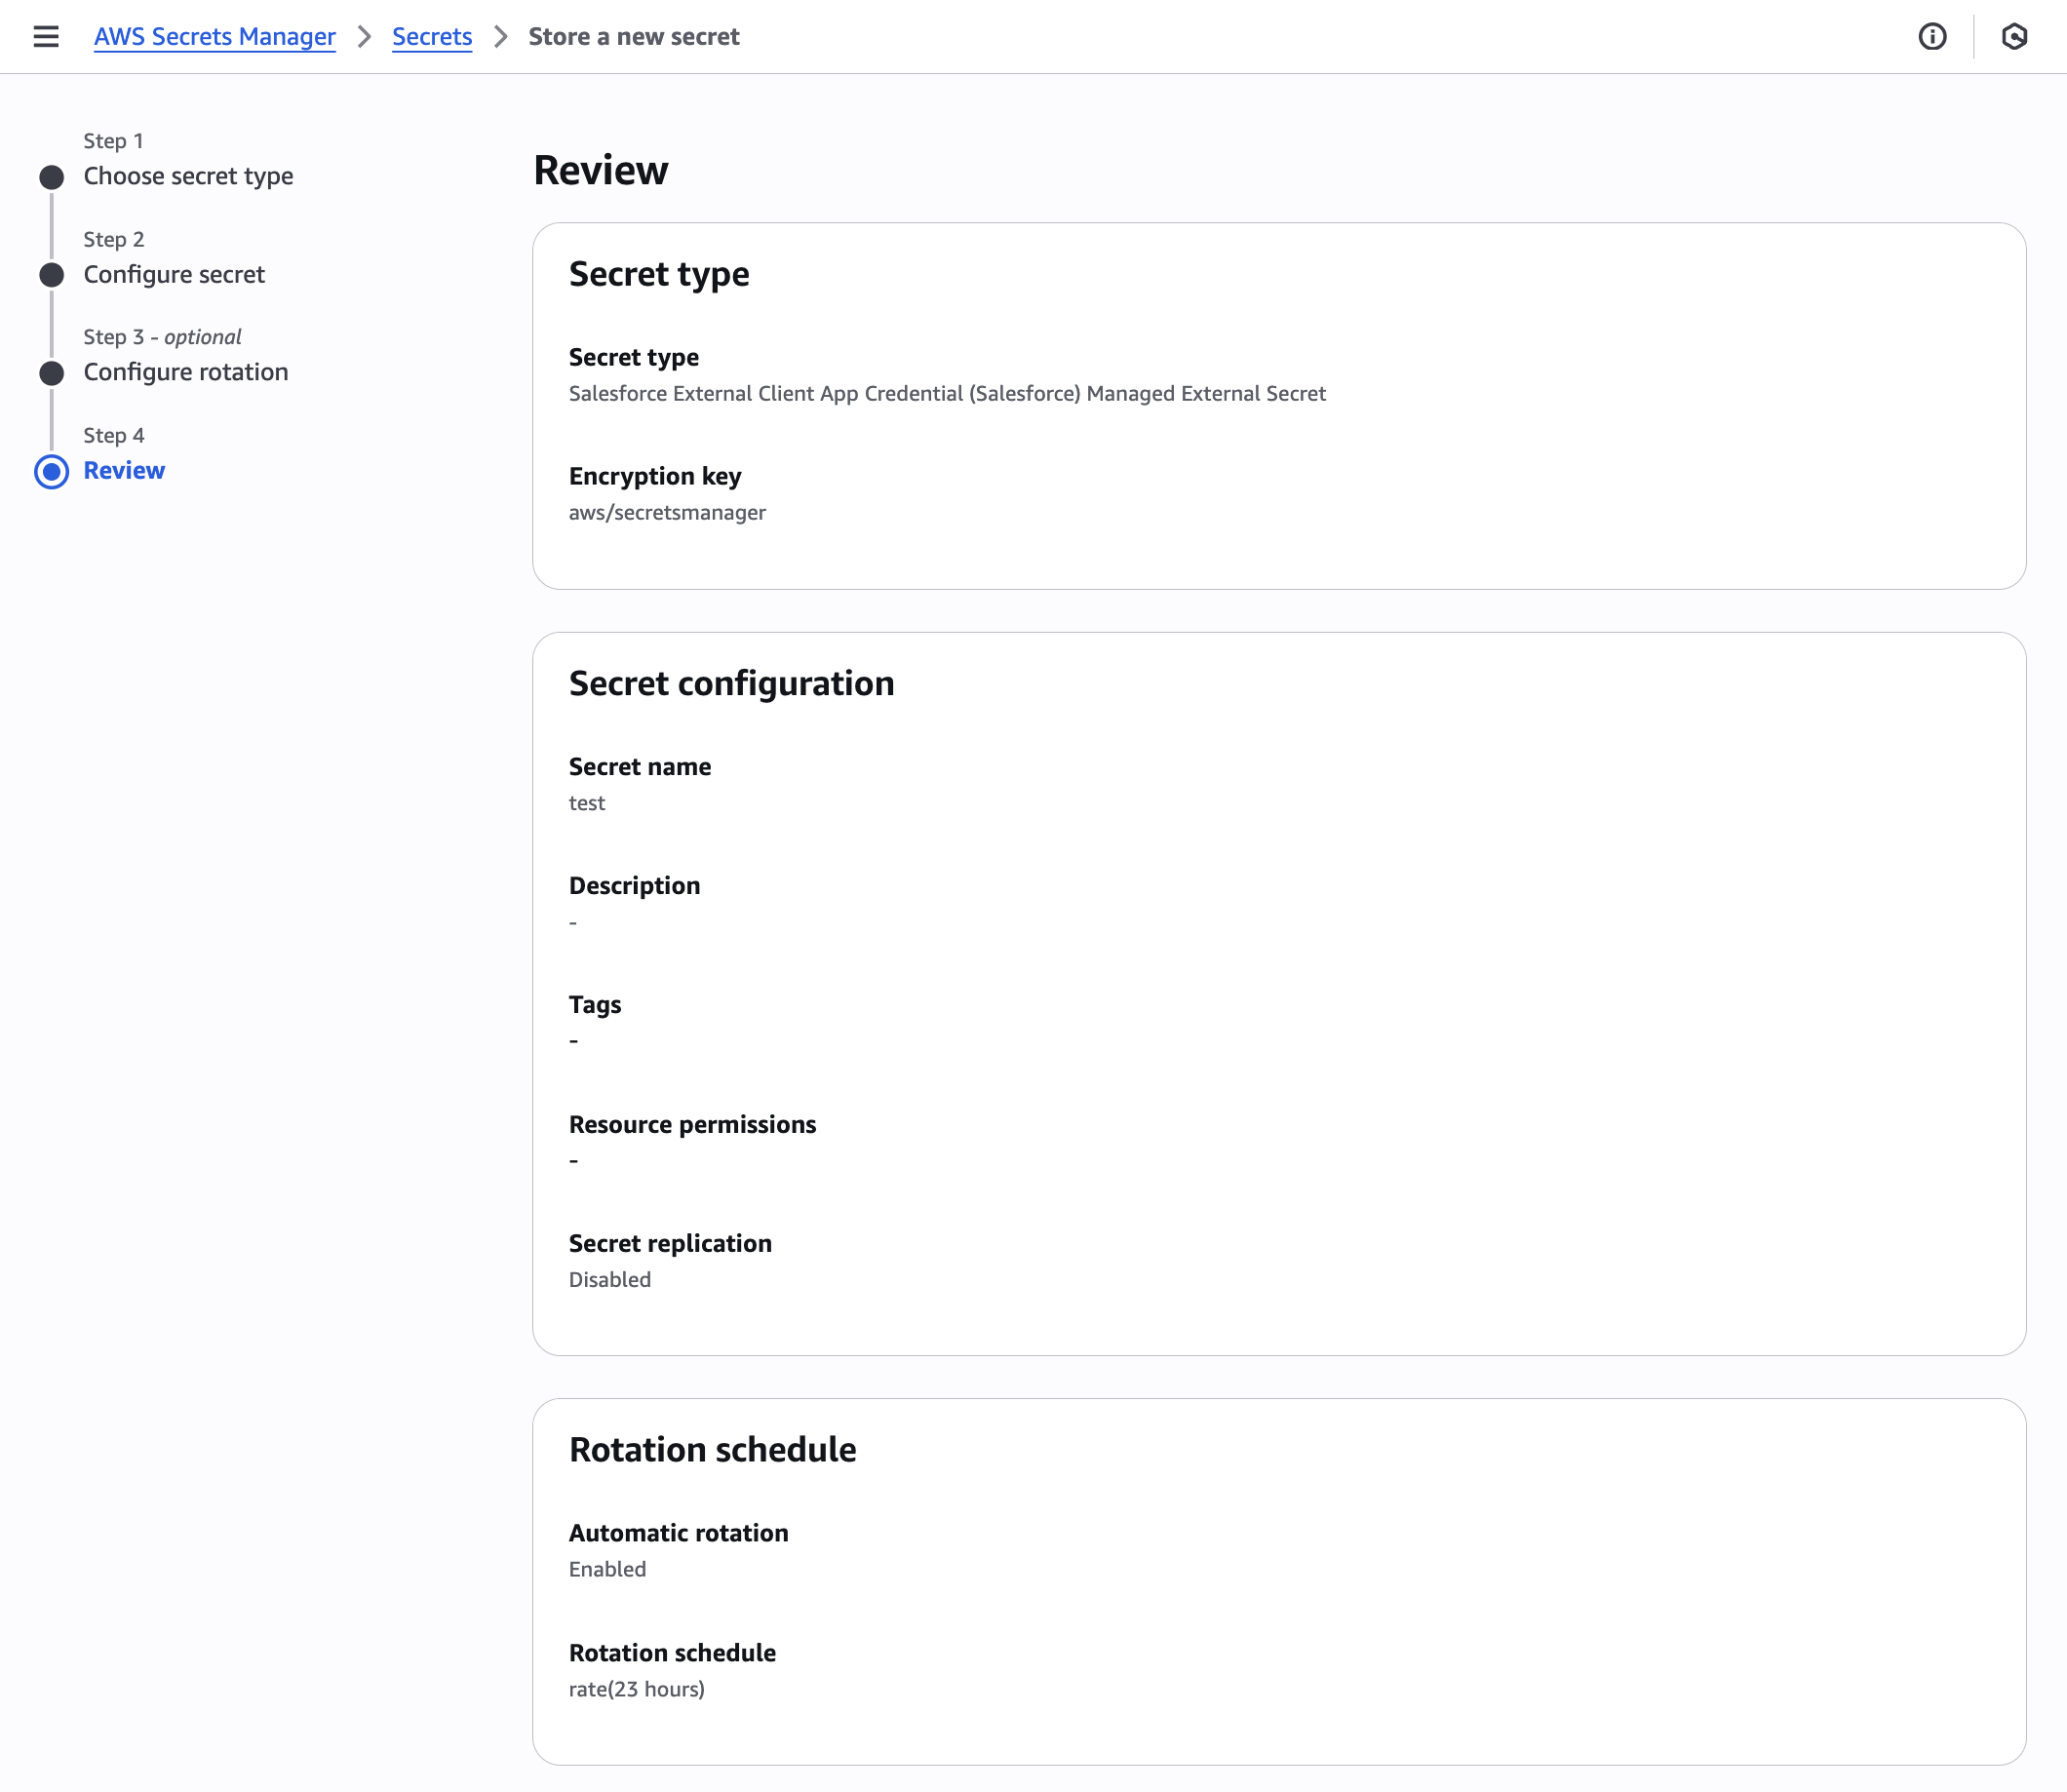
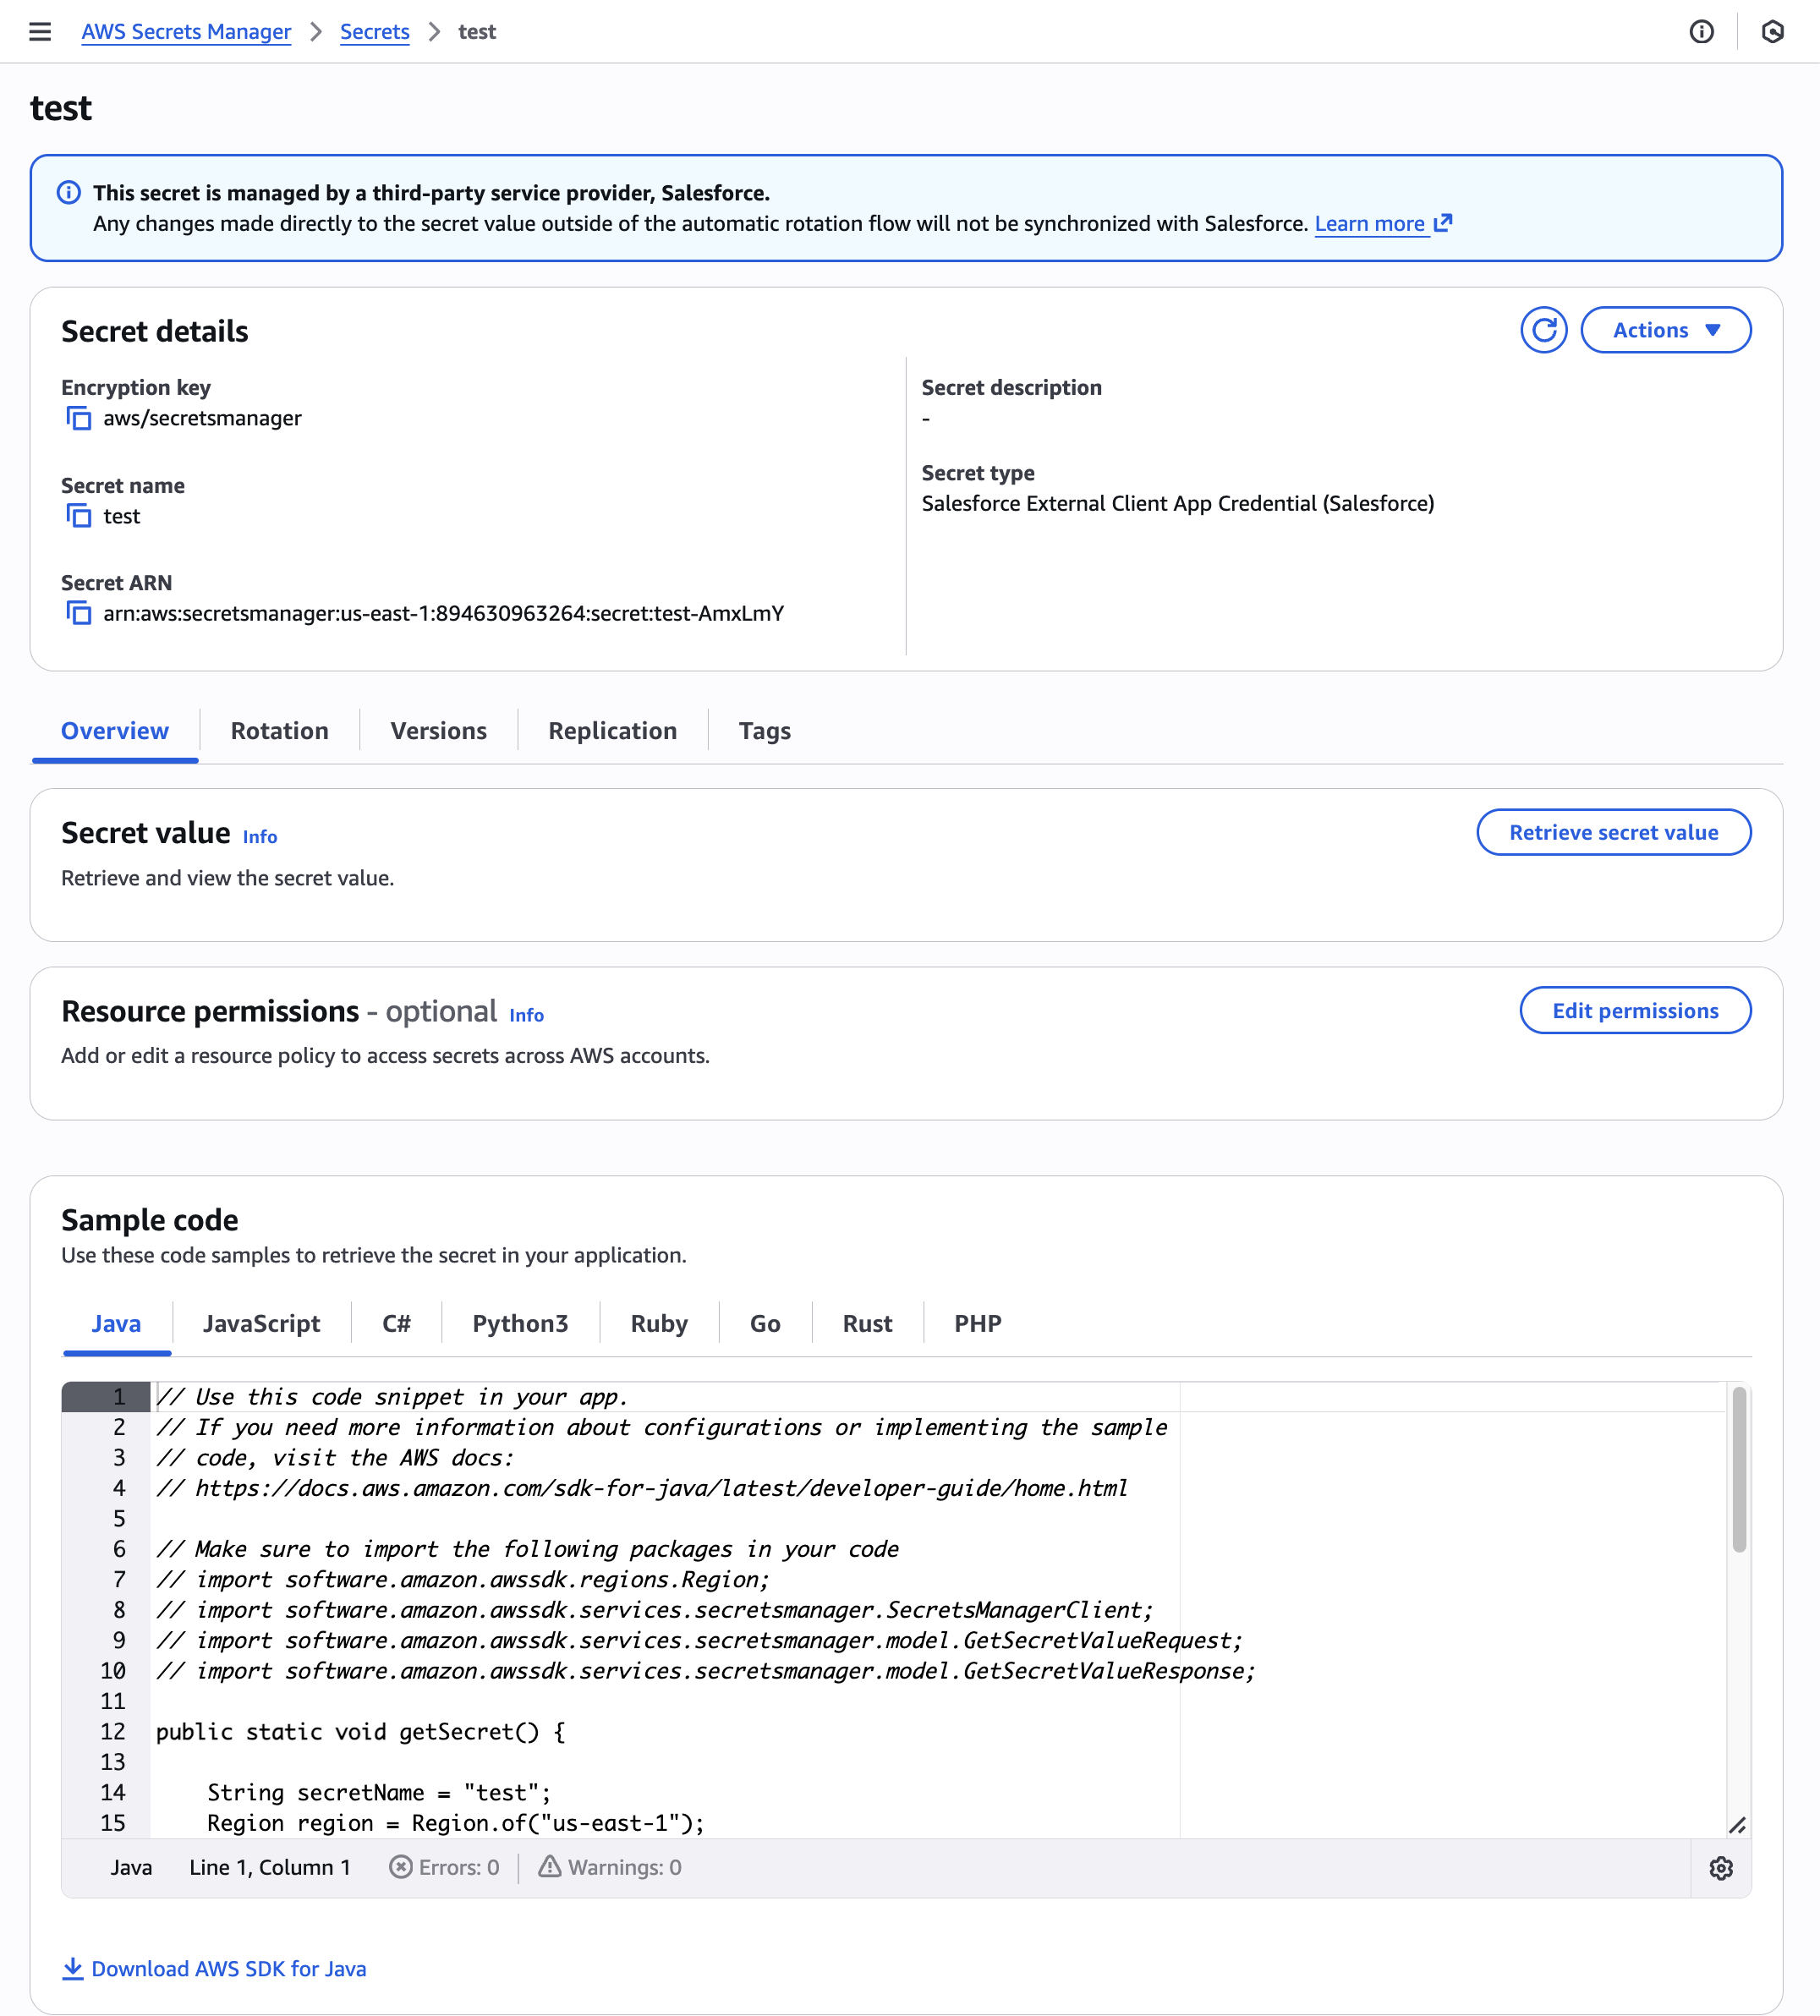
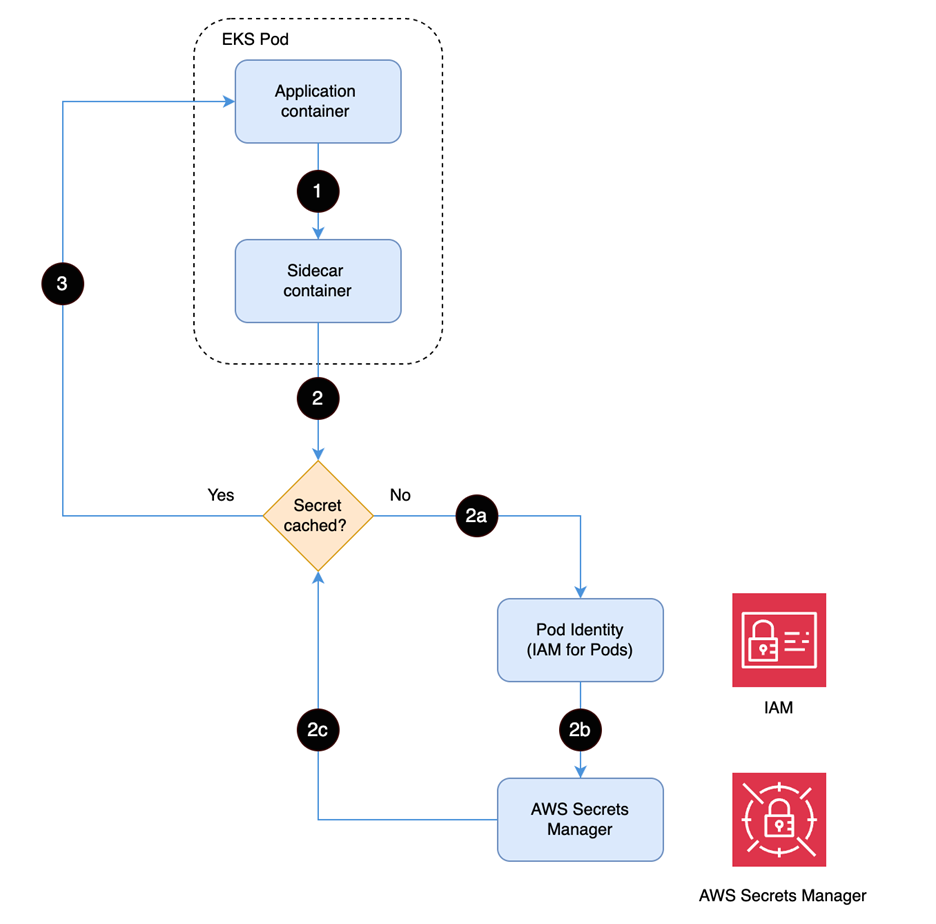


 Figure 1: AWS KMS GenerateDataKey requests per second without TLS connection reuse
 Figure 2: AWS KMS GenerateDataKey requests per second with TLS connection reuse