All posts by Srini Ponnada

Unlock granular resource control with queue-based QMR in Amazon Redshift Serverless

Post Syndicated from Srini Ponnada original https://aws.amazon.com/blogs/big-data/unlock-granular-resource-control-with-queue-based-qmr-in-amazon-redshift-serverless/

Amazon Redshift Serverless removes infrastructure management and manual scaling requirements from data warehousing operations. Amazon Redshift Serverless queue-based query resource management, helps you protect critical workloads and control costs by isolating queries into dedicated queues with automated rules that prevent runaway queries from impacting other users. You can create dedicated query queues with customized monitoring rules for different workloads, providing granular control over resource usage. Queues let you define metrics-based predicates and automated responses, such as automatically aborting queries that exceed time limits or consume excessive resources.

Different analytical workloads have distinct requirements. Marketing dashboards need consistent, fast response times. Data science workloads might run complex, resource-intensive queries. Extract, transform, and load (ETL) processes might execute lengthy transformations during off-hours.

As organizations scale analytics usage across more users, teams, and workloads, ensuring consistent performance and cost control becomes increasingly challenging in a shared environment. A single poorly optimized query can consume disproportionate resources, degrading performance for business-critical dashboards, ETL jobs, and executive reporting. With Amazon Redshift Serverless queue-based Query Monitoring Rules (QMR), administrators can define workload-aware thresholds and automated actions at the queue level—a significant improvement over previous workgroup-level monitoring. You can create dedicated queues for distinct workloads such as BI reporting, ad hoc analysis, or data engineering, then apply queue-specific rules to automatically abort, log, or restrict queries that exceed execution-time or resource-consumption limits. By isolating workloads and enforcing targeted controls, this approach protects mission-critical queries, improves performance predictability, and prevents resource monopolization—all while maintaining the flexibility of a serverless experience.

In this post, we discuss how you can implement your workloads with query queues in Redshift Serverless.

Queue-based vs. workgroup-level monitoring

Before query queues, Redshift Serverless offered query monitoring rules (QMRs) only at the workgroup level. This meant the queries, regardless of purpose or user, were subject to the same monitoring rules.

Queue-based monitoring represents a significant advancement:

  • Granular control – You can create dedicated queues for different workload types
  • Role-based assignment – You can direct queries to specific queues based on user roles and query groups
  • Independent operation – Each queue maintains its own monitoring rules

Solution overview

In the following sections, we examine how a typical organization might implement query queues in Redshift Serverless.

Architecture Components

Workgroup Configuration

  • The foundational unit where query queues are defined
  • Contains the queue definitions, user role mappings, and monitoring rules

Queue Structure

  • Multiple independent queues operating within a single workgroup
  • Each queue has its own resource allocation parameters and monitoring rules

User/Role Mapping

  • Directs queries to appropriate queues based on:
  • User roles (e.g., analyst, etl_role, admin)
  • Query groups (e.g., reporting, group_etl_inbound)
  • Query group wildcards for flexible matching

Query Monitoring Rules (QMRs)

  • Define thresholds for metrics like execution time and resource usage
  • Specify automated actions (abort, log) when thresholds are exceeded

Prerequisites

To implement query queues in Amazon Redshift Serverless, you need to have the following prerequisites:

Redshift Serverless environment:

  • Active Amazon Redshift Serverless workgroup
  • Associated namespace

Access requirements:

  • AWS Management Console access with Redshift Serverless permissions
  • AWS CLI access (optional for command-line implementation)
  • Administrative database credentials for your workgroup

Required permissions:

  • IAM permissions for Redshift Serverless operations (CreateWorkgroup, UpdateWorkgroup)
  • Ability to create and manage database users and roles

Identify workload types

Begin by categorizing your workloads. Common patterns include:

  • Interactive analytics – Dashboards and reports requiring fast response times
  • Data science – Complex, resource-intensive exploratory analysis
  • ETL/ELT – Batch processing with longer runtimes
  • Administrative – Maintenance operations requiring special privileges

Define queue configuration

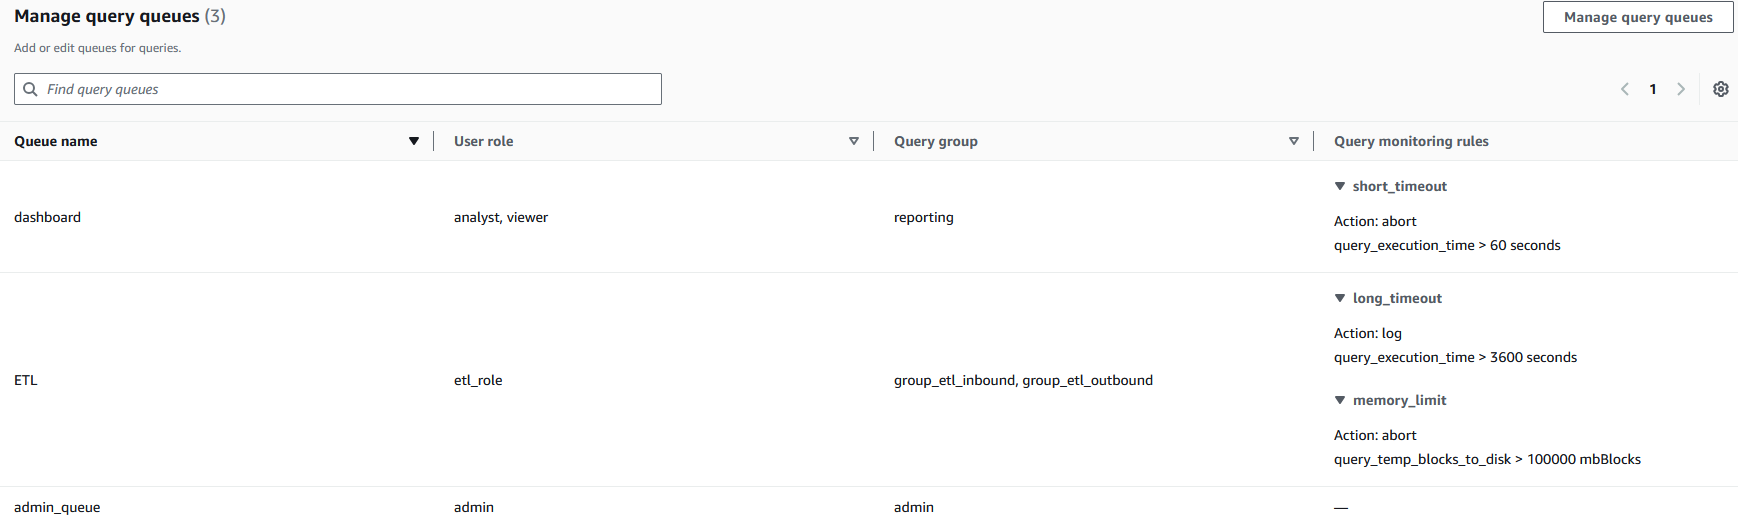
For each workload type, define appropriate parameters and rules. For a practical example, let’s assume we want to implement three queues:

  • Dashboard queue – Used by analyst and viewer user roles, with a strict runtime limit set to stop queries longer than 60 seconds
  • ETL queue – Used by etl_role user roles, with a limit of 100,000 blocks on disk spilling (query_temp_blocks_to_disk) to control resource usage during data processing operations
  • Admin queue – Used by admin user roles, without a query monitoring limit enforced

To implement this using the AWS Management Console, complete the following steps:

  1. On the Redshift Serverless console, go to your workgroup.
  2. On the Limits tab, under Query queues, choose Enable queues.
  3. Configure each queue with appropriate parameters, as shown in the following screenshot.

Each queue (dashboard, ETL, admin_queue) is mapped to specific user roles and query groups, creating clear boundaries between query rules. The query monitoring rules implement automated resource governance—for example, the dashboard queue automatically stops queries exceeding 60 seconds (short_timeout) while allowing ETL processes longer runtimes with different thresholds. This configuration helps prevent resource monopolization by establishing separate processing lanes with appropriate guardrails, so critical business processes can maintain necessary computational resources while limiting the impact of resource-intensive operations.

Alternatively, you can implement the solution using the AWS Command Line Interface (AWS CLI).

In the following example, we create a new workgroup named test-workgroup within an existing namespace called test-namespace. This makes it possible to create queues and establish associated monitoring rules for each queue using the following command:

aws redshift-serverless create-workgroup \
  --workgroup-name test-workgroup \
  --namespace-name test-namespace \
  --config-parameters '[{"parameterKey": "wlm_json_configuration", "parameterValue": "[{\"name\":\"dashboard\",\"user_role\":[\"analyst\",\"viewer\"],\"query_group\":[\"reporting\"],\"query_group_wild_card\":1,\"rules\":[{\"rule_name\":\"short_timeout\",\"predicate\":[{\"metric_name\":\"query_execution_time\",\"operator\":\">\",\"value\":60}],\"action\":\"abort\"}]},{\"name\":\"ETL\",\"user_role\":[\"etl_role\"],\"query_group\":[\"group_etl_inbound\",\"group_etl_outbound\"],\"rules\":[{\"rule_name\":\"long_timeout\",\"predicate\":[{\"metric_name\":\"query_execution_time\",\"operator\":\">\",\"value\":3600}],\"action\":\"log\"},{\"rule_name\":\"memory_limit\",\"predicate\":[{\"metric_name\":\"query_temp_blocks_to_disk\",\"operator\":\">\",\"value\":100000}],\"action\":\"abort\"}]},{\"name\":\"admin_queue\",\"user_role\":[\"admin\"],\"query_group\":[\"admin\"]}]"}]' 

You can also modify an existing workgroup using update-workgroup using the following command:

aws redshift-serverless update-workgroup \
  --workgroup-name test-workgroup \
  --config-parameters '[{"parameterKey": "wlm_json_configuration", "parameterValue": "[{\"name\":\"dashboard\",\"user_role\":[\"analyst\",\"viewer\"],\"query_group\":[\"reporting\"],\"query_group_wild_card\":1,\"rules\":[{\"rule_name\":\"short_timeout\",\"predicate\":[{\"metric_name\":\"query_execution_time\",\"operator\":\">\",\"value\":60}],\"action\":\"abort\"}]},{\"name\":\"ETL\",\"user_role\":[\"etl_role\"],\"query_group\":[\"group_etl_load\",\"group_etl_replication\"],\"rules\":[{\"rule_name\":\"long_timeout\",\"predicate\":[{\"metric_name\":\"query_execution_time\",\"operator\":\">\",\"value\":3600}],\"action\":\"log\"},{\"rule_name\":\"memory_limit\",\"predicate\":[{\"metric_name\":\"query_temp_blocks_to_disk\",\"operator\":\">\",\"value\":100000}],\"action\":\"abort\"}]},{\"name\":\"admin_queue\",\"user_role\":[\"admin\"],\"query_group\":[\"admin\"]}]"}]'

Best practices for queue management

Consider the following best practices:

  • Start simple – Begin with a minimal set of queues and rules
  • Align with business priorities – Configure queues to reflect critical business processes
  • Monitor and adjust – Regularly review queue performance and adjust thresholds
  • Test before production – Validate query metrics behavior in a test environment before applying to production

Clean up

To clean up your resources, delete the Amazon Redshift Serverless workgroups and namespaces. For instructions, see Deleting a workgroup.

Conclusion

Query queues in Amazon Redshift Serverless bridge the gap between serverless simplicity and fine-grained workload control by enabling queue-specific Query Monitoring Rules tailored to different analytical workloads. By isolating workloads and enforcing targeted resource thresholds, you can protect business-critical queries, improve performance predictability, and limit runaway queries, helping minimize unexpected resource consumption and better control costs, while still benefiting from the automatic scaling and operational simplicity of Redshift Serverless.

Get started with Amazon Redshift Serverless today.


About the authors

Srini Ponnada

Srini is a Sr. Data Architect at Amazon Web Services (AWS). He has helped customers build scalable data warehousing and big data solutions for over 20 years. He loves to design and build efficient end-to-end solutions on AWS.

Niranjan Kulkarni

Niranjan is a Software Development Engineer for Amazon Redshift. He focuses on Amazon Redshift Serverless adoption and Amazon Redshift security-related features. Outside of work, he spends time with his family and enjoys watching high-quality TV series.

Ashish Agrawal

Ashish is currently a Principal Technical Product Manager with Amazon Redshift, building cloud-based data warehouses and analytics cloud services solutions. Ashish has over 24 years of experience in IT. Ashish has expertise in data warehouses, data lakes, and platform as a service. Ashish is a speaker at worldwide technical conferences.

Davide Pagano

Davide is a Software Development Manager with Amazon Redshift, specialized in building smart cloud-based data warehouses and analytics cloud services solutions like automatic workload management, multi-dimensional data layouts, and AI-driven scaling and optimizations for Amazon Redshift Serverless. He has over 10 years of experience with databases, including 8 years of experience tailored to Amazon Redshift.

IPv6 addressing with Amazon Redshift

Post Syndicated from Srini Ponnada original https://aws.amazon.com/blogs/big-data/ipv6-addressing-with-amazon-redshift/

As we witness the gradual transition from IPv4 to IPv6, Amazon Web Services (AWS) continues to expand its support for dual-stack networking across its service portfolio. In this post, we show how you can migrate your Amazon Redshift Serverless workgroup from IPv4-only to dual-stack mode, so you can make your data warehouse future ready.

An IP address serves as a digital identity for devices connected to the internet. This unique numerical identifier enables devices to communicate across IP-based networks, facilitating the exchange of data packets between source and destination.

Today’s internet operates on two IP versions:

  • IPv4 – The traditional 32-bit addressing system (such as 192.168.0.22) that has powered internet communications for over three decades. With approximately 4 billion possible addresses (2³²), IPv4’s limitations have become increasingly apparent as our digital environment expands.
  • IPv6 – The next-generation 128-bit addressing system (such as 2606:4700::6810:787f) offers an astronomical number of unique addresses (340 undecillion or 2¹²⁸). This virtually unlimited address space is designed to accommodate the explosive growth of internet-connected devices.

In the case of Amazon Redshift, dual-stack networking allows Redshift workgroups to communicate over both IPv4 and IPv6 protocols simultaneously. This networking architecture allows Redshift workgroups to be accessible using both IPv4 and IPv6 addresses, providing greater flexibility and future-proofing for network communications. Dual-stack networking provides the following advantages:

  1. Future-proofing – Facilitates compatibility with both IPv4 systems and modern IPv6 networks
  2. Enhanced connectivity – Provides more flexible networking options for diverse client applications

Enable dual-stack networking for Amazon Redshift

An Amazon Redshift workgroup operating in dual-stack mode has both IPv4 and IPv6 addresses associated with the database endpoints. We’ve introduced a new API field called ipAddressTypein the Amazon Redshift API that gives you direct control over your workgroup’s network configuration. You can now specifically choose whether your Amazon Redshift instance operates in IPv4-only mode or dual-stack mode. For complete implementation details, refer to the ipAddressType parameter in the Amazon Redshift API Reference.

Best practice

When implementing dual-stack networking in Amazon Redshift, deploy your workgroups in private subnets with virtual private cloud (VPC) endpoints for optimal security and compatibility. This approach aligns with the current Amazon Redshift support model, which requires dual-stack databases to operate in private mode only. Amazon Redshift doesn’t currently support databases with IPv6-only endpoints or publicly accessible dual-stack instances.

Prerequisites

To implement dual-stack networking in Amazon Redshift, you need to have the following prerequisites:

  • An existing Amazon Redshift serverless workgroups running in IPv4-only mode that you want to convert to dual-stack mode
  • Administrative permissions to modify Amazon Redshift workgroup network configurations
  • VPC with both IPv4 and IPv6 CIDR blocks assigned

Enable IPv6 support in your VPC subnets

Before migrating your Amazon Redshift Serverless workgroup to dual-stack mode, you must first make sure your VPC subnets support IPv6 addressing. In this section, we walk through the process of enabling IPv6 CIDR blocks for your VPC.

Existing VPC Subnets

To enable dual-stack mode in your existing VPC follow these five high-level steps:

  1. Access the VPC dashboard
  2. Navigate to the subnet settings
  3. Add the IPv6 CIDR block
  4. Repeat for the required subnets
  5. Verify IPv6 CIDR association

To access the VPC dashboard:

  1. Sign in to your account on the AWS Management Console
  2. In the search bar at the top, type VPC
  3. Choose VPC from the dropdown list to navigate to the Amazon Virtual Private Cloud (Amazon VPC) dashboard

To navigate to subnet settings:

  1. In the left navigation panel under Virtual private cloud, choose Subnets
  2. From the subnet list, identify and select the subnet(s) that your Amazon Redshift Serverless workgroup uses or will use

To add the IPv6 CIDR block:

  1. With your subnet selected, choose Actions in the dropdown list
  2. Choose Edit IPv6 CIDRs from the available options
  3. In the configuration panel that appears, choose Add IPv6 CIDR
  4. The system will automatically suggest an appropriate IPv6 CIDR block allocation
  5. Choose Save to apply the changes

Repeat for the required subnets. You must modify the subnets within the VPC that will be used by your Amazon Redshift resources. Repeat high-level steps 2–3 for each subnet in your Amazon Redshift subnet group.

Verify the IPv6 CIDR association. After completing the configuration, verify that each subnet displays both IPv4 and IPv6 CIDR blocks in the subnet details. Your subnet details should show something like the following snippet:IPv4 CIDR: 10.0.0.0/24IPv6 CIDR: 2600:1f16:c72:9d00::/64

After you’ve successfully configured IPv6 CIDR blocks for the relevant subnets, you’re ready to proceed with enabling dual-stack mode on your Amazon Redshift Serverless workgroup.

New VPC Subnets

To enable dual-stack mode in a new VPC, follow these steps:

  1. To create a dual-stack VPC, add the --amazon-provided-ipv6-cidr-block option to add an Amazon provided IPv6 CIDR block, as shown in the following example:
    aws ec2 create-vpc --cidr-block 10.0.0.0/24 \
    --amazon-provided-ipv6-cidr-block \
    --query Vpc.VpcId \
    --output text

  2. [Dual stack VPC] Get the IPv6 CIDR block that’s associated with your VPC by using the following describe-vpcs command:
    aws ec2 describe-vpcs --vpc-id vpcxxxxx \
    --query Vpcs[].Ipv6CidrBlockAssociationSet[].Ipv6CidrBlock \
    --output text

  3. If you created a dual-stack VPC, you can use the --ipv6-cidr-block option to create a dual stack subnet, as shown in the following command:
    aws ec2 create-subnet --vpc-id vpc-xxx \
    --cidr-block 10.0.1.0/20 \
    --ipv6-cidr-block 2600:1f13:cfe:3600::/64 \
    --availability-zone us-east-2a \
    --query Subnet.SubnetId \
    --output text

Migrate an existing Amazon Redshift Serverless workgroup from IPv4 to IPv6

To enable dual-stack mode for your Amazon Redshift Serverless workgroup, follow these five high-level steps:

  1. Access Amazon Redshift Serverless
  2. Select your workgroup
  3. Access network and security settings
  4. Enable dual-stack mode
  5. Verify the configuration

To access Amazon Redshift Serverless:

  1. Sign in to AWS Management Console using your credentials.
  2. In the search bar at the top of the console, enter Redshift.
  3. Choose Amazon Redshift in the dropdown list. This will take you to the Amazon Redshift dashboard. Confirm Make sure you’re on the Redshift Serverless dashboard view

To select your workgroup:

  1. In the Redshift Serverless dashboard, locate the Workgroups section
  2. Select the name of the specific workgroup you want to modify

To access network and security settings:

  1. On the workgroup details page, locate the horizontal navigation tabs
  2. Next to the Query and database monitoring section, choose the Data access tab
  3. Choose Edit to access the Edit network and security page

To enable dual-stack mode:

  1. In the network settings section, locate the IP address type options
  2. Choose Dual-stack mode. This enables connectivity for both IPv4 and IPv6
  3. Choose Save changes at the bottom of the page

To verify the configuration:

After the changes are applied, you’ll be returned to the workgroup details page. Confirm that your workgroup now displays Dual-stack mode in its network settings, as shown in the following screenshot.

Your Amazon Redshift Serverless workgroup is now configured to support both IPv4 and IPv6 traffic. This configuration allows your Redshift Serverless workgroup to communicate over both IPv4 and IPv6 protocols, providing greater flexibility for your network connectivity options.

Access Redshift dual-stack serverless workgroups

Redshift dual-stack workgroups maintain the same access methods regardless of whether you’re connecting using IPv4 or IPv6. Your existing connection endpoints remain unchanged.

To access a Redshift dual-stack workgroups from an Amazon Elastic Compute Cloud (Amazon EC2) instance, follow these steps:

  1. Create an IPv4 EC2 instance.
  2. Add the associated EC2 security group to your Redshift workgroup’s security group inbound rules.
  3. Connect to your EC2 instance. Log in to your EC2 instance on the AWS console to install the psql client to test the database connectivity. Enter the following commands from the terminal window:
    # Update your system packages
    sudo dnf update -y
    # Install the PostgreSQL 15 repository
    sudo dnf install -y postgresql15
    # Verify the installation
    psql –version

    Connect to your Redshift workgroup using application user

    psql -h your-redshift-endpoint -U your-username -d your-database -p 5439

    Enter password when prompted

  4. Enter sample queries, as shown in the following:
    SELECT * FROM your_table LIMIT 10;

  5. Validate the IPv4 connection using the following SQL by replacing your associated IPv4 EC2 instance IP address:
    SELECT * FROM sys_connection_log where user_name = 'admin' 
    and remote_host like '%172.31.83.132%' order by record_time desc;

  6. Execute identical validation steps on your IPv6-enabled EC2 instance to verify that all functionality operates correctly with the IPv6 protocol stack using the preceding commands.

Create dual-stack mode in Amazon Redshift Serverless using AWS CLI

You can create a new dual-stack mode in Amazon Redshift Serverless using AWS Command Line Interface (AWS CLI). Follow these high-level steps:

  1. Create a namespace
  2. Create a workgroup
  3. Verify the workgroup is set up in dual-stack mode

To create namespace, enter the following code:

export AWS_USE_DUALSTACK_ENDPOINT=true
aws redshift-serverless create-namespace \
--region us-east-1 \
--namespace-name ipv6-demo \
--admin-username xxx  \
--admin-user-password "yyyyyyy"

To create workgroup, enter the following code:

aws redshift-serverless create-workgroup \
--workgroup-name ipv6-demo-wg \
--namespace-name ipv6-demo \
--region us-east-1 \
--subnet-ids subnet-ppppppp subnet-qqqqqq \
--ip-address-type dualstack

To verify the workgroup is set up in dual-stack mode, refer to the steps in the previous section.

Clean up

To clean up your resources, complete the following steps:

  1. On the Amazon Redshift Serverless console, delete the Amazon Redshift workgroups and namespaces
  2. On the Amazon EC2 console, terminate the EC2 instances

Conclusion

In this post, we’ve explored the capability of Amazon Redshift Serverless to support IPv6 addressing through dual-stack mode, marking a significant advancement in the AWS data warehouse networking flexibility.

We’ve walked through the complete migration journey, from preparing your VPC subnets with IPv6 CIDR blocks to configuring your Amazon Redshift Serverless workgroup for dual-stack operation. The process is straightforward. Although IPv6-only configurations aren’t yet supported for Amazon Redshift, the dual-stack approach provides an ideal transition path, maintaining compatibility with existing IPv4 systems while introducing IPv6 capabilities. Remember that dual-stack configurations are currently limited to private access mode, with public accessibility not yet supported for dual-stack instances.

By migrating to dual-stack mode now, you can make sure your Amazon Redshift environment remains optimally connected, addressable, and ready to support your organization’s data analytics needs well into the future—regardless of how internet addressing protocols continue to evolve.

If you have questions or suggestions on the content covered in this post, leave them in the comments section.


About the authors

Srini Ponnada

Srini Ponnada

Srini is a Sr. Data Architect at AWS. He has helped customers build scalable data warehousing and big data solutions for over 20 years. He loves to design and build efficient end-to-end solutions on AWS.

Ji Yanzhu

Yanzhu Ji

Ji Yanzhu is a Senior Product Manager on the Amazon Redshift team. She has extensive experience in database security and developing product vision and strategy for industry-leading data products and platforms. She excels at building robust software products using web development, system design, database, and distributed programming techniques.

Hua Zirui

Hua Zirui

Zirui Hua is a Software Development Engineer for Amazon Redshift, where he works on developing next generation features for Amazon Redshift. His main focuses are on networking and proxy of database. Outside of work, he likes to play tennis and basketball.

Sandeep Adwankar

Sandeep Adwankar

Sandeep is a Senior Product Manager at AWS. Based in the California Bay Area, he works with customers around the globe to translate business and technical requirements into products that enable customers to improve how they manage, secure, and access data.

Sumanth Punyamurthula

Sumanth Punyamurthula

Sumanth is a Senior Data and Analytics Architect at AWS with more than 20 years of experience in leading large analytical initiatives, including analytics, data warehouse, data lakes, data governance, security, and cloud infrastructure across travel, hospitality, financial, and healthcare industries.

Niranjan Kulkarni

Niranjan Kulkarni

Niranjan is a Software Development Engineer for Amazon Redshift. He focuses on Amazon Redshift Serverless adoption and Amazon Redshift security-related features. Outside of work, he spends time with his family and enjoys watching high-quality TV series.

Ingest telemetry messages in near real time with Amazon API Gateway, Amazon Data Firehose, and Amazon Location Service

Post Syndicated from Srini Ponnada original https://aws.amazon.com/blogs/big-data/ingest-telemetry-messages-in-near-real-time-with-amazon-api-gateway-amazon-data-firehose-and-amazon-location-service/

Many organizations specializing in communications and navigation surveillance technologies are required to support multi-modal transportation supply chain markets such as road, water, air, space, and rail. One common use case is provisioning of emergency alerts services for multiple government agencies.

These organizations use third-party satellite-powered terminal devices for remote monitoring using telemetry and NMEA-0183 formatted messages generated in near real time. This post demonstrates how to implement a satellite-based remote alerting and response solution on the AWS Cloud to provide time-critical alerts and actionable insights, with a focus on telemetry message ingestion and alerts. Key services in the solution include Amazon API Gateway, Amazon Data Firehose, and Amazon Location Service.

The challenge

In the event of a disaster e.g. water flood, there is usually a lack of terrestrial data connectivity that prevents monitoring stations from taking actionable measures in real time. In the space analytics domain, many organizations deploy satellite-powered terminals on these monitoring stations.

These terminal devices transmit telemetry and NMEA-0183 formatted messages to a satellite network managed by a third-party entity, which is subsequently traversed down to an API endpoint.

Our AWS-powered solution aims to capture, enrich, and ingest satellite-powered telemetry messages as well as deliver alerts in near real time. This solution is based on AWS serverless services such as API Gateway, Data Firehose, and Amazon Simple Storage Service (Amazon S3), and is able to scale to more than a million terminal devices transmitting an hourly state of health telemetry message over the satellite.

Solution overview

This telemetry message processing begins with an API endpoint created using API Gateway, securing HTTPS transmission over a satellite network. This endpoint receives raw JSON messages and responds with an HTTP 200 success code. We take advantage of the direct integration between API Gateway and Data Firehose to ingest these messages into Amazon S3 in near real time. The default message reception limit on an API Gateway endpoint is 10,000 messages per second, which can be increased upon request.

Upon receiving messages through API Gateway, Data Firehose batches them into 60-second intervals or 1 MB size files, whichever comes first, and delivers them to Amazon S3. This configuration enables near real-time processing, which is essential for timely alerts and responses. We use the built-in features of Data Firehose, including AWS Lambda for necessary data transformation and Amazon Simple Notification Service (Amazon SNS) for near real-time alerts. Additionally, Data Firehose converts JSON data to Parquet format before delivering it to Amazon S3, optimizing data consumption by tools like Amazon Athena, which are ideal for partitioned data formats.

To maintain up-to-date data, an AWS Glue crawler reads and updates the AWS Glue Data Catalog from transformed Parquet files. This crawler runs one time a day by default to optimize costs, but you can adjust its schedule to meet varying end-user requirements.

We use an AWS CloudFormation template to implement the solution architecture, as illustrated in the following diagram.

Cloudformation template to implement the solution architecture

Cloudformation template to implement the solution architecture

For this post, we deliver sample JSON formatted telemetry messages to an API Gateway endpoint test interface to simulate the satellite-powered terminal device functionality. API Gateway integrates with Data Firehose, which uses Lambda to perform the following actions in near real time:

  1. Parse the message and decode the data blob from base64 encoding to utf-8. Most third-party satellite-powered terminal devices transmit messages in an encoded format and require decoding to a standard readable format such as utf-8.
  2. Use Amazon Location and append with location specifics (such as street, city, and ZIP) based on the latitude and longitude of the terminal device.
  3. Detect if the solar panel battery of the terminal device is lower than the defined threshold and generate an alert through Amazon SNS to the user-provided email address. For simplicity, the CloudFormation template creates an SNS topic within the same account instead of a cross-account consumer application. You must subscribe to the topic using an email received at the provided email address.
  4. Ingest the messages in an S3 bucket received in 1 minute or aggregate to 1 MB size files.

The solution uses the following key services:

  • Amazon API Gateway – API Gateway is a fully managed service that makes it straightforward developers to create, publish, maintain, monitor, and secure APIs at any scale. APIs act as the entry point for applications to access data, business logic, or functionality from your backend services.
  • Amazon Data Firehose – Data Firehose is an extract, transform, and load (ETL) service that reliably captures, transforms, and delivers streaming data to data lakes, data stores, and analytics services.
  • AWS Glue – The AWS Glue Data Catalog is your persistent technical metadata store in the AWS Cloud. Each AWS account has one Data Catalog per AWS Region. Each Data Catalog is a highly scalable collection of tables organized into databases. A table is metadata representation of a collection of structured or semi-structured data stored in sources such as Amazon Relational Database Service (Amazon RDS), Apache Hadoop Distributed File System (HDFS), Amazon OpenSearch Service, and others.
  • IAM – With AWS Identity and Access Management (IAM), you can specify who or what can access services and resources in AWS, centrally manage fine-grained permissions, and analyze access to refine permissions across AWS.
  • AWS Lambda – Lambda is a serverless, event-driven compute service that lets you run code for virtually any type of application or backend service without provisioning or managing servers. You can invoke Lambda functions from over 200 AWS services and software as a service (SaaS) applications, and only pay for what you use.
  • Amazon Location Service – Location Service makes it straightforward for developers to add location functionality, such as maps, points of interest, geocoding, routing, tracking, and geofencing, to their applications without sacrificing data security and user privacy.
  • Amazon S3 – Amazon S3 is an object storage service offering industry-leading scalability, data availability, security, and performance. Customers of all sizes and industries can store and protect any amount of data for virtually any use case, such as data lakes, cloud-centered applications, and mobile apps.
  • Amazon SNS – Amazon SNS sends notifications two ways: application-to-application (A2A) and application-to-person (A2P). A2A provides high-throughput, push-based, many-to-many messaging between distributed systems, microservices, and event-driven serverless applications. These applications include Amazon Simple Queue Service (SQS), Data Firehose, Lambda, and other HTTPS endpoints. A2P functionality lets you send messages to your customers with SMS texts, push notifications, and email.

Deploy the solution

AWS CloudFormation creates the API Gateway endpoint, Data Firehose delivery stream, Lambda function, Amazon Location index, SNS topic, S3 bucket, and AWS Glue database, table, and crawler. To deploy the solution, launch the CloudFormation stack and provide the following parameters:

  • S3 bucket name – The bucket that stores terminal device messages ingested in near real time by the Data Firehose delivery stream
  • Email address – The email of the user to subscribe for SNS alerts
  • Database name – The name of the AWS Glue database

Test the solution

The following is a sample JSON state of health telemetry message transmitted by a terminal device:

{
  "packetId": 29957891,
  "deviceType": 1,
  "deviceId": 6113,
  "userApplicationId": 65535,
  "organizationId": 65681,
  "data": "eyJsbiI6LTEwNC45NTUsInNpIjowLjAsImJpIjowLjIxMiwic3YiOjAuMDA4LCJsdCI6MzkuNTc1MiwiYnYiOjMuNzI4LCJkIjoxNjU4NzQ1MzM2LCJuIjo2NjksImEiOjE3MzguMCwicyI6NS4wLCJjIjozMjAuMCwiciI6LTEwMSwidGkiOjAuMDM2fQ==",
  "len": 142,
  "status": 0,
  "hiveRxTime": "2022-07-25T13:03:29"
}

The data blob in the preceding sample telemetry message is encoded in base64. The following chart explains the metadata of each key indicating state of health and location of the terminal device.

Parameter Key Sample Value Notes
Longitude ln -104.955 Negative = Westing from PM
Solar Panel Current si 0.176 (Amps)
Battery Current bi 0.228 (Amps)
Solar Panel Voltage sv 19.088 (Volts)
Latitude lt 39.5751 Positive = Northing from Equator
Battery Voltage bv 4.12 (Volts) Full charge ~4.12V Dead ~ 3.3V
Date and Time d 1658248415 Epoch Seconds
Number of Messages Sent Since Last Power Cycle n 531
Altitude a 1721.0 (Meters) GPS value
Speed s 1.0 (km/h) Stationary terminal reports non-zero value
Course: c 139.0 (degrees) Nautical heading convention
Last RSSI Value r -100 (dBm) >-90 = marginal link.
Modem Current ti 0.04 (Amps)

These telemetry messages can vary based on the default configuration of the device terminal manufacturer or user definitions.

To demonstrate the capability of the solution, we send the sample telemetry message to the API Gateway endpoint through its test interface, as shown in the following screenshot.

sample telemetry message

Sending sample telemetry message

After about a minute, you should see the delivered message to Amazon S3 through Data Firehose in the stage folder.

delivered message to Amazon S3

Delivered message to Amazon S3

You should also receive an SNS alert at the provided email address.

SNS alert message

SNS alert message

To see the results in Athena, we crawl this data with the AWS Glue crawler created by the CloudFormation template. By default, the crawler is scheduled daily to reflect newer records for the day in the stage table.

AWS Glue crawler execution

AWS Glue crawler execution

After the data is crawled successfully, you can query the results in Athena.

Query the results in Athena

Query results in Athena

Best practices and considerations

Keep in mind the following best practices when implementing this solution:

  • Make sure API Gateway is protected using an API key or other authorization method
  • Adhere to the least privilege principle for all created users and roles to mitigate potential security breaches
  • Conduct load testing of the solution using an API simulator tailored to your specific use case
  • Automate the solution using the AWS Cloud Development Kit (AWS CDK), AWS CloudFormation, or your preferred infrastructure as code (IaC) tools

Additionally, Data Firehose now supports zero buffering. For more information, refer to Amazon Kinesis Data Firehose now supports zero buffering.

Conclusion

In this post, we provided a proof of concept to implement a satellite-based remote alerting and response solution to provide time-critical alerts and actionable insights, for use cases in the space analytics domain. Make sure to adhere to AWS best practices and your organizational security policies before deploying this solution in a production environment.

Try out the solution for your own use case, and let us know your feedback and questions in the comments section.


About the authors

Srini Ponnada is a Sr. Data Architect at AWS. He has helped customers build scalable data warehousing and big data solutions for over 20 years. He loves to design and build efficient end-to-end solutions on AWS. In his spare time, he loves walking, and playing Tennis.

Munim Abbasi is currently a Sr. Data Architect at AWS with more than ten years of experience in Data & Analytics domain. Leveraging his core competencies in data architecture, design and engineering, he strives to make his customers empowered through their data by helping them deploy scalable cloud solutions adhering to AWS best practices. Outside of work, he holds great love for music, strength training and family.

Vivek Shrivastava is a Principal Data Architect, Data Lake in AWS Professional Services. He is a big data enthusiast and holds 14 AWS Certifications. He is passionate about helping customers build scalable and high-performance data analytics solutions in the cloud. In his spare time, he loves reading and finds areas for home automation.