All posts by Swapna Bandla

Amazon MSK Express brokers now support Intelligent Rebalancing for 180 times faster operation performance

Post Syndicated from Swapna Bandla original https://aws.amazon.com/blogs/big-data/amazon-msk-express-brokers-now-support-intelligent-rebalancing-for-180-times-faster-operation-performance/

Effective today, all new Amazon Managed Streaming for Apache Kafka (Amazon MSK) Provisioned clusters with Express brokers will support Intelligent Rebalancing at no additional cost. With this new capability you can perform automatic partition balancing operations when scaling Apache Kafka clusters up or down. Intelligent Rebalancing maximizes the capacity utilization of Amazon MSK clusters with Express brokers by optimally rebalancing Kafka resources on them for better performance, eliminating the need to manage partitions independently or by using third-party tools. Intelligent Rebalancing on Amazon MSK Express brokers performs these operations up to 180 times faster compared to Standard brokers.

We launched Amazon MSK Express brokers in November 2024 to reimagine Apache Kafka for ease of use, best-in-class price performance, and predictable availability. Amazon MSK Express brokers are designed to deliver up to three times more throughput per-broker, scale up to 20 times faster, and reduce recovery time by 90 percent as compared to Standard brokers running Apache Kafka. Since launch, we have expanded Amazon MSK Express brokers to additional AWS Regions, instance types, and most recently increased support to 5x more partitions per Express broker, improving price-performance by up to 50% for partition-bound workloads.

With Intelligent Rebalancing, Amazon MSK Express broker clusters are continuously monitored for resource imbalance or overload based on intelligent Amazon MSK defaults to maximize cluster performance. When required, brokers are efficiently scaled, without affecting cluster availability for clients to produce and consume data. Customers can now take full advantage of the scaling and performance benefits of Amazon MSK Provisioned clusters for Express brokers while simplifying cluster management operations.

In this post we’ll introduce the Intelligent Rebalancing feature and show an example of how it works to improve operation performance.

When to use Intelligent Rebalancing

With Intelligent Rebalancing, Amazon MSK Express brokers now offer a fully automated solution for managing and scaling Kafka clusters, requiring no additional tools or configuration. Intelligent Rebalancing is enabled by default on all new Amazon MSK Express brokers clusters, so we recommend always keeping it on. Intelligent Rebalancing uses Amazon MSK best practices to trigger automatic rebalancing during the following situations:

  • Scaling in and out clusters: When customers add or remove brokers from their Amazon MSK Express brokers clusters, Intelligent Rebalancing automatically redistributes partitions to balance resource utilization across the brokers. This ensures that the cluster continues to operate at peak performance, making scaling in and out possible with a single update operation.
  • Steady-state rebalancing: Even during normal operations, Intelligent Rebalancing continuously monitors the Amazon MSK Express brokers cluster and triggers rebalancing when it detects resource imbalances or hotspots. For example, if certain brokers become overloaded due to uneven distribution of partitions or skewed traffic patterns, Intelligent Rebalancing will automatically move partitions to less utilized brokers to restore balance.

How to use Intelligent Rebalancing

To demonstrate the power of Intelligent Rebalancing, let’s run a few tests on an Amazon MSK Express brokers cluster:

Scaling test: We’ll start by creating an Amazon MSK Express brokers cluster with 3 brokers. We’ll then rapidly scale the cluster up to 6 brokers and back down to 3 brokers, simulating a sudden spike in workload. With Intelligent Rebalancing enabled, you’ll see that the rebalancing of partitions is completed within 5-10 minutes, so that the cluster can sustain the increased throughput without any drop in performance.


You can track the current and historical rebalancing operations using the metric RebalanceInProgress. In the picture below, you can also see that the clients on the producer side are not impacted during this rebalancing.

Next, we’ll create an imbalance in the cluster by directing a large portion of the traffic to a single broker. You’ll see that Intelligent Rebalancing detects this imbalance within minutes and automatically redistributes the partitions, restoring the cluster to an optimal state.

The intelligent rebalancing feature detects hotspots and automatically redistributes affected partitions across other brokers to optimize resource utilization. Without Intelligent Rebalancing, the resource imbalance would persist, potentially leading to performance issues or the need for manual intervention by the customer.

These tests showcase how Intelligent Rebalancing with Amazon MSK Express brokers enables scaling Kafka clusters seamlessly while maintaining consistently high performance, even under varying workload conditions.

Conclusion

Intelligent Rebalancing for Amazon MSK Provisioned clusters with Express brokers are currently being rolled out over the next few weeks in all AWS Regions where Amazon MSK Express brokers are supported. This feature is automatically enabled for all new Amazon MSK Provisioned clusters with Express brokers at no additional cost.

To get started, visit the Amazon MSK console. For more information, see the Amazon MSK Developer Guide.


About the authors

Swapna Bandla

Swapna Bandla

Swapna is a Senior Streaming Solutions Architect at AWS. With a deep understanding of real-time data processing and analytics, she partners with customers to architect scalable, cloud-native solutions that align with AWS Well-Architected best practices. Swapna is passionate about helping organizations unlock the full potential of their data to drive business value. Beyond her professional pursuits, she cherishes quality time with her family.

Masudur Rahaman Sayem

Masudur Rahaman Sayem

Masudur is a Streaming Data Architect at AWS with over 25 years of experience in the IT industry. He collaborates with AWS customers worldwide to architect and implement sophisticated data streaming solutions that address complex business challenges. He has a keen interest and passion for distributed architecture, which he applies to designing enterprise-grade solutions at internet scale.

Shakhi Hali

Shakhi Hali

Shakhi is a Principal Product Manager for Amazon Managed Streaming for Apache Kafka (Amazon MSK) at AWS. She is passionate about helping customers generate business value from real-time data. Before joining MSK, Shakhi was a PM with Amazon S3. In her free time, Shakhi enjoys traveling, cooking, and spending time with family.

Overcome your Kafka Connect challenges with Amazon Data Firehose

Post Syndicated from Swapna Bandla original https://aws.amazon.com/blogs/big-data/overcome-your-kafka-connect-challenges-with-amazon-data-firehose/

Apache Kafka is a popular open source distributed streaming platform that is widely used in the AWS ecosystem. It’s designed to handle real-time, high-throughput data streams, making it well-suited for building real-time data pipelines to meet the streaming needs of modern cloud-based applications.

For AWS customers looking to run Apache Kafka, but don’t want to worry about the undifferentiated heavy lifting involved with self-managing their Kafka clusters, Amazon Managed Streaming for Apache Kafka (Amazon MSK) offers fully managed Apache Kafka. This means Amazon MSK provisions your servers, configures your Kafka clusters, replaces servers when they fail, orchestrates server patches and upgrades, makes sure clusters are architected for high availability, makes sure data is durably stored and secured, sets up monitoring and alarms, and runs scaling to support load changes. With a managed service, you can spend your time developing and running streaming event applications.

For applications to use data sent to Kafka, you need to write, deploy, and manage application code that consumes data from Kafka.

Kafka Connect is an open-source component of the Kafka project that provides a framework for connecting with external systems such as databases, key-value stores, search indexes, and file systems from your Kafka clusters. On AWS, our customers commonly write and manage connectors using the Kafka Connect framework to move data out of their Kafka clusters into persistent storage, like Amazon Simple Storage Service (Amazon S3), for long-term storage and historical analysis.

At scale, customers need to programmatically manage their Kafka Connect infrastructure for consistent deployments when updates are required, as well as the code for error handling, retries, compression, or data transformation as it is delivered from your Kafka cluster. However, this introduces a need for investment into the software development lifecycle (SDLC) of this management software. Although the SDLC is a cost-effective and time-efficient process to help development teams build high-quality software, for many customers, this process is not desirable for their data delivery use case, particularly when they could dedicate more resources towards innovating for other key business differentiators. Beyond SDLC challenges, many customers face fluctuating data streaming throughput. For instance:

  • Online gaming businesses experience throughput variations based on game usage
  • Video streaming applications see changes in throughput depending on viewership
  • Traditional businesses have throughput fluctuations tied to consumer activity

Striking the right balance between resources and workload can be challenging. Under-provisioning can lead to consumer lag, processing delays, and potential data loss during peak loads, hampering real-time data flows and business operations. On the other hand, over-provisioning results in underutilized resources and unnecessary high costs, making the setup economically inefficient for customers. Even the action of scaling up your infrastructure introduces additional delays because resources need to be provisioned and acquired for your Kafka Connect cluster.

Even when you can estimate aggregated throughput, predicting throughput per individual stream remains difficult. As a result, to achieve smooth operations, you might resort to over-provisioning your Kafka Connect resources (CPU) for your streams. This approach, though functional, might not be the most efficient or cost-effective solution.

Customers have been asking for a fully serverless solution that will not only handle managing resource allocation, but transition the cost model to only pay for the data they are delivering from the Kafka topic, instead of underlying resources that require constant monitoring and management.

In September 2023, we announced a new integration between Amazon and Amazon Data Firehose, allowing builders to deliver data from their MSK topics to their destination sinks with a fully managed, serverless solution. With this new integration, you no longer needed to develop and manage your own code to read, transform, and write your data to your sink using Kafka Connect. Data Firehose abstracts away the retry logic required when reading data from your MSK cluster and delivering it to the desired sink, as well as infrastructure provisioning, because it can scale out and scale in automatically to adjust to the volume of data to transfer. There are no provisioning or maintenance operations required on your side.

At release, the checkpoint time to start consuming data from the MSK topic was the creation time of the Firehose stream. Data Firehose couldn’t start reading from other points on the data stream. This caused challenges for several different use cases.

For customers that are setting up a mechanism to sink data from their cluster for the first time, all data in the topic older than the timestamp of Firehose stream creation would need another way to be persisted. For example, customers using Kafka Connect connectors, like These users were limited in using Data Firehose because they wanted to sink all the data from the topic to their sink, but Data Firehose couldn’t read data from earlier than the timestamp of Firehose stream creation.

For other customers that were running Kafka Connect and needed to migrate from their Kafka Connect infrastructure to Data Firehose, this required some extra coordination. The release functionality of Data Firehose means you can’t point your Firehose stream to a specific point on the source topic, so a migration requires stopping data ingest to the source MSK topic and waiting for Kafka Connect to sink all the data to the destination. Then you can create the Firehose stream and restart the producers such that the Firehose stream can then consume new messages from the topic. This adds additional, and non-trivial, overhead to the migration effort when attempting to cut over from an existing Kafka Connect infrastructure to a new Firehose stream.

To address these challenges, we’re happy to announce a new feature in the Data Firehose integration with Amazon MSK. You can now specify the Firehose stream to either read from the earliest position on the Kafka topic or from a custom timestamp to begin reading from your MSK topic.

In the first post of this series, we focused on managed data delivery from Kafka to your data lake. In this post, we extend the solution to choose a custom timestamp for your MSK topic to be synced to Amazon S3.

Overview of Data Firehose integration with Amazon MSK

Data Firehose integrates with Amazon MSK to offer a fully managed solution that simplifies the processing and delivery of streaming data from Kafka clusters into data lakes stored on Amazon S3. With just a few clicks, you can continuously load data from your desired Kafka clusters to an S3 bucket in the same account, eliminating the need to develop or run your own connector applications. The following are some of the key benefits to this approach:

  • Fully managed service – Data Firehose is a fully managed service that handles the provisioning, scaling, and operational tasks, allowing you to focus on configuring the data delivery pipeline.
  • Simplified configuration – With Data Firehose, you can set up the data delivery pipeline from Amazon MSK to your sink with just a few clicks on the AWS Management Console.
  • Automatic scaling – Data Firehose automatically scales to match the throughput of your Amazon MSK data, without the need for ongoing administration.
  • Data transformation and optimization – Data Firehose offers features like JSON to Parquet/ORC conversion and batch aggregation to optimize the delivered file size, simplifying data analytical processing workflows.
  • Error handling and retries – Data Firehose automatically retries data delivery in case of failures, with configurable retry durations and backup options.
  • Offset select option – With Data Firehose, you can select the starting position for the MSK delivery stream to be delivered within a topic from three options:
    • Firehose stream creation time – This allows you to deliver data starting from Firehose stream creation time. When migrating from to Data Firehose, if you have an option to pause the producer, you can consider this option.
    • Earliest – This allows you to deliver data starting from MSK topic creation time. You can choose this option if you’re setting a new delivery pipeline with Data Firehose from Amazon MSK to Amazon S3.
    • At timestamp – This option allows you to provide a specific start date and time in the topic from where you want the Firehose stream to read data. The time is in your local time zone. You can choose this option if you prefer not to stop your producer applications while migrating from Kafka Connect to Data Firehose. You can refer to the Python script and steps provided later in this post to derive the timestamp for the latest events in your topic that were consumed by Kafka Connect.

The following are benefits of the new timestamp selection feature with Data Firehose:

  • You can select the starting position of the MSK topic, not just from the point that the Firehose stream is created, but from any point from the earliest timestamp of the topic.
  • You can replay the MSK stream delivery if required, for example in the case of testing scenarios to select from different timestamps with the option to select from a specific timestamp.
  • When migrating from Kafka Connect to Data Firehose, gaps or duplicates can be managed by selecting the starting timestamp for Data Firehose delivery from the point where Kafka Connect delivery ended. Because the new custom timestamp feature isn’t monitoring Kafka consumer offsets per partition, the timestamp you select for your Kafka topic should be a few minutes before the timestamp at which you stopped Kafka Connect. The earlier the timestamp you select, the more duplicate records you will have downstream. The closer the timestamp to the time of Kafka Connect stopping, the higher the likelihood of data loss if certain partitions have fallen behind. Be sure to select a timestamp appropriate to your requirements.

Overview of solution

We discuss two scenarios to stream data.

In Scenario 1, we migrate to Data Firehose from Kafka Connect with the following steps:

  1. Derive the latest timestamp from MSK events that Kafka Connect delivered to Amazon S3.
  2. Create a Firehose delivery stream with Amazon MSK as the source and Amazon S3 as the destination with the topic starting position as Earliest.
  3. Query Amazon S3 to validate the data loaded.

In Scenario 2, we create a new data pipeline from Amazon MSK to Amazon S3 with Data Firehose:

  1. Create a Firehose delivery stream with Amazon MSK as the source and Amazon S3 as the destination with the topic starting position as At timestamp.
  2. Query Amazon S3 to validate the data loaded.

The solution architecture is depicted in the following diagram.

Prerequisites

You should have the following prerequisites:

  • An AWS account and access to the following AWS services:
  • An MSK provisioned or MSK serverless cluster with topics created and data streaming to it. The sample topic used in this is order.
  • An EC2 instance configured to use as a Kafka admin client. Refer to Create an IAM role for instructions to create the client machine and IAM role that you will need to run commands against your MSK cluster.
  • An S3 bucket for delivering data from Amazon MSK using Data Firehose.
  • Kafka Connect to deliver data from Amazon MSK to Amazon S3 if you want to migrate from Kafka Connect (Scenario 1).

Migrate to Data Firehose from Kafka Connect

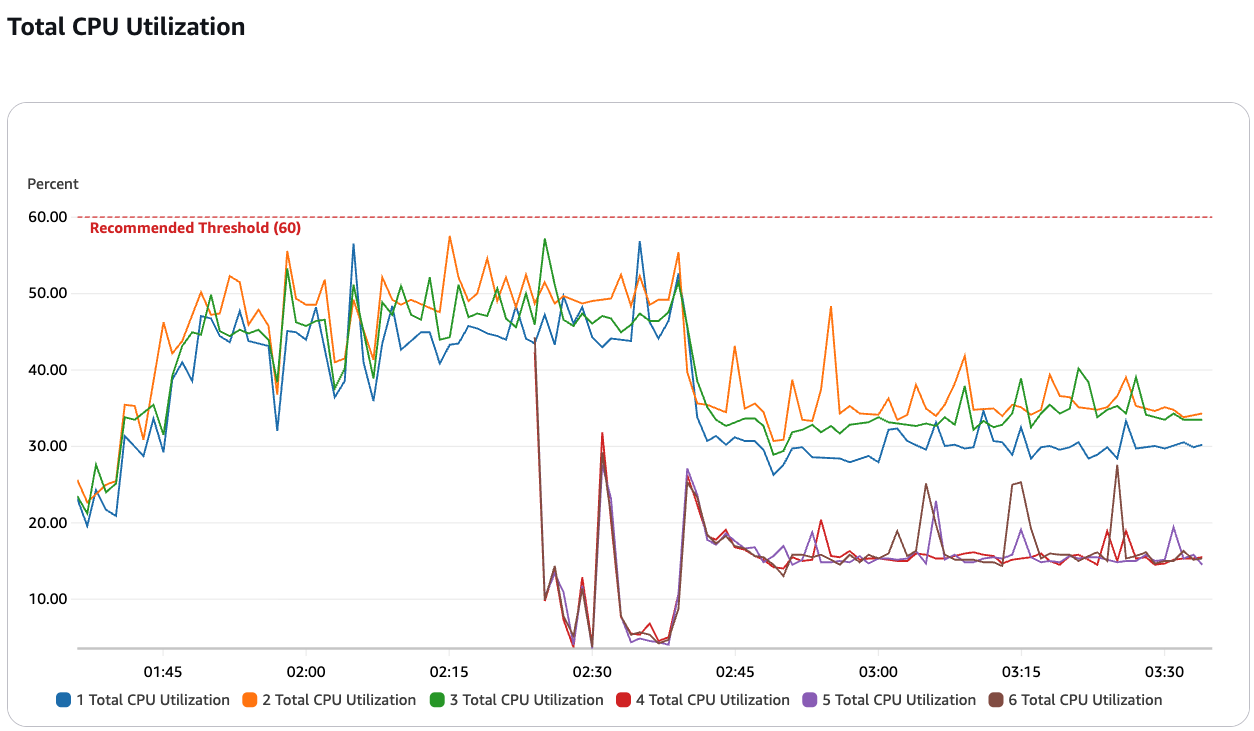
To reduce duplicates and minimize data loss, you need to configure your custom timestamp for Data Firehose to read events as close to the timestamp of the oldest committed offset that Kafka Connect reported. You can follow the steps in this section to visualize how the timestamps of each committed offset will vary by partition across the topic you want to read from. This is for demonstration purposes and doesn’t scale as a solution for workloads with a large number of partitions.

Sample data was generated for demonstration purposes by following the instructions referenced in the following GitHub repo. We set up a sample producer application that generates clickstream events to simulate users browsing and performing actions on an imaginary ecommerce website.

To derive the latest timestamp from MSK events that Kafka Connect delivered to Amazon S3, complete the following steps:

  1. From your Kafka client, query Amazon MSK to retrieve the Kafka Connect consumer group ID:
    ./kafka-consumer-groups.sh --bootstrap-server $bs --list --command-config client.properties

  2. Stop Kafka Connect.
  3. Query Amazon MSK for the latest offset and associated timestamp for the consumer group belonging to Kafka Connect.

You can use the get_latest_offsets.py Python script from the following GitHub repo as a reference to get the timestamp associated with the latest offsets for your Kafka Connect consumer group. To enable authentication and authorization for a non-Java client with an IAM authenticated MSK cluster, refer to the following GitHub repo for instructions on installing the aws-msk-iam-sasl-signer-python package for your client.

python3 get_latest_offsets.py --broker-list $bs --topic-name “order” --consumer-group-id “connect-msk-serverless-connector-090224” --aws-region “eu-west-1”

Note the earliest timestamp across all the partitions.

Create a data pipeline from Amazon MSK to Amazon S3 with Data Firehose

The steps in this section are applicable to both scenarios. Complete the following steps to create your data pipeline:

  1. On the Data Firehose console, choose Firehose streams in the navigation pane.
  2. Choose Create Firehose stream.
  3. For Source, choose Amazon MSK.
  4. For Destination, choose Amazon S3.
  5. For Source settings, browse to the MSK cluster and enter the topic name you created as part of the prerequisites.
  6. Configure the Firehose stream starting position based on your scenario:
    1. For Scenario 1, set Topic starting position as At Timestamp and enter the timestamp you noted in the previous section.
    2. For Scenario 2, set Topic starting position as Earliest.
  7. For Firehose stream name, leave the default generated name or enter a name of your preference.
  8. For Destination settings, browse to the S3 bucket created as part of the prerequisites to stream data.

Within this S3 bucket, by default, a folder structure with YYYY/MM/dd/HH will be automatically created. Data will be delivered to subfolders pertaining to the HH subfolder according to the Data Firehose to Amazon S3 ingestion timestamp.

  1. Under Advanced settings, you can choose to create the default IAM role for all the permissions that Data Firehose needs or choose existing an IAM role that has the policies that Data Firehose needs.
  2. Choose Create Firehose stream.

On the Amazon S3 console, you can verify the data streamed to the S3 folder according to your chosen offset settings.

Clean up

To avoid incurring future charges, delete the resources you created as part of this exercise if you’re not planning to use them further.

Conclusion

Data Firehose provides a straightforward way to deliver data from Amazon MSK to Amazon S3, enabling you to save costs and reduce latency to seconds. To try Data Firehose with Amazon S3, refer to the Delivery to Amazon S3 using Amazon Data Firehose lab.


About the Authors

Swapna Bandla is a Senior Solutions Architect in the AWS Analytics Specialist SA Team. Swapna has a passion towards understanding customers data and analytics needs and empowering them to develop cloud-based well-architected solutions. Outside of work, she enjoys spending time with her family.

Austin Groeneveld is a Streaming Specialist Solutions Architect at Amazon Web Services (AWS), based in the San Francisco Bay Area. In this role, Austin is passionate about helping customers accelerate insights from their data using the AWS platform. He is particularly fascinated by the growing role that data streaming plays in driving innovation in the data analytics space. Outside of his work at AWS, Austin enjoys watching and playing soccer, traveling, and spending quality time with his family.

Uplevel your data architecture with real- time streaming using Amazon Data Firehose and Snowflake

Post Syndicated from Swapna Bandla original https://aws.amazon.com/blogs/big-data/uplevel-your-data-architecture-with-real-time-streaming-using-amazon-data-firehose-and-snowflake/

Today’s fast-paced world demands timely insights and decisions, which is driving the importance of streaming data. Streaming data refers to data that is continuously generated from a variety of sources. The sources of this data, such as clickstream events, change data capture (CDC), application and service logs, and Internet of Things (IoT) data streams are proliferating. Snowflake offers two options to bring streaming data into its platform: Snowpipe and Snowflake Snowpipe Streaming. Snowpipe is suitable for file ingestion (batching) use cases, such as loading large files from Amazon Simple Storage Service (Amazon S3) to Snowflake. Snowpipe Streaming, a newer feature released in March 2023, is suitable for rowset ingestion (streaming) use cases, such as loading a continuous stream of data from Amazon Kinesis Data Streams or Amazon Managed Streaming for Apache Kafka (Amazon MSK).

Before Snowpipe Streaming, AWS customers used Snowpipe for both use cases: file ingestion and rowset ingestion. First, you ingested streaming data to Kinesis Data Streams or Amazon MSK, then used Amazon Data Firehose to aggregate and write streams to Amazon S3, followed by using Snowpipe to load the data into Snowflake. However, this multi-step process can result in delays of up to an hour before data is available for analysis in Snowflake. Moreover, it’s expensive, especially when you have small files that Snowpipe has to upload to the Snowflake customer cluster.

To solve this issue, Amazon Data Firehose now integrates with Snowpipe Streaming, enabling you to capture, transform, and deliver data streams from Kinesis Data Streams, Amazon MSK, and Firehose Direct PUT to Snowflake in seconds at a low cost. With a few clicks on the Amazon Data Firehose console, you can set up a Firehose stream to deliver data to Snowflake. There are no commitments or upfront investments to use Amazon Data Firehose, and you only pay for the amount of data streamed.

Some key features of Amazon Data Firehose include:

  • Fully managed serverless service – You don’t need to manage resources, and Amazon Data Firehose automatically scales to match the throughput of your data source without ongoing administration.
  • Straightforward to use with no code – You don’t need to write applications.
  • Real-time data delivery – You can get data to your destinations quickly and efficiently in seconds.
  • Integration with over 20 AWS services – Seamless integration is available for many AWS services, such as Kinesis Data Streams, Amazon MSK, Amazon VPC Flow Logs, AWS WAF logs, Amazon CloudWatch Logs, Amazon EventBridge, AWS IoT Core, and more.
  • Pay-as-you-go model – You only pay for the data volume that Amazon Data Firehose processes.
  • Connectivity – Amazon Data Firehose can connect to public or private subnets in your VPC.

This post explains how you can bring streaming data from AWS into Snowflake within seconds to perform advanced analytics. We explore common architectures and illustrate how to set up a low-code, serverless, cost-effective solution for low-latency data streaming.

Overview of solution

The following are the steps to implement the solution to stream data from AWS to Snowflake:

  1. Create a Snowflake database, schema, and table.
  2. Create a Kinesis data stream.
  3. Create a Firehose delivery stream with Kinesis Data Streams as the source and Snowflake as its destination using a secure private link.
  4. To test the setup, generate sample stream data from the Amazon Kinesis Data Generator (KDG) with the Firehose delivery stream as the destination.
  5. Query the Snowflake table to validate the data loaded into Snowflake.

The solution is depicted in the following architecture diagram.

Prerequisites

You should have the following prerequisites:

Create a Snowflake database, schema, and table

Complete the following steps to set up your data in Snowflake:

  • Log in to your Snowflake account and create the database:
    create database adf_snf;

  • Create a schema in the new database:
    create schema adf_snf.kds_blog;

  • Create a table in the new schema:
    create or replace table iot_sensors
    (sensorId number,
    sensorType varchar,
    internetIP varchar,
    connectionTime timestamp_ntz,
    currentTemperature number
    );

Create a Kinesis data stream

Complete the following steps to create your data stream:

  • On the Kinesis Data Streams console, choose Data streams in the navigation pane.
  • Choose Create data stream.
  • For Data stream name, enter a name (for example, KDS-Demo-Stream).
  • Leave the remaining settings as default.
  • Choose Create data stream.

Create a Firehose delivery stream

Complete the following steps to create a Firehose delivery stream with Kinesis Data Streams as the source and Snowflake as its destination:

  • On the Amazon Data Firehose console, choose Create Firehose stream.
  • For Source, choose Amazon Kinesis Data Streams.
  • For Destination, choose Snowflake.
  • For Kinesis data stream, browse to the data stream you created earlier.
  • For Firehose stream name, leave the default generated name or enter a name of your preference.
  • Under Connection settings, provide the following information to connect Amazon Data Firehose to Snowflake:
    • For Snowflake account URL, enter your Snowflake account URL.
    • For User, enter the user name generated in the prerequisites.
    • For Private key, enter the private key generated in the prerequisites. Make sure the private key is in PKCS8 format. Do not include the PEM header-BEGIN prefix and footer-END suffix as part of the private key. If the key is split across multiple lines, remove the line breaks.
    • For Role, select Use custom Snowflake role and enter the IAM role that has access to write to the database table.

You can connect to Snowflake using public or private connectivity. If you don’t provide a VPC endpoint, the default connectivity mode is public. To allow list Firehose IPs in your Snowflake network policy, refer to Choose Snowflake for Your Destination. If you’re using a private link URL, provide the VPCE ID using SYSTEM$GET_PRIVATELINK_CONFIG:

select SYSTEM$GET_PRIVATELINK_CONFIG();

This function returns a JSON representation of the Snowflake account information necessary to facilitate the self-service configuration of private connectivity to the Snowflake service, as shown in the following screenshot.

  • For this post, we’re using a private link, so for VPCE ID, enter the VPCE ID.
  • Under Database configuration settings, enter your Snowflake database, schema, and table names.
  • In the Backup settings section, for S3 backup bucket, enter the bucket you created as part of the prerequisites.
  • Choose Create Firehose stream.

Alternatively, you can use an AWS CloudFormation template to create the Firehose delivery stream with Snowflake as the destination rather than using the Amazon Data Firehose console.

To use the CloudFormation stack, choose

BDB-4100-CFN-Launch-Stack

Generate sample stream data
Generate sample stream data from the KDG with the Kinesis data stream you created:

{ 
"sensorId": {{random.number(999999999)}}, 
"sensorType": "{{random.arrayElement( ["Thermostat","SmartWaterHeater","HVACTemperatureSensor","WaterPurifier"] )}}", 
"internetIP": "{{internet.ip}}", 
"connectionTime": "{{date.now("YYYY-MM-DDTHH:m:ss")}}", 
"currentTemperature": {{random.number({"min":10,"max":150})}} 
}

Query the Snowflake table

Query the Snowflake table:

select * from adf_snf.kds_blog.iot_sensors;

You can confirm that the data generated by the KDG that was sent to Kinesis Data Streams is loaded into the Snowflake table through Amazon Data Firehose.

Troubleshooting

If data is not loaded into Kinesis Data Steams after the KDG sends data to the Firehose delivery stream, refresh and make sure you are logged in to the KDG.

If you made any changes to the Snowflake destination table definition, recreate the Firehose delivery stream.

Clean up

To avoid incurring future charges, delete the resources you created as part of this exercise if you are not planning to use them further.

Conclusion

Amazon Data Firehose provides a straightforward way to deliver data to Snowpipe Streaming, enabling you to save costs and reduce latency to seconds. To try Amazon Kinesis Firehose with Snowflake, refer to the Amazon Data Firehose with Snowflake as destination lab.


About the Authors

Swapna Bandla is a Senior Solutions Architect in the AWS Analytics Specialist SA Team. Swapna has a passion towards understanding customers data and analytics needs and empowering them to develop cloud-based well-architected solutions. Outside of work, she enjoys spending time with her family.

Mostafa Mansour is a Principal Product Manager – Tech at Amazon Web Services where he works on Amazon Kinesis Data Firehose. He specializes in developing intuitive product experiences that solve complex challenges for customers at scale. When he’s not hard at work on Amazon Kinesis Data Firehose, you’ll likely find Mostafa on the squash court, where he loves to take on challengers and perfect his dropshots.

Bosco Albuquerque is a Sr. Partner Solutions Architect at AWS and has over 20 years of experience working with database and analytics products from enterprise database vendors and cloud providers. He has helped technology companies design and implement data analytics solutions and products.

Build an analytics pipeline that is resilient to schema changes using Amazon Redshift Spectrum

Post Syndicated from Swapna Bandla original https://aws.amazon.com/blogs/big-data/build-an-analytics-pipeline-that-is-resilient-to-schema-changes-using-amazon-redshift-spectrum/

You can ingest and integrate data from multiple Internet of Things (IoT) sensors to get insights. However, you may have to integrate data from multiple IoT sensor devices to derive analytics like equipment health information from all the sensors based on common data elements. Each of these sensor devices could be transmitting data with unique schemas and different attributes.

You can ingest data from all your IoT sensors to a central location on Amazon Simple Storage Service (Amazon S3). Schema evolution is a feature where a database table’s schema can evolve to accommodate for changes in the attributes of the files getting ingested. With the schema evolution functionality available in AWS Glue, Amazon Redshift Spectrum can automatically handle schema changes when new attributes get added or existing attributes get dropped. This is achieved with an AWS Glue crawler by reading schema changes based on the S3 file structures. The crawler creates a hybrid schema that works with both old and new datasets. You can read from all the ingested data files at a specified Amazon S3 location with different schemas through a single Amazon Redshift Spectrum table by referring to the AWS Glue metadata catalog.

In this post, we demonstrate how to use the AWS Glue schema evolution feature to read from multiple JSON formatted files with various schemas that are stored in a single Amazon S3 location. We also show how to query this data in Amazon S3 with Redshift Spectrum without redefining the schema or loading the data into Redshift tables.

Solution overview

The solution consists of the following steps:

  • Create an Amazon Data Firehose delivery stream with Amazon S3 as its destination.
  • Generate sample stream data from the Amazon Kinesis Data Generator (KDG) with the Firehose delivery stream as the destination.
  • Upload the initial data files to the Amazon S3 location.
  • Create and run an AWS Glue crawler to populate the Data Catalog with external table definition by reading the data files from Amazon S3.
  • Create the external schema called iotdb_ext in Amazon Redshift and query the Data Catalog table.
  • Query the external table from Redshift Spectrum to read data from the initial schema.
  • Add additional data elements to the KDG template and send the data to the Firehose delivery stream.
  • Validate that the additional data files are loaded to Amazon S3 with additional data elements.
  • Run an AWS Glue crawler to update the external table definitions.
  • Query the external table from Redshift Spectrum again to read the combined dataset from two different schemas.
  • Delete a data element from the template and send the data to the Firehose delivery stream.
  • Validate that the additional data files are loaded to Amazon S3 with one less data element.
  • Run an AWS Glue crawler to update the external table definitions.
  • Query the external table from Redshift Spectrum to read the combined dataset from three different schemas.

This solution is depicted in the following architecture diagram.

Prerequisites

This solution requires the following prerequisites:

Implement the solution

Complete the following steps to build the solution:

  • On the Kinesis console, create a Firehose delivery stream with the following parameters:
    • For Source, choose Direct PUT.
    • For Destination, choose Amazon S3.
    • For S3 bucket, enter your S3 bucket.
    • For Dynamic partitioning, select Enabled.

    • Add the following dynamic partitioning keys:
      • Key year with expression .connectionTime | strptime("%d/%m/%Y:%H:%M:%S") | strftime("%Y")
      • Key month with expression .connectionTime | strptime("%d/%m/%Y:%H:%M:%S") | strftime("%m")
      • Key day with expression .connectionTime | strptime("%d/%m/%Y:%H:%M:%S") | strftime("%d")
      • Key hour with expression .connectionTime | strptime("%d/%m/%Y:%H:%M:%S") | strftime("%H")
    • For S3 bucket prefix, enter year=!{partitionKeyFromQuery:year}/month=!{partitionKeyFromQuery:month}/day=!{partitionKeyFromQuery:day}/hour=!{partitionKeyFromQuery:hour}/

You can review your delivery stream details on the Kinesis Data Firehose console.

Your delivery stream configuration details should be similar to the following screenshot.

  • Generate sample stream data from the KDG with the Firehose delivery stream as the destination with the following template:
    {
    "sensorId": {{random.number(999999999)}},
    "sensorType": "{{random.arrayElement( ["Thermostat","SmartWaterHeater","HVACTemperatureSensor","WaterPurifier"] )}}",
    "internetIP": "{{internet.ip}}",
    "recordedDate": "{{date.past}}",
    "connectionTime": "{{date.now("DD/MM/YYYY:HH:mm:ss")}}",
    "currentTemperature": "{{random.number({"min":10,"max":150})}}",
    "serviceContract": "{{random.arrayElement( ["ActivePartsService","Inactive","SCIP","ActiveServiceOnly"] )}}",
    "status": "{{random.arrayElement( ["OK","FAIL","WARN"] )}}" }

  • On the Amazon S3 console, validate that the initial set of files got loaded into the S3 bucket.
  • On the AWS Glue console, create and run an AWS Glue Crawler with the data source as the S3 bucket that you used in the earlier step.

When the crawler is complete, you can validate that the table was created on the AWS Glue console.

  • In Amazon Redshift Query Editor v2, connect to the Redshift instance and create an external schema pointing to the AWS Glue Data Catalog database. In the following code, use the Amazon Resource Name (ARN) for the IAM role that your cluster uses for authentication and authorization. As a minimum, the IAM role must have permission to perform a LIST operation on the S3 bucket to be accessed and a GET operation on the S3 objects the bucket contains.
    CREATE external SCHEMA iotdb_ext FROM data catalog DATABASE 'iotdb' IAM_ROLE 'arn:aws:iam::<AWS account-id>:role/<role-name>' 
    CREATE external DATABASE if not exists;

  • Query the table defined in the Data Catalog from the Redshift external schema and note the columns defined in the KDG template:
    select * from iotdb_ext.sensorsiotschemaevol;

  • Add an additional data element in the KDG template and send the data to the Firehose delivery stream:
    "serviceRecommendedDate": "{{date.future}}",

  • Validate that the new data was added to the S3 bucket.
  • Rerun the AWS Glue crawler.
  • Query the table again from the Redshift external schema and note the newly populated dataset vs. the previous dataset for the servicerecommendeddate column:
    select * from iotdb_ext.sensorsiotschemaevol where servicerecommendeddate is not null;

    select * from iotdb_ext.sensorsiotschemaevol where servicerecommendeddate is null;

  • Delete the data element status from the KDG template and resend the data to the Firehose delivery stream.
  • Validate that new data was added to the S3 bucket.
  • Rerun the AWS Glue crawler.
  • Query the table again from the Redshift external schema and note the newly populated dataset vs. previous datasets with values for the status column:
    select * from iotdb_ext.sensorsiotschemaevol order by connectiontime desc;

    select * from iotdb_ext.sensorsiotschemaevol order by connectiontime;

Troubleshooting

If data is not loaded into Amazon S3 after sending it from the KDG template to the Firehose delivery stream, refresh and make sure you are logged in to the KDG.

Clean up

You may want to delete your S3 data and Redshift cluster if you are not planning to use it further to avoid unnecessary cost to your AWS account.

Conclusion

With the emergence of requirements for predictive and prescriptive analytics based on big data, there is a growing demand for data solutions that integrate data from multiple heterogeneous data models with minimal effort. In this post, we showcased how you can derive metrics from common atomic data elements from different data sources with unique schemas. You can store data from all the data sources in a common S3 location, either in the same folder or multiple subfolders by each data source. You can define and schedule an AWS Glue crawler to run at the same frequency as the data refresh requirements for your data consumption. With this solution, you can create a Redshift Spectrum table to read from an S3 location with varying file structures using the AWS Glue Data Catalog and schema evolution functionality.

If you have any questions or suggestions, please leave your feedback in the comment section. If you need further assistance with building analytics solutions with data from various IoT sensors, please contact your AWS account team.


About the Authors

Swapna Bandla is a Senior Solutions Architect in the AWS Analytics Specialist SA Team. Swapna has a passion towards understanding customers data and analytics needs and empowering them to develop cloud-based well-architected solutions. Outside of work, she enjoys spending time with her family.

Indira Balakrishnan is a Principal Solutions Architect in the AWS Analytics Specialist SA Team. She is passionate about helping customers build cloud-based analytics solutions to solve their business problems using data-driven decisions. Outside of work, she volunteers at her kids’ activities and spends time with her family.