Post Syndicated from Tom McMeekin original https://aws.amazon.com/blogs/big-data/visualize-data-using-apache-spark-running-on-amazon-emr-with-amazon-quicksight/
Organizations often need to process large volumes of data before serving to business stakeholders. In this blog, we will learn how to leverage Amazon EMR to process data using Apache Spark, the go-to platform for in-memory analytics of large data volume, and connect business intelligence (BI) tool Amazon QuickSight to serve data to end-users.
QuickSight is a fast, cloud-powered BI service that makes it easy to build visualizations, perform ad hoc analysis, and quickly get business insights from your data. With our cloud-based service, you can easily connect to your data, perform advanced analysis, and create stunning visualizations and rich dashboards that can be accessed from any browser or mobile device.
QuickSight supports connectors for big data analytics using Spark. With the SparkSQL connector in QuickSight, you can easily create interactive visualizations over large datasets using Amazon EMR. Amazon EMR provides a simple and cost-effective way to run highly distributed processing frameworks such as Spark.
In this post, we use the public data set, New York City Taxi and Limousine Commission (TLC) Trip Record Data, which contains data of trips taken by taxis and for-hire vehicles in New York City. We use an optimized Parquet version of the CSV public dataset available from the Registry of Open Data on AWS.
This post also explores how to use AWS Glue to create the Data Catalog by crawling the NYC taxi data in an Amazon Simple Storage Service (Amazon S3) bucket, making it immediately query able for analyzing. AWS Glue is a fully managed extract, transform, and load (ETL) service that makes it easy to prepare and load your data for analytics. To learn more about how to use AWS Glue to transform a dataset from CSV to Parquet, see Harmonize, Query, and Visualize Data from Various Providers using AWS Glue, Amazon Athena, and Amazon QuickSight.
Prerequisites
The following steps assume that you have a VPC with public and private subnets, with NAT configured for private subnets and an available S3 bucket for Amazon EMR logging.
If you create the EMR cluster in a private subnet, you can use AWS Systems Manager Session Manager, a bastion host, or a VPN connection to access the EMR cluster. For this post, we use Session Manager to access our EMR cluster.
In QuickSight Enterprise edition, you can create connections to your VPCs from your QuickSight account. Each connection creates an elastic network interface in your VPC for QuickSight to send traffic to instances in your VPC. For more information, see Connecting to a VPC with Amazon QuickSight. If you haven’t already signed up for QuickSight, you can sign up before getting started. QuickSight offers a free trial so you can try out this solution at no cost.
The following AWS CloudFormation template offers single-click deployment.
![]()
We use the US East (N. Virginia) Region as the default; we highly recommended you launch the stack to optimize querying the public dataset in Amazon S3. You can change to any Region that supports Amazon EMR, AWS Glue, and QuickSight, but it may impact the time it takes to query the data.
If deploying into production, we recommend you secure communication by using the Configure SSL with a QuickSight supported authority step after deployment of the CloudFormation template to enable SSL.
Solution overview
We walk you through the following steps:
- Deploy and configure Amazon EMR with a CloudFormation template.
- Run AWS Glue crawlers to crawl and populate the Hive-compatible metastore.
- Test JDBC connectivity using Beeline.
- Visualize the data with QuickSight.
The CloudFormation template provided in the prerequisites, provides a configured Amazon EMR cluster for you to start querying your data with Spark. After deploying the CloudFormation stack, you can skip the first step and start running the AWS Glue crawlers.
Deploy and Configure Amazon EMR
Those looking to dive deep to understand what the CloudFormation template is deploying can use the following steps to manually deploy Amazon EMR running Spark and connect it to QuickSight:
- Create an EMR cluster with 5.30.0 or later release.
- Connect to the cluster using Session Manager.
- Install and configure OpenLDAP.
- Create a user in LDAP.
- Start the Thrift server.
- Configure SSL using a QuickSight supported authority.
Create an EMR cluster
For this post, we use an EMR cluster with 5.30.0 or later release.
- On the Amazon EMR console, choose Create cluster.
- For Cluster name, enter a name (for example,
visualisedatablog). - For Release, choose your release version.
- For Applications, select Spark.
- Select Use AWS Glue Data Catalog for table metadata.
- For Instance type¸ choose your instance.
- For EC2 key pair, choose Proceed without an EC2 key pair.
- Choose Create cluster.
Make sure you enabled run as support for Session Manager.

Connect to the EMR cluster using Session Manager
Session Manager is a fully managed AWS Systems Manager capability that lets you manage your Amazon Elastic Compute Cloud (Amazon EC2) instances, on-premises instances, and virtual machines through an interactive, one-click, browser-based shell or through the AWS Command Line Interface (AWS CLI). Session Manager provides secure and auditable instance management without the need to open inbound ports, maintain bastion hosts, or manage SSH keys.
By default, sessions are launched using the credentials of a system-generated ssm-user account that is created on a managed instance. For Amazon EMR, you can instead launch sessions using the Hadoop user account. Session Manager provides two methods for specifying the Hadoop user operating system account to use. For more information, see Enable run as support for Linux and macOS instances. For those configuring Systems Manager for the first time, review Why is my EC2 instance not appearing under Managed Instances in the Systems Manager console? for helpful tips on getting started with adding managed instances.
After you log in to the primary node of your cluster, run the following commands to install and configure OpenLDAP.
Install and configure OpenLDAP
To install and configure OpenLDAP, complete the following steps (alternatively, you can download the script used in the CloudFormation script and run it):
- Run the following commands:
For more about configuring OpenLDAP, see the OpenLDAP documentation.
- Run the following command to set a new password for the root account and store the resulting hash:
This command outputs a hash that looks like the following sample:
- Copy the hash output to a text editor to use in subsequent steps.
Next, we prepare the commands to set the password for the LDAP root.
- Run the following code (replace the hash with the one you generated in the previous step, and make sure carriage returns are preserved):
- Run the following command to run the preceding commands against LDAP:
- Copy the sample database configuration file to
/var/lib/ldapand add relevant schemas:
Create a user in LDAP
Next, create a user account with a password in the LDAP directory with the following commands. When prompted for a password, use the LDAP root password that you created in the previous step (for this post, we use sparky as the username). Make sure carriage returns are preserved when copying and entering the code.
Run the following command to run the preceding commands against LDAP (you must enter the root LDAP password specified in the previous section):
We have now configured OpenLDAP on the EMR cluster running Spark and created the user sparky that we use to connect to QuickSight.
Start the Thrift server
Start the Thrift server by running the following command. By default, the Thrift server runs on port 10001. Amazon EMR by default places limits on executor sizes to avoid having the executor consume too much memory and interfere with the operating system and other processes running on the instance. To optimize the use of R family instances with the flexibility of also using the smallest supported instance types, we use –executor-memory=18GB –executor-cores=4 for our Thrift server configuration. See the following code:
Now that we have configured the EMR cluster to accept connections, let’s get our public dataset ready.
Configure SSL using a QuickSight supported authority
If deploying into production, we recommend using a secure communication between QuickSight and Spark. QuickSight doesn’t accept certificates that are self-signed or issued from a non-public CA. For more information, see Amazon QuickSight SSL and CA Certificates. To secure the Thrift connection, you can enable the SSL encryption and restart the hive-server2 and Thrift service on the primary EMR instance.
After you have your certificate, you can enable SSL.
In your preferred editor, open and edit /etc/hive/conf/hive-site.xml:
Restart the Thrift server by running the following command:
Run AWS Glue crawlers
Now let’s use AWS Glue crawlers to detect the schema. If you used the CloudFormation template, you already have a crawler ready to start via the AWS Glue console. When the crawler is complete, you should have a table listed in the database.
If you’re configuring the crawler manually on the AWS Glue console, the following screenshot summarizes the crawler configuration.

After the crawler has run, you can go to the Tables page to view the taxi_ny_pub table with the table properties and schema. The following screenshot shows the table details page; here you can find the partitions and various versions of the schema.
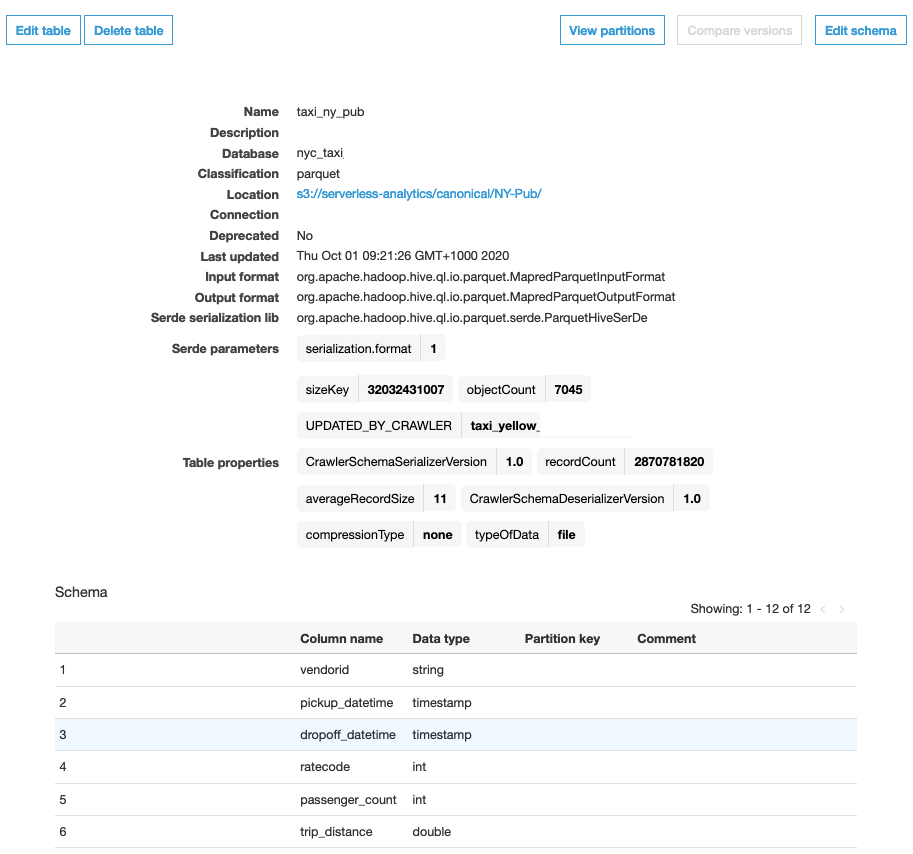
The Data Catalog is shared between Amazon EMR, Amazon Athena, and Amazon Redshift Spectrum. You can use Athena to preview the data that is stored in this table.
Test JDBC connectivity using Beeline
Now that the EMR cluster is deployed and the data is copied, we can quickly test the JDBC connectivity on the EMR cluster using Beeline. Beeline is an open-source JDBC client, based on the SQLLine CLI, used to connect to your cluster via the command line.
Log in to your EMR cluster using Session Manager. You can use Beeline to connect to the Thrift server and test the connection:
The preceding command connects to the Spark cluster and shows you the list of databases, as in the following example code:
Visualize data with QuickSight
Now let’s connect Amazon EMR to QuickSight and do a quick visualization of this data.
- On the QuickSight console, on the Datasets page, choose New dataset.
- Choose Spark as your connector.

- For Data source name, enter a name (for example,
SPARKY). - For Database server, enter your public primary DNS.
To allow QuickSight to connect to your EMR cluster, you must create a security group containing an inbound rule authorizing access from the appropriate IP address range for the QuickSight servers in that Region. For further details on how to create appropriate security group rules, see Authorizing Connections from Amazon QuickSight to Amazon EC2 Instances.
For this post, we use security groups to control network connectivity.
- For Port, add TCP port 10001 as an inbound rule to allow for inbound connectivity from QuickSight to Amazon EMR.
If deploying into production, we recommend using a secure communication between QuickSight and Spark, which we covered in a previous step.
QuickSight Enterprise edition provides full integration with Amazon Virtual Private Cloud (Amazon VPC), which enables you to secure and isolate traffic between resources. For more information, see Connecting to a VPC with Amazon QuickSight. This allows you to deploy your EMR cluster in a private VPC Subnet.
- Enter a username and password.
- If you configured SSL, select Enable SSL.
- Choose Create data source.

The Spark cluster reads the Data Catalog and provides information about the schema and the tables in the schema. You can also choose the table created by the AWS Glue crawler and load the data into SPICE for faster analytics. SPICE is the in-memory calculation engine in QuickSight that provides blazing fast performance at scale. SPICE automatically replicates data for high availability, allowing thousands of users to simultaneously perform fast, interactive analysis, while shielding your underlying data infrastructure, which saves you time and resources. QuickSight supports uploading 250 million rows (and 500 GB) per SPICE dataset. If you have larger datasets than this, you can use the direct query option. In this post, we use SPICE.
Also make sure that you defined the correct permissions to access the S3 bucket for the EMR cluster. For instructions, see Reading and Writing Data to Amazon S3 Using EMRFS.
Let’s create a custom SQL query to perform some aggregations prior to loading into SPICE (see the following screenshot).

- Enter the following code:
The database and table names may vary in your deployment.
- For this post, select Import to SPICE for quicker analytics.
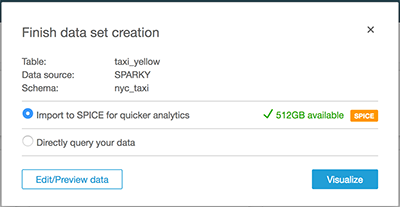
Alternatively, because the NYC taxi dataset is larger than 250 million rows, you can choose to directly query your data.
- To create a visualization, select the fields in the left panel.
For this post, we review the Average Fare Amount and Passenger Count between 2013–2019, using ML Insights to automatically generate natural language narratives when analyzing the 229.12 GB dataset.

Summary
In less than an hour, we created an EMR cluster, enabled OpenLDAP, and started the Thrift server. We also used AWS Glue to crawl a public dataset and visualize the data. Now you have what you need to get started creating powerful dashboards and reports using QuickSight on your Amazon S3 data using Apache Spark. Feel free to reach out if you have any questions or suggestions.
To learn more about these capabilities and start using them in your dashboards, check out the QuickSight User Guide.
If you have questions and suggestions, you can post them on the QuickSight forum.
Go to the QuickSight website to get started now for free.
About the Author
 Tom McMeekin is an Enterprise Solutions Architect with a career in technology spanning over 20 years. Tom has worked across a number of industry verticals including Telecommunications, Manufacturing, Infrastructure and Development, Utilities, Energy, and Retail. Throughout his career, he has focused on solving complex business problems through innovative technologies that deliver the right business outcomes for his customers.