All posts by Veena Vasudevan

Amazon EMR Serverless supports larger worker sizes to run more compute and memory-intensive workloads

Post Syndicated from Veena Vasudevan original https://aws.amazon.com/blogs/big-data/amazon-emr-serverless-supports-larger-worker-sizes-to-run-more-compute-and-memory-intensive-workloads/

Amazon EMR Serverless allows you to run open-source big data frameworks such as Apache Spark and Apache Hive without managing clusters and servers. With EMR Serverless, you can run analytics workloads at any scale with automatic scaling that resizes resources in seconds to meet changing data volumes and processing requirements. EMR Serverless automatically scales resources up and down to provide just the right amount of capacity for your application.

We are excited to announce that EMR Serverless now offers worker configurations of 8 vCPUs with up to 60 GB memory and 16 vCPUs with up to 120 GB memory, allowing you to run more compute and memory-intensive workloads on EMR Serverless. An EMR Serverless application internally uses workers to execute workloads. and you can configure different worker configurations based on your workload requirements. Previously, the largest worker configuration available on EMR Serverless was 4 vCPUs with up to 30 GB memory. This capability is especially beneficial for the following common scenarios:

  • Shuffle-heavy workloads
  • Memory-intensive workloads

Let’s look at each of these use cases and the benefits of having larger worker sizes.

Benefits of using large workers for shuffle-intensive workloads

In Spark and Hive, shuffle occurs when data needs to be redistributed across the cluster during a computation. When your application performs wide transformations or reduce operations such as join, groupBy, sortBy, or repartition, Spark and Hive triggers a shuffle. Also, every Spark stage and Tez vertex is bounded by a shuffle operation. Taking Spark as an example, by default, there are 200 partitions for every Spark job defined by spark.sql.shuffle.partitions. However, Spark will compute the number of tasks on the fly based on the data size and the operation being performed. When a wide transformation is performed on top of a large dataset, there could be GBs or even TBs of data that need to be fetched by all the tasks.

Shuffles are typically expensive in terms of both time and resources, and can lead to performance bottlenecks. Therefore, optimizing shuffles can have a significant impact on the performance and cost of a Spark job. With large workers, more data can be allocated to each executor’s memory, which minimizes the data shuffled across executors. This in turn leads to increased shuffle read performance because more data will be fetched locally from the same worker and less data will be fetched remotely from other workers.

Experiments

To demonstrate the benefits of using large workers for shuffle-intensive queries, let’s use q78 from TPC-DS, which is a shuffle-heavy Spark query that shuffles 167 GB of data over 12 Spark stages. Let’s perform two iterations of the same query with different configurations.

The configurations for Test 1 are as follows:

  • Size of executor requested while creating EMR Serverless application = 4 vCPUs, 8 GB memory, 200 GB disk
  • Spark job config:
    • spark.executor.cores = 4
    • spark.executor.memory = 8
    • spark.executor.instances = 48
    • Parallelism = 192 (spark.executor.instances * spark.executor.cores)

The configurations for Test 2 are as follows:

  • Size of executor requested while creating EMR Serverless application = 8 vCPUs, 16 GB memory, 200 GB disk
  • Spark job config:
    • spark.executor.cores = 8
    • spark.executor.memory = 16
    • spark.executor.instances = 24
    • Parallelism = 192 (spark.executor.instances * spark.executor.cores)

Let’s also disable dynamic allocation by setting spark.dynamicAllocation.enabled to false for both tests to avoid any potential noise due to variable executor launch times and keep the resource utilization consistent for both tests. We use Spark Measure, which is an open-source tool that simplifies the collection and analysis of Spark performance metrics. Because we’re using a fixed number of executors, the total number of vCPUs and memory requested are the same for both the tests. The following table summarizes the observations from the metrics collected with Spark Measure.

. Total Time Taken for Query in milliseconds shuffleLocalBlocksFetched shuffleRemoteBlocksFetched shuffleLocalBytesRead shuffleRemoteBytesRead shuffleFetchWaitTime shuffleWriteTime
Test 1 153244 114175 5291825 3.5 GB 163.1 GB 1.9 hr 4.7 min
Test 2 108136 225448 5185552 6.9 GB 159.7 GB 3.2 min 5.2 min

As seen from the table, there is a significant difference in performance due to shuffle improvements. Test 2, with half the number of executors that are twice as large as Test 1, ran 29.44% faster, with 1.97 times more shuffle data fetched locally compared to Test 1 for the same query, same parallelism, and same aggregate vCPU and memory resources. Therefore, you can benefit from improved performance without compromising on cost or job parallelism with the help of large executors. We have observed similar performance benefits for other shuffle-intensive TPC-DS queries such as q23a and q23b.

Recommendations

To determine if the large workers will benefit your shuffle-intensive Spark applications, consider the following:

  • Check the Stages tab from the Spark History Server UI of your EMR Serverless application. For example, from the following screenshot of Spark History Server, we can determine that this Spark job wrote and read 167 GB of shuffle data aggregated across 12 stages, looking at the Shuffle Read and Shuffle Write columns. If your jobs shuffle over 50 GB of data, you may potentially benefit from using larger workers with 8 or 16 vCPUs or spark.executor.cores.

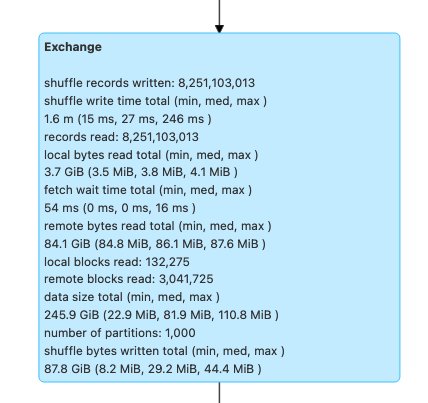
  • Check the SQL / DataFrame tab from the Spark History Server UI of your EMR Serverless application (only for Dataframe and Dataset APIs). When you choose the Spark action performed, such as collect, take, showString, or save, you will see an aggregated DAG for all stages separated by the exchanges. Every exchange in the DAG corresponds to a shuffle operation, and it will contain the local and remote bytes and blocks shuffled, as seen in the following screenshot. If the local shuffle blocks or bytes fetched is much less compared to the remote blocks or bytes fetched, you can rerun your application with larger workers (with 8 or 16 vCPUs or spark.executor.cores) and review these exchange metrics in a DAG to see if there is any improvement.

  • Use the Spark Measure tool with your Spark query to obtain the shuffle metrics in the Spark driver’s stdout logs, as shown in the following log for a Spark job. Review the time taken for shuffle reads (shuffleFetchWaitTime) and shuffle writes (shuffleWriteTime), and the ratio of the local bytes fetched to the remote bytes fetched. If the shuffle operation takes more than 2 minutes, rerun your application with larger workers (with 8 or 16 vCPUs or spark.executor.cores) with Spark Measure to track the improvement in shuffle performance and the overall job runtime.
Time taken: 177647 ms

Scheduling mode = FIFO
Spark Context default degree of parallelism = 192

Aggregated Spark stage metrics:
numStages => 22
numTasks => 10156
elapsedTime => 159894 (2.7 min)
stageDuration => 456893 (7.6 min)
executorRunTime => 28418517 (7.9 h)
executorCpuTime => 20276736 (5.6 h)
executorDeserializeTime => 326486 (5.4 min)
executorDeserializeCpuTime => 124323 (2.1 min)
resultSerializationTime => 534 (0.5 s)
jvmGCTime => 648809 (11 min)
shuffleFetchWaitTime => 340880 (5.7 min)
shuffleWriteTime => 245918 (4.1 min)
resultSize => 23199434 (22.1 MB)
diskBytesSpilled => 0 (0 Bytes)
memoryBytesSpilled => 0 (0 Bytes)
peakExecutionMemory => 1794288453176
recordsRead => 18696929278
bytesRead => 77354154397 (72.0 GB)
recordsWritten => 0
bytesWritten => 0 (0 Bytes)
shuffleRecordsRead => 14124240761
shuffleTotalBlocksFetched => 5571316
shuffleLocalBlocksFetched => 117321
shuffleRemoteBlocksFetched => 5453995
shuffleTotalBytesRead => 158582120627 (147.7 GB)
shuffleLocalBytesRead => 3337930126 (3.1 GB)
shuffleRemoteBytesRead => 155244190501 (144.6 GB)
shuffleRemoteBytesReadToDisk => 0 (0 Bytes)
shuffleBytesWritten => 156913371886 (146.1 GB)
shuffleRecordsWritten => 13867102620

Benefits of using large workers for memory-intensive workloads

Certain types of workloads are memory-intensive and may benefit from more memory configured per worker. In this section, we discuss common scenarios where large workers could be beneficial for running memory-intensive workloads.

Data skew

Data skews commonly occur in several types of datasets. Some common examples are fraud detection, population analysis, and income distribution. For example, when you want to detect anomalies in your data, it’s expected that only less than 1% of the data is abnormal. If you want to perform some aggregation on top of normal vs. abnormal records, 99% of the data will be processed by a single worker, which may lead to that worker running out of memory. Data skews may be observed for memory-intensive transformations like groupBy, orderBy, join, window functions, collect_list, collect_set, and so on. Join types such as BroadcastNestedLoopJoin and Cartesan product are also inherently memory-intensive and susceptible to data skews. Similarly, if your input data is Gzip compressed, a single Gzip file can’t be read by more than one task because the Gzip compression type is unsplittable. When there are a few very large Gzip files in the input, your job may run out of memory because a single task may have to read a huge Gzip file that doesn’t fit in the executor memory.

Failures due to data skew can be mitigated by applying strategies such as salting. However, this often requires extensive changes to the code, which may not be feasible for a production workload that failed due to an unprecedented data skew caused by a sudden surge in incoming data volume. For a simpler workaround, you may just want to increase the worker memory. Using larger workers with more spark.executor.memory allows you to handle data skew without making any changes to your application code.

Caching

In order to improve performance, Spark allows you to cache the data frames, datasets, and RDDs in memory. This enables you to reuse a data frame multiple times in your application without having to recompute it. By default, up to 50% of your executor’s JVM is used to cache the data frames based on the property spark.memory.storageFraction. For example, if your spark.executor.memory is set to 30 GB, then 15 GB is used for cache storage that is immune to eviction.

The default storage level of cache operation is DISK_AND_MEMORY. If the size of the data frame you are trying to cache doesn’t fit in the executor’s memory, a portion of the cache spills to disk. If there isn’t enough space to write the cached data in disk, the blocks are evicted and you don’t get the benefits of caching. Using larger workers allows you to cache more data in memory, boosting job performance by retrieving cached blocks from memory rather than the underlying storage.

Experiments

For example, the following PySpark job leads to a skew, with one executor processing 99.95% of the data with memory-intensive aggregates like collect_list. The job also caches a very large data frame (2.2 TB). Let’s run two iterations of the same job on EMR Serverless with the following vCPU and memory configurations.

Let’s run Test 3 with the previously largest possible worker configurations:

  • Size of executor set while creating EMR Serverless application = 4 vCPUs, 30 GB memory, 200 GB disk
  • Spark job config:
    • spark.executor.cores = 4
    • spark.executor.memory = 27 G

Let’s run Test 4 with the newly released large worker configurations:

  • Size of executor set in while creating EMR Serverless application = 8 vCPUs, 60 GB memory, 200 GB disk
  • Spark job config:
    • spark.executor.cores = 8
    • spark.executor.memory = 54 G

Test 3 failed with FetchFailedException, which resulted due to the executor memory not being sufficient for the job.

Also, from the Spark UI of Test 3, we see that the reserved storage memory of the executors was fully utilized for caching the data frames.

The remaining blocks to cache were spilled to disk, as seen in the executor’s stderr logs:

23/02/06 16:06:58 INFO MemoryStore: Will not store rdd_4_1810
23/02/06 16:06:58 WARN MemoryStore: Not enough space to cache rdd_4_1810 in memory! (computed 134.1 MiB so far)
23/02/06 16:06:58 INFO MemoryStore: Memory use = 14.8 GiB (blocks) + 507.5 MiB (scratch space shared across 4 tasks(s)) = 15.3 GiB. Storage limit = 15.3 GiB.
23/02/06 16:06:58 WARN BlockManager: Persisting block rdd_4_1810 to disk instead.

Around 33% of the persisted data frame was cached on disk, as seen on the Storage tab of the Spark UI.

Test 4 with larger executors and vCores ran successfully without throwing any memory-related errors. Also, only about 2.2% of the data frame was cached to disk. Therefore, cached blocks of a data frame will be retrieved from memory rather than from disk, offering better performance.

Recommendations

To determine if the large workers will benefit your memory-intensive Spark applications, consider the following:

  • Determine if your Spark application has any data skews by looking at the Spark UI. The following screenshot of the Spark UI shows an example data skew scenario where one task processes most of the data (145.2 GB), looking at the Shuffle Read size. If one or fewer tasks process significantly more data than other tasks, rerun your application with larger workers with 60–120 G of memory (spark.executor.memory set anywhere from 54–109 GB factoring in 10% of spark.executor.memoryOverhead).

  • Check the Storage tab of the Spark History Server to review the ratio of data cached in memory to disk from the Size in memory and Size in disk columns. If more than 10% of your data is cached to disk, rerun your application with larger workers to increase the amount of data cached in memory.
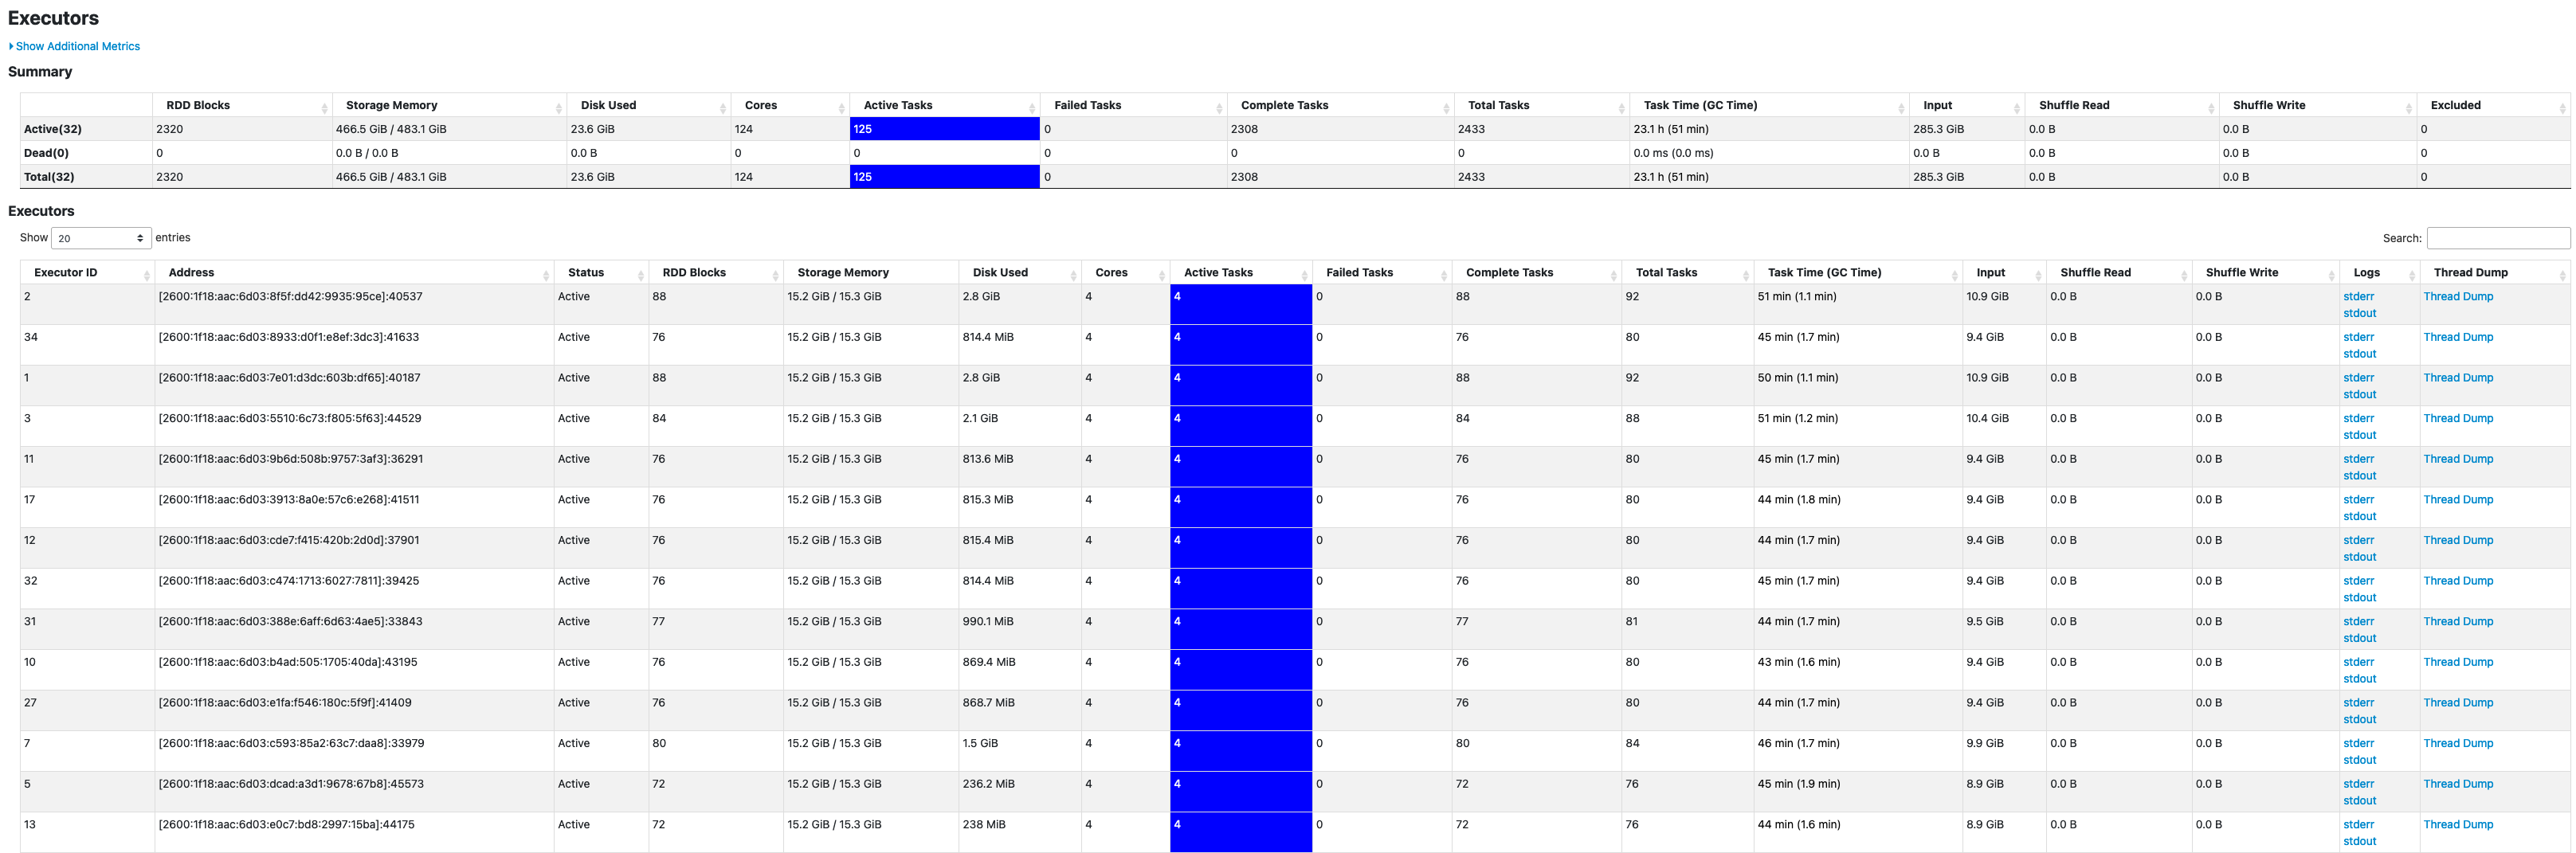
  • Another way to preemptively determine if your job needs more memory is by monitoring Peak JVM Memory on the Spark UI Executors tab. If the peak JVM memory used is close to the executor or driver memory, you can create an application with a larger worker and configure a higher value for spark.executor.memory or spark.driver.memory. For example, in the following screenshot, the maximum value of peak JVM memory usage is 26 GB and spark.executor.memory is set to 27 G. In this case, it may be beneficial to use larger workers with 60 GB memory and spark.executor.memory set to 54 G.

Considerations

Although large vCPUs help increase the locality of the shuffle blocks, there are other factors involved such as disk throughput, disk IOPS (input/output operations per second), and network bandwidth. In some cases, more small workers with more disks could offer higher disk IOPS, throughput, and network bandwidth overall compared to fewer large workers. We encourage you to benchmark your workloads against suitable vCPU configurations to choose the best configuration for your workload.

For shuffle-heavy jobs, it’s recommended to use large disks. You can attach up to 200 GB disk to each worker when you create your application. Using large vCPUs (spark.executor.cores) per executor may increase the disk utilization on each worker. If your application fails with “No space left on device” due to the inability to fit shuffle data in the disk, use more smaller workers with 200 GB disk.

Conclusion

In this post, you learned about the benefits of using large executors for your EMR Serverless jobs. For more information about different worker configurations, refer to Worker configurations. Large worker configurations are available in all Regions where EMR Serverless is available.


About the Author

Veena Vasudevan is a Senior Partner Solutions Architect and an Amazon EMR specialist at AWS focusing on big data and analytics. She helps customers and partners build highly optimized, scalable, and secure solutions; modernize their architectures; and migrate their big data workloads to AWS.

Add your own libraries and application dependencies to Spark and Hive on Amazon EMR Serverless with custom images

Post Syndicated from Veena Vasudevan original https://aws.amazon.com/blogs/big-data/add-your-own-libraries-and-application-dependencies-to-spark-and-hive-on-amazon-emr-serverless-with-custom-images/

Amazon EMR Serverless allows you to run open-source big data frameworks such as Apache Spark and Apache Hive without managing clusters and servers. Many customers who run Spark and Hive applications want to add their own libraries and dependencies to the application runtime. For example, you may want to add popular open-source extensions to Spark, or add a customized encryption-decryption module that is used by your application.

We are excited to announce a new capability that allows you to customize the runtime image used in EMR Serverless by adding custom libraries that your applications need to use. This feature enables you to do the following:

  • Maintain a set of version-controlled libraries that are reused and available for use in all your EMR Serverless jobs as part of the EMR Serverless runtime
  • Add popular extensions to open-source Spark and Hive frameworks such as pandas, NumPy, matplotlib, and more that you want your EMR serverless application to use
  • Use established CI/CD processes to build, test, and deploy your customized extension libraries to the EMR Serverless runtime
  • Apply established security processes, such as image scanning, to meet the compliance and governance requirements within your organization
  • Use a different version of a runtime component (for example the JDK runtime or the Python SDK runtime) than the version that is available by default with EMR Serverless

In this post, we demonstrate how to use this new feature.

Solution Overview

To use this capability, customize the EMR Serverless base image using Amazon Elastic Container Registry (Amazon ECR), which is a fully managed container registry that makes it easy for your developers to share and deploy container images. Amazon ECR eliminates the need to operate your own container repositories or worry about scaling the underlying infrastructure. After the custom image is pushed to the container registry, specify the custom image while creating your EMR Serverless applications.

The following diagram illustrates the steps involved in using custom images for your EMR Serverless applications.

In the following sections, we demonstrate using custom images with Amazon EMR Serverless to address three common use cases:

  • Add popular open-source Python libraries into the EMR Serverless runtime image
  • Use a different or newer version of the Java runtime for the EMR Serverless application
  • Install a Prometheus agent and customize the Spark runtime to push Spark JMX metrics to Amazon Managed Service for Prometheus, and visualize the metrics in a Grafana dashboard

General prerequisites

The following are the prerequisites to use custom images with EMR Serverless. Complete the following steps before proceeding with the subsequent steps:

  1. Create an AWS Identity and Access Management (IAM) role with IAM permissions for Amazon EMR Serverless applications, Amazon ECR permissions, and Amazon S3 permissions for the Amazon Simple Storage Service (Amazon S3) bucket aws-bigdata-blog and any S3 bucket in your account where you will store the application artifacts.
  2. Install or upgrade to the latest AWS Command Line Interface (AWS CLI) version and install the Docker service in an Amazon Linux 2 based Amazon Elastic Compute Cloud (Amazon EC2) instance. Attach the IAM role from the previous step for this EC2 instance.
  3. Select a base EMR Serverless image from the following public Amazon ECR repository. Run the following commands on the EC2 instance with Docker installed to verify that you are able to pull the base image from the public repository:
    # If docker is not started already, start the process
    $ sudo service docker start 
    
    # Check if you are able to pull the latest EMR 6.9.0 runtime base image 
    $ sudo docker pull public.ecr.aws/emr-serverless/spark/emr-6.9.0:latest

  4. Log in to Amazon ECR with the following commands and create a repository called emr-serverless-ci-examples, providing your AWS account ID and Region:
    $ sudo aws ecr get-login-password --region <region> | sudo docker login --username AWS --password-stdin <your AWS account ID>.dkr.ecr.<region>.amazonaws.com
    
    $ aws ecr create-repository --repository-name emr-serverless-ci-examples --region <region>

  5. Provide IAM permissions to the EMR Serverless service principal for the Amazon ECR repository:
    1. On the Amazon ECR console, choose Permissions under Repositories in the navigation pane.
    2. Choose Edit policy JSON.
    3. Enter the following JSON and save:
      {
        "Version": "2012-10-17",
        "Statement": [
          {
            "Sid": "Emr Serverless Custom Image Support",
            "Effect": "Allow",
            "Principal": {
              "Service": "emr-serverless.amazonaws.com"
            },
            "Action": [
              "ecr:BatchGetImage",
              "ecr:DescribeImages",
              "ecr:GetDownloadUrlForLayer"
            ]
          }
        ]
      }

Make sure that the policy is updated on the Amazon ECR console.

For production workloads, we recommend adding a condition in the Amazon ECR policy to ensure only allowed EMR Serverless applications can get, describe, and download images from this repository. For more information, refer to Allow EMR Serverless to access the custom image repository.

In the next steps, we create and use custom images in our EMR Serverless applications for the three different use cases.

Use case 1: Run data science applications

One of the common applications of Spark on Amazon EMR is the ability to run data science and machine learning (ML) applications at scale. For large datasets, Spark includes SparkML, which offers common ML algorithms that can be used to train models in a distributed fashion. However, you often need to run many iterations of simple classifiers to fit for hyperparameter tuning, ensembles, and multi-class solutions over small-to-medium-sized data (100,000 to 1 million records). Spark is a great engine to run multiple iterations of such classifiers in parallel. In this example, we demonstrate this use case, where we use Spark to run multiple iterations of an XGBoost model to select the best parameters. The ability to include Python dependencies in the EMR Serverless image should make it easy to make the various dependencies (xgboost, sk-dist, pandas, numpy, and so on) available for the application.

Prerequisites

The EMR Serverless job runtime IAM role should be given permissions to your S3 bucket where you will be storing your PySpark file and application logs:

{
    "Version": "2012-10-17",
    "Statement": [
        {
            "Sid": "AccessToS3Buckets",
            "Effect": "Allow",
            "Action": [
                "s3:PutObject",
                "s3:GetObject",
                "s3:ListBucket"
            ],
            "Resource": [
                "arn:aws:s3:::<YOUR-BUCKET>",
                "arn:aws:s3:::<YOUR-BUCKET>/*"
            ]
        }
    ]
}

Create an image to install ML dependencies

We create a custom image from the base EMR Serverless image to install dependencies required by the SparkML application. Create the following Dockerfile in your EC2 instance that runs the docker process inside a new directory named datascience:

FROM public.ecr.aws/emr-serverless/spark/emr-6.9.0:latest

USER root

# python packages
RUN pip3 install boto3 pandas numpy
RUN pip3 install -U scikit-learn==0.23.2 scipy 
RUN pip3 install sk-dist
RUN pip3 install xgboost
RUN sed -i 's|import Parallel, delayed|import Parallel, delayed, logger|g' /usr/local/lib/python3.7/site-packages/skdist/distribute/search.py

# EMRS will run the image as hadoop
USER hadoop:hadoop

Build and push the image to the Amazon ECR repository emr-serverless-ci-examples, providing your AWS account ID and Region:

# Build the image locally. This command will take a minute or so to complete
sudo docker build -t local/emr-serverless-ci-ml /home/ec2-user/datascience/ --no-cache --pull
# Create tag for the local image
sudo docker tag local/emr-serverless-ci-ml:latest <your AWS account ID>.dkr.ecr.<region>.amazonaws.com/emr-serverless-ci-examples:emr-serverless-ci-ml
# Push the image to Amazon ECR. This command will take a few seconds to complete
sudo docker push <your AWS account ID>.dkr.ecr.<region>.amazonaws.com/emr-serverless-ci-examples:emr-serverless-ci-ml

Submit your Spark application

Create an EMR Serverless application with the custom image created in the previous step:

aws --region <region>  emr-serverless create-application \
    --release-label emr-6.9.0 \
    --type "SPARK" \
    --name data-science-with-ci \
    --image-configuration '{ "imageUri": "<your AWS account ID>.dkr.ecr.<region>.amazonaws.com/emr-serverless-ci-examples:emr-serverless-ci-ml" }'

Make a note of the value of applicationId returned by the command.

After the application is created, we’re ready to submit our job. Copy the application file to your S3 bucket:

aws s3 cp s3://aws-bigdata-blog/artifacts/BDB-2771/code/emrserverless-xgboost-spark-example.py s3://<YOUR BUCKET>/<PREFIX>/emrserverless-xgboost-spark-example.py

Submit the Spark data science job. In the following command, provide the name of the S3 bucket and prefix where you stored your application file. Additionally, provide the applicationId value obtained from the create-application command and your EMR Serverless job runtime IAM role ARN.

aws emr-serverless start-job-run \
        --region <region> \
        --application-id <applicationId> \
        --execution-role-arn <jobRuntimeRole> \
        --job-driver '{
            "sparkSubmit": {
                "entryPoint": "s3://<YOUR BUCKET>/<PREFIX>/emrserverless-xgboost-spark-example.py"
            }
        }' \
        --configuration-overrides '{
              "monitoringConfiguration": {
                "s3MonitoringConfiguration": {
                  "logUri": "s3://<YOUR BUCKET>/emrserverless/logs"
                }
              }
            }'

After the Spark job succeeds, you can view the best model estimates from our application by viewing the Spark driver’s stdout logs. Navigate to Spark History Server, Executors, Driver, Logs, stdout.

Use case 2: Use a custom Java runtime environment

Another use case for custom images is the ability to use a custom Java version for your EMR Serverless applications. For example, if you’re using Java11 to compile and package your Java or Scala applications, and try to run them directly on EMR Serverless, it may lead to runtime errors because EMR Serverless uses Java 8 JRE by default. To make the runtime environments of your EMR Serverless applications compatible with your compile environment, you can use the custom images feature to install the Java version you are using to package your applications.

Prerequisites

An EMR Serverless job runtime IAM role should be given permissions to your S3 bucket where you will be storing your application JAR and logs:

{
    "Version": "2012-10-17",
    "Statement": [
        {
            "Sid": "AccessToS3Buckets",
            "Effect": "Allow",
            "Action": [
                "s3:PutObject",
                "s3:GetObject",
                "s3:ListBucket"
            ],
            "Resource": [
                "arn:aws:s3:::<YOUR-BUCKET>",
                "arn:aws:s3:::<YOUR-BUCKET>/*"
            ]
        }
    ]
}

Create an image to install a custom Java version

We first create an image that will install a Java 11 runtime environment. Create the following Dockerfile in your EC2 instance inside a new directory named customjre:

FROM public.ecr.aws/emr-serverless/spark/emr-6.9.0:latest

USER root

# Install JDK 11
RUN amazon-linux-extras install java-openjdk11

# EMRS will run the image as hadoop
USER hadoop:hadoop

Build and push the image to the Amazon ECR repository emr-serverless-ci-examples, providing your AWS account ID and Region:

sudo docker build -t local/emr-serverless-ci-java11 /home/ec2-user/customjre/ --no-cache --pull
sudo docker tag local/emr-serverless-ci-java11:latest <your AWS account ID>.dkr.ecr.<region>.amazonaws.com/emr-serverless-ci-examples:emr-serverless-ci-java11
sudo docker push <your AWS account ID>.dkr.ecr.<region>.amazonaws.com/emr-serverless-ci-examples:emr-serverless-ci-java11

Submit your Spark application

Create an EMR Serverless application with the custom image created in the previous step:

aws --region <region>  emr-serverless create-application \
    --release-label emr-6.9.0 \
    --type "SPARK" \
    --name custom-jre-with-ci \
    --image-configuration '{ "imageUri": "<your AWS account ID>.dkr.ecr.<region>.amazonaws.com/emr-serverless-ci-examples:emr-serverless-ci-java11" }'

Copy the application JAR to your S3 bucket:

aws s3 cp s3://aws-bigdata-blog/artifacts/BDB-2771/code/emrserverless-custom-images_2.12-1.0.jar s3://<YOUR BUCKET>/<PREFIX>/emrserverless-custom-images_2.12-1.0.jar

Submit a Spark Scala job that was compiled with Java11 JRE. This job also uses Java APIs that may produce different results for different versions of Java (for example: java.time.ZoneId). In the following command, provide the name of the S3 bucket and prefix where you stored your application JAR. Additionally, provide the applicationId value obtained from the create-application command and your EMR Serverless job runtime role ARN with IAM permissions mentioned in the prerequisites. Note that in the sparkSubmitParameters, we pass a custom Java version for our Spark driver and executor environments to instruct our job to use the Java11 runtime.

aws emr-serverless start-job-run \
        --region <region> \
        --application-id <applicationId> \
        --execution-role-arn <jobRuntimeRole> \
        --job-driver '{
            "sparkSubmit": {
                "entryPoint": "s3://<YOUR BUCKET>/<PREFIX>/emrserverless-custom-images_2.12-1.0.jar",
                "entryPointArguments": ["40000000"],
                "sparkSubmitParameters": "--conf spark.executorEnv.JAVA_HOME=/usr/lib/jvm/java-11-openjdk-11.0.16.0.8-1.amzn2.0.1.x86_64 --conf spark.emr-serverless.driverEnv.JAVA_HOME=/usr/lib/jvm/java-11-openjdk-11.0.16.0.8-1.amzn2.0.1.x86_64 --class emrserverless.customjre.SyntheticAnalysis"
            }
        }' \
        --configuration-overrides '{
              "monitoringConfiguration": {
                "s3MonitoringConfiguration": {
                  "logUri": "s3://<YOUR BUCKET>/emrserverless/logs"
                }
              }
            }'

You can also extend this use case to install and use a custom Python version for your PySpark applications.

Use case 3: Monitor Spark metrics in a single Grafana dashboard

Spark JMX telemetry provides a lot of fine-grained details about every stage of the Spark application, even at the JVM level. These insights can be used to tune and optimize the Spark applications to reduce job runtime and cost. Prometheus is a popular tool used for collecting, querying, and visualizing application and host metrics of several different processes. After the metrics are collected in Prometheus, we can query these metrics or use Grafana to build dashboards and visualize them. In this use case, we use Amazon Managed Prometheus to gather Spark driver and executor metrics from our EMR Serverless Spark application, and we use Grafana to visualize the collected metrics. The following screenshot is an example Grafana dashboard for an EMR Serverless Spark application.

Prerequisites

Complete the following prerequisite steps:

  1. Create a VPC, private subnet, and security group. The private subnet should have a NAT gateway or VPC S3 endpoint attached. The security group should allow outbound access to the HTTPS port 443 and should have a self-referencing inbound rule for all traffic.


    Both the private subnet and security group should be associated with the two Amazon Managed Prometheus VPC endpoint interfaces.
  2. On the Amazon Virtual Private Cloud (Amazon VPC) console, create two endpoints for Amazon Managed Prometheus and the Amazon Managed Prometheus workspace. Associate the endpoints to the VPC, private subnet, and security group to both endpoints. Optionally, provide a name tag for your endpoints and leave everything else as default.

  3. Create a new workspace on the Amazon Managed Prometheus console.
  4. Note the ARN and the values for Endpoint – remote write URL and Endpoint – query URL.
  5. Attach the following policy to your Amazon EMR Serverless job runtime IAM role to provide remote write access to your Prometheus workspace. Replace the ARN copied from the previous step in the Resource section of "Sid": "AccessToPrometheus". This role should also have permissions to your S3 bucket where you will be storing your application JAR and logs.
    {
        "Version": "2012-10-17",
        "Statement": [
            {
                "Sid": "AccessToPrometheus",
                "Effect": "Allow",
                "Action": [
                    "aps:RemoteWrite"
                ],
                "Resource": "arn:aws:aps:<region>:<your AWS account>:workspace/<Workspace_ID>"
            }, {
                "Sid": "AccessToS3Buckets",
                "Effect": "Allow",
                "Action": [
                    "s3:PutObject",
                    "s3:GetObject",
                    "s3:ListBucket"
                ],
                "Resource": [
                    "arn:aws:s3:::<YOUR-BUCKET>",
                    "arn:aws:s3:::<YOUR-BUCKET>/*"
                ]
            }
        ]
    }

  6. Create an IAM user or role with permissions to create and query the Amazon Managed Prometheus workspace.

We use the same IAM user or role to authenticate in Grafana or query the Prometheus workspace.

Create an image to install the Prometheus agent

We create a custom image from the base EMR Serverless image to do the following:

  • Update the Spark metrics configuration to use PrometheusServlet to publish driver and executor JMX metrics in Prometheus format
  • Download and install the Prometheus agent
  • Upload the configuration YAML file to instruct the Prometheus agent to send the metrics to the Amazon Managed Prometheus workspace

Create the Prometheus config YAML file to scrape the driver, executor, and application metrics. You can run the following example commands on the EC2 instance.

  1. Copy the prometheus.yaml file from our S3 path:
    aws s3 cp s3://aws-bigdata-blog/artifacts/BDB-2771/prometheus-config/prometheus.yaml .

  2. Modify prometheus.yaml to replace the Region and value of the remote_write URL with the remote write URL obtained from the prerequisites:
    ## Replace your AMP workspace remote write URL 
    endpoint_url="https://aps-workspaces.<region>.amazonaws.com/workspaces/<ws-xxxxxxx-xxxx-xxxx-xxxx-xxxxxx>/api/v1/remote_write"
    
    ## Replace the remote write URL and region. Following is example for us-west-2 region. Modify the command for your region. 
    sed -i "s|region:.*|region: us-west-2|g" prometheus.yaml
    sed -i "s|url:.*|url: ${endpoint_url}|g" prometheus.yaml

  3. Upload the file to your own S3 bucket:
    aws s3 cp prometheus.yaml s3://<YOUR BUCKET>/<PREFIX>/

  4. Create the following Dockerfile inside a new directory named prometheus on the same EC2 instance that runs the Docker service. Provide the S3 path where you uploaded the prometheus.yaml file.
    # Pull base image
    FROM public.ecr.aws/emr-serverless/spark/emr-6.9.0:latest
    
    USER root
    
    # Install Prometheus agent
    RUN yum install -y wget && \
        wget https://github.com/prometheus/prometheus/releases/download/v2.26.0/prometheus-2.26.0.linux-amd64.tar.gz && \
        tar -xvf prometheus-2.26.0.linux-amd64.tar.gz && \
        rm -rf prometheus-2.26.0.linux-amd64.tar.gz && \
        cp prometheus-2.26.0.linux-amd64/prometheus /usr/local/bin/
    
    # Change Spark metrics configuration file to use PrometheusServlet
    RUN cp /etc/spark/conf.dist/metrics.properties.template /etc/spark/conf/metrics.properties && \
        echo -e '\
     *.sink.prometheusServlet.class=org.apache.spark.metrics.sink.PrometheusServlet\n\
     *.sink.prometheusServlet.path=/metrics/prometheus\n\
     master.sink.prometheusServlet.path=/metrics/master/prometheus\n\
     applications.sink.prometheusServlet.path=/metrics/applications/prometheus\n\
     ' >> /etc/spark/conf/metrics.properties
    
     # Copy the prometheus.yaml file locally. Change the value of bucket and prefix to where you stored your prometheus.yaml file
    RUN aws s3 cp s3://<YOUR BUCKET>/<PREFIX>/prometheus.yaml .
    
     # Create a script to start the prometheus agent in the background
    RUN echo -e '#!/bin/bash\n\
     nohup /usr/local/bin/prometheus --config.file=/home/hadoop/prometheus.yaml </dev/null >/dev/null 2>&1 &\n\
     echo "Started Prometheus agent"\n\
     ' >> /home/hadoop/start-prometheus-agent.sh && \ 
        chmod +x /home/hadoop/start-prometheus-agent.sh
    
     # EMRS will run the image as hadoop
    USER hadoop:hadoop

  5. Build the Dockerfile and push to Amazon ECR, providing your AWS account ID and Region:
    sudo docker build -t local/emr-serverless-ci-prometheus /home/ec2-user/prometheus/ --no-cache --pull
    sudo docker tag local/emr-serverless-ci-prometheus <your AWS account ID>.dkr.ecr.<region>.amazonaws.com/emr-serverless-ci-examples:emr-serverless-ci-prometheus
    sudo docker push <your AWS account ID>.dkr.ecr.<region>.amazonaws.com/emr-serverless-ci-examples:emr-serverless-ci-prometheus
    

Submit the Spark application

After the Docker image has been pushed successfully, you can create the serverless Spark application with the custom image you created. We use the AWS CLI to submit Spark jobs with the custom image on EMR Serverless. Your AWS CLI has to be upgraded to the latest version to run the following commands.

  1. In the following AWS CLI command, provide your AWS account ID and Region. Additionally, provide the subnet and security group from the prerequisites in the network configuration. In order to successfully push metrics from EMR Serverless to Amazon Managed Prometheus, make sure that you are using the same VPC, subnet, and security group you created based on the prerequisites.
    aws emr-serverless create-application \
    --name monitor-spark-with-ci \
    --region <region> \
    --release-label emr-6.9.0 \
    --type SPARK \
    --network-configuration subnetIds=<subnet-xxxxxxx>,securityGroupIds=<sg-xxxxxxx> \
    --image-configuration '{ "imageUri": "<your AWS account ID>.dkr.ecr.<region>.amazonaws.com/emr-serverless-ci-examples:emr-serverless-ci-prometheus" }'

  2. Copy the application JAR to your S3 bucket:
    aws s3 cp s3://aws-bigdata-blog/artifacts/BDB-2771/code/emrserverless-custom-images_2.12-1.0.jar s3://<YOUR BUCKET>/<PREFIX>/emrserverless-custom-images_2.12-1.0.jar

  3. In the following command, provide the name of the S3 bucket and prefix where you stored your application JAR. Additionally, provide the applicationId value obtained from the create-application command and your EMR Serverless job runtime IAM role ARN from the prerequisites, with permissions to write to the Amazon Managed Prometheus workspace.
    aws emr-serverless start-job-run \
        --region <region> \
        --application-id <applicationId> \
        --execution-role-arn <jobRuntimeRole> \
        --job-driver '{
            "sparkSubmit": {
                "entryPoint": "s3://<YOUR BUCKET>/<PREFIX>/emrserverless-custom-images_2.12-1.0.jar",
                "entryPointArguments": ["40000000"],
                "sparkSubmitParameters": "--conf spark.ui.prometheus.enabled=true --conf spark.executor.processTreeMetrics.enabled=true --class emrserverless.prometheus.SyntheticAnalysis"
            }
        }' \
        --configuration-overrides '{
              "monitoringConfiguration": {
                "s3MonitoringConfiguration": {
                  "logUri": "s3://<YOUR BUCKET>/emrserverless/logs"
                }
              }
            }'
    

Inside this Spark application, we run the bash script in the image to start the Prometheus process. You will need to add the following lines to your Spark code after initiating the Spark session if you’re planning to use this image to monitor your own Spark application:

import scala.sys.process._
Seq("/home/hadoop/start-prometheus-agent.sh").!!

For PySpark applications, you can use the following code:

import os
os.system("/home/hadoop/start-prometheus-agent.sh")

Query Prometheus metrics and visualize in Grafana

About a minute after the job changes to Running status, you can query Prometheus metrics using awscurl.

  1. Replace the value of AMP_QUERY_ENDPOINT with the query URL you noted earlier, and provide the job run ID obtained after submitting the Spark job. Make sure that you’re using the credentials of an IAM user or role that has permissions to query the Prometheus workspace before running the commands.
    $ export AMP_QUERY_ENDPOINT="https://aps-workspaces.<region>.amazonaws.com/workspaces/<Workspace_ID>/api/v1/query"
    $ awscurl -X POST --region <region> \
                              --service aps "$AMP_QUERY_ENDPOINT?query=metrics_<jobRunId>_driver_ExecutorMetrics_TotalGCTime_Value{}"
    

    The following is example output from the query:

    {
        "status": "success",
        "data": {
            "resultType": "vector",
            "result": [{
                "metric": {
                    "__name__": "metrics_00f6bueadgb0lp09_driver_ExecutorMetrics_TotalGCTime_Value",
                    "instance": "localhost:4040",
                    "instance_type": "driver",
                    "job": "spark-driver",
                    "spark_cluster": "emrserverless",
                    "type": "gauges"
                },
                "value": [1671166922, "271"]
            }]
        }
    }

  2. Install Grafana on your local desktop and configure our AMP workspace as a data source.Grafana is a commonly used platform for visualizing Prometheus metrics.
  3. Before we start the Grafana server, enable AWS SIGv4 authentication in order to sign queries to AMP with IAM permissions.
    ## Enable SIGv4 auth 
    export AWS_SDK_LOAD_CONFIG=true 
    export GF_AUTH_SIGV4_AUTH_ENABLED=true

  4. In the same session, start the Grafana server. Note that the Grafana installation path may vary based on your OS configurations. Modify the command to start the Grafana server in case your installation path is different from /usr/local/. Also, make sure that you’re using the credentials of an IAM user or role that has permissions to query the Prometheus workspace before running the following commands
    ## Start Grafana server
    grafana-server --config=/usr/local/etc/grafana/grafana.ini \
      --homepath /usr/local/share/grafana \
      cfg:default.paths.logs=/usr/local/var/log/grafana \
      cfg:default.paths.data=/usr/local/var/lib/grafana \
      cfg:default.paths.plugins=/usr/local/var/lib/grafana/plugin

  5. Log in to Grafana and go on the data sources configuration page /datasources to add your AMP workspace as a data source.The URL should be without the /api/v1/query at the end. Enable SigV4 auth, then choose the appropriate Region and save.

When you explore the saved data source, you can see the metrics from the application we just submitted.

You can now visualize these metrics and create elaborate dashboards in Grafana.

Clean up

When you’re done running the examples, clean up the resources. You can use the following script to delete resources created in EMR Serverless, Amazon Managed Prometheus, and Amazon ECR. Pass the Region and optionally the Amazon Managed Prometheus workspace ID as arguments to the script. Note that this script will not remove EMR Serverless applications in Running status.

aws s3 cp s3://aws-bigdata-blog/artifacts/BDB-2771/cleanup/cleanup_resources.sh .
chmod +x cleanup_resources.sh
sh cleanup_resources.sh <region> <AMP Workspace ID> 

Conclusion

In this post, you learned how to use custom images with Amazon EMR Serverless to address some common use cases. For more information on how to build custom images or view sample Dockerfiles, see Customizing the EMR Serverless image and Custom Image Samples.


About the Author

Veena Vasudevan is a Senior Partner Solutions Architect and an Amazon EMR specialist at AWS focusing on Big Data and Analytics. She helps customers and partners build highly optimized, scalable, and secure solutions; modernize their architectures; and migrate their Big Data workloads to AWS.