Post Syndicated from Veerendra Nayak original https://aws.amazon.com/blogs/big-data/federating-amazon-redshift-access-from-onelogin/
You can use federation to access AWS accounts using credentials from a corporate directory, utilizing open standards such as SAML, to exchange identity and security information between an identity provider (IdP) and an application.
With this integration, you manage user identities to AWS resources centrally in IdPs. This improves enterprise security and removes the need for separate database users and passwords.
In this post, we walk through the steps required to set up Amazon Redshift user federation from OneLogin. Amazon Redshift supports SAML 2.0, and can be easily configured to integrate with OneLogin. For information about integrating with other IdPs, see Federate Amazon Redshift access with Microsoft Azure AD single sign-on and Federate Amazon Redshift access with Okta as an identity provider, respectively.
Solution overview
Amazon Redshift federated login with OneLogin involves the following steps:
- Create a OneLogin SAML application, users, and roles.
- Create two AWS Identity and Access Management (IAM) roles to support OneLogin integration with Amazon Redshift:
- A role to establish the trust relationship between IdP and AWS.
- A role that defines Amazon Redshift access policies.
- Edit the OneLogin application configuration and parameters using the AWS roles created in the previous step.
- Configure JDBC and ODBC clients to connect to Amazon Redshift using corporate credentials
Setting up your OneLogin user
If you don’t have OneLogin set up, you can sign up for a 30-day free trial.
- Sign in to OneLogin using the following URL:
https://<orgname>.onelogin.com/admin(<orgname> is the name used when setting up the OneLogin account). - On the Users page (
https://<orgname>.onelogin.com/users), choose New User.

- On the Applications page, choose Add app.

- Choose Amazon Redshift JDBC/ODBC.

- After the application is created, choose SSO from the navigation pane.
- From the More Actions drop-down menu, choose SAML Metadata.


Setting up IAM
In this step, you configure your IdP in IAM and create roles to support OneLogin integration with Amazon Redshift.
Configuring IdP in IAM
To configure your IdP, complete the following steps:
- On the IAM console, choose Identity providers.
- Choose Create Provider.

- For Provider Type, choose SAML.
- For Provider Name, enter
OneloginRedshift. - For Metadata Document, choose the file that you downloaded in the earlier step.

- Choose Next.
- Choose Create.


Creating your IAM role
In this step, you create a new IAM role that users federated from OneLogin can assume.
- On the IAM console, create an IAM policy with the following permissions. In this policy, we allow Amazon Redshift to query data, create users, and allow users to join groups. For this use case, the sales and marketing groups are already created in Redshift.
- On the Roles page, choose Create role.
- For Role name, enter
OneloginRedshiftCluster. - For Role description, enter a description.
- For Trusted entities, choose Redshift.
- Choose Next: Permissions.
- Choose the policy you created earlier (
OneloginCustomPolicy). - Choose Create role.

In the next steps, we edit the trust relationships.
- On the Summary page for your role, choose Edit trust relationship.

- Add the following policy document:

Setting up your OneLogin application
In this step, you edit the OneLogin application configuration and parameters using the AWS roles created in the previous step.
- Go to your application in OneLogin and confirm Redshift Local Host URL is set to
http://localhost:7890/redshift/.

- On the Parameters page, add the following fields:

| Field Name | Value | Flags: Include in SAML Assertion |
DbUser |
Default (checked) | |
Role |
Enter the role created for Amazon Redshift access and the IDP ARN separated by a comma: RoleARNforRedshiftCluster,RoleARNforIAMIDP. For example, |
Default (checked) |
|
|
Default (checked) | |
DbGroups |
Choose your AD groups. If no AD integration is in place, choose user roles with semicolon-delimited input. This is to handle users associated with multiple groups. The following section shows how to create roles and attach them to users. |
Associating user roles
If you don’t have an AD association in OneLogin and you need to authorize access using groups in Amazon Redshift, complete the following steps.
- On the OneLogin page, under Users, choose Roles.

- Choose New Role.

- Create new roles that correspond to the Amazon Redshift user groups. Make sure that the role names are lowercase.
- Add the Amazon Redshift JDBC ODBC application created earlier.

- Choose Save.


We associate users to the role we created earlier so we can map users to Amazon Redshift groups.
- We assign the Fred Taylor user to the
marketingrole and Joe Bloggs to thesalesrole.
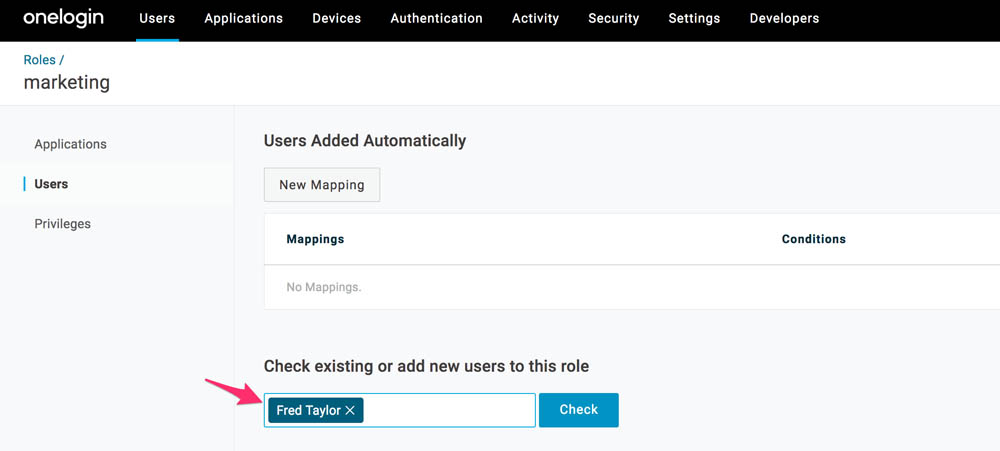
These roles are used to assign the users to the appropriate groups when they log in. You can also add users automatically to roles by using rules.
- Go to user profile and check if the role is associated with the user.
- If it’s not selected, choose New Role and add the application.

- If it’s not selected, choose New Role and add the application.

In the next steps, we set up the JDBC and ODBC tools.
Setting up JDBC and ODBC connections
In this post, we use SQL Workbench to demonstrate the JDBC setup, but you can extend the solution to other JDBC-compliant tools.
- Download the Amazon Redshift driver and ensure that the driver version is 1.2.41 or above with SDK included.
- In SQL Workbench/J, on the Manage drivers page, create a new Amazon Redshift driver profile and point it to the file downloaded in the previous step.

- Create a connection to the Amazon Redshift cluster using the driver you downloaded.
- For URL, enter the URL in the following format:
jdbc:redshift:iam://<clusterendpoint>:5439/dev. - Leave Username and Password blank (they are federated from OneLogin).
- Select Save password.

- Choose Extended properties and add the following values:
- login_url –
https://exampleinc.onelogin.com/trust/saml2/http-post/sso/613ac582-9999999999(from OneLogin application setup) - plugin_name –
com.amazon.redshift.plugin.BrowserSamlCredentialsProvider - idp_response_timeout –
15
- login_url –
- Choose Test or Connect to open the OneLogin page.
- Enter your corporate user name and password.


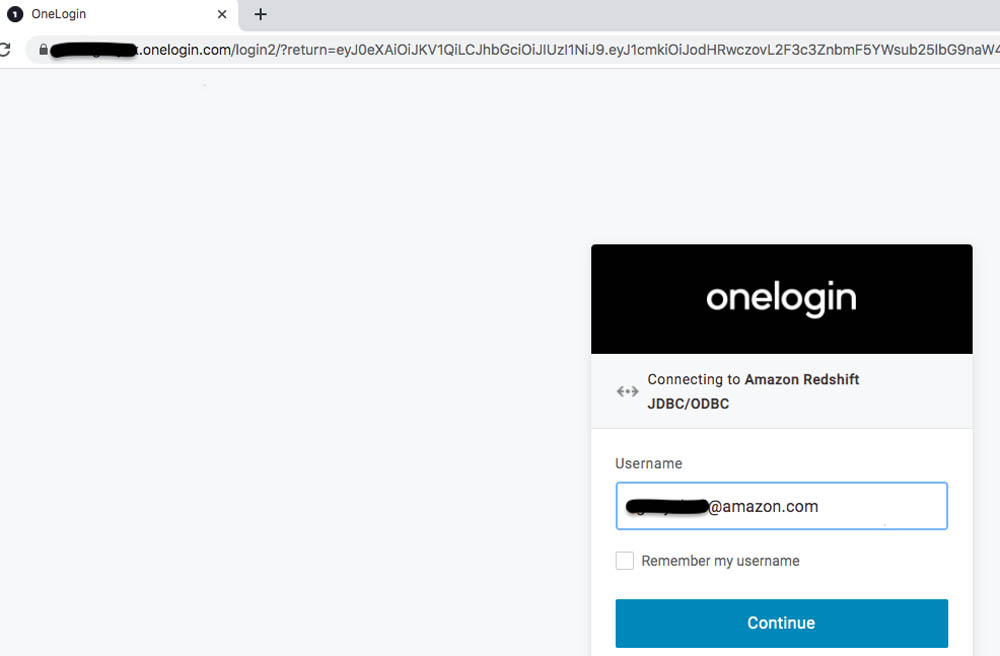
You should see the following message upon successful authentication: “Thank you for using Amazon Redshift! You can now close this window.”

- Navigate back to SQL Workbench and you should be connected to the Amazon Redshift cluster with the OneLogin user name and the role assigned to you in OneLogin.
- Verify the user name passed in via OneLogin by running the following SQL command:
You can now verify that the users have been associated with the correct groups. For our use case, Fred Taylor has access to the tables in the marketing schema only. The user Joe Bloggs has access to tables in the sales schema only. Using the Joe Bloggs user, you get the following results when trying to query data from each schema:
For client tools that support ODBC, you can configure the ODBC driver to connect Redshift to integrate with OneLogin. In this post, we show ODBC connectivity using the command line tool isql and Python.
isql is an interactive ODBC test tool to test your DSNs for their connectivity to databases and run SQL statements when you’re connected to a database. It is installed with PSQL.
- Download and install the ODBC driver (use ODBC – macOS X driver version 1.4.16 or higher).
- On MacOS, the installation process installs the driver files in the following directories:
- Open the
/usr/local/etc/odbc.inidirectory and add Amazon Redshift DSN andLogin_URL. See the following screenshot.

- After
odbc.iniis set up, we connect using isql. On terminal, enter the following code:

isql should open the browser window to ask for credentials (use your OneLogin credentials).
- We can also use Python3 to connect to Amazon Redshift using ODBC. See the following example code:
Summary
In this post, we demonstrated how to set up federated login to Amazon Redshift using OneLogin. We also showed how to pass along group membership within your IdP, enabling you to manage user access to Amazon Redshift resources from within your IdP.
If you have any questions or suggestions, please leave us a comment.
About the Authors
 Veerendra Nayak is a Senior Database Solution Architect with Amazon Web Services.
 Sam Selvan is a Senior Database Solution Architect with Amazon Web Services.