Amazon MQ is a managed, highly available message broker for Apache ActiveMQ. The service manages the provisioning, setup, and maintenance of ActiveMQ. Now, with Amazon MQ as an event source for AWS Lambda, you can process messages from the service. This allows you to integrate Amazon MQ with downstream serverless workflows.
ActiveMQ is a popular open source message broker that uses open standard APIs and protocols. You can move from any message broker that uses these standards to Amazon MQ. With Amazon MQ, you can deploy production-ready broker configurations in minutes, and migrate existing messaging services to the AWS Cloud. Often, this does not require you to rewrite any code, and in many cases you only need to update the application endpoints.
In this blog post, I explain how to set up an Amazon MQ broker and networking configuration. I also show how to create a Lambda function that is invoked by messages from Amazon MQ queues.
Overview
Using Amazon MQ as an event source operates in a similar way to using Amazon SQS or Amazon Kinesis. In all cases, the Lambda service internally polls for new records or messages from the event source, and then synchronously invokes the target Lambda function. Lambda reads the messages in batches and provides these to your function as an event payload.
Lambda is a consumer application for your Amazon MQ queue. It processes records from one or more partitions and sends the payload to the target function. Lambda continues to process batches until there are no more messages in the topic.
The Lambda function’s event payload contains an array of records in the messages attribute. Each array item contains envelope details of the message, together with the base64 encoded message in the data attribute:
How to configure Amazon MQ as an event source for Lambda
Amazon MQ is a highly available service, so it must be configured to run in a minimum of two Availability Zones in your preferred Region. You can also run a single broker in one Availability Zone for development and test purposes. In this walk through, I show how to run a production, public broker and then configure an event source mapping for a Lambda function.
There are four steps:
Configure the Amazon MQ broker and security group.
In Configure settings, in the ActiveMQ Access panel, enter a user name and password for broker access.
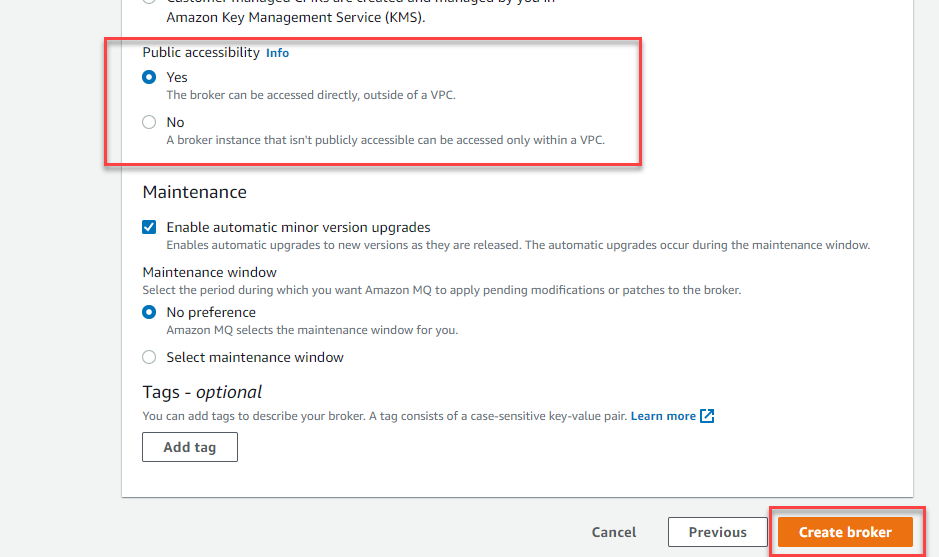
Expand the Additional settings panel, keep the defaults, and ensure that Public accessibility is set to Yes. Choose Create broker.
The creation process takes up to 15 minutes. From the Brokers list, select the broker name. In the Details panel, choose the Security group.
On the Inbound rules tab, choose Edit inbound rules. Add rules to enable inbound TCP traffic on ports 61617 and 8162:
Port 8162 is used to access the ActiveMQ Web Console to configure the broker settings.
Port 61667 is used by the internal Lambda poller to connect with your broker, using the OpenWire endpoint.
Create a queue on the broker
The Lambda service subscribes to a queue on the broker. In this step, you create a new queue:
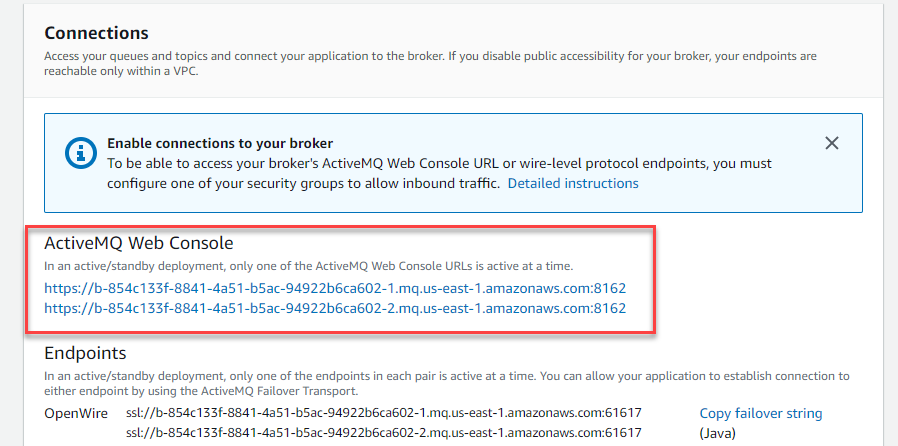
Navigate to the Amazon MQ console and choose the newly created broker. In the Connections panel, locate the URLs for the web console.
Only one endpoint is active at a time. Select both and one resolves to the ActiveMQ Web Console application. Enter the user name and password that you configured earlier.
In the top menu, select Queues. For Queue Name, enter myQueue and choose Create. The new queue appears in the Queues list.
Keep this webpage open, since you use this later for sending messages to the Lambda function.
Set up Secrets Manager
The Lambda service needs access to your Amazon MQ broker, using the user name and password you configured earlier. To avoid exposing secrets in plaintext in the Lambda function, it’s best practice to use a service like Secrets Manager. To create a secret, use the create-secret AWS CLI command. To do this, ensure you have the AWS CLI installed.
From a terminal window, enter this command, replacing the user name and password with your own values:
The command responds with the ARN of the stored secret:
Build the Lambda function and associated permissions
The Lambda must have permission to access the Amazon MQ broker and stored secret. It must also be able to describe VPCs and security groups, and manage elastic network interfaces. These execution roles permissions are:
mq:DescribeBroker
secretsmanager:GetSecretValue
ec2:CreateNetworkInterface
ec2:DescribeNetworkInterfaces
ec2:DescribeVpcs
ec2:DeleteNetworkInterface
ec2:DescribeSubnets
ec2:DescribeSecurityGroups
If you are using an encrypted customer managed key, you must also add the kms:Decrypt permission.
To set up the Lambda function:
Navigate to the Lambda console and choose Create Function.
For function name, enter MQconsumer and choose Create Function.
In the Permissions tab, choose the execution role to edit the permissions.
Choose Attach policies then choose Create policy.
Select the JSON tab and paste the following policy. Choose Review policy.
For name, enter ‘AWSLambdaMQExecutionRole’. Choose Create policy.
In the IAM Summary panel, choose Attach policies. Search for AWSLambdaMQExecutionRole and choose Attach policy.
On the Lambda function page, in the Designer panel, choose Add trigger. Select MQ from the drop-down. Choose the broker name, enter ‘myQueue’ for Queue name, and choose the secret ARN. Choose Add.
The status of the Amazon MQ trigger changes from Creating to Enabled after a couple of minutes. The trigger configuration confirms the settings.
Testing the event source mapping
In the ActiveMQ Web Console, choose Active consumers to confirm that the Lambda service has been configured to consume events.
In the main dashboard, choose Send To on the queue. For Number of messages to send, enter 10 and keep the other defaults. Enter a test message then choose Send.
In the MQconsumer Lambda function, select the Monitoring tab and then choose View logs in CloudWatch. The log streams show that the Lambda function has been invoked by Amazon MQ.
A single Lambda function consumes messages from a single queue in an Amazon MQ broker. You control the rate of message processing using the Batch size property in the event source mapping. The Lambda service limits the concurrency to one execution environment per queue.
For example, in a queue with 100,000 messages and a batch size of 100 and function duration of 2000 ms, the Monitoring tab shows this behavior. The Concurrent executions graph remains at 1 as the internal Lambda poller fetches messages. It continues to invoke the Lambda function until the queue is empty.
Using AWS SAM
In AWS SAM templates, you can configure a Lambda function with an Amazon MQ event source mapping and the necessary permissions. For example:
Amazon MQ provide a fully managed, highly available message broker service for Apache ActiveMQ. Now Lambda supports Amazon MQ as an event source, you can invoke Lambda functions from messages in Amazon MQ queues to integrate into your downstream serverless workflows.
In this post, I give an overview of how to set up an Amazon MQ broker. I show how to configure the networking and create the event source mapping with Lambda. I also show how to set up a consumer Lambda function in the AWS Management Console, and refer to the equivalent AWS SAM syntax to simplify deployment.
This post is courtesy of Sam Dengler, AWS Solutions Architect.
Message brokers can be used to solve a number of needs in enterprise architectures, including managing workload queues and broadcasting messages to a number of subscribers. Some AWS customers are using RabbitMQ today and would like to migrate to a managed service to reduce the overhead of operating their own message broker.
Amazon MQ is a managed message broker service for Apache ActiveMQ that makes it easier to operate and scale message brokers in the cloud. Amazon MQ provides compatibility with your existing workloads that use standard protocols such as OpenWire, AMQP, MQTT, and Stomp (all enabled with SSL). Amazon MQ automatically provisions infrastructure configured as a single-instance broker or as an active/standby broker for high availability.
In this post, I describe how to launch a new Amazon MQ instance. I review example Java code to migrate from a RabbitMQ to Amazon MQ message broker using clients for ActiveMQ, Apache Qpid JMS, and Spring JmsTemplates. I also review best practices for Amazon MQ and changes from RabbitMQ to Amazon MQ to support Publish/Subscribe message patterns.
Getting started with Amazon MQ
To start, open the Amazon MQ console. Enter a broker name and choose Next step.
Launch a new Amazon MQ instance, choosing the mq.t2.micro instance type and Single-instance broker deployment mode, creating a user name and password, and choosing Create broker.
After several minutes, your instance changes status from Creation in progress to Running. You can visit the Details page of your broker to retrieve connection information, including a link to the ActiveMQ web console where you can monitor the status of your instance queues, etc. In the following code examples, you use the OpenWire and AMQP endpoints.
To be able to access your broker, you must configure one of your security groups to allow inbound traffic. For more information, see the link to Detailed instructions in the blue box in the Connections section.
Now that your Amazon MQ broker is running, let’s look at some code!
Dependencies
The following code examples have dependencies across a range of libraries in order to demonstrate RabbitMQ, ActiveMQ, Qpid, Spring JMS templates, and connection pooling. I’ve listed all the dependencies in a single Maven pom.xml:
Here’s an example using RabbitMQ to send and receive a message via queue. The installation and configuration of RabbitMQ is out of scope for this post. For instructions for downloading and installing RabbitMQ, see Downloading and Installing RabbitMQ.
RabbitMQ uses the AMQP 0-9-1 protocol by default, with support for AMQP 1.0 via a plugin. The RabbitMQ examples in this post use the AMQP 0-9
RabbitMQ queue example
To start, here’s some sample code to send and receive a message in RabbitMQ using a queue.
import java.io.IOException;
import java.net.URISyntaxException;
import java.security.KeyManagementException;
import java.security.NoSuchAlgorithmException;
import java.util.concurrent.TimeoutException;
import com.rabbitmq.client.Channel;
import com.rabbitmq.client.Connection;
import com.rabbitmq.client.ConnectionFactory;
import com.rabbitmq.client.GetResponse;
public class RabbitMQExample {
private static final boolean ACKNOWLEDGE_MODE = true;
// The Endpoint, Username, Password, and Queue should be externalized and
// configured through environment variables or dependency injection.
private static final String ENDPOINT;
private static final String USERNAME;
private static final String PASSWORD;
private static final String QUEUE = "MyQueue";
public static void main(String[] args) throws KeyManagementException, NoSuchAlgorithmException, URISyntaxException, IOException, TimeoutException {
// Create a connection factory.
ConnectionFactory connectionFactory = new ConnectionFactory();
connectionFactory.setUri(ENDPOINT);
// Specify the username and password.
connectionFactory.setUsername(USERNAME);
connectionFactory.setPassword(PASSWORD);
// Establish a connection for the producer.
Connection producerConnection = connectionFactory.newConnection();
// Create a channel for the producer.
Channel producerChannel = producerConnection.createChannel();
// Create a queue named "MyQueue".
producerChannel.queueDeclare(QUEUE, false, false, false, null);
// Create a message.
String text = "Hello from RabbitMQ!";
// Send the message.
producerChannel.basicPublish("", QUEUE, null, text.getBytes());
System.out.println("Message sent: " + text);
// Clean up the producer.
producerChannel.close();
producerConnection.close();
// Establish a connection for the consumer.
Connection consumerConnection = connectionFactory.newConnection();
// Create a channel for the consumer.
Channel consumerChannel = consumerConnection.createChannel();
// Create a queue named "MyQueue".
consumerChannel.queueDeclare(QUEUE, false, false, false, null);
// Receive the message.
GetResponse response = consumerChannel.basicGet(QUEUE, ACKNOWLEDGE_MODE);
String message = new String(response.getBody(), "UTF-8");
System.out.println("Message received: " + message);
// Clean up the consumer.
consumerChannel.close();
consumerConnection.close();
}
}
In this example, you need to specify the ENDPOINT, USERNAME, and PASSWORD for your RabbitMQ message broker using environment variables or dependency injection.
This example uses the RabbitMQ client library to establish connectivity to the message broker and a channel for communication. In RabbitMQ, messages are sent over the channel to a named queue, which stores messages in a buffer, and from which consumers can receive and process messages. In this example, you publish a message using the Channel.basicPublish method, using the default exchange, identified by an empty string (“”).
To receive and process the messages in the queue, create a second connection, channel, and queue. Queue declaration is an idempotent operation, so there is no harm in declaring it twice. In this example, you receive the message using the Channel.basicGet method, automatically acknowledging message receipt to the broker.
This example demonstrates the basics of sending and receiving a message of one type. However, what if you wanted to publish messages of different types such that various consumers could subscribe only to pertinent message types (that is, pub/sub)? Here’s a RabbitMQ example using topic exchanges to route messages to different queues.
RabbitMQ topic example
This example is similar to the one earlier. To enable topic publishing, specify two additional properties: EXCHANGE and ROUTING_KEY. RabbitMQ uses the exchange and routing key properties for routing messaging. Look at how these properties change the code to publish a message.
import java.io.IOException;
import java.net.URISyntaxException;
import java.security.KeyManagementException;
import java.security.NoSuchAlgorithmException;
import java.util.concurrent.TimeoutException;
import com.rabbitmq.client.BuiltinExchangeType;
import com.rabbitmq.client.Channel;
import com.rabbitmq.client.Connection;
import com.rabbitmq.client.ConnectionFactory;
import com.rabbitmq.client.GetResponse;
public class RabbitMQExample {
private static final boolean ACKNOWLEDGE_MODE = true;
// The Endpoint, Username, Password, Queue, Exhange, and Routing Key should
// be externalized and configured through environment variables or
// dependency injection.
private static final String ENDPOINT; // "amqp://localhost:5672"
private static final String USERNAME;
private static final String PASSWORD;
private static final String QUEUE = "MyQueue";
private static final String EXCHANGE = "MyExchange";
private static final String ROUTING_KEY = "MyRoutingKey";
public static void main(String[] args) throws KeyManagementException, NoSuchAlgorithmException, URISyntaxException, IOException, TimeoutException {
// Create a connection factory.
ConnectionFactory connectionFactory = new ConnectionFactory();
connectionFactory.setUri(ENDPOINT);
// Specify the username and password.
connectionFactory.setUsername(USERNAME);
connectionFactory.setPassword(PASSWORD);
// Establish a connection for the producer.
Connection producerConnection = connectionFactory.newConnection();
// Create a channel for the producer.
Channel producerChannel = producerConnection.createChannel();
// Create a queue named "MyQueue".
producerChannel.queueDeclare(QUEUE, false, false, false, null);
// Create an exchange named "MyExchange".
producerChannel.exchangeDeclare(EXCHANGE, BuiltinExchangeType.TOPIC);
// Bind "MyQueue" to "MyExchange", using routing key "MyRoutingKey".
producerChannel.queueBind(QUEUE, EXCHANGE, ROUTING_KEY);
// Create a message.
String text = "Hello from RabbitMQ!";
// Send the message.
producerChannel.basicPublish(EXCHANGE, ROUTING_KEY, null, text.getBytes());
System.out.println("Message sent: " + text);
// Clean up the producer.
producerChannel.close();
producerConnection.close();
...
As before, you establish a connection to the RabbitMQ message broker, a channel for communication, and a queue to buffer messages for consumption. In addition to these components, you declare an explicit exchange of type BuiltinExchangeType.TOPIC and bind the queue to the exchange using the ROUTING_KEY that filters messages to send to the queue.
Again, publish a message using the Channel.basicPublish method. This time, instead of publishing the message to a queue, specify the EXCHANGE and ROUTING_KEY values for the message. RabbitMQ uses these properties to route the message to the appropriate queue, from which a consumer receives the message using the same code from the first example.
JMS API
Now that you’ve seen examples for queue and topic publishing in RabbitMQ, look at code changes to support Amazon MQ, starting with the ActiveMQ client. But first, a quick review of the Java Messaging Service (JMS) API.
The remainder of the examples in this post use the JMS API, which abstracts messaging methods from underlying protocol and client implementations. The JMS API programming model uses a combination of connection factories, connections, sessions, destinations, message producers, and message consumers to send and receive messages. The following image (from The Java EE 6 Tutorial) shows the relationship between these components:
ActiveMQ OpenWire connectivity to Amazon MQ
Here’s how JMS is used with ActiveMQ to send and receive messages on a queue.
The ActiveMQ client uses the OpenWire protocol, supported by Amazon MQ. The OpenWire protocol can be found in your Amazon MQ broker’s endpoint list (screenshot). It requires that the security group for the Amazon MQ be open for the ActiveMQ OpenWire protocol endpoint port, 61617.
ActiveMQ queue example
Next, here’s an example to send and receive messages to Amazon MQ using the ActiveMQ client. This example should look familiar, as it follows the same flow to send and receive messages via a queue. I’ve included the example in full and then highlighted the differences to consider when migrating from RabbitMQ.
import javax.jms.Connection;
import javax.jms.DeliveryMode;
import javax.jms.Destination;
import javax.jms.JMSException;
import javax.jms.Message;
import javax.jms.MessageConsumer;
import javax.jms.MessageProducer;
import javax.jms.Session;
import javax.jms.TextMessage;
import org.apache.activemq.ActiveMQConnectionFactory;
import org.apache.activemq.jms.pool.PooledConnectionFactory;
public class ActiveMQClientExample {
private static final int DELIVERY_MODE = DeliveryMode.NON_PERSISTENT;
private static final int ACKNOWLEDGE_MODE = Session.AUTO_ACKNOWLEDGE;
// The Endpoint, Username, Password, and Queue should be externalized and
// configured through environment variables or dependency injection.
private static final String ENDPOINT; // "ssl://x-xxxxxxxx-xxxx-xxxx-xxxx-xxxxxxxxxxxx-x.mq.us-east-1.amazonaws.com:61617"
private static final String USERNAME;
private static final String PASSWORD;
private static final String QUEUE = "MyQueue";
public static void main(String[] args) throws JMSException {
// Create a connection factory.
ActiveMQConnectionFactory connectionFactory = new ActiveMQConnectionFactory(ENDPOINT);
// Specify the username and password.
connectionFactory.setUserName(USERNAME);
connectionFactory.setPassword(PASSWORD);
// Create a pooled connection factory.
PooledConnectionFactory pooledConnectionFactory = new PooledConnectionFactory();
pooledConnectionFactory.setConnectionFactory(connectionFactory);
pooledConnectionFactory.setMaxConnections(10);
// Establish a connection for the producer.
Connection producerConnection = pooledConnectionFactory.createConnection();
producerConnection.start();
// Create a session.
Session producerSession = producerConnection.createSession(false, ACKNOWLEDGE_MODE);
// Create a queue named "MyQueue".
Destination producerDestination = producerSession.createQueue(QUEUE);
// Create a producer from the session to the queue.
MessageProducer producer = producerSession.createProducer(producerDestination);
producer.setDeliveryMode(DELIVERY_MODE);
// Create a message.
String text = "Hello from Amazon MQ!";
TextMessage producerMessage = producerSession.createTextMessage(text);
// Send the message.
producer.send(producerMessage);
System.out.println("Message sent.");
// Clean up the producer.
producer.close();
producerSession.close();
producerConnection.close();
// Establish a connection for the consumer.
// Note: Consumers should not use PooledConnectionFactory.
Connection consumerConnection = connectionFactory.createConnection();
consumerConnection.start();
// Create a session.
Session consumerSession = consumerConnection.createSession(false, ACKNOWLEDGE_MODE);
// Create a queue named "MyQueue".
Destination consumerDestination = consumerSession.createQueue(QUEUE);
// Create a message consumer from the session to the queue.
MessageConsumer consumer = consumerSession.createConsumer(consumerDestination);
// Begin to wait for messages.
Message consumerMessage = consumer.receive(1000);
// Receive the message when it arrives.
TextMessage consumerTextMessage = (TextMessage) consumerMessage;
System.out.println("Message received: " + consumerTextMessage.getText());
// Clean up the consumer.
consumer.close();
consumerSession.close();
consumerConnection.close();
pooledConnectionFactory.stop();
}
}
In this example, you use the ActiveMQ client to establish connectivity to AmazonMQ using the OpenWire protocol with the ActiveMQConnectionFactory class to specify the endpoint and user credentials. For this example, use the master user name and password chosen when creating the Amazon MQ broker earlier. However, it’s a best practice to create additional Amazon MQ users for brokers in non-sandbox environments.
You could use the ActiveMQConnectionFactory to establish connectivity to the Amazon MQ broker. However, it is a best practice in Amazon MQ to group multiple producer requests using the ActiveMQ PooledConnectionFactory to wrap the ActiveMQConnectionFactory.
Using the PooledConnectionFactory, you can create a connection to Amazon MQ and establish a session to send a message. Like the RabbitMQ queue example, create a message queue destination using the Session.createQueue method, and a message producer to send the message to the queue.
For the consumer, use the ActiveMQConnectionFactory, NOT the PooledConnectionFactory, to create a connection, session, queue destination, and message consumer to receive the message because pooling of consumers is not considered a best practice. For more information, see the ActiveMQ Spring Support page.
ActiveMQ virtual destinations on Amazon MQ
Here’s how topic publishing differs from RabbitMQ to Amazon MQ.
If you remember from the RabbitMQ topic example, you bound a queue to an exchange using a routing key to control queue destinations when sending messages using a key attribute.
You run into a problem if you try to implement topic subscription using the message consumer in the preceding ActiveMQ queue example. The following is an excerpt from Virtual Destinations, which provides more detail on this subject:
A JMS durable subscriber MessageConsumer is created with a unique JMS clientID and durable subscriber name. To be JMS-compliant, only one JMS connection can be active at any point in time for one JMS clientID, and only one consumer can be active for a clientID and subscriber name. That is, only one thread can be actively consuming from a given logical topic subscriber.
To solve this, ActiveMQ supports the concept of a virtual destination, which provides a logical topic subscription access to a physical queue for consumption without breaking JMS compliance. To do so, ActiveMQ uses a simple convention for specifying the topic and queue names to configure message routing.
Topic names must use the “VirtualTopic.” prefix, followed by the topic name. For example, VirtualTopic.MyTopic.
Consumer names must use the “Consumer.” prefix, followed by the consumer name, followed by the topic name. For example, Consumer.MyConsumer.VirtualTopic.MyTopic.
ActiveMQ topic example
Next, here’s an example for the ActiveMQ client that demonstrates publishing messaging to topics. This example is similar to the ActiveMQ Queue Example. In this one, create a Topic destination instead of a queue destination.
import javax.jms.Connection;
import javax.jms.DeliveryMode;
import javax.jms.Destination;
import javax.jms.JMSException;
import javax.jms.Message;
import javax.jms.MessageConsumer;
import javax.jms.MessageProducer;
import javax.jms.Session;
import javax.jms.TextMessage;
import org.apache.activemq.ActiveMQConnectionFactory;
import org.apache.activemq.jms.pool.PooledConnectionFactory;
public class ActiveMQClientExample {
private static final int DELIVERY_MODE = DeliveryMode.NON_PERSISTENT;
private static final int ACKNOWLEDGE_MODE = Session.AUTO_ACKNOWLEDGE;
// The Endpoint, Username, Password, Producer Topic, and Consumer Topic
// should be externalized and configured through environment variables or
// dependency injection.
private static final String ENDPOINT; // "ssl://x-xxxxxxxx-xxxx-xxxx-xxxx-xxxxxxxxxxxx-x.mq.us-east-1.amazonaws.com:61617"
private static final String USERNAME;
private static final String PASSWORD;
private static final String PRODUCER_TOPIC = "VirtualTopic.MyTopic";
private static final String CONSUMER1_TOPIC = "Consumer.Consumer1." + PRODUCER_TOPIC;
public static void main(String[] args) throws JMSException {
// Create a connection factory.
ActiveMQConnectionFactory connectionFactory = new ActiveMQConnectionFactory(ENDPOINT);
// Specify the username and password.
connectionFactory.setUserName(USERNAME);
connectionFactory.setPassword(PASSWORD);
// Create a pooled connection factory.
PooledConnectionFactory pooledConnectionFactory = new PooledConnectionFactory();
pooledConnectionFactory.setConnectionFactory(connectionFactory);
pooledConnectionFactory.setMaxConnections(10);
// Establish a connection for the producer.
Connection producerConnection = pooledConnectionFactory.createConnection();
producerConnection.start();
// Create a session.
Session producerSession = producerConnection.createSession(false, ACKNOWLEDGE_MODE);
// Create a topic named "VirtualTopic.MyTopic".
Destination producerDestination = producerSession.createTopic(PRODUCER_TOPIC);
// Create a producer from the session to the topic.
MessageProducer producer = producerSession.createProducer(producerDestination);
producer.setDeliveryMode(DELIVERY_MODE);
// Create a message.
String text = "Hello from Amazon MQ!";
TextMessage producerMessage = producerSession.createTextMessage(text);
// Send the message.
producer.send(producerMessage);
System.out.println("Message sent.");
// Clean up the producer.
producer.close();
producerSession.close();
producerConnection.close();
// Establish a connection for the consumer.
// Note: Consumers should not use PooledConnectionFactory.
Connection consumerConnection = connectionFactory.createConnection();
consumerConnection.start();
// Create a session.
Session consumerSession = consumerConnection.createSession(false, ACKNOWLEDGE_MODE);
// Create a queue called "Consumer.Consumer1.VirtualTopic.MyTopic".
Destination consumerDestination = consumerSession.createQueue(CONSUMER1_TOPIC);
// Create a message consumer from the session to the queue.
MessageConsumer consumer = consumerSession.createConsumer(consumerDestination);
// Begin to wait for messages.
Message consumerMessage = consumer.receive(1000);
// Receive the message when it arrives.
TextMessage consumerTextMessage = (TextMessage) consumerMessage;
System.out.println("Message received: " + consumerTextMessage.getText());
// Clean up the consumer.
consumer.close();
consumerSession.close();
consumerConnection.close();
pooledConnectionFactory.stop();
}
}
In this example, the message producer uses the Session.createTopic method with the topic name, VirtualTopic.MyTopic, as the publishing destination. The message consumer code does not change, but the queue destination uses the virtual destination convention, Consumer.Consumer1.VirtualTopic.MyTopic. ActiveMQ uses these names for the topic and queue to route messages accordingly.
AMQP connectivity to Amazon MQ
Now that you’ve explored some examples using an ActiveMQ client, look at examples using the Qpid JMS client to connect to the Amazon MQ broker over the AMQP 1.0 protocol and see how they differ.
The Qpid client uses the Advanced Message Queuing Protocol (AMQP) 1.0 protocol, supported by Amazon MQ. The AMQP 1.0 protocol can be found in your Amazon MQ broker’s endpoint list (screenshot). It uses port 5671, which must be opened in the Security Group associated with the Amazon MQ broker.
The AMQP endpoint specifies a transport, amqp+ssl. For encrypted connections, Qpid expects the protocol name to be amqps, instead of amqp+ssl, however the rest of the connection address remains the same.
Qpid JMS queue example
Next, here’s an example to send and receive messages to Amazon MQ using the Qpid client. The Qpid JMS client is built using Apache Qpid Proton, an AMQP messaging toolkit.
import java.util.Hashtable;
import javax.jms.Connection;
import javax.jms.ConnectionFactory;
import javax.jms.DeliveryMode;
import javax.jms.Destination;
import javax.jms.JMSException;
import javax.jms.Message;
import javax.jms.MessageConsumer;
import javax.jms.MessageProducer;
import javax.jms.Session;
import javax.jms.TextMessage;
import javax.naming.Context;
import javax.naming.NamingException;
import org.apache.activemq.jms.pool.PooledConnectionFactory;
public class QpidClientExample {
private static final int DELIVERY_MODE = DeliveryMode.NON_PERSISTENT;
private static final int ACKNOWLEDGE_MODE = Session.AUTO_ACKNOWLEDGE;
// The Endpoint, Username, Password, and Queue should be externalized and
// configured through environment variables or dependency injection.
private static final String ENDPOINT; // "amqps://x-xxxxxxxx-xxxx-xxxx-xxxx-xxxxxxxxxxxx-x.mq.us-east-1.amazonaws.com:5671"
private static final String USERNAME;
private static final String PASSWORD;
private static final String QUEUE = "MyQueue";
public static void main(String[] args) throws JMSException, NamingException {
// Use JNDI to specify the AMQP endpoint
Hashtable<Object, Object> env = new Hashtable<Object, Object>();
env.put(Context.INITIAL_CONTEXT_FACTORY, "org.apache.qpid.jms.jndi.JmsInitialContextFactory");
env.put("connectionfactory.factoryLookup", ENDPOINT);
javax.naming.Context context = new javax.naming.InitialContext(env);
// Create a connection factory.
ConnectionFactory connectionFactory = (ConnectionFactory) context.lookup("factoryLookup");
// Create a pooled connection factory.
PooledConnectionFactory pooledConnectionFactory = new PooledConnectionFactory();
pooledConnectionFactory.setConnectionFactory(connectionFactory);
pooledConnectionFactory.setMaxConnections(10);
// Establish a connection for the producer.
Connection producerConnection = pooledConnectionFactory.createConnection(USERNAME, PASSWORD);
producerConnection.start();
// Create a session.
Session producerSession = producerConnection.createSession(false, ACKNOWLEDGE_MODE);
// Create a queue named "MyQueue".
Destination producerDestination = producerSession.createQueue(QUEUE);
// Create a producer from the session to the queue.
MessageProducer producer = producerSession.createProducer(producerDestination);
producer.setDeliveryMode(DELIVERY_MODE);
// Create a message.
String text = "Hello from Qpid Amazon MQ!";
TextMessage producerMessage = producerSession.createTextMessage(text);
// Send the message.
producer.send(producerMessage);
System.out.println("Message sent.");
// Clean up the producer.
producer.close();
producerSession.close();
producerConnection.close();
// Establish a connection for the consumer.
// Note: Consumers should not use PooledConnectionFactory.
Connection consumerConnection = connectionFactory.createConnection(USERNAME, PASSWORD);
consumerConnection.start();
// Create a session.
Session consumerSession = consumerConnection.createSession(false, ACKNOWLEDGE_MODE);
// Create a queue named "MyQueue".
Destination consumerDestination = consumerSession.createQueue(QUEUE);
// Create a message consumer from the session to the queue.
MessageConsumer consumer = consumerSession.createConsumer(consumerDestination);
// Begin to wait for messages.
Message consumerMessage = consumer.receive(1000);
// Receive the message when it arrives.
TextMessage consumerTextMessage = (TextMessage) consumerMessage;
System.out.println("Message received: " + consumerTextMessage.getText());
// Clean up the consumer.
consumer.close();
consumerSession.close();
consumerConnection.close();
pooledConnectionFactory.stop();
}
}
The Qpid queue example is similar to the ActiveMQ Queue Example. They both use the JMS API model to send and receive messages, but the difference is in how the ConnectionFactory and AMQP endpoint is specified. According to the Qpid client configuration documentation, the ConnectionFactory is specified using a JNDI InitialContext to look up JMS objects. The JNDI configuration is popularly specified in a file named jndi.properties on the Java Classpath. In this example, do it programmatically using a HashTable for simplicity.
NOTE: Although the Qpid client and Qpid JMS client are used to establish connectivity to Amazon MQ using the AMQP 1.0 protocol, the producer should still use the ActiveMQ PooledConnectionFactory to wrap the Qpid ConnectionFactory. This can be confusing because Qpid client provides a PooledConnectionFactory that should NOT be used for AMQP 1.0.
The Qpid topic example is identical to the earlier ActiveMQ topic example with the same substitution, which establishes the ConnectionFactory to the AMQP 1.0 endpoint via JNDI.
Spring JMS template queue example
Finally, here are examples using the Spring JmsTemplate to send and receive messages.
This example established connectivity to Amazon MQ using the same protocol and client library used in the ActiveMQ queue example. That example requires that the security group for the Amazon MQ be open for the ActiveMQ OpenWire protocol endpoint port, 61617.
The Spring JmsTemplate provides a higher-level abstraction on top of JMS. Code using the JmsTemplate class only needs to implement handlers to process messages, while the management of connections, sessions, message producers, and message consumers is delegated to Spring. Look at the following code:
import javax.jms.DeliveryMode;
import javax.jms.JMSException;
import javax.jms.Message;
import javax.jms.Session;
import javax.jms.TextMessage;
import org.apache.activemq.ActiveMQConnectionFactory;
import org.apache.activemq.command.ActiveMQQueue;
import org.apache.activemq.jms.pool.PooledConnectionFactory;
import org.springframework.jms.core.JmsTemplate;
import org.springframework.jms.core.MessageCreator;
public class ActiveMQSpringExample {
private static final int DELIVERY_MODE = DeliveryMode.NON_PERSISTENT;
private static final int ACKNOWLEDGE_MODE = Session.AUTO_ACKNOWLEDGE;
// The Endpoint, Username, Password, and Queue should be externalized and
// configured through environment variables or dependency injection.
private static final String ENDPOINT; // ssl://x-xxxxxxxx-xxxx-xxxx-xxxx-xxxxxxxxxxxx-x.mq.us-east-1.amazonaws.com:61617"
private static final String USERNAME;
private static final String PASSWORD;
private static final String QUEUE = "MyQueue";
public static void main(String[] args) throws JMSException {
// Create a connection factory.
ActiveMQConnectionFactory connectionFactory = new ActiveMQConnectionFactory(ENDPOINT);
// Specify the username and password.
connectionFactory.setUserName(USERNAME);
connectionFactory.setPassword(PASSWORD);
// Create a pooled connection factory.
PooledConnectionFactory pooledConnectionFactory = new PooledConnectionFactory();
pooledConnectionFactory.setConnectionFactory(connectionFactory);
pooledConnectionFactory.setMaxConnections(10);
// Create a JmsTemplate for the producer.
JmsTemplate producerJmsTemplate = new JmsTemplate();
producerJmsTemplate.setConnectionFactory(pooledConnectionFactory);
producerJmsTemplate.setDefaultDestination(new ActiveMQQueue(QUEUE));
producerJmsTemplate.setSessionAcknowledgeMode(ACKNOWLEDGE_MODE);
producerJmsTemplate.setDeliveryMode(DELIVERY_MODE);
// Create a message creator.
MessageCreator messageCreator = new MessageCreator() {
public Message createMessage(Session session) throws JMSException {
return session.createTextMessage("Hello from Spring Amazon MQ!");
}
};
// Send the message.
producerJmsTemplate.send(messageCreator);
System.out.println("Message sent.");
// Clean up the producer.
// producer JmsTemplate will close underlying sessions and connections.
// Create a JmsTemplate for the consumer.
// Note: Consumers should not use PooledConnectionFactory.
JmsTemplate consumerJmsTemplate = new JmsTemplate();
consumerJmsTemplate.setConnectionFactory(connectionFactory);
consumerJmsTemplate.setDefaultDestination(new ActiveMQQueue(QUEUE));
consumerJmsTemplate.setSessionAcknowledgeMode(ACKNOWLEDGE_MODE);
consumerJmsTemplate.setReceiveTimeout(1000);
// Begin to wait for messages.
Message consumerMessage = consumerJmsTemplate.receive();
// Receive the message when it arrives.
TextMessage consumerTextMessage = (TextMessage) consumerMessage;
System.out.println("Message received: " + consumerTextMessage.getText());
// Clean up the consumer.
// consumer JmsTemplate will close underlying sessions and connections.
pooledConnectionFactory.stop();
}
}
Although Spring manages connections, sessions, and message producers, the grouping of producer connections is still a best practice. The ActiveMQ PooledConnectionFactory class is used in this example. However, the Spring CachingConnectionFactory object is another option.
Following the PooledConnectionFactory creation, a JmsTemplate is created for the producer and an ActiveMQQueue is created as the message destination. To use JmsTemplate to send a message, a MessageCreator callback is defined that generates a text message via the JmsTemplate.
A second JmsTemplate with an ActiveMQQueue is created for the consumer. In this example, a single message is received synchronously, however, asynchronous message reception is a popular alternative when using message-driven POJOs.
Unlike the ActiveMQ examples, the Spring JMS template example does not require the explicit cleanup of the connection, session, message producer, or message consumer resources, as that is managed by Spring. Make sure to call the PooledConnectionFactory.stop method to cleanly exit the main method.
Finally, here’s an example using a Spring JmsTemplate for topic publishing.
Spring JmsTemplate topic example
This example combines the Spring JmsTemplate queue example with the virtual destinations approach from the ActiveMQ topic example. Look at the following code.
import javax.jms.DeliveryMode;
import javax.jms.JMSException;
import javax.jms.Message;
import javax.jms.Session;
import javax.jms.TextMessage;
import org.apache.activemq.ActiveMQConnectionFactory;
import org.apache.activemq.command.ActiveMQQueue;
import org.apache.activemq.command.ActiveMQTopic;
import org.apache.activemq.jms.pool.PooledConnectionFactory;
import org.springframework.jms.core.JmsTemplate;
import org.springframework.jms.core.MessageCreator;
public class ActiveMQSpringExample {
private static final int DELIVERY_MODE = DeliveryMode.NON_PERSISTENT;
private static final int ACKNOWLEDGE_MODE = Session.AUTO_ACKNOWLEDGE;
// The Endpoint, Username, Password, Producer Topic, and Consumer Topic
// should be externalized and configured through environment variables or
// dependency injection.
private static final String ENDPOINT; // "ssl://x-xxxxxxxx-xxxx-xxxx-xxxx-xxxxxxxxxxxx-x.mq.us-east-1.amazonaws.com:61617"
private static final String USERNAME;
private static final String PASSWORD;
private static final String PRODUCER_TOPIC = "VirtualTopic.MyTopic";
private static final String CONSUMER1_TOPIC = "Consumer.Consumer1." + PRODUCER_TOPIC;
public static void main(String[] args) throws JMSException {
// Create a connection factory.
ActiveMQConnectionFactory connectionFactory = new ActiveMQConnectionFactory(ENDPOINT);
// Specify the username and password.
connectionFactory.setUserName(USERNAME);
connectionFactory.setPassword(PASSWORD);
// Create a pooled connection factory.
PooledConnectionFactory pooledConnectionFactory = new PooledConnectionFactory();
pooledConnectionFactory.setConnectionFactory(connectionFactory);
pooledConnectionFactory.setMaxConnections(10);
// Create a JmsTemplate for the producer.
JmsTemplate producerJmsTemplate = new JmsTemplate();
producerJmsTemplate.setConnectionFactory(pooledConnectionFactory);
producerJmsTemplate.setDefaultDestination(new ActiveMQTopic(PRODUCER_TOPIC));
producerJmsTemplate.setSessionAcknowledgeMode(ACKNOWLEDGE_MODE);
producerJmsTemplate.setDeliveryMode(DELIVERY_MODE);
// Create a message creator.
MessageCreator messageCreator = new MessageCreator() {
public Message createMessage(Session session) throws JMSException {
return session.createTextMessage("Hello from Spring Amazon MQ!");
}
};
// Send the message.
producerJmsTemplate.send(messageCreator);
System.out.println("Message sent.");
// Clean up the producer.
// producer JmsTemplate will close underlying sessions and connections.
// Create a JmsTemplate for the consumer.
// Note: Consumers should not use PooledConnectionFactory.
JmsTemplate consumerJmsTemplate = new JmsTemplate();
consumerJmsTemplate.setConnectionFactory(connectionFactory);
consumerJmsTemplate.setDefaultDestination(new ActiveMQQueue(CONSUMER1_TOPIC));
consumerJmsTemplate.setSessionAcknowledgeMode(ACKNOWLEDGE_MODE);
consumerJmsTemplate.setReceiveTimeout(1000);
// Begin to wait for messages.
Message consumerMessage = consumerJmsTemplate.receive();
// Receive the message when it arrives.
TextMessage consumerTextMessage = (TextMessage) consumerMessage;
System.out.println("Message received: " + consumerTextMessage.getText());
// Clean up the consumer.
// consumer JmsTemplate will close underlying sessions and connections.
pooledConnectionFactory.stop();
}
}
In this example, follow the ActiveMQ virtual destination naming convention for topics and queues:
When creating the producer JMS template, specify an ActiveMQTopic as the destination using the name VirtualTopic.MyTopic.
When creating the consumer JMS template, specify an ActiveMQQueue as the destination using the name Consumer.Consumer1.VirtualTopic.MyTopic.
ActiveMQ automatically handles routing messages from topic to queue.
Conclusion
In this post, I reviewed how to get started with an Amazon MQ broker and walked you through several code examples that explored the differences between RabbitMQ and Apache ActiveMQ client integrations. If you are considering migrating to Amazon MQ, these examples should help you understand the changes that might be required.
If you’re thinking about integrating your existing apps with new serverless apps, see the related post, Invoking AWS Lambda from Amazon MQ.
To learn more, see the Amazon MQ website and Developer Guide. You can try Amazon MQ for free with the AWS Free Tier, which includes up to 750 hours of a single-instance mq.t2.micro broker and up to 1 GB of storage per month for one year for new AWS accounts.
This post is courtesy of Alan Protasio, Software Development Engineer, Amazon Web Services
Just like compute and storage, messaging is a fundamental building block of enterprise applications. Message brokers (aka “message-oriented middleware”) enable different software systems, often written in different languages, on different platforms, running in different locations, to communicate and exchange information. Mission-critical applications, such as CRM and ERP, rely on message brokers to work.
A common performance consideration for customers deploying a message broker in a production environment is the throughput of the system, measured as messages per second. This is important to know so that application environments (hosts, threads, memory, etc.) can be configured correctly.
In this post, we demonstrate how to measure the throughput for Amazon MQ, a new managed message broker service for ActiveMQ, using JMS Benchmark. It should take between 15–20 minutes to set up the environment and an hour to run the benchmark. We also provide some tips on how to configure Amazon MQ for optimal throughput.
Benchmarking throughput for Amazon MQ
ActiveMQ can be used for a number of use cases. These use cases can range from simple fire and forget tasks (that is, asynchronous processing), low-latency request-reply patterns, to buffering requests before they are persisted to a database.
The throughput of Amazon MQ is largely dependent on the use case. For example, if you have non-critical workloads such as gathering click events for a non-business-critical portal, you can use ActiveMQ in a non-persistent mode and get extremely high throughput with Amazon MQ.
On the flip side, if you have a critical workload where durability is extremely important (meaning that you can’t lose a message), then you are bound by the I/O capacity of your underlying persistence store. We recommend using mq.m4.large for the best results. The mq.t2.micro instance type is intended for product evaluation. Performance is limited, due to the lower memory and burstable CPU performance.
Tip: To improve your throughput with Amazon MQ, make sure that you have consumers processing messaging as fast as (or faster than) your producers are pushing messages.
Because it’s impossible to talk about how the broker (ActiveMQ) behaves for each and every use case, we walk through how to set up your own benchmark for Amazon MQ using our favorite open-source benchmarking tool: JMS Benchmark. We are fans of the JMS Benchmark suite because it’s easy to set up and deploy, and comes with a built-in visualizer of the results.
Non-Persistent Scenarios – Queue latency as you scale producer throughput
Getting started
At the time of publication, you can create an mq.m4.large single-instance broker for testing for $0.30 per hour (US pricing).
Step 2 – Create an EC2 instance to run your benchmark Launch the EC2 instance using Step 1: Launch an Instance. We recommend choosing the m5.large instance type.
Step 3 – Configure the security groups Make sure that all the security groups are correctly configured to let the traffic flow between the EC2 instance and your broker.
From the broker list, choose the name of your broker (for example, MyBroker)
In the Details section, under Security and network, choose the name of your security group or choose the expand icon ( ).
From the security group list, choose your security group.
At the bottom of the page, choose Inbound, Edit.
In the Edit inbound rules dialog box, add a role to allow traffic between your instance and the broker: • Choose Add Rule. • For Type, choose Custom TCP. • For Port Range, type the ActiveMQ SSL port (61617). • For Source, leave Custom selected and then type the security group of your EC2 instance. • Choose Save.
Your broker can now accept the connection from your EC2 instance.
Step 4 – Run the benchmark Connect to your EC2 instance using SSH and run the following commands:
After the benchmark finishes, you can find the results in the ~/reports directory. As you may notice, the performance of ActiveMQ varies based on the number of consumers, producers, destinations, and message size.
Amazon MQ architecture
The last bit that’s important to know so that you can better understand the results of the benchmark is how Amazon MQ is architected.
Amazon MQ is architected to be highly available (HA) and durable. For HA, we recommend using the multi-AZ option. After a message is sent to Amazon MQ in persistent mode, the message is written to the highly durable message store that replicates the data across multiple nodes in multiple Availability Zones. Because of this replication, for some use cases you may see a reduction in throughput as you migrate to Amazon MQ. Customers have told us they appreciate the benefits of message replication as it helps protect durability even in the face of the loss of an Availability Zone.
Conclusion
We hope this gives you an idea of how Amazon MQ performs. We encourage you to run tests to simulate your own use cases.
To learn more, see the Amazon MQ website. You can try Amazon MQ for free with the AWS Free Tier, which includes up to 750 hours of a single-instance mq.t2.micro broker and up to 1 GB of storage per month for one year.
This post courtesy of Massimiliano Angelino, AWS Solutions Architect
Different enterprise systems—ERP, CRM, BI, HR, etc.—need to exchange information but normally cannot do that natively because they are from different vendors. Enterprises have tried multiple ways to integrate heterogeneous systems, generally referred to as enterprise application integration (EAI).
Modern EAI systems are based on a message-oriented middleware (MoM), also known as enterprise service bus (ESB). An ESB provides data communication via a message bus, on top of which it also provides components to orchestrate, route, translate, and monitor the data exchange. Communication with the ESB is done via adapters or connectors provided by the ESB. In this way, the different applications do not have to have specific knowledge of the technology used to provide the integration.
Amazon MQ used with Apache Camel is an open-source alternative to commercial ESBs. With the launch of Amazon MQ, integration between on-premises applications and cloud services becomes much simpler. Amazon MQ provides a managed message broker service currently supporting ApacheMQ 5.15.0.
In this post, I show how a simple integration between Amazon MQ and other AWS services can be achieved by using Apache Camel.
Apache Camel provides built-in connectors for integration with a wide variety of AWS services such as Amazon MQ, Amazon SQS, Amazon SNS, Amazon SWF, Amazon S3, AWS Lambda, Amazon DynamoDB, AWS Elastic Beanstalk, and Amazon Kinesis Streams. It also provides a broad range of other connectors including Cassandra, JDBC, Spark, and even Facebook and Slack.
EAI system architecture
Different applications use different data formats, hence the need for a translation/transformation service. Such services can be provided to or from a common “normalized” format, or specifically between two applications.
The use of normalized formats simplifies the integration process when multiple applications need to share the same data, as the number of conversions to be realized is N (number of applications). This is at the cost of a more complex adaptation to a common format, which is required to cover all needs from the different applications, current and future.
Another characteristic of an EAI system is the support of distributed transactions to ensure data consistency across multiple applications.
EAI system architecture is normally composed of the following components:
A centralized broker that handles security, access control, and data communications. Amazon MQ provides these features through the support of multiple transport protocols (AMQP, Openwire, MQTT, WebSocket), security (all communications are encrypted via SSL), and per destination granular access control.
An independent data model, also known as the canonical data model. XML is the de facto standard for the data representation.
Connectors/agents that allow the applications to communicate with the broker.
A system model to allow a standardized way for all components to interface with the EAI. Java Message Service (JMS) and Windows Communication Foundation (WCF) are standard APIs to interact with constructs such as queues and topics to implement the different messaging patterns.
Walkthrough
This solution walks you through the following steps:
Creating the broker
Writing a simple application
Adding the dependencies
Triaging files into S3
Writing the Camel route
Sending files to the AMQP queue
Setting up AMQP
Testing the code
Creating the broker
To create a new broker, log in to your AWS account and choose Amazon MQ. Amazon MQ is currently available in six AWS Regions:
US East (N. Virginia)
US East (Ohio)
US West (Oregon)
EU (Ireland)
EU (Frankfurt)
Asia Pacific (Sydney) regions.
Make sure that you have selected one of these Regions.
The master user name and password are used to access the monitoring console of the broker and can be also used to authenticate when connecting the clients to the broker. I recommend creating separate users, without console access, to authenticate the clients to the broker, after the broker has been created.
For this example, create a single broker without failover. If your application requires a higher availability level, check the Create standby in a different zone check box. In case the principal broker instance would fail, the standby takes over in seconds. To make the client aware of the standby, use the failover:// protocol in the connection configuration pointing to both broker endpoints.
Leave the other settings as is. The broker takes few minutes to be created. After it’s done, you can see the list of endpoints available for the different protocols.
After the broker has been created, modify the security group to add the allowed ports and sources for access.
For this example, you need access to the ActiveMQ admin page and to AMQP. Open up ports 8162 and 5671 to the public address of your laptop.
You can also create a new user for programmatic access to the broker. In the Users section, choose Create User and add a new user named sdk.
Writing a simple application
The complete code for this walkthrough is available from the aws-amazonmq-apachecamel-sample GitHub repo. Clone the repository on your local machine to have the fully functional example. The rest of this post offers step-by-step instructions to build this solution.
To write the application, use Apache Maven and the Camel archetypes provided by Maven. If you do not have Apache Maven installed on your machine, you can follow the instructions at Installing Apache Maven.
From a terminal, run the following command:
mvn archetype:generate
You get a list of archetypes. Type camel to get only the one related to camel. In this case, use the java8 example and type the following:
Maven now generates the skeleton code in a folder named as the artifactId. In this case:
camel-aws-simple
Next, test that the environment is configured correctly to run Camel. At the prompt, run the following commands:
cd camel-aws-simple
mvn install
mvn exec:java
You should see a log appearing in the console, printing the following:
[INFO] --- exec-maven-plugin:1.6.0:java (default-cli) @ camel-aws-test ---
[ com.angmas.MainApp.main()] DefaultCamelContext INFO Apache Camel 2.20.1 (CamelContext: camel-1) is starting
[ com.angmas.MainApp.main()] ManagedManagementStrategy INFO JMX is enabled
[ com.angmas.MainApp.main()] DefaultTypeConverter INFO Type converters loaded (core: 192, classpath: 0)
[ com.angmas.MainApp.main()] DefaultCamelContext INFO StreamCaching is not in use. If using streams then its recommended to enable stream caching. See more details at http://camel.apache.org/stream-caching.html
[ com.angmas.MainApp.main()] DefaultCamelContext INFO Route: route1 started and consuming from: timer://simple?period=1000
[ com.angmas.MainApp.main()] DefaultCamelContext INFO Total 1 routes, of which 1 are started
[ com.angmas.MainApp.main()] DefaultCamelContext INFO Apache Camel 2.20.1 (CamelContext: camel-1) started in 0.419 seconds
[-1) thread #2 - timer://simple] route1 INFO Got a String body
[-1) thread #2 - timer://simple] route1 INFO Got an Integer body
[-1) thread #2 - timer://simple] route1 INFO Got a Double body
[-1) thread #2 - timer://simple] route1 INFO Got a String body
[-1) thread #2 - timer://simple] route1 INFO Got an Integer body
[-1) thread #2 - timer://simple] route1 INFO Got a Double body
[-1) thread #2 - timer://simple] route1 INFO Got a String body
[-1) thread #2 - timer://simple] route1 INFO Got an Integer body
[-1) thread #2 - timer://simple] route1 INFO Got a Double body
Adding the dependencies
Now that you have verified that the sample works, modify it to add the dependencies to interface to Amazon MQ/ActiveMQ and AWS.
For the following steps, you can use a normal text editor, such as vi, Sublime Text, or Visual Studio Code. Or, open the maven project in an IDE such as Eclipse or IntelliJ IDEA.
Open pom.xml and add the following lines inside the <dependencies> tag:
The camel-aws component is taking care of the interface with the supported AWS services without requiring any in-depth knowledge of the AWS Java SDK. For more information, see Camel Components for Amazon Web Services.
Triaging files into S3
Write a Camel component that receives files as a payload to messages in a queue and write them to an S3 bucket with different prefixes depending on the extension.
Because the broker that you created is exposed via a public IP address, you can execute the code from anywhere that there is an internet connection that allows communication on the specific ports. In this example, run the code from your own laptop. A broker can also be created without public IP address, in which case it is only accessible from inside the VPC in which it has been created, or by any peered VPC or network connected via a virtual gateway (VPN or AWS Direct Connect).
First, look at the code created by Maven. The archetype chosen created a standalone Camel context run via the helper org.apache.camel.main.Main class. This provides an easy way to run Camel routes from an IDE or the command line without needing to deploy it inside a container. Apache Camel can be also run as an OSGi module, or Spring and SpringBoot bean.
package com.angmas;
import org.apache.camel.main.Main;
/**
* A Camel Application
*/
public class MainApp {
/**
* A main() so you can easily run these routing rules in your IDE
*/
public static void main(String... args) throws Exception {
Main main = new Main();
main.addRouteBuilder(new MyRouteBuilder());
main.run(args);
}
}
The main method instantiates the Camel Main helper class and the routes, and runs the Camel application. The MyRouteBuilder class creates a route using Java DSL. It is also possible to define routes in Spring XML and load them dynamically in the code.
public void configure() {
// this sample sets a random body then performs content-based
// routing on the message using method references
from("timer:simple?period=1000")
.process()
.message(m -> m.setHeader("index", index++ % 3))
.transform()
.message(this::randomBody)
.choice()
.when()
.body(String.class::isInstance)
.log("Got a String body")
.when()
.body(Integer.class::isInstance)
.log("Got an Integer body")
.when()
.body(Double.class::isInstance)
.log("Got a Double body")
.otherwise()
.log("Other type message");
}
Writing the Camel route
Replace the existing route with one that fetches messages from Amazon MQ over AMQP, and routes the content to different S3 buckets depending on the file name extension.
Reads messages from the AMQP queue named filequeue.
Processes the message and sets a new ext header using the setExtensionHeader method (see below).
Checks the value of the ext header and write the body of the message as an object in an S3 bucket using different key prefixes, retaining the original name of the file.
The Amazon S3 component is configured with the bucket name, and a reference to an S3 client (amazonS3client=#s3Client) that you added to the Camel registry in the Main method of the app. Adding the object to the Camel registry allows Camel to find the object at runtime. Even though you could pass the region, accessKey, and secretKey parameters directly in the component URI, this way is more secure. It can make use of EC2 instance roles, so that you never need to pass the secrets.
Sending files to the AMQP queue
To send the files to the AMQP queue for testing, add another Camel route. In a real scenario, the messages to the AMQP queue are generated by another client. You are going to create a new route builder, but you could also add this route inside the existing MyRouteBuilder.
package com.angmas;
import org.apache.camel.builder.RouteBuilder;
/**
* A Camel Java8 DSL Router
*/
public class MessageProducerBuilder extends RouteBuilder {
/**
* Configure the Camel routing rules using Java code...
*/
public void configure() {
from("file://input?delete=false&noop=true")
.log("Content ${body} ${headers.CamelFileName}")
.to("amqp:filequeue");
}
}
The code reads files from the input folder in the work directory and publishes it to the queue. The route builder is added in the main class:
By default, Camel tries to connect to a local AMQP broker. Configure it to connect to your Amazon MQ broker.
Create an AMQPConnectionDetails object that is configured to connect to Amazon MQ broker with SSL and pass the user name and password that you set on the broker. Adding the object to the Camel registry allows Camel to find the object at runtime and use it as the default connection to AMQP.
public class MainApp {
public static String BROKER_URL = System.getenv("BROKER_URL");
public static String AMQP_URL = "amqps://"+BROKER_URL+":5671";
public static String BROKER_USERNAME = System.getenv("BROKER_USERNAME");
public static String BROKER_PASSWORD = System.getenv("BROKER_PASSWORD");
/**
* A main() so you can easily run these routing rules in your IDE
*/
public static void main(String... args) throws Exception {
Main main = new Main();
main.bind("amqp", getAMQPconnection());
main.bind("s3Client", AmazonS3ClientBuilder.standard().withRegion(Regions.US_EAST_1).build());
main.addRouteBuilder(new MyRouteBuilder());
main.addRouteBuilder(new MessageProducerBuilder());
main.run(args);
}
public static AMQPConnectionDetails getAMQPconnection() {
return new AMQPConnectionDetails(AMQP_URL, BROKER_USERNAME, BROKER_PASSWORD);
}
}
The AMQP_URL uses the amqps schema that indicates that you are using SSL. You then add the component to the registry. Camel finds it by matching the class type. main.bind("amqp-ssl", getAMQPConnection());
Testing the code
Create an input folder in the project root, and create few files with different extensions, such as txt, html, and csv.
Set the different environment variables required by the code, either in the shell or in your IDE as execution configuration.
If you are running the example from an EC2 instance, ensure that the EC2 instance role has read permission on the S3 bucket.
If you are running this on your laptop, ensure that you have configured the AWS credentials in the environment, for example, by using the aws configure command.
From the command line, execute the code:
mvn exec:java
If you are using an IDE, execute the main class. Camel outputs logging information and you should see messages listing the content and names of the files in the input folder.
Keep adding some more files to the input folder. You see that they are triaged in S3 a few seconds later. You can open the S3 console to check that they have been created.
To stop Camel, press CTRL+C in the shell.
Conclusion
In this post, I showed you how to create a publicly accessible Amazon MQ broker, and how to use Apache Camel to easily integrate AWS services with the broker. In the example, you created a Camel route that reads messages containing files from the AMQP queue and triages them by file extension into an S3 bucket.
Camel supports several components and provides blueprints for several enterprise integration patterns. Used in combination with the Amazon MQ, it provides a powerful and flexible solution to extend traditional enterprise solutions to the AWS Cloud, and integrate them seamlessly with cloud-native services, such as Amazon S3, Amazon SNS, Amazon SQS, Amazon CloudWatch, and AWS Lambda.
To learn more, see the Amazon MQ website. You can try Amazon MQ for free with the AWS Free Tier, which includes up to 750 hours of a single-instance mq.t2.micro broker and up to 1 GB of storage per month for one year.
This post courtesy of Greg Share, AWS Solutions Architect
Many organizations, particularly enterprises, rely on message brokers to connect and coordinate different systems. Message brokers enable distributed applications to communicate with one another, serving as the technological backbone for their IT environment, and ultimately their business services. Applications depend on messaging to work.
In many cases, those organizations have started to build new or “lift and shift” applications to AWS. In some cases, there are applications, such as mainframe systems, too costly to migrate. In these scenarios, those on-premises applications still need to interact with cloud-based components.
Amazon MQ is a managed message broker service for ActiveMQ that enables organizations to send messages between applications in the cloud and on-premises to enable hybrid environments and application modernization. For example, you can invoke AWS Lambda from queues and topics managed by Amazon MQ brokers to integrate legacy systems with serverless architectures. ActiveMQ is an open-source message broker written in Java that is packaged with clients in multiple languages, Java Message Server (JMS) client being one example.
This post shows you can use Amazon MQ to integrate on-premises and cloud environments using the network of brokers feature of ActiveMQ. It provides configuration parameters for a one-way duplex connection for the flow of messages from an on-premises ActiveMQ message broker to Amazon MQ.
ActiveMQ and the network of brokers
First, look at queues within ActiveMQ and then at the network of brokers as a mechanism to distribute messages.
The network of brokers behaves differently from models such as physical networks. The key consideration is that the production (sending) of a message is disconnected from the consumption of that message. Think of the delivery of a parcel: The parcel is sent by the supplier (producer) to the end customer (consumer). The path it took to get there is of little concern to the customer, as long as it receives the package.
The same logic can be applied to the network of brokers. Here’s how you build the flow from a simple message to a queue and build toward a network of brokers. Before you look at setting up a hybrid connection, I discuss how a broker processes messages in a simple scenario.
When a message is sent from a producer to a queue on a broker, the following steps occur:
A message is sent to a queue from the producer.
The broker persists this in its store or journal.
At this point, an acknowledgement (ACK) is sent to the producer from the broker.
When a consumer looks to consume the message from that same queue, the following steps occur:
The message listener (consumer) calls the broker, which creates a subscription to the queue.
Messages are fetched from the message store and sent to the consumer.
The consumer acknowledges that the message has been received before processing it.
Upon receiving the ACK, the broker sets the message as having been consumed. By default, this deletes it from the queue.
You can set the consumer to ACK after processing by setting up transactionmanagement or handle it manually using Session.CLIENT_ACKNOWLEDGE.
Static propagation
I now introduce the concept of static propagation with the network of brokers as the mechanism for message transfer from on-premises brokers to Amazon MQ. Static propagation refers to message propagation that occurs in the absence of subscription information. In this case, the objective is to transfer messages arriving at your selected on-premises broker to the Amazon MQ broker for consumption within the cloud environment.
After you configure static propagation with a network of brokers, the following occurs:
The on-premises broker receives a message from a producer for a specific queue.
The on-premises broker sends (statically propagates) the message to the Amazon MQ broker.
The Amazon MQ broker sends an acknowledgement to the on-premises broker, which marks the message as having been consumed.
Amazon MQ holds the message in its queue ready for consumption.
A consumer connects to Amazon MQ broker, subscribes to the queue in which the message resides, and receives the message.
Amazon MQ broker marks the message as having been consumed.
For Broker instance type, choose your instance size: – mq.t2.micro – mq.m4.large
For Deployment mode, enter one of the following: – Single-instance broker for development and test implementations (recommended) – Active/standby broker for high availability in production environments
Scroll down and enter your user name and password.
Expand Advanced Settings.
For VPC, Subnet, and Security Group, pick the values for the resources in which your broker will reside.
For Public Accessibility, choose Yes, as connectivity is internet-based. Another option would be to use private connectivity between your on-premises network and the VPC, an example being an AWS Direct Connect or VPN connection. In that case, you could set Public Accessibility to No.
For Maintenance, leave the default value, No preference.
Choose Create Broker. Wait several minutes for the broker to be created.
After creation is complete, you see your broker listed.
For connectivity to work, you must configure the security group where Amazon MQ resides. For this post, I focus on the OpenWire protocol.
For Openwire connectivity, allow port 61617 access for Amazon MQ from your on-premises ActiveMQ broker source IP address. For alternate protocols, see the Amazon MQ broker configuration information for the ports required:
Configuring the network of brokers with static propagation occurs on the on-premises broker by applying changes to the following file: <activemq install directory>/conf activemq.xml
Network connector
This is the first configuration item required to enable a network of brokers. It is only required on the on-premises broker, which initiates and creates the connection with Amazon MQ. This connection, after it’s established, enables the flow of messages in either direction between the on-premises broker and Amazon MQ. The focus of this post is the uni-directional flow of messages from the on-premises broker to Amazon MQ.
The default activemq.xml file does not include the network connector configuration. Add this with the networkConnector element. In this scenario, edit the on-premises broker activemq.xml file to include the following information between <systemUsage> and <transportConnectors>:
The highlighted components are the most important elements when configuring your on-premises broker.
name – Name of the network bridge. In this case, it specifies two things:
That this connection relates to an ActiveMQ queue (Q) as opposed to a topic (T), for reference purposes.
The source broker and target broker.
duplex –Setting this to false ensures that messages traverse uni-directionally from the on-premises broker to Amazon MQ.
uri –Specifies the remote endpoint to which to connect for message transfer. In this case, it is an Openwire endpoint on your Amazon MQ broker. This information could be obtained from the Amazon MQ console or via the API.
username and password – The same username and password configured when creating the Amazon MQ broker, and used to access the Amazon MQ ActiveMQ console.
networkTTL – Number of brokers in the network through which messages and subscriptions can pass. Leave this setting at the current value, if it is already included in your broker connection.
staticallyIncludedDestinations > queue physicalName – The destination ActiveMQ queue for which messages are destined. This is the queue that is propagated from the on-premises broker to the Amazon MQ broker for message consumption.
After the network connector is configured, you must restart the ActiveMQ service on the on-premises broker for the changes to be applied.
Verify the configuration
There are a number of places within the ActiveMQ console of your on-premises and Amazon MQ brokers to browse to verify that the configuration is correct and the connection has been established.
On-premises broker
Launch the ActiveMQ console of your on-premises broker and navigate to Network. You should see an active network bridge similar to the following:
This identifies that the connection between your on-premises broker and your Amazon MQ broker is up and running.
Now navigate to Connections and scroll to the bottom of the page. Under the Network Connectors subsection, you should see a connector labeled with the name: value that you provided within the ActiveMQ.xml configuration file. You should see an entry similar to:
Amazon MQ broker
Launch the ActiveMQ console of your Amazon MQ broker and navigate to Connections. Scroll to the Connections openwire subsection and you should see a connection specified that references the name: value that you provided within the ActiveMQ.xml configuration file. You should see an entry similar to:
If you configured the uri: for AMQP, STOMP, MQTT, or WSS as opposed to Openwire, you would see this connection under the corresponding section of the Connections page.
Testing your message flow
The setup described outlines a way for messages produced on premises to be propagated to the cloud for consumption in the cloud. This section provides steps on verifying the message flow.
Verify that the queue has been created
After you specify this queue name as staticallyIncludedDestinations > queue physicalName: and your ActiveMQ service starts, you see the following on your on-premises ActiveMQ console Queues page.
As you can see, no messages have been sent but you have one consumer listed. If you then choose Active Consumers under the Views column, you see Active Consumers for TestingQ.
This is telling you that your Amazon MQ broker is a consumer of your on-premises broker for the testing queue.
Produce and send a message to the on-premises broker
Now, produce a message on an on-premises producer and send it to your on-premises broker to a queue named TestingQ. If you navigate back to the queues page of your on-premises ActiveMQ console, you see that the messages enqueued and messages dequeued column count for your TestingQ queue have changed:
What this means is that the message originating from the on-premises producer has traversed the on-premises broker and propagated immediately to the Amazon MQ broker. At this point, the message is no longer available for consumption from the on-premises broker.
If you access the ActiveMQ console of your Amazon MQ broker and navigate to the Queues page, you see the following for the TestingQ queue:
This means that the message originally sent to your on-premises broker has traversed the network of brokers unidirectional network bridge, and is ready to be consumed from your Amazon MQ broker. The indicator is the Number of Pending Messages column.
Consume the message from an Amazon MQ broker
Connect to the Amazon MQ TestingQ queue from a consumer within the AWS Cloud environment for message consumption. Log on to the ActiveMQ console of your Amazon MQ broker and navigate to the Queue page:
As you can see, the Number of Pending Messages column figure has changed to 0 as that message has been consumed.
This diagram outlines the message lifecycle from the on-premises producer to the on-premises broker, traversing the hybrid connection between the on-premises broker and Amazon MQ, and finally consumption within the AWS Cloud.
Conclusion
This post focused on an ActiveMQ-specific scenario for transferring messages within an ActiveMQ queue from an on-premises broker to Amazon MQ.
For other on-premises brokers, such as IBM MQ, another approach would be to run ActiveMQ on-premises broker and use JMS bridging to IBM MQ, while using the approach in this post to forward to Amazon MQ. Yet another approach would be to use Apache Camel for more sophisticated routing.
I hope that you have found this example of hybrid messaging between an on-premises environment in the AWS Cloud to be useful. Many customers are already using on-premises ActiveMQ brokers, and this is a great use case to enable hybrid cloud scenarios.
To learn more, see the Amazon MQ website and Developer Guide. You can try Amazon MQ for free with the AWS Free Tier, which includes up to 750 hours of a single-instance mq.t2.micro broker and up to 1 GB of storage per month for one year.
Message brokers can be used to solve a number of needs in enterprise architectures, including managing workload queues and broadcasting messages to a number of subscribers. Amazon MQ is a managed message broker service for Apache ActiveMQ that makes it easy to set up and operate message brokers in the cloud.
In this post, I discuss one approach to invoking AWS Lambda from queues and topics managed by Amazon MQ brokers. This and other similar patterns can be useful in integrating legacy systems with serverless architectures. You could also integrate systems already migrated to the cloud that use common APIs such as JMS.
For example, imagine that you work for a company that produces training videos and which recently migrated its video management system to AWS. The on-premises system used to publish a message to an ActiveMQ broker when a video was ready for processing by an on-premises transcoder. However, on AWS, your company uses Amazon Elastic Transcoder. Instead of modifying the management system, Lambda polls the broker for new messages and starts a new Elastic Transcoder job. This approach avoids changes to the existing application while refactoring the workload to leverage cloud-native components.
This solution uses Amazon CloudWatch Events to trigger a Lambda function that polls the Amazon MQ broker for messages. Instead of starting an Elastic Transcoder job, the sample writes the received message to an Amazon DynamoDB table with a time stamp indicating the time received.
Getting started
To start, navigate to the Amazon MQ console. Next, launch a new Amazon MQ instance, selecting Single-instance Broker and supplying a broker name, user name, and password. Be sure to document the user name and password for later.
For the purposes of this sample, choose the default options in the Advanced settings section. Your new broker is deployed to the default VPC in the selected AWS Region with the default security group. For this post, you update the security group to allow access for your sample Lambda function. In a production scenario, I recommend deploying both the Lambda function and your Amazon MQ broker in your own VPC.
After several minutes, your instance changes status from “Creation Pending” to “Available.” You can then visit the Details page of your broker to retrieve connection information, including a link to the ActiveMQ web console where you can monitor the status of your broker, publish test messages, and so on. In this example, use the Stomp protocol to connect to your broker. Be sure to capture the broker host name, for example:
<BROKER_ID>.mq.us-east-1.amazonaws.com
You should also modify the Security Group for the broker by clicking on its Security Group ID. Click the Edit button and then click Add Rule to allow inbound traffic on port 8162 for your IP address.
Deploying and scheduling the Lambda function
To simplify the deployment of this example, I’ve provided an AWS Serverless Application Model (SAM) template that deploys the sample function and DynamoDB table, and schedules the function to be invoked every five minutes. Detailed instructions can be found with sample code on GitHub in the amazonmq-invoke-aws-lambda repository, with sample code. I discuss a few key aspects in this post.
First, SAM makes it easy to deploy and schedule invocation of our function:
In the code, you include the URI, user name, and password for your newly created Amazon MQ broker. These allow the function to poll the broker for new messages on the sample queue.
stomp.connect(options, (error, client) => {
if (error) { /* do something */ }
let headers = {
destination: ‘/queue/SAMPLE_QUEUE’,
ack: ‘auto’
}
client.subscribe(headers, (error, message) => {
if (error) { /* do something */ }
message.readString(‘utf-8’, (error, body) => {
if (error) { /* do something */ }
let params = {
FunctionName: MyWorkerFunction,
Payload: JSON.stringify({
message: body,
timestamp: Date.now()
})
}
let lambda = new AWS.Lambda()
lambda.invoke(params, (error, data) => {
if (error) { /* do something */ }
})
}
})
})
Sending a sample message
For the purpose of this example, use the Amazon MQ console to send a test message. Navigate to the details page for your broker.
About midway down the page, choose ActiveMQ Web Console. Next, choose Manage ActiveMQ Broker to launch the admin console. When you are prompted for a user name and password, use the credentials created earlier.
At the top of the page, choose Send. From here, you can send a sample message from the broker to subscribers. For this example, this is how you generate traffic to test the end-to-end system. Be sure to set the Destination value to “SAMPLE_QUEUE.” The message body can contain any text. Choose Send.
You now have a Lambda function polling for messages on the broker. To verify that your function is working, you can confirm in the DynamoDB console that the message was successfully received and processed by the sample Lambda function.
First, choose Tables on the left and select the table name “amazonmq-messages” in the middle section. With the table detail in view, choose Items. If the function was successful, you’ll find a new entry similar to the following:
If there is no message in DynamoDB, check again in a few minutes or review the CloudWatch Logs group for Lambda functions that contain debug messages.
Alternative approaches
Beyond the approach described here, you may consider other approaches as well. For example, you could use an intermediary system such as Apache Flume to pass messages from the broker to Lambda or deploy Apache Camel to trigger Lambda via a POST to API Gateway. There are trade-offs to each of these approaches. My goal in using CloudWatch Events was to introduce an easily repeatable pattern familiar to many Lambda developers.
Summary
I hope that you have found this example of how to integrate AWS Lambda with Amazon MQ useful. If you have expertise or legacy systems that leverage APIs such as JMS, you may find this useful as you incorporate serverless concepts in your enterprise architectures.
To learn more, see the Amazon MQ website and Developer Guide. You can try Amazon MQ for free with the AWS Free Tier, which includes up to 750 hours of a single-instance mq.t2.micro broker and up to 1 GB of storage per month for one year.
The collective thoughts of the interwebz
By continuing to use the site, you agree to the use of cookies. more information
The cookie settings on this website are set to "allow cookies" to give you the best browsing experience possible. If you continue to use this website without changing your cookie settings or you click "Accept" below then you are consenting to this.