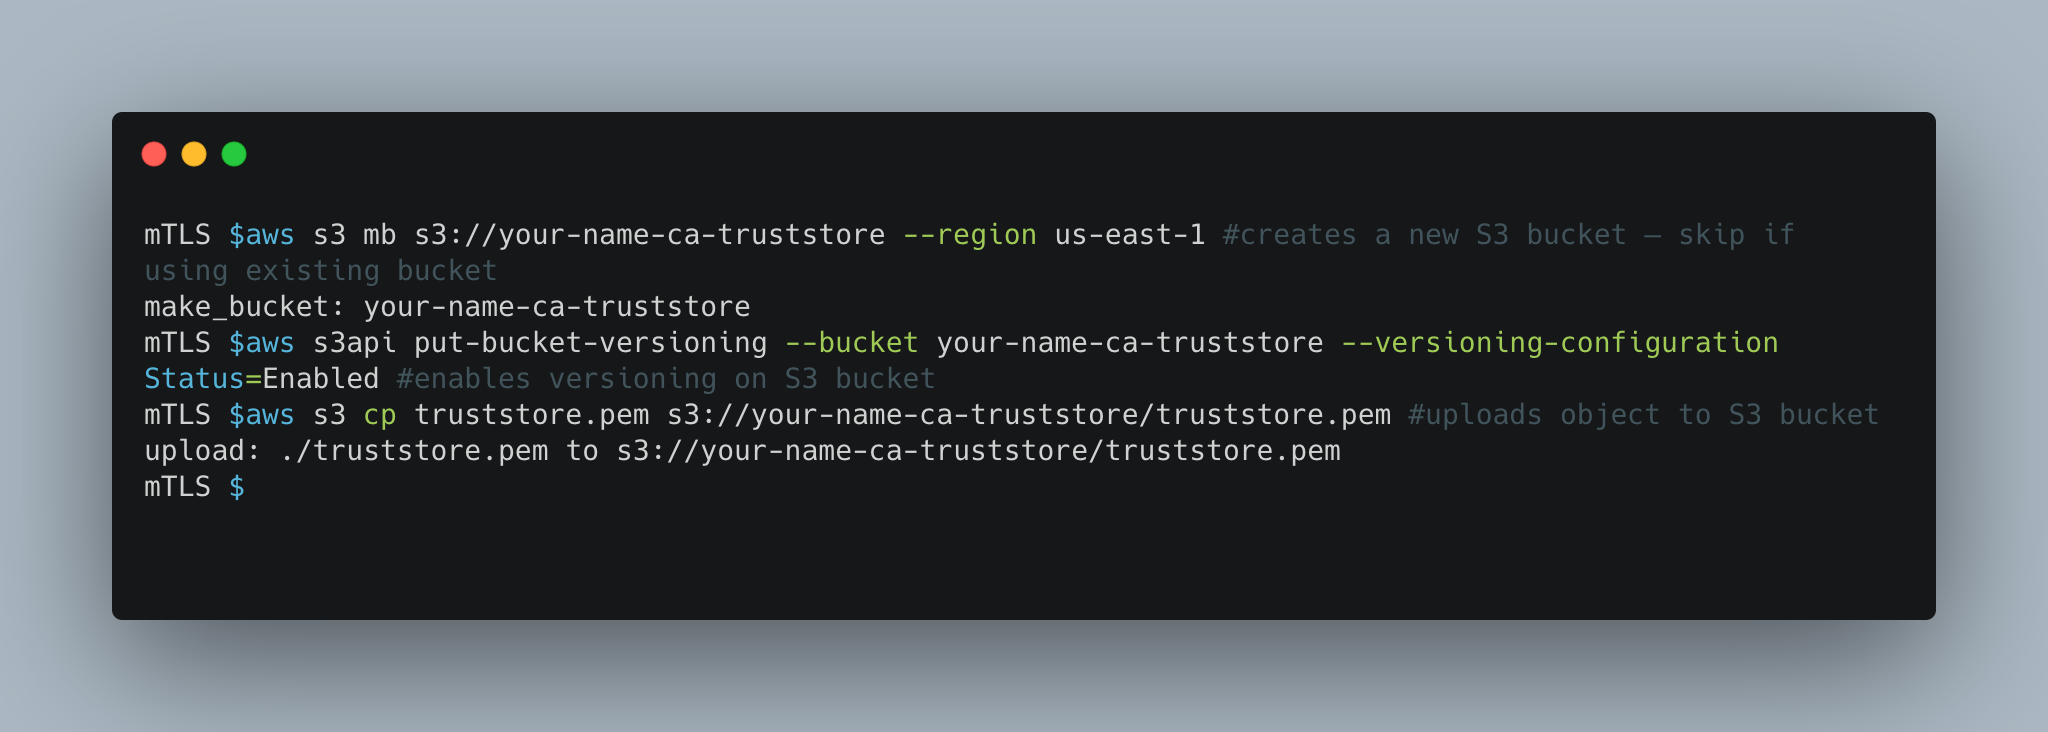
After five years of intensive research and cryptanalysis among partners from academia, the cryptographic community, and the National Institute of Standards and Technology (NIST), NIST has selected Kyber for post-quantum key encapsulation mechanism (KEM) standardization. This marks the beginning of the next generation of public key encryption. In time, the classical key establishment algorithms we use today, like RSA and elliptic curve cryptography (ECC), will be replaced by quantum-secure alternatives. At AWS Cryptography, we’ve been researching and analyzing the candidate KEMs through each round of the NIST selection process. We began supporting Kyber in round 2 and continue that support today.
A cryptographically relevant quantum computer that is capable of breaking RSA and ECC does not yet exist. However, we are offering hybrid post-quantum TLS with Kyber today so that customers can see how the performance differences of PQC affect their workloads. We also believe that the use of PQC raises the already-high security bar for connecting to AWS KMS and ACM, making this feature attractive for customers with long-term confidentiality needs.
Performance of hybrid post-quantum TLS with Kyber
Hybrid post-quantum TLS incurs a latency and bandwidth overhead compared to classical crypto alone. To quantify this overhead, we measured how long S2N-TLS takes to negotiate hybrid post-quantum (ECDHE + Kyber) key establishment compared to ECDHE alone. We performed the tests with the Linux perf subsystem on an Amazon Elastic Compute Cloud (Amazon EC2) c6i.4xlarge instance in the US East (Northern Virginia) AWS Region, and we initiated 2,000 TLS connections to a test server running in the US West (Oregon) Region, to include typical internet latencies.
Figure 1 shows the latencies of a TLS handshake that uses classical ECDHE and hybrid post-quantum (ECDHE + Kyber) key establishment. The columns are separated to illustrate the CPU time spent by the client and server compared to the time spent sending data over the network.
Figure 1: Latency of classical compared to hybrid post-quantum TLS handshake
Figure 2 shows the bytes sent and received during the TLS handshake, as measured by the client, for both classical ECDHE and hybrid post-quantum (ECDHE + Kyber) key establishment.
Figure 2: Bandwidth of classical compared to hybrid post-quantum TLS handshake
This data shows that the overhead for using hybrid post-quantum key establishment is 0.25 ms on the client, 0.23 ms on the server, and an additional 2,356 bytes on the wire. Intra-Region tests would result in lower network latency. Your latencies also might vary depending on network conditions, CPU performance, server load, and other variables.
The results show that the performance of Kyber is strong; the additional latency is one of the top contenders among the NIST PQC candidates that we analyzed in a previous blog post. In fact, the performance of these ciphers has improved during our latest test, because x86-64 assembly-optimized versions of these ciphers are now available for use.
Configure a Maven project for hybrid post-quantum TLS
In this section, we provide a Maven configuration and code example that will show you how to get started using our assembly-optimized, hybrid post-quantum TLS configuration with Kyber.
To configure a Maven project for hybrid post-quantum TLS
Configure the desired cipher suite in your code’s initialization. The following code sample configures an AWS KMS client to use the latest hybrid post-quantum cipher suite.
// Check platform support
if(!TLS_CIPHER_PREF_PQ_TLSv1_0_2021_05.isSupported()){
    throw new RuntimeException(“Hybrid post-quantum cipher suites are not supported.”);
}

// Configure HTTP client
SdkAsyncHttpClient awsCrtHttpClient = AwsCrtAsyncHttpClient.builder()
          .tlsCipherPreference(TLS_CIPHER_PREF_PQ_TLSv1_0_2021_05)
          .build();

// Create the AWS KMS async client
KmsAsyncClient kmsAsync = KmsAsyncClient.builder()
         .httpClient(awsCrtHttpClient)
         .build();
With that, all calls made with your AWS KMS client will use hybrid post-quantum TLS. You can use the latest hybrid post-quantum cipher suite with ACM by following the preceding example but using an AcmAsyncClient instead.
Tune connection settings for hybrid post-quantum TLS
Although hybrid post-quantum TLS has some latency and bandwidth overhead on the initial handshake, that cost is amortized over the duration of the TLS session, and you can fine-tune your connection settings to help further reduce the cost. In this section, you learn three ways to reduce the impact of hybrid PQC on your TLS connections: connection pooling, connection timeouts, and TLS session resumption.
Connection pooling
Connection pools manage the number of active connections to a server. They allow a connection to be reused without closing and reopening it, which amortizes the cost of connection establishment over time. Part of a connection’s setup time is the TLS handshake, so you can use connection pools to help reduce the impact of an increase in handshake latency.
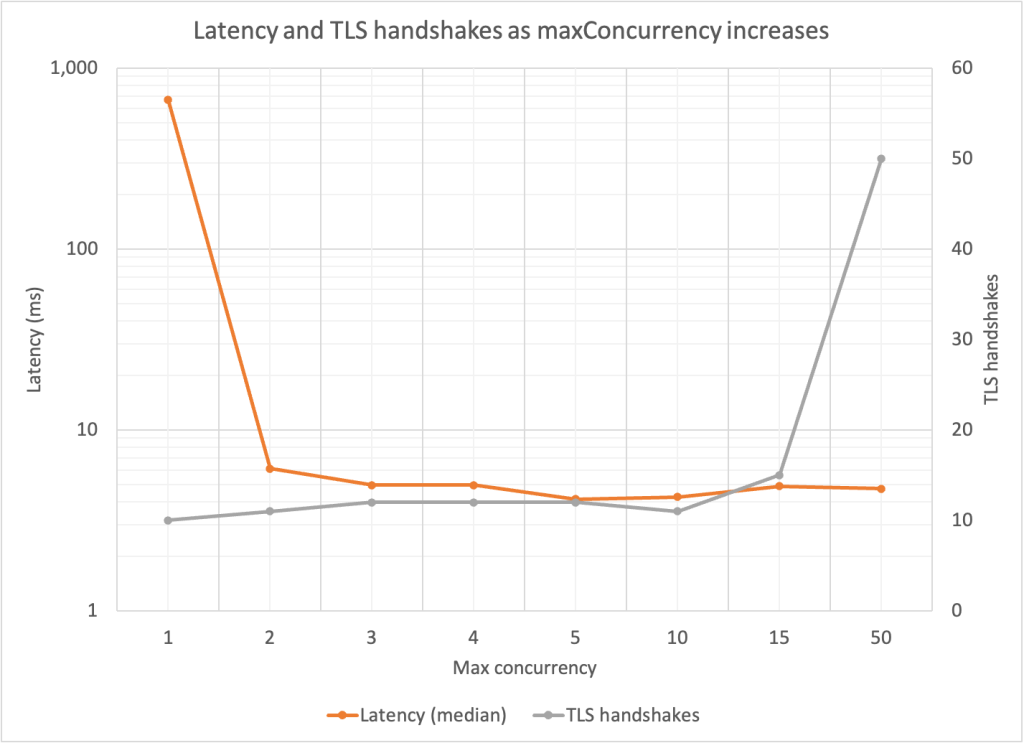
To illustrate this, we wrote a test application that generates approximately 200 transactions per second to a test server. We varied the maximum concurrency setting of the HTTP client and measured the latency of the test request. In the AWS CRT HTTP client, this is the maxConcurrency setting. If the connection pool doesn’t have an idle connection available, the request latency includes establishing a new connection. Using Wireshark, we captured the network traffic to observe the number of TLS handshakes that took place over the duration of the application. Figure 3 shows the request latency and number of TLS handshakes as the maxConcurrency setting is increased.
Figure 3: Median request latency and number of TLS handshakes as concurrency pool size increases
The biggest latency benefit occurred with a maxConcurrency value greater than 1. Beyond that, the latencies were past the point of diminishing returns. For all maxConcurrency values of 10 and below, additional TLS handshakes took place within the connections, but they didn’t have much impact on median latency. These inflection points will depend on your application’s request volume. The takeaway is that connection pooling allows connections to be reused, thereby spreading the cost of any increased TLS negotiation time over many requests.
Connection timeouts work in conjunction with connection pooling. Even if you use a connection pool, there is a limit to how long idle connections stay open before the pool closes them. You can adjust this time limit to save on connection establishment overhead.
A nice way to visualize this setting is to imagine bursty traffic patterns. Despite tuning the connection pool concurrency, your connections keep closing because the burst period is longer than the idle time limit. By increasing the maximum idle time, you can reuse these connections despite bursty behavior.
To simulate the impact of connection timeouts, we wrote a test application that starts 10 threads, each of which activate at the same time on a periodic schedule every 5 seconds for a minute. We set maxConcurrency to 10 to allow each thread to have its own connection. We set connectionMaxIdleTime of the AWS CRT HTTP client to 1 second for the first test; and to 10 seconds for the second test.
When the maximum idle time was 1 second, the connections for all 10 threads closed during the time between each burst. As a result, 100 total connections were formed over the life of the test, causing a median request latency of 20.3 ms. When we changed the maximum idle time to 10 seconds, the 10 initial connections were reused by each subsequent burst, reducing the median request latency to 5.9 ms.
By setting the connectionMaxIdleTime appropriately for your application, you can reduce connection establishment overhead, including TLS negotiation time, to help achieve time savings throughout the life of your application.
TLS session resumption allows a client and server to bypass the key agreement that is normally performed to arrive at a new shared secret. Instead, communication quickly resumes by using a shared secret that was previously negotiated, or one that was derived from a previous secret (the implementation details depend on the version of TLS in use). This feature requires that both the client and server support it, but if available, TLS session resumption allows the TLS handshake time and bandwidth increases associated with hybrid PQ to be amortized over the life of multiple connections.
Conclusion
As you learned in this post, hybrid post-quantum TLS with Kyber is available for AWS KMS and ACM. This new cipher suite raises the security bar and allows you to prepare your workloads for post-quantum cryptography. Hybrid key agreement has some additional overhead compared to classical ECDHE, but you can mitigate these increases by tuning your connection settings, including connection pooling, connection timeouts, and TLS session resumption. Begin using hybrid key agreement today with AWS KMS and ACM.
If you have feedback about this post, submit comments in the Comments section below.
Want more AWS Security news? Follow us on Twitter.
In this post, we show how you can use the AWS Certificate Manager Private Certificate Authority (ACM Private CA) to help follow security best practices when you build a CA hierarchy. This blog post walks through certificate authority (CA) lifecycle management topics, including an architecture overview, centralized security, separation of duties, certificate issuance auditing, and certificate sharing by means of templates. These topics provide best practices surrounding your ACM Private CA hierarchy so that you can build the right CA hierarchy for your organization.
With ACM Private CA, you can create private certificate authority hierarchies, including root and subordinate CAs, without the upfront investment and ongoing maintenance costs of operating your own private CA. You can issue certificates for authenticating internal users, computers, applications, services, servers or other devices, and code signing.
In this blog post, you’ll see an example automotive manufacturing company and their supplier companies. Each will have associated AWS accounts, which we will call Manufacturer Account(s) and Supplier Account(s), respectively.
Automotive manufacturing companies usually have modules that come from different suppliers. Modules, in the automotive context, are embedded systems that control electrical systems in the vehicle. These modules might be interconnected throughout the in-vehicle network or provide connectivity external to the vehicle, for example, for navigation or sending telemetry to off-board systems.
The architecture needs to allow the Manufacturer to retain control of their CA hierarchy, while giving their external Suppliers limited access to sign the certificates on these modules with the Manufacturer’s CA hierarchy. The architecture we provide here gives you the basic information you need to cover the following objectives:
IAM role creation for specific personas to manage the CA lifecycle
Auditing the CA hierarchy by using audit reports
Cross-account sharing by using AWS RAM with certificate template scoping
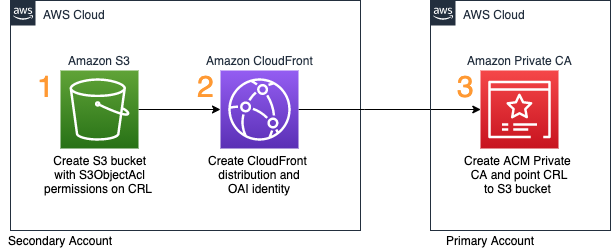
Architecture overview
Figure 1 shows the solution architecture.
Figure 1: Multi-account certificate authority hierarchy using ACM Private CA
The Manufacturer has two categories of AWS accounts:
A dedicated account to hold the Manufacturer’s root CA
An account to hold their subordinate CA
Note: The diagram shows two subordinate CAs in the Manufacturer account. However, depending on your security needs, you can have a subordinate CA per account per supplier.
Additionally, each Supplier has one AWS account. These accounts will have the Manufacturer’s subordinate CA shared by using AWS RAM. The Manufacturer will have a subordinate CA for each Supplier.
Logically separate accounts
In order to minimize the scope of impact and scope users to actions within their duties, it’s critical that you logically separate AWS accounts based on workload within the CA hierarchy. The following section shows a recommendation for how to do that.
AWS account that holds the root CA
You, the Manufacturer, should place the ACM Private root CA within its own dedicated AWS account to segment and tightly control access to the root CA. This limits access at the account level and only uses the dedicated account for a single purpose: holding the root CA for your organization. This account will only have access from IAM principals that maintain the CA hierarchy through a federation service like AWS Single Sign-On (AWS SSO) or direct federation to IAM through an existing identity provider. This account also has AWS CloudTrail enabled and configured for business-specific alerting, including actions like creation, updating, or deletion of the root CA.
AWS account that holds the subordinate CAs
You, the Manufacturer, will have a dedicated account where the entire CA hierarchy below the root will be located. You should have a separate subordinate CA for each Supplier, and in some cases a separate subordinate CA for each hardware module the Supplier is building. The subordinate CAs can issue certificates for specific hardware modules within the Supplier account.
This Manufacturer account shares each subordinate CA to the respective Supplier’s AWS account by using AWS RAM. This provides joint control to the shared subordinate CA, creating isolation between individual Suppliers. AWS RAM allows Suppliers to control certificate issuance and revocation if this is allowed by the Manufacturer. Each Supplier is only shared certificate provisioning access through AWS RAM configuration, which means that you can tightly monitor and revoke access through AWS RAM. Given this sharing through AWS RAM, the Suppliers don’t have access to modify or delete the CA hierarchy itself and can only provision certificates from it.
Supplier AWS account(s)
These AWS accounts are owned by each respective Supplier. For example, you might partner with radio, navigation system, and telemetry suppliers. Each Supplier would have their own AWS account, which they control. The Supplier accepts an invitation from the manufacturer through AWS RAM, sharing the subordinate CA. The subordinate is allowed to take only certain actions, based on how the Manufacturer configured the share (more on this later in the post).
Separation of duties by means of IAM role creation
In this flow, one IAM role is able to disable the CA, and a second principal can delete the CA. This enables two-person control for this highly privileged action—meaning that you need a two-person quorum to rotate the CA certificate.
We recommend that you, the Manufacturer, create a two-person process for highly privileged events like CA certificate rotation ceremonies. The preceding policies serve two purposes. First, they allow you to designate separation of management duties between day-to-day CA admin tasks and infrequent root CA rotation ceremonies. The day-to-day CA admin policy allows all ACM Private CA actions except the ability to delete the root CA. This is because the day-to-day CA admin should not be deleting the root CA. Meanwhile, the privileged CA admin policy has the ability to call DeleteCertificateAuthority. However, in order to call DeleteCertificateAuthority, you first need to have the day-to-day CA admin role disable the root CA.
This means that both roles listed here are necessary to perform a root CA deletion for a rotation or replacement ceremony. This arrangement creates a way to control the deletion of the CA resource by requiring two separate actors to disable and delete. It’s crucial that the two roles are assumed by two different people at the identity provider. Having one person assume both of these roles negates the increased security created by each role.
Your Suppliers should also follow least privilege when creating IAM roles within their own accounts. However, as we’ll see in the Cross-account sharing by using AWS RAM section, even if the Suppliers don’t follow best practices, the Manufacturer’s ACM Private CA hierarchy is still isolated and secure.
That being said, here are common IAM roles that your Suppliers should create within their own accounts:
Developers who provision certificates for development and QA workloads
Developers who provision certificates for production
These certificate issuing roles give the Supplier the ability to issue end-entity certificates from the CA hierarchy. In this use case, the Supplier needs two different levels of permissions: non-production certificates and production certificates. To simplify the roles within IAM, the Supplier decided to use ABAC. These ABAC policies allow operations when the principal’s tag matches the resource tag. Because the Supplier has many similar policies, each with a different set of users, they use ABAC to create a single IAM policy that uses principal tags rather than creating multiple slightly different IAM policies.
This single policy enables all personas to be scoped to least privilege access. If you look at the Condition portion of the IAM policy, you can see the power of ABAC. This condition verifies that the PrincipalTag matches the ResourceTag. The Supplier is federating into IAM roles through AWS SSO and tagging the Supplier’s principals within its selected identity providers.
Because you as the Manufacturer have tagged the subordinate CAs that are shared with the Supplier, the Supplier can use identity provider (IdP) attributes as tags to simplify the Supplier’s IAM strategy. In this example, the Supplier configures each relevant user in the IdP with the attribute (tag) key: access-team. This tag matches the tagging strategy used by the Manufacturer. Here’s the mapping for each persona within the use case:
Dev environment:
access-team: DevTeam
Production environment:
access-team: ProdTeam
You can choose to add or remove tags depending on your use case, and the preceding scenario serves as a simple example. This offloads the need to create new IAM policies as the number of subordinate CAs grow. If you decide to use ABAC, make sure that you require both principal tagging and resource tagging upon creation of each, because these tags become your authorization mechanism.
CA lifecycle: Audit report published by the Manufacturer
In terms of auditing and monitoring, we recommend that the Manufacturer have a mechanism to track how many certificates were issued for a specific Supplier or module. Within the Manufacturer accounts, you can generate audit reports through the console or CLI. This allows you, the manufacturer, to gather metrics on certificate issuance and revocation. Following is an example of a certificate issuance.
Figure 2: Audit report output for certificate issuance
With AWS RAM, you can share CAs with another account. We recommend that you, as a Manufacturer, use AWS RAM to share CAs with Suppliers so that they can issue certificates without administrator access to the CA. This arrangement allows you as the Manufacturer to more easily limit and revoke access if you change Suppliers. The Suppliers can create certificates through the ACM console or through the CLI, API, or AWS CloudFormation. Manufacturers are only sharing the ability to create, manage, bind, and export certificates from the CA hierarchy. The CA hierarchy itself is contained within the Manufacturers’ accounts, and not within the Suppliers’ accounts. By using AWS RAM, the Suppliers don’t have any administrator access to the CA hierarchy. From a cost perspective, you can centrally control and monitor the costs of your private CA hierarchy without having to deal with cost-sharing across Suppliers.
Certificate templates with AWS RAM managed permissions
AWS RAM has the ability to create managed permissions in order to define the actions that can be performed on shared resources. For each shareable resource type, you can use AWS RAM managed permissions to define which permissions to grant to whom for shared resource types that support additional managed permissions. This means that when you use AWS RAM to share a resource (in this case ACM Private CA), you can now specify which IAM actions can take place on that resource. AWS RAM managed permissions integrate with the following ACM Private CA certificate templates:
These five certificate templates allow a Manufacturer to scope its Suppliers to the certificate template provisioning level. This means that you can limit which certificate templates can be issued by the Suppliers.
Let’s assume you have a Supplier that is supplying a module that has infotainment media capability, and you, the manufacturer, want the Supplier to provision the end-entity client certificate but you don’t want them to be able to revoke that certificate. You can use AWS RAM managed permissions to scope that Supplier’s shared private CA to allow the EndEntityClientAuthCertificate issuance template, which implicitly denies RevokeCertificate template actions. This further scopes down what the Supplier is authorized to issue on the shared CA, gives the responsibility for revoking infotainment device certificates to the Manufacturer, but still allows the Supplier to load devices with a certificate upon creation.
Example of creating a resource share in AWS RAM by using the AWS CLI
This walkthrough shows you the general process of sharing a private CA by using AWS RAM and then accepting that shared resource in the partner account.
Create your shared resource in AWS RAM from the Manufacturer subordinate CA account. Notice that in the example that follows, we selected one of the certificate templates within the managed permissions option. This limits the shared CA so that it can only issue certain types of certificate templates.
Note: Replace the <variable> placeholders with your own values.
In this blog post, you learned about the various considerations for building a secure public key infrastructure (PKI) hierarchy by using ACM Private CA through an example customer’s prescriptive setup. You learned how you can use AWS RAM to share CAs across accounts easily and securely. You also learned about sharing specific CAs through the ability to define permissions to specific principals across accounts, allowing for granular control of permissions on principals that might act on those resources.
The main takeaways of this post are how to create least privileged roles within IAM in order to scope down the activities of each persona and limit the potential scope of impact for your organization’s private CA hierarchy. Although these best practices are specific to manufacturer business requirements, you can alter them based on your business needs. With the managed permissions in AWS RAM, you can further scope down the actions that principals can perform with your CA by limiting the certificate templates allowed on that CA when you share it. Using all of these tools, you can help your PKI hierarchy to have a high level of security. To learn more, see the other ACM Private CA posts on the AWS Security Blog.
If you have feedback about this post, submit comments in the Comments section below. If you have questions about this post, contact AWS Support.
Want more AWS Security news? Follow us on Twitter.
AWS Certificate Manager Private Certificate Authority (ACM PCA) is a highly available, fully managed private certificate authority (CA) service that allows you to create CA hierarchies and issue X.509 certificates from the CAs you create in ACM PCA. You can then use these certificates for scenarios such as encrypting TLS communication channels, cryptographically signing code, authenticating users, and more. But what happens if you decide to change your TLS endpoint or update your code signing entity? How do you revoke a certificate so that others no longer accept it?
In this blog post, we will cover two fully managed certificate revocation status checking mechanisms provided by ACM PCA: the Online Certificate Status Protocol (OCSP) and certificate revocation lists (CRLs). OCSP and CRLs both enable you to manage how you can notify services and clients about ACM PCA–issued certificates that you revoke. We’ll explain how these standard mechanisms work, we’ll highlight appropriate deployment use cases, and we’ll identify the advantages and downsides of each. We won’t cover configuration topics directly, but will provide you with links to that information as we go.
Certificate revocation
An X.509 certificate is a static, cryptographically signed document that represents a user, an endpoint, an IoT device, or a similar end entity. Because certificates provide a mechanism to authenticate these end entities, they are valid for a fixed period of time that you specify in the expiration date attribute when you generate a certificate. The expiration attribute is important, because it validates and regulates an end entity’s identity, and provides a means to schedule the termination of a certificate’s validity. However, there are situations where a certificate might need to be revoked before its scheduled expiration. These scenarios can include a compromised private key, the end of agreement between signed and signing organizations, user or configuration error when issuing certificates, and more. Although you can use certificates in many ways, we will refer to the predominant use case of TLS-based client-server implementations for the remainder of this blog post.
Certificate revocation can be used to identify certificates that are no longer trusted, and CRLs and OCSP are the standard mechanisms used to publish the revocation information. In addition, the special use case of OCSP stapling provides a more efficient mechanism that is supported in TLS 1.2 and later versions.
ACM PCA gives you the flexibility to use either of these mechanisms, or both. More importantly, as an ACM PCA administrator, the mechanism you choose to use is reflected in the certificate, and you must know how you want to manage revocation before you create the certificate. Therefore, you need to understand how the mechanisms work, select your strategy based on its appropriateness to your needs, and then create and deploy your certificates. Let’s look at how each mechanism works, the use cases for each, and issues to be aware of when you select a revocation strategy.
Certificate revocation using CRLs
As the name suggests, a CRL contains a list of revoked certificates. A CRL is cryptographically signed and issued by a CA, and made available for download by clients (for example, web browsers for TLS) through a CRL distribution point (CDP) such as a web server or a Lightweight Directory Access Point (LDAP) endpoint.
A CRL contains the revocation date and the serial number of revoked certificates. It also includes extensions, which specify whether the CA administrator temporarily suspended or irreversibly revoked the certificate. The CRL is signed and timestamped by the CA and can be verified by using the public key of the CA and the cryptographic algorithm included in the certificate. Clients download the CRL by using the address provided in the CDP extension and trust a certificate by verifying the signature, expiration date, and revocation status in the CRL.
CRLs provide an easy way to verify certificate validity. They can be cached and reused, which makes them resilient to network disruptions, and are an excellent choice for a server that is getting requests from many clients for the same CA. All major web browsers, OpenSSL, and other major TLS implementations support the CRL method of validating certificates.
However, the size of CRLs can lead to inefficiency for clients that are validating server identities. An example is the scenario of browsing multiple websites and downloading a CRL for each site that is visited. CRLs can also grow large over time as you revoke more certificates. Consider the World Wide Web and the number of invalidations that take place daily, which makes CRLs an inefficient choice for small-memory devices (for example, mobile, IoT, and similar devices). In addition, CRLs are not suited for real-time use cases. CRLs are downloaded periodically, a value that can be hours, days, or weeks, and cached for memory management. Many default TLS implementations, such as Mozilla, Chrome, Windows OS, and similar, cache CRLs for 24 hours, leaving a window of up to a day where an endpoint might incorrectly trust a revoked certificate. Cached CRLs also open opportunities for non-trusted sites to establish secure connections until the server refreshes the list, leading to security risks such as data breaches and identity theft.
Implementing CRLs by using ACM PCA
ACM PCA supports CRLs and stores them in an Amazon Simple Storage Service (Amazon S3) bucket for high availability and durability. You can refer to this blog post for an overview of how to securely create and store your CRLs for ACM PCA. Figure 1 shows how CRLs are implemented by using ACM PCA.
Figure 1: Certificate validation with a CRL
The workflow in Figure 1 is as follows:
On certificate revocation, ACM PCA updates the Amazon S3 CRL bucket with a new CRL.
Note: An update to the CRL may take up to 30 minutes after a certificate is revoked.
The client requests a TLS connection and receives the server’s certificate.
The client retrieves the current CRL file from the Amazon S3 bucket and validates it.
The refresh interval is the period between when an administrator revokes a certificate and when all parties consider that certificate revoked. The length of the refresh interval can depend on how quickly new information is published and how long clients cache revocation information to improve performance.
When you revoke a certificate, ACM PCA publishes a new CRL. ACM PCA waits 5 minutes after a RevokeCertificate API call before publishing a new CRL. This process exists to accommodate multiple revocation requests in a short time frame. An update to the CRL can take up to 30 minutes to propagate. If the CRL update fails, ACM PCA makes further attempts every 15 minutes.
CRLs also have a validity period, which you define as part of the CRL configuration by using ExpirationInDays. ACM PCA uses the value in the ExpirationInDays parameter to calculate the nextUpdate field in the CRL (the day and time when ACM PCA will publish the next CRL). If there are no changes to the CRL, the CRL is refreshed at half the interval of the next update. Clients may cache CRLs while they are still valid, so not all clients will have the updated CRL with the newly revoked certificates until the previous published CRL has expired.
Certificate revocation using OCSP
OCSP removes the burden of downloading the CRL from the client. With OCSP, clients provide the serial number and obtain the certificate status for a single certificate from an OCSP Responder. The OCSP Responder can be the CA or an endpoint managed by the CA. The certificate that is returned to the client contains an authorityInfoAccess extension, which provides an accessMethod (for example, OCSP), and identifies the OCSP Responder by a URL (for example, http://example-responder:<port>) in the accessLocation. You can also specify the OCSP Responder location manually in the CA profile. The certificate status response that is returned by the OCSP Responder can be good, revoked, or unknown, and is signed by using a process similar to the CRL for protection against forgery.
OCSP status checks are conducted in real time and are a good choice for time-sensitive devices, as well as mobile and IoT devices with limited memory.
However, the certificate status needs to be checked against the OCSP Responder for every connection, therefore requiring an extra hop. This can overwhelm the responder endpoint that needs to be designed for high availability, low latency, and protection against network and system failures. We will cover how ACM PCA addresses these availability and latency concerns in the next section.
Another thing to be mindful of is that the OCSP protocol implements OCSP status checks over unencrypted HTTP that poses privacy risks. When a client requests a certificate status, the CA receives information regarding the endpoint that is being connected to (for example, domain, IP address, and related information), which can easily be intercepted by a middle party. We will address how OCSP stapling can be used to address these privacy concerns in the OCSP stapling section.
Implementing OCSP by using ACM PCA
ACM PCA provides a highly available, fully managed OCSP solution to notify endpoints that certificates have been revoked. The OCSP implementation uses AWS managed OCSP responders and a globally available Amazon CloudFront distribution that caches OCSP responses closer to you, so you don’t need to set up and operate any infrastructure by yourself. You can enable OCSP on new or existing CAs using the ACM PCA console, the API, the AWS Command Line Interface (AWS CLI), or through AWS CloudFormation. Figure 2 shows how OCSP is implemented on ACM PCA.
Note: OCSP Responders, and the CloudFront distribution that caches the OCSP response for client requests, are managed by AWS.
Figure 2: Certificate validation with OCSP
The workflow in Figure 2 is as follows:
On certificate revocation, the ACM PCA updates the OCSP Responder, which generates the OCSP response.
The client requests a TLS connection and receives the server’s certificate.
The client sends a query to the OCSP endpoint on CloudFront.
Note: If the response is still valid in the CloudFront cache, it will be served to the client from the cache.
If the response is invalid or missing in the CloudFront cache, the request is forwarded to the OCSP Responder.
The OCSP Responder sends the OCSP response to the CloudFront cache.
CloudFront caches the OCSP response and returns it to the client.
The ACM PCA OCSP Responder generates an OCSP response that gets cached by CloudFront for 60 minutes. When a certificate is revoked, ACM PCA updates the OCSP Responder to generate a new OCSP response. During the caching interval, clients continue to receive responses from the CloudFront cache. As with CRLs, clients may also cache OCSP responses, which means that not all clients will have the updated OCSP response for the newly revoked certificate until the previously published (client-cached) OCSP response has expired. Another thing to be mindful of is that while the response is cached, a compromised certificate can be used to spoof a client.
Certificate revocation using OCSP stapling
With both CRLs and OCSP, the client is responsible for validating the certificate status. OCSP stapling addresses the client validation overhead and privacy concerns that we mentioned earlier by having the server obtain status checks for certificates that the server holds, directly from the CA. These status checks are periodic (based on a user-defined value), and the responses are stored on the web server. During TLS connection establishment, the server staples the certificate status in the response that is sent to the client. This improves connection establishment speed by combining requests and reduces the number of requests that are sent to the OCSP endpoint. Because clients are no longer directly connecting to OCSP Responders or the CAs, the privacy risks that we mentioned earlier are also mitigated.
Implementing OCSP stapling by using ACM PCA
OCSP stapling is supported by ACM PCA. You simply use the OCSP Certificate Status Response passthrough to add the stapling extension in the TLS response that is sent from the server to the client. Figure 3 shows how OCSP stapling works with ACM PCA.
Figure 3: Certificate validation with OCSP stapling
The workflow in Figure 3 is as follows:
On certificate revocation, the ACM PCA updates the OCSP Responder, which generates the OCSP response.
The client requests a TLS connection and receives the server’s certificate.
In the case of server’s cache miss, the server will query the OCSP endpoint on CloudFront.
Note: If the response is still valid in the CloudFront cache, it will be returned to the server from the cache.
If the response is invalid or missing in the CloudFront cache, the request is forwarded to the OCSP Responder.
The OCSP Responder sends the OCSP response to the CloudFront cache.
CloudFront caches the OCSP response and returns it to the server, which also caches the response.
The server staples the certificate status in its TLS connection response (for TLS 1.2 and later versions).
OCSP stapling is supported with TLS 1.2 and later versions.
Selecting the correct path with OCSP and CRLs
All certificate revocation offerings from AWS run on a highly available, distributed, and performance-optimized infrastructure. We strongly recommend that you enable a certificate validation and revocation strategy in your environment that best reflects your use case. You can opt to use CRLs, OCSP, or both. Without a revocation and validation process in place, you risk unauthorized access. We recommend that you review your business requirements and evaluate the risk profile of access with an invalid certificate versus the availability requirements for your application.
In the following sections, we’ll provide some recommendations on when to select which certificate validation and revocation strategy. We’ll cover client-server TLS communication, and also provide recommendations for mutual TLS (mTLS) authentication scenarios.
Recommended scenarios for OCSP stapling and OCSP Must-Staple
If your organization requires support for TLS 1.2 and later versions, you should use OCSP stapling. If you want to reduce the application availability risk for a client that is configured to fail the TLS connection establishment when it is unable to validate the certificate, you should consider using the OCSP Must-Staple extension.
OCSP stapling
If your organization requires support for TLS 1.2 and later versions, you should use OCSP stapling. With OCSP stapling, you reduce your client’s load and connectivity requirements, which helps if your network connectivity is unpredictable. For example, if your application client is a mobile device, you should anticipate network failures, low bandwidth, limited processing capacity, and impatient users. In this scenario, you will likely benefit the most from a system that relies on OCSP stapling.
Although the majority of web browsers support OCSP stapling, not all servers support it. OCSP stapling is, therefore, typically implemented together with CRLs that provide an alternate validation mechanism or as a passthrough for when the OCSP response fails or is invalid.
OCSP Must-Staple
If you want to rely on OCSP alone and avoid implementing CRLs, you can use the OCSP Must-Staple certificate extension, which tells the connecting client to expect a stapled response. You can then use OCSP Must-Staple as a flag for your client to fail the connection if the client does not receive a valid OCSP response during connection establishment.
Recommended scenarios for CRLs, OCSP (without stapling), and combinational strategies
If your application needs to support legacy, now deprecated protocols such as TLS 1.0 or 1.1, or if your server doesn’t support OCSP stapling, you could use a CRL, OCSP, or both together. To determine which option is best, you should consider your sensitivity to CA availability, recently revoked certificates, the processing capacity of your application client, and network latency.
CRLs
If your application needs to be available independent of your CA connectivity, you should consider using a CRL. CRLs are much larger files that, from a practical standpoint, require much longer cache times to be of use, but they will be present and available for verification on your system regardless of the status of your network connection. In addition, the lookup time of a certificate within a CRL is local and therefore shorter than a network round trip to an OCSP Responder, because there are no network connection or DNS lookup times.
OCSP (without stapling)
If you are sensitive to the processing capacity of your application client, you should use OCSP. The size of an OCSP message is much smaller compared to a CRL, which allows you to configure shorter caching times that are better suited for your risk profile. To optimize your OCSP and OCSP stapling process, you should review your DNS configuration because it plays a significant role in the amount of time your application will take to receive a response.
For example, if you’re building an application that will be hosted on infrastructure that doesn’t support OCSP stapling, you will benefit from clients making an OCSP request and caching it for a short period. In this scenario, your application client will make a single OCSP request during its connection setup, cache the response, and reuse the certificate state for the duration of its application session.
Combining CRLs and OCSP
You can also choose to implement both CRLs and OCSP for your certificate revocation and validation needs. For example, if your application needs to support legacy TLS protocols while providing resiliency to network failures, you can implement both CRLs and OCSP. When you use CRLs and OCSP together, you verify certificates primarily by using OCSP; however, in case your client is unable to reach the OCSP endpoint, you can fail over to an alternative validation method (for example, CRL). This approach of combining CRLs and OCSP gives you all the benefits of OCSP mentioned earlier, while providing a backup mechanism for failure scenarios such as an unreachable OCSP Responder, invalid response from the OCSP Responder, and similar. However, while this approach adds resilience to your application, it will add management overhead because you will need to set up CRL-based and OCSP-based revocation separately. Also, remember that clients with reduced computing power or poor network connectivity might struggle as they attempt to download and process the CRL.
Recommendations for mTLS authentication scenarios
You should consider network latency and revocation propagation delays when optimizing your server infrastructure for mTLS authentication. In a typical scenario, server certificate changes are infrequent, so caching an OCSP response or CRL on your client and an OCSP-stapled response on a server will improve performance. For mTLS, you can revoke a client certificate at any time; therefore, cached responses could introduce the risk of invalid access. You should consider designing your system such that a copy of a CRL for client certificates is maintained on the server and refreshed based on your business needs. For example, you can use S3 ETags to determine whether an object has changed, and flush the server’s cache in response.
Conclusion
This blog post covered two certificate revocation methods, OCSP and CRLs, that are available on ACM PCA. Remember, when you deploy CA hierarchies for public key infrastructure (PKI), it’s important to define how to handle certificate revocation. The certificate revocation information must be included in the certificate when it is issued, so the choice to enable either CRL or OCSP, or both, has to happen before the certificate is issued. It’s also important to have highly available CRL and OCSP endpoints for certificate lifecycle management. ACM PCA provides a highly available, fully managed CA service that you can use to meet your certificate revocation and validation requirements. Get started using ACM PCA.
If you have feedback about this post, submit comments in the Comments section below. If you have questions about this post, contact AWS Support.
Want more AWS Security news? Follow us on Twitter.
Many customers use Amazon MSK for streaming data from multiple producers. Multiple subscribers can then consume the streaming data and build data pipelines, analytics, and data integration. To learn more, read Using Amazon MSK as an event source for AWS Lambda.
You can activate any combination of authentication modes (mutual TLS, SASL SCRAM, or IAM access control) on new or existing clusters. This is useful if you are migrating to a new authentication mode or must run multiple authentication modes simultaneously. Lambda natively supports consuming messages from both self-managed Kafka and Amazon MSK through event source mapping.
By default, the TLS protocol only requires a server to authenticate itself to the client. The authentication of the client to the server is managed by the application layer. The TLS protocol also offers the ability for the server to request that the client send an X.509 certificate to prove its identity. This is called mutual TLS as both parties are authenticated via certificates with TLS.
Mutual TLS is a commonly used authentication mechanism for business-to-business (B2B) applications. It’s used in standards such as Open Banking, which enables secure open API integrations for financial institutions. It is one of the popular authentication mechanisms for customers using Kafka.
To use mutual TLS authentication for your Kafka-triggered Lambda functions, you provide a signed client certificate, the private key for the certificate, and an optional password if the private key is encrypted. This establishes a trust relationship between Lambda and Amazon MSK or self-managed Kafka. Lambda supports self-signed server certificates or server certificates signed by a private certificate authority (CA) for self-managed Kafka. Lambda trusts the Amazon MSK certificate by default as the certificates are signed by Amazon Trust Services CAs.
This blog post explains how to set up a Lambda function to process messages from an Amazon MSK cluster using mutual TLS authentication.
Overview
Using Amazon MSK as an event source operates in a similar way to using Amazon SQS or Amazon Kinesis. You create an event source mapping by attaching Amazon MSK as event source to your Lambda function.
The Lambda service internally polls for new records from the event source, reading the messages from one or more partitions in batches. It then synchronously invokes your Lambda function, sending each batch as an event payload. Lambda continues to process batches until there are no more messages in the topic.
The Lambda function’s event payload contains an array of records. Each array item contains details of the topic and Kafka partition identifier, together with a timestamp and base64 encoded message.
Kafka event payload
You store the signed client certificate, the private key for the certificate, and an optional password if the private key is encrypted in the AWS Secrets Manager as a secret. You provide the secret in the Lambda event source mapping.
The steps for using mutual TLS authentication for Amazon MSK as event source for Lambda are:
To use mutual TLS client authentication with Amazon MSK, create a root CA using AWS ACM Private Certificate Authority (PCA). We recommend using independent ACM PCAs for each MSK cluster when you use mutual TLS to control access. This ensures that TLS certificates signed by PCAs only authenticate with a single MSK cluster.
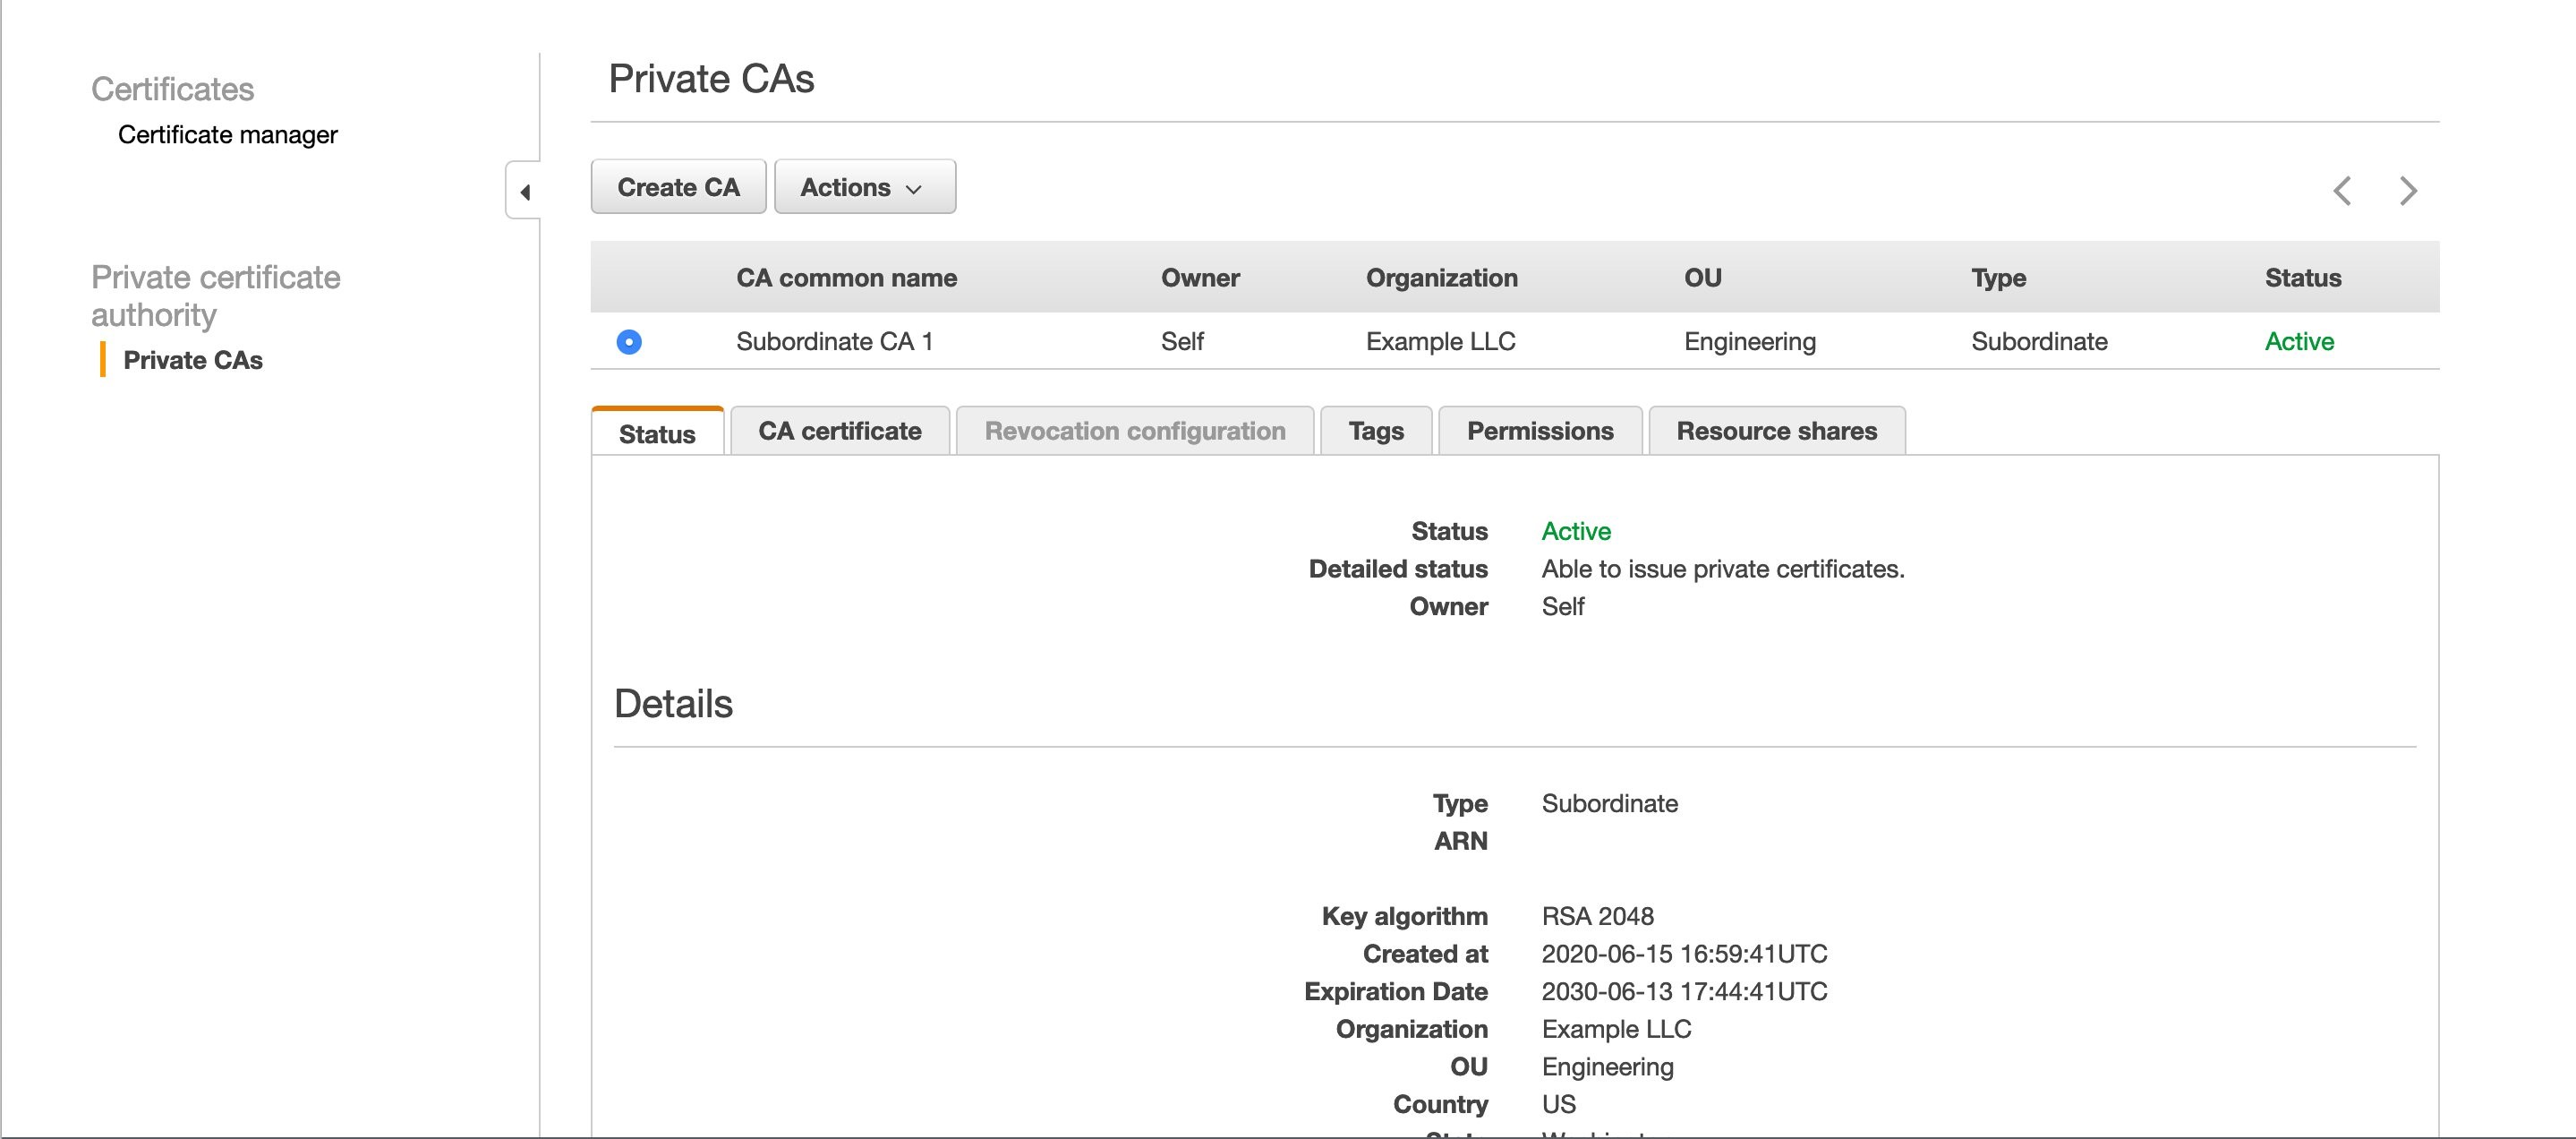
In the Select CA type panel, select Root CA and choose Next.
Select Root CA
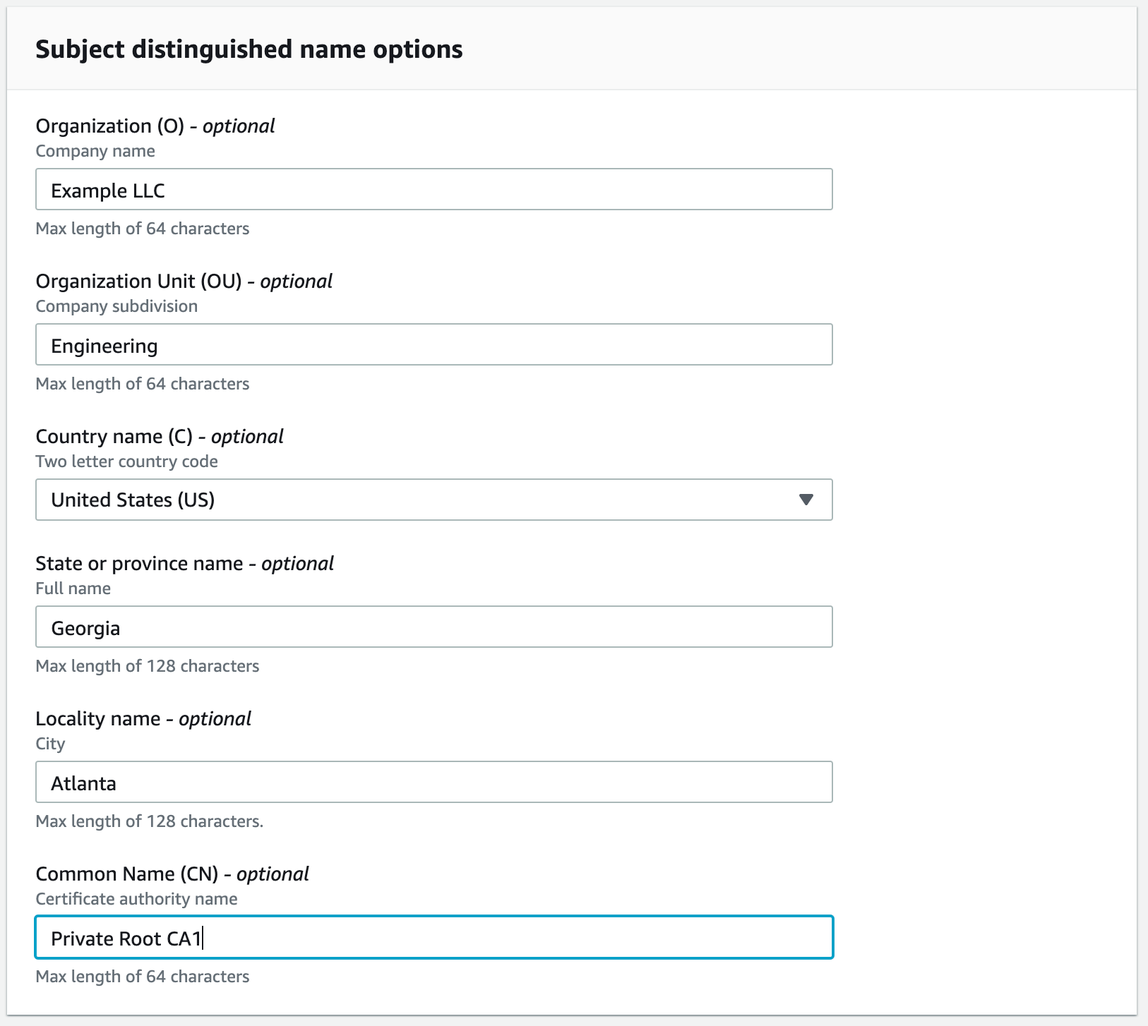
In the Configure CA subject name panel, provide your certificate details, and choose Next.
Provide your certificate details
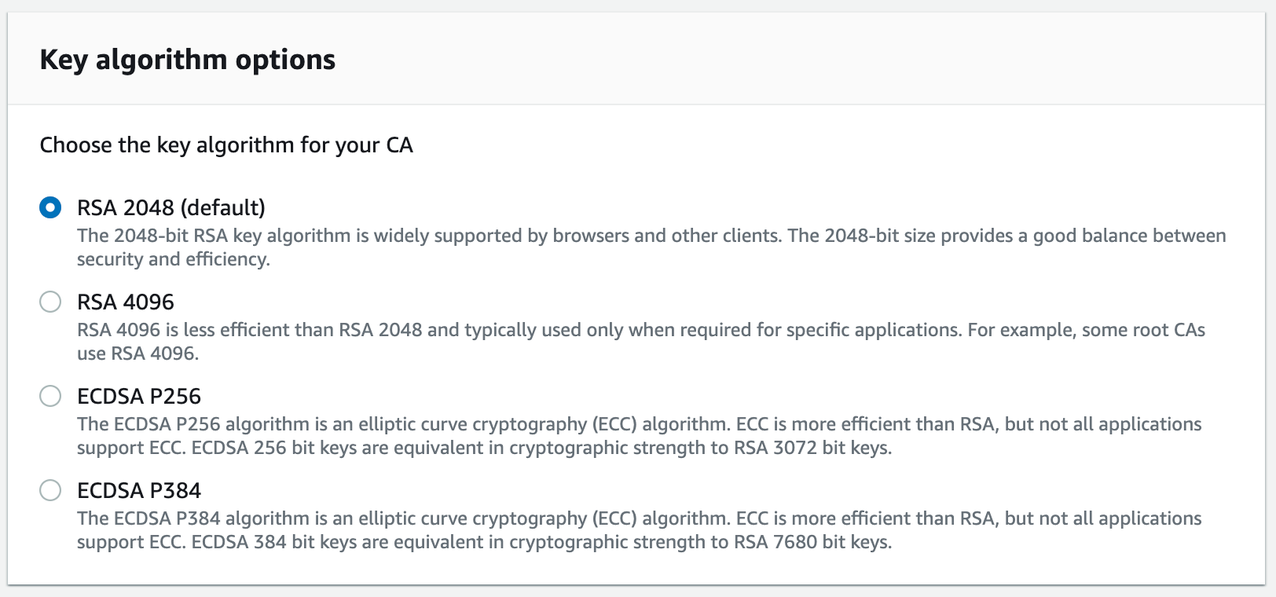
From the Configure CA key algorithm panel, choose the key algorithm for your CA and choose Next.
Configure CA key algorithm
From the Configure revocation panel, choose any optional certificate revocation options you require and choose Next.
Configure revocation
Continue through the screens to add any tags required, allow ACM to renew certificates, review your options, and confirm pricing. Choose Confirm and create.
Once the CA is created, choose Install CA certificate to activate your CA. Configure the validity of the certificate and the signature algorithm and choose Next.
Configure certificate
Review the certificate details and choose Confirmand install. Note down the Amazon Resource Name (ARN) of the private CA for the next section.
Review certificate details
2. Creating a client certificate.
You generate a client certificate using the root certificate you previously created, which is used to authenticate the client with the Amazon MSK cluster using mutual TLS. You provide this client certificate and the private key as AWS Secrets Manager secrets to the AWS Lambda event source mapping.
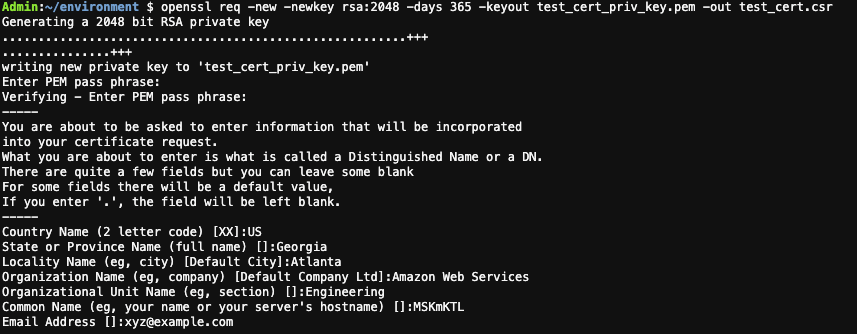
On your local machine, run the following command to create a private key and certificate signing request using OpenSSL. Enter your certificate details. This creates a private key file and a certificate signing request file in the current directory.
OpenSSL create a private key and certificate signing request
Use the AWS CLI to sign your certificate request with the private CA previously created. Replace Private-CA-ARN with the ARN of your private CA. The certificate validity value is set to 300, change this if necessary. Save the certificate ARN provided in the response.
Retrieve the certificate that ACM signed for you. Replace the Private-CA-ARN and Certificate-ARN with the ARN you obtained from the previous commands. This creates a signed certificate file called client_cert.pem.
Create a new file called secret.json with the following structure
{
"certificate":"",
"privateKey":""
}
Copy the contents of the client_cert.pem in certificate and the content of key.pem in privatekey. Ensure that there are no extra spaces added.The file structure looks like this:
Certificate file structure
Create the secret and save the ARN for the next section.
3. Setting up an Amazon MSK cluster with AWS Lambda as a consumer.
Amazon MSK is a highly available service, so it must be configured to run in a minimum of two Availability Zones in your preferred Region. To comply with security best practice, the brokers are usually configured in private subnets in each Region.
You can use AWS CLI, AWS Management Console, AWS SDK and AWS CloudFormation to create the cluster and the Lambda functions. This blog uses AWS SAM to create the infrastructure and the associated code is available in the GitHub repository.
The AWS SAM template creates the following resources:
Amazon MSK cluster with mutual TLS authentication.
Lambda function for consuming the records from the Amazon MSK cluster.
IAM roles.
Lambda function for testing the Amazon MSK integration by publishing messages to the topic.
The VPC has public and private subnets in two Availability Zones with the private subnets configured to use a NAT Gateway. You can also set up VPC endpoints with PrivateLink to allow the Amazon MSK cluster to communicate with Lambda. To learn more about different configurations, see this blog post.
The Lambda function requires permission to describe VPCs and security groups, and manage elastic network interfaces to access the Amazon MSK data stream. The Lambda function also needs two Kafka permissions: kafka:DescribeCluster and kafka:GetBootstrapBrokers. The policy template AWSLambdaMSKExecutionRole includes these permissions. The Lambda function also requires permission to get the secret value from AWS Secrets Manager for the secret you configure in the event source mapping.
1. CLIENT_CERTIFICATE_TLS_AUTH – (Amazon MSK, Self-managed Apache Kafka) The Secrets Manager ARN of your secret key containing the certificate chain (PEM), private key (PKCS#8 PEM), and private key password (optional) used for mutual TLS authentication of your Amazon MSK/Apache Kafka brokers. A private key password is required if the private key is encrypted.
2. SERVER_ROOT_CA_CERTIFICATE – This is only for self-managed Apache Kafka. This contains the Secrets Manager ARN of your secret containing the root CA certificate used by your Apache Kafka brokers in PEM format. This is not applicable for Amazon MSK as Amazon MSK brokers use public AWS Certificate Manager certificates which are trusted by AWS Lambda by default.
Navigate to the aws-lambda-msk-mtls-integration directory. Copy the client certificate file and the private key file to the producer lambda function code.
cd aws-lambda-msk-mtls-integration
cp ../client_cert.pem code/producer/client_cert.pem
cp ../key.pem code/producer/client_key.pem
Navigate to the code directory and build the application artifacts using the AWS SAM build command.
cd code
sam build
Run sam deploy to deploy the infrastructure. Provide the Stack Name, AWS Region, ARN of the private CA created in section 1. Provide additional information as required in the sam deploy and deploy the stack.
sam deploy -g
Running sam deploy -g
The stack deployment takes about 30 minutes to complete. Once complete, note the output values.
Create the event source mapping for the Lambda function. Replace the CONSUMER_FUNCTION_NAME and MSK_CLUSTER_ARN from the output of the stack created by the AWS SAM template. Replace SECRET_ARN with the ARN of the AWS Secrets Manager secret created previously.
Navigate one directory level up and configure the producer function with the Amazon MSK broker details. Replace the PRODUCER_FUNCTION_NAME and MSK_CLUSTER_ARN from the output of the stack created by the AWS SAM template.
cd ../
./setup_producer.sh MSK_CLUSTER_ARN PRODUCER_FUNCTION_NAME
Verify that the event source mapping state is enabled before moving on to the next step. Replace UUID from the output of step 5.
aws lambda get-event-source-mapping --uuid UUID
Publish messages using the producer. Replace PRODUCER_FUNCTION_NAME from the output of the stack created by the AWS SAM template. The following command creates a Kafka topic called exampleTopic and publish 100 messages to the topic.
Verify that the consumer Lambda function receives and processes the messages by checking in Amazon CloudWatch log groups. Navigate to the log group by searching for aws/lambda/{stackname}-MSKConsumerLambda in the search bar.
Consumer function log stream
Conclusion
Lambda now supports mutual TLS authentication for Amazon MSK and self-managed Kafka as an event source. You now have the option to provide a client certificate to establish a trust relationship between Lambda and MSK or self-managed Kafka brokers. It supports configuration via the AWS Management Console, AWS CLI, AWS SDK, and AWS CloudFormation.
Securing east-west traffic in service meshes, such as AWS App Mesh, by using mutual Transport Layer Security (mTLS) adds an additional layer of defense beyond perimeter control. mTLS adds bidirectional peer-to-peer authentication on top of the one-way authentication in normal TLS. This is done by adding a client-side certificate during the TLS handshake, through which a client proves possession of the corresponding private key to the server, and as a result the server trusts the client. This prevents an arbitrary client from connecting to an App Mesh service, because the client wouldn’t possess a valid certificate.
You’ll first see how to derive server-side certificates from ACM Private CA into App Mesh internally by using the native integration between the two services. You’ll then see a method and code for installing client-side certificates issued from ACM Private CA into App Mesh; this method is needed because client-side certificates aren’t integrated natively.
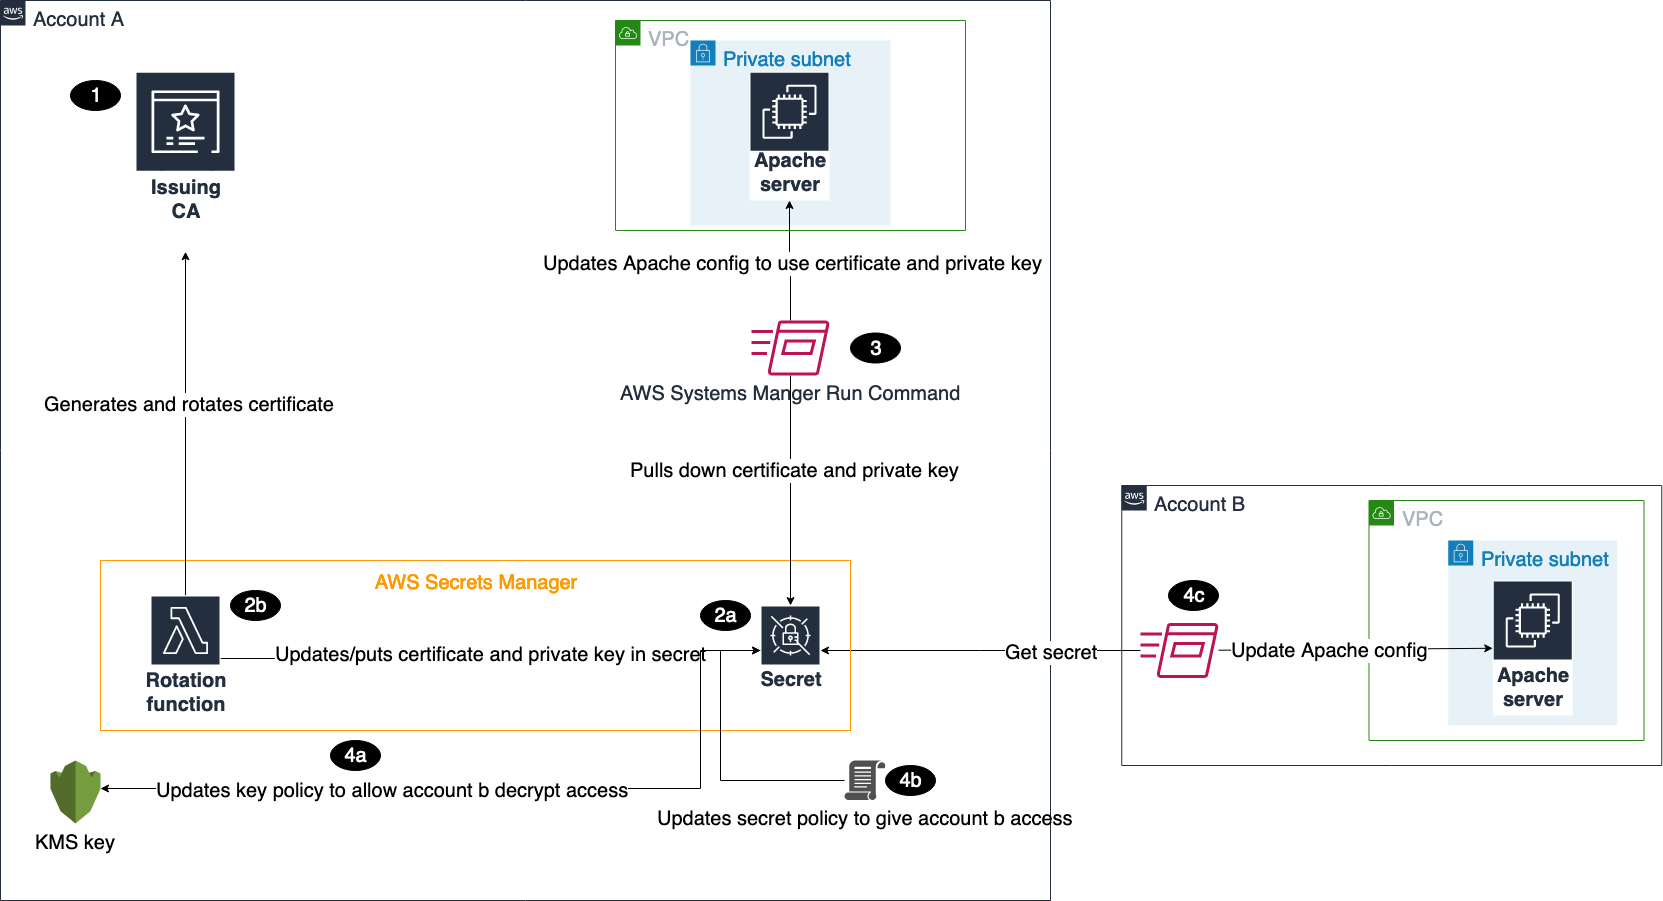
You’ll learn how to use AWS Lambda to export a client-side certificate from ACM Private CA and store it in AWS Secrets Manager. You’ll then see Envoy proxies in App Mesh retrieve the certificate from Secrets Manager and use it in an mTLS handshake. The solution is designed to ensure confidentiality of the private key of a client-side certificate, in transit and at rest, as it moves from ACM to Envoy.
The solution described in this blog post simplifies and allows you to automate the configuration and operations of mTLS-enabled App Mesh deployments, because all of the certificates are derived from a single managed private public key infrastructure (PKI) service—ACM Private CA—eliminating the need to run your own private PKI. The solution uses Amazon Elastic Container Services (Amazon ECS) with AWS Fargate as the App Mesh hosting environment, although the design presented here can be applied to any compute environment that is supported by App Mesh.
Solution overview
ACM Private CA provides a highly available managed private PKI service that enables creation of private CA hierarchies—including root and subordinate CAs—without the investment and maintenance costs of operating your own private PKI service. The service allows you to choose among several CA key algorithms and key sizes and makes it easier for you to export and deploy private certificates anywhere by using API-based automation.
App Mesh is a service mesh that provides application-level networking across multiple types of compute infrastructure. It standardizes how your microservices communicate, giving you end-to-end visibility and helping to ensure transport security and high availability for your applications. In order to communicate securely between mesh endpoints, App Mesh directs the Envoy proxy instances that are running within the mesh to use one-way or mutual TLS.
TLS provides authentication, privacy, and data integrity between two communicating endpoints. The authentication in TLS communications is governed by the PKI system. The PKI system allows certificate authorities to issue certificates that are used by clients and servers to prove their identity. The authentication process in TLS happens by exchanging certificates via the TLS handshake protocol. By default, the TLS handshake protocol proves the identity of the server to the client by using X.509 certificates, while the authentication of the client to the server is left to the application layer. This is called one-way TLS. TLS also supports two-way authentication through mTLS. In mTLS, in addition to the one-way TLS server authentication with a certificate, a client presents its certificate and proves possession of the corresponding private key to a server during the TLS handshake.
Example application
The following sections describe one-way and mutual TLS integrations between App Mesh and ACM Private CA in the context of an example application. This example application exposes an API to external clients that returns a text string name of a color—for example, “yellow”. It’s an extension of the Color App that’s used to demonstrate several existing App Mesh examples.
The example application is comprised of two services running in App Mesh—ColorGateway and ColorTeller. An external client request enters the mesh through the ColorGateway service and is proxied to the ColorTeller service. The ColorTeller service responds back to the ColorGateway service with the name of a color. The ColorGateway service proxies the response to the external client. Figure 1 shows the basic design of the application.
Figure 1: App Mesh services in the Color App example application
The two services are mapped onto the following constructs in App Mesh:
ColorGateway is mapped as a Virtual gateway. A virtual gateway in App Mesh allows resources that are outside of a mesh to communicate to resources that are inside the mesh. A virtual gateway represents Envoy deployed by itself. In this example, the virtual gateway represents an Envoy proxy that is running as an Amazon ECS service. This Envoy proxy instance acts as a TLS client, since it initiates TLS connections to the Envoy proxy that is running in the ColorTeller service.
ColorTeller is mapped as a Virtual node. A virtual node in App Mesh acts as a logical pointer to a particular task group. In this example, the virtual node—ColorTeller—runs as another Amazon ECS service. The service runs two tasks—an Envoy proxy instance and a ColorTeller application instance. The Envoy proxy instance acts as a TLS server, receiving inbound TLS connections from ColorGateway.
Let’s review running the example application in one-way TLS mode. Although optional, starting with one-way TLS allows you to compare the two methods and establish how to look at certain Envoy proxy statistics to distinguish and verify one-way TLS versus mTLS connections.
For practice, you can deploy the example application project in your own AWS account and perform the steps described in your own test environment.
Note: In both the one-way TLS and mTLS descriptions in the following sections, we’re using a flat certificate hierarchy for demonstration purposes. The root CAs are issuing end-entity certificates. The AWS ACM Private CA best practices recommend that root CAs should only be used to issue certificates for intermediate CAs. When intermediate CAs are involved, your certificate chain has multiple certificates concatenated in it, but the mechanisms are the same as those described here.
One-way TLS in App Mesh using ACM Private CA
Because this is a one-way TLS authentication scenario, you need only one Private CA—ColorTeller—and issue one end-entity certificate from it that’s used as the server-side certificate for the ColorTeller virtual node.
Figure 2, following, shows the architecture for this setup, including notations and color codes for certificates and a step-by-step process that shows how the system is configured and functions. Because this architecture uses a server-side certificate only, you use the native integration between App Mesh and ACM Private CA and don’t need an external mechanism for certificate integration.
Figure 2: One-way TLS in App Mesh integrated with ACM Private CA
The steps in Figure 2 are:
Step 1: A Private CA instance—ColorTeller—is created in ACM Private CA. Next, an end-entity certificate is created and signed by the CA. This certificate is used as the server-side certificate in ColorTeller.
Step 2: The CloudFormation templates configure the ColorGateway to validate server certificates against the ColorTeller private CA certificate chain. As the App Mesh endpoints are starting up, the ColorTeller CA certificate trust chain is ingested into the ColorGateway Envoy instance. The TLS configuration for ColorGateway in App Mesh is shown in Figure 3.
Figure 3: One-way TLS configuration in the client policy of ColorGateway
Figure 3 shows that the client policy attributes for outbound transport connections for ColorGateway have been configured as follows:
Enforce TLS is set to Enforced. This enforces use of TLS while communicating with backends.
TLSvalidation method is set to AWS Certificate Manager Private Certificate Authority (ACM-PCA hosting). This instructs App Mesh to derive the certificate trust chain from ACM PCA.
Certificate is set to the Amazon Resource Name (ARN) of the ColorTeller Private CA, which is the identifier of the certificate trust chain in ACM PCA.
This configuration ensures that ColorGateway makes outbound TLS-only connections towards ColorTeller, extracts the CA trust chain from ACM-PCA, and validates the server certificate presented by the ColorTeller virtual node against the configured CA ARN.
Step 3: The CloudFormation templates configure the ColorTeller virtual node with the ColorTeller end-entity certificate ARN in ACM Private CA. While the App Mesh endpoints are started, the ColorTeller end-entity certificate is ingested into the ColorTeller Envoy instance.
The TLS configuration for the ColorTeller virtual node in App Mesh is shown in Figure 4.
Figure 4: One-way TLS configuration in the listener configuration of ColorTeller
Figure 4 shows that various TLS-related attributes are configured as follows:
Enable TLS termination is on.
Mode is set to Strict to limit connections to TLS only.
TLS Certificate method is set to ACM Certificate Manager (ACM) hosting as the source of the end-entity certificate.
Certificate is set to ARN of the ColorTeller end-entity certificate.
Note: Figure 4 shows an annotation where the certificate ARN has been superimposed by the cert icon in green color. This icon follows the color convention from Figure 2 and can help you relate how the individual resources are configured to construct the architecture shown in Figure 2. The cert shown (and the associated private key that is not shown) in the diagram is necessary for ColorTeller to run the TLS stack and serve the certificate. The exchange of this material happens over the internal communications between App Mesh and ACM Private CA.
Step 4: The ColorGateway service receives a request from an external client.
Step 5: This step includes multiple sub-steps:
The ColorGateway Envoy initiates a one-way TLS handshake towards the ColorTeller Envoy.
The ColorTeller Envoy presents its server-side certificate to the ColorGateway Envoy.
The ColorGateway Envoy validates the certificate against its configured CA trust chain—the ColorTeller CA trust chain—and the TLS handshake succeeds.
Verifying one-way TLS
To verify that a TLS connection was established and that it is one-way TLS authenticated, run the following command on your bastion host:
This command queries the runtime statistics that are maintained in ColorTeller Envoy and filters the output for certain SSL-related counts. The count for ssl.handshake should be one. If the ssl.handshake count is more than one, that means there’s been more than one TLS handshake. The count for ssl.no_certificate should also be one, or equal to the count for ssl.handshake. The ssl.no_certificate count tracks the total successful TLS connections with no client certificate. Since this is a one-way TLS handshake that doesn’t involve client certificates, this count is the same as the count of ssl.handshake.
The preceding statistics verify that a TLS handshake was completed and the authentication was one-way, where the ColorGateway authenticated the ColorTeller but not vice-versa. You’ll see in the next section how the ssl.no_certificate count differs when mTLS is enabled.
Mutual TLS in App Mesh using ACM Private CA
In the one-way TLS discussion in the previous section, you saw that App Mesh and ACM Private CA integration works without needing external enhancements. You also saw that App Mesh retrieved the server-side end-entity certificate in ColorTeller and the root CA trust chain in ColorGateway from ACM Private CA internally, by using the native integration between the two services.
However, a native integration between App Mesh and ACM Private CA isn’t currently available for client-side certificates. Client-side certificates are necessary for mTLS. In this section, you’ll see how you can issue and export client-side certificates from ACM Private CA and ingest them into App Mesh.
The solution uses Lambda to export the client-side certificate from ACM Private CA and store it in Secrets Manager. The solution includes an enhanced startup script embedded in the Envoy image to retrieve the certificate from Secrets Manager and place it on the Envoy file system before the Envoy process is started. The Envoy process reads the certificate, loads it in memory, and uses it in the TLS stack for the client-side certificate exchange of the mTLS handshake.
The choice of Lambda is based on this being an ephemeral workflow that needs to run only during system configuration. You need a short-lived, runtime compute context that lets you run the logic for exporting certificates from ACM Private CA and store them in Secrets Manager. Because this compute doesn’t need to run beyond this step, Lambda is an ideal choice for hosting this logic, for cost and operational effectiveness.
The choice of Secrets Manager for storing certificates is based on the confidentiality requirements of the passphrase that is used for encrypting the private key (PKCS #8) of the certificate. You also need a higher throughput data store that can support secrets retrieval from large meshes. Secrets Manager supports a higher API rate limit than the API for exporting certificates from ACM Private CA, and thus serves as a high-throughput front end for ACM Private CA for serving certificates without compromising data confidentiality.
The resulting architecture is shown in Figure 5. The figure includes notations and color codes for certificates—such as root certificates, endpoint certificates, and private keys—and a step-by-step process showing how the system is configured, started, and functions at runtime. The example uses two CA hierarchies for ColorGateway and ColorTeller to demonstrate an mTLS setup where the client and server belong to separate CA hierarchies but trust each other’s CAs.
Figure 5: mTLS in App Mesh integrated with ACM Private CA
The numbered steps in Figure 5 are:
Step 1: A Private CA instance representing the ColorGateway trust hierarchy is created in ACM Private CA. Next, an end-entity certificate is created and signed by the CA, which is used as the client-side certificate in ColorGateway.
Step 2: Another Private CA instance representing the ColorTeller trust hierarchy is created in ACM Private CA. Next, an end-entity certificate is created and signed by the CA, which is used as the server-side certificate in ColorTeller.
Step 3: As part of running CloudFormation, the Lambda function is invoked. This Lambda function is responsible for exporting the client-side certificate from ACM Private CA and storing it in Secrets Manager. This function begins by requesting a random password from Secrets Manager. This random password is used as the passphrase for encrypting the private key inside ACM Private CA before it’s returned to the function. Generating a random password from Secrets Manager allows you to generate a random password with a specified complexity.
Step 4: The Lambda function issues an export certificate request to ACM, requesting the ColorGateway end-entity certificate. The request conveys the private key passphrase retrieved from Secrets Manager in the previous step so that ACM Private CA can use it to encrypt the private key that’s sent in the response.
Step 5: The ACM Private CA responds to the Lambda function. The response carries the following elements of the ColorGateway end-entity certificate.
Step 6: The Lambda function processes the response that is returned from ACM. It extracts individual fields in the JSON-formatted response and stores them in Secrets Manager. The Lambda function stores the following four values in Secrets Manager:
The ColorGateway endpoint certificate
The ColorGateway certificate trust chain, which contains the ColorGateway Private CA root certificate
The encrypted private key for the ColorGateway end-entity certificate
The passphrase that was used to encrypt the private key
Step 7: The App Mesh services—ColorGateway and ColorTeller—are started, which then start their Envoy proxy containers. A custom startup script embedded in the Envoy docker image fetches a certificate from Secrets Manager and places it on the Envoy file system.
Note: App Mesh publishes its own custom Envoy proxy Docker container image that ensures it is fully tested and patched with the latest vulnerability and performance patches. You’ll notice in the example source code that a custom Envoy image is built on top of the base image published by App Mesh. In this solution, we add an Envoy startup script and certain utilities such as AWS Command Line Interface (AWS CLI) and jq to help retrieve the certificate from Secrets Manager and place it on the Envoy file system during Envoy startup.
Step 8: The CloudFormation scripts configure the client policy for mTLS in ColorGateway in App Mesh, as shown in Figure 6. The following attributes are configured:
Provide client certificate is enabled. This ensures that the client certificate is exchanged as part of the mTLS handshake.
Certificate method is set to Local file hosting so that the certificate is read from the local file system.
Certificate chain is set to the path for the file that contains the ColorGateway certificate chain.
Private key is set to the path for the file that contains the private key for the ColorGateway certificate.
Figure 6: Client-side mTLS configuration in ColorGateway
At the end of the custom Envoy startup script described in step 7, the core Envoy process in ColorGateway service is started. It retrieves the ColorTeller CA root certificate from ACM Private CA and configures it internally as a trusted CA. This retrieval happens due to native integration between App Mesh and ACM Private CA. This allows ColorGateway Envoy to validate the certificate presented by ColorTeller Envoy during the TLS handshake.
Step 9: The CloudFormation scripts configure the listener configuration for mTLS in ColorTeller in App Mesh, as shown in Figure 7. The following attributes are configured:
Require client certificate is enabled, which enforces mTLS.
Validation Method is set to Local file hosting, which causes Envoy to read the certificate from the local file system.
Certificate chain is set to the path for the file that contains the ColorGateway certificate chain.
Figure 7: Server-side mTLS configuration in ColorTeller
At the end of the Envoy startup script described in step 7, the core Envoy process in ColorTeller service is started. It retrieves its own server-side end-entity certificate and corresponding private key from ACM Private CA. This retrieval happens internally, driven by the native integration between App Mesh and ACM Private CA. This allows ColorTeller Envoy to present its server-side certificate to ColorGateway Envoy during the TLS handshake.
The system startup concludes with this step, and the application is ready to process external client requests.
Step 10: The ColorGateway service receives a request from an external client.
Step 11: The ColorGateway Envoy initiates a TLS handshake with the ColorTeller Envoy. During the first half of the TLS handshake protocol, the ColorTeller Envoy presents its server-side certificate to the ColorGateway Envoy. The ColorGateway Envoy validates the certificate. Because the ColorGateway Envoy has been configured with the ColorTeller CA trust chain in step 8, the validation succeeds.
Step 12: During the second half of the TLS handshake, the ColorTeller Envoy requests the ColorGateway Envoy to provide its client-side certificate. This step is what distinguishes an mTLS exchange from a one-way TLS exchange.
The ColorGateway Envoy responds with its end-entity certificate that had been placed on its file system in step 7. The ColorTeller Envoy validates the received certificate with its CA trust chain, which contains the ColorGateway root CA that was placed on its file system (in step 7). The validation succeeds, and so an mTLS session is established.
Verifying mTLS
You can now verify that an mTLS exchange happened by running the following command on your bastion host.
The count for ssl.handshake should be one. If the ssl.handshake count is more than one, that means that you’ve gone through more than one TLS handshake. It’s important to note that the count for ssl.no_certificate—the total successful TLS connections with no client certificate—is zero. This shows that mTLS configuration is working as expected. Recall that this count was one or higher—equal to the ssl.handshake count—in the previous section that described one-way TLS. The ssl.no_certificate count being zero indicates that this was an mTLS authenticated connection, where the ColorGateway authenticated the ColorTeller and vice-versa.
Step 2: CloudWatch triggers a Lambda function that is responsible for certificate renewal.
Step 3: The Lambda function renews the certificate in ACM and exports the new certificate by calling ACM APIs.
Step 4: The Lambda function writes the certificate to Secrets Manager.
Step 5: The Lambda function triggers a new service deployment in an Amazon ECS cluster. This will cause the ECS services to go through a graceful update process to acquire a renewed certificate.
Step 6: The Envoy processes in App Mesh fetch the client-side certificate from Secrets Manager using external integration, and the server-side certificate from ACM using native integration.
Conclusion
In this post, you learned a method for enabling mTLS authentication between App Mesh endpoints based on certificates issued by ACM Private CA. mTLS enhances security of App Mesh deployments due to its bidirectional authentication capability. While server-side certificates are integrated natively, you saw how to use Lambda and Secrets Manager to integrate client-side certificates externally. Because ACM Private CA certificates aren’t eligible for managed renewal, you also learned how to implement an external certificate renewal process.
This solution enhances your App Mesh security posture by simplifying configuration of mTLS-enabled App Mesh deployments. It achieves this because all mTLS certificate requirements are met by a single, managed private PKI service—ACM Private CA—which allows you to centrally manage certificates and eliminates the need to run your own private PKI.
If you have feedback about this post, submit comments in the Comments section below. If you have questions about this post, start a new thread on the AWS Certificate Manager forum or contact AWS Support.
Want more AWS Security how-to content, news, and feature announcements? Follow us on Twitter.
A CRL is a list of certificates that have been revoked by the CA. Certificates can be revoked because they might have inadvertently been shared, or to discontinue their use, such as when someone leaves the company or an IoT device is decommissioned. In this solution, you use a combination of separate AWS accounts, Amazon S3 Block Public Access (BPA) settings, and a new parameter created by ACM Private CA called S3ObjectAcl to mark the CRL as private. This new parameter allows you to set the privacy of your CRL as PUBLIC_READ or BUCKET_OWNER_FULL_CONTROL. If you choose PUBLIC_READ, the CRL will be accessible over the internet. If you choose BUCKET_OWNER_FULL_CONTROL, then only the CRL S3 bucket owner can access it, and you will need to use Amazon CloudFront to serve the CRL stored in Amazon S3 using origin access identity (OAI). This is because most TLS implementations expect a public endpoint for access.
A best practice for Amazon S3 is to apply the principle of least privilege. To support least privilege, you want to ensure you have the BPA settings for Amazon S3 enabled. These settings deny public access to your S3 objects by using ACLs, bucket policies, or access point policies. I’m going to walk you through setting up your CRL as a private object in an isolated secondary account with BPA settings for access, and a CloudFront distribution with OAI settings enabled. This will confirm that access can only be made through the CloudFront distribution and not directly to your S3 bucket. This enables you to maintain your private CA in your primary account, accessible only by your public key infrastructure (PKI) security team.
As part of the private infrastructure setup, you will create a CloudFront distribution to provide access to your CRL. While not required, it allows access to private CRLs, and is helpful in the event you want to move the CRL to a different location later. However, this does come with an extra cost, so that’s something to consider when choosing to make your CRL private instead of public.
Prerequisites
For this walkthrough, you should have the following resources ready to use:
Two AWS accounts, with an AWS IAM role created that has Amazon S3, ACM Private CA, Amazon Route 53, and Amazon CloudFront permissions. One account will be for your private CA setup, the other will be for your CRL hosting.
The solution consists of creating an S3 bucket in an isolated secondary account, enabling all BPA settings, creating a CloudFront OAI, and a CloudFront distribution.
Figure 1: Solution flow diagram
As shown in Figure 1, the steps in the solution are as follows:
Set up the S3 bucket in the secondary account with BPA settings enabled.
Create the CloudFront distribution and point it to the S3 bucket.
Create your private CA in AWS Certificate Manager (ACM).
In this post, I walk you through each of these steps.
Deploying the CRL solution
In this section, you walk through each item in the solution overview above. This will allow access to your CRL stored in an isolated secondary account, away from your private CA.
To create your S3 bucket
Sign in to the AWS Management Console of your secondary account. For Services, select S3.
In the S3 console, choose Create bucket.
Give the bucket a unique name. For this walkthrough, I named my bucket example-test-crl-bucket-us-east-1, as shown in Figure 2. Because S3 buckets are unique across all of AWS and not just within your account, you must create your own unique bucket name when completing this tutorial. Remember to follow the S3 naming conventions when choosing your bucket name.
Figure 2: Creating an S3 bucket
Choose Next, and then choose Next again.
For Block Public Access settings for this bucket, make sure the Block all public access check box is selected, as shown in Figure 3.
Figure 3: S3 block public access bucket settings
Choose Create bucket.
Select the bucket you just created, and then choose the Permissions tab.
For Bucket Policy, choose Edit, and in the text field, paste the following policy (remember to replace each <user input placeholder> with your own value).
Select Bucket owner preferred, and then choose Save changes.
To create your CloudFront distribution
Still in the console of your secondary account, from the Services menu, switch to the CloudFront console.
Choose Create Distribution.
For Select a delivery method for your content, under Web, choose Get Started.
On the Origin Settings page, do the following, as shown in Figure 4:
For Origin Domain Name, select the bucket you created earlier. In this example, my bucket name is example-test-crl-bucket-us-east-1.s3.amazonaws.com.
For Restrict Bucket Access, select Yes.
For Origin Access Identity, select Create a New Identity.
For Comment enter a name. In this example, I entered access-identity-crl.
For Grant Read Permissions on Bucket, select Yes, Update Bucket Policy.
Leave all other defaults.
Figure 4: CloudFront Origin Settings page
Choose Create Distribution.
To create your private CA
(Optional) If you have already created a private CA, you can update your CRL pointer by using the update-certificate-authority API. You must do this step from the CLI because you can’t select an S3 bucket in a secondary account for the CRL home when you create the CRL through the console. If you haven’t already created a private CA, follow the remaining steps in this procedure.
Use a text editor to create a file named ca_config.txt that holds your CA configuration information. In the following example ca_config.txt file, replace each <user input placeholder> with your own value.
From the CLI configured with a credential profile for your primary account, use the create-certificate-authority command to create your CA. In the following example, replace each <user input placeholder> with your own value.
With the CA created, use the describe-certificate-authority command to verify success. In the following example, replace each <user input placeholder> with your own value.
You should see the CA in the PENDING_CERTIFICATE state. Use the get-certificate-authority-csr command to retrieve the certificate signing request (CSR), and sign it with your ACM private CA. In the following example, replace each <user input placeholder> with your own value.
Now that you have your CSR, use it to issue a certificate. Because this example sets up a ROOT CA, you will issue a self-signed RootCACertificate. You do this by using the issue-certificate command. In the following example, replace each <user input placeholder> with your own value. You can find all allowable values in the ACM PCA documentation.
Now that the certificate is issued, you can retrieve it. You do this by using the get-certificate command. In the following example, replace each <user input placeholder> with your own value.
Import the certificate ca_cert.pem into your CA to move it into the ACTIVE state for further use. You do this by using the import-certificate-authority-certificate command. In the following example, replace each <user input placeholder> with your own value.
Use a text editor to create a file named revoke_config.txt that holds your CRL information pointing to your CloudFront distribution ID. In the following example revoke_config.txt, replace each <user input placeholder> with your own value.
Update your CA CRL CNAME to point to the CloudFront distribution you created. You do this by using the update-certificate-authority command. In the following example, replace each <user input placeholder> with your own value.
You can use the describe-certificate-authority command to verify that your CA is in the ACTIVE state. After the CA is active, ACM generates your CRL periodically for you, and places it into your specified S3 bucket. It also generates a new CRL list shortly after you revoke any certificate, so you have the most updated copy.
Now that the PCA, CRL, and CloudFront distribution are all set up, you can test to verify the CRL is served appropriately.
To test that the CRL is served appropriately
Create a CSR to issue a new certificate from your PCA. In the following example, replace each <user input placeholder> with your own value. Enter a secure PEM password when prompted and provide the appropriate field data.
Note: Do not enter any values for the unused attributes, just press Enter with no value.
Issue a new certificate using the issue-certificate command. In the following example, replace each <user input placeholder> with your own value. You can find all allowable values in the ACM PCA documentation.
After issuing the certificate, you can use the get-certificate command retrieve it, parse it, then get the CRL URL from the certificate just like a PKI client would. In the following example, replace each <user input placeholder> with your own value. This command uses the JQ package.
The following are some of the security best practices for setting up and maintaining your private CA in ACM Private CA.
Place your root CA in its own account. You want your root CA to be the ultimate authority for your private certificates, limiting access to it is key to keeping it secure.
Minimize access to the root CA. This is one of the best ways of reducing the risk of intentional or unintentional inappropriate access or configuration. If the root CA was to be inappropriately accessed, all subordinate CAs and certificates would need to be revoked and recreated.
Keep your CRL in a separate account from the root CA. The reason for placing the CRL in a separate account is because some external entities—such as customers or users who aren’t part of your AWS organization, or external applications—might need to access the CRL to check for revocation. To provide access to these external entities, the CRL object and the S3 bucket need to be accessible, so you don’t want to place your CRL in the same account as your private CA.
You’ve now successfully set up your private CA and have stored your CRL in an isolated secondary account. You configured your S3 bucket with Block Public Access settings, created a custom URL through CloudFront, enabled OAI settings, and pointed your DNS to it by using Route 53. This restricts access to your S3 bucket through CloudFront and your OAI only. You walked through the setup of each step, from bucket configurations, hosted zone setup, distribution setup, and finally, private CA configuration and setup. You can now store your private CA in an account with limited access, while your CRL is hosted in a separate account that allows external entity access.
If you have feedback about this post, submit comments in the Comments section below. If you have questions about this post, start a new thread on the AWS Certificate Manager forum or contact AWS Support.
Want more AWS Security how-to content, news, and feature announcements? Follow us on Twitter.
In this blog post, we show you how to set up end-to-end encryption on Amazon Elastic Kubernetes Service (Amazon EKS) with AWS Certificate Manager Private Certificate Authority. For this example of end-to-end encryption, traffic originates from your client and terminates at an Ingress controller server running inside a sample app. By following the instructions in this post, you can set up an NGINX ingress controller on Amazon EKS. As part of the example, we show you how to configure an AWS Network Load Balancer (NLB) with HTTPS using certificates issued via ACM Private CA in front of the ingress controller.
AWS Private CA supports an open source plugin for cert-manager that offers a more secure certificate authority solution for Kubernetes containers. cert-manager is a widely-adopted solution for TLS certificate management in Kubernetes. Customers who use cert-manager for application certificate lifecycle management can now use this solution to improve security over the default cert-manager CA, which stores keys in plaintext in server memory. Customers with regulatory requirements for controlling access to and auditing their CA operations can use this solution to improve auditability and support compliance.
Solution components
Kubernetes is an open-source system for automating the deployment, scaling, and management of containerized applications.
Amazon EKS is a managed service that you can use to run Kubernetes on Amazon Web Services (AWS) without needing to install, operate, and maintain your own Kubernetes control plane or nodes.
cert-manager is an add on to Kubernetes to provide TLS certificate management. cert-manager requests certificates, distributes them to Kubernetes containers, and automates certificate renewal. cert-manager ensures certificates are valid and up-to-date, and attempts to renew certificates at an appropriate time before expiry.
ACM Private CA enables the creation of private CA hierarchies, including root and subordinate CAs, without the investment and maintenance costs of operating an on-premises CA. With ACM Private CA, you can issue certificates for authenticating internal users, computers, applications, services, servers, and other devices, and for signing computer code. The private keys for private CAs are stored in AWS managed hardware security modules (HSMs), which are FIPS 140-2 certified, providing a better security profile compared to the default CAs in Kubernetes. Private certificates help identify and secure communication between connected resources on private networks such as servers, mobile and IoT devices, and applications.
AWS Private CA Issuer plugin. Kubernetes containers and applications use digital certificates to provide secure authentication and encryption over TLS. With this plugin, cert-manager requests TLS certificates from Private CA. The integration supports certificate automation for TLS in a range of configurations, including at the ingress, on the pod, and mutual TLS between pods. You can use the AWS Private CA Issuer plugin with Amazon Elastic Kubernetes Service, self managed Kubernetes on AWS, and Kubernetes on-premises.
An AWS Application Load Balancer (ALB) when you create a Kubernetes Ingress.
An AWS Network Load Balancer (NLB) when you create a Kubernetes Service of type LoadBalancer.
Different points for terminating TLS in Kubernetes
How and where you terminate your TLS connection depends on your use case, security policies, and need to comply with regulatory requirements. This section talks about four different use cases that are regularly used for terminating TLS. The use cases are illustrated in Figure 1 and described in the text that follows.
Figure 1: Terminating TLS at different points
At the load balancer: The most common use case for terminating TLS at the load balancer level is to use publicly trusted certificates. This use case is simple to deploy and the certificate is bound to the load balancer itself. For example, you can use ACM to issue a public certificate and bind it with AWS NLB. You can learn more from How do I terminate HTTPS traffic on Amazon EKS workloads with ACM?
At the ingress: If there is no strict requirement for end-to-end encryption, you can offload this processing to the ingress controller or the NLB. This helps you to optimize the performance of your workloads and make them easier to configure and manage. We examine this use case in this blog post.
On the pod: In Kubernetes, a pod is the smallest deployable unit of computing and it encapsulates one or more applications. End-to-end encryption of the traffic from the client all the way to a Kubernetes pod provides a secure communication model where the TLS is terminated at the pod inside the Kubernetes cluster. This could be useful for meeting certain security requirements. You can learn more from the blog post Setting up end-to-end TLS encryption on Amazon EKS with the new AWS Load Balancer Controller.
Mutual TLS between pods: This use case focuses on encryption in transit for data flowing inside Kubernetes cluster. For more details on how this can be achieved with Cert-manager using an Istio service mesh, please see the Securing Istio workloads with mTLS using cert-manager blog post. You can use the AWS Private CA Issuer plugin in conjunction with cert-manager to use ACM Private CA to issue certificates for securing communication between the pods.
In this blog post, we use a scenario where there is a requirement to terminate TLS at the ingress controller level, demonstrating the second example above.
Figure 2 provides an overall picture of the solution described in this blog post. The components and steps illustrated in Figure 2 are described fully in the sections that follow.
Verify that you have the latest versions of these tools installed before you begin.
Provision an Amazon EKS cluster
If you already have a running Amazon EKS cluster, you can skip this step and move on to install NGINX Ingress.
You can use the AWS Management Console or AWS CLI, but this example uses eksctl to provision the cluster. eksctl is a tool that makes it easier to deploy and manage an Amazon EKS cluster.
This example uses the US-EAST-2 Region and the T2 node type. Select the node type and Region that are appropriate for your environment. Cluster provisioning takes approximately 15 minutes.
To provision an Amazon EKS cluster
Run the following eksctl command to create an Amazon EKS cluster in the us-east-2 Region with Kubernetes version 1.19 and two nodes. You can change the Region to the one that best fits your use case.
Run the following command to determine the address that AWS has assigned to your NLB:
$ kubectl get service -n ingress-nginx
NAME                                 TYPE           CLUSTER-IP      EXTERNAL-IP                                                                     PORT(S)                      AGE
ingress-nginx-controller             LoadBalancer   10.100.214.10   a3ebe22e7ca0522d1123456fbc92605c-8ac7f1d49be2fc42.elb.us-east-2.amazonaws.com   80:32598/TCP,443:30624/TCP   14s
ingress-nginx-controller-admission   ClusterIP      10.100.118.1    <none>                                                                          443/TCP                      14s
It can take up to 5 minutes for the load balancer to be ready. Once the external IP is created, run the following command to verify that traffic is being correctly routed to ingress-nginx:
curl http://a3ebe22e7ca0522d1123456fbc92605c-8ac7f1d49be2fc42.elb.us-east-2.amazonaws.com
<html>
<head><title>404 Not Found</title></head>
<body>
<center><h1>404 Not Found</h1></center>
<hr><center>nginx</center>
</body>
</html>
Note: Even though, it’s returning an HTTP 404 error code, in this case curl is still reaching the ingress controller and getting the expected HTTP response back.
Configure your DNS records
Once your load balancer is provisioned, the next step is to point the application’s DNS record to the URL of the NLB.
You can use your DNS provider’s console, for example Route53, and set a CNAME record pointing to your NLB. See CNAME record type for more details on how to setup a CNAME record using Route53.
This scenario uses the sample domain rsa-2048.example.com.
As you go through the scenario, replace rsa-2048.example.com with your registered domain.
Install cert-manager
cert-manager is a Kubernetes add-on that you can use to automate the management and issuance of TLS certificates from various issuing sources. It runs within your Kubernetes cluster and will ensure that certificates are valid and attempt to renew certificates at an appropriate time before they expire.
After you’ve deployed cert-manager, you can verify the installation by following these instructions. If all the above steps have completed without error, you’re good to go!
Note: If you’re planning to use Amazon EKS with Kubernetes pods running on AWS Fargate, please follow the cert-manager Fargate instructions to make sure cert-manager installation works as expected. AWS Fargate is a technology that provides on-demand, right-sized compute capacity for containers.
Install aws-privateca-issuer
The AWS PrivateCA Issuer plugin acts as an addon (see external cert configuration) to cert-manager that signs certificate requests using ACM Private CA.
To install aws-privateca-issuer
For installation, use the following helm commands:
Verify that the AWS Private CA Issuer is configured correctly by running the following command and ensure that it is in READY state with status as Running:
$ kubectl get pods --namespace aws-pca-issuer
NAME                                         READY   STATUS    RESTARTS   AGE
aws-pca-issuer-1622570742-56474c464b-j6k8s   1/1     Running   0          21s
You can check the chart configuration in the default values file.
Create an ACM Private CA
In this scenario, you create a private certificate authority in ACM Private CA with RSA 2048 selected as the key algorithm. You can create a CA using the AWS console, AWS CLI, or AWS CloudFormation.
To create an ACM Private CA
Download the CA certificate using the following command. Replace the <CA_ARN> and <Region> values with the values from the CA you created earlier and save it to a file named cacert.pem:
aws acm-pca get-certificate-authority-certificate --certificate-authority-arn <CA_ARN> -- region <region> --output text > cacert.pem
Once your private CA is active, you can proceed to the next step. You private CA will look similar to the CA in Figure 3.
Figure 3: Sample ACM Private CA
Set EKS node permission for ACM Private CA
In order to issue a certificate from ACM Private CA, add the IAM policy from the prerequisites to your EKS NodeInstanceRole. Replace the <CA_ARN> value with the value from the CA you created earlier:
Now that the ACM Private CA is active, you can begin requesting private certificates which can be used by Kubernetes applications. Use aws-privateca-issuer plugin to create the ClusterIssuer, which will be used with the ACM PCA to issue certificates.
Issuers (and ClusterIssuers) represent a certificate authority from which signed x509 certificates can be obtained, such as ACM Private CA. You need at least one Issuer or ClusterIssuer before you can start requesting certificates in your cluster. There are two custom resources that can be used to create an Issuer inside Kubernetes using the aws-privateca-issuer add-on:
AWSPCAIssuer is a regular namespaced issuer that can be used as a reference in your Certificate custom resources.
AWSPCAClusterIssuer is specified in exactly the same way, but it doesn’t belong to a single namespace and can be referenced by certificate resources from multiple different namespaces.
To create an Issuer in Amazon EKS
For this scenario, you create an AWSPCAClusterIssuer. Start by creating a file named cluster-issuer.yaml and save the following text in it, replacing <CA_ARN> and <Region> information with your own.
Verify the installation and make sure that the following command returns a Kubernetes service of kind AWSPCAClusterIssuer:
$ kubectl get AWSPCAClusterIssuer
NAME                AGE
demo-test-root-ca   51s
Request the certificate
Now, you can begin requesting certificates which can be used by Kubernetes applications from the provisioned issuer. For more details on how to specify and request Certificate resources, please check Certificate Resources guide.
To request the certificate
As a first step, create a new namespace that contains your application and secret:
$ kubectl create namespace acm-pca-lab-demo
namespace/acm-pca-lab-demo created
Next, create a basic X509 private certificate for your domain. Create a file named rsa-2048.yaml and save the following text in it. Replace rsa-2048.example.com with your domain.
For the purpose of this scenario, you can create a new service—a simple “hello world” website that uses echoheaders that respond with the HTTP request headers along with some cluster details.
To deploy a demo application
Create a new file named hello-world.yaml with below content:
You should see an output similar to the following:
Hostname: hello-world-d8fbd49c6-9bczb

Pod Information:
	-no pod information available-

Server values:
	server_version=nginx: 1.13.3 - lua: 10008

Request Information:
	client_address=192.162.32.64
	method=GET
	real path=/
	query=
	request_version=1.1
	request_scheme=http
	request_uri=http://rsa-2048.example.com:8080/

Request Headers:
	accept=*/*
	host=rsa-2048.example.com
	user-agent=curl/7.62.0
	x-forwarded-for=52.94.2.2
	x-forwarded-host=rsa-2048.example.com
	x-forwarded-port=443
	x-forwarded-proto=https
	x-real-ip=52.94.2.2
	x-request-id=371b6fc15a45d189430281693cccb76e
	x-scheme=https

Request Body:
	-no body in request-…
This response is returned from the service running behind the Kubernetes Ingress controller and demonstrates that a successful TLS handshake happened at port 443 with https protocol.
You can use the following command to verify that the certificate issued earlier is being used for the SSL handshake:
You can also clean up from your Cloudformation console by deleting the stacks named eksctl-acm-pca-lab-nodegroup-acm-pca-nlb-lab-workers and eksctl-acm-pca-lab-cluster.
If you have feedback about this post, submit comments in the Comments section below. If you have questions about this post, start a new thread on the AWS Certificate Manager forum or contact AWS Support.
Want more AWS Security how-to content, news, and feature announcements? Follow us on Twitter.
In this post, I will explain how you can use ACM Private CA with AWS CloudHSM to operate a hybrid public key infrastructure (PKI) in which the root CA is in CloudHSM, and the subordinate CAs are in ACM Private CA. In this configuration your root CA is portable, meaning that it can be securely moved outside of the AWS Region in which it was created.
Important: This post assumes that you are familiar with the ideas of CA trust and hierarchy. The example in this post uses an advanced hybrid configuration for operating PKI.
The Challenge
The root CA private key of your CA hierarchy represents the anchor of trust for all CAs and end entities that use certificates from that hierarchy. A root CA private key generated by ACM Private CA cannot be exported or transferred to another party. You may require the flexibility to move control of your root CA in the future. Situations where you may want to move control of a root CA include cases such as a divestiture of a corporate division or a major corporate reorganization. In this post, I will describe one solution for a hybrid PKI architecture that allows you to take advantage of the availability of ACM Private CA for certificate issuance, while maintaining the flexibility offered by having direct control and portability of your root CA key. The solution I detail in this post uses CloudHSM to create a root CA key that is predominantly kept inactive, along with a signed subordinate CA that is created and managed online in ACM Private CA that you can use for regular issuing of further subordinate or end-entity certificates. In the next section, I show you how you can achieve this.
The hybrid ACM Private CA and CloudHSM solution
With AWS CloudHSM, you can create and use your own encryption keys that use FIPS 140-2 Level 3 validated HSMs. CloudHSM offers you the flexibility to integrate with your applications by using standard APIs, such as PKCS#11. Most importantly for this solution is that CloudHSM offers a suite of standards-compliant SDKs for you to create, export, and import keys. This can make it easy for you to securely exchange your keys with other commercially-available HSMs, as long as your configurations allow it.”
By using AWS CloudHSM to store and perform cryptographic operations with root CA private key, and by using ACM Private CA to manage a first-level subordinate CA key, you maintain a fully cloud-based infrastructure while still retaining access to – and control over – your root CA key pairs. You can keep the key pair of the root in CloudHSM, where you have the ability to escrow the keys, and only generate and use subordinate CAs in ACM Private CA. Figure 1 shows the high-level architecture of this solution.
Figure 1: Architecture overview of portable root CA with AWS CloudHSM and ACM Private CA
Note: The solution in this post creates the root CA and Subordinate CA 0a but does not demonstrate the steps to use Subordinate CA 0a to issue the remainder of the key hierarchy that is depicted in Figure 1.
This architecture relies on a root CA that you create and manage with AWS CloudHSM. The root CA is generally required for use in the following circumstances:
When you create the PKI.
When you need to replace a root CA.
When you need to configure a certificate revocation list (CRL) or Online Certificate Status Protocol (OCSP).
A single direct subordinate intermediate CA is created and managed with AWS ACM Private CA, which I will refer to as the primary subordinate CA, (Subordinate CA 0a in Figure 1). A certificate signing request (CSR) for this primary subordinate CA is then provided to the CloudHSM root CA, and the signed certificate and certificate chain is then imported to ACM Private CA. The primary subordinate CA in ACM Private CA is issued with the same validity duration as the CloudHSM root CA and in day-to-day practice plays the role of a root CA, acting as the single issuer of additional subordinate CAs. These second-level subordinate CAs (Subordinate CA 0b, Subordinate CA 1b, and Subordinate CA 2b in Figure 1) must be issued with a shorter validity period than the root CA or the primary subordinate CA, and may be used as typical subordinate CAs issuing end-entity certificates or further subordinate CAs as appropriate.
The root CA private key that is stored in CloudHSM can be exported to other commercially-available HSMs through a secure key export process if required, or can be taken offline. The CloudHSM cluster can be shut down, and the root CA private key can be securely retained in a CloudHSM backup. In the event that the root CA must be used, a CloudHSM cluster can be provisioned on demand, and the backup restored temporarily.
Prerequisites
To follow this walkthrough, you need to have the following in place:
An Amazon Linux 2 Amazon Elastic Compute Cloud (Amazon EC2) instance. For ease of setup and access AWS Cloud9 can be used to provide a cloud-based environment running on a managed Amazon EC2 instance.
A crypto user (CU) on the HSM to perform the steps in this post.
Process
In this post, you will create an ACM Private CA subordinate CA that is chained to a root CA that is created and managed with AWS CloudHSM. The high-level steps are as follows:
Create a root CA with AWS CloudHSM
Create a subordinate CA in ACM Private CA
Sign your subordinate CA with your root CA
Import the signed subordinate CA certificate in ACM Private CA
Remove any unused CloudHSM resources to reduce cost
To create a root CA with AWS CloudHSM
To install the AWS CloudHSM dynamic engine for OpenSSL on Amazon Linux 2, open a terminal on your Amazon Linux 2 EC2 instance and enter the following commands:
Note: This process exports a fake PEM private key from the HSM and saves it to a file. This file contains a reference to the private key that is stored on the HSM; it doesn’t contain the actual private key. You can use this fake PEM private key file and the AWS CloudHSM engine for OpenSSL to perform CA operations using the referenced private key within the HSM.
To generate a CSR for your certificate using the AWS CloudHSM dynamic engine for OpenSSL, enter the following command:
When prompted, enter your values for Country Name, State or Province Name, Locality Name, Organization Name, Organizational Unit Name, and Common Name. For the purposes of this walkthrough, you can leave the other fields blank.
Figure 2 shows an example result of running the command.
Figure 2: An example certificate signing request for your private key using AWS CloudHSM dynamic engine for OpenSSL
To sign your root CA with its own private key using the AWS CloudHSM dynamic engine for OpenSSL, enter the following command:
To create a CA configuration file for your subordinate CA, open a terminal on your Amazon Linux 2 EC2 instance and enter the following command. Replace each user input placeholder with your own information.
To retrieve the certificate signing request (CSR) for your subordinate CA, open a terminal on your Amazon Linux 2 EC2 instance and enter the following command. Replace each user input placeholder with your own information.
When you are ready to implement the solution in this post, you will need to create a root CA configuration file for signing the CSR for your subordinate CA. Details of your X.509 infrastructure, and the CA hierarchy within it, are beyond the scope of this post.
To sign the CSR for your subordinate CA using the sample minimalist CA application OpenSSL-CA, enter the following command:
To import the private CA certificate into ACM Private CA, open a terminal on your Amazon Linux 2 EC2 instance and enter the following command. Replace each user input placeholder with your own information.
After you import your subordinate CA, it is available for use in ACM Private CA. You can configure the subordinate CA with the same validity period as the root CA, so that you can automate CA certificate management using and renewals using ACM without requiring regular access to the root CA. Typically you will create one or more intermediate issuing CAs with a shorter lifetime that chain up to the subordinate CA.
If you have enabled OCSP or CRL for your CA, you will need to maintain your CloudHSM in an active state in order to access the root CA private key for these functions. However, if you have no immediate need to access the root CA you can safely remove the CloudHSM resources while preserving your AWS CloudHSM cluster’s users, policies, and keys in an CloudHSM cluster backup stored encrypted in Amazon Simple Storage Service (Amazon S3).
To remove the CloudHSM resources
(Optional) If you don’t know the ID of the cluster that contains the HSM that you are deleting, or your HSM IP address, open a terminal on your Amazon Linux 2 EC2 instance and enter the describe-clusters command to find them.
Enter the following command, replacing cluster ID with the ID of the cluster that contains the HSM that you are deleting, and replacing HSM IP address with your HSM IP address.
aws cloudhsmv2 delete-hsm --cluster-id cluster ID --eni-ip HSM IP address
To disable expiration of your automatically generated CloudHSM backup
(Optional) If you don’t know the value for your backup ID, open a terminal on your Amazon Linux 2 EC2 instance and enter the describe-backups command to find it.
Enter the following command, replacing backup ID with the ID of the backup for your cluster.
aws cloudhsmv2 modify-backup-attributes --backup-id backup ID --never-expires
Later, when you do need to access your root CA private key in a CloudHSM, create a new HSM in the same cluster, and this action will restore the backup you previously created with the delete HSM operation.
Depending on your particular needs, you may also want to securely export a copy of the root CA private key to an offsite HSM by using key wrapping. You may need to do this to meet your requirements for managing the CA using another HSM or you may want to copy a cluster backup to a different AWS Region for disaster recovery purposes.
Summary
In this post, I explained an approach to establishing a PKI infrastructure using Amazon Certificate Manager Private Certificate Authority (ACM Private CA) with portable root CA private keys created and managed with AWS CloudHSM. This approach allows you to meet specific requirements for root CA portability that cannot be met by ACM Private CA alone. Before adopting this approach in production, you should carefully consider whether a portable root CA is a requirement for your use case, and review the ACM Private CA guide for Planning a Private CA.
If you have feedback about this post, submit comments in the Comments section below. If you have questions about this post, start a new thread on the AWS Certificate Manager forum or contact AWS Support.
Want more AWS Security how-to content, news, and feature announcements? Follow us on Twitter.
As customers migrate workloads into Amazon Web Services (AWS) they may be running a combination of on-premises and cloud infrastructure. When certificates are issued to this infrastructure, having a common root of trust to the certificate hierarchy allows for consistency and interoperability of the Public Key Infrastructure (PKI) solution.
In this blog post, I am going to show how you can plan and deploy a PKI that enables certificates to be issued across a hybrid (cloud & on-premises) environment with a common root. This solution will use Windows Server Certificate Authority (Windows CA), also known as Active Directory Certificate Services (ADCS) to distribute and manage x.509 certificates for Active Directory users, domain controllers, routers, workstations, web servers, mobile and other devices. And an AWS Certificate Manager Private Certificate Authority (ACM PCA) to manage certificates for AWS services, including API Gateway, CloudFront, Elastic Load Balancers, and other workloads.
The Windows CA also integrates with AWS Cloud HSM to securely store the private keys that sign the certificates issued by your CAs, and use the HSM to perform the cryptographic signing operations. In Figure 1, the diagram below shows how ACM PCA and Windows CA can be used together to issue certificates across a hybrid environment.
Figure 1: Hybrid PKI hierarchy
PKI is a framework that enables a safe and trustworthy digital environment through the use of a public and private key encryption mechanism. PKI maintains secure electronic transactions on the internet and in private networks. It also governs the verification, issuance, revocation, and validation of individual systems in a network.
This blog post focuses on the implementation of a private PKI, to issue and manage private certificates.
When implementing a PKI, there can be challenges from security, infrastructure, and operations standpoints, especially when dealing with workloads across multiple platforms. These challenges include managing isolated PKIs for individual networks across on-premises and AWS cloud, managing PKI with no Hardware Security Module (HSM) or on-premises HSM, and lack of automation to rapidly scale the PKI servers to meet demand.
Figure 2 shows how an internal PKI can be limited to a single network. In the following example, the root CA, issuing CAs, and certificate revocation list (CRL) distribution point are all in the same network, and issue cryptographic certificates only to users and devices in the same private network.
Figure 2: On-premises PKI hierarchy in a single network
Planning for your PKI system deployment
It’s important to carefully consider your business requirements, encryption use cases, corporate network architecture, and the capabilities of your internal teams. You must also plan for how to manage the confidentiality, integrity, and availability of the cryptographic keys. These considerations should guide the design and implementation of your new PKI system.
In the below section, we outline the key services and components used to design and implement this hybrid PKI solution.
Key services and components for this hybrid PKI solution
AWS CloudHSM offers a cloud-based hardware security module (HSM) to process cryptographic operations and provide secure storage for encryption keys. CloudHSM integrates with third-party systems, such as Windows Server CA, and automatically sends its audit logs to Amazon CloudWatch Logs.
Amazon Simple Storage Service (Amazon S3) is an object storage service. In this solution, you use it as the PKI CRL distribution point (CDP) to store the CRL and authority information access (AIA).
Amazon Virtual Private Cloud (Amazon VPC) lets you provision a logically isolated section of the AWS Cloud, where you can launch AWS resources in a virtual network that you create and manage. Your Windows CA servers for this solution are hosted in Amazon VPC.
Amazon Elastic Compute Cloud (Amazon EC2) is a web service that provides secure, resizable compute instances in the cloud. Amazon EC2 instances are used to install and run your Windows AD CS, which provides the CA.
Network Load Balancer distributes incoming traffic across multiple targets, such as Amazon EC2 instances. A Network Load Balancer is used to increase the availability of your PKI solution by distributing network traffic among your Windows PKI instances across multiple Availability Zones (AZs).
This hybrid PKI can be used if you need a new private PKI, or want to upgrade from an existing legacy PKI with a cryptographic service provider (CSP) to a secure PKI with Windows Cryptography Next Generation (CNG). The hybrid PKI design allows you to seamlessly manage cryptographic keys throughout the IT infrastructure of your organization, from on-premises to multiple AWS networks.
Figure 3: Hybrid PKI solution architecture
The solution architecture is depicted in the preceding figure—Figure 3. The solution uses an offline root CA that can be operated on-premises or in an Amazon VPC, while the subordinate Windows CAs run on EC2 instances and are integrated with CloudHSM for key management and storage. To insulate the PKI from external access, the CloudHSM cluster are deployed in protected subnets, the EC2 instances are deployed in private subnets, and the host VPC has site-to-site network connectivity to the on-premises network. The Amazon EC2 volumes are encrypted with AWS KMS customer managed keys. Users and devices connect and enroll to the PKI interface through a Network Load Balancer.
This solution also includes a subordinate ACM private CA to issue certificates that will be installed on AWS services that are integrated with ACM. For example, ELB, CloudFront, and API Gateway. This is so that the certificates users see are always presented from your organization’s internal PKI.
Prerequisites for deploying this hybrid internal PKI in AWS
Experience with AWS Cloud, Windows Server, and AD CS is necessary to deploy and configure this solution.
An offline root CA, running on Windows 2016 or newer, to sign the CloudHSM and the issuing CAs, including the private CA and Windows CAs. Here is an AWS Quick-Start article to deploy your Root CA in a VPC. We recommend installing the Windows Root CA in its own AWS account.
A VPC with at least four subnets. Two or more public subnets and two or more private subnets, across two or more AZs, with secure firewall rules, such as HTTPS to communicate with your PKI web servers through a load balancer, along with DNS, RDP and other port to communicate within your organization network. You can use this CloudFormation sample VPC template to help you get started with your PKI VPC provisioning.
Site-to-site AWS Direct Connect or VPN connection from your VPC to the on-premises network and other VPCs to securely manage multiple networks.
Windows 2016 EC2 instances for the subordinate CAs.
The below CloudFormation Code and instructions will help you deploy and configure all the AWS components shown in the above architecture diagram. To implement the solution, you’ll deploy a series of CloudFormation templates through the AWS Management Console.
If you’re not familiar with CloudFormation, you can learn about it from Getting started with AWS CloudFormation. The templates for this solution can be deployed with the CloudFormation console, AWS Service Catalog, or a code pipeline.
Download and review the template bundle
To make it easier to deploy the components of this internal PKI solution, you download and deploy a template bundle. The bundle includes a set of CloudFormation templates, and a PowerShell script to complete the integration between CloudHSM and the Windows CA servers.
There are additional costs for resources deployed by this solution. The resources include: CloudHSM, ACM PCA, ELB, EC2s, S3, and KMS.
Review the descriptions in each template for more instructions.
Deploy the CloudFormation templates
Now that you have the templates downloaded, use the CouldFormation console to deploy them.
To deploy the VPC modification template
Deploy this template into an existing VPC to create the protected subnets to deploy a CloudHSM cluster.
Navigate to the CloudFormation console.
Select the appropriate AWS Region, and then choose Create Stack.
Choose Upload a template file.
Select 01_PKI_Automated-VPC_Modifications.yaml as the CloudFormation stack file, and then choose Next.
On the Specify stack details page, enter a stack name and the parameters. Some parameters have a dropdown list that you can use to select existing values.
Figure 4: Example of a Specify stack details page
Choose Next, Next, and Create Stack.
To deploy the PKI CDP S3 bucket template
This template creates an S3 bucket for the CRL and AIA distribution point, with initial bucket policies that allow access from the PKI VPC, and PKI users and devices from your on-premises network, based on your input. To grant access to additional AWS accounts, VPCs, and on-premises networks, please refer to the instructions in the template.
Navigate to the CloudFormation console.
Choose Upload a template file.
Select 02_PKI_Automated-Central-PKI_CDP-S3bucket.yaml as the CloudFormation stack file, and then choose Next.
On the Specify stack details page, enter a stack name and the parameters.
Choose Next, Next, and Create Stack
To deploy the ACM Private CA subordinate template
This step provisions the ACM private CA, which is signed by an existing Windows root CA. Provisioning your private CA with CloudFormation makes it possible to sign the CA with a Windows root CA.
Navigate to the CloudFormation console.
Choose Upload a template file.
Select 03_PKI_Automated-ACMPrivateCA-Provisioning.yaml as the CloudFormation stack file, and then choose Next.
On the Specify stack details page, enter a stack name and the parameters. Some parameters have a dropdown list that you can use to select existing values.
Choose Next, Next, and Create Stack.
Assign and configure certificates
After deploying the preceding templates, use the console to assign certificate renewal permissions to ACM and configure your certificates.
To assign renewal permissions
In the ACM Private CA console, choose Private CAs.
Select your private CA from the list.
Choose the Permissions tab.
Select Authorize ACM to use this CA for renewals.
Choose Save.
To sign private CA certificates with an external CA (console)
In the ACM Private CA console, select your private CA from the list.
From the Actions menu, choose Import CA certificate. The ACM Private CA console returns the certificate signing request (CSR).
Choose Export CSR to a file and save it locally.
Choose Next.
Use your existing Windows root CA.
Copy the CSR to the root CA and sign it.
Export the signed CSR in base64 format.
Export the <RootCA>.crt certificate in base64 format.
On the Upload the certificates page, upload the signed CSR and the RootCA certificates.
Choose Confirm and Import to import the private CA certificate.
To request a private certificate using the ACM console
Note: Make a note of IDs of the certificate you configure in this section to use when you deploy the HTTPS listener CloudFormation templates.
Sign in to the console and open the ACM console.
Choose Request a certificate.
On the Request a certificate page, choose Request a private certificate and Request a certificate to continue.
On the Select a certificate authority (CA) page, choose Select a CA to view the list of available private CAs.
Choose Next.
On the Add domain names page, enter your domain name. You can use a fully qualified domain name, such as www.example.com, or a bare—also called apex—domain name such as example.com. You can also use an asterisk (*) as a wild card in the leftmost position to include all subdomains in the same root domain. For example, you can use *.example.com to include all subdomains of the root domain example.com.
To add another domain name, choose Add another name to this certificate and enter the name in the text box.
(Optional) On the Add tags page, tag your certificate.
When you finish adding tags, choose Review and request.
If the Review and request page contains the correct information about your request, choose Confirm and request.
With the certificates assigned and configured, you can complete the deployment of the CloudFormation templates for this solution.
To deploy the Network Load Balancer template
In this step, you provision a Network Load Balancer.
Navigate to the CloudFormation console.
Choose Upload a template file.
Select 05_PKI_Automated-LoadBalancer-Provisioning.yaml as the CloudFormation stack file, and then choose Next.
On the Specify stack details page, enter a stack name and the parameters. Some parameters are filled in automatically or have a dropdown list that you can use to select existing values.
Choose Next, Next, and Create Stack.
To deploy the HTTPS listener configuration template
The following steps create the HTTPS listener with an initial configuration for the load balancer.
Navigate to the CloudFormation console:
Choose Upload a template file.
Select 06_PKI_Automated-HTTPS-Listener.yaml as the CloudFormation stack file, and then choose Next.
On the Specify stack details page, enter the stack name and the parameters. Some parameters are filled in automatically or have a dropdown list that you can use to select existing values.
Choose Next, Next, and Create Stack.
To deploy the AWS KMS CMK template
In this step, you create an AWS KMS CMK to encrypt EC2 EBS volumes and other resources. This is required for the EC2 instances in this solution.
Open the CloudFormation console.
Choose Upload a template file.
Select 04_PKI_Automated-KMS_CMK-Creation.yaml as the CloudFormation stack file, and then choose Next.
On the Specify stack details page, enter a stack name and the parameters.
Choose Next, Next, and Create Stack.
To deploy the Windows EC2 instances provisioning template
This template provisions a purpose-built Windows EC2 instance within an existing VPC. It will provision an EC2 instance for the Windows CA, with KMS to encrypt the EBS volume, an IAM instance profile and automatically installs SSM agent on your instance.
It also has optional features and flexibilities. For example, the template can automatically create new target group, or add instance to existing target group. It can also configure listener rules, create Route 53 records and automatically join an Active Directory domain.
Note: The AWS KMS CMK and the IAM role are required to provision the EC2, while the target group, listener rules, and domain join features are optional.
Navigate to the CloudFormation console.
Choose Upload a template file.
Select 07_PKI_Automated-EC2-Servers-Provisioning.yaml as the CloudFormation stack file, and then choose Next.
On the Specify stack details page, enter the stack name and the parameters. Some parameters are filled in automatically or have a dropdown list that you can use to select existing values.
Note: The Optional properties section at the end of the parameters list isn’t required if you’re not joining the EC2 instance to an Active Directory domain.
Choose Next, Next, and Create Stack.
Create and initialize a CloudHSM cluster
In this section, you create and configure CloudHSM within the VPC subnets provisioned in previous steps. After the CloudHSM cluster is completed and signed by the Windows root CA, it will be integrated with the EC2 Windows servers provisioned in previous sections.
Open the console and go to the CloudHSM cluster you created in the preceding step.
Choose Initialize.
Select an AZ for the HSM that you’re creating, and then choose Create.
To download and sign a CSR
Before you can initialize the cluster, you must download and sign a CSR generated by the first HSM of the cluster.
Open the CloudHSM console.
Choose Initialize next to the cluster that you created previously.
When the CSR is ready, select Cluster CSR to download it.
Figure 5: Download CSR
To initialize the cluster
Open the CloudHSM console.
Choose Initialize next to the cluster that you created previously.
On the Download certificate signing request page, choose Next. If Next is not available, choose one of the CSR or certificate links, and then choose Next.
On the Sign certificate signing request (CSR) page, choose Next.
Use your existing Windows root CA.
Copy the CSR to the root CA and sign it.
Export the signed CSR in base64 format.
Also export the <RootCA>.crt certificate in base64 format.
On the Upload the certificates page, upload the signed CSR and the root CA certificates.
Choose Upload and initialize.
Integrate CloudHSM cluster to Windows Server AD CS
In this section you use a script that provides step-by-step instructions to help you successfully integrate your Windows Server CA with AWS CloudHSM.
To integrate CloudHSM cluster to Windows Server AD CS
Open the script 09_PKI_AWS_CloudHSM-Windows_CA-Integration-Playbook.txt and follow the instructions to complete the CloudHSM integration with the Windows servers.
By deploying the hybrid solution in this post, you’ve implemented a PKI to manage security across all workloads in your AWS accounts and in your on-premises network.
With this solution, you can use a private CA to issue Transport Layer Security (TLS) certificates to your Application Load Balancers, Network Load Balancers, CloudFront, and other AWS workloads across multiple accounts and VPCs. The Windows CA lets you enhance your internal security by binding your internal users, digital devices, and applications to appropriate private keys. You can use this solution with TLS, Internet Protocol Security (IPsec), digital signatures, VPNs, wireless network authentication, and more.
When you manage the lifecycle of certificates, it’s important to follow best practices. You can think of a certificate as an identity of a service you’re connecting to. You have to ensure that these identities are secure and up to date, ideally with the least amount of manual intervention. AWS Secrets Manager provides a mechanism for managing certificates, and other secrets, at scale. Specifically, you can configure secrets to automatically rotate on a scheduled basis by using pre-built or custom AWS Lambda functions, encrypt them by using AWS Key Management Service (AWS KMS) keys, and automatically retrieve or distribute them for use in applications and services across an AWS environment. This reduces the overhead of manually managing the deployment, creation, and secure storage of these certificates.
In this post, you’ll learn how to use Secrets Manager to manage and distribute certificates created by ACM PCA across AWS Regions and accounts.
We present two use cases in this blog post to demonstrate the difference between issuing private certificates with ACM and with ACM PCA. For the first use case, you will create a certificate by using the ACM defaults for private certificates. You will then deploy the ACM default certificate to an Amazon Elastic Compute Cloud (Amazon EC2) instance that is launched in the same account as the secret and private CA. In the second scenario, you will create a custom certificate by using ACM PCA templates and parameters. This custom certificate will be deployed to an EC2 instance in a different account to demonstrate cross-account sharing of secrets.
Solution overview
Figure 1 shows the architecture of our solution.
Figure 1: Solution architecture
This architecture includes resources that you will create during the blog walkthrough and by using AWS CloudFormation templates. This architecture outlines how these services can be used in a multi-account environment. As shown in the diagram:
You create a certificate authority (CA) in ACM PCA to generate end-entity certificates.
In the account where the issuing CA was created, you create secrets in Secrets Manager.
There are several required parameters that you must provide when creating secrets, based on whether you want to create an ACM or ACM PCA issued certificate. These parameters will be passed to our Lambda function to make sure that the certificate is generated and stored properly.
The Lambda rotation function created by the CloudFormation template is attached when configuring secrets rotation. Initially, the function generates two Privacy-Enhanced Mail (PEM) encoded files containing the certificate and private key, based on the provided parameters, and stores those in the secret. Subsequent calls to the function are made when the secret needs to be rotated, and then the function stores the resulting Certificate PEM and Private Key PEM in the desired secret. The function is written using Python, the AWS SDK for Python (Boto3), and OpenSSL. The flow of the function follows the requirements for rotating secrets in Secrets Manager.
The first CloudFormation template creates a Systems Manager Run Command document that can be invoked to install the certificate and private key from the secret on an Apache Server running on EC2 in Account A.
The second CloudFormation template deploys the same Run Command document and EC2 environment in Account B.
To make sure that the account has the ability to pull down the certificate and private key from Secrets Manager, you need to update the key policy in Account A to give Account B access to decrypt the secret.
You also need to add a resource-based policy to the secret that gives Account B access to retrieve the secret from Account A.
Once the proper access is set up in Account A, you can use the Run Command document to install the certificate and private key on the Apache Server.
In a multi-account scenario, it’s common to have a central or shared AWS account that owns the ACM PCA resource, while workloads that are deployed in other AWS accounts use certificates issued by the ACM PCA. This can be achieved in two ways:
Secrets in Secrets Manager can be shared with other AWS accounts by using resource-based policies. Once shared, the secrets can be deployed to resources, such as EC2 instances.
The cost for running this solution comes from the following services:
AWS Certificate Manager Private Certificate Authority (ACM PCA) Referring to the pricing page for ACM PCA, this solution incurs a prorated monthly charge of $400 for each CA that is created. A CA can be deleted the same day it’s created, leading to a charge of around $13/day (400 * 12 / 365.25). In addition, there is a cost for issuing certificates using ACM PCA. For the first 1000 certificates, this cost is $0.75. For this demonstration, you only need two certificates, resulting in a total charge of $1.50 for issuing certificates using ACM PCA. In all, the use of ACM PCA in this solution results in a charge of $14.50.
Amazon EC2 The CloudFormation templates create t2.micro instances that cost $0.0116/hour, if they’re not eligible for Free Tier.
Secrets Manager There is a 30-day free trial for Secrets Manager, which is initiated when the first secret is created. After the free trial has completed, it costs $0.40 per secret stored per month. You will use two secrets for this solution and can schedule these for deletion after seven days, resulting in a prorated charge of $0.20.
Lambda Lambda has a free usage tier that allows for 1 million free requests per month and 400,000 GB-seconds of compute time per month. This fits within the usage for this blog, making the cost $0.
AWS KMS A single key created by one of the CloudFormation templates costs $1/month. The first 20,000 requests to AWS KMS are free, which fits within the usage of the test environment. In a production scenario, AWS KMS would charge $0.03 per 10,000 requests involving this key.
There are no charges for Systems Manager Run Command.
See the “Clean up resources” section of this blog post to get information on how to delete the resources that you create for this environment.
Deploy the solution
Now we’ll walk through the steps to deploy the solution. The CloudFormation templates and Lambda function code can be found in the AWS GitHub repository.
Create a CA to issue certificates
First, you’ll create an ACM PCA to issue private certificates. A common practice we see with customers is using a subordinate CA in AWS that is used to issue end-entity certificates for applications and workloads in the cloud. This subordinate can either point to a root CA in ACM PCA that is maintained by a central team, or to an existing on-premises public key infrastructure (PKI). There are some considerations when creating a CA hierarchy in ACM.
You should have one or more private CAs in the ACM console, as shown in Figure 2.
Figure 2: A private CA in the ACM PCA console
You will use two CloudFormation templates for this architecture. The first is launched in the same account where your private CA lives, and the second is launched in a different account. The first template generates the following: a Lambda function used for Secrets Manager rotation, an AWS KMS key to encrypt secrets, and a Systems Manager Run Command document to install the certificate on an Apache Server running on EC2 in Amazon Virtual Private Cloud (Amazon VPC). The second template launches the same Systems Manager Run Command document and EC2 environment.
To deploy the resources for the first template, select the following Launch Stack button. Make sure you’re in the N. Virginia (us-east-1) Region.
The template takes a few minutes to launch.
Use case #1: Create and deploy an ACM certificate
For the first use case, you’ll create a certificate by using the ACM defaults for private certificates, and then deploy it.
Create a Secrets Manager secret
To begin, create your first secret in Secrets Manager. You will create these secrets in the console to see how the service can be set up and used, but all these actions can be done through the AWS Command Line Interface (AWS CLI) or AWS SDKs.
To create a secret
Navigate to the Secrets Manager console.
Choose Store a new secret.
For the secret type, select Other type of secrets.
The Lambda rotation function has a set of required parameters in the secret type depending on what kind of certificate needs to be generated.For this first secret, you’re going to create an ACM_ISSUED certificate. Provide the following parameters.
Key
Value
CERTIFICATE_TYPE
ACM_ISSUED
CA_ARN
The Amazon Resource Name (ARN) of your certificate-issuing CA in ACM PCA
COMMON_NAME
The end-entity name for your certificate (for example, server1.example)
ENVIRONMENT
TEST (You need this later on to test the renewal of certificates. If using this outside of the blog walkthrough, set it to something like DEV or PROD.)
For Encryption key, select CAKey, and then choose Next.
Give the secret a name and optionally add tags or a description. Choose Next.
Select Enable automatic rotation and choose the Lambda function that starts with <CloudFormation Stack Name>-SecretsRotateFunction. Because you’re creating an ACM-issued certificate, the rotation will be handled 60 days before the certificate expires. The validity is set to 365 days, so any value higher than 305 would work. Choose Next.
Review the configuration, and then choose Store.
This will take you back to a list of your secrets, and you will see your new secret, as shown in Figure 3. Select the new secret.
Figure 3: The new secret in the Secrets Manager console
Choose Retrieve secret value to confirm that CERTIFICATE_PEM, PRIVATE_KEY_PEM, CERTIFICATE_CHAIN_PEM, and CERTIFICATE_ARN are set in the secret value.
You now have an ACM-issued certificate that can be deployed to an end entity.
Deploy to an end entity
For testing purposes, you will now deploy the certificate that you just created to an Apache Server.
To deploy the certificate to the Apache Server
In a new tab, navigate to the Systems Manager console.
Choose Documents at the bottom left, and then choose the Owned by me tab.
Choose RunUpdateTLS.
Choose Run command at the top right.
Copy and paste the secret ARN from Secrets Manager and make sure there are no leading or trailing spaces.
Select Choose instances manually, and then choose ApacheServer.
Select CloudWatch output to track progress.
Choose Run.
The certificate and private key are now installed on the server, and it has been restarted.
To verify that the certificate was installed
Navigate to the EC2 console.
In the dashboard, choose Running Instances.
Select ApacheServer, and choose Connect.
Select Session Manager, and choose Connect.
When you’re logged in to the instance, enter the following command.
This will display the certificate that the server is using, along with other metadata like the certificate chain and validity period. For the validity period, note the Not Before and Not After dates and times, as shown in figure 4.
Figure 4: Server certificate
Now, test the rotation of the certificate manually. In a production scenario, this process would be automated by using maintenance windows. Maintenance windows allow for the least amount of disruption to the applications that are using certificates, because you can determine when the server will update its certificate.
To test the rotation of the certificate
Navigate back to your secret in Secrets Manager.
Choose Rotate secret immediately. Because you set the ENVIRONMENT key to TEST in the secret, this rotation will renew the certificate. When the key isn’t set to TEST, the rotation function pulls down the renewed certificate based on its rotation schedule, because ACM is managing the renewal for you. In a couple of minutes, you’ll receive an email from ACM stating that your certificate was rotated.
Pull the renewed certificate down to the server, following the same steps that you used to deploy the certificate to the Apache Server.
Follow the steps that you used to verify that the certificate was installed to make sure that the validity date and time has changed.
Use case #2: Create and deploy an ACM PCA certificate by using custom templates
Next, use the second CloudFormation template to create a certificate, issued by ACM PCA, which will be deployed to an Apache Server in a different account. Sign in to your other account and select the following Launch Stack button to launch the CloudFormation template.
This creates the same Run Command document you used previously, as well as the EC2 and Amazon VPC environment running an Apache Server. This template takes in a parameter for the KMS key ARN; this can be found in the first template’s output section, shown in figure 5.
Figure 5: CloudFormation outputs
While that’s completing, sign in to your original account so that you can create the new secret.
To create the new secret
Follow the same steps you used to create a secret, but change the secret values passed in to the following.
Key
Value
CA_ARN
The ARN of your certificate-issuing CA in ACM PCA
COMMON_NAME
You can use any name you want, such as server2.example
TEMPLATE_ARN
For testing purposes, use arn:aws:acm-pca:::template/EndEntityCertificate/V1
This template ARN determines what type of certificate is being created and your desired path length. For more information, see Understanding Certificate Templates.
KEY_ALGORITHM
TYPE_RSA (You can also use TYPE_DSA)
KEY_SIZE
2048 (You can also use 1024 or 4096)
SIGNING_HASH
sha256 (You can also use sha384 or sha512)
SIGNING_ALGORITHM
RSA (You can also use ECDSA if the key type for your issuing CA is set to ECDSA P256 or ECDSA P384)
CERTIFICATE_TYPE
ACM_PCA_ISSUED
Add the following resource policy during the name and description step. This gives your other account access to pull this secret down to install the certificate on its Apache Server.
After the secret has been created, the last thing you need to do is add permissions to the KMS key policy so that your other account can decrypt the secret when installing the certificate on your server.
To add AWS KMS permissions
Navigate to the AWS KMS console, and choose CAKey.
Next to the key policy name, choose Edit.
For the Statement ID (SID) Allow use of the key, add the ARN of the EC2 instance role in the other account. This can be found in the CloudFormation templates as an output called ApacheServerInstanceRole, as shown in Figure 5. The Statement should look something like this:
{
            "Sid": "Allow use of the key",
            "Effect": "Allow",
            "Principal": {
                "AWS": [
                    "arn:aws:iam::<AccountID with CA>:role/<Apache Server Instance Role>",
                    "arn:aws:iam:<Second AccountID>:role/<Apache Server Instance Role>"
                ]
            },
            "Action": [
                "kms:Encrypt",
                "kms:Decrypt",
                "kms:ReEncrypt*",
                "kms:GenerateDataKey*",
                "kms:DescribeKey"
            ],
            "Resource": "*"
}
Your second account now has permissions to pull down the secret and certificate to the Apache Server. Follow the same steps described in the earlier section, “Deploy to an end entity.” Test rotating the secret the same way, and make sure the validity period has changed. You may notice that you didn’t get an email notifying you of renewal. This is because the certificate isn’t issued by ACM.
In this demonstration, you may have noticed you didn’t create resources that pull down the secret in different Regions, just in different accounts. If you want to deploy certificates in different Regions from the one where you create the secret, the process is exactly the same as what we described here. You don’t need to do anything else to accomplish provisioning and deploying in different Regions.
Clean up resources
Finally, delete the resources you created in the earlier steps, in order to avoid additional charges described in the section, “Solution cost.”
To delete all the resources created:
Navigate to the CloudFormation console in both accounts, and select the stack that you created.
Choose Actions, and then choose Delete Stack. This will take a few minutes to complete.
Navigate to the Secrets Manager console in the CA account, and select the secrets you created.
Choose Actions, and then choose Delete secret. This won’t automatically delete the secret, because you need to set a waiting period that allows for the secret to be restored, if needed. The minimum time is 7 days.
Navigate to the Certificate Manager console in the CA account.
Select the certificates that were created as part of this blog walkthrough, choose Actions, and then choose Delete.
Choose Private CAs.
Select the subordinate CA you created at the beginning of this process, choose Actions, and then choose Disable.
After the CA is disabled, choose Actions, and then Delete. Similar to the secrets, this doesn’t automatically delete the CA but marks it for deletion, and the CA can be recovered during the specified period. The minimum waiting period is also 7 days.
Conclusion
In this blog post, we demonstrated how you could use Secrets Manager to rotate, store, and distribute private certificates issued by ACM and ACM PCA to end entities. Secrets Manager uses AWS KMS to secure these secrets during storage and delivery. You can introduce additional automation for deploying the certificates by using Systems Manager Maintenance Windows. This allows you to define a schedule for when to deploy potentially disruptive changes to EC2 instances.
If you have feedback about this post, submit comments in the Comments section below. If you have questions about this post, start a new thread on the AWS Secrets Manager forum or contact AWS Support.
Want more AWS Security how-to content, news, and feature announcements? Follow us on Twitter.
Mutual TLS is commonly used for business-to-business (B2B) applications. It’s used in standards such as Open Banking, which enables secure open API integrations for financial institutions. It’s also common for Internet of Things (IoT) applications to authenticate devices using digital certificates.
This post covers automating the mTLS setup for API Gateway HTTP APIs, but the same steps can also be used for REST APIs as well. Download the code used in this walkthrough from the project’s GitHub repo.
Overview
To enable mutual TLS, you must create an API with a valid custom domain name. Mutual TLS is available for both regional REST APIs and the newer HTTP APIs. To set up mutual TLS with API Gateway, you must upload a certificate authority (CA) public key certificate to Amazon S3. This is called a truststore and is used for validating client certificates.
The AWS Certificate Manager Private Certificate Authority (ACM Private CA) is a highly available private CA service. I am using the ACM Private CA as a certificate authority to configure HTTP APIs and to distribute certificates to clients.
Deploying the solution
To deploy the application, the solution uses the AWS Serverless Application Model (AWS SAM). AWS SAM provides shorthand syntax to define functions, APIs, databases, and event source mappings. As a prerequisite, you must have AWS SAM CLI and Java 8 installed. You must also have the AWS CLI configured.
To deploy the solution:
Clone the GitHub repository and build the application with the AWS SAM CLI. Run the following commands in a terminal:
git clone https://github.com/aws-samples/api-gateway-auth.git
cd api-gateway-auth
sam build
Deploy the application:
sam deploy --guided
Provide a stack name and preferred AWS Region for the deployment process. The template requires three parameters:
HostedZoneId: The template uses an Amazon Route 53 public hosted zone to configure the custom domain. Provide the hosted zone ID where the record set must be created.
DomainName: The custom domain name for the API Gateway HTTP API.
TruststoreKey: The name for the trust store file in S3 bucket, which is used by API Gateway for mTLS. By default its truststore.pem.
After deployment, the stack outputs the ARN of a test client certificate (ClientOneCertArn). This is used to validate the setup later. The API Gateway HTTP API endpoint is also provided as output.
You have now created an API Gateway HTTP APIs endpoint using mTLS.
Setting up the ACM Private CA
The AWS SAM template starts with setting up the ACM Private CA. This enables you to create a hierarchy of certificate authorities with up to five levels. A well-designed CA hierarchy offers benefits such as granular security controls and division of administrative tasks. To learn more about the CA hierarchy, visit designing a CA hierarchy. The ACM Private CA is used to configure HTTP APIs and to distribute certificates to clients.
First, a root CA is created and activated, followed by a subordinate CA following best practices. The subordinate CA is used to configure mTLS for the API and distribute the client certificates.
The ACM Private CA is ready for configuring mTLS on the API. The configuration uses an S3 object as its truststore to validate client certificates. To automate this, an AWS Lambda backed custom resource copies the public certificate chain of the ACM Private CA to the S3 bucket:
The example custom resource is written in Java but it could also be written in another language runtime. The custom resource is invoked with the public certificate details of the private root CA, subordinate CAs, and the target S3 bucket. The Lambda function then concatenates the certificate chain and stores the object in the S3 bucket.
Configuring Amazon API Gateway HTTP APIs with mTLS
With a valid truststore object in the S3 bucket, you can set up the API. A valid custom domain must be configured for API Gateway to enable mTLS. The following code creates and sets up a custom domain for HTTP APIs. See template.yaml for a complete example.
An Amazon Route 53 public hosted zone is used to configure the custom domain. This must be set up in your AWS account separately and you must provide the hosted zone ID as a parameter to the template.
Since the HTTP APIs default endpoint does not require mutual TLS, it is disabled via DisableExecuteApiEndpoint. This helps to ensure that mTLS authentication is enforced for all traffic to the API.
The sample API invokes a Lambda function and returns the request payload as the response.
Testing and validating the setup
To validate the setup, first export the client certificate created earlier. You can export the certificate by using the AWS Management Console or AWS CLI. This example uses the AWS CLI to export the certificate. To learn how to do this via the console, see exporting a private certificate using the console.
Export the base64 PEM-encoded certificate to a local file, client.pem.aws acm export-certificate --certificate-arn <<Certificat ARN from stack output>> --passphrase $(echo -n 'your paraphrase' | base64) --region us-east-2 | jq -r '"\(.Certificate)"' > client.pem
Export the encrypted private key associated with the public key in the certificate and save it to a local file client.encrypted.key. You must provide a passphrase to associate with the encrypted private key. This is used to decrypt the exported private key.aws acm export-certificate --certificate-arn <<Certificat ARN from stack output>> --passphrase $(echo -n 'your paraphrase' | base64) --region us-east-2| jq -r '"\(.PrivateKey)"' > client.encrypted.key
Decrypt the exported private key using passphrase and OpenSSL:openssl rsa -in client.encrypted.key -out client.decrypted.key
Access the API using mutual TLS:curl -v --cert client.pem --key client.decrypted.key https://demo-api.example.com
CRL is a way for certificate authority (CA) to make it known that one or more of their digital certificates is no longer trustworthy. When they revoke a certificate, they invalidate the certificate ahead of its expiration date. The certificate authority can revoke an issued certificate for several reasons, the most common one being that the certificate’s private key are compromised.
API Gateway HTTP APIs mTLS setup can be used along with all existing API Gateway authorizer options. You can further extend validation to AWS Lambda authorizers, which can be configured to validate the client certificates against this certificate revocation list (CRL). For example:
Mutual TLS (mTLS) for API Gateway is now generally available at no additional cost. This post shows how to automate mutual TLS for Amazon API Gateway HTTP APIs using the AWS Certificate Manager Private Certificate Authority as a private CA. Using infrastructure as code (IaC) enables you to develop, deploy, and scale cloud applications, often with greater speed, less risk, and reduced cost.
In this post, I take you through the steps to deploy a public AWS Certificate Manager (ACM) certificate across multiple accounts and AWS Regions by using the functionality of AWS CloudFormationStackSets and AWS Lambda. ACM is a service offered by Amazon Web Services (AWS) that you can use to obtain x509 v3 SSL/TLS certificates. New certificates can be either requested or—if you’ve already obtained the certificate from a third-party certificate provider—imported into AWS. These certificates can then be used with AWS services to ensure that your content is delivered over HTTPS.
ACM is a regional service. The certificates issued by ACM can be used only with AWS resources in the same Region as your ACM service. Additionally, ACM public certificates cannot be exported for use with external resources, since the private keys aren’t made available to users and are managed solely by AWS. Hence, when your architecture becomes large and complex, involving multiple accounts and resources distributed across various Regions, you must manually request and deploy individual certificates in each Region and account to use the functionalities of ACM. So, the question arises as to how you can simplify the task of obtaining and deploying ACM certificates across multiple accounts.
The proposed solution (illustrated in Figure 1), deploys AWS CloudFormation stack sets to create necessary resources like AWS Identity and Access Management roles and Lambda functions in AWS accounts. The IAM roles provide Lambda functions with the permissions needed. The function can be hosted as a deployment package in an Amazon Simple Storage Service (Amazon S3) bucket of your choice, which then requests ACM certificates on your behalf and ensures they are validated.
Figure 1: Architecture diagram
Before I describe the implementation, let’s review the important aspects of an ACM certificate from the time it’s requested to the time it’s available for use.
Important aspects of an ACM certificate
When requesting a new certificate, ACM prompts you to provide one or more domains for the certificate. Before the certificate is issued, ACM must validate the ownership of the domains that the certificate is being requested for. ACM lets you choose either of two options to validate the domain. These options are:
You can choose only one option for validating the domain—this cannot be changed for the entirety of the life of the certificate. ACM uses the same validation option to validate the domain when renewing the certificate.
In this post, I discuss validation through DNS. Validating through DNS can be automated, which helps in achieving the end goal of having public AWS certificates in multiple AWS accounts and Regions. Let’s get started.
Validate DNS by using Lambda
During DNS validation, ACM generates a new CNAME record for the domains the certificate is requested for. ACM then checks if the records are in place.
The Lambda function, which the CloudFormation stack starts, populates the CNAME records from certificates requested in multiple accounts and Regions into a single Route 53 hosted zone. The Lambda function execution role in various accounts assumes the IAM role in the parent account to make changes to the hosted zone and add the required records.
Here are a few things that you need to keep in mind with respect to the Lambda function:
All the certificates are issued for all of the domains. There’s no option to deploy the certificates for different domains in different accounts.
Route 53 is a global service. Every ACM certificate in an account has the same CNAME record name and value regardless of the Region the certificate is requested from, as CNAME records are all the same for the domain in an account. This means that you need to populate the CNAME record for an account only once, irrespective of the number of Regions for which you are requesting the certificates.
However, you don’t use the Lambda function directly, instead, you use automation through AWS CloudFormation. Using AWS CloudFormation, you can create customized scripts called stacks in JSON or YAML to deploy AWS resources in a specific order. AWS CloudFormation offers another functionality known as StackSets. CloudFormation stacks can only be used within the account and Region they’re launched in. Stack sets give you the ability to deploy the same stack in different accounts and Regions within those accounts automatically. Let’s look at how AWS CloudFormation fits in with everything that I’ve discussed so far.
Deploy resources in multiple accounts and Regions
Let’s look at how AWS CloudFormation can help you extend this solution across multiple accounts and Regions. Using two CloudFormation stacks, you can deploy the following AWS resources:
Note: From this point, I discuss only the prerequisites and steps needed to deploy the solution. You can follow the included hyperlinks to learn more about the services and concepts discussed.
Route 53 and IAM are global services and so you don’t need to create these resources in every Region. The following implementation has been broken into two CloudFormation stacks. One for deploying global resources and the second stack as a stack set to deploy cross-account and cross-Region resources.
Prerequisites before deploying the stacks
It’s important to understand the parent-child relationship between the accounts that are used in the following workflow. The parent account is where the stacks are deployed. The stack set deploys individual stacks in each of the child accounts where the certificate resources are needed. Here are the prerequisites that you must set up before deploying the stack:
The DNS of your domain should be set up in a Route 53 hosted zone in the parent account.
You must have an Amazon S3 bucket to store the Lambdadeployment package. The AWS CloudFormation stack set fetches the deployment package from the bucket, which is added as a parameter when launching the stack set.
Since the bucket is in the parent account, you must modify the bucket policy to add the ARN of the cross-account AWS CloudFormation stack set IAM roles, which allows the stack to access the bucket and fetch the Lambda deployment package. For this to work, you must make sure that the bucket policy allows this cross-account access.
For stack sets to run, there are a few prerequisites related to cross-account IAM permissions that you must fulfil. Refer to Prerequisites for stack set operations.
Once the prerequisites are met, you can deploy the two CloudFormation stacks. One deploys the Global-resources stack, and the other deploys the Cross-account stack.
Deploy the global resources stack
Let me show you how to deploy the global resources stack. The Global-resources stack creates an IAM role in the parent account and attaches the necessary permissions to it. Please log in to your AWS management console and navigate to the AWS CloudFormation service home page to get started. You can leverage the stack Global resources template given inline directly during the setup.
To deploy the global resources stack
Deploy the stack named Global-resources (the stack can be deployed in any AWS Region). You must deploy this stack in the parent account. This stack consists of a parent account IAM role: This role is assumed by the Lambda execution role from other child accounts to populate the CNAME records of ACM certificates in the hosted zone of the parent account.
Note: Make sure that the AWS CloudFormation role has enough permissions to perform these actions.
While deploying the stack, you’ll be prompted to supply values for two parameters:
TrustedAccounts – The child accounts, which are populated in the trust policy of the role.
HostedZoneId – This hosted zone ID is used to create the IAM policy for the parent account role.
When the stack finishes running, go to the Outputs tab, and take note of the RoleARN, which you need for the second part of this implementation.
The following is the Global-resources CloudFormation template:
AWSTemplateFormatVersion: 2010-09-09
Parameters:
  TrustedAccounts:
    Type: List<Number>
    Description: >-
      List of AWS accounts in which the template will be deployed. These
      accounts will form a trust policy of the role that will be used to edit
      the records in the hosted zone.
  HostedZoneId:
    Type: String
    Description: Hosted zone ID for the domain
Resources:
  IamRole:
    Type: 'AWS::IAM::Role'
    Properties:
      AssumeRolePolicyDocument:
        Version: 2012-10-17
        Statement:
          - Sid: ''
            Effect: Allow
            Principal:
              AWS: !Ref TrustedAccounts
            Action: 'sts:AssumeRole'
      ManagedPolicyArns:
        - 'arn:aws:iam::aws:policy/AmazonRoute53AutoNamingFullAccess'
      Path: /
      Policies:
        - PolicyName: lambda-policy
          PolicyDocument:
            Version: 2012-10-17
            Statement:
              - Effect: Allow
                Action:
                  - 'route53:ListResourceRecordSets'
                Resource: !Join
                  - ''
                  - - 'arn:aws:route53:::hostedzone/'
                    - !Ref HostedZoneId
Outputs:
  RoleARN:
    Description: The role arn to be passed on to the next template
    Value: !GetAtt
      - IamRole
      - Arn
Deploy the cross-account stack
When the Global-resources stack is in the CREATE_COMPLETE state, you can deploy the second stack. The Cross-account stack deploys the rest of the resources that need to be created in all the Regions and AWS accounts where you want to deploy the certificates.
To deploy the cross-account stack
Before deploying the stack set, download this deployment package and upload it to an Amazon S3 bucket. Don’t create a new folder—object key—in the bucket to store this package. Upload it directly under the root prefix. Make a note of the Region this bucket belongs to.
Navigate to the AWS CloudFormation console to deploy the cross-account stack. You deploy the cross-account stack as a stack set, which can be deployed in any Region. To deploy the stack set, you must provide the following parameters:
HostedZone – The hosted zone ID where your domain is hosted.
DomainNameParameter – The same parameter as in the previous stack.
S3BucketNameParameter – The name of the bucket that hosts the deployment package.
SubjectAlternativeNames – These are the additional domain names that you want to create the certificates for. Add only the subdomains of your hosted zone. Route 53 doesn’t allow creation of CNAME records not applicable for the domain.
Regions – The different AWS Regions these certificates are deployed in. Note that the certificates are in the same Region in other accounts as well. You can enter multiple Regions as a comma-separated Region code.
RoleARN: The IAM role created by the Global-account stack (RoleARN outputs of the previous stack).
Deploy the stack set either in individual accounts (self-service permissions) or in accounts under AWS Organizations (service-managed permissions). You can learn more about the required permissions from Prerequisites for stack set operations.
If you choose self-service permissions, be sure to choose the parent account role under the IAM admin role ARN – optional section and the execution role under the IAM execution role name section before moving to the next step.
If you choose service-managed permissions, be sure to enable trusted access for AWS CloudFormation stack sets from the AWS Organizations console.
Choose the Region you want to deploy this stack in. In this section, choose the Region in which the Amazon S3 bucket was created. If you deploy this in any other Region, the stack will fail.
Note: This might not be the same as the Region the certificate is in.
Select Submit to deploy the stack set.
The following is the Cross-account CloudFormation template:
AWSTemplateFormatVersion: 2010-09-09
Parameters:
  DomainNameParameter:
    Type: String
    Description: The domain name for which the certificate will be issued.
  Regions:
    Type: List<CommaDelimitedList>
    Description: >-
      The regions in which this certificate will be deployed in (same across
      multiple accounts).
  HostedZone:
    Type: String
    Description: The hosted zone ID of your domain in Route53.
  RoleArn:
    Type: String
    Description: >-
      The Arn of the role that the lambda's execution role will assume to
      populate the CNAME records.
  S3BucketNameParameter:
    Type: String
    Description: >-
      The S3 bucket name that has the lambda deployment package (should not be
      within an object)
  SubjectAlternativeName:
    Type: List<CommaDelimitedList>
    Description: Alternative sub-domain names that will be covered in your certificate.
Resources:
  CustomResource:
    Type: 'Custom::CustomResource'
    Properties:
      ServiceToken: !GetAtt
        - LambdaFunction
        - Arn
      HostedZone: !Ref HostedZone
      DomainName: !Ref DomainNameParameter
      SAN: !Ref SubjectAlternativeName
      RoleARN: !Ref RoleArn
      Regions: !Ref Regions
  LambdaFunction:
    Type: 'AWS::Lambda::Function'
    Properties:
      Code:
        S3Bucket: !Ref S3BucketNameParameter
        S3Key: Lambda_Custom_Resource-c57297c6-ee20-401d-852f-1a71e1facbbe.zip
      Handler: index.lambda_handler
      Runtime: python3.6
      Timeout: 900
      Role: !GetAtt
        - LambdaExecutionRole
        - Arn
  LambdaExecutionRole:
    Type: 'AWS::IAM::Role'
    Properties:
      AssumeRolePolicyDocument:
        Version: 2012-10-17
        Statement:
          - Effect: Allow
            Principal:
              Service:
                - lambda.amazonaws.com
            Action:
              - 'sts:AssumeRole'
      Path: /
      Policies:
        - PolicyName: lambda-policy
          PolicyDocument:
            Version: 2012-10-17
            Statement:
              - Action:
                  - 'acm:DescribeCertificate'
                  - 'acm:DeleteCertificate'
                  - 'acm:GetCertificate'
                  - 'logs:PutLogEvents'
                  - 'logs:CreateLogGroup'
                  - 'logs:CreateLogStream'
                Resource:
                  - !Sub 'arn:aws:acm:*:${AWS::AccountId}:certificate/*'
                  - !Sub 'arn:aws:logs:*:${AWS::AccountId}:log-group:/aws/lambda/*'
                  - !Sub 'arn:aws:logs:*:${AWS::AccountId}:log-group:/aws/lambda/*:log-stream:*'
                Effect: Allow
              - Action:
                  - 'acm:ListCertificates'
                  - 'acm:RequestCertificate'
                Resource: '*'
                Effect: Allow
              - Effect: Allow
                Action: 'sts:AssumeRole'
                Resource: !Ref RoleArn
This completes the implementation of your cross-account setup. All the CNAMEs of cross-account certificates are now populated in the hosted zone of the parent account, and the certificates are validated after the CNAME records are successfully populated globally, which ideally takes only a few minutes. When set up is complete, you can delete the CloudFormation stacks.
Note: When you delete the CloudFormation stacks, the ACM certificates and the corresponding Route 53 record sets remain. This is to prevent inconsistency. Other resources such as the Lambda functions and IAM roles are deleted.
Summary
In this post, I’ve shown you how to use Lambda and AWS CloudFormation to automate ACM certificate creation across your AWS environment. The automation simplifies the certificate creation by completing tasks that are normally done manually. The certificates can now be used with other AWS resources to support your use cases. You can learn more about how you can use ACM certificates with integrated services like AWS load balancers and using alternate domain names with Amazon CloudFront distributions.
If you have feedback about this post, submit comments in the Comments section below. If you have questions about this post, start a new thread on the AWS Certificate Manager forum or contact AWS Support.
Want more AWS Security how-to content, news, and feature announcements? Follow us on Twitter.
This post is courtesy of Justin Pirtle, Principal Serverless Solutions Architect.
Today, AWS is introducing certificate-based mutual Transport Layer Security (TLS) authentication for Amazon API Gateway. This is a new method for client-to-server authentication that can be used with API Gateway’s existing authorization options.
By default, the TLS protocol only requires a server to authenticate itself to the client. The authentication of the client to the server is managed by the application layer. The TLS protocol also offers the ability for the server to request that the client send an X.509 certificate to prove its identity. This is called mutual TLS (mTLS) as both parties are authenticated via certificates with TLS.
Mutual TLS is commonly used for business-to-business (B2B) applications. It’s used in standards such as Open Banking, which enables secure open API integrations for financial institutions across the United Kingdom and Australia. It’s common for Internet of Things (IoT) applications to authenticate devices using digital certificates. Also, many companies authenticate their employees before granting access to data and services when used with a private certificate authority (CA).
API Gateway now provides integrated mutual TLS authentication at no additional cost. You can enable mutual TLS authentication on your custom domains to authenticate regional REST and HTTP APIs. You can still authorize requests with bearer or JSON Web Tokens (JWTs) or sign requests with IAM-based authorization.
To use mutual TLS with API Gateway, you upload a CA public key certificate bundle as an object containing public or private/self-signed CA certs. This is used for validation of client certificates. All existing API authorization options are available for use with mTLS authentication.
Getting started
To complete the following sample setup, you must first create an HTTP API with a valid custom domain name using the AWS Management Console. Mutual TLS is now available for both regional REST APIs and the newer HTTP APIs. You use HTTP APIs for the examples depicted in this post. More details on the pre-requisites to configure a custom domain name are available in the documentation.
Securing your API with mutual TLS
To configure mutual TLS, you first create the private certificate authority and client certificates. You need the public keys of the root certificate authority and any intermediate certificate authorities. These must be uploaded to API Gateway to authenticate certificates properly using mutual TLS. This example uses OpenSSL to create the certificate authority and client certificate. You can alternatively use a managed service such as AWS Certificate Manager Private Certificate Authority (ACM Private CA).
You first create a new certificate authority with signed client certificate using OpenSSL:
Create the private certificate authority (CA) private and public keys: openssl genrsa -out RootCA.key 4096 openssl req -new -x509 -days 36500 -key RootCA.key -out RootCA.pem
Provide the requested inputs for the root certificate authority’s subject name, locality, organization, and organizational unit properties. Choose your own values for these prompts to customize your root CA.
You can optionally create any intermediary certificate authorities (CAs) using the previously issued root CA. The certificate chain length for certificates authenticated with mutual TLS in API Gateway can be up to four levels.
Once the CA certificates are created, you create the client certificate for use with authentication.
Enter the client’s subject name, locality, organization, and organizational unit properties of the client certificate. Keep the optional password challenge empty default.
Sign the newly created client cert by using your certificate authority you previously created: openssl x509 -req -in my_client.csr -CA RootCA.pem -CAkey RootCA.key -set_serial 01 -out my_client.pem -days 36500 -sha256
You now have a minimum of five files in your directory (there are additional files if you are also using an intermediate CA):
Prepare a PEM-encoded trust store file for all certificate authority public keys you want to use with mutual TLS:
If only using a single root CA (with no intermediary CAs), only the RootCA.pem file is required. Copy the existing root CA public key to a new truststore.pem file name for further clarity on which file is being used by API Gateway as the trust store:cp RootCA.pem truststore.pem
If using one or more intermediary CAs to sign certificates with a root of trust to your root CA previously created, you must bundle the respective PEM files of each CA into a single trust store PEM file. Use the cat command to build the bundle file:cat IntermediateCA_1.pem IntermediateCA_2.pem RootCA.pem > truststore.pem Note: The trust store CA bundle can contain up to 1,000 certificates authority PEM-encoded public key certificates up to 1 MB total object size.
Upload the trust store file to an Amazon S3 bucket in the same AWS account as our API Gateway API. It is also recommended to enable object versioning for the bucket you choose. You can perform these actions using the AWS Management Console, SDKs, or AWS CLI. Using the AWS CLI, create an S3 bucket, enable object versioning on the bucket, and upload the CA bundle file:aws s3 mb s3://your-name-ca-truststore --region us-east-1 #creates a new S3 bucket – skip if using existing bucket aws s3api put-bucket-versioning --bucket your-name-ca-truststore --versioning-configuration Status=Enabled #enables versioning on S3 bucket aws s3 cp truststore.pem s3://your-name-ca-truststore/truststore.pem #uploads object to S3 bucket
After uploading the new truststore CA bundle file, enable mutual TLS on the API Gateway custom domain name.
Enabling mutual TLS on a custom domain name
To configure mutual TLS within API Gateway:
Browse to the API Gateway console and choose Custom domain names:
Before changing settings, test a custom domain name with an API mapping to ensure that the API works without mutual TLS using curl. If your custom domain name and API configuration are correct, you receive a well-formed response and HTTP status code of 200.
After validation, enable mutual TLS for additional protection. Choose Edit to update the custom domain name configuration:
Enable the Mutual TLSauthentication option and enter the path of the truststore PEM file, stored in an S3 bucket. You can optionally provide an S3 object version identifier to reference a specific version of the truststore CA bundle object:
Choose Save to enable mutual TLS for all APIs that the custom domain name maps to.
Wait for the custom domain status to show “Available”, indicating that the mutual TLS change is successfully deployed.
Test the HTTP request again using curl with the same custom domain name and without modifying the request. The request is now forbidden as the call cannot be properly authenticated with mutual TLS.
Test again with additional parameters in the curl command to include the local client certificate and negotiate the mutual TLS session for authentication. You can use curl with the —key and —cert parameters to send the client certificate as part of the request:curl --key my_client.key --cert my_client.pem https://api.yourdomain.com
The request is now properly authenticated and returns successfully.
Hardening the configuration
After setting up mutual TLS authentication for the API, harden the configuration with several additional capabilities.
Disabling access to the default API endpoint
Mutual TLS is successfully enabled on the custom domain name but the default API endpoint URL is still active. This default endpoint has the format https://{apiId}.execute-api.{region}.amazonaws.com. Since the default endpoint does not require mutual TLS, you may want to disable it. This helps to ensure that mutual TLS authentication is enforced for all traffic to the API.
To disable the endpoint:
Browse to the HTTP API in the API Gateway console.
Choose the API name in the menu:
In the API, choose Edit:
Disable the default endpoint toggle to force traffic to the custom domain name and use mutual TLS authentication. Choose Save. Note: Disabling the default endpoint is only currently available for HTTP APIs.
Test invoking the default endpoint again. It is no longer active. The custom domain name continues to serve requests when authenticated using your client certificate.
Additional authorization capabilities
In addition to the initial mutual TLS authentication via client certificate, you can use all existing API Gateway authorizer options. This includes JSON Web Tokens (JWT)/Cognito user pool authorizers, Lambda authorizers, and IAM-based authorization.
For Lambda authorizers, the event payload is expanded to include additional certificate properties from the client’s authenticated certificate. These properties are found at requestContext.identity.clientCert with the Lambda authorizer v1 payload version or at requestContext.authentication.clientCert with the v2 payload version. These additional attributes include the PEM-encoded public key of the client cert and also the certificate subject distinguished name (DN), its issuer’s CA distinguished name, and the certificate’s valid from and to timestamps.
These additional context properties enable any custom validation of the calling certificate with any other request properties, such as bearer tokens in authorization headers, all with a unified authorizer response:
You can validate certificates against any certificate revocation list (CRL) or by using the Online Certificate Status Protocol (OCSP) directly from a Lambda custom authorizer. A Lambda authorizer can locally cache a CRL for re-use across API authorization requests without downloading it each time.
For OCSP requests, the authorizer can make an API call to the OCSP server requesting validation that the certificate is still valid before returning the authorization response to API Gateway. Further enhancements supporting native certificate revocation verification capabilities are planned for future API Gateway releases.
Conclusion
Mutual TLS (mTLS) for API Gateway is generally available today at no additional cost. It’s available in all AWS commercial Regions, AWS GovCloud (US) Regions, and China Regions. It supports configuration via the API Gateway console, AWS CLI, SDKs, and AWS CloudFormation.
This post shows how to configure mutual TLS on a custom domain name and disable the default execute-api API endpoint. It also covers how to use Lambda authorizer extensions to further authorize client invocations or verify certificate revocation.
In this blog post, we show you how to import PFX-formatted certificates into AWS Certificate Manager (ACM) using OpenSSL tools.
Secure Sockets Layer and Transport Layer Security (SSL/TLS) certificates are small data files that digitally bind a cryptographic key pair to an organization’s details. The key pair is used to secure network communications and establish the identity of websites over the internet and on private networks. These certificates are usually issued by a trusted certificate authority (CA). A CA acts as a trusted third party—trusted both by the subject (owner) of the certificate and by the party relying upon the certificate. The format of these certificates is specified by the X.509 or Europay, Mastercard, and Visa (EMV) standards. SSL/TLS certificates issued by a trusted CA are usually encoded in Personal Information Exchange (PFX) or Privacy-Enhanced Mail (PEM) format.
ACM lets you easily provision, manage, and deploy public and private SSL/TLS certificates for use with Amazon Web Services (AWS) and your internal connected resources. Certificates can be imported from outside AWS, or created using AWS tools. Certificates can be used to help with ACM-integrated AWS resources, such as Elastic Load Balancing, Amazon CloudFront distributions, and Amazon API Gateway.
To import a self–signed SSL/TLS certificate into ACM, you must provide the certificate and its private key in PEM format. To import a signed certificate, you must also include the certificate chain in PEM format. Prerequisites for Importing Certificates provides more detail.
Sometimes, the trusted CA issues the certificate, private key, and certificate chain details in PFX format. In this post, we show you how to convert a PFX-encoded certificate into PEM format and then import it into ACM.
Solution
The following solution converts a PFX-encoded certificate to PEM format using the OpenSSL command line tool. The certificate is then imported into ACM.
Figure 1: Use the OpenSSL Toolkit to convert the certificate, then import the certificate into ACM
The solution has two parts, shown in the preceding figure:
Use the OpenSSL Toolkit to convert the PFX-encoded certificate into PEM format.
Import the PEM certificate into ACM.
Prerequisites
We use the OpenSSL toolkit to convert a PFX encoded certificate to PEM format. OpenSSL is an open source toolkit for manipulating cryptographic files. It’s also a general-purpose cryptography library.
For this post, we use a password protected PFX-encoded file—website.xyz.com.pfx—with an X.509 standard CA signed certificate and 2048-bit RSA private key data.
Download and install the OpenSSL toolkit.
If you’re using Linux, download and install the latest TAR file from OpenSSL Downloads.
Add the OpenSSL binaries location to your system PATH variable, so that the binaries are available for command line use.
Convert the PFX encoded certificate into PEM format
Run the following commands to convert a PFX-encoded SSL certificate into PEM format. The procedure requires the PFX-encoded certificate and the passphrase used for encrypting it.
The procedure converts the PFX-encoded signed certificate file into three files in PEM format.
cert-file.pem – PEM file containing the SSL/TLS certificate for the resource.
withoutpw-privatekey.pem – PEM file containing the private key of the certificate with no password protection.
ca-chain.pem – PEM file containing the root certificate of the CA.
To convert the PFX encoded certificate
Use the following command to extract the certificate private key from the PFX file. If your certificate is secured with a password, enter it when prompted. The command generates a PEM-encoded private key file named privatekey.pem. Enter a passphrase to protect the private key file when prompted to Enter a PEM pass phrase.
The previous step generates a password-protected private key. To remove the password, run the following command. When prompted, provide the passphrase created in step 1. If successful, you will see writing RSA key.
Use the following command to transfer the certificate from the PFX file to a PEM file. This creates the PEM-encoded certificate file named cert-file.pem. If successful, you will see MAC verified OK.
Finally, use the following command to extract the CA chain from the PFX file. This creates the CA chain file named ca-chain.pem. If successful, you will see MAC verified OK.
When the preceding steps are complete, the PFX-encoded signed certificate file is split and returned as three files in PEM format, shown in the following figure. To view the list of files in a directory, enter the command dir in Windows or type the command ls -l in Linux.
cert-file.pem
withoutpw-privatekey.pem
ca-chain.pem
Figure 6: PEM-formatted files
Import the PEM certificates into ACM
Use the ACM console to import the PEM-encoded SSL certificate. You need the PEM files containing the SSL certificate (cert-file.pem), the private key (withoutpw-privatekey.pem), and the root certificate of the CA (ca-chain.pem) that you created in the previous procedure.
To import the certificates
Open the ACM console. If this is your first time using ACM, look for the AWS Certificate Manager heading and select the Get started button.
Select Import a certificate.
Add the files you created in the previous procedure:
Use a text-editing tool such as Notepad to open cert-file.pem. Copy the lines beginning at –BEGIN CERTIFICATE– and ending with –END CERTIFICATE–. Paste them into the Certificate body text box.
Open withoutpw-privatekey.pem. Copy the lines beginning at –BEGIN RSA PRIVATE KEY– and ending with –END RSA PRIVATE KEY–. Paste them into the Certificate private key, text box.
For Certificate chain, copy and paste the lines starting –BEGIN CERTIFICATE– and ending with –END CERTIFICATE– in the file ca-chain.pem.
Figure 7: Add the files to import the certificate
Select Next and add tags for the certificate. Each tag is a label consisting of a key and value that you define. Tags help you manage, identify, organize, search for, and filter resources.
Select Review and import.
Review the information about your certificate, then select Import.
Conclusion
In this post, we discussed how you can use OpenSSL tools to import a PFX-encoded SSL/TLS certificate into ACM. You can use the imported certificate with any ACM-integrated AWS service. ACM makes it easier to set up SSL/TLS for a website or application on AWS. ACM can replace many of the manual processes usually associated with using and managing SSL/TLS certificates. ACM can also manage renewals, which can help you avoid downtime due to misconfigured, revoked, or expired certificates. You can renew an imported certificate by obtaining and importing a new certificate from your certificate issuer, or you can request a new certificate from ACM.
If you have feedback about this post, submit comments in the Comments section below.
Want more AWS Security how-to content, news, and feature announcements? Follow us on Twitter.
The collective thoughts of the interwebz
Manage Consent
To provide the best experiences, we use technologies like cookies to store and/or access device information. Consenting to these technologies will allow us to process data such as browsing behavior or unique IDs on this site. Not consenting or withdrawing consent, may adversely affect certain features and functions.
Functional
Always active
The technical storage or access is strictly necessary for the legitimate purpose of enabling the use of a specific service explicitly requested by the subscriber or user, or for the sole purpose of carrying out the transmission of a communication over an electronic communications network.
Preferences
The technical storage or access is necessary for the legitimate purpose of storing preferences that are not requested by the subscriber or user.
Statistics
The technical storage or access that is used exclusively for statistical purposes.The technical storage or access that is used exclusively for anonymous statistical purposes. Without a subpoena, voluntary compliance on the part of your Internet Service Provider, or additional records from a third party, information stored or retrieved for this purpose alone cannot usually be used to identify you.
Marketing
The technical storage or access is required to create user profiles to send advertising, or to track the user on a website or across several websites for similar marketing purposes.