As outlined in the AWS post-quantum cryptography migration plan, establishing quantum-resistant roots of trust is critical for systems that need to maintain security for extended periods of time. ML-DSA, a signature scheme standardized in FIPS 204, provides quantum resistance while maintaining the performance characteristics needed for deployments at scale.
Previously, we shared how to use AWS Private CA and AWS KMS for code signing. In this post, we show you how to combine the post-quantum signing capability provided by AWS KMS with post-quantum code-signing PKI from AWS Private CA. Consumers of signed code that have been pre-provisioned with the post-quantum PKI roots can rest assured that the software could not have been forged by an adversary with a cryptographically relevant quantum computer (CRQC). For demonstration purposes, we use the diy-code-signing-kms-private-ca sample program, which uses the AWS SDK for Java. This code creates a PKI infrastructure, generates a code-signing certificate, signs binary code, and verifies the signature. Although we break down the steps to demonstrate the functionality in this post, you can run the Runner as-is to see it in action with commands found in the README file.
This post uses the Cryptographic Message Syntax (CMS) standard for encapsulating the signatures generated for input binary data. It stores the signature, X.509 certificate, and chain used to establish trust. The signature, known as a detached signature, doesn’t contain the original data. The detached signature can be used together with the original file, which was signed with standard tools such as OpenSSL natively to validate the authenticity of the file.
Create a post-quantum PKI hierarchy
For this post, we will use AWS Private CA to introduce a code-signing PKI. It will consist of a root CA to sign a subordinate CA, and a code-signing certificate signed by the subordinate CA. The whole chain will consist of quantum-resistant ML-DSA certificates.
CA hierarchy creation
First, the post-quantum CA hierarchy must be created with ML-DSA. In this example, we use the ML-DSA-65 variant of the post-quantum signature algorithm. You can do this with the AWS Java SDK as shown in the Runner.java file:
For code signing, you need an asymmetric key pair and a code-signing certificate. The asymmetric ML-DSA key pair is generated in AWS KMS and the code-signing certificate is issued by AWS Private CA.
Create an ML-DSA key pair in AWS KMS
First, you must create an asymmetric key pair for code signing operations. Similar to the creation of the hierarchy, the AWS Java SDK can be used to create that AWS KMS key (key pair). Signing will be taking place with the key pair’s private key in AWS KMS. The corresponding public key will be in the code-signing leaf certificate signed by the subordinate CA. These calls are performed as part of the main method within the Runner.java file:
Creating a certificate signing request (CSR) using AWS Private CA is a two-step process. First, you must create a CSR that contains both an identity (Subject) and the previously created AWS KMS public key. The following code snippet in Runner.java accomplishes this:
You can see that the CSR contains an ML-DSA-65 public key. Its corresponding private key will be used to sign code.
The CSR is used by the subordinate CA to issue the code-signing certificate. Note that the code-signing template is used in the templateArn of the IssueCertificate request in the relevant PrivateCA.java file. The inclusion of this template helps ensure that AWS Private CA will issue a certificate with the correct Key Usage (KU) and Extended Key Usage (EKU) extension values, regardless of the values presented in the CSR.
The response includes the ML-DSA-65 code-signing certificate. You can use OpenSSL 3.5 or later to inspect the contents of the certificate after you save it to a file named code-signing-cert.pem:
You can see that the certificate includes the ML-DSA-65 public key of the code-signing key pair and the ML-DSA-65 signature from the subordinate CA. You also see the KU and the EKU values, which represent a code-signing certificate from the AWS Private CA template.
Sign code
At this point, you have set up the code-signing PKI, have a code-signing certificate issued by AWS Private CA and a corresponding ML-DSA key pair residing in KMS.
The Java SDK can be used to generate a CMS signature for a code binary file. In the background, this is accomplished by calling the AWS KMS Sign API with the ML-DSA key pair as shown in Runner.java. The following is part of the Java code. This first snippet involves building a certificate chain and then using it along with the code-signing AWS KMS key, the signer’s certificate, and <DATA_TO_SIGN>, the byte array representation of the code file, to generate the detached signature in a CMS structure.
The CMS signature object directly encapsulates both the code-signing certificate and the subordinate CA certificate. It’s expected that the root certificate will reside in a customer-managed trust store. In addition to these certificates, the CMS object also contains the digest of the input data within the signedAttrs of the signerInfos in the ASN.1 structure. The digest algorithm is SHAKE256 and the OCTET STRING represents the binary digest itself. The use of ML-DSA in CMS is specified in RFC9882.
Note: Although this example uses one ML-DSA signature, some use cases might include dual signatures, a traditional and a quantum-resistant one. Such signed artifacts can be backwards compatible with legacy verifiers that support and can only verify the traditional signature. Upgraded verifiers can verify both signatures.
Verify signed code
Before loading a signed code artifact, its signature needs to be verified. That includes verifying the signature of the code and validating the certificate chain to the trusted root CA. The following code snippet from the main method within the file Runner.java is used for the certificate chain validation and the signature in the code object:
The preceding code retrieves the ML-DSA public key from the code-signing certificate; AWS access or credentials aren’t needed to validate the signature. Entities that have the root CA certificate loaded in their trust store can verify it without needing access to the AWS KMS verify API.
Note: The Runner.java implementation doesn’t use a certificate trust store that’s either part of a browser or part of a file system within the resident operating system of a device or a server. The trust store is placed in an instance of a Java class object for the purpose of this post. If you’re planning to use this code-signing example in a production system, you must change the implementation to use a trust store on the host. To do so, you can build and distribute a secure trust store that includes the root CA certificate.
Alternatively, OpenSSL 3.5 or later can be used to validate the detached signature of the provided input data file with root-ca-MLDSA65.pem, the provided root CA certificate from AWS Private CA.
Note: Although this post focused on code-signing, AWS Private CA can enable post-quantum ML-DSA authentication for other private PKI use cases. In one scenario, applications outside of AWS can access AWS resources by temporarily using certificate-based authentication and swapping it with AWS credentials with AWS IAM Roles Anywhere. AWS IAM Roles Anywhere now supports ML-DSA PKIs like the one created in this post. In another scenario, an mTLS client or IKEv2/IPsec peer could use an ML-DSA certificate issued by AWS Private CA to be authenticated by a server or peer respectively who has been pre-provisioned with the post-quantum PKI root certificate.
Conclusion
This announcement marks an important milestone for post-quantum authentication. With the introduction of ML-DSA X.509 certificates in AWS Private CA, customers can bring quantum resistance to their private PKI use cases. These use cases include client authentication for mTLS or IKEv2/IPsec tunnels, IAM Roles Anywhere, or applications that use private PKI authentication. ML-DSA certificates with AWS Private CA and signing with AWS KMS also enable post-quantum code-singing and establishing post-quantum long-lived roots of trust for devices designed to operate for a long time even after CRQCs became available. Learn more about post-quantum cryptography in general and the overall AWS plan to migrate to post-quantum cryptography.
If you have feedback about this post, submit comments in the Comments section below. If you have questions about this post, start a new thread on the AWS Security, Identity, & Compliance re:Post or contact AWS Support. For more details regarding AWS PQC efforts, refer to our PQC page.
In this post, we show how to configure customer trust stores to work with public certificates issued through AWS Certificate Manager (ACM). Organizations can encounter challenges when configuring trust stores for ACM certificates and incorrect trust store configuration can lead to SSL/TLS errors and application downtime. While most modern web browsers and operating systems trust ACM certificates by default, understanding how this trust is established and verifying proper configuration is important for IT professionals and developers. We also describe the relationship between public certificates issued through ACM and Amazon Trust Services. Whether you’re developing applications that connect to endpoints using ACM certificates or managing systems with customer trust stores that need to trust ACM certificates, this guide will provide you with insight regarding ACM certificate trust.
Background
ACM is a managed service that you can use to provision, manage, and deploy public and private SSL/TLS certificates. When you visit a website over HTTPS that has an ACM certificate, most modern web browsers will show a Connection is secure message in the address bar. This indicates that the web browser trusted the certificate. ACM certificates are trusted by popular browsers such as Chrome, Firefox, and Safari because they are issued by Amazon Trust Services, a public certificate authority (CA) managed by Amazon, whose root CA certificates are included by default in most web browsers’ and operating systems’ trust stores.
What is a trust store?
Web browsers, devices, and applications trust a collection of certificates known as CA certificates. These collections of CA certificates are called trust stores. Most often, the CA certificates in a trust store are root CA certificates. Root CA certificates are CA certificates that act as the foundation of trust. It’s best practice that root CAs issue intermediate CA certificates, which then issue end-entity certificates to minimize interaction with the root CA. When navigating to a website protected with HTTPS using a web browser, the website will present the end-entity certificate and the certificate chain. The certificate chain is a series of certificates, each issued by the next, leading back to a root CA certificate. The web browser will then check the end-entity certificate. It will make sure it’s derived from a root certificate that is in its trust store. It is important to note that trust store configurations can vary depending on the web browser, device or application.
Amazon Trust Services
Amazon Trust Services is a publicly trusted CA that is managed by Amazon. Amazon Trust Services root CA certificates are included in the trust stores of most web browsers and operating systems. As shown in Figure 1, when you request a public ACM certificate through DNS, Email, or HTTP validation, it will be issued by one of the multiple intermediate CAs that Amazon manages. These intermediate CAs are issued by one of the five Amazon Trust Services root CAs. Therefore, by trusting the Amazon Trust Services root CAs, you will be trusting ACM certificates. It’s important to note that ACM uses a dynamic intermediate CA model. This means you cannot predict which specific intermediate CA will issue an ACM certificate. The issuing intermediate CA is selected dynamically from a group of intermediate CAs at the time of certificate issuance. This means that the intermediate CA that issues ACM certificates is non-deterministic. In summary, we recommend customer trust stores include the five Amazon Trust Services root CA certificates. This includes Amazon Root CA 1, Amazon Root CA 2, Amazon Root CA 3, Amazon Root CA 4 and Starfield Services Root Certificate Authority – G2.
Figure 1 – ACM certificate chain
Best practices
To help establish reliable HTTPS connections to endpoints using ACM certificates, we recommend that your trust stores include the fiveAmazon root CAs.
Adding the five Amazon root CAs provide maximum compatibility for trusting ACM certificates. If you must use certificate pinning in your application, we recommend that you pin to the public key of the mentioned root CAs.
While addressing the best practices, it is important to review how trust stores should notbe configured.
Don’t limit your trust stores to only the intermediate CA certificates that issue ACM certificates. Examples of such intermediate CAs include Amazon RSA 2048 M01, Amazon RSA 2048 M02, Amazon RSA 2048 M03. Adding only these intermediate CA certificates to your trust store will introduce risk to your application. This is because of the dynamic intermediate CA (ICA) model. When an ACM certificate is issued or when it’s renewed, it will be from one of the many intermediate CAs. Furthermore, they are non-deterministic. If an ACM certificate was first issued by Amazon RSA 2048 M01,there is no guarantee that it will renew from that same intermediate CA.
In summary, here are the best practices for trusting ACM certificates.
Add the five Amazon root CAs listed in Amazon Trust Services to your trust stores: Amazon Root CA 1 through 4 and Starfield Services Root Certificate Authority – G2.
You should only add Amazon root CAs to your trust store, not their intermediate CAs or end-entity certificates. Because of the dynamic intermediate CA (ICA) model, installing only intermediate CAs or end-entity certificates will introduce risk to your trust store and application.
Do not pin an ACM certificate (end-entity) or its intermediate CA certificate.
If you require pinning, we recommend that you pin to the public key of the Amazon root CAs.
How do I verify that the Amazon root CAs are in my trust store?
As mentioned in the previous section, most modern web browsers and operating systems already include the five Amazon root CAs in their respective trust stores by default. It’s still recommended to verify that the Amazon root CAs are installed correctly. It’s important to note that many applications have different trust store locations. For example, an application might use the Windows trust store location—Trusted Root Certification Authorities—as its trust store or it might use a PEM trust store in a custom directory. This is why we recommend that you review your application’s trust store documentation.
To verify, check your system’s trust store for existing Amazon root CA certificates. If they are not present, you can proceed with adding the five Amazon root CA certificates.
Windows: Check for the Amazon root CAs in Windows operating systems (GUI)
Press Windows + R, enter certmgr.msc , then press Enter.
Go to Trusted Root Certification Authorities and choose Certificates.
Figure 2: Windows certificate store: Trusted Root Certification Authorities
Check for the Amazon root CAs in Windows operating systems (CLI)
You can use Powershell to check for the Amazon root CAs. Use the certutil command.
Open Windows Powershell and use the following certutil commands. These will search for the five Amazon root CAs.
To add the Amazon root CAs to the default trust store
1. Navigate to the following directory for adding CA certificates $ cd /etc/pki/ca-trust/source/anchors/
2. Using cURL, download each Amazon Trust Services root CA in the preceding folder. Do this for each of the Amazon root CAs replacing the name of the PEM file as needed.
3. Add the root CAs by updating the system trust store. $ sudo update-ca-trust extract
4. Verify that the bundle has been updated with OpenSSL. $ openssl crl2pkcs7 -nocrl -certfile /etc/pki/tls/certs/ca-bundle.crt | openssl pkcs7 -print_certs -noout | grep -i "Amazon\|Starfield Services"
Java: Check for the Amazon root CAs in a Java trust store (Java Keystore)
Many custom Java applications use Java Keystore (JKS) as a trust store. You can use the keytool CLI tool to verify if the Amazon root CAs exist in your JKS trust store.
keytool -list -keystore custom_truststore.jks -storepass mypassword

Keystore type: PKCS12
Keystore provider: SUN

Your keystore contains 5 entries

amazonrootca1, Jun 27, 2025, trustedCertEntry, Certificate fingerprint (SHA-256): 8E:CD:E6:88:4F:3D:87:B1:12:5B:A3:1A:C3:FC:B1:3D:70:16:DE:7F:57:CC:90:4F:E1:CB:97:C6:AE:98:19:6E
amazonrootca2, Jun 27, 2025, trustedCertEntry, Certificate fingerprint (SHA-256): 1B:A5:B2:AA:8C:65:40:1A:82:96:01:18:F8:0B:EC:4F:62:30:4D:83:CE:C4:71:3A:19:C3:9C:01:1E:A4:6D:B4
amazonrootca3, Jun 27, 2025, trustedCertEntry, Certificate fingerprint (SHA-256): 18:CE:6C:FE:7B:F1:4E:60:B2:E3:47:B8:DF:E8:68:CB:31:D0:2E:BB:3A:DA:27:15:69:F5:03:43:B4:6D:B3:A4
amazonrootca4, Jun 27, 2025, trustedCertEntry, Certificate fingerprint (SHA-256): E3:5D:28:41:9E:D0:20:25:CF:A6:90:38:CD:62:39:62:45:8D:A5:C6:95:FB:DE:A3:C2:2B:0B:FB:25:89:70:92
starfieldg2, Jun 27, 2025, trustedCertEntry, Certificate fingerprint (SHA-256): 56:8D:69:05:A2:C8:87:08:A4:B3:02:51:90:ED:CF:ED:B1:97:4A:60:6A:13:C6:E5:29:0F:CB:2A:E6:3E:DA:B5
The output should show the Amazon root CAs listed as “trustedCertEntry” with those exact certificate fingerprints.
To add the Amazon root CAs to a Java trust store (Java Keytool)
1. Download each Amazon Trust Services root CA in PEM or DER format. Use the PowerShell command Invoke-WebRequest if you’re using Windows, or use cURL if you’re using a Linux-based operating system or MacOS.
2. Import the Amazon root CAs to the trust store—custom_truststore.jks. Replace changeit with your JKS password. Do this command for each of the Amazon root CAs, replacing the name of the root CA as needed.
After you have set up your trust store with the five Amazon root CA certificates, you can perform tests to confirm that the installed root CAs are correctly providing trust. Remember that your custom application might be sourcing its trust from a store other than the stores mentioned in this article. For custom applications, we recommend checking your testing documentation.
PEM
For operating systems or applications that use PEM certificate bundles, such as Amazon Linux 2023, you can use OpenSSL or cURL to test. For additional test URLs, see the Amazon Trust Services website. Replace CAbundle.pem with your certificate bundle.
Because Windows doesn’t use PEM certificate bundles, but a trust store in certmgr called Trusted Root Certification Authorities, you can use PowerShell to test.
1. Copy the following PowerShell script and save it in a file named ssl-connect.ps1.
2. Run the PowerShell script with the following command:
> .\ssl-connect.ps1
You can test with the other test URLs by passing them in -url:
> .\ssl-connect.ps1 -url https://s3.amazonaws.com
3. After running the command, you should see the subject and issuer of the end-entity certificate and the full trust chain, including the intermediate CA and root CA. If the command returns Certificate is valid and trusted, the certificate is trusted. If it returns an error with Certificate error, the error should tell you what went wrong.
Java
To test your Java applications that use JKS as a trust store, you can make HTTPS connections to endpoints that use Amazon Trust Services certificates.
1. Copy the Java code and name the file SSLTester.java.
In the code, you can replace the urls variable with additional URLs to test HTTPS. See the Amazon Trust Services website for additional test URLs.
Update your_keystore.jks and your password with your JKS file path and password.
import javax.net.ssl.SSLContext;
import javax.net.ssl.TrustManagerFactory;
import java.io.FileInputStream;
import java.net.URL;
import java.security.KeyStore;
import java.security.cert.Certificate;
import java.security.cert.X509Certificate;

public class SSLTester {
     public static void main(String[] args) {
         // Enable revocation checking
         System.setProperty("com.sun.net.ssl.checkRevocation", "true");
         System.setProperty("com.sun.security.enableCRLDP", "true");
         System.setProperty("com.sun.security.enableAIAcaIssuer", "true");
         // Define your HTTPS URLs here
         String[] urls = {
              "https://valid.rootca1.demo.amazontrust.com/",  // Use an Amazon Trust Services Valid test URL (Example: https://valid.rootca1.demo.amazontrust.com/)
              "https://revoked.rootca1.demo.amazontrust.com/", // Use an Amazon Trust Services Revoked test URL (Example: https://revoked.rootca1.demo.amazontrust.com/)
              "https://expired.rootca1.demo.amazontrust.com/", // Use an Amazon Trust Services Expired test URL (Example: https://expired.rootca1.demo.amazontrust.com/)
              "https://ec2.amazonaws.com" // AWS Service Endpoint
		  };
          String keystorePath = "your_keystore.jks"; // Define your .jks file
          String keystorePassword = "your password"; // Pass your keystore password

          try {
             // Load the JKS
             KeyStore trustStore = KeyStore.getInstance("JKS");
             FileInputStream fis = new FileInputStream(keystorePath);
             trustStore.load(fis, keystorePassword.toCharArray());
             fis.close();

             // Initialize TrustManagerFactory with JKS
             TrustManagerFactory tmf =
TrustManagerFactory.getInstance(TrustManagerFactory.getDefaultAlgorithm());
             tmf.init(trustStore);
            // Initialize SSLContext
            SSLContext sslContext =
SSLContext.getInstance("TLS");
             sslContext.init(null, tmf.getTrustManagers(), null);

             // Test SSL connections to URLs
             for (String urlStr : urls) {
                 System.out.println("Testing URL: " + urlStr);
                 try {
                     URL url = new URL(urlStr);
                     javax.net.ssl.HttpsURLConnection conn = (javax.net.ssl.HttpsURLConnection) url.openConnection();                    conn.setSSLSocketFactory(sslContext.getSocketFactory());
                     conn.connect();

                     // Get server certificate
                     Certificate[] certs =
conn.getServerCertificates();
                     for (Certificate cert : certs) {
                         if (cert instanceof X509Certificate) {
                             X509Certificate x509Cert = (X509Certificate) cert;
                             System.out.println("Certificate: " + x509Cert.getSubjectDN());
                         }
                     }
                     System.out.println("Connection successful for " + urlStr);
                     conn.disconnect();
                 } catch (Exception e) {
                     System.err.println("Failed for " + urlStr + ": " + e.getMessage());
                 }
             }
         } catch (Exception e) {
             e.printStackTrace();
         }
     }
 }
2. After you save the file, compile it and run.
javac SSLTester.java java SSLTester.java
3. Check the output after it’s finished running.
For Valid URLs, you should see Connection successful:
Connection successful for https://valid.rootca1.demo.amazontrust.com/
For Revoked URLs, you should see Certificate has been revoked:
failed: java.security.cert.CertPathValidatorException: Certificate has been revoked, reason: UNSPECIFIED
For Expired URLs, you should see Validity check failed:
When your web browser, device, or application performs HTTPS connections, it validates the certificate presented by the server using its trust store. A trust store is a collection of trusted CA certificates, primarily consisting of root CA certificates. When trusting endpoints using public certificates issued through ACM, best practice recommends installing the five Amazon Trust Services root CA certificates into your trust store. Be aware that trusting only the Amazon Trust Services intermediate CA certificates, such as Amazon RSA 2048 M01 and Amazon RSA 2048 M02, increases your application’s risk for outages. This is because of the non-deterministic nature of the dynamic intermediate CA (ICA) model. It’s worth noting that trust store configurations can vary across different applications. Furthermore, applications can also source their trust store from different locations. For example, you can have a Java application hosted on a Windows-based operating system that sources its trust store from a Java Keystore (JKS) file rather than the default Windows trust store location Trusted Root Certification Authorities. This means that you should thoroughly test your application after installing the Amazon Trust Services root CA certificates in your trust store. This will help to sustain reliable HTTPS connections to endpoints using ACM certificates.
If you have feedback about this post, submit comments in the Comments section below. If you have questions about this post, contact AWS Support.
Last month, we announced new sovereign controls and governance structure for the AWS European Sovereign Cloud. The AWS European Sovereign Cloud is a new, independent cloud for Europe, designed to help customers meet their evolving sovereignty needs, including stringent data residency, operational autonomy, and resiliency requirements. Launching by the end of 2025, the AWS European Sovereign Cloud will be entirely located within the European Union (EU) and operate as an independent cloud for Europe. Last month, we announced plans to launch a dedicated European certificate authority (CA), or trust service provider, to support autonomous trust service operations within the AWS European Sovereign Cloud.
We are actively building out the first AWS Region of the AWS European Sovereign Cloud in the state of Brandenburg, Germany. We are on track for launch and AWS services are being deployed, configured, and tested for autonomous operations in the AWS European Sovereign Cloud. The AWS European Sovereign Cloud infrastructure will be physically and logically separate from other Regions. We designed the AWS European Sovereign Cloud to have no critical dependencies on non-EU infrastructure. Everything needed to operate the AWS European Sovereign Cloud is in the EU: the talent, the technology, the infrastructure, and the leadership. In addition to independent infrastructure, there will be zero operational control outside of EU borders. Only AWS employees, residing in the EU, will control day-to-day operations, including access to data centers, technical support, and customer service for the AWS European Sovereign Cloud.
For the first time, we will provide a dedicated sovereign European trust service provider (EU-TSP). This EU-TSP will autonomously operate its own CA key materials and perform certificate issuance functions within the AWS European Sovereign Cloud. A trust service provider is an entity that manages the policies and operations for a set of root and subordinate certificate authorities. A root CA is a cryptographic building block and root of trust upon which end entity certificates can be issued. It represents a private key for signing (issuing) certificates and a root certificate that identifies the root CA and binds the private key to the name of the CA. In short, the EU-TSP is an autonomous trust service provider in Europe, for Europe.
The EU-TSP will be the public root of trust for the AWS European Sovereign Cloud, helping to maintain the confidentiality and integrity of network communications. The EU-TSP will provide the default CA used by AWS service endpoints, AWS Certificate Manager (ACM), and ACM integrated services. For AWS European Sovereign Cloud customers, this means that even in the event of a material loss of connectivity outside of the EU, the EU-TSP will continue to provide trust services autonomously.
We recently completed the cryptographic key signing ceremony for our EU-TSP at a secure EU location, witnessed by external, third-party auditors. The resulting root CAs have been submitted for inclusion to popular web browsers used by AWS customers. This EU-TSP will be operated in accordance with the requirements of the Certificate Authority/Browser Forum. All the key material for the EU-TSP is located within EU borders, and only EU residents have the ability to operate, control, or reconfigure the EU-TSP.
To maintain verifiable trust, we will engage independent EU-based auditors to assure the EU-TSP controls are designed appropriately, operate effectively, and can help customers satisfy their compliance obligations. We will make the audit reports publicly available.
The EU-TSP will be active and providing autonomous trust services when the AWS European Sovereign Cloud launches at the end of 2025. To learn more, visit AWS European Sovereign Cloud.
If you have feedback about this post, submit comments in the Comments section below. If you have questions about this post, contact AWS Support.
AWS Certificate Manager (ACM) simplifies the provisioning, management, and deployment of public and private TLS certificates for AWS services and your on-premises and hybrid applications. To further enhance the flexibility of ACM for diverse workloads, we’re introducing a powerful new capability: ACM exportable public certificates. You can use this capability to export public TLS certificates and associated private keys from ACM, which can be used to secure workloads on Amazon Elastic Compute Cloud (Amazon EC2) instances, Amazon Elastic Kubernetes Service (Amazon EKS) pods, on-premises servers, or servers hosted with other cloud providers. The capability supports public certificates that are newly created in your AWS account
In this post, we show you how to automate the export and distribution of public exportable certificates across a diverse infrastructure. We walk you through creating workflows that automatically deliver certificates to multiple destinations including EC2 instances and virtual machines in hybrid environments. We explore how this automation works, its benefits, and provide a step-by-step guide to get started. Additionally, we explore how you can use integration with Amazon EventBridge to trigger automatic certificate exports when certificates are issued or renewed, streamlining certificate deployment across heterogeneous environments and significantly reducing management overhead.
Background: ACM and certificate management
ACM is a managed service that removes the complexity of purchasing, uploading, and renewing TLS certificates. It provides public certificates at no additional cost for AWS services integrated with ACM such as Elastic Load Balancing (ELB), Amazon CloudFront, and Amazon API Gateway. ACM also supports importing third-party public certificates and issuing private certificates through AWS Private Certificate Authority. Prior to this release, ACM public certificates were designed for AWS services integrated with ACM such as CloudFront, providing seamless TLS encryption for those services. For use cases involving third-party content delivery networks (CDNs) or workloads terminating TLS on EC2 instances, customers typically sourced certificates from other providers or imported them into ACM for centralized management. Customers have told us that they would like to use ACM for these use cases, extending its simplicity and scalability to a wider range of environments. The new ACM exportable public certificates capability fulfills this need, enabling you to export ACM-managed public certificates for use with your custom workloads while maintaining centralized management and automated renewals.
With ACM you can now request a public certificate, validate domain ownership, and export the certificate for use with software that terminates TLS such as Apache, NGINX, or Microsoft IIS. ACM handles certificate renewals, reducing the risk of expirations that can disrupt your applications.
How it works: ACM public certificate issuance and renewal
To use ACM exportable public certificates, you need to understand how to automate certificate management using the issuance and renewal processes. In this section, we describe these processes and their automation capabilities, which are critical for deploying and maintaining certificates.
ACM public certificate issuance
Issuing an ACM public certificate involves the following steps:
Request a certificate: In the AWS Management Console for ACM, or the AWS Command Line Interface (AWS CLI) or API, initiate a certificate request by specifying the domain names you want to secure (for example, example.com or *.example.com).
Validate domain ownership: ACM requires that you prove control over the domain. If the domain is hosted on Amazon Route 53, you can request that ACM validate the domain ownership. For domains hosted outside AWS, you can use DNS validation (adding a CNAME record) or email validation (responding to emails sent to domain contacts).
Certificate issuance: After the domain ownership has been validated, ACM issues the certificate, which includes the public key, private key, and certificate chain.
Associate the certificate with an integrated AWS service: See Services integrated with ACM for information about associating the certificate with an integrated AWS service.
Export the certificate: With the new capability you can now export the public certificate, private key, and certificate chain using the ACM console, AWS CLI, or API for use on servers that aren’t integrated with ACM.
Bind to application: Install the exported certificate on your server (for example, Apache or NGINX) to enable TLS termination.
With the launch of this new capability, you can now control the future exportability of public certificates that you create in ACM.
To create an exportable public certificate, use the ACM console to create a new public certificate. To get started, choose Request certificate in the ACM console and on the Request public certificate page, under Allow export, select Enable export. If you select Disable export, the private key for this certificate will be disallowed for exporting from ACM, which cannot be changed after certificate issuance.
Figure 1: Request a public certificate and enable export
After creating your certificate with the Enable export option selected and completing domain ownership validation, you can proceed with the export process, as shown in Figure 2. To export your certificate, select it from the list of certificates, choose More actions, and select Export.
Figure 2: Export a certificate
ACM public certificate renewal
ACM automates the process of certificate renewal, which includes:
Renewal initiation: ACM automatically initiates renewal 60 days before a certificate expires.
Domain revalidation: ACM revalidates domain ownership using the same method as the initial issuance (DNS or email).
Certificate update: Upon successful revalidation, ACM issues a new certificate with the same Amazon Resource Name (ARN) with updated validity dates.
When a certificate is renewed in ACM, the service automatically sends an EventBridge event to notify you that the new certificate is available. If the renewal fails, ACM sends notifications to both the AWS Health Dashboard and EventBridge. To stay informed about these certificate events, you can create EventBridge rules that monitor for specific certificate-related events. You can configure these rules to send notifications to an Amazon Simple Notification Service Amazon (SNS) topic so that interested parties receive timely updates about their certificate status.
New EventBridge schema fields: Following successful ACM certificate renewal, the ACM Certificate Available event now includes an exportable field that indicates with TRUE|FALSE whether the public certificate is ready to be exported.
Export and update: You can export the renewed certificate and update it on your servers manually or using EventBridge targets such as AWS Systems Manager Automation documents triggered by EventBridge rules. For more information, see Event bus targets in Amazon EventBridge.
You can use EventBridge rules to monitor specific events and route them to one or more targets (such as Amazon SNS topics, AWS Lambda functions, or other AWS services) for processing. For example, when domain validation fails because of DNS configuration issues, ACM generates an ACM Certificate Renewal Action RequiredEventBridge event. By creating an EventBridge rule that targets an SNS topic, you can subscribe to receive email alerts and take necessary corrective actions.
Automating deployment of renewed certificates using EventBridge
The certificate renewal process helps make sure that your TLS certificates remain valid without manual intervention, but updating certificates across diverse environments can still require effort. When ACM renews a certificate, it generates an EventBridge event. You can configure EventBridge rules to trigger targets based on this event, such as:
Send notifications: Route the event to Amazon SNS to send email or SMS notifications to administrators.
Automate certificate deployment: Trigger Lambda functions or Systems Manager Automation documents to retrieve the renewed certificate using the ACM API and update it on your servers.
Monitor renewal failures: Configure alerts based on ACM certificate renewal failure events. These events can be directly routed to notification channels to inform you about issues such as domain validation errors.
To set this up, create an EventBridge rule to match the ACM renewal event, specify a target, (such as an SNS topic or Lambda function). This automation minimizes manual intervention, helping to facilitate seamless certificate updates across your infrastructure.
Solution overview
In the section, we describe two workflows. The first demonstrates an automated process for exporting existing ACM public certificates and installing them on target EC2 instances or virtual machines. The second workflow is triggered when public certificates are automatically renewed by ACM when they become available in ACM, followed by updating these certificates on downstream EC2 instances and virtual machines. While this solution uses EC2 instances and virtual machines as the target systems, the same methods can be applied to refresh public certificates at scale across various types of systems.
Prerequisites
To extend this automated public certificate export and update process to:
Add TargetTagKey tags to EC2 instances and virtual machines where you want to deploy renewed certificates. The automation uses these tags to identify target instances.
The ExportCertificate API requires a certificate passphrase for operation. To maintain security best practices, we recommend storing passwords in encrypted form using password vaults instead of plain text storage. Our implementation uses AWS Secrets Manager to securely store these sensitive credentials. The solution also uses Amazon DynamoDB to maintain certificate metadata, which includes a reference to the corresponding secret name stored in Secrets Manager. For added security, the DynamoDB table’s data is automatically encrypted at rest using AWS Key Management Service (AWS KMS).
ACM certificate export
Figure 3: ACM certificate issuance and export workflow
The workflow shown in Figure 3 demonstrates an automated process for exporting existing public ACM certificates through an API-driven process and deploying them to downstream systems.
The process begins when a user makes a request to an API Gateway endpoint, providing essential parameters including the CertificateArn to identify the certificate you want to export, CertName for certificate identification, and TargetTagKey and TargetTagValue for identifying the target EC2 instances where you want this certificate to be installed. The following is an example of the payload sent to API Gateway:
Upon receiving the request, API Gateway triggers an AWS Step Functions workflow containing multiple orchestrated states.
The initial state executes a Lambda function named acm-Export, which generates a passphrase for the private key.
The acm-Export lambda function also securely stores the generated passphrase in Secrets Manager and uses the generated passphrase to export the ACM certificate.
After completing the acm-Export function, the Step Functions workflow invokes the Lambda ssm-run function.
This function performs two operations: it checks the certificate’s existence in DynamoDB (which serves as an inventory tracking system) and manages record-keeping. When the function encounters an existing certificateARN, it updates the record with the current CertExpiryDate and LastExportedDate timestamp values. For certificates being exported for the first time, the Lambda function creates a new record in DynamoDB if no matching entry exists. This new record captures the certificate’s metadata, including its details and tracking information. Figure 4 shows how this metadata is structured in a DynamoDB table entry in the console.
Figure 4: Certificate metadata in a DynamoDB table
Following the metadata verification step in DynamoDB, the Lambda function also initiates running a custom Systems Manager document called Install-ACMCertificate. This document handles the installation of newly exported public certificates onto specified EC2 instances. The same Systems Manager document can be used for certificate installation or updates onto on-premises servers, providing flexibility in certificate deployment.
When the Systems Manager document execution succeeds, it deploys the newly exported public certificates to EC2 instances matching the TargetTagKey. By default, on Linux servers, certificates are stored in /etc/ssl/certs and /etc/ssl/private, though these paths can be customized in the Systems Manager document.
After successfully running this Systems Manager document, the Step Functions workflow then advances to its next state, which triggers another Lambda function named Statuscheck. This function monitors the execution status of the previously initiated Systems Manager document. The Step Functions workflow concludes its execution after it confirms the successful installation of certificates on the targeted EC2 instances.
ACM certificate renewal and export
Figure 5: ACM certificate and renewal process
When a certificate is within 60 days of expiring, ACM automatically begins the renewal process. When ACM successfully completes a certificate renewal, it generates an event in EventBridge as shown in the following example:
The workflow illustrated in Figure 5 showcases an automated system for exporting existing public ACM certificates using an API-driven process and deploying them to downstream systems.
The solution uses an EventBridge rule that watches for certificate renewal notifications and triggers the acm-renew Lambda function in response. The function begins its execution by receiving the certificate ARN from the ACM event. Using this ARN as a lookup key, it queries a DynamoDB table to retrieve the associated certificate metadata. From this query, it extracts essential certificate details including the Certificate Name and the TargetTag Key-Value pairs that identify which resources need the updated certificate. These details are needed for the subsequent certificate deployment process and help make sure that the updates are applied to the correct systems.
This information is then formatted into a payload and used to trigger a Step Functions workflow. This Step Functions workflow follows the same process described in the ACM Certificate Export section.
Steps 3 through 9 follow the process described in the ACM Certificate Export section. Upon successful completion of step 9, the Step Functions workflow concludes its execution. At this point, the renewed public certificate has been successfully installed on the targeted EC2 instances, completing the automated certificate export and installation process.
Detailed instructions for downloading the solution, executing it, validating the certificate export, and deploying it to your AWS account are available on GitHub.
Pricing and availability
ACM exportable public certificates are available in AWS commercial Regions, AWS GovCloud (US) Regions, and China Regions and follow a pay-as-you go pricing model, with no upfront commitments. You pay only for the certificates you export. Public certificates for AWS Services integrated with ACM such as ELB, CloudFront, and API Gateway remain available at no additional cost. For detailed pricing, see AWS Certificate Manager pricing.
Conclusion
The ACM exportable public certificates capability empowers customers to secure diverse workloads with a unified, managed certificate solution. By enabling certificate exports for EC2, containers, on-premises servers and other cloud providers, ACM simplifies TLS management, while offering centralized control, automated renewals and cost-effective pricing. Get started today by exploring this feature in the ACM console and streamline your certificate management workflows.
If you have feedback about this post, submit comments in the Comments section below. If you have questions about this post, contact AWS Support.
Now you can export public certificates from ACM, get access to the private keys, and use them on any workloads running on Amazon Elastic Compute Cloud (Amazon EC2) instances, containers, or on-premises hosts. The exportable public certificate are valid for 395 days. There is a charge at time of issuance, and again at time of renewal. Public certificates exported from ACM are issued by Amazon Trust Services and are widely trusted by commonly used platforms such as Apple and Microsoft and popular web browsers such as Google Chrome and Mozilla Firefox.
ACM exportable public certificates in action To export a public certificate, you first request a new exportable public certificate. You cannot export previously created public certificates.
To get started, choose Request certificate in the ACM console and choose Enable export in the Allow export section. If you select Disable export, the private key for this certificate will be disallowed for exporting from ACM and this cannot be changed after certificate issuance.
You can also use the request-certificate command to request a public exportable certificate with Export=ENABLED option on the AWS Command Line Interface (AWS CLI).
After you request the public certificate, you must validate your domain name to prove that you own or control the domain for which you are requesting the certificate. The certificate is typically issued within seconds after successful domain validation.
When the certificate enters status Issued, you can export your issued public certificate by choosing Export.
Enter a passphrase for encrypting the private key. You will need the passphrase later to decrypt the private key. To get the public key, Choose Generate PEM Encoding.
You can copy the PEM encoded certificate, certificate chain, and private key or download each to a separate file.
You can use the export-certificate command to export a public certificate and private key. For added security, use a file editor to store your passphrase and output keys to a file to prevent being stored in the command history.
You can now use the exported public certificates for any workload that requires SSL/TLS communication such as Amazon EC2 instances. To learn more, visit Configure SSL/TLS on Amazon Linux in your EC2 instances.
Things to know Here are a couple of things to know about exportable public certificates:
Key security – An administrator of your organization can set AWS IAM policies to authorize roles and users who can request exportable public certificates. ACM users who have current rights to issue a certificate will automatically get rights to issue an exportable certificate. ACM admins can also manage the certificates and take actions such as revoking or deleting the certificates. You should protect exported private keys using secure storage and access controls.
Revocation – You may need to revoke exportable public certificates to comply with your organization’s policies or mitigate key compromise. You can only revoke the certificates that were previously exported. The certificate revocation process is global and permanent. Once revoked, you can’t retrieve revoked certificates to reuse. To learn more, visit Revoke a public certificate in the AWS documentation.
Renewal – You can configure automatic renewal events for exportable public certificates by Amazon EventBridge to monitor certificate renewals and create automation to handle certificate deployment when renewals occur. To learn more, visit Using Amazon EventBridge in the AWS documentation. You can also renew these certificates on-demand. When you renew the certificates, you’re charged for a new certificate issuance. To learn more, visit Force certificate renewal in the AWS documentation.
Now available You can now issue exportable public certificates from ACM and export the certificate with the private keys to use other compute workloads as well as ELB, Amazon CloudFront, and Amazon API Gateway.
You are subject to additional charges for an exportable public certificate when you create it with ACM. It costs $15 per fully qualified domain name and $149 per wildcard domain name. You only pay once during the lifetime of the certificate and will be charged again only when the certificate renews. To learn more, visit the AWS Certificate Manager Service Pricing page.
Today, I’m happy to announce the general availability of Amazon CloudFront SaaS Manager, a new feature that helps software-as-a-service (SaaS) providers, web development platform providers, and companies with multiple brands and websites efficiently manage delivery across multiple domains. Customers already use CloudFront to securely deliver content with low latency and high transfer speeds. CloudFront SaaS Manager addresses a critical challenge these organizations face: managing tenant websites at scale, each requiring TLS certificates, distributed denial-of-service (DDoS) protection, and performance monitoring.
With CloudFront Saas Manager, web development platform providers and enterprise SaaS providers who manage a large number of domains will use simple APIs and reusable configurations that use CloudFront edge locations worldwide, AWS WAF, and AWS Certificate Manager. CloudFront SaaS Manager can dramatically reduce operational complexity while providing high-performance content delivery and enterprise-grade security for every customer domain.
How it works In CloudFront, you can use multi-tenant SaaS deployments, a strategy where a single CloudFront distribution serves content for multiple distinct tenants (users or organizations). CloudFront SaaS Manager uses a new template-based distribution model called a multi-tenant distribution to serve content across multiple domains while sharing configuration and infrastructure. However, if supporting single websites or application, a standard distribution would be better or recommended.
A template distribution defines the base configuration that will be used across domains such as origin configurations, cache behaviors, and security settings. Each template distribution has a distribution tenant to represent domain-specific origin paths or origin domain names including web access control list (ACL) overrides and custom TLS certificates.
Optionally, multiple distribution tenants can use the same connection group that provides the CloudFront routing endpoint that serves content to viewers. DNS records point to the CloudFront endpoint of the connection group using a Canonical Name Record (CNAME).
CloudFront SaaS Manager in action I’d like to give you an example to help you understand the capabilities of CloudFront SaaS Manager. You have a company called MyStore, a popular e-commerce platform that helps your customer easily set up and manage an online store. MyStore’s tenants already enjoy outstanding customer service, security, reliability, and ease-of-use with little setup required to get a store up and running, resulting in 99.95 percent uptime for the last 12 months.
Customers of MyStore are unevenly distributed across three different pricing tiers: Bronze, Silver, and Gold, and each customer is assigned a persistent mystore.app subdomain. You can apply these tiers to different customer segments, customized settings, and operational Regions. For example, you can add AWS WAF service in the Gold tier as an advanced feature. In this example, MyStore has decided not to maintain their own web servers to handle TLS connections and security for a growing number of applications hosted on their platform. They are evaluating CloudFront to see if that will help them reduce operational overhead.
Let’s find how as MyStore you configure your customer’s websites distributed in multiple tiers with the CloudFront SaaS Manager. To get started, you can create a multi-tenant distribution that acts as a template corresponding to each of the three pricing tiers the MyStore offers: Bronze, Sliver, and Gold shown in Multi-tenant distribution under the SaaS menu on the Amazon CloudFront console.
To create a multi-tenant distribution, choose Create distribution and select Multi-tenant architecture if you have multiple websites or applications that will share the same configuration. Follow the steps to provide basic details such as a name for your distribution, tags, and wildcard certificate, specify origin type and location for your content such as a website or app, and enable security protections with AWS WAF web ACL feature.
When the multi-tenant distribution is created successfully, you can create a distribution tenant by choosing Create tenant in the Distribution tenants menu in the left navigation pane. You can create a distribution tenant to add your active customer to be associated with the Bronze tier.
Each tenant can be associated with up to one multi-tenant distribution. You can add one or more domains of your customers to a distribution tenant and assign custom parameter values such as origin domains and origin paths. A distribution tenant can inherit the TLS certificate and security configuration of its associated multi-tenant distribution. You can also attach a new certificate specifically for the tenant, or you can override the tenant security configuration.
When the distribution tenant is created successfully, you can finalize this step by updating a DNS record to route traffic to the domain in this distribution tenant and creating a CNAME pointed to the CloudFront application endpoint. To learn more, visit Create a distribution in the Amazon CloudFront Developer Guide.
Now you can see all customers in each distribution tenant to associate multi-tenant distributions.
By increasing customers’ business needs, you can upgrade your customers from Bronze to Silver tiers by moving those distribution tenants to a proper multi-tenant distribution.
During the monthly maintenance process, we identify domains associated with inactive customer accounts that can be safely decommissioned. If you’ve decided to deprecate the Bronze tier and migrate all customers who are currently in the Bronze tier to the Silver tier, then you can delete a multi-tenant distribution to associate the Bronze tier. To learn more, visit Update a distribution or Distribution tenant customizations in the Amazon CloudFront Developer Guide.
By default, your AWS account has one connection group that handles all your CloudFront traffic. You can enable Connection group in the Settings menu in the left navigation pane to create additional connection groups, giving you more control over traffic management and tenant isolation.
(This survey is hosted by an external company. AWS handles your information as described in the AWS Privacy Notice. AWS will own the data gathered via this survey and will not share the information collected with survey respondents.)
Today’s organizations rely heavily on secure and reliable communication channels and digital certificates play a crucial role in securing internal and external-facing infrastructure by establishing trust and enabling encrypted communication. While public certificates are commonly used to secure internet applications, many organizations prefer private certificates for internal resources to maintain confidentiality and enable custom configurations that public certificates don’t support. AWS Private Certificate Authority (AWS Private CA) offers a comprehensive solution to create and manage private certificate hierarchies within an organization’s public key infrastructure (PKI). AWS handles the heavy lifting of certificate authority (CA) management, allowing organizations to issue certificates for various use cases, including creating encrypted communication channels, authenticating clients, and cryptographically signing code. These certificates remain trusted within the organization, helping to ensure internal security without exposing them to the public internet.
AWS Certificate Manager (ACM) and AWS Private CA provide robust tools to issue and manage certificates seamlessly within AWS. However, as workloads evolve—spanning cloud native microservices, containerized environments, and hybrid edge deployments—the default certificate configurations might not meet every need. For instance, private TLS certificates requested using ACM come with a fixed 13-month validity period, which ACM tracks and renews automatically. But what if your organization requires certificates with custom validity periods such as short-lived certificates for ephemeral containers or certificates with extended durations for your on-premises systems? This is a common scenario for enterprises using modern architectures. You can gain significant advantages by creating and updating your certificates through AWS Command Line Interface (AWS CLI) or AWS SDKs. These powerful tools offer enhanced flexibility and integrate seamlessly with existing workflows.
Taking this efficiency even further, you can optimize your certificate management by bypassing the AWS Management Console, using the AWS CLI or SDK to generate certificates programmatically through their custom PKI pipelines.
You can use this automation-friendly approach to maintain full control over your certificate lifecycle, though it’s worth noting that ACM doesn’t inherently track the expiration of certificates that are issued using the acm-pca:IssueCertificate API, and aren’t requested using ACM. Lack of oversight on certificate expiration can lead to operational disruptions and compromise the accessibility of your applications. The AWS Private CA offers a powerful option to address this gap: the Generate audit report option. This option produces a detailed report of the certificates issued by your certificate hierarchy—including their expiration dates—regardless of how they were generated. However, with organizations managing vast numbers of certificates across multiple certificate hierarchies, manual report generation and review becomes impractical and unsustainable.
In this blog post, we guide you through a custom automation workflow that harnesses AWS Private CA audit reports to monitor certificate expirations proactively. The solution uses Amazon EventBridge, AWS Lambda, Amazon Simple Storage Service (Amazon S3), Amazon Simple Notification Service (Amazon SNS), and AWS Security Hub to generate daily reports, review them for expiring certificates, notify stakeholders, and generate log findings for centralized visibility. We’ve also included an AWS CloudFormation template to deploy this solution in your AWS environments, complete with step-by-step instructions. This approach can help ensure that you stay ahead of certificate expirations.
The challenge: Certificate management beyond the defaults
To understand why this solution matters, let’s explore the evolving needs of certificate management.
Certificates requested using ACM that are issued by your private CA through the console default to a 13-month validity period; a reasonable middle ground for many workloads. ACM tracks these certificates, monitors their expiration, and even automates renewals. This hands-off approach works well for standard cloud applications, but modern IT environments are rarely standard because of the diverse requirements of real-world use cases.
Consider these real-world examples:
Short-lived certificates: in containerized environments running on EKS or Amazon Elastic Container Service (Amazon ECS) certificates with validity periods of a few hours or days are increasingly common. Service meshes like Istio or Linkerd rely on short-lived certificates to secure pod-to-pod communication, reducing the threat surface if a key is compromised. A 13-month certificate might not be optimal for this use case.
Long-lived certificates: On the other hand, some workloads—often found in traditional or resource-constrained environments—benefit from certificates with extended validity periods. For instance, systems deployed in locations with unreliable or restricted network access might require longer-lived certificates to minimize the challenges of frequent renewals, which could disrupt operations or require manual intervention. Likewise, infrastructures running critical applications with minimal automation might lean towards multi-year certificates to reduce the administrative burden and maintain consistent security over time. In such cases, long-lived certificates offer a dependable solution, balancing security needs with operational simplicity and minimizing the frequency of maintenance tasks.
To address these needs, many organizations turn to their own continuous integration and delivery (CI/CD) pipelines and custom automation using AWS Private CA and ACM. Using AWS CLI or SDKs, you can use AWS Private CA to issue certificates that have custom validity periods tailored to their workload requirements.
Even if certificates aren’t requested using ACM, you can optionally re-import the certificates into ACM. After the certificates have been imported, ACM begins tracking and monitoring them. However, you have the flexibility to decide which certificates to import. Certificates that aren’t imported into ACM will not be tracked by the service. These certificates won’t appear in the ACM console, their expiration events won’t trigger Amazon CloudWatch Logs and managed renewals of these certificates aren’t supported by ACM.
Without a centralized view, you must manually monitor expiration dates, a task that quickly becomes unmanageable as certificate volume grows. An expired certificate can lead to downtime (for example, a load balancer rejecting traffic). This is where the ability to generate an audit report from AWS Private CA can help you. It provides a comprehensive list of all the certificates issued by your CA, including serial numbers, issuance dates, and expiration dates. However, generating this report manually using the console and reviewing it daily isn’t scalable.
In the following section, we show you how to set up a more scalable, automated solution that will notify you when certificates need to be renewed.
Prerequisites
For this walkthrough, you need to have the following:
An AWS account
A private CA from AWS Private CA
An externally created certificate imported into ACM
Solution overview
This audit generation solution provides an automated, scalable, and integrated approach to generating and analyzing audit reports for certificates issued by AWS Private CA. It uses AWS services to monitor certificate statuses, detect impending expirations, and notify administrators while integrating findings into Security Hub for centralized security monitoring. The solution helps ensure timely awareness of expiring certificates; enhancing compliance and operational security.
The following figure shows the solution architecture. The process begins with an EventBridge rule (PCAReportRule) that triggers the audit report generation on a user-defined schedule (for example: daily). This rule invokes the first of the two Lambda functions: PCAauditReportLambdaGenerator. This function interacts with the AWS boto3 SDK to generate an audit report, capturing details of issued certificates. The report is formatted as a CSV file (with optional JSON support configurable in the Lambda function) and stored in a designated S3 bucket. To simulate expiration alerts for demonstration purposes, certificates can be issued with a validity period of less than 30 days, as opposed to the default 13-month validity of AWS Private CA certificates.
Figure 1: Solution architecture
After the audit report is uploaded to the S3 bucket, an S3:PutObject event notification triggers the second Lambda function, PCAAuditReportLambdaProcessor. This function downloads the most recent report, parses the data in the CSV file, and analyzes the details to identify certificates that are expiring within the 30-day threshold. Upon identifying expiring certificates, the function sends a consolidated notification using an Amazon SNS topic PCASNSTopic, which supports subscriptions such as an email or an optional Amazon Simple Queue Service (Amazon SQS) queue for further processing. Simultaneously, the function integrates findings into Security Hub, providing a centralized view of expiring certificates for compliance tracking and security monitoring.
The architecture is deployed using a CloudFormation template, automating the setup of the core components—EventBridge, Lambda functions, an S3 bucket, an SNS topic, and Security Hub integration—into a cohesive system. Security Hub serves as a cloud security posture management service that provides organizations with a consolidated view of their security alerts and compliance status across your AWS accounts. It functions as a central dashboard where security data from various sources and AWS services is aggregated, enabling automatic assessment of resources against established security standards while helping teams prioritize security concerns throughout their environment. This design helps ensure scalability, flexibility, and minimal manual intervention, enabling users to modify the Lambda functions to support additional report formats (such as JSON) or adjust notification thresholds as required. It’s also worth noting that you can generate a report every 30 minutes.
Deploy the solution
With the prerequisites in place and an understanding of the architecture, you’re ready to deploy and test the automation workflow and run an audit report on-demand.
Deploy the CloudFormation template
To get started, clone the following GitHub repo.
~ $ curl -O https://aws-security-blog-content.s3.us-east-1.amazonaws.com/public/sample/2526-monitor-private-ca-issued-certificates-aws-private-certificate-authority-eventbridge/ACM-PCA-Monitoring-cfn.yml

~ $ ls
ACM-PCA-Monitoring-cfn.yml
The ACM-PCA-Monitoring-cfn.yml CloudFormation template includes the following parameters, which allow you to customize the deployment:
CertificateAuthorityArn: The Amazon Resource Name (ARN) (<ARN_of_your_PrivateCA>) of your pre-existing private CA for which the audit report is generated.
S3BucketName: A new S3 bucket (<Name_of_s3_bucket>) where the audit report will be stored.
EventBridgeRuleName: The name of the EventBridge rule (<Name_of_EventBridgeRule>) to trigger the Lambda function (default value: PCAReportRule).
CronJobExpression: A cron expression (<Frequency_of_running_evaluation>) to define the schedule for report generation (default value: cron(0 21 * * ? *)).
SNSName: The name of a new Amazon SNS topic (<Name_of_SNS_Topic>) for expiration alerts (default value: PCASNSTopic).
SQSName: The name of a new Amazon SQS queue (<Name_of_SQS>) for expiration alerts (default value PCASQS).
EmailAddress: The email address for receiving notifications (<Email_to_Receive_alerts>).
CertificateExpirationThreshold: The threshold value in days (<Expiration_threshold_in_days>) to monitor for your certificate’s expiration (default value: 30).
Run the following command to create the CloudFormation stack. Stack creation will take 2–3 minutes to complete.
When stack creation is complete, you’ll get an email asking you to confirm your subscription to the specified SNS topic from the previous step.
Figure 2: Sample notification email sent by Amazon SNS
Test the automation workflow
Test the automation workflow by creating a private certificate that will trigger your expiration alert system. To do this, you’ll generate a private certificate using your private CA with an intentionally short expiration period. The certificate should expire before the threshold you set in the CloudFormation template (the default is 30 days). For example, if you kept the default 30-day threshold, the following code will generate a certificate that expires in 20 days, which should trigger the notification system:
Note: You’ll receive alerts for all certificates that are approaching expiration, even for certificates that are requested using ACM, which support managed renewal. You can compare the ARN of the expiring certificate to your list of requested certificates in the ACM console, or to the results of the acm:ListCertificates API.
With the audit report infrastructure deployed and a test certificate created within your expiration threshold, the next step is to trigger the automation workflow to generate and process the audit report.
Run an audit report on-demand
To test the EventBridge rule PCAReportRule, you’ll temporarily modify it to run every 30 minutes. When you’re done testing, you can revert it back to the original scheduled that you specified in the CloudFormation template parameters.
In the Amazon EventBridge console, choose Rules in the navigation pane. Select PCAReportRule and then choose Edit rule.
Select Define schedule.
Under Schedule pattern, select A schedule that runs at a regular rate…
Under Rate expression, for Value enter 30, and for Unit, select Minutes.
Choose Next.
Figure 3: Edit the schedule of PCAReportRule for the test
For an immediate test, you can also trigger this workflow from the Lambda console.
In the Lambda console, choose Functions in the navigation pane, and then select the PCAauditReportLambdaGenerator Lambda function.
Choose the Test tab, leave the default values for the Event JSON.
Choose Test at the top of the window.
Figure 4: Use the console to trigger a test
This Lambda function generates an AWS Private CA audit report and saves it to the specified S3 bucket at the audit-report prefix. To verify this, navigate to the Amazon S3 console and choose Buckets from the navigation pane.
Select the bucket that you created when you ran the CloudFormation template and verify the reports in the audit-report folder.
Figure 5: The audit report is saved to the specified S3 bucket
When an audit report is uploaded to the S3 bucket, it automatically triggers the PCAAuditReportLambdaProcessor Lambda function through S3 event notifications. The function analyzes the audit report to identify any certificates approaching expiration. If certificates are found that will expire within the specified threshold (30 days by default), the function automatically creates detailed findings in Security Hub for tracking and monitoring purposes. These findings include important details such as the certificate ARN, expiration date, and severity level.
Because you created a test certificate that expires in 20 days (which is within the test threshold), the automation workflow will detect this and generate corresponding findings in Security Hub. To see the results go to the Security Hub console and choose Findings in the navigation pane.
Figure 6: View the audit report findings in Security Hub
After creating Security Hub findings, the Lambda function sends detailed certificate expiration alerts through Amazon SNS. You’ll receive an email notification at the address you provided in the CloudFormation parameters. The email will contain important information about the certificates approaching expiration, including their ARNs and exact expiration dates. Here’s an example of the email notification format
Figure 7: Sample notification email sent by Amazon SNS
Conclusion
Certificate management is crucial for maintaining security across modern workloads, and AWS Private CA plays a vital role in issuing certificates with custom validity periods. The solution in this post delivers a robust, automated approach to certificate lifecycle management by seamlessly integrating several AWS services.
The solution combines Amazon EventBridge for scheduled execution of audit reports, AWS Lambda for automated processing and analysis, Amazon S3 for secure storage of audit reports, Amazon SNS for immediate notification delivery, and AWS Security Hub for centralized monitoring and tracking. This powerful integration creates a comprehensive automation workflow that actively monitors certificate expirations and provides timely alerts across your cloud, hybrid, and edge deployments.
By implementing this CloudFormation template, you can:
Automate the generation and processing of AWS Private CA audit reports at scheduled intervals
Receive immediate notifications when certificates approach their expiration threshold
Maintain centralized visibility through detailed Security Hub findings
Track certificate lifecycles across your entire infrastructure
Help ensure compliance with organizational security policies
Minimize the risk of service disruptions due to expired certificates
The solution transforms traditional certificate management from a manual, error-prone process into a streamlined, automated workflow. It provides security teams with the tools they need to proactively manage certificate lifecycles, maintain compliance requirements, and respond quickly to potential certificate-related issues. The automated notifications and centralized monitoring through Security Hub help ensure that no certificate expiration goes unnoticed, allowing teams to take timely action before service disruptions occur.
The result is a scalable, reliable system that simplifies certificate management and strengthens your organization’s overall security posture through consistent monitoring and proactive management of certificate lifecycles.
If you have feedback about this post, submit comments in the Comments section below.
These three services were chosen because they are security-critical AWS services with the most urgent need for post-quantum confidentiality. These three AWS services have previously deployed support for CRYSTALS-Kyber, the predecessor of ML-KEM. Support for CRYSTALS-Kyber will continue through 2025, but will be removed across all AWS service endpoints in 2026 in favor of ML-KEM.
Our migration to post-quantum cryptography
AWS is committed to following our post-quantum cryptography migration plan. As part of this commitment, and part of the AWS post-quantum shared responsibility model, AWS plans to deploy support for ML-KEM to all AWS services with HTTPS endpoints over the coming years. AWS customers must update their TLS clients and SDKs to offer ML-KEM when connecting to AWS service HTTPS endpoints. This will protect against future harvest now, decrypt later threats posed by quantum computing advancements. Meanwhile, AWS service HTTPS endpoints will be responsible for selecting ML-KEM when offered by clients.
The effect of hybrid post-quantum ML-KEM on TLS performance
Migrating from an Elliptic Curve Diffie-Hellman (ECDH)-only key agreement to an ECDH+ML-KEM hybrid key agreement necessarily requires that the TLS handshake send more data and perform more cryptographic operations. Switching from a classical to a hybrid post-quantum key agreement will transfer approximately 1600 additional bytes during the TLS handshake and will require approximately 80–150 microseconds more compute time to perform ML-KEM cryptographic operations. This is a one-time TLS connection startup cost and is amortized over the lifetime of the TLS connection across the HTTP requests sent over that connection.
AWS is working to provide a smooth migration to hybrid post-quantum key agreement for TLS. This work includes performing benchmarks on example workloads to help customers understand the impact of enabling hybrid post-quantum key agreement with ML-KEM.
Using the AWS SDK for Java v2, AWS has measured the number of AWS KMS GenerateDataKey requests per second that a single thread can issue serially between an Amazon Elastic Compute Cloud (Amazon EC2) C6in.metal client and the public AWS KMS endpoint. Both the client and server were in the us-west-2 Region. Classical TLS connections to AWS KMS negotiated the P256 elliptic curve for key agreement, and hybrid post-quantum TLS connections negotiated the X25519 elliptic curve with ML-KEM-768 for their hybrid key agreement. Your own performance characteristics might differ and will depend on your environment, including your instance type, your workload profiles, the amount of parallelism and number of threads used, and your network location and capacity. The HTTP request transaction rates were measured with TLS connection reuse both enabled and disabled.
Figure 1 shows the number of requests per second issued at different percentiles when TLS 1.3 connection reuse is disabled. It shows that in the worst-case scenario—when the cost of a TLS handshake is never amortized and every HTTP request must perform a full TLS handshake—enabling hybrid post-quantum TLS decreases the transactions per second (TPS) by about 2.3 percent on average, from 108.7 TPS to 106.2 TPS.
Figure 1: AWS KMS GenerateDataKey requests per second without TLS connection reuse
Figure 2 shows the number of requests per second issued at different percentiles when TLS connection reuse is enabled. Reusing TLS connections and amortizing the cost of a TLS handshake over many HTTP requests is the default setting in the AWS SDK for Java v2. We show that enabling hybrid post-quantum TLS when using default SDK settings leaves the TPS rate almost unchanged, with only a 0.05 percent decrease on average, from 216.1 TPS to 216.0 TPS.
Figure 2: AWS KMS GenerateDataKey requests per second with TLS connection reuse
Our results show that the performance impact of enabling hybrid post-quantum TLS is negligible when using typical configuration settings in your SDK. Our measurements show that enabling hybrid post-quantum TLS for a default-case example workload only lowered maximum TPS rate by 0.05 percent. Our results also show that overriding SDK defaults to force the worst-case scenario of performing a new TLS handshake for every request only decreased maximum TPS rate by 2.3 percent.
The following table shows the benchmark data that we measured. Each benchmark performed 500 one-second TPS measurements for varying TLS key agreement settings and TLS connection reuse settings. The measurements used v2.30.22 of the AWS SDK for Java v2. The TLS key agreement was switched between classical and hybrid post-quantum by toggling the postQuantumTlsEnabled() configuration. TLS connection reuse was toggled by injecting a Connection: close HTTP header into each HTTP request. This header forces the TLS connection to be shut down after each HTTP request and requires that a new TLS connection be created for each HTTP request.
TLS key agreement
TLS conn resuse
Total HTTP requests
Average (TPS)
p01 (TPS)
p10 (TPS)
p25 (TPS)
p50 (TPS)
p75 (TPS)
p90 (TPS)
p99 (TPS)
Classical (P256)
No
54,367
108.7
78
86
96
102
129
137
145
Hybrid post-quantum (X25519MLKEM768)
No
53,106
106.2
76
85
93
100
126
134
141
Classical (P256)
Yes
108,052
216.1
181
194
200
216
233
240
245
Hybrid post-quantum (X25519MLKEM768)
Yes
107,994
216
177
194
200
216
233
239
245
Removing support for draft post-quantum standards
AWS service endpoints with support for CRYSTALS-Kyber, the predecessor of ML-KEM, will continue to support CRYSTALS-Kyber through 2025. We will slowly phase out support for the pre-standard CRYSTALS-Kyber implementations after customers have moved to the ML-KEM standard. Customers using previous versions of the AWS SDK for Java with CRYSTALS-Kyber support should upgrade to the latest SDK versions that have ML-KEM support. No code changes are necessary for customers using a generally available release of the AWS SDK for Java v2 to upgrade from CRYSTALS-Kyber to ML-KEM.
Customers currently negotiating CRYSTALS-Kyber who do not upgrade their AWS Java SDK v2 clients by 2026 will see their clients gracefully fall back to a classical key agreement once CRYSTALS-Kyber is removed from AWS service HTTPS endpoints.
How to use hybrid post-quantum key agreement
If using the AWS SDK for Rust, you can enable the hybrid post-quantum key agreement by adding the rustls package to your crate and enabling the prefer-post-quantum feature flag. See the rustls documentation for more information.
If using the AWS SDK for Java 2.x, you can enable hybrid post-quantum key agreement by calling .postQuantumTlsEnabled(true) when building your AWS Common Runtime HTTP client.
Step 1: Add the AWS Common Runtime HTTP client to your Java dependencies.
Add the AWS Common Runtime HTTP client to your Maven dependencies. We recommend using the latest available version. Use version 2.30.22 or greater to enable the use of ML-KEM.
Step 2: Enable post-quantum TLS in your Java SDK client configuration
When configuring your AWS service client, use the AwsCrtAsyncHttpClient configured with post-quantum TLS.
// Configure an AWS Common Runtime HTTP client with Post-Quantum TLS enabled
SdkAsyncHttpClient awsCrtHttpClient = AwsCrtAsyncHttpClient.builder()
          .postQuantumTlsEnabled(true)
          .build();

// Create an AWS service client that uses the AWS Common Runtime client
KmsAsyncClient kmsAsync = KmsAsyncClient.builder()
         .httpClient(awsCrtHttpClient)
         .build();

// Make a request over a TLS connection that uses post-quantum key agreement
ListKeysReponse keys = kmsAsync.listKeys().get();
Here are some ideas about how to use this post-quantum-enabled client:
Run load tests and benchmarks. The AwsCrtAsyncHttpClient is heavily optimized for performance and uses AWS Libcrypto on Linux-based environments. If you aren’t already using the AwsCrtAsyncHttpClient, try it today to see the performance benefits compared to the default SDK HTTP client. After using AwsCrtAsyncHttpClient, enable post-quantum TLS support. See if using AwsCrtAsyncHttpClient with post-quantum TLS is an overall performance gain to using the default SDK HTTP client without post-quantum TLS.
Try connecting from different network locations. Depending on the network path that your request takes, you might discover that intermediate hosts, proxies, or firewalls with deep packet inspection (DPI) block the request. If this is the case, you might need to work with your security team or IT administrators to update firewalls in your network to unblock these new TLS algorithms. We want to hear from you about how your infrastructure interacts with this new variant of TLS traffic.
Conclusion
Support for ML-KEM-based hybrid key agreement has been deployed to three security-critical AWS service endpoints. The performance impact of enabling hybrid post-quantum TLS is likely to be negligible when TLS connection reuse is enabled. Our measurements showed only a 0.05 percent decrease to maximum transactions per second when calling AWS KMS GenerateDataKey.
Starting with version 2.30.22, the AWS SDK for Java v2 now supports ML-KEM-based hybrid key agreement on Linux-based platforms when using the AWS Common Runtime HTTP client. Try enabling post quantum key agreement for TLS in your Java SDK client configuration today.
AWS plans to deploy support for ML-KEM-based hybrid post-quantum key agreement to every AWS service HTTPS endpoint over the coming years as part of our post-quantum cryptography migration plan. AWS customers will be responsible for updating their TLS clients and SDKs to help ensure that ML-KEM key agreement is offered when connecting to AWS service HTTPS endpoints. This will protect against future harvest now, decrypt later threats posed by quantum computing advancements.
For additional information, blog posts, and periodic updates on our post-quantum cryptography migration, keep watching the AWS Post-Quantum Cryptography page. To learn more about post-quantum cryptography with AWS, contact the post-quantum cryptography team.
Multiple popular browsers have announced that they will no longer trust public certificates issued by Entrust later this year. Certificates that are issued by Entrust on dates up to and including October 31, 2024 will continue to be trusted until they expire, according to current information from browser makers. Certificates issued by Entrust after that date will not be trusted.
If you’ve imported Entrust certificates into AWS Certificate Manager (ACM) for use with integrated services such as Amazon CloudFront or Elastic Load Balancing, consider reissuing these certificates through Entrust before October 31, 2024, and re-importing them. This will provide you with a longer timeline to evaluate your alternatives. In this blog post, we discuss how you can determine whether certificates you imported to ACM will be affected, and suggest potential alternatives, including public certificates issued by Amazon Trust Services.
How to tell if you’ve imported Entrust certificates to ACM
If you’re unsure whether you’ve imported certificates to ACM, there are a few different ways to verify. You can use the ACM console to view your certificates for that AWS account. Certificates that are imported to ACM have the type Imported, as shown in Figure 1.
Figure 1: Viewing certificates in AWS Certificate Manager
You can also list the certificates in your AWS account by using the AWS CLI or APIs. You can use the list-certificates command with the AWS CLI:
aws acm list-certificates
You can then filter the response to only show the certificate ARN of certificates that are imported into ACM by using the following command:
After you’ve identified the ARNs of imported certificates, you can use the describe-certificate CLI command to get more information about each of the imported certificates. One of the returned fields is Issuer—this field indicates who originally issued the certificate in question. See the following example command and output, where in this case the issuer is Amazon:
You can use one of these methods to determine whether you’ve imported certificates to ACM, and use the Issuer field of the DescribeCertificate response to check whether any of your imported certificates were issued by Entrust and will be affected by the coming changes in popular browsers.
Lastly, you can also use this sample code from our GitHub repository to discover imported certificates that were issued by a certain CA or issuer. The project evaluates the ACM certificates for a given AWS account, flagging certificates with an Issuer value that matches against a specific, customizable list of CAs. This can be run as a Python script, an AWS Configquery, or a custom rule in AWS Config.
Consider replacing Entrust certificates with public certificates issued through ACM
If you’re using Extended Validation (EV) or Organization Validation (OV) certificates, we recommend that you use Domain Validated (DV) certificates from ACM instead. Popular browsers do not differentiate between EV/OV and DV certificates when indicating whether a site is trusted. Additionally, EV/OV certificate issuance and renewals cannot be automated and require manual effort, unlike DV certificates.
Evaluate use of private certificates for internal-facing use cases
We also recommend that you re-evaluate your use of certificates to reconsider whether you need private or public certificates for your use cases. For internal-facing workloads, you should consider using private certificates. This will allow you to control the certificate parameters, such as the certificate type or the validity period, to align with your specific TLS requirements. For example, ACM issued public certificates are valid for 395 days, but you might have use cases in which certificates with a longer validity period make more sense, and in such cases you can issue private certificates from AWS Private Certificate Authority (AWS Private CA).
Conclusion
In summary, if you are importing Entrust-issued certificates to ACM, evaluate whether you need public or private certificates, especially for internal-facing workloads—for which private certificates are typically better suited. For public certificates, take this opportunity to re-evaluate your usage of EV and OV certificates, and whether they could be replaced with DV certificates. If you want to use public certificates with services such as Amazon CloudFront, Elastic Load Balancing, or Amazon API Gateway, issue the certificates directly from ACM. Lastly, if you need more time to evaluate your options before making a decision, consider re-issuing and re-importing your certificates from Entrust before October 31, 2024. Popular browsers stated their intention to trust certificates issued by Entrust prior to October 31, 2024 until these certificates expire, giving you until the next certificate renewal to make an informed decision. You can learn more about ACM by reviewing the AWS documentation, and get started issuing certificates from ACM in the AWS Management Console.
If you have feedback about this post, submit comments in the Comments section below. If you have questions about this post, contact AWS Support.
A mobile driver’s license (mDL) is a digital representation of a physical driver’s license that’s stored on a mobile device. An mDL is a significant improvement over physical credentials, which can be lost, stolen, counterfeited, damaged, or contain outdated information, and can expose unconsented personally identifiable information (PII). Organizations are working together to use mDLs across various situations, ranging from validating identity during airplane boarding to sharing information for age-restricted activities.
The trust in the mDL system is based on public-private key cryptography where mDLs are signed by issuing authorities using their private key and verified using the issuing authority’s public key. In this blog post, we show you how to build an mDL issuing authority in Amazon Web Services (AWS) using AWS Private Certificate Authority and AWS Key Management Service (AWS KMS) according to mDL specification ISO/IEC 18013-5:2021. These AWS services align with the cryptographic requirements placed on the issuing authorities by ISO/IEC 18013-5. While we have tailored this post to an mDL use case, the sign and verify mechanism using AWS Private CA and AWS KMS can be used for multiple kinds of digital identity verification.
Solution overview
AWS Private CA provides you with a highly available private certificate authority (CA) service without the initial investment and ongoing maintenance costs of operating your own private CA. CA administrators can use AWS Private CA to create a complete CA hierarchy, including online root and subordinate CAs, without needing external CAs. You can issue, rotate, and revoke certificates that are trusted within your organization using AWS Private CA.
AWS Private CA can issue certificates formatted as required by ISO/IEC 18013-5. You can build a certificate authority (CA) in AWS Private CA—referred to as the issuing authority certificate authority (IACA) in ISO/IEC 18013-5. We create an IACA self-signed root certificate and an mDL document signing certificate in AWS Private CA.
AWS KMS is a managed service that you can use to create and control the cryptographic keys that are used to protect your data. AWS KMS uses FIPS 140-2 Level 3 validated hardware security modules (HSMs) to protect AWS KMS keys, which is a requirement for building an issuing authority as described in ISO/IEC 18013-5. We create an asymmetric key pair in AWS KMS for signing and verification of the mDL document. We programmatically create a certificate signing request (CSR) that’s signed by the asymmetric key pair stored in AWS KMS. The CSR is sent to the AWS Private CA service for issuing the mDL document signing certificate that matches the certificate profile requirement specified for the document signing certificate in ISO/IEC 18013-5.
We sign an mDL document using the private key of the asymmetric key pair created in AWS KMS with a KeyUsage value of SIGN_VERIFY. The signed mDL document is delivered to a mobile device where it’s stored in a digital wallet and produced for verification by mDL readers. The mDL readers are configured with IACA certificates from various issuing authorities that allow them to verify the mDL documents signed by respective issuing authorities. An example of an issuing authority could be a state government agency that issues driver’s licenses.
Least privilege
The solution in this post uses AWS KMS and AWS Private CA services. Before you implement the process described in this post, ensure that the AWS Identity and Access Management (IAM) principal you choose follows the principle of least privilege and that permissions are scoped to the minimum required permissions required. See Security best practices in IAM to learn more.
Solution architecture
A sample solution architecture for building an mDL issuing authority in AWS is shown in Figure 1. The figure shows the step-by-step process starting from setting up a private CA and issuing an mDL document signing certificate to mDL issuance and verification. The infrastructure that’s built using this architecture includes a root certificate authority, which issues a document signer certificate. You can find the certificate requirements in section B.1 Certificate Profile of ISO/IEC 18013-5.
Figure 1: mDL issuing authority architecture and process flow in AWS
In this post, we use AWS Command Line Interface (AWS CLI) commands, but these can be replaced by AWS SDK API calls if needed. Along with the AWS CLI steps, a GitHub sample is provided that’s used to programmatically create and sign an mDL document signing CSR using AWS KMS.
See the AWS CLI commands documentation for AWS Private CA and AWS KMS for detailed information on the commands used in this solution.
Solution walkthrough
Use the following steps to create the infrastructure needed for mDL signing and verification.
Step 1: Create IACA CA in AWS Private CA
In this step, the root of trust IACA (issuing authority CA) will be created. The IACA root CA is the root of trust that will be used for verification of the mDL.
Create a local ca_config.txt file with the following content. The contents of this file are derived from the Certificate profiles section (Annex B) within ISO/IEC 18013-5. You can change the Country and CommonName values in the file as needed for your requirements.
The IACA root certificate will be paired with a certificate revocation list (CRL). See Planning a certificate revocation list (CRL) for information about configuring CRLs. Create a local file called revocation_config.txt with the following information to configure a CRL. The values for CustomCname and S3BucketName are examples, update them with the values that you have created within your AWS account. Update ExpirationInDays to fit your requirements. We recommend configuring encryption on the Amazon Simple Storage Service (Amazon S3) bucket containing your CRLs.
Invoke an AWS CLI command to create a private certificate authority. Replace the region parameter as needed. Update the file:// paths in the following command to the locations where you’ve stored the ca_config.txt and revocation_config.txt files.
The command should produce the following output. The output contains the Amazon Resource Name (ARN) of the created CA. You will need this ARN in subsequent steps.
Step 2: Retrieve the CSR for IACA root certificate
You’ll create an IACA root certificate, which starts with retrieving a CSR. This step retrieves the CSR for the IACA root certificate. The certificate-authority-arn parameter carries the CA ARN that was generated in Step 1.
This step issues the IACA root certificate. Create a file named extensions.txt using the following contents, which are derived from the Certificate profiles section of ISO/IEC 18013-5.
The KeyUsage extension with KeyCertSign and CRLSign should be set to true. A custom extension for the CRL distribution point is set and the validity of the certificate should be set to 9 years or 3285 days (set in the next step). Because the IACA root certificate is only used to issued mDLs, a maximum validity period of 9 years is sufficient, as indicated in Table B.1 of ISO/IEC 18013-5. Additionally, a CRL distribution point extension must be present. In the following example, the CRL URL encoded in the CDP extension is http://example.com/crl/0116z123-dv7a-59b1-x7be-1231v72571136.crl, aligning with both the CA CRL configuration applied to the CA at creation and to the CA ID. For base-64 encoding of the CDP extension, you can refer to this java sample.
Note that the IACA root CA created with AWS Private CA currently doesn’t have a CRL distribution point (CDP) extension by default. However, that is a mandatory extension according to the IACA root certificate profile in ISO/IEC 18013-5. To implement this, we use a custom extension passed in using API passthrough, which embeds the CDP extension. The distribution point specified in that extension must be based on the CA ID, which is 0116z123-dv7a-59b1-x7be-1231v7257113 derived from the CA ARN that was created in Step 1.
Step 4: Retrieve root certificate
This step retrieves the IACA root certificate in PEM format.
Use the following code to retrieve the IACA root certificate:
Copy the output and store it in a file named document-signing-kms.csr. You will use the file in Step 8 to create the mDL document signing certificate based on this CSR.
Step 8: Generate an mDL document signing certificate
Create a file named extensionSigner.txt with the following contents. The contents of this file are derived from the Certificate profiles section of ISO/IEC 18013-5. The JSON snippet that follows shows the extension structure containing the KeyUsage extension with DigitalSignature field set to true.
Store the output text in document_signing_cert.pem.
You now have the mDL document signing certificate for packaging later with the Concise Binary Object Representation (CBOR) structure required by ISO/IEC 18013-5.
An mDL reader can trust the mDL presented by a user after cryptographically verifying the mDL. This verification requires the reader to possess the mDL signing certificate chain of the issuing authority that issued the user the mDL. As required by the decentralized public key infrastructure (PKI) trust model specified in ISO/IEC 18013-5, the mDL reader will ingest the mDL signing certificate chain of the issuing authority.
Step 11: User makes an mDL signing request to the issuing authority
The user makes a request to the issuing authority to sign the mDL.
Step 12: Issuing authority issues signed mDL to the user
The issuing authority will authenticate the user’s identity and issue a signed mDL. The issuing authority provisions mDL data to the user’s device along with a CBOR encoded object known as a mobile security object (MSO). MSOs contain a digest algorithm, individual digests of mDL data elements, and a validity period. After this MSO has been generated and encoded as required by ISO/IEC 18013-5:2021 section 9.1.2.4, the MSO can be signed by the issuing authority. This signature can be generated in AWS KMS as shown in the following command. Generating the encoded MSO is out of scope for this post.
Use the following command to produce the SHA-256 digest of encoded MSO object using the sha256sum utility.
sha256sum < EncodedMSO > EncodedMSODigest
Sign the digest using the AWS KMS asymmetric key created in Step 6.
This signature will be combined with the issuing authority certificate and the MSO to form a CBOR Object Signing and Encryption (COSE) signed message and will be presented with the mDL data elements to readers. Readers can validate this signature to confirm the integrity of the MSO.
Step 13: User presents their mDL to an mDL reader
The user presents their mDL to the mDL reader for identity verification, such as at an airport. This process is called mDL Initialization in ISO/IEC 18013-5:2021 section 6.3.2.2. The mDL is activated during this initialization step.
Step 14: An mDL reader requests mDL data from a user’s mobile device
The mDL reader issues an mDL retrieval request to the user’s mobile device. A key feature of mDLs is that they allow mDL holders to present a subset of their PII. An mDL reader will request specific attributes such as name and date of birth, requiring the mDL holder to consent to the release of this information. The mDL reader’s request contains the list of PII data element identifiers that it is requesting the mDL holder to share.
Step 15: User consents to share their mDL data
The user receives a prompt notifying them of mDL sharing request. This prompt shows the user the list of PII data elements that are being requested. The user consents to the request and the mDL data that includes the MSO is shared with the reader.
Step 16: Reader validates mDL integrity
The reader receives the mDL data and validates it for integrity. The inclusion of the MSO with the mDL data elements provides mDL readers with a mechanism for validating the integrity of the data they’ve received. The mDL reader can then hash and verify individual mDL data elements presented by the device. If all data elements match their corresponding entries in the MSO, the mDL device reader can attest that the data hasn’t been tampered with.
As an example, assume that the mDL contains the following data elements:
The MSO’s integrity would first confirm that the validity period of the MSO (not shown) has not expired. It can then verify the signature (not shown) with the issuing authority’s public key. After this has been established, both data elements need to be verified. The CBOR representation of each element (digestID, random, elementIdentifier, and elementValue) is encoded as bytes and then hashed using SHA-256. For example, the following should equal D6AA81E454036313A9A681809151DDDBDF702289094F18286DDC591C41C6434E.
If all data elements pass this hash verification check, then the presented mDL contents can be trusted by the mDL reader.
Summary
As you saw in this solution, mobile driver’s licenses (mDLs) provide increased security and flexible consent management to preserve privacy for individuals. The principles of cryptographic signing and verification aren’t new and both AWS KMS and AWS Private CA are well suited for supporting digital identity applications, whether it’s a driver’s license or some other kind of identification. To learn more about AWS KMS asymmetric keys and AWS Private CA, see Digital signing with the new asymmetric keys feature of AWS KMS and How to host and manage an entire private certificate infrastructure in AWS.
On November 1, 2023, the New York State Department of Financial Services (NYDFS) issued its Second Amendment (the Amendment) to its Cybersecurity Requirements for Financial Services Companies adopted in 2017, published within Section 500 of 23 NYCRR 500 (the Cybersecurity Requirements; the Cybersecurity Requirements as amended by the Amendment, the Amended Cybersecurity Requirements). In the introduction to its Cybersecurity Resource Center, the Department explains that the revisions are aimed at addressing the changes in the increasing sophistication of threat actors, the prevalence of and relative ease in running cyberattacks, and the availability of additional controls to manage cyber risks.
This blog post focuses on the revision to the encryption in transit requirement under section 500.15(a). It outlines the encryption capabilities and secure connectivity options offered by Amazon Web Services (AWS) to help customers demonstrate compliance with this updated requirement. The post also provides best practices guidance, emphasizing the shared responsibility model. This enables organizations to design robust data protection strategies that address not only the updated NYDFS encryption requirements but potentially also other security standards and regulatory requirements.
The target audience for this information includes security leaders, architects, engineers, and security operations team members and risk, compliance, and audit professionals.
Note that the information provided here is for informational purposes only; it is not legal or compliance advice and should not be relied on as legal or compliance advice. Customers are responsible for making their own independent assessments and should obtain appropriate advice from their own legal and compliance advisors regarding compliance with applicable NYDFS regulations.
500.15 Encryption of nonpublic information
The updated requirement in the Amendment states that:
As part of its cybersecurity program, each covered entity shall implement a written policy requiring encryption that meets industry standards, to protect nonpublic information held or transmitted by the covered entity both in transit over external networks and at rest.
To the extent a covered entity determines that encryption of nonpublic information at rest is infeasible, the covered entity may instead secure such nonpublic information using effective alternative compensating controls that have been reviewed and approved by the covered entity’s CISO in writing. The feasibility of encryption and effectiveness of the compensating controls shall be reviewed by the CISO at least annually.
This section of the Amendment removes the covered entity’s chief information security officer’s (CISO) discretion to approve compensating controls when encryption of nonpublic information in transit over external networks is deemed infeasible. The Amendment mandates that, effective November 2024, organizations must encrypt nonpublic information transmitted over external networks without the option of implementing alternative compensating controls. While the use of security best practices such as network segmentation, multi-factor authentication (MFA), and intrusion detection and prevention systems (IDS/IPS) can provide defense in depth, these compensating controls are no longer sufficient to replace encryption in transit over external networks for nonpublic information.
However, the Amendment still allows for the CISO to approve the use of alternative compensating controls where encryption of nonpublic information at rest is deemed infeasible. AWS is committed to providing industry-standard encryption services and capabilities to help protect customer data at rest in the cloud, offering customers the ability to add layers of security to their data at rest, providing scalable and efficient encryption features. This includes the following services:
Flexible key management options, including AWS Key Management Service (AWS KMS), which allow you to choose whether to have AWS manage the encryption keys or keep complete control over your keys.
Dedicated, hardware-based cryptographic key storage using AWS CloudHSM, to help you adhere to compliance requirements
While the above highlights encryption-at-rest capabilities offered by AWS, the focus of this blog post is to provide guidance and best practice recommendations for encryption in transit.
AWS guidance and best practice recommendations
Cloud network traffic encompasses connections to and from the cloud and traffic between cloud service provider (CSP) services. From an organization’s perspective, CSP networks and data centers are deemed external because they aren’t under the organization’s direct control. The connection between the organization and a CSP, typically established over the internet or dedicated links, is considered an external network. Encrypting data in transit over these external networks is crucial and should be an integral part of an organization’s cybersecurity program.
AWS implements multiple mechanisms to help ensure the confidentiality and integrity of customer data during transit and at rest across various points within its environment. While AWS employs transparent encryption at various transit points, we strongly recommend incorporating encryption by design into your architecture. AWS provides robust encryption-in-transit capabilities to help you adhere to compliance requirements and mitigate the risks of unauthorized disclosure and modification of nonpublic information in transit over external networks.
Additionally, AWS recommends that financial services institutions adopt a secure by design (SbD) approach to implement architectures that are pre-tested from a security perspective. SbD helps establish control objectives, security baselines, security configurations, and audit capabilities for workloads running on AWS.
Security and Compliance is a shared responsibility between AWS and the customer. Shared responsibility can vary depending on the security configuration options for each service. You should carefully consider the services you choose because your organization’s responsibilities vary depending on the services used, the integration of those services into your IT environment, and applicable laws and regulations. AWS provides resources such as service user guides and AWS Customer Compliance Guides, which map security best practices for individual services to leading compliance frameworks, including NYDFS.
Protecting connections to and from AWS
We understand that customers place a high priority on privacy and data security. That’s why AWS gives you ownership and control over your data through services that allow you to determine where your content will be stored, secure your content in transit and at rest, and manage access to AWS services and resources for your users. When architecting workloads on AWS, classifying data based on its sensitivity, criticality, and compliance requirements is essential. Proper data classification allows you to implement appropriate security controls and data protection mechanisms, such as Transport Layer Security (TLS) at the application layer, access control measures, and secure network connectivity options for nonpublic information over external networks. When it comes to transmitting nonpublic information over external networks, it’s a recommended practice to identify network segments traversed by this data based on your network architecture. While AWS employs transparent encryption at various transit points, it’s advisable to implement encryption solutions at multiple layers of the OSI model to establish defense in depth and enhance end-to-end encryption capabilities. Although requirement 500.15 of the Amendment doesn’t mandate end-to-end encryption, implementing such controls can provide an added layer of security and can help demonstrate that nonpublic information is consistently encrypted during transit.
AWS offers several options to achieve this. While not every option provides end-to-end encryption on its own, using them in combination helps to ensure that nonpublic information doesn’t traverse open, public networks unprotected. These options include:
Client-side encryption of data before sending it to AWS
AWS Direct Connect with MACsec encryption
AWS Direct Connect provides direct connectivity to the AWS network through third-party colocation facilities, using a cross-connect between an AWS owned device and either a customer- or partner-owned device. Direct Connect can reduce network costs, increase bandwidth throughput, and provide a more consistent network experience than internet-based connections. Within Direct Connect connections (a physical construct) there will be one or more virtual interfaces (VIFs). These are logical entities and are reflected as industry-standard 802.1Q VLANs on the customer equipment terminating the Direct Connect connection. Depending on the type of VIF, they will use either public or private IP addressing. There are three different types of VIFs:
Public virtual interface – Establish connectivity between AWS public endpoints and your data center, office, or colocation environment.
Transit virtual interface – Establish private connectivity between AWS Transit Gateways and your data center, office, or colocation environment. Transit Gateways is an AWS managed high availability and scalability regional network transit hub used to interconnect Amazon Virtual Private Cloud (Amazon VPC) and customer networks.
Private virtual interface – Establish private connectivity between Amazon VPC resources and your data center, office, or colocation environment.
By default, a Direct Connect connection isn’t encrypted from your premises to the Direct Connect location because AWS cannot assume your on-premises device supports the MACsec protocol. With MACsec, Direct Connect delivers native, near line-rate, point-to-point encryption, ensuring that data communications between AWS and your corporate network remain protected. MACsec is supported on 10 Gbps and 100 Gbps dedicated Direct Connect connections at selected points of presence. Using Direct Connect with MACsec-enabled connections and combining it with the transparent physical network encryption offered by AWS from the Direct Connect location through the AWS backbone not only benefits you by allowing you to securely exchange data with AWS, but also enables you to use the highest available bandwidth. For additional information on MACsec support and cipher suites, see the MACsec section in the Direct Connect FAQs.
Figure 1: Sample architecture for using Direct Connect with MACsec encryption
In the sample architecture, you can see that Layer 2 encryption through MACsec only encrypts the traffic from your on-premises systems to the AWS device in the Direct Connect location, and therefore you need to consider additional encryption solutions at Layer 3, 4, or 7 to get closer to end-to-end encryption to the device where you’re comfortable for the packets to be decrypted. In the next section, let’s review an option for using network layer encryption using AWS Site-to-Site VPN.
Direct Connect with Site-to-Site VPN
AWS Site-to-Site VPN is a fully managed service that creates a secure connection between your corporate network and your Amazon VPC using IP security (IPsec) tunnels over the internet. Data transferred between your VPC and the remote network routes over an encrypted VPN connection to help maintain the confidentiality and integrity of data in transit. Each VPN connection consists of two tunnels between a virtual private gateway or transit gateway on the AWS side and a customer gateway on the on-premises side. Each tunnel supports a maximum throughput of up to 1.25 Gbps. See Site-to-Site VPN quotas for more information.
You can use Site-to-Site VPN over Direct Connect to achieve secure IPsec connection with the low latency and consistent network experience of Direct Connect when reaching resources in your Amazon VPCs.
Figure 2: Encrypted connections between the AWS Cloud and a customer’s network using VPN
While Direct Connect with MACsec and Site-to-Site VPN with IPsec can provide encryption at the physical and network layers respectively, they primarily secure the data in transit between your on-premises network and the AWS network boundary. To further enhance the coverage for end-to-end encryption, it is advisable to use TLS encryption. In the next section, let’s review mechanisms for securing API endpoints on AWS using TLS encryption.
Secure API endpoints
APIs act as the front door for applications to access data, business logic, or functionality from other applications and backend services.
While requests to public AWS service API endpoints use HTTPS by default, a few services, such as Amazon S3 and Amazon DynamoDB, allow using either HTTP or HTTPS. If the client or application chooses HTTP, the communication isn’t encrypted. Customers are responsible for enforcing HTTPS connections when using such AWS services. To help ensure secure communication, you can establish an identity perimeter by using the IAM policy condition key aws:SecureTransport in your IAM roles to evaluate the connection and mandate HTTPS usage.
As enterprises increasingly adopt cloud computing and microservices architectures, teams frequently build and manage internal applications exposed as private API endpoints. Customers are responsible for managing the certificates on private customer-owned endpoints. AWS helps you deploy private customer-owned identities (that is, TLS certificates) through the use of AWS Certificate Manager (ACM)private certificate authorities (PCA) and the integration with AWS services that offer private customer-owned TLS termination endpoints.
ACM is a fully managed service that lets you provision, manage, and deploy public and private TLS certificates for use with AWS services and internal connected resources. ACM minimizes the time-consuming manual process of purchasing, uploading, and renewing TLS certificates. You can provide certificates for your integrated AWS services either by issuing them directly using ACM or by importing third-party certificates into the ACM management system. ACM offers two options for deploying managed X.509 certificates. You can choose the best one for your needs.
AWS Certificate Manager (ACM) – This service is for enterprise customers who need a secure web presence using TLS. ACM certificates are deployed through Elastic Load Balancing (ELB), Amazon CloudFront, Amazon API Gateway, and other integrated AWS services. The most common application of this type is a secure public website with significant traffic requirements. ACM also helps to simplify security management by automating the renewal of expiring certificates.
AWS Private Certificate Authority (Private CA) – This service is for enterprise customers building a public key infrastructure (PKI) inside the AWS Cloud and is intended for private use within an organization. With AWS Private CA, you can create your own certificate authority (CA) hierarchy and issue certificates with it for authenticating users, computers, applications, services, servers, and other devices. Certificates issued by a private CA cannot be used on the internet. For more information, see the AWS Private CA User Guide.
You can use a centralized API gateway service, such as Amazon API Gateway, to securely expose customer-owned private API endpoints. API Gateway is a fully managed service that allows developers to create, publish, maintain, monitor, and secure APIs at scale. With API Gateway, you can create RESTful APIs and WebSocket APIs, enabling near real-time, two-way communication applications. API Gateway operations must be encrypted in-transit using TLS, and require the use of HTTPS endpoints. You can use API Gateway to configure custom domains for your APIs using TLS certificates provisioned and managed by ACM. Developers can optionally choose a specific TLS version for their custom domain names. For use cases that require mutual TLS (mTLS) authentication, you can configure certificate-based mTLS authentication on your custom domains.
Pre-encryption of data to be sent to AWS
Depending on the risk profile and sensitivity of the data that’s being transferred to AWS, you might want to choose encrypting data in an application running on your corporate network before sending it to AWS (client-side encryption). AWS offers a variety of SDKs and client-side encryption libraries to help you encrypt and decrypt data in your applications. You can use these libraries with the cryptographic service provider of your choice, including AWS Key Management Service or AWS CloudHSM, but the libraries do not require an AWS service.
The AWS Encryption SDK is a client-side encryption library that you can use to encrypt and decrypt data in your application and is available in several programming languages, including a command-line interface. You can use the SDK to encrypt your data before you send it to an AWS service. The SDK offers advanced data protection features, including envelope encryption and additional authenticated data (AAD). It also offers secure, authenticated, symmetric key algorithm suites, such as 256-bit AES-GCM with key derivation and signing.
The AWS Database Encryption SDK is a set of software libraries developed in open source that enable you to include client-side encryption in your database design. The SDK provides record-level encryption solutions. You specify which fields are encrypted and which fields are included in the signatures that help ensure the authenticity of your data. Encrypting your sensitive data in transit and at rest helps ensure that your plaintext data isn’t available to a third party, including AWS. The AWS Database Encryption SDK for DynamoDB is designed especially for DynamoDB applications. It encrypts the attribute values in each table item using a unique encryption key. It then signs the item to protect it against unauthorized changes, such as adding or deleting attributes or swapping encrypted values. After you create and configure the required components, the SDK transparently encrypts and signs your table items when you add them to a table. It also verifies and decrypts them when you retrieve them. Searchable encryption in the AWS Database Encryption SDK enables you search encrypted records without decrypting the entire database. This is accomplished by using beacons, which create a map between the plaintext value written to a field and the encrypted value that is stored in your database. For more information, see the AWS Database Encryption SDK Developer Guide.
The Amazon S3 Encryption Client is a client-side encryption library that enables you to encrypt an object locally to help ensure its security before passing it to Amazon S3. It integrates seamlessly with the Amazon S3 APIs to provide a straightforward solution for client-side encryption of data before uploading to Amazon S3. After you instantiate the Amazon S3 Encryption Client, your objects are automatically encrypted and decrypted as part of your Amazon S3 PutObject and GetObject requests. Your objects are encrypted with a unique data key. You can use both the Amazon S3 Encryption Client and server-side encryption to encrypt your data. The Amazon S3 Encryption Client is supported in a variety of programming languages and supports industry-standard algorithms for encrypting objects and data keys. For more information, see the Amazon S3 Encryption Client developer guide.
Encryption in-transit inside AWS
AWS implements responsible and sophisticated technical and physical controls that are designed to help prevent unauthorized access to or disclosure of your content. To protect data in transit, traffic traversing through the AWS network that is outside of AWS physical control is transparently encrypted by AWS at the physical layer. This includes traffic between AWS Regions (except China Regions), traffic between Availability Zones, and between Direct Connect locations and Regions through the AWS backbone network.
Network segmentation
When you create an AWS account, AWS offers a virtual networking option to launch resources in a logically isolated virtual private network (VPN), Amazon Virtual Private Cloud (Amazon VPC). A VPC is limited to a single AWS Region and every VPC has one or more subnets. VPCs can be connected externally using an internet gateway (IGW), VPC peering connection, VPN, Direct Connect, or Transit Gateways. Traffic within the your VPC is considered internal because you have complete control over your virtual networking environment, including selection of your own IP address range, creation of subnets, and configuration of route tables and network gateways.
As a customer, you maintain ownership of your data, and you select which AWS services can process, store, and host your data, and you choose the Regions in which your data is stored. AWS doesn’t automatically replicate data across Regions, unless the you choose to do so. Data transmitted over the AWS global network between Regions and Availability Zones is automatically encrypted at the physical layer before leaving AWS secured facilities. Cross-Region traffic that uses Amazon VPC and Transit Gateway peering is automatically bulk-encrypted when it exits a Region.
Encryption between instances
AWS provides secure and private connectivity between Amazon Elastic Compute Cloud (Amazon EC2) instances of all types. The Nitro System is the underlying foundation for modern Amazon EC2 instances. It’s a combination of purpose-built server designs, data processors, system management components, and specialized firmware that provides the underlying foundation for EC2 instances launched since the beginning of 2018. Instance types that use the offload capabilities of the underlying Nitro System hardware automatically encrypt in-transit traffic between instances. This encryption uses Authenticated Encryption with Associated Data (AEAD) algorithms, with 256-bit encryption and has no impact on network performance. To support this additional in-transit traffic encryption between instances, instances must be of supported instance types, in the same Region, and in the same VPC or peered VPCs. For a list of supported instance types and additional requirements, see Encryption in transit.
Conclusion
The second Amendment to the NYDFS Cybersecurity Regulation underscores the criticality of safeguarding nonpublic information during transmission over external networks. By mandating encryption for data in transit and eliminating the option for compensating controls, the Amendment reinforces the need for robust, industry-standard encryption measures to protect the confidentiality and integrity of sensitive information.
AWS provides a comprehensive suite of encryption services and secure connectivity options that enable you to design and implement robust data protection strategies. The transparent encryption mechanisms that AWS has built into services across its global network infrastructure, secure API endpoints with TLS encryption, and services such as Direct Connect with MACsec encryption and Site-to-Site VPN, can help you establish secure, encrypted pathways for transmitting nonpublic information over external networks.
By embracing the principles outlined in this blog post, financial services organizations can address not only the updated NYDFS encryption requirements for section 500.15(a) but can also potentially demonstrate their commitment to data security across other security standards and regulatory requirements.
AWS Certificate Manager (ACM) is a managed service that you can use to provision, manage, and deploy public and private TLS certificates for use with Elastic Load Balancing (ELB), Amazon CloudFront, Amazon API Gateway, and other integrated AWS services. Starting August 2024, public certificates issued from ACM will terminate at the Starfield Services G2 (G2) root with subject C=US, ST=Arizona, L=Scottsdale, O=Starfield Technologies, Inc., CN=Starfield Services Root Certificate Authority – G2 as the trust anchor. We will no longer cross sign ACM public certificates with the GoDaddy operated root Starfield Class 2 (C2) with subject C=US, O=Starfield Technologies, Inc., OU=Starfield Class 2 Certification Authority.
Background
Public certificates that you request through ACM are obtained from Amazon Trust Services. Like other public CAs, Amazon Trust Services CAs have a structured trust hierarchy. A public certificate issued to you, also known as the leaf certificate, chains to one or more intermediate CAs and then to the Amazon Trust Services root CA.
The Amazon Trust Services root CAs 1 to 4 are cross signed by the Amazon Trust Services root Starfield Services G2 (G2) and further by the GoDaddy operated Starfield Class 2 root (C2). The cross signing was done to provide broader trust because Starfield Class 2 was widely trusted when ACM was launched in 2016.
What is changing?
Starting August 2024, the last certificate in an AWS issued certificate chain will be one of Amazon Root CAs 1 to 4 where the trust anchor is Starfield Services G2. Currently, the last certificate in the chain that is returned by ACM is the cross-signed Starfield Services G2 root where the trust anchor could be Starfield Class 2, as shown in Figure 1 that follows.
Current chain
Figure 1: Certificate chain for ACM prior to August 2024
New chain
Figure 2 shows the new chain, where the last certificate in an AWS issued certificate’s chain is one of the Amazon Root CAs (1 to 4), and the trust anchor is Starfield Services G2.
Figure 2: New certificate chain for ACM starting on August 2024
Why are we making this change?
Starfield Class 2 is operated by GoDaddy, and GoDaddy intends to deprecate C2 in the future. To align with this, ACM is removing the trust anchor dependency on the C2 root.
How will this change impact my use of ACM?
We don’t expect this change to impact most customers. Amazon owned trust anchors have been established for over a decade across many devices and browsers. The Amazon owned Starfield Services G2 is trusted on Android devices starting with later versions of Gingerbread, and by iOS starting at version 4.1. Amazon Root CAs 1 to 4 are trusted by iOS starting at version 11. A browser, application, or OS that includes the Amazon or Starfield G2 roots will trust public certificates obtained from ACM.
What should you do to prepare?
We expect the impact of removing Starfield Services C2 as a trust anchor to be limited to the following types of customers:
To resolve this, you can add the Amazon CAs to your trust store.
Customers who pin to the cross-signed certificate or the certificate hash of Starfield Services G2 rather than the public key of the certificate.
Certificate pinning guidance can be found in the Amazon Trust repository.
Customers who have taken a dependency on the chain length. The chain length for ACM issued public certificates will reduce from 3 to 2 as part of this change.
Customers who have a dependency on chain length will need to update their processes and checks to account for the new length.
Customers can test that their clients are able to open the Valid test certificates from the Amazon Trust Repository.
FAQs
What should I do if the Amazon Trust Services CAs aren’t in my trust store?
If your application is using a custom trust store, you must add the Amazon Trust Services root CAs to your application’s trust store. The instructions for doing this vary based on the application or service. Refer to the documentation for the application or service that you’re using.
If your tests of any of the test URLs failed, you must update your trust store. The simplest way to update your trust store is to upgrade the operating system or browser that you’re using.
The following operating systems use the Amazon Trust Services CAs:
Amazon Linux (all versions)
Microsoft Windows versions, with updates installed, from January 2005, Windows Vista, Windows 7, Windows Server 2008, and later versions
Mac OS X 10.4 with Java for Mac OS X 10.4 Release 5, Mac OS X 10.5, and later versions
Red Hat Enterprise Linux 5 (March 2007 release), Linux 6, and Linux 7 and CentOS 5, CentOS 6, and CentOS 7
Ubuntu 8.10
Debian 5.0
Java 1.4.2_12, Java 5 update 2 and all later versions, including Java 6, Java 7, and Java 8
Modern browsers trust Amazon Trust Services CAs. To update the certificate bundle in your browser, update your browser. For instructions on how to update your browser, see the update page for your browser:
The Windows operating system manages certificate bundles for Internet Explorer and Microsoft Edge, so to update your browser, you must update Windows.
Why does ACM have to change the trust anchor? Why can’t ACM continue to vend certificates cross signed with C2?
There are some rare clients who check for the validity of all the certificates in the certificate chain returned by an endpoint even when they have a shorter-path trust anchor. If ACM continues to return the chain with the G2 root cross signed by C2, such clients might check the CRL and OCSP issued by Starfield Class 2. These clients will see failures on CRL and OCSP lookup chain after the expiry of the CRLs or OCSP responses issued by Starfield Class 2.
When will GoDaddy deprecate the Starfield Class 2 root?
GoDaddy has not announced specific dates for deprecation of the Starfield Class 2 root. We are working with GoDaddy to minimize customer impact.
If you have feedback about this post, submit comments in the Comments section below. If you have questions about this post, start a new thread on the AWS Certificate Manager re:Post or contact AWS Support.
In this blog post, we delve into using Amazon Web Services (AWS) data protection services such as Amazon Secrets Manager,AWS Key Management Service (AWS KMS), and AWS Certificate Manager (ACM) to help fortify both the security of the pipeline and security in the pipeline. We explore how these services contribute to the overall security of the DevOps pipeline infrastructure while enabling seamless integration of data protection measures. We also provide practical insights by demonstrating the implementation of these services within a DevOps pipeline for a three-tier WordPress web application deployed using Amazon Elastic Kubernetes Service (Amazon EKS).
DevOps pipelines involve the continuous integration, delivery, and deployment of cloud infrastructure and applications, which can store and process sensitive data. The increasing adoption of DevOps pipelines for cloud infrastructure and application deployments has made the protection of sensitive data a critical priority for organizations.
Some examples of the types of sensitive data that must be protected in DevOps pipelines are:
Credentials: Usernames and passwords used to access cloud resources, databases, and applications.
Configuration files: Files that contain settings and configuration data for applications, databases, and other systems.
Certificates: TLS certificates used to encrypt communication between systems.
Secrets: Any other sensitive data used to access or authenticate with cloud resources, such as private keys, security tokens, or passwords for third-party services.
Unintended access or data disclosure can have serious consequences such as loss of productivity, legal liabilities, financial losses, and reputational damage. It’s crucial to prioritize data protection to help mitigate these risks effectively.
The concept of security of the pipeline encompasses implementing security measures to protect the entire DevOps pipeline—the infrastructure, tools, and processes—from potential security issues. While the concept of security in the pipeline focuses on incorporating security practices and controls directly into the development and deployment processes within the pipeline.
By using Secrets Manager, AWS KMS, and ACM, you can strengthen the security of your DevOps pipelines, safeguard sensitive data, and facilitate secure and compliant application deployments. Our goal is to equip you with the knowledge and tools to establish a secure DevOps environment, providing the integrity of your pipeline infrastructure and protecting your organization’s sensitive data throughout the software delivery process.
Sample application architecture overview
WordPress was chosen as the use case for this DevOps pipeline implementation due to its popularity, open source nature, containerization support, and integration with AWS services. The sample architecture for the WordPress application in the AWS cloud uses the following services:
Amazon Route 53: A DNS web service that routes traffic to the correct AWS resource.
Amazon CloudFront: A global content delivery network (CDN) service that securely delivers data and videos to users with low latency and high transfer speeds.
AWS WAF: A web application firewall that protects web applications from common web exploits.
AWS Key Management Service (AWS KMS): A key management service that allows you to create and manage the encryption keys used to protect your data at rest.
AWS Secrets Manager: A service that provides the ability to rotate, manage, and retrieve database credentials.
AWS CodePipeline: A fully managed continuous delivery service that helps to automate release pipelines for fast and reliable application and infrastructure updates.
AWS CodeBuild: A fully managed continuous integration service that compiles source code, runs tests, and produces ready-to-deploy software packages.
AWS CodeCommit: A secure, highly scalable, fully managed source-control service that hosts private Git repositories.
Before we explore the specifics of the sample application architecture in Figure 1, it’s important to clarify a few aspects of the diagram. While it displays only a single Availability Zone (AZ), please note that the application and infrastructure can be developed to be highly available across multiple AZs to improve fault tolerance. This means that even if one AZ is unavailable, the application remains operational in other AZs, providing uninterrupted service to users.
Figure 1: Sample application architecture
The flow of the data protection services in the post and depicted in Figure 1 can be summarized as follows:
First, we discuss securing your pipeline. You can use Secrets Manager to securely store sensitive information such as Amazon RDS credentials. We show you how to retrieve these secrets from Secrets Manager in your DevOps pipeline to access the database. By using Secrets Manager, you can protect critical credentials and help prevent unauthorized access, strengthening the security of your pipeline.
Next, we cover data encryption. With AWS KMS, you can encrypt sensitive data at rest. We explain how to encrypt data stored in Amazon RDS using AWS KMS encryption, making sure that it remains secure and protected from unauthorized access. By implementing KMS encryption, you add an extra layer of protection to your data and bolster the overall security of your pipeline.
Lastly, we discuss securing connections (data in transit) in your WordPress application. ACM is used to manage SSL/TLS certificates. We show you how to provision and manage SSL/TLS certificates using ACM and configure your Amazon EKS cluster to use these certificates for secure communication between users and the WordPress application. By using ACM, you can establish secure communication channels, providing data privacy and enhancing the security of your pipeline.
Note: The code samples in this post are only to demonstrate the key concepts. The actual code can be found on GitHub.
Securing sensitive data with Secrets Manager
In this sample application architecture, Secrets Manager is used to store and manage sensitive data. The AWS CloudFormation template provided sets up an Amazon RDS for MySQL instance and securely sets the master user password by retrieving it from Secrets Manager using KMS encryption.
Here’s how Secrets Manager is implemented in this sample application architecture:
Creating a Secrets Manager secret.
Create a Secrets Manager secret that includes the Amazon RDS database credentials using CloudFormation.
The secret is encrypted using an AWS KMS customer managed key.
The ManageMasterUserPassword: true line in the CloudFormation template indicates that the stack will manage the master user password for the Amazon RDS instance. To securely retrieve the password for the master user, the CloudFormation template uses the MasterUserSecret parameter, which retrieves the password from Secrets Manager. The KmsKeyId: !Ref RDSMySqlSecretEncryption line specifies the KMS key ID that will be used to encrypt the secret in Secrets Manager.
By setting the MasterUserSecret parameter to retrieve the password from Secrets Manager, the CloudFormation stack can securely retrieve and set the master user password for the Amazon RDS MySQL instance without exposing it in plain text. Additionally, specifying the KMS key ID for encryption adds another layer of security to the secret stored in Secrets Manager.
Retrieving secrets from Secrets Manager.
The secrets store CSI driver is a Kubernetes-native driver that provides a common interface for Secrets Store integration with Amazon EKS. The secrets-store-csi-driver-provider-aws is a specific provider that provides integration with the Secrets Manager.
To set up Amazon EKS, the first step is to create a SecretProviderClass, which specifies the secret ID of the Amazon RDS database. This SecretProviderClass is then used in the Kubernetes deployment object to deploy the WordPress application and dynamically retrieve the secrets from the secret manager during deployment. This process is entirely dynamic and verifies that no secrets are recorded anywhere. The SecretProviderClass is created on a specific app namespace, such as the wp namespace.
When using Secrets manager, be aware of the following best practices for managing and securing Secrets Manager secrets:
Use AWS Identity and Access Management (IAM) identity policies to define who can perform specific actions on Secrets Manager secrets, such as reading, writing, or deleting them.
Secrets Manager resource policies can be used to manage access to secrets at a more granular level. This includes defining who has access to specific secrets based on attributes such as IP address, time of day, or authentication status.
Encrypt the Secrets Manager secret using an AWS KMS key.
Using CloudFormation templates to automate the creation and management of Secrets Manager secrets including rotation.
Use AWS CloudTrail to monitor access and changes to Secrets Manager secrets.
Use CloudFormation hooks to validate the Secrets Manager secret before and after deployment. If the secret fails validation, the deployment is rolled back.
Encrypting data with AWS KMS
Data encryption involves converting sensitive information into a coded form that can only be accessed with the appropriate decryption key. By implementing encryption measures throughout your pipeline, you make sure that even if unauthorized individuals gain access to the data, they won’t be able to understand its contents.
Here’s how data at rest encryption using AWS KMS is implemented in this sample application architecture:
Amazon RDS secret encryption
Encrypting secrets: An AWS KMS customer managed key is used to encrypt the secrets stored in Secrets Manager to ensure their confidentiality during the DevOps build process.
Enable encryption for an Amazon RDS instance using CloudFormation. Specify the KMS key ARN in the CloudFormation stack and RDS will use the specified KMS key to encrypt data at rest.
Sample code:
RDSMySQL:
Type: AWS::RDS::DBInstanceProperties:
KmsKeyId: !Ref RDSMySqlDataEncryptionStorageEncrypted: trueRDSMySqlDataEncryption:Type: "AWS::KMS::Key"Properties:KeyPolicy:Id: rds-mysql-data-encryptionStatement:- Sid: Allow administration of the keyEffect: Allow"Action": ["kms:Create*","kms:Describe*","kms:Enable*","kms:List*","kms:Put*",...]- Sid: Allow use of the keyEffect: Allow"Action": ["kms:Decrypt","kms:GenerateDataKey","kms:DescribeKey"]
Kubernetes Pods storage
Use encrypted Amazon Elastic Block Store (Amazon EBS) volumes to store configuration data. Create a managed encrypted Amazon EBS volume using the following code snippet, and then deploy a Kubernetes pod with the persistent volume claim (PVC) mounted as a volume.
Create a KMS key for Amazon ECR and use that key to encrypt the data at rest.
Automate the creation of encrypted ECR repositories and enable encryption at rest using a DevOps pipeline, use CodePipeline to automate the deployment of the CloudFormation stack.
Define the creation of encrypted Amazon ECR repositories as part of the pipeline.
AWS best practices for managing encryption keys in an AWS environment
To effectively manage encryption keys and verify the security of data at rest in an AWS environment, we recommend the following best practices:
Use separate AWS KMS customer managed KMS keys for data classifications to provide better control and management of keys.
Enforce separation of duties by assigning different roles and responsibilities for key management tasks, such as creating and rotating keys, setting key policies, or granting permissions. By segregating key management duties, you can reduce the risk of accidental or intentional key compromise and improve overall security.
Use CloudTrail to monitor AWS KMS API activity and detect potential security incidents.
Rotate KMS keys as required by your regulatory requirements.
Use CloudFormation hooks to validate KMS key policies to verify that they align with organizational and regulatory requirements.
Following these best practices and implementing encryption at rest for different services such as Amazon RDS, Kubernetes Pods storage, and Amazon ECR, will help ensure that data is encrypted at rest.
Securing communication with ACM
Secure communication is a critical requirement for modern environments and implementing it in a DevOps pipeline is crucial for verifying that the infrastructure is secure, consistent, and repeatable across different environments. In this WordPress application running on Amazon EKS, ACM is used to secure communication end-to-end. Here’s how to achieve this:
Provision TLS certificates with ACM using a DevOps pipeline
To provision TLS certificates with ACM in a DevOps pipeline, automate the creation and deployment of TLS certificates using ACM. Use AWS CloudFormation templates to create the certificates and deploy them as part of infrastructure as code. This verifies that the certificates are created and deployed consistently and securely across multiple environments.
Provisioning of ALB and integration of TLS certificate using AWS ALB Ingress Controller for Kubernetes
Use a DevOps pipeline to create and configure the TLS certificates and ALB. This verifies that the infrastructure is created consistently and securely across multiple environments.
To secure communication between CloudFront and the ALB, verify that the traffic from the client to CloudFront and from CloudFront to the ALB is encrypted using the TLS certificate.
To secure communication between the ALB and the Kubernetes Pods, use the Kubernetes ingress resource to terminate SSL/TLS connections at the ALB. The ALB sends the PROTO metadata http connection header to the WordPress web server. The web server checks the incoming traffic type (http or https) and enables the HTTPS connection only hereafter. This verifies that pod responses are sent back to ALB only over HTTPS.
Additionally, using the X-Forwarded-Proto header can help pass the original protocol information and help avoid issues with the $_SERVER[‘HTTPS’] variable in WordPress.
To secure communication between the Kubernetes Pods in Amazon EKS and the Amazon RDS database, use SSL/TLS encryption on the database connection.
Configure an Amazon RDS MySQL instance with enhanced security settings to verify that only TLS-encrypted connections are allowed to the database. This is achieved by creating a DB parameter group with a parameter called require_secure_transport set to ‘1‘. The WordPress configuration file is also updated to enable SSL/TLS communication with the MySQL database. Then enable the TLS flag on the MySQL client and the Amazon RDS public certificate is passed to ensure that the connection is encrypted using the TLS_AES_256_GCM_SHA384 protocol. The sample code that follows focuses on enhancing the security of the RDS MySQL instance by enforcing encrypted connections and configuring WordPress to use SSL/TLS for communication with the database.
Sample code:
RDSDBParameterGroup:
Type: 'AWS::RDS::DBParameterGroup'Properties:
DBParameterGroupName: 'rds-tls-custom-mysql'Parameters:
require_secure_transport: '1'RDSMySQL:
Type: AWS::RDS::DBInstanceProperties:
DBName: 'wordpress'DBParameterGroupName: !Ref RDSDBParameterGroupwp-config-docker.php:
// Enable SSL/TLS between WordPress and MYSQL databasedefine('MYSQL_CLIENT_FLAGS', MYSQLI_CLIENT_SSL);//This activates SSL modedefine('MYSQL_SSL_CA', '/usr/src/wordpress/amazon-global-bundle-rds.pem');
In this architecture, AWS WAF is enabled at CloudFront to protect the WordPress application from common web exploits. AWS WAF for CloudFront is recommended and use AWS managed WAF rules to verify that web applications are protected from common and the latest threats.
Here are some AWS best practices for securing communication with ACM:
Use SSL/TLS certificates: Encrypt data in transit between clients and servers. ACM makes it simple to create, manage, and deploy SSL/TLS certificates across your infrastructure.
Use ACM-issued certificates: This verifies that your certificates are trusted by major browsers and that they are regularly renewed and replaced as needed.
Implement certificate revocation: Implement certificate revocation for SSL/TLS certificates that have been compromised or are no longer in use.
Implement strict transport security (HSTS): This helps protect against protocol downgrade attacks and verifies that SSL/TLS is used consistently across sessions.
Configure proper cipher suites: Configure your SSL/TLS connections to use only the strongest and most secure cipher suites.
Monitoring and auditing with CloudTrail
In this section, we discuss the significance of monitoring and auditing actions in your AWS account using CloudTrail. CloudTrail is a logging and tracking service that records the API activity in your AWS account, which is crucial for troubleshooting, compliance, and security purposes. Enabling CloudTrail in your AWS account and securely storing the logs in a durable location such as Amazon Simple Storage Service (Amazon S3) with encryption is highly recommended to help prevent unauthorized access. Monitoring and analyzing CloudTrail logs in real-time using CloudWatch Logs can help you quickly detect and respond to security incidents.
In a DevOps pipeline, you can use infrastructure-as-code tools such as CloudFormation, CodePipeline, and CodeBuild to create and manage CloudTrail consistently across different environments. You can create a CloudFormation stack with the CloudTrail configuration and use CodePipeline and CodeBuild to build and deploy the stack to different environments. CloudFormation hooks can validate the CloudTrail configuration to verify it aligns with your security requirements and policies.
It’s worth noting that the aspects discussed in the preceding paragraph might not apply if you’re using AWS Organizations and the CloudTrail Organization Trail feature. When using those services, the management of CloudTrail configurations across multiple accounts and environments is streamlined. This centralized approach simplifies the process of enforcing security policies and standards uniformly throughout the organization.
By following these best practices, you can effectively audit actions in your AWS environment, troubleshoot issues, and detect and respond to security incidents proactively.
Complete code for sample architecture for deployment
The complete code repository for the sample WordPress application architecture demonstrates how to implement data protection in a DevOps pipeline using various AWS services. The repository includes both infrastructure code and application code that covers all aspects of the sample architecture and implementation steps.
The infrastructure code consists of a set of CloudFormation templates that define the resources required to deploy the WordPress application in an AWS environment. This includes the Amazon Virtual Private Cloud (Amazon VPC), subnets, security groups, Amazon EKS cluster, Amazon RDS instance, AWS KMS key, and Secrets Manager secret. It also defines the necessary security configurations such as encryption at rest for the RDS instance and encryption in transit for the EKS cluster.
The application code is a sample WordPress application that is containerized using Docker and deployed to the Amazon EKS cluster. It shows how to use the Application Load Balancer (ALB) to route traffic to the appropriate container in the EKS cluster, and how to use the Amazon RDS instance to store the application data. The code also demonstrates how to use AWS KMS to encrypt and decrypt data in the application, and how to use Secrets Manager to store and retrieve secrets. Additionally, the code showcases the use of ACM to provision SSL/TLS certificates for secure communication between the CloudFront and the ALB, thereby ensuring data in transit is encrypted, which is critical for data protection in a DevOps pipeline.
Conclusion
Strengthening the security and compliance of your application in the cloud environment requires automating data protection measures in your DevOps pipeline. This involves using AWS services such as Secrets Manager, AWS KMS, ACM, and AWS CloudFormation, along with following best practices.
By automating data protection mechanisms with AWS CloudFormation, you can efficiently create a secure pipeline that is reproducible, controlled, and audited. This helps maintain a consistent and reliable infrastructure.
Monitoring and auditing your DevOps pipeline with AWS CloudTrail is crucial for maintaining compliance and security. It allows you to track and analyze API activity, detect any potential security incidents, and respond promptly.
By implementing these best practices and using data protection mechanisms, you can establish a secure pipeline in the AWS cloud environment. This enhances the overall security and compliance of your application, providing a reliable and protected environment for your deployments.
If you have feedback about this post, submit comments in the Comments section below. If you have questions about this post, contact AWS Support.
Want more AWS Security news? Follow us on Twitter.
AWS Certificate Manager (ACM) is a managed service that you can use to provision, manage, and deploy public and private TLS certificates for use with Amazon Web Services (AWS) and your internal connected resources. Today, we’re announcing that ACM will be discontinuing the use of WHOIS lookup for validating domain ownership when you request email-validated TLS certificates.
WHOIS lookup is commonly used to query registration information for a given domain name. This information includes details such as when the domain was originally registered, and contact information for the domain owner and the technical and administrative contacts. Domain owners create and maintain domain registration information outside of ACM in WHOIS, which is a publicly available directory that contains information about domains sponsored by domain registrars and registries. You can use WHOIS lookup to view information about domains that are registered with Amazon Route 53.
Starting June 2024, ACM will no longer send domain validation emails by using WHOIS lookup for new email-validated certificates that you request. Starting October 2024, ACM will no longer send domain validation emails to mailboxes associated with WHOIS lookup for renewal of existing email-validated certificates. ACM will continue to send validation emails to the five common system addresses for the requested domain—we provide a list of these common system addresses in the next section of this post.
In this blog post, we share important details about this change and how you can prepare. Note that if you currently use DNS validation for your certificates requested from ACM, this change doesn’t affect you. These changes only apply to certificates that use email validation.
Background
When you request public certificates through ACM, you need to prove that you own or control the domain before ACM can issue the public certificate. ACM provides two options to validate ownership of a domain: DNS validation and email validation.
AWS recommends that you use DNS validation whenever possible so that ACM can automatically renew certificates that are requested from ACM without requiring action on your part. Email validation is another option that you can use to prove ownership of the domain, but you must manually validate ownership of the domain by using a link provided in an email. Figure 1 is a sample validation email from ACM for the AWS account 111122223333 and AWS US West (Oregon) Region (us-west-2) to validate ownership of the example.com domain.
Figure 1: Sample validation email for example.com domain
How does ACM know where to send the validation email? Today, as part of the email validation process, ACM sends domain validation emails to the three contact addresses associated with the domain listed in the WHOIS database. These contact addresses are the domain registrant, technical contact, and administrative contact. You create and maintain domain registration information, including these contact addresses, outside of ACM—in the WHOIS database that your domain registrar provides.
ACM also sends validation emails to the following five common system addresses for each domain:
administrator@your_domain_name
hostmaster@your_domain_name
postmaster@your_domain_name
webmaster@your_domain_name
admin@your_domain_name
To prove that you own the domain, you must select the validation link included in these emails. ACM also sends validation emails to these same addresses to renew the certificate when the certificate is 45 days from expiry.
What’s changing?
If you currently use email validation for certificates requested from ACM, there are two important dates that you should be aware of:
Starting June 2024, ACM will no longer send domain validation emails by using WHOIS lookup for new email-validated certificates that you request. ACM will continue to send validation emails to the three WHOIS lookup contact addresses for renewal of existing certificates, until October 2024.
Starting October 2024, ACM will no longer send the validation emails to mailboxes associated with WHOIS lookup for existing certificates. After this date, ACM will not send validation emails to the three WHOIS lookup addresses for new or existing certificates.
ACM will continue to send validation emails to the five common system addresses that we listed in the previous section of this post.
Why are we making this change?
We’re making this change to mitigate a potential availability risk for ACM customers. A TLS certificate that ACM issues is valid for up to 395 days, and if you want to keep using it, you need to renew it prior to expiry. To renew an email-validated certificate, you must approve an email that ACM sends. ACM sends the first renewal email 45 days prior to certificate renewal, and if you don’t respond to this email, ACM sends additional reminders prior to expiry. If a certificate bound to one of your AWS resources—such as an Application Load Balancer—expires without being renewed, this could cause an outage for your application.
Some domain registrars that support WHOIS have made changes to the data that they publish to support their compliance with various privacy laws and recommended practices. Over the past several years, we’ve observed that the WHOIS lookup success rate has declined to less than 5 percent. If you rely on the contact addresses listed in the WHOIS database provided by your domain registrar to validate your domain ownership, this might create an availability risk. With a 5 percent success rate for WHOIS lookup, you might not receive validation emails for renewals of your certificates around 95 percent of the time. To provide a consistent mechanism for validating domain ownership when renewing certificates, ACM will only send validation emails to the five common system addresses that we listed in the Background section of this post.
What should you do to prepare?
If you currently monitor one of the five common system addresses (listed previously) for your domains, you don’t need to take any action. Otherwise, we strongly recommend that you create new DNS-validated certificates rather than creating and using email-validated certificates. ACM can automatically renew a DNS-validated certificate, without you taking any action, as long as the CNAME is accurately configured.
Alternatively, if you want to continue using email-validated certificates, we recommend that you monitor at least one of the five common email addresses listed previously. ACM sends the validation emails during certificate issuance for new ACM-issued certificates and during renewal of existing certificates. You can use the ACM describe-certificate API or check the certificate details on the ACM console to see if ACM previously sent validation emails to the relevant system addresses.
In this blog post, we outlined the changes coming to the email validation process when requesting and renewing certificates from ACM. We also shared the steps that you can take to prepare for this change, including monitoring at least one of the five relevant email addresses for your domains. Remember that these changes only apply to certificates that use email validation, not certificates that use DNS validation. For more information about certificate management on AWS, see the ACM documentation or get started using ACM today in the AWS Management Console.
If you have questions, contact AWS Support or your technical account manager (TAM), or start a new thread on the AWS re:Post ACM Forum. If you have feedback about this post, submit comments in the Comments section below.
Want more AWS Security news? Follow us on Twitter.
AWS Certificate Manager (ACM) lets you provision, manage, and deploy public and private Transport Layer Security (TLS) certificates for use with AWS services and your internal connected resources. You probably have many users, applications, or accounts that request and use TLS certificates as part of your public key infrastructure (PKI); which means you might also need to enforce specific PKI enterprise controls, such as the types of certificates that can be issued or the validation method used. You can now use AWS Identity and Access Management (IAM)condition context keys to define granular rules around certificate issuance from ACM and help ensure your users are issuing or requesting TLS certificates in accordance with your organizational guidelines.
In this blog post, we provide an overview of the new IAM condition keys available with ACM. We also discuss some example use cases for these condition keys, including example IAM policies. Lastly, we highlight some recommended practices for logging and monitoring certificate issuance across your organization using AWS CloudTrail because you might want to provide PKI administrators a centralized view of certificate activities. Combining preventative controls, like the new IAM condition keys for ACM, with detective controls and comprehensive activity logging can help you meet your organizational requirements for properly issuing and using certificates.
This blog post assumes you have a basic understanding of IAM policies. If you’re new to using identity policies in AWS, see the IAM documentation for more information.
Using IAM condition context keys with ACM to enforce certificate issuance guidelines across your organization
Let’s take a closer look at IAM condition keys to better understand how to use these controls to enforce certificate guidelines. The condition block in an IAM policy is an optional policy element that lets you specify certain conditions for when a policy will be in effect. For instance, you might use a policy condition to specify that no one can delete an Amazon Simple Storage Service (Amazon S3) bucket except for your system administrator IAM role. In this case, the condition element of the policy translates to the exception in the previous sentence: all identities are denied the ability to delete S3 buckets except under the condition that the role is your administrator IAM role. We will highlight some useful examples for certificate issuance later in the post.
When used with ACM, IAM condition keys can now be used to help meet enterprise standards for how certificates are issued in your organization. For example, your security team might restrict the use of RSA certificates, preferring ECDSA certificates. You might want application teams to exclusively use DNS domain validation when they request certificates from ACM, enabling fully managed certificate renewals with little to no action required on your part. Using these condition keys in identity policies or service control policies (SCPs) provide ACM users more control over who can issue certificates with certain configurations. You can now create condition keys to define certificate issuance guardrails around the following:
Certificate validation method — Allow or deny a specific validation type (such as email validation).
Certificate key algorithm — Allow or deny use of certain key algorithms (such as RSA) for certificates issued with ACM.
Certificate transparency (CT) logging — Deny users from disabling CT logging during certificate requests.
Domain names — Allow or deny authorized accounts and users to request certificates for specific domains, including wildcard domains. This can be used to help prevent the use of wildcard certificates or to set granular rules around which teams can request certificates for which domains.
Certificate authority — Allow or deny use of specific certificate authorities in AWS Private Certificate Authority for certificate requests from ACM.
Before this release, you didn’t always have a proactive way to prevent users from issuing certificates that weren’t aligned with your organization’s policies and best practices. You could reactively monitor certificate issuance behavior across your accounts using AWS CloudTrail, but you couldn’t use an IAM policy to prevent the use of email validation, for example. With the new policy conditions, your enterprise and network administrators gain more control over how certificates are issued and better visibility into inadvertent violations of these controls.
Using service control policies and identity-based policies
Before we showcase some example policies, let’s examine service control policies, or SCPs. SCPs are a type of policy that you can use with AWS Organizations to manage permissions across your enterprise. SCPs offer central control over the maximum available permissions for accounts in your organization, and SCPs can help ensure your accounts stay aligned with your organization’s access control guidelines. You can find more information in Getting started with AWS Organizations.
Let’s assume you want to allow only DNS validated certificates, not email validated certificates, across your entire enterprise. You could create identity-based policies in all your accounts to deny the use of email validated certificates, but creating an SCP that denies the use of email validation across every account in your enterprise would be much more efficient and effective. However, if you only want to prevent a single IAM role in one of your accounts from issuing email validated certificates, an identity-based policy attached to that role would be the simplest, most granular method.
It’s important to note that no permissions are granted by an SCP. An SCP sets limits on the actions that you can delegate to the IAM users and roles in the affected accounts. You must still attach identity-based policies to IAM users or roles to actually grant permissions. The effective permissions are the logical intersection between what is allowed by the SCP and what is allowed by the identity-based and resource-based policies. In the next section, we examine some example policies and how you can use the intersection of SCPs and identity-based policies to enforce enterprise controls around certificates.
Certificate governance use cases and policy examples
Let’s look at some example use cases for certificate governance, and how you might implement them using the new policy condition keys. We’ve selected a few common use cases, but you can find more policy examples in the ACM documentation.
Example 1: Policy to prevent issuance of email validated certificates
Certificates requested from ACM using email validation require manual action by the domain owner to renew the certificates. This could lead to an outage for your applications if the person receiving the email to validate the domain leaves your organization — or is otherwise unable to validate your domain ownership — and the certificate expires without being renewed.
We recommend using DNS validation, which doesn’t require action on your part to automatically renew a public certificate requested from ACM. The following SCP example demonstrates how to help prevent the issuance of email validated certificates, except for a specific IAM role. This IAM role could be used by application teams who cannot use DNS validation and are given an exception.
Note that this policy will only apply to new certificate requests. ACM managed certificate renewals for certificates that were originally issued using email validation won’t be affected by this policy.
Example 2: Policy to prevent issuance of a wildcard certificate
A wildcard certificate contains a wildcard (*) in the domain name field, and can be used to secure multiple sub-domains of a given domain. For instance, *.example.com could be used for mail.example.com, hr.example.com, and dev.example.com. You might use wildcard certificates to reduce your operational complexity, because you can use the same certificate to protect multiple sites on multiple resources (for example, web servers). However, this also means the wildcard certificates have a larger impact radius, because a compromised wildcard certificate could affect each of the subdomains and resources where it’s used. The US National Security Agency warned about the use of wildcard certificates in 2021.
Therefore, you might want to limit the use of wildcard certificates in your organization. Here’s an example SCP showing how to help prevent the issuance of wildcard certificates using condition keys with ACM:
Notice that in this example, we’re denying a request for a certificate where the leftmost character of the domain name is a wildcard. In the condition section, ForAnyValue means that if a value in the request matches at least one value in the list, the condition will apply. As acm:DomainNames is a multi-value field, we need to specify whether at least one of the provided values needs to match (ForAnyValue), or all the values must match (ForAllValues), for the condition to be evaluated as true. You can read more about multi-value context keys in the IAM documentation.
Example 3: Allow application teams to request certificates for their FQDN but not others
Consider a scenario where you have multiple application teams, and each application team has their own domain names for their workloads. You might want to only allow application teams to request certificates for their own fully qualified domain name (FQDN). In this example SCP, we’re denying requests for a certificate with the FQDN app1.example.com, unless the request is made by one of the two IAM roles in the condition element. Let’s assume these are the roles used for staging and building the relevant application in production, and the roles should have access to request certificates for the domain.
Multiple conditions in the same block must be evaluated as true for the effect to be applied. In this case, that means denying the request. In the first statement, the request must contain the domain app1.example.com for the first part to evaluate to true. If the identity making the request is not one of the two listed roles, then the condition is evaluated as true, and the request will be denied. The request will not be denied (that is, it will be allowed) if the domain name of the certificate is notapp1.example.com or if the role making the request is one of the roles listed in the ArnNotLike section of the condition element. The same applies for the second statement pertaining to application team 2.
Keep in mind that each of these application team roles would still need an identity policy with the appropriate ACM permissions attached to request a certificate from ACM. This policy would be implemented as an SCP and would help prevent application teams from giving themselves the ability to request certificates for domains that they don’t control, even if they created an identity policy allowing them to do so.
Example 4: Policy to prevent issuing certificates with certain key algorithms
You might want to allow or restrict a certain certificate key algorithm. For example, allowing the use of ECDSA certificates but restricting RSA certificates from being issued. See this blog post for more information on the differences between ECDSA and RSA certificates, and how to evaluate which type to use for your workload. Here’s an example SCP showing how to deny requests for a certificate that uses one of the supported RSA key lengths.
Notice that we’re using a wildcard after RSA to restrict use of RSA certificates, regardless of the key length (for example, 2048, 4096, and so on).
Creating detective controls for better visibility into certificate issuance across your organization
While you can use IAM policy condition keys as a preventative control, you might also want to implement detective controls to better understand certificate issuance across your organization. Combining these preventative and detective controls helps you establish a comprehensive set of enterprise controls for certificate governance. For instance, imagine you use an SCP to deny all attempts to issue a certificate using email validation. You will have CloudTrail logs for RequestCertificate API calls that are denied by this policy, and can use these events to notify the appropriate application team that they should be using DNS validation.
You’re probably familiar with the access denied error message received when AWS explicitly or implicitly denies an authorization request. The following is an example of the error received when a certificate request is denied by an SCP:
"An error occurred (AccessDeniedException) when calling the RequestCertificate operation: User: arn:aws:sts::account:role/example is not authorized to perform: acm:RequestCertificate on resource: arn:aws:acm:us-east-1:account:certificate/* with an explicit deny in a service control policy"
If you use AWS Organizations, you can have a consolidated view of the CloudTrail events for certificate issuance using ACM by creating an organization trail. Please refer to the CloudTrail documentation for more information on security best practices in CloudTrail. Using Amazon EventBridge, you can simplify certificate lifecycle management by using event-driven workflows to notify or automatically act on expiring TLS certificates. Learn about the example use cases for the event types supported by ACM in this Security Blog post.
Conclusion
In this blog post, we discussed the new IAM policy conditions available for use with ACM. We also demonstrated some example use cases and policies where you might use these conditions to provide more granular control on the issuance of certificates across your enterprise. We also briefly covered SCPs, identity-based policies, and how you can get better visibility into certificate governance using services like AWS CloudTrail and Amazon EventBridge. See the AWS Certificate Manager documentation to learn more about using policy conditions with ACM, and then get started issuing certificates with AWS Certificate Manager.
If you have feedback about this post, submit comments in the Comments section below. If you have questions about this post, contact AWS Support.
Want more AWS Security news? Follow us on Twitter.
In March 2022, AWS announced support for custom certificate extensions, including name constraints, using AWS Certificate Manager (ACM) Private Certificate Authority (CA). Defining DNS name constraints with your subordinate CA can help establish guardrails to improve public key infrastructure (PKI) security and mitigate certificate misuse. For example, you can set a DNS name constraint that restricts the CA from issuing certificates to a resource that is using a specific domain name. Certificate requests from resources using an unauthorized domain name will be rejected by your CA and won’t be issued a certificate.
In this blog post, I’ll walk you step-by-step through the process of applying DNS name constraints to a subordinate CA by using the AWS Private CA service.
Prerequisites
You need to have the following prerequisite tools, services, and permissions in place before following the steps presented within this post:
All of the examples in this blog post are provided for the us-west-2 AWS Region. You will need to make sure that you have access to resources in your desired Region and specify the Region in the example commands.
Retrieve the solution code
Our GitHub repository contains the Python code that you need in order to replicate the steps presented in this post. There are two methods for cloning the repository provided, HTTPS or SSH. Select the method that you prefer.
Creating a Python virtual environment will allow you to run this solution in a fresh environment without impacting your existing Python packages. This will prevent the solution from interfering with dependencies that your other Python scripts may have. The virtual environment has its own set of Python packages installed. Read the official Python documentation on virtual environments for more information on their purpose and functionality.
To create a Python virtual environment
Create a new directory for the Python virtual environment in your home path.
Generate the API passthrough file with encoded name constraints
This step allows you to define the permitted and excluded DNS name constraints to apply to your subordinate CA. Read the documentation on name constraints in RFC 5280 for more information on their usage and functionality.
The Python encoder provided in this solution accepts two arguments for the permitted and excluded name constraints. The -p argument is used to provide the permitted subtrees, and the -e argument is used to provide the excluded subtrees. Use commas without spaces to separate multiple entries. For example: -p .dev.example.com,.test.example.com -e .prod.dev.example.com,.amazon.com.
To encode your name constraints
Run the following command, and update <~/github> with your information and provide your desired name constraints for the permitted (-p) and excluded (-e) arguments.
If the command runs successfully, you will see the message “Successfully Encoded Name Constraints” and the name of the generated API passthrough JSON file. The output of Permitted Subtrees will show the domain names you passed with the -p argument, and Excluded Subtrees will show the domain names you passed with the -e argument in the previous step.
Figure 1: Command line output example for name-constraints-encoder.py
Use the following command to display the contents of the API passthrough file generated by the Python encoder.
The contents of api_passthrough_config.json will look similar to the following screenshot. The JSON object will have an ObjectIdentifier key and value of 2.5.29.30, which represents the name constraints OID from the Global OID database. The base64-encoded Value represents the permitted and excluded name constraints you provided to the Python encoder earlier.
Figure 2: Viewing contents of api_passthrough_config.json
Generate a CSR from your subordinate CA
You must generate a certificate signing request (CSR) from the subordinate CA to which you intend to have the name constraints applied. Otherwise, you might encounter errors when you attempt to install the new certificate with name constraints.
To generate the CSR
Update and run the following command with your subordinate CA ARN and Region. The ARN is something that uniquely identifies AWS resources, similar to how your home address tells the mail person where to deliver the mail. In this case, the ARN is the unique identifier for your subordinate CA that tells the command which subordinate CA it’s interacting with.
The following screenshot provides an example output for a CSR. Your CSR details will be different; however, you should see something similar. Look for verify OK in the output and make sure that the Subject details match your subordinate CA. The subject details will provide the country, state, and city. The details will also likely contain your organization’s name, organizational unit or department name, and a common name for the subordinate CA.
Figure 3: Reviewing CSR content using openssl
Use the root CA to issue a new certificate with the name constraints custom extension
This post uses a two-tiered certificate authority architecture for simplicity. However, you can use the steps in this post with a more complex multi-level CA architecture. The name constraints certificate will be generated by the root CA and applied to the intermediary CA.
To issue and download a certificate with name constraints
Run the following command, making sure to update the argument values in red italics with your information. Make sure that the certificate-authority-arn is that of your root CA.
Note that the provided template-arn instructs the root CA to use the api_passthrough_config.json file that you created earlier to generate the certificate with the name constraints custom extension. If you use a different template, the new certificate might not be created as you intended.
Also, note that the validity period provided in this example is 5 years or 1825 days. The validity period for your subordinate CA must be less than that of your root CA.
If the issue-certificate command is successful, the output will provide the ARN of the new certificate that is issued by the root CA. Copy the certificate ARN, because it will be used in the following command.
Figure 4: Issuing a certificate with name constraints from the root CA using the AWS CLI
To download the new certificate, run the following command. Make sure to update the placeholders in red italics with your root CA’s certificate-authority-arn, the certificate-arn you obtained from the previous step, and your region.
Separate the certificate and certificate chain into two separate files by running the following commands. The new subordinate CA certificate is saved as cert.pem and the certificate chain is saved as cert_chain.pem.
The x509v3 Name Constraints portion of cert.pem should match the permitted and excluded name constraints you provided to the Python encoder earlier.
Figure 5: Verifying the X509v3 name constraints in the newly issued certificate using openssl
Install the name constraints certificate on the subordinate CA
In this section, you will install the name constraints certificate on your subordinate CA. Note that this will replace the existing certificate installed on the subordinate CA. The name constraints will go into effect as soon as the new certificate is installed.
To install the name constraints certificate
Run the following command with your subordinate CA’s certificate-authority-arn and path to the cert.pem and cert_chain.pem files you created earlier.
The output from the previous command will be similar to the following screenshot. The CertificateAuthorityConfiguration and highlighted NotBefore and NotAfter fields in the output should match the name constraints certificate.
Figure 6: Verifying subordinate CA details using the AWS CLI
Test the name constraints
Now that your subordinate CA has the new certificate installed, you can test to see if the name constraints are being enforced based on the certificate you installed in the previous section.
To request a certificate from your subordinate CA and test the applied name constraints
To request a new certificate, update and run the following command with your subordinate CA’s certificate-authority-arn, region, and desired certificate subject in the domain-name argument.
You will see output similar to the following screenshot if the requested certificate domain name was not permitted by the name constraints applied to your subordinate CA. In this example, a certificate for app.prod.dev.example.com was rejected. The Status shows “FAILED” and the FailureReason indicates “PCA_NAME_CONSTRAINTS_VALIDATION”.
Figure 7: Verifying the status of the certificate request using the AWS CLI describe-certificate command
With AWS Certificate Manager (ACM), you can simplify certificate lifecycle management by using event-driven workflows to notify or take action on expiring TLS certificates in your organization. Using ACM, you can provision, manage, and deploy public and private TLS certificates for use with integrated AWS services like Amazon CloudFront and Elastic Load Balancing (ELB), as well as for your internal resources and infrastructure. For a full list of integrated services, see Services integrated with AWS Certificate Manager.
By implementing event-driven workflows for certificate lifecycle management, you can help increase the visibility of upcoming and actual certificate expirations, and notify application teams that their action is required to renew a certificate. You can also use event-driven workflows to automate provisioning of private certificates to your internal resources, like a web server based on Amazon Elastic Compute Cloud (Amazon EC2).
In this post, we describe the ACM event types that Amazon EventBridge supports. EventBridge is a serverless event router that you can use to build event-driven applications at scale. ACM publishes these events for important occurrences, such as when a certificate becomes available, approaches expiration, or fails to renew. We also highlight example use cases for the event types supported by ACM. Lastly, we show you how to implement an event-driven workflow to notify application teams that they need to take action to renew a certificate for their workloads. You can also use these types of workflows to send the relevant event information to AWS Security Hub or to initiate certificate automation actions through AWS Lambda.
In October 2022, ACM released support for three new event types:
ACM Certificate Renewal Action Required
ACM Certificate Expired
ACM Certificate Available
Before this release, ACM had a single event type: ACM Certificate Approaching Expiration. By default, ACM creates Certificate Approaching Expiration events daily for active, ACM-issued certificates starting 45 days prior to their expiration. To learn more about the structure of these event types, see Amazon EventBridge support for ACM. The following examples highlight how you can use the different event types in the context of certificate lifecycle operations.
Notify stakeholders that action is required to complete certificate renewal
ACM emits an ACM Certificate Renewal Action Required event when customer action must be taken before a certificate can be renewed. For instance, if permissions aren’t appropriately configured to allow ACM to renew private certificates issued from AWS Private Certificate Authority (AWS Private CA), ACM will publish this event when automatic renewal fails at 45 days before expiration. Similarly, ACM might not be able to renew a public certificate because an administrator needs to confirm the renewal by email validation, or because Certification Authority Authorization (CAA) record changes prevent automatic renewal through domain validation. ACM will make further renewal attempts at 30 days, 15 days, 3 days, and 1 day before expiration, or until customer action is taken, the certificate expires, or the certificate is no longer eligible for renewal. ACM publishes an event for each renewal attempt.
It’s important to notify the appropriate parties — for example, the Public Key Infrastructure (PKI) team, security engineers, or application developers — that they need to take action to resolve these issues. You might notify them by email, or by integrating with your workflow management system to open a case that the appropriate engineering or support teams can track.
Notify application teams that a certificate for their workload has expired
You can use the ACM Certificate Expired event type to notify application teams that a certificate associated with their workload has expired. The teams should quickly investigate and validate that the expired certificate won’t cause an outage or cause application users to see a message stating that a website is insecure, which could impact their trust. To increase visibility for support teams, you can publish this event to Security Hub or a support ticketing system. For an example of how to publish these events as findings in Security Hub, see Responding to an event with a Lambda function.
Use automation to export and place a renewed private certificate
ACM sends an ACM Certificate Available event when a managed public or private certificate is ready for use. ACM publishes the event on issuance, renewal, and import. When a private certificate becomes available, you might still need to take action to deploy it to your resources, such as installing the private certificate for use in an EC2 web server. This includes a new private certificate that AWS Private CA issues as part of managed renewal through ACM. You might want to notify the appropriate teams that the new certificate is available for export from ACM, so that they can use the ACM APIs, AWS Command Line Interface (AWS CLI), or AWS Management Console to export the certificate and manually distribute it to your workload (for example, an EC2-based web server). For integrated services such as ELB, ACM binds the renewed certificate to your resource, and no action is required.
You can also use this event to invoke a Lambda function that exports the private certificate and places it in the appropriate directory for the relevant server, provide it to other serverless resources, or put it in an encrypted Amazon Simple Storage Service (Amazon S3) bucket to share with a third party for mutual TLS or a similar use case.
How to build a workflow to notify administrators that action is required to renew a certificate
In this section, we’ll show you how to configure notifications to alert the appropriate stakeholders that they need to take an action to successfully renew an ACM certificate.
The following is a sample resource-based policy that allows EventBridge to publish to an Amazon SNS topic. Make sure to replace <region>, <account-id>, and <topic-name> with your own data.
The first step is to create an SNS topic by using the console to link multiple endpoints such as AWS Lambda and Amazon Simple Queue Service (Amazon SQS), or send a notification to an email address.
Enter a name for the topic, and (optional) enter a display name.
Choose the triangle next to the Encryption — optional panel title.
Select the Encryption toggle (optional) to encrypt the topic. This will enable server-side encryption (SSE) to help protect the contents of the messages in Amazon SNS topics.
For this demonstration, we are going to use the default AWS managed KMS key. Using Amazon SNS with AWS Key Management Service (AWS KMS) provides encryption at rest, and the data keys that encrypt the SNS message data are stored with the data protected. To learn more about SNS data encryption, see Data encryption.
Keep the defaults for all other settings.
Choose Create topic.
When the topic has been successfully created, a notification bar appears at the top of the screen, and you will be routed to the page for the newly created topic. Note the Amazon Resource Name (ARN) listed in the Details panel because you’ll need it for the next section.
Next, you need to create a subscription to the topic to set a destination endpoint for the messages that are pushed to the topic to be delivered.
To create a subscription to the topic
In the Subscriptions section of the SNS topic page you just created, choose Create subscription.
On the Create subscription page, in the Details section, do the following:
For Protocol, choose Email.
For Endpoint, enter the email address where the ACM Certificate Renewal Action Required event alerts should be sent.
Keep the default Subscription filter policy and Redrive policy settings for this demonstration.
Choose Create subscription.
To finalize the subscription, an email will be sent to the email address that you entered as the endpoint. To validate your subscription, choose Confirm Subscription in the email when you receive it.
A new web browser will open with a message verifying that the subscription status is Confirmed and that you have been successfully subscribed to the SNS topic.
Next, create the EventBridge rule that will be invoked when an ACM Certificate Renewal Action Required event occurs. This rule uses the SNS topic that you just created as a target.
Define the rule by entering a Name and an optional Description.
In the Event bus dropdown menu, select the default event bus.
The default event bus in your AWS account only allows events from one account. If you want to add additional permissions, attach a resource-based policy to a new event bus. See Permissions for Amazon EventBridge event buses to find example policies for sending events.
Keep the default values for the rest of the settings.
Choose Next.
For Event source, make sure that AWS events or EventBridge partner events is selected, because the event source is ACM.
In the Sample event panel, under Sample events, choose ACM Certificate Renewal Action Required as the sample event. This helps you verify your event pattern.
In the Event pattern panel, for Event Source, make sure that AWS services is selected.
For AWS service, choose Certificate Manager.
Under Event type, choose ACM Certificate Renewal Action Required.
Choose Test pattern.
In the Event pattern section, a notification will appear stating Sample event matched the event pattern to confirm that the correct event pattern was created.
Choose Next.
In the Target 1 panel, do the following:
For Target types, make sure that AWS service is selected.
Under Select a target, choose SNS topic.
In the Topic dropdown list, choose your desired topic.
Choose Next.
(Optional) Add tags to the topic.
Choose Next.
Review the settings for the rule, and then choose Create rule.
Now you are listening to this event and will be notified when a customer action must be taken before a certificate can be renewed.
For another example of how to use Amazon SNS and email notifications, see How to monitor expirations of imported certificates in AWS Certificate Manager (ACM). For an example of how to use Lambda to publish findings to Security Hub to provide visibility to administrators and security teams, see Responding to an event with a Lambda function. Other options for responding to this event include invoking a Lambda function to export and distribute private certificates, or integrating with a messaging or collaboration tool for ChatOps.
Conclusion
In this blog post, you learned about the new EventBridge event types for ACM, and some example use cases for each of these event types. You also learned how to use these event types to create a workflow with EventBridge and Amazon SNS that notifies the appropriate stakeholders when they need to take action, so that ACM can automatically renew a TLS certificate.
By using these events to increase awareness of upcoming certificate lifecycle events, you can make it simpler to manage TLS certificates across your organization. For more information about certificate management on AWS, see the ACM documentation or get started using ACM today in the AWS Management Console.
If you have feedback about this post, submit comments in the Comments section below. If you have questions about this post, contact AWS Support.
Want more AWS Security news? Follow us on Twitter.
Given the pace of Amazon Web Services (AWS) innovation, it can be challenging to stay up to date on the latest AWS service and feature launches. AWS provides services and tools to help you protect your data, accounts, and workloads from unauthorized access. AWS data protection services provide encryption capabilities, key management, and sensitive data discovery. Last year, we saw growth and evolution in AWS data protection services as we continue to give customers features and controls to help meet their needs. Protecting data in the AWS Cloud is a top priority because we know you trust us to help protect your most critical and sensitive asset: your data. This post will highlight some of the key AWS data protection launches in the last year that security professionals should be aware of.
AWS Key Management Service Create and control keys to encrypt or digitally sign your data
In April, AWS Key Management Service (AWS KMS) launched hash-based message authentication code (HMAC) APIs. This feature introduced the ability to create AWS KMS keys that can be used to generate and verify HMACs. HMACs are a powerful cryptographic building block that incorporate symmetric key material within a hash function to create a unique keyed message authentication code. HMACs provide a fast way to tokenize or sign data such as web API requests, credit card numbers, bank routing information, or personally identifiable information (PII). This technology is used to verify the integrity and authenticity of data and communications. HMACs are often a higher performing alternative to asymmetric cryptographic methods like RSA or elliptic curve cryptography (ECC) and should be used when both message senders and recipients can use AWS KMS.
At AWS re:Invent in November, AWS KMS introduced the External Key Store (XKS), a new feature for customers who want to protect their data with encryption keys that are stored in an external key management system under their control. This capability brings new flexibility for customers to encrypt or decrypt data with cryptographic keys, independent authorization, and audit in an external key management system outside of AWS. XKS can help you address your compliance needs where encryption keys for regulated workloads must be outside AWS and solely under your control. To provide customers with a broad range of external key manager options, AWS KMS developed the XKS specification with feedback from leading key management and hardware security module (HSM) manufacturers as well as service providers that can help customers deploy and integrate XKS into their AWS projects.
AWS Nitro System A combination of dedicated hardware and a lightweight hypervisor enabling faster innovation and enhanced security
In November, we published The Security Design of the AWS Nitro System whitepaper. The AWS Nitro System is a combination of purpose-built server designs, data processors, system management components, and specialized firmware that serves as the underlying virtualization technology that powers all Amazon Elastic Compute Cloud (Amazon EC2) instances launched since early 2018. This new whitepaper provides you with a detailed design document that covers the inner workings of the AWS Nitro System and how it is used to help secure your most critical workloads. The whitepaper discusses the security properties of the Nitro System, provides a deeper look into how it is designed to eliminate the possibility of AWS operator access to a customer’s EC2 instances, and describes its passive communications design and its change management process. Finally, the paper surveys important aspects of the overall system design of Amazon EC2 that provide mitigations against potential side-channel vulnerabilities that can exist in generic compute environments.
AWS Secrets Manager Centrally manage the lifecycle of secrets
In February, AWS Secrets Manager added the ability to schedule secret rotations within specific time windows. Previously, Secrets Manager supported automated rotation of secrets within the last 24 hours of a specified rotation interval. This new feature added the ability to limit a given secret rotation to specific hours on specific days of a rotation interval. This helps you avoid having to choose between the convenience of managed rotations and the operational safety of application maintenance windows. In November, Secrets Manager also added the capability to rotate secrets as often as every four hours, while providing the same managed rotation experience.
In May, Secrets Manager started publishing secrets usage metrics to Amazon CloudWatch. With this feature, you have a streamlined way to view how many secrets you are using in Secrets Manager over time. You can also set alarms for an unexpected increase or decrease in number of secrets.
At the end of December, Secrets Manager added support for managed credential rotation for service-linked secrets. This feature helps eliminate the need for you to manage rotation Lambda functions and enables you to set up rotation without additional configuration. Amazon Relational Database Service (Amazon RDS) has integrated with this feature to streamline how you manage your master user password for your RDS database instances. Using this feature can improve your database’s security by preventing the RDS master user password from being visible during the database creation workflow. Amazon RDS fully manages the master user password’s lifecycle and stores it in Secrets Manager whenever your RDS database instances are created, modified, or restored. To learn more about how to use this feature, see Improve security of Amazon RDS master database credentials using AWS Secrets Manager.
AWS Private Certificate Authority Create private certificates to identify resources and protect data
In September, AWS Private Certificate Authority (AWS Private CA) launched as a standalone service. AWS Private CA was previously a feature of AWS Certificate Manager (ACM). One goal of this launch was to help customers differentiate between ACM and AWS Private CA. ACM and AWS Private CA have distinct roles in the process of creating and managing the digital certificates used to identify resources and secure network communications over the internet, in the cloud, and on private networks. This launch coincided with the launch of an updated console for AWS Private CA, which includes accessibility improvements to enhance screen reader support and additional tab key navigation for people with motor impairment.
In October, AWS Private CA introduced a short-lived certificate mode, a lower-cost mode of AWS Private CA that is designed for issuing short-lived certificates. With this new mode, public key infrastructure (PKI) administrators, builders, and developers can save money when issuing certificates where a validity period of 7 days or fewer is desired. To learn more about how to use this feature, see How to use AWS Private Certificate Authority short-lived certificate mode.
Additionally, AWS Private CA supported the launches of certificate-based authentication with Amazon AppStream 2.0 and Amazon WorkSpaces to remove the logon prompt for the Active Directory domain password. AppStream 2.0 and WorkSpaces certificate-based authentication integrates with AWS Private CA to automatically issue short-lived certificates when users sign in to their sessions. When you configure your private CA as a third-party root CA in Active Directory or as a subordinate to your Active Directory Certificate Services enterprise CA, AppStream 2.0 or WorkSpaces with AWS Private CA can enable rapid deployment of end-user certificates to seamlessly authenticate users. To learn more about how to use this feature, see How to use AWS Private Certificate Authority short-lived certificate mode.
AWS Certificate Manager Provision and manage SSL/TLS certificates with AWS services and connected resources
In early November, ACM launched the ability to request and use Elliptic Curve Digital Signature Algorithm (ECDSA) P-256 and P-384 TLS certificates to help secure your network traffic. You can use ACM to request ECDSA certificates and associate the certificates with AWS services like Application Load Balancer or Amazon CloudFront. Previously, you could only request certificates with an RSA 2048 key algorithm from ACM. Now, AWS customers who need to use TLS certificates with at least 120-bit security strength can use these ECDSA certificates to help meet their compliance needs. The ECDSA certificates have a higher security strength—128 bits for P-256 certificates and 192 bits for P-384 certificates—when compared to 112-bit RSA 2048 certificates that you can also issue from ACM. The smaller file footprint of ECDSA certificates makes them ideal for use cases with limited processing capacity, such as small Internet of Things (IoT) devices.
Amazon Macie Discover and protect your sensitive data at scale
Amazon Macie introduced two major features at AWS re:Invent. The first is a new capability that allows for one-click, temporary retrieval of up to 10 samples of sensitive data found in Amazon Simple Storage Service (Amazon S3). With this new capability, you can more readily view and understand which contents of an S3 object were identified as sensitive, so you can review, validate, and quickly take action as needed without having to review every object that a Macie job returned. Sensitive data samples captured with this new capability are encrypted by using customer-managed AWS KMS keys and are temporarily viewable within the Amazon Macie console after retrieval.
Additionally, Amazon Macie introduced automated sensitive data discovery, a new feature that provides continual, cost-efficient, organization-wide visibility into where sensitive data resides across your Amazon S3 estate. With this capability, Macie automatically samples and analyzes objects across your S3 buckets, inspecting them for sensitive data such as personally identifiable information (PII) and financial data; builds an interactive data map of where your sensitive data in S3 resides across accounts; and provides a sensitivity score for each bucket. Macie uses multiple automated techniques, including resource clustering by attributes such as bucket name, file types, and prefixes, to minimize the data scanning needed to uncover sensitive data in your S3 buckets. This helps you continuously identify and remediate data security risks without manual configuration and lowers the cost to monitor for and respond to data security risks.
Support for new open source encryption libraries
In February, we announced the availability of s2n-quic, an open source Rust implementation of the QUIC protocol, in our AWS encryption open source libraries. QUIC is a transport layer network protocol used by many web services to provide lower latencies than classic TCP. AWS has long supported open source encryption libraries for network protocols; in 2015 we introduced s2n-tls as a library for implementing TLS over HTTP. The name s2n is short for signal to noise and is a nod to the act of encryption—disguising meaningful signals, like your critical data, as seemingly random noise. Similar to s2n-tls, s2n-quic is designed to be small and fast, with simplicity as a priority. It is written in Rust, so it has some of the benefits of that programming language, such as performance, threads, and memory safety.
Cryptographic computing for AWS Clean Rooms (preview)
At re:Invent, we also announced AWS Clean Rooms, currently in preview, which includes a cryptographic computing feature that allows you to run a subset of queries on encrypted data. Clean rooms help customers and their partners to match, analyze, and collaborate on their combined datasets—without sharing or revealing underlying data. If you have data handling policies that require encryption of sensitive data, you can pre-encrypt your data by using a common collaboration-specific encryption key so that data is encrypted even when queries are run. With cryptographic computing, data that is used in collaborative computations remains encrypted at rest, in transit, and in use (while being processed).
With AWS, you control your data by using powerful AWS services and tools to determine where your data is stored, how it is secured, and who has access to it. In 2023, we will further the AWS Digital Sovereignty Pledge, our commitment to offering AWS customers the most advanced set of sovereignty controls and features available in the cloud.
You can join us at our security learning conference, AWS re:Inforce 2023, in Anaheim, CA, June 13–14, for the latest advancements in AWS security, compliance, identity, and privacy solutions.
AWS Certificate Manager (ACM) is a managed service that enables you to provision, manage, and deploy public and private SSL/TLS certificates that you can use to securely encrypt network traffic. You can now use ACM to request Elliptic Curve Digital Signature Algorithm (ECDSA) certificates and associate the certificates with AWS services like Application Load Balancer (ALB) or Amazon CloudFront. As a result, you get the benefit of managed renewal, where ACM can automatically renew ECDSA certificates before they expire. Previously, you could only request certificates with an RSA 2048 key algorithm from ACM. ECDSA certificates could be imported to ACM, but imported certificates cannot use managed renewal.
You can request both ECDSA P-256 and P-384 certificates from ACM. If you do not request an ECDSA certificate, ACM will issue an RSA 2048 certificate by default.
In this blog post, we will briefly examine the differences between RSA and ECDSA certificates, discuss some important considerations when evaluating which certificate type to use, and walk through how you can request an ECDSA certificate and associate it with an application load balancer in AWS.
Cryptographic certificates overview
TLS certificates are used to secure network communications and establish the identity of websites over the internet, as well as the identity of resources on private networks. Public certificates that you request through ACM are obtained from Amazon Trust Services, which is an Amazon managed public certificate authority (CA).
Both public and private certificates can help customers identify resources on networks and secure communication between these resources. Public certificates identify resources on the public internet, whereas private certificates do the same for private networks. One key difference is that applications and browsers trust public certificates by default, but an administrator must explicitly configure applications and devices to trust private certificates.
RSA and ECDSA primer
RSA and ECDSA are two widely used public-key cryptographic algorithms—algorithms that use two different keys to encrypt and decrypt data. In the case of TLS, a public key is used to encrypt data, and a private key is used to decrypt data. Public key (or asymmetric key) algorithms are not as computationally efficient as symmetric key algorithms like AES. For this reason, public key algorithms like RSA and ECDSA are primarily used to exchange secrets between two parties initiating a TLS connection. These secrets are then used by both parties to decipher the same symmetric key that actually encrypts the data in transit.
RSA stands for Rivest, Shamir, and Adleman: the researchers who first publicly described this algorithm in 1977. The basic functionality of RSA relies on the idea that large prime numbers are very difficult to efficiently factor. ECDSA, or Elliptic Curve Digital Signature Algorithm, is based on certain unique mathematical properties of elliptic curves that make them very useful for cryptographic operations. The cryptographic utility of ECDSA comes from a concept called the discrete logarithm problem.
Considerations when choosing between RSA and ECDSA
What are the important differences between RSA and ECDSA certificates? When should you choose ECDSA certificates to encrypt network traffic? In this section, we’ll examine the security and performance considerations that help to determine whether ECDSA or RSA certificates are the best choice for your workload.
Security
In cryptography, security is measured as the computational work it takes to exhaust all possible values of a symmetric key in an ideal cipher. An ideal cipher is a theoretical algorithm that has no weaknesses, so you must try every possible key to discover which is the correct key. This is similar to the idea of “brute forcing” a password: trying every possible character combination to find the correct password.
Let’s imagine you have a 112-bit key ideal cipher, which means it would take 2112 tries to exhaust the key space—we would say this cipher has a 112-bit security strength. However, it is important to realize that security strength and key length are not always equal—meaning that an encryption key with a length of 112 bits will not always have a 112-bit security strength.
ECDSA provides higher security strength for lower computational cost. ECDSA P-256, for example, provides 128-bit security strength and is equivalent to an RSA 3072 key. Meanwhile, ECDSA P-384 provides 192-bit security strength, equivalent to the key associated with an RSA 7680 certificate. In other words, an ECDSA P-384 key would require 2192 tries to exhaust the key space.
The following table provides an in-depth comparison of the different security strengths for RSA key lengths and ECDSA curve types. Note that only RSA 2048 and ECDSA P-256 and P-384 are currently issued by ACM. However, ACM does support the import and usage of the other certificate types listed in the table. For more information, see Importing certificates into AWS Certificate Manager.
Security strength
RSA key length
ECDSA curve type
80-bit
1024
160
112-bit
2048
224
128-bit
3072
256
192-bit
7680
384
256-bit
15360
512
Performance
ECDSA provides a higher security strength (for a given key length) than RSA but does not add performance overhead. For example, ECDSA P-256 is as performant as RSA 2048 while providing security strength that is comparable to RSA 3072.
ECDSA certificates also have up to a 50% smaller certificate size when compared to RSA certificates, and are therefore more suitable to protect data-in-transit over low bandwidth or for applications with limited memory and storage, such as Internet of Things (IoT) devices.
Take a look at the following certificate examples; you can see the size difference between RSA and ECDSA certificates.
Consider a small IoT sensor device that tracks temperature in an office building. This device typically has very low storage capacity and compute power, so the smaller ECDSA certificate will be easier to process and store. In the case of an IoT device, you might not be able to store the entire RSA certificate chain on the device due to memory limitations and the larger size of RSA certificates. This can make it more difficult to validate the chain of trust for that certificate.
Using ECDSA, customers can take advantage of the smaller size of the certificates (and the certificate trust chain) and store the entire chain of trust on the IoT device itself, enabling the IoT device to more easily validate the certificate.
When should I use ECDSA certificates from ACM?
In general, you should consider using ECDSA certificates wherever possible, because they provide stronger security (for a given key length) compared to RSA, without impacting performance. You can also choose to issue ECDSA certificates from ACM to implement 128-bit or 192-bit TLS security, where previously you could request up to 112-bit security from ACM by using RSA 2048 certificates.
ECDSA certificates are strongly recommended for applications that need to securely send data over low-bandwidth connections, or when you are using IoT devices that might not have much memory or computational power to store and process the larger certificate sizes that RSA offers.
If your application is not ECDSA compatible, you will need to continue using RSA certificates. RSA 2048 remains the default certificate type issued by ACM, in order to prevent compatibility issues with legacy applications or with applications that do not support ECDSA certificate types. We will provide links to check if your application is compatible with ECDSA certificate types in the next section of this blog.
Getting started with ECDSA certificates
Modern browsers and operating systems are ECDSA compatible. That said, some custom applications might not be ECDSA compatible. You can check whether your calling application is ECDSA compatible by accessing the following links from your application:
When you access one of these links, you should see a message stating “Expected Status: good”. This indicates that the application is ECDSA compatible. See Figure 1 for an example of a successful result.
Figure 1: ECDSA application compatibility example
When you terminate your TLS traffic with ALB, you can work around compatibility concerns by binding both ECDSA and RSA certificates for a given domain. ALB will prioritize and present the ECDSA certificate when the calling application is ECDSA compatible and will use the RSA certificate if the calling application is not ECDSA compatible. We’ll walk through this configuration in the demonstration portion of this post.
How to request an ECDSA certificate from ACM
You can use the ACM console, APIs, or AWS Command Line Interface (AWS CLI) to issue public or private ECDSA P-256 and P-384 TLS certificates. When you request certificates by using the API or AWS CLI, you can use the request-certificate API action with either EC_prime256v1 or EC_secp384r1 as the key-algorithm parameter to request a P-256 or P-384 ECDSA certificate, respectively.
Certificates have a defined validity period, and ACM will attempt to renew certificates that were issued by ACM and that are in use before they expire. ACM will also attempt to automatically bind the renewed certificates with an integrated service. ACM issued private ECDSA certificates can also be exported and used on other workloads to terminate TLS traffic.
Associate an ECDSA certificate with an Application Load Balancer for TLS
To demonstrate how to request and use ECDSA certificates from ACM, let’s examine a common use case: requesting a public certificate from ACM and associating it with an ALB. This walkthrough will also include requesting an RSA 2048 certificate and associating it with the same ALB, to facilitate TLS connections for applications that do not support ECDSA. ALB will prioritize and present the ECDSA certificate when the calling application is ECDSA compatible, and will use the RSA certificate if the calling application is not ECDSA compatible.
Navigate to the ACM console and choose Request a certificate.
Choose Request a public certificate, and then choose Next.
For Fully qualified domain name, enter your domain name.
Choose DNS validation. DNS validation is recommended wherever possible, because it enables automatic renewal of ACM issued certificates with no action required by the domain owner. If you use Amazon Route 53, you can use ACM to directly update your DNS records. DNS-validated certificates will be renewed by ACM as long as the certificate is in use and the DNS record is in place.
Figure 2: Requesting a public ECDSA certificate
In the Key algorithm options section, select your preferred algorithm based on your security requirements:
ECDSA P-256 — Equivalent in security strength to RSA 3072
ECDSA P-384 — Equivalent in security strength to RSA 7680
Figure 3: Key algorithms
(Optional) Add tags to help you identify and manage your certificate. You can find more information on using tags in Tagging AWS resources in the AWS General Reference.
Choose Request to request the public certificate.
The certificate will now be in the Pending Validation state until the domain can be validated, either through DNS or email validation, depending on your selection in the previous steps. For information on how to validate ownership of the domain name or names, see Validating domain ownership in the AWS Certificate Manager User Guide.
Take note of the certificate ARN; you will need this later to identify the certificate.
To request an RSA 2048 certificate from ACM
To request a public RSA 2048 certificate, use the same steps noted in the preceding section, but select RSA 2048 in the Key algorithm options section.
Make sure that both certificates you request have the same fully qualified domain name.
For this post, we will use an Application Load Balancer. You can view more details on each type of Load Balancer, and see a feature-to-feature breakdown, on the Elastic Load Balancing features page.
For the Application Load Balancer type, choose Create.
Enter a name for your load balancer.
Select the scheme and IP address type of the application load balancer. For this post, we will choose Internet-facing for the scheme and use the IPv4 address type.
Under Default SSL/TLS certificate, verify thatFrom ACM is selected, and then in the drop-down list, select the RSA certificate you requested earlier.
Note: We are using the RSA certificate as the default so that the ALB will use this certificate if the connecting client does not support ECDSA or the Server Name Indication (SNI) protocol. This is to maximize availability and compatibility with legacy applications.
Figure 6: Secure listener settings
(Optional) Add tags to the Application Load Balancer.
Review your selections, and then choose Create load balancer.
Figure 7: Review and create load balancer
To associate the ECDSA certificate with the Application Load Balancer
In the EC2 console, select the new ALB you just created, and choose the Listeners tab.
In the SSL Certificate column, you should see the default certificate you added when you created the ALB. Choose View/edit certificates to see the full list of certificates associated with this ALB.
Figure 8: ALB listeners
Under Listener certificates for SNI, choose Add certificate.
Figure 9: Listener certificates for SNI
Under ACM and IAM certificates, select the ECDSA certificate you requested earlier.
Note: You can use the certificate ARN to identify the appropriate certificate.
Choose Include as pending below to add the ECDSA certificate to the listener.
Figure 10: Adding the ECDSA certificate to the load balancer listener
Under Listener certificates for SNI, confirm that the ECDSA certificate is listed as pending, and choose Add pending certificates.
Figure 11: Confirm addition of pending certificates
Great! We’ve used ACM to request a public ECDSA certificate and a public RSA 2048 certificate. Next, we associated both of these certificates with an Application Load Balancer to facilitate TLS communications between the load balancer and client devices.
If clients support the SNI protocol, the ALB uses a smart certificate selection algorithm. The load balancer will select the best certificate that the client can support from the certificate list. Certificate selection is based on the following criteria, in the following order:
Public key algorithm (prefer ECDSA over RSA)
Hashing algorithm (prefer SHA over MD5)
Key length (prefer the longest key)
Validity period
In the earlier example, this means if clients support SNI and ECDSA, the ECDSA certificate will be prioritized and presented to the client. If the client does not support SNI or ECDSA, the RSA certificate will be used to maximize compatibility with legacy applications.
Conclusion
In this blog post, we discussed the basic differences between RSA and ECDSA certificates, when you might choose ECDSA over RSA, and how you can use AWS Certificate Manager to request public or private ECDSA certificates. We also covered how to request a public ECDSA certificate from ACM and associate it with an Application Load Balancer. Finally, we showed you how to request an RSA 2048 certificate and associate it with the same load balancer to facilitate TLS for applications that do not support ECDSA certificates.
AWS Certificate Manager (ACM) is a service that lets you efficiently provision, manage, and deploy public and private SSL/TLS certificates for use with AWS services and your internal connected resources. The certificates issued by ACM can then be used to secure network communications and establish the identity of websites on the internet or resources on private networks.
So why might you want to import a certificate into ACM, rather than using a certificate issued by ACM? According to the AWS Certificate Manager User Guide topic Importing certificates into AWS Certificate Manager, “you might do this because you already have a certificate from a third-party certificate authority (CA), or because you have application-specific requirements that are not met by ACM issued certificates.”
In this blog post, I’ll list 10 reasons why you might want to import a certificate into ACM, including what specific requirements you might have, and why you might want to use a certificate signed by a third-party CA in the first place.
1. To use an ECDSA certificate for faster TLS connections
Imported Elliptic Curve Digital Signature Algorithm (ECDSA) certificates use smaller keys than ACM issued public RSA certificates, allowing for TLS connections to be established faster. For this reason, ECDSA certificates are particularly useful for systems with limited processing resources, such as Internet of Things (IoT) devices. ACM supports imported certificates with ECDSA in 256, 384, and 521 bit variations. If you want to use an ECDSA certificate for your public-facing web application, you need to get a third-party certificate and then import it into ACM. For more information about supported cryptographic algorithms for imported certificates, see Prerequisites for importing certificates in the AWS Certificate Manager User Guide.
2. To control your certificate’s renewal cycle
When you import a certificate into ACM, you have greater control over its renewal cycle simply because you can re-import it as frequently as you want. You also have control over how often your imported certificate’s private key can be rotated. As a best practice, you should rotate your certificate’s private key based on your certificate’s usage frequency.
Note: When you re-import your certificate, to maintain the existing associations during renewal, ensure that you specify the existing certificate’s Amazon Resource Name (ARN). For more information and step-by-step instructions, see Reimporting a certificate in the AWS Certificate Manager User Guide.
3. To use certificate pinning
You might have an application that requires certificate pinning, which is the practice of bypassing the typical hierarchical model of trust that is governed by certificate authorities. With certificate pinning, a host’s identity is trusted based on a specific certificate or public key. As a certificate pinning best practice, AWS recommends that public certificates issued by ACM should not be pinned because ACM will generate a new public/private key pair at the next renewal phase, which essentially replaces the pinned certificate with a new one, causing service disruption along the process. If you want to use certificate pinning, you can pin an imported certificate because imported certificates are not subject to managed renewal, thereby reducing the risk of production impact.
4. To use a higher-assurance certificate
You might want to use a higher-assurance certificate, such as an organization validation (OV) or extended validation (EV) certificate. Certificates issued by ACM currently only support domain validation (DV). If the domain you want to protect is an application that requires OV or EV, you can import OV or EV certificates into ACM by using a third-party certificate of either type. You can use the ACM API action ImportCertificate to import OV or EV certificates into ACM.
5. To use a self-signed certificate
For internal testing environments where your developers want speed and flexibility, self-signed certificates are issued faster and effortlessly. However, it’s important to know that self-signed certificates are not trusted by default, which means that self-signed certificates need to be installed inside the trust stores of the intended clients, to avoid the risk of your users getting into the habit of ignoring browser warnings. For more information, see the additional requirements for self-signed certificates in Prerequisites for importing certificates in the AWS Certificate Manager User Guide.
6. To use an IP address for the certificate’s subject
By design, the subject field of an ACM certificate can only identify a fully qualified domain name (FQDN). If you want to use an IP address for the certificate’s subject, then you can create the certificate and import it to ACM.
7. To exceed the number of domains allowed by the ACM quotas
Certificates issued by ACM are subject to the ACM service quotas. The default quota for ACM is 10 domain names for each ACM certificate, and you can request an increase to the quota up to a maximum of 100 domain names for each certificate. However, if you import certificates, they are not subject to the quotas, and you can use a public certificate with more than 100 FQDNs in its domain scope without having to go through the process of requesting any limit increases.
8. To use a private certificate issued by ACM Private CA with the IssueCertificate API action
Certificates provisioned with the IssueCertificate API action have a private status and cannot be associated directly with an AWS integrated service, such as an internal Application Load Balancer. Instead, a private certificate issued by AWS Certificate Manager Private Certificate Authority (ACM Private CA) with the IssueCertificate API action needs to be exported and then imported into ACM before the association can be made. The same is true for certificate templates as well, which are configuration templates that can be passed as parameters to the IssueCertificate API action as a means to have greater control over the private certificate’s extensions.
9. To use a private certificate issued by your on-premises CA
You might want to use a private certificate issued by your on-premises CA instead of using ACM Private CA. To administer your internal public key infrastructure (PKI), AWS generally recommends that you use ACM Private CA. However, you might still come across scenarios where a certificate signed by your on-premises CA is better suited for your specific needs. For example, you might want to have a common root of trust, for consistency and interoperability purposes across a hybrid PKI solution. Furthermore, using an external parent CA with ACM Private CA also allows you to enforce CA name constraints. For more information, see Signing private CA certificates with an external CA in the AWS Certificate Manager Private Certificate Authority User Guide.
10. To use a certificate for something other than securing a public website
In this blog post, you learned about some of the reasons you might want to import a certificate into AWS Certificate Manager (ACM). For more information about importing certificates into ACM and step-by-step instructions, see Importing certificates into AWS Certificate Manager in the AWS Certificate Manager User Guide. For the latest pricing information, see the AWS Certificate Manager Pricing page on the AWS website. You can also use the AWS pricing calculator to estimate costs.
If you have feedback about this post, submit comments in the Comments section below. If you have questions about this post, start a new thread on the AWS Certificate Manager forum or contact AWS Support.
Want more AWS Security news? Follow us on Twitter.
The collective thoughts of the interwebz
Manage Consent
To provide the best experiences, we use technologies like cookies to store and/or access device information. Consenting to these technologies will allow us to process data such as browsing behavior or unique IDs on this site. Not consenting or withdrawing consent, may adversely affect certain features and functions.
Functional
Always active
The technical storage or access is strictly necessary for the legitimate purpose of enabling the use of a specific service explicitly requested by the subscriber or user, or for the sole purpose of carrying out the transmission of a communication over an electronic communications network.
Preferences
The technical storage or access is necessary for the legitimate purpose of storing preferences that are not requested by the subscriber or user.
Statistics
The technical storage or access that is used exclusively for statistical purposes.The technical storage or access that is used exclusively for anonymous statistical purposes. Without a subpoena, voluntary compliance on the part of your Internet Service Provider, or additional records from a third party, information stored or retrieved for this purpose alone cannot usually be used to identify you.
Marketing
The technical storage or access is required to create user profiles to send advertising, or to track the user on a website or across several websites for similar marketing purposes.
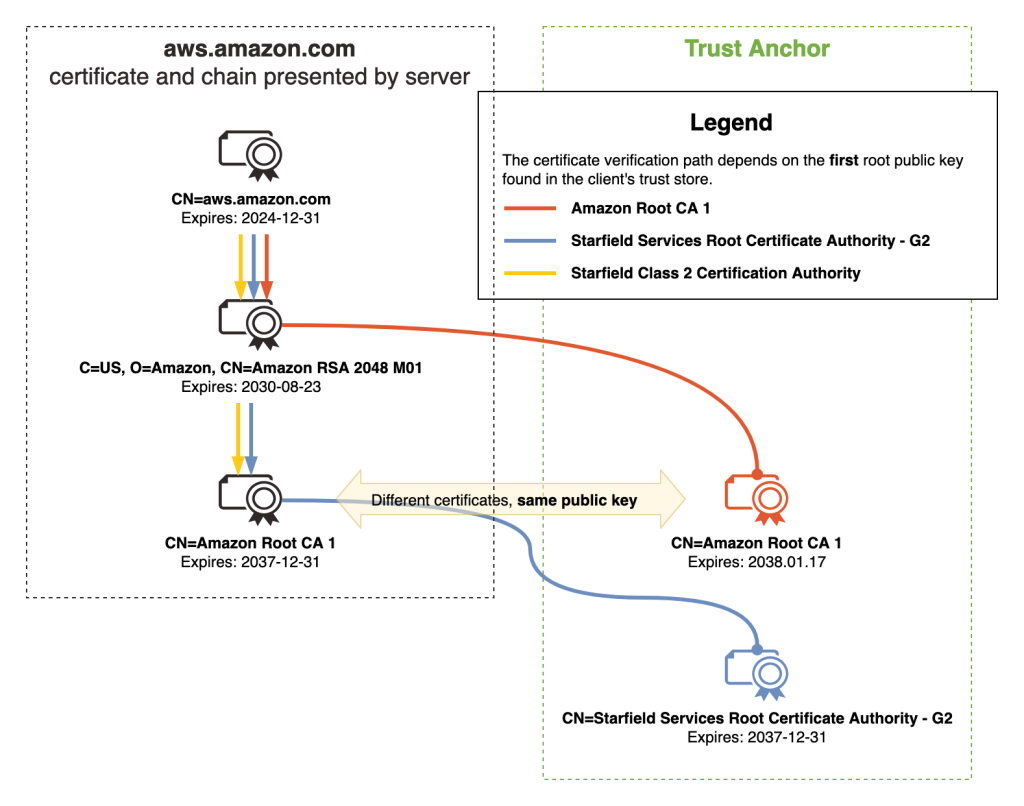
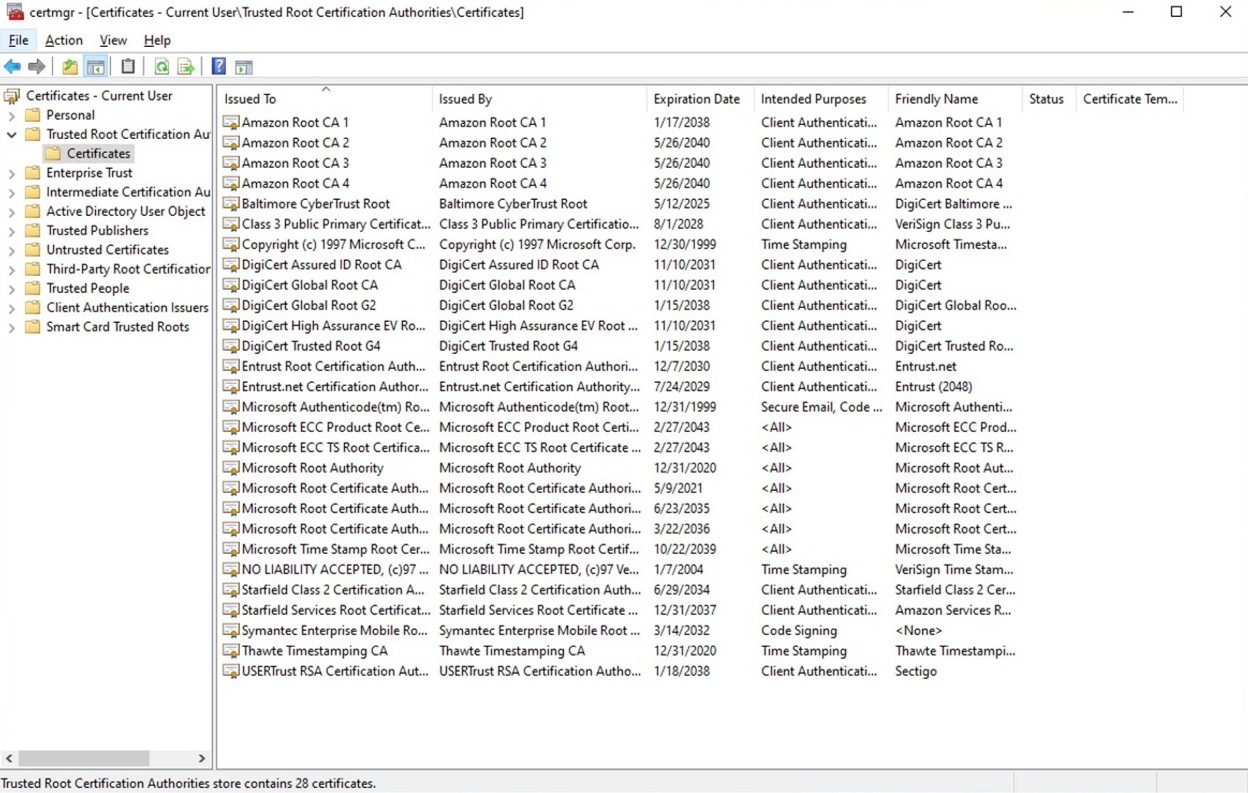
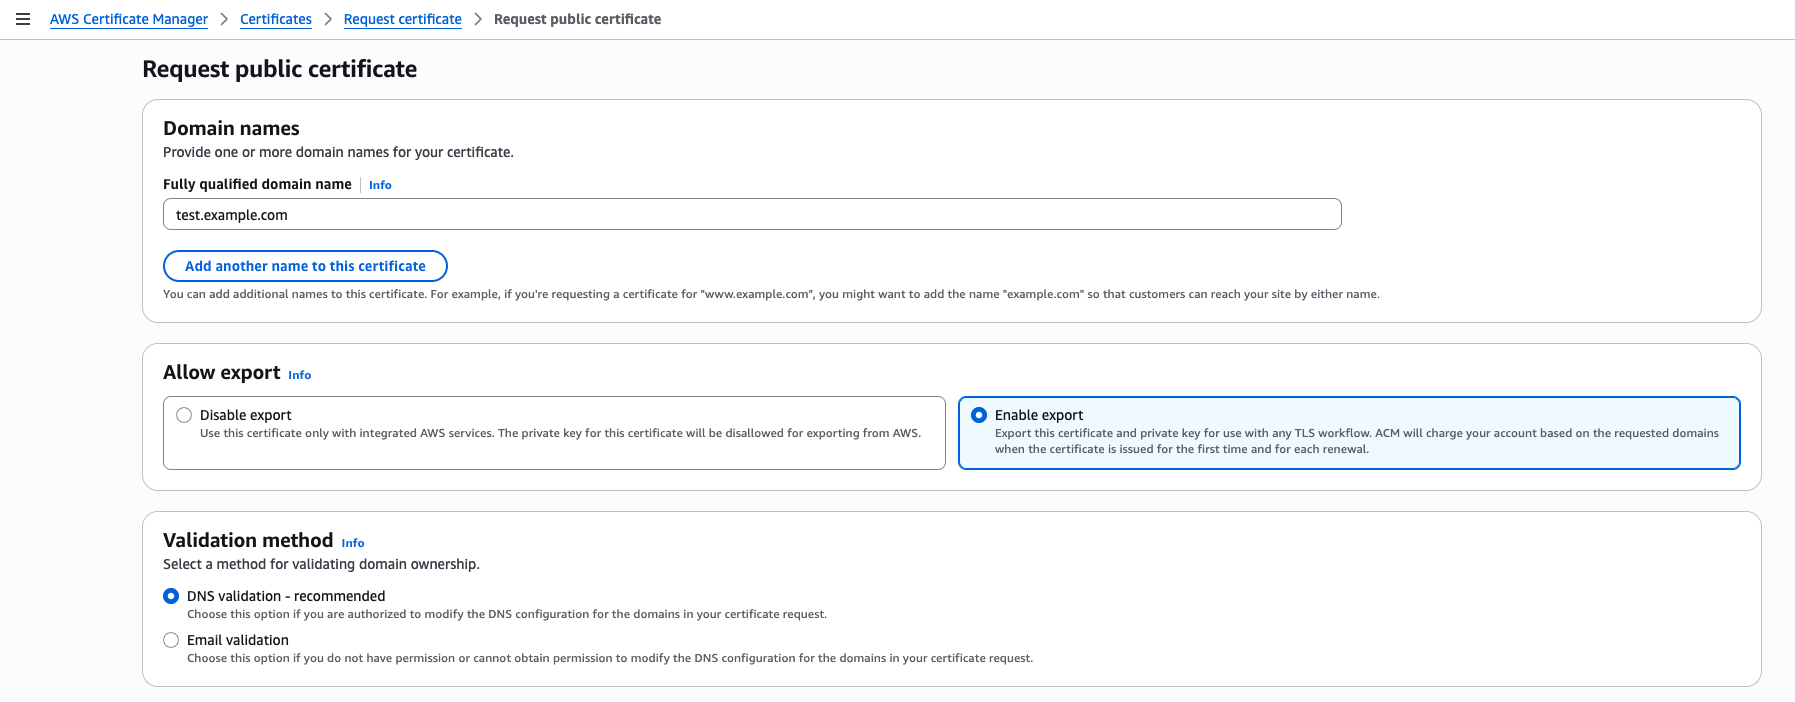

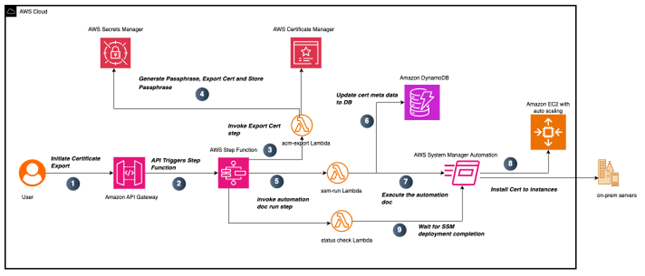

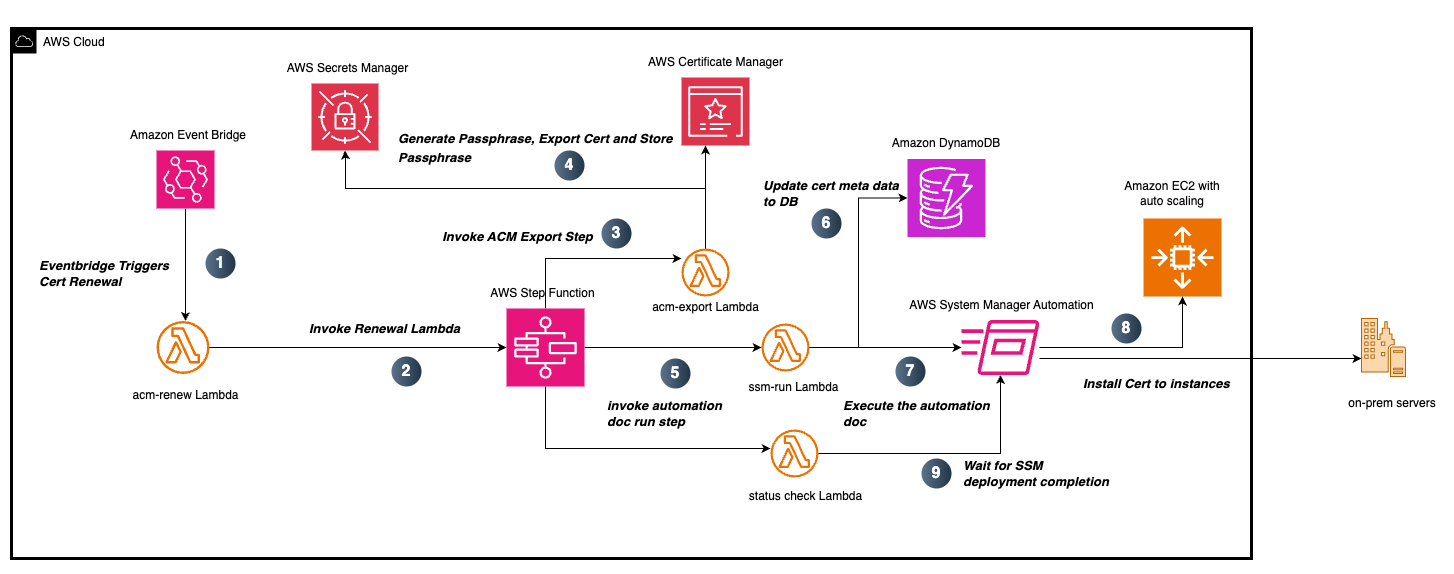


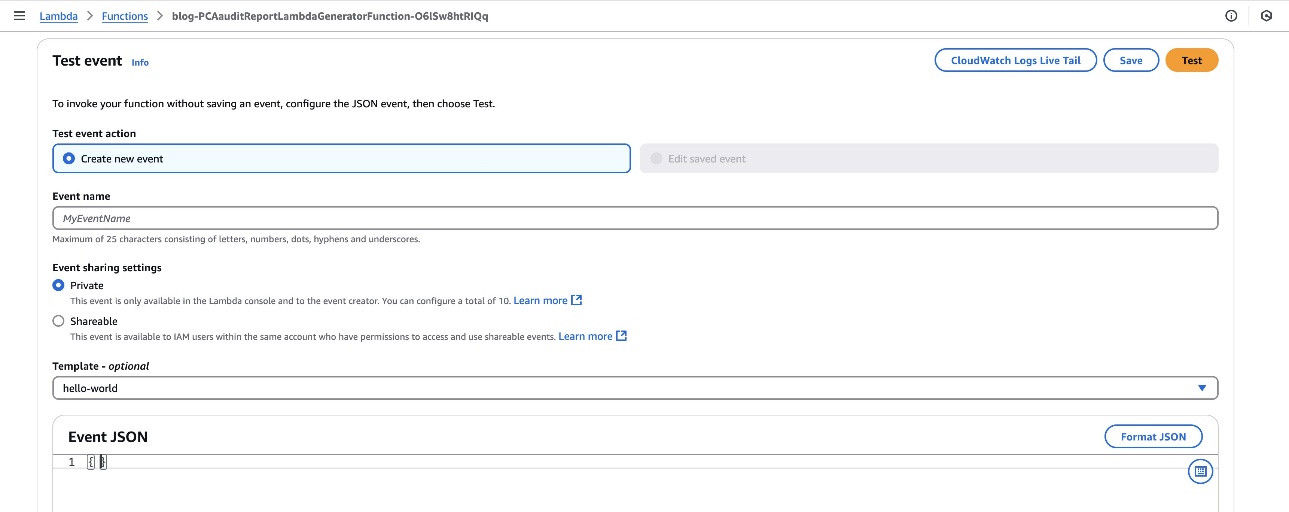


 Figure 1: AWS KMS GenerateDataKey requests per second without TLS connection reuse
 Figure 2: AWS KMS GenerateDataKey requests per second with TLS connection reuse


