Tag Archives: modin

Advanced patterns with AWS SDK for pandas on AWS Glue for Ray

Post Syndicated from Abdel Jaidi original https://aws.amazon.com/blogs/big-data/advanced-patterns-with-aws-sdk-for-pandas-on-aws-glue-for-ray/

AWS SDK for pandas is a popular Python library among data scientists, data engineers, and developers. It simplifies interaction between AWS data and analytics services and pandas DataFrames. It allows easy integration and data movement between 22 types of data stores, including Amazon Simple Storage Service (Amazon S3), Amazon Athena, Amazon Redshift, and Amazon OpenSearch Service.

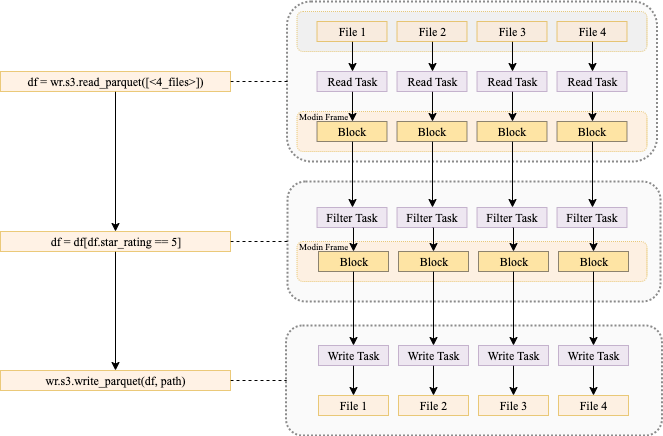
In the previous post, we discussed how you can use AWS SDK for pandas to scale your workloads on AWS Glue for Ray. We explained how using both Ray and Modin within the library enabled us to distribute workloads across a compute cluster. To illustrate these capabilities, we explored examples of writing Parquet files to Amazon S3 at scale and querying data in parallel with Athena.

In this post, we show some more advanced ways to use this library on AWS Glue for Ray. We cover features and APIs from AWS services such as S3 Select, Amazon DynamoDB, and Amazon Timestream.

Solution overview

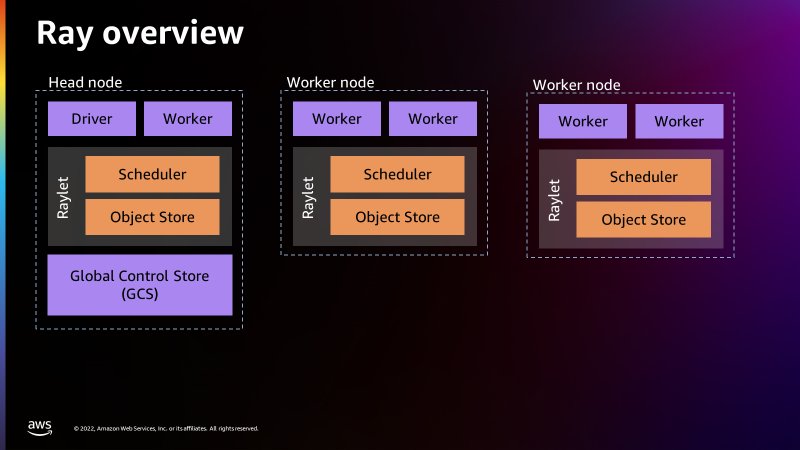
The Ray and Modin frameworks allow scaling of pandas workloads easily. You can write code on your laptop that uses the SDK for pandas to get data from an AWS data or analytics service to a pandas DataFrame, transform it using pandas, and then write it back to the AWS service. By using the distributed version of the SDK for pandas and replacing pandas with Modin, exactly the same code will scale on a Ray runtime—all logic about task coordination and distribution is hidden. Taking advantage of these abstractions, the AWS SDK for pandas team has made considerable use of Ray primitives to distribute some of the existing APIs (for the full list, see Supported APIs).

In this post, we show how to use some of these APIs in an AWS Glue for Ray job, namely querying with S3 Select, writing to and reading from a DynamoDB table, and writing to a Timestream table. Because AWS Glue for Ray is a fully managed environment, it’s by far the easiest way to run jobs because you don’t need to worry about cluster management. If you want to create your own cluster on Amazon Elastic Compute Cloud (Amazon EC2), refer to Distributing Calls on Ray Remote Cluster.

Configure solution resources

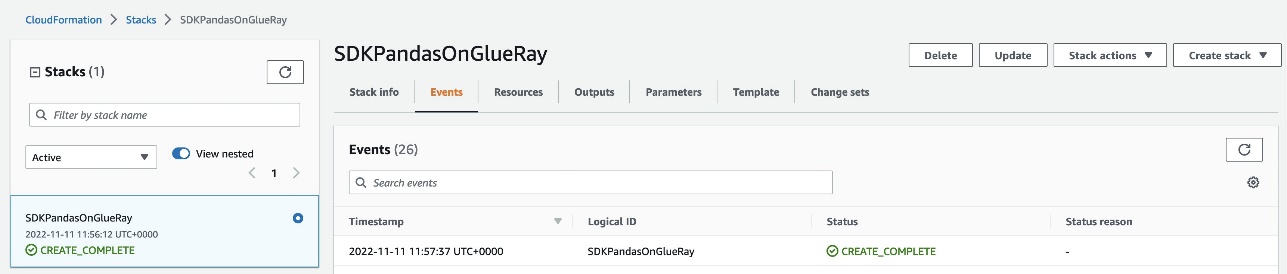
We use an AWS CloudFormation stack to provision the solution resources. Complete the following steps:

  1. Choose Launch stack to provision the stack in your AWS account:

Launch CloudFormation Stack

This takes about 2 minutes to complete. On successful deployment, the CloudFormation stack shows the status as CREATE_COMPLETE.

CloudFormation CREATE_COMPLETE

  1. Navigate to AWS Glue Studio to find an AWS Glue job named AdvancedGlueRayJob.

Glue for Ray Job Script

  1. On the Job details tab, scroll down and choose Advanced Properties.

Under Job Parameters, AWS SDK for pandas is specified as an additional Python module to install, along with Modin as an extra dependency.

Glue for Ray Job Details

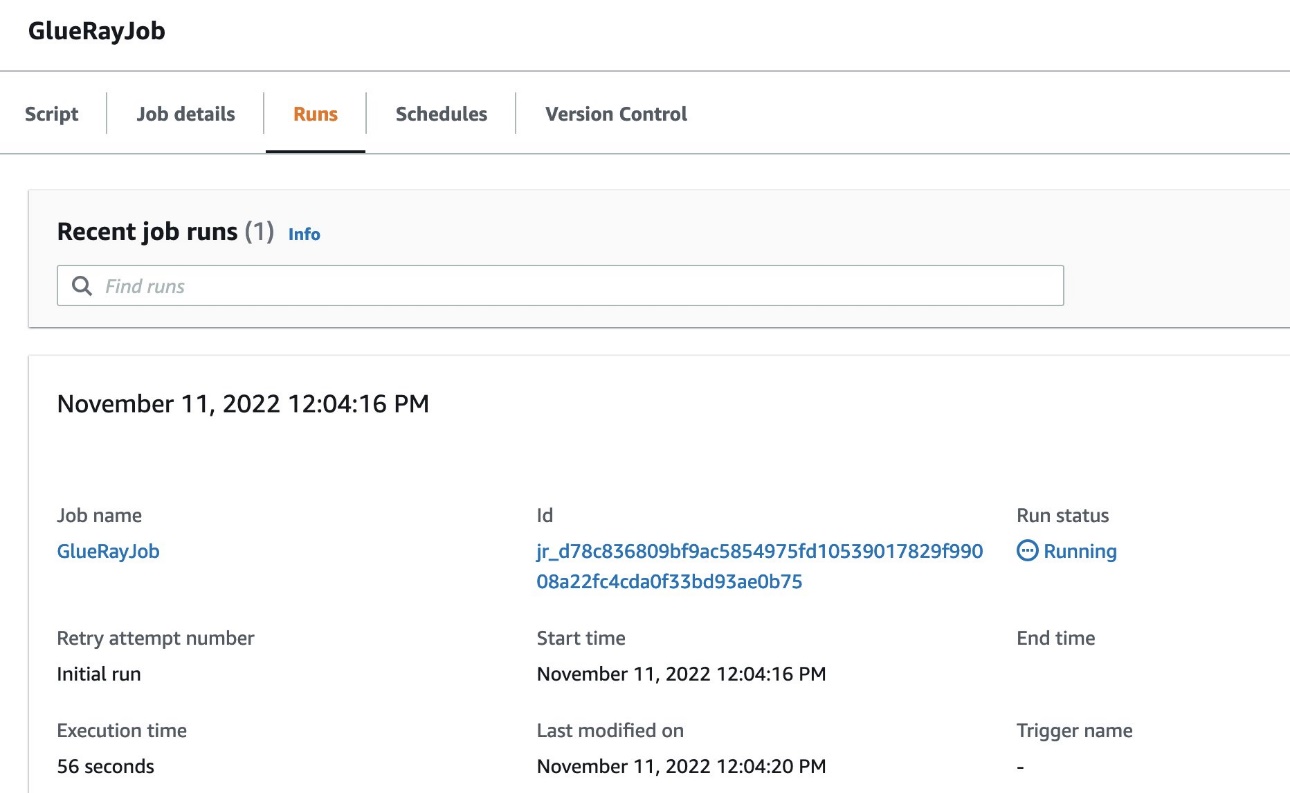
  1. To run the job, choose Run and navigate to the Runs tab to monitor the job’s progress.

Glue for Ray Job Runs

Import the library

To import the library, use the following code:

import awswrangler as wr

AWS SDK for pandas detects if the runtime supports Ray, and automatically initializes a cluster with the default parameters. Advanced users can override this process by starting the Ray runtime before the import command.

Scale S3 Select workflows

S3 Select allows you to use SQL statements to query and filter S3 objects, including compressed files. This can be particularly useful if you have large files of several TBs and want to extract some information. Because the workload is delegated to Amazon S3, you don’t have to download and filter objects on the client side, leading to lower latency, lower cost, and higher performance.

With AWS SDK for pandas, these calls to S3 Select can be distributed across Ray workers in the cluster. In the following example, we query Amazon reviews data in Parquet format, filtering for reviews with 5-star ratings in the Mobile_Electronics partition. star_rating is a column in the Parquet data itself, while the partition is a directory.

# Filter for 5-star reviews with S3 Select within a partition
df_select = wr.s3.select_query(
    sql="SELECT * FROM s3object s where s.\"star_rating\" >= 5",
    path="s3://amazon-reviews-pds/parquet/product_category=Mobile_Electronics/",
    input_serialization="Parquet",
    input_serialization_params={},
    scan_range_chunk_size=1024*1024*16,
)

scan_range_chunk_size is an important parameter to calibrate when using S3 Select. It specifies the range of bytes to query the S3 object, thereby determining the amount of work delegated to each worker. For this example, it’s set to 16 MB, meaning the work of scanning the object is parallelized into separate S3 Select requests each 16 MB in size. A higher value equates to larger chunks per worker but fewer workers, and vice versa.

The results are returned in a Modin DataFrame, which is a drop-in replacement for pandas. It exposes the same APIs but enables you to use all the workers in the cluster. The data in the Modin DataFrame is distributed along with all the operations among the workers.

Scale DynamoDB workflows

DynamoDB is a scalable NoSQL database service that provides high-performance, low-latency, and managed storage.

AWS SDK for pandas uses Ray to scale DynamoDB workflows, allowing parallel data retrieval and insertion operations. The wr.dynamodb.read_items function retrieves data from DynamoDB in parallel across multiple workers, and the results are returned as a Modin DataFrame. Similarly, data insertion into DynamoDB can be parallelized using the wr.dynamodb.put_df function.

For example, the following code inserts the Amazon Reviews DataFrame obtained from S3 Select into a DynamoDB table and then reads it back:

# Write Modin DataFrame to DynamoDB
wr.dynamodb.put_df(
    df=df_select,
    table_name=dynamodb_table_name,
    use_threads=4,
)
# Read data back from DynamoDB to Modin
    df_dynamodb = wr.dynamodb.read_items(
    table_name=dynamodb_table_name,
    allow_full_scan=True,
)

DynamoDB calls are subject to AWS service quotas. The concurrency can be limited using the use_threads parameter.

Scale Timestream workflows

Timestream is a fast, scalable, fully managed, purpose-built time series database that makes it easy to store and analyze trillions of time series data points per day. With AWS SDK for pandas, you can distribute Timestream write operations across multiple workers in your cluster.

Data can be written to Timestream using the wr.timestream.write function, which parallelizes the data insertion process for improved performance.

In this example, we use sample data from Amazon S3 loaded into a Modin DataFrame. Familiar pandas commands such as selecting columns or resetting the index are applied at scale with Modin:

# Select columns
df_timestream = df_timestream.loc[:, ["region", "az", "hostname", "measure_kind", "measure", "time"]]
# Overwrite the time column
df_timestream["time"] = datetime.now()
# Reset the index
df_timestream.reset_index(inplace=True, drop=False)
# Filter a measure
df_timestream = df_timestream[df_timestream.measure_kind == "cpu_utilization"]

The Timestream write operation is parallelized across blocks in your dataset. If the blocks are too big, you can use Ray to repartition the dataset and increase the throughput, because each block will be handled by a separate thread:

# Repartition the data into 100 blocks
df_timestream = ray.data.from_modin(df_timestream).repartition(100).to_modin()

We are now ready to insert the data into Timestream, and a final query confirms the number of rows in the table:

# Write data to Timestream
rejected_records = wr.timestream.write(
    df=df_timestream,
    database=timestream_database_name,
    table=timestream_table_name,
    time_col="time",
    measure_col="measure",
    dimensions_cols=["index", "region", "az", "hostname"],
)

# Query
df = wr.timestream.query(f'SELECT COUNT(*) AS counter FROM "{timestream_database_name}"."{timestream_table_name}"')

Clean up

To prevent unwanted charges to your AWS account, we recommend deleting the AWS resources that you used in this post:

  1. On the Amazon S3 console, empty the data from the S3 bucket with prefix glue-ray-blog-script.

S3 Bucket

  1. On the AWS CloudFormation console, delete the AdvancedSDKPandasOnGlueRay stack.

All resources will be automatically deleted with it.

Conclusion

In this post, we showcased some more advanced patterns to run your workloads using AWS SDK for pandas. In particular, these examples demonstrated how Ray is used within the library to distribute operations for several other AWS services, not just Amazon S3. When used in combination with AWS Glue for Ray, this gives you access to a fully managed environment to run at scale. We hope this solution can help with migrating your existing pandas jobs to achieve higher performance and speedups across multiple data stores on AWS.


About the Authors

Abdel JaidiAbdel Jaidi is a Senior Cloud Engineer for AWS Professional Services. He works on open-source projects focused on AWS Data & Analytics services. In his spare time, he enjoys playing tennis and hiking.

Anton KukushkinAnton Kukushkin is a Data Engineer for AWS Professional Services based in London, UK. In his spare time, he enjoys playing musical instruments.

Leon LuttenbergerLeon Luttenberger is a Data Engineer for AWS Professional Services based in Austin, Texas. He works on AWS open-source solutions that help our customers analyze their data at scale. In his spare time, he enjoys reading and traveling.

Scale AWS SDK for pandas workloads with AWS Glue for Ray

Post Syndicated from Abdel Jaidi original https://aws.amazon.com/blogs/big-data/scale-aws-sdk-for-pandas-workloads-with-aws-glue-for-ray/

AWS SDK for pandas is an open-source library that extends the popular Python pandas library, enabling you to connect to AWS data and analytics services using pandas data frames. We’ve seen customers use the library in combination with pandas for both data engineering and AI workloads. Although pandas data frames are simple to use, they have a limitation on the size of data that can be processed. Because pandas is single-threaded, jobs are bounded by the available resources. If the data you need to process is small, this won’t be a problem, and pandas makes analysis and manipulation simple, as well as interactions with many other tools that support machine learning (ML) and visualization. However, as your data size scales, you may run into problems. This can be especially frustrating if you’ve created a promising prototype that can’t be moved to production. In our work with customers, we’ve seen many projects, both in data science and data engineering, that are stuck while they wait for someone to rewrite using a big data framework such as Apache Spark.

We are excited to announce that AWS SDK for pandas now supports Ray and Modin, enabling you to scale your pandas workflows from a single machine to a multi-node environment, with no code changes. The simplest way to do this is to use AWS Glue with Ray, the new serverless option to run distributed Python code announced at AWS re:Invent 2022. AWS SDK for pandas also supports self-managed Ray on Amazon Elastic Compute Cloud (Amazon EC2).

In this post, we show you how you can use pandas to connect to AWS data and analytics services and manipulate data at scale by running on an AWS Glue with Ray job.

Overview of solution

Ray is a unified framework that enables you to scale AI and Python applications. The goal of the project is to take any Python code that’s written on a laptop and scale the workload on a cluster. This innovative framework opens the door to big data processing to a new audience. Previously, the only way to process large datasets on a cluster was to use tools such as Apache Hadoop, Apache Spark, or Apache Flink. These frameworks require additional skills because they provide their own programming model and often require languages such as Scala or Java to fully take advantage of the advanced capabilities. With Ray, you can just use Python to parallelize your code with few modifications.

Although Ray opens the door to big data processing, it’s not enough on its own to distribute pandas-specific methods. That task falls to Modin, a drop-in replacement of pandas, optimized to run in a distributed environment, such as Ray. Modin has the same API as pandas, so you can keep your code the same, but it parallelizes workloads to improve performance.

With today’s announcement, AWS SDK for pandas customers can use both Ray and Modin for their workloads. You have the option of loading data into Modin data frames, instead of regular pandas data frames. By configuring the library to use Ray and Modin, your existing data processing scripts can distribute operations end-to-end, with no code changes. AWS SDK for pandas takes care of parallelizing the read and write operations for your files across the compute cluster.

To use this feature, you can install the release candidate version of awswrangler with the ray and modin extras:

pip install "awswrangler[modin,ray]==3.0.0rc2"

Once installed, you can use the library in your code by importing it with the following statement:

import awswrangler as wr

When you run this code, the SDK for pandas looks for an environmental variable called WR_ADDRESS. If it finds it, it uses this value to send the commands to a remote cluster. If it doesn’t find it, it starts a local Ray runtime on your machine.

The following diagram shows what is happening when you run code that uses AWS SDK for pandas to read data from Amazon Simple Storage Service (Amazon S3) into a Modin data frame, perform a filtering operation, and write the data back to Amazon S3, using a multi-node cluster.

In the first phase, each node reads one or more input files and stores them in memory as blocks. During this phase, the head node builds a mapping reference that tracks the location of each block on the worker nodes. In the second phase, a filter operation is submitted to each node, creating a subset of the data. Finally, each worker node writes its blocks to Amazon S3.

It’s important to note that certain data frame operations (for example groupby or join) may result in the data being shuffled across nodes. Shuffling will also happen if you do partitioned or bucketed writes. This tends to slow down the job because data needs to move between nodes.

If you want to create your own Ray cluster on Amazon EC2, refer to the tutorial Distributing Calls on Ray Remote Cluster. The rest of this post shows you how to run AWS SDK for pandas and Modin on an AWS Glue with Ray job.

Use AWS Glue with Ray

Because AWS Glue with Ray is a fully managed environment, it’s a simple way to run jobs. Both AWS SDK for pandas and Modin are pre-loaded, you don’t need to worry about cluster management or installing the right set of dependencies, and the job auto scales with your workload. To get started, complete the following steps:

  1. Choose Launch Stack to provision an AWS CloudFormation stack in your AWS account:
    launch cloudformation stack
    Note that while in preview, AWS Glue with Ray is available in a limited set of AWS Regions.The stack takes about 3 minutes to complete. You can verify that everything was successfully deployed by checking that the CloudFormation stack shows the status CREATE_COMPLETE.
  2. Navigate to AWS Glue Studio to find an AWS Glue job named GlueRayJob with the following script.
  3. Choose Run to start the job and navigate to the Runs tab to monitor progress.

Here, we break down the script and show you what happens at each stage when we run this code on AWS Glue with Ray. First, we import the library:

import awswrangler as wr

At import, AWS SDK for pandas detects if the runtime supports Ray, and automatically initializes a Ray cluster with the default parameters. In this case, because we’re running on AWS Glue with Ray, AWS SDK for pandas automatically uses the Ray cluster with no extra configuration needed. Advanced users can override this process, however, by starting the Ray runtime before the import command.

Next, we read Amazon product data in Parquet format from Amazon S3 and load it into a distributed Modin data frame:

# Read Parquet data (1.2 Gb Parquet compressed)
df = wr.s3.read_parquet(
    path=f"s3://amazon-reviews-pds/parquet/product_category={category.title()}/",
)

Simple data transformations on the data frame are applied next. Modin data frames implement the same interface as pandas data frames, allowing you to perform familiar pandas operations at scale. First, we drop the customer_id column, then we filter for a subset of the reviews that received five-star ratings:

# Drop the customer_id column
df.drop("customer_id", axis=1, inplace=True)

# Filter reviews with 5-star rating
df5 = df[df["star_rating"] == 5]

The data is written back to Amazon S3 in Parquet format, partitioned by year and marketplace. The dataset=True argument ensures that an associated Hive table is also created in the AWS Glue metadata catalog:

# Write partitioned five-star reviews to S3 in Parquet format
wr.s3.to_parquet(
    df5,
    path=f"s3://{bucket_name}/{category}/",
    partition_cols=["year", "marketplace"],
    dataset=True, 
    database=glue_database,
    table=glue_table, 
)

Finally, a query is run in Amazon Athena, and the S3 objects resulting from this operation are read in parallel into a Modin data frame:

# Read the data back to a Modin df via Athena
df5_athena = wr.athena.read_sql_query(
    f"SELECT * FROM {glue_table}",
    database=glue_database,
    ctas_approach=False, 
    unload_approach=True, 
    workgroup=workgroup_name,
    s3_output=f"s3://{bucket_name}/unload/{category}/",
)

The Amazon CloudWatch logs of the job provide insights into the performance achieved from reading blocks in parallel in a multi-node Ray cluster.

For simplicity, this example showcased Amazon S3 and Athena APIs only, but AWS SDK for pandas supports other services, including Amazon Timestream and Amazon Redshift. For a full list of the APIs that support distribution, refer to Supported APIs.

Clean up AWS resources

To prevent unwanted charges to your AWS account, you can delete the AWS resources that you used for this example:

  1. On the Amazon S3 console, empty data from both buckets with prefix glue-ray-.
  2. On the AWS CloudFormation console, delete the SDKPandasOnGlueRay stack.

The resources created as part of the stack are automatically deleted with it.

Conclusion

In this post, we demonstrated how you can run your workloads at scale using AWS SDK for pandas. When used in combination with AWS Glue with Ray, this gives you access to a fully managed environment to distribute your Python scripts. We hope this solution can help with migrating your existing pandas jobs to achieve higher performance and speedups across multiple data stores on AWS.

For more examples, check out the tutorials in the AWS SDK for pandas documentation.


About the Authors

Abdel Jaidi is a Senior Cloud Engineer for AWS Professional Services. He works on open-source projects focused on AWS Data & Analytics services. In his spare time, he enjoys playing tennis and hiking.

Anton Kukushkin is a Data Engineer for AWS Professional Services based in London, United Kingdom. He works with AWS customers, helping them build and scale their data and analytics.

Leon Luttenberger is a Data Engineer for AWS Professional Services based in Austin, Texas. He works on AWS open-source solutions that help our customers analyze their data at scale.

Lucas Hanson is Senior Cloud Engineer for AWS Professional Services. He focuses on helping customers with infrastructure management and DevOps processes for data management solutions. Outside of work, he enjoys music production and practicing yoga.

Introducing AWS Glue for Ray: Scaling your data integration workloads using Python

Post Syndicated from Zach Mitchell original https://aws.amazon.com/blogs/big-data/introducing-aws-glue-for-ray-scaling-your-data-integration-workloads-using-python/

AWS Glue is a serverless data integration service that makes it simple to discover, prepare, move, and integrate data from multiple sources for analytics, machine learning (ML), and application development. Today, AWS Glue processes customer jobs using either Apache Spark’s distributed processing engine for large workloads or Python’s single-node processing engine for smaller workloads. Customers like Python for its ease of use and rich collection of built-in data-processing libraries but might find it difficult for customers to scale Python beyond a single compute node. This limitation makes it difficult for customers to process large datasets. Customers want a solution that allows them to continue using familiar Python tools and AWS Glue jobs on data sets of all sizes, even those that can’t fit on a single instance.

We are happy to announce the release of a new AWS Glue job type: Ray. Ray is an open-source unified compute framework that makes it simple to scale AI and Python workloads. Ray started as an open-source project at RISELab in UC Berkeley. If your application is written in Python, you can scale it with Ray in a distributed cluster in a multi-node environment.  Ray is Python native and you can combine it with the AWS SDK for pandas to prepare, integrate and transform your data for running your data analytics and ML workloads in combination.

This post provides an introduction to AWS Glue for Ray and shows you how to start using Ray to distribute your Python workloads.

What is AWS Glue for Ray?

Customers like the serverless experience and fast start time offered by AWS Glue. With the introduction of Ray, we have ensured that you get the same experience. We have also ensured that you can use the AWS Glue job and AWS Glue interactive session primitives to access the Ray engine. AWS Glue jobs are fire-and-forget systems where customer submit their Ray code to the AWS Glue jobs API and AWS Glue automatically provisions the required compute resources and runs the job. AWS Glue interactive session APIs allow interactive exploration of the data for the purpose of job development. Regardless of the option used, you are only billed for the duration of the compute used. With AWS Glue for Ray, we are also introducing a new Graviton2 based worker (Z.2x) which offers 8 virtual CPUs and 64 GB of RAM.

AWS Glue for Ray consists of two major components:

  1. Ray Core – The distributed computing framework
  2. Ray Dataset – The distributed data framework based on Apache Arrow

When running a Ray job, AWS Glue provisions the Ray cluster for you and runs these distributed Python jobs on a serverless auto-scaling infrastructure.  The cluster in AWS Glue for Ray will consists of exactly one head node and one or more worker nodes.  

The head node is identical to the other worker nodes with the exception that it runs singleton processes for cluster management and the Ray driver process.  The driver is a special worker process in the head node that runs the top-level application in Python that starts the Ray job.  The worker node has processes that are responsible for submitting and running tasks.

The following figure provides a simple introduction to the Ray architecture.  The architecture illustrates how Ray is able to schedule jobs through processes called Raylets.  The Raylet manages the shared resources on each node and is shared between the concurrently running jobs.  For more information on how Ray works, see Ray.io.

The following figure shows the components of the worker node and the shared-memory object store:

There is a Global Control Store in the head node that can treat each separate machine as nodes, similar to how Apache Spark treats workers as nodes.  The following figure shows the components of the head node and the Global Control Store managing the cluster-level metadata.

AWS Glue for Ray comes included with Ray Core, Ray DatasetModin (distributed pandas) and the AWS SDK for pandas (on Modin) for seamless distributed integration into other AWS services.  Ray Core is the foundation of Ray and the basic framework for distributing Python functions and classes. Ray Dataset is a distributed data framework based on Apache Arrow and is most closely analogous to a dataframe in Apache Spark. Modin is a library designed to distribute pandas applications across a Ray cluster without any modification and is compatible with data in Ray Datasets. The included AWS SDK for pandas (formerly AWS Data Wrangler) is an abstraction layer on top of Modin to allow for the creation of pandas dataframes from (and writing to) many AWS sources such as Amazon Simple Storage Service (Amazon S3), Amazon Redshift, Amazon DynamoDB, Amazon OpenSearch Service, and others.

You can also install your own ARM compatible Python libraries via pip, either through Ray’s environmental configuration in @ray.remote or via --additional-python-modules.

To learn more about Ray, please visit the GitHub repo.

Why use AWS Glue for Ray?

Many of us start our data journey on AWS with Python, looking to prepare data for ML and data science, and move data at scale with AWS APIs and Boto3. Ray allows you to bring those familiar skills, paradigms, frameworks and libraries to AWS Glue and make them scale to handle massive datasets with minimal code changes. You can use the same data processing tools you currently have (such as Python libraries for data cleansing, computation, and ML) on datasets of all sizes. AWS Glue for Ray enables the distributed run of your Python scripts over multi-node clusters.

AWS Glue for Ray is designed for the following:

  • Task parallel applications (for example, when you want to apply multiple transforms in parallel)
  • Speeding up your Python workload as well as using Python native libraries.
  • Running the same workload across hundreds of data sources.
  • ML ingestion and parallel batch inference on data

Solution overview

For this post, you will use the Parquet Amazon Customer Reviews Dataset stored in the public S3 bucket. The objective is to perform transformations using the Ray dataset and then write it back to Amazon S3 in the Parquet file format.

Configure Amazon S3

The first step is to create an Amazon S3 bucket to store the transformed Parquet dataset as the end result.

  1. On the Amazon S3 console, choose Buckets in the navigation pane.
  2. Choose Create bucket.
  3. For Bucket name, enter a name for your Amazon S3 bucket.
  4. Choose Create.

Set up a Jupyter notebook with an AWS Glue interactive session

For our development environment, we use a Jupyter notebook to run the code.

You’re required to install the AWS Glue interactive sessions locally or run interactive sessions with an AWS Glue Studio notebook. Using AWS Glue Interactive sessions will help you follow and run the series of demonstration steps.

Refer to Getting started with AWS Glue interactive sessions for instructions to spin up a notebook on an AWS Glue interactive session.

Run your code using Ray in a Jupyter notebook

This section walks you through several notebook paragraphs on how to use AWS Glue for Ray. In this exercise, we look at the customer reviews from the Amazon Customer Review Parquet dataset, perform some Ray transformations, and write the results to Amazon S3 in a Parquet format.

  1. On Jupyter console, under New, choose Glue Python.
  2. Signify you want to use Ray as the engine by using the %glue_ray magic.
  3. Import the Ray library along with additional Python libraries:
    %glue_ray
    
    import ray
    import pandas
    import pyarrow
    from ray import data
    import time
    from ray.data import ActorPoolStrategy

  4. Initialize a Ray Cluster with AWS Glue.
    ray.init('auto')

  5. Next, we read a single partition from the dataset, which is Parquet file format:
    start = time.time()
    ds = ray.data.read_parquet("s3://amazon-reviews-pds/parquet/product_category=Wireless/")
    end = time.time()
    print(f"Reading the data to dataframe: {end - start} seconds")

  6. Parquet files store the number of rows per file in the metadata, so we can get the total number of records in ds without performing a full data read:
    ds.count()

  7. Next , we can check the schema of this dataset. We don’t have to read the actual data to get the schema; we can read it from the metadata:
    ds.schema()

  8. We can check the total size in bytes for the full Ray dataset:
    #calculate the size in bytes of the full dataset,  Note that for Parquet files, this size-in-bytes will be pulled from the Parquet
    #  metadata (not triggering a data read).
    ds.size_bytes()

  9. We can see a sample record from the Ray dataset:
    #Show sample records from the underlying Parquet dataset  
    start = time.time()
    ds.show(1)
    end = time.time()
    print(f"Time taken to show the data from dataframe : {end - start} seconds")

Applying dataset transformations with Ray

There are primarily two types of transformations that can be applied to Ray datasets:

  • One-to-One transformations – Each input block will contributes to only one output block, such as add_column(), map_batches() and drop_column() , and so on.
  • All-to-All transformations – Input blocks can contribute to multiple output blocks such as sort() and groupby(), and so on.

In the next series of steps we will apply some of these transformations on our resultant Ray datasets from the previous section.

  1. We can add a new column and check the schema to verify the newly added column, followed by retrieving a sample record. This transformation is only available for the datasets that can be converted to pandas format.
    # Add the given new column to the dataset and show the sample record after adding a new column
    
    start = time.time()
    ds = ds.add_column( "helpful_votes_ratio", lambda df: df["helpful_votes"] / df["total_votes"])
    end = time.time()
    print(f"Time taken to Add a new columns : {end - start} seconds")
    ds.show(1)

  2. Let’s drop a few columns we don’t need using a drop_columns transformation and then check the schema to verify if those columns are dropped from the Ray dataset:
    # Dropping few columns from the underlying Dataset 
    start = time.time()
    ds = ds.drop_columns(["review_body", "vine", "product_parent", "verified_purchase", "review_headline"])
    end = time.time()
    print(f"Time taken to drop a few columns : {end - start} seconds")
    ds.schema()


    Ray datasets have built-in transformations such as sorting the dataset by the specified key column or key function.

  3. Next, we apply the sort transformation using one of the columns present in the dataset (total_votes):
    #Sort the dataset by total votes
    start = time.time()
    ds =ds.sort("total_votes")
    end = time.time()
    print(f"Time taken for sort operation  : {end - start} seconds")
    ds.show(3)

  4. Next, we will create a Python UDF function that allows you to write customized business logic in transformations. In our UDF we have written a logic to find out the products that are rated low (i.e. total votes less than 100).We create a UDF as a function on pandas DataFrame batches. For the supported input batch formats, see the UDF Input Batch Format. We also demonstrate using map_batches() which applies the given function to the batches of records of this dataset. Map_batches() uses the default compute strategy (tasks), which helps distribute the data processing to multiple Ray workers, which are used to run tasks. For more information on a map_batches() transformation, please see the following documentation.
    # UDF as a function on pandas DataFrame - To Find products with total_votes < 100 
    def low_rated_products(df: pandas.DataFrame) -> pandas.DataFrame:
        return df[(df["total_votes"] < 100)]
        
    #Calculate the number of products which are rated low in terms of low votes i.e. less than 100
    # This technique is called Batch inference processing with Ray tasks (the default compute strategy).
    ds = ds.map_batches(low_rated_products)
    
    #See sample records for the products which are rated low in terms of low votes i.e. less than 100
    ds.show(1)

    #Count total number of products which are rated low 
    ds.count()

  5. If you have complex transformations that require more resources for data processing, we recommend utilizing Ray actors using additional configurations with applicable transformations. We have demonstrated with map_batches() below:
    # Batch inference processing with Ray actors. Autoscale the actors between 2 and 4.
    
    class LowRatedProducts:
        def __init__(self):
            self._model = low_rated_products
    
        def __call__(self, batch: pandas.DataFrame) -> pandas.DataFrame:
            return self._model(batch)
    
    start = time.time()
    predicted = ds.map_batches(
        LowRatedProducts, compute=ActorPoolStrategy(2, 4), batch_size=4)
    end = time.time()
    

  6. Next, before writing the final resultant Ray dataset we will apply map_batches() transformations to filter out the customer reviews data where the total votes for a given product is greater than 0 and the reviews belongs to the “US” marketplace only. Using map_batches() for the filter operation is better in terms of performance in comparison to filter() transformation.
    # Filter our records with total_votes == 0
    ds = ds.map_batches(lambda df: df[df["total_votes"] > 0])
    
    # Filter and select records with marketplace equals US only
    ds = ds.map_batches(lambda df: df[df["marketplace"] == 'US'])
    
    ds.count()

  7. Finally, we write the resultant data to the S3 bucket you created in a Parquet file format. You can use different dataset APIs available, such as write_csv() or write_json() for different file formats.  Additionally, you can convert the resultant dataset to another DataFrame type such as Mars, Modin or pandas.
    ds.write_parquet("s3://<your-own-s3-bucket>/manta/Output/Raydemo/")

Clean up

To avoid incurring future charges, delete the Amazon S3 bucket and Jupyter notebook.

  1. On the Amazon S3 console, choose Buckets.
  2. Choose the bucket you created.
  3. Choose Empty and enter your bucket name.
  4. Choose Confirm.
  5. Choose Delete and enter your bucket name.
  6. Choose Delete bucket.
  7. On the AWS Glue console, choose Interactive Sessions
  8. Choose the interactive session you created.
  9. Choose Delete to remove the interactive session.

Conclusion

In this post, we demonstrated how you can use AWS Glue for Ray to run your Python code in a distributed environment.  You can now run your data and ML applications in a multi-node environment.

Refer to the Ray documentation for additional information and use cases.


About the authors

Zach Mitchell is a Sr. Big Data Architect. He works within the product team to enhance understanding between product engineers and their customers while guiding customers through their journey to develop data lakes and other data solutions on AWS analytics services.

Ishan Gaur works as Sr. Big Data Cloud Engineer ( ETL ) specialized in AWS Glue. He’s passionate about helping customers build out scalable distributed ETL workloads and implement scalable data processing and analytics pipelines on AWS. When not at work, Ishan likes to cook, travel with his family, or listen to music.

Derek Liu is a Solutions Architect on the Enterprise team based out of Vancouver, BC.  He is part of the AWS Analytics field community and enjoys helping customers solve big data challenges through AWS analytic services.

Kinshuk Pahare is a Principal Product Manager on AWS Glue.