Post Syndicated from Sheila Busser original https://aws.amazon.com/blogs/compute/enabling-microsoft-defender-credential-guard-on-amazon-ec2/
This blog post is written by Jason Nicholls, Principal Solutions Architect AWS.
In this post we show you how to enable that Windows Defender Credential Guard (Credential Guard) on Amazon Elastic Compute Cloud (Amazon EC2) running Microsoft Windows Server. Credential Guard, when enabled on Amazon EC2 Windows Instances protects sensitive user login information from being extracted from the Operating System (OS) memory.
Microsoft Windows stores credential material such as authentication tokens in the Local Security Authority (LSA), a process in the Microsoft Windows operating system that is responsible for enforcing the security policy of the system. Traditionally these credentials are stored in LSA’s process memory accessible to the rest of the OS, making it possible for a privileged user to extract these credentials. The use of complex passwords, limiting privileged account use, and training users not to use the same password across multiple systems are steps that limit the use of credentials extracted from the LSA, but customers want to isolate these credentials from other rest of the OS.
With Credential Guard enabled, the LSA is isolated by Windows virtualization-based security (VBS). VBS is a suite of Windows security mechanisms that use hardware virtualization features to create an isolated compute environment to store user credentials referred to as the isolated LSA. The isolated LSA is inaccessible to the rest of the OS.
Prerequisites
Credential Guard requires a virtualization technology that supports Virtualization-based Security (VBS) and Unified Extensible Firmware Interface (UEFI) Secure Boot. Optionally, Credential Guard can leverage a Trusted Platform Module (TPM) to further secure credentials. In this walk-through we will use NitroTPM, a virtual TPM 2.0-compliant (ISO/IEC 11889:2015) module for your Amazon EC2 instances to enhance the security of the isolated LSA.
Launch your instance
A list of Windows Amazon Machine Image (AMI)s preconfigured to enable UEFI Secure Boot is available in our “Launch an instance with UEFI Secure Boot support ” guide. You can verify that your AMI supports UEFI Secure Boot and NitroTPM using the AWS Command Line Interface (AWS CLI) describe-images command as follows:
aws ec2 describe-images --image-ids ami-0123456789
When UEFI Secure Boot and NitroTPM are enabled for the AMI, “TpmSupport“: “v2.0“, and “BootMode”: “uefi” appear in the output respectively, such as in the following example.
{
   "Images": [
      {
         ...
         "BootMode": "uefi",
         "TpmSupport": "v2.0"
      }
   ]
}
Before launching the AMI verify that the instance type you want to launch supports UEFI boot mode and uses the Nitro System by using the DescribeInstanceTypes API call. Using the AWS CLI and calling describe-instance-types as follows:
aws ec2 describe-instance-types --instance-types [INSTANCE_TYPE] --region [REGION]
Where INSTANCE_TYPE is a supported instance type as defined in the documentation, an example is c5.large and REGION is a supported AWS Region.
The output of the command should display nitro as the hypervisor and list uefi as a supported boot mode. For example:
{
   "InstanceTypes": [
   {
      ...
      "Hypervisor": "nitro",
      ...
      "SupportedBootModes": [
                "legacy-bios",
                "uefi"
      ]
   }
}
Use the Amazon EC2 console or AWS Command Line Interface (AWS CLI) to launch an Amazon EC2 instance which has “uefi” boot mode enabled. Administrator access to the Amazon EC2 instance is required to enable Credential Guard.
Walkthrough:
Enabling Credential Guard with Amazon EC2 Launch an Amazon EC2 Windows Instance
Launch an Amazon EC2 Windows Instance using a Windows AMI preconfigured to enable UEFI Secure Boot with Microsoft Windows Secure Boot Keys on an instance type that supports UEFI Secure Boot.
You can use the launch wizard in the Amazon EC2 console or run-instances command via the AWS CLI to launch an instance that can support Credential Guard. You need a compatible AMI ID for launching your instance which is unique for each AWS Region. You can use the following link to discover and launch instances with compatible Amazon-provided AMIs in the Amazon EC2 console:
Enable Credential Guard on the launched Instance
Now that you know how to create an AMI with UEFI Secure Boot support enabled, let’s create a Windows instance and configure Credential Guard.
Credential Guard can be enabled either by using Group Policies, the Windows Registry, or the Windows Defender Device Guard and Windows Defender Credential Guard hardware readiness tool (DG-Readiness tool). In this post we will show you how to enable Credential Guard using the Windows Registry and via the DG-Readiness tool.
Option 1: Enabling Credential Guard via the Windows Registry
Start the Amazon EC2 instance using an AMI that has the BootMode set to “uefi“. Windows AMI must be preconfigured to enable UEFI Secure Boot with Microsoft Windows Secure Boot keys as we defined earlier. Once you’re connected to the instance use the Windows System Information tool to check that Credential Guard isn’t running on the instance:
- Select Start, type msinfo32.exe, and then select System Information.
- Select System Summary on the left.
- Confirm that Virtualization-based security is Not Enabled.
 Figure 1 Overview of System Information in Windows

Figure 2 System Information confirming that Credential Guard is Not Enabled
4. Open the Windows Command Shell by selecting Start, type cmd.exe, and then press Enter.
5. Run the following commands from the Windows Command Shell to enable Credential Guard using the Windows Registry:
REG ADD "HKLM\System\CurrentControlSet\Control\DeviceGuard" /v EnableVirtualizationBasedSecurity /t REG_DWORD /d 1 /f

REG ADD "HKLM\System\CurrentControlSet\Control\DeviceGuard" /v RequirePlatformSecurityFeatures /t REG_DWORD /d 1 /f

REG ADD "HKLM\System\CurrentControlSet\Control\LSA" /v LsaCfgFlags /t REG_DWORD /d 2 /f

REG ADD "HKLM\SYSTEM\CurrentControlSet\Control\DeviceGuard\Capabilities\" /v "HyperVEnabled" /t REG_DWORD /d 1 /f
 Figure 3 Update the Windows Registry to enable Credential Guard
6. Once the changes have been made, reboot the instance.
7. When the instance is back up, reconnect to the instance and select Start, type msinfo32.exe, and then select System Information.
8. Select System Summary on the left.
9. Note that Virtualisation-based security is now changed to Running, and that Secure Boot and Credential Guard are enabled.
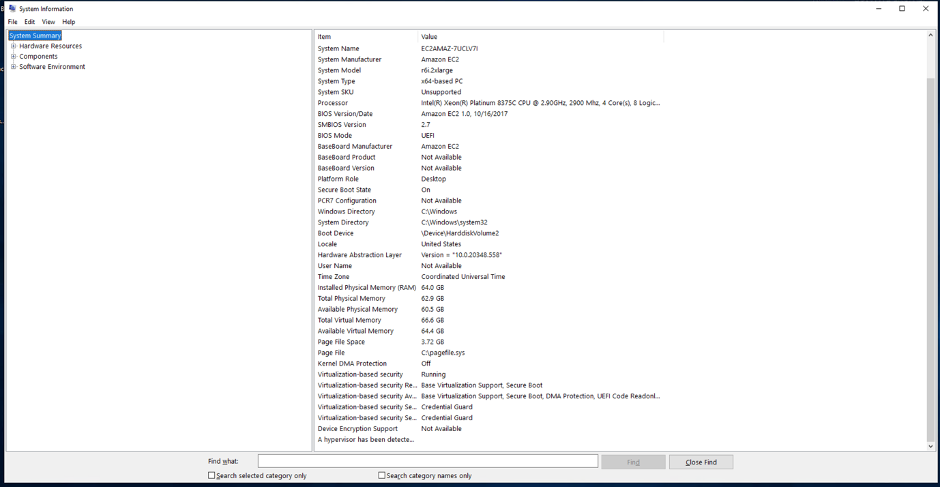 Figure 4 Overview of System Information showing Credential Guard is Enabled
 Figure 5 System Information shows Credential Guard is now Enabled
Option 2: Enabling Credential Guard via the DG-Readiness tool
Option 1 requires a remote desktop session to your Windows Instance. Option 2 is run via PowerShell which can either be done in a remote desktop session as described here or via a remote PowerShell session.
Start the Amazon EC2 instance using an AMI that has the BootMode set to “uefi“. Windows AMI must be preconfigured to enable UEFI Secure Boot with Microsoft Windows Secure Boot keys as we defined earlier. Once you’re connected to the instance start a PowerShell session:
- Select Start, type PowerShell, and then click Windows PowerShell.
 Figure 6 Start PowerShell via the Start Bar
2. Download the DG-Readiness tool by running the command:
wget https://download.microsoft.com/download/B/D/8/BD821B1F-05F2-4A7E-AA03-DF6C4F687B07/dgreadiness_v3.6.zip -outfile dgreadiness.zip
 Figure 7 Download the DG-Readiness tool
- Uncompress the downloaded zip file using the Expand-Archive function within PowerShell
Expand-Archive -Path C:\Users\Administrator\dgreadiness.zip -DestinationPath C:\dgreadiness
- Move the DG-Readiness tool to the current folder
copy C:\dgreadiness\dgreadiness_v3.6\DG_Readiness_Tool_v3.6.ps1 .\
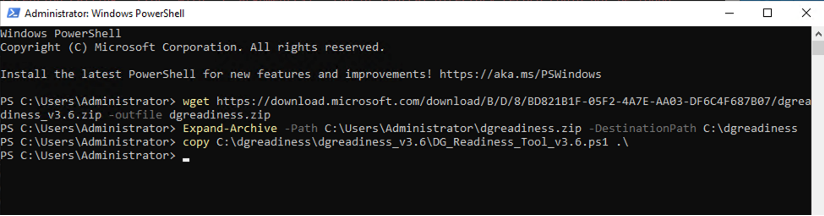 Figure 8 Copy the DG-Readiness tool to the current folder
- Confirm that Credential Guard is disabled by running the DG-Readiness tool with the -Ready option, as follows:
DG_Readiness_Tool_v3.6.ps1 -Ready
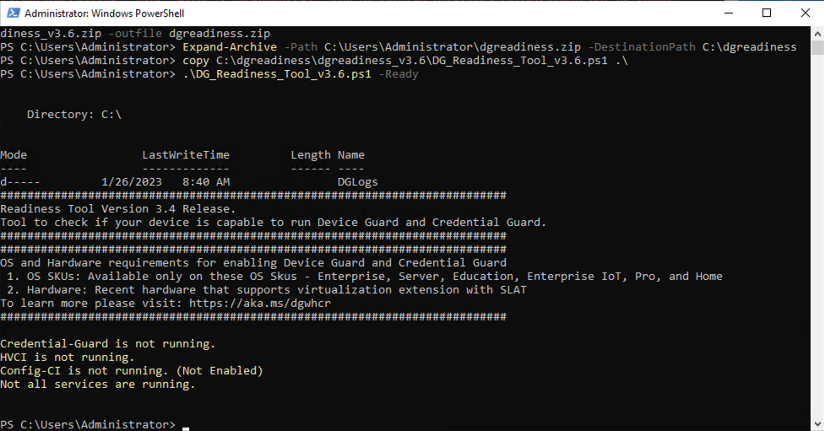 Figure 9 Using the DG-Readiness tool to confirm Credential Guard is not enabled
- Enable Credential Guard using the
-Enable -CGoptions as follows:
DG_Readiness_Tool_v3.6.ps1 -Enable -CG
- Reboot the instance
- Reconnect to the instance after the reboot and confirm that Credential Guard is now running by running the command:
DG_Readiness_Tool_v3.6.ps1 -Ready
 Figure 10 DG Readiness Tool shows Credential Guard is enabled and running
Conclusion
With support for Windows Defender Credential Guard on Amazon EC2 Windows Instances customers can create an isolated compute environment that is inaccessible to the rest of the OS. Credential Guard requires UEFI Secure Boot support. Credential Guard can leverage NitroTPM to further secure credentials.
To learn more about the support of Credential Guard visit documentation.