Setting up Cloudflare Zaraz on your website is a great way to load third-party tools and scripts, like analytics or conversion pixels, while keeping things secure and performant. The process can be a breeze if all you need is just to add a few tools to your website, but If your setup is complex and requires using click listeners, advanced triggers and variables, or, if you’re migrating a substantial container from Google Tag Manager, it can be quite an undertaking. We want to make sure customers going through this process receive all the support they need.
Historically, we’ve provided hands-on support and maintenance for Zaraz customers, helping them navigate the intricacies of this powerful tool. However, as Zaraz’s popularity continues to surge, providing one-on-one support has become increasingly impractical.
Companies usually rely on agencies to manage their tags and marketing campaigns. These agencies often have specialized knowledge, can handle diverse client needs efficiently, scale resources as required, and may offer cost advantages compared to maintaining an in-house team. That’s why we’re thrilled to announce the launch of the first round of certified Zaraz developers, aligning with the way other Tag Management software works. Our certified developers have undergone an intensive training program and passed an examination to prove their in-depth knowledge of Cloudflare Zaraz, including all the ins-and-outs of the tool.
These certified developers are now available to assist you with everything related to Zaraz, whether it’s migration, configuration, or ongoing support. They are well-equipped to ensure that you get the most out of your Zaraz experience, and they have a direct line of communication with the Cloudflare Zaraz team when a need arises.
We’re also pleased to mention that the majority of the course materials used for training are available online for free. You can explore these resources in our YouTube playlist for the Zaraz Developer Certification Program and empower yourself with the knowledge you need to make the most of Zaraz. The videos total more than 4 hours of deep dive into many areas of how to use Zaraz in the best way.
In conclusion, our new certified developers play a significant role in extending the ecosystem for Zaraz. We started this process by empowering developers to write their own integrations by open-sourcing the Managed Components technology, and we’re now pushing to make Zaraz an even better choice for enterprises and big websites. We encourage you to leverage the Certified Developers expertise to streamline your Zaraz experience, and to explore the wealth of free educational materials at your disposal.
The Cloudflare Support team is excited to announce the launch of our brand-new Customer Support Portal. When our customers open support tickets, we understand that they want quick and accurate responses from us. For those of you who have opened a support ticket in the past, we are certain you will notice the improvements we’ve made! The new Support Portal lives where our ticket submission form has always been, dash.cloudflare.com/support, but that’s where the similarities between the old and the new one end.
What can you expect in the new portal?
The new Support Portal will help you solve your problems quickly and effectively, by getting you on the fastest path to resolution. In some cases, the most efficient way to resolve your issue will be to use our self-help resources or our machine learning-trained Support Bot. Other times, the most efficient way to resolve your issue will be by working with one of our Support Engineers via ticket, phone or chat, depending on your plan type. Regardless of how we help you solve your issue, we will have more context about the products you are using and your issue up front, reducing time-consuming back and forth.
The new portal has several features that will make it easier for you to access the support you need, including:
Fast and secure ticket submission for verified Cloudflare users
An easier-to-use interface that serves relevant resources based on your issue summary
Machine learning-powered Support Bot to run diagnostics and serve targeted help guides
Everyone is encouraged to begin using our new portal. Tickets submitted through our legacy form are typically solved faster than tickets emailed to us, and we expect the updates in our new form to help us resolve your issues even faster!
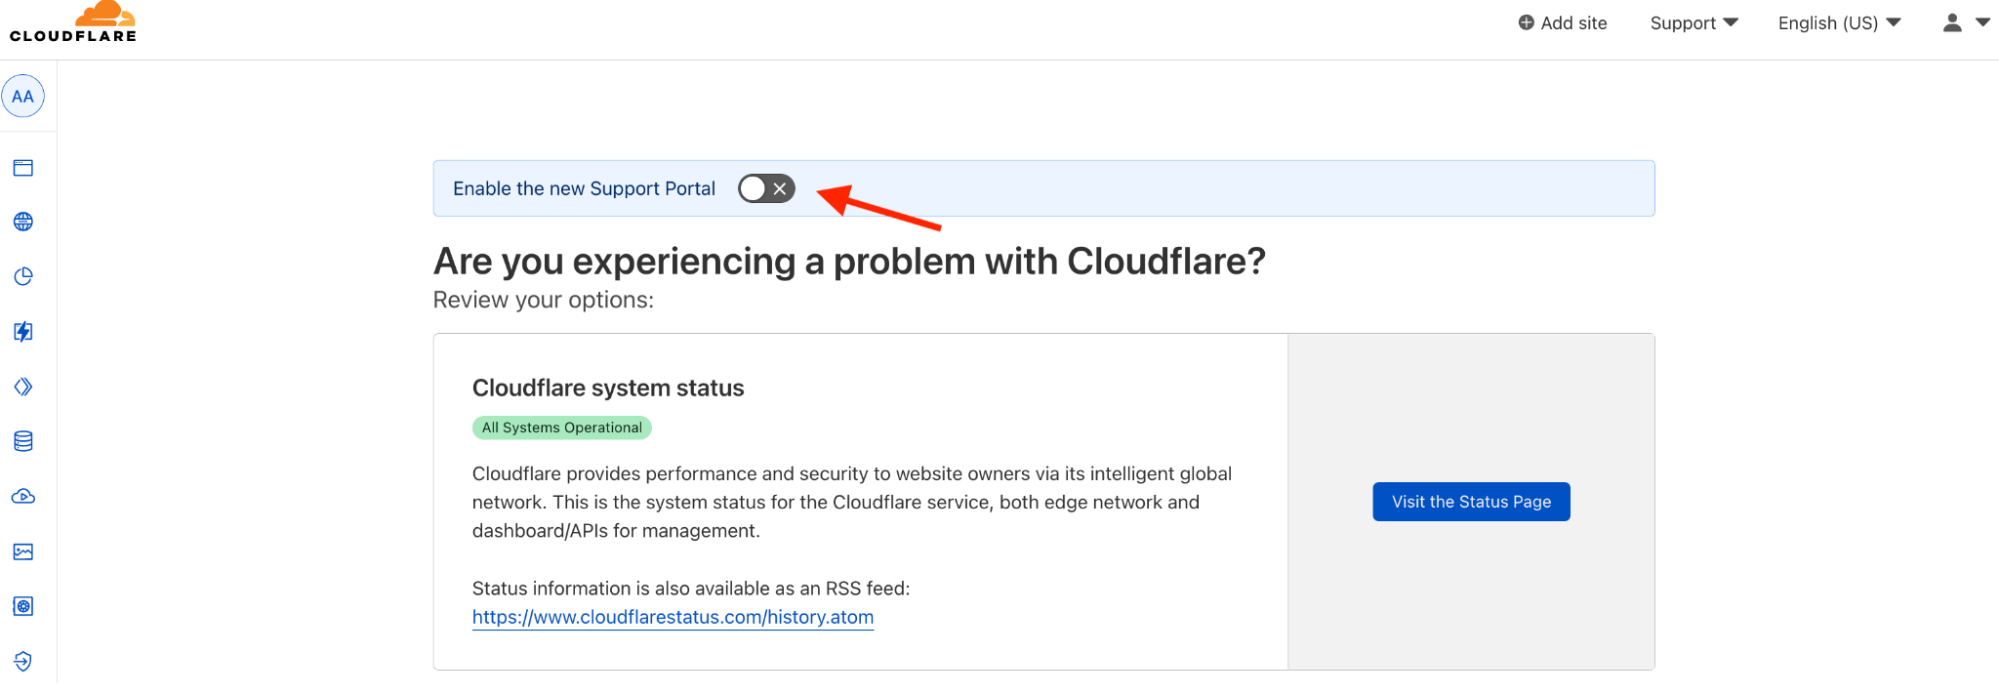
If you are ready to be one of the first people to take advantage of our new Support Portal, you can now opt in and begin using the new experience to access resources and submit tickets. Just hit the Support dropdown in your dashboard and click Contact Support.
Below is a preview of what you can expect with the new experience.
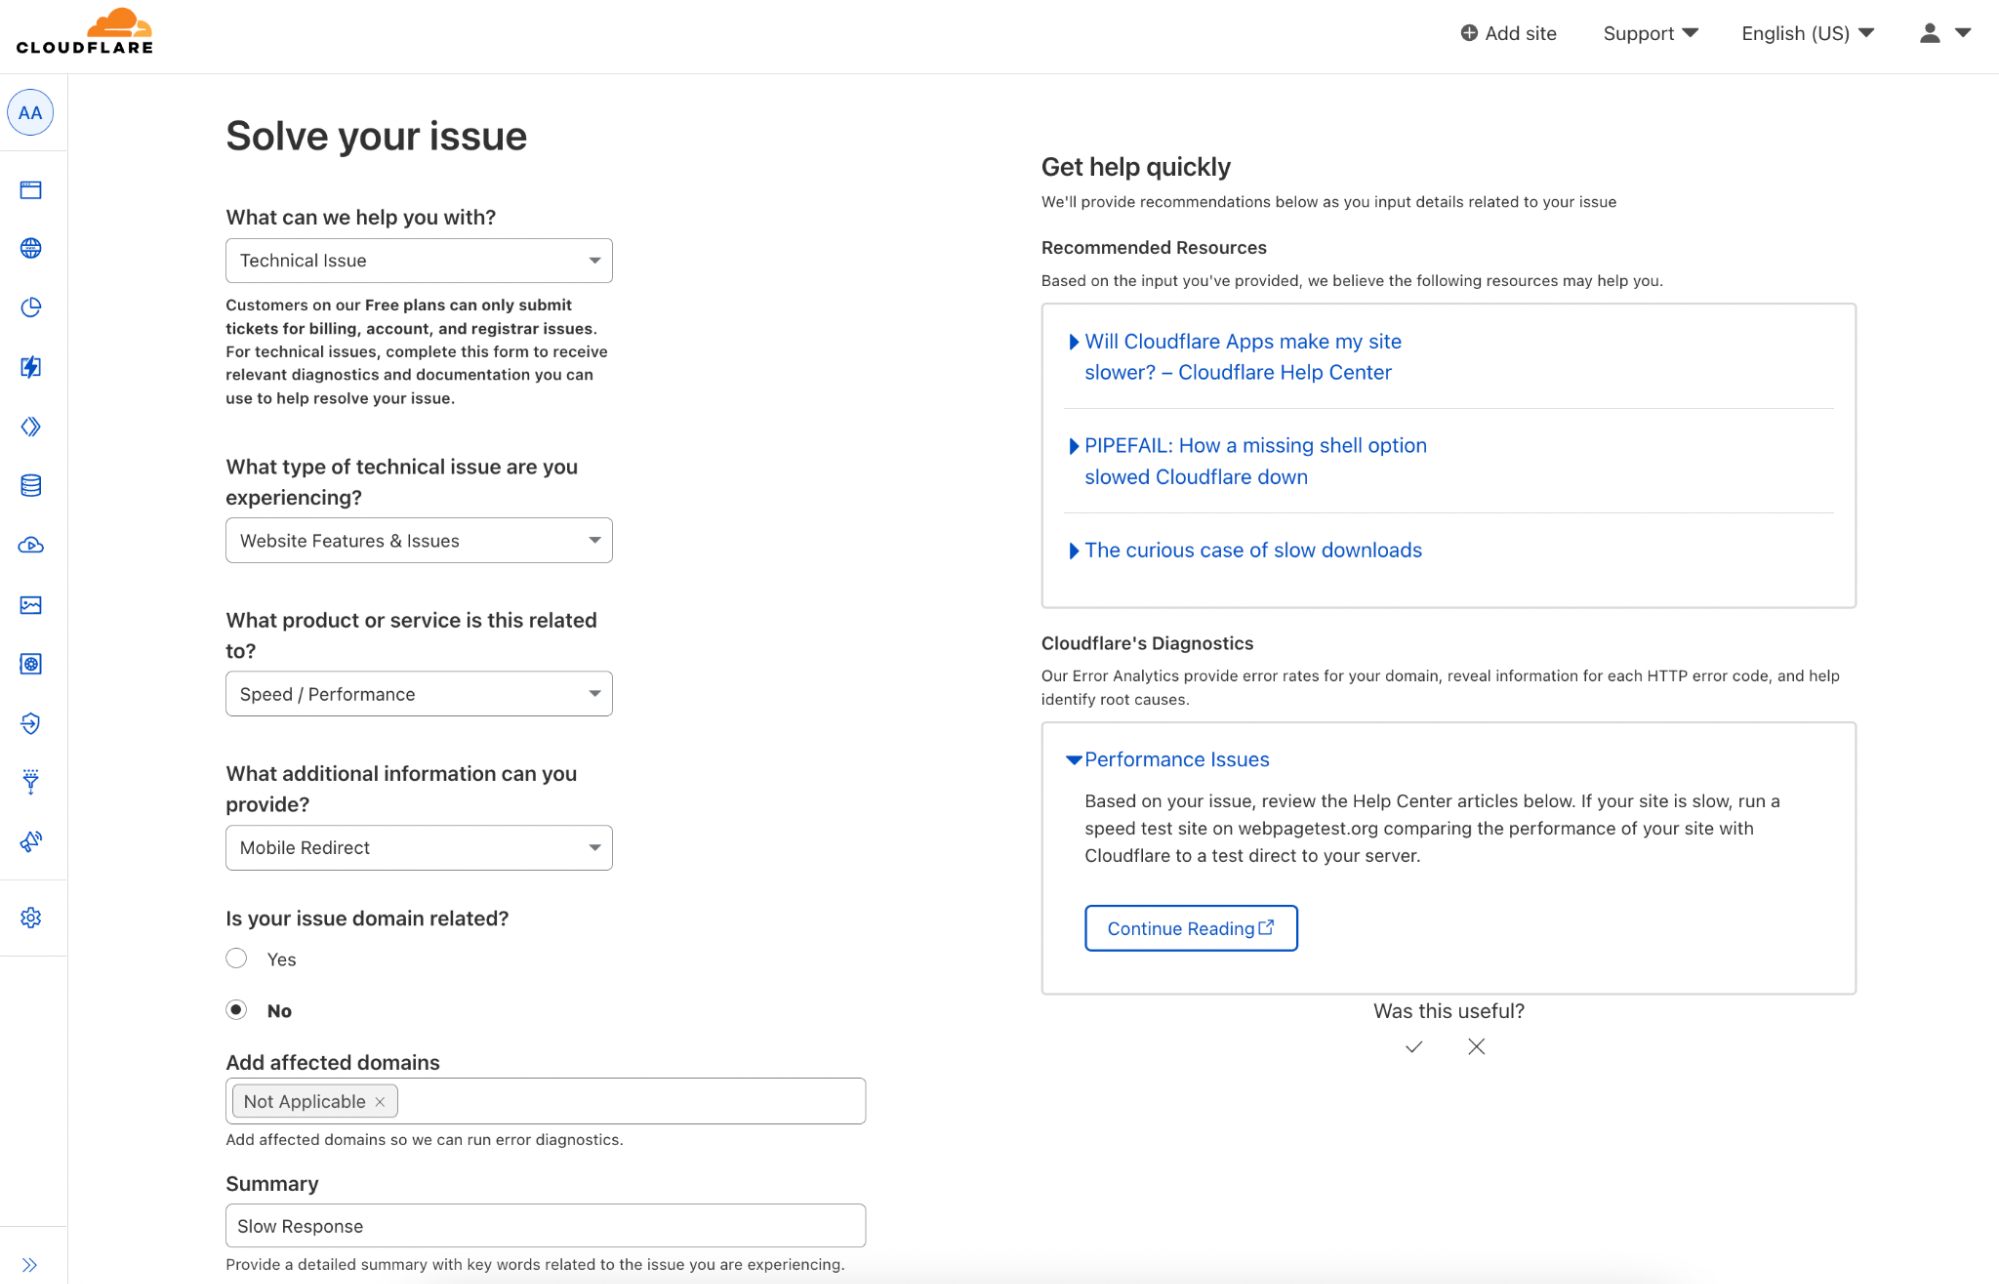
Relevant self-help resources at your fingertips
The biggest change you’ll notice from our old ticket submission form is that we’ve made it easier to get help. First, we link you directly to relevant resources and the ticket submission form immediately upon clicking “Contact Support”. You no longer have to navigate through multiple steps to get your problem resolved. Second, we’ve moved to a full-page experience allowing us to curate a selection of support articles and help guides targeting your specific problem, making it easier for you to find answers to your questions. Of course, there will still be times when you need to submit a support ticket, but if we have resources that address your problem, we want you to be able to find that information easily.
All the details you provide when searching for articles in the portal will be captured and added to your ticket if you are not able to find the answers to your questions.
Take advantage of our Support Bot
Our machine learning-powered Support Bot has been integrated into the new portal to deliver a customized experience that identifies your specific problem. Support Bot has been helping our Support Engineers work more efficiently for years, and now we’re making some of this functionality customer-facing so that you can benefit from these efficiencies as well.
Within the portal, the Support Bot will run diagnostics (if your issue is domain-related), assess the issue summary you entered, and provide you with help guides to address the root cause of your problem. The more information you are able to provide, the better our bot can direct you to the resources most pertinent to your issue. This gives you the chance to solve your issue on the spot, rather than waiting for a response to your ticket.
For each issue submitted through the portal, our Support Bot can perform one of two actions. If your issue is domain-specific, the bot will run a set of diagnostics against your domain that check for common configuration issues. If any issue is detected, the bot will display the issue and a suggested solution. Regardless of whether your issue is domain-specific, the bot will also analyze the issue summary you’ve entered against our ensemble of Natural Language Processing models and keyword searches. The bot is trained on thousands of historic customer tickets to differentiate between specific customer issues. We retrain the model on a regular basis to ensure it is consistently learning from new and emerging issues. If the bot detects keywords in your summary that map to a relevant issue, it will present a known solution for that issue.
The solutions the bot surfaces are based on how successfully these resources resolved issues previously, and we will continue to refine the bot’s responses and solutions based on a couple of key success metrics. We consider a recommendation successful if a customer doesn’t need to ultimately open a ticket or if they acknowledge that a resource was helpful by voting on the page. We will evaluate this data along with any information you provide on why specific content wasn’t helpful, and make iterative improvements to the bot every time we retrain it.
Fast and secure ticket submission
While we have a ton of helpful content for a wide range of problems, we know there will be instances where you need to speak to one of our very experienced Support Engineers. For plan types that include ticket support, we have built our ticket submission flow into the portal and introduced new features to make the experience more efficient. The first step for our Support Engineers in resolving most issues is for us to verify the identity of account users and admins. The new process ensures that tickets are only submitted by verified account users and admins, reducing some back and forth and allowing us to start working on your issue right away.
Along with this verification step, the new portal will collect detailed information about your problem up front, including issue category and impact level. These details will help route your ticket to the Support Engineer most knowledgeable in the area of your issue and enable that engineer to begin work on your ticket more quickly and without having to come to you with additional questions.
How to try the new experience
To take advantage of these improvements, we encourage everyone to use the new Support Portal as the starting point for troubleshooting your issues.
Over the next few months, we will be rolling out the new portal to all plan types, starting with an opt-in period where you can pilot the new experience. Once we are satisfied the portal is working as intended, we will close the opt-in phase and release the portal to all customers. At that point, we will begin redirecting emails received at our main support email addresses (support at cloudflare.com and billing at cloudflare.com) to the Support Portal so that they can be triaged, and resolved quicker and more efficiently. We are excited to start implementing these changes and are confident that these steps are the first of many planned in making your support experience as efficient and effective as possible. We can’t wait for you to check it out!
To start using the new portal today, you can opt in from your dashboard. Let us know what you think with the feedback form included at the top of the new portal.
The collective thoughts of the interwebz
Manage Consent
To provide the best experiences, we use technologies like cookies to store and/or access device information. Consenting to these technologies will allow us to process data such as browsing behavior or unique IDs on this site. Not consenting or withdrawing consent, may adversely affect certain features and functions.
Functional
Always active
The technical storage or access is strictly necessary for the legitimate purpose of enabling the use of a specific service explicitly requested by the subscriber or user, or for the sole purpose of carrying out the transmission of a communication over an electronic communications network.
Preferences
The technical storage or access is necessary for the legitimate purpose of storing preferences that are not requested by the subscriber or user.
Statistics
The technical storage or access that is used exclusively for statistical purposes.The technical storage or access that is used exclusively for anonymous statistical purposes. Without a subpoena, voluntary compliance on the part of your Internet Service Provider, or additional records from a third party, information stored or retrieved for this purpose alone cannot usually be used to identify you.
Marketing
The technical storage or access is required to create user profiles to send advertising, or to track the user on a website or across several websites for similar marketing purposes.