Post Syndicated from arrohan original https://aws.amazon.com/blogs/messaging-and-targeting/how-to-send-web-push-notifications-using-amazon-pinpoint/
How to send push notifications on any website using AWS messaging tools
Web Push Notifications (also known as browser push notifications) are messages from a website you receive in your browser. These messages are intended to be rich, contextual, timely, personalized and best used to engage, re-engage, and retain website visitors. For instance, as a website owner you could use web push notifications to notify users about sales, important updates or new content on your website.
How are web push notifications different from native app push notifications?
Push notifications are short messages that are displayed directly on the user’s screen sent via mobile applications, providing timely information and messages like order status, promotions, or relevant news in the application.
Web push notifications are simply push notifications sent via web browsers (the browser application on the device), and they work across platforms – Desktop, mobile and tablet. They are a newer channel than push notifications, and have now become a part of the modern marketing strategy alongside native app push notifications, emails and SMS.
In the case of mobile apps, the user must install the application to receive push notifications. In the case of web push, there is no need to download any software—it just takes one click on your website.
Why are Web Push Notifications useful?
Let’s consider a real-world example. Suppose you are an e-commerce website where customers can purchase products. Once, the purchase has been made, customers would be interested in getting real time updates of where the package is in transit, when is it likely to be delivered, a confirmation that the shipment has been delivered and so on. Web push notifications can be an excellent way of providing such updates. Accessing email on mobile devices is often unwieldy, SMS messages cannot support images and are constrained in length (also they typically they cost more money to send!). Push notifications are perfect for such a use case. Till now, the major constraint was that it would require users to install your app on their device. Web push notifications gives website owners and customers the power of push notifications without any need for driving app installs.
Marketers in a variety of sectors like travel, publishing, restaurant & delivery, finance and insurance can use push notifications to improve their down-to-funnel conversions. From new content alerts to limited-time promotions to upcoming events, push messages are short, crisp and drive engagement, conversion, and retention. A short search on the AWS blogs website gives us a number of examples of businesses who have created value for their customers with the help of push notifications. Some of the key advantages of web push notifications are:
- Easy opt in model: Unlike other marketing channels like email or SMS, web push notifications offer users a seamless opt-in experience ― Users simply select `Allow’ on a browser permission prompt. Users do not have to worry about sharing their personal data, like their name, email, or phone number nor do they have to go to the play store/app store and install an app on their device.
- Increased Engagement: Push notifications appear on a user’s desktop or mobile screen and are quick to grab attention. Since push messages are real time and have high visibility – they typically enjoy higher “Click Through Rate (CTR)” as compared to other channels like SMS or email.
- Reach users even when they are not on your website: Web Push Notifications from your website are delivered and shown to the customer even if the user is visiting some other site or on some other app. In this respect (and most others), it is quite similar to app push notifications. Even if subscribers were offline when you sent your push campaign, they will get the push message delivered to them the next time they come online.
- No need for users to install native apps: One of the most compelling reason for installing mobile apps, is because users could stay updated with the latest and the greatest – thanks to app push notifications. The additional cost of going to the play store/app store and installing the app is something which would often discourage users. This is especially true for countries and regions where users are still on lower end phones with limited storage space. Users would often have to uninstall apps (which might include yours too) that they do not use frequently in order to make space for other stuff.
- Makes websites richer and more memorable: If you ask a room of developers what mobile device features are missing from the web, push notifications are always high on the list. This is no longer the case since browsers are increasingly adding support for web push notifications and this has offered website owners a powerful cross platform (Desktop & Mobile, Android & iOS) alternative as against developing and maintaining different native apps for different platforms. Web push notifications even appear quite similar to native mobile push on most smartphones.
- Lower Cost: Unlike channels like SMS, sending web push notifications is absolutely free as browsers themselves offer support for it by adhering to the web push protocol. The only costs incurred will be that of sending push notifications as per the Pinpoint pricing policy.
- Popular browsers support web push: Google Chrome, Firefox, Opera, Edge support web push on both Mobile and Desktop. What’s more the support for web push is continuously getting better. Refer to this link for the latest support status matrix across browsers and form factors.
What is Amazon Pinpoint?
Amazon Pinpoint is an AWS service that provides scalable, targeted multichannel communications. Amazon Pinpoint enables companies to send messages to customers through SMS, push notifications, in-app notifications, email, and voice channels. To learn more about Amazon Pinpoint, visit the website and documentation.
Web Push support on Firebase Cloud Messaging (FCM):
Firebase uses cloud services for its notification services on Android, iOS & Web. Firebase Cloud Messaging or FCM run on basic principles of tokens, which is uniquely generated for each device & later used for sending messages to respective devices. There are two key advantages of using FCM for sending web push notifications:
- Abstracts away the complexity of onboarding to the web push protocol for push messages: Sending web push notifications directly without any third party in between requires your website to add support for the web push protocol. Adherence to the web push protocol requires website owners to perform some steps specific to wpn like adding VAPID headers and payload encryption of push messages. This would be additional work for website owners, especially for those businesses which are already onboarded to FCM for sending native app push notifications. FCM server side apis for sending web push notifications work pretty much the same way as they work for native apps. They abstract away the additional complexity of sending web push messages.
- Send push notifications from Amazon Pinpoint via FCM: Amazon Pinpoint already supports integration with FCM, refer to documentation. Similar to how we add a FCM project in Pinpoint to send push messages to native android apps, in this blog post we will see how a similar integration can be leveraged to send web push notifications.
Advantages of sending Web Push Notifications with Amazon Pinpoint:
Now at this point, you might be thinking, Web push notifications can go a long way towards delighting customers and FCM already abstracts the complexities of sending web push. So why do I need Amazon Pinpoint?
Well, integration with Amazon Pinpoint offers a number of advantages. Here are a few:
- Map FCM tokens to actual users and web app ‘installs’: FCM would give you tokens for each user on your website who subscribes for web push. Roughly speaking, an FCM token for each web app install with permissions to send push messages. To be able to send messages to these users we would need to store the FCM tokens for each user/web app install/browser instance. Amazon Pinpoint treats each browser instance as an endpoint and enables you to save the push tokens in the same way in which we would store native push tokens/mobile numbers/email addresses, i.e., as a primary identifier for that endpoint. This enables us to send messages to Pinpoint endpoints without caring about the underlying complexity of storing and managing push tokens.
- Intelligently send web push, map user attributes to push tokens: Along with the push token, each pinpoint endpoint can also store other attributes like device characteristics, user Id and user attributes. This helps us to create dynamic and complex segments which can be used to send targeted web push notifications.
- It is essentially the same as sending android native push: Create an FCM project, create FCM tokens, Create Pinpoint endpoints with the tokens, send push campaigns to those endpoints. Swap out native android code with service workers, JavaScript on the client and you get web push. It really is that simple.
- Web push, native push, SMS or emails. One stop shop for reaching out to users on all channels: Pinpoint becomes your single backend for reaching out to users across multiple channels. For app users, send them app push, for users who prefer the web, you have web push.
- Leverage Pinpoint features like Campaign Management, Events, Analytics and Segments: Read up about Amazon Pinpoint. It has a lot of great features which can help you better engage your users.
In this blog we will see how to send web push notifications using Amazon Pinpoint on a website built using AWS Amplify.
Overview of solution
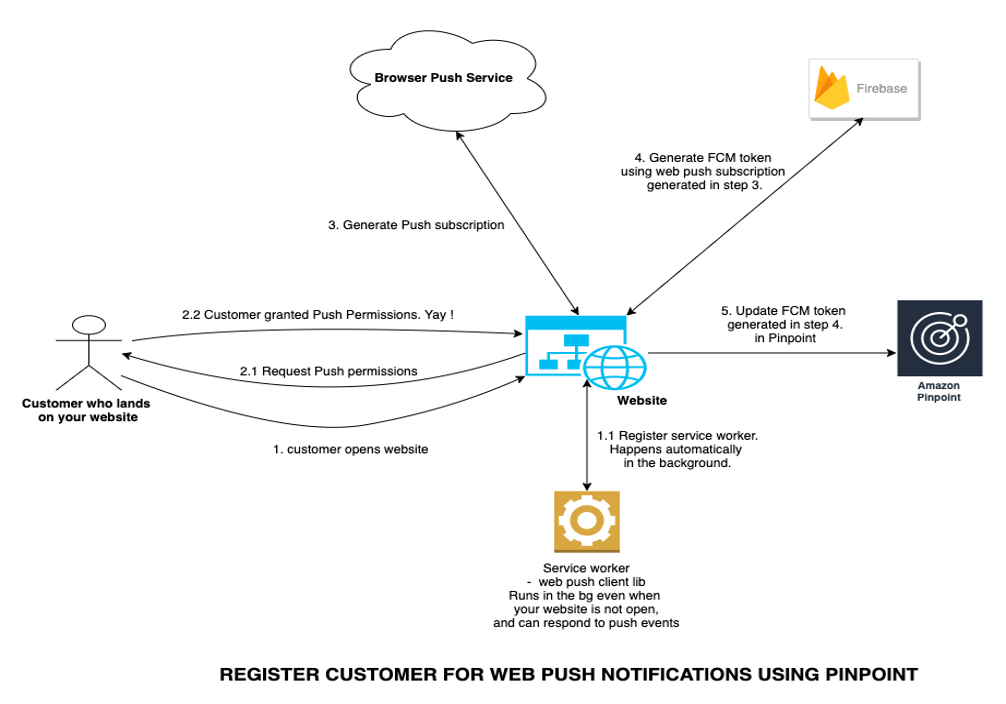
Enable web push by using FCM as an intermediary service and Pinpoint as an app server (map FCM tokens to actual users) and a push campaign management tool. Integrate web push protocol, FCM and Amazon Pinpoint.
Walkthrough
In this blog post, we will create a simple demo website using Amplify which can be used to create web push subscriptions and also receive web push messages. We will integrate this website with FCM js sdk and Amazon Pinpoint to store the FCM push tokens on Pinpoint. Later we will see how to send web push notifications using Amazon Pinpoint with FCM acting as an intermediary.
The above can be broken down into the below simple and independent steps:
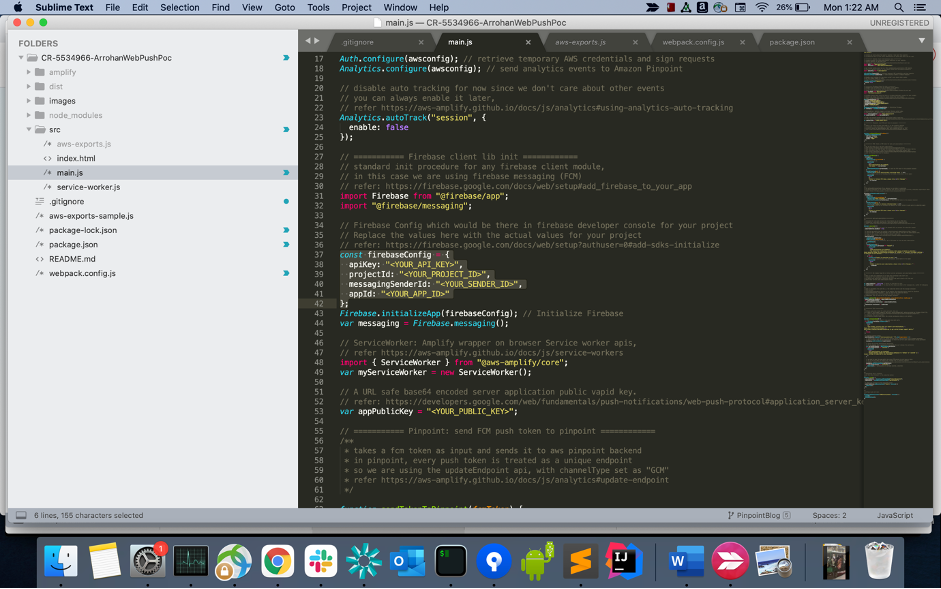
- Create a project on FCM.
- Generate web push notifications server keys on FCM.
- Create a simple web app (website) using Amplify
- Create an Amazon Pinpoint project. This is a one-line command which will be done as part of Amplify web app setup.
- Make your amplify website web push capable. In this step we will also integrate with the FCM sdk for web push.
- Configure the Pinpoint project and integrate it with FCM. It just involves adding the FCM server key to Pinpoint.
- Go to the Amazon Pinpoint console and send a test web push message from your website. And we are done!
You can see checkout my demo website here.
The source code for this demo website (and the blog) is available here.
Prerequisites – Essentials
For this walkthrough, you should have the following prerequisites:
- An AWS account and a FCM developer account.
- Create a FCM project on the Firebase Developer Console. You need to have a FCM developer account to access the console.
- Node and npm.
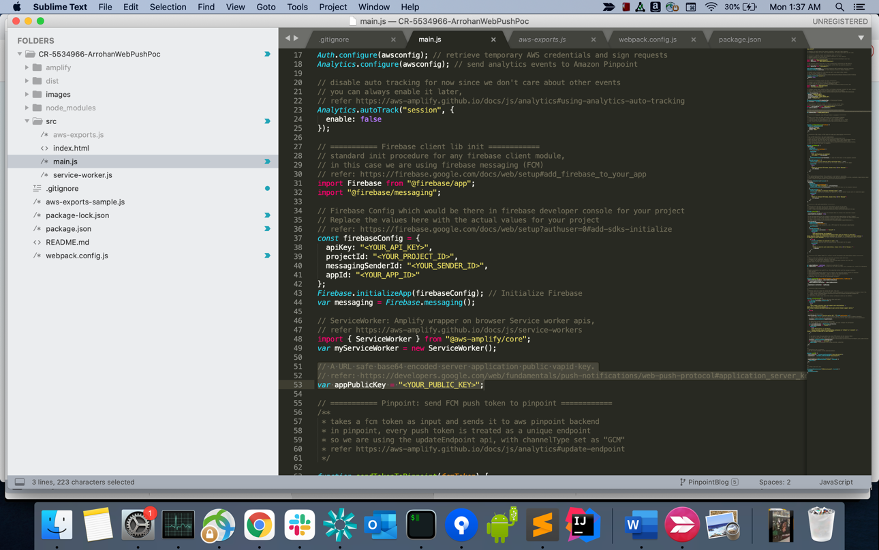
- AWS Amplify cli setup
- A browser which supports web push notifications and the web push protocol. Refer Browser support matrix.
Prerequisites – Recommended
In addition to the necessary prerequisites mentioned above, I would highly recommend readers to go through the below in order to derive maximum value from this blog post.
- Web Push fundamentals: Some basic reading up on web push notifications and going through a couple of relevant code samples. It is not compulsory to implement and understand everything, but it would be beneficial to have an elementary understanding of service workers, permissions, push subscriptions and notifications apis.
- Introduction: Some of the sections are a bit detailed and complex, you need not go through all the sections completely at once. However, at least go through the overview and the how push works sections carefully.
- Simple Code demo with explanations to help you get started.
- FCM client-side code : You need not go through the send Message sections since we will not directly use FCM apis or the console. Instead, we will use the Pinpoint console to manage our push campaigns.
- Building web apps with amplify: By the end of the tutorial, you should get clarity on how to build and host web apps using amplify. It will also help you become familiar with the amplify cli tool.
- Read up on Amazon Pinpoint.
Setting up the demo web app
Let’s deploy the demo web app using AWS Amplify to see how all the parts come together.
Clone the code for the sample web app
git clone ssh://git.amazon.com/pkg/ArrohanWebPushPoc (branch: PinpointBlog) <github_link>
Create an FCM account and a project on the FCM developer console, on the FCM project add web push as a channel
It is possible that Firebase may change the UI of the console in the future so the given screenshots may not be exactly reflective of the UI, but the broad steps would remain the same.
- Under “Engage” click on ‘Cloud Messaging Tab’. The page url should typically be of the form: https://console.firebase.google.com/u/0/project/<name_of_your_project>/notification.
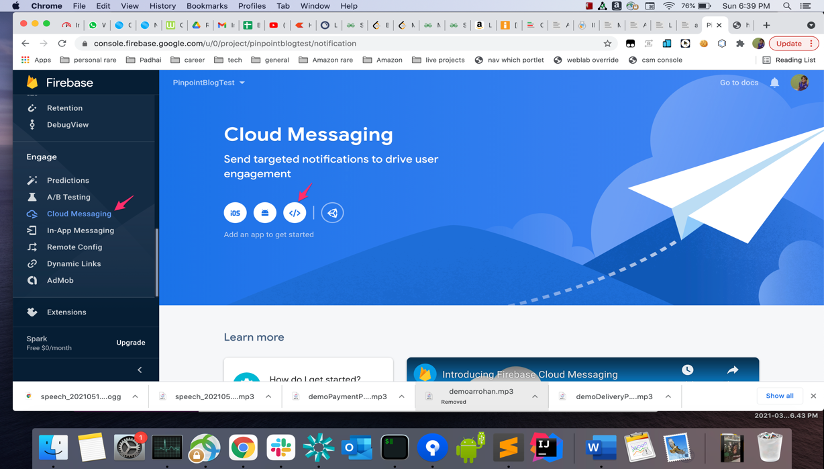
- Under the option “Add an app to get started”, Click on the “web/javascript” (the one with the </> symbol) app.
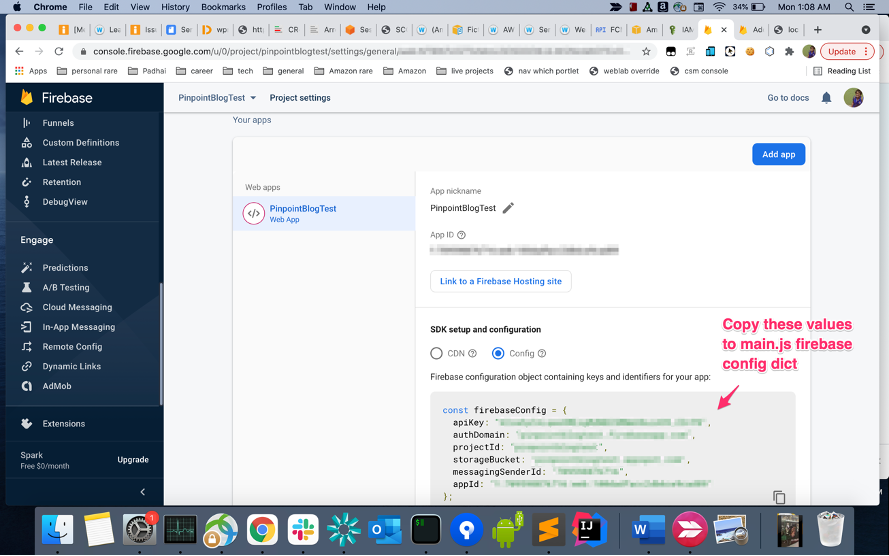
- Once you have created the project, go to project settings. Click on General Tab. Replace the values in
firebaseConfig main.jswith the actual values for your project.
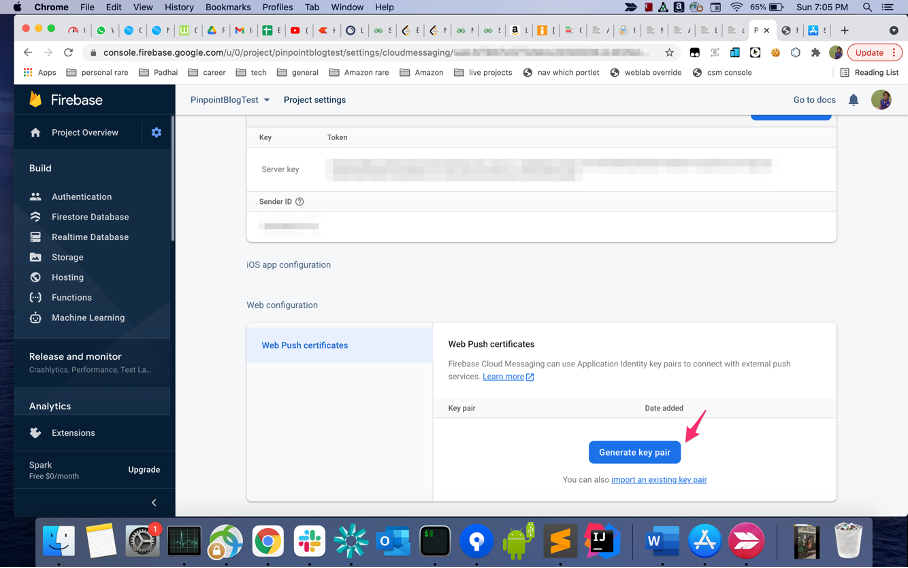
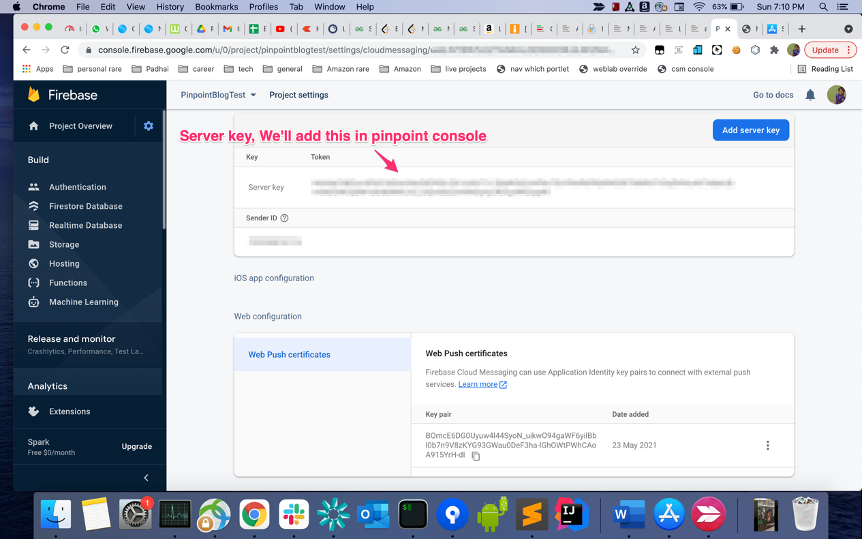
Generate a public-private key pair for the FCM cloud messaging project
- Under project settings, switch to the cloud messaging tab. Click generate key pair under web push certificates to generate a public-private key pair.
- Replace the
<YOUR PUBLIC KEY>in the filemain.jsin the source code with the vapid public key you generated in the previous step.
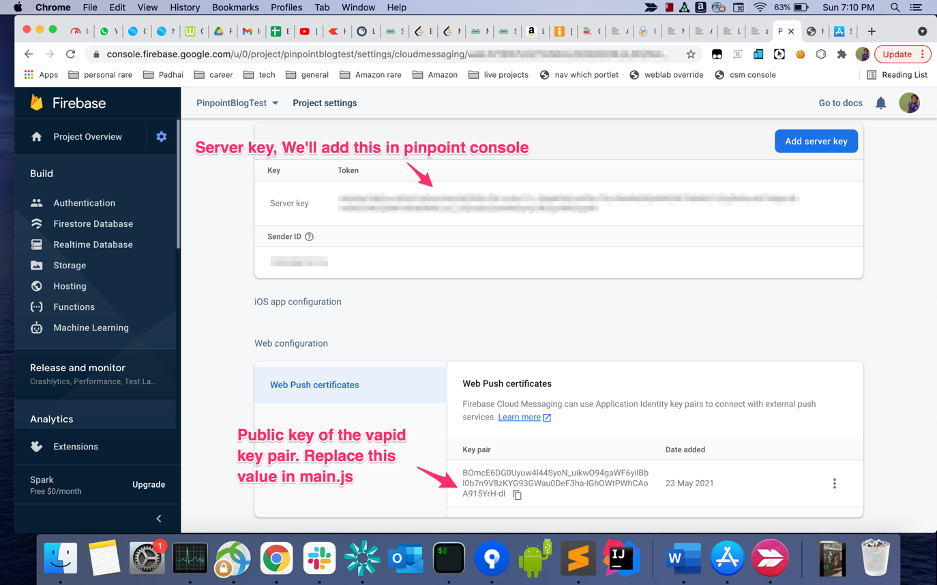
- Note the Server key, you will need it during pinpoint project setup.
Setup an Amplify web app and integrate with pinpoint
- Clone the code in the given repo, replace your FCM config and keys. Run
npm install.- In case you face build errors due to package versions getting outdated (firebase, especially gets updated often, sometimes with breaking changes), please update the dependencies to the latest version. This post offers an easy way to identify outdated dependencies and update them.
- Setup an Amplify web app. Note, for the purpose of this demo, you just need to setup a simple static website. Simply run
amplify init. Enter the required details, the default config should work fine.

- Create a pinpoint project and integrate with our web app through amplify cli:
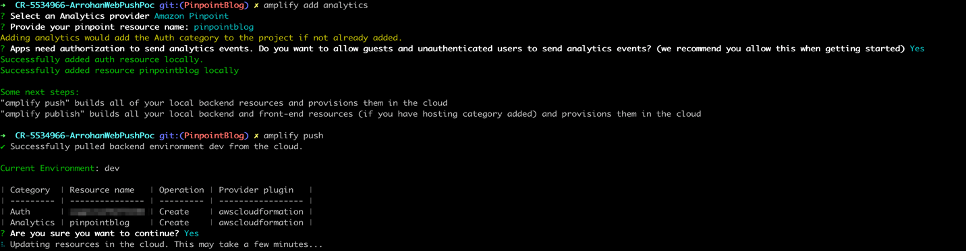
- Create a pinpoint project: Run
amplify add analytics. ChooseAmazon Pinpointas the analytics provider and accept all defaults. - Please note when you add “analytics” to the project you will get a prompt which says something like – “Apps need authorization to send analytics events. Do you want to allow guests and unauthenticated users to send analytics events? (We recommend you allow this when getting started)” – Please accept and answer
Yeswhen you get this. - Push to AWS: Run
amplify push. A configuration file (aws-exports.js) will be added to the source directory. Notice, we are calling this file from our main.js file.
- Create a pinpoint project: Run
Pinpoint Project setup
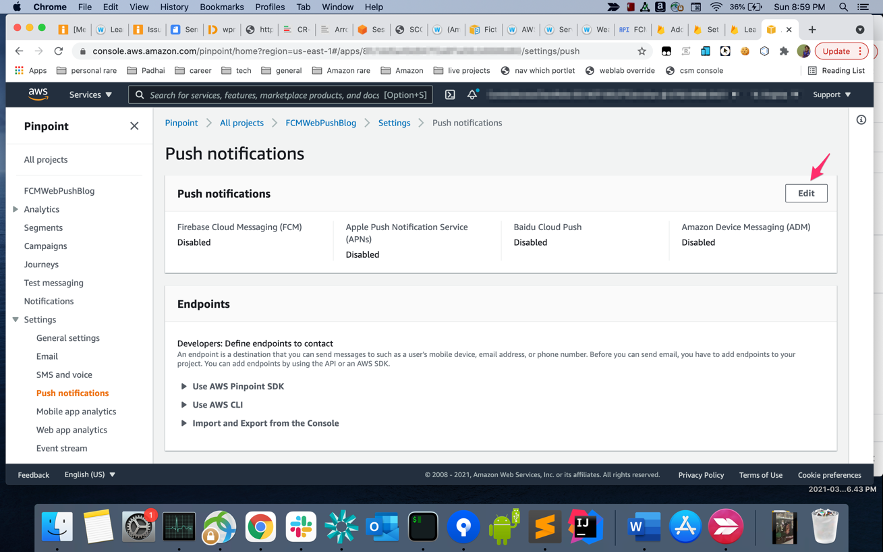
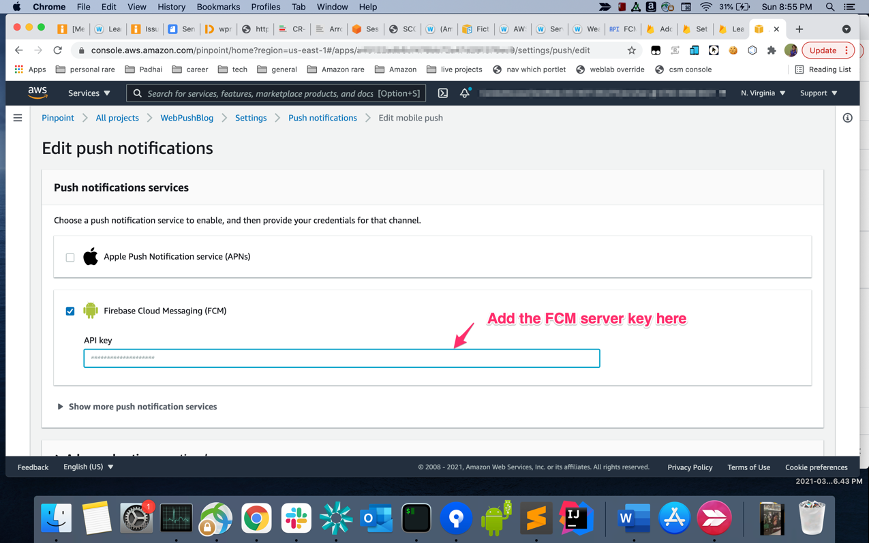
- Get the Server key of the FCM project you created earlier.
- Open the pinpoint project you created in the previous step on the Pinpoint console. Add FCM Legacy server key to the Project. The process is exactly the same as one would follow for native android apps.
Run the web app and subscribe for push notifications
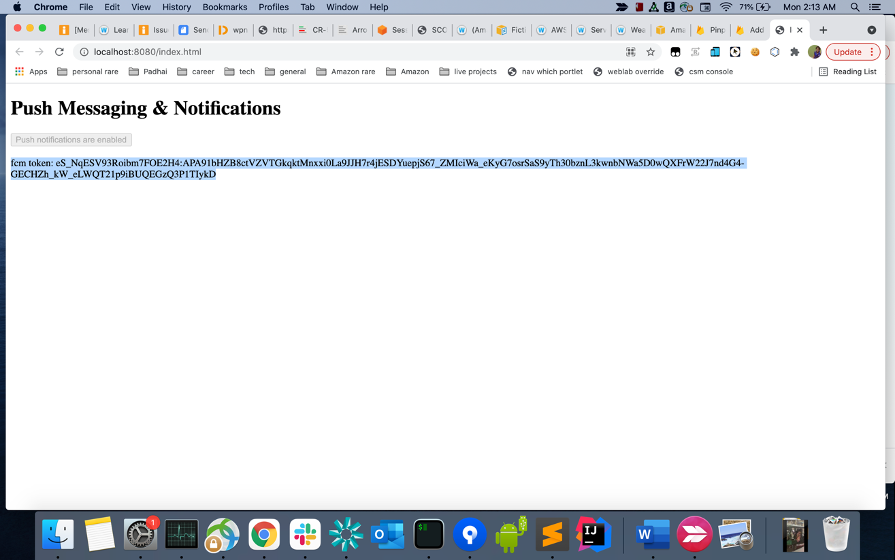
- Run
npm start, our web app will be running on http://localhost:8080/index.html - Click on enable push messages and click allow/accept on the browser permission prompt which follows. Once it is enabled, you will see a FCM token on the page, copy the token.
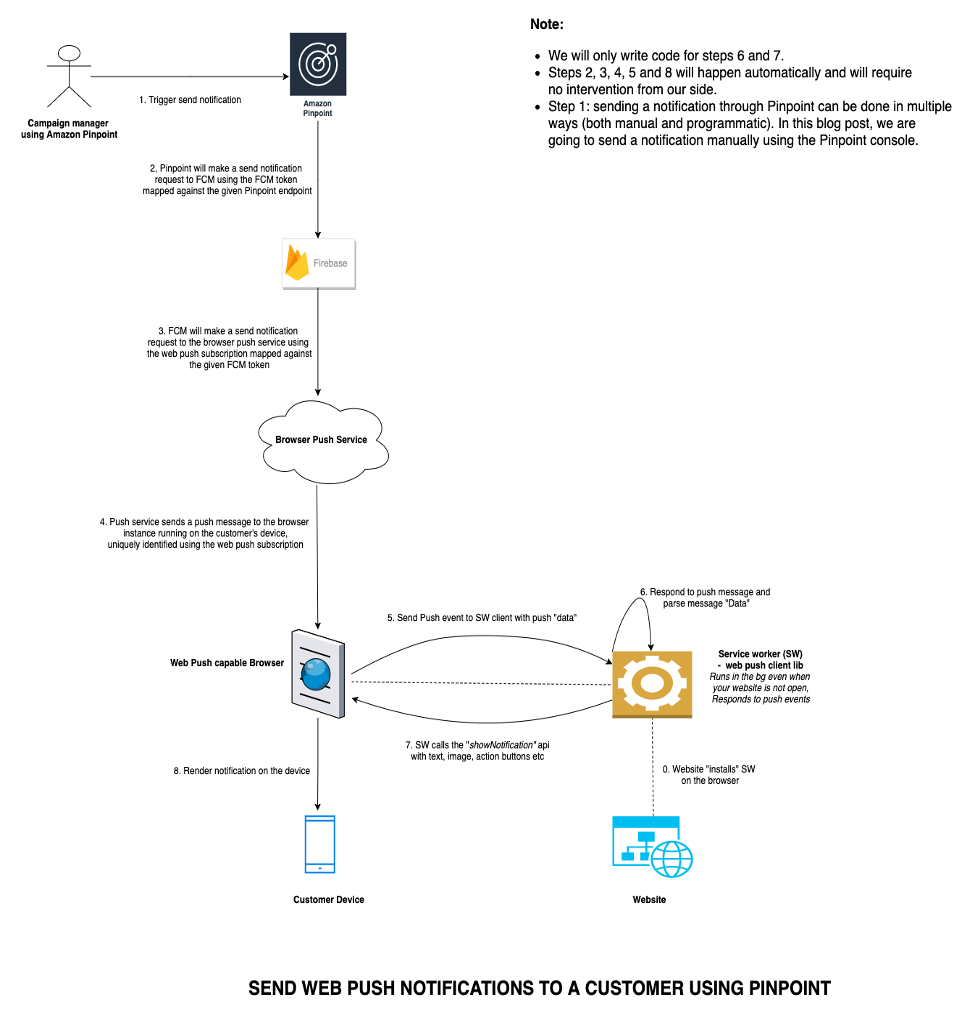
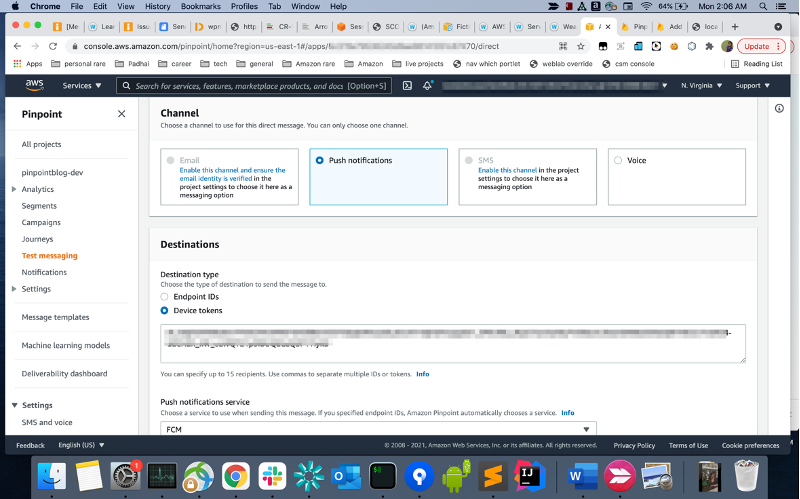
Send a web push notification from the Amazon Pinpoint console
- Open the pinpoint project you created in the previous step on the Pinpoint console. Click on your project and then go to test messaging. The process is exactly the same as the one for native apps described here. Under “destination type” select “Device Tokens” and paste the FCM token you copied in the previous step.
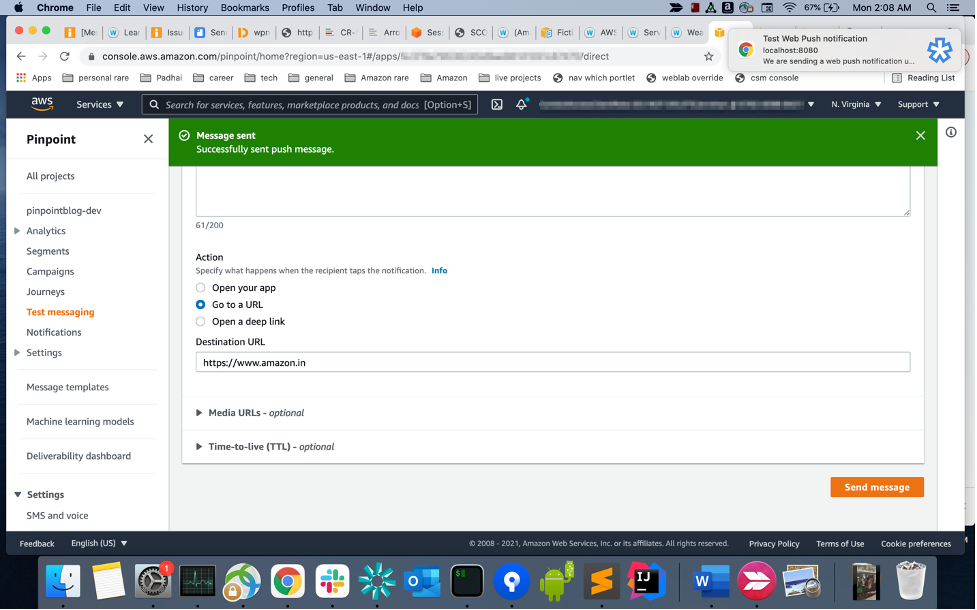
- Fill in title, body and optionally URL (“Go to a URL” under “Actions”). Click on Send Message, you should get a push message on your browser.

Next steps
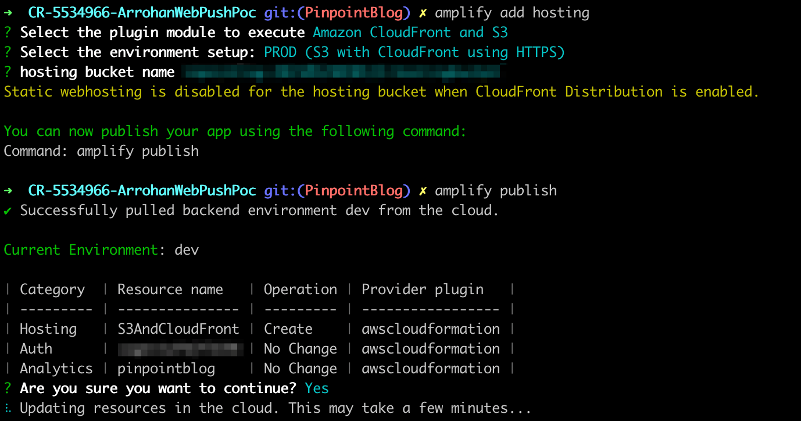
- Host your app. Simply run
amplify add hostingfollowed byamplify publish. Remember that for web push (service workers) to work, your site should be https.
- Create segments, campaigns and journeys on pinpoint and try sending web push messages through them.
Code Walkthrough
- Gitfarmlink: https://code.amazon.com/packages/ArrohanWebPushPoc/trees/heads/PinpointBlog
- File wise description:
- package.json: Simple npm config file. It includes the list of dependencies and their versions used by our web app. For our use case, all we need is webpack and AWS Amplify.
- package-lock.json: Auto generated config file generated by npm after resolving modules and
package.json. aws-exports.js: Auto generated configuration file created by Amplify cli. This file contains the configuration and endpoint metadata used to link your front end to your backend services. It will be structured similar to the sample config file.- webpack.config.js: Simple webpack configuration file
src: The folder which contains the source code for our web app. It contains:- service-worker.js: The service worker that we register for our website which is used to display push notifications. In the service worker we parse the notification payload sent through pinpoint and call the notification apis to display push notification with the appropriate fields.
- index.html: The website html.
- main.js: The heart of the web app. It does permission handling, push subscription management and communicates with FCM and Amazon Pinpoint.
- images/icon-192×192.png: static icon that we display on our push messages. This would essentially be your website logo.
Conclusion
This small demo shows how we can send web push notifications using Amazon Pinpoint. As next steps to come up with an actual production ready solution, you can look into the following:
- Develop deeper understanding and expertise on web push
- Read the full push notifications tutorial.
- The web push book by the author of the above tutorial, Matt Gaunt.
- The push api spec: You don’t need it now but it might be a useful resource later on.
- Push api Mozilla doc: overview, spec, browser compatibility and other useful info.
- Service Workers: The technical foundation which makes “native app like” features like push possible on the web.
- Richer and smarter push notification: Add big images, action buttons, replace notifications using tags (for example, sports score updates) and explore other features in the show notifications api.
- Smart push notifications: add custom business logic in the payload. Hint: use the “body” (“
pinpoint.notification.body“) field on the pinpoint console to send a custom json string. - Driving more subscriptions: Leverage Amplify Analytics to track how users interact with the push subscribe UI. Think of where and how you might ask users to subscribe to drive maximum engagement.
- Easy unsubscribe: Allow users an easy option to disable push notifications without having to block you from browser settings. Also, make sure that you are disabling that endpoint on pinpoint. Hint: use the
updateEndpointapi and passoptOutfrom ‘ALL’ as the argument. - Targeted and personalised push notifications: Leverage Pinpoint segments to send users push notifications according to their interests and requirements. Hint: add user data to endpoints and use it to filter and create targeted segments.
- Campaign management: Leverage pinpoint features like segments, analytics, campaigns, journeys and more!
Project Cleanup
In this section we will quickly go over the steps to delete the resources we created for this demo to make sure that we do not incur any charges.
- Cleaning up all AWS resources including the Amazon Pinpoint project, S3 buckets for hosting (and any other resources you may have added): Simply run
amplify deletefrom the project directory on your command line. - Cleaning up the FCM Project: Refer to the FCM support page for the steps to delete a project – https://support.google.com/firebase/answer/9137886 .
- Open the project settings page: The URL will be of the form https://console.firebase.google.com/u/0/project/<your_project_identifier>/settings/general
- Click on the delete project button at the bottom of the page.