Post Syndicated from Ben Peven original https://aws.amazon.com/blogs/compute/how-to-run-3d-interactive-applications-with-nice-dcv-in-aws-batch/
This post is contributed by Alberto Falzone, Consultant, HPC and Roberto Meda, Senior Consultant, HPC.
High Performance Computing (HPC) workflows across industry verticals such as Design and Engineering, Oil and Gas, and Life Sciences often require GPU-based 3D/OpenGL rendering. Setting up drivers and applications for these types of workflows can require significant effort.
Similar GPU intensive workloads, such as AI/ML, are heavily using containers to package software stacks and reduce the complexity of installing and setting up the required binaries and scripts to download and run a simple container image. This approach is rarely used in the visualization of previously mentioned pre- and post-processing steps due to the complexity of using a graphical user interface within a container.
This post describes how to reduce the complexity of installing and configuring a GPU accelerated application while maintaining performance by using NICE DCV. NICE DCV is a high-performance remote display protocol that provides customers with a secure way to deliver remote desktops and application streaming from any cloud or data center to any device, over varying network conditions.
With remote server-side graphical rendering, and optimized streaming technology over network, huge volume data can be analyzed easily without moving or downloading on client, saving on data transfer costs.
Services and solution overview
This post provides a step-by-step guide on how to build a container able to run accelerated graphical applications using NICE DCV, and setup AWS Batch to run it. Finally, I will showcase how to submit an AWS Batch job that will provision the compute environment (CE) that contains a set of managed or unmanaged compute resources that are used to run jobs, launch the application in a container, and how to connect to the application with NICE DCV.
Services
Before reviewing the solution, below are the AWS services and products you will use to run your application:
- AWS Batch (AWS Batch) plans, schedules, and runs batch workloads on Amazon Elastic Container Service (ECS), dynamically provisioning the defined CE with Amazon EC2
- Amazon Elastic Container Registry (Amazon ECR) is a fully managed Docker container registry that simplifies how developers store, manage, and deploy Docker container images. In this example, you use it to register the Docker image with all the required software stack that will be used from AWS Batch to submit batch jobs.
- NICE DCV (NICE DCV) is a high-performance remote display protocol that delivers remote desktops and application streaming from any cloud or data center to any device, over varying network conditions. With NICE DCV and Amazon EC2, customers can run graphics-intensive applications remotely on G3/G4 EC2 instances, and stream the results to client machines not provided with a GPU.
- AWS Secrets Manager (AWS Secrets Manager) helps you to securely encrypt, store, and retrieve credentials for your databases and other services. Instead of hardcoding credentials in your apps, you can make calls to Secrets Manager to retrieve your credentials whenever needed.
- AWS Systems Manager (AWS Systems Manager) gives you visibility and control of your infrastructure on AWS, and provides a unified user interface so you can view operational data from multiple AWS services. It also allows you to automate operational tasks across your AWS resources. Here it is used to retrieve a public parameter.
- Amazon Simple Notification Service (Amazon SNS) enables applications, end-users, and devices to instantly send and receive notifications from the cloud. You can send notifications by email to the user who has created a valid and verified subscription.
Solution
The goal of this solution is to run an interactive Linux desktop session in a single Amazon ECS container, with support for GPU rendering, and connect remotely through NICE DCV protocol. AWS Batch will dynamically provision EC2 instances, with or without GPU (e.g. G3/G4 instances).
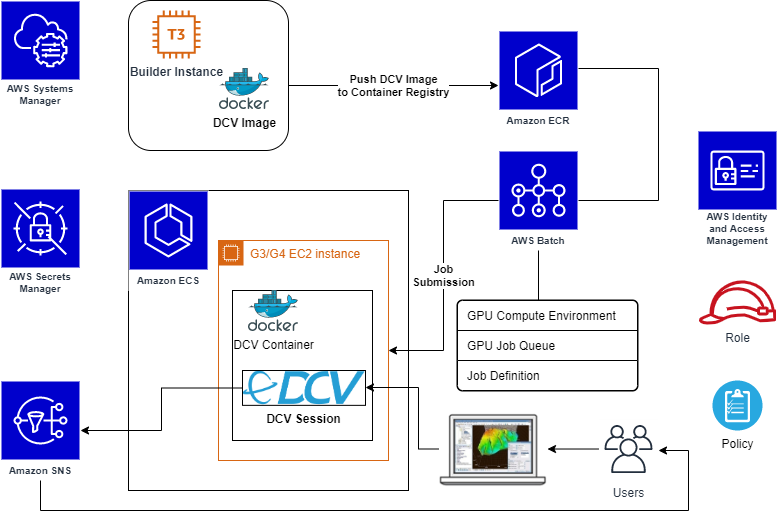
You will build and register the DCV Container image to be used for the DCV Desktop Sessions. In AWS Batch, we will set up a managed CE starting from the Amazon ECS GPU-optimized AMI, which comes with the NVIDIA drivers and Amazon ECS agent already installed. Also, you will use Amazon Secrets Manager to safely store user credentials and Amazon SNS to automatically notify the user that the interactive job is ready.
Tutorial
As a Computational Fluid Dynamics (CFD) visualization application example you will use Paraview.
This blog post goes through the following steps:
- Prepare required components
- Launch temporary EC2 instance to build a DCV container image
- Store user’s credentials and notification data
- Create required roles
- Build DCV container image
- Create a repository on Amazon ECR
- Push the DCV container image
- Configure AWS Batch
- Create a managed CE
- Create a related job queue
- Create its Job Definition
- Submit a batch job
- Connect to the interactive desktop session using NICE DCV
- Run the Paraview application to visualize results of a job simulation
Prerequisites
- An Amazon Linux 2 instance as a Docker host, launched from the latest Amazon ECS GPU-optimized AMI
- In order to connect to desktop sessions, inbound DCV port must be opened (by default DCV port is 8443)
- AWS account credentials with the necessary access permissions
- AWS Command Line Interface (CLI) installed and configured with the same AWS credentials
- To easily install third-party/open source required software, assume that the Docker host has outbound internet access allowed
Step 1. Required components
In this step you’ll create a temporary EC2 instance dedicated to a Docker image, and create the IAM policies required for the next steps. Next create the secrets in AWS Secrets Manager service to store sensible data like credentials and SNS topic ARN, and apply and verify the required system settings.
1.1 Launch the temporary EC2 instance for Docker image building
Launch the EC2 instance that becomes your Docker host from the Amazon ECS GPU-optimized AMI. Retrieve its AMI ID. For cost saving, you can use one of t3* family instance type for this stage (e.g. t3.medium).
1.2 Store user credentials and notification data
As an example of avoiding hardcoded credentials or keys into scripts used in next stages, we’ll use AWS Secrets Manager to safely store final user’s OS credentials and other sensible data.
- In the AWS Management Console select Secrets Manager, create a new secret, select type Other type of secrets, and specify key pair. Store the user login name as a key, e.g.: user001, and the password as value, then name the secret as
Run_DCV_in_Batch, or alternatively you can use the commands. Notexxxxxxxxxxis your chosen password.
aws secretsmanager create-secret --secret-id Run_DCV_in_Batch
aws secretsmanager put-secret-value --secret-id Run_DCV_in_Batch --secret-string '{"user001":"xxxxxxxxxx"}'
- Create an SNS Topic to send email notifications to the user when a DCV session is ready for connection:
- In the AWS Management Console select Simple Notification Service, then Topics, and finally Create Topic and its related subscription with the chosen email address. Learn more.
- In the AWS Management Console select Secrets Manager service to create a new secret named
DCV_Session_Ready_Notification, with type other type of secrets and key pair values. Store the stringsns_topic_arnas a key and the SNS Topic ARN as value:
aws secretsmanager  create-secret --secret-id DCV_Session_Ready_Notification
 aws secretsmanager put-secret-value --secret-id DCV_Session_Ready_Notification --secret-string '{"sns_topic_arn":"<put here your SNS Topic ARN>"}'
1.3 Create required role and policy
To simplify, define a single role named dcv-ecs-batch-role gathering all the necessary policies. This role will be associated to the EC2 instance that launches from an AWS Batch job submission, so it is included inside the CE definition later.
To allow DCV sessions, push images into Amazon ECR and AWS Batch operations, create the role and include the following AWS managed and custom policies:
AmazonEC2ContainerRegistryFullAccessAmazonEC2ContainerServiceforEC2RoleSecretsManagerReadWriteAmazonSNSFullAccessAmazonECSTaskExecutionRolePolicy
To reach the NICE DCV licenses stored in Amazon S3 (see licensing the NICE DCV server for more details), define a custom policy named DCVLicensePolicy (the following policy is for eu-west-1 Region, you might also use us-east-1):

Note: If needed, you can add additional policies to allow the copy data from/to S3 bucket.
Update the Trust relationships of the same role in order to allow the Amazon ECS tasks execution and use this role from the AWS Batch Job definition as well:

1.4 Create required Security Group
In the AWS Management Console, access EC2, and create a Security Group, named dcv-sg, that is open to DCV sessions and DCV clients by enabling tcp port 8443 in Inbound.
Step 2. DCV container image
Now you will build a container that provides OpenGL acceleration via NICE DCV. You’ll write the Dockerfile starting from Amazon Linux 2 base image, and add DCV with its related requirements.
2.1 Define the Dockerfile
The base software packages in the Dockerfile will contain: NVIDIA libraries, X server and GNOME desktop and some external scripts to manage the DCV service startup and email notification for the user.
Starting from the base image just pulled, our Dockerfile does install all required (and optional) system tools and libraries, desktop manager packages, manage the Prerequisites for Linux NICE DCV Servers , Install the NICE DCV Server on Linux and Paraview application for 2D/3D data visualization.
The final contents of the Dockerfile is available here; in the same repository, you can also find scripts that manage the DCV service system script, the notification message sent to the User, the creation of local User at startup and the run script for the DCV container.
2.2 Build Dockerfile
Install required tools both to unpack archives and perform command on AWS:
sudo yum install -y unzip awscli
Download the Git archive within the EC2 instance, and unpack on a temporary directory:
curl -s -L -o - https://github.com/aws-samples/aws-batch-using-nice-dcv/archive/latest.tar.gz | tar zxvf -
From inside the folder containing aws-batch-using-nice-dcv.dockerfile, let’s build the Docker image:
docker build -t dcv -f aws-batch-using-nice-dcv.dockerfile .
The first time it takes a while since it has to download and install all the required packages and related dependencies. After the command completes, check it has been built and tagged correctly with the command:
docker images
Step 3. Amazon ECR configuration
In this step, you’ll push/archive our newly built DCV container AMI into Amazon ECR. Having this image in Amazon ECR allows you to use it inside Amazon ECS and AWS Batch.
3.1 Push DCV image into Amazon ECR repository
Set a desired name for your new repository, e.g. dcv, and push your latest dcv image into it. The push procedure is described in Amazon ECR by selecting your repository, and clicking on the top-right button View push commands.
Install the required tool to manage content in JSON format:
sudo yum install -y jq
Amazon ECR push commands to run include:
- Login command to authenticate your Docker client to Amazon ECS registry. Using the AWS CLI:
AWS_REGION="$(curl -s http://169.254.169.254/latest/dynamic/instance-identity/document | jq -r .region)"
eval $(aws ecr get-login --no-include-email --region "${AWS_REGION}") Note: If you receive an “Unknown options: –no-include-email” error when using the AWS CLI, ensure that you have the latest version installed. Learn more.
- Create the repository:
aws ecr create-repository --repository-name=dcv —region "${AWS_REGION}"DCV_REPOSITORY=$(aws ecr describe-repositories --repository-names=dcv --region "${AWS_REGION}"| jq -r '.repositories[0].repositoryUri')
- Tag the image to push the image to the Amazon ECR repository:
docker build -t "${DCV_REPOSITORY}:$(date +%F)" -f aws-batch-using-nice-dcv.dockerfile .
- Push command:
docker push "${DCV_REPOSITORY}:$(date +%F)"
Step 4. AWS Batch configuration
The final step is to set up AWS Batch to manage your DCV containers. The link to all previous steps is the use of our DCV container image inside the AWS Batch CE.
4.1 Compute environment
Create an AWS Batch CE using othe newly created AMI.
- Log into the AWS Management Console, select AWS Batch, select ‘get started’, and skip the wizard on next page.
- Choose Compute Environments on the left, and click on Create Environment.
- Specify all your desired settings, e.g.:
-
- Managed type
- Name: DCV-GPU-CE
- Service role:
AWSBatchServiceRole - Instance role:
dcv-ecs-batch-role
-
- Since you want OpenGL acceleration, choose an instance type with GPU (e.g. g4dn.xlarge).
- Choose an allocation strategy. In this example I choose BEST_FIT_PROGRESSIVE
- Assign the security group
dcv-sg, created previously at step 1.4 that keeps DCV port 8443 open. - Add a Nametag with the value e.g. “
DCV-GPU-Batch-Instance”; to assign it to the EC2 instances started by AWS Batch automatically, so you can recognize it if needed.
4.2 Job Queue
Time to create a Job Queue for DCV with your preferred settings.
- Select Job Queues from the left menu, then select Create queue (naming, for instance, e.g. DCV-GPU-Queue)
- Specify a required Priority integer value.
- Associate to this queue the CE you defined in the previous step (e.g. DCV-GPU-CE).
4.3 Job Definition
Now, we create a Job Definition by selecting the related item in the left menu, and select Create.
We’ll use, listed per section:
- Job Definition name (e.g. DCV-GPU-JD)
- Execution timeout to 1h: 3600
- Parameter section:
- Add the Parameter named
commandwith value:--network=host- Note: This parameter is required and equivalent to specify the same option to the
docker run.Learn more.
- Note: This parameter is required and equivalent to specify the same option to the
- Add the Parameter named
- Environment section:
- Job role:
dcv-ecs-batch-role - Container image: Use the ECR repository previously created, e.g.
dkr.ecr.eu-west-1.amazonaws.com/dcv. If you don’t remember the Amazon ECR image URI, just return to Amazon ECR -> Repository -> Images. - vCPUs: 8
- Note: Value equal to the vCPUs of the chosen instance type (in this example: gdn4.2xlarge), having one job per node to avoid conflicts on usage of TCP ports required by NICE DCV daemons.
- Memory (MiB): 2048
- Job role:
- Security section:
- Check Privileged
- Set user root (run as root)
- Environment Variables section:
- DISPLAY: 0
- NVIDIA_VISIBLE_DEVICES: 0
- NVIDIA_ALL_CAPABILITIES: all
Note: Amazon ECS provides a GPU-optimized AMI that comes ready with pre-configured NVIDIA kernel drivers and a Docker GPU runtime, learn more; the variables above make available the required graphic device(s) inside the container.
4.4 Create and submit a Job
We can finally, create an AWS Batch job, by selecting Batch → Jobs → Submit Job.
Let’s specify the job queue and job definition defined in the previous steps. Leave the command filed as pre-filled from job definition.
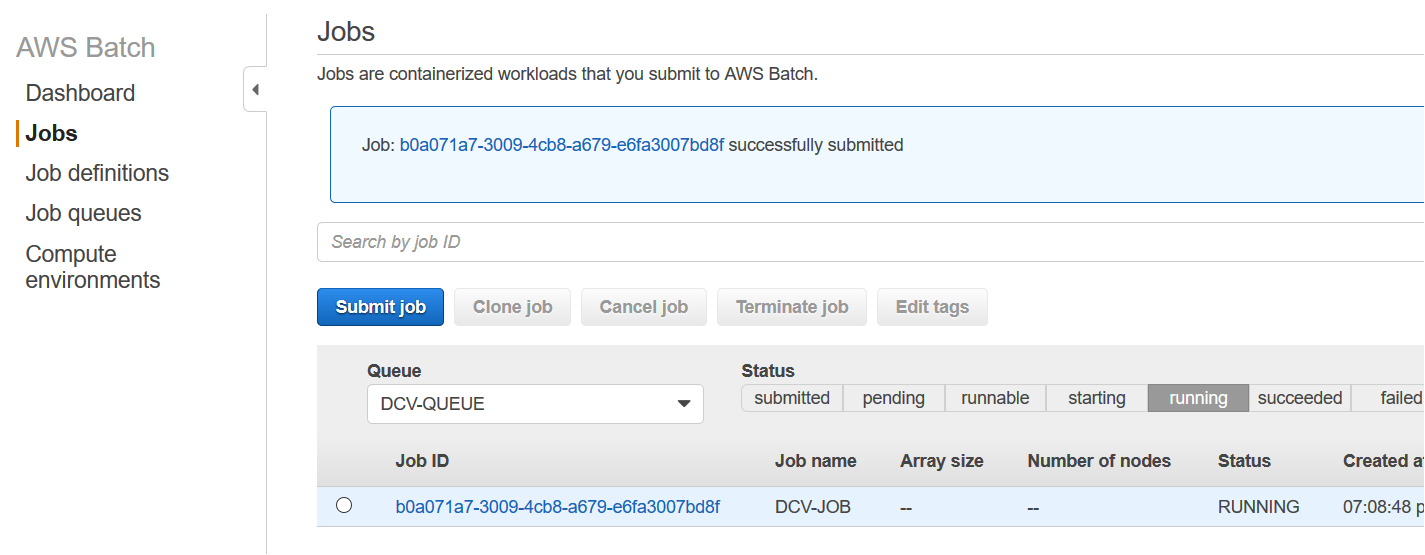
4.5 Connect to sessions
Once the job is in RUNNING state, go to the AWS Batch dashboard, you can get the IP address/DNS in several ways as noted in How do I get the ID or IP address of an Amazon EC2 instance for an AWS Batch job. For example, assuming the tag Name set on CE is DCV-GPU-Batch-Instance:
aws ec2 describe-instances --filters Name=instance-state-name,Values=running Name=tag:Name,Values="DCV-GPU-Batch-Instance" --query "Reservations[].Instances[].{id: InstanceId, tm: LaunchTime, ip: PublicIpAddress}" | jq -r 'sort_by(.tm) | reverse | .[0]' | jq -r .ip
Note: It could be required to add the EC2 policy to the list of instances in the IAM role. If the AWS SNS Topic is properly configured, as mentioned in subsection 1.2, you receive the notification email message with the URL link to connect to the interactive graphical DCV session.

Finally, connect to it:
- https://<ip address>:8443
Note: You might need to wait for the host to report as running on EC2 in AWS Management Console.
Below is a NICE DCV session running inside a container using the web browser, or equivalently the NICE DCV native client as well, running Paraview visualization application. It shows the basic elbow results coming from an external OpenFoam simulation, which data has been previously copied over from an S3 bucket; and the dcvgltest as well:

Cleanup
Once you’ve finished running the application, avoid incurring future charges by navigating to the AWS Batch console and terminate the job, set CE parameter Minimum vCPUs and Desired vCPUs equal to 0. Also, navigate to Amazon EC2 and stop the temporary EC2 instance used to build the Docker image.
For a full cleanup of all of the configurations and resources used, delete: the job definition, the job queue and the CE (AWS Batch), the Docker image and ECR Repository (Amazon ECR), the role dcv-ecs-batch-role (Amazon IAM), the security group dcv-sg (Amazon EC2), the Topic DCV_Session_Ready_Notification (AWS SNS), and the secret Run_DCV_in_Batch (Amazon Secrets Manager).
Conclusion
This blog post demonstrates how AWS Batch enables innovative approaches to run HPC workflows including not only batch jobs, but also pre-/post-analysis steps done through interactive graphical OpenGL/3D applications.
You are now ready to start interactive applications with AWS Batch and NICE DCV on G-series instance types with dedicated 3D hardware. This allows you to take advantage of graphical remote rendering on optimized infrastructure without moving data to save costs.