Post Syndicated from Srikanth Sopirala original https://aws.amazon.com/blogs/big-data/building-aws-glue-spark-etl-jobs-by-bringing-your-own-jdbc-drivers-for-amazon-rds/
AWS Glue is a fully managed extract, transform, and load (ETL) service that makes it easy to prepare and load your data for analytics. AWS Glue has native connectors to connect to supported data sources either on AWS or elsewhere using JDBC drivers. Additionally, AWS Glue now enables you to bring your own JDBC drivers (BYOD) to your Glue Spark ETL jobs. This feature enables you to connect to data sources with custom drivers that aren’t natively supported in AWS Glue, such as MySQL 8 and Oracle 18. You can also use multiple JDBC driver versions in the same AWS Glue job, enabling you to migrate data between source and target databases with different versions. For more information, see Connection Types and Options for ETL in AWS Glue.
This post shows how to build AWS Glue ETL Spark jobs and set up connections with custom drivers with Oracle18 and MySQL8 databases.
Solution overview
We discuss three different use cases in this post, using AWS Glue, Amazon RDS for MySQL, and Amazon RDS for Oracle.
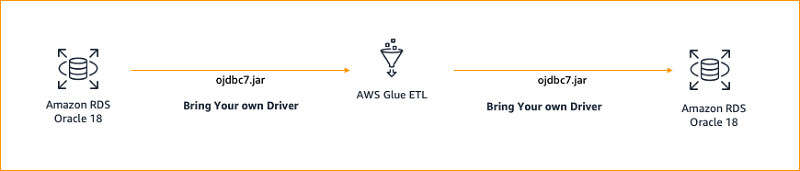
In the following architecture, we connect to Oracle 18 using an external ojdbc7.jar driver from AWS Glue ETL, extract the data, transform it, and load the transformed data to Oracle 18.
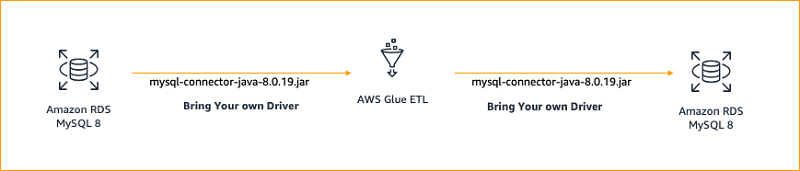
In the second scenario, we connect to MySQL 8 using an external mysql-connector-java-8.0.19.jar driver from AWS Glue ETL, extract the data, transform it, and load the transformed data to MySQL 8.
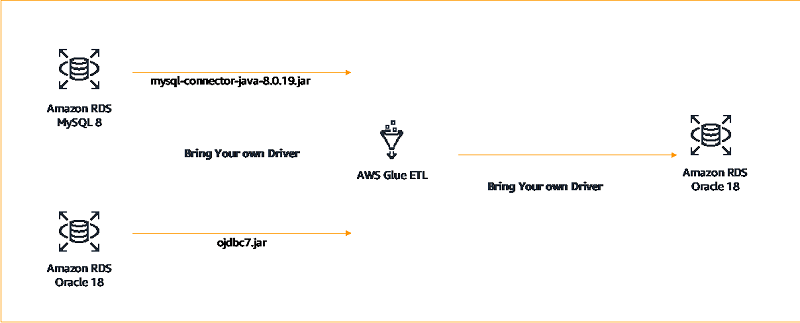
In the third scenario, we set up a connection where we connect to Oracle 18 and MySQL 8 using external drivers from AWS Glue ETL, extract the data, transform it, and load the transformed data to Oracle 18.
Prerequisites
Before getting started, you must complete the following prerequisites:
- Create an AWS Identity and Access Management (IAM) user with sufficient permissions to interact with the AWS Management Console. Your IAM permissions must also include access to create IAM roles and policies created by the AWS CloudFormation template provided in this post.
- Create am IAM policy for AWS Glue.
- Before setting up the AWS Glue job, you need to download drivers for Oracle and MySQL, which we discuss in the next section.
Downloading drivers for Oracle and MySQL
To download the required drivers for Oracle and MySQL, complete the following steps:
- Download the MySQL JDBC connector.
- Select the operating system as platform independent and download the .tar.gz or .zip file (for example, mysql-connector-java-8.0.19.tar.gz or mysql-connector-java-8.0.19.zip) and extract it.
- Pick MySQL connector .jar file (such as mysql-connector-java-8.0.19.jar) and upload it into your Amazon Simple Storage Service (Amazon S3) bucket.
- Make a note of that path because you use it later in the AWS Glue job to point to the JDBC driver.
- Similarly, download the Oracle JDBC connector (ojdbc7.jar).
This post is tested for mysql-connector-java-8.0.19.jar and ojdbc7.jar drivers, but based on your database types, you can download and use appropriate version of JDBC drivers supported by the database.
- Upload the Oracle JDBC 7 driver to (ojdbc7.jar) to your S3 bucket.
- Make a note of that path, because you use it in the AWS Glue job to establish the JDBC connection with the database.
- Make sure to upload the three scripts (OracleBYOD.py, MySQLBYOD.py, and CrossDB_BYOD.py) in an S3 bucket.
- Save the following code as py in your S3 bucket.
- Save the following code as
MySQLBYOD.pyin your S3 bucket.
- Save the following code as
CrossDB_BYOD.pyin your S3 bucket.
Provisioning resources with AWS CloudFormation
The generic workflow of setting up a connection with your own custom JDBC drivers involves various steps. It’s a manual configuration that is error prone and adds overhead when repeating the steps between environments and accounts. With AWS CloudFormation, you can provision your application resources in a safe, repeatable manner, allowing you to build and rebuild your infrastructure and applications without having to perform manual actions or write custom scripts. The declarative code in the file captures the intended state of the resources to create, and allows you to automate the creation of AWS resources.
We provide this CloudFormation template for you to use. Review and customize it to suit your needs. Some of the resources deployed by this stack incur costs as long as they remain in use, like Amazon RDS for Oracle and Amazon RDS for MySQL.
This CloudFormation template creates the following resources:
- A VPC
- Two subnets
- A route table
- An internet gateway
- A MySQL 8 database
- An Oracle 18 database
To provision your resources, complete the following steps:
- Sign in to the console.
- Choose the
us-east-1Region in which to create the stack. - Choose Next.
- Choose Launch Stack:
![]()
This step automatically launches AWS CloudFormation in your AWS account with a template. It prompts you to sign in as needed. You can view the CloudFormation template from within the console as required.
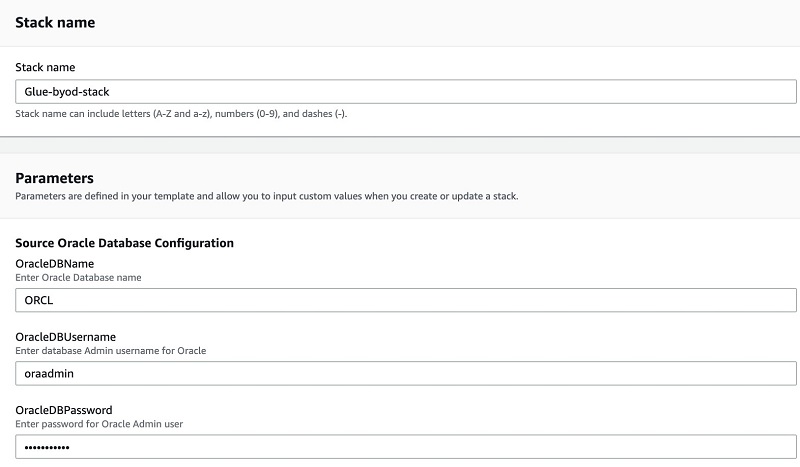
- For Stack name, enter a name.
- Change the other parameters as needed or keep the following default values:
- Oracle user name –
oraadmin - Oracle password –
oraadmin123 - MySQL username –
MySQLadmin - MySQL password –
MYSQLadmin123
- Oracle user name –
- Choose Next.
- Choose Next
- Review the details and choose Create.
This stack creation can take up to 20 minutes.
After the stack creation is complete, go to the Outputs tab on the AWS CloudFormation console and note the following values (you use these in later steps):
MySQLJDBCConnectionStringOracleJDBCConnectionString
Configuring an AWS Glue ETL job using your own drivers
Before creating an AWS Glue ETL, run the SQL script (database_scripts.sql) on both the databases (Oracle and MySQL) to create tables and insert data. For more information about connecting to the RDS DB instance, see How can I troubleshoot connectivity to an Amazon RDS DB instance that uses a public or private subnet of a VPC?
To set up AWS Glue connections, complete the following steps:
- On the AWS Glue console, under Databases, choose Connections.
- Choose Add Connection.
- For Connection Name, enter a name for your connection.
- For Connection Type, choose JDBC.
- For JDBC URL, enter a URL, such as
jdbc:oracle:thin://@<hostname>:1521/ORCLfor Oracle orjdbc:mysql://<hostname>:3306/mysqlfor MySQL. - Enter the user name and password for the database.
- Select the VPC in which you created the RDS instance (Oracle and MySQL).
- Choose the subnet within your VPC. Refer to the CloudFormation stack Outputs tab for the subnet name.
- Choose the security group of the database. Refer to the CloudFormation stack Outputs tab for security group name.
- Choose Next.
- Check the connection details and choose Finish.
Make sure to add a connection for both databases (Oracle and MySQL).
Creating endpoints and a security group
Before testing the connection, make sure you create an AWS Glue endpoint and S3 endpoint in the VPC in which databases are created. Complete the following steps for both Oracle and MySQL instances:
- To create your AWS Glue endpoint, on the Amazon VPC console, choose Endpoints.
- Choose Create endpoint.
- For Service Names, choose AWS Glue.
- Choose amazonaws.<region>.glue (for example,
com.amazonaws.us-west-2.glue). - Choose the VPC of the RDS for Oracle or RDS for MySQL
- Choose the security group of the RDS instances.
- Choose Create endpoint.
To create your S3 endpoint, you use Amazon Virtual Private Cloud (Amazon VPC).
- On the Amazon VPC console, choose Endpoints.
- Choose Create endpoint.
- For Service Names, choose Amazon S3.
- Choose amazonaws.<region>.s3 (for example,
com.amazonaws.us-west-2.s3). - Choose the VPC of the RDS for Oracle or RDS for MySQL
- Choose the route table ID.
- Choose Create endpoint.
The RDS for Oracle or RDS for MySQL security group must include itself as a source in its inbound rules.
- On the Security Groups page, choose Edit Inbound Rules.
- Choose Add rule.
- For Type, choose All Traffic Type, for example
glue-byod-stack1…. - For Source, choose the same security group.
- Choose Save Rules.
If both the databases are in the same VPC and subnet, you don’t need to create a connection for MySQL and Oracle databases separately. The reason for setting an AWS Glue connection to the databases is to establish a private connection between the RDS instances in the VPC and AWS Glue via S3 endpoint, AWS Glue endpoint, and Amazon RDS security group. It’s not required to test JDBC connection because that connection is established by the AWS Glue job when you run it. If you test the connection with MySQL8, it fails because the AWS Glue connection doesn’t support the MySQL 8.0 driver at the time of writing this post, therefore you need to bring your own driver.
Setting up AWS Glue ETL jobs
You’re now ready to set up your ETL job in AWS Glue. Complete the following steps for both connections:
- Edit the following parameters in the scripts (
OracleBYOD.py,MySQLBYOD.py, andCrossDB_BYOD.py) and upload them in Amazon S3:urluserpasswordcustomJdbcDriverS3Pathfor sources and target tables
You can find the database endpoints (url) on the CloudFormation stack Outputs tab; the other parameters are mentioned earlier in this post. If you use another driver, make sure to change customJdbcDriverClassName to the corresponding class in the driver.
Alternatively, you can pass on this as AWS Glue job parameters and retrieve the arguments that are passed using the getResolvedOptions.
- On the AWS Glue console, under ETL, choose Jobs.
- Choose Add Job.
- For Job Name, enter a name.
- For IAM role, choose the IAM role you created as a prerequisite.
- For Type, choose Spark.
- For Glue Version, choose Python (latest version).
- For This job runs, choose An existing script that you provide.
- Choose the Amazon S3 path where the script (
OracleBYOD.py,MySQLBYOD.py, orCrossDB_BYOD.py) is stored. - Under Advanced properties, enable Job bookmark.
Job bookmarks help AWS Glue maintain state information and prevent the reprocessing of old data.
- Keep the remaining settings as their defaults and choose
- For Connections, choose the Amazon RDS for Oracle connection for
OracleBYOD.py, Amazon RDS for MySQL connection forMySQLBYOD.py, or Amazon RDS for Oracle and Amazon RDS for MySQL connection forCrossDB_BYOD.py. - Choose Save job and edit scripts.
- Choose Run Job.
- When the job is complete, validate the data loaded in the target table.
Cleaning up
After you finish, don’t forget to delete the CloudFormation stack, because some of the AWS resources deployed by the stack in this post incur a cost as long as you continue to use them.
You can delete the CloudFormation stack to delete all AWS resources created by the stack.
- On the AWS CloudFormation console, on the Stacks page, select the stack to delete. The stack must be currently running.
- In the stack details pane, choose Delete.
- Choose Delete stack when prompted.
Summary
In this post, we showed you how to build AWS Glue ETL Spark jobs and set up connections with custom drivers with Oracle18 and MySQL8 databases using AWS CloudFormation. You can use this solution to use your custom drivers for databases not supported natively by AWS Glue.
If you have any questions or suggestions, please leave a comment.
About the Authors
 Srikanth Sopirala is a Sr. Analytics Specialist Solutions Architect at AWS. He is a seasoned leader with over 20 years of experience, who is passionate about helping customers build scalable data and analytics solutions to gain timely insights and make critical business decisions. In his spare time, he enjoys reading, spending time with his family and road biking.
 Naresh Gautam is a Sr. Analytics Specialist Solutions Architect at AWS. His role is helping customers architect highly available, high-performance, and cost-effective data analytics solutions to empower customers with data-driven decision-making. In his free time, he enjoys meditation and cooking.