Post Syndicated from Chayan Panda original https://aws.amazon.com/blogs/architecture/field-notes-accelerating-data-science-with-rstudio-and-shiny-server-on-aws-fargate/
Data scientists continuously look for ways to accelerate time to value for analytics projects. RStudio Server is a popular Integrated Development Environment (IDE) for R, which is used to render analytics visualizations for faster decision making. These visualizations are traditionally hosted on legacy unix servers along with Shiny Server to support analytics. In this previous blog, we provided a solution architecture to run Data Science use cases for medium to large enterprises across industry verticals.
In this post, we describe and deliver the infrastructure code to run a secure, scalable and highly available RStudio and Shiny Server installation on AWS. We use these services: AWS Fargate, Amazon Elastic Container Service (Amazon ECS), Amazon Elastic File System (Amazon EFS), AWS DataSync, and Amazon Simple Storage Service (Amazon S3). We will then demonstrate a Data Science use case in RStudio and create an application on Shiny. The use case discussed involves pre-processing a dataset, and training a machine learning model in RStudio. The goal is to build a shiny application to surface breast cancer prediction insights against a set of parameters to users.
Overview of solution
We show how to deploy a Open Source RStudio Server and a Shiny Server in a serverless architecture from an automated deployment pipeline built with AWS Developer Tools. This is illustrated in the diagram that follows. The deployment adheres to best practices for following an AWS Multi-Account strategy using AWS Organizations.
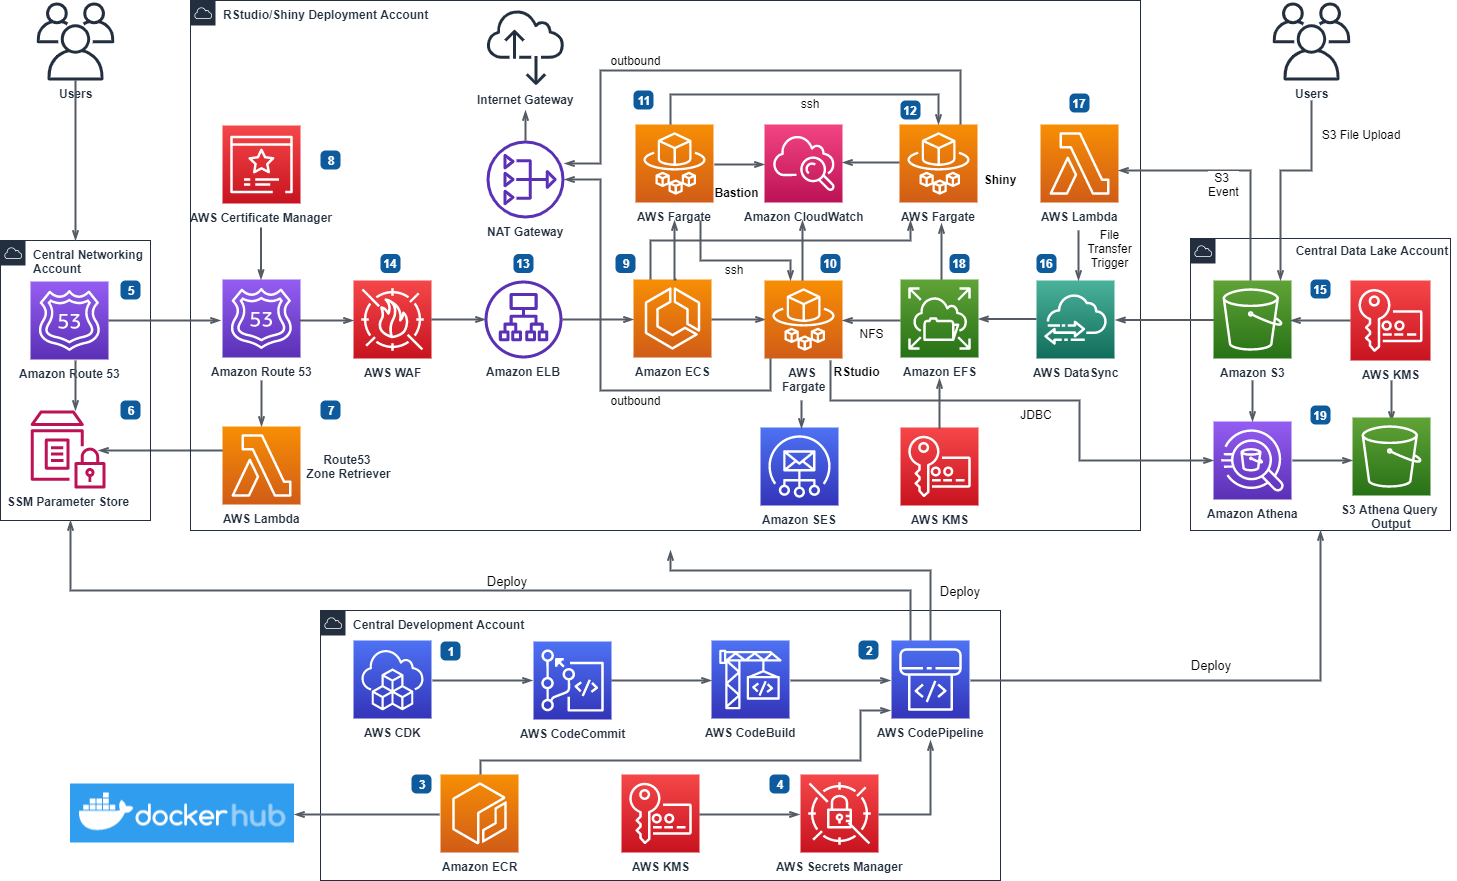
Figure 1. RStudio/Shiny Open Source Deployment Pipeline on AWS Serverless Infrastructure
Multi-Account Setup
In the preceding architecture, a central development account hosts the development resources. From this account, the deployment pipeline creates AWS services for RStudio and Shiny along with the integrated services into another AWS account. There can be multiple RStudio/Shiny accounts and instances to suit your requirements. You can also host multiple non-production instances of RStudio/Shiny in a single account.
Public URL Domain and Data Feed
The RStudio/Shiny deployment accounts obtain the networking information for the publicly resolvable domain from a central networking account. The data feed for the containers comes from a central data repository account. Users upload data to the S3 buckets in the central data account or configure an automated service like AWS Transfer Family to programmatically upload files. AWS DataSync transfers the uploaded files from Amazon S3 and stores the files on Amazon EFS mount points on the containers. Amazon EFS provides shared, persistent, and elastic storage for the containers.
Security Footprint
We recommend that you configure AWS Shield or AWS Shield Advanced for the networking account and enable Amazon GuardDuty in all accounts. You can also use AWS Config and AWS CloudTrail for monitoring and alerting on security events before deploying the infrastructure code. You should use an outbound filter such as AWS Network Firewall for network traffic destined for the internet. AWS Web Application Firewall (AWS WAF) protects the Amazon Elastic Load Balancers (Amazon ELB). You can restrict access to RStudio and Shiny from only allowed IP ranges using the automated pipeline.
High Availability
You deploy all AWS services in this architecture in one particular AWS Region. The AWS services used are managed services and configured for high availability. Should a service become unavailable, it automatically launches in the same Availability Zone (AZ) or in a different AZ within the same AWS Region. This means if Amazon ECS restarts the container in another AZ, following a failover, the files and data for the container will not be lost as these are stored on Amazon EFS.
Deployment
The infrastructure code provided in this blog creates all resources described in the preceding architecture. The following numbered items refer to Figure 1.
1. We used AWS Cloud Development Kit (AWS CDK) for Python to develop the infrastructure code and stored the code in an AWS CodeCommit repository.
2. AWS CodePipeline integrates the AWS CDK stacks for automated builds. The stacks are divided into four different stages and are organized by AWS service.
3. AWS CodePipeline fetches the container images from public Docker Hub and stores the images into Amazon Elastic Container Registry (Amazon ECR) repositories for cross-account access. The deployment pipeline accesses these images to create the Amazon ECS container on AWS Fargate in the deployment accounts.
4. The build script uses a key from AWS Key Management Service (AWS KMS) to create secrets. These include a RStudio front-end password, public key for bastion containers, and central data account access keys in AWS Secrets Manager. The deployment pipeline uses these secrets to configure the cross-account containers.
5. The central networking account Amazon Route 53 has the pre-configured base public domain. This is done outside the automated pipeline and the base domain info is passed on as a parameter to the deployment pipeline.
6. The central networking account delegates the base public domain to the RStudio deployment accounts via AWS Systems Manager (SSM) Parameter Store.
7. An AWS Lambda function retrieves the delegated Route 53 zone for configuring the RStudio and Shiny sub-domains.
8. AWS Certificate Manager configures encryption in transit by applying HTTPS certificates on the RStudio and Shiny sub-domains.
9. The pipeline configures an Amazon ECS cluster to control the RStudio, Shiny and Bastion containers and to scale up and down the number of containers as needed.
10. The pipeline creates RStudio container for the instance in a private subnet. RStudio container is not horizontally scalable for the Open Source version of RStudio.
– If you create only one container, the container will be configured for multiple front-end users. You need to specify the user names as email ids in cdk.json.
– Users receive their passwords and Rstudio/Shiny URLs via emails using Amazon Simple Email Service (SES).
– You can also create one RStudio container for each Data Scientist depending on your compute requirements by setting the cdk.json parameter individual_containers to true. You can also control the container memory/vCPU using cdk.json.
– Further details are provided in the readme. If your compute requirements exceed Fargate container compute limits, consider using EC2 launch type of Amazon ECS which offers a range of Amazon EC2 servers to fit your compute requirement. You can specify your installation type in cdk.json and choose either Fargate or EC2 launcg type for your RStudio containers.
11. To help you SSH to RStudio and Shiny containers for administration tasks, the pipeline creates a Bastion container in the public subnet. A Security Group restricts access to the bastion container and you can only access it from the IP range you provide in the cdk.json.
12. Shiny containers are horizontally scalable and the pipeline creates the Shiny containers in the private subnet using Fargate launch type of Amazon ECS. You can specify the number of containers you need for Shiny Server in cdk.json.
13. Application Load Balancers route traffic to the containers and perform health checks. The pipeline registers the RStudio and Shiny load balancers with the respective Amazon ECS services.
14. AWS WAF rules are built to provide additional security to RStudio and Shiny endpoints. You can specify approved IPs to restrict access to RStudio and Shiny from only allowed IPs.
15. Users upload files to be analysed to a central data lake account either with manual S3 upload or programmatically using AWS Transfer for SFTP.
16. AWS DataSync transfers files from Amazon S3 to cross-account Amazon EFS on an hourly interval schedule.
17. An AWS Lambda initiates DataSync transfer on demand outside of the hourly schedule for files that require urgent analysis. It is expected that bulk of the data transfer will happen on the hourly schedule and on-demand trigger will only be used when necessary.
18. Amazon EFS file systems provide shared, persistent and elastic storage for the containers. This is to facilitate deployment of Shiny Apps from RStudio containers using shared file system. The EFS file systems will live through container recycles.
19. You can create Amazon Athena tables on the central data account S3 buckets for direct interaction using JDBC from the RStudio container. Access keys for cross account operation are stored in the RStudio container R environment.
Note: It is recommended that you implement short term credential vending for this operation.
The source code for this deployment can be found in the aws-samples GitHub repository.
Prerequisites
To deploy the cdk stacks from the source code, you should have the following prerequisites:
1. Access to four AWS accounts (minimum three) for a basic multi-account deployment.
2. Permission to deploy all AWS services mentioned in the solution overview.
3. Review RStudio and Shiny Open Source Licensing: AGPL v3 (https://www.gnu.org/licenses/agpl-3.0-standalone.html)
4. Basic knowledge of R, RStudio Server, Shiny Server, Linux, AWS Developer Tools (AWS CDK in Python, AWS CodePipeline, AWS CodeCommit), AWS CLI and, the AWS services mentioned in the solution overview
5. Ensure you have a Docker hub login account, otherwise you might get an error while pulling the container images from Docker Hub with the pipeline – You have reached your pull rate limit. You may increase the limit by authenticating and upgrading: https://www.docker.com/increase-rate-limits.
6. Review the readmes delivered with the code and ensure you understand how the parameters in cdk.json control the deployment and how to prepare your environment to deploy the cdk stacks via the pipeline detailed below.
Installation
Create the AWS accounts to be used for deployment and ensure you have admin permissions access to each account. Typically, the following accounts are required:
Central Development account – this is the account where the AWS Secret Manager parameters, AWS CodeCommit repository, Amazon ECR repositories, and AWS CodePipeline will be created.
Central Network account – the Route53 base public domain will be hosted in this account
Rstudio instance account – You can use as many of these accounts as required, this account will deploy RStudio and Shiny containers for an instance (dev, test, uat, prod) along with a bastion container and associated services as described in the solution architecture.
Central Data account – this is the account to be used for deploying the data lake resources – such as S3 bucket for selecting up ingested source files.
1. Install AWS CLI and create an AWS CLI profile for each account (pipeline, rstudio, network, datalake ) so that AWS CDK can be used.
2. Install AWS CDK in Python and bootstrap each account and allow the Central Development account to perform cross-account deployment to all the other accounts.
export CDK_NEW_BOOTSTRAP=1
npx cdk bootstrap --profile <AWS CLI profile of central development account> --cloudformation-execution-policies arn:aws:iam::aws:policy/AdministratorAccess aws://<Central Development Account>/<Region>

cdk bootstrap \
--profile <AWS CLI profile of rstudio deployment account> \
--trust <Central Development Account> \
--cloudformation-execution-policies arn:aws:iam::aws:policy/AdministratorAccess \
aws://<RStudio Deployment Account>/<Region>

cdk bootstrap \
--profile <AWS CLI profile of central network account> \
--trust <Central Development Account> \
--cloudformation-execution-policies arn:aws:iam::aws:policy/AdministratorAccess \
aws://<Central Network Account>/<Region>

cdk bootstrap \
--profile <AWS CLI profile of central data account> \
--trust <Central Development Account> \
--cloudformation-execution-policies arn:aws:iam::aws:policy/AdministratorAccess \
aws://<Central Data Account>/<Region>
3. Build the Docker container images in Amazon ECR in the central development account by running the image build pipeline as instructed in the readme.
a. Using the AWS console, create an AWS CodeCommit repository to hold the source code for building the images – for example, rstudio_docker_images.
b. Clone the GitHub repository and move into the image-build folder.
c. Using the CLI – Create a secret to store your DockerHub login details as follows:
aws secretsmanager create-secret --profile <AWS CLI profile of central development account> --name ImportedDockerId --secret-string '{"username":"<dockerhub username>", "password":"<dockerhub password>"}'d. Create an AWS CodeCommit repository to hold the source code for building the images – e.g. rstudio_docker_images and pass the repository name to the name parameter in cdk.json for the image build pipeline
e. Pass the account numbers (comma separated) where rstudio instances will be deployed in the cdk.json paramter rstudio_account_ids
f. Synthesize the image build stack
cdk synth --profile <AWS CLi profile of central development account>g. Commit the changes into the AWS CodeCommit repo you created using GitHub.
h. Deploy the pipeline stack for container image build.
cdk deploy --profile <AWS CLI profile of central development account>i. Log into AWS console in the central development account and navigate to CodePipeline service. Monitor the pipeline (pipeline name is the name you provided in the name parameter in cdk.json) and confirm the docker images build successfully.
4. Move into the rstudio-fargate folder. Provide the comma separated accounts where rstudio/shiny will be deployed in the cdk.json against the parameter rstudio_account_ids.
5. Synthesize the stack Rstudio-Configuration-Stack in the Central Development account.
cdk synth Rstudio-Configuration-Stack --profile <AWS CLI profile of central development account> 6. Deploy the Rstudio-Configuration-Stack. This stack should create a new CMK KMS Key to use for creating the secrets with AWS Secrets Maanger. The stack will output the AWS ARN for the KMS key. Note down the ARN. Set the parameter “encryption_key_arn” inside cdk.json to the above ARN.
cdk deploy Rstudio-Configuration-Stack --profile <AWS CLI profile of rstudio deployment account>7. Run the script rstudio_config.sh after setting the required cdk.json parameters. Refer readme.
sh ./rstudio_config.sh <AWS CLI profile of the central development account> "arn:aws:kms:<region>:<AWS CLI profile of central development account>:key/<key hash>" <AWS CLI profile of central data account> <comma separated AWS CLI profiles of the rstudio deployment accounts>8. Run the script check_ses_email.sh with comma separated profiles for rstudio deployment accounts. This will check whether all user emails have been registed with Amazon SES for all the rstudio deployment accounts in the region, before you can deploy rstudio/shiny.
sh ./check_ses_email.sh <comma separated AWS CLI profiles of the rstudio deployment accounts>9. Before committing the code into the AWS CodeCommit repository, synthesize the pipeline stack against all the accounts involved in this deployment. This ensures all the necessary context values are populated into cdk.context.json file and to avoid the DUMMY values being mapped.
cdk synth --profile <AWS CLI profile of the central development account>
cdk synth --profile <AWS CLI profile of the central network account>
cdk synth --profile <AWS CLIrepeat for each profile of the RStudio deplyment account>
10. Deploy the Rstudio Fargate pipeline stack.
cdk deploy --profile <AWS CLI profile of the central development account> Rstudio-Piplenine-StackData Science use case
Now the installation is completed. We can demonstrate a typical data science use case:
- Explore, and pre-process a dataset, and train a machine learning model in RStudio,
- Build a Shiny application that makes prediction against the trained model to surface insight to dashboard users.
This showcases how to publish a Shiny application from RStudio containers to Shiny containers via a common EFS filesystem.
First, we log on to the RStudio container with the URL from the deployment and clone the accompanying repository using the command line terminal. The ML example is in ml_example directory. We use the UCI Breast Cancer Wisconsin (Diagnostic) dataset from mlbench library. Refer to the ml_example/breast_cancer_modeling.r.
$ git clone https://github.com/aws-samples/aws-fargate-with-rstudio-open-source.git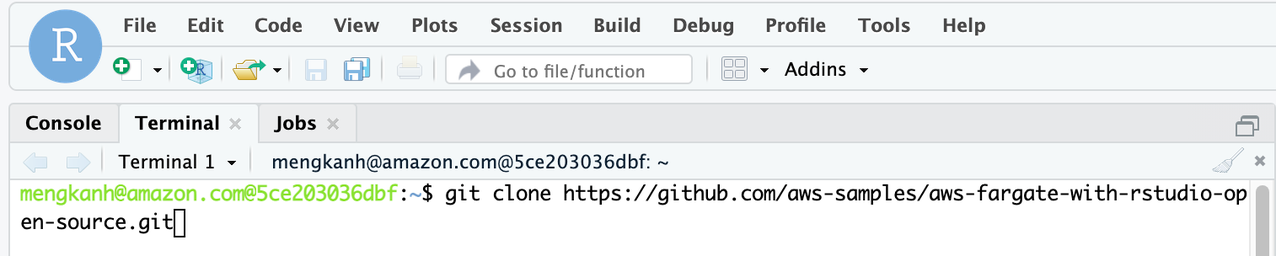
Figure 2 – Use the terminal to clone the repository in RStudio IDE.
Let’s open the ml_example/breast_cancer_modeling.r script in the RStudio IDE. The script does the following:
- Install and import the required libraries, mainly caret, a popular machine learning library, and mlbench, a collection of ML datasets;
- Import the UCI breast cancer dataset, create an 80/20 split for training and testing (in shiny app) purposes;
- Perform preprocessing to impute the missing values (shown as NA) in the dataframe and standardize the numeric columns;
- Train a stochastic gradient boosting model with cross-validation with the area under the ROC curve (AUC) as the tuning metric;
- Save the testing split, preprocessing object and the trained model into the directory where shiny app script is located
/breast-cancer-prediction.
You can execute the whole script with this command in the console.
> source('~/aws-fargate-with-rstudio-open-source/ml_example/breast_cancer_modeling.r')We can then inspect the model evaluation in the model object gbmFit.
> gbmFit
Stochastic Gradient Boosting

560 samples
  9 predictor
  2 classes: 'benign', 'malignant'

No pre-processing
Resampling: Cross-Validated (10 fold, repeated 10 times)
Summary of sample sizes: 504, 505, 503, 504, 504, 504, ...
Resampling results across tuning parameters:

  interaction.depth  n.trees  ROC        Sens       Spec
  1                   50      0.9916391  0.9716967  0.9304474
  1                  100      0.9917702  0.9700676  0.9330789
  1                  150      0.9911656  0.9689790  0.9305000
  2                   50      0.9922102  0.9708859  0.9351316
  2                  100      0.9917640  0.9681682  0.9346053
  2                  150      0.9910501  0.9662613  0.9361842
  3                   50      0.9922109  0.9689865  0.9381316
  3                  100      0.9919198  0.9684384  0.9360789
  3                  150      0.9912103  0.9673348  0.9345263
If the results are as expected, move on to developing a dashboard and publishing the model for business users to consume the machine learning insights.
In the repository, ml_example/breast-cancer-prediction/app.R has a Shiny application that displays a summary statistics and distribution of the testing data, and an interactive dashboard. This allows users to select data points on the chart and understand get the machine learning model inference as needed. Users can also modify the threshold to alter the specificity and sensitivity of the prediction. Thanks to the shared EFS filesystem across the RStudio and Shiny containers, we can publish the Shiny application with the following shell command to /srv/shiny-server.
$ cp ~/aws-fargate-with-rstudio-open-source/ml_example/breast-cancer-prediction/ \ /srv/shiny-server/ -rfvThat’s it. The Shiny application is now on the Shiny containers accessible from the Shiny URL, load balanced by Application Load Balancer. You can slide over the Probability Threshold to test how it changes the total count in the prediction, change the variables for the scatter plot and select data points to test the individual predictions.

Figure 3 – The Shiny Application
Cleaning up
Please follow the readme in the repository to delete the stacks created.
Conclusion
In this blog, we demonstrated how a serverless architecture can be deployed, walked through a data science use case in RStudio server and deployed an interactive dashboard in Shiny server. The solution creates a scalable, secure, and serverless data science environment for the R community that accelerates the data science process. The infrastructure and data science code is available in the github repository.
Field Notes provides hands-on technical guidance from AWS Solutions Architects, consultants, and technical account managers, based on their experiences in the field solving real-world business problems for customers.