Post Syndicated from Nick Ragusa original https://aws.amazon.com/blogs/architecture/field-notes-use-aws-cloud9-to-power-your-visual-studio-code-ide/
Everyone has their favorite integrated development environment, or IDE, as it’s more commonly known. For many of us, it’s a tool that we rely on for our day-to-day activities. In some instances, it’s a tool we’ve spent years getting set up just the way we want – from the theme that looks the best to the most productive plugins and extensions that help us optimize our workflows.
After many iterations of trying different IDEs, I’ve chosen Visual Studio Code as my daily driver. One of the things I appreciate most about Visual Studio Code is its vast ecosystem of extensions, allowing me to extend its core functionality to exactly how I need it. I’ve spent hours installing (and sometimes subsequently removing) extensions, figuring out the keyboard shortcut combinations but it’s the theme and syntax highlighter that I find the most appealing. Despite all of this time invested in building the perfect IDE, it can still fall somewhat short.
One of the hardest challenges to overcome, regardless of IDE, is the fact that it’s confined to the hardware that it’s installed on. Some of these challenges include running out of local disk space, RAM exhaustion, or requiring more CPU cores to process a build. In this blog post, I show you how to overcome the limitations of your laptop or desktop by using AWS Cloud9 to power your Visual Studio Code IDE.
Solution Overview
One way to overcome the limitations of your laptop or desktop is to use a remote machine. You’ve probably tried to mount some remote file system over SSH on your machine so you could continue to use your IDE, but timeouts and connection resets made that a frustrating and unusable solution.
Imagine a solution where you can:
- Use SSH to connect to a remote instance, install all of your favorite extensions on the remote instance, and take advantage of the remote machine’s resources including CPU, disk, RAM, and more.
- Access the instance without needing to open security groups and ACLs from your (often changing) desktop IP.
- Leverage your existing AWS infrastructure including your VPC, IAM user / role and policies, and take advantage of AWS Cloud9 to power your remote instance.
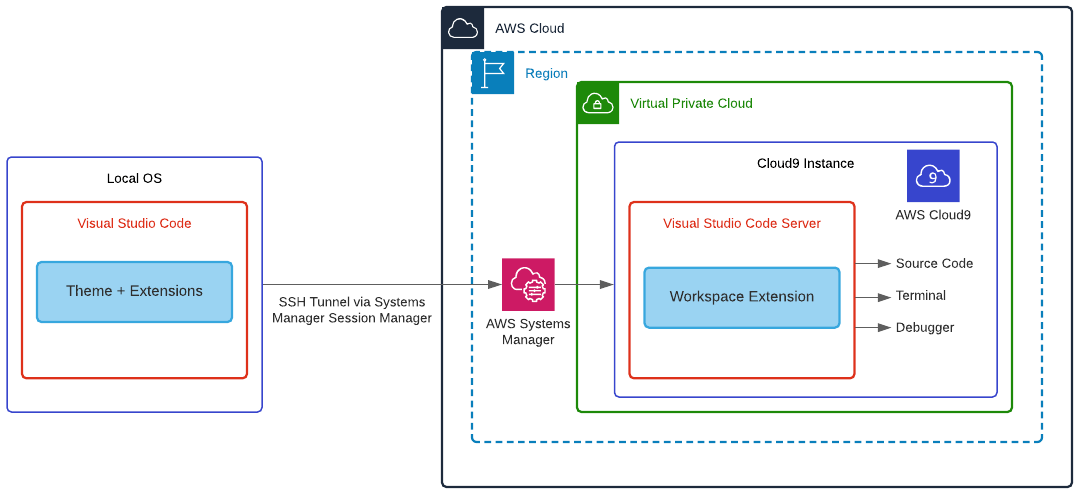
With AWS Cloud9, you start with an environment pre-packaged with essential tools for popular programming languages, coupled with the power of Amazon EC2. As an added advantage, you can even take advantage of AWS Cloud9’s built-in auto-shutdown capability which powers off your instance when you’re not actively connected to it. The following diagram shows the architecture you can build to use AWS Cloud9 to power your Visual Studio Code IDE.
Walkthrough
I will walk you through setting up the Visual Studio Code with the Remote SSH extension. Once installed, I’ll show you how to leverage the features of AWS Cloud9 to power your Visual Studio Code IDE, including:
- Automatically power on your instance when you connect to it
- Configure your SSH client to use AWS Systems Manager Session Manager to connect to your AWS Cloud9 instance
- Modify your AWS Cloud9 instance to shut down after you disconnect
Before you get started, launch the following AWS CloudFormation template in your AWS account. This will be the easiest way to get up and running to be able to evaluate this solution.
![]()
Once launched, a second CloudFormation stack is deployed named aws-cloud9-VS-Code-Remote-SSH-Demo-<unique id>.
- Select this stack from your console.
- Select the Resources tab, and take note of the instance Physical ID.
- Save this value for use later on.

Finally, you may wish to encrypt your AWS Cloud9 instance’s EBS volume for an additional layer of security. Follow this procedure to encrypt your AWS Cloud9 instance’s volume.
Prerequisites
For this walkthrough, you should have the following available to you:
- An AWS account
- Visual Studio Code downloaded and installed
- An OpenSSH compatible SSH client with a key pair that can be used for public key authentication
- AWS CLI installed and configured with a named profile that provides access into the AWS account
Install Remote – SSH Extension
First, install the Remote SSH extension in Visual Studio Code. You have the option of clicking the Install button from the preceding link, or by opening the extensions panel (View -> Extensions) from within Visual Studio Code and searching for Remote SSH.

Once installed, there are a few extension settings I suggest modifying for this solution. To access the extension settings, click on the ![]() icon in the extension browser, and go to Extension Settings.
icon in the extension browser, and go to Extension Settings.
Here, you will land on a screen similar to the following. Adjust:
- Remote.SSH: Connect Timeout – I suggest putting a value such as 60 here. Doing so will prevent a timeout from happening in the event your AWS Cloud9 instance is powered off. This gives it ample time to power on and get ready.
- Remote.SSH: Default Extensions – For your essential extensions, specify them on this screen. Whenever you connect to a new remote host, these extensions will be installed by default.

Install the Session Manager plugin for the AWS CLI
First, install the Session Manager plugin to start and stop sessions that connect to your EC2 instances from the AWS CLI. This plugin can be installed on supported versions of Microsoft Windows, macOS, Linux, and Ubuntu Server.
Note: the plugin requires AWS CLI version 1.16.12 or later to work.
Create an SSH key pair
An SSH key pair is required to access our instance over SSH. Using public key authentication over a simple password provides cryptographic strength over even the most complex passwords. In my macOS environment, I have a utility called ssh-keygen, which I will use to create a key pair. From a terminal, run:
$ ssh-keygen -b 4096 -C 'VS Code Remote SSH user' -t rsaTo avoid any confusion with existing SSH keys, I chose to save my key to /Users/nickragusa/.ssh/id_rsa-cloud9 for this example.
Now that we have a keypair created, we need to copy the public key to the authorized_keys file on the AWS Cloud9 instance. Since I saved my key to /Users/nickragusa/.ssh/id_rsa-cloud9, the corresponding public key has been saved to /Users/nickragusa/.ssh/id_rsa-cloud9.pub.
Open the AWS Cloud9 service console in the same region you deployed the CloudFormation stack. Your environment should be named VS Code Remote SSH Demo. Select Open IDE:

Now that you’re in your AWS Cloud9 IDE, edit ~/.ssh/authorized_keys and paste your public key, being sure to paste it below the lines. Following is an example of using the AWS Cloud9 editor to first reveal the file and then edit it:

Save the file and move on to the next steps.
Modify the shutdown script
As an optional cost saving measure in AWS Cloud9, you can specify a timeout value in minutes that when reached, the instance will automatically power down. This works perfectly when you are connected to your AWS Cloud9 IDE through your browser. In our use case here, we connect to the instance strictly via SSH from our Visual Studio Code IDE. We modify the shutdown logic on the instance itself to check for connectivity from our IDE, and if we’re actively connected, this prevents the automatic shutdown.
To prevent the instance from shutting down while connected from Visual Studio Code, download this script and place it in ~/.c9/stop-if-inactive.sh. From your AWS Cloud9 instance, run:
# Save a copy of the script first
$ sudo mv ~/.c9/stop-if-inactive.sh ~/.c9/stop-if-inactive.sh-SAVE
$ curl https://raw.githubusercontent.com/aws-samples/cloud9-to-power-vscode-blog/main/scripts/stop-if-inactive.sh -o ~/.c9/stop-if-inactive.sh
$ sudo chown root:root ~/.c9/stop-if-inactive.sh
$ sudo chmod 755 ~/.c9/stop-if-inactive.sh
That’s all of the configuration changes that are needed on your AWS Cloud9 instance. The remainder of the work will be done on your laptop or desktop.
- ssm-proxy.sh – This script will launch each time you SSH to the AWS Cloud9 instance. Upon invocation, the script checks the current state of your instance. If your instance is powered off, it will execute the aws ec2 start-instances CLI to power on the instance and wait for it to start. Once started, it will use the aws ssm start-session command, along with the Session Manager plugin installed earlier, to create an SSH session with the instance via AWS Systems Manager Session Manager.
- ~/.ssh/config – For OpenSSH clients, this file defines any user specific SSH configurations you need. In this file, you specify the EC2 instance ID of your AWS Cloud9 instance, the private SSH key to use, the user to connect as, and the location of the ssm-proxy.sh script.
Start by downloading the ssm-proxy.sh script to your machine. To keep things organized, I downloaded this script to my ~/.ssh/ folder.
$ curl https://raw.githubusercontent.com/aws-samples/cloud9-to-power-vscode blog/main/scripts/ssm-proxy.sh -o ~/.ssh/ssm-proxy.sh
$ chmod +x ~/.ssh/ssm-proxy.sh
Next, you edit this script to match your environment. Specifically, there are 4 variables at the top of ssm-proxy.sh that you may want to edit:
- AWS_PROFILE – If you use named profiles, you specify the appropriate profile here. If you do not use named profiles, specify a value of default here.
- AWS_REGION – The Region where you launched your AWS Cloud9 environment into.
- MAX_ITERATION – The number of times this script will check if the environment has successfully powered on.
- SLEEP_DURATION – The number of seconds to wait between MAX_ITERATION checks.
Once this script is set up, you need to edit your SSH configuration. You can use the example provided to get you started.
Edit ~/.ssh/config and paste the contents of the example to the bottom of the file. Edit any values that are unique to your environment, specifically:
- IdentityFile – This should be the full path to the private key you created earlier.
- HostName – Specify the EC2 instance ID of your AWS Cloud9 environment. You should have copied this value down from the ‘Walkthrough’ section of this post.
- ProxyCommand – Make sure to specify the full path of the location where you downloaded the ssm-proxy.sh script from the previous step.
Test the solution
Your AWS Cloud9 environment is now up and you have configured your local SSH configuration to use AWS Systems Manager Session Manager for connectivity. Time to try it all out!
From the Visual Studio Code editor, open the command palette, start typing remote-ssh to bring up the correct command, and select Remote-SSH: Connect Current Window to Host.

A list of your SSH hosts should appear as defined in ~/.ssh/config. Select the host called cloud9 and wait for the connection to establish.
Now your Visual Studio Code environment is powered by your AWS Cloud9 instance! As some next steps, I suggest:
- Open the integrated terminal so you can explore the file system and check what tools are already installed.
- Browse the extension gallery and install any extensions you frequently use. Remember that extensions are installed locally – so any extensions you may have already installed on your desktop / laptop are not automatically available in this remote environment.
Cleaning up
To avoid any incurring future charges, you should delete any resources you created. I recommend deleting the CloudFormation stack you launched at the beginning of this walkthrough.
Conclusion
In this post, I covered how you can use the Remote SSH extension within Visual Studio Code to connect to your AWS Cloud9 instance. By making some adjustments to your local OpenSSH configuration, you can use AWS Systems Manager Session Manager to establish an SSH connection to your instance. This is done without the need to open an SSH specific port in the instance’s security group.
Now that you can power your Visual Studio Code IDE with AWS Cloud9, how will you take your IDE to the next level? Feel free to share some of your favorite extensions, keyboard shortcuts, or your vastly improved build times in the comments!