Post Syndicated from Caitlin Bryson original https://www.backblaze.com/blog/how-to-back-up-your-twitch-stream/
Every month, millions of viewers tune in to their favorite channels live streaming League of Legends, Call of Duty, Dota, and more on Twitch. With over two million streamers creating live content each month, video games and streaming go hand in hand.
Whether you’re streaming for yourself, your friends, an audience, or you’re trying to build a brand, you’re creating a lot of great content when you stream. The problem is that most services will only protect your content for a few weeks before deleting it.
Whether you want to edit or rewatch your content for fun, to build a reel for a sponsor, or to distribute content to your adoring fans, backups of the raw and edited content are essential to make sure your hard work doesn’t disappear forever. Outside of videos, you should also consider backing up other Twitch content like stream graphics including overlays, alerts, emotes, and chat badges; your stream setup; and media files that you use on stream.
Read our guide below to learn:
- Two methods for downloading your Twitch stream.
- How to create a backup of your Twitch stream setup.
How to Download Your Twitch Stream
Once you finish a stream, Twitch automatically saves that broadcast as a video on demand. For most accounts, videos are saved for 14 days, but if you are a Twitch Partner or have Twitch linked to your Amazon Prime account, you have access to your videos for up to 60 days. You can also create clips up to a minute long of your streams within Twitch or upload longer videos as highlights, which are stored indefinitely.
Download Method #1
With this method, there’s almost no work required besides hitting the record button in your streaming software. Keep in mind that recording while streaming can put a strain on your output performance, so while it’s the simplest download method, it might not work best depending on your setup.
Continue reading to learn how to simultaneously stream and record a copy of your videos, or skip to method #2 to learn how to download without affecting performance during streaming.
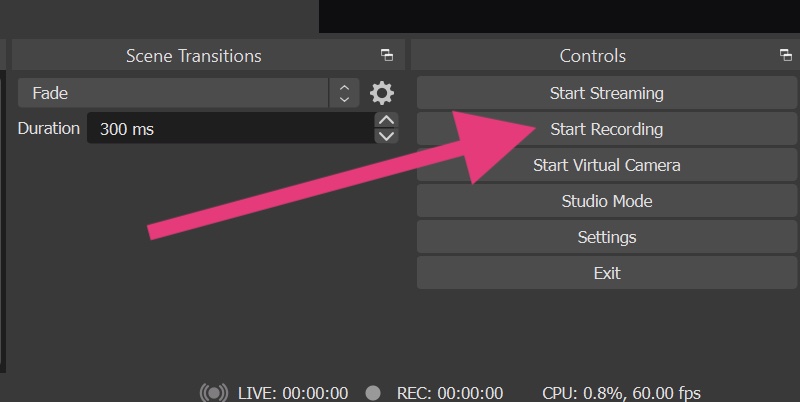
- If you, like many streamers, use software like OBS or Streamlabs OBS, you have the option of simultaneously streaming your output and recording a copy of the video locally.
- Before you start recording, check to make sure that the folder for your local recordings is included in your computer backup system.
- Then, go ahead with streaming. When you’re done, the video will save to your local folder.
Download Method #2
This second method for downloading and saving your videos requires a bit more work, but the benefit is that you can choose which videos you’d like to keep without affecting your streaming performance.
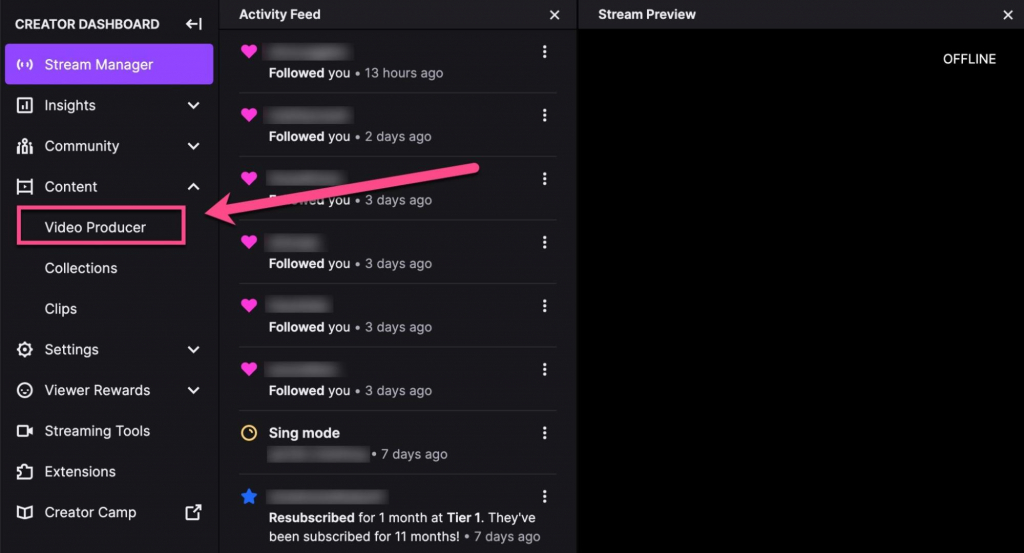
- Once you’ve finished streaming, navigate to your Creator Dashboard.
- On the left side of the screen, click “Content,” then “Video Producer.” Your clips and highlights live here and can be downloaded from this panel.
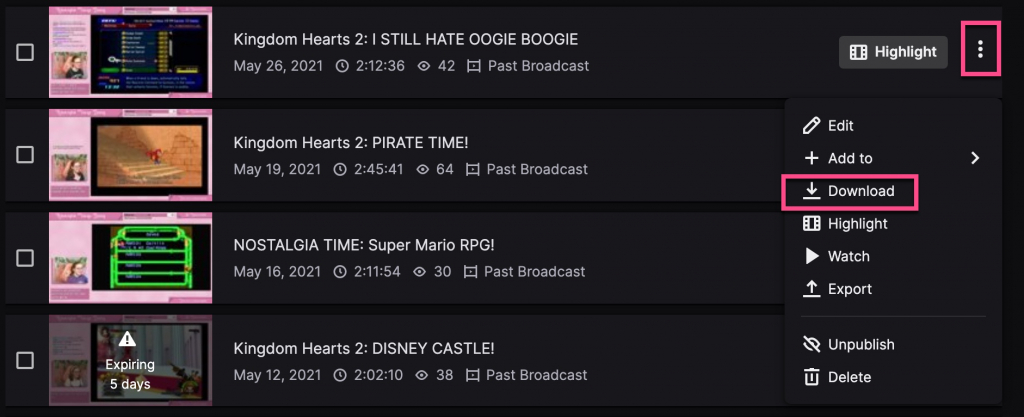
- Find the video you’d like to download, then click the three vertical dots and choose “Download.” The menu will change to “Preparing” and may take several minutes.
- Once the download is ready, a save screen will appear where you can choose where you’d like to save your video on your computer.
How to Download Your Stream Setup
If you’re using streaming software like OBS, most services allow you to export your Scene Profile and back it up, which will allow you to re-import without rebuilding all of your Scenes if you ever need to restore your Profile or switch computers. In OBS, go to the Profile menu, choose “Export” to download your data, and save it in a folder on your computer.
If you also use a caption program for your streams like Webcaptioner, you can follow similar steps to export and back up your caption settings as well.
How to Back Up Your Twitch Streams and Setups
Having a backup of your original videos as well as the edited clips and highlights is fundamental because data loss can happen at any time, and losing all your work is a huge setback. In case any data loss wreaks havoc on your setup or updates change your settings, you’ll always have a backup of all of your content that you can restore to your system. We recommend keeping a local copy on your computer and an off-site backup—you can learn more about this kind of backup strategy here.
Downloading your live streams will mean saving a collection of large files that will put a strain on your system to store. By creating a cloud storage archive of data you don’t need to access regularly, you can free up space on your local system. It’s quick and easy to organize your content using buckets where you simply drag and drop the files or folders you’d like to upload and save to the cloud. Take a look at how to set up and test a cloud storage archive here.
The difference between computer backup and cloud storage is that data is stored in the cloud for both options, but in backup, the data in the cloud is a copy of the data on your computer. For cloud storage, it’s just saved data without mirroring or versioning.
If you prefer to back up your files, computer backup services automatically scan your computer for new files, so all you have to do is make sure your local recordings folder is included in your backup.
Nowadays with our data scattered across multiple platforms, it’s all the more important to make sure you have a copy saved in case your media becomes inaccessible for any reason. Take a look at our other posts about downloading and backing up your data:
- How to Download Your Facebook Data.
- How to Download Your Google Drive Files.
- How to Download TikTok Videos.
Let us know in the comments about other helpful backup guides you’d like to see!
The post How to Back Up Your Twitch Stream appeared first on Backblaze Blog | Cloud Storage & Cloud Backup.