Post Syndicated from Brendan Coll original https://blog.cloudflare.com/miniflare/


In July 2021, I launched Miniflare 1.0, a fun, full-featured, fully-local simulator for Workers, on the Cloudflare Workers Discord server. What began as a pull request to the cloudflare-worker-local project has now become an official Cloudflare project and a core part of the Workers ecosystem, being integrated into wrangler 2.0. Today, I’m thrilled to announce the release of the next major version: a more modular, lightweight, and accurate Miniflare 2.0. 🔥
Background: Why Miniflare was created

At the end of 2020, I started to build my first Workers app. Initially I used the then recently released wrangler dev, but found it was taking a few seconds before changes were reflected. While this was still impressive considering it was running on the Workers runtime, I was using Vite to develop the frontend, so I knew a significantly faster developer experience was possible.
I then found cloudflare-worker-local and cloudworker, which were local Workers simulators, but didn’t have support for newer features like Workers Sites. I wanted a magical simulator that would just work ✨ in existing projects, focusing on the developer experience, and — by the reception of Miniflare 1.0 — I wasn’t the only one.
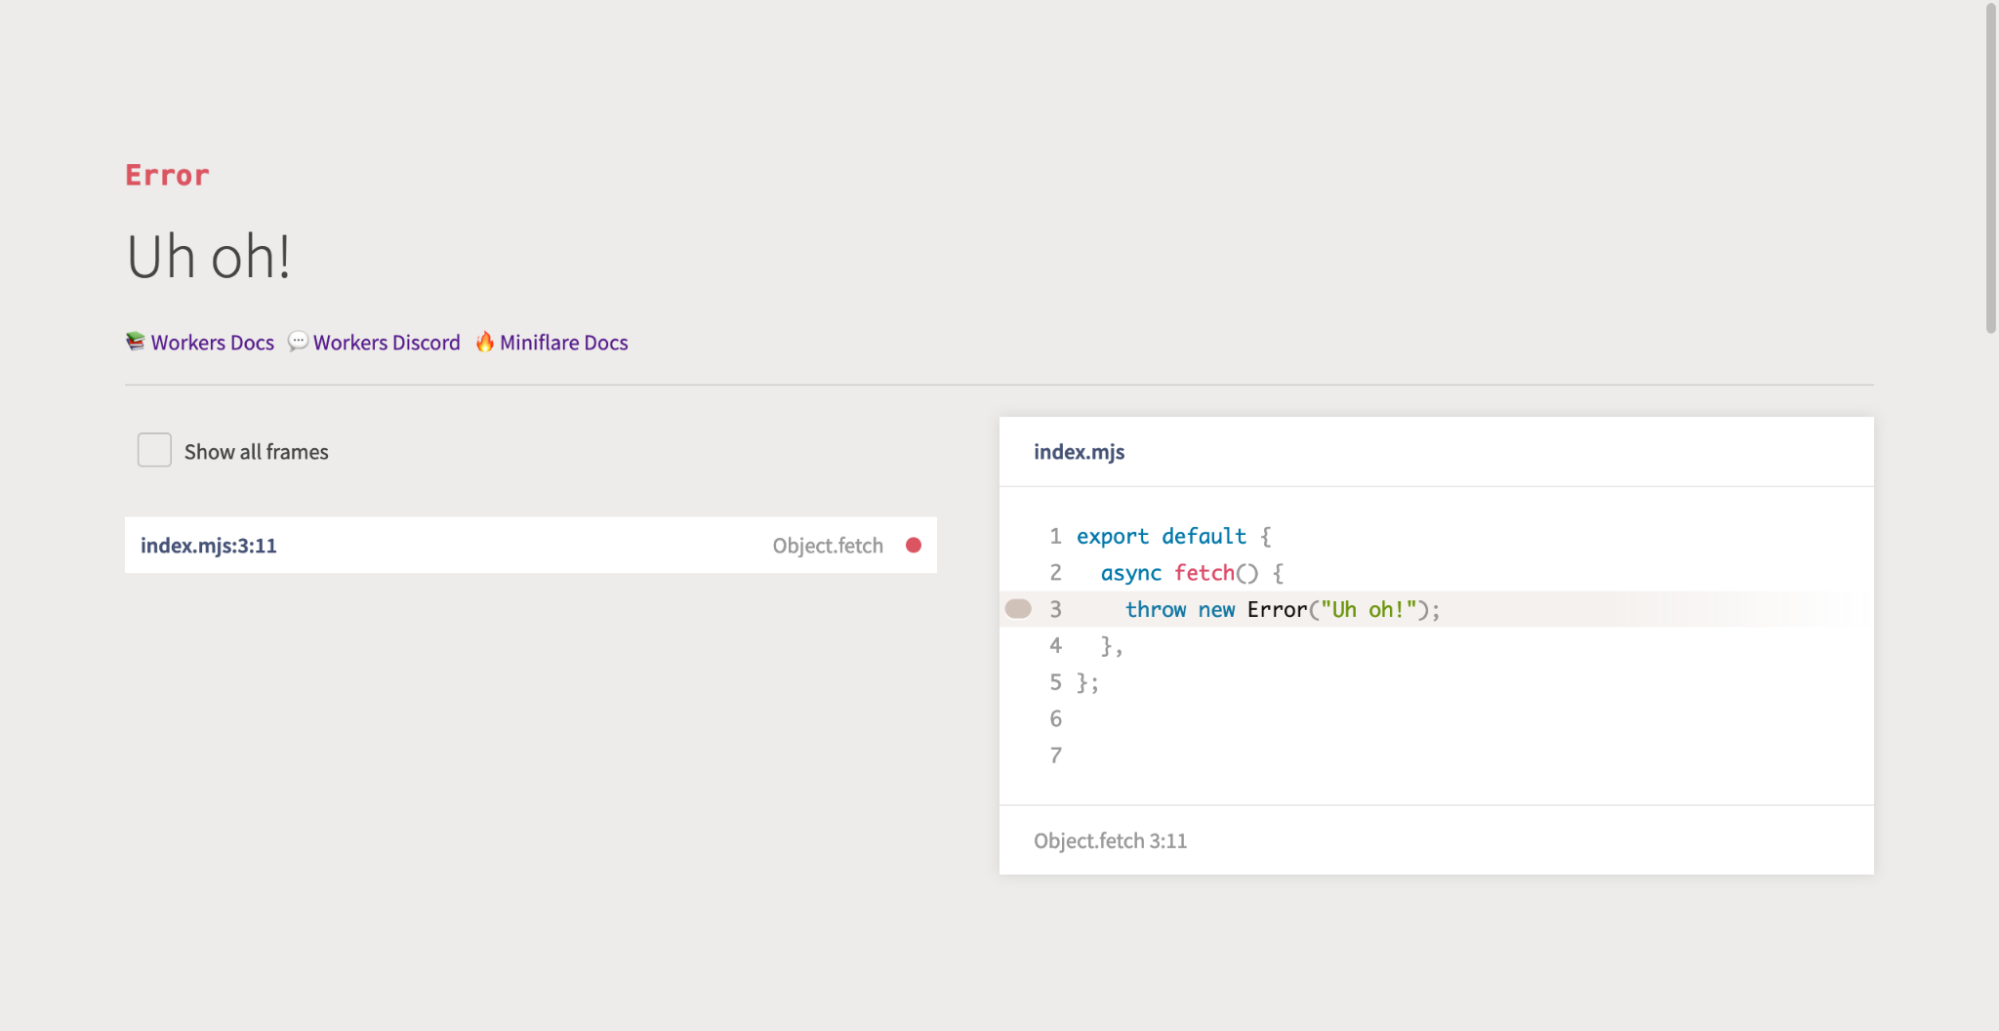
Miniflare 1.0 brought near instant reloads, source map support (so you could see where errors were thrown), cleaner logs (no more { unknown object }s or massive JSON stack traces), a pretty error page that highlighted the cause of the error, step-through debugger support, and more.

The next iteration: What’s new in version 2
In the relatively short time since the launch of Miniflare 1.0 in July, Workers as a platform has improved dramatically. Durable Objects now have input and output gates for ensuring consistency without explicit transactions, Workers has compatibility dates allowing developers to opt-into backwards-incompatible fixes, and you can now write Workers using JavaScript modules.
Miniflare 2 supports all these features and has been completely redesigned with three primary design goals:
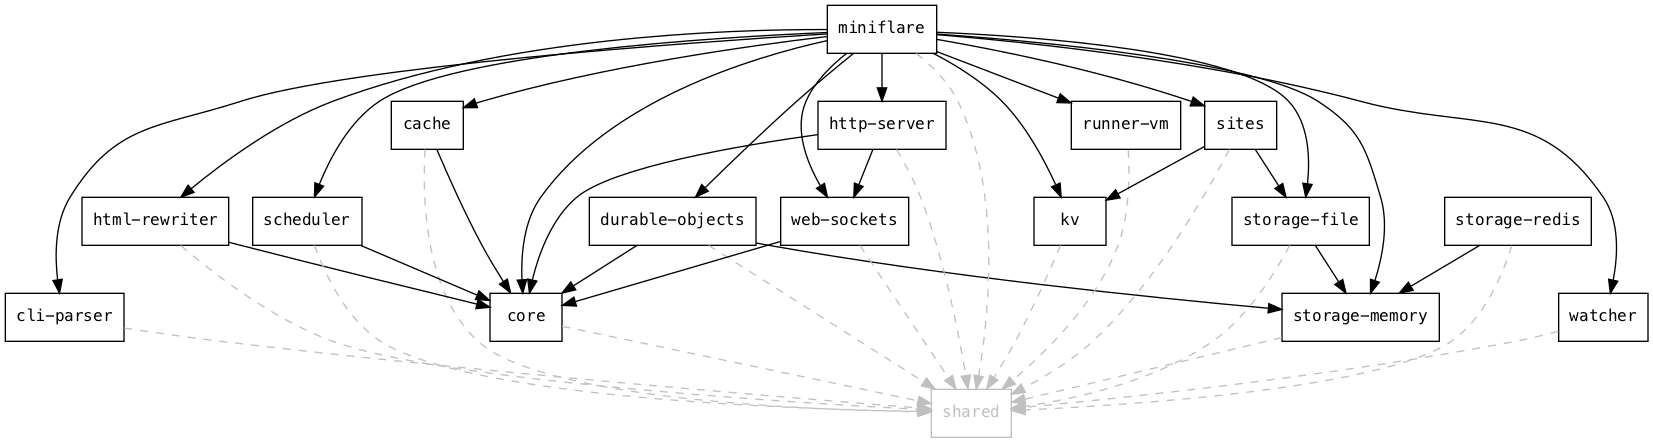
- Modular: Miniflare 2 splits Workers components (KV, Durable Objects, etc.) into separate packages (
@miniflare/kv,@miniflare/durable-objects, etc.) that you can import on their own for testing. This will also make it easier to add support for new, unreleased features like R2 Storage. - Lightweight: Miniflare 1 included 122 third-party packages with a total install size of
88.3MB. Miniflare 2 reduces this to 23 packages and6MBby leveraging features included with Node.js 16. - Accurate: Miniflare 2 replicates the quirks and thrown errors of the real Workers runtime, so you’ll know before you deploy if things are going to break. Of course,
wrangler devwill always be the most accurate preview, running on the real edge with real data, but Miniflare 2 is really close!
It also adds a new live-reload feature and first-class support for testing with Jest for an even more enjoyable developer experience.
Getting started with local development
As mentioned in the introduction, Miniflare 2.0 is now integrated into wrangler 2.0, so you just need to run npx wrangler@beta dev --local to start a fully-local Worker development server or npx wrangler@beta pages dev to start a Cloudflare Pages Functions server. Make sure you’ve got the latest release of Node.js installed.
However, if you’re using Wrangler 1 or want to customize your local environment, you can install Miniflare standalone. If you’ve got an existing worker with a wrangler.toml file, just run npx miniflare --live-reload to start a live-reloading development server. Miniflare will automatically load configuration like KV namespaces or Durable Object bindings from your wrangler.toml file and secrets from a .env file.
Miniflare is highly configurable. For example, if you want to persist KV data between restarts, include the --kv-persist flag. See the Miniflare docs or run npx miniflare --help for many more options, like running multiple workers or starting an HTTPS server.
If you’ve got a scheduled event handler, you can manually trigger it by visiting http://localhost:8787/cdn-cgi/mf/scheduled in your browser.
Testing for Workers with Jest
Jest is one of the most popular JavaScript testing frameworks, so it made sense to add first-class support for it. Miniflare 2.0 includes a custom test environment that gives your tests access to Workers runtime APIs.
For example, suppose we have the following worker, written using JavaScript modules, that stores the number of times each URL is visited in Workers KV:
Aside: Workers KV is not designed for counters as it’s eventually consistent. In a real worker, you should use Durable Objects. This is just a simple example.
// src/index.mjs
export async function increment(namespace, key) {
  // Get the current count from KV
  const currentValue = await namespace.get(key);
  // Increment the count, defaulting it to 0
  const newValue = parseInt(currentValue ?? "0") + 1;
  // Store and return the new count
  await namespace.put(key, newValue.toString());
  return newValue;
}

export default {
  async fetch(request, env, ctx) {
    // Use the pathname for a key
    const url = new URL(request.url);
    const key = url.pathname;
    // Increment the key
    const value = await increment(env.COUNTER_NAMESPACE, key);
    // Return the new incremented count
    return new Response(`count for ${key} is now ${value}`);
  },
};
# wrangler.toml
kv_namespaces = [
  { binding = "COUNTER_NAMESPACE", id = "..." }
]

[build.upload]
format = "modules"
dist = "src"
main = "./index.mjs"
…we can write unit tests like so:
// test/index.spec.mjs
import worker, { increment } from "../src/index.mjs";

// When using `format = "modules"`, bindings are included in the `env` parameter,
// which we don't have access to in tests. Miniflare therefore provides a custom
// global method to access these.
const { COUNTER_NAMESPACE } = getMiniflareBindings();

test("should increment the count", async () => {
  // Seed the KV namespace
  await COUNTER_NAMESPACE.put("a", "3");

  // Perform the increment
  const newValue = await increment(COUNTER_NAMESPACE, "a");
  const storedValue = await COUNTER_NAMESPACE.get("a");

  // Check the return value of increment
  expect(newValue).toBe(4);
  // Check increment had the side effect of updating KV
  expect(storedValue).toBe("4");
});

test("should return new count", async () => {
  // Note we're using Worker APIs in our test, without importing anything extra
  const request = new Request("http://localhost/a");
  const response = await worker.fetch(request, { COUNTER_NAMESPACE });

  // Each test gets its own isolated storage environment, so the changes to "a"
  // are *undone* automatically. This means at the start of this test, "a"
  // wasn't in COUNTER_NAMESPACE, so it defaulted to 0, and the count is now 1.
  expect(await response.text()).toBe("count for /a is now 1");
});
// jest.config.js
const { defaults } = require("jest-config");

module.exports = {
  testEnvironment: "miniflare", // ✨
  // Tell Jest to look for tests in .mjs files too
  testMatch: [
    "**/__tests__/**/*.?(m)[jt]s?(x)",
    "**/?(*.)+(spec|test).?(m)[tj]s?(x)",
  ],
  moduleFileExtensions: ["mjs", ...defaults.moduleFileExtensions],
};
…and run them with:
# Install dependencies
$ npm install -D jest jest-environment-miniflare
# Run tests with experimental ES modules support
$ NODE_OPTIONS=--experimental-vm-modules npx jest
For more details about the custom test environment and isolated storage, see the Miniflare docs or this example project that also uses TypeScript and Durable Objects.
Not using Jest? Miniflare lets you write your own integration tests with vanilla Node.js or any other test framework. For an example using AVA, see the Miniflare docs or this repository.
How Miniflare works
Let’s now dig deeper into how some interesting parts of Miniflare work.
Miniflare is powered by Node.js, a JavaScript runtime built on Chrome’s V8 JavaScript engine. V8 is the same engine that powers the Cloudflare Workers runtime, but Node and Workers implement different runtime APIs on top of it. To ensure Node’s APIs aren’t visible to users’ worker code and to inject Workers’ APIs, Miniflare uses the Node.js vm module. This lets you run arbitrary code in a custom V8 context.
A core part of Workers are the Request and Response classes. Miniflare gets these from undici, a project written by the Node team to bring fetch to Node. For service workers, we also need a way to addEventListeners and dispatch events using the EventTarget API, which was added in Node 15.
With that we can build a mini-miniflare:
import vm from "vm";
import { Request, Response } from "undici";

// An instance of this class will become the global scope of our Worker,
// extending EventTarget for addEventListener and dispatchEvent
class ServiceWorkerGlobalScope extends EventTarget {
  constructor() {
    super();

    // Add Worker runtime APIs
    this.Request = Request;
    this.Response = Response;

    // Make sure this is bound correctly when EventTarget methods are called
    this.addEventListener = this.addEventListener.bind(this);
    this.removeEventListener = this.removeEventListener.bind(this);
    this.dispatchEvent = this.dispatchEvent.bind(this);
  }
}

// An instance of this class will be passed as the event parameter to "fetch"
// event listeners
class FetchEvent extends Event {
  constructor(type, init) {
    super(type);
    this.request = init.request;
  }

  respondWith(response) {
    this.response = response;
  }
}

// Create a V8 context to run user code in
const globalScope = new ServiceWorkerGlobalScope();
const context = vm.createContext(globalScope);

// Example user worker code, this could be loaded from the file system
const workerCode = `
addEventListener("fetch", (event) => {
  event.respondWith(new Response("Hello mini-miniflare!"));
})
`;
const script = new vm.Script(workerCode);

// Run the user's code, registering the "fetch" event listener
script.runInContext(context);

// Create an example request, this could come from an incoming HTTP request
const request = new Request("http://localhost:8787/");
const event = new FetchEvent("fetch", { request });

// Dispatch the event and log the response
globalScope.dispatchEvent(event);
console.log(await event.response.text()); // Hello mini-miniflare!
Plugins
There are a lot of Workers runtime APIs, so adding and configuring them all manually as above would be tedious. Therefore, Miniflare 2 has a plugin system that allows each package to export globals and bindings to be included in the sandbox. Options have annotations describing their type, CLI flag, and where to find them in Wrangler configuration files:
@Option({
  // Define type for runtime validation of the CLI flag
  type: OptionType.ARRAY,
  // Use --kv instead of auto-generated --kv-namespace for the CLI flag
  name: "kv",
  // Define -k as an alias
  alias: "k",
  // Displayed in --help
  description: "KV namespace to bind",
  // Where to find this option in wrangler.toml
  fromWrangler: (config) => config.kv_namespaces?.map(({ binding }) => binding),
})
kvNamespaces?: string[];
Durable Objects
Before input and output gates were added, you usually needed to use the transaction() method to ensure consistency:
async function incrementCount() {
  let value;
  await this.storage.transaction(async (txn) => {
    value = await txn.get("count");
    await txn.put("count", value + 1);
  });
  return value;
}
Miniflare implements this using optimistic-concurrency control (OCC). However, input and output gates are now available, so to avoid race conditions when simulating newly-written Durable Object code, Miniflare 2 needed to implement them.
From the description in the gates announcement blog post:
Input gates: While a storage operation is executing, no events shall be delivered to the object except for storage completion events. Any other events will be deferred until such a time as the object is no longer executing JavaScript code and is no longer waiting for any storage operations. We say that these events are waiting for the "input gate" to open.
…we can see input gates need to have two methods, one for closing the gate while a storage operation is running and one for waiting until the input gate is open:
class InputGate {
  async runWithClosed<T>(closure: () => Promise<T>): Promise<T> {
    // 1. Close the input gate
    // 2. Run the closure and store the result
    // 3. Open the input gate
    // 4. Return the result
  }

  async waitForOpen(): Promise<void> {
    // 1. Check if the input gate is open
    // 2. If it is, return
    // 3. Otherwise, wait until it is
  }
}
Each Durable Object has its own InputGate. In the storage implementation, we call runWithClosed to defer other events until the storage operation completes:
class DurableObjectStorage {
  async get<Value>(key: string): Promise<Value | undefined> {
    return this.inputGate.runWithClosed(() => {
      // Get key from storage
    });
  }
}
…and whenever we’re ready to deliver another event, we call waitForOpen:
import { fetch as baseFetch } from "undici";

async function fetch(input, init) {
  const response = await baseFetch(input, init);
  await inputGate.waitForOpen();
  return response;
}
You may have noticed a problem here. Where does inputGate come from in fetch? We only have one global scope for the entire Worker and all its Durable Objects, so we can’t have a fetch per Durable Object InputGate. We also can’t ask the user to pass it around as another parameter to all functions that need it. We need some way of storing it in a context that’s passed around automatically between potentially async functions. For this, we can use another lesser-known Node module, async_hooks, which includes the AsyncLocalStorage class:
import { AsyncLocalStorage } from "async_hooks";

const inputGateStorage = new AsyncLocalStorage<InputGate>();

const inputGate = new InputGate();
await inputGateStorage.run(inputGate, async () => {
  // This closure will run in an async context with inputGate
  await fetch("https://example.com");
});

async function fetch(input: RequestInfo, init: RequestInit): Promise<Response> {
  const response = await baseFetch(input, init);
  // Get the input gate in the current async context
  const inputGate = inputGateStorage.getStore();
  await inputGate.waitForOpen();
  return response;
}
Durable Objects also include a blockConcurrencyWhile(closure) method that defers events until the closure completes. This is exactly the runWithClosed() method:
class DurableObjectState {
  // ...

  blockConcurrencyWhile<T>(closure: () => Promise<T>): Promise<T> {
    return this.inputGate.runWithClosed(closure);
  }
}
However, there’s a problem with what we’ve got at the moment. Consider the following code:
export class CounterObject {
  constructor(state: DurableObjectState) {
    state.blockConcurrencyWhile(async () => {
      const res = await fetch("https://example.com");
      this.data = await res.text();
    });
  }
}
blockConcurrencyWhile closes the input gate, but fetch won’t return until the input gate is open, so we’re deadlocked! To fix this, we need to make InputGates nested:
class InputGate {
  constructor(private parent?: InputGate) {}

  async runWithClosed<T>(closure: () => Promise<T>): Promise<T> {
    // 1. Close the input gate, *and any parents*
    // 2. *Create a new child input gate with this as its parent*
    const childInputGate = new InputGate(this);
    // 3. Run the closure, *under the child input gate's context*
    // 4. Open the input gate, *and any parents*
    // 5. Return the result
  }
}
Now the input gate outside of blockConcurrencyWhile will be closed, so fetches to the Durable Object will be deferred, but the input gate inside the closure will be open, so the fetch can return.
This glosses over some details, but you can check out the gates implementation for additional context and comments. 🙂
HTMLRewriter
HTMLRewriter is another novel class that allows parsing and transforming HTML streams. In the edge Workers runtime, it’s powered by C-bindings to the lol-html Rust library. Luckily, Ivan Nikulin built WebAssembly bindings for this, so we’re able to use the same library in Node.js.
However, these were missing support for async handlers that allow you to access external resources when rewriting:
class UserElementHandler {
  async element(node) {
    const response = await fetch("/user");
    // ...
  }
}
The WebAssembly bindings Rust code includes something like:
macro_rules! make_handler {
  ($handler:ident, $JsArgType:ident, $this:ident) => {
    move |arg: &mut _| {
      // `js_arg` here is the `node` parameter from above
      let js_arg = JsValue::from(arg);
      // $handler here is the `element` method from above
      match $handler.call1(&$this, &js_arg) {
        Ok(res) => {
          // Check if this is an async handler
          if let Some(promise) = res.dyn_ref::<JsPromise>() {
            await_promise(promise);
          }
          Ok(())
        }
        Err(e) => ...,
      }
    }
  };
}
The key thing to note here is that the Rust move |...| { ... } closure is synchronous, but handlers can be asynchronous. This is like trying to await a Promise in a non-async function.
To solve this, we use the Asyncify feature of Binaryen, a set of tools for working with WebAssembly modules. Whenever we call await_promise, Asyncify unwinds the current WebAssembly stack into some temporary storage. Then in JavaScript, we await the Promise. Finally, we rewind the stack from the temporary storage to the previous state and continue rewriting where we left off.
You can find the full implementation in the html-rewriter-wasm package.
The future of Miniflare
As mentioned earlier, Miniflare is now included in wrangler 2.0. Try it out and let us know what you think!
I’d like to thank everyone on the Workers team at Cloudflare for building such an amazing platform and supportive community. Special thanks to anyone who’s contributed to Miniflare, opened issues, given suggestions, or asked questions in the Discord server.
Maybe now I can finish off my original workers project… 😅