All posts by Brendan Coll

Improved Workers testing via Vitest and workerd

Post Syndicated from Brendan Coll original https://blog.cloudflare.com/workers-vitest-integration


Today, we’re excited to announce a new Workers Vitest integration – allowing you to write unit and integration tests via the popular testing framework, Vitest, that execute directly in our runtime, workerd!

This integration provides you with the ability to test anything related to your Worker!

For the first time, you can write unit tests that run within the same runtime that Cloudflare Workers run on in production, providing greater confidence that the behavior of your Worker in tests will be the same as when deployed to production. For integration tests, you can now write tests for Workers that are triggered by Cron Triggers in addition to traditional fetch() events. You can also more easily test complex applications that interact with KV, R2, D1, Queues, Service Bindings, and more Cloudflare products.

For all of your tests, you have access to Vitest features like snapshots, mocks, timers, and spies.

In addition to increased testing and functionality, you’ll also notice other developer experience improvements like hot-module-reloading, watch mode on by default, and per-test isolated storage. Meaning that, as you develop and edit your tests, they’ll automatically re-run, without you having to restart your test runner.

Get started testing Workers with Vitest

The easiest way to get started with testing your Workers via Vitest is to start a new Workers project via our create-cloudflare tool:

npm create cloudflare@latest hello-world -- --type=hello-world

Running this command will scaffold a new project for you with the Workers Vitest integration already set up. An example unit test and integration test are also included.

Manual install and setup instructions

If you prefer to manually install and set up the Workers Vitest integration, begin by installing @cloudflare/vitest-pool-workers from npm:

$ npm install --save-dev @cloudflare/vitest-pool-workers

@cloudflare/vitest-pool-workers has a peer dependency on a specific version of vitest. Modern versions of npm will install this automatically, but we recommend you install it explicitly too. Refer to the getting started guide for the current supported version. If you’re using TypeScript, add @cloudflare/vitest-pool-workers to your tsconfig.json’s types to get types for the cloudflare:test module:

{
  "compilerOptions": {
    "module": "esnext",
    "moduleResolution": "bundler",
    "lib": ["esnext"],
    "types": [
      "@cloudflare/workers-types/experimental",
      "@cloudflare/vitest-pool-workers"
    ]
  }
}

Then, enable the pool in your Vitest configuration file:

// vitest.config.js
import { defineWorkersConfig } from "@cloudflare/vitest-pool-workers/config";

export default defineWorkersConfig({
  test: {
    poolOptions: {
      workers: {
        wrangler: { configPath: "./wrangler.toml" },
      },
    },
  },
});

After that, define a compatibility date after “2022-10-31” and enable the nodejs_compat compatibility flag in your wrangler.toml:

# wrangler.toml
main = "src/index.ts"
compatibility_date = "2024-01-01"
compatibility_flags = ["nodejs_compat"]

Test anything exported from a Worker

With the new Workers Vitest Integration, you can test anything exported from your Worker in both unit and integration-style tests. Within these tests, you can also test connected resources like R2, KV, and Durable Objects, as well as applications involving multiple Workers.

Writing unit tests

In a Workers context, a unit test imports and directly calls functions from your Worker then asserts on their return values. Let’s say you have a Worker that looks like this:

export function add(a, b) {
  return a + b;
}

export default {
  async fetch(request) {
    const url = new URL(request.url);
    const a = parseInt(url.searchParams.get("a"));
    const b = parseInt(url.searchParams.get("b"));
    return new Response(add(a, b));
  }
}

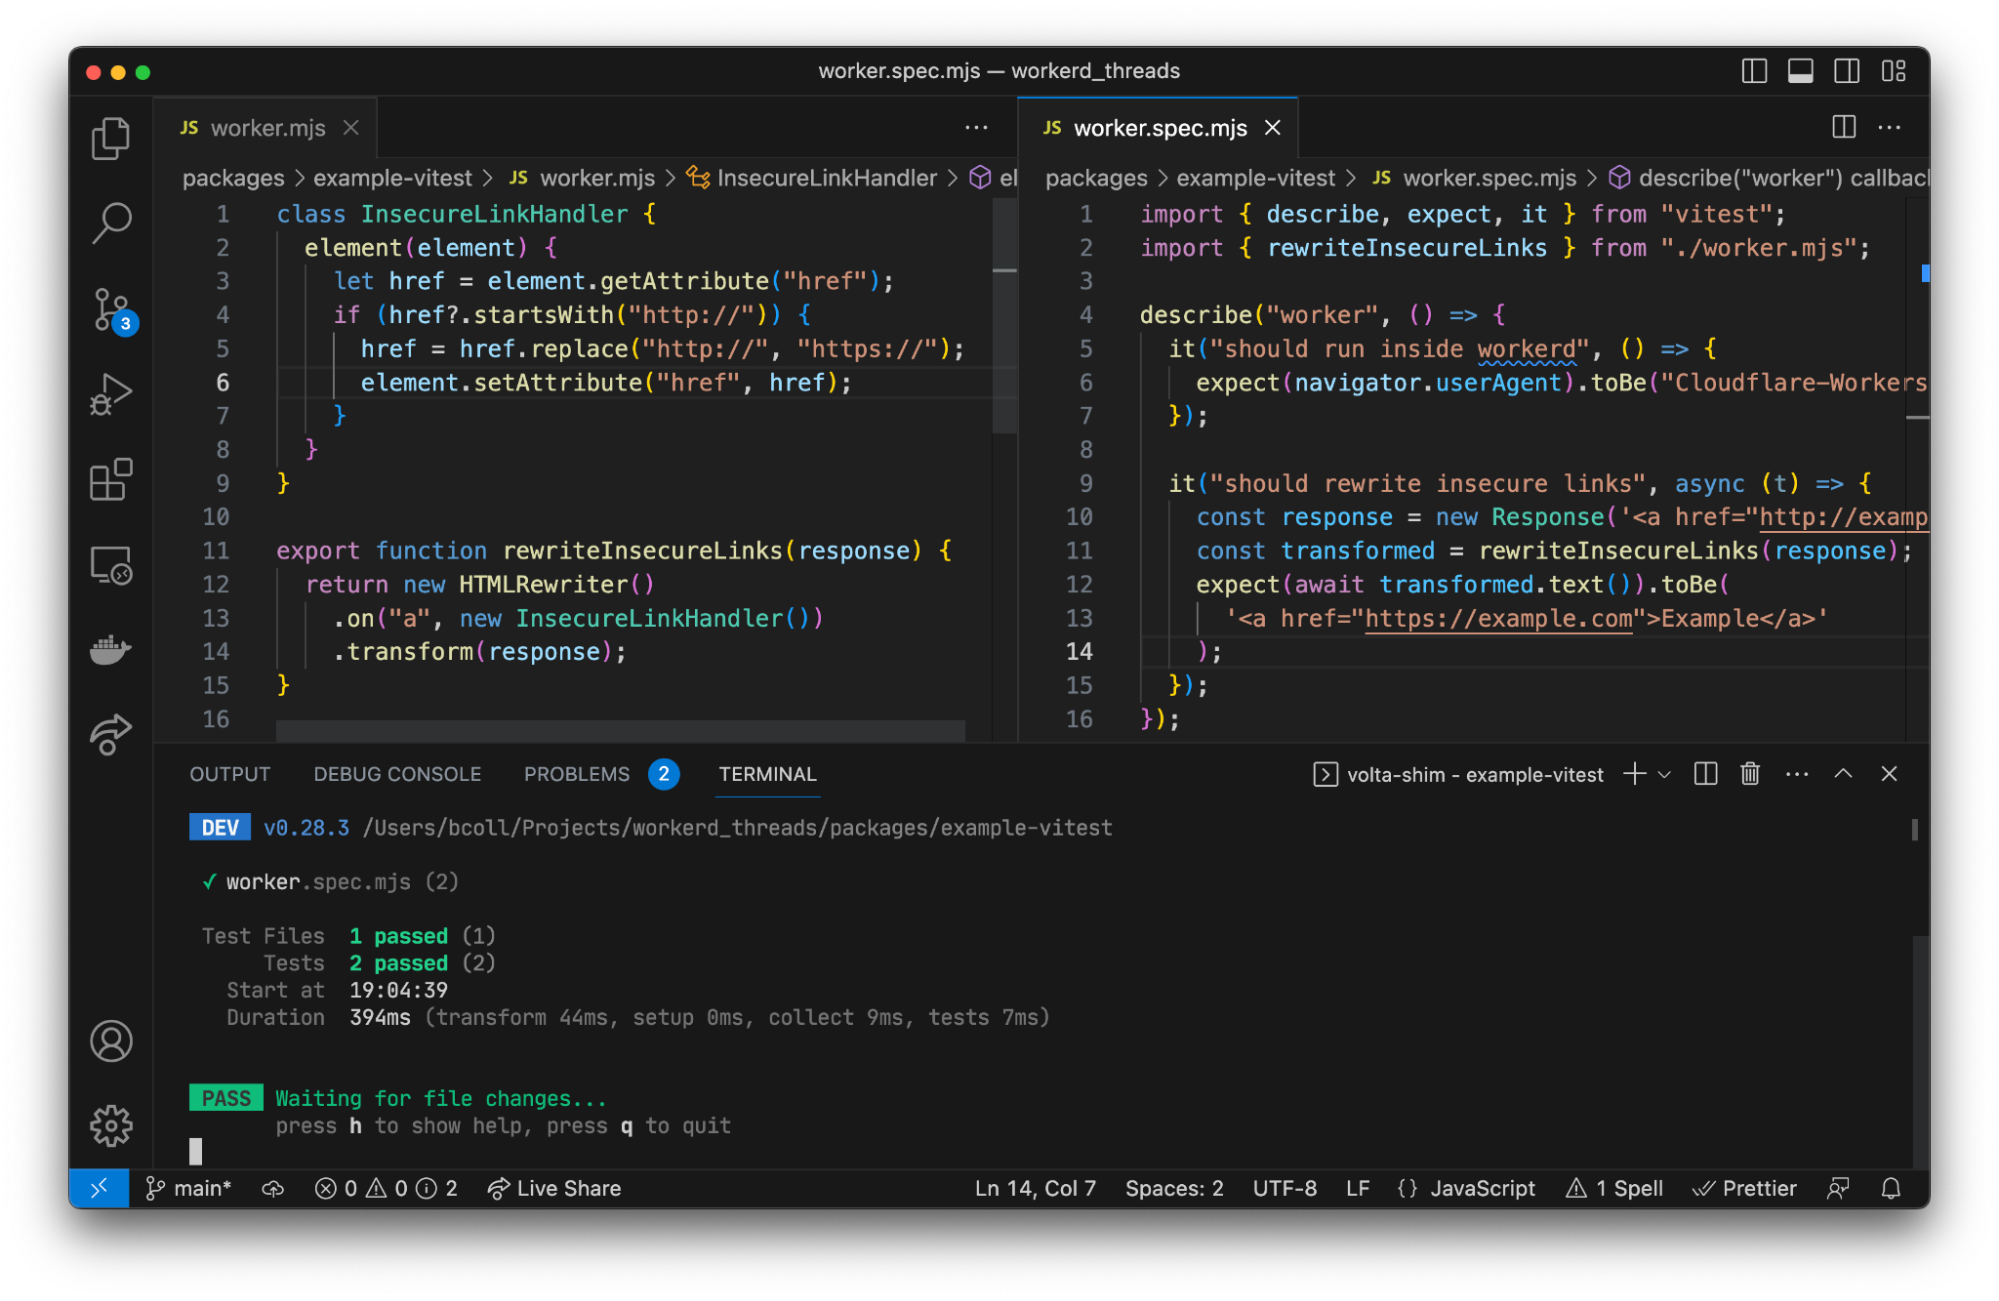
After you’ve setup and installed the Workers Vitest integration, you can unit test this Worker by creating a new test file called index.spec.js with the following code:

import { env, createExecutionContext, waitOnExecutionContext, } from "cloudflare:test";
import { describe, it, expect } from "vitest";
import { add }, worker from "./src";

describe("Hello World worker", () => {
  it(“adds two numbers”, async () => {
    expect(add(2,3).toBe(5);
  });
  it("sends request (unit style)", async () => {
    const request = new Request("http://example.com/?a=3&b=4");
    const ctx = createExecutionContext();
    const response = await worker.fetch(request, env, ctx);
    await waitOnExecutionContext(ctx);
    expect(await response.text()).toMatchInlineSnapshot(`"7"`);
  });
});

Using the Workers Vitest integration, you can write unit tests like these for any of your Workers.

Writing integration tests

While unit tests are great for testing individual parts of your application, integration tests assess multiple units of functionality, ensuring that workflows and features work as expected. These are usually more complex than unit tests, but provide greater confidence that your app works as expected. In the Workers context, an integration test sends HTTP requests to your Worker and asserts on the HTTP responses.

With the Workers Vitest Integration, you can run integration tests by importing SELF from the new cloudflare:test utility like this:

// test/index.spec.ts
import { SELF } from "cloudflare:test";
import { it, expect } from "vitest";
import "../src";

// an integration test using SELF
it("sends request (integration style)", async () => {
   const response = await SELF.fetch("http://example.com/?a=3&b=4");
   expect(await response.text()).toMatchInlineSnapshot(`"7"`);
});

When using SELF for integration tests, your Worker code runs in the same context as the test runner. This means you can use mocks to control your Worker.

Testing different scenarios

Whether you’re writing unit or integration tests, if your application uses Cloudflare Developer Platform products (e.g. KV, R2, D1, Queues, or Durable Objects), you can test them. To demonstrate this, we have created a set of examples to help get you started testing.

Better testing experience === better testing

Having better testing tools makes it easier to test your projects right from the start, which leads to better overall quality and experience for your end users. The Workers Vitest integration provides that better experience, not just in terms of developer experience, but in making it easier to test your entire application.

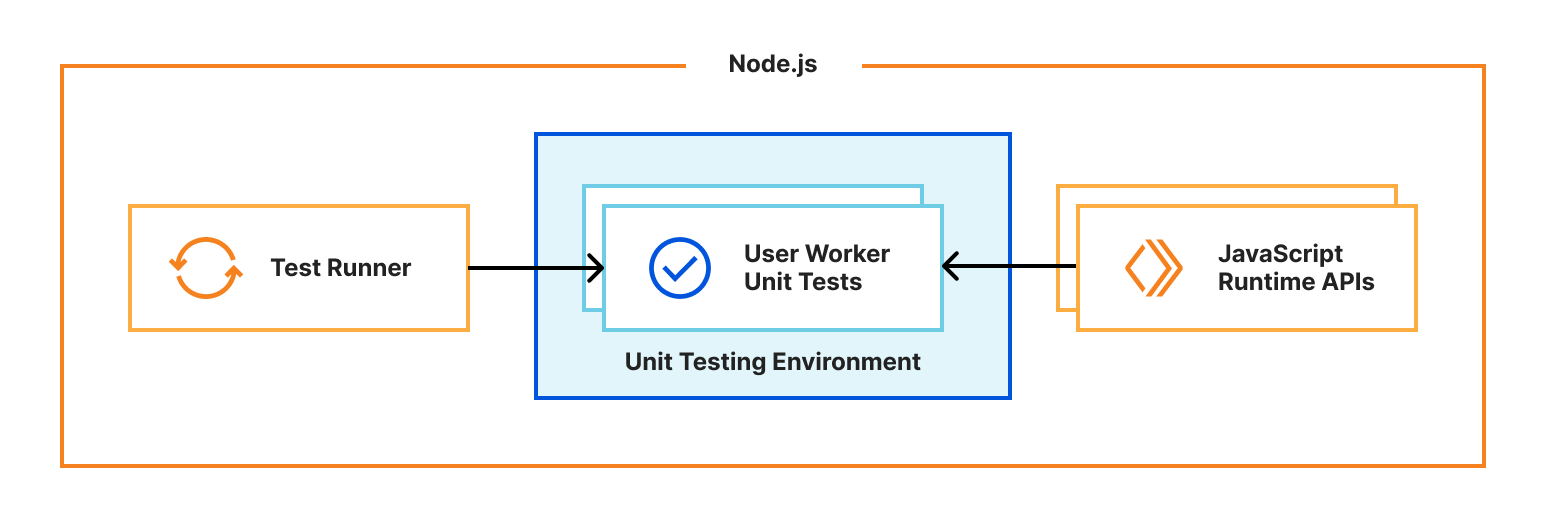
The rest of this post will focus on how we built this new testing integration, diving into the internals of how Vitest works, the problems we encountered trying to get a framework to work within our runtime, and ultimately how we solved it and the improved DX that it unlocked.

How Vitest traditionally works

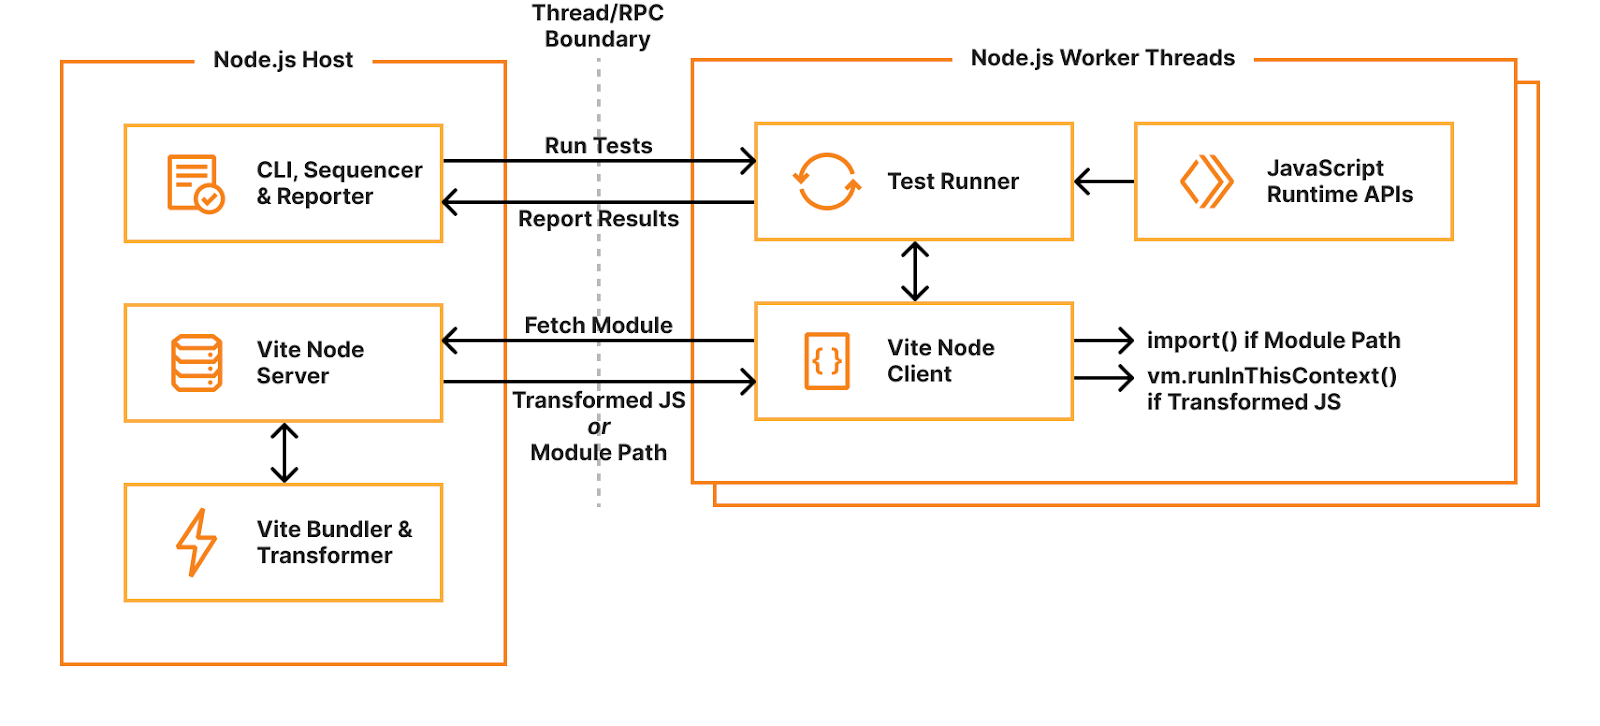
When you start Vitest’s CLI, it first collects and sequences all your test files. By default, Vitest uses a “threads” pool, which spawns Node.js worker threads for isolating and running tests in parallel. Each thread gets a test file to run, dynamically requesting and evaluating code as needed. When the test runner imports a module, it sends a request to the host’s “Vite Node Server” which will either return raw JavaScript code transformed by Vite, or an external module path. If raw code is returned, it will be executed using the node:vm runInThisContext() function. If a module path is returned, it will be imported using dynamic import(). Transforming user code with Vite allows hot-module-reloading (HMR) — when a module changes, it’s invalidated in the module cache and a new version will be returned when it’s next imported.

Miniflare is a fully-local simulator for Cloudflare’s Developer Platform. Miniflare v2 provided a custom environment for Vitest that allowed you to run your tests inside the Workers sandbox. This meant you could import and call any function using Workers runtime APIs in your tests. You weren’t restricted to integration tests that just sent and received HTTP requests. In addition, this environment provided per-test isolated storage, automatically undoing any changes made at the end of each test. In Miniflare v2, this environment was relatively simple to implement. We’d already reimplemented Workers Runtime APIs in a Node.js environment, and could inject them using Vitest’s APIs into the global scope of the test runner.

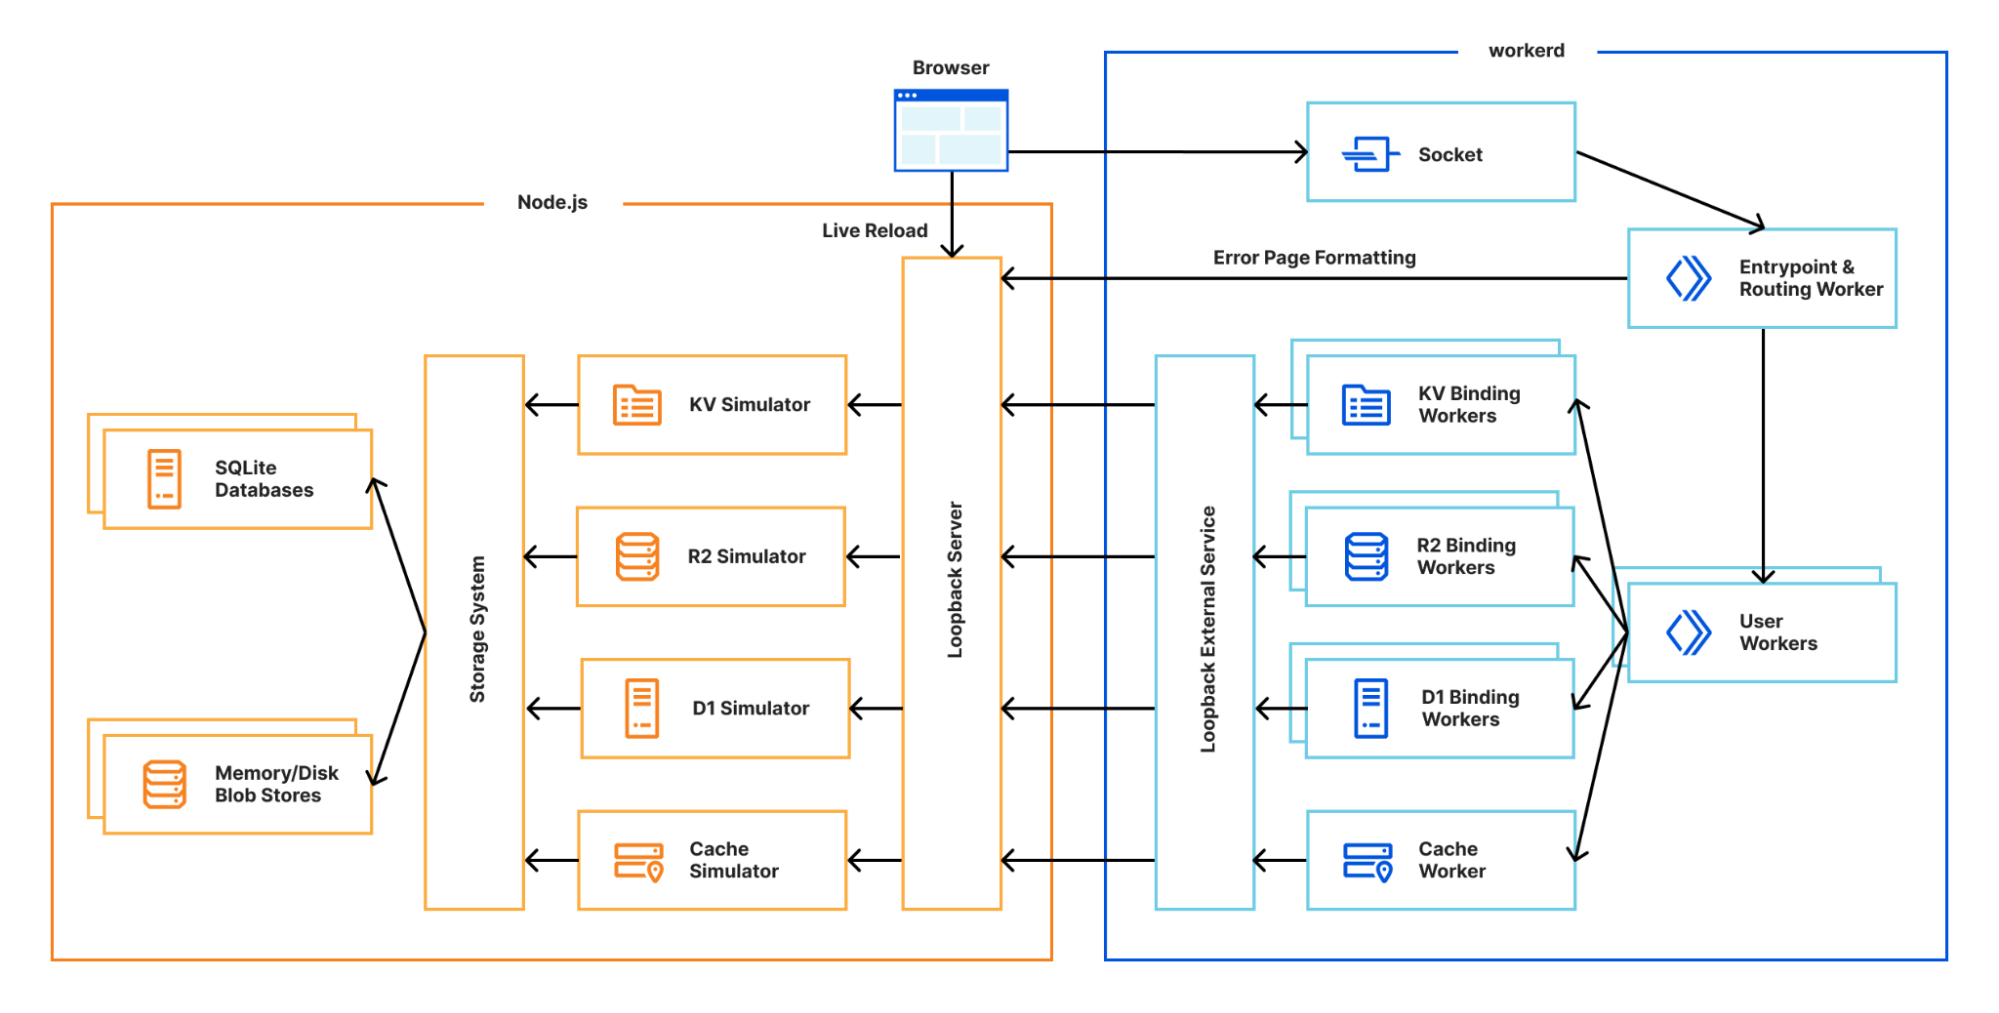
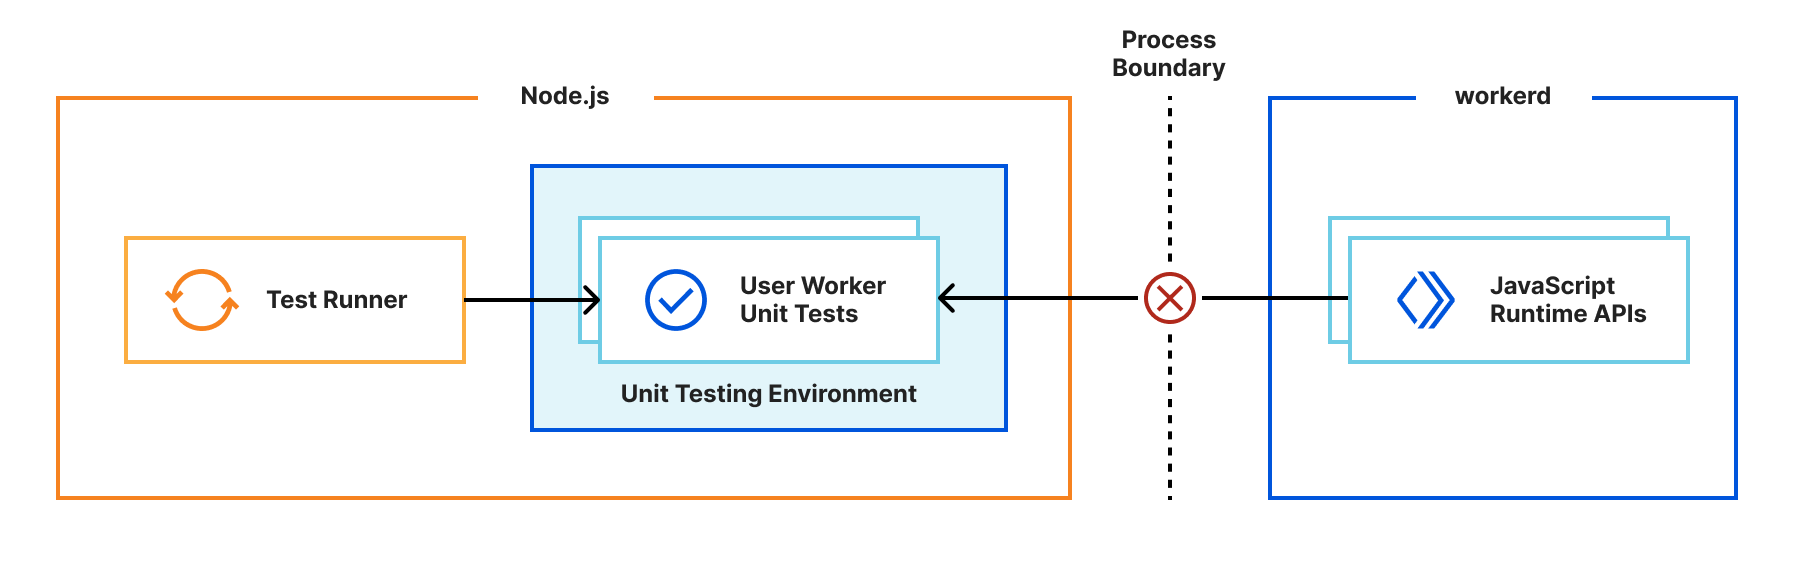
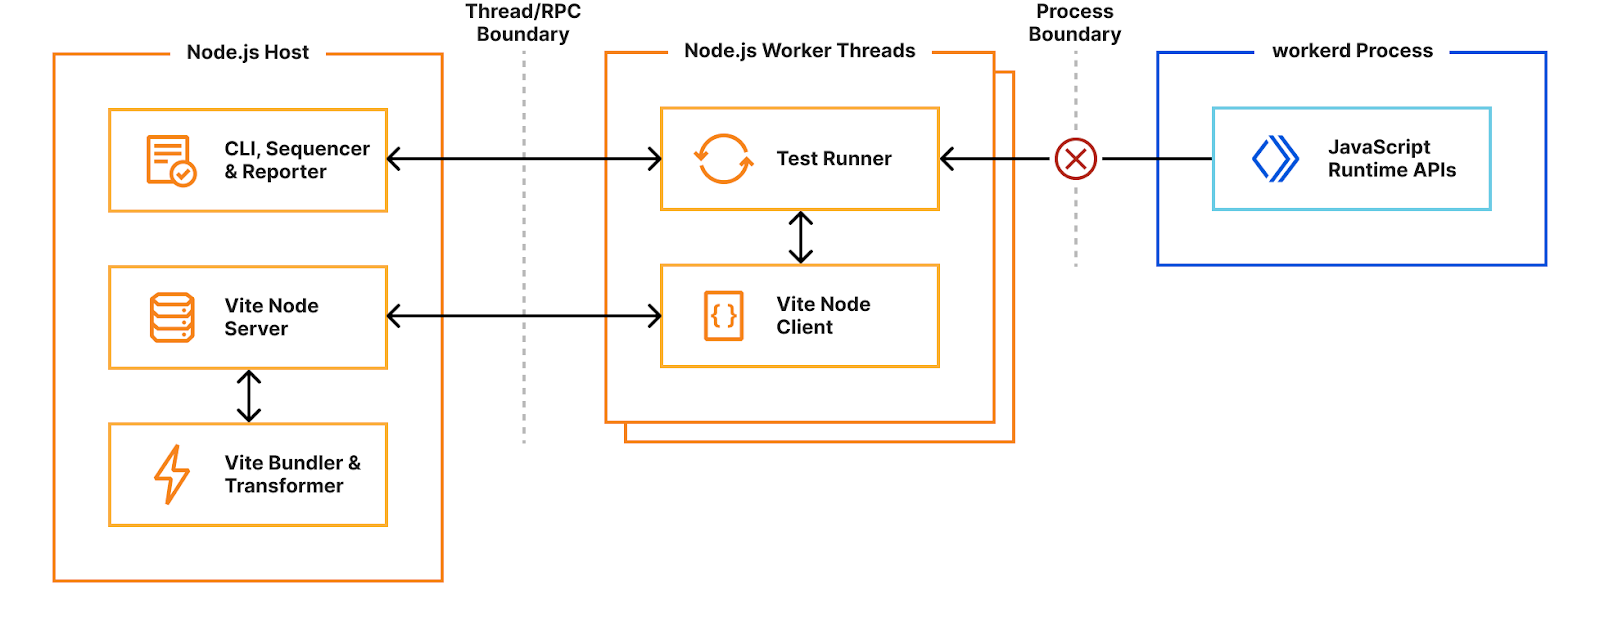
By contrast, Miniflare v3 runs your Worker code inside the same workerd runtime that Cloudflare uses in production. Running tests directly in workerd presented a challenge — workerd runs in its own process, separate from the Node.js worker thread, and it’s not possible to reference JavaScript classes across a process boundary.

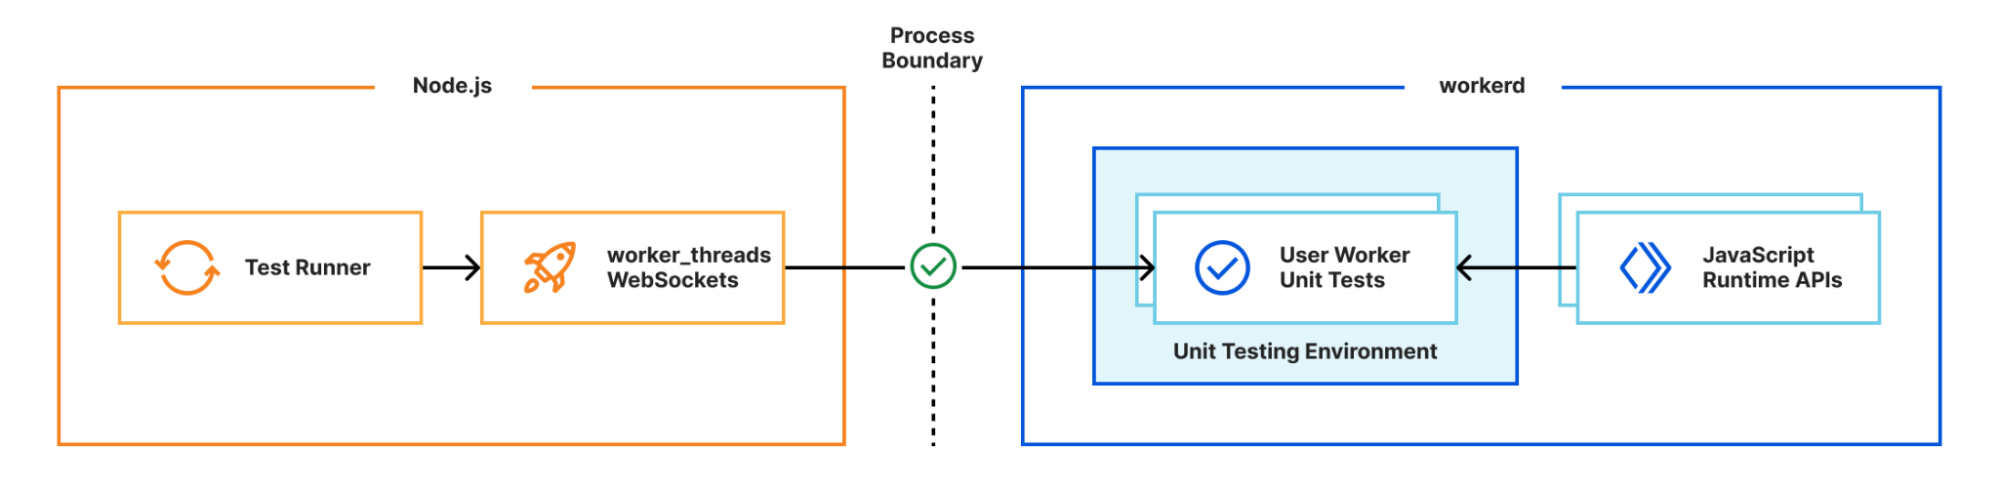
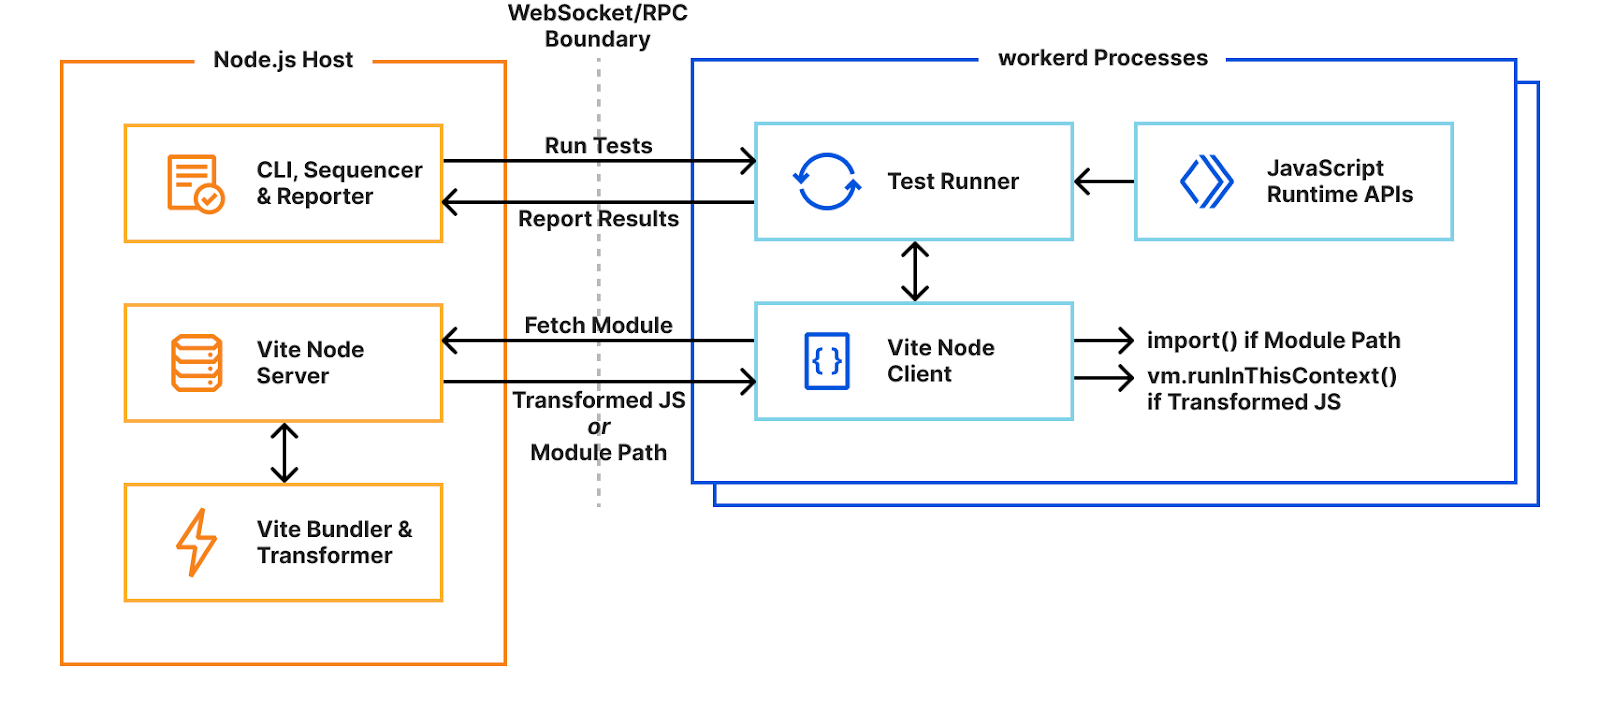
Solving the problem with custom pools

Instead, we use Vitest’s custom pools feature to run the test runner in Cloudflare Workers running locally with workerd. A pool receives test files to run and decides how to execute them. By executing the runner inside workerd, tests have direct access to Workers runtime APIs as they’re running in a Worker. WebSockets are used to send and receive serialisable RPC messages between the Node.js host and workerd process. Note we’re running the exact same test runner code originally designed for a Node-context inside a Worker here. This means our Worker needs to provide Node’s built-in modules, support for dynamic code evaluation, and loading of arbitrary modules from disk with Node-resolution behavior. The nodejs_compat compatibility flag provides support for some of Node’s built-in modules, but does not solve our other problems. For that, we had to get creative…

Dynamic code evaluation

For security reasons, the Cloudflare Workers runtime does not allow dynamic code evaluation via eval() or new Function(). It also requires all modules to be defined ahead-of-time before execution starts. The test runner doesn’t know what code to run until we start executing tests, so without lifting these restrictions, we have no way of executing the raw JavaScript code transformed by Vite nor importing arbitrary modules from disk. Fortunately, code that is only meant to run locally – like tests – has a much more relaxed security model than deployed code. To support local testing and other development-specific use-cases such as Vite’s new Runtime API, we added “unsafe-eval bindings” and “module-fallback services” to workerd.

Unsafe-eval bindings provide local-only access to the eval() function, and new Function()/new AsyncFunction()/new WebAssembly.Module() constructors. By exposing these through a binding, we retain control over which code has access to these features.

// Type signature for unsafe-eval bindings
interface UnsafeEval {
  eval(script: string, name?: string): unknown;
  newFunction(script: string, name?: string, ...args: string[]): Function;
  newAsyncFunction(script: string, name?: string, ...args: string[]): AsyncFunction;
  newWasmModule(src: BufferSource): WebAssembly.Module;
}

Using the unsafe-eval binding eval() method, we were able to implement a polyfill for the required vm.runInThisContext() function. While we could also implement loading of arbitrary modules from disk using unsafe-eval bindings, this would require us to rebuild workerd’s module resolution system in JavaScript. Instead, we allow workers to be configured with module fallback services. If enabled, imports that cannot be resolved by workerd become HTTP requests to the fallback service. These include the specifier, referrer, and whether it was an import or require. The service may respond with a module definition, or a redirect to another location if the resolved location doesn’t match the specifier. Requests originating from synchronous requires will block the main thread until the module is resolved. The Workers Vitest pool’s fallback service implements Node-like resolution with Node-style interoperability between CommonJS and ES modules.

Durable Objects as test runners

Now that we can run and import arbitrary code, the next step is to get Vitest’s thread worker running inside workerd. Every incoming request has its own request context. To improve overall performance, I/O objects such as streams, request/response bodies and WebSockets created in one request context cannot be used from another. This means if we want to use a WebSocket for RPC between the pool and our workerd processes, we need to make sure the WebSocket is only used from one request context. To coordinate this, we define a singleton Durable Object for accepting the RPC connection and running tests from. Functions using RPC such as resolving modules, reporting results and console logging will always use this singleton. We use Miniflare’s “magic proxy” system to get a reference to the singleton’s stub in Node.js, and send a WebSocket upgrade request directly to it. After adding a few more Node.js polyfills, and a basic cloudflare:test module to provide access to bindings and a function for creating ExecutionContexts, we’re able to write basic Workers unit tests! 🎉

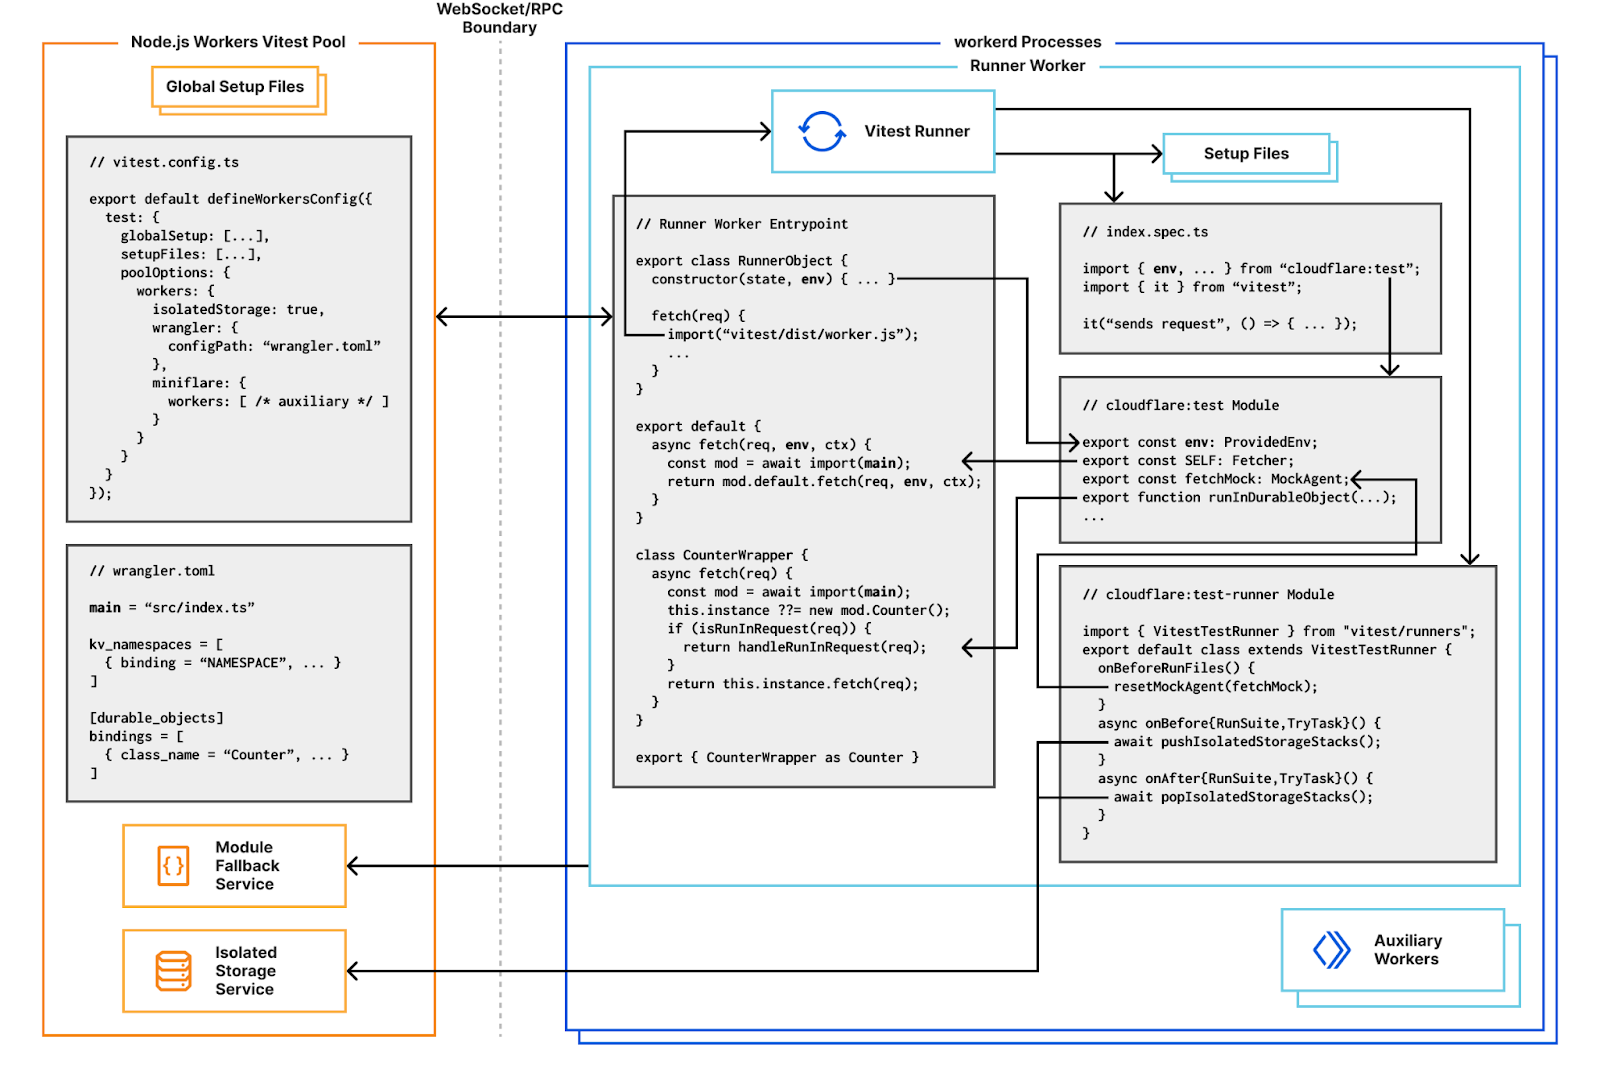
Integration tests with hot-module-reloading

In addition to unit tests, we support integration testing with a special SELF service binding in the cloudflare:test module. This points to a special export default { fetch(...) {...} } handler which uses Vite to import your Worker’s main module.

Using Vite’s transformation pipeline here means your handler gets hot-module-reloading (HMR) for free! When code is updated, the module cache is invalidated, tests are rerun, and subsequent requests will execute with new code. The same approach of wrapping user code handlers applies to Durable Objects too, providing the same HMR benefits.

Integration tests can be written by calling SELF.fetch(), which will dispatch a fetch() event to your user code in the same global scope as your test, but under a different request context. This means global mocks apply to your Worker’s execution, as do request context lifetime restrictions. In particular, if you forget to call ctx.waitUntil(), you’ll see an appropriate error message. This wouldn’t be the case if you called your Worker’s handler directly in a unit test, as you’d be running under the runner singleton’s Durable Object request context, whose lifetime is automatically extended.

// test/index.spec.ts
import { SELF } from "cloudflare:test";
import { it, expect } from "vitest";
import "../src/index";

it("sends request", async () => {
   const response = await SELF.fetch("https://example.com");
   expect(await response.text()).toMatchInlineSnapshot(`"body"`);
});

Isolated per-test storage

Most Workers applications will have at least one binding to a Cloudflare storage service, such as KV, R2 or D1. Ideally, tests should be self-contained and runnable in any order or on their own. To make this possible, writes to storage need to be undone at the end of each test, so reads by other tests aren’t affected. Whilst it’s possible to do this manually, it can be tricky to keep track of all writes and undo them in the correct order. For example, take the following two functions:

// helpers.ts
interface Env {
  NAMESPACE: KVNamespace;
}
// Get the current list stored in a KV namespace
export async function get(env: Env, key: string): Promise<string[]> {
  return await env.NAMESPACE.get(key, "json") ?? [];
}
// Add an item to the end of the list
export async function append(env: Env, key: string, item: string) {
  const value = await get(env, key);
  value.push(item);
  await env.NAMESPACE.put(key, JSON.stringify(value));
}

If we wanted to test these functions, we might write something like below. Note we have to keep track of all the keys we might write to, and restore their values at the end of tests, even if those tests fail.

// helpers.spec.ts
import { env } from "cloudflare:test";
import { beforeAll, beforeEach, afterEach, it, expect } from "vitest";
import { get, append } from "./helpers";

let startingList1: string | null;
let startingList2: string | null;
beforeEach(async () => {
  // Store values before each test
  startingList1 = await env.NAMESPACE.get("list 1");
  startingList2 = await env.NAMESPACE.get("list 2");
});
afterEach(async () => {
  // Restore starting values after each test
  if (startingList1 === null) {
    await env.NAMESPACE.delete("list 1");
  } else {
    await env.NAMESPACE.put("list 1", startingList1);
  }
  if (startingList2 === null) {
    await env.NAMESPACE.delete("list 2");
  } else {
    await env.NAMESPACE.put("list 2", startingList2);
  }
});

beforeAll(async () => {
  await append(env, "list 1", "one");
});

it("appends to one list", async () => {
  await append(env, "list 1", "two");
  expect(await get(env, "list 1")).toStrictEqual(["one", "two"]);
});

it("appends to two lists", async () => {
  await append(env, "list 1", "three");
  await append(env, "list 2", "four");
  expect(await get(env, "list 1")).toStrictEqual(["one", "three"]);
  expect(await get(env, "list 2")).toStrictEqual(["four"]);
});

This is slightly easier with the recently introduced onTestFinished() hook, but you still need to remember which keys were written to, or enumerate them at the start/end of tests. You’d also need to manage this for KV, R2, Durable Objects, caches and any other storage service you used. Ideally, the testing framework should just manage this all for you.

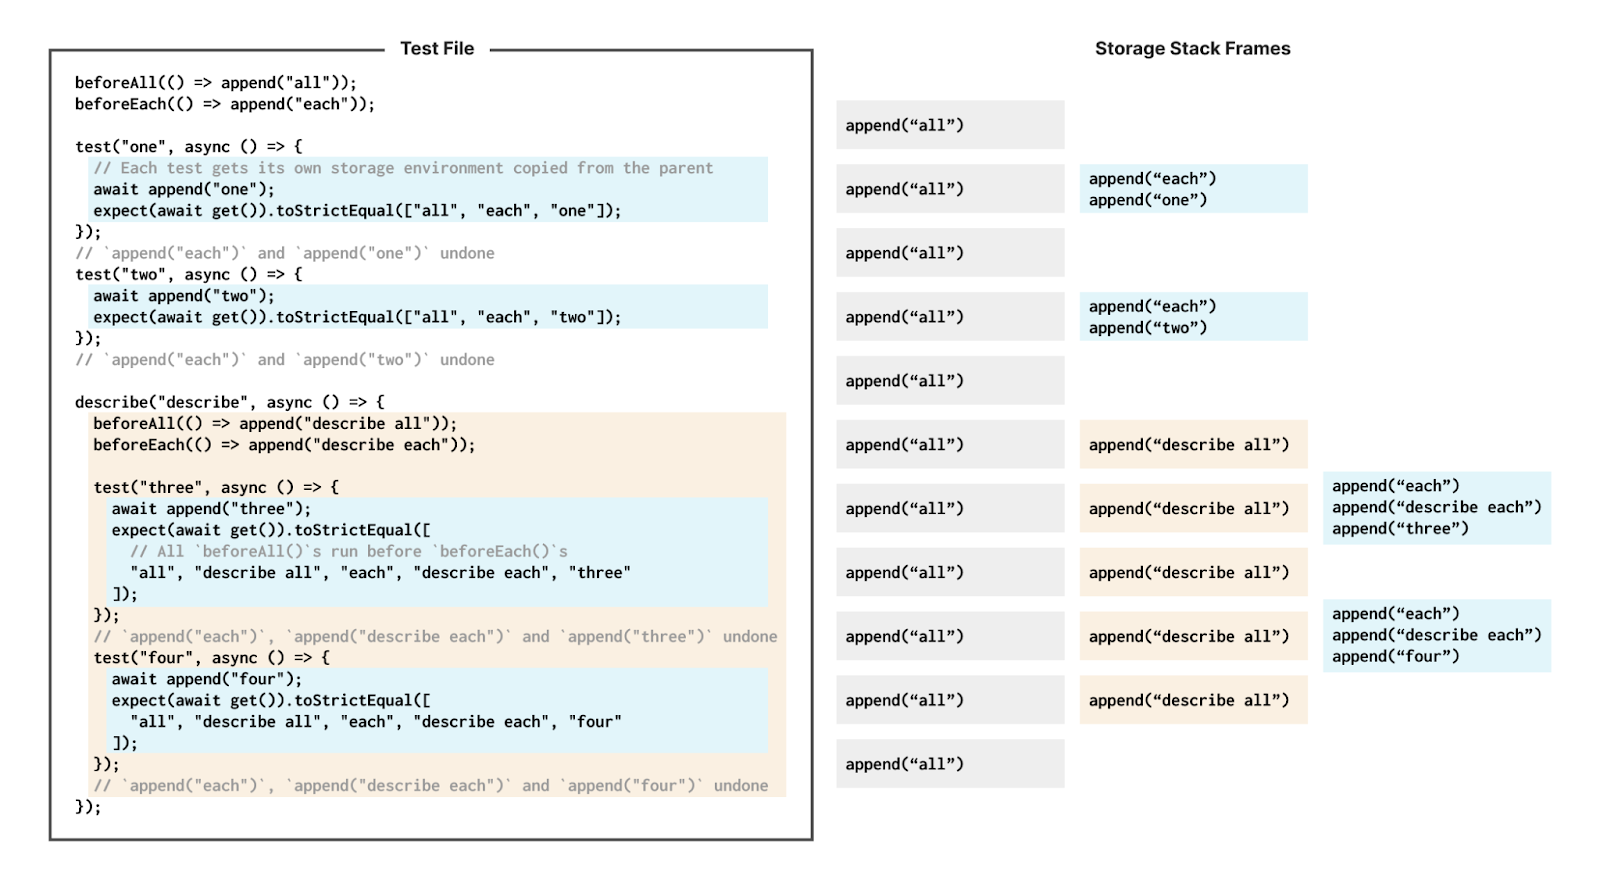
That’s exactly what the Workers Vitest pool does with the isolatedStorage option which is enabled by default. Any writes to storage performed in a test are automagically undone at the end of the test. To support seeding data in beforeAll() hooks, including those in nested describe()-blocks, a stack is used. Before each suite or test, a new frame is pushed to the storage stack. All writes performed by the test or associated beforeEach()/afterEach() hooks are written to the frame. After each suite or test, the top frame is popped from the storage stack, undoing any writes.

Miniflare implements simulators for storage services on top of Durable Objects with a separate blob store. When running locally, workerd uses SQLite for Durable Object storage. To implement isolated storage, we implement an on-disk stack of .sqlite database files by backing up the databases when “pushing”, and restoring backups when “popping”. Blobs stored in the separate store are retained through stack operations, and cleaned up at the end of each test run. Whilst this works, it involves copying lots of .sqlite files. Looking ahead, we’d like to explore using SQLite SAVEPOINTS for a more efficient solution.

Declarative request mocking

In addition to storage, most Workers will make outbound fetch() requests. For tests, it’s often useful to mock responses to these requests. Miniflare already allows you to specify an undici MockAgent to route all requests through. The MockAgent class provides a declarative interface for specifying requests to mock and the corresponding responses to return. This API is relatively simple, whilst being flexible enough for advanced use cases. We provide an instance of MockAgent as fetchMock in the cloudflare:test module.

import { fetchMock } from "cloudflare:test";
import { beforeAll, afterEach, it, expect } from "vitest";

beforeAll(() => {
  // Enable outbound request mocking...
  fetchMock.activate();
  // ...and throw errors if an outbound request isn't mocked
  fetchMock.disableNetConnect();
});
// Ensure we matched every mock we defined
afterEach(() => fetchMock.assertNoPendingInterceptors());

it("mocks requests", async () => {
  // Mock the first request to `https://example.com`
  fetchMock
    .get("https://example.com")
    .intercept({ path: "/" })
    .reply(200, "body");

  const response = await fetch("https://example.com/");
  expect(await response.text()).toBe("body");
});

To implement this, we bundled a stripped down version of undici containing just the MockAgent code. We then built a custom undici Dispatcher that used the Worker’s global fetch() function instead of undici’s built-in HTTP implementation based on llhttp and node:net.

Testing Durable Objects directly

Finally, Miniflare v2’s custom Vitest environment provided support for accessing the instance methods and state of Durable Objects in tests directly. This allowed you to unit test Durable Objects like any other JavaScript class—you could mock particular methods and properties, or immediately call specific handlers like alarm(). To implement this in workerd, we rely on our existing wrapping of user Durable Objects for Vite transforms and hot-module reloading. When you call the runInDurableObject(stub, callback) function from cloudflare:test, we store callback in a global cache and send a special fetch() request to stub which is intercepted by the wrapper. The wrapper executes the callback in the request context of the Durable Object, and stores the result in the same cache. runInDurableObject() then reads from this cache, and returns the result.

Note that this assumes the Durable Object is running in the same isolate as the runInDurableObject() call. While this is true for same-Worker Durable Objects running locally, it means Durable Objects defined in auxiliary workers can’t be accessed directly.

Try it out!

We are excited to release the @cloudflare/vitest-pool-workers package on npm, and to provide an improved testing experience for you.

Make sure to read the Write your first test guide and begin writing unit and integration tests today! If you’ve been writing tests using one of our previous options, our unstable_dev migration guide or our Miniflare 2 migration guide should explain key differences and help you move your tests over quickly.

If you run into issues or have suggestions for improvements, please file an issue in our GitHub repo or reach out via our Developer Discord.

Improved local development with wrangler and workerd, Developer Week

Post Syndicated from Brendan Coll original http://blog.cloudflare.com/wrangler3/

Improved local development with wrangler and workerd, Developer Week

Improved local development with wrangler and workerd, Developer Week

For over a year now, we’ve been working to improve the Workers local development experience. Our goal has been to improve parity between users' local and production environments. This is important because it provides developers with a fully-controllable and easy-to-debug local testing environment, which leads to increased developer efficiency and confidence.

To start, we integrated Miniflare, a fully-local simulator for Workers, directly into Wrangler, the Workers CLI. This allowed users to develop locally with Wrangler by running wrangler dev --local. Compared to the wrangler dev default, which relied on remote resources, this represented a significant step forward in local development. As good as it was, it couldn’t leverage the actual Workers runtime, which led to some inconsistencies and behavior mismatches.

Last November, we announced the experimental version of Miniflare v3, powered by the newly open-sourced workerd runtime, the same runtime used by Cloudflare Workers. Since then, we’ve continued to improve upon that experience both in terms of accuracy with the real runtime and in cross-platform compatibility.

As a result of all this work, we are proud to announce the release of Wrangler v3 – the first version of Wrangler with local-by-default development.

A new default for Wrangler

Starting with Wrangler v3, users running wrangler dev will be leveraging Miniflare v3 to run your Worker locally. This local development environment is effectively as accurate as a production Workers environment, providing an ability for you to test every aspect of your application before deploying. It provides the same runtime and bindings, but has its own simulators for KV, R2, D1, Cache and Queues. Because you’re running everything on your machine, you won’t be billed for operations on KV namespaces or R2 buckets during development, and you can try out paid-features like Durable Objects for free.

In addition to a more accurate developer experience, you should notice performance differences. Compared to remote mode, we’re seeing a 10x reduction to startup times and 60x reduction to script reload times with the new local-first implementation. This massive reduction in reload times drastically improves developer velocity!

Improved local development with wrangler and workerd, Developer Week

Remote development isn’t going anywhere. We recognise many developers still prefer to test against real data, or want to test Cloudflare services like image resizing that aren’t implemented locally yet. To run wrangler dev on Cloudflare’s network, just like previous versions, use the new --remote flag.

Deprecating Miniflare v2

For users of Miniflare, there are two important pieces of information for those updating from v2 to v3. First, if you’ve been using Miniflare’s CLI directly, you’ll need to switch to wrangler dev. Miniflare v3 no longer includes a CLI. Secondly, if you’re using Miniflare’s API directly, upgrade to miniflare@3 and follow the migration guide.

How we built Miniflare v3

Miniflare v3 is now built using workerd, the open-source Cloudflare Workers runtime. As workerd is a server-first runtime, every configuration defines at least one socket to listen on. Each socket is configured with a service, which can be an external server, disk directory or most importantly for us, a Worker! To start a workerd server running a Worker, create a worker.capnp file as shown below, run npx workerd serve worker.capnp and visit http://localhost:8080 in your browser:

using Workerd = import "/workerd/workerd.capnp";


const helloConfig :Workerd.Config = (
 services = [
   ( name = "hello-worker", worker = .helloWorker )
 ],
 sockets = [
   ( name = "hello-socket", address = "*:8080", http = (), service = "hello-worker" )
 ]
);


const helloWorker :Workerd.Worker = (
 modules = [
   ( name = "worker.mjs",
     esModule =
       `export default {
       `  async fetch(request, env, ctx) {
       `    return new Response("Hello from workerd! 👋");
       `  }
       `}
   )
 ],
 compatibilityDate = "2023-04-04",
);

If you’re interested in what else workerd can do, check out the other samples. Whilst workerd provides the runtime and bindings, it doesn’t provide the underlying implementations for the other products in the Developer Platform. This is where Miniflare comes in! It provides simulators for KV, R2, D1, Queues and the Cache API.

Improved local development with wrangler and workerd, Developer Week

Building a flexible storage system

As you can see from the diagram above, most of Miniflare’s job is now providing different interfaces for data storage. In Miniflare v2, we used a custom key-value store to back these, but this had a few limitations. For Miniflare v3, we’re now using the industry-standard SQLite, with a separate blob store for KV values, R2 objects, and cached responses. Using SQLite gives us much more flexibility in the queries we can run, allowing us to support future unreleased storage solutions. 👀

A separate blob store allows us to provide efficient, ranged, streamed access to data. Blobs have unguessable identifiers, can be deleted, but are otherwise immutable. These properties make it possible to perform atomic updates with the SQLite database. No other operations can interact with the blob until it's committed to SQLite, because the ID is not guessable, and we don't allow listing blobs. For more details on the rationale behind this, check out the original GitHub discussion.

Running unit tests inside Workers

One of Miniflare’s primary goals is to provide a great local testing experience. Miniflare v2 provided custom environments for popular Node.js testing frameworks that allowed you to run your tests inside the Miniflare sandbox. This meant you could import and call any function using Workers runtime APIs in your tests. You weren’t restricted to integration tests that just send and receive HTTP requests. In addition, these environments provide per-test isolated storage, automatically undoing any changes made at the end of each test.

In Miniflare v2, these environments were relatively simple to implement. We’d already reimplemented Workers Runtime APIs in a Node.js environment, and could inject them using Jest and Vitest’s APIs into the global scope.

Improved local development with wrangler and workerd, Developer Week

For Miniflare v3, this is much trickier. The runtime APIs are implemented in a separate workerd process, and you can’t reference JavaScript classes across a process boundary. So we needed a new approach…

Improved local development with wrangler and workerd, Developer Week

Many test frameworks like Vitest use Node’s built-in worker_threads module for running tests in parallel. This module spawns new operating system threads running Node.js and provides a MessageChannel interface for communicating between them. What if instead of spawning a new OS thread, we spawned a new workerd process, and used WebSockets for communication between the Node.js host process and the workerd “thread”?

Improved local development with wrangler and workerd, Developer Week

We have a proof of concept using Vitest showing this approach can work in practice. Existing Vitest IDE integrations and the Vitest UI continue to work without any additional work. We aren’t quite ready to release this yet, but will be working on improving it over the next few months. Importantly, the workerd “thread” needs access to Node.js built-in modules, which we recently started rolling out support for.

Improved local development with wrangler and workerd, Developer Week

Running on every platform

We want developers to have this great local testing experience, regardless of which operating system they’re using. Before open-sourcing, the Cloudflare Workers runtime was originally only designed to run on Linux. For Miniflare v3, we needed to add support for macOS and Windows too. macOS and Linux are both Unix-based, making porting between them relatively straightforward. Windows on the other hand is an entirely different beast… 😬

The workerd runtime uses KJ, an alternative C++ base library, which is already cross-platform. We’d also migrated to the Bazel build system in preparation for open-sourcing the runtime, which has good Windows support. When compiling our C++ code for Windows, we use LLVM's MSVC-compatible compiler driver clang-cl, as opposed to using Microsoft’s Visual C++ compiler directly. This enables us to use the "same" compiler frontend on Linux, macOS, and Windows, massively reducing the effort required to compile workerd on Windows. Notably, this provides proper support for #pragma once when using symlinked virtual includes produced by Bazel, __atomic_* functions, a standards-compliant preprocessor, GNU statement expressions used by some KJ macros, and understanding of the .c++ extension by default. After switching out unix API calls for their Windows equivalents using #if _WIN32 preprocessor directives, and fixing a bunch of segmentation faults caused by execution order differences, we were finally able to get workerd running on Windows! No WSL or Docker required! 🎉

Let us know what you think!

Wrangler v3 is now generally available! Upgrade by running npm install --save-dev wrangler@3 in your project. Then run npx wrangler dev to try out the new local development experience powered by Miniflare v3 and the open-source Workers runtime. Let us know what you think in the #wrangler channel on the Cloudflare Developers Discord, and please open a GitHub issue if you hit any unexpected behavior.

Doubling down on local development with Workers: Miniflare meets workerd

Post Syndicated from Brendan Coll original https://blog.cloudflare.com/miniflare-and-workerd/

Doubling down on local development with Workers: Miniflare meets workerd

Doubling down on local development with Workers: Miniflare meets workerd

Local development gives you a fully-controllable and easy-to-debug testing environment. At the start of this year, we brought this experience to Workers developers by launching Miniflare 2.0: a local Cloudflare Workers simulator. Miniflare 2 came with features like step-through debugging support, detailed console.logs, pretty source-mapped error pages, live reload and a highly-configurable unit testing environment. Not only that, but we also incorporated Miniflare into Wrangler, our Workers CLI, to enable wrangler dev’s —local mode.

Today, we’re taking local development to the next level! In addition to introducing new support for migrating existing projects to your local development environment, we’re making it easier to work with your remote data—locally! Most importantly, we’re releasing a much more accurate Miniflare 3, powered by the recently open-sourced workerd runtime—the same runtime used by Cloudflare Workers!

Enabling local development with workerd

One of the superpowers of having a local development environment is that you can test changes without affecting users in production. A great local environment offers a level of fidelity on par with production.

The way we originally approached local development was with Miniflare 2, which reimplemented Workers runtime APIs in JavaScript. Unfortunately, there were subtle behavior mismatches between these re-implementations and the real Workers runtime. These types of issues are really difficult for developers to debug, as they don’t appear locally, and step-through debugging of deployed Workers isn’t possible yet. For example, the following Worker returns responses successfully in Miniflare 2, so we might assume it’s safe to publish:

let cachedResponsePromise;
export default {
  async fetch(request, env, ctx) {
    // Let's imagine this fetch takes a few seconds. To speed up our worker, we
    // decide to only fetch on the first request, and reuse the result later.
    // This works fine in Miniflare 2, so we must be good right?
    cachedResponsePromise ??= fetch("https://example.com");
    return (await cachedResponsePromise).clone();
  },
};

However, as soon as we send multiple requests to our deployed Worker, it fails with Error: Cannot perform I/O on behalf of a different request. The problem here is that response bodies created in one request’s handler cannot be accessed from a different request’s handler. This limitation allows Cloudflare to improve overall Worker performance, but it was almost impossible for Miniflare 2 to detect these types of issues locally. In this particular case, the best solution is to cache using fetch itself.

Additionally, because the Workers runtime uses a very recent version of V8, it supports some JavaScript features that aren’t available in all versions of Node.js. This meant a few features implemented in Workers, like Array#findLast, weren’t always available in Miniflare 2.

With the Workers runtime now open-sourced, Miniflare 3 can leverage the same implementations that are deployed on Cloudflare’s network, giving bug-for-bug compatibility and practically eliminating behavior mismatches. 🎉

Doubling down on local development with Workers: Miniflare meets workerd
Miniflare 3’s new simplified architecture using worked

This radically simplifies our implementation too. We were able to remove over 50,000 lines of code from Miniflare 2. Of course, we still kept all the Miniflare special-sauce that makes development fun like live reload and detailed logging. 🙂

Doubling down on local development with Workers: Miniflare meets workerd

Local development with real data

We know that many developers choose to test their Workers remotely on the Cloudflare network as it gives them the ability to test against real data. Testing against fake data in staging and local environments is sometimes difficult, as it never quite matches the real thing.

With Miniflare 3, we’re blurring the lines between local and remote development, by bringing real data to your machine as an experimental opt-in feature. If enabled, Miniflare will read and write data to namespaces on the Cloudflare network, as your Worker would when deployed. This is only supported with Workers KV for now, but we’re exploring similar solutions for R2 and D1.

Doubling down on local development with Workers: Miniflare meets workerd
Miniflare’s system for accessing real KV data, reads and writes are cached locally for future accesses

A new default for Wrangler

With Miniflare 3 now effectively as accurate as the real Workers environment, and the ability to access real data locally, we’re revisiting the decision to make remote development the initial Wrangler experience. In a future update, wrangler dev --local will become the default. --local will no longer be required. Benchmarking suggests this will bring an approximate 10x reduction to startup and a massive 60x reduction to script reload times! Over the next few weeks, we’ll be focusing on further optimizing Wrangler’s performance to bring you the fastest Workers development experience yet!

Doubling down on local development with Workers: Miniflare meets workerd

wrangler init --from-dash

We want all developers to be able to take advantage of the improved local experience, so we’re making it easy to start a local Wrangler project from an existing Worker that’s been developed in the Cloudflare dashboard. With Node.js installed, run npx wrangler init –from-dash <your_worker_name> in your terminal to set up a new project with all your existing code and bindings such as KV namespaces configured. You can now seamlessly continue development of your application locally, taking advantage of all the developer experience improvements Wrangler and Miniflare provide. When you’re ready to deploy your worker, run npx wrangler publish.

Looking to the future

Over the next few months, the Workers team is planning to further improve the local development experience with a specific focus on automated testing. Already, we’ve released a preliminary API for programmatic end-to-end tests with wrangler dev, but we’re also investigating ways of bringing Miniflare 2’s Jest/Vitest environments to workerd. We’re also considering creating extensions for popular IDEs to make developing workers even easier. 👀

Miniflare 3.0 is now included in Wrangler! Try it out by running npx wrangler@latest dev --experimental-local. Let us know what you think in the #wrangler channel on the Cloudflare Developers Discord, and please open a GitHub issue if you hit any unexpected behavior.

Improving Workers TypeScript support: accuracy, ergonomics and interoperability

Post Syndicated from Brendan Coll original https://blog.cloudflare.com/improving-workers-types/

Improving Workers TypeScript support: accuracy, ergonomics and interoperability

Improving Workers TypeScript support: accuracy, ergonomics and interoperability

TypeScript makes it easy for developers to write code that doesn’t crash, by catching type errors before your program runs. We want developers to take advantage of this tooling, which is why one year ago, we built a system to automatically generate TypeScript types for the Cloudflare Workers runtime. This enabled developers to see code completions in their IDEs for Workers APIs, and to type check code before deploying. Each week, a new version of the types would be published, reflecting the most recent changes.

Over the past year, we’ve received lots of feedback from customers and internal teams on how we could improve our types. With the switch to the Bazel build system in preparation for open-sourcing the runtime, we saw an opportunity to rebuild our types to be more accurate, easier to use, and simpler to generate. Today, we’re excited to announce the next major release of @cloudflare/workers-types with a bunch of new features, and the open-sourcing of the fully-rewritten automatic generation scripts.

How to use TypeScript with Workers

Setting up TypeScript in Workers is easy! If you’re just getting started with Workers, install Node.js, then run npx wrangler init in your terminal to generate a new project. If you have an existing Workers project and want to take advantage of our improved typings, install the latest versions of TypeScript and @cloudflare/workers-types with npm install --save-dev typescript @cloudflare/workers-types@latest, then create a tsconfig.json file with the following contents:

{
  "compilerOptions": {
    "target": "esnext",
    "module": "esnext",
    "lib": ["esnext"],
    "types": ["@cloudflare/workers-types"]
  }
}

Your editor will now highlight issues and give you code completions as you type, leading to a less error-prone and more enjoyable developer experience.

Improving Workers TypeScript support: accuracy, ergonomics and interoperability
Editor highlighting incorrect use of set instead of put, and providing code completions

Improved interoperability with standard types

Cloudflare Workers implement many of the same runtime APIs as browsers, and we’re working to improve our standards compliance even more with the WinterCG. However, there will always be fundamental differences between what browsers and Workers can do. For example, browsers can play audio files, whereas Workers have direct access to Cloudflare’s network for storing globally-distributed data. This mismatch means that the runtime APIs and types provided by each platform are different, which in turn makes it difficult to use Workers types with frameworks, like Remix, that run the same files on the Cloudflare network and in the browser. These files need to be type-checked against lib.dom.d.ts, which is incompatible with our types.

To solve this problem, we now generate a separate version of our types that can be selectively imported, without having to include @cloudflare/workers-types in your tsconfig.json’s types field. Here’s an example of what this looks like:

import type { KVNamespace } from "@cloudflare/workers-types";

declare const USERS_NAMESPACE: KVNamespace;

In addition, we automatically generate a diff of our types against TypeScript’s lib.webworker.d.ts. Going forward, we’ll use this to identify areas where we can further improve our spec-compliance.

Improved compatibility with compatibility dates

Cloudflare maintains strong backwards compatibility promises for all the APIs we provide. We use compatibility flags and dates to make breaking changes in a backwards-compatible way. Sometimes these compatibility flags change the types. For example, the global_navigator flag adds a new navigator global, and the url_standard flag changes the URLSearchParams constructor signature.

We now allow you to select the version of the types that matches your compatibility date, so you can be sure you’re not using features that won’t be supported at runtime.

{
  "compilerOptions": {
    ...
    "types": ["@cloudflare/workers-types/2022-08-04"]
  }
}

Improved integration with Wrangler

In addition to compatibility dates, your Worker environment configuration also impacts the runtime and type API surface. If you have bindings such as KV namespaces or R2 buckets configured in your wrangler.toml, these need to be reflected in TypeScript types. Similarly, custom text, data and WebAssembly module rules need to be declared so TypeScript knows the types of exports. Previously, it was up to you to create a separate ambient TypeScript file containing these declarations.

To keep wrangler.toml as the single source of truth, you can now run npx wrangler types to generate this file automatically.

For example, the following wrangler.toml

kv_namespaces = [{ binding = "MY_NAMESPACE", id = "..." }]
rules = [{ type = "Text", globs = ["**/*.txt"] }]

…generates these ambient types:

interface Env {
  MY_NAMESPACE: KVNamespace;
}
declare module "*.txt" {
  const value: string;
  export default value;
}

Improved integrated documentation and changelogs

Code completions provide a great way for developers new to the Workers platform to explore the API surface. We now include the documentation for standard APIs from TypeScript’s official types in our types. We’re also starting the process of bringing docs for Cloudflare specific APIs into them too.

Improving Workers TypeScript support: accuracy, ergonomics and interoperability

For developers already using the Workers platform, it can be difficult to see how types are changing with each release of @cloudflare/workers-types. To avoid type errors and highlight new features, we now generate a detailed changelog with each release that splits out new, changed and removed definitions.

How does type generation work under the hood?

As mentioned earlier, we’ve completely rebuilt the automatic type generation scripts to be more reliable, extensible and maintainable. This means developers will get improved types as soon as new versions of the runtime are published. Our system now uses workerd’s new runtime-type-information (RTTI) system to query types of Workers runtime APIs, rather than attempting to extract this information from parsed C++ ASTs.

// Encode the KV namespace type without any compatibility flags enabled
CompatibilityFlags::Reader flags = {};
auto builder = rtti::Builder(flags);
auto type = builder.structure<KvNamespace>();
capnp::TextCodec codec;
auto encoded = codec.encode(type);
KJ_DBG(encoded); // (name = "KvNamespace", members = [ ... ], ...)

We then pass this RTTI to a TypeScript program that uses the TypeScript Compiler API to generate declarations and perform AST transformations to tidy them up. This is built into workerd’s Bazel build system, meaning generating types is now a single bazel build //types:types command. We leverage Bazel’s cache to rebuild as little as possible during generation.

import ts, { factory as f } from "typescript";

const keyParameter = f.createParameterDeclaration(
  /* decorators */ undefined,
  /* modifiers */ undefined,
  /* dotDotDotToken */ undefined,
  "key",
  /* questionToken */ undefined,
  f.createTypeReferenceNode("string")
);
const returnType = f.createTypeReferenceNode("Promise", [
  f.createUnionTypeNode([
    f.createTypeReferenceNode("string"),
    f.createLiteralTypeNode(f.createNull()),
  ]),
]);
const getMethod = f.createMethodSignature(
  /* modifiers */ undefined,
  "get",
  /* questionToken */ undefined,
  /* typeParameters */ undefined,
  [keyParameter],
  returnType
);
const kvNamespace = f.createInterfaceDeclaration(
  /* decorators */ undefined,
  /* modifiers */ undefined,
  "KVNamespace",
  /* typeParameters */ undefined,
  /* heritageClauses */ undefined,
  [getMethod]
);

const file = ts.createSourceFile("file.ts", "", ts.ScriptTarget.ESNext);
const printer = ts.createPrinter();
const output = printer.printNode(ts.EmitHint.Unspecified, kvNamespace, file);
console.log(output); // interface KVNamespace { get(key: string): Promise<string | null>; }

Improving Workers TypeScript support: accuracy, ergonomics and interoperability

Whilst the auto-generated types correctly describe the JavaScript interface of Workers runtime APIs, TypeScript provides additional features we can use to provide higher-fidelity types and improve developer ergonomics. Our system allows us to handwrite partial TypeScript “overrides” that get merged with the auto-generated types. This enables us to…

  • Add type parameters (generics) to types such as ReadableStream and avoid any typed values.
  • Specify the correspondence between input and output types with method overloads. For example, KVNamespace#get() should return a string when the type argument is text, but ArrayBuffer when it’s arrayBuffer.
  • Rename types to match TypeScript standards and reduce verbosity.
  • Fully-replace a type for more accurate declarations. For example, we replace WebSocketPair with a const declaration for better types with Object.values().
  • Provide types for values that are internally untyped such as the Request#cf object.
  • Hide internal types that aren’t usable in your workers.

Previously, these overrides were defined in separate TypeScript files to the C++ declarations they were overriding. This meant they often fell out-of-sync with the original declarations. In the new system, overrides are defined alongside the originals with C++ macros, meaning they can be reviewed alongside runtime implementation changes. See the README for workerd’s JavaScript glue code for many more details and examples.

Try typing with workers-types today!

We encourage you to upgrade to the latest version of @cloudflare/workers-types with npm install --save-dev @cloudflare/workers-types@latest, and try out the new wrangler types command. We’ll be publishing a new version of the types with each workerd release. Let us know what you think on the Cloudflare Developers Discord, and please open a GitHub issue if you find any types that could be improved.

Miniflare 2.0: fully-local development and testing for Workers

Post Syndicated from Brendan Coll original https://blog.cloudflare.com/miniflare/

Miniflare 2.0: fully-local development and testing for Workers

Miniflare 2.0: fully-local development and testing for Workers

In July 2021, I launched Miniflare 1.0, a fun, full-featured, fully-local simulator for Workers, on the Cloudflare Workers Discord server. What began as a pull request to the cloudflare-worker-local project has now become an official Cloudflare project and a core part of the Workers ecosystem, being integrated into wrangler 2.0. Today, I’m thrilled to announce the release of the next major version: a more modular, lightweight, and accurate Miniflare 2.0. 🔥

Background: Why Miniflare was created

Miniflare 2.0: fully-local development and testing for Workers

At the end of 2020, I started to build my first Workers app. Initially I used the then recently released wrangler dev, but found it was taking a few seconds before changes were reflected. While this was still impressive considering it was running on the Workers runtime, I was using Vite to develop the frontend, so I knew a significantly faster developer experience was possible.

I then found cloudflare-worker-local and cloudworker, which were local Workers simulators, but didn’t have support for newer features like Workers Sites. I wanted a magical simulator that would just work ✨ in existing projects, focusing on the developer experience, and — by the reception of Miniflare 1.0 — I wasn’t the only one.

Miniflare 1.0 brought near instant reloads, source map support (so you could see where errors were thrown), cleaner logs (no more { unknown object }s or massive JSON stack traces), a pretty error page that highlighted the cause of the error, step-through debugger support, and more.

Miniflare 2.0: fully-local development and testing for Workers

Pretty-error page powered by `youch`

Miniflare 2.0: fully-local development and testing for Workers

The next iteration: What’s new in version 2

In the relatively short time since the launch of Miniflare 1.0 in July, Workers as a platform has improved dramatically. Durable Objects now have input and output gates for ensuring consistency without explicit transactions, Workers has compatibility dates allowing developers to opt-into backwards-incompatible fixes, and you can now write Workers using JavaScript modules.

Miniflare 2 supports all these features and has been completely redesigned with three primary design goals:

  1. Modular: Miniflare 2 splits Workers components (KV, Durable Objects, etc.) into separate packages (@miniflare/kv, @miniflare/durable-objects, etc.) that you can import on their own for testing. This will also make it easier to add support for new, unreleased features like R2 Storage.
  2. Lightweight: Miniflare 1 included 122 third-party packages with a total install size of 88.3MB. Miniflare 2 reduces this to 23 packages and 6MB by leveraging features included with Node.js 16.
  3. Accurate: Miniflare 2 replicates the quirks and thrown errors of the real Workers runtime, so you’ll know before you deploy if things are going to break. Of course, wrangler dev will always be the most accurate preview, running on the real edge with real data, but Miniflare 2 is really close!

It also adds a new live-reload feature and first-class support for testing with Jest for an even more enjoyable developer experience.

Getting started with local development

As mentioned in the introduction, Miniflare 2.0 is now integrated into wrangler 2.0, so you just need to run npx wrangler@beta dev --local to start a fully-local Worker development server or npx wrangler@beta pages dev to start a Cloudflare Pages Functions server. Make sure you’ve got the latest release of Node.js installed.

However, if you’re using Wrangler 1 or want to customize your local environment, you can install Miniflare standalone. If you’ve got an existing worker with a wrangler.toml file, just run npx miniflare --live-reload to start a live-reloading development server. Miniflare will automatically load configuration like KV namespaces or Durable Object bindings from your wrangler.toml file and secrets from a .env file.

Miniflare is highly configurable. For example, if you want to persist KV data between restarts, include the --kv-persist flag. See the Miniflare docs or run npx miniflare --help for many more options, like running multiple workers or starting an HTTPS server.

If you’ve got a scheduled event handler, you can manually trigger it by visiting http://localhost:8787/cdn-cgi/mf/scheduled in your browser.

Testing for Workers with Jest

Jest is one of the most popular JavaScript testing frameworks, so it made sense to add first-class support for it. Miniflare 2.0 includes a custom test environment that gives your tests access to Workers runtime APIs.

For example, suppose we have the following worker, written using JavaScript modules, that stores the number of times each URL is visited in Workers KV:

Aside: Workers KV is not designed for counters as it’s eventually consistent. In a real worker, you should use Durable Objects. This is just a simple example.

// src/index.mjs
export async function increment(namespace, key) {
  // Get the current count from KV
  const currentValue = await namespace.get(key);
  // Increment the count, defaulting it to 0
  const newValue = parseInt(currentValue ?? "0") + 1;
  // Store and return the new count
  await namespace.put(key, newValue.toString());
  return newValue;
}

export default {
  async fetch(request, env, ctx) {
    // Use the pathname for a key
    const url = new URL(request.url);
    const key = url.pathname;
    // Increment the key
    const value = await increment(env.COUNTER_NAMESPACE, key);
    // Return the new incremented count
    return new Response(`count for ${key} is now ${value}`);
  },
};
# wrangler.toml
kv_namespaces = [
  { binding = "COUNTER_NAMESPACE", id = "..." }
]

[build.upload]
format = "modules"
dist = "src"
main = "./index.mjs"

…we can write unit tests like so:

// test/index.spec.mjs
import worker, { increment } from "../src/index.mjs";

// When using `format = "modules"`, bindings are included in the `env` parameter,
// which we don't have access to in tests. Miniflare therefore provides a custom
// global method to access these.
const { COUNTER_NAMESPACE } = getMiniflareBindings();

test("should increment the count", async () => {
  // Seed the KV namespace
  await COUNTER_NAMESPACE.put("a", "3");

  // Perform the increment
  const newValue = await increment(COUNTER_NAMESPACE, "a");
  const storedValue = await COUNTER_NAMESPACE.get("a");

  // Check the return value of increment
  expect(newValue).toBe(4);
  // Check increment had the side effect of updating KV
  expect(storedValue).toBe("4");
});

test("should return new count", async () => {
  // Note we're using Worker APIs in our test, without importing anything extra
  const request = new Request("http://localhost/a");
  const response = await worker.fetch(request, { COUNTER_NAMESPACE });

  // Each test gets its own isolated storage environment, so the changes to "a"
  // are *undone* automatically. This means at the start of this test, "a"
  // wasn't in COUNTER_NAMESPACE, so it defaulted to 0, and the count is now 1.
  expect(await response.text()).toBe("count for /a is now 1");
});
// jest.config.js
const { defaults } = require("jest-config");

module.exports = {
  testEnvironment: "miniflare", // ✨
  // Tell Jest to look for tests in .mjs files too
  testMatch: [
    "**/__tests__/**/*.?(m)[jt]s?(x)",
    "**/?(*.)+(spec|test).?(m)[tj]s?(x)",
  ],
  moduleFileExtensions: ["mjs", ...defaults.moduleFileExtensions],
};

…and run them with:

# Install dependencies
$ npm install -D jest jest-environment-miniflare
# Run tests with experimental ES modules support
$ NODE_OPTIONS=--experimental-vm-modules npx jest

For more details about the custom test environment and isolated storage, see the Miniflare docs or this example project that also uses TypeScript and Durable Objects.

Not using Jest? Miniflare lets you write your own integration tests with vanilla Node.js or any other test framework. For an example using AVA, see the Miniflare docs or this repository.

How Miniflare works

Let’s now dig deeper into how some interesting parts of Miniflare work.

Miniflare is powered by Node.js, a JavaScript runtime built on Chrome’s V8 JavaScript engine. V8 is the same engine that powers the Cloudflare Workers runtime, but Node and Workers implement different runtime APIs on top of it. To ensure Node’s APIs aren’t visible to users’ worker code and to inject Workers’ APIs, Miniflare uses the Node.js vm module. This lets you run arbitrary code in a custom V8 context.

A core part of Workers are the Request and Response classes. Miniflare gets these from undici, a project written by the Node team to bring fetch to Node. For service workers, we also need a way to addEventListeners and dispatch events using the EventTarget API, which was added in Node 15.

With that we can build a mini-miniflare:

import vm from "vm";
import { Request, Response } from "undici";

// An instance of this class will become the global scope of our Worker,
// extending EventTarget for addEventListener and dispatchEvent
class ServiceWorkerGlobalScope extends EventTarget {
  constructor() {
    super();

    // Add Worker runtime APIs
    this.Request = Request;
    this.Response = Response;

    // Make sure this is bound correctly when EventTarget methods are called
    this.addEventListener = this.addEventListener.bind(this);
    this.removeEventListener = this.removeEventListener.bind(this);
    this.dispatchEvent = this.dispatchEvent.bind(this);
  }
}

// An instance of this class will be passed as the event parameter to "fetch"
// event listeners
class FetchEvent extends Event {
  constructor(type, init) {
    super(type);
    this.request = init.request;
  }

  respondWith(response) {
    this.response = response;
  }
}

// Create a V8 context to run user code in
const globalScope = new ServiceWorkerGlobalScope();
const context = vm.createContext(globalScope);

// Example user worker code, this could be loaded from the file system
const workerCode = `
addEventListener("fetch", (event) => {
  event.respondWith(new Response("Hello mini-miniflare!"));
})
`;
const script = new vm.Script(workerCode);

// Run the user's code, registering the "fetch" event listener
script.runInContext(context);

// Create an example request, this could come from an incoming HTTP request
const request = new Request("http://localhost:8787/");
const event = new FetchEvent("fetch", { request });

// Dispatch the event and log the response
globalScope.dispatchEvent(event);
console.log(await event.response.text()); // Hello mini-miniflare!

Plugins

Miniflare 2.0: fully-local development and testing for Workers

Dependency graph of the Miniflare monorepo.

There are a lot of Workers runtime APIs, so adding and configuring them all manually as above would be tedious. Therefore, Miniflare 2 has a plugin system that allows each package to export globals and bindings to be included in the sandbox. Options have annotations describing their type, CLI flag, and where to find them in Wrangler configuration files:

@Option({
  // Define type for runtime validation of the CLI flag
  type: OptionType.ARRAY,
  // Use --kv instead of auto-generated --kv-namespace for the CLI flag
  name: "kv",
  // Define -k as an alias
  alias: "k",
  // Displayed in --help
  description: "KV namespace to bind",
  // Where to find this option in wrangler.toml
  fromWrangler: (config) => config.kv_namespaces?.map(({ binding }) => binding),
})
kvNamespaces?: string[];

Durable Objects

Before input and output gates were added, you usually needed to use the transaction() method to ensure consistency:

async function incrementCount() {
  let value;
  await this.storage.transaction(async (txn) => {
    value = await txn.get("count");
    await txn.put("count", value + 1);
  });
  return value;
}

Miniflare implements this using optimistic-concurrency control (OCC). However, input and output gates are now available, so to avoid race conditions when simulating newly-written Durable Object code, Miniflare 2 needed to implement them.

From the description in the gates announcement blog post:

Input gates: While a storage operation is executing, no events shall be delivered to the object except for storage completion events. Any other events will be deferred until such a time as the object is no longer executing JavaScript code and is no longer waiting for any storage operations. We say that these events are waiting for the "input gate" to open.

…we can see input gates need to have two methods, one for closing the gate while a storage operation is running and one for waiting until the input gate is open:

class InputGate {
  async runWithClosed<T>(closure: () => Promise<T>): Promise<T> {
    // 1. Close the input gate
    // 2. Run the closure and store the result
    // 3. Open the input gate
    // 4. Return the result
  }

  async waitForOpen(): Promise<void> {
    // 1. Check if the input gate is open
    // 2. If it is, return
    // 3. Otherwise, wait until it is
  }
}

Each Durable Object has its own InputGate. In the storage implementation, we call runWithClosed to defer other events until the storage operation completes:

class DurableObjectStorage {
  async get<Value>(key: string): Promise<Value | undefined> {
    return this.inputGate.runWithClosed(() => {
      // Get key from storage
    });
  }
}

…and whenever we’re ready to deliver another event, we call waitForOpen:

import { fetch as baseFetch } from "undici";

async function fetch(input, init) {
  const response = await baseFetch(input, init);
  await inputGate.waitForOpen();
  return response;
}

You may have noticed a problem here. Where does inputGate come from in fetch? We only have one global scope for the entire Worker and all its Durable Objects, so we can’t have a fetch per Durable Object InputGate. We also can’t ask the user to pass it around as another parameter to all functions that need it. We need some way of storing it in a context that’s passed around automatically between potentially async functions. For this, we can use another lesser-known Node module, async_hooks, which includes the AsyncLocalStorage class:

import { AsyncLocalStorage } from "async_hooks";

const inputGateStorage = new AsyncLocalStorage<InputGate>();

const inputGate = new InputGate();
await inputGateStorage.run(inputGate, async () => {
  // This closure will run in an async context with inputGate
  await fetch("https://example.com");
});

async function fetch(input: RequestInfo, init: RequestInit): Promise<Response> {
  const response = await baseFetch(input, init);
  // Get the input gate in the current async context
  const inputGate = inputGateStorage.getStore();
  await inputGate.waitForOpen();
  return response;
}

Durable Objects also include a blockConcurrencyWhile(closure) method that defers events until the closure completes. This is exactly the runWithClosed() method:

class DurableObjectState {
  // ...

  blockConcurrencyWhile<T>(closure: () => Promise<T>): Promise<T> {
    return this.inputGate.runWithClosed(closure);
  }
}

However, there’s a problem with what we’ve got at the moment. Consider the following code:

export class CounterObject {
  constructor(state: DurableObjectState) {
    state.blockConcurrencyWhile(async () => {
      const res = await fetch("https://example.com");
      this.data = await res.text();
    });
  }
}

blockConcurrencyWhile closes the input gate, but fetch won’t return until the input gate is open, so we’re deadlocked! To fix this, we need to make InputGates nested:

class InputGate {
  constructor(private parent?: InputGate) {}

  async runWithClosed<T>(closure: () => Promise<T>): Promise<T> {
    // 1. Close the input gate, *and any parents*
    // 2. *Create a new child input gate with this as its parent*
    const childInputGate = new InputGate(this);
    // 3. Run the closure, *under the child input gate's context*
    // 4. Open the input gate, *and any parents*
    // 5. Return the result
  }
}

Now the input gate outside of blockConcurrencyWhile will be closed, so fetches to the Durable Object will be deferred, but the input gate inside the closure will be open, so the fetch can return.

This glosses over some details, but you can check out the gates implementation for additional context and comments. 🙂

HTMLRewriter

HTMLRewriter is another novel class that allows parsing and transforming HTML streams. In the edge Workers runtime, it’s powered by C-bindings to the lol-html Rust library. Luckily, Ivan Nikulin built WebAssembly bindings for this, so we’re able to use the same library in Node.js.

However, these were missing support for async handlers that allow you to access external resources when rewriting:

class UserElementHandler {
  async element(node) {
    const response = await fetch("/user");
    // ...
  }
}

The WebAssembly bindings Rust code includes something like:

macro_rules! make_handler {
  ($handler:ident, $JsArgType:ident, $this:ident) => {
    move |arg: &mut _| {
      // `js_arg` here is the `node` parameter from above
      let js_arg = JsValue::from(arg);
      // $handler here is the `element` method from above
      match $handler.call1(&$this, &js_arg) {
        Ok(res) => {
          // Check if this is an async handler
          if let Some(promise) = res.dyn_ref::<JsPromise>() {
            await_promise(promise);
          }
          Ok(())
        }
        Err(e) => ...,
      }
    }
  };
}

The key thing to note here is that the Rust move |...| { ... } closure is synchronous, but handlers can be asynchronous. This is like trying to await a Promise in a non-async function.

To solve this, we use the Asyncify feature of Binaryen, a set of tools for working with WebAssembly modules. Whenever we call await_promise, Asyncify unwinds the current WebAssembly stack into some temporary storage. Then in JavaScript, we await the Promise. Finally, we rewind the stack from the temporary storage to the previous state and continue rewriting where we left off.

You can find the full implementation in the html-rewriter-wasm package.

Miniflare 2.0: fully-local development and testing for Workers

The future of Miniflare

As mentioned earlier, Miniflare is now included in wrangler 2.0. Try it out and let us know what you think!

I’d like to thank everyone on the Workers team at Cloudflare for building such an amazing platform and supportive community. Special thanks to anyone who’s contributed to Miniflare, opened issues, given suggestions, or asked questions in the Discord server.

Maybe now I can finish off my original workers project… 😅

Automatically generating types for Cloudflare Workers

Post Syndicated from Brendan Coll original https://blog.cloudflare.com/automatically-generated-types/

Automatically generating types for Cloudflare Workers

Automatically generating types for Cloudflare Workers

Historically, keeping our Rust and TypeScript type repos up to date has been hard. They were manually generated, which means they ran the risk of being inaccurate or out of date. Until recently, the workers-types repository needed to be manually updated whenever the types changed. We also used to add type information for mostly complete browser APIs. This led to confusion when people would try to use browser APIs that aren’t supported by the Workers runtime they would compile but throw errors.

That all changed this summer when Brendan Coll, whilst he was interning with us, built an automated pipeline for generating them. It runs every time we build the Workers runtime, generating types for our TypeScript and Rust repositories. Now everything is up-to-date and accurate.

A quick overview

Every time the Workers runtime code is built, a script runs over the public APIs and generates the Rust and TypeScript types as well as a JSON file containing an intermediate representation of the static types. The types are sent to the appropriate repositories and the JSON file is uploaded as well in case people want to create their own types packages. More on that later.

This means the static types will always be accurate and up to date. It also allows projects running Workers in other, statically-typed languages to generate their own types from our intermediate representation. Here is an example PR from our Cloudflare bot. It’s detected a change in the runtime types and is updating the TypeScript files as well as the intermediate representation.

Automatically generating types for Cloudflare Workers

Using the auto-generated types

To get started, use wrangler to generate a new TypeScript project:

$ wrangler generate my-typescript-worker https://github.com/cloudflare/worker-typescript-template

If you already have a TypeScript project, you can install the latest version of workers-types with:

$ npm install --save-dev @cloudflare/workers-types

And then add @cloudflare/workers-types to your project’s tsconfig.json file.

{
"compilerOptions": {
"target": "ES2020",
"module": "CommonJS",
"lib": ["ES2020"],
"types": ["@cloudflare/workers-types"]
}
}

After that, you should get automatic type completion in your IDE of choice.

Automatically generating types for Cloudflare Workers

How it works

Here is some example code from the Workers runtime codebase.

class Blob: public js::Object {
public:
typedef kj::Array<kj::OneOf<kj::Array<const byte>, kj::String, js::Ref<Blob>>> Bits;
struct Options {
js::Optional<kj::String> type;
JS_STRUCT(type);
};
static js::Ref<Blob> constructor(js::Optional<Bits> bits, js::Optional<Options> options);
int getSize();
js::Ref<Blob> slice(js::Optional<int> start, js::Optional<int> end);
JS_RESOURCE_TYPE(Blob) {
JS_READONLY_PROPERTY(size, getSize);
JS_METHOD(slice);
}
};

A Python script runs over this code during each build and generates an Abstract Syntax Tree containing information about the function including an identifier, any argument types and any return types.

{
  "name": "Blob",
  "kind": "class",
  "members": [
    {
      "name": "size",
      "type": {
        "name": "integer"
      },
      "readonly": true
    },
    {
      "name": "slice",
      "type": {
        "params": [
          {
            "name": "start",
            "type": {
              "name": "integer",
              "optional": true
            }
          },
          {
            "name": "end",
            "type": {
              "name": "integer",
              "optional": true
            }
          }
        ],
        "returns": {
          "name": "Blob"
        }
      }
    }
  ]
}

Finally, the TypeScript types repositories are automatically sent PRs with the updated types.

declare type BlobBits = (ArrayBuffer | string | Blob)[];

interface BlobOptions {
  type?: string;
}

declare class Blob {
  constructor(bits?: BlobBits, options?: BlobOptions);
  readonly size: number;
  slice(start?: number, end?: number, type?: string): Blob;
}

Overrides

In some cases, TypeScript supports concepts that our C++ runtime does not. Namely, generics and function overloads. In these cases, we override the generated types with partial declarations. For example, DurableObjectStorage makes heavy use of generics for its getter and setter functions.

declare abstract class DurableObjectStorage {
	 get<T = unknown>(key: string, options?: DurableObjectStorageOperationsGetOptions): Promise<T | undefined>;
	 get<T = unknown>(keys: string[], options?: DurableObjectStorageOperationsGetOptions): Promise<Map<string, T>>;
	 
	 list<T = unknown>(options?: DurableObjectStorageOperationsListOptions): Promise<Map<string, T>>;
	 
	 put<T>(key: string, value: T, options?: DurableObjectStorageOperationsPutOptions): Promise<void>;
	 put<T>(entries: Record<string, T>, options?: DurableObjectStorageOperationsPutOptions): Promise<void>;
	 
	 delete(key: string, options?: DurableObjectStorageOperationsPutOptions): Promise<boolean>;
	 delete(keys: string[], options?: DurableObjectStorageOperationsPutOptions): Promise<number>;
	 
	 transaction<T>(closure: (txn: DurableObjectTransaction) => Promise<T>): Promise<T>;
	}

You can also write type overrides using Markdown. Here is an example of overriding types of KVNamespace.

Creating your own types

The JSON IR (intermediate representation) has been open sourced alongside the TypeScript types and can be found in this GitHub repository. We’ve also open sourced the type schema itself, which describes the format of the IR. If you’re interested in generating Workers types for your own language, you can take the IR, which describes the declaration in a “normalized” data structure, and generate types from it.

The declarations inside `workers.json` contain the elements to derive function signatures and other elements needed for code generation such as identifiers, argument types, return types and error management. A concrete use-case would be to generate external function declarations for a language that compiles to WebAssembly, to import precisely the set of available function calls available from the Workers runtime.

Conclusion

Cloudflare cares deeply about supporting the TypeScript and Rust ecosystems. Brendan created a tool which will ensure the type information for both languages is always up-to-date and accurate. We also are open-sourcing the type information itself in JSON format, so that anyone interested can create type data for any language they’d like!