Tag Archives: Miniflare

Blazing fast development with full-stack frameworks and Cloudflare

Post Syndicated from Igor Minar original https://blog.cloudflare.com/blazing-fast-development-with-full-stack-frameworks-and-cloudflare


Hello web developers! Last year we released a slew of improvements that made deploying web applications on Cloudflare much easier, and in response we’ve seen a large growth of Astro, Next.js, Nuxt, Qwik, Remix, SolidStart, SvelteKit, and other web apps hosted on Cloudflare. Today we are announcing major improvements to our integration with these web frameworks that makes it easier to develop sophisticated applications that use our D1 SQL database, R2 object store, AI models, and other powerful features of Cloudflare’s developer platform.

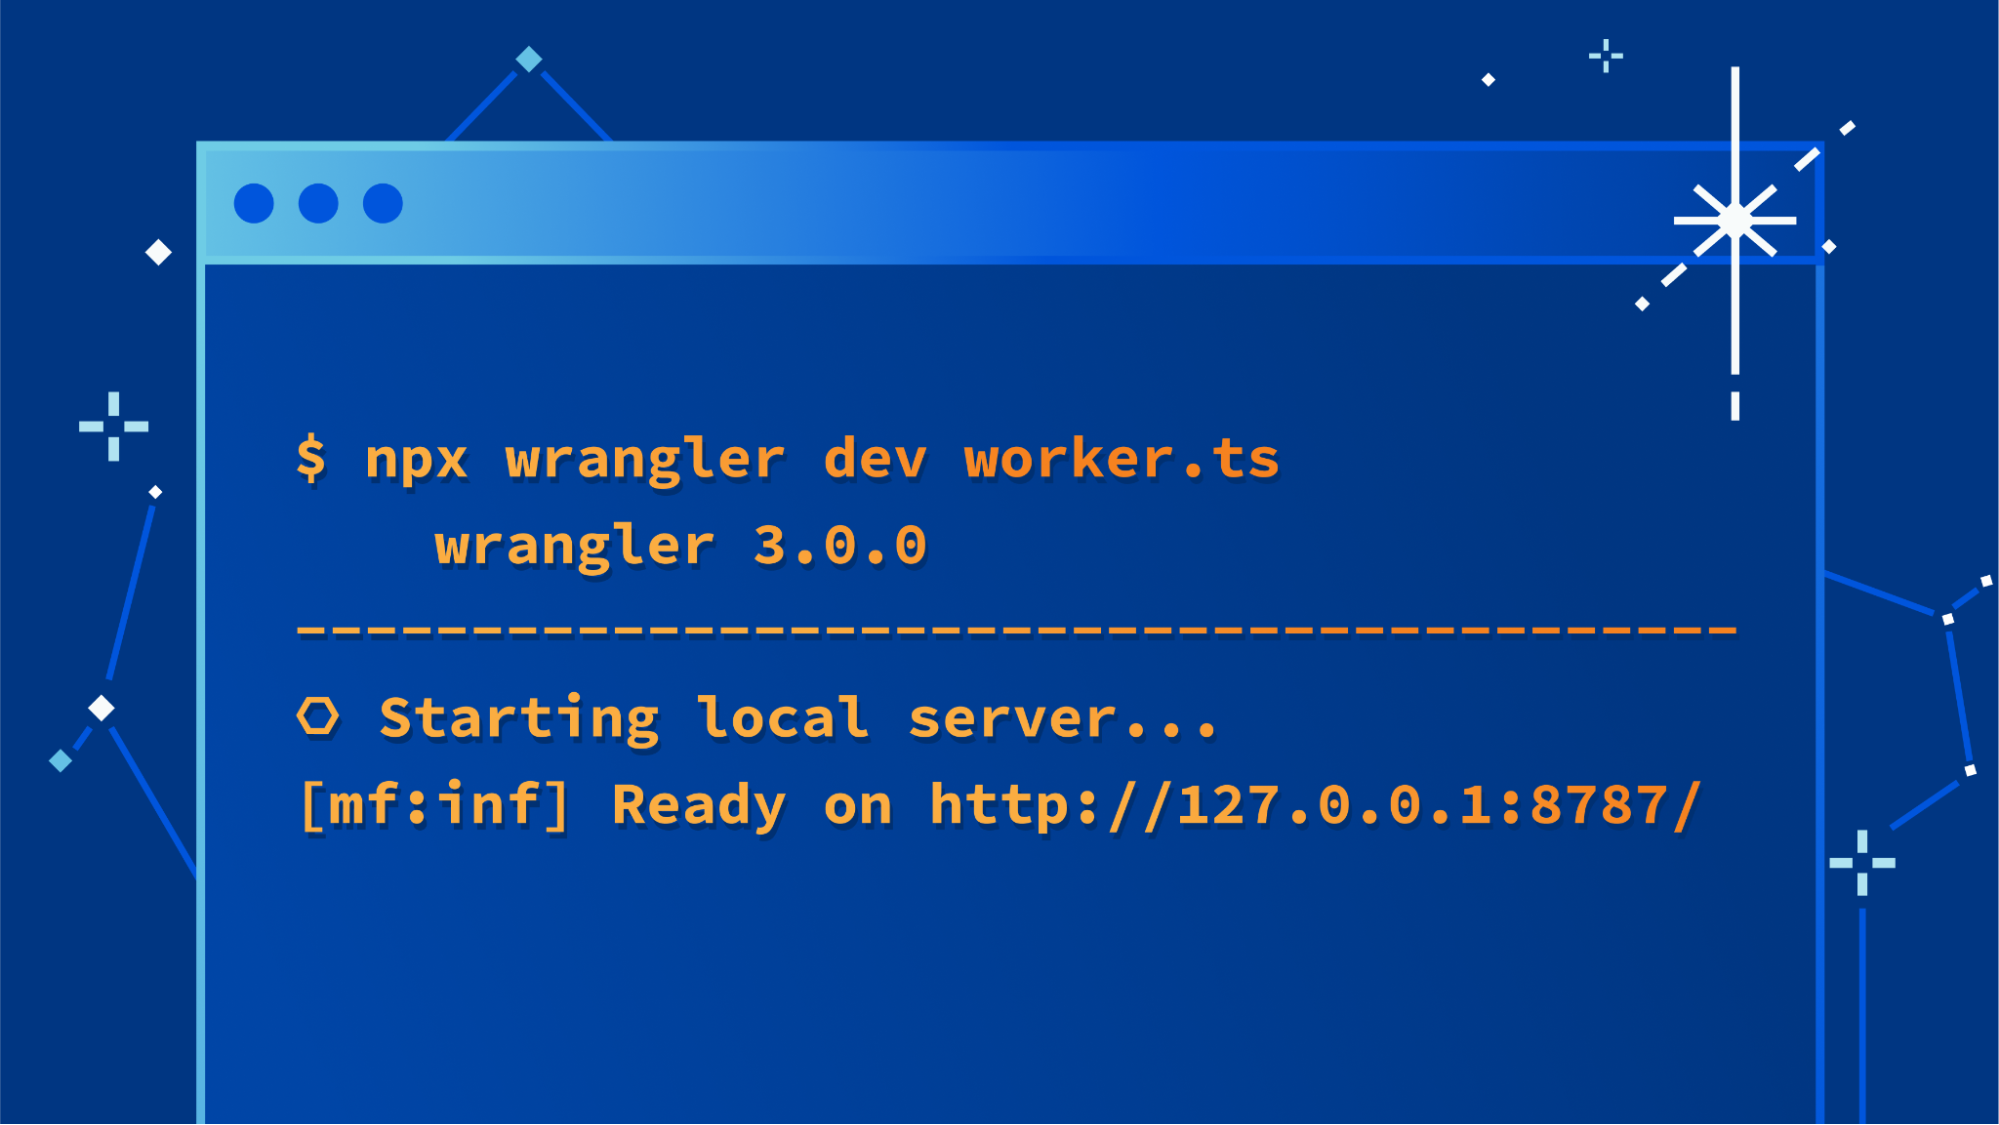
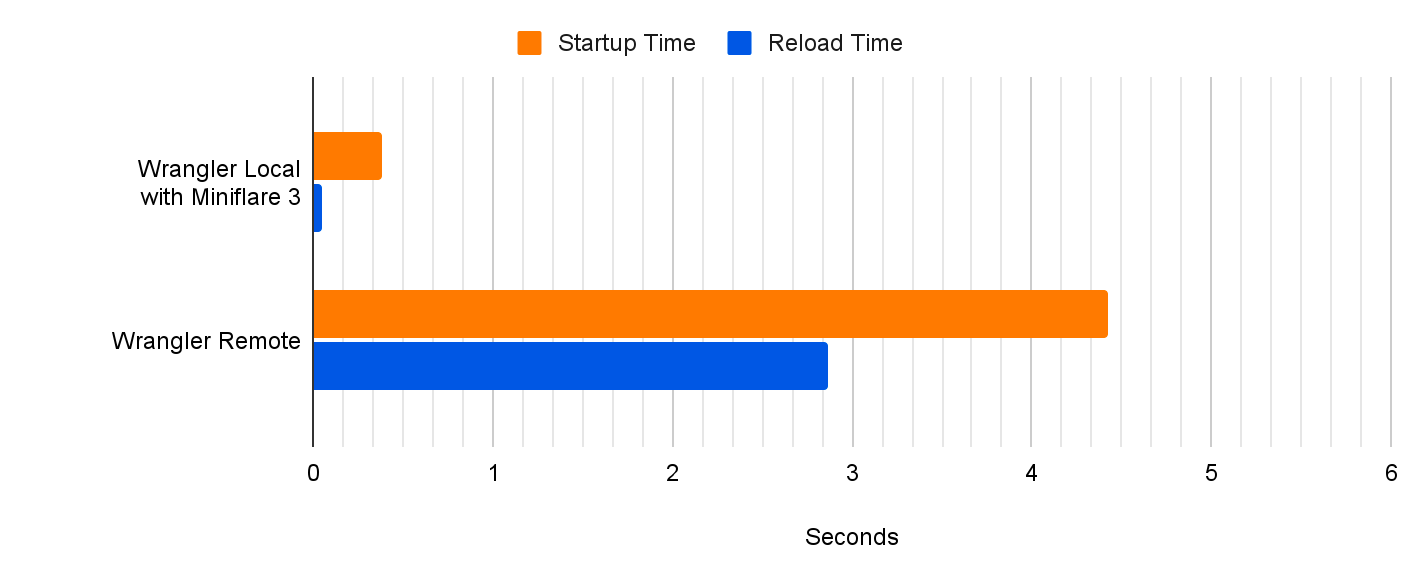
In the past, if you wanted to develop a web framework-powered application with D1 and run it locally, you’d have to build a production build of your application, and then run it locally using `wrangler pages dev`. While this worked, each of your code iterations would take seconds, or tens of seconds for big applications. Iterating using production builds is simply too slow, pulls you out of the flow, and doesn’t allow you to take advantage of all the DX optimizations that framework authors have put a lot of hard work into. This is changing today!

Our goal is to integrate with web frameworks in the most natural way possible, without developers having to learn and adopt significant workflow changes or custom APIs when deploying their app to Cloudflare. Whether you are a Next.js developer, a Nuxt developer, or prefer another framework, you can now keep on using the blazing fast local development workflow familiar to you, and ship your application on Cloudflare.

All full-stack web frameworks come with a local development server (dev server) that is custom tailored to the framework and often provides an excellent development experience, with only one exception — they don’t natively support some important features of Cloudflare’s development platform, especially our storage solutions.

So up until recently, you had to make a tough choice. You could use the framework-specific dev server to develop your application, but forgo access to many of Cloudflare’s features. Alternatively, you could take full advantage of Cloudflare’s platform including various resources like D1 or R2, but you would have to give up using the framework specific developer tooling. In that case, your iteration cycle would slow down, and it would take seconds rather than milliseconds for you to see results of your code changes in the browser. But not anymore! Let’s take a look.

Let’s build an application

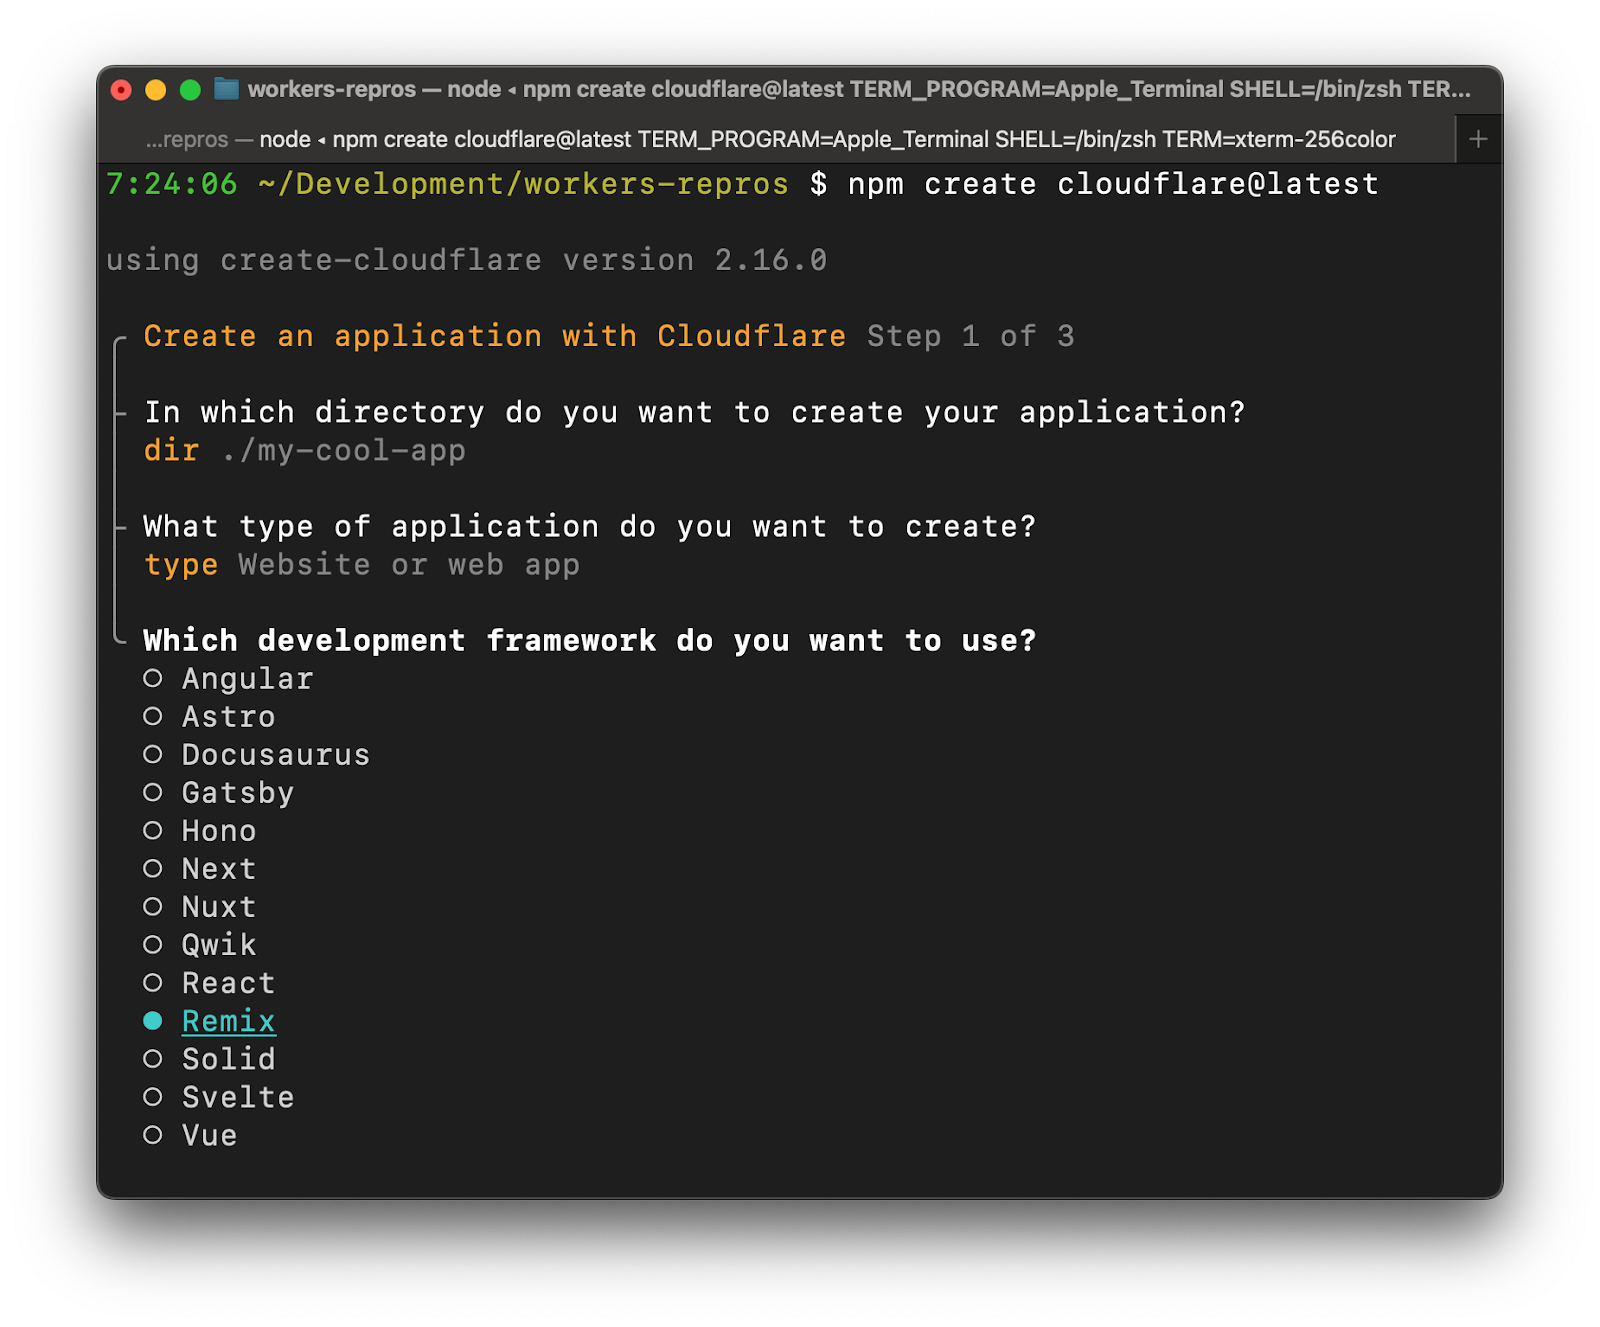
Let’s create a new application using C3 — our create-cloudflare CLI. We could use any npm client of our choice (pnpm anyone?!?), but to keep things simple in this post, we’ll stick with the default npm client. To get started, just run:

$ npm create cloudflare@latest

Provide a name for your app, or stick with the randomly generated one. Then select the “Website or web app” category, and pick a full-stack framework of your choice. We support many: Astro, Next.js, Nuxt, Qwik, Remix, SolidStart, and SvelteKit.

Since C3 delegates the application scaffolding to the latest version of the framework-specific CLI, you will scaffold the application exactly as the framework authors intended without missing out on any of the framework features or options. C3 then adds to your application everything necessary for integrating and deploying to Cloudflare so that you don’t have to configure it yourself.

With our application scaffolded, let’s get it to display a list of products stored in a database with just a few steps. First, we add the configuration for our database to our wrangler.toml config file:

[[d1_databases]]
binding = "DB"
database_name = "blog-products-db"
database_id = "XXXXXXXXXXXXXXXX"

Yes, that’s right! You can now configure your bound resources via the wrangler.toml file, even for full-stack apps deployed to Pages. We’ll share much more about configuration enhancements to Pages in a dedicated announcement.

Now let’s create a simple schema.sql file representing our database schema:

CREATE TABLE products(product_id INTEGER PRIMARY KEY, name TEXT, price INTEGER);
INSERT INTO products (product_id, name, price) VALUES (1, 'Apple', 250), (2, 'Banana', 100), (3, 'Cherry', 375);

And initialize our database:

$ npx wrangler d1 execute blog-products-db --local --file schema.sql

Notice that we used the –local flag of wrangler d1 execute to apply the changes to our local D1 database. This is the database that our dev server will connect to.

Next, if you use TypeScript, let TypeScript know about your database by running:

$ npm run build-cf-types

This command is preconfigured for all full-stack applications created via C3 and executes wrangler types to update the interface of Cloudflare’s environment containing all configured bindings.

We can now start the dev server provided by your framework via a handy shortcut:

$ npm run dev

This shortcut will start your framework’s dev server, whether it’s powered by next dev, nitro, or vite.

Now to access our database and list the products, we can now use a framework specific approach. For example, in a Next.js application that uses the App router, we could update app/api/hello/route.ts with the following:

const db = getRequestContext().env.DB;
 const productsResults = await db.prepare('SELECT * FROM products').all();
 return Response.json(productsResults.results);

Or in a Nuxt application, we can create a server/api/hello.ts file and populate it with:

export default defineEventHandler(async ({ context }) => {
   const db = context.cloudflare.env.DB;
   const productsResults = await db.prepare('SELECT * FROM products').all();
   return productsResults.results;
 });

Assuming that the framework dev server is running on port 3000, you can test the new API route in either framework by navigating to http://localhost:3000/api/hello. For simplicity, we picked API routes in these examples, but the same applies to any UI-generating routes as well.

Each web framework has its own way to define routes and pass contextual information about the request throughout the application, so how you access your databases, object stores, and other resources will depend on your framework. You can read our updated full-stack framework guides to learn more:

Now that you know how to access Cloudflare’s resources in the framework of your choice, everything else you know about your framework remains the same. You can now develop your application locally, using the development server optimized for your framework, which often includes support for hot module replacement (HMR), custom dev tools, enhanced debugging support and more, all while still benefiting from Cloudflare-specific APIs and features. Win-win!

What has actually changed to enable these development workflows?

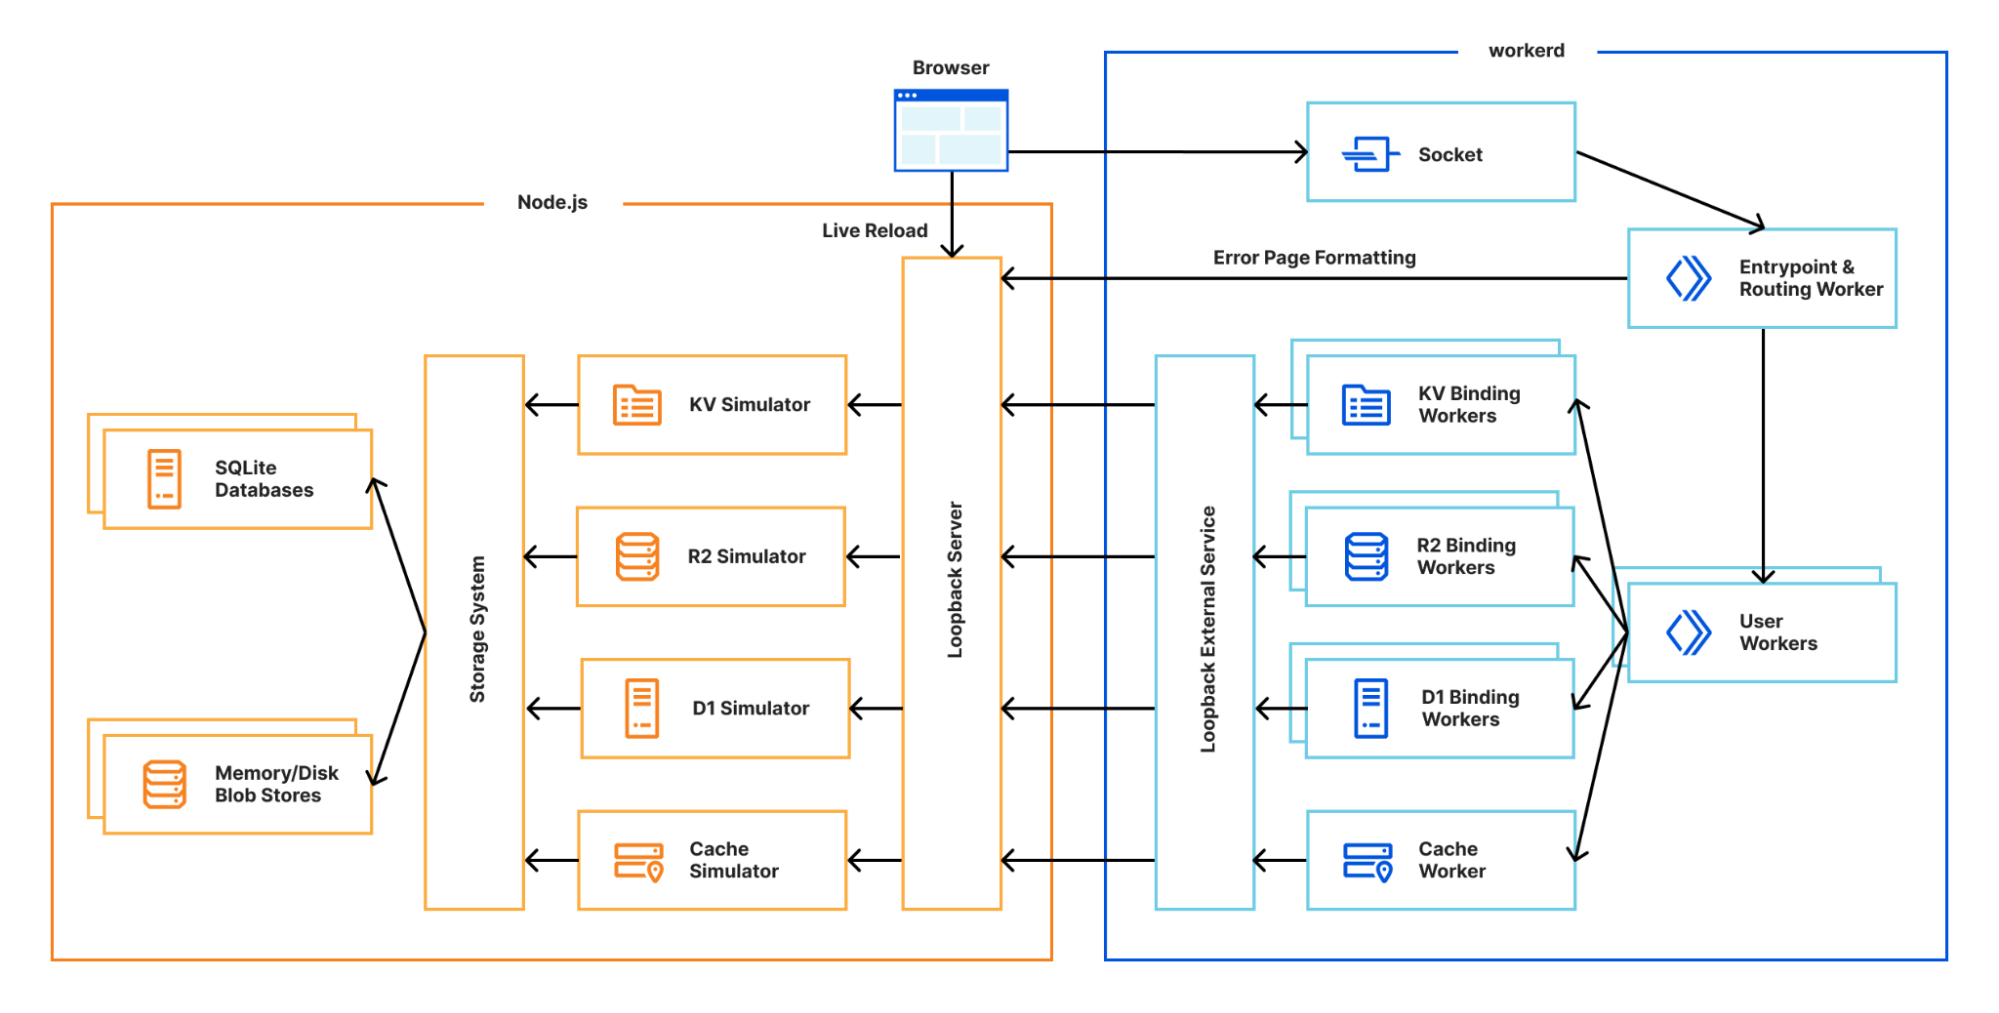
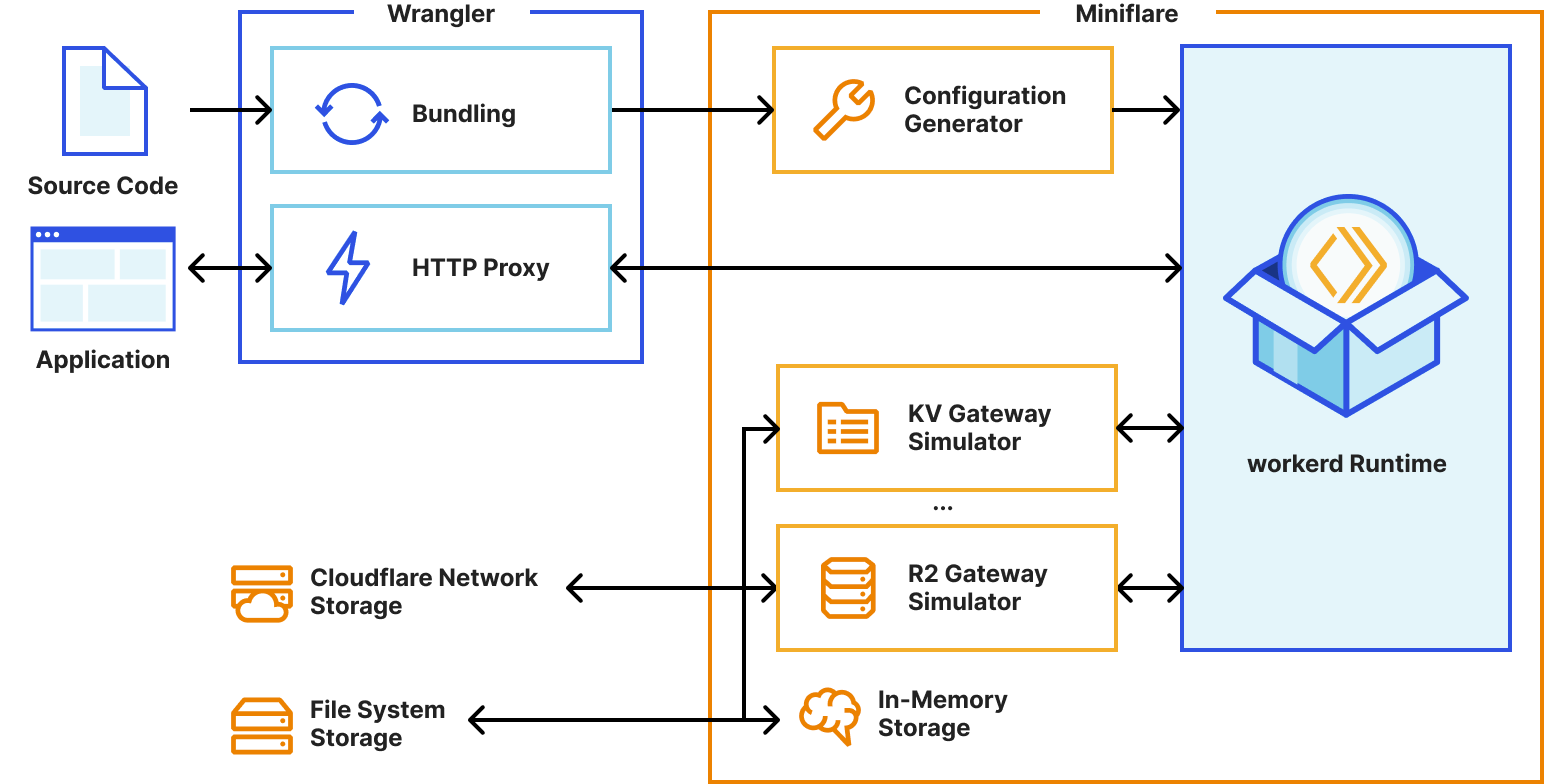
To decrease the development latency and preserve the custom framework-specific experiences, we needed to enable web frameworks and their dev servers to integrate with wrangler and miniflare in a seamless, almost invisible way.

Miniflare is a key component in this puzzle. It is our local simulator for Cloudflare-specific resources, which is powered by workerd, our JavaScript (JS) runtime. By relying on workerd, we ensure that Cloudflare’s JavaScript APIs run locally in a way that faithfully simulates our production environment. The trouble is that framework dev servers already rely on Node.js to run the application, so bringing another JS runtime into the mix breaks many assumptions in how these dev servers have been architected.

Our team however came up with an interesting approach to bridging the gap between these two JS runtimes. We call it the getPlatformProxy() API, which is now part of wrangler and is super-powered by miniflare’s magic proxy. This API exposes a JS proxy object that behaves just like the usual Workers env object containing all bound resources. The proxy object enables code from Node.js to transparently invoke JavaScript code running in workerd, as well access Cloudflare-specific runtime APIs.

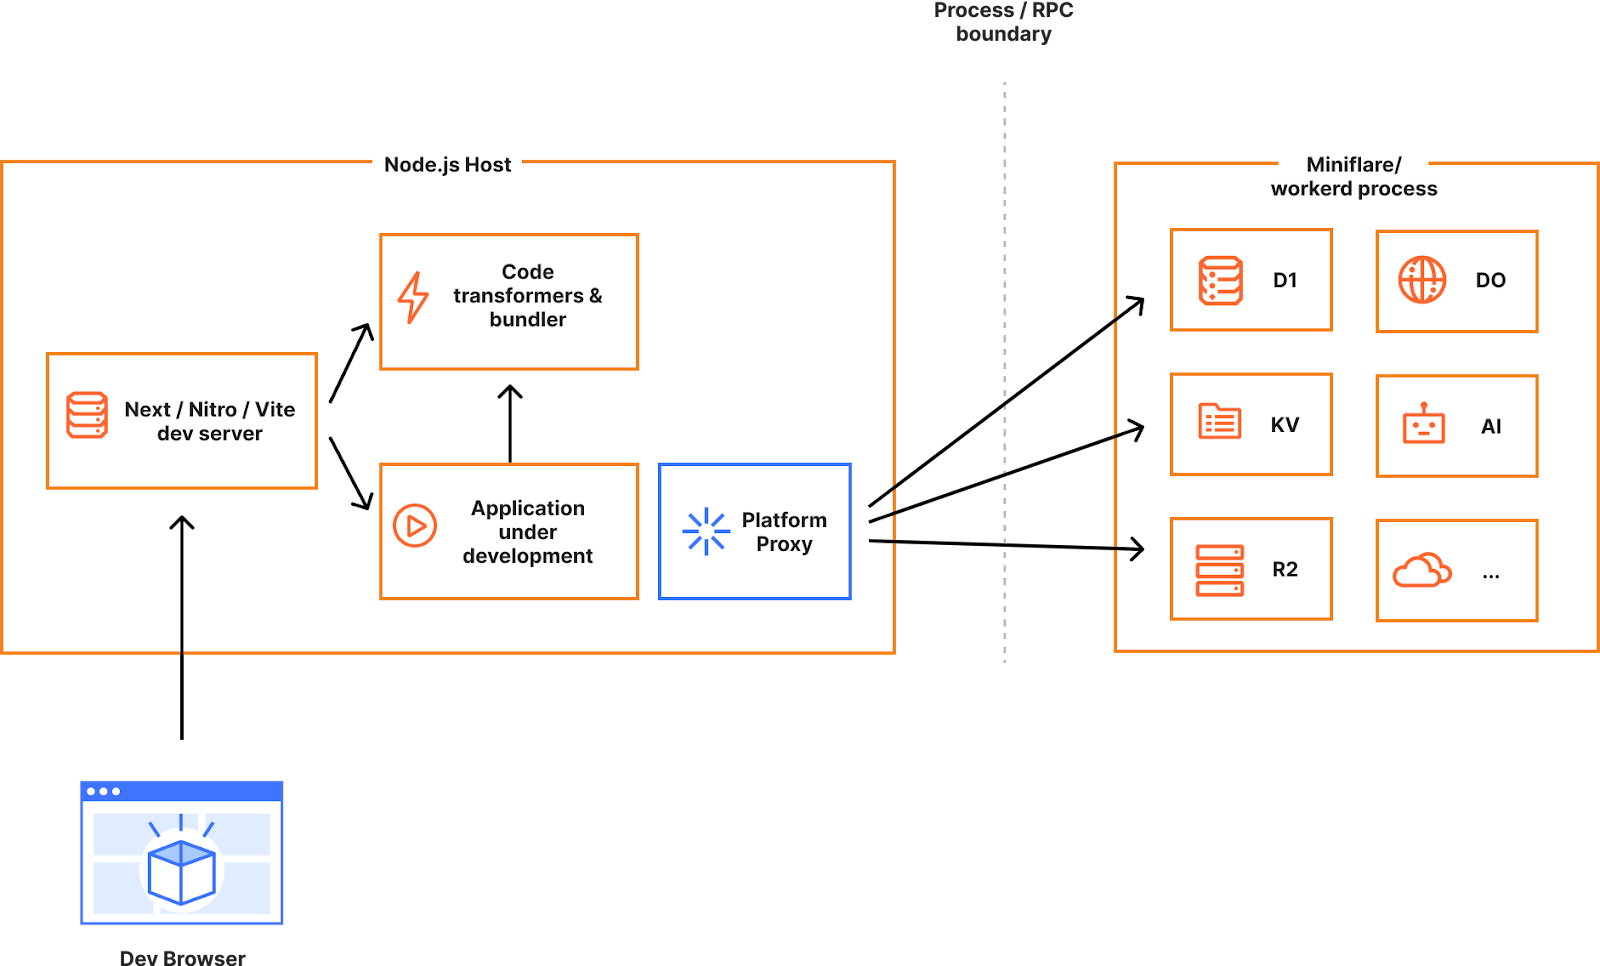
With this bridge between the Node.js and workerd runtimes, your application can now access Cloudflare simulators for D1, R2, KV and other storage solutions directly while running in a dev server powered by Node.js. Or you could even write an Node.js script to do the same:

 import {getPlatformProxy} from 'wrangler';


 const {env} = getPlatformProxy();
 console.dir(env);
 const db = env.DB;


 // Now let’s execute a DB query that runs in a local D1 db
 // powered by miniflare/workerd and access the result from Node.js
 const productsResults = await db.prepare('SELECT * FROM products').all();
 console.log(productsResults.results);

With the getPlatformProxy() API available, the remaining work was all about updating all framework adapters, plugins, and in some cases frameworks themselves to make use of this API. We are grateful for the support we received from framework teams on this journey, especially Alex from Astro, pi0 from Nuxt, Pedro from Remix, Ryan from Solid, Ben and Rich from Svelte, and our collaborator on the next-on-pages project, James Anderson.

Future improvements to development workflows with Vite

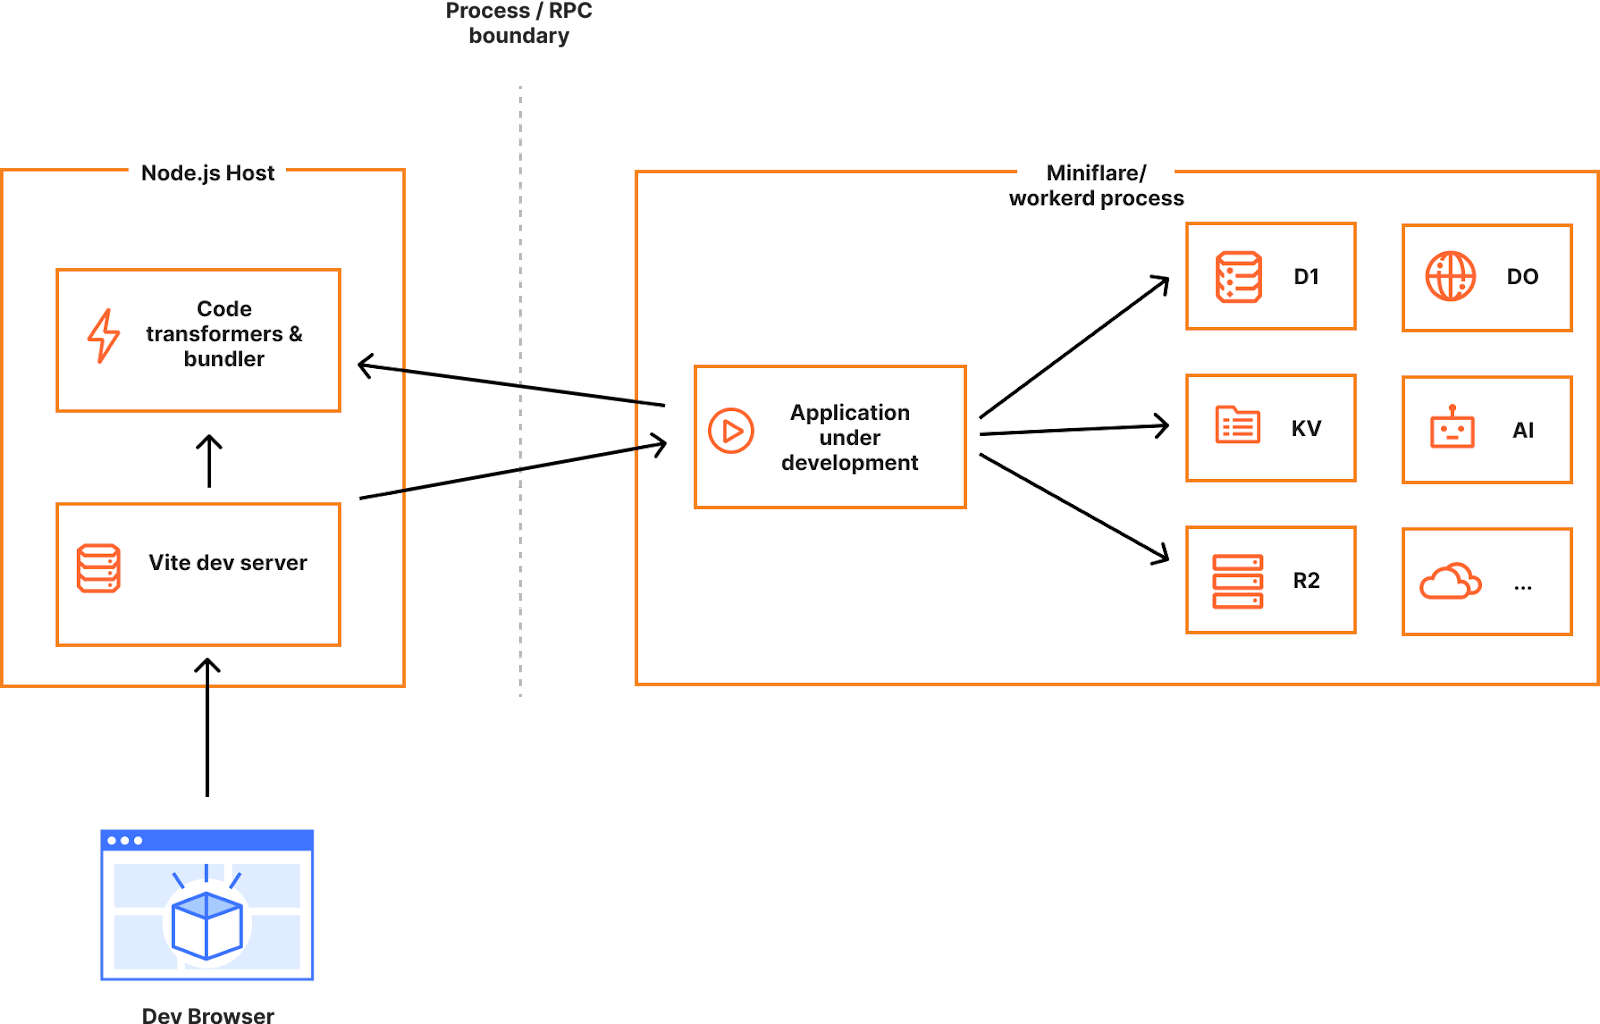
While the getPlatformProxy() API is a good solution for many scenarios, we can do better. If we could run the entire application in our JS runtime rather than Node.js, we could even more faithfully simulate the production environment and reduce developer friction and production surprises.

In the ideal world, we’d like you to develop against the same runtime that you deploy to in production, and this can only be achieved by integrating workerd directly into the dev servers of all frameworks, which is not a small feat considering the number of frameworks out there and the differences between them.

We however got a bit lucky. As we kicked off this effort, we quickly realized that Vite, a popular dev server used by many full-stack frameworks, was gaining increasingly greater adoption. In fact, Remix switched over to Vite just recently and confirmed the popularity of Vite as the common foundation for web development today.

If Vite had first-class support for running a full-stack application in an alternative JavaScript runtime, we could enable anyone using Vite to develop their applications locally with complete access to the Cloudflare developer platform. No more framework specific custom integrations and workarounds — all the features of a full-stack framework, Vite, and Cloudflare accessible to all developers.

Sounds too good to be true? Maybe. We are very stoked to be working with the Vite team on the Vite environments proposal, which could enable just that. This proposal is still evolving, so stay tuned for updates.

What will you build today?

We aim to make Cloudflare the best development platform for web developers. Making it quick and easy to develop your application with frameworks and tools you are already familiar with is a big part of our story. Start your journey with us by running a single command:

$ npm create cloudflare@latest

Improved local development with wrangler and workerd, Developer Week

Post Syndicated from Brendan Coll original http://blog.cloudflare.com/wrangler3/

Improved local development with wrangler and workerd, Developer Week

Improved local development with wrangler and workerd, Developer Week

For over a year now, we’ve been working to improve the Workers local development experience. Our goal has been to improve parity between users' local and production environments. This is important because it provides developers with a fully-controllable and easy-to-debug local testing environment, which leads to increased developer efficiency and confidence.

To start, we integrated Miniflare, a fully-local simulator for Workers, directly into Wrangler, the Workers CLI. This allowed users to develop locally with Wrangler by running wrangler dev --local. Compared to the wrangler dev default, which relied on remote resources, this represented a significant step forward in local development. As good as it was, it couldn’t leverage the actual Workers runtime, which led to some inconsistencies and behavior mismatches.

Last November, we announced the experimental version of Miniflare v3, powered by the newly open-sourced workerd runtime, the same runtime used by Cloudflare Workers. Since then, we’ve continued to improve upon that experience both in terms of accuracy with the real runtime and in cross-platform compatibility.

As a result of all this work, we are proud to announce the release of Wrangler v3 – the first version of Wrangler with local-by-default development.

A new default for Wrangler

Starting with Wrangler v3, users running wrangler dev will be leveraging Miniflare v3 to run your Worker locally. This local development environment is effectively as accurate as a production Workers environment, providing an ability for you to test every aspect of your application before deploying. It provides the same runtime and bindings, but has its own simulators for KV, R2, D1, Cache and Queues. Because you’re running everything on your machine, you won’t be billed for operations on KV namespaces or R2 buckets during development, and you can try out paid-features like Durable Objects for free.

In addition to a more accurate developer experience, you should notice performance differences. Compared to remote mode, we’re seeing a 10x reduction to startup times and 60x reduction to script reload times with the new local-first implementation. This massive reduction in reload times drastically improves developer velocity!

Improved local development with wrangler and workerd, Developer Week

Remote development isn’t going anywhere. We recognise many developers still prefer to test against real data, or want to test Cloudflare services like image resizing that aren’t implemented locally yet. To run wrangler dev on Cloudflare’s network, just like previous versions, use the new --remote flag.

Deprecating Miniflare v2

For users of Miniflare, there are two important pieces of information for those updating from v2 to v3. First, if you’ve been using Miniflare’s CLI directly, you’ll need to switch to wrangler dev. Miniflare v3 no longer includes a CLI. Secondly, if you’re using Miniflare’s API directly, upgrade to miniflare@3 and follow the migration guide.

How we built Miniflare v3

Miniflare v3 is now built using workerd, the open-source Cloudflare Workers runtime. As workerd is a server-first runtime, every configuration defines at least one socket to listen on. Each socket is configured with a service, which can be an external server, disk directory or most importantly for us, a Worker! To start a workerd server running a Worker, create a worker.capnp file as shown below, run npx workerd serve worker.capnp and visit http://localhost:8080 in your browser:

using Workerd = import "/workerd/workerd.capnp";


const helloConfig :Workerd.Config = (
 services = [
   ( name = "hello-worker", worker = .helloWorker )
 ],
 sockets = [
   ( name = "hello-socket", address = "*:8080", http = (), service = "hello-worker" )
 ]
);


const helloWorker :Workerd.Worker = (
 modules = [
   ( name = "worker.mjs",
     esModule =
       `export default {
       `  async fetch(request, env, ctx) {
       `    return new Response("Hello from workerd! 👋");
       `  }
       `}
   )
 ],
 compatibilityDate = "2023-04-04",
);

If you’re interested in what else workerd can do, check out the other samples. Whilst workerd provides the runtime and bindings, it doesn’t provide the underlying implementations for the other products in the Developer Platform. This is where Miniflare comes in! It provides simulators for KV, R2, D1, Queues and the Cache API.

Improved local development with wrangler and workerd, Developer Week

Building a flexible storage system

As you can see from the diagram above, most of Miniflare’s job is now providing different interfaces for data storage. In Miniflare v2, we used a custom key-value store to back these, but this had a few limitations. For Miniflare v3, we’re now using the industry-standard SQLite, with a separate blob store for KV values, R2 objects, and cached responses. Using SQLite gives us much more flexibility in the queries we can run, allowing us to support future unreleased storage solutions. 👀

A separate blob store allows us to provide efficient, ranged, streamed access to data. Blobs have unguessable identifiers, can be deleted, but are otherwise immutable. These properties make it possible to perform atomic updates with the SQLite database. No other operations can interact with the blob until it's committed to SQLite, because the ID is not guessable, and we don't allow listing blobs. For more details on the rationale behind this, check out the original GitHub discussion.

Running unit tests inside Workers

One of Miniflare’s primary goals is to provide a great local testing experience. Miniflare v2 provided custom environments for popular Node.js testing frameworks that allowed you to run your tests inside the Miniflare sandbox. This meant you could import and call any function using Workers runtime APIs in your tests. You weren’t restricted to integration tests that just send and receive HTTP requests. In addition, these environments provide per-test isolated storage, automatically undoing any changes made at the end of each test.

In Miniflare v2, these environments were relatively simple to implement. We’d already reimplemented Workers Runtime APIs in a Node.js environment, and could inject them using Jest and Vitest’s APIs into the global scope.

Improved local development with wrangler and workerd, Developer Week

For Miniflare v3, this is much trickier. The runtime APIs are implemented in a separate workerd process, and you can’t reference JavaScript classes across a process boundary. So we needed a new approach…

Improved local development with wrangler and workerd, Developer Week

Many test frameworks like Vitest use Node’s built-in worker_threads module for running tests in parallel. This module spawns new operating system threads running Node.js and provides a MessageChannel interface for communicating between them. What if instead of spawning a new OS thread, we spawned a new workerd process, and used WebSockets for communication between the Node.js host process and the workerd “thread”?

Improved local development with wrangler and workerd, Developer Week

We have a proof of concept using Vitest showing this approach can work in practice. Existing Vitest IDE integrations and the Vitest UI continue to work without any additional work. We aren’t quite ready to release this yet, but will be working on improving it over the next few months. Importantly, the workerd “thread” needs access to Node.js built-in modules, which we recently started rolling out support for.

Improved local development with wrangler and workerd, Developer Week

Running on every platform

We want developers to have this great local testing experience, regardless of which operating system they’re using. Before open-sourcing, the Cloudflare Workers runtime was originally only designed to run on Linux. For Miniflare v3, we needed to add support for macOS and Windows too. macOS and Linux are both Unix-based, making porting between them relatively straightforward. Windows on the other hand is an entirely different beast… 😬

The workerd runtime uses KJ, an alternative C++ base library, which is already cross-platform. We’d also migrated to the Bazel build system in preparation for open-sourcing the runtime, which has good Windows support. When compiling our C++ code for Windows, we use LLVM's MSVC-compatible compiler driver clang-cl, as opposed to using Microsoft’s Visual C++ compiler directly. This enables us to use the "same" compiler frontend on Linux, macOS, and Windows, massively reducing the effort required to compile workerd on Windows. Notably, this provides proper support for #pragma once when using symlinked virtual includes produced by Bazel, __atomic_* functions, a standards-compliant preprocessor, GNU statement expressions used by some KJ macros, and understanding of the .c++ extension by default. After switching out unix API calls for their Windows equivalents using #if _WIN32 preprocessor directives, and fixing a bunch of segmentation faults caused by execution order differences, we were finally able to get workerd running on Windows! No WSL or Docker required! 🎉

Let us know what you think!

Wrangler v3 is now generally available! Upgrade by running npm install --save-dev wrangler@3 in your project. Then run npx wrangler dev to try out the new local development experience powered by Miniflare v3 and the open-source Workers runtime. Let us know what you think in the #wrangler channel on the Cloudflare Developers Discord, and please open a GitHub issue if you hit any unexpected behavior.

Doubling down on local development with Workers: Miniflare meets workerd

Post Syndicated from Brendan Coll original https://blog.cloudflare.com/miniflare-and-workerd/

Doubling down on local development with Workers: Miniflare meets workerd

Doubling down on local development with Workers: Miniflare meets workerd

Local development gives you a fully-controllable and easy-to-debug testing environment. At the start of this year, we brought this experience to Workers developers by launching Miniflare 2.0: a local Cloudflare Workers simulator. Miniflare 2 came with features like step-through debugging support, detailed console.logs, pretty source-mapped error pages, live reload and a highly-configurable unit testing environment. Not only that, but we also incorporated Miniflare into Wrangler, our Workers CLI, to enable wrangler dev’s —local mode.

Today, we’re taking local development to the next level! In addition to introducing new support for migrating existing projects to your local development environment, we’re making it easier to work with your remote data—locally! Most importantly, we’re releasing a much more accurate Miniflare 3, powered by the recently open-sourced workerd runtime—the same runtime used by Cloudflare Workers!

Enabling local development with workerd

One of the superpowers of having a local development environment is that you can test changes without affecting users in production. A great local environment offers a level of fidelity on par with production.

The way we originally approached local development was with Miniflare 2, which reimplemented Workers runtime APIs in JavaScript. Unfortunately, there were subtle behavior mismatches between these re-implementations and the real Workers runtime. These types of issues are really difficult for developers to debug, as they don’t appear locally, and step-through debugging of deployed Workers isn’t possible yet. For example, the following Worker returns responses successfully in Miniflare 2, so we might assume it’s safe to publish:

let cachedResponsePromise;
export default {
  async fetch(request, env, ctx) {
    // Let's imagine this fetch takes a few seconds. To speed up our worker, we
    // decide to only fetch on the first request, and reuse the result later.
    // This works fine in Miniflare 2, so we must be good right?
    cachedResponsePromise ??= fetch("https://example.com");
    return (await cachedResponsePromise).clone();
  },
};

However, as soon as we send multiple requests to our deployed Worker, it fails with Error: Cannot perform I/O on behalf of a different request. The problem here is that response bodies created in one request’s handler cannot be accessed from a different request’s handler. This limitation allows Cloudflare to improve overall Worker performance, but it was almost impossible for Miniflare 2 to detect these types of issues locally. In this particular case, the best solution is to cache using fetch itself.

Additionally, because the Workers runtime uses a very recent version of V8, it supports some JavaScript features that aren’t available in all versions of Node.js. This meant a few features implemented in Workers, like Array#findLast, weren’t always available in Miniflare 2.

With the Workers runtime now open-sourced, Miniflare 3 can leverage the same implementations that are deployed on Cloudflare’s network, giving bug-for-bug compatibility and practically eliminating behavior mismatches. 🎉

Doubling down on local development with Workers: Miniflare meets workerd
Miniflare 3’s new simplified architecture using worked

This radically simplifies our implementation too. We were able to remove over 50,000 lines of code from Miniflare 2. Of course, we still kept all the Miniflare special-sauce that makes development fun like live reload and detailed logging. 🙂

Doubling down on local development with Workers: Miniflare meets workerd

Local development with real data

We know that many developers choose to test their Workers remotely on the Cloudflare network as it gives them the ability to test against real data. Testing against fake data in staging and local environments is sometimes difficult, as it never quite matches the real thing.

With Miniflare 3, we’re blurring the lines between local and remote development, by bringing real data to your machine as an experimental opt-in feature. If enabled, Miniflare will read and write data to namespaces on the Cloudflare network, as your Worker would when deployed. This is only supported with Workers KV for now, but we’re exploring similar solutions for R2 and D1.

Doubling down on local development with Workers: Miniflare meets workerd
Miniflare’s system for accessing real KV data, reads and writes are cached locally for future accesses

A new default for Wrangler

With Miniflare 3 now effectively as accurate as the real Workers environment, and the ability to access real data locally, we’re revisiting the decision to make remote development the initial Wrangler experience. In a future update, wrangler dev --local will become the default. --local will no longer be required. Benchmarking suggests this will bring an approximate 10x reduction to startup and a massive 60x reduction to script reload times! Over the next few weeks, we’ll be focusing on further optimizing Wrangler’s performance to bring you the fastest Workers development experience yet!

Doubling down on local development with Workers: Miniflare meets workerd

wrangler init --from-dash

We want all developers to be able to take advantage of the improved local experience, so we’re making it easy to start a local Wrangler project from an existing Worker that’s been developed in the Cloudflare dashboard. With Node.js installed, run npx wrangler init –from-dash <your_worker_name> in your terminal to set up a new project with all your existing code and bindings such as KV namespaces configured. You can now seamlessly continue development of your application locally, taking advantage of all the developer experience improvements Wrangler and Miniflare provide. When you’re ready to deploy your worker, run npx wrangler publish.

Looking to the future

Over the next few months, the Workers team is planning to further improve the local development experience with a specific focus on automated testing. Already, we’ve released a preliminary API for programmatic end-to-end tests with wrangler dev, but we’re also investigating ways of bringing Miniflare 2’s Jest/Vitest environments to workerd. We’re also considering creating extensions for popular IDEs to make developing workers even easier. 👀

Miniflare 3.0 is now included in Wrangler! Try it out by running npx wrangler@latest dev --experimental-local. Let us know what you think in the #wrangler channel on the Cloudflare Developers Discord, and please open a GitHub issue if you hit any unexpected behavior.

Miniflare 2.0: fully-local development and testing for Workers

Post Syndicated from Brendan Coll original https://blog.cloudflare.com/miniflare/

Miniflare 2.0: fully-local development and testing for Workers

Miniflare 2.0: fully-local development and testing for Workers

In July 2021, I launched Miniflare 1.0, a fun, full-featured, fully-local simulator for Workers, on the Cloudflare Workers Discord server. What began as a pull request to the cloudflare-worker-local project has now become an official Cloudflare project and a core part of the Workers ecosystem, being integrated into wrangler 2.0. Today, I’m thrilled to announce the release of the next major version: a more modular, lightweight, and accurate Miniflare 2.0. 🔥

Background: Why Miniflare was created

Miniflare 2.0: fully-local development and testing for Workers

At the end of 2020, I started to build my first Workers app. Initially I used the then recently released wrangler dev, but found it was taking a few seconds before changes were reflected. While this was still impressive considering it was running on the Workers runtime, I was using Vite to develop the frontend, so I knew a significantly faster developer experience was possible.

I then found cloudflare-worker-local and cloudworker, which were local Workers simulators, but didn’t have support for newer features like Workers Sites. I wanted a magical simulator that would just work ✨ in existing projects, focusing on the developer experience, and — by the reception of Miniflare 1.0 — I wasn’t the only one.

Miniflare 1.0 brought near instant reloads, source map support (so you could see where errors were thrown), cleaner logs (no more { unknown object }s or massive JSON stack traces), a pretty error page that highlighted the cause of the error, step-through debugger support, and more.

Miniflare 2.0: fully-local development and testing for Workers

Pretty-error page powered by `youch`

Miniflare 2.0: fully-local development and testing for Workers

The next iteration: What’s new in version 2

In the relatively short time since the launch of Miniflare 1.0 in July, Workers as a platform has improved dramatically. Durable Objects now have input and output gates for ensuring consistency without explicit transactions, Workers has compatibility dates allowing developers to opt-into backwards-incompatible fixes, and you can now write Workers using JavaScript modules.

Miniflare 2 supports all these features and has been completely redesigned with three primary design goals:

  1. Modular: Miniflare 2 splits Workers components (KV, Durable Objects, etc.) into separate packages (@miniflare/kv, @miniflare/durable-objects, etc.) that you can import on their own for testing. This will also make it easier to add support for new, unreleased features like R2 Storage.
  2. Lightweight: Miniflare 1 included 122 third-party packages with a total install size of 88.3MB. Miniflare 2 reduces this to 23 packages and 6MB by leveraging features included with Node.js 16.
  3. Accurate: Miniflare 2 replicates the quirks and thrown errors of the real Workers runtime, so you’ll know before you deploy if things are going to break. Of course, wrangler dev will always be the most accurate preview, running on the real edge with real data, but Miniflare 2 is really close!

It also adds a new live-reload feature and first-class support for testing with Jest for an even more enjoyable developer experience.

Getting started with local development

As mentioned in the introduction, Miniflare 2.0 is now integrated into wrangler 2.0, so you just need to run npx wrangler@beta dev --local to start a fully-local Worker development server or npx wrangler@beta pages dev to start a Cloudflare Pages Functions server. Make sure you’ve got the latest release of Node.js installed.

However, if you’re using Wrangler 1 or want to customize your local environment, you can install Miniflare standalone. If you’ve got an existing worker with a wrangler.toml file, just run npx miniflare --live-reload to start a live-reloading development server. Miniflare will automatically load configuration like KV namespaces or Durable Object bindings from your wrangler.toml file and secrets from a .env file.

Miniflare is highly configurable. For example, if you want to persist KV data between restarts, include the --kv-persist flag. See the Miniflare docs or run npx miniflare --help for many more options, like running multiple workers or starting an HTTPS server.

If you’ve got a scheduled event handler, you can manually trigger it by visiting http://localhost:8787/cdn-cgi/mf/scheduled in your browser.

Testing for Workers with Jest

Jest is one of the most popular JavaScript testing frameworks, so it made sense to add first-class support for it. Miniflare 2.0 includes a custom test environment that gives your tests access to Workers runtime APIs.

For example, suppose we have the following worker, written using JavaScript modules, that stores the number of times each URL is visited in Workers KV:

Aside: Workers KV is not designed for counters as it’s eventually consistent. In a real worker, you should use Durable Objects. This is just a simple example.

// src/index.mjs
export async function increment(namespace, key) {
  // Get the current count from KV
  const currentValue = await namespace.get(key);
  // Increment the count, defaulting it to 0
  const newValue = parseInt(currentValue ?? "0") + 1;
  // Store and return the new count
  await namespace.put(key, newValue.toString());
  return newValue;
}

export default {
  async fetch(request, env, ctx) {
    // Use the pathname for a key
    const url = new URL(request.url);
    const key = url.pathname;
    // Increment the key
    const value = await increment(env.COUNTER_NAMESPACE, key);
    // Return the new incremented count
    return new Response(`count for ${key} is now ${value}`);
  },
};
# wrangler.toml
kv_namespaces = [
  { binding = "COUNTER_NAMESPACE", id = "..." }
]

[build.upload]
format = "modules"
dist = "src"
main = "./index.mjs"

…we can write unit tests like so:

// test/index.spec.mjs
import worker, { increment } from "../src/index.mjs";

// When using `format = "modules"`, bindings are included in the `env` parameter,
// which we don't have access to in tests. Miniflare therefore provides a custom
// global method to access these.
const { COUNTER_NAMESPACE } = getMiniflareBindings();

test("should increment the count", async () => {
  // Seed the KV namespace
  await COUNTER_NAMESPACE.put("a", "3");

  // Perform the increment
  const newValue = await increment(COUNTER_NAMESPACE, "a");
  const storedValue = await COUNTER_NAMESPACE.get("a");

  // Check the return value of increment
  expect(newValue).toBe(4);
  // Check increment had the side effect of updating KV
  expect(storedValue).toBe("4");
});

test("should return new count", async () => {
  // Note we're using Worker APIs in our test, without importing anything extra
  const request = new Request("http://localhost/a");
  const response = await worker.fetch(request, { COUNTER_NAMESPACE });

  // Each test gets its own isolated storage environment, so the changes to "a"
  // are *undone* automatically. This means at the start of this test, "a"
  // wasn't in COUNTER_NAMESPACE, so it defaulted to 0, and the count is now 1.
  expect(await response.text()).toBe("count for /a is now 1");
});
// jest.config.js
const { defaults } = require("jest-config");

module.exports = {
  testEnvironment: "miniflare", // ✨
  // Tell Jest to look for tests in .mjs files too
  testMatch: [
    "**/__tests__/**/*.?(m)[jt]s?(x)",
    "**/?(*.)+(spec|test).?(m)[tj]s?(x)",
  ],
  moduleFileExtensions: ["mjs", ...defaults.moduleFileExtensions],
};

…and run them with:

# Install dependencies
$ npm install -D jest jest-environment-miniflare
# Run tests with experimental ES modules support
$ NODE_OPTIONS=--experimental-vm-modules npx jest

For more details about the custom test environment and isolated storage, see the Miniflare docs or this example project that also uses TypeScript and Durable Objects.

Not using Jest? Miniflare lets you write your own integration tests with vanilla Node.js or any other test framework. For an example using AVA, see the Miniflare docs or this repository.

How Miniflare works

Let’s now dig deeper into how some interesting parts of Miniflare work.

Miniflare is powered by Node.js, a JavaScript runtime built on Chrome’s V8 JavaScript engine. V8 is the same engine that powers the Cloudflare Workers runtime, but Node and Workers implement different runtime APIs on top of it. To ensure Node’s APIs aren’t visible to users’ worker code and to inject Workers’ APIs, Miniflare uses the Node.js vm module. This lets you run arbitrary code in a custom V8 context.

A core part of Workers are the Request and Response classes. Miniflare gets these from undici, a project written by the Node team to bring fetch to Node. For service workers, we also need a way to addEventListeners and dispatch events using the EventTarget API, which was added in Node 15.

With that we can build a mini-miniflare:

import vm from "vm";
import { Request, Response } from "undici";

// An instance of this class will become the global scope of our Worker,
// extending EventTarget for addEventListener and dispatchEvent
class ServiceWorkerGlobalScope extends EventTarget {
  constructor() {
    super();

    // Add Worker runtime APIs
    this.Request = Request;
    this.Response = Response;

    // Make sure this is bound correctly when EventTarget methods are called
    this.addEventListener = this.addEventListener.bind(this);
    this.removeEventListener = this.removeEventListener.bind(this);
    this.dispatchEvent = this.dispatchEvent.bind(this);
  }
}

// An instance of this class will be passed as the event parameter to "fetch"
// event listeners
class FetchEvent extends Event {
  constructor(type, init) {
    super(type);
    this.request = init.request;
  }

  respondWith(response) {
    this.response = response;
  }
}

// Create a V8 context to run user code in
const globalScope = new ServiceWorkerGlobalScope();
const context = vm.createContext(globalScope);

// Example user worker code, this could be loaded from the file system
const workerCode = `
addEventListener("fetch", (event) => {
  event.respondWith(new Response("Hello mini-miniflare!"));
})
`;
const script = new vm.Script(workerCode);

// Run the user's code, registering the "fetch" event listener
script.runInContext(context);

// Create an example request, this could come from an incoming HTTP request
const request = new Request("http://localhost:8787/");
const event = new FetchEvent("fetch", { request });

// Dispatch the event and log the response
globalScope.dispatchEvent(event);
console.log(await event.response.text()); // Hello mini-miniflare!

Plugins

Miniflare 2.0: fully-local development and testing for Workers

Dependency graph of the Miniflare monorepo.

There are a lot of Workers runtime APIs, so adding and configuring them all manually as above would be tedious. Therefore, Miniflare 2 has a plugin system that allows each package to export globals and bindings to be included in the sandbox. Options have annotations describing their type, CLI flag, and where to find them in Wrangler configuration files:

@Option({
  // Define type for runtime validation of the CLI flag
  type: OptionType.ARRAY,
  // Use --kv instead of auto-generated --kv-namespace for the CLI flag
  name: "kv",
  // Define -k as an alias
  alias: "k",
  // Displayed in --help
  description: "KV namespace to bind",
  // Where to find this option in wrangler.toml
  fromWrangler: (config) => config.kv_namespaces?.map(({ binding }) => binding),
})
kvNamespaces?: string[];

Durable Objects

Before input and output gates were added, you usually needed to use the transaction() method to ensure consistency:

async function incrementCount() {
  let value;
  await this.storage.transaction(async (txn) => {
    value = await txn.get("count");
    await txn.put("count", value + 1);
  });
  return value;
}

Miniflare implements this using optimistic-concurrency control (OCC). However, input and output gates are now available, so to avoid race conditions when simulating newly-written Durable Object code, Miniflare 2 needed to implement them.

From the description in the gates announcement blog post:

Input gates: While a storage operation is executing, no events shall be delivered to the object except for storage completion events. Any other events will be deferred until such a time as the object is no longer executing JavaScript code and is no longer waiting for any storage operations. We say that these events are waiting for the "input gate" to open.

…we can see input gates need to have two methods, one for closing the gate while a storage operation is running and one for waiting until the input gate is open:

class InputGate {
  async runWithClosed<T>(closure: () => Promise<T>): Promise<T> {
    // 1. Close the input gate
    // 2. Run the closure and store the result
    // 3. Open the input gate
    // 4. Return the result
  }

  async waitForOpen(): Promise<void> {
    // 1. Check if the input gate is open
    // 2. If it is, return
    // 3. Otherwise, wait until it is
  }
}

Each Durable Object has its own InputGate. In the storage implementation, we call runWithClosed to defer other events until the storage operation completes:

class DurableObjectStorage {
  async get<Value>(key: string): Promise<Value | undefined> {
    return this.inputGate.runWithClosed(() => {
      // Get key from storage
    });
  }
}

…and whenever we’re ready to deliver another event, we call waitForOpen:

import { fetch as baseFetch } from "undici";

async function fetch(input, init) {
  const response = await baseFetch(input, init);
  await inputGate.waitForOpen();
  return response;
}

You may have noticed a problem here. Where does inputGate come from in fetch? We only have one global scope for the entire Worker and all its Durable Objects, so we can’t have a fetch per Durable Object InputGate. We also can’t ask the user to pass it around as another parameter to all functions that need it. We need some way of storing it in a context that’s passed around automatically between potentially async functions. For this, we can use another lesser-known Node module, async_hooks, which includes the AsyncLocalStorage class:

import { AsyncLocalStorage } from "async_hooks";

const inputGateStorage = new AsyncLocalStorage<InputGate>();

const inputGate = new InputGate();
await inputGateStorage.run(inputGate, async () => {
  // This closure will run in an async context with inputGate
  await fetch("https://example.com");
});

async function fetch(input: RequestInfo, init: RequestInit): Promise<Response> {
  const response = await baseFetch(input, init);
  // Get the input gate in the current async context
  const inputGate = inputGateStorage.getStore();
  await inputGate.waitForOpen();
  return response;
}

Durable Objects also include a blockConcurrencyWhile(closure) method that defers events until the closure completes. This is exactly the runWithClosed() method:

class DurableObjectState {
  // ...

  blockConcurrencyWhile<T>(closure: () => Promise<T>): Promise<T> {
    return this.inputGate.runWithClosed(closure);
  }
}

However, there’s a problem with what we’ve got at the moment. Consider the following code:

export class CounterObject {
  constructor(state: DurableObjectState) {
    state.blockConcurrencyWhile(async () => {
      const res = await fetch("https://example.com");
      this.data = await res.text();
    });
  }
}

blockConcurrencyWhile closes the input gate, but fetch won’t return until the input gate is open, so we’re deadlocked! To fix this, we need to make InputGates nested:

class InputGate {
  constructor(private parent?: InputGate) {}

  async runWithClosed<T>(closure: () => Promise<T>): Promise<T> {
    // 1. Close the input gate, *and any parents*
    // 2. *Create a new child input gate with this as its parent*
    const childInputGate = new InputGate(this);
    // 3. Run the closure, *under the child input gate's context*
    // 4. Open the input gate, *and any parents*
    // 5. Return the result
  }
}

Now the input gate outside of blockConcurrencyWhile will be closed, so fetches to the Durable Object will be deferred, but the input gate inside the closure will be open, so the fetch can return.

This glosses over some details, but you can check out the gates implementation for additional context and comments. 🙂

HTMLRewriter

HTMLRewriter is another novel class that allows parsing and transforming HTML streams. In the edge Workers runtime, it’s powered by C-bindings to the lol-html Rust library. Luckily, Ivan Nikulin built WebAssembly bindings for this, so we’re able to use the same library in Node.js.

However, these were missing support for async handlers that allow you to access external resources when rewriting:

class UserElementHandler {
  async element(node) {
    const response = await fetch("/user");
    // ...
  }
}

The WebAssembly bindings Rust code includes something like:

macro_rules! make_handler {
  ($handler:ident, $JsArgType:ident, $this:ident) => {
    move |arg: &mut _| {
      // `js_arg` here is the `node` parameter from above
      let js_arg = JsValue::from(arg);
      // $handler here is the `element` method from above
      match $handler.call1(&$this, &js_arg) {
        Ok(res) => {
          // Check if this is an async handler
          if let Some(promise) = res.dyn_ref::<JsPromise>() {
            await_promise(promise);
          }
          Ok(())
        }
        Err(e) => ...,
      }
    }
  };
}

The key thing to note here is that the Rust move |...| { ... } closure is synchronous, but handlers can be asynchronous. This is like trying to await a Promise in a non-async function.

To solve this, we use the Asyncify feature of Binaryen, a set of tools for working with WebAssembly modules. Whenever we call await_promise, Asyncify unwinds the current WebAssembly stack into some temporary storage. Then in JavaScript, we await the Promise. Finally, we rewind the stack from the temporary storage to the previous state and continue rewriting where we left off.

You can find the full implementation in the html-rewriter-wasm package.

Miniflare 2.0: fully-local development and testing for Workers

The future of Miniflare

As mentioned earlier, Miniflare is now included in wrangler 2.0. Try it out and let us know what you think!

I’d like to thank everyone on the Workers team at Cloudflare for building such an amazing platform and supportive community. Special thanks to anyone who’s contributed to Miniflare, opened issues, given suggestions, or asked questions in the Discord server.

Maybe now I can finish off my original workers project… 😅