Post Syndicated from Pat Patterson original https://www.backblaze.com/blog/building-a-multiregion-origin-store-with-backblaze-b2-fastly-computeedge/
Backblaze B2 Cloud Storage customers have long leveraged our partner Fastly’s Deliver@Edge CDN as an essential component of a modern, scalable web architecture. Complementing Deliver@Edge, Compute@Edge is a serverless computing environment built on the same caching platform to provide a general-purpose compute layer between the cloud and end users. Today, we’re excited to celebrate Fastly’s announcement of its Compute@Edge partner ecosystem.
Serverless computing is quickly gaining popularity among developers for its simplicity, agility, and functionality. In the serverless model, cloud providers allocate resources to applications on demand, managing the compute infrastructure on behalf of their customers. The term, “serverless,” is a little misleading: The servers are actually still there, but customers don’t have to get involved in their provisioning, configuration, maintenance, or scaling.
Fastly’s Compute@Edge represents the next generation of serverless computing—purpose-built for better performance, reduced latency, and enhanced visibility and security. Using Fastly’s tools, a developer can create an edge application, test it locally, then with one command, deploy it to the Compute@Edge platform. When a request for that application reaches any of Fastly’s global network of edge servers, the application is launched and running in microseconds and can instantly scale to tens of thousands of requests per second.
It’s difficult to overstate the power and flexibility this puts in your hands as a developer—your application can be running on every edge server, with access to every attribute of its incoming requests, assembling responses in any way you choose. For an idea of the possibilities, check out the Compute@Edge demos, in particular, the implementation of the video game classic, “Doom.”
We don’t have space in a single blog post to explore an edge application of that magnitude, but read on for a simple example of how you can combine Fastly’s Compute@Edge with Backblaze B2 to improve your website’s user experience, directing requests to the optimal origin store end point based on the user’s location.
The Case for a Multiregion Origin Store
Although the CDN caches resources to improve performance, if a requested resource is not present in the edge server cache, it must be fetched from the origin store. When the edge server is close to the origin store, the increase in latency is minimal. If, on the other hand, the edge server is on a different continent from the origin store, it can take significantly longer to retrieve uncached content. In most cases, this additional delay is hardly noticeable, but for websites with many resources that are frequently updated, it can add up to a sluggish experience for users. A solution is for the origin store to maintain multiple copies of a website’s content, each at an end point in a different region. This approach can dramatically reduce the penalty for cache misses, improving the user experience.
There is a problem here, though: How do we ensure that a given CDN edge server directs requests to the “best” end point? The answer: build an application that uses the edge server’s location to select the end point. I’ll explain how I did just that, creating a Fastly Compute@Edge application to proxy requests to Backblaze B2 buckets.
Creating an Application on Fastly Compute@Edge
The Fastly Compute@Edge developer documentation did a great job of walking me through creating a Compute@Edge application. As part of the process, I had to choose a starter kit—a simple working application targeting a specific use case. The Static Content starter kit was the ideal basis for my application—it demonstrates many useful techniques, such as generating an AWS V4 Signature and manipulating the request’s Host HTTP header to match the origin store.
The core of the application is just a few lines written in the Rust programming language:
#[fastly::main]


fn main(mut req: Request) -> Result<Response, Error> {

    // 1. Where is the application running?

    let pop = get_pop(&req);
// 2. Choose the origin based on the edge server (pop) -
// default to US if there is no match on the pop
let origin = POP_ORIGIN.get(pop.as_str()).unwrap_or(&US_ORIGIN);
// 3. Remove the query string to improve cache hit ratio
req.remove_query();
// 4. Set the `Host` header to the bucket name + host rather than
// our Compute@Edge endpoint
let host = format!("{}.{}", origin.bucket_name, origin.endpoint);
req.set_header(header::HOST, &host);
// 5. Copy the modified client request to form the backend request
let mut bereq = req.clone_without_body();
// 6. Set the AWS V4 authentication headers
set_authentication_headers(&mut bereq, &origin);
// 7. Send the request to the backend and assign its response to `beresp`
let mut beresp = bereq.send(origin.backend_name)?;
// 8. Set a response header indicating the origin that we used
beresp.set_header("X-B2-Host", &host);
// 9. Return the response to the client
return Ok(beresp);
}
In step one, the get_pop function returns the three-letter abbreviation for the edge server, or point of presence (POP). For the purposes of testing, you can specify a POP as a query parameter in your HTTP request. For example, https://three.interesting.words.edgecompute.app/image.png?pop=AMS will simulate the application running on the Amsterdam POP. Next, in step two, the application looks up the POP in a mapping of POPs to Backblaze B2 end points. There are about a hundred Fastly POPs spread around the world; I simply took the list generated by running the Fastly command-line tool with the POPs argument, and assigned POPs to Backblaze B2 end points based on their location:
- POPs in North America, South America, and Asia/Pacific map to the U.S. end point.
- POPs in Europe and Africa map to the EU end point.
I won’t step through the rest of the logic in detail here—the comments in the code sample above cover the basics; feel free to examine the code in detail on GitHub if you’d like a closer look.
Serve Your Own Data From Multiple Backblaze B2 Regions
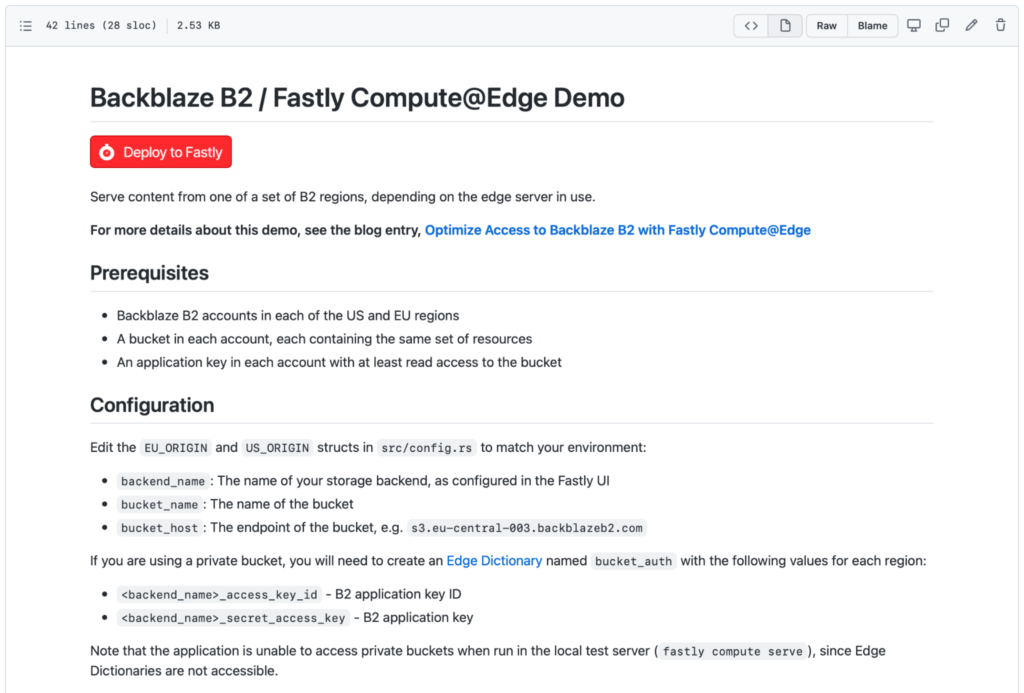
As you can see in the screenshot above, Fastly has implemented a Deploy to Fastly button. You can use this to create your own copy of the Backblaze B2 Compute@Edge demo application in just a couple of minutes. You’ll need to gather a few prerequisites before you start:
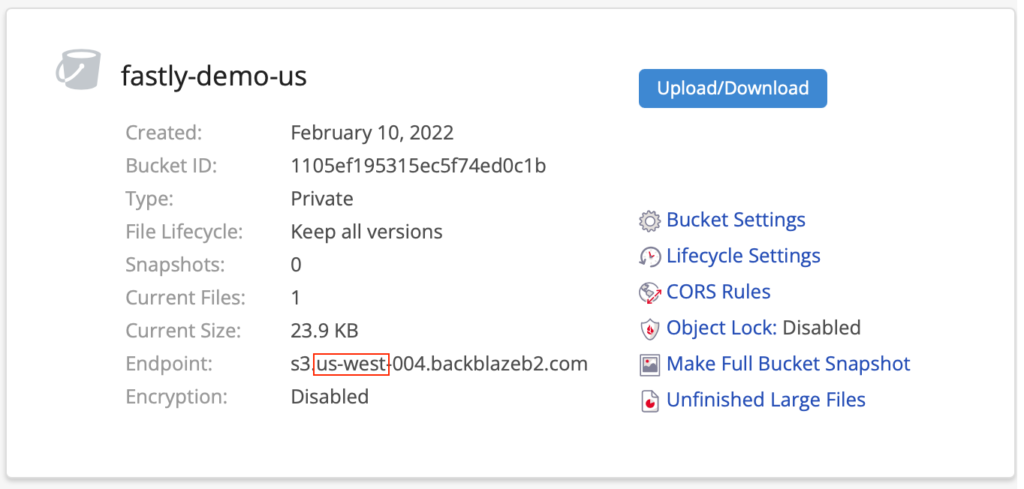
- You must create Backblaze B2 accounts in both the U.S. and EU regions. If you have an existing account and you’re not sure which region it’s in, just take a look at the end point for one of your buckets. For example, this bucket is in the U.S. West region:

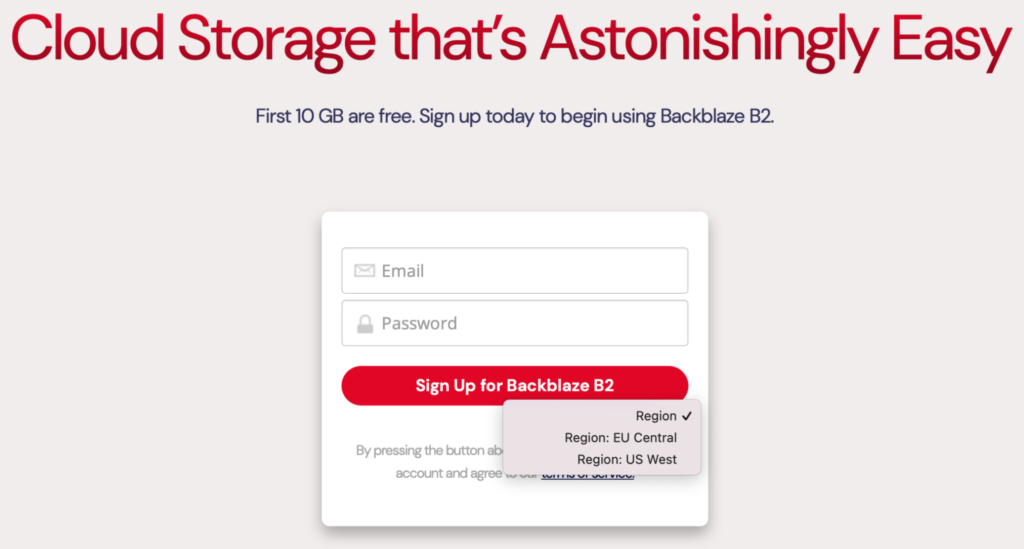
To create your second account, go to the Sign Up page, and click the Region drop-down on the right under the big, red Sign Up button:

Pick the region in which you don’t already have an account, and enter an email and password. Remember, your new account comes with 10GB of storage, free of charge, so there’s no need to enter your credit card details.
Note: You’ll need to use a different email address from your existing account. If you don’t have a second email address, you can use the plus trick (officially known as sub-addressing) and reuse an existing email address. For example, if you used
[email protected]for your existing B2 Cloud Storage account in the U.S. region, you can use[email protected]for your new EU account. Mail will be routed to the same inbox, and Backblaze B2 will be satisfied that it’s a different email address. This technique isn’t limited to Gmail, by the way, it works with many email providers. - Create a private bucket in each account, and use your tool of choice to copy the same data into each of them. Make a note of the end point for each bucket.
- Create an application key with read access to each bucket.
- Sign up for a free Fastly account if you don’t already have one. Right now, this includes free credits for Compute@Edge.
- Sign up for a free GitHub account.
- Go to the Backblaze B2/Fastly Compute@Edge Demo GitHub repository, click the Deploy to Fastly button, and follow the prompts. The repository will be forked to your GitHub account and then deployed to Fastly.
- Important: There is one post-deploy step you must complete before your application will work! In your new GitHub repository, navigate to
src/config.rsand hit the pencil icon near the top right to edit the file. Change the origin configuration in lines 18-31 to match your buckets and their end points. Alternatively, you can, of course, clone the repository to your local machine, edit it there, and push the changes back to GitHub.
Once you have your accounts and buckets created, it takes just a few minutes to deploy the application. Watch me walk through the process:
What Can You Do With Fastly’s Compute@Edge and Backblaze B2?
My simple demo application only scratches the surfaces of Compute@Edge. How could you combine Fastly’s edge computing platform with Backblaze B2 to create a new capability for your website? Check out Fastly’s collection of over 100 Compute@Edge code samples for inspiration. If you come up with something neat and share it on GitHub, let me know in the comments and I’ll round up a bundle of Backblaze-branded goodies, just for you!
The post Building a Multiregion Origin Store With Backblaze B2 + Fastly Compute@Edge appeared first on Backblaze Blog | Cloud Storage & Cloud Backup.