Post Syndicated from Darius Jankauskas original https://blog.cloudflare.com/get-updates-on-the-health-of-your-origin-where-you-need-them/

We are thrilled to announce the availability of Health Checks in the Cloudflare Dashboard’s Notifications tab, available to all Pro, Business, and Enterprise customers. Now, you can get critical alerts on the health of your origin without checking your inbox! Keep reading to learn more about how this update streamlines notification management and unlocks countless ways to stay informed on the health of your servers.
Keeping your site reliable
We first announced Health Checks when we realized some customers were setting up Load Balancers for their origins to monitor the origins’ availability and responsiveness. The Health Checks product provides a similarly powerful interface to Load Balancing, offering users the ability to ensure their origins meet criteria such as reachability, responsiveness, correct HTTP status codes, and correct HTTP body content. Customers can also receive email alerts when a Health Check finds their origin is unhealthy based on their custom criteria. In building a more focused product, we’ve added a slimmer, monitoring-based configuration, Health Check Analytics, and made it available for all paid customers. Health Checks run in multiple locations within Cloudflare’s edge network, meaning customers can monitor site performance across geographic locations.
What’s new with Health Checks Notifications
Health Checks email alerts have allowed customers to respond quickly to incidents and guarantee minimum disruption for their users. As before, Health Checks users can still select up to 20 email recipients to notify if a Health Check finds their site to be unhealthy. And if email is the right tool for your team, we’re excited to share that we have jazzed up our notification emails and added details on which Health Check triggered the notification, as well as the status of the Health Check:

That being said, monitoring an inbox is not ideal for many customers needing to stay proactively informed. If email is not the communication channel your team typically relies upon, checking emails can at best be inconvenient and, at worst, allow critical updates to be missed. That’s where the Notifications dashboard comes in.
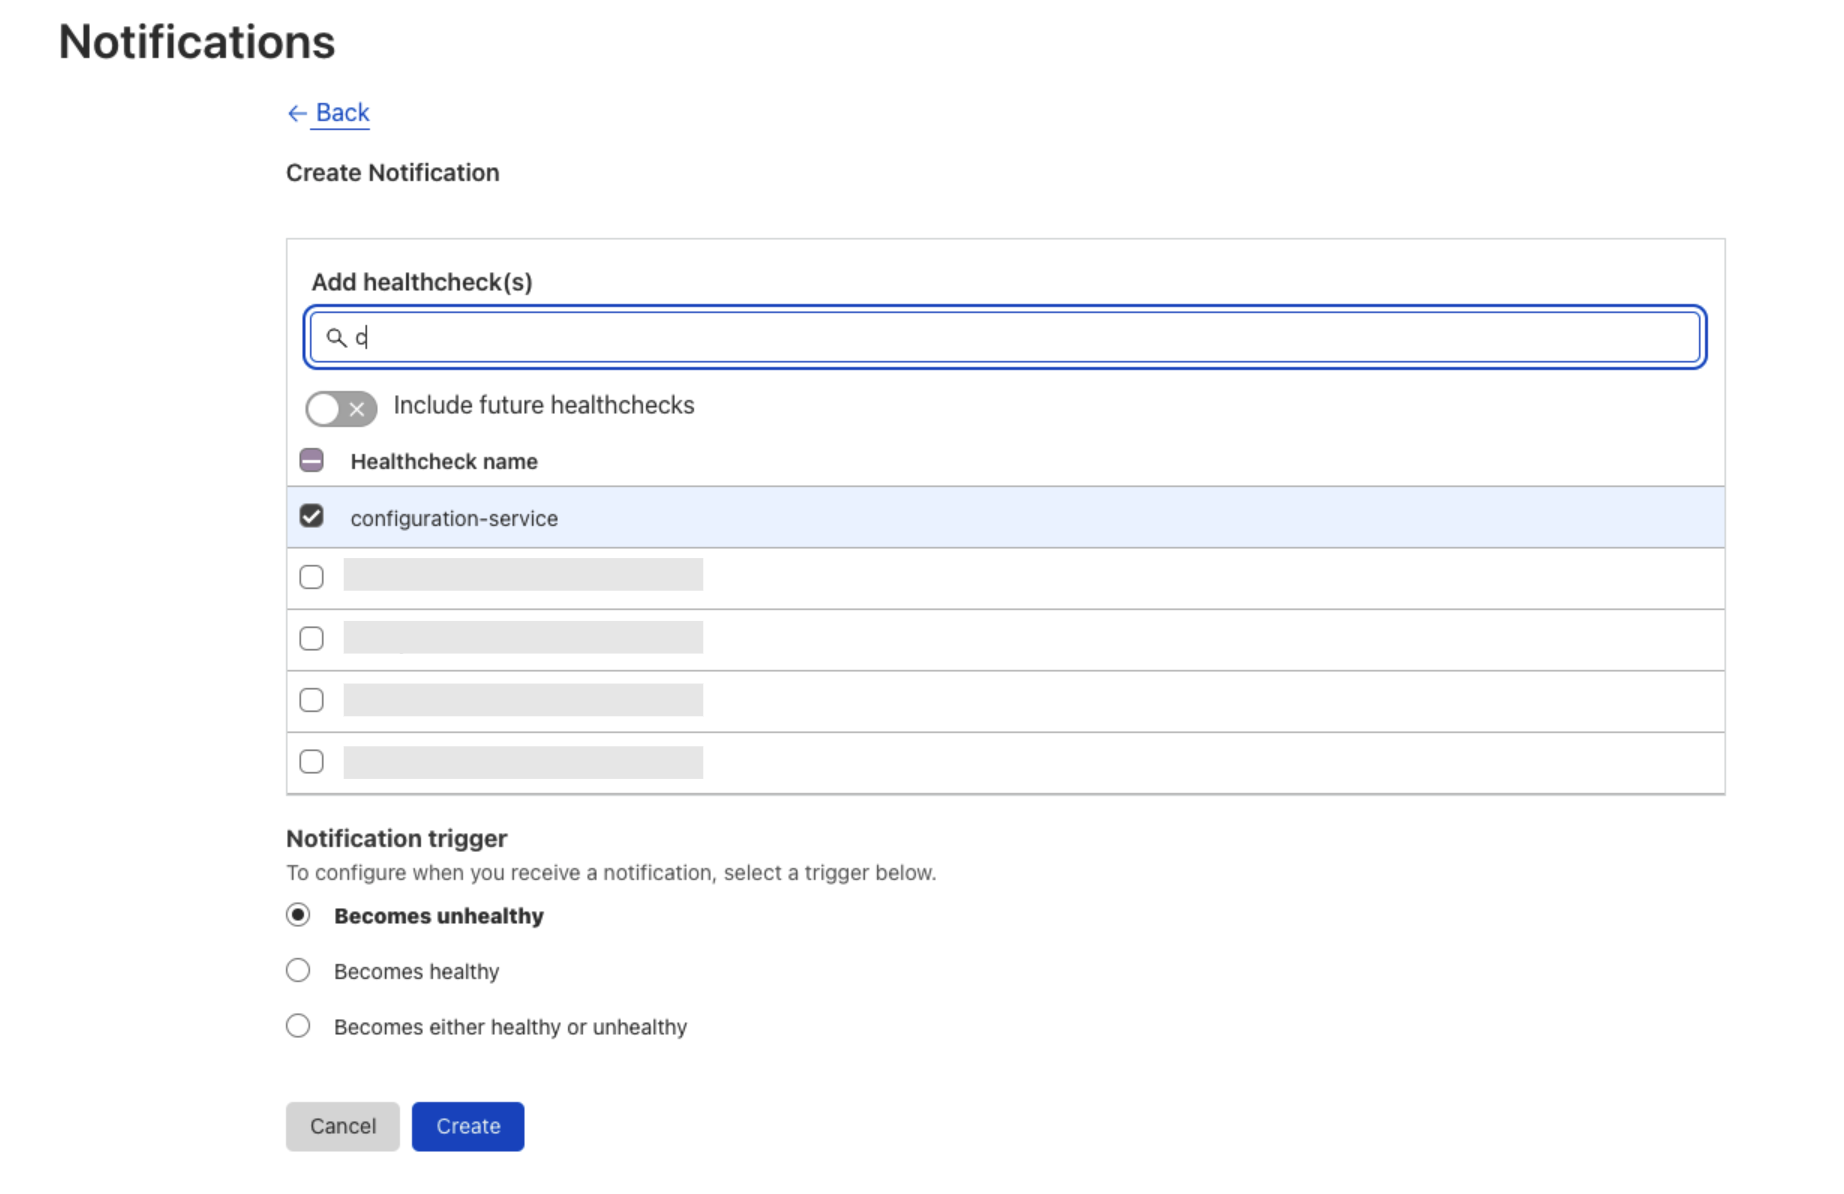
Users can now create Health Checks notifications within the Cloudflare Notifications dashboard. By integrating Health Checks with Cloudflare’s powerful Notification platform, we have unlocked myriad new ways to ensure customers receive critical updates for their origin health. One of the key benefits of Cloudflare’s Notifications is webhooks, which give customers the flexibility to sync notifications with various external services. Webhook responses contain JSON-encoded information, allowing users to ingest them into their internal or third-party systems.
For real-time updates, users can now use webhooks to send Health Check alerts directly to their preferred instant messaging platforms such as Slack, Google Chat, or Microsoft Teams, to name a few. Beyond instant messaging, customers can also use webhooks to send Health Checks notifications to their internal APIs or their Security Information and Event Management (SIEM) platforms, such as DataDog or Splunk, giving customers a single pane of glass for all Cloudflare activity, including notifications and event logs. For more on how to configure popular webhooks, check out our developer docs. Below, we’ll walk you through a couple of powerful webhook applications. But first, let’s highlight a couple of other ways the update to Health Checks notifications improves user experience.
By including Health Checks in the Notifications tab, users need only to access one page for a single source of truth where they can manage their account notifications. For added ease of use, users can also migrate to Notification setup directly from the Health Check creation page as well. From within a Health Check, users will also be able to see what Notifications are tied to it.
Additionally, configuring notifications for multiple Health Checks is now simplified. Instead of configuring notifications one Health Check at a time, users can now set up notifications for multiple or even all Health Checks from a single workflow.
Also, users can now access Health Checks notification history, and Enterprise customers can integrate Health Checks directly with PagerDuty. Last but certainly not least, as Cloudflare’s Notifications infrastructure grows in capabilities, Health Checks will be able to leverage all of these improvements. This guarantees Health Checks users the most timely and versatile notification capabilities that Cloudflare offers now and into the future.
Setting up a Health Checks webhook
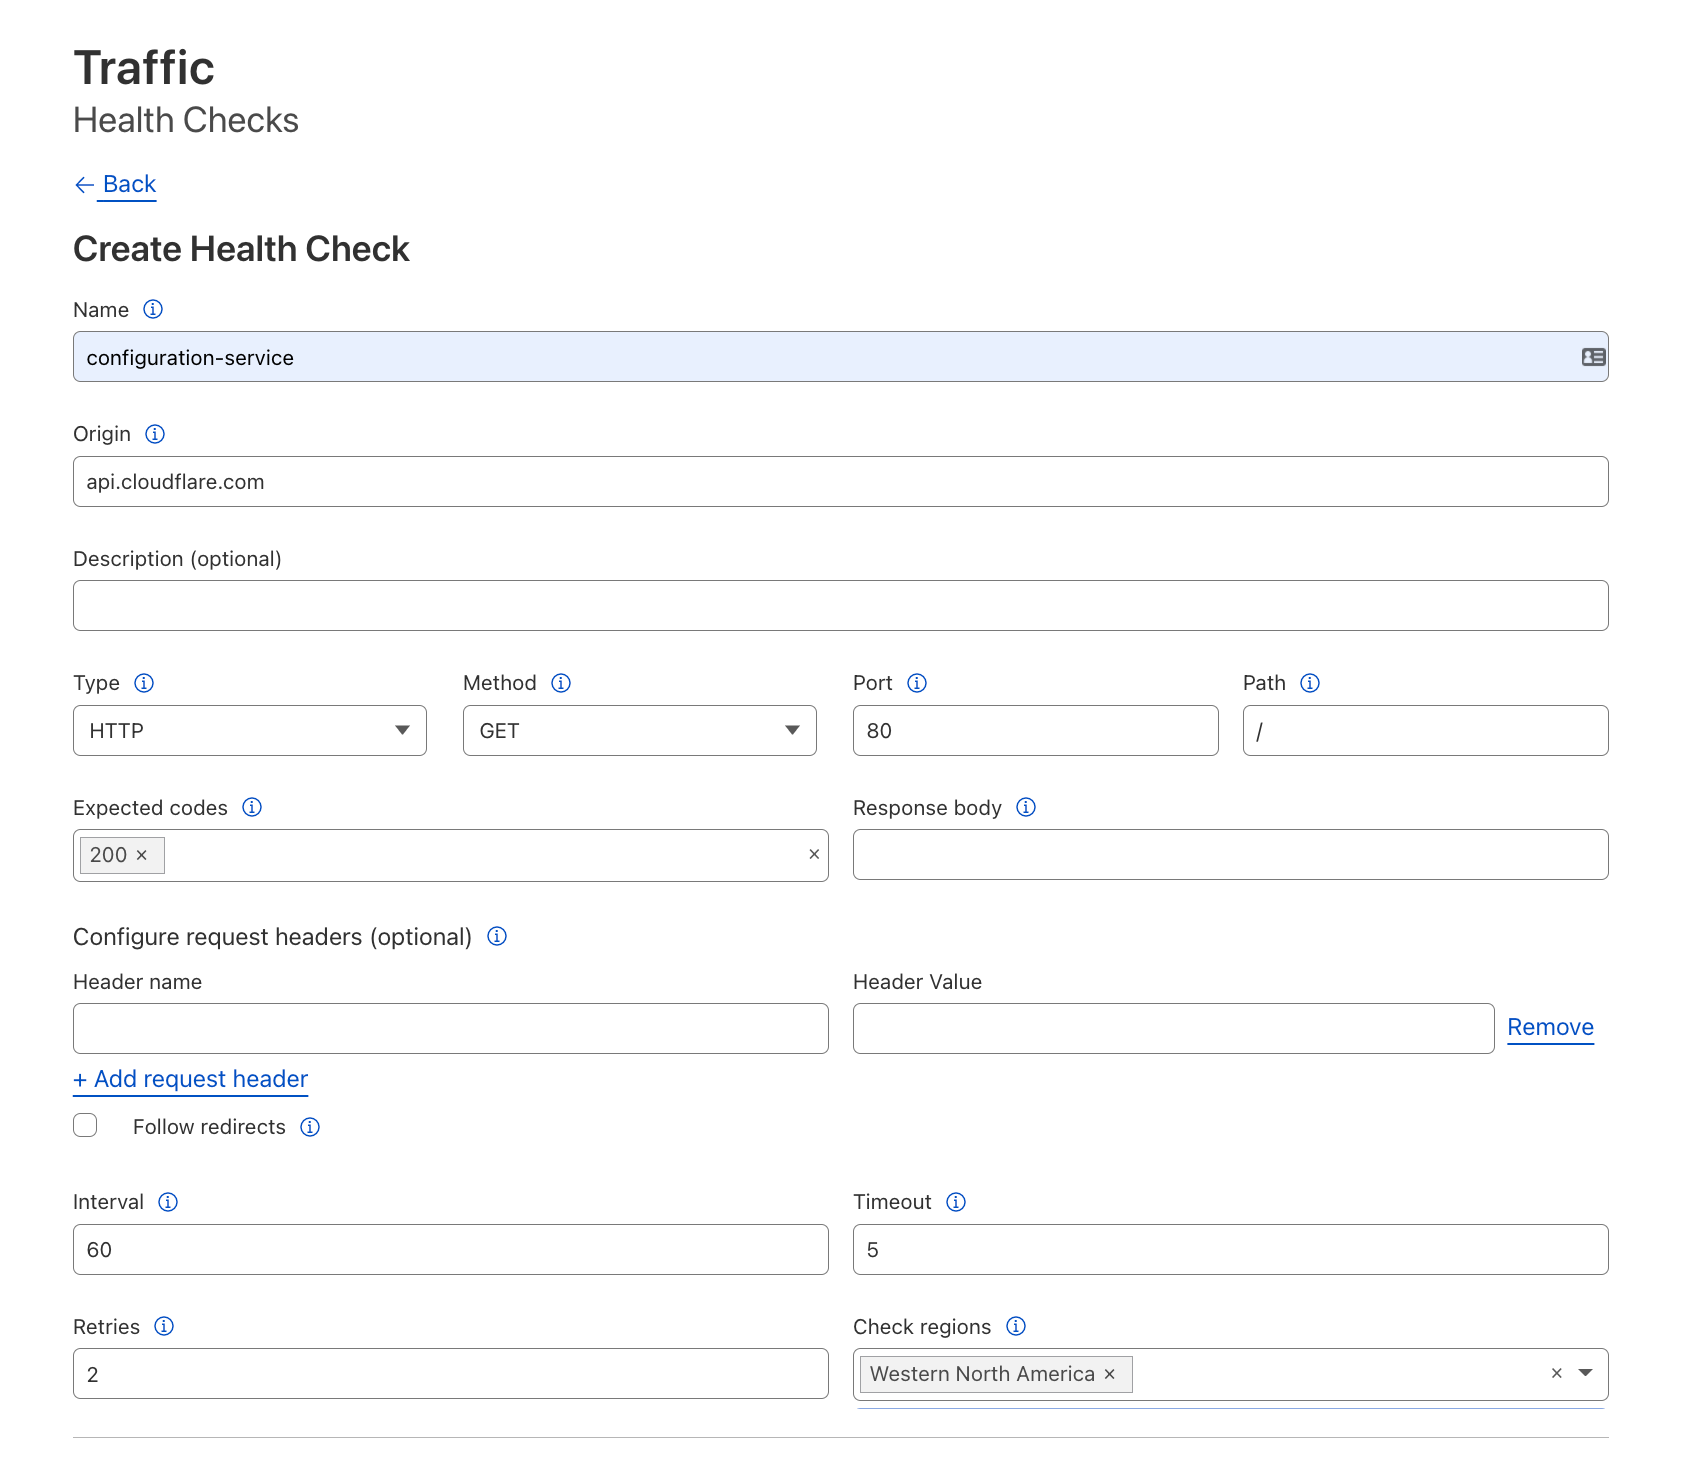
To get notifications for health changes at an origin, we first need to set up a Health Check for it. In this example, we’ll monitor HTTP responses: leave the Type and adjacent fields to their defaults. We will also monitor HTTP response codes: add `200` as an expected code, which will cause any other HTTP response code to trigger an unhealthy status.
Creating the webhook notification policy
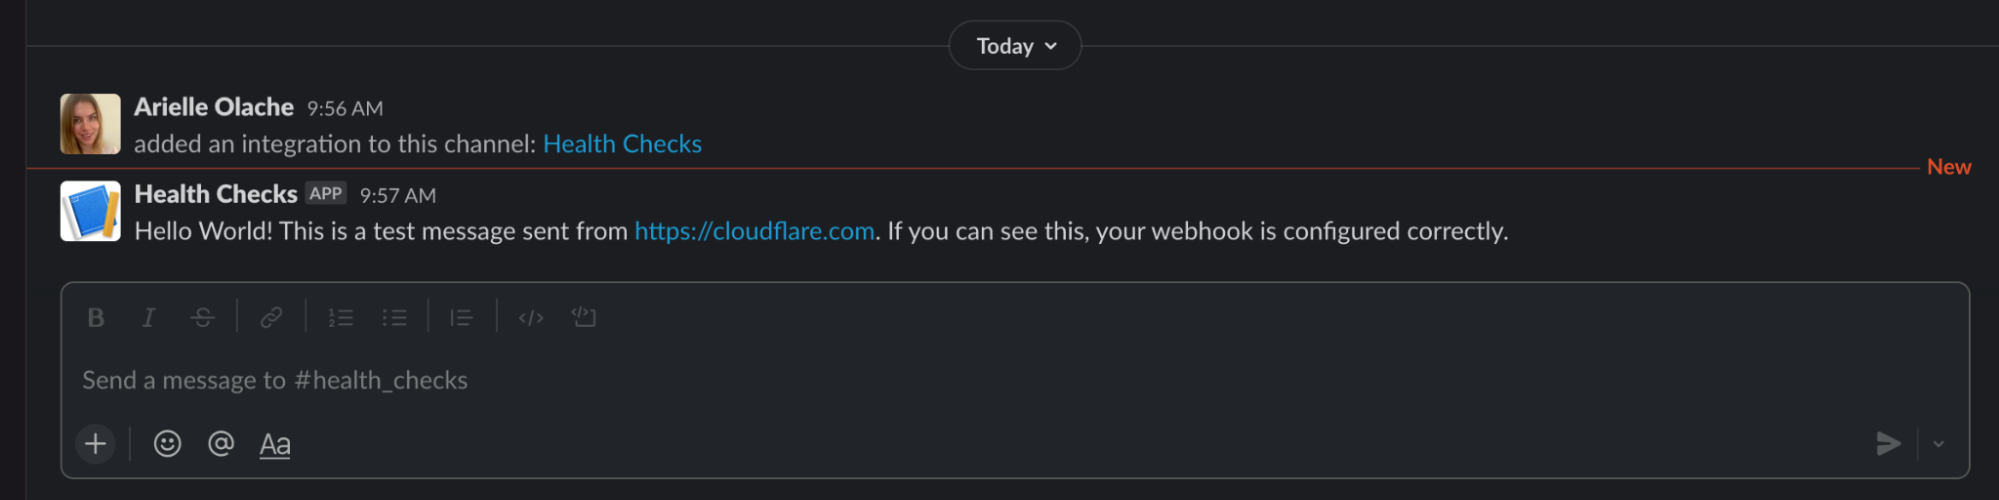
Once we’ve got our Health Check set up, we can create a webhook to link it to. Let’s start with a popular use case and send our Health Checks to a Slack channel. Before creating the webhook in the Cloudflare Notifications dashboard, we enable webhooks in our Slack workspace and retrieve the webhook URL of the Slack channel we want to send notifications to. Next, we navigate to our account’s Notifications tab to add the Slack webhook as a Destination, entering the name and URL of our webhook — the secret will populate automatically.
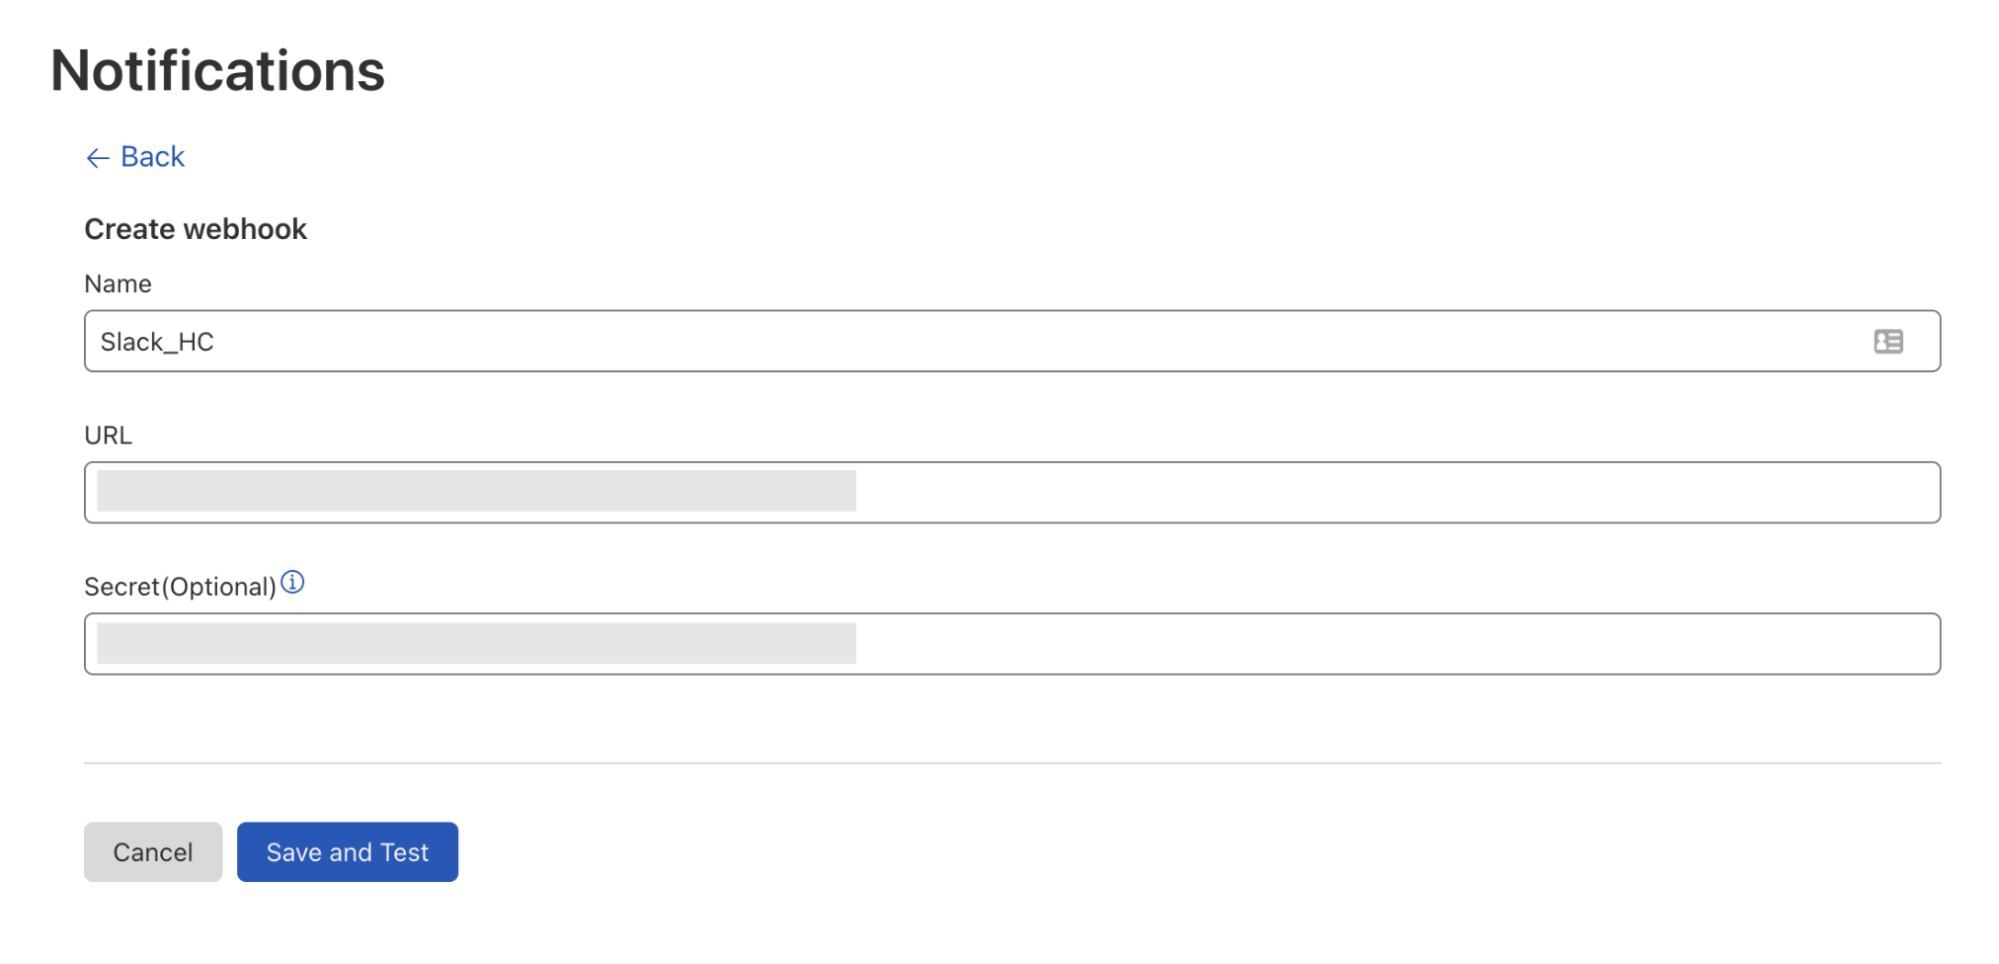
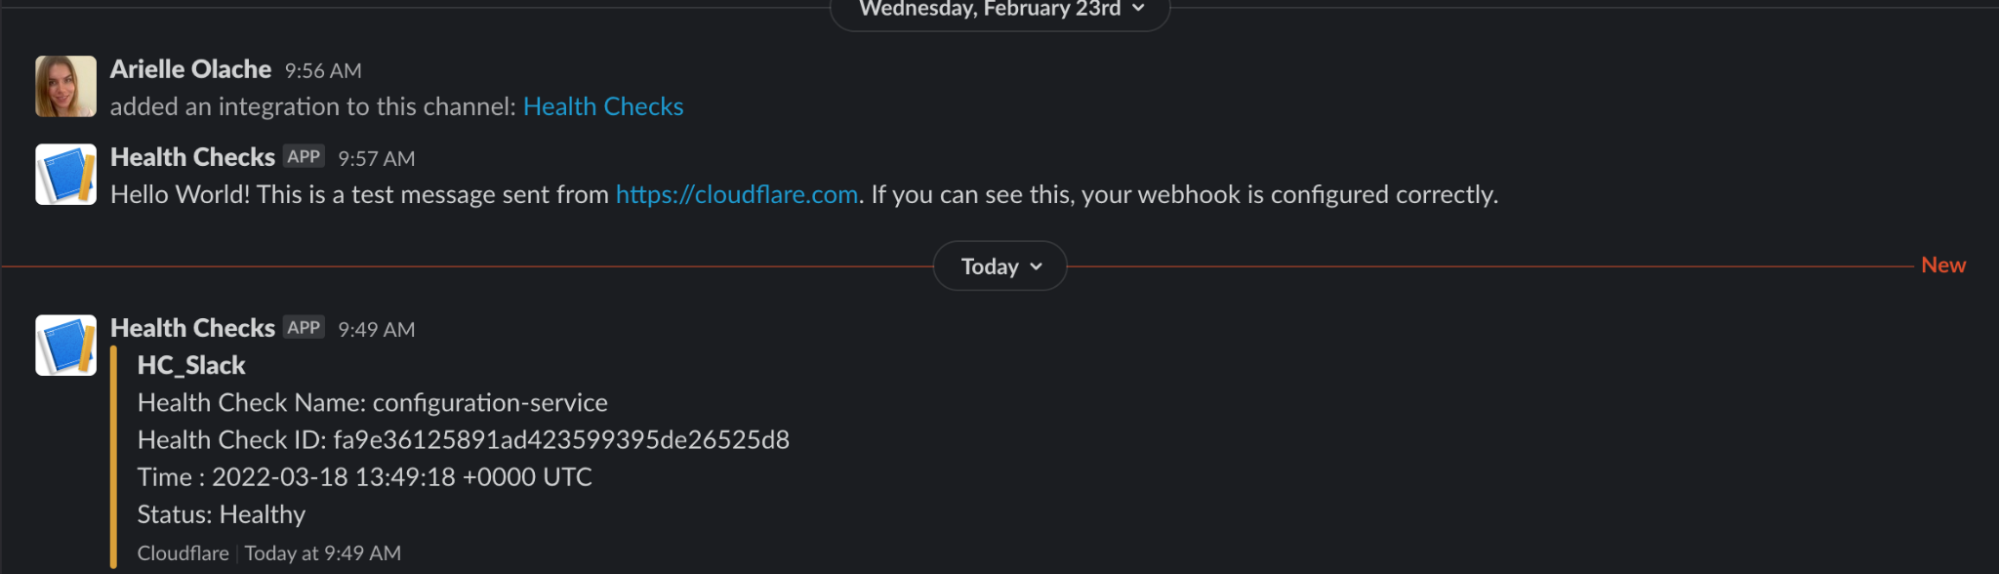
Once we hit Save and Test, we will receive a message in the designated Slack channel verifying that our webhook is working.
This webhook can now be used for any notification type available in the Notifications dashboard. To have a Health Check notification sent to this Slack channel, simply add a new Health Check notification from the Notifications dashboard, selecting the Health Check(s) to tie to this webhook and the Slack webhook we just created. And, voilà! Anytime our Health Check detects a response status code other than 200 or goes from unhealthy to healthy, this Slack channel will be notified.
Create an Origin Health Status Page
Let’s walk through another powerful webhooks implementation with Health Checks. Using the Health Check we configured in our last example, let’s create a simple status page using Cloudflare Workers and Durable Objects that stores an origin’s health, updates it upon receiving a webhook request, and displays a status page to visitors.
Writing our worker
You can find the code for this example in this GitHub repository, if you want to clone it and try it out.
We’ve got our Health Check set up, and we’re ready to write our worker and durable object. To get started, we first need to install wrangler, our CLI tool for testing and deploying more complex worker setups.
$ wrangler -V
wrangler 1.19.8
The examples in this blog were tested in this wrangler version.
Then, to speed up writing our worker, we will use a template to generate a project:
$ wrangler generate status-page [https://github.com/cloudflare/durable-objects-template](https://github.com/cloudflare/durable-objects-template)
$ cd status-page
The template has a Durable Object with the name Counter. We’ll rename that to Status, as it will store and update the current state of the page.
For that, we update wrangler.toml to use the correct name and type, and rename the Counter class in index.mjs.
name = "status-page"
# type = "javascript" is required to use the `[build]` section
type = "javascript"
workers_dev = true
account_id = "<Cloudflare account-id>"
route = ""
zone_id = ""
compatibility_date = "2022-02-11"

[build.upload]
# Upload the code directly from the src directory.
dir = "src"
# The "modules" upload format is required for all projects that export a Durable Objects class
format = "modules"
main = "./index.mjs"

[durable_objects]
bindings = [{name = "status", class_name = "Status"}]
Now, we’re ready to fill in our logic. We want to serve two different kinds of requests: one at /webhook that we will pass to the Notification system for updating the status, and another at / for a rendered status page.
First, let’s write the /webhook logic. We will receive a JSON object with a data and a text field. The `data` object contains the following fields:
time - The time when the Health Check status changed.
status - The status of the Health Check.
reason - The reason why the Health Check failed.
name - The Health Check name.
expected_codes - The status code the Health Check is expecting.
actual_code - The actual code received from the origin.
health_check_id - The id of the Health Check pushing the webhook notification.
For the status page we are using the Health Check name, status, and reason (the reason a Health Check became unhealthy, if any) fields. The text field contains a user-friendly version of this data, but it is more complex to parse.
 async handleWebhook(request) {
  const json = await request.json();

  // Ignore webhook test notification upon creation
  if ((json.text || "").includes("Hello World!")) return;

  let healthCheckName = json.data?.name || "Unknown"
  let details = {
    status: json.data?.status || "Unknown",
    failureReason: json.data?.reason || "Unknown"
  }
  await this.state.storage.put(healthCheckName, details)
 }
Now that we can store status changes, we can use our state to render a status page:
 async statusHTML() {
  const statuses = await this.state.storage.list()
  let statHTML = ""

  for(let[hcName, details] of statuses) {
   const status = details.status || ""
   const failureReason = details.failureReason || ""
   let hc = `<p>HealthCheckName: ${hcName} </p>
         <p>Status: ${status} </p>
         <p>FailureReason: ${failureReason}</p>
         <br/>`
   statHTML = statHTML + hc
  }

  return statHTML
 }

 async handleRoot() {
  // Default of healthy for before any notifications have been triggered
  const statuses = await this.statusHTML()

  return new Response(`
     <!DOCTYPE html>
     <head>
      <title>Status Page</title>
      <style>
       body {
        font-family: Courier New;
        padding-left: 10vw;
        padding-right: 10vw;
        padding-top: 5vh;
       }
      </style>
     </head>
     <body>
       <h1>Status of Production Servers</h1>
       <p>${statuses}</p>
     </body>
     `,
   {
    headers: {
     'Content-Type': "text/html"
    }
   })
 }
Then, we can direct requests to our two paths while also returning an error for invalid paths within our durable object with a fetch method:
async fetch(request) {
  const url = new URL(request.url)
  switch (url.pathname) {
   case "/webhook":
    await this.handleWebhook(request);
    return new Response()
   case "/":
    return await this.handleRoot();
   default:
    return new Response('Path not found', { status: 404 })
  }
 }
Finally, we can call that fetch method from our worker, allowing the external world to access our durable object.
export default {
 async fetch(request, env) {
  return await handleRequest(request, env);
 }
}
async function handleRequest(request, env) {
 let id = env.status.idFromName("A");
 let obj = env.status.get(id);

 return await obj.fetch(request);
}
Testing and deploying our worker
When we’re ready to deploy, it’s as simple as running the following command:
$ wrangler publish --new-class Status
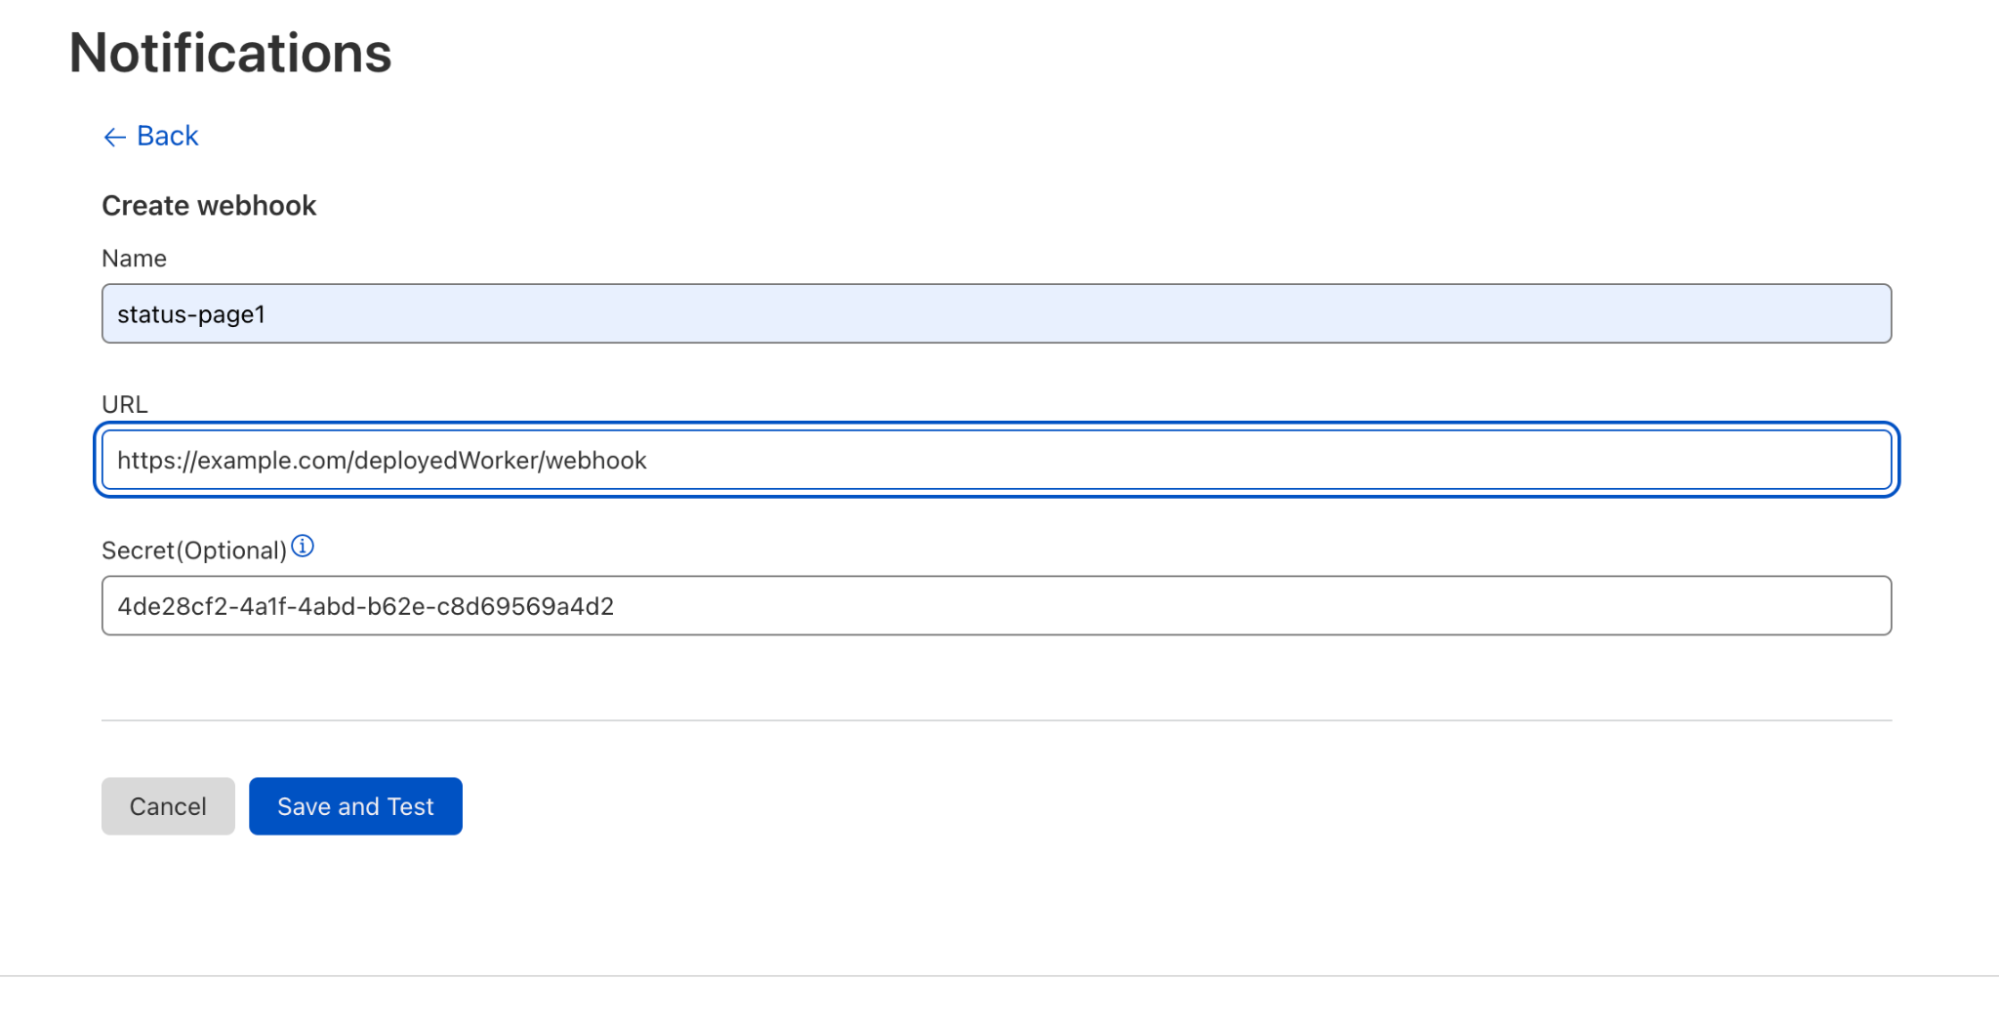
To test the change, we create a webhook pointing to the path the worker was deployed to. On the Cloudflare account dashboard, navigate to Notifications > Destinations, and create a webhook.
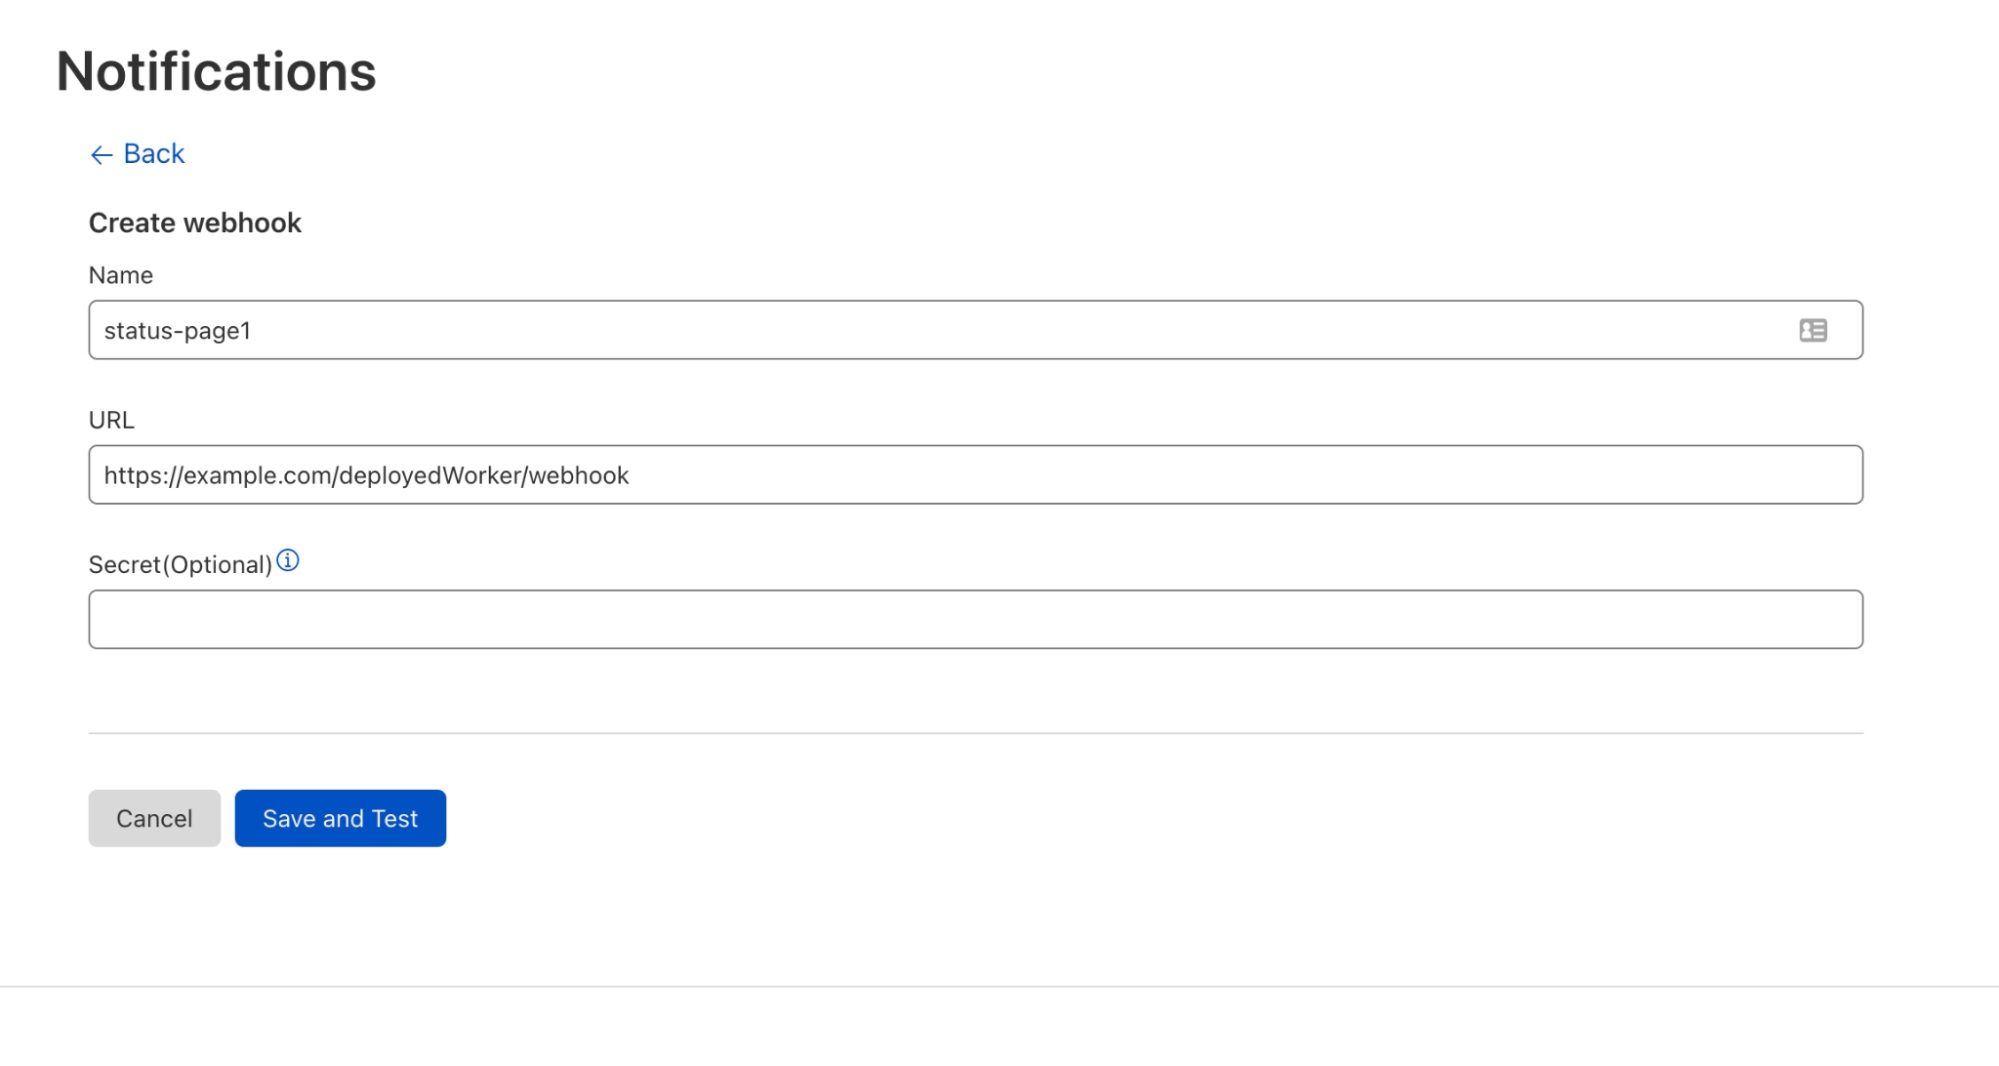
Then, while still in the Notifications dashboard, create a Health Check notification tied to the status page webhook and Health Check.

Before getting any updates the status-page worker should look like this:
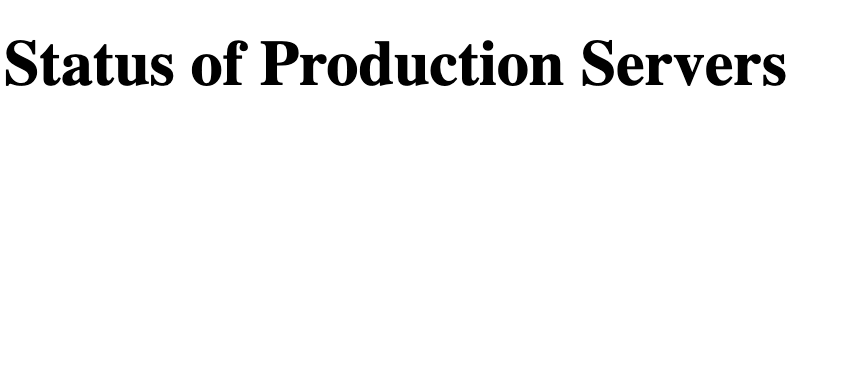
Webhooks get triggered when the Health Check status changes. To simulate the change of Health Check status we take the origin down, which will send an update to the worker through the webhook. This causes the status page to get updated.
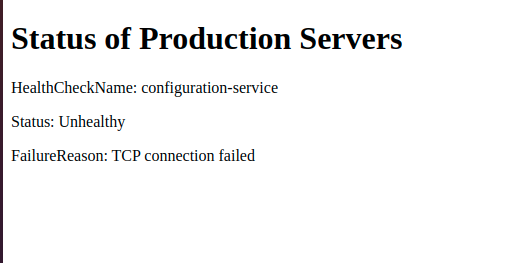
Next, we simulate a return to normal by changing the Health Check expected status back to 200. This will make the status page show the origin as healthy.

If you add more Health Checks and tie them to the webhook durable object, you will see the data being added to your account.
Authenticating webhook requests
We already have a working status page! However, anyone possessing the webhook URL would be able to forge a request, pushing arbitrary data to an externally-visible dashboard. Obviously, that’s not ideal. Thankfully, webhooks provide the ability to authenticate these requests by supplying a secret. Let’s create a new webhook that will provide a secret on every request. We can generate a secret by generating a pseudo-random UUID with Python:
$ python3
>>> import uuid
>>> uuid.uuid4()
UUID('4de28cf2-4a1f-4abd-b62e-c8d69569a4d2')
Now we create a new webhook with the secret.
We also want to provide this secret to our worker. Wrangler has a command that lets us save the secret.
$ wrangler secret put WEBHOOK_SECRET
Enter the secret text you'd like assigned to the variable WEBHOOK_SECRET on the script named status-page:
4de28cf2-4a1f-4abd-b62e-c8d69569a4d2
🌀 Creating the secret for script name status-page
✨ Success! Uploaded secret WEBHOOK_SECRET.
Wrangler will prompt us for the secret, then provide it to our worker. Now we can check for the token upon every webhook notification, as the secret is provided by the header cf-webhook-auth. By checking the header’s value against our secret, we can authenticate incoming webhook notifications as genuine. To do that, we modify handleWebhook:
 async handleWebhook(request) {
  // ensure the request we receive is from the Webhook destination we created
  // by examining its secret value, and rejecting it if it's incorrect
  if((request.headers.get('cf-webhook-auth') != this.env.WEBHOOK_SECRET) {
    return
   }
  ...old code here
 }
This origin health status page is just one example of the versatility of webhooks, which allowed us to leverage Cloudflare Workers and Durable Objects to support a custom Health Checks application. From highly custom use cases such as this to more straightforward, out-of-the-box solutions, pairing webhooks and Health Checks empowers users to respond to critical origin health updates effectively by delivering that information where it will be most impactful.
Migrating to the Notifications Dashboard
The Notifications dashboard is now the centralized location for most Cloudflare services. In the interest of consistency and streamlined administration, we will soon be limiting Health Checks notification setup to the Notifications dashboard. Many existing Health Checks customers have emails configured via our legacy alerting system. Over the next three months, we will support the legacy system, giving customers time to transition their Health Checks notifications to the Notifications dashboard. Customers can expect the following timeline for the phasing out of existing Health Checks notifications:
- For now, customers subscribed to legacy emails will continue to receive them unchanged, so any parsing infrastructure will still work. From within a Health Check, you will see two options for configuring notifications–the legacy format and a deep link to the Notifications dashboard.
- On May 24, 2022, we will disable the legacy method for the configuration of email notifications from the Health Checks dashboard.
- On June 28, 2022, we will stop sending legacy emails, and adding new emails at the
/healthchecksendpoint will no longer send email notifications.
We strongly encourage all our users to migrate existing Health Checks notifications to the Notifications dashboard within this timeframe to avoid lapses in alerts.