Post Syndicated from BP Yau original https://aws.amazon.com/blogs/big-data/accelerate-snowflake-to-amazon-redshift-migration-using-aws-schema-conversion-tool/
Amazon Redshift is a fully managed, petabyte-scale data warehouse service in the cloud. You can start with just a few hundred gigabytes of data and scale to a petabyte or more. This enables you to use your data to acquire new insights for your business and customers. Today, tens of thousands of AWS customers—from Fortune 500 companies, startups, and everything in between—use Amazon Redshift to run mission-critical business intelligence (BI) dashboards, analyze real-time streaming data, and run predictive analytics jobs. With the constant increase in generated data, Amazon Redshift customers continue to achieve successes in delivering better service to their end-users, improving their products, and running an efficient and effective business.
Several new features of Amazon Redshift address a wide range of analytics requirements and improve performance of the cloud data warehouse:
- Amazon Redshift Serverless (preview)
- AWS Data Exchange for Amazon Redshift
- Data sharing and cross-Region data sharing
- SQL notebooks support in Query Editor V2
- Automated Materialized View (preview)
- Amazon Redshift ML
- Concurrency scaling
- Support for the spatial geography data type
- The new RA3 instance types
- Elastic resize
- Federated queries, which allow you to query data stored in your Amazon Aurora or Amazon Relational Database Service (Amazon RDS) PostgreSQL and MySQL operational databases directly from Amazon Redshift
- The SUPER data type, which can store semi-structured data or documents as values
- The new distributed and hardware accelerated cache with AQUA (Advanced Query Accelerator) for Amazon Redshift, which delivers up to 10 times more performance than other cloud warehouses
- The machine learning (ML) based self-tuning capability to set sort and distribution keys for tables, which significantly improves query performance that was previously handled manually
To take advantage of these capabilities and future innovations, you must migrate from your existing data warehouse to Amazon Redshift.
In this post, we show you how to migrate your data warehouse schema from Snowflake to Amazon Redshift using AWS Schema Conversion Tool (AWS SCT). AWS SCT is a service that makes heterogeneous database migrations predictable by automatically converting the source database schema and a majority of the database code objects, including views, stored procedures, and functions, to a format compatible with the target database. Any objects that can’t be automatically converted are clearly marked so that they can be manually converted to complete the migration. AWS SCT can also scan your application source code for embedded SQL statements and convert them as part of a database schema conversion project. During this process, AWS SCT performs cloud-native code optimization by converting legacy data warehouse functions to their equivalent AWS service, thereby helping you modernize the applications at the same time of database migration.
Solution overview
To implement this solution, you complete the following high-level steps:
- Configure your AWS SCT application.
- Analyze your source Snowflake schema.
- Convert your Snowflake schema to an Amazon Redshift schema.
- Deploy the schema to Amazon Redshift.
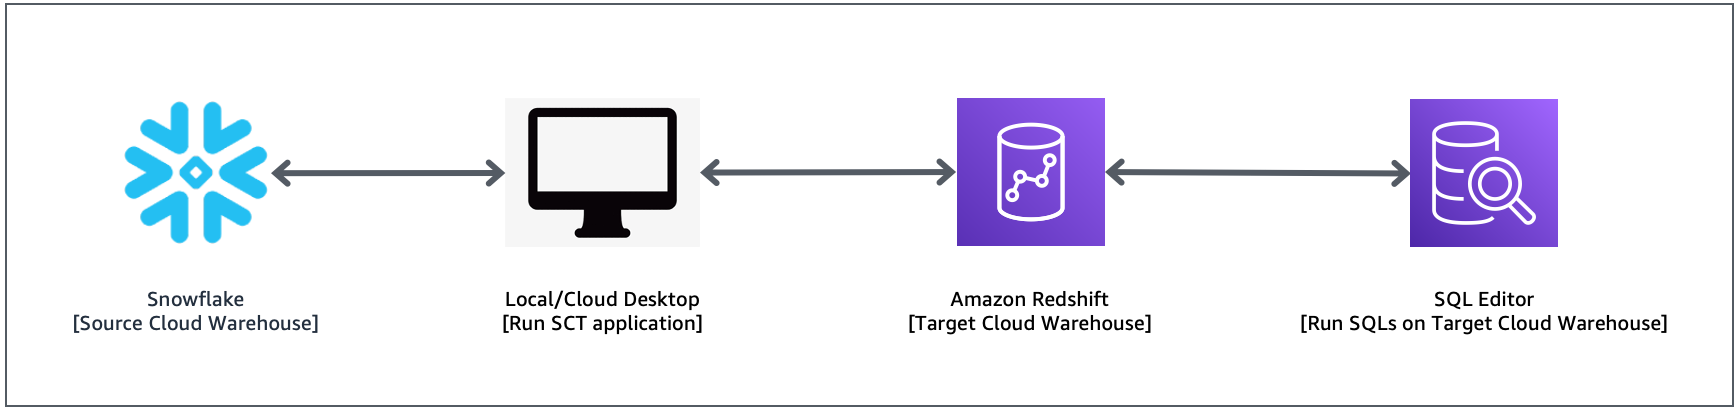
The following diagram illustrates the solution architecture.
Prerequisites
Before starting this walkthrough, you must have the following prerequisites:
- An existing Snowflake account with user credentials required to use AWS SCT. For more information, see Using Snowflake as source for AWS SCT.
- An AWS account.
- A desktop machine with AWS SCT installed. For more information, see Installing AWS SCT.
- An Amazon Redshift cluster that is accessible from the machine where AWS SCT is installed.
- JDBC drivers for Amazon Redshift and Snowflake. For more information, see Installing the required database drivers.
Set up an AWS SCT project and extract the schema from the source
In this walkthrough, we use the Snowflake sample database TPCDS_SF10TCL as the source of the schema conversion.
To set up the database migration project, complete the following steps:
- Launch the AWS SCT application.
- On the File menu, choose New project wizard.
- Enter the project name and location.
- For Source engine, choose Snowflake.
- Choose Next.

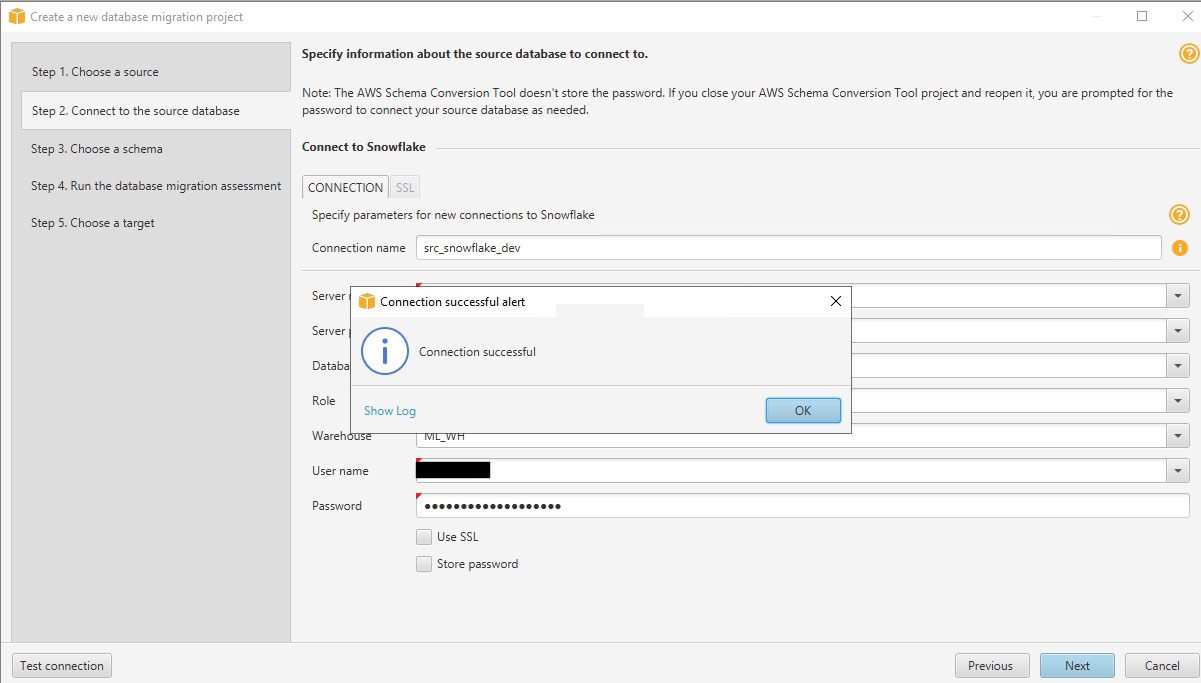
- Provide the database information and credentials for Snowflake and choose Test Connection.
- When the connection is successful, choose Next.

For more information, see Using Snowflake as a source for AWS SCT.
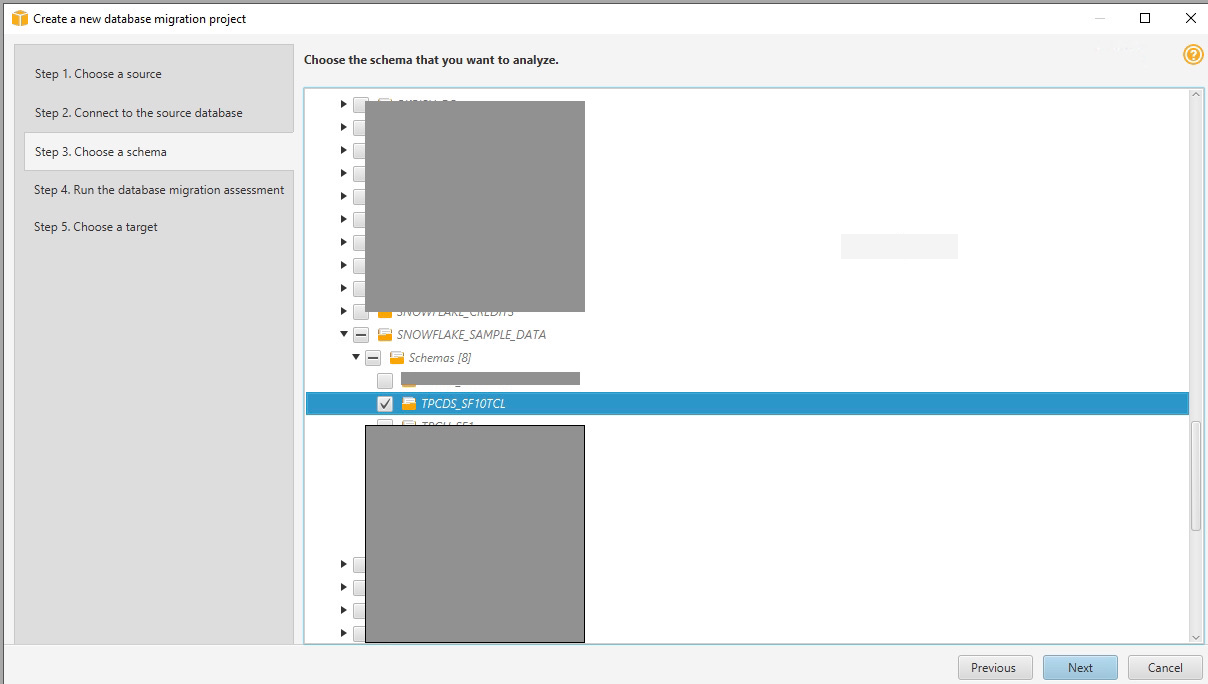
- Expand SNOWFLAKE_SAMPLE_DATA and Schemas.
- Select TPCDS_SF10TCL and choose Next.

AWS SCT analyzes the schema and prepares an assessment report summary, as shown in the following screenshot.

This report summarizes the objects that AWS SCT converts to Amazon Redshift.
- Review the report and choose Next.
- Provide the database information and credentials for Amazon Redshift and deselect Use AWS Glue.
- Choose Test Connection.
- When the connection is successful, choose Finish.
For more information about establishing a connection to Amazon Redshift, see Getting the JDBC URL.

Review and apply the schema from Snowflake to Amazon Redshift
To convert the schema from Snowflake objects to Amazon Redshift, complete the following steps:
- Expand SNOWFLAKE_SAMPLE_DATA and Schemas.
- Choose (right-click) TPCDS_SF10TCL and choose Convert schema.

- Choose Collect and continue.

AWS SCT converts the schema and shows the converted schema and objects in the right pane. The converted schema is marked with a red check mark.
Amazon Redshift take some actions automatically while converting the schema to Amazon Redshift; objects with such actions are marked with a red warning sign.
- Choose the object and then on the top menu, choose Main view and choose Assessment Report view.
- Choose the Action items tab.
You can see list of all issues and actions taken by AWS SCT.

You can evaluate and inspect the individual object DDL by selecting it from the right pane, and you can also edit it as needed. In the following example, we modify the DISTKEY to use inv_item_sk. AWS SCT analyze the tables and recommends the distribution and sort keys based on the statistics. For cases where you’re not sure, you should set it to AUTO. For more information about automatic data distribution and optimization in Amazon Redshift, refer to Automate your Amazon Redshift performance tuning with automatic table optimization.

- To deploy the objects DDL to Amazon Redshift, select the converted schema in the right pane, right-click, and choose Apply to database.
- Optionally, if you want to export the copy of the DDLs generated by AWS SCT and apply them manually, you can select the Amazon Redshift converted schema, right-click, and choose Save as SQL.

- Log in to your Amazon Redshift cluster using the Query Editor V2.

For more information about Query Editor V2, refer to Introducing Amazon Redshift Query Editor V2, a Free Web-based Query Authoring Tool for Data Analysts.
- To verify that the converted schema objects are deployed in Amazon Redshift, select the desired table, right-click, and choose Show table definition to see the underlying DDL.


Clean up
To avoid incurring future charges, complete the following steps:
- Delete the Amazon Redshift cluster created for this demonstration.
- If you were using an existing cluster, delete the new tables that you created as part of this exercise.
- Stop any Amazon Elastic Compute Cloud (Amazon EC2) instances that were created to run the AWS SCT application.
Summary
In this post, we showed how easy it is to convert a Snowflake schema to an Amazon Redshift schema and used AWS SCT for this automatic conversion.
We look forward to hearing from you about your experience. If you have questions or suggestions, please leave a comment.
About the Authors
 BP Yau is a Sr Analytics Specialist Solutions Architect at AWS. His role is to help customers architect big data solutions to process data at scale. Before AWS, he helped Amazon.com Supply Chain Optimization Technologies migrate its Oracle data warehouse to Amazon Redshift and build its next generation big data analytics platform using AWS technologies.
 Tahir Aziz is an Analytics Solution Architect at AWS. He has worked with building data warehouses and big data solutions for over 13 years. He loves to help customers design end-to-end analytics solutions on AWS. Outside of work, he enjoys traveling and cooking.
 Shawn Sachdev is a Sr Analytics Specialist Solutions Architect at AWS. He works with customers and provides guidance to help them innovate and build well-architected and high-performance data warehouses and implement analytics at scale on the AWS platform. Before AWS, he has worked in several Analytics and System Engineering roles. Outside of work, he loves watching sports, and is an avid foodie and a craft beer enthusiast.
 Srikanth Sopirala is a Principal Analytics Specialist Solutions Architect at AWS. He is a seasoned leader with over 20 years of experience, who is passionate about helping customers build scalable data and analytics solutions to gain timely insights and make critical business decisions. In his spare time, he enjoys reading, spending time with his family, and road cycling.