Post Syndicated from Raks Khare original https://aws.amazon.com/blogs/big-data/migrate-from-snowflake-to-amazon-redshift-using-aws-glue-python-shell/
As the most widely used cloud data warehouse, Amazon Redshift makes it simple and cost-effective to analyze your data using standard SQL and your existing ETL (extract, transform, and load), business intelligence (BI), and reporting tools. Tens of thousands of customers use Amazon Redshift to analyze exabytes of data per day and power analytics workloads such as BI, predictive analytics, and real-time streaming analytics without having to manage the data warehouse infrastructure. It natively integrates with other AWS services, facilitating the process of building enterprise-grade analytics applications in a manner that is not only cost-effective, but also avoids point solutions.
We are continuously innovating and releasing new features of Amazon Redshift, enabling the implementation of a wide range of data use cases and meeting requirements with performance and scale. For example, Amazon Redshift Serverless allows you to run and scale analytics workloads without having to provision and manage data warehouse clusters. Other features that help power analytics at scale with Amazon Redshift include automatic concurrency scaling for read and write queries, automatic workload management (WLM) for concurrency scaling, automatic table optimization, the new RA3 instances with managed storage to scale cloud data warehouses and reduce costs, cross-Region data sharing, data exchange, and the SUPER data type to store semi-structured data or documents as values. For the latest feature releases for Amazon Redshift, see Amazon Redshift What’s New. In addition to improving performance and scale, you can also gain up to three times better price performance with Amazon Redshift than other cloud data warehouses.
To take advantage of the performance, security, and scale of Amazon Redshift, customers are looking to migrate their data from their existing cloud warehouse in a way that is both cost optimized and performant. This post describes how to migrate a large volume of data from Snowflake to Amazon Redshift using AWS Glue Python shell in a manner that meets both these goals.
AWS Glue is serverless data integration service that makes it easy to discover, prepare, and combine data for analytics, machine learning (ML), and application development. AWS Glue provides all the capabilities needed for data integration, allowing you to analyze your data in minutes instead of weeks or months. AWS Glue supports the ability to use a Python shell job to run Python scripts as a shell, enabling you to author ETL processes in a familiar language. In addition, AWS Glue allows you to manage ETL jobs using AWS Glue workflows, Amazon Managed Workflows for Apache Airflow (Amazon MWAA), and AWS Step Functions, automating and facilitating the orchestration of ETL steps.
Solution overview
The following architecture shows how an AWS Glue Python shell job migrates the data from Snowflake to Amazon Redshift in this solution.
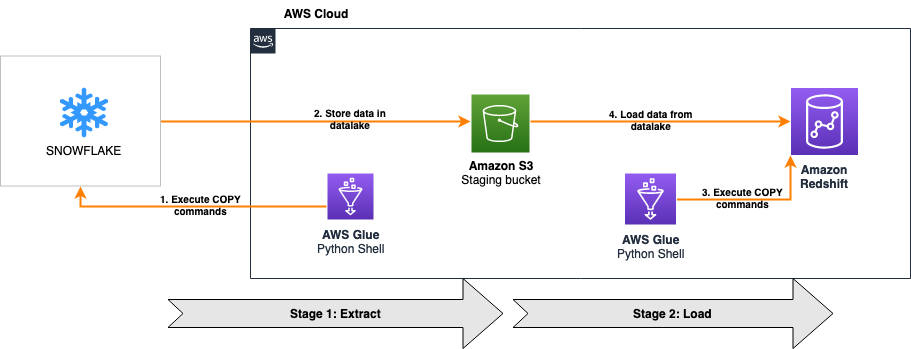
The solution is comprised of two stages:
- Extract – The first part of the solution extracts data from Snowflake into an Amazon Simple Storage Service (Amazon S3) data lake
- Load – The second part of the solution reads the data from the same S3 bucket and loads it into Amazon Redshift
For both stages, we connect the AWS Glue Python shell jobs to Snowflake and Amazon Redshift using database connectors for Python. The first AWS Glue Python shell job reads a SQL file from an S3 bucket to run the relevant COPY commands on the Snowflake database using Snowflake compute capacity and parallelism to migrate the data to Amazon S3. When this is complete, the second AWS Glue Python shell job reads another SQL file, and runs the corresponding COPY commands on the Amazon Redshift database using Redshift compute capacity and parallelism to load the data from the same S3 bucket.
Both jobs are orchestrated using AWS Glue workflows, as shown in the following screenshot. The workflow pushes data processing logic down to the respective data warehouses by running COPY commands on the databases themselves, minimizing the processing capacity required by AWS Glue to just the resources needed to run the Python scripts. The COPY commands load data in parallel both to and from Amazon S3, providing one of the fastest and most scalable mechanisms to transfer data from Snowflake to Amazon Redshift.
Because all heavy lifting around data processing is pushed down to the data warehouses, this solution is designed to provide a cost-optimized and highly performant mechanism to migrate a large volume of data from Snowflake to Amazon Redshift with ease.

The entire solution is packaged in an AWS CloudFormation template for simplicity of deployment and automatic provisioning of most of the required resources and permissions.
The high-level steps to implement the solution are as follows:
- Generate the Snowflake SQL file.
- Deploy the CloudFormation template to provision the required resources and permissions.
- Provide Snowflake access to newly created S3 bucket.
- Run the AWS Glue workflow to migrate the data.
Prerequisites
Before you get started, you can optionally build the latest version of the Snowflake Connector for Python package locally and generate the wheel (.whl) package. For instructions, refer to How to build.
If you don’t provide the latest version of the package, the CloudFormation template uses a pre-built .whl file that may not be on the most current version of Snowflake Connector for Python.
By default, the CloudFormation template migrates data from all tables in the TPCH_SF1 schema of the SNOWFLAKE_SAMPLE_DATA database, which is a sample dataset provided by Snowflake when an account is created. The following stored procedure is used to dynamically generate the Snowflake COPY commands required to migrate the dataset to Amazon S3. It accepts the database name, schema name, and stage name as the parameters.
Deploy the required resources and permissions using AWS CloudFormation
You can use the provided CloudFormation template to deploy this solution. This template automatically provisions an Amazon Redshift cluster with your desired configuration in a private subnet, maintaining a high standard of security.
- Sign in to the AWS Management Console, preferably as admin user.
- Select your desired Region, preferably the same Region where your Snowflake instance is provisioned.
- Choose Launch Stack:

- Choose Next.
- For Stack name, enter a meaningful name for the stack, for example,
blog-resources.
The Parameters section is divided into two subsections: Source Snowflake Infrastructure and Target Redshift Configuration.
- For Snowflake Unload SQL Script, it defaults to S3 location (URI) of a SQL file which migrates the sample data in the
TPCH_SF1schema of theSNOWFLAKE_SAMPLE_DATAdatabase. - For Data S3 Bucket, enter a prefix for the name of the S3 bucket that is automatically provisioned to stage the Snowflake data, for example,
sf-migrated-data. - For Snowflake Driver, if applicable, enter the S3 location (URI) of the .whl package built earlier as a prerequisite. By default, it uses a pre-built .whl file.
- For Snowflake Account Name, enter your Snowflake account name.
You can use the following query in Snowflake to return your Snowflake account name:
- For Snowflake Username, enter your user name to connect to the Snowflake account.
- For Snowflake Password, enter the password for the preceding user.
- For Snowflake Warehouse Name, enter the warehouse name for running the SQL queries.
Make sure the aforementioned user has access to the warehouse.
- For Snowflake Database Name, enter the database name. The default is
SNOWFLAKE_SAMPLE_DATA. - For Snowflake Schema Name, enter schema name. The default is
TPCH_SF1.

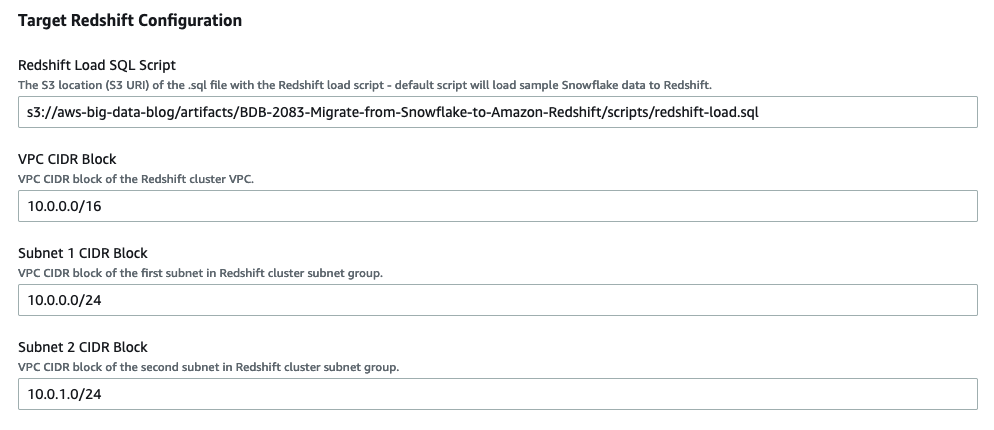
- For VPC CIDR Block, enter the desired CIDR block of Redshift cluster. The default is
10.0.0.0/16. - For Subnet 1 CIDR Block, enter the CIDR block of the first subnet. The default is
10.0.0.0/24. - For Subnet 2 CIDR Block, enter the CIDR block of the first subnet. The default is
10.0.1.0/24. - For Redshift Load SQL Script, it defaults to S3 location (URI) of a SQL file which migrates the sample data in S3 to Redshift.
The following database view in Redshift is used to dynamically generate Redshift COPY commands required to migrate the dataset from Amazon S3. It accepts the schema name as the filter criteria.
- For Redshift Database Name, enter your desired database name, for example,
dev. - For Number of Redshift Nodes, enter the desired compute nodes, for example,
2. - For Redshift Node Type, choose the desired node type, for example, ra3.4xlarge.
- For Redshift Password, enter your desired password with the following constraints: it must be 8–64 characters in length, and contain at least one uppercase letter, one lowercase letter, and one number.
- For Redshift Port, enter the Amazon Redshift port number to connect to. The default port is
5439.

- Choose Next.
- Review and choose Create stack.
It takes around 5 minutes for the template to finish creating all resources and permissions. Most of the resources have the prefix of the stack name you specified for easy identification of the resources later. For more details on the deployed resources, see the appendix at the end of this post.
Create an IAM role and external Amazon S3 stage for Snowflake access to the data S3 bucket
In order for Snowflake to access the TargetDataS3Bucket created earlier by CloudFormation template, you must create an AWS Identity and Access Management (IAM) role and external Amazon S3 stage for Snowflake access to the S3 bucket. For instructions, refer to Configuring Secure Access to Amazon S3.
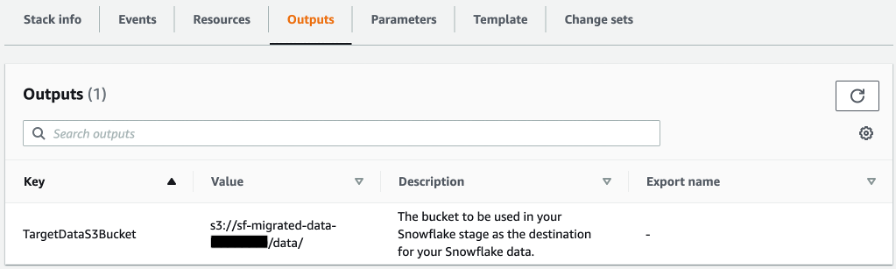
When you create an external stage in Snowflake, use the value for TargetDataS3Bucket on the Outputs tab of your deployed CloudFormation stack for the Amazon S3 URL of your stage.
Make sure to name the external stage unload_to_s3 if you’re migrating the sample data using the default scripts provided in the CloudFormation template.
Convert Snowflake tables to Amazon Redshift
You can simply run the following DDL statements to create TPCH_SF1 schema objects in Amazon Redshift. You can also use AWS Schema Conversion Tool (AWS SCT) to convert Snowflake custom objects to Amazon Redshift. For instructions on converting your schema, refer to Accelerate Snowflake to Amazon Redshift migration using AWS Schema Conversion Tool.
Run an AWS Glue workflow for data migration
When you’re ready to start the data migration, complete the following steps:
- On the AWS Glue console, choose Workflows in the navigation pane.
- Select the workflow to run (<stack name>–
snowflake-to-redshift-migration). - On the Actions menu, choose Run.

- To check the status of the workflow, choose the workflow and on the History tab, select the Run ID and choose View run details.

- When the workflow is complete, navigate to the Amazon Redshift console and launch the Amazon Redshift query editor v2 to verify the successful migration of data.
- Run the following query in Amazon Redshift to get row counts of all tables migrated from Snowflake to Amazon Redshift. Make sure to adjust the
table_schemavalue accordingly if you’re not migrating the sample data.


- Run the following query in Snowflake to compare and validate the data:

Clean up
To avoid incurring future charges, delete the resources you created as part of the CloudFormation stack by navigating to the AWS CloudFormation console, selecting the stack blog-resources, and choosing Delete.
Conclusion
In this post, we discussed how to perform an efficient, fast, and cost-effective migration from Snowflake to Amazon Redshift. Migrations from one data warehouse environment to another can typically be very time-consuming and resource-intensive; this solution uses the power of cloud-based compute by pushing down the processing to the respective warehouses. Orchestrating this migration with the AWS Glue Python shell provides additional cost optimization.
With this solution, you can facilitate your migration from Snowflake to Amazon Redshift. If you’re interested in further exploring the potential of using Amazon Redshift, please reach out to your AWS Account Team for a proof of concept.
Appendix: Resources deployed by AWS CloudFormation
The CloudFormation stack deploys the following resources in your AWS account:
- Networking resources – Amazon Virtual Private Cloud (Amazon VPC), subnets, ACL, and security group.
- Amazon S3 bucket – This is referenced as
TargetDataS3Bucketon the Outputs tab of the CloudFormation stack. This bucket holds the data being migrated from Snowflake to Amazon Redshift. - AWS Secrets Manager secrets – Two secrets in AWS Secrets Manager store credentials for Snowflake and Amazon Redshift.
- VPC endpoints – The two VPC endpoints are deployed to establish a private connection from VPC resources like AWS Glue to services that run outside of the VPC, such as Secrets Manager and Amazon S3.
- IAM roles – IAM roles for AWS Glue, Lambda, and Amazon Redshift. If the CloudFormation template is to be deployed in a production environment, you need to adjust the IAM policies so they’re not as permissive as presented in this post (which were set for simplicity and demonstration). Particularly, AWS Glue and Amazon Redshift don’t require all the actions granted in the
*FullAccesspolicies, which would be considered overly permissive. - Amazon Redshift cluster – An Amazon Redshift cluster is created in a private subnet, which isn’t publicly accessible.
- AWS Glue connection – The connection for Amazon Redshift makes sure that the AWS Glue job runs within the same VPC as Amazon Redshift. This also ensures that AWS Glue can access the Amazon Redshift cluster in a private subnet.
- AWS Glue jobs – Two AWS Glue Python shell jobs are created:
- <stack name>-glue-snowflake-unload – The first job runs the SQL scripts in Snowflake to copy data from the source database to Amazon S3. The Python script is available in S3. The Snowflake job accepts two parameters:
- SQLSCRIPT – The Amazon S3 location of the SQL script to run in Snowflake to migrate data to Amazon S3. This is referenced as the Snowflake Unload SQL Script parameter in the input section of the CloudFormation template.
- SECRET – The Secrets Manager ARN that stores Snowflake connection details.
- <stack name>-glue-redshift-load – The second job runs another SQL script in Amazon Redshift to copy data from Amazon S3 to the target Amazon Redshift database. The Python script link is available in S3. The Amazon Redshift job accepts three parameters:
- SQLSCRIPT – The Amazon S3 location of the SQL script to run in Amazon Redshift to migrate data from Amazon S3. If you provide custom SQL script to migrate the Snowflake data to Amazon S3 (as mentioned in the prerequisites), the file location is referenced as LoadFileLocation on the Outputs tab of the CloudFormation stack.
- SECRET – The Secrets Manager ARN that stores Amazon Redshift connection details.
- PARAMS – This includes any additional parameters required for the SQL script, including the Amazon Redshift IAM role used in the COPY commands and the S3 bucket staging the Snowflake data. Multiple parameter values can be provided separated by a comma.
- <stack name>-glue-snowflake-unload – The first job runs the SQL scripts in Snowflake to copy data from the source database to Amazon S3. The Python script is available in S3. The Snowflake job accepts two parameters:
- AWS Glue workflow – The orchestration of Snowflake and Amazon Redshift AWS Glue Python shell jobs is managed via an AWS Glue workflow. The workflow <stack name>–
snowflake-to-redshift-migrationruns later for actual migration of data.
About the Authors
 Raks Khare is an Analytics Specialist Solutions Architect at AWS based out of Pennsylvania. He helps customers architect data analytics solutions at scale on the AWS platform.
 Julia Beck is an Analytics Specialist Solutions Architect at AWS. She supports customers in validating analytics solutions by architecting proof of concept workloads designed to meet their specific needs.