Post Syndicated from Nita Shah original https://aws.amazon.com/blogs/big-data/automate-data-archival-for-amazon-redshift-time-series-tables/
Amazon Redshift is a fast, scalable, secure, and fully managed cloud data warehouse that makes it simple and cost-effective to analyze all of your data using standard SQL. Tens of thousands of customers today rely on Amazon Redshift to analyze exabytes of data and run complex analytical queries, making it the most widely used cloud data warehouse. You can run and scale analytics in seconds on all your data without having to manage your data warehouse infrastructure.
A data retention policy is part of an organization’s overall data management. In a big data world, the size of data is consistently increasing, which directly affects the cost of storing the data in data stores. It’s necessary to keep optimizing your data in data warehouses for consistent performance, reliability, and cost control. It’s crucial to define how long an organization needs to hold on to specific data, and if data that is no longer needed should be archived or deleted. The frequency of data archival depends on the relevance of the data with respect to your business or legal needs.
Data archiving is the process of moving data that is no longer actively used in a data warehouse to a separate storage device for long-term retention. Archive data consists of older data that is still important to the organization and may be needed for future reference, as well as data that must be retained for regulatory compliance.
Data purging is the process of freeing up space in the database or deleting obsolete data that isn’t required by the business. The purging process can be based on the data retention policy, which is defined by the data owner or business need.
This post walks you through the process of how to automate data archival and purging of Amazon Redshift time series tables. Time series tables retain data for a certain period of time (days, months, quarters, or years) and need data to be purged regularly to maintain the rolling data to be analyzed by end-users.
Solution overview
The following diagram illustrates our solution architecture.
We use two database tables as part of this solution.
The arch_table_metadata database table stores the metadata for all the tables that need to be archived and purged. You need to add rows into this table that you want to archive and purge. The arch_table_metadata table contains the following columns.
| ColumnName | Description |
id |
Database-generated, automatically assigns a unique value to each record. |
schema_name |
Name of the database schema of the table. |
table_name |
Name of the table to be archived and purged. |
column_name |
Name of the date column that is used to identify records to be archived and purged. |
s3_uri |
Amazon S3 location where the data will be archived. |
retention_days |
Number of days the data will be retained for the table. Default is 90 days. |
The arch_job_log database table stores the run history of stored procedures. Records are added to this table by the stored procedure. It contains the following columns.
| ColumnName | Description |
job_run_id |
Assigns unique numeric value per stored procedure run. |
arch_table_metadata_id |
Id column value from table arch_table_metadata. |
no_of_rows_bfr_delete |
Number of rows in the table before purging. |
no_of_rows_deleted |
Number of rows deleted by the purge operation. |
job_start_time |
Time in UTC when the stored procedure started. |
job_end_time |
Time in UTC when the stored procedure ended. |
job_status |
Status of the stored procedure run: IN-PROGRESS, COMPLETED, or FAILED. |
Prerequisites
For this solution, complete the following prerequisites:
- Create an Amazon Redshift provisioned cluster or Amazon Redshift serverless workgroup.
- In Amazon Redshift query editor v2 or a compatible SQL editor of your choice, create the tables
arch_table_metadataandarch_job_log. Use the following code for the table DDLs: - Create the stored procedure
sp_archive_datawith the following code snippet. The stored procedure takes the AWS Identity and Access Management (IAM) role ARN as an input argument if you’re not using the default IAM role. If you’re using the default IAM role for your Amazon Redshift cluster, you can pass the input parameter as default. For more information, refer to Creating an IAM role as default in Amazon Redshift.
Archival and purging
For this use case, we use a table called orders, for which we want to archive and purge any records older than the last 30 days.
Use the following DDL to create the table in the Amazon Redshift cluster:
The O_ORDERDATE column makes it a time series table, which you can use to retain the rolling data for a certain period.
In order to load the data into the orders table using the below COPY command , you would need to have default IAM role attached to your Redshift cluster or replace the default keyword in the COPY command with the arn of the IAM role attached to the Redshift cluster
When you query the table, you can see that this data is for 1998. To test this solution, you need to manually update some of the data to the current date by running the following SQL statement:
The table looks like the following screenshot after running the update statement.
Now let’s run the following SQL to get the count of number of records to be archived and purged:

Before running the stored procedure, we need to insert a row into the arch_file_metadata table for the stored procedure to archive and purge records in the orders table. In the following code, provide the Amazon Simple Storage Service (Amazon S3) bucket name where you want to store the archived data:
The stored procedure performs the following high-level steps:
- Open a cursor to read and loop through the rows in the
arch_table_metadatatable. - Retrieve the total number of records in the table before purging.
- Export and archive the records to be deleted into the Amazon S3 location as specified in the
s3_uricolumn value. Data is partitioned in Amazon S3 based on thecolumn_namefield inarch_table_metadata. The stored procedure uses the IAM role passed as input for the UNLOAD operation. - Run the DELETE command to purge the identified records based on the
retention_dayscolumn value. - Add a record in
arch_job_logwith the run details.
Now, let’s run the stored procedure via the call statement passing a role ARN as input parameter to verify the data was archived and purged correctly:
As shown in the following screenshot, the stored procedure ran successfully.

Now let’s validate the table was purged successfully by running the following SQL:

We can navigate to the Amazon S3 location to validate the archival process. The following screenshot shows the data has been archived into the Amazon S3 location specified in the arch_table_metadata table.

Now let’s run the following SQL statement to look at the stored procedure run log entry:
The following screenshot shows the query results.

In this example, we demonstrated how you can set up and validate your Amazon Redshift table archival and purging process.
Schedule the stored procedure
Now that you have learned how to set up and validate your Amazon Redshift tables for archival and purging, you can schedule this process. For instructions on how to schedule a SQL statement using either the AWS Management Console or the AWS Command Line Interface (AWS CLI), refer to Scheduling SQL queries on your Amazon Redshift data warehouse.
Archive data in Amazon S3
As part of this solution, data is archived in an S3 bucket before it’s deleted from the Amazon Redshift table. This helps reduce the storage on the Amazon Redshift cluster and enables you to analyze the data for any ad hoc requests without needing to load back into the cluster. In the stored procedure, the UNLOAD command exports the data to be purged to Amazon S3, partitioned by the date column, which is used to identify the records to purge. To save costs on Amazon S3 storage, you can manage the storage lifecycle with Amazon S3 lifecycle configuration.
Analyze the archived data in Amazon S3 using Amazon Redshift Spectrum
With Amazon Redshift Spectrum, you can efficiently query and retrieve structured and semistructured data from files in Amazon S3, and easily analyze the archived data in Amazon S3 without having to load it back in Amazon Redshift tables. For further analysis of your archived data (cold data) and frequently accessed data (hot data) in the cluster’s local disk, you can run queries joining Amazon S3 archived data with tables that reside on the Amazon Redshift cluster’s local disk. The following diagram illustrates this process.
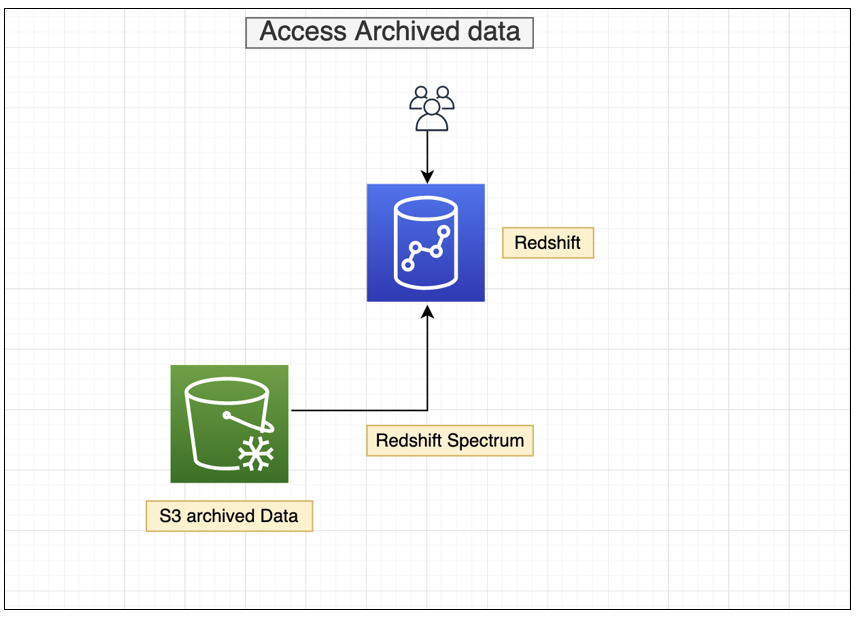
Let’s take an example where you want to view the number of orders for the last 2 weeks of December 1998, which is archived in Amazon S3. You need to complete the following steps using Redshift Spectrum:
- Create an external schema in Amazon Redshift.
- Create a late-binding view to refer to the underlying Amazon S3 files with the following query:
- To see a unified view of the orders historical data archived in Amazon S3 and the current data stored in the Amazon Redshift local table, you can use a UNION ALL clause to join the Amazon Redshift orders table and the Redshift Spectrum orders table:
To learn more about the best practices for Redshift Spectrum, refer to Best Practices for Amazon Redshift Spectrum.
Best practices
The following are some best practices to reduce your storage footprint and optimize performance of your workloads:
- Working with column compression
- Choose the best distribution style
- Use the smallest possible column size
- Use date/time data types for date columns
Conclusion
In this post, we demonstrated the automatic archival and purging of data in Amazon Redshift tables to meet your compliance and business requirements, thereby optimizing your application performance and reducing storage costs. As an administrator, you can start working with application data owners to identify retention policies for Amazon Redshift tables to achieve optimal performance, prevent any storage issues specifically for DS2 and DC2 nodes, and reduce overall storage costs.
About the authors
 Nita Shah is an Analytics Specialist Solutions Architect at AWS based out of New York. She has been building data warehouse solutions for over 20 years and specializes in Amazon Redshift. She is focused on helping customers design and build enterprise-scale well-architected analytics and decision support platforms.
 Ranjan Burman is an Analytics Specialist Solutions Architect at AWS. He specializes in Amazon Redshift and helps customers build scalable analytical solutions. He has more than 15 years of experience in different database and data warehousing technologies. He is passionate about automating and solving customer problems with the use of cloud solutions.
 Prathap Thoguru is an Enterprise Solutions Architect at Amazon Web Services. He has over 15 years of experience in the IT industry and is a 9x AWS certified professional. He helps customers migrate their on-premises workloads to the AWS Cloud.