Post Syndicated from Nita Shah original https://aws.amazon.com/blogs/big-data/upgrade-from-amazon-redshift-dc2-node-type-to-amazon-redshift-serverless/
Amazon Redshift is a fully managed, petabyte-scale, cloud data warehouse service. You can use Amazon Redshift to run complex queries against petabytes of structured and semi-structured data quickly and efficiently, integrating seamlessly with other AWS services.
Amazon Redshift Serverless helps you run and scale analytics in seconds without having to set up, manage, or scale data warehouse infrastructure. It automatically provisions data warehouse capacity and intelligently scales the underlying resources to deliver fast performance for demanding workloads and you pay only for the compute capacity you use. Additionally, with Amazon Redshift managed storage, you can further optimize your data warehouse by scaling storage and compute independently and you pay only for the storage you use.
Upgrading your data warehouse from Amazon Redshift dense compute (DC2) instances to Amazon Redshift Serverless unlocks these advantages and provides an enhanced user experience and simplified operations, offering a more efficient, scalable solution for data analytics.
In this post, we show you the upgrade process from DC2 instances to Amazon Redshift Serverless. We’ll cover:
- Assessing your current setup and determining if an upgrade is right for you
- Planning and preparing for the upgrade
- Step-by-step instructions for the upgrade process
- Post-upgrade optimization and best practices
Why upgrade to Amazon Redshift Serverless
By using Amazon Redshift Serverless, you can run and scale analytics without managing data warehouse infrastructure. When you upgrade from DC2 instances to Amazon Redshift Serverless, you get the following benefits:
- Simplified operations: Access and analyze data without needing to set up, tune, and manage compute clusters.
- Automatic performance optimization: Deliver consistently high performance and simplified operations for demanding and volatile workloads with automatic scaling and AI driven scaling and optimization.
- Pay-as-you-go pricing: The flexible pricing structure charges you only during active usage; you pay only for what you use.
- Online maintenance: Amazon Redshift Serverless automatically manages system updates and patches without requiring maintenance windows, helping to facilitate seamless operation of your data warehouse.
- Decoupled storage and compute: Control costs by scaling and paying for compute and storage separately with Amazon Redshift managed storage.
- Access to new capabilities: Use advanced features including data sharing writes, Redshift Streaming Ingestion, zero-ETL, and other capabilities.
Sizing guidance
To upgrade from DC2 to Amazon Redshift Serverless, you need to understand the size equivalency. The following table shows suggested sizing configurations when upgrading from the DC2 node type.
Note that availability of Redshift Processing Unit (RPU) configurations varies by AWS Region.
| Existing node type | Existing number of nodes | Amazon Redshift Serverless upgrade |
| DC2.large | 1–4 | Start with 4 RPUs |
| DC2.large | 5–7 | Start with 8 RPUs |
| DC2.large | 8–32 | Add 8 RPUs per 8 nodes of DC2.large |
| DC2.8xlarge | 2–32 | Add 16 RPUs per node (up to a maximum of 1,024 RPUs) |
These sizing estimates provide a flexible starting point tailored to help you make the most of Amazon Redshift Serverless. The ideal configuration for your needs will depend on factors such as your desired balance of cost and performance and the specific latency and throughput requirements of your workload. To further optimize the sizing based on your specific requirements, you can use one or more of following approaches:
- Test your workload beforehand: Before migrating to Amazon Redshift Serverless, evaluate your workload’s performance requirements in a non-production environment. The Amazon Redshift Test Drive utility simplifies this process by simulating your production workloads across different serverless configurations. You can use the results to help identify the optimal balance between performance and cost and make informed decisions about your configuration. For step-by-step guidance on using the Test Drive utility for DC2 to Serverless upgrades, see the Amazon Redshift Migration Workshop. Running these performance tests before migration helps you to identify any necessary adjustments to your configuration before deploying to production
- Monitor in production: After you’ve deployed your workload, closely monitor the performance and resource utilization for over a period of time that represents your typical workloads. Based on the observed metrics, you can then scale the resources up or down as needed to achieve the best balance of performance and cost.
- AI-driven scaling and optimization: Consider using Amazon Redshift Serverless with AI-driven scaling and optimization to automatically size Amazon Redshift Serverless for your workload needs.
A methodical approach to sizing validation, combining both pre-production testing and ongoing production monitoring, helps ensure your Amazon Redshift Serverless configuration aligns with your workload.
Upgrade to Amazon Redshift Serverless
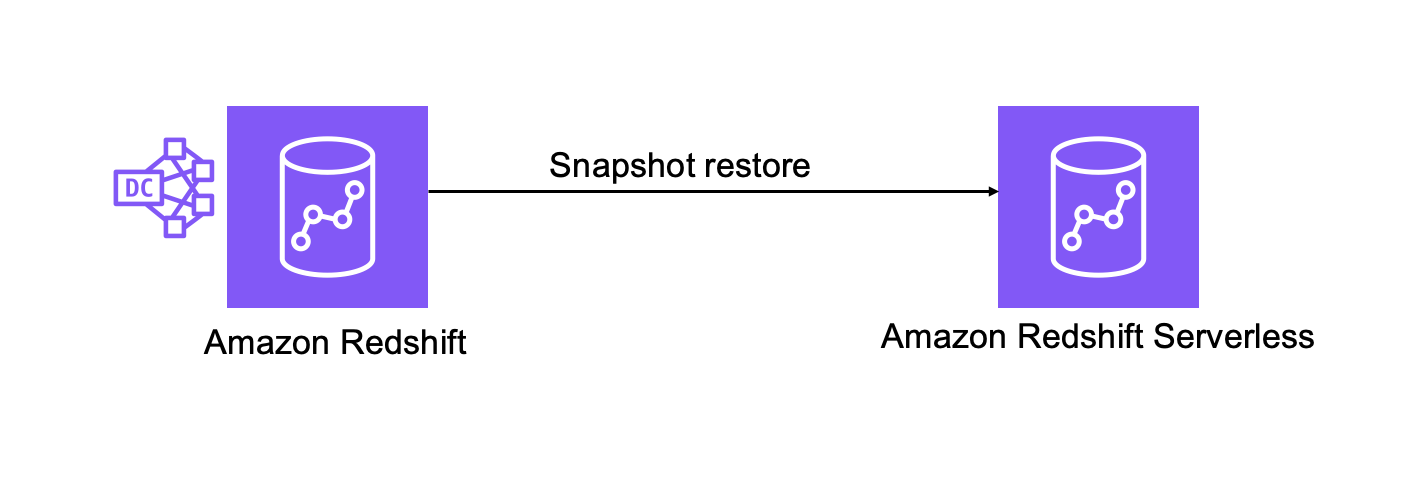
To upgrade to Amazon Redshift Serverless, you can use a snapshot restore to move directly from Amazon Redshift to Amazon Redshift Serverless, as shown in the following figure. A snapshot restore restores data and objects in addition to users and their associated permissions, configurations, and schema structures. By using snapshot restore for migration, you can validate the target Amazon Redshift Serverless warehouses without impacting your production Amazon Redshift DC2 cluster. You can also use snapshot restore to migrate your Amazon Redshift DC2 workloads to different Regions or Availability Zones.
Prerequisites to migrate using a snapshot restore
- Create an Amazon Redshift Serverless workgroup with a namespace. For more information, see creating workgroup with a namespace.
- Amazon Redshift Serverless is encrypted by default. Amazon Redshift Serverless also supports changing the AWS KMS key for the namespace so you can adhere to your organization’s security policies.
- Verify that the Amazon Redshift Serverless namespace you’re trying to restore to is attached to an Amazon Redshift Serverless workgroup.
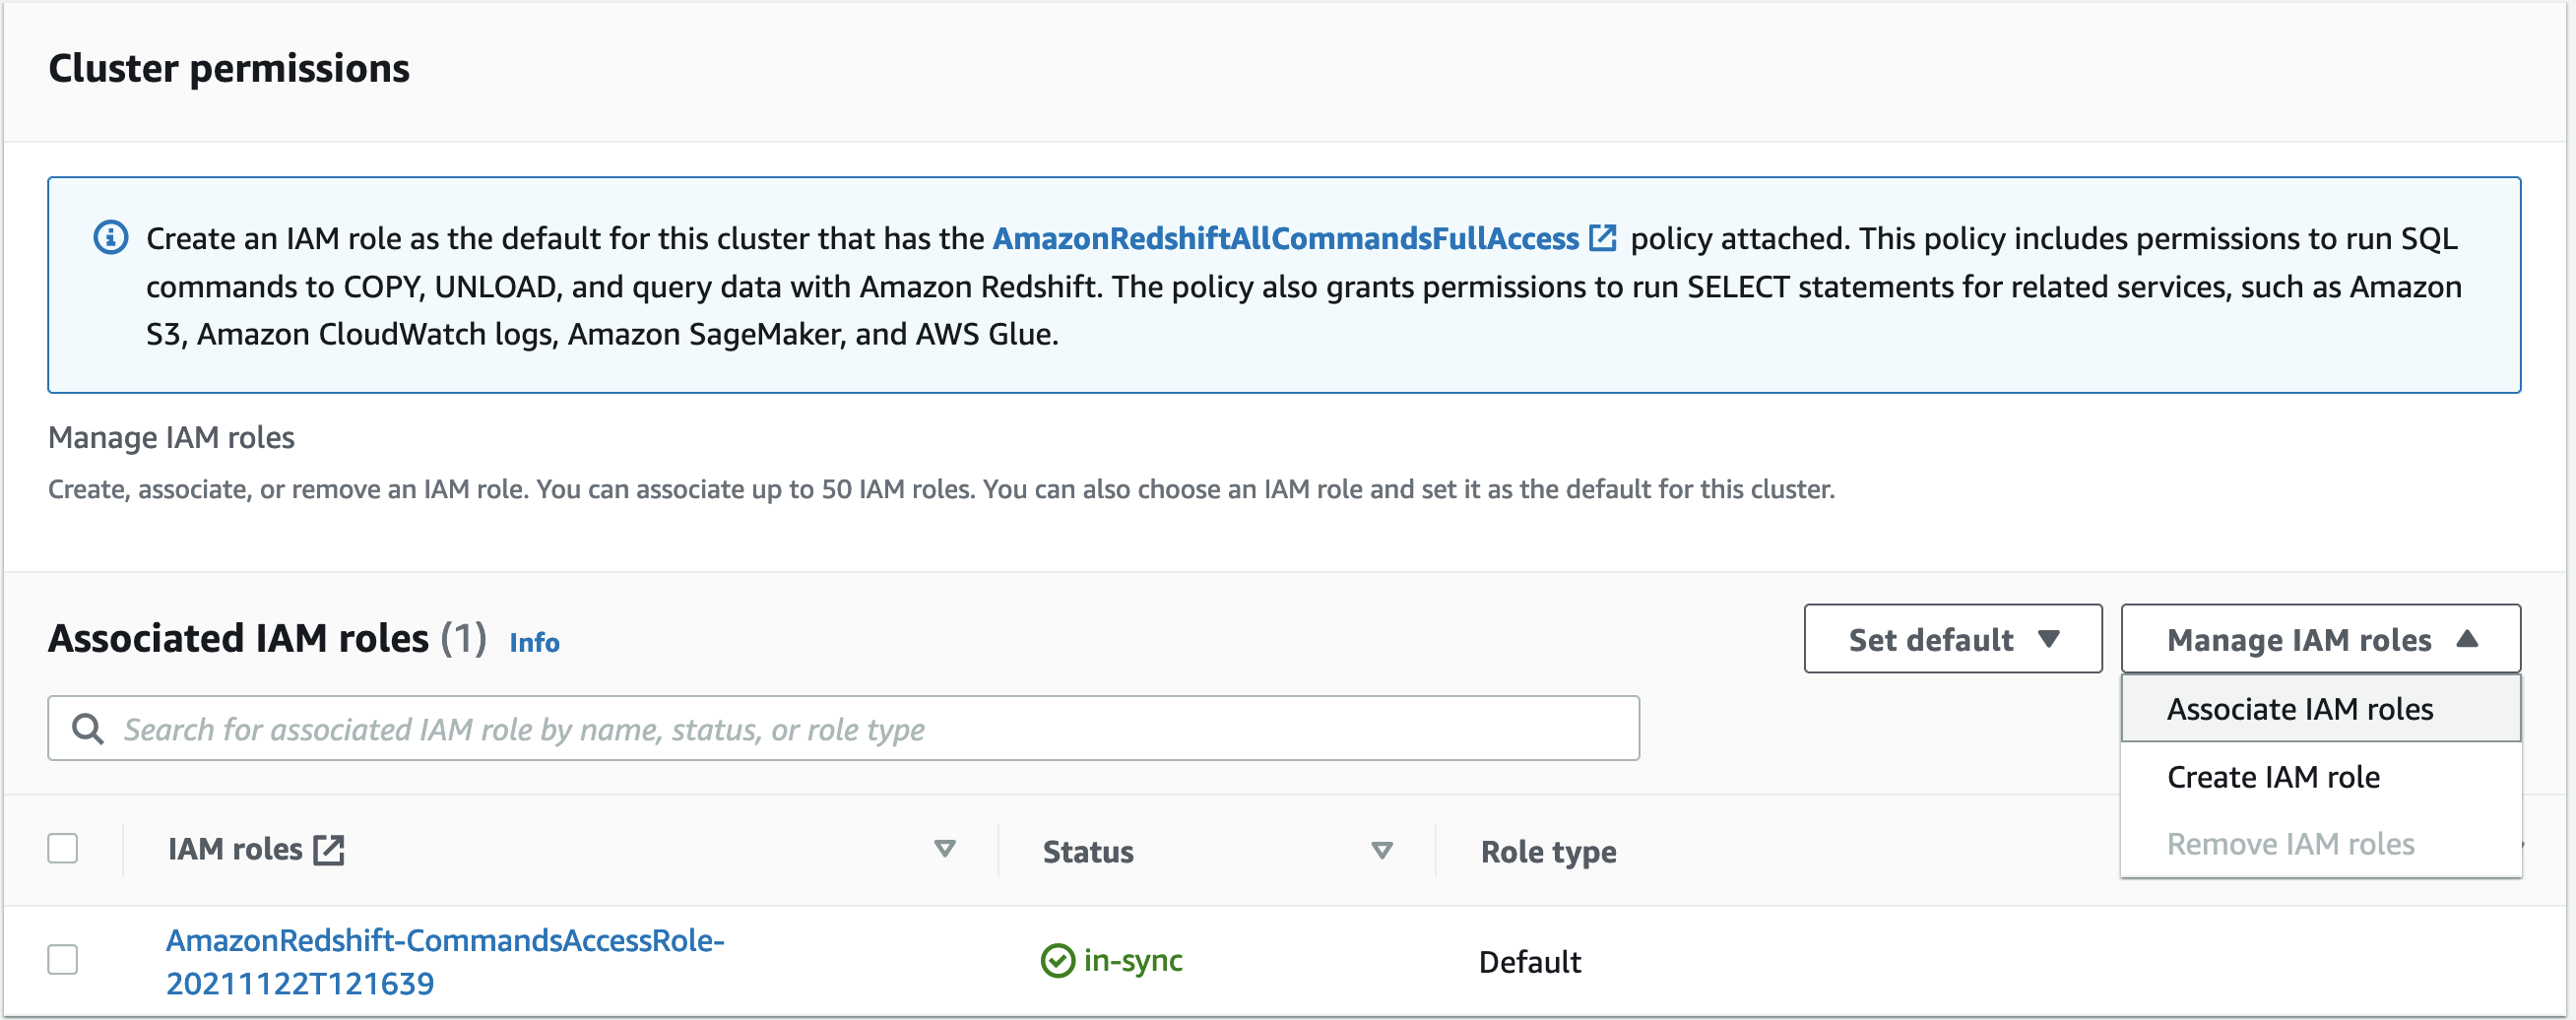
- To restore from a provisioned Amazon Redshift cluster to Amazon Redshift Serverless, the AWS Identity and Access Management (IAM) user or role must have the following permissions:
redshift-serverless:RestoreFromSnapshot,CreateNamespace, andCreateWorkgroup. For more information, see Amazon Redshift Serverless restore.
Upgrade using the console
Use the following steps in the AWS Management Console for Amazon Redshift to upgrade your DC2 cluster to Amazon Redshift Serverless using the snapshot restore method.
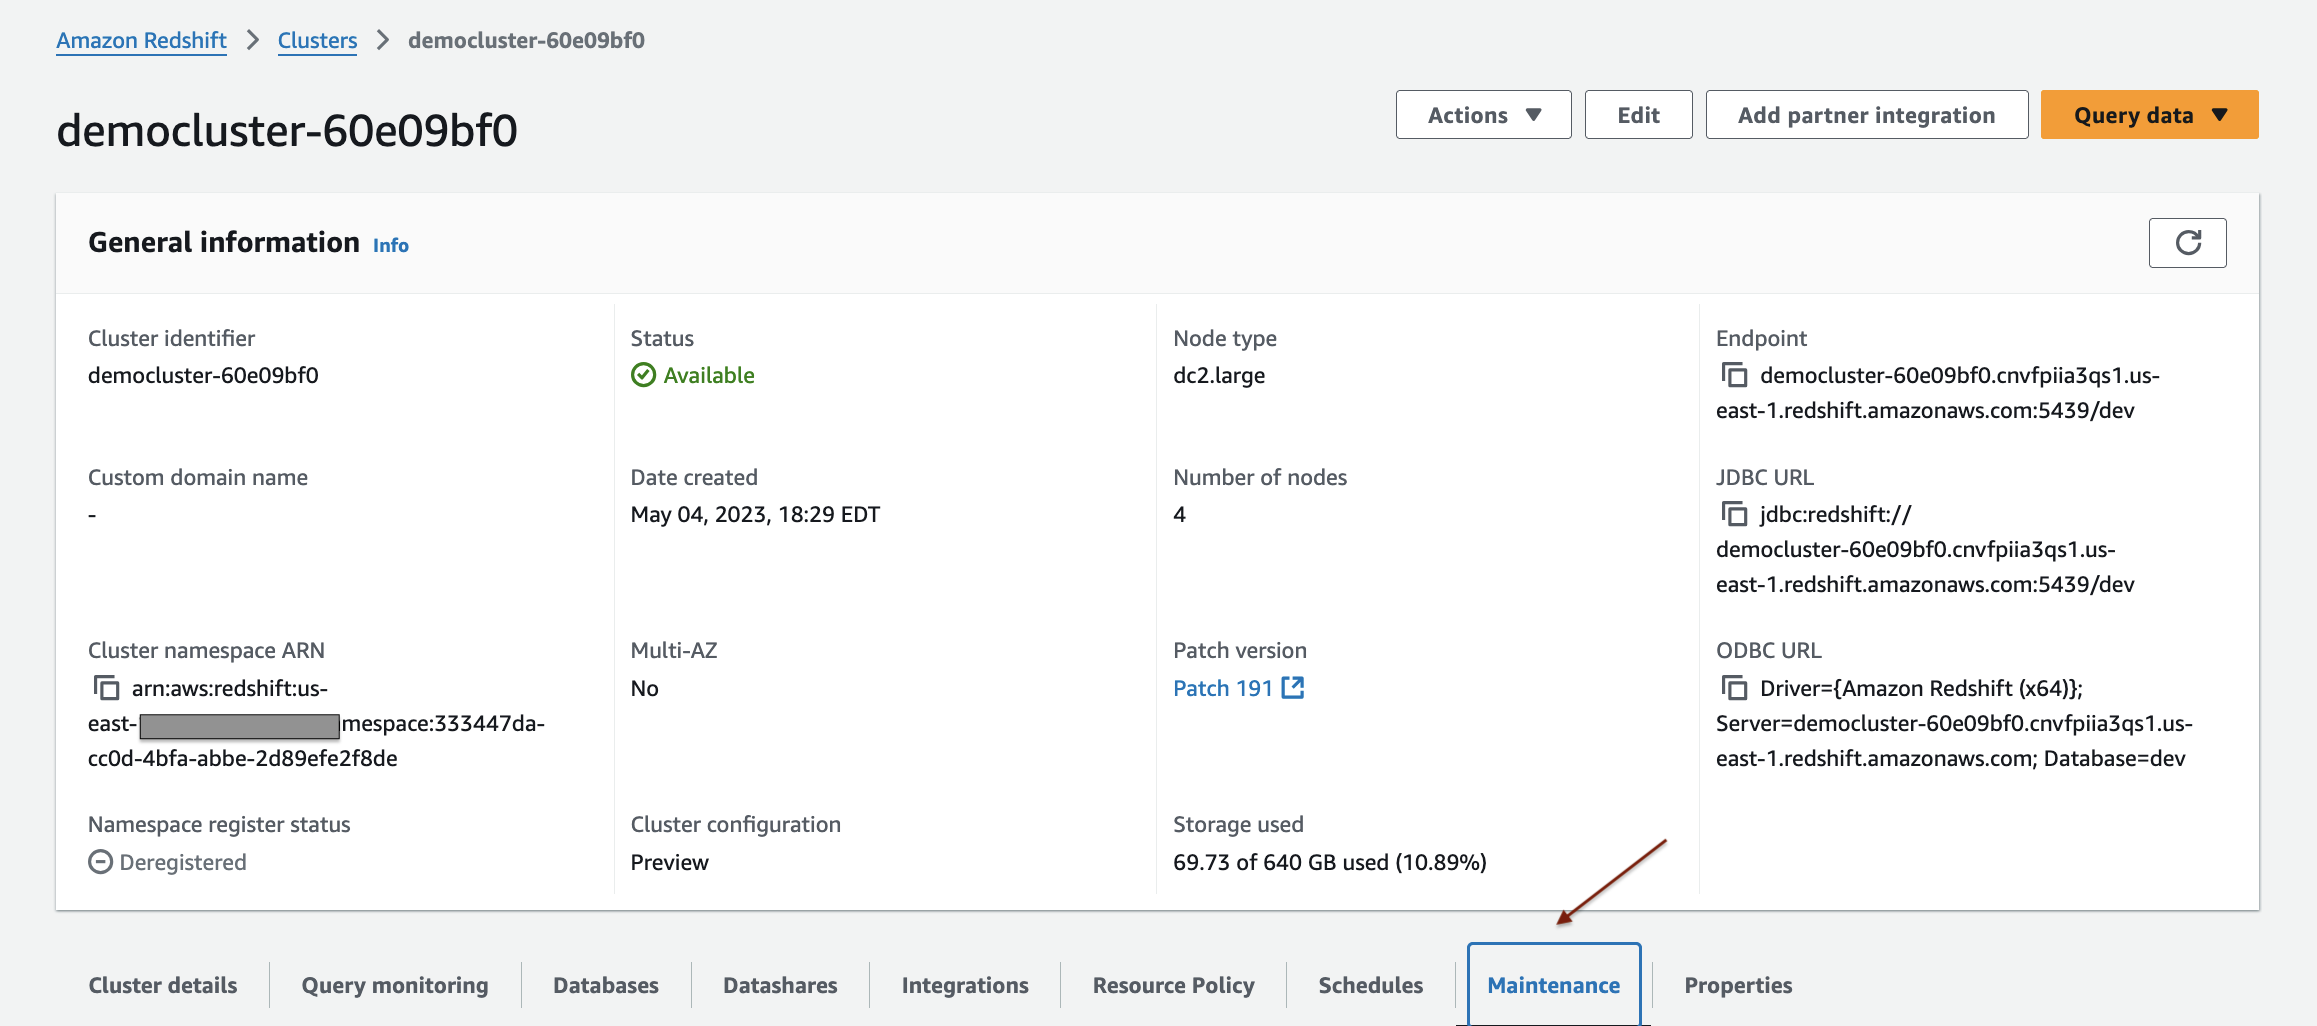
- On the Redshift console, choose Clusters in the navigation pane. Select your cluster and then choose Maintenance.

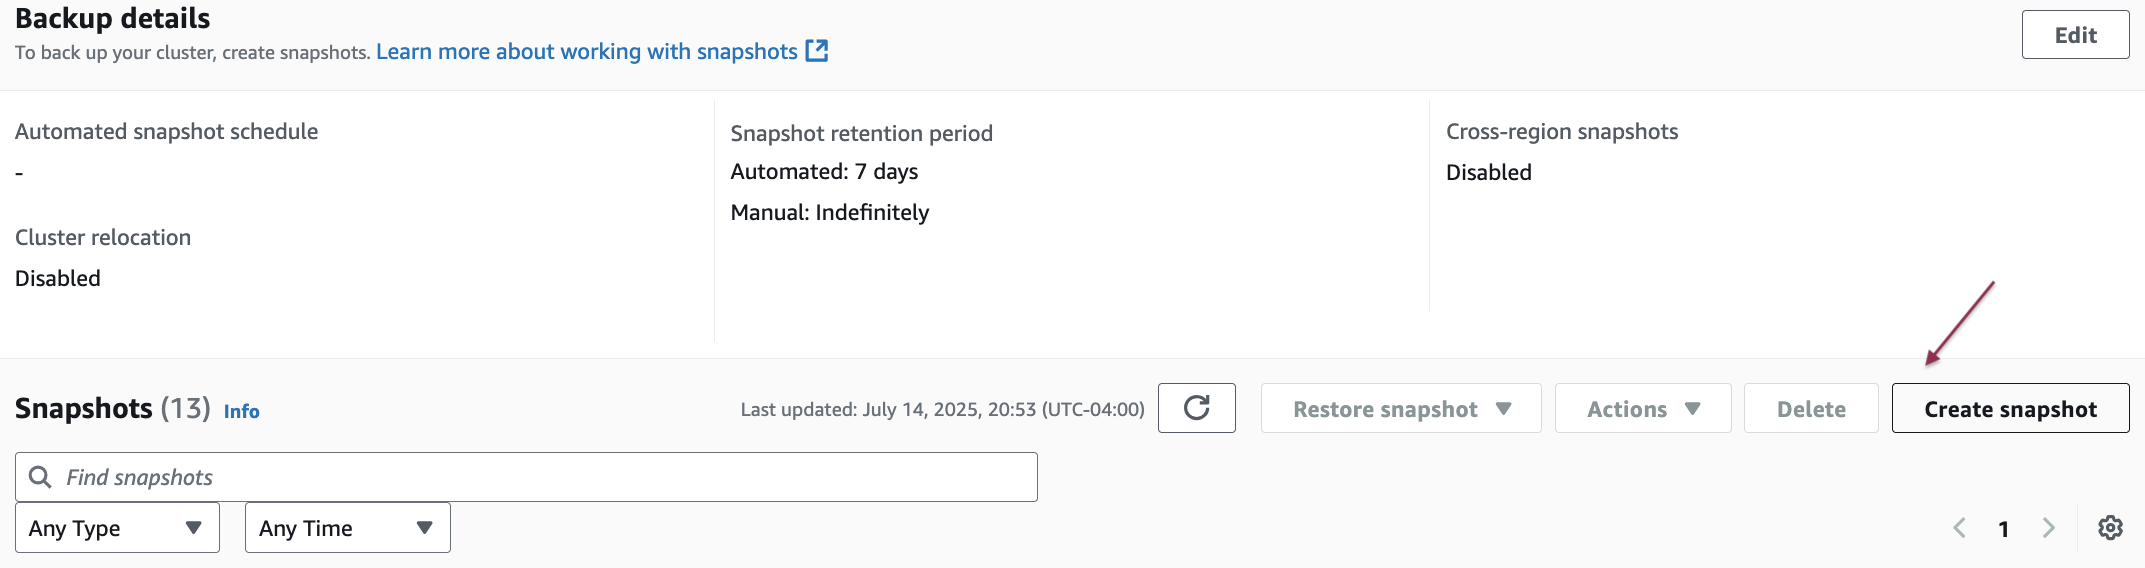
- Choose Create snapshot to create a manual snapshot of the existing Amazon Redshift provisioned cluster.

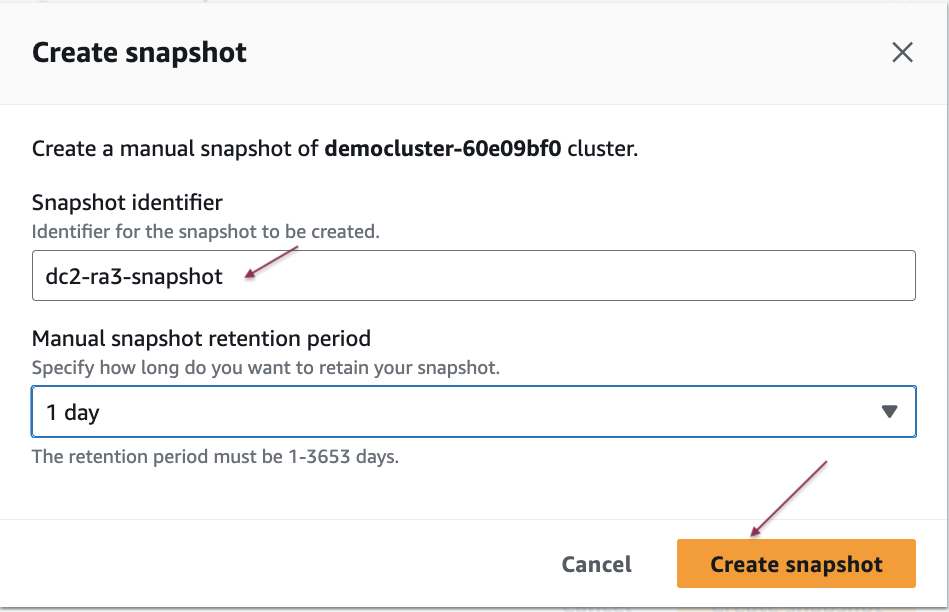
- Enter a snapshot identifier, select the snapshot retention period, and then choose Create snapshot.

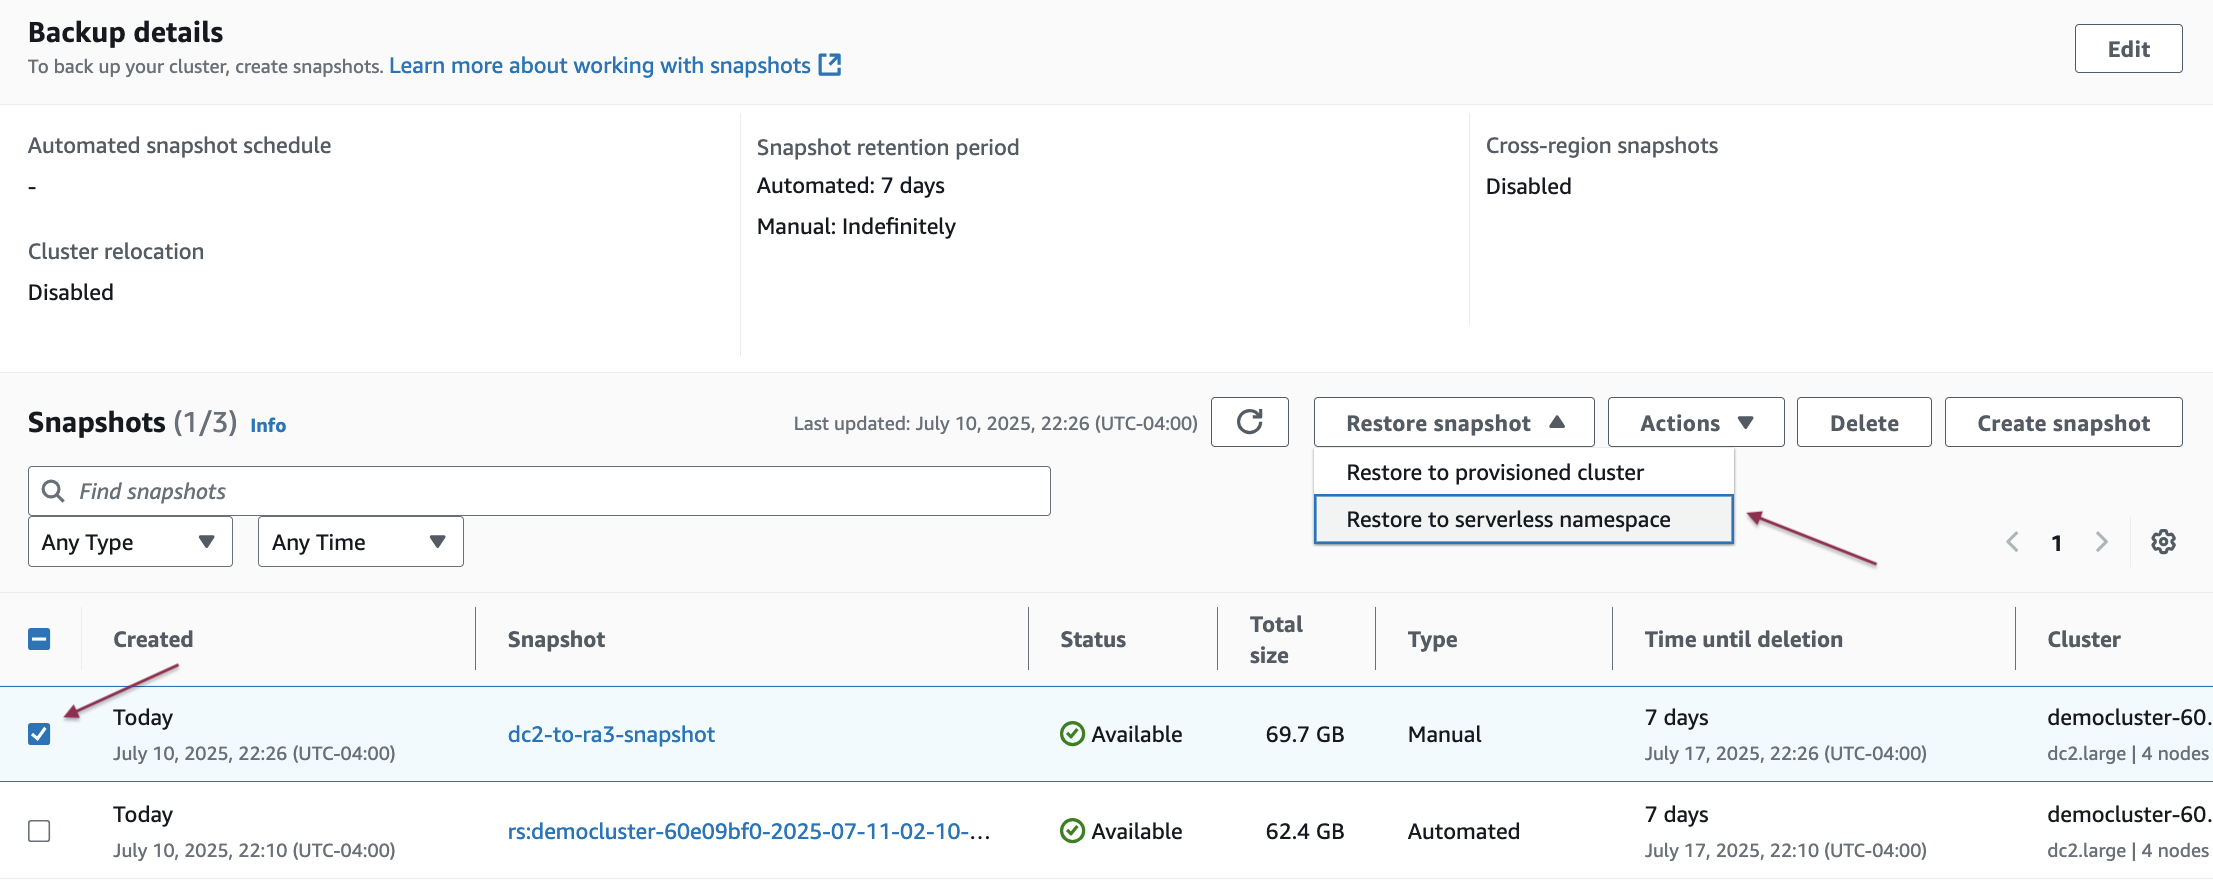
- Select the snapshot you want to restore to Amazon Redshift Serverless from the list and then choose Restore snapshot and select Restore to serverless namespace.

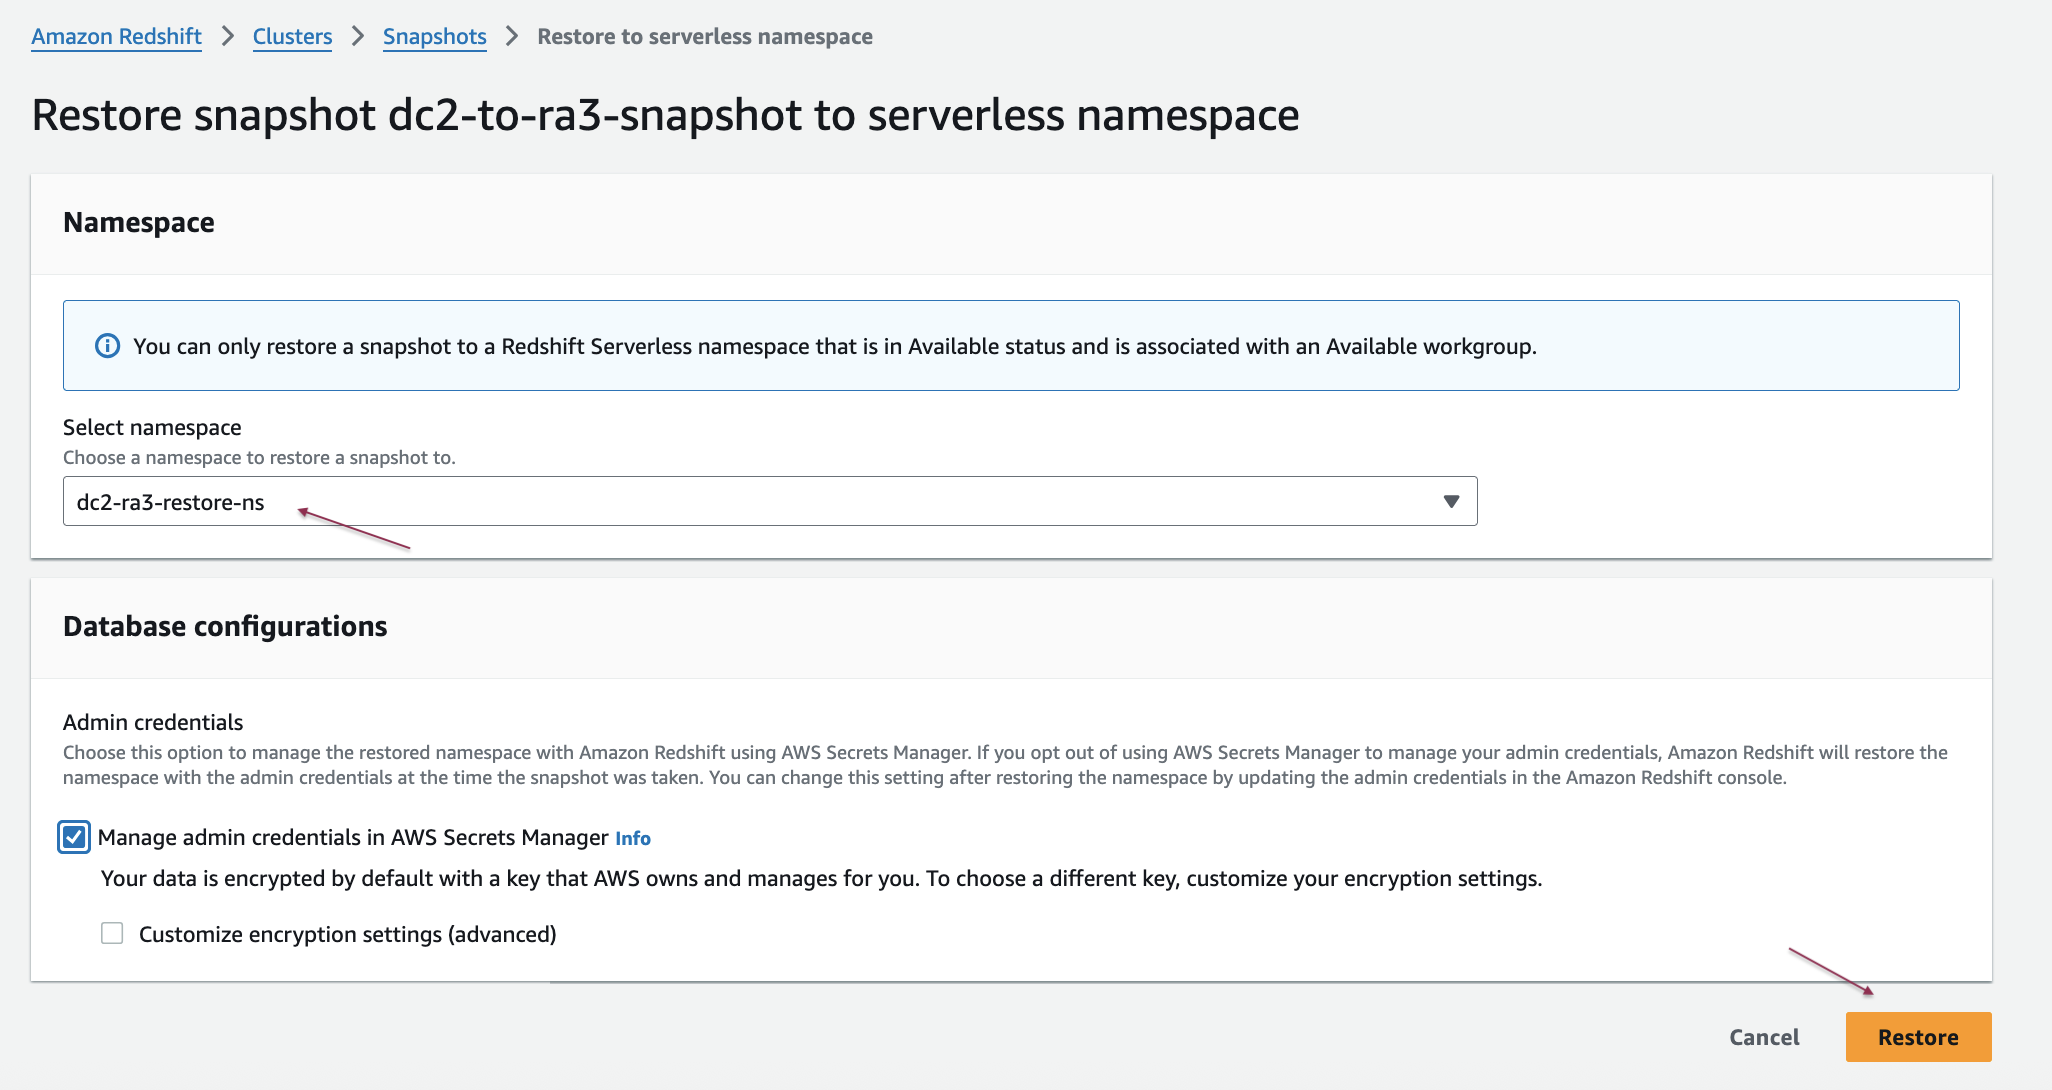
- Under Select namespace, select your target serverless namespace from the dropdown list and then choose Restore.

- The restoration time will vary based on your data volume.

- After the restoration completes, verify your data migration by connecting to your Amazon Redshift Serverless workspace using either the Amazon Redshift Query Editor v2 or your preferred SQL client.

For more information, see Creating a snapshot of your provisioned cluster.
Upgrade using the AWS CLI
Use the following steps in the AWS Command Line Interface (AWS CLI) to upgrade your DC2 cluster to Amazon Redshift Serverless using the snapshot restore method.
- Create a snapshot from the source cluster:
- Verify that the snapshot exists:
- Restore the snapshot to your Amazon Redshift Serverless namespace:
For more information, see Restore from cluster snapshot using AWS CLI.
Best practices for upgrading to Amazon Redshift Serverless
The following are recommended best practices when upgrading from Amazon Redshift to Amazon Redshift Serverless.
- Pre-upgrade:
- Determine a suitable target configuration using the sizing guidance.
- Validate the target configuration by running a proof of concept (POC) using Amazon Redshift Test Drive.
- Consider a CNAME. A Canonical Name (CNAME) record is a type of DNS record that you can use to create an alias for the endpoint of your Amazon Redshift cluster.
- If you use interleaved sort keys, Amazon Redshift automatically converts them to compound keys when you restore a provisioned cluster snapshot to a serverless namespace. For more information, see Considerations when using Amazon Redshift Serverless.
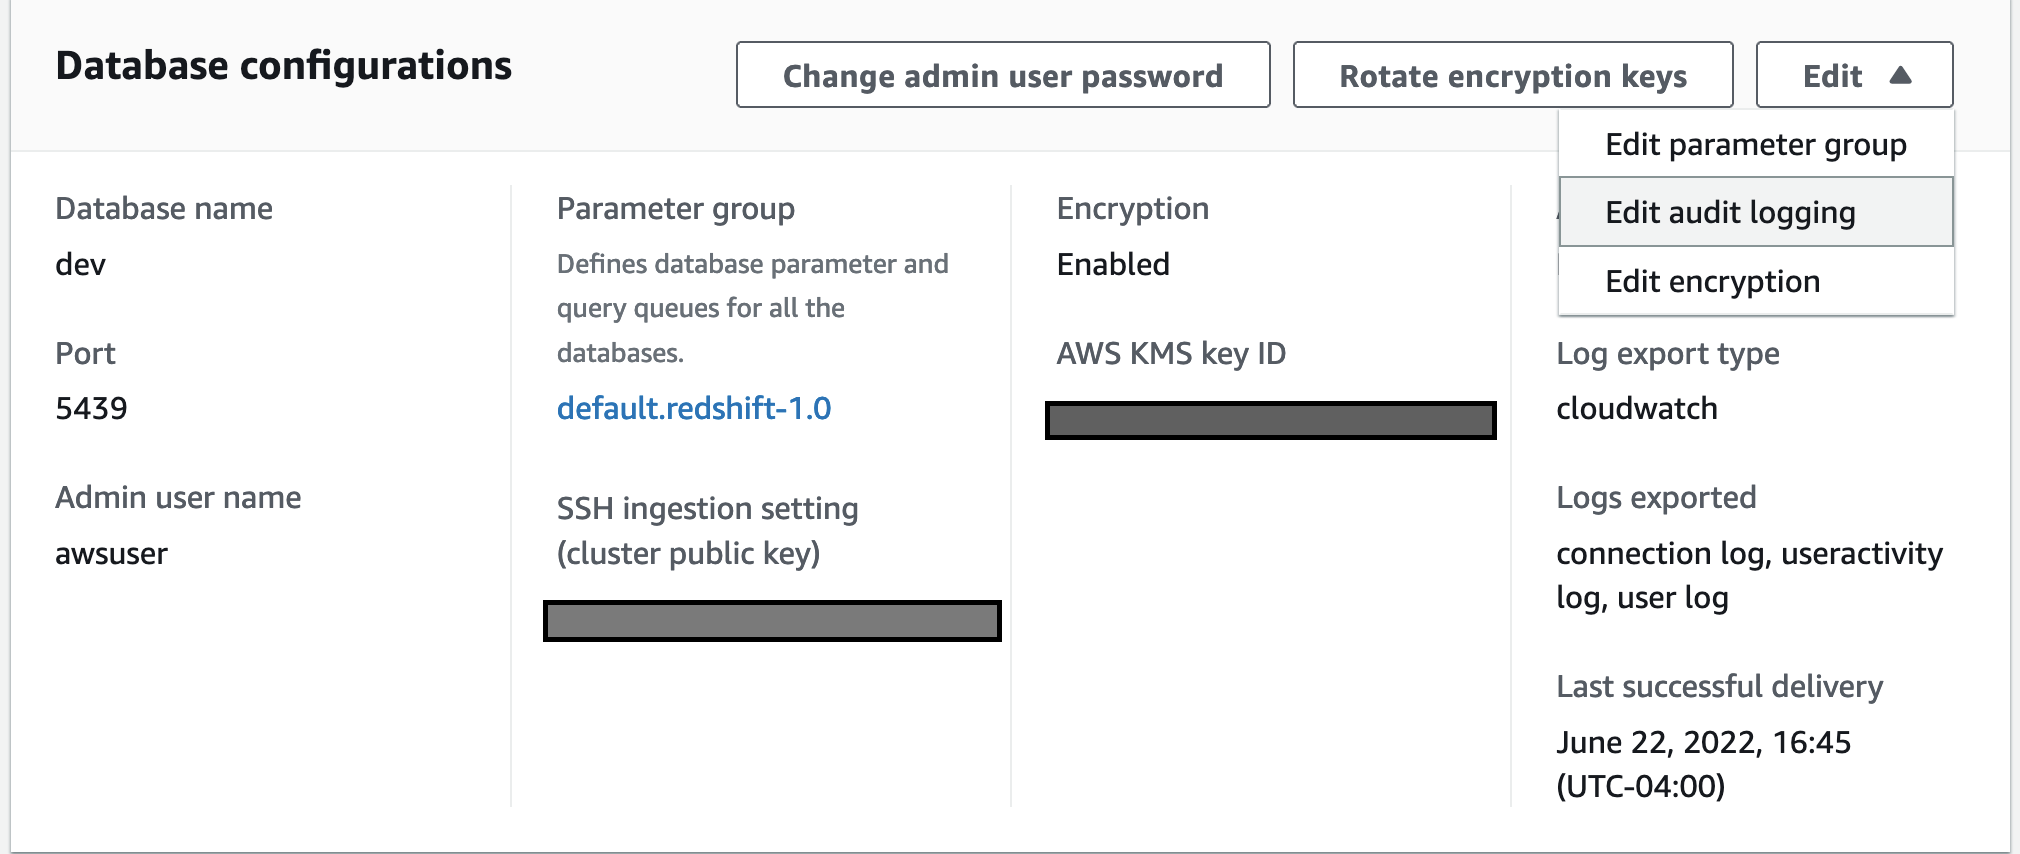
- Some concepts and features are different in Amazon Redshift Serverless than their corresponding feature for an Amazon Redshift provisioned data warehouse. These include differences in system tables and views, audit logging, and endpoint names. For a full list of these differences, see Comparing Amazon Redshift Serverless to an Amazon Redshift provisioned data warehouse.
- Subscribe to the Amazon Redshift Serverless event notifications using Amazon EventBridge to be notified of the events during the migration process
- Post-upgrade:
- Update existing connections: When you migrate to Amazon Redshift Serverless, a new endpoint will be created. Update any existing connections to business intelligence and other reporting tools.
- Observability and monitoring: If you have any data monitoring tools using systems views, verify that there are no open or empty transactions. It’s important as a best practice to end transactions. If you don’t end or roll back open transactions, Amazon Redshift Serverless will continue to use RPUs for those transactions.
- Access: When using IAM authentication with
dbUseranddbGroups, your applications can access the database using the GetCredentials API. For more information, see Connecting using IAM. - System views: Review the list of unified system views available in Amazon Redshift Serverless.
If your workloads aren’t suited for Amazon Redshift Serverless because of their nature or any of the considerations listed in Considerations when using Amazon Redshift Serverless, you can upgrade to Amazon Redshift RA3 instances by following the RA3 sizing guidance.
Cost considerations
In this section, we provide information to help you understand and manage your Amazon Redshift Serverless costs.
- You can reduce your serverless computing costs by reserving capacity in advance when you have predictable usage patterns.
- Amazon Redshift Serverless automatically adjusts capacity based on workload. By setting a maximum RPU limit, you can control costs by capping how much the system can scale up.
- Amazon Redshift Serverless uses RPUs as a compute unit. While it starts with a default of 128 RPUs, you can adjust the base RPU anywhere from 4 to 1,024 RPUs to match your specific workload needs and SLA requirement. For more information, see Billing for Amazon Redshift Serverless.
- Amazon Redshift Serverless automatically creates recovery points every 30 minutes or whenever 5 GB of data changes per node occur, whichever happens first. The minimum interval between recovery points is 15 minutes. All recovery points are retained for 24 hours by default.
If you need to preserve backups for a longer period, you can create manual backups. Manual backups will incur additional storage costs.
- Amazon Redshift Serverless AI-driven scaling and optimization let you reduce costs by easily adjusting compute resources with a simple slider – balancing your budget against performance needs.
Clean up
To avoid incurring future charges, delete the Amazon Redshift Serverless instance or provisioned data warehouse cluster created as part of the prerequisite steps. For more information, see Deleting a workgroup and Shutting down and deleting a cluster.
Conclusion
In this post, we discussed the benefits of upgrading Amazon Redshift DC2 instances to Amazon Redshift Serverless, in addition to the various options for upgrading and some best practices. It is essential to determine the target Amazon Redshift Serverless configuration and validate it using Amazon Redshift Test Drive utility in test and development environments before upgrading.
Get started upgrading to Amazon Redshift Serverless today by implementing the guidance in this post. If you have questions or need assistance, contact AWS Support forarchitectural and design guidance, in addition to support for proofs of concept and implementation.


 Nita Shah is an Analytics Specialist Solutions Architect at AWS based out of New York. She has been building data warehouse solutions for over 20 years and specializes in Amazon Redshift. She is focused on helping customers design and build enterprise-scale well-architected analytics and decision support platforms.
 Sushmita Barthakur is a Senior Data Solutions Architect at Amazon Web Services (AWS), supporting Strategic customers architect their data workloads on AWS. With a background in data analytics, she has extensive experience helping customers architect and build enterprise data lakes, ETL workloads, data warehouses and data analytics solutions, both on-premises and the cloud. Sushmita is based in Florida and enjoys traveling, reading and playing tennis.
 Jonathan Katz is a Principal Product Manager – Technical on the Amazon Redshift team and is based in New York. He is a Core Team member of the open source PostgreSQL project and an active open source contributor, including PostgreSQL and the pgvector project.


 Poulomi Dasgupta is a Senior Analytics Solutions Architect with AWS. She is passionate about helping customers build cloud-based analytics solutions to solve their business problems. Outside of work, she likes travelling and spending time with her family.
 Ranjan Burman is an Analytics Specialist Solutions Architect at AWS. He specializes in Amazon Redshift and helps customers build scalable analytical solutions. He has more than 16 years of experience in different database and data warehousing technologies. He is passionate about automating and solving customer problems with cloud solutions.
 Jason Pedreza is a Senior Redshift Specialist Solutions Architect at AWS with data warehousing experience handling petabytes of data. Prior to AWS, he built data warehouse solutions at Amazon.com and Amazon Devices. He specializes in Amazon Redshift and helps customers build scalable analytic solutions.
 Agasthi Kothurkar is an AWS Solutions Architect, and is based in Boston. Agasthi works with enterprise customers as they transform their business by adopting the Cloud. Prior to joining AWS, he worked with leading IT consulting organizations on customers engagements spanning Cloud Architecture, Enterprise Architecture, IT Strategy, and Transformation. He is passionate about applying Cloud technologies to resolve complex real world business problems.


 Ranjan Burman is an Analytics Specialist Solutions Architect at AWS. He specializes in Amazon Redshift and helps customers build scalable analytical solutions. He has more than 15 years of experience in different database and data warehousing technologies. He is passionate about automating and solving customer problems with the use of cloud solutions.