Post Syndicated from Srividya Parthasarathy original https://aws.amazon.com/blogs/big-data/build-an-aws-lake-formation-permissions-inventory-dashboard-using-aws-glue-and-amazon-quicksight/
AWS Lake Formation is an integrated data lake service that makes it easy for you to ingest, clean, catalog, transform, and secure your data and make it available for analysis and machine learning (ML). Lake Formation provides a single place to define fine-grained access control on catalog resources. These permissions are granted to the principals by a data lake admin, and integrated engines like Amazon Athena, AWS Glue, Amazon EMR, and Amazon Redshift Spectrum enforce the access controls defined in Lake Formation. It also allows principals to securely share data catalog resources across multiple AWS accounts and AWS organizations through a centralized approach.
As organizations are adopting Lake Formation for scaling their permissions, there is steady increase in the access policies established and managed within the enterprise. However, it becomes more difficult to analyze and understand the permissions for auditing. Therefore, customers are looking for a simple way to collect, analyze, and visualize permissions data so that they can inspect and validate the policies. It also enables organizations to take actions that help them with compliance requirements.
This solution offers the ability to consolidate and create a central inventory of Lake Formation permissions that are registered in the given AWS account and Region. It provides a high-level view of various permissions that Lake Formation manages and aims at answering questions like:
- Who has select access on given table
- Which tables have delete permission granted
- Which databases or tables does the given principal have select access to
In this post, we walk through how to set up and collect the permissions granted on resources in a given account using the Lake Formation API. AWS Glue makes it straightforward to set up and run jobs for collecting the permission data and creating an external table on the collected data. We use Amazon QuickSight to create a permissions dashboard using an Athena data source and dataset.
Overview of solution
The following diagram illustrates the architecture of this solution.
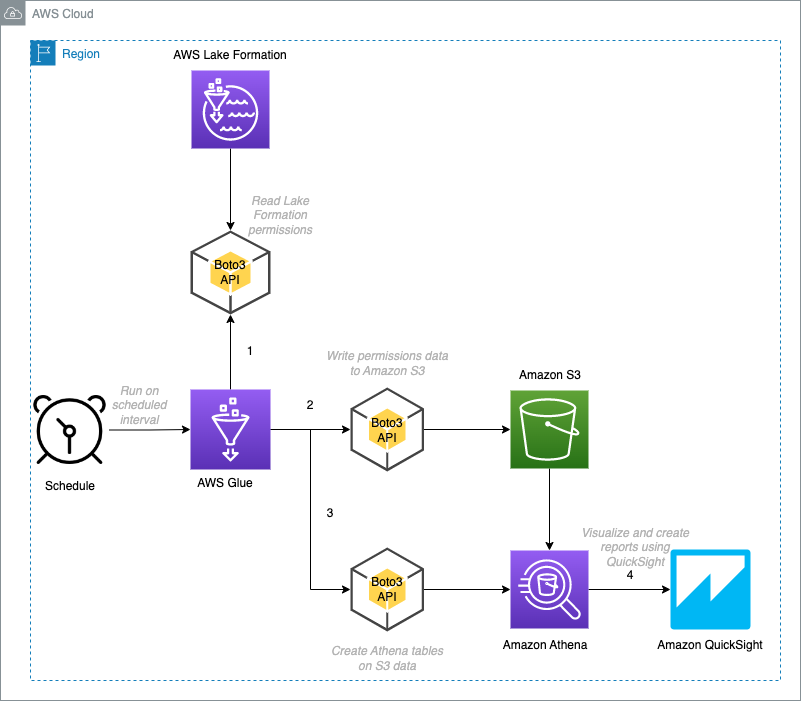
In this solution, we walk through the following tasks:
- Create an AWS Glue job to collect and store permissions data, and create external tables using Boto3.
- Verify the external tables created using Athena.
- Sign up for a QuickSight Enterprise account and enable Athena access.
- Create a dataset using an Athena data source.
- Use the datasets for analysis.
- Publish the analyses as a QuickSight dashboard.
The collected JSON data is flattened and written into an Amazon Simple Storage Service (Amazon S3) bucket as Parquet files partitioned by account ID, date, and resource type. After the data is stored in Amazon S3, external tables are created on them and filters are added for different types of resource permissions. These datasets can be imported into SPICE, an in-memory query engine that is part of QuickSight, or queried directly from QuickSight to create analyses. Later, you can publish these analyses as a dashboard and share it with other users.
Dashboards are created for the following use cases:
- Database permissions
- Table permissions
- Principal permissions
Prerequisites
You should have the following prerequisites:
- An S3 bucket to store the permissions inventory data
- An AWS Glue database for permissions inventory metadata
- An AWS Identity and Access Management (IAM) role for the AWS Glue job with access to the inventory AWS Glue database and S3 bucket and added as a data lake admin
- A QuickSight account with access to Athena
- An IAM role for QuickSight with access to the inventory AWS Glue database and S3 bucket
Set up and run the AWS Glue job
We create an AWS Glue job to collect Lake Formation permissions data for the given account and Region that is provided as job parameters, and the collected data is flattened before storage. Data is partitioned by account ID, date, and permissions type, and is stored as Parquet in an S3 bucket using Boto3. We create external tables on the data and add filters for different types of resource permissions.
To create the AWS Glue job, complete the following steps:
- Download the Python script file to local.
- On the AWS Glue console, under Data Integration and ETL in the navigation pane, choose Jobs.
- Under Create job, select Python Shell script editor.
- For Options, select Upload and edit an existing script.
- For File upload, choose Choose file.
- Choose the downloaded file (
lf-permissions-inventory.py). - Choose Create.

- After the job is created, enter a name for the job (for this post, lf-inventory-builder) and choose Save.

- Choose the Job details tab.
- For Name, enter a name for the job.
- For IAM Role¸ choose an IAM role that has access to the inventory S3 bucket and inventory schema and registered as data lake admin.
- For Type, choose Python Shell.
- For Python version, choose Python 3.9.

- You can leave other property values at their default.
- Under Advanced properties¸ configure the following job parameters and values:
catalog-id: with the value as the current AWS account ID whose permissions data are collected.databasename: with the value as the AWS Glue database where the inventory-related schema objects are created.region: with the value as the current Region where the job is configured and whose permissions data is collected.s3bucket: with the value as the S3 bucket where the collected permissions data is written.createtable: with the value yes, which enables external table creation on the data.

- Choose Save to save the job settings.

- Choose Run to start the job.
When the job is complete, the run status changes to Succeeded. You can view the log messages in Amazon CloudWatch Logs.

Permissions data is collected and stored in the S3 bucket (under lfpermissions-data) that you provided in the job parameters.

The following external tables are created on the permissions data and can be queried using Athena:
- lfpermissions – A summary of resource permissions
- lfpermissionswithgrant – A summary of grantable resource permissions
For both tables, the schema structure is the same and the lftype column indicates what type of permissions the row applies to.

Verify the tables using Athena
You can use Athena to verify the data using the following queries.
For more information, refer to Running SQL queries using Amazon Athena
- List the database permissions:
- List the table permissions:
- List the data lake permissions:
- List the grantable database permissions:
- List the grantable table permissions:
- List grantable data lake permissions:
As the next step, we create a QuickSight dashboard with three sheets, each focused on different sets of permissions (database, table, principal) to slice and dice the data.
Sign up for a QuickSight account
If you haven’t signed up for QuickSight, complete the following steps:
- Sign in to the AWS Management Console as Admin, search for QuickSight and choose Sign up for QuickSight.

- For Edition, select Enterprise.
- Choose Continue.
- For Authentication method, select Use IAM federated identities & QuickSight-managed users.
- Under QuickSight Region, choose the same Region as your inventory S3 bucket.
- Under Account info, enter a QuickSight account name and email address for notification.

- In the Quick access to AWS services section, for IAM Role, select Use QuickSight-managed role (default).
- Allow access to IAM, Athena, and Amazon S3.
- Specify the S3 bucket that contains the permissions data.
- Choose Finish to complete the signup process.

Note: If the inventory bucket and database is managed by Lake Formation, grant database and table access to the created QuickSight IAM role. For instructions, refer to Granting and revoking permissions on Data Catalog resources.
Configure your dataset in QuickSight
QuickSight is configured with an Athena data source the same Region as the S3 bucket. To set up your dataset, complete the following steps:
- On the QuickSight console, choose Datasets in the navigation pane.
- Choose New dataset.

- Choose Athena as your data source.

- Enter
LF_DASHBOARD_DSas the name of your data source. - Choose Create data source.
- For Catalog, leave it as AwsDataCatalog.
- For Database, choose database name provided as parameter to the Job.
- For Tables, select lfpermissions.
- Choose Select.

- Select Directly query your data and choose Visualize to take you to the analysis.

Create analyses
We create three sheets for our dashboard to view different levels of permissions.
Sheet 1: Database permission view
To view database permissions, complete the following steps:
- On the QuickSight console, choose the plus sign to create a new sheet.
- Choose Add, then choose Add title.

- Name the sheet Database Permissions.
- Repeat steps (5-7) to add the following parameters:
catalogiddatabasenamepermissiontablename
- On the Add menu, choose Add parameter.
- Enter a name for the parameter.
- Leave the other values as default and choose Create.
- Choose Insights in the navigation pane, then choose Add control.

- Add a control for each parameter:
- For each parameter, for Style¸ choose List, and for Values, select Link to a dataset field.

- Provide additional information for each parameter according to the following table.
- For each parameter, for Style¸ choose List, and for Values, select Link to a dataset field.

| Parameter | Display Name | Dataset | Field |
| catalogid | AccountID | lfpermissions | catalog_id |
| databasename | DatabaseName | lfpermissions | databasename |
| permission | Permission | lfpermissions | permission |
- Add a control dependency and for Database, choose the options menu and choose Edit.

- Under Format control, choose Control options.
- Change the relevant values, choose AccountID, and choose Update.
- Similarly, under Permission control, choose Control options.
- Change the relevant values, choose AccountID, and choose Update.
We create two visuals for this view.
- For the first visual, choose Visualize and choose pivot table as the visual type.
- Drag and drop
catalog_idanddatabasenameinto Rows. - Drag and drop
permissioninto Column. - Drag and drop
principalinto Values and change the aggregation to Count distinct.

- Add a filter on the
lftypefield with the following options:- Custom filter as the filter type.
- Equals as the filter condition.
- DATABASE as the value.
- Add a filter on
catalog_idthe following options:- Custom filter as the filter type.
- Equals as the filter condition.
- Select Use parameters and choose
catalogid.
- Add a filter on
databasenamewith the following options:- Custom filter as the filter type.
- Equals as the filter condition.
- Select Use parameters and choose
databasename.
- Add a filter on
permissionwith the following options:- Custom filter as the filter type.
- Equals as the filter condition.
- Select Use parameters and choose
permission.
- Choose Actions in the navigation pane.
- Define a new action with the following parameters:
- For Activation, select Select.
- For Filter action, select All fields.
- For Target visuals, select Select visuals and Check principal.
Now we add our second visual.
- Add a second visual and choose the table visual type.
- Drag and drop
principalto Group by. - Add a filter on the
lftypefield with the following options:- Custom filter as the filter type.
- Equals as the filter condition.
- DATABASE as the value.
- Add a filter on
catalog_idthe following options:- Custom filter as the filter type.
- Equals as the filter condition.
- Select Use parameters and choose
catalogid.
- Add a filter on
databasenamethe following options:- Custom filter as the filter type.
- Equals as the filter condition.
- Select Use parameters and choose
databasename.
- Add a filter on
permissionwith the following options:- Custom filter as the filter type.
- Equals as the filter condition.
- Select Use parameters and choose
permission.
Now the Database and Permission drop-down menus are populated based on the relevant attributes and changes dynamically.

Sheet 2: Table permission view
Now that we have created the database permissions sheet, we can add a table permissions sheet.
- Choose the plus sign to add a new sheet.
- On the QuickSight console, choose Add, then choose Add title.
- Name the sheet Table Permissions.
- Choose Insights in the navigation pane, then choose Add control.
- Add a control for each parameter:
- For each parameter, for Style¸ choose List, and for Values, select Link to a dataset field.
- Provide the additional information for each parameter according to the following table.
| Parameter | Display Name | Dataset | Field |
| catalogid | AccountID | lfpermissions | catalog_id |
| databasename | DatabaseName | lfpermissions | databasename |
| permission | Permission | lfpermissions | permission |
| tablename | TableName | lfpermissions | tablename |
We create two visuals for this view.
- For the first visual, choose Visualize and choose pivot table as the visual type.
- Drag and drop
catalog_id,databasename, andtablenameinto Rows. - Drag and drop
permissioninto Column. - Drag and drop
principalinto Values and change the aggregation to Count distinct. - Add a filter on the
lftypefield with the following options:- Custom filter as the filter type.
- Equals as the filter condition.
- TABLE as the value.
- Add a filter on
catalog_idthe following options:- Custom filter as the filter type.
- Equals as the filter condition.
- Select Use parameters and choose
catalogid.
- Add a filter on the
databasenamewith the following options:- Custom filter as the filter type.
- Equals as the filter condition.
- Select Use parameters and choose
databasename.
- Add a filter on
tablenamewith the following options:- Custom filter as the filter type.
- Equals as the filter condition.
- Select Use parameters and choose
tablename.
- Add a filter on
permissionwith the following options:- Custom filter as the filter type.
- Equals as the filter condition.
- Select Use parameters and choose
permission.
- Choose Actions in the navigation pane.
- Define a new action with the following parameters:
- For Activation, select Select.
- For Filter action, select All fields.
- For Target visuals, select Select visuals and Check principal.
Now we add our second visual.
- Add a second visual and choose the table visual type.
- Drag and drop
principalto Group by. - Add a filter on the
lftypefield with the following options:- Custom filter as the filter type.
- Equals as the filter condition.
- TABLE as the value.
- Add a filter on
catalog_idthe following options:- Custom filter as the filter type.
- Equals as the filter condition.
- Select Use parameters and choose
catalogid.
- Add a filter on the
databasenamewith the following options:- Custom filter as the filter type.
- Equals as the filter condition.
- Select Use parameters and choose
databasename.
- Add a filter on
tablenamewith the following options:- Custom filter as the filter type.
- Equals as the filter condition.
- Select Use parameters and choose
tablename.
- Add a filter on
permissionwith the following options:- Custom filter as the filter type.
- Equals as the filter condition.
- Select Use parameters and choose
permission.
Now the Databasename, Tablename, and Permission drop-down menus are populated based on the relevant attributes.

Sheet 3: Principal permission view
Now we add a third sheet for principal permissions.
- Choose the plus sign to add a new sheet.
- On the QuickSight console, choose Add, then choose Add title.
- Name the sheet Principal Permissions.
- Choose Insights in the navigation pane, then choose Add control.
- Add a control for the
catalogidparameter:- For Style¸ choose List, and for Values, select Link to a dataset field.
- Provide the additional information for the parameter according to the following table.
| Parameter | Display Name | Dataset | Field |
| catalogid | AccountID | lfpermissions | catalog_id |
We create four visuals for this view.
- For the first visual, choose Visualize and choose pivot table as the visual type.
- Drag and drop
catalog_idandprincipalinto Rows. - Drag and drop
permissioninto Column. - Drag and drop
databasenameinto Values and change the aggregation to Count distinct. - Add a filter on the
lftypefield with the following options:- Custom filter as the filter type.
- Equals as the filter condition.
- DATABASE as the value.
- Add a filter on the
catalog_idfield with the following options:- Custom filter as the filter type.
- Equals as the filter condition.
- Select Use parameters and choose
catalogid.
- Choose Actions in the navigation pane.
- Define a new action with the following parameters:
- For Activation, select Select.
- For Filter action, select All fields.
- For Target visuals, select Select visuals and Check Databasename.
- For the second visual, choose Visualize and choose table as the visual type.
- Drag and drop
databasenameinto Group by. - Add a filter on the
lftypefield with the following options:- Custom filter as the filter type.
- Equals as the filter condition.
- DATABASE as the value.
- Add a filter on the
catalog_idfield with the following options:- Custom filter as the filter type.
- Equals as the filter condition.
- Select Use parameters and choose
catalogid.
- For the third visual, choose Visualize and choose pivot table as the visual type.
- Drag and drop
catalog_idandprincipalinto Rows. - Drag and drop
permissioninto Column. - Drag and drop
tablenameinto Values and change the aggregation to Count distinct. - Add a filter on the
lftypefield with the following options:- Custom filter as the filter type.
- Equals as the filter condition.
- TABLE as the value.
- Add a filter on the
catalog_idfield with the following options:- Custom filter as the filter type.
- Equals as the filter condition.
- Select Use parameters and choose
catalogid.
- Choose Actions in the navigation pane.
- Define a new action with the following parameters:
- For Activation, select Select.
- For Filter action, select All fields.
- For Target visuals, select Select visuals and Check Tablename.
- For the final visual, choose Visualize and choose table as the visual type.
- Drag and drop
tablenameinto Group by. - Add a filter on the
lftypefield with the following options:- Custom filter as the filter type.
- Equals as the filter condition.
- TABLE as the value.
- Add a filter on the
catalog_idfield with the following options:- Custom filter as the filter type.
- Equals as the filter condition.
- Select Use parameters and choose
catalogid.
The following screenshot shows our sheet.

Create a dashboard
Now that the analysis is ready, you can publish it as a dashboard and share it with other users. For instructions, refer to the tutorial Create an Amazon QuickSight dashboard.
Clean up
To clean up the resources created in this post, complete the following steps:
- Delete the AWS Glue job
lf-inventory-builder. - Delete the data stored under the bucket provided as the value of the
s3bucketjob parameter. - Drop the external tables created under the schema provided as the value of the
databasenamejob parameter. - If you signed up for QuickSight to follow along with this post, you can delete the account.
- For an existing QuickSight account, delete the following resources:
lfpermissionsdatasetlfpermissionsanalysislfpermissionsdashboard
Conclusion
In this post, we provided a design and implementation steps for a solution to collect Lake Formation permissions in a given Region of an account and consolidate them for analysis. We also walked through the steps to create a dashboard using Amazon QuickSight. You can utilize other QuickSight visuals to create more sophisticated dashboards based on your requirements.
You can also expand this solution to consolidate permissions for a multi-account setup. You can use a shared bucket across organizations and accounts and configure an AWS Glue job in each account or organization to write their permission data. With this solution, you can maintain a unified dashboard view of all the Lake Formation permissions within your organization, thereby providing a central audit mechanism to comply with business requirements.
Thanks for reading this post! If you have any comments or questions, please don’t hesitate to leave them in the comments section.
About the Author
 Srividya Parthasarathy is a Senior Big Data Architect on the AWS Lake Formation team. She enjoys building analytics and data mesh solutions on AWS and sharing them with the community.