Post Syndicated from Rommel Sunga original https://aws.amazon.com/blogs/messaging-and-targeting/send-whatsapp-business-messages-with-aws-end-user-messaging-social/
WhatsApp reaches over 3 billion monthly active users worldwide — with more than 2 billion using it every day — making it the single most direct channel for customer communication at global scale. AWS End User Messaging Social gives you a managed API to send WhatsApp Business messages without building or maintaining your own WhatsApp Business API integration.
Whether you’re building appointment reminders, order notifications, or interactive customer support flows, with WhatsApp Business messaging, you can meet customers where they already communicate.
This post is for developers and solutions architects looking to integrate WhatsApp messaging into their customer engagement workflows using AWS. By the end, you will know how to send every supported message type—from straightforward text and media to templates, interactive menus, and WhatsApp Flows—using Python and the AWS End User Messaging Social API.
Solution overview
This solution uses AWS End User Messaging Social to connect your WhatsApp Business Account (WABA) with your AWS workloads, enabling automated, two-way messaging with your customers. When a customer sends a WhatsApp message to your WABA phone number, AWS End User Messaging Social receives the message and publishes an event to an Amazon Simple Notification Service (Amazon SNS) topic. Amazon SNS then invokes an AWS Lambda function. You configure this Lambda function to process the incoming message and send a contextual WhatsApp reply to the customer. The following diagram illustrates this architecture:
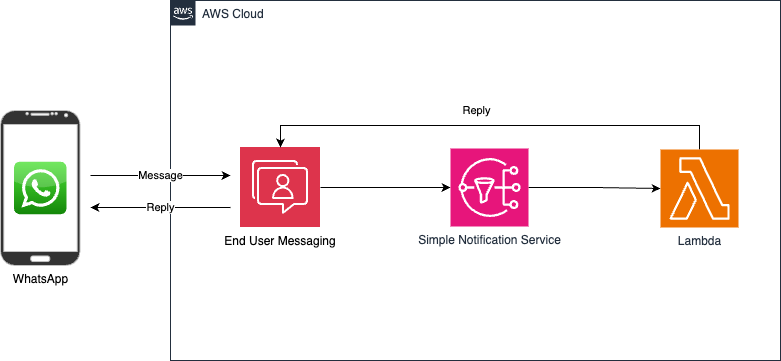
Figure A: Shows the architecture flow “Customer WhatsApp → End User Messaging Social → SNS → Lambda → End User Messaging Social → Response”
IMPORTANT: Note that any WhatsApp user can send a message to your WABA number and trigger the workflow. To avoid incurring ongoing charges, complete the steps in the “Clean up” section.
The solution is deployed using the AWS Serverless Application Model (AWS SAM) and includes a sample Lambda function that demonstrates how to handle common message types, send interactive list messages, and respond with templated replies. You can extend this foundation to build more sophisticated workflows, such as invoking AWS Step Functions for multi-step processes or routing messages to container-based workloads running on AWS. AWS End User Messaging Social also provides unified billing within AWS, streamlining cost management for your WhatsApp messaging workloads.
Prerequisites
Before you run any of the examples in this post, complete the following prerequisites:
- A phone number to link a WABA.
- Connect a verified WhatsApp Business Account (WABA) to AWS End User Messaging Social.
- Install the AWS SDK for Python (Boto3).
- Optionally, install the AWS Command Line Interface (AWS CLI) for template creation (otherwise the templates must be created within the AWS Console UI or Meta’s WhatsApp Manager).
- A phone with WhatsApp Messenger app installed to test the solution. Note that the mobile app uses a different phone number than the one that is associated with your WABA.
This walkthrough typically takes 30–45 minutes, though actual time might vary based on your familiarity with AWS services and WhatsApp Business configuration.
If you’re new to AWS End User Messaging Social, see the Getting Started with WhatsApp guide before proceeding.
IAM permissions
To configure AWS End User Messaging Social, you will need several types of permissions depending on what you’re setting up. Here are the key permissions required:
Core AWS End User Messaging social permissions
For basic configuration and management, you will need permissions for the following actions:
social-messaging:AssociateWhatsAppBusinessAccount— to associate a WhatsApp Business Account with your AWS accountsocial-messaging:CreateWhatsAppMessageTemplate— to create WhatsApp message templatessocial-messaging:ListLinkedWhatsAppBusinessAccounts— to list linked WhatsApp Business Accountssocial-messaging:GetWhatsAppMessageTemplate— to retrieve message template detailssocial-messaging:ListWhatsAppMessageTemplates— to list message templates
For event destinations (SNS integration)
If you’re configuring event destinations with Amazon SNS, your SNS topic must have a resource policy allowing the sms-voice.amazonaws.com service principal to publish to it, and you will need an AWS Identity and Access Management (IAM) role with a trust policy allowing social-messaging.amazonaws.com to assume it. For detailed setup instructions, see Configuring Event Destinations in the AWS End User Messaging Social User Guide.
For Amazon Connect integration
If integrating with Amazon Connect, the service-linked role (SLR) includes the following permissions:
social-messaging:SendWhatsAppMessagesocial-messaging:PostWhatsAppMessageMediasocial-messaging:GetWhatsAppMessageMediasocial-messaging:GetLinkedWhatsAppBusinessAccountPhoneNumber
For more information, see Amazon Connect Service-Linked Role in the Amazon Connect Administrator Guide.
Additional considerations
- If using encrypted SNS topics with AWS KMS, you will need additional AWS Key Management Service (AWS KMS) permissions for the service to generate and decrypt data keys.
Configuration
Create a config.json file in your project directory with the following structure to store the destination WhatsApp number and the origination phone number ID (for example, phone-number-id-a1b2c3d4######) that we’re sending messages from and receiving the message:
Security note: The config.json file is intended for local testing only. In production environments, avoid hardcoding phone numbers and credentials. Instead, use AWS Secrets Manager, AWS Systems Manager Parameter Store, or environment variables to manage sensitive configuration values.
Each example builds a message_data payload and sends it using the following code:
For production use, wrap the send call with error handling to manage throttling and failures gracefully:
The following sections show only the message_data for each message type. To send any of these messages, use the shared sending code from the previous Configuration section—load config.json, create the Boto3 client, and call client.send_whatsapp_message() with the payload.
Text messages
Text messages are plain text communications sent within the 24-hour conversation window. They don’t require Meta template approval and support basic formatting.
Specifications and requirements
Text messages are the foundation of WhatsApp conversations. You can send up to 4,096 characters per message. Text messages don’t require Meta approval and work within an active 24-hour conversation window that opens when a customer messages your business first, or when you initiate contact using an approved template.
- Maximum length: 4,096 characters (including spaces and formatting)
- 24-hour window requirement: Can only be sent within 24 hours of last customer message
- No WhatsApp template approval required
WhatsApp message example
The following image is a WhatsApp message example.

Code example
The following is a code example for the previous message.
Media messages
With Media messages, you can send images, documents, audio, and video files.
Specifications and requirements
- Images: Maximum 5 MB (JPEG, PNG)
- Documents: Maximum 100 MB (PDF, DOC, DOCX, PPT, PPTX, XLS, XLSX)
- Audio: Maximum 16 MB (AAC, MP4, AMR, MP3, OGG)
- Video: Maximum 16 MB (MP4, 3GPP)
Note: Media uploaded to Meta is retained for 30 days. If you reuse media across messages (such as a company logo), use the external URL method or re-upload before sending. The examples in this post use external URLs.
Media (document) message example
The message is presented as a PDF with the provided message body in the following example.

Code example
The following is a code example for the previous message.
Media (image) message example
This media message includes an image with a message body in the following example to describe the image. In this case it shows a laptop available for purchase with a link included as part of the message body.

Code example
The following is a code example for the previous message.
Template messages
Template messages enable business-initiated conversations outside the 24-hour window. Templates must be created and approved by Meta before use.
Text template message creation with parameters
Template creation using CLI
While it’s possible to create templates directly in the AWS End User Messaging Social console and in WhatsApp Manager’s UI, you can also use AWS End User Messaging Social to programmatically create templates using the AWS CLI.
Step 1 — Create a file named order_confirmation_template.json in your working directory with the following template definition.
Step 2 — Run the following CLI command to create the template. Note that the –template-definition parameter points to the local JSON file that contains the template structure:
Template creation using the console
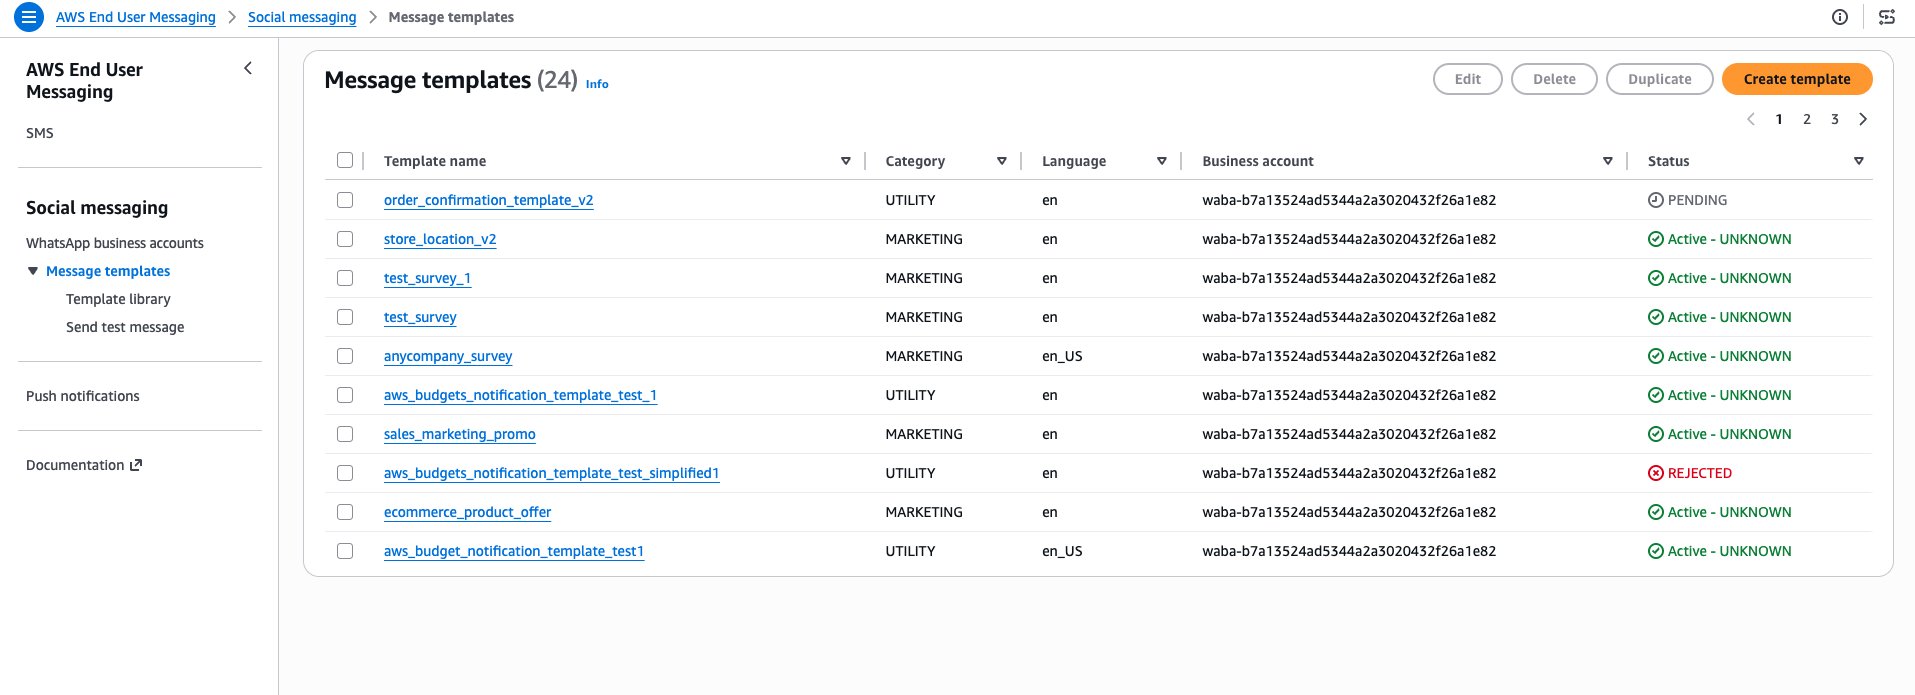
AWS End User Messaging Social also features a built-in template management UI which you can use to create and manage templates directly within the AWS End User Messaging Social portion of the AWS Console under AWS End User messaging > Social Messaging > Message Templates. To create a new template, choose the Create Template button.
In the first screen, you can set your template name, template language and template type for your respective WhatsApp Business Account.

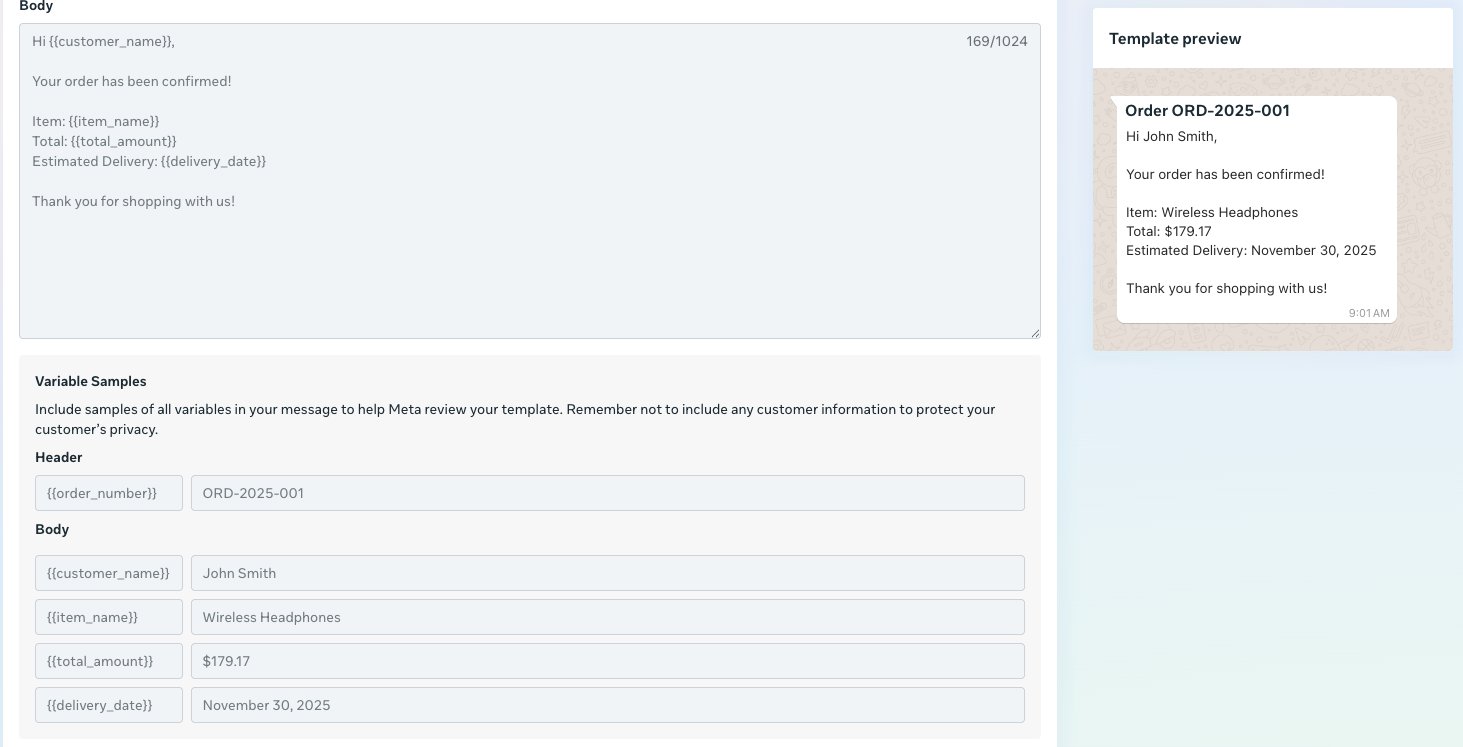
In the second screen, you can set the message content for the template including variables to dynamically populate when sending the message content.
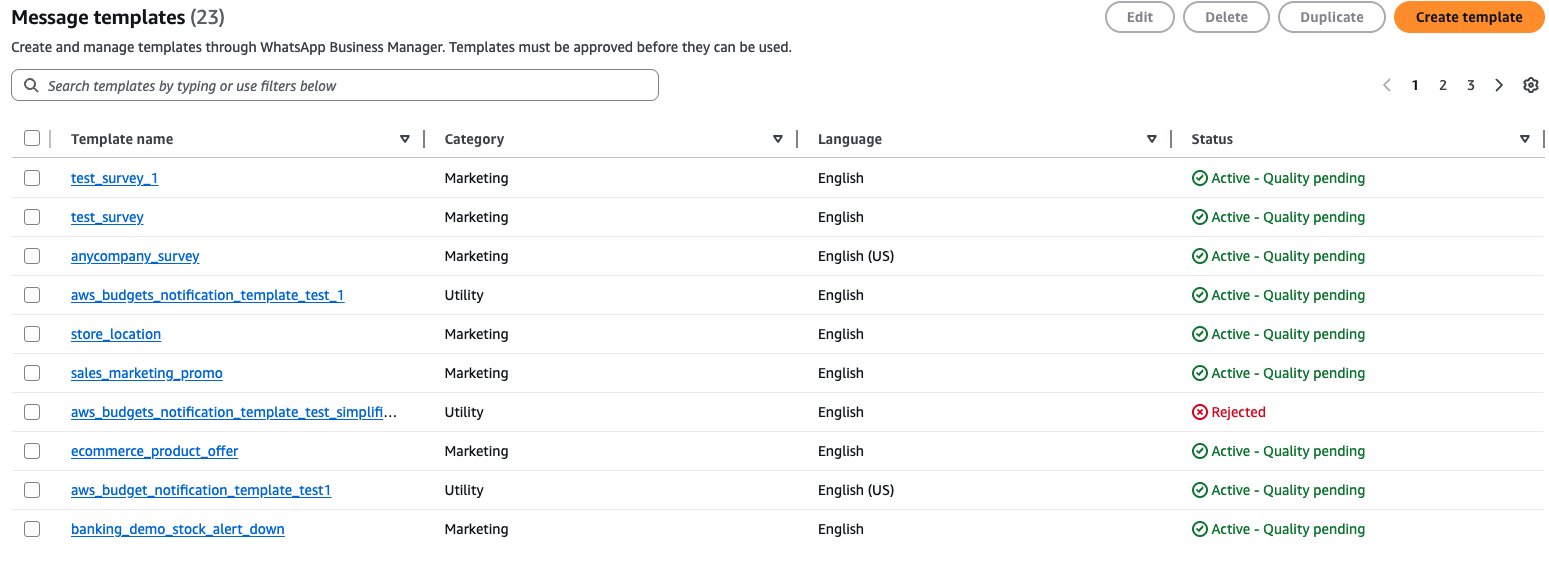
Approved message templates can be seen under the message template screen along with their approval status.
Sending the template message
After your template is approved, you can send it with parameter values populated at send time.
Important: When sending the template message, you must use the same language and locale that you used when creating the template. For example, a language code of “en” isn’t the same as “en_US”.
Location messages
Location messages share geographic coordinates with optional name and address information. For example, you can send a location for a store branch to a customer.
Create template message with CLI
Step 1 — Create a file named store_location_template.json in your working directory with the following template definition:
Step 2 — Run the following CLI command to create the template. The –template-definition parameter references the JSON file that you previously created:
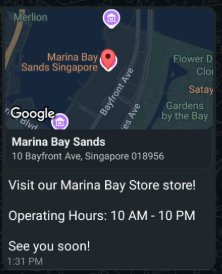
Location message example
The following image is an example of a location message.
Code example
The following is a code example of the previous location message example.
Interactive messages
Interactive messages provide pre-defined response options through buttons or lists. These messages must be sent within the 24-hour conversation window.
- Structured responses – Pre-defined options ensure consistent data collection
- Enhanced UX – One-tap interactions reduce friction and improve completion rates
- 24-hour window requirement – Must be sent within active conversation windows
Quick reply buttons message
This example demonstrates collecting guest feedback using quick reply buttons for streamlined response collection.
Technical specifications:
- Maximum three buttons per message
- Button text limit: 20 characters
- Buttons appear in a horizontal row on most devices
Quick reply buttons message example
The following image is an example of the Quick reply buttons message.

Code example
The following is a code example of the previous example image.
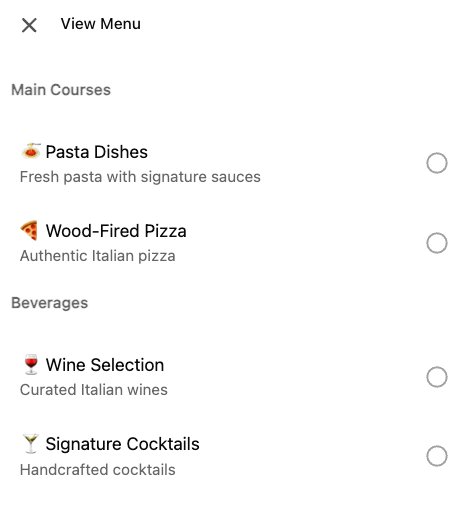
List Message
This example shows a restaurant menu using list messages for organized, scrollable content presentation.
Technical specifications:
- Max Options: Up to 10 rows total, which can be organized into 10 sections.
- Button Text: Maximum 24 characters to open the menu.
- Sections: A list can contain multiple sections (e.g., “Starters”, “Mains”).
List message example
The following is an image of a list message example.
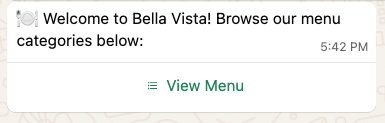
When the user expands the list, they can select individual items to add to their cart.
Code example
The following is the code example for the previously mentioned example.
Contact messages
Contact messages share vCard-formatted contact information, useful for sharing business contact details with customers.
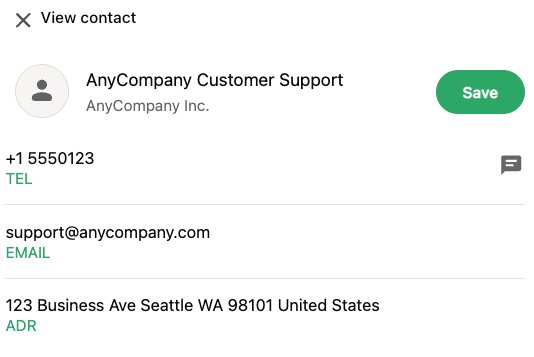
Contact message example
The following is an image of an example contact message.

Customers can choose to directly message the contact, save the contact to their contacts list and view details about the contact in a pop up.
Code example
The following is a code example for the previously mentioned image example.
WhatsApp Flows
WhatsApp Flows can help power interactive experiences. Note that a verified WhatsApp Business Account is required to use WhatsApp Flows. There are two general types of WhatsApp Flows:
- Without an endpoint — Results are stored and can be viewed directly within WhatsApp Manager. This is the type demonstrated in this post.
- With an endpoint — Results are sent to an API endpoint that you specify for further processing.
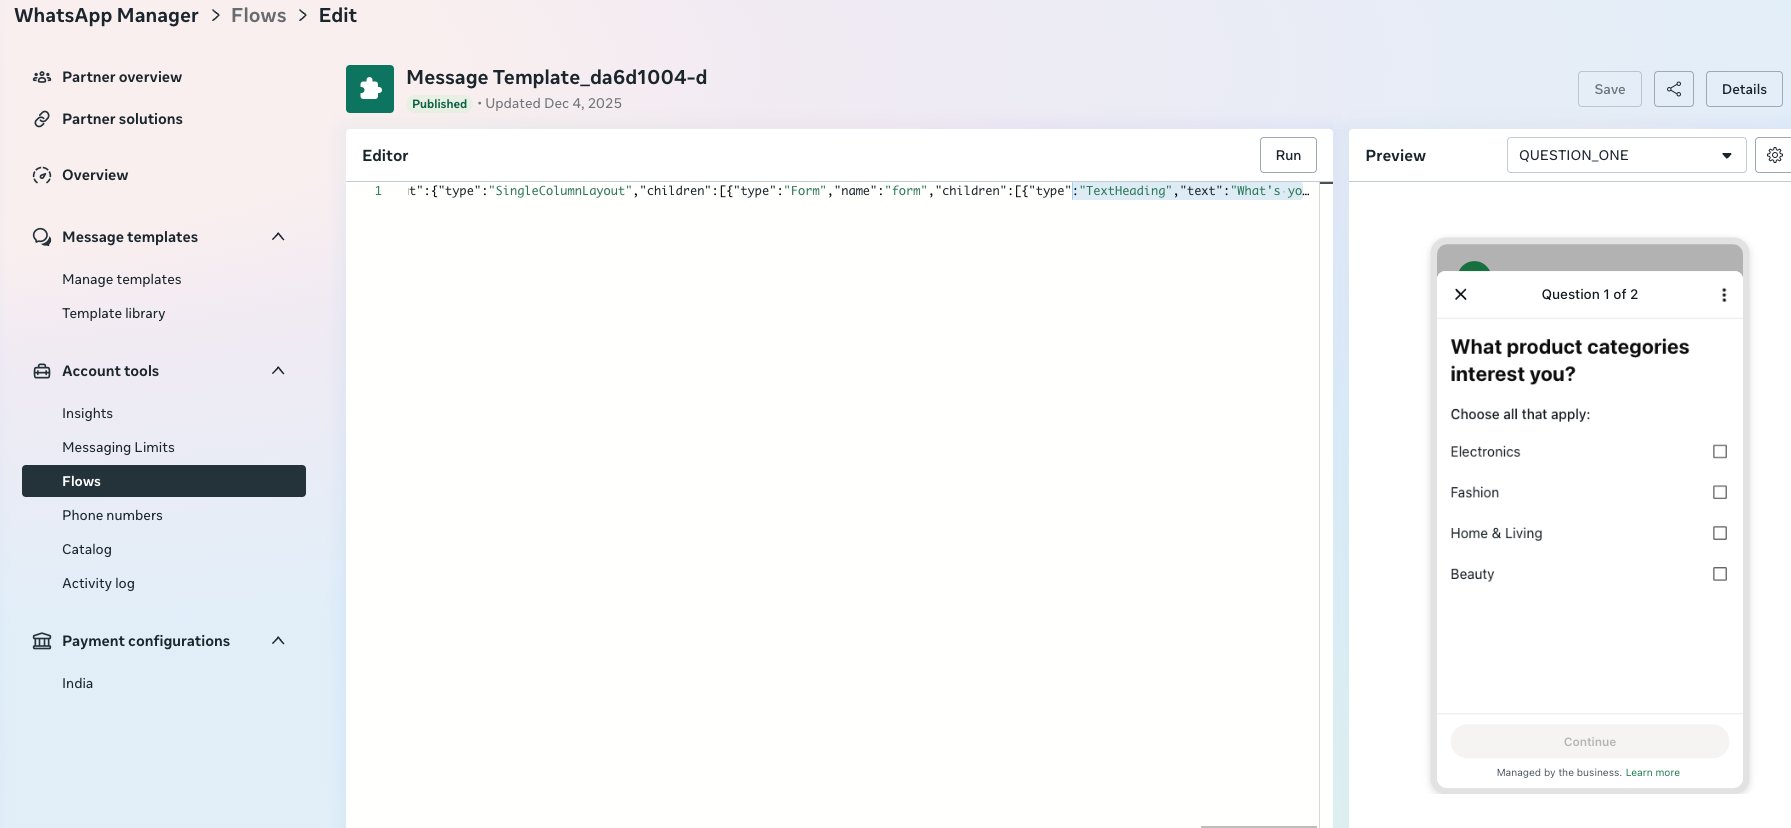
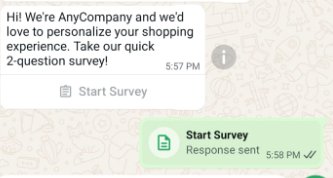
WhatsApp Flow – survey
This is an example of a WhatsApp Flow without an endpoint that sends a product survey to customers. Since this flow doesn’t use an endpoint, the results can be viewed directly within WhatsApp Manager.
Create WhatsApp Flow using Flow Playground
First create a WhatsApp Flow using the Flows Playground on the Meta for Developers website.
You can use the following JSON in the editor to use the example flow that we’re creating.
Afterwards you will be prompted to create the template to attach to the flow.
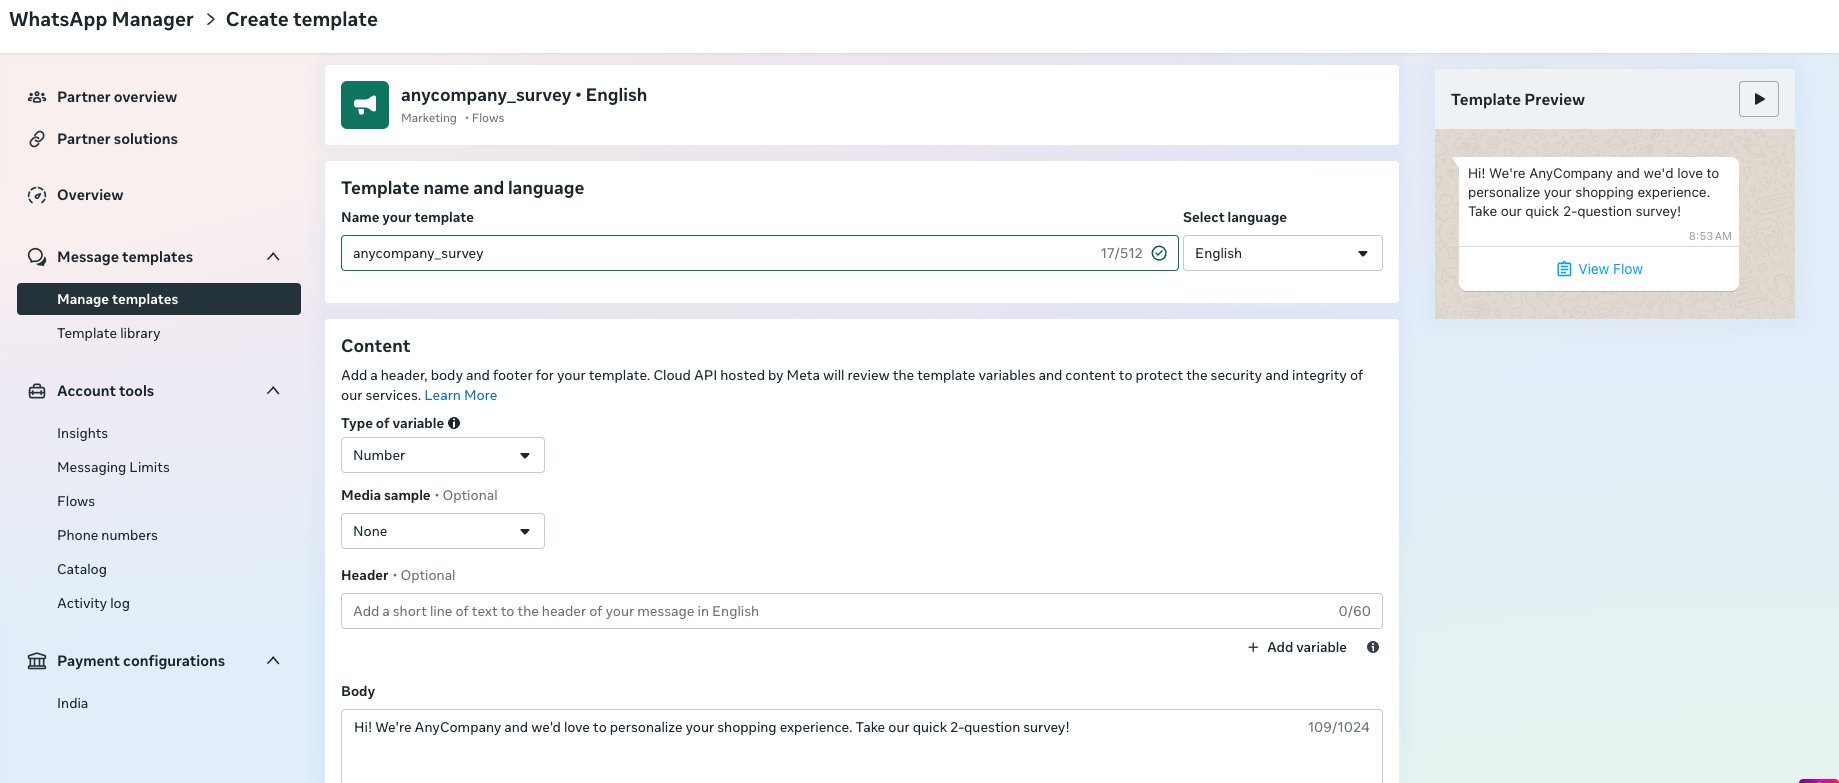
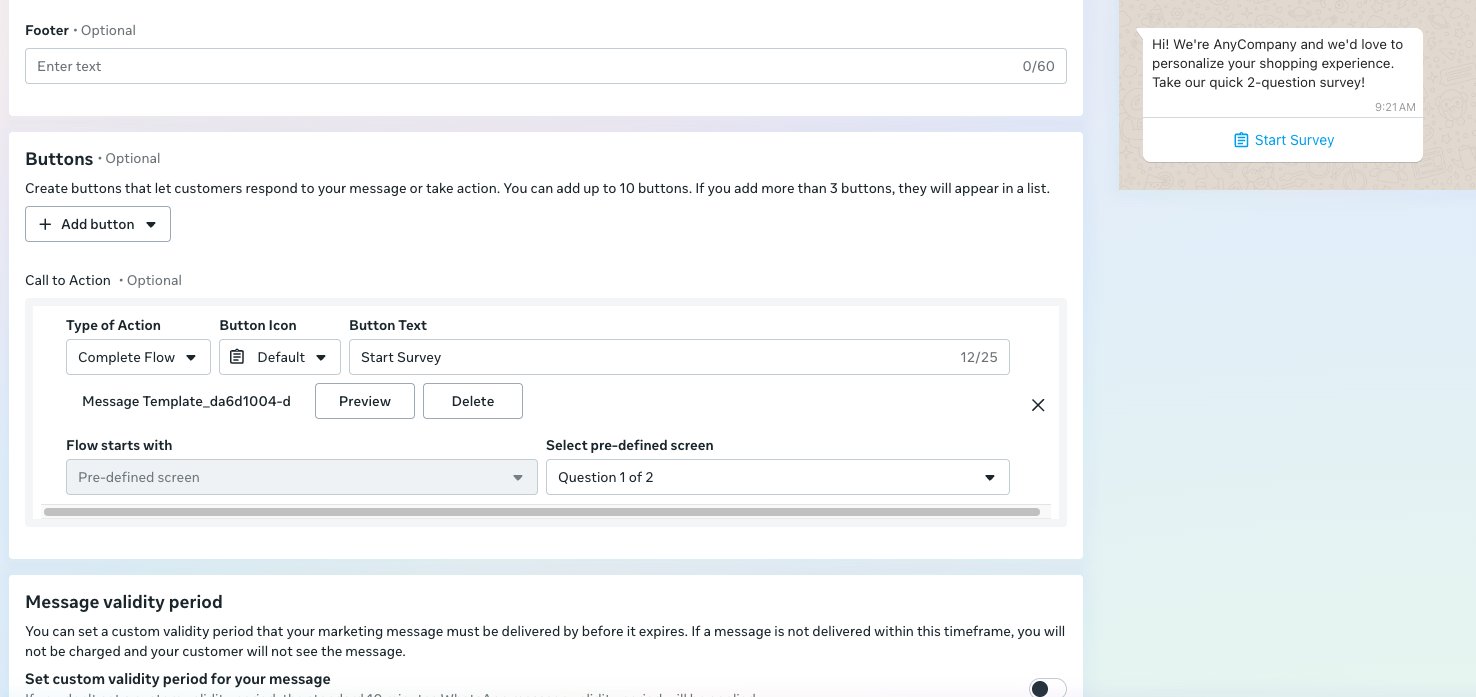
Create WhatsApp template using AWS CLI
Step 1 — Create a file named anycompany_survey_template.json in your working directory with the following template definition. Notice that the Flow JSON is embedded directly in the flow_json field of the button component:
Step 2 — Run the following CLI command to create the template. The –template-definition parameter references the JSON file that you previously created:
Sending the WhatsApp Flow
After the Template and Flow are approved, a message can be sent with the following code.
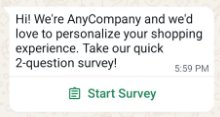
WhatsApp Flow survey example
The Flow will appear with the message body specified and a link to start the survey.
The recipient can provide their answers on each page of the Flow which can be submitted at the end.
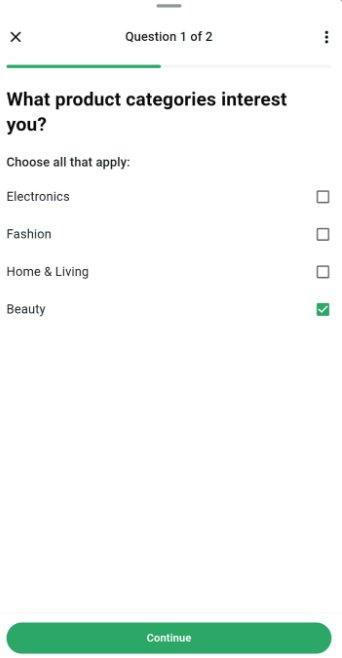
After providing inputs, the Flow will show a completed message.
Clean up
To avoid incurring future charges, delete the resources that you created during this walkthrough:
- In the AWS End User Messaging Social console, disassociate (unlink) the WhatsApp Business Account.
- Navigate to Message Templates and delete any test templates that you created.
- Delete any WhatsApp Flows you created in the Flow Playground on the Meta for Developers website.
- Review your Amazon CloudWatch Logs for any log groups created by the service and delete them if no longer needed.
- Optionally, if you provisioned a phone number in End User Messaging SMS just for WhatsApp release the phone number in End User Messaging SMS.
For templates created in WhatsApp Manager, you can also delete them directly from the WhatsApp Business Manager interface on the Meta for Developers website.
Conclusion
In this post, you learned how to send various WhatsApp Business message types using AWS End User Messaging Social, including text messages, media messages, template messages, location messages, interactive messages, contact messages, and WhatsApp Flows.
AWS End User Messaging Social provides a managed API that removes the complexity of maintaining your own WhatsApp Business API integration, so you can focus on building engaging customer experiences. The service handles the heavy lifting of managing WhatsApp Business API connections, template approvals, and message delivery, while providing you with a unified, consistent API interface.
Next steps
- Explore advanced template features with dynamic content and media headers
- Implement webhook handlers for incoming messages and delivery receipts
- Set up automated message flows for common customer inquiries using Amazon EventBridge
- Integrate with Amazon Connect for omnichannel customer support experiences
We’d love to hear about your experience! Share your use cases and implementation approaches in the comments.
Additional resources
- AWS End User Messaging Social Documentation
- AWS End User Messaging Social API Reference
- AWS End User Messaging Social User Guide
- WhatsApp Business Platform API Documentation on the Meta for Developers website
- WhatsApp Flows Documentation on the Meta for Developers website
- AWS End User Messaging Social Console