Post Syndicated from Aarthi Srinivasan original https://aws.amazon.com/blogs/big-data/create-aws-glue-data-catalog-views-using-cross-account-definer-roles/
With AWS Glue Data Catalog views you can create a SQL view in the Data Catalog that references one or more base tables. These multi-dialect views support various SQL query engines, providing consistent access across multiple Amazon Web Services (AWS) services including Amazon Athena, Amazon Redshift Spectrum, and Apache Spark in both Amazon EMR and AWS Glue 5.0.
You can now create Data Catalog views using a cross-account AWS Identity and Access Management (IAM) definer role. A definer role is an IAM role used to create the Data Catalog view and has SELECT permissions on all columns of the underlying base tables. This definer role is assumed by AWS Glue and AWS Lake Formation service principals to vend credentials to the base tables’ data whenever the view is queried. The definer role allows the Data Catalog view to be shared to principals or AWS accounts so that you can share a filtered subset of data without sharing the base tables.
Previously, Data Catalog views required a definer role within the same AWS account as the base tables. The introduction of cross-account definer roles enables Data Catalog view creation in enterprise data mesh architectures. In this setup, database and table metadata is centralized in a governance account, and individual data owner accounts maintain control over table creation and management through their IAM roles. Data owner accounts can now create and manage Data Catalog views in the central governance accounts using their existing continuous integration and continuous delivery (CI/CD) pipeline roles.
In this post, we show you a cross-account scenario involving two AWS accounts: a central governance account containing the tables and hosting the views and a data owner (producer) account with the IAM role used to create and manage views. We provide implementation details for both SPARK dialect using AWS SDK code samples and ATHENA dialect using SQL commands. Using this approach, you can implement sophisticated data governance models at enterprise scale while maintaining operational efficiency across your AWS environment.
Key benefits
Key benefits for cross-account definer roles are as follows:
- Enhanced data mesh support – Enterprises with multi-account data lakehouse architectures can now maintain their existing operational model where data owner accounts manage table creation and updates using their established IAM roles. These same roles can now create and manage Data Catalog views across account boundaries.
- Strengthened security controls – By keeping table and view management within data owner account roles:
- Security posture is enhanced through proper separation of duties.
- Audit trails become more comprehensive and meaningful.
- Access controls follow the principle of least privilege.
- Elimination of data duplication – Data owner accounts can create views in central accounts that:
- Provide access to specific data subsets without duplicating tables.
- Reduce storage costs and management overhead.
- Maintain a single source of truth while enabling targeted data sharing.
Solution overview
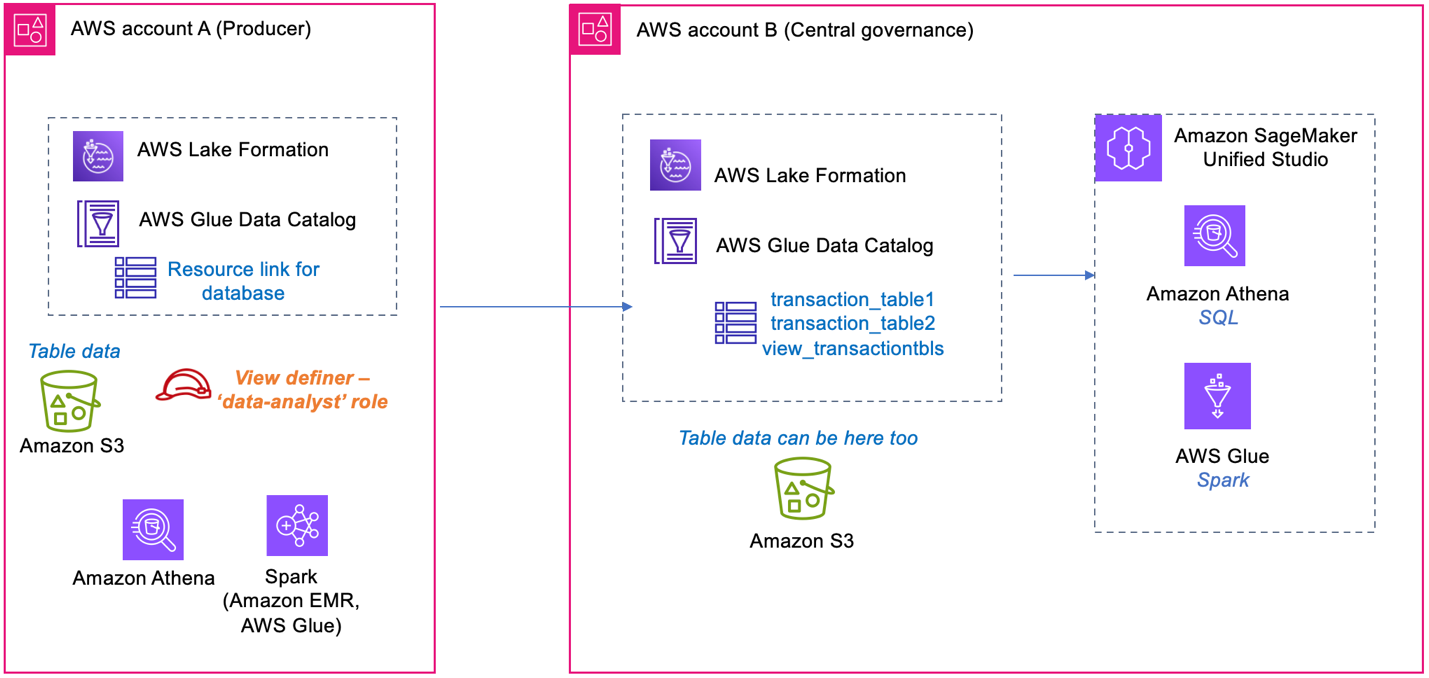
An example customer has a database with two transaction tables in their central account, where the catalog and permissions are maintained. With the database shared to the data owner (producer) account, we create a Data Catalog view in the central account on these two tables, using the producer’s definer role. The view from the central account can be shared to additional consumer accounts and queried. We illustrate creating the SPARK dialect using create-table CLI, and add the ATHENA dialect for the same view from the Athena console. We also provide the AWS SDK sample code for CreateTable() and UpdateTable(), with view definition and a sample pySpark script to read and verify the view in AWS Glue.
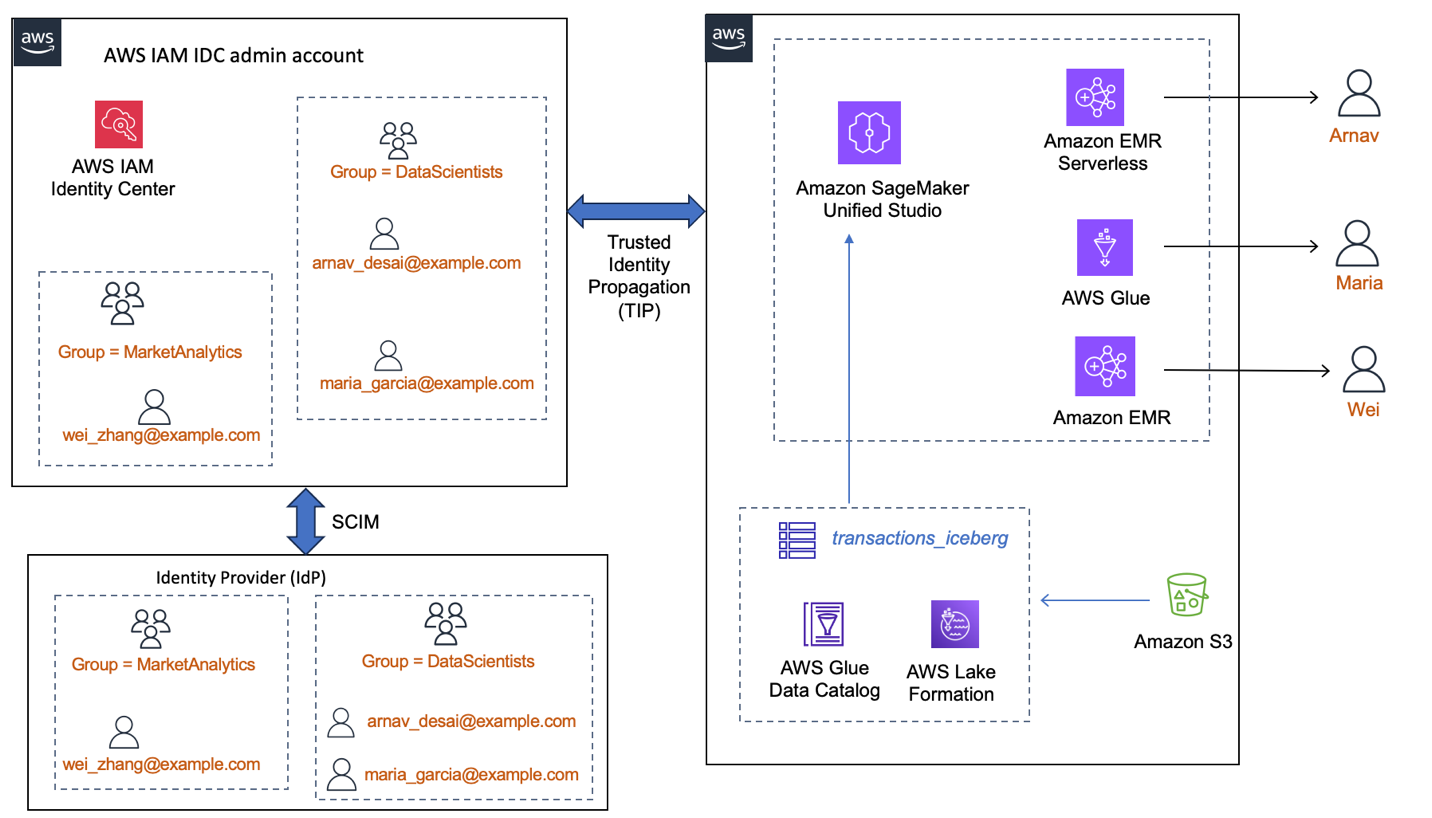
The following diagram shows the table, view, and definer IAM role placements between a central governance account and data producer account.
Prerequisites
To perform this solution, you need to have the following prerequisites:
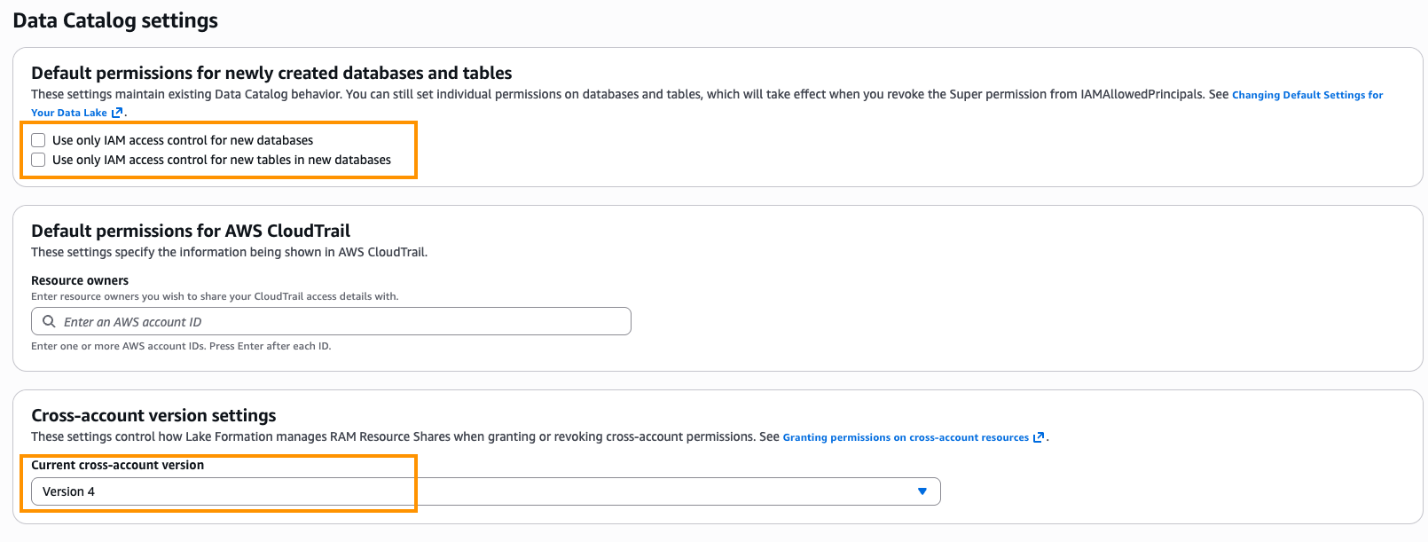
- Two AWS accounts with AWS Lake Formation set up. For details, refer to Set up AWS Lake Formation. The Lake Formation setup includes registering your IAM admin role as Lake Formation administrator. In the Data Catalog settings, shown in the following screenshot, Default permissions for newly created databases and tables is set to use Lake Formation permissions only. Cross-account version settings is set to Version 4.
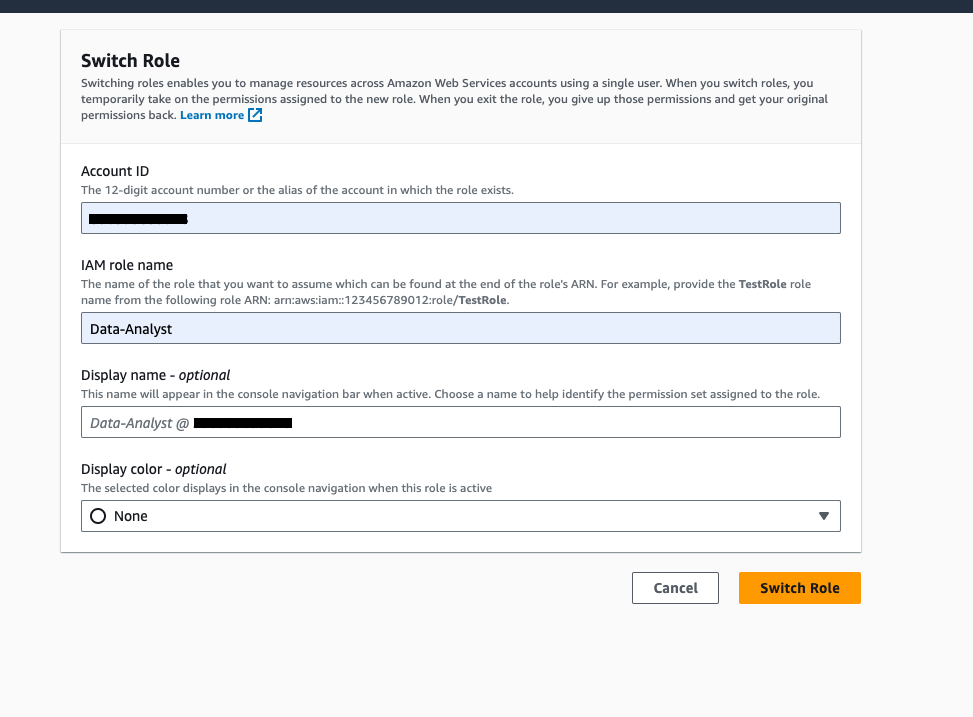
- Create an IAM role
Data-Analystin the producer account. For the IAM permissions on this role, refer to Data analyst permissions. This role will also be used as the view definer role. Add the permissions to this definer role from the Prerequisites for creating views.
Create database and tables in the central account
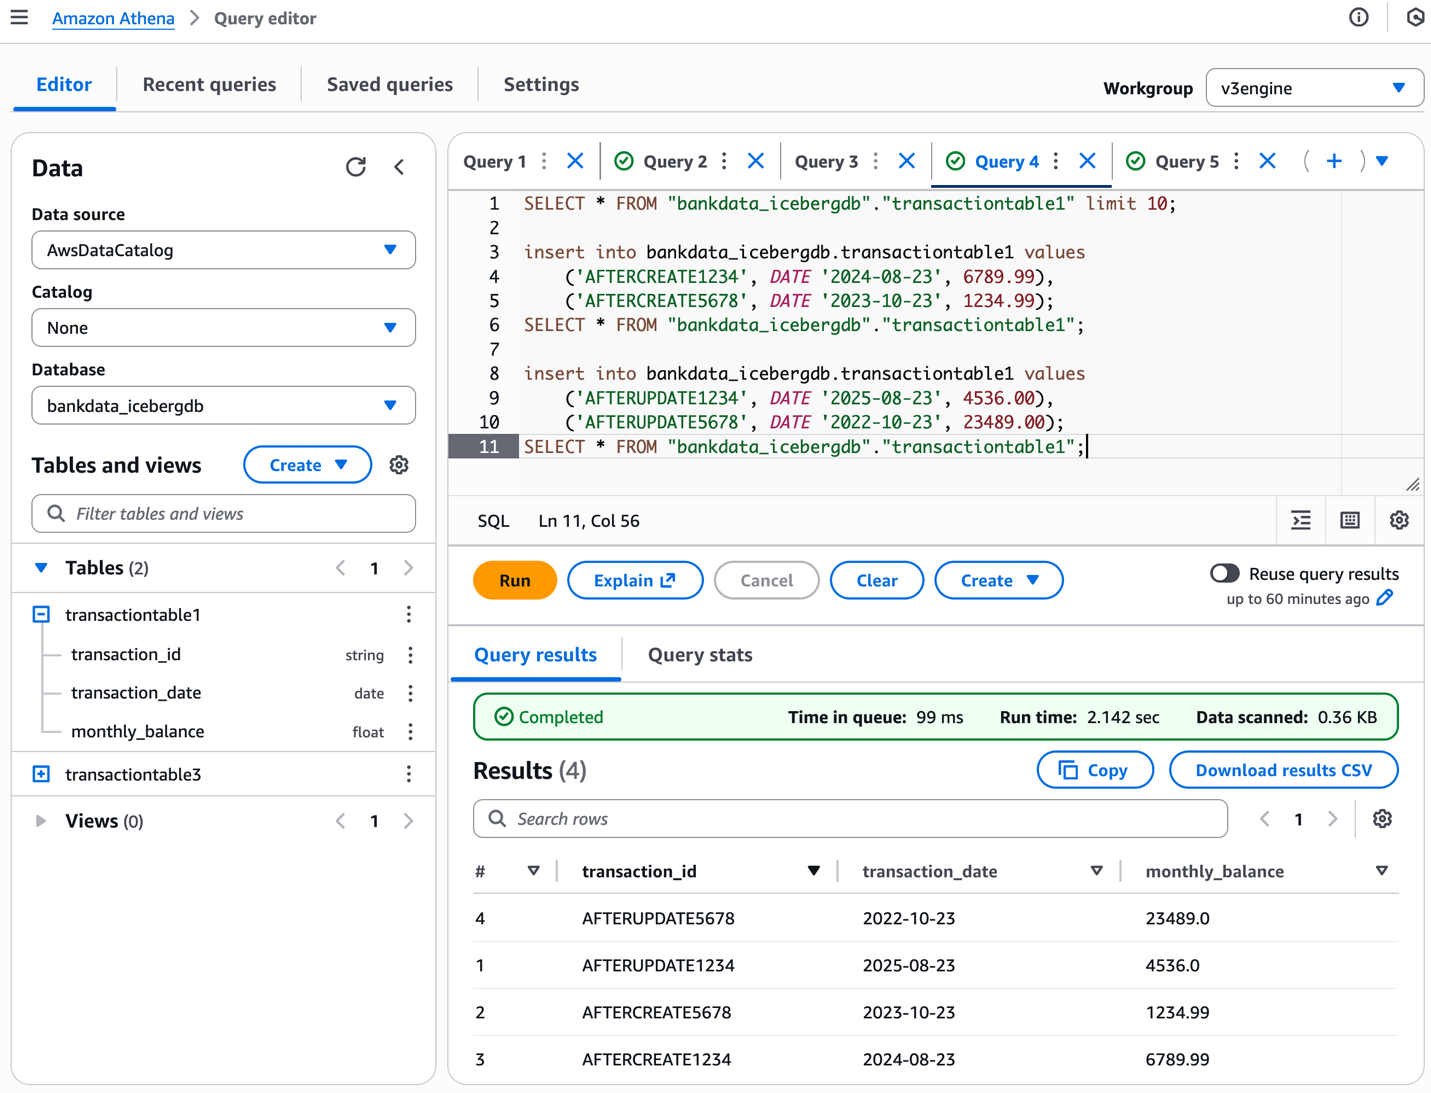
In this step, you create two tables in the central governance account and populate them with few rows of data:
- Sign in to the central account as admin user. Open the Athena console and set up the Athena query results bucket.
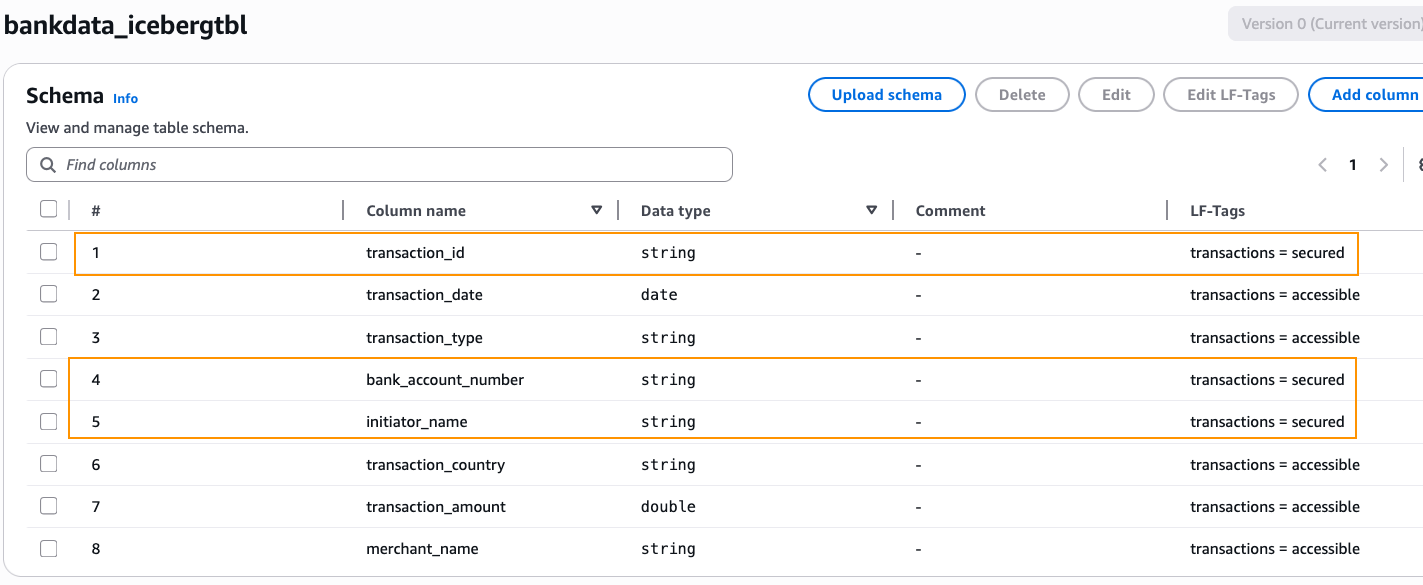
- Run the following queries to create two sample Iceberg tables, representing bank customer transactions data:
- Verify the created tables in Athena query editor by running a preview.
Share the database and tables from central to producer account
In the central governance account, you share the database and the two tables to the producer account and the Data-Analyst role in producer.
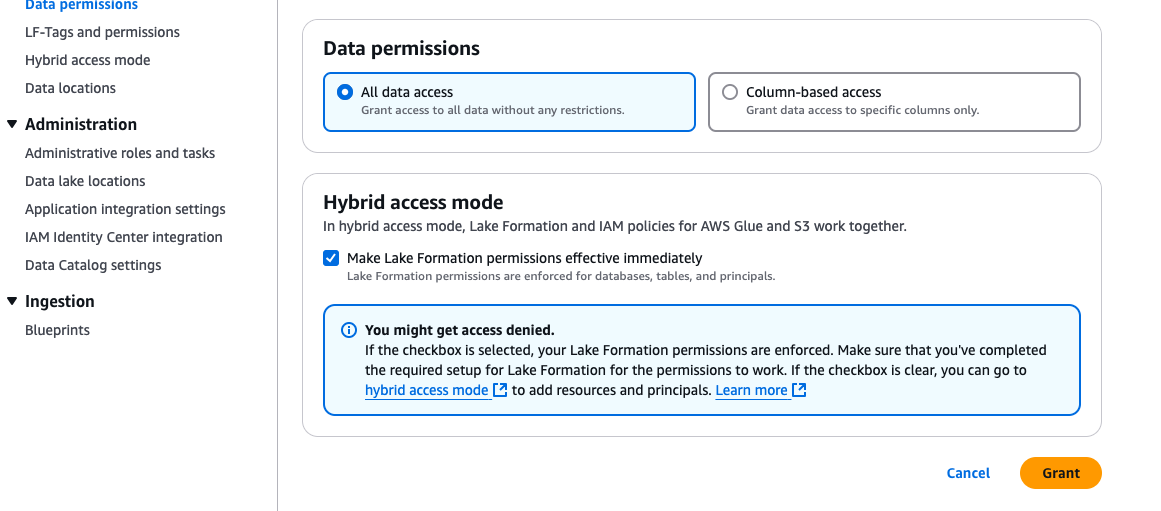
- Sign in to the Lake Formation console as the Lake Formation admin role.
- In the navigation pane, choose Data permissions.
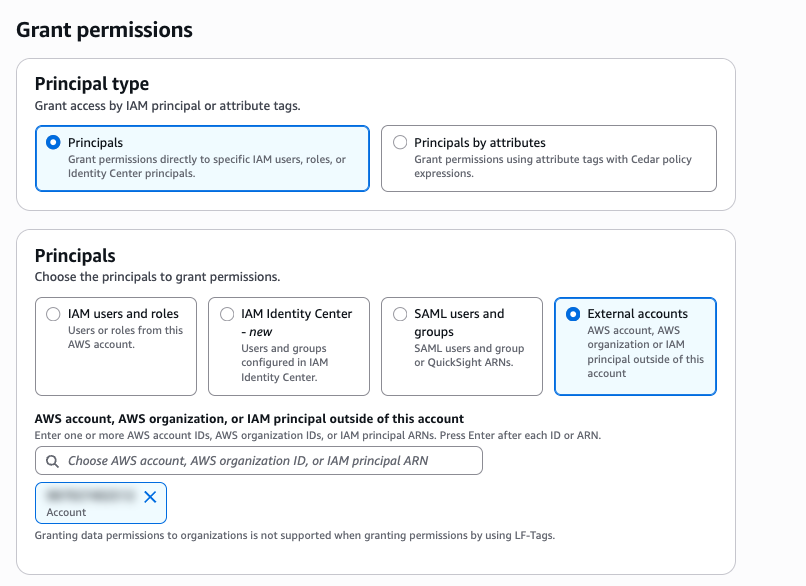
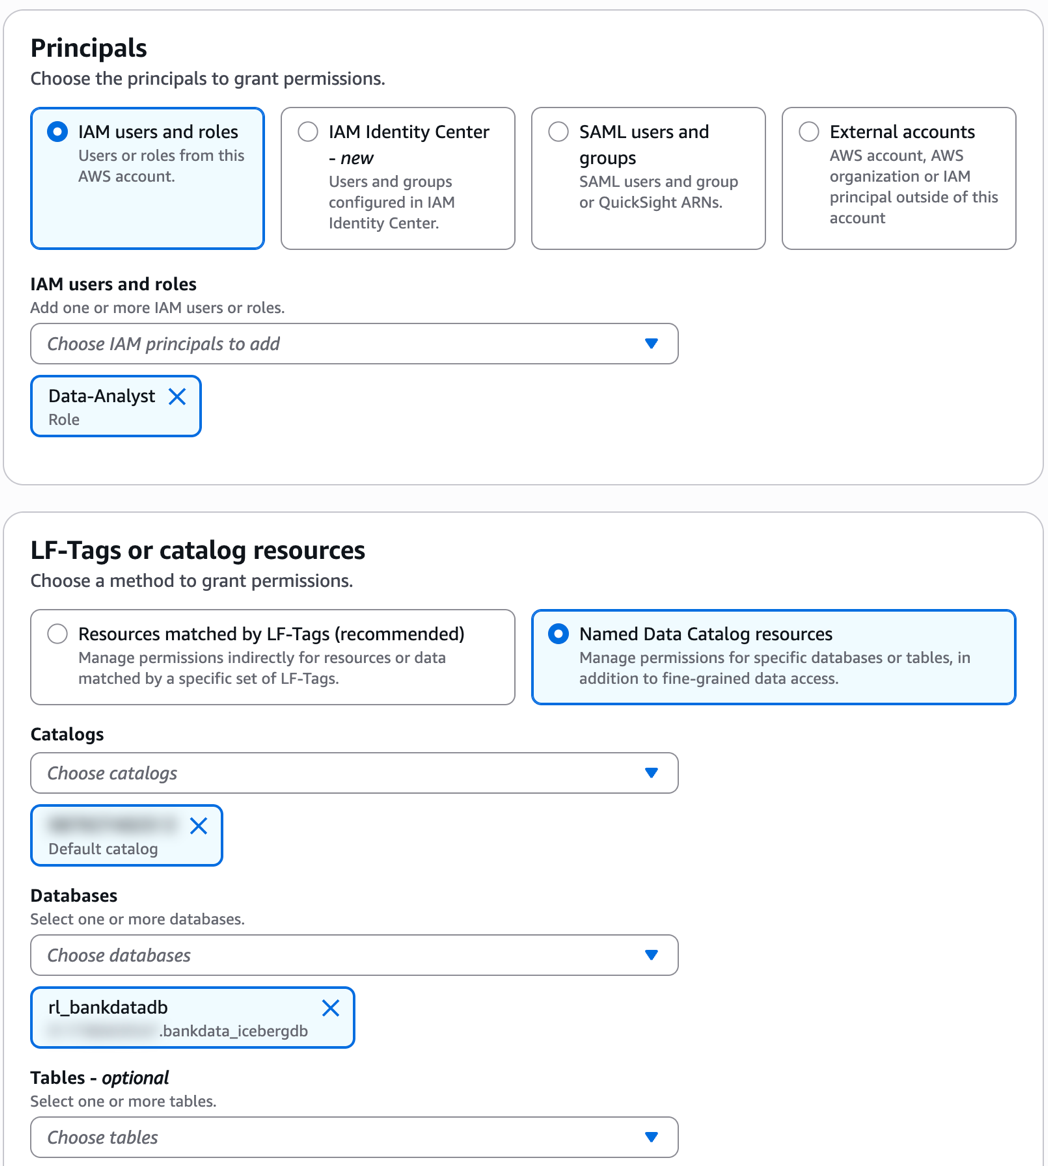
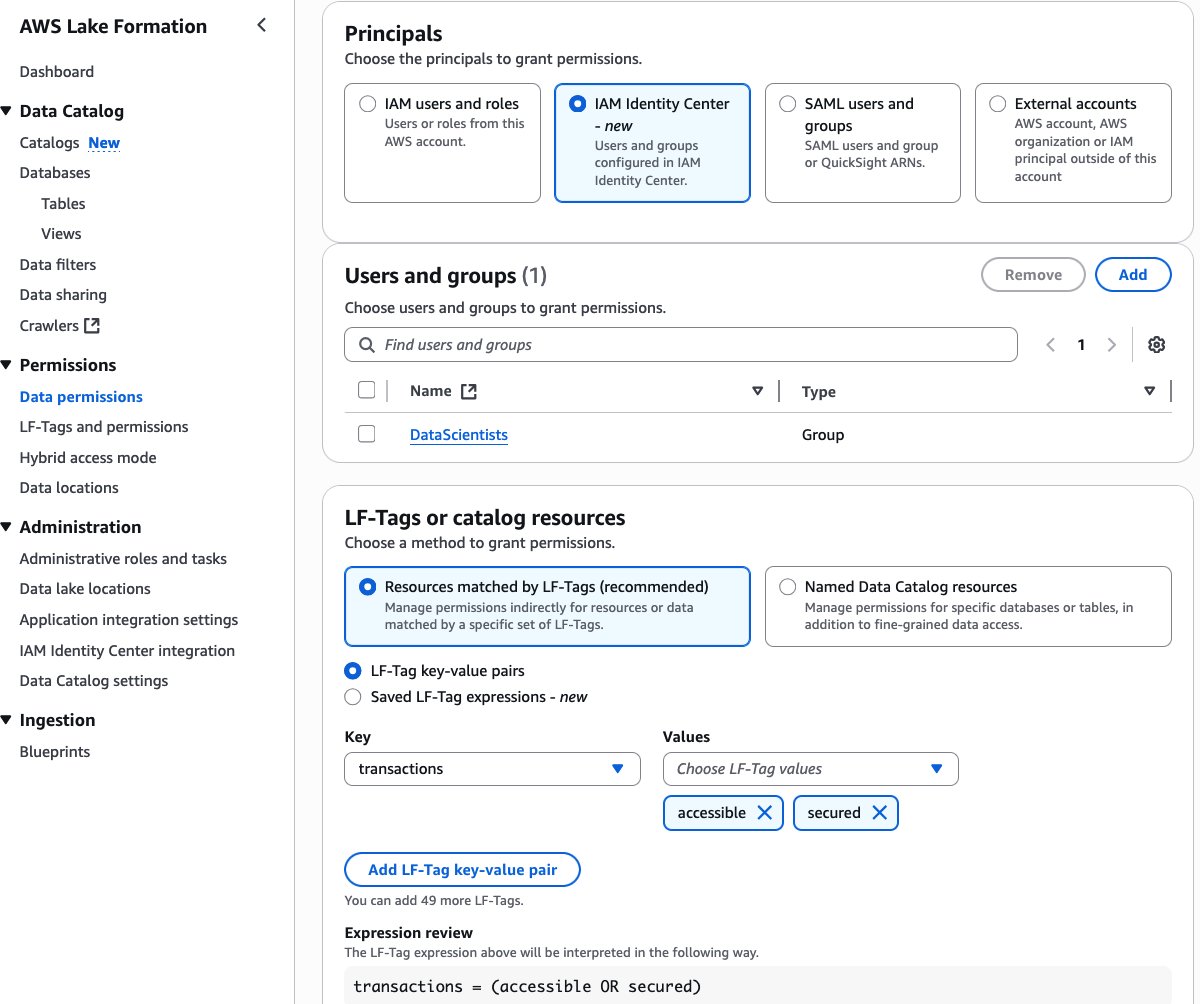
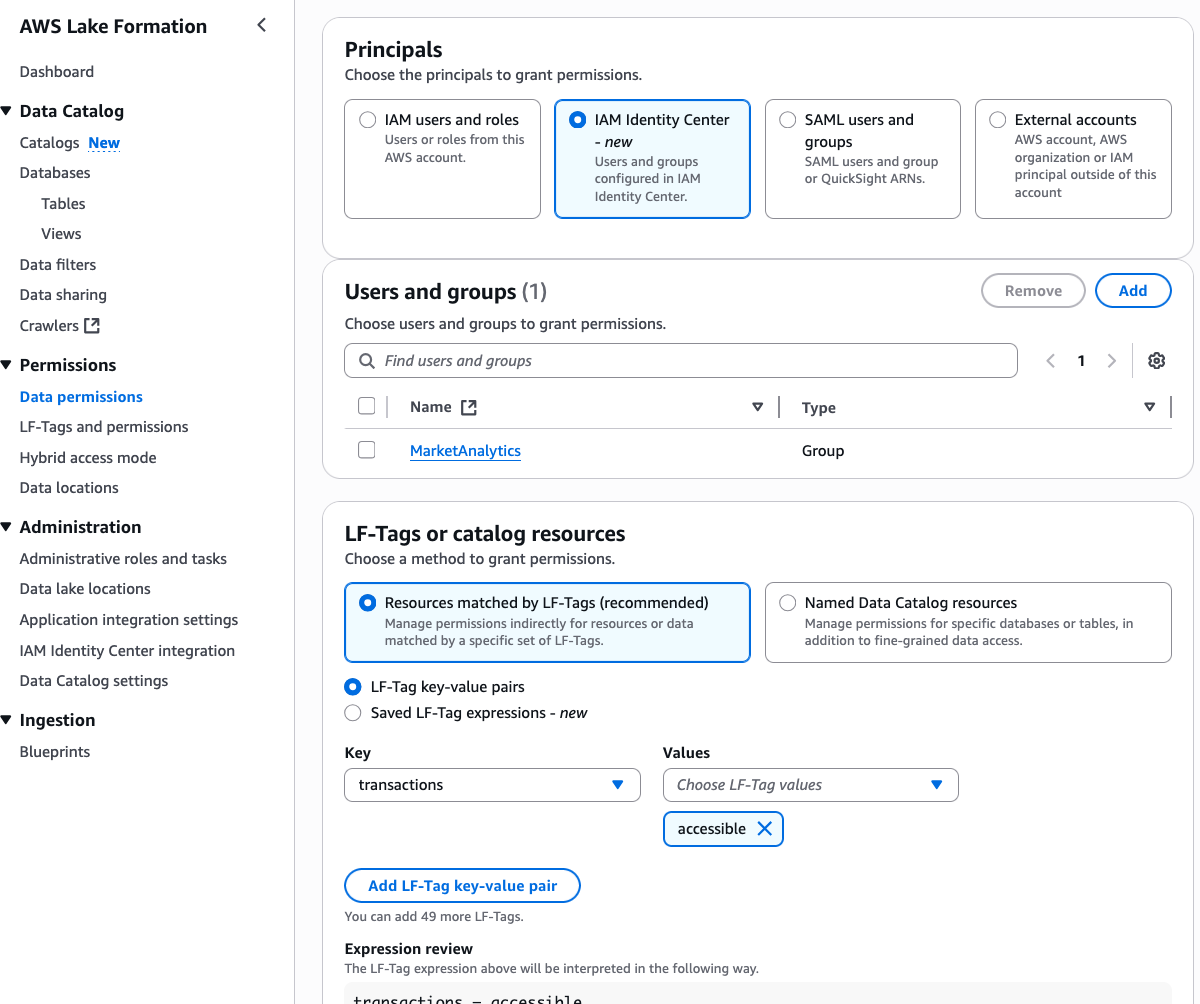
- Choose Grant and provide the following information:
- For Principals, select External accounts and enter the producer account ID, as shown in the following screenshot.

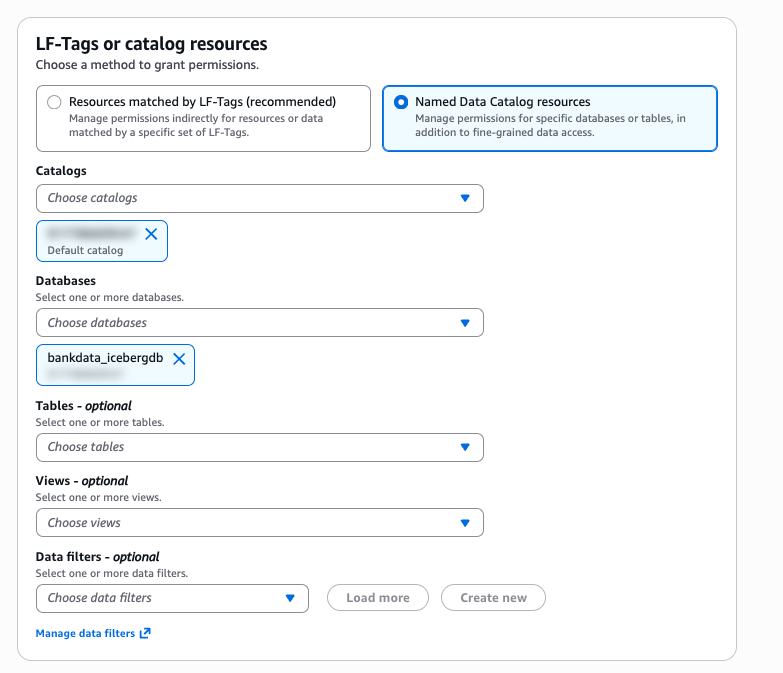
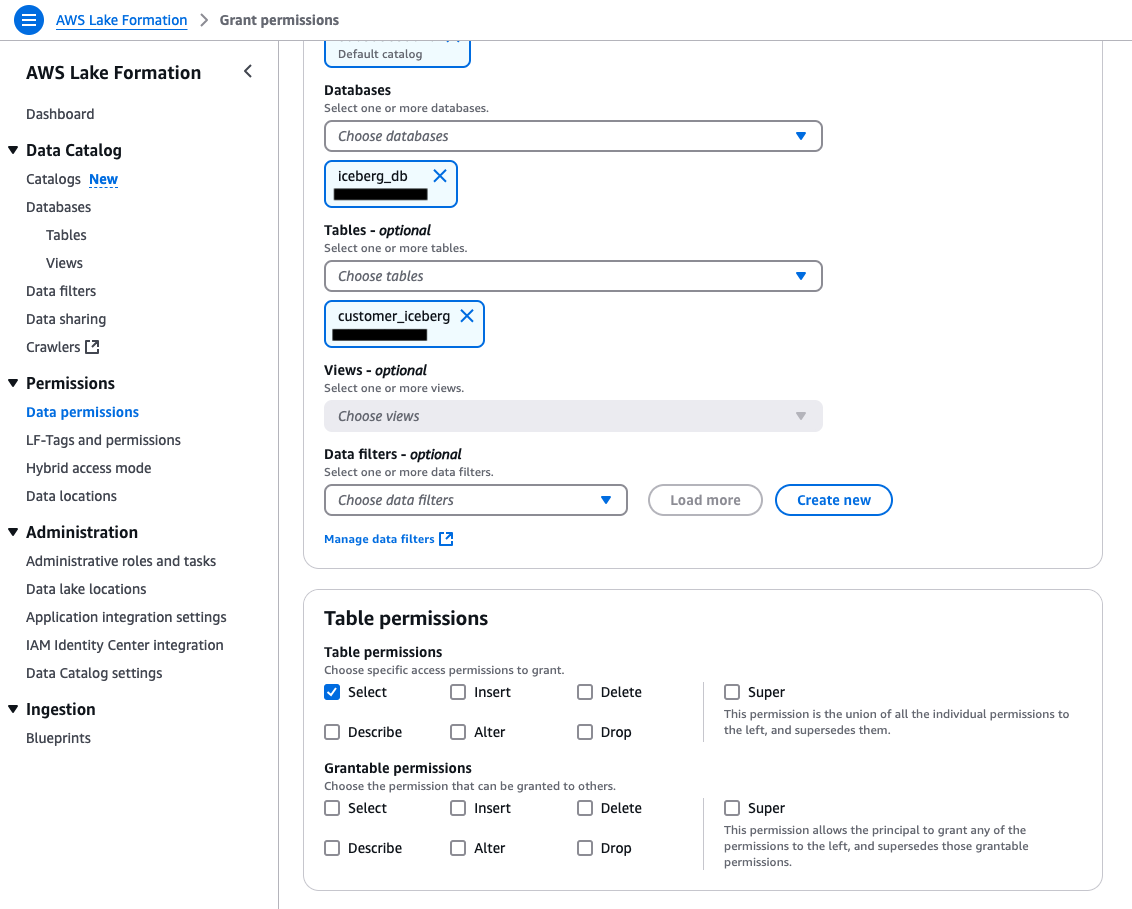
- For Named Data Catalog Resources, select the default catalog and database
bankdata_icebergdb, as shown in the following screenshot.

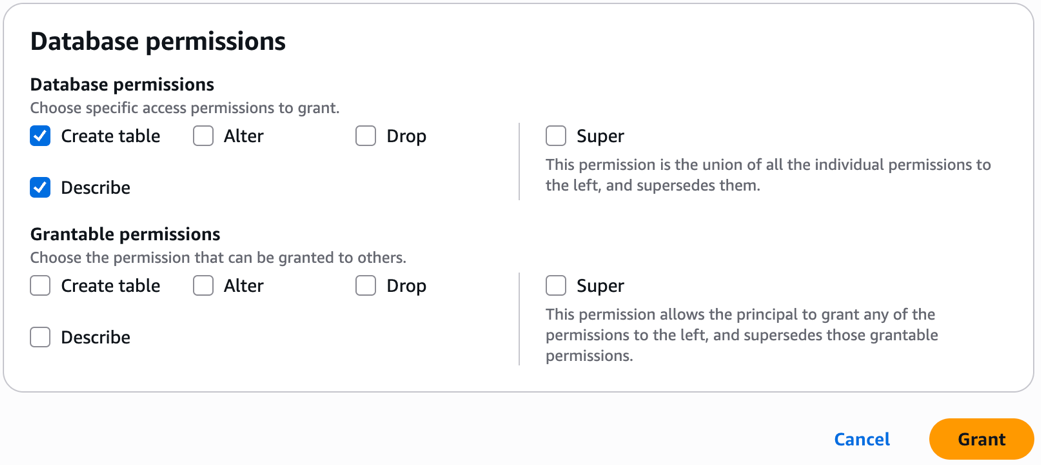
- Under Database permissions, select Describe. For Grantable permissions, select Describe.

- Choose Grant.
- Repeat the preceding steps to grant access to the producer account definer role
Data-Analyston the databasebankdata_icebergdband the two tablestransaction_table1andtransaction_table2as follows. - Under Database permissions, grant Create table and Describe permissions.

- Under Table permissions, grant Select and Describe on all columns.

- For Principals, select External accounts and enter the producer account ID, as shown in the following screenshot.


With these steps, the central governance account data admin steward has shared the database and tables to the producer account definer role.
Steps for producer account
Follow these steps for the producer account:
- Sign in to the Lake Formation console on the producer account as the Lake Formation administrator.
- In the left navigation pane, choose Databases. A blue banner will appear on the console, showing pending invitations from AWS Resource Access Manager (AWS RAM).
- Open the AWS RAM console and review the AWS RAM shares under Shared with me. You will see the AWS RAM shares in pending state. Select the pending AWS RAM share from central account and choose Accept resource share. After the resource share request is accepted, the shared database shows up in the producer account.
- On the Lake Formation console, select the database. On the Create dropdown list, choose Resource link. Provide a name
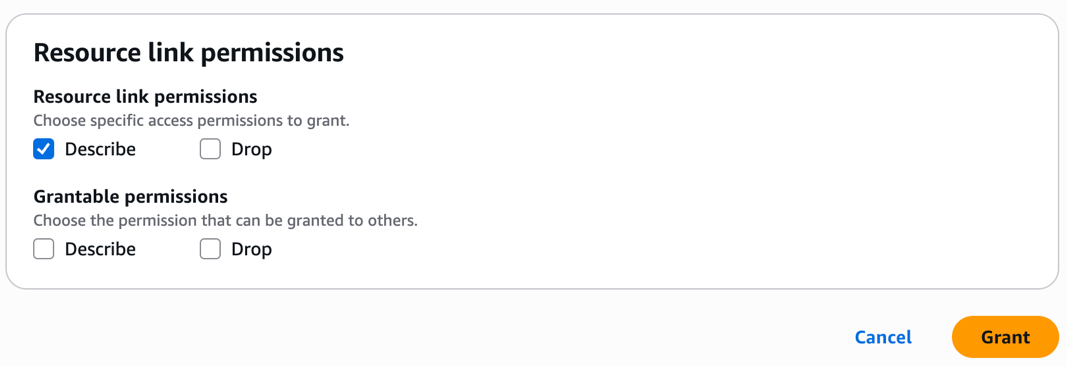
rl_bank_icebergand choose Create. - Let’s grant Describe permission on the resource link to the
Data-Analystrole in the producer account in the following steps.- In the left navigation pane, choose Data permissions. Choose the
Data-Analystrole. Select the resource linkrl_bank_icebergfor the database as shown in the following screenshot.

- Grant Describe permission on the resource link.

- In the left navigation pane, choose Data permissions. Choose the
Note: Cross-account Data Catalog views can’t be created using a resource link, although a resource link is needed for the SDK use of SPARK dialect.
Next, add the central account Data Catalog as a Data Source in Athena from producer account:
- Open the Athena console.
- On the left navigation pane, choose Data sources and catalogs. Choose Create data source.
- Select S3-AWS Glue Data Catalog.
- Choose AWS – Glue Data Catalog in another account and name the data source as
centraladmin. - Choose Next and then create data source.
After the data source is created, navigate to the Query editor and verify the Data source centraladmin appears, as shown in the following screenshot.
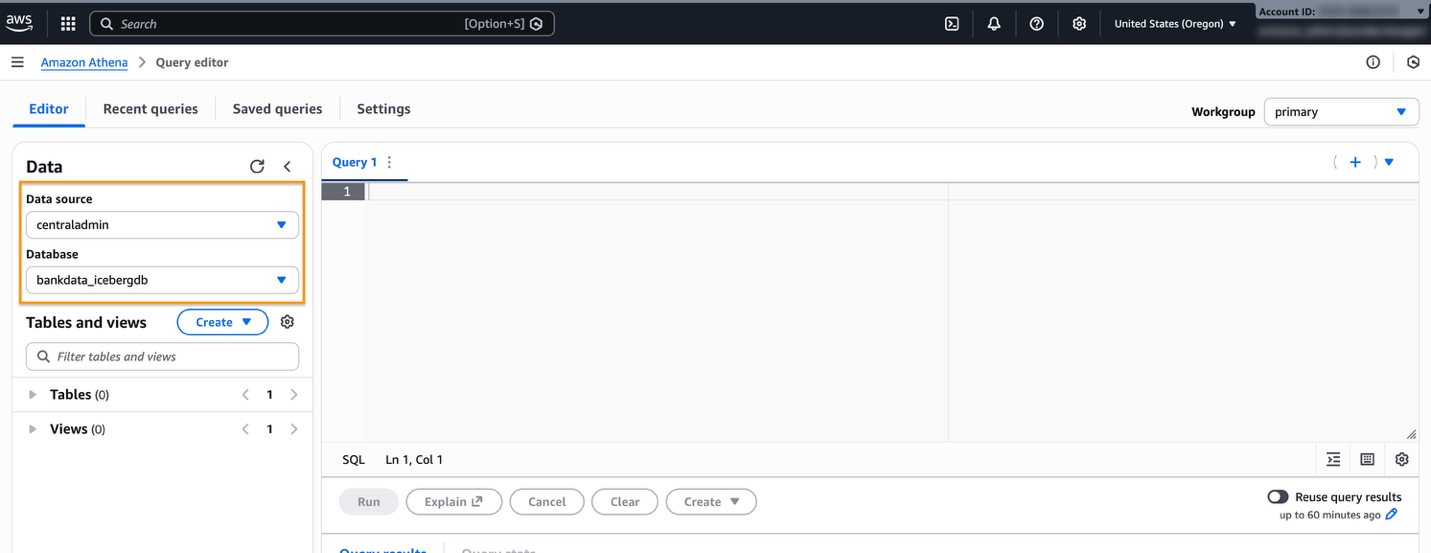
The definer role can also now access and query the central catalog database.
Create SPARK dialect view
In this step, you create a view with SPARK dialect, using AWS Glue CLI command create-table:
- Sign in to the AWS console in the producer account as
Data-Analystrole. Enter the following command in your CLI environment, such as AWS CloudShell, to create a SPARK DIALECT:
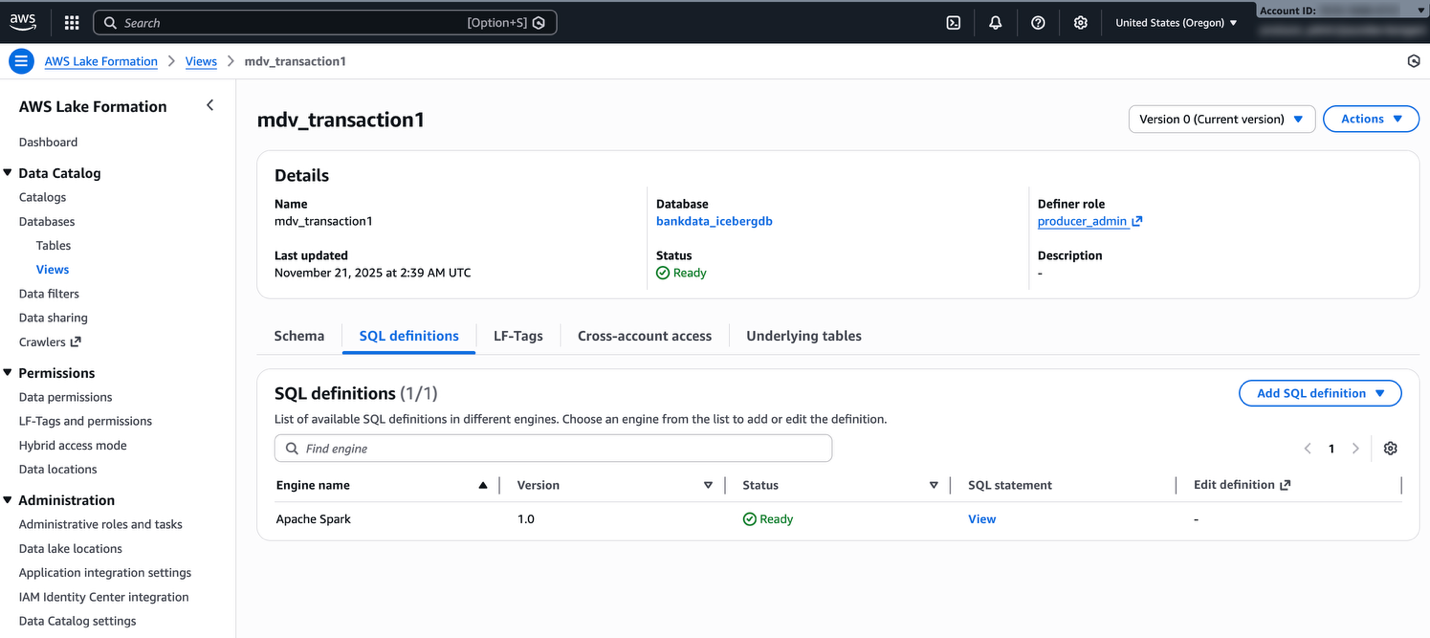
- Open the Lake Formation console and verify if the view is created. Verify the dialect of the view on the SQL definitions tab for the view details.
Add ATHENA dialect
To add ATHENA dialect, follow these steps:
- On the Athena console, select
centraladminfrom the Data source. - Enter the following SQL script to create the ATHENA dialect for the same view:
We can’t use the resource link rl_bank_iceberg in the Athena query editor to create or alter a view in the central account.
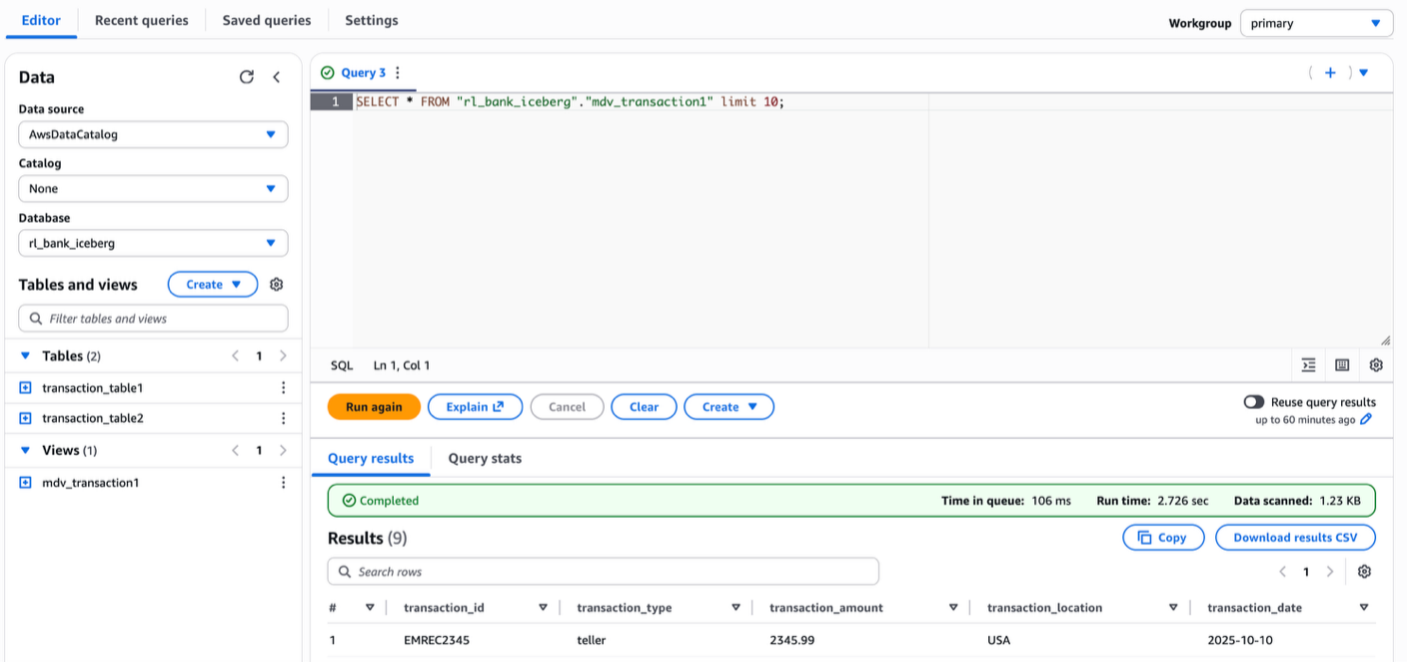
- Verify the added dialect by running a preview in Athena. For running the query, you can use either the resource link
rl_bank_icebergfrom the producer account catalog or use thecentraladmincatalog.
The following screenshot shows querying using the resource link of the database in the producer account catalog.
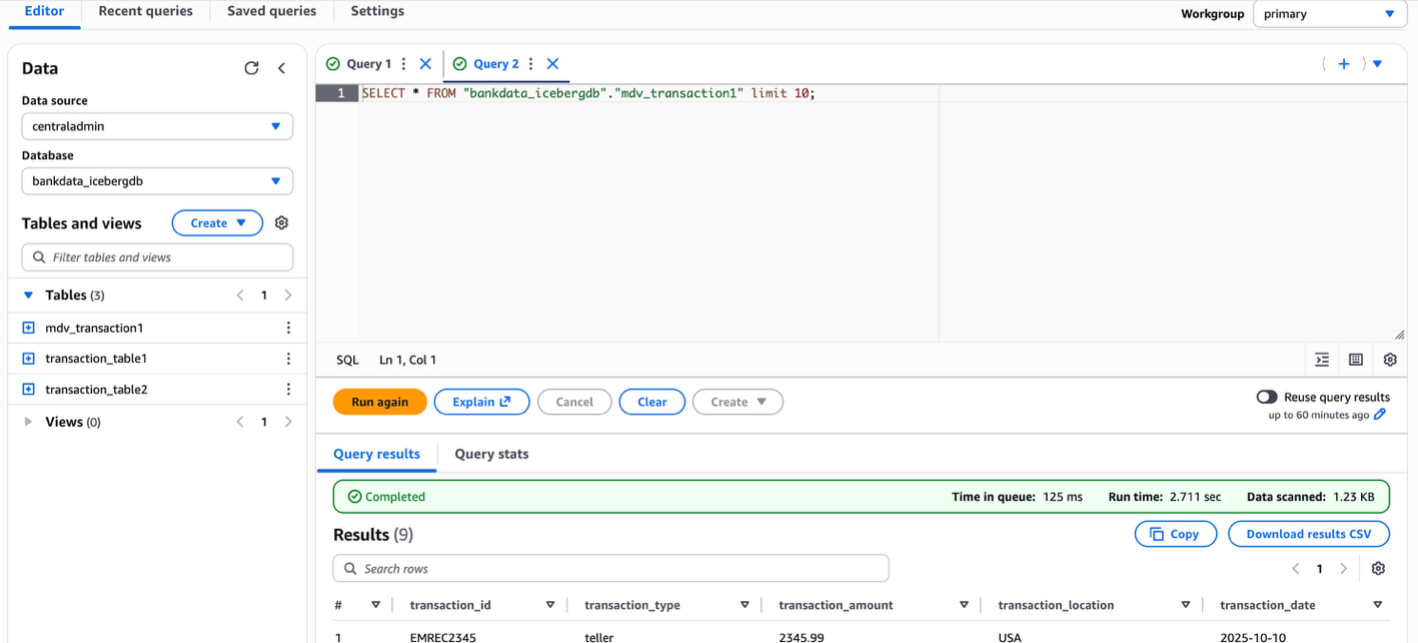
The following screenshot shows querying the view from the producer using the connected catalog centraladmin as the data source.
- Verify the dialects on the view by inspecting the table in the Lake Formation console.
You can now query the view as the Data-Analyst role in the producer account, using both Athena and Spark. The view will also show in the central account as shown in the following code example, with access to the Lake Formation admin.
You can also create the view with ATHENA dialect and add the SPARK dialect. The SQL syntax to create the view in ATHENA dialect is shown in the following example:
The update-table CLI to add the corresponding SPARK dialect is shown in the following example:
The following is a sample Python script to create a SPARK dialect view: glueview-createtable.py.
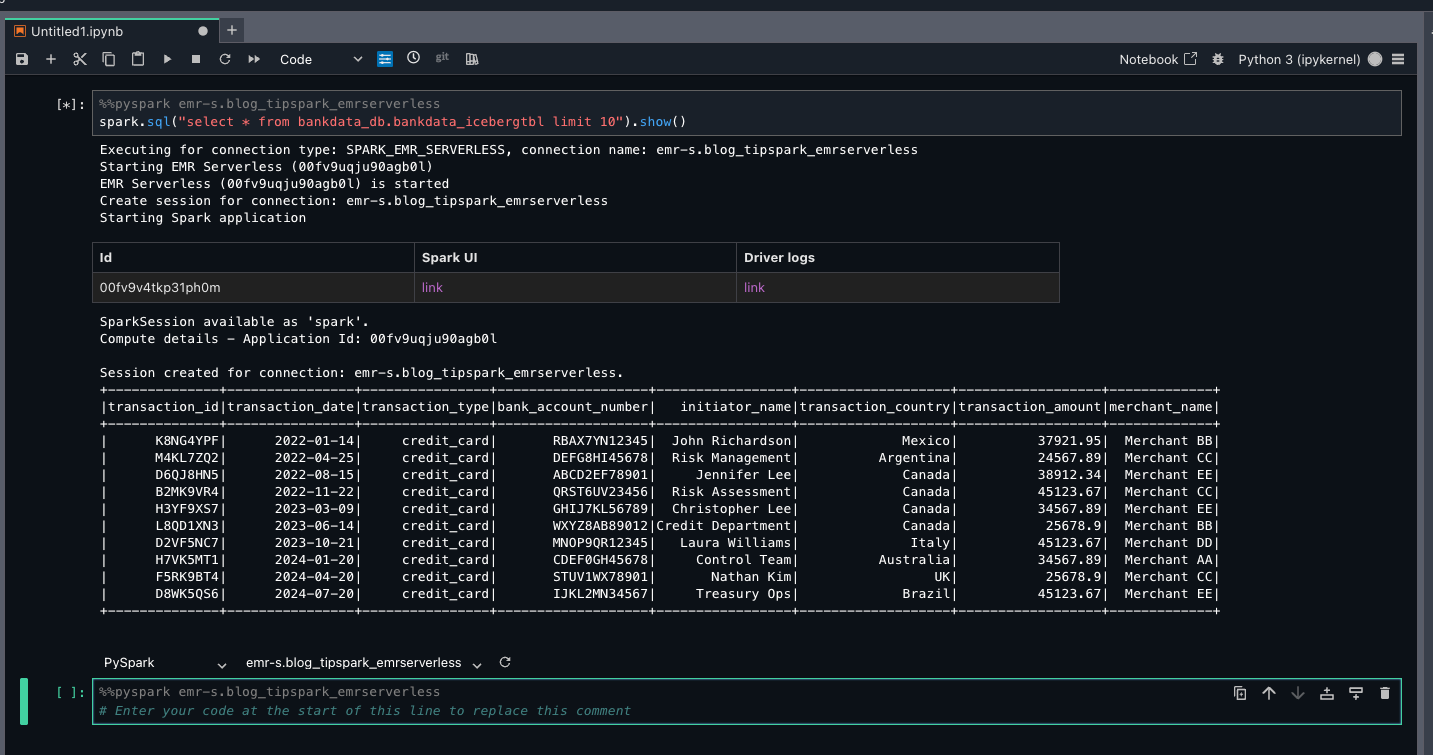
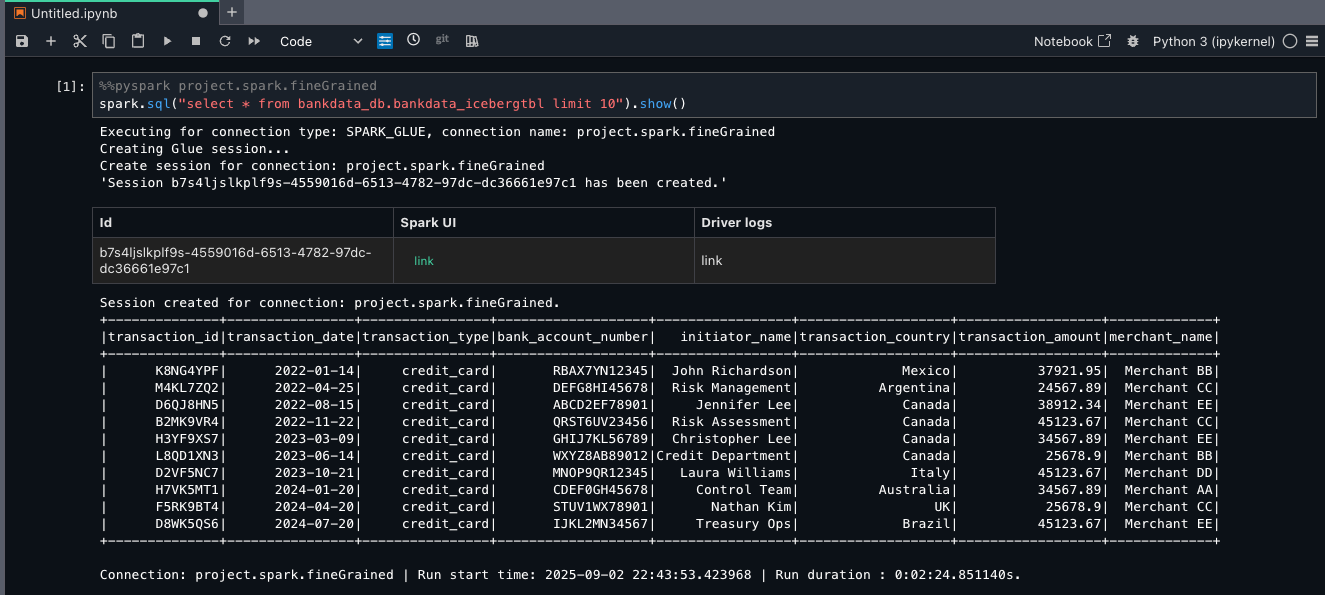
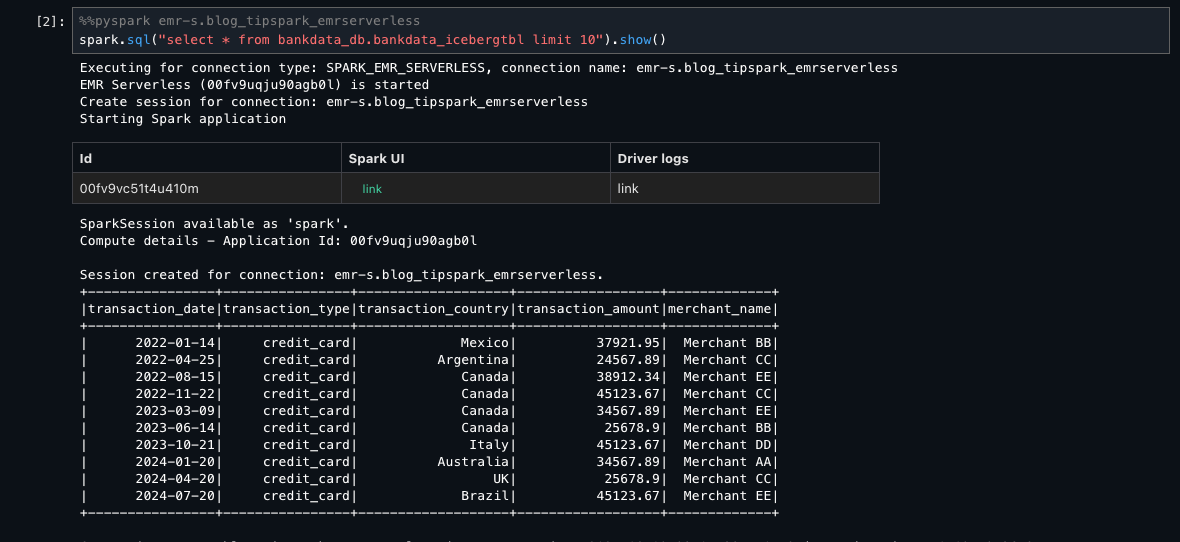
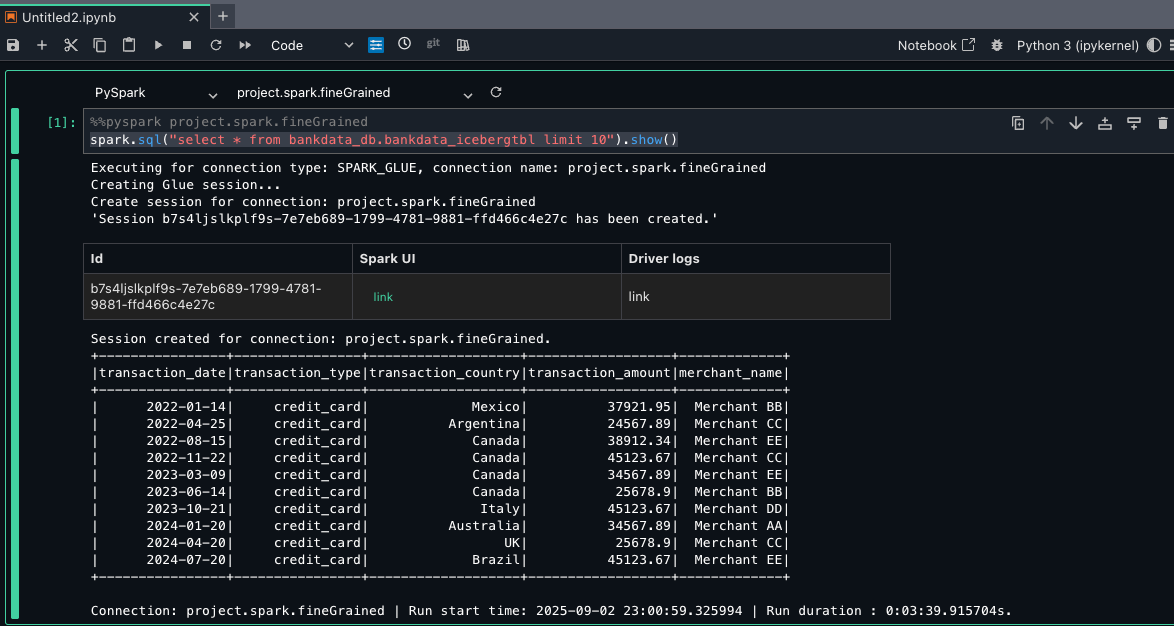
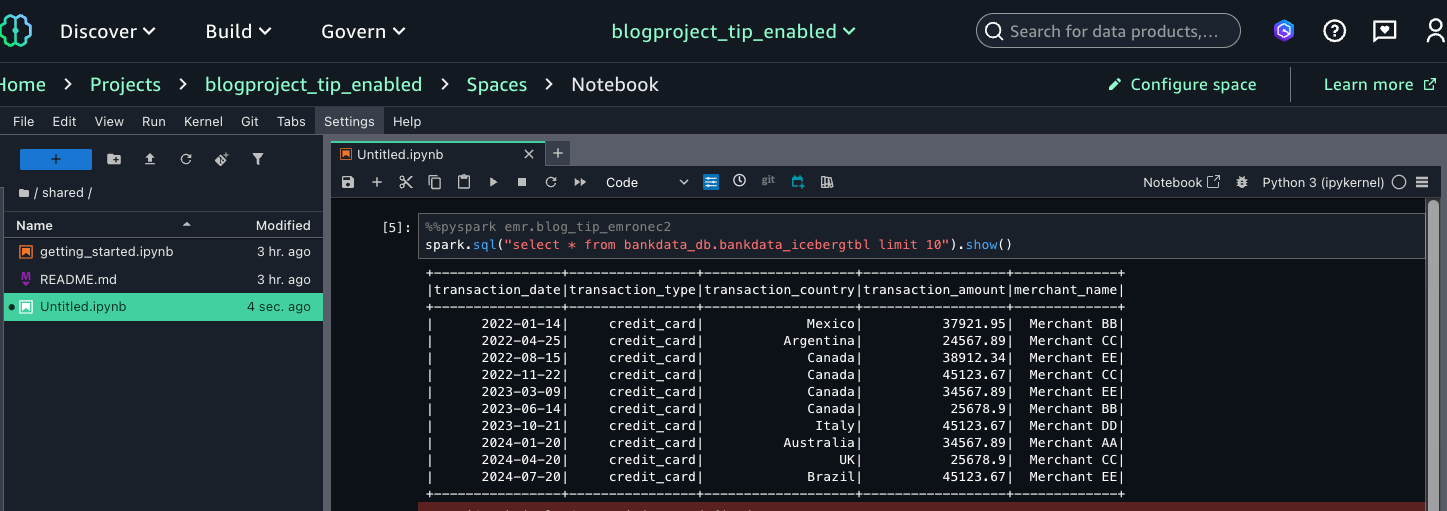
The following code block is a sample AWS Glue extract, transfer, and load (ETL) script to access the Spark dialect of the view from AWS Glue 5.0 from the central account. The AWS Glue job execution role should have Lake Formation SELECT permission on the AWS Glue view:
In the AWS Glue job-details, for Lake Formation managed tables and for Iceberg tables, set additional parameters respectively as follows:
Cleanup
To avoid incurring costs, clean up the resources you used for this post:
- Revoke the Lake Formation permissions granted to the Data-Analyst role and Producer account
- Drop the Athena tables
- Delete the Athena query results from your Amazon Simple Storage Service (Amazon S3) bucket
- Delete the
Data-Analystrole from IAM
Conclusion
In this post, we demonstrated how to use cross-account IAM definer roles with AWS Glue Data Catalog views. We showed how data owner accounts can create and manage views in a central governance account while maintaining security and control over their data assets. This feature enables enterprises to implement sophisticated data mesh architectures without compromising on security or requiring data duplication.
The ability to use cross-account definer roles with Data Catalog views provides several key advantages:
- Streamlines view management in multi-account environments
- Maintains existing CI/CD workflows and automation
- Enhances security through centralized governance
- Reduces operational overhead by eliminating the need for data duplication
As organizations continue to build and scale their data lakehouse architectures across multiple AWS accounts, cross-account definer roles for Data Catalog views provide a crucial capability for implementing efficient, secure, and well-governed data sharing patterns.


 Aarthi Srinivasan is a Senior Big Data Architect with Amazon SageMaker Lakehouse. As part of the SageMaker Lakehouse team, she works with AWS customers and partners to architect lake house solutions, enhance product features, and establish best practices for data governance.
 Praveen Kumar is an Analytics Solutions Architect at AWS with expertise in designing, building, and implementing modern data and analytics platforms using cloud-based services. His areas of interest are serverless technology, data governance, and data-driven AI applications.
 Dhananjay Badaya is a Software Developer at AWS, specializing in distributed data processing engines including Apache Spark and Apache Hadoop. As a member of the Amazon EMR team, he focuses on designing and implementing enterprise governance features for EMR Spark.


 Aarthi Srinivasan is a Senior Big Data Architect with AWS Lake Formation. She collaborates with the service team to enhance product features, works with AWS customers and partners to architect lake house solutions, and establishes best practices.
 Parul Saxena is a Senior Big Data Specialist Solutions Architect in AWS. She helps customers and partners build highly optimized, scalable, and secure solutions. She specializes in Amazon EMR, Amazon Athena, and AWS Lake Formation, providing architectural guidance for complex big data workloads and assisting organizations in modernizing their architectures and migrating analytics workloads to AWS.
 Leon Stigter is a Senior Technical Product Manager with AWS Lake Formation. Leon’s focus is on helping developers build data lakes faster, with seamless connectivity to analytical tools, to transform data into game-changing insights. Leon is interested in data and serverless technologies, and enjoys exploring different cities on his mission to taste cheesecake everywhere he goes.


 Aarthi Srinivasan is a Senior Big Data Architect with AWS Lake Formation. She likes building data lake solutions for AWS customers and partners. When not on the keyboard, she explores the latest science and technology trends and spends time with her family.


 Aarthi Srinivasan is a Senior Big Data Architect with AWS Lake Formation. She likes building data lake solutions for AWS customers and partners. When not on the keyboard, she explores the latest science and technology trends and spends time with her family.
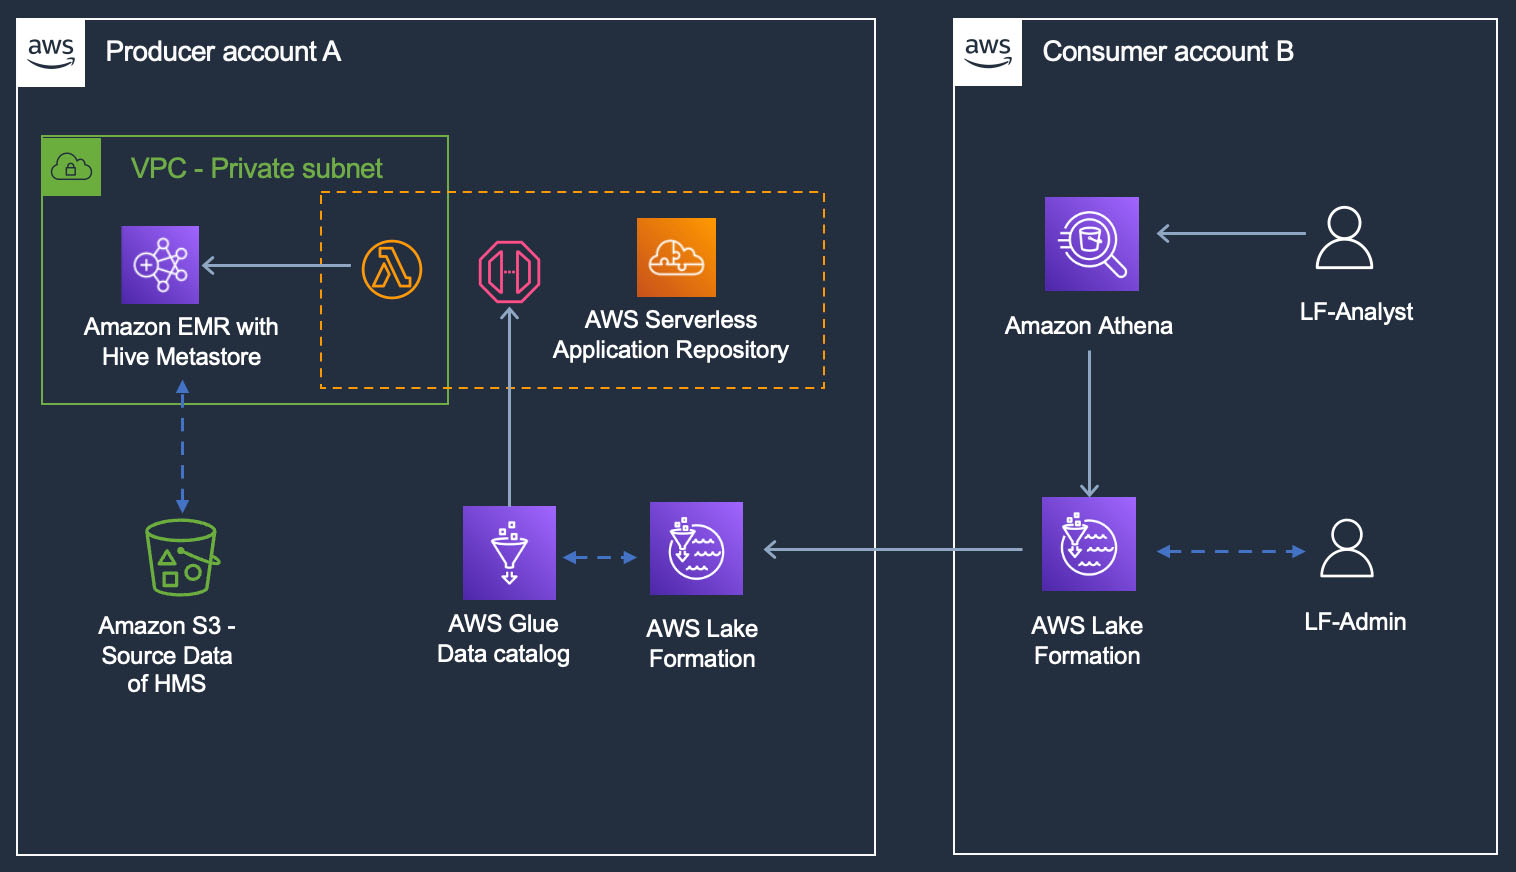


 Aarthi Srinivasan is a Senior Big Data Architect with AWS Lake Formation. She likes building data lake solutions for AWS customers and partners. When not on the keyboard, she explores the latest science and technology trends and spends time with her family.
 Srividya Parthasarathy is a Senior Big Data Architect on the AWS Lake Formation team. She enjoys building analytics and data mesh solutions on AWS and sharing them with the community.